MOZA Aircross S is available now >>

-
Back
-
Perfect your creation
-
Designed for shooting stable videos
-
World’s first 3-in-1 slider&monopod
-
Created for cinematography
-
Immerse into VR world
-
Enhance your creativity
-
-
Back
-
Best smartphone gimbal ever
-
- Manuals
- Brands
- Moza Manuals
- Camera Accessories
- AirCross 2
- User manual
-
Contents
-
Table of Contents
-
Bookmarks
Quick Links
User Manual
Note: The users manual is suitable for AirCross 2 V0.1.19 firmware.
封4
封1
Related Manuals for Moza AirCross 2
Summary of Contents for Moza AirCross 2
-
Page 1
User Manual Note: The users manual is suitable for AirCross 2 V0.1.19 firmware. 封4 封1… -
Page 2: Table Of Contents
Contents MOZA AirCross 2 Overview Installation and Balance Adjustment Installing the Battery Attaching the Tripod Unlocking Motors Mounting the Camera Balancing Buttons and OLED Display Button Functions LED Indicators Main Interface Menu Description Features Description Camera Control Motor Output PFV,Sport Gear Mode…
-
Page 3: Moza Aircross 2 Overview
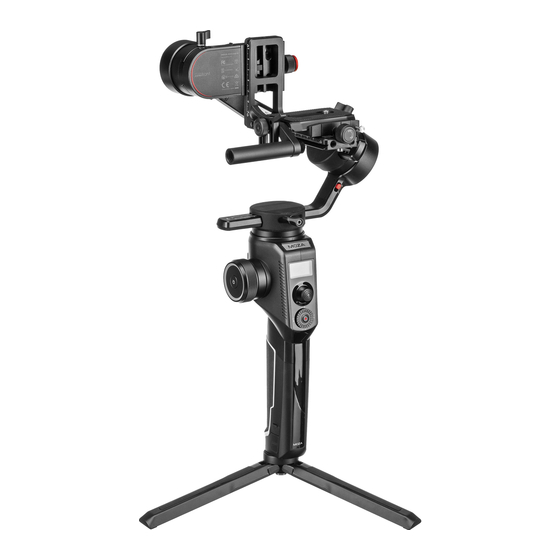
AirCross 2 Overview Tilt Knob Pan Motor Lock 3/8”Screw USB Type-C Charging Port Tilt Motor Trigger Battery Level OLED Screen Indicator Tilt Arm Roll Motor Lock Safety Lock Joystick Camera Pan Knob Roll Motor Lock Dial Wheel Control Port Baseplate Knob…
-
Page 4: Installation And Balance Adjustment
Screw the tripod tightly into the 1/4″ hole at the bottom of the gimbal. b. Expand three support feet, place the gimbal on a flat surface Unlocking Motors The AirCross 2 gimbal has 3 locks which are used to lock motors to prevent rotation. 3 Motor Locks…
-
Page 5: Mounting The Camera
Mounting the Camera Horizontal Mounting a. Place the longer side of the L-Bracket b. Loosen the quick release knob screw, Pull out the safety lock at the end of the quick-release under the camera, and lock the camera knob, insert the shorter end of the L-Bracket into with a 1/4”screw.
-
Page 6: Buttons And Oled Display
Note: Please release the motor lock of the axes before balance adjustment, otherwise it can’t be adjusted accurately. Please ensure that the MOZA AirCross 2 is balanced well before use. Buttons and OLED Display…
-
Page 7: Led Indicators
OLED Display Tilt 50 L Roll 50 L 50 F A: Smart wheel working modes Controlling external follow focus motor 1 Controlling external follow focus motor 2 Electronic follow focus Controlling the tilt axis Controlling the roll axis Controlling the pan axis B: Focus motor connection status.
-
Page 8: Menu Description
Menu Description Value Function Shutter Cable set the connection type to universal shutter cable MCSC-Multi set the connection type to Sony-Multi port MCSC-Multi/C set the connection type to Sony-Multi port and power supply MCSC-Remote set the connection type to Panasonic-Remote port camera M3C-USB set the connection type to USB port…
-
Page 9
Value Function habits dial rotate the dial clockwise to increase/decrease value gimbal operation switch turn on/off LED light on the wheel ?/ok brightness 0-100 adjust the brightness autotune ?/ok auto tune balance chk check the balance state of camera switch ?/ok/err turn on/off the focus motor 1 set A… -
Page 10: Features Description
Refer to the list to choose and connect the camera control cable. Connect the Mini-USB end of the control cable to the control port of AirCross 2. Connect the other end to the corresponding control port of the camera.
-
Page 11: Motor Output
Motor Output The payload of AirCross 2 is from 300g to 3200g. Different payload requires different motor power to achieve the best stability. There are three methods for adjusting the output of the motor: Auto-tuning operation method: a.
-
Page 12: Pfv,Sport Gear Mode
Exit the roll follow Note: 1. The AirCross 2 is in pan follow mode by default. 2. In addition to switches that enable the follow mode of each axis independently, commonly used follow modes can be also enabled by trigger, please refer to Page4 ‘Button Functions’ for more details.
-
Page 13: Manual Positioning
The manual positioning of the tilt axis is enabled by default on the AirCross 2. Manual positioning of the roll and pan axes can be enabled in the menu.
-
Page 14: Balance Check
release or turn to a specified angle, the gimbal stops. ● Turn the dial: adjust the rotation speed ● Press the left button on the dial once: the gimbal rotates to the left automatically.If the gimbal is rotating, press once to stop. ●…
-
Page 15: Sensor Calibration
Turn off the motors(double press the power button/enter the menu, select gimbal>motor>switch, set ‘off’) c. Leave the AirCross 2 on the table and don’t shake it or the desktop. d. Enter the menu, select advanced>calibrate>Gyro cali and press the dial right button, wait about 5 seconds, when the ‘?’…
-
Page 16: Language Switch
> User Configuration Management The AirCross 2 can save 3 groups of user data like camera type, motor output, button operations and other parameters, so users can retrieve relevant parameters previously used and avoid trouble of setting parameters each time when changing the camera.
-
Page 17: Extension
,TheArka quick release plate can be mounted on the side of the camera rabbit cage with a 1/4″ screw and then mounted to AirCross 2. 3.When camera is mounted in this way, the camera control port or HDMI port will be blocked.
-
Page 18: Smartphone And Pc Connection
Users can set parameters, shot time-lapse video, upgrade firmware and make other operations via the MOZA Master App. With a Type-C USB interface, the AirCross 2 is able to be connected to a computer. Users can set parameter, upgrade firmware and make other operations via the MOZA Master software.
-
Page 19: Specs
’Boot Mode’ appears on the screen. c.Start App, press Bluetooth to search for AirCross 2 device and connect. d.The App will automatically enter the firmware upgrade interface, please wait for the firmware download to complete, press the ‘upgrade’…
![]()
User Manual
Note: The users manual is suitable for AirCross 2 V0.1.19 firmware.

|
Содержание |
|||
|
Обзор изделия MOZA AirCross 2 |
1 |
||
|
Установка и регулировка балансировки |
2 |
||
|
Установка аккумулятора |
2 |
||
|
Крепление штатива |
2 |
||
|
Разблокировка двигателей |
2 |
||
|
Установка камеры |
3 |
||
|
Балансировка |
3 |
||
|
Клавиши и OLED дисплей (дисплей на органических светодиодах) |
4 |
||
|
Функции клавиш |
4 |
||
|
Светодиодные индикаторы |
5 |
||
|
Основной интерфейс |
5 |
||
|
Описание меню |
6 |
||
|
Описание функций |
8 |
||
|
Управление камерой |
8 |
||
|
Мощность двигателя |
9 |
||
|
Режимы сопровождения |
10 |
||
|
Ручное позиционирование |
11 |
||
|
Настройка клавиш |
11 |
||
|
Исходный режим |
11 |
||
|
Проверка балансировки |
12 |
||
|
Калибровка датчика |
13 |
||
|
Переключение языка |
14 |
||
|
Управление конфигурацией пользователя |
14 |
||
|
Дополнительные устройства |
15 |
||
|
Быстросъемное соединение Manfrotto |
15 |
||
|
Два направления установки камеры |
15 |
||
|
Подключение смартфона и компьютера |
16 |
||
|
Держатель телефона |
16 |
||
|
Обновление программного обеспечения |
16 |
||
|
ХАРАКТЕРИСТИКИ |
17 |
||

|
Обзор кронштейна AirCross 2 |
||||||
|
21 |
||||||
|
19 |
||||||
|
20 |
||||||
|
23 |
22 |
|||||
|
11 |
24 |
|||||
|
12 |
25 |
|||||
|
13 |
||||||
|
14 |
26 |
|||||
|
15 |
27 |
29 |
||||
|
10 |
28 |
30 |
||||
|
16 |
31 |
|||||
|
32 |
17 |
18 |
||||
|
Рукоятка положения |
Винт 3/8” |
17 USB-C порт зарядки |
25 |
Фиксатор двигателя |
||
|
оси Tilt |
поворота в оси Pan |
|||||
|
Двигатель поворота |
10 |
Переключатель |
18 |
Индикатор уровня |
26 |
Светодиодный |
|
оси Tilt |
зарядка аккумулятора |
органический OLED |
||||
|
Рукоятка положения |
Фиксатор двигателя |
Предохранительная |
экран |
|||
|
11 |
19 |
27 Джойстик |
||||
|
оси Tilt |
оси Roll |
защелка |
||||
|
Порт управления |
12 |
Рукоятка |
20 |
Фиксатор двигателя |
28 Регулятор |
|
|
камерой |
положения оси Pan |
оси Roll |
||||
|
Рукоятка базовой |
13 |
Колесо |
Порт Multi-CAN |
29 USB порт |
||
|
микропроцессорного 21 |
||||||
|
площадки |
управления |
Рычаг положения оси |
||||
|
Рычаг положения |
14 |
Кольцо |
22 |
30 Порт Multi-CAN |
||
|
оси Pan |
светоиндикатора |
Roll |
||||
|
Площадка |
15 |
Выключатель |
23 |
Рукоятка положения |
31 Аккумулятор |
|
|
складывания |
питания |
|||||
|
кронштейна |
оси Roll |
Фиксатор |
||||
|
Двигатель поворота |
16 |
Контакт питающего |
24 |
Двигатель оси Roll |
32 |
|
|
оси Pan |
напряжения |
аккумулятора |
||||
|
1 |

Установка и регулировка балансировки
Уст
 ановка аккумулят
 ора
ора
|
a. Нажать на фиксатор аккумулятора по |
c |
d |
|
направлению вниз. |
||
|
b. Изъять аккумулятор; |
||
|
c. Удалить изолирующую пленку на |
||
|
электроде; |
b |
|
|
d. Совместить электроды аккумулятора и |
e |
|
|
металлические контакты шарнирного |
||
|
механизма; |
||
|
e.Нажатием установить аккумулятор в |
||
|
углублении для его установки |
a |
|
|
Крепление штатива |
Прикрепить штатив к стойке шарнирного механизма.
a.Плотно закрутить штатив в отверстии диаметром 1/4″ в нижней части шарнирного механизма.
b.Выдвинуть три опоры, расположить шарнирный механизм на ровной поверхности


 a
a 


 b
b
Разблокировка двигат
 елей
елей
Шарнирный механизм AirCross 2 оборудован тремя фиксаторами, которые служат для блокировки двигателей, чтобы предотвратить их вращение. 


|
3 фиксатора |
Развертывани |
Хранение |
Примечания. Перед вращением кронштейна необходимо разблокировать все  фиксаторы, в противном случае двигатели перегреются или переключатся в
защитный режим.
2

|
Установка камеры |
|||
|
Установка в горизонтальном положении |
|||
|
a. Расположить более длинную часть |
b. Ослабить винт быстросъемного соединения, |
||
|
Г-образного кронштейна под камерой и |
вынуть предохранительную защелку, вставить |
||
|
зафиксировать камеру винтом размера |
короткий конец Г-образного кронштейна в |
||
|
площадку быстросъемного соединения и |
|||
|
1/4”. |
|||
|
заблокировать предохранительную защелку. |
|||
|
Установка в вертикальном положении |
|||
|
a. Расположить более длинную часть |
b. Ослабить винт быстросъемного |
||
|
Г-образного кронштейна под камерой и |
соединения, вынуть предохранительную |
||
|
заблокировать камеру винтом размера |
защелку, вставить длинный конец |
||
|
Г-образного кронштейна в площадку |
|||
|
1/4”. |
|||
|
быстросъемного соединения и |
|||
|
заблокировать предохранительную |
|||
|
защелку. |
|||
|
Воспользуйтесь быстросъемной штативной площадкой стандарта Arca—Swiss для |
|||
|
получения вертикально—ориентированных фотографий: |
|||
|
a. Разместите быстросъемную |
b. Ослабьте ручку быстросъемного |
||
|
штативную площадку стандарта |
соединения и вытяните предохранитель на |
||
|
Arca-Swiss горизонтально под |
конце ручки быстросъемного |
||
|
соединения.Установите быстросъемную |
|||
|
фотокамерой и зафиксируйте |
|||
|
штативную площадку стандарта Arca-Swiss |
|||
|
камеру с помощью винта 1/4″; |
|||
|
the quick-release base. Then lock the knob. |
|||
|
Примечание: При использовании быстросъемной штативной площадки |
|||
|
стандарта Arca-Swiss фотокамеру можно установить только вертикально.Она |
|||
|
не блокирует доступ к аккумуляторному отсеку и слоту для карты памяти на |
|||
|
фотокамере. |
|||
|
Балансировка |
|||
|
a. Ослабить рукоятку рычага оси Tilt, |
b. Повернуть камеру, чтобы объектив был |
||
|
отрегулировать ход рычага в обоих |
направлен вверх, ослабить рукоятку, чтобы вынуть |
||
|
направлениях, чтобы объектив |
площадку, отрегулировать ход площадки |
||
|
двигался горизонтально вперед, а |
быстросъемного соединения в обоих |
||
|
затем зафиксировать рукоятку. |
направлениях, пока объектив не установится в |
||
|
строго вертикальном положении, а затем |
|||
|
зафиксировать рукоятку. |
|||
|
3 |

|
c.Ослабить рукоятку рычага оси Roll, |
d. удерживать шарнирный механизм |
|||||||||
|
отрегулировать рычаг в левом и правом |
горизонтально, чтобы рычаг оси Pan |
|||||||||
|
положении, пока он не установится |
находился параллельно уровню земли, затем |
|||||||||
|
горизонтально, затем зафиксировать |
ослабить рукоятку на рычаге, отрегулировать |
|||||||||
|
рукоятку. |
рычаг вправо и влево, чтобы он оставался в |
|||||||||
|
уровне, а затем зафиксировать рукоятку. |
||||||||||
|
Примечание. |
||||||||||
|
Перед регулировкой следует освободить фиксаторы двигателей на осях, в противном случае его |
||||||||||
|
невозможно будет отрегулировать точно. Перед использованием необходимо убедится в том |
||||||||||
|
кронштейн MOZA AirCross 2 надежно отбалансирован. |
||||||||||
|
Клавиши и OLED дисплей (дисплей на органических светодиодах) |
||||||||||
|
Функции клавиш |
||||||||||
|
Клавиша Действие |
Функция |
Настраиваемая функция |
Меню |
|||||||
|
1X нажатие |
—— |
—— |
Фокус |
Фото |
—— |
—— |
—— |
То же |
||
|
2X нажатие |
Возвратвнейтраль |
—— |
Возврат в нейтральное |
Селфи |
—— |
—— |
—— |
То же |
||
|
положениев осях |
||||||||||
|
ноеположение |
Pan-Tilt |
|||||||||
|
Возврат в нейтральное |
Селфи |
То же |
||||||||
|
3X нажатие |
Селфи |
—— |
положениев осях |
—— |
—— |
—— |
||||
|
Pan-Tilt |
||||||||||
|
Переключение |
Сопровожде |
Сопровожде |
Общая |
Спортивн |
Режим |
|||||
|
ние |
FPV (вид |
То же |
||||||||
|
Удерживать |
поворота в |
—— |
ние |
блокиров |
ый режим |
от |
—— |
|||
|
осях Pan-Tilt |
поворота в |
ка |
первого |
|||||||
|
осях Pan-Tilt |
лица) |
|||||||||
|
Нажатьиудерживать |
Общаяблокировка |
—— |
—— |
—— |
—— |
—— |
—— |
То же |
||
|
Переключен |
То же |
|||||||||
|
1X нажатие |
ие режима |
—— |
—— |
—— |
—— |
—— |
—— |
|||
|
колеса |
||||||||||
|
Выключатель |
управления |
|||||||||
|
питания |
Ждущий/акт |
|||||||||
|
2X нажатие |
ивный |
—— |
—— |
—— |
—— |
—— |
—— |
То же |
||
|
режим |
||||||||||
|
вверх |
||||||||||
|
Переключение |
То же |
|||||||||
|
3X нажатие |
групп режимов |
—— |
—— |
—— |
—— |
—— |
—— |
|||
|
колеса |
||||||||||
|
Длительное |
управления |
—— |
—— |
—— |
—— |
—— |
—— |
То же |
||
|
ВКЛ./ВЫКЛ |
||||||||||
|
нажатие |
Фокусирующи Фокусирую |
|||||||||
|
Поворот |
окусирующи |
Ось Tilt |
Ось Roll Ось Pan То же |
|||||||
|
й двигатель 1 |
й двигатель 1 |
щий |
||||||||
|
двигатель 2 |
||||||||||
|
Вверх/вниз |
Сдвигать |
Ось Tilt |
Ось Roll |
Ось Pan |
—— |
—— |
—— |
То же |
||
|
нажать |
ось Tilt |
|||||||||
|
Джойстик |
||||||||||
|
Влево/вправ |
Сдвигать |
|||||||||
|
Ось Tilt |
Ось Roll |
Ось Pan |
—— |
—— |
—— |
То же |
||||
|
о нажать |
ось Pan |
|||||||||
|
Клавиша |
1X нажатие |
Сопровождени |
—— |
—— |
—— |
—— |
—— |
—— |
Опционально — |
|
|
е положения |
||||||||||
|
вверх |
оси Tilt |
клавиша вверх |
||||||||
|
Клавиша |
1X нажатие |
Сопровождени |
—— |
—— |
—— |
—— |
—— |
—— |
Опционально — |
|
|
вниз |
е положения |
клавиша вниз |
||||||||
|
оси Pan |
—— |
—— |
—— |
—— |
—— |
—— |
||||
|
Клавиша 1X нажатие |
Сопровождени |
Возврат |
||||||||
|
е положения |
||||||||||
|
влево |
оси Roll |
—— |
—— |
—— |
—— |
—— |
—— |
—— |
||
|
3X нажатие |
Режим FPV |
|||||||||
|
1X нажатие |
Sport gear |
—— |
—— |
—— |
—— |
—— |
—— |
Подтвердить/след. |
||
|
Клавиша |
mode |
пунктменю |
||||||||
|
вправо |
3X нажатие |
Inception |
—— |
—— |
—— |
—— |
—— |
—— |
—— |
|
|
mode |
||||||||||
|
1X нажатие |
Video |
—— |
—— |
—— |
—— |
—— |
—— |
Запись видео |
||
|
recording |
||||||||||
|
Клавиша |
||||||||||
|
2X нажатие |
Take photo |
—— |
—— |
—— |
—— |
—— |
—— |
Сделать фото |
||
|
центр |
||||||||||
|
Длительное |
Войтивменю |
—— |
—— |
—— |
—— |
—— |
—— |
Выйти из меню |
||
|
нажатие |
Отрегулиро |
|||||||||
|
Регулятор |
Поворот |
—— |
—— |
—— |
—— |
—— |
—— |
Отрегулировать |
||
|
ватьскорость |
соответствующий |
|||||||||
|
Клавиша Питание+ |
сопровождения |
параметр |
||||||||
|
Комбинирова |
Обновление |
—— |
—— |
—— |
—— |
—— |
—— |
—— |
||
|
нный режим |
центрКлавиша |
ПО |
||||||||
|
4 |
View a manual of the Moza AirCross 2 below. All manuals on ManualsCat.com can be viewed completely free of charge. By using the ‘Select a language’ button, you can choose the language of the manual you want to view.

MANUALSCAT | EN
Question & answers
Have a question about the Moza AirCross 2 but cannot find the answer in the user manual? Perhaps the users of ManualsCat.com can help you answer your question. By filling in the form below, your question will appear below the manual of the Moza AirCross 2. Please make sure that you describe your difficulty with the Moza AirCross 2 as precisely as you can. The more precies your question is, the higher the chances of quickly receiving an answer from another user. You will automatically be sent an e-mail to inform you when someone has reacted to your question.
Ask a question about the Moza AirCross 2
Page: 1
7
6
3
3
7
7
7
8
8
9
9
10
10
11
13
13
19
20
21
21
21
14
15
16
16
16
17
18
19
19
19
MOZA AirCross 2 Overview
1
Packing List
Disclaimer and Warning
Safety Guidelines
Installation and Balance Adjustment
Installing the Battery
Attaching the Tripod
Unlocking Motors
Mounting the Camera
Balancing
Buttons and OLED Display
Button Functions
LED Indicators
Main Interface
Menu Description
Features Description
Camera Control
Motor Output
FPV,Sport Gear Mode
Manual Positioning
Button Customization
Inception Mode
Balance Check
Sensor Calibration
Language Switch
User Configuration Management
Extension
Extensible electronic accessories
Two Camera Mounting Directions
Smartphone and PC Connection
Phone Holder
Firmware Upgrade
22
SPECS
Contents
Page: 2
1
Packing List
Check that all of the following items are in your package. If any
item is missing ,please contact MOZA or your local dealer.
x1 x1
x1 x1
x1 x1
x1 x1
x1 x1
Gimbal
Battery Quick Release Baseplate
Tripod
Lens Support Lens Support Screw
L-Bracket
Quick Release Plate
3/8”Camera Mount Screw MCSC-C1
Page: 3
2
x1 x1
x1 x1
x1 x1
x1 x1
x1 x1
x1 x1
x1 x1
M3C-Mini MCSC-Remote
M3C-Micro
USB-C Cable
MCSC-Multi/C
Tool Box
Follow Focus Support Rod
M3C-C
EPP Case User Manual
Warning Card
Phone holder (Optional) Arca quick release plate (Optional)
Page: 4
3
Disclaimer and Warning
Safety Guidelines
Thank you for purchasing the MOZA AirCross 2!
● This document is related to the safety use and legal rights of your
equipment. Please read it carefully before the first use.
● By using this product, you are deemed to have read, understood,
endorsed and accepted all the terms and content of this statement. You
are solely responsible for the use of this product and the consequences
thereof. You undertake to use this product for legitimate purposes and
agree to the terms and any relevant regulations, policies and guidelines
formulated by Shenzhen Gudsen Technology Co., Ltd. (hereinafter
referred to as Gudsen). Gudsen is not responsible for damage, injury or
any legal problems caused by the direct or indirect use of this product.
Users should follow all safety guidelines including but not limited to this
document.
● MOZA AirCross 2 is professional videography equipment. Users need to
have professional videography and safety knowledge, and need to be
careful. Please read the user manual carefully before the first use.
● This product is not a toy and not suitable for use by minors. Do not allow
children to operate this product.
● Do not use MOZA AirCross 2 with products or accessories that are not
provided or recommended by Gudsen, and please strictly follow the
safety guidelines in the product manual.
● The final interpretation of this document belongs to Shenzhen Gudsen
Technology Co., Ltd. Updates are subject to change without notice.
Please visit the official website www.gudsen.com for the latest product
information.
1. Battery Safety Instructions
The AirCross 2 is equipped with an M2S30QB smart battery. Do not use an
unofficial battery to prevent the gimbal from working properly and causing
unnecessary damage. When a backup battery is needed, please purchase
the official battery. Please fully charge the new battery to activate it before
the first use.
● Do not put the batteries into the water or get it wet!
● Do not charge the batteries under fire or extremely hot conditions!
● Do not use or store the batteries near heat sources such as fire or heaters!
If the batteries leak or give off an odor, remove the batteries from the open
fire immediately!
● Do not use the unqualified adapter to charge the batteries!
● Do not reverse the positive and negative poles!
● Do not put the batteries into fire or heat the batteries!
Page: 5
4
Indicator Status Battery Level
75%-100%
50%-75%
25%-50%
0%-25%
Out of power
● Do not short the positive or negative pole with wires or other metal
objects. Do not transport or store batteries with necklaces, hair clips or
other metal objects!
● Do not pierce the battery case with nails or other sharp objects. Do not
hammer or pedal the batteries!
● Do not hit, throw or shake the batteries!
● Do not solder the battery poles directly!
● Do not disassemble the batteries in any way!
● Do not put the batteries into microwave or pressure vessel!
● Do not use in combination with primary batteries(such as dry batteries)
or batteries of different capacities, models or varieties!
● Do not use if the batteries emit odor, heat, deformation, discoloration, or
any other abnormality; If the batteries are in use or charging, unplug the
power adapter from the device and stop using it immediately!
● The batteries are only available for MOZA AirCross 2. Do not attempt to
connect it to other products to avoid damage to the batteries or other
equipment.
Battery Charging
M2S30QB smart battery is equipped with a Type-C interface, supporting
5V2A low-speed charging and 9V2A high-speed charging, users can
select the matched charger according to actual needs.
Please use the TYPE-C interface to charge the batteries and do not use
external power sources such as wall outlet or car cigarette lighter to
charge the batteries.
Battery Indicator
The M2S30QB smart battery has 4 LED indicators. When it is in charging, 4
indicators will light up in turn; when it is removed and not charged, users
can slightly shake it to check the battery level. Indicators will light up for 5
seconds and then automatically go off.
Battery Protection
The M2S30QB smart battery has under-voltage, overcurrent and overheat
protection state. Battery protection state will be triggered by abnormal
conditions such as overuse and short circuit. When the battery enters the
protection state, it stops output and cannot be shaken to view the battery
level. The battery can be unprotected by charging. Insert the charging
cable, when indicators light up in sequence, users can use it again.
Page: 6
5
Note:
Violent rotation of each arm in the locked state may cause motor locks to malfunction;
It is strictly forbidden to turn on the AirCross 2 in the locked state, otherwise it will cause
motors to heat up and enter the protection state.
Battery Storage
● IThe storage temperature for battery must be in the range of -20 ° C ~ 45
° C.
● For long-term storage(more than 3 months), batteries must be placed in
an environment with a temperature of -20 ~ 25 ° C and a humidity of 65 ±
20% RH.
● For long-term storage, batteries should be fully charged and should be
recharged once a month.
2. Motor Lock Use Instructions
The AirCross 2 is equipped with 3 motor locks that are used to secure the
gimbal axes. After receiving the product, please check if the motor locks
are in the locked position. Please unlock the gimbal axes first before using it.
Motor locks are used for:
a. Locking all three axes for easy carry.
b. Securing certain axes when mounting the camera and adjusting the
balance.
c. Fixing the body to prevent collision and friction.
d. Keeping good posture when placed statically.
3. Notes for Abnormal Situation
Wrong Camera Mounting Direction
The tilt axis of the MOZA AirCross 2 can be rotated 360°. When mounting
the camera, please follow the red arrow indication to keep the elliptical
end of the tilt axis aligned with the lens direction.
Transportation Safety
The AirCross 2 contains sensitive accelerometers and gyro sensors that
may experience sensor drift after severe vibrations. After receiving the
product, please follow instructions in the manual to mount the camera. If
the camera cannot keep level after turning it on, please calibrate the
gyroscope and accelerometer to ensure normal use.
Page: 7
6
AirCross 2 overview
10
Tilt Knob
Pan Motor
Smart Trigger
Roll Motor Lock
11
12 Pan Knob
13 Smart Wheel
14
15
17
18
19
20
21
22
Indicator Light
Ring
Tilt Motor
Tilt Arm
Power Button
Power Supply
Electrode
16
23
24
25
26
27
28
Camera
Control Port
Baseplate Knob
Pan Arm
USB Type-C
Charging Port
Battery Level
Indicator
Dial Wheel
29
30
31
32
USB Port
Multi-CAN Port
Battery
Battery Lock
Multi-CAN Port
Roll Arm
Roll Knob
Roll Motor
Roll Motor Lock
Pan Motor Lock
OLED Screen
Crash Pad
Joystick
3/8”Screw
Safety Lock
11
10
16
21
24
22
23
20
26
27
28
25
29
30
31
32
12
13
14
15
17 18
19
Page: 8
7
Installing the Battery
a. Press the battery lock downwards;
b. Take out the battery;
c. Remove the insulating film at the
electrode;
d. Attach the battery electrode to
the gimbal.
e. Press the battery into the hatch
Attaching the Tripod
Attach the tripod to stand the gimbal.
a. Screw the tripod tightly into the 1/4″ hole at the bottom of the gimbal.
b. Expand mini tripod, place the gimbal on a flat surface
Unlocking Motors
The AirCross 2 gimbal has 3 locks which are used to lock motors to prevent
rotation.
Installation and Balance Adjustment
Notes: Please unlock all motor locks before starting on the gimbal, otherwise motors
will get overheated or enter the protection mode.
3 Motor Locks Unfolding Storage
a
b
e
d
a b
c
Page: 9
8
Mounting the Camera
Horizontal Mounting
Vertical Mounting
Use the Arca-Swiss quick release plate for vertical shot:
Balancing
a. Place the longer side of the L-Bracket
under the camera, and lock the camera
with a 1/4”screw.
a. Place the Arca-Swiss quick release
plate horizontally under the camera
and use a 1/4″ screw to lock the
camera;
Note: The camera can only be installed vertically using the Arca-Swiss quick release
plate. It does not block the camera’s battery port and memory card slot.
b. Loosen the quick-release knob and pull out
the safety lock at the end of the quick-release
knob. Install the Arca-Swiss quick-release plate
into the quick-release base. Then lock the knob.
a. Place the longer side of the L-Bracket
under the camera, and lock the camera
with a 1/4”screw.
b. Loosen the quick release knob screw, Pull out
the safety lock at the end of the quick-release
knob, insert the shorter end of the L-Bracket into
the quick release baseplate, and then lock the
knob.
a. Loosen the knob of the tilt arm, adjust
the tilt arm back and forth until the lens
moves horizontally forward, and then lock
the knob.
b. Rotate the camera to make its lens
face upward, loosen knob on the release
plate, adjust the release plate back and
forth until the lens faces straight upward,
and then lock the knob.
b. Loosen the quick release knob screw,
pull out the safety lock, insert the longer
end of the L-Bracket into the quick release
baseplate, and then lock the knob.
Page: 10
9
Note: Please release the motor lock of the axes before balance adjustment,
otherwise it can’t be adjusted accurately. Please ensure that the MOZA AirCross 2 is
balanced well before use.
c. Loosen the knob of the roll arm, adjust
roll arm leftwards and rightwards until it
remains horizontal, and then lock the
knob.
d. Hold the gimbal horizontally to make the
pan arm level with the ground, then loosen
the knob on the pan arm, adjust the pan arm
leftwards and rightwards until it remains level,
and then lock the knob.
Buttons and OLED Display
Button Functions
Button Operation Function Customizable Function Menu
Trigger
1X click —— —— Focus Photo —— —— —— The same
2X click Re-center —— Re-center Selfie —— —— —— The same
3X click Selfie —— Re-center Selfie —— —— —— The same
Hold Pan-tilt follow ——
Pan-tilt
follow All lock
Sport
gear
mode
FPV —— The same
Click and hold All lock —— —— —— —— —— —— The same
Power
Button
1X click Switch wheel
modes —— —— —— —— —— —— The same
2X click
3X click
Sleep/wake
up
Switch Grouping
of Wheel Modes
—— —— —— —— —— ——
—— —— —— —— —— ——
The same
The same
Long press
Long press
Turn
Turn
ON/OFF —— —— —— —— —— —— The same
Smart
Wheel
Focus motor
1
Focus
motor 1
Focus
motor 2 E-focus Tilt axis Roll axis Pan axis The same
Joystick
Push up/down
Move the
tilt axis
Tilt axis
Tilt axis
Roll axis Pan axis —— —— —— The same
Push left/right Move the
pan axis Roll axis Pan axis —— —— —— The same
Top
Button
1X click
Lock/Unlock
the dial
—— —— —— —— —— —— Option-up
—— —— —— —— —— —— ——
Down
Button 1X click Pan follow
Tilt follow
—— —— —— —— —— —— Option-down
Left
Button
1X click Roll follow —— —— —— —— —— —— Return
3X click FPV mode —— —— —— —— —— ——
Right
Button
1X click Sport gear
mode —— —— —— —— —— ——
Confirm/Next
menu
3X click Inception
mode —— —— —— —— —— ——
——
——
Center
Button
1X click Video
recording
—— —— —— —— —— —— Video recording
2X click Take photo —— —— —— —— —— —— Take photo
Long press Enter menu —— —— —— —— —— —— Exit menu
Dial
Wheel
Adjust the
follow speed —— —— —— —— —— —— Adjust relevant
parameter
Combo —— —— —— —— —— —— ——
Center button
+Power
Firmware
upgrade
Page: 11
10
OLED Display
LED Indicators
Power on: automatic color changing
Sport gear mode: solid blue
Inception mode: solid blue
Sleep mode: slowly flashing green
Warning alarm: quickly flashing red
Firmware upgraded: breathing yellow
Note: The button functions and light colors above are the factory
default settings. You can customize some button functions and light
effects in the menu.
A: Smart wheel working modes
Controlling external follow focus motor 1
Controlling external follow focus motor 2
Electronic follow focus
Controlling the tilt axis
Controlling the roll axis
Controlling the pan axis
B: Focus motor connection status. Icon will be displayed after
connection,otherwise it won’t be displayed. Up to two focus motors can
be connected at the same time.
C: Camera connection status. Icon will be displayed after USB connection,
otherwise it won’t be displayed.
D: Battery level. Each grid represents 25% battery level. When the battery is
empty, please charge the battery in time.
E: Follow speed value: 0-100. Turn the dial to adjust the value
F: Follow status
L: Lock. The axis locks and doesn’t follow.
F: Follow. The axis follows.
Q: Sport Gear Mode
G: the dial is locked, please long press ‘TF’ button to unlock
A B C
E F
D
G
Pan 50 F
Roll 50 L
Tilt 50 L
Page: 12
11
Menu Description
L1 L2 L3 L4 L5 Value Function
* set the connection type to universal shutter cable
* set the connection type to Sony-Multi port
* set the connection type to Sony-Multi port and power supply
* set the connection type to Panasonic-Remote port
* set the connection type to USB port
32—106400 Set the camera ISO
30—1/8000 Set the camera shutter
F1—F22 Set the camera aperture
?/ok turn on/off motor
?/ok tuning/tuned
ultra light * set motor level to the minimum
light * set motor level to light
medium * set motor level to medium
heavy * set motor level to heavy
ultra heavy
* set motor level to ultra heavy
tilt 0-100 set tilt motor power
roll 0-100 set roll motor power
pan 0-100 set pan motor power
0-100 set tilt motor filter
0-100 set roll motor filter
0-100 set pan motor filter
on/off enter/exit tilt follow mode
on/off enter/exit roll follow mode
on/off enter/exit pan follow mode
0-100 set the following speed of tilt motor
0-100 set the following speed of roll motor
0-100 set the following speed of pan motor
0-100 set the following initiation angle of tilt motor
0-100 set the following initiation angle of roll motor
0-100 set the following initiation angle of pan motor
left-right tilt/rol/pan move the joystick left/right to control the tilt/roll/pan rotation
up-down tilt/rol/pan move the joystick up/down to control the tilt/roll/pan rotation
left-right 0-100 set sensitivity level of left-right movement
up-down 0-100 set sensitivity level of up-down movement
left-right +/- set the control habit of joystick left/right movement
up-down +/- set the control habit of joystick up/down movement
focus-1 * control the external focus motor 1
focus-2 * control the external focus motor 2
focus-e * control the electronic focus
tilt * control the pan axis
roll * control the tilt axis
pan * control the roll axis
0-100 wheel sensitivity
+/- set the control direction of wheel rotation
none * none
follow * enter pan-tilt follow mode
lock * enter all lock mode
quick * enter sport gear mode
FPV * enter FPV mode
none * none
shutter * take photo
focus * auto focus
none * none
re-center * re-center
selfie * rotate the gimbal 180° for selfie
none * none
re-center * re-center
selfie * rotate the gimbal 180° for selfie
M3C-USB
parameter
ISO
TV
AV
motor
switch
power
autotune
level
custom
filter
tilt
camera
select
Shutter Cable
MCSC-Multi
MCSC-Multi/C
MCSC-Remote
roll
pan
follow
switch
tilt
roll
pan
speed
tilt
roll
pan
deadband
tilt
roll
pan
wheel
function
sensitivity
habits
trigger
hold
click
double-click >
triple-click
joystick
function
sensitivity
habits
operation
gimbal
Page: 13
12
Notes:
1. If there is a “*” at the right side of one item, the current list is the final option, press
the dial right button to launch it.
2. If the selected item and other items in the menu list don’t have any marks, press the
dial right button to launch the option once. “>” is displayed during the process. “ok” is
displayed after the process is completed, and “err” is displayed if the option fails.
Menu type introduction:
If there is a “>”mark at the right side of the selected item, press the dial
right button for the next menu.
If the selected item has a “[ ]”and contains a number, rotate the dial to
adjust its value.
If the selected item has a “()”and contains an option, press the right
button to switch among options
L1 L2 L3 L4 L5 Value Function
dial +/- rotate the dial clockwise to increase/decrease value
on/off turn on/off LED light on the wheel
0-100 adjust the brightness
?/ok auto tune
balance chk check the balance state of camera
switch ?/ok/err turn on/off the focus motor 1
set A ?/ok/err set the point A of focus motor 1
set B ?/ok/err set the point B of focus motor 1
Clear AB ?/ok/err Clear the calibration information
Guidance > Enter the guidance mode
switch ?/ok/err turn on/off the focus motor 1
set A ?/ok/err set the point A of focus motor 1
set B ?/ok/err set the point B of focus motor 1
Clear AB ?/ok/err Clear the calibration information
Guidance > Enter the guidance mode
> Enter the dolly zoom mode
inception 0—100 set the rotation speed of inception mode
?/on/off turn on/off the motion control of tilt axis
?/on/off turn on/off the motion control of roll axis
?/on/off turn on/off the motion control of pan axis
0-100 set the rotation speed of motion control
tracking 0-100 set the max speed of tracking
on/off turn on/off the manual positioning of tilt axis
on/off turn on/off the manual positioning of roll axis
on/off turn on/off the manual positioning of pan axis
?/ok calibrating/calibrated the gyroscope
?/ok calibrating/calibrated the accelerometer
0-100 set the offset value of tilt axis
0-100 set the offset value of roll axis
0-100 set the offset value of pan axis
* switch display language to English
* switch display language to Chinese
?/ok save to configuration 1
?/ok load configuration 1
?/ok save to configuration 2
?/ok load configuration 2
?/ok save to configuration 3
?/ok load configuration 3
?/ok restore default parameter settings
device name and firmware information
habits
LED
switch
brightness
advanced
autotune
iFocus
F1
manual pos
dolly zoom
speed
motion sensing
switch
tilt
roll
pan
speed
calibration
gyro
acc
angle offset
tilt
roll
pan
general
language
English
中文
config
config1
save
load
config2
save
config3
save
load
reset
about
tilt
roll
pan
load
speed
F2
operation
gimbal
Page: 14
13
Features Description
3. Filtering parameters: When the motor vibrates with highfrequency, the value
should be turned down. When the motor vibrates with low-frequency, the value
should be increased.
4. The manual positioning function has lower priority than the following function.
When using manual positioning functionnormally, following function of the axis
should be turned off.
Operation Steps:
a. Long press the center button to enter the menu, refer to the compatibility list to select the
correct camera type.
The AirCross 2 can support camera video recording, photo taking and
electronic focus control. Please refer to the compatibility list for more
details ( * Please set the lens to «MF»mode)
Camera Control
Note: please refer to the official website for the latest camera control list.
The M3C-DP and M3C-LANC control cables are optional, you can purchase those
cables from www.gudsen.com
—
—
—
—
—
—
—
—
ISO TV AV
EOS R
EOS RP
EOS 6D Mark II
EOS 6D
EOS 60D
EOS 77D
EOS 80D
EOS 5D2
EOS 5D3
EOS 800D
EOS 750D
Alpha 7S
Alpha 7R
Alpha 6300
Alpha 6400
Alpha 6500
Alpha 7S Ⅱ
Alpha 7R Ⅱ
Alpha 7 Ⅱ
Alpha 7 Ⅲ
Alpha 7R Ⅲ
DSC-RX100M3
DSC-RX100M4
DSC-RX100M5
Alpha 7S
Alpha 7R
Alpha 6300
Alpha 6400
Alpha 6500
Alpha 7S Ⅱ
Alpha 7R Ⅱ
Alpha 7 Ⅱ
Alpha 7 Ⅲ
Alpha 7R Ⅲ
DSC-RX100M3
DSC-RX100M4
DSC-RX100M5
DMC-G7KGK
DMC-G85GK
DMC-GH3
Lumix GH4
Lumix GH5
Lumix GH5s
Z6
Z7
D850
X-T2
X-T3
X-T20
X-T30
√ √ √ √ √ √ √
√ √ √ √ √ √ √
√ √ √ √ √ √
√ √ √ √ √ √
√ √ √ √ √ √
√ √ √ √ √ √
√ √ √ √ √ √
√ √ √ √ √ √
√ √ √ √ √ √
√ √ √ √ √
√ √ √ √ √ √
√ √ √ √ √ √
√ √ √ √ √ √
√ √ √ √ √ √ √
√ √ √ √ √ √
√ √ √ √ √ √
√ √ √ √ √ √
√ √ √ √ √ √
√ √ √ √ √ √ √
√ √ √ √ √ √ √
√ √ √ √ √ √
√ √ √ √ √ √
√ √ √ √ √ √
√ √ √
√ √ √
√ √ √ √
√ √ √ √
√ √ √ √
√ √ √ √
√ √ √ √
√ √ √ √
√ √ √ √
√ √ √ √
√ √ √ √
√ √ √ √
√ √ √ √
√ √ √
√ √ √
√ √ √
√ √ √
√ √
√ √ √ √ √ √ √ √
√ √ √ √ √ √ √
√ √ √ √ √ √ √
√ √ √ √ √ √ √
√ √ √ √ √ √ √
√ √ √ √ √ √ √
√ √ √
√ √ √
√ √ √
√ √ √
—
—
—
—
—
—
—
—
—
— —
—
—
—
—
—
—
—
—
—
—
—
—
—
—
—
—
—
—
—
—
—
—
—
— — — — —
— — — — —
— — — —
— — — —
— — — —
— — — —
— — — —
— — — —
— — — —
— — — —
— — — —
— — — —
— — — —
— — — — —
— — — — —
— — — — —
— — — — —
— — — — — —
— — — —
— — — —
— — — —
— — — — —
DC-S1GK-K
Shutter
Camera
Brand
Camera
Model
Connection
Type
Cable Recording
Electronic
Focus
Power
Supply
Auto Focus
M3C-USB
CANON
SONY
SONY
Panasonic
USB
USB
Multi
MCSC-Remote
USB
USB
Fuji shutter
M3C-C
M3C-Micro
MCSC-C1
M3C-USB
MCSC-Multi
MCSC-Multi/C
MCSC-Remote
M3C-USB
M3C-USB
MCSC-C1
Nikon
FUJFILM
M3C-C
M3C-Mini
M3C-Micro
MCSC-Multi
MCSC-Multi/C
MCSC-Remote
M3C-C
*
*
*
*
*
*
*
*
EOS 5D Mark IV
EOS 200D Ⅱ
EOS M50
EOS M5
MCSC-C1 MCSC-C1 shutter Protocol
√ √ √ √ √ √
√ √ √ √ √ √
√ √ √ √ √ √ √
√
—
—
—
— — — — — — —
√ — — — — — — —
M3C-Micro
*
*
Control Protocol
BMPCC 4K M3C-USB M3C-CP ①
①
USB
ZCAM
BMD
E2 M3C-LANC LANC √ √
√
— —
—
—
— —
— —
— — —
—
—
M3C-LANC
Page: 15
14
The payload of AirCross 2 is from 300g to 3200g. Different payload requires
different motor power to achieve the best stability. There are three methods for
adjusting the output of the motor:
Auto-tuning operation method:
a. Install the camera and adjust the balance
b. Unlock all motor locks
c. Turn on the stabilizer, long press the center button to enter the menu, select
‘Gimbal’ > ‘Motor’ > ‘Power’ > ‘Auto-tune’
d. During the auto-tuning, the stabilizer will vibrate automatically to match the
most suitable output value. Wait for about 5 seconds, the stabilizer stops
shaking, and the auto-tuning completes.
Set the output gear:
Factory default presets 5 groups of motor output values, which are suitable for
cameras of different weight levels.
Customize the output value of each motor:
The users can customize the output value of each motor to reach more precise
control of the motor output. The adjustment range is 0 to 100.
Note:
1. Cameras equipped with Micro USB 3.0 interface, such as the Nikon D850,
can be normally controlled by half plugging the M3C-Micro cable.
2. After plugging the camera control cable, please operate the camera
according to the prompts on the camera screen, otherwise the camera
control function may not work properly.
Note:
1. Under the camera lens combination of the limit, the auto-tuning function may not
accurately calculate the appropriate output value. Please manually adjust the motor output
according to the situation.
2. If the motor output is too low, the video is not stable enough; if the motor output is too high,
it will cause high-frequency vibration of the stabilizer.
3. When the motor output is at the critical value, the stabilizer will not vibrate in the upright
state, but it will vibrate in the forward or inverted state. Please reduce the motor output
moderately.
Motor Output
camera > motor > switch autotune
gimbal > follow > power > level >
advanced > operation > filter > custom >
general >
b. Refer to the list to choose and connect the camera control cable. Connect the Mini-USB end of
the control cable to the control port of AirCross 2. Connect the other end to the corresponding
control port of the camera.
c. You can achieve recording by clicking the menu button one time and taking photos by clicking
menu button twice after selecting the camera type and connecting the camera control cable.
Page: 16
15
When the follow function is enabled, the camera will follow the movement
of the gimbal.
Users can enable the follow mode of each axis through dial buttons and
turn the dial to adjust the following speed, which can be also enabled in
the menu.
Note:
1. The AirCross 2 is in pan follow mode by default.
2. In addition to controlling the follow mode by the switches of each
axis independently, follow modes can be also enabled by the
trigger, please refer to Page9 ‘Button Functions’ for more details.
3. The angle of the roll follow is 60°. For a larger following angle, please
triple click the left button to enter the FPV mode to achieve 360°
follow of three axes.
4. If faster following speed is required, please click the right button to
enter the sport gear mode. (Currently only supports the pan axis)
FPV, Sport Gear Mode
Enter the
tilt follow
Exit the
tilt follow
Enter the
roll follow
Exit the
roll follow
Follow Mode
Switch
Example 1 Example 2
Page: 17
16
Inception Mode
Button Customization
Manual positioning is used to quickly adjust the direction of the camera. When
the function of manual positioning is enabled, the camera orientation can be
adjusted by hand which will not automatically return to the initial position. The
adjustment speed is faster than using the joystick or the following mode.
The manual positioning of the tilt and pan axis are enabled by default on the
AirCross 2. Manual positioning of the roll axes can be enabled in the menu.
The Inception Mode is used to control the camera to rotate in the roll
direction for shooting upside down and rotating footages. In the main
interface, triple click the right button to enter the Inception Mode.
After entering the Inception Mode, the camera lens is vertically up and
each axis automatically follows.
Button Definition for Inception Mode:
● Turn the joystick left or right: the gimbal turns to left or right, when
The higher the sensitivity of the button, the more sensitive and faster the
control is. If you change the ‘custom’ to -, the direction of operation will be
opposite. For more button customization, please refer to Page11 Menu
Description.
Note: The follow function has higher priority than manual positioning.
When the follow function of any axis is on, the manual positioning
function cannot be used. Only after the follow function is off, the
manual positioning can be used normally.
Manual Positioning
off
off
相机
高级
通用
pan
Button Customization is used to specify the function, sensitivity and
operation direction of each button according to the user’s habits.
For Example:
By default, moving the joystick up and down controls the tilt axis rotation.
It can be changed to control the roll or pan axis rotation by customizing;
By default, moving the joystick left and right controls the pan axis
rotation. It can be changed to control the tilt or roll axis rotation by
customizing.
camera > inception tilt [off] tilt [on]
gimbal > motion sensing >
>
roll [off] roll [off]
advanced > tracking > pan [ on] pan [ on]
general > manual pos >
camera > motor > joystick > function > left-right [p]
gimbal > follow > wheel > sensitivity > up-down [t]
advanced > operation > trigger > habits >
general > dial >
Page: 18
17
Balance Check
The gimbal can check the balance status of the tilt and roll axis
automatically and instruct users to make the correct adjustment.
a. Attach a tripod to the gimbal, turn on the gimbal and place it on a
horizontal tabletop.
b. Enter the menu, select advanced>balance chk, the gimbal begins to
check the balance adjustment.
c. When balance check is completed, the balance status of each axis will
be displayed on the screen, direction guide will be also displayed if the
adjustment is needed.
d. C means quick release plate, T means tilt axis, R means roll axis, the
direction can be viewed at the corresponding position of the gimbal,
then start the adjustment according to the screen prompts.
e. When adjustment is completed, press the right button and check it
again until the gimbal is well balanced.
Note: Balance check can be only used with the tilt and roll axis, the
pan axis balance can’t be checked. When exit balance check, a
notice that user need to check and balance pan axis manually will
appear on the screen. Be sure that the motor lock has been released
when using balance check.
Triple click the right button again to exit the Inception Mode.
release or turn to a specified angle, the gimbal stops.
● Turn the dial: adjust the rotation speed
● Press the left button on the dial once: the gimbal rotates to the left
automatically.If the gimbal is rotating, press once to stop.
● Press right button on the dial once: the gimbal rotates to the right
automatically.If the gimbal is rotating, press once to stop.
● Press up/down button on the dial: select rotationangle
● Normal: gimbal rotatesand does not stop automatically
● 180: the gimbal rotates 180° and stops automatically.
● 360: the gimbal rotates 360° and stops automatically.
camera > autotune C adjust to +
gimbal > balance chk checking T adjust to —
advanced > iFocus > R well balanced
general > inception > exit
Inception Mode
< Speed:50 >
Normal 180 360
Inception Mode
< Speed:50 >
Inception Mode
< Speed:50 >
Normal 180 360
Normal 180 360
Page: 19
18
Accelerometer Calibration
Turn on the gimbal and there is no obvious drift, the accelerometer calibration is
required when the camera doesn’t keep level. The steps are as follows:
a. Turn on the gimbal(long press the power button)
b. Turn off the motors(double press the power button/enter the menu, select
gimbal>motor>switch, set ‘off’)
c. Leave the L-shaped quick release plate on the horizontal table. Avoid the bottom
screw and keep the AirCross 2 at static position. Do not shake the it or tilt it. (or
mount the camera to refer to its level)
d. Enter the menu, select advanced>calibrate>Acc cali, and press the dial right
button to enter calibration. Wait about 5 seconds, when the ‘?’ changes to
‘OK’, the calibration is completed.
Note:
1.Please keep the gimbal stationary during the calibration, any shaking will cause
the calibration to deviate. 2.Any drastic shaking might cause ’err’ shown on the
screen, please calibrate again. 3.Do not arbitrarily perform calibration operations
while it is not necessary.
Gyroscope Calibration
Turn on the gimbal and leave it quietly for about 5 minutes, the gyroscope
calibration is required when the gimbal drifts obviously. The steps are as follows:
a. Turn on the gimbal(long press the power button)
b. Turn off the motors(double press the power button/enter the menu, select
gimbal>motor>switch, set ‘off’)
c. Leave the AirCross 2 on the table and don’t shake it or the desktop.
d. Enter the menu, select advanced>calibrate>Gyro cali and press the dial right
button, wait about 5 seconds, when the ‘?’ changes to ‘OK’, the calibration
is completed.
Offset
In case of emergency shooting, the camera cannot be leveled and there is no
time for sensor calibration, the camera can be adjusted to a horizontal state by
offset.
a. Turn on the gimbal and the camera level, check the offset of the tilt and yaw axis.
b. Enter the menu, select advanced>calibrate>offset, select an axis that is not
horizontal, and then turn the dial to adjust the fine adjustment value of the
axis until the camera completely keeps level.
Sensor Calibration
camera > iFocus > gyro gyro ok
gimbal > inception > acc acc
advanced > > > >
general > calibration >
camera > iFocus > gyro gyro
gimbal > inception > acc acc ok
advanced > manual pos >
> angle offset > angle offset >
general > calibration >
manual pos angle offset angle offset
Page: 20
19
User Configuration Management
The AirCross 2 can save 3 groups of user data like camera type, motor
output, button operations and other parameters, so users can retrieve
relevant parameters previously used and avoid trouble of setting
parameters each time when changing the camera.
Extensible electronic accessories
AirCross 2 can assemble 2 iFocus M motors to control focus ring and zoom
ring of the lens, please connect the CAN port of AirCross 2 and iFocus M
via Multi-CAN cable, and set the smart wheel to ‘F1’ or ‘F2’ mode, then
you can control iFocus M motor with the smart wheel AirCross 2 and
slypod can be assembled together to form a 4-axis linkage photography
system.
When configuration data is confusing, users can select “restore
configuration” to clear all previous configuration data.
Notes:
1.The offset can only adjust the angle of each axis within the range of about ±5°, if
there is too much offset, the camera cannot be completely leveled. 2.Offset is only
a temporary solution, after shooting, accelerometer calibration is still needed. 3.The
parameters of the offset will not be saved and will become invalid after restart.
The AirCross 2 supports both Chinese and English. After turning on the
gimbal, users can switch language in the menu.
Language Switch
Extension
camera > iFocus > gyro tilt [0] tilt [1]
gimbal > inception > acc roll [0] roll [0]
advanced > manual pos >
> angle offset > pan [0] pan [0]
general > calibration >
camera > language > English English *
gimbal > config > 中文 * 中文
advanced >
general >
about
camera > language > config1 > save
gimbal > config > config2 > load
advanced > config3 >
general >
about
reset
Page: 21
20
The AirCross 2 is equipped with a Manfrotto quick release baseplate and
a plate which make it facile for users to change shooting equipment.
When using the Manfrotto quick release system, please install the
baseplate onto the longer end of the L-Bracket, so that the knob screw
onto the baseplate is exposed. Then fix the camera onto the release
plate.
By default, the camera handle side is located near the tilt motor to allow
an unobstructed access to the camera control ports; however under
some special circumstances, the camera control ports side should be
located near the tilt motor.
Rightward installation is required under the following situations:
a. The camera size is too wide like BMPCC.
b. A specialized camera cage is used.
c. The camera lens is too heavy to adjust the balance
Notes:
1. Some camera cages are equipped with ARCA standard release plate.
These special cages can be mounted directly on the AirCross 2. gimbal
without using the L-Bracket. 2.Some special cages have no Arca-Swiss
standard quick release plate on the side ,The Arca-Swiss quick release plate
can be mounted on the side of the camera rabbit cage with a 1/4″ screw
and then mounted to AirCross 2. 3.When camera is mounted in this way, the
camera control port or HDMI port will be blocked.
Manfrotto Quick Release System
Two Camera Mounting Directions
Regular installation Rightward installation
Rightward Installation steps:
a. Mount the L-Bracket at the bottom of the camera with the short end
near the side of the lens;
b. Rotate the roll arm 180° until the tilt motor is located at the left side of
the roll motor;
c. Mount the shorter end of the L-Bracket on the release baseplate.
Page: 22
21
The AirCross 2 is equipped with BLUETOOTH 4.0 and can be connected
with smartphones. Users can set parameters, shot time-lapse video,
upgrade firmware and make other operations via the MOZA Master App.
With a Type-C USB interface, the AirCross 2 is able to be connected to a
computer. Users can set parameter, upgrade firmware and make other
operations via the MOZA Master software.
Download Link: https://www.gudsen.com/moza-aircross-2
Note:
1. The MOZA Master supports iOS, Android, Windows and MacOS
2. Before using the MOZA Master on computer, please install the driver
first, otherwise the computer cannot recognize the AirCross 2
3. Smart phones cannot directly pair with the AirCross 2 via Bluetooth,
MOZA Master App must be used to connect your phone with the
AirCross 2
Upgrade via computer:
a.Turn off the gimbal.
b.Long press the center button, then press the power button with the
other hand until the prompt ‘BOOT MODE’ appears on the screen.
c.Connect the gimbal to the computer with a USB Type-C cable.
d.The software will automatically identify the device and load the
firmware. Press the ‘Upgrade’ button and wait for about 30s.
e.Restart the gimbal after the upgrade.
Smartphone and PC Connection
Firmware Upgrade
Install the phone on top of the camera.Operate object tracking through
App.
a. Fix the phone holder to the hot shoe connector on the top of the
camera
b. Place the phone horizontally in the phone holder
c. Open the App.Enter the object tracking feature. Adjust the phone
angle. Make the phone framing as consistent as possible with the camera
framing.
In addition to being mounted on the top of the camera for object
tracking, the phone holder can also be used to fasten the phone to
tripod head for mimic motion control.
Install the Phone Holder
Page: 23
22
Specs
Note:
Make sure the gimbal is fully charged and the computer or mobile phone network
connection is normal during the upgrade.
Do not disconnect the gimbal from power, USB cable or Bluetooth during the
upgrade, otherwise the upgrade will fail.
Please re-install the batteries and try to upgrade again until the upgrade is
completed.
Specs
Body weight (g) Battery excluded 950
Payload (g)
Minimum 300
Maximum 3200
Dimension (mm) Storage dimension 335*225*90
Camera Tray Dimension
(mm)
Release center to roll axis 105
Release center to tilt axis 120
Release center to the peak of tilt 80
Mechanical Endpoint
Range(°)
Pan 360°continuous
Roll 360°continuous
Tilt 360°continuous
Operation Temperature
(℃)
Lowest 0
Highest 50
Operation Voltage Standard 7.2
Operation Current Dynamic (mA) 200
Battery
Model M2S30QB
Type Li-ion
Standard capacity (mAh) 3000
Standard voltage (V) 7.2
Charging time (H) 1.5
Battery life (H) 12
Connections
Bluetooth 4.0 BLE
2.4G 50m
USB in USB -C
Camera control port Mini USB 10PIN
Accessory extension ports Multi-CAN*3
Upgrade via App:
a.Turn off the gimbal.
b.Long press the center button, then press the power button with the
other hand until the prompt ’BOOT MODE’ appears on the screen.
c.Start App, press Bluetooth to search for AirCross 2 device and
connect.
d.The App will automatically enter the firmware upgrade interface,
please wait for the firmware download to complete, press the
‘upgrade’ button and wait for about 5 minutes.
e.Restart the gimbal after the upgrade.
Page: 24
Note: The users manual is suitable for AirCross 2 V1.0.3 firmware.
Посмотреть инструкция для Moza AirCross 2 бесплатно. Руководство относится к категории штативы, 5 человек(а) дали ему среднюю оценку 8.7. Руководство доступно на следующих языках: английский. У вас есть вопрос о Moza AirCross 2 или вам нужна помощь? Задайте свой вопрос здесь
Не можете найти ответ на свой вопрос в руководстве? Вы можете найти ответ на свой вопрос ниже, в разделе часто задаваемых вопросов о Moza AirCross 2.
Инструкция Moza AirCross 2 доступно в русский?
Не нашли свой вопрос? Задайте свой вопрос здесь