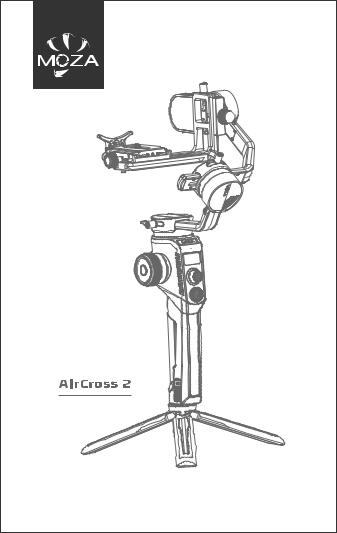
Смотреть руководство для Moza AirCross 2 ниже. Все руководства на ManualsCat.com могут просматриваться абсолютно бесплатно. Нажав кнопку «Выбор языка» вы можете изменить язык руководства, которое хотите просмотреть.
MANUALSCAT | RU
Вопросы и ответы
У вас есть вопрос о Moza AirCross 2, но вы не можете найти ответ в пользовательском руководстве? Возможно, пользователи ManualsCat.com смогут помочь вам и ответят на ваш вопрос. Заполните форму ниже — и ваш вопрос будет отображаться под руководством для Moza AirCross 2. Пожалуйста, убедитесь, что вы опишите свои трудности с Moza AirCross 2 как можно более детально. Чем более детальным является ваш вопрос, тем более высоки шансы, что другой пользователь быстро ответит на него. Вам будет автоматически отправлено электронное письмо, чтобы проинформировать вас, когда кто-то из пользователей ответит на ваш вопрос.
Задать вопрос о Moza AirCross 2
- Бренд:
- Moza
- Продукт:
- штативы
- Модель/название:
- AirCross 2
- Тип файла:
- Доступные языки:
- английский
Сопутствующие товары Moza AirCross 2

User Manual

|
Contents |
|||
|
MOZA AirCross 2 Overview |
1 |
||
|
Installation and Balance Adjustment |
2 |
||
|
Installing the Battery |
2 |
||
|
Attaching the Tripod |
2 |
||
|
Unlocking Motors |
2 |
||
|
Mounting the Camera |
3 |
||
|
Balancing |
3 |
||
|
Buttons and OLED Display |
4 |
||
|
Button Functions |
4 |
||
|
LED Indicators |
5 |
||
|
Main Interface |
5 |
||
|
Menu Description |
6 |
||
|
Features Description |
8 |
||
|
Camera Control |
8 |
||
|
Motor Output |
9 |
||
|
PFV,Sport Gear Mode |
10 |
||
|
Manual Positioning |
11 |
||
|
Button Customization |
11 |
||
|
Inception Mode |
11 |
||
|
Balance Check |
12 |
||
|
Sensor Calibration |
13 |
||
|
Language Switch |
14 |
||
|
User Con guration Management |
14 |
||
|
Extension |
15 |
||
|
Manfrotto Quick Release System |
15 |
||
|
Two Camera Mounting Directions |
15 |
||
|
Smartphone and PC Connection |
16 |
||
|
Phone Holder |
16 |
||
|
Firmware Upgrade |
16 |
||
|
SPECS |
17 |
||

|
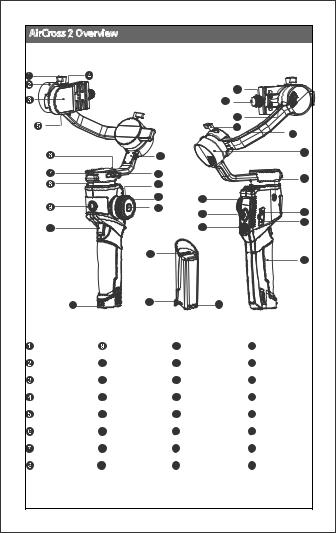
AirCross 2 Overview |
||||||
|
21 |
||||||
|
19 |
||||||
|
20 |
||||||
|
23 |
22 |
|||||
|
11 |
24 |
|||||
|
12 |
25 |
|||||
|
13 |
||||||
|
14 |
26 |
|||||
|
15 |
27 |
29 |
||||
|
10 |
28 |
30 |
||||
|
16 |
31 |
|||||
|
32 |
17 |
18 |
||||
|
Tilt Knob |
3/8”Screw |
17 |
USB Type-C |
25 |
Pan Motor Lock |
|
|
Charging Port |
||||||
|
Tilt Motor |
10 |
Trigger |
18 |
Battery Level |
26 |
OLED Screen |
|
Indicator |
||||||
|
Tilt Arm |
11 |
Roll Motor Lock |
19 |
Safety Lock |
27 |
Joystick |
|
Camera |
12 |
Pan Knob |
20 Roll Motor Lock |
28 |
Dial Wheel |
|
|
Control Port |
||||||
|
Baseplate Knob |
13 |
Smart Wheel |
21 Multi-CAN Port |
29 |
USB Port |
|
|
Pan Arm |
14 |
Indicator Light |
22 |
Roll Arm |
30 |
Multi-CAN Port |
|
Ring |
||||||
|
Crash Pad |
15 |
Power Button |
23 |
Roll Knob |
31 |
Battery |
|
Pan Motor |
16 |
Power Supply |
24 |
Roll Motor |
32 |
Battery Lock |
|
Electrode |
||||||
|
1 |

Installation and Balance Adjustment
|
Installing the Battery |
|||
|
a. Press the battery lock downwards; |
c |
d |
|
|
b. Take out the battery; |
|||
|
c. Remove the insulating lm at the |
|||
|
electrode; |
b |
||
|
d. Attach the battery electrode to |
e |
||
|
the gimbal. |
|||
|
e. Press the battery into the hatch |
|||
|
Attaching the Tripod |
a |
||
|
Attach the tripod to stand the gimbal. |
a.Screw the tripod tightly into the 1/4″ hole at the bottom of the gimbal.
b.Expand three support feet, place the gimbal on a at surface
Unlocking Motors
The AirCross 2 gimbal has 3 locks which are used to lock motors to prevent rotation.
|
3 Motor Locks |
Unfolding |
Storage |

2

Mounting the Camera
Horizontal
a. Place the longer side of the L-Bracket under the camera, and lock the camera with a 1/4”screw.
Vertical Mounting
a. Place the longer side of the L-Bracket under the camera, and lock the camera with a 1/4”screw.
b. Loosen the quick release knob screw, Pull out the safety lock at the end of the quick-release knob, insert the shorter end of the L-Bracket into the quick release baseplate, and then lock the knob.
b. Loosen the quick release knob screw, pull out the safety lock, insert the longer end of the L-Bracket into the quick release baseplate, and then lock the knob.
Use the Arka quick release plate for vertical shot:
a. Place the arka-swiss quick release plate horizontally under the camera and use a 1/4″ screw to lock the camera;
b. Loosen the quick-release knob and pull out the safety lock at the end of the quick-release knob. Install the Arka quick-release plate into
the quick-release base. Then lock the knob.
Note: The camera can only be installed vertically using the Arka quick release plate. It does not block the camera’s battery port and memory card slot.
Balancing
a. Loosen the knob of the tilt arm, adjust the tilt arm back and forth until the lens moves horizontally forward, and then lock the knob.
b. Rotate the camera to make its lens face upward, loosen knob on the release plate, adjust the release plate back and forth until the lens faces straight upward, and then lock the knob.
3

c. Loosen the knob of the roll arm, adjust roll arm leftwards and rightwards until it remains horizontal, and then lock the knob.
d. Hold the gimbal horizontally to make the pan arm level with the ground, then loosen the knob on the pan arm, adjust the pan arm leftwards and rightwards until it remains level, and then lock the knob.
Note: Please release the motor lock of the axes before balance adjustment, otherwise it can’t be adjusted accurately. Please ensure that the MOZA AirCross 2 is balanced well before use.
Buttons and OLED Display
Button Functions
|
Button |
Operation |
Function |
Customizable Function |
Menu |
||||||
|
1X click |
—— |
—— |
Focus |
Photo |
—— |
—— |
—— |
The same |
||
|
2X click |
Re -center |
—— |
Re -center |
Sel e |
—— |
—— |
—— |
The same |
||
|
3X click |
Sel e |
—— |
Re -center |
Sel e |
—— |
—— |
—— |
The same |
||
|
Trigger |
Pan -tilt |
Sport |
||||||||
|
Hold |
Pan -tilt follow |
—— |
All lock |
FPV |
—— |
The same |
||||
|
follow |
gear |
|||||||||
|
mode |
||||||||||
|
Click and hold |
All lock |
—— |
—— |
—— |
—— |
—— |
—— |
The same |
||
|
1X click |
Switch wheel |
—— |
—— |
—— |
—— |
—— |
—— |
The same |
||
|
modes |
||||||||||
|
Power |
||||||||||
|
2X click |
Sleep/wake |
—— |
—— |
—— |
—— |
—— |
—— |
The same |
||
|
Button |
||||||||||
|
up |
||||||||||
|
3X click |
Switch Grouping |
—— |
—— |
—— |
—— |
—— |
—— |
—— |
||
|
of Wheel Modes |
||||||||||
|
Long press |
ON/OFF |
—— |
—— |
—— |
—— |
—— |
—— |
The same |
||
|
Smart |
Turn |
Focus motor |
Focus |
Focus |
E-focus |
Tilt axis |
Roll axis |
Pan axis |
The same |
|
|
Wheel |
1 |
motor 1 |
motor 2 |
|||||||
|
Push up/down |
Move the |
Tilt axis |
Roll axis |
Pan axis |
—— |
—— |
—— |
The same |
||
|
tilt axis |
||||||||||
|
Joystick |
||||||||||
|
Push left/right |
Move the |
Tilt axis |
Roll axis |
Pan axis |
—— |
—— |
—— |
The same |
||
|
pan axis |
||||||||||
|
Top |
1X click |
Tilt follow |
—— |
—— |
—— |
—— |
—— |
—— |
Option-up |
|
|
Button |
||||||||||
|
Down |
1X click |
Pan follow |
—— |
—— |
—— |
—— |
—— |
—— |
Option-down |
|
|
Button |
||||||||||
|
Left |
1X click |
Roll follow |
—— |
—— |
—— |
—— |
—— |
—— |
Return |
|
|
Button |
||||||||||
|
3X click |
FPV mode |
—— |
—— |
—— |
—— |
—— |
—— |
—— |
||
|
Right |
1X click |
Sport gear |
—— |
—— |
—— |
—— |
—— |
—— |
Con rm/Next |
|
|
mode |
menu |
|||||||||
|
Button |
||||||||||
|
3X click |
Inception |
—— |
—— |
—— |
—— |
—— |
—— |
—— |
||
|
mode |
||||||||||
|
1X click |
Video |
—— |
—— |
—— |
—— |
—— |
—— |
Video recording |
||
|
recording |
||||||||||
|
Center |
2X click |
Take photo |
—— |
—— |
—— |
—— |
—— |
—— |
Take photo |
|
|
Button |
||||||||||
|
Long press |
Enter menu |
—— |
—— |
—— |
—— |
—— |
—— |
Exit menu |
||
|
Dial |
Turn |
Adjust the |
—— |
—— |
—— |
—— |
—— |
—— |
Adjust relevant |
|
|
Wheel |
follow speed |
parameter |
||||||||
|
Combo |
Power+center |
Firmware |
—— |
—— |
—— |
—— |
—— |
—— |
—— |
|
|
button |
upgrade |
4

You can only view or download manuals with
Sign Up and get 5 for free
Upload your files to the site. You get 1 for each file you add
Get 1 for every time someone downloads your manual
Buy as many as you need
Посмотреть инструкция для Moza AirCross 2 бесплатно. Руководство относится к категории штативы, 5 человек(а) дали ему среднюю оценку 8.7. Руководство доступно на следующих языках: английский. У вас есть вопрос о Moza AirCross 2 или вам нужна помощь? Задайте свой вопрос здесь
Не можете найти ответ на свой вопрос в руководстве? Вы можете найти ответ на свой вопрос ниже, в разделе часто задаваемых вопросов о Moza AirCross 2.
Инструкция Moza AirCross 2 доступно в русский?
Не нашли свой вопрос? Задайте свой вопрос здесь


