![]()
|
2004 Microchip Technology Inc. |
DS51288C_CN |

Microchip
•Microchip Microchip
•Microchip Microchip
•MicrochipMicrochip
•Microchip
•Microchip “ ”
Microchip MicrochipDigital Millennium Copyright Act
您自身应负的责任。Microchip Microchip Microchip MicrochipMicrochip
Microchip Microchip Accuron dsPIC KEELOQ microID MPLAB PIC PICmicro PICSTART PRO MATE PowerSmart rfPIC SmartShuntMicrochip Technology Inc.
AmpLab FilterLab MXDEV MXLAB PICMASTER rfPIC SEEVAL SmartSensor The Embedded Control Solutions Company Microchip Technology Inc.
Analog-for-the-Digital Age Application Maestro dsPICDEM dsPICDEM.net dsPICworks ECAN ECONOMONITOR FanSense FlexROM fuzzyLAB In-Circuit Serial Programming ICSP ICEPIC Migratable Memory MPASM MPLIB MPLINK MPSIM PICkit PICDEM PICDEM.net PICLAB PICtail PowerCal PowerInfo PowerMate PowerTool rfLAB rfPICDEM Select Mode Smart Serial SmartTel Total Endurance Microchip Technology Inc.
SQTP Microchip Technology Inc.
© 2004, Microchip Technology Inc
Microchip Chandler Tempe
Mountain View 2003 10ISO/TS-16949:2002 PICmicro® 8KEELOQ® EEPROM ISO/TS-16949:2002 Microchip ISO 9001:2000
|
DS51288C_CN ii |
2004 Microchip Technology Inc. |

|
MPLAB ® C18 C |
|||
|
………………………………………………………………………………………………………………… |
1 |
||
|
1 |
|||
|
1.1 |
……………………………………………………………………………………………….. |
7 |
|
|
1.2 |
……………………………………………………………………………………… |
7 |
|
|
1.2.1 ……………………………………………………………………………………. |
8 |
||
|
1.2.2 ……………………………………………………………………………………. |
8 |
||
|
1.2.3 ……………………………………………………………………………………………… |
9 |
||
|
1.2.4 ……………………………………………………………………………………….. |
9 |
||
|
1.2.5 …………………………………………………………………………………………… |
9 |
||
|
2 |
|||
|
2.1 |
……………………………………………………………………….. |
11 |
|
|
2.1.1 ……………………………………………………………………………………………….. |
11 |
||
|
2.1.2 ……………………………………………………………………………………………. |
12 |
||
|
2.2 |
………………………………………………………….— Endianness |
12 |
|
|
2.3 |
……………………………………………………………………………………….. |
13 |
|
|
2.3.1 …………………………………………………………………………………………… |
Overlay |
13 |
|
|
2.3.2 …………………………………………………………………………. |
static |
14 |
|
|
2.4 |
……………………………………………………………………………………. |
14 |
|
|
2.4.1 ………………………………………………………………….. |
near/far |
14 |
|
|
2.4.2 ………………………………………………………………….. |
near/far |
14 |
|
|
2.4.3 ……………………………………………………………………………… |
ram/rom |
15 |
|
|
2.5 |
………………………………………………………………………….. |
15 |
|
|
2.5.1 ……………………………………………………………………………………… |
15 |
||
|
2.5.2 ……………………………………………………………………………………… |
15 |
||
|
2.6 |
……………………………………………………………………………………. |
16 |
|
|
2.7 |
ISO ………………………………………………………………………………… |
16 |
|
|
2.7.1 ……………………………………………………………………………………… |
16 |
||
|
2.7.2 …………………………………………………………………………………………. |
16 |
||
|
2.7.3 ……………………………………………………………………………………… |
17 |
||
|
2.8 |
……………………………………………………………………………………. |
19 |
|
|
2.8.1 …………………………………………………………………………………………. |
19 |
||
|
2.8.2 …………………………………………………………………………………………. |
20 |
||
|
2.9 |
Pragma ………………………………………………………………………………. |
21 |
|
|
2.9.1 ………………………………………………………………… |
#pragma sectiontype |
21 |
|
|
2.9.2 |
#pragma interruptlow fname / |
27 |
|
|
………………………………………………………….. |
#pragma interrupt fname |
||
|
2.9.3 #pragma varlocate bank variable-name |
|||
|
………………. |
#pragma varlocate » section — name » variable — name |
31 |
|
|
2.10 |
……………………………………………………………………….. |
33 |
|
|
2.11 |
………………………………………………………….. |
35 |
|
|
2.12 |
………………………………………………………………………………………….. |
35 |
|
|
2004 Microchip Technology Inc. |
DS51288C_CN iii |

MPLAB® C18 C
3
|
3.1 |
………………………………………………………………………………………. |
37 |
|
|
3.2 |
……………………………………………………………………………… |
38 |
|
|
3.2.1 |
…………………………………………………………………………………………….. |
39 |
|
|
3.2.2 |
…………………………………………………………………………………… |
40 |
|
|
3.2.3 |
C …………………………………………………………….. |
40 |
|
3.3 |
………………………………………………………………………………………. |
45 |
|
|
3.3.1 |
…………………………………………………………………………………………. |
45 |
|
|
3.3.2 |
……………………………………………………………………………………………….. |
46 |
|
|
3.4 |
………………………………………………………………………….. |
46 |
4
|
4.1 |
………………………………………………………………………….. |
49 |
|
4.2 |
………………………………………………………………………………………. |
50 |
|
4.3 |
…………………………………………………………………………….. |
50 |
|
4.4 |
W …………………………………………………………………………. |
51 |
|
4.5 |
………………………………………………………………………………………. |
51 |
|
4.6 |
………………………………………………………………………………………. |
52 |
|
4.7 |
………………………………………………………………………. |
53 |
|
4.8 |
………………………………………………………………………………………. |
53 |
|
4.9 |
………………………………………………………………………………… |
54 |
|
4.10 |
……………………………………………………………………………………. |
55 |
|
4.11 |
………………………………………………………………………………………. |
55 |
5 A COFF
|
A.1 struct filehdr — …………………………………………………………. |
61 |
|
|
A.1.1 unsigned short f_magic……………………………………………………………. |
61 |
|
|
A.1.2 |
unsigned short f_nscns…………………………………………………………….. |
61 |
|
A.1.3 |
unsigned long f_timdat……………………………………………………………… |
61 |
|
A.1.4 |
unsigned long f_symptr……………………………………………………………… |
61 |
|
A.1.5 |
unsigned long f_nsyms ……………………………………………………………….. |
61 |
|
A.1.6 |
unsigned short f_opthdr……………………………………………………………. |
61 |
|
A.1.7 |
unsigned short f_flags ……………………………………………………………… |
62 |
|
A.2 struct opthdr — …………………………………………………….. |
62 |
|
|
A.2.1 |
unsigned short magic …………………………………………………………………. |
62 |
|
A.2.2 |
unsigned short vstamp ……………………………………………………………….. |
62 |
|
A.2.3 |
unsigned long proc_type……………………………………………………………. |
62 |
|
A.2.4 |
unsigned long rom_width_bits ………………………………………………….. |
64 |
|
A.2.5 |
unsigned long ram_width_bits ………………………………………………….. |
64 |
|
A.3 struct scnhdr — ………………………………………………………………. |
64 |
|
|
A.3.1 |
union _s ……………………………………………………………………………………….. |
65 |
|
A.3.2 |
unsigned long s_size …………………………………………………………………. |
65 |
|
A.3.3 |
unsigned long s_scnptr……………………………………………………………… |
65 |
|
A.3.4 |
unsigned long s_relptr……………………………………………………………… |
65 |
|
A.3.5 |
unsigned long s_lnnoptr……………………………………………………………. |
65 |
|
A.3.6 |
unsigned short s_nreloc……………………………………………………………. |
65 |
|
A.3.7 |
unsigned short s_nlnno ……………………………………………………………… |
65 |
|
A.3.8 |
unsigned long s_flags ……………………………………………………………….. |
66 |
|
DS51288C_CN iv |
2004 Microchip Technology Inc. |

|
A.4 |
struct reloc — ……………………………………………………….. |
66 |
|
|
A.4.1 |
unsigned long r_vaddr……………………………………………………………….. |
66 |
|
|
A.4.2 |
unsigned long r_symndx……………………………………………………………… |
66 |
|
|
A.4.3 |
short r_offset……………………………………………………………………………. |
66 |
|
|
A.4.4 |
unsigned short r_type……………………………………………………………….. |
67 |
|
|
A.5 |
struct syment — ……………………………………………………… |
68 |
|
|
A.5.1 |
union _n……………………………………………………………………………………….. |
68 |
|
|
A.5.2 |
unsigned long n_value……………………………………………………………….. |
68 |
|
|
A.5.3 |
short n_scnum……………………………………………………………………………… |
69 |
|
|
A.5.4 |
unsigned short n_type……………………………………………………………….. |
69 |
|
|
A.5.5 |
char n_sclass……………………………………………………………………………… |
70 |
|
|
A.5.6 |
char n_numaux……………………………………………………………………………… |
70 |
|
|
A.6 |
struct coff_lineno — ………………………………………………. |
71 |
|
|
A.6.1 |
unsigned long l_srcndx……………………………………………………………… |
71 |
|
|
A.6.2 |
unsigned short l_lnno……………………………………………………………….. |
71 |
|
|
A.6.3 |
unsigned long l_paddr……………………………………………………………….. |
71 |
|
|
A.6.4 |
unsigned short l_flags……………………………………………………………… |
71 |
|
|
A.6.5 |
unsigned long l_fcnndx……………………………………………………………… |
71 |
|
|
A.7 |
struct aux_file — ……………………………… |
71 |
|
|
A.7.1 |
unsigned long x_offset……………………………………………………………… |
71 |
|
|
A.7.2 |
unsigned long x_incline …………………………………………………………… |
71 |
|
|
A.7.3 |
unsigned char x_flags……………………………………………………………….. |
72 |
|
|
A.8 |
struct aux_scn — ………………………………………. |
72 |
|
|
A.8.1 |
unsigned long x_scnlen……………………………………………………………… |
72 |
|
|
A.8.2 |
unsigned short x_nreloc …………………………………………………………… |
72 |
|
|
A.8.3 |
unsigned short x_nlinno …………………………………………………………… |
72 |
|
|
A.9 |
struct aux_tag — struct/union/enum . 72 |
||
|
A.9.1 |
unsigned short x_size……………………………………………………………….. |
72 |
|
|
A.9.2 |
unsigned long x_endndx……………………………………………………………… |
72 |
|
|
A.10 |
struct aux_eos — struct/union/enum …… |
73 |
|
|
A.10.1 |
unsigned long x_tagndx……………………………………………………………. |
73 |
|
|
A.10.2 |
unsigned short x_size……………………………………………………………… |
73 |
|
|
A.11 |
struct aux_fcn — …………………………………. |
73 |
|
|
A.11.1 |
unsigned long x_tagndx……………………………………………………………. |
73 |
|
|
A.11.2 |
unsigned long x_lnnoptr …………………………………………………………. |
73 |
|
|
A.11.3 |
unsigned long x_endndx……………………………………………………………. |
73 |
|
|
A.11.4 |
short x_actscnum ……………………………………………………………………… |
73 |
|
|
A.12 |
struct aux_fcn_calls — ………………….. |
74 |
|
|
A.12.1 |
unsigned long x_calleendx ……………………………………………………… |
74 |
|
|
A.12.2 |
unsigned long x_is_interrupt………………………………………………… |
74 |
|
|
A.13 |
struct aux_arr — ……………………………………. |
74 |
|
|
A.13.1 |
unsigned long x_tagndx……………………………………………………………. |
74 |
|
|
A.13.2 |
unsigned short x_size……………………………………………………………… |
74 |
|
|
A.13.3 |
unsigned short x_dimen[X_DIMNUM]………………………………………… |
74 |
|
|
A.14 struct aux_eobf — …………………….. |
75 |
||
|
A.14.1 |
unsigned short x_lnno……………………………………………………………… |
75 |
|
2004 Microchip Technology Inc. |
DS51288C_CN v |

|
MPLAB® C18 C |
|||
|
A.15 |
struct aux_bobf — |
……………………. 75 |
|
|
A.15.1 |
unsigned short x_lnno ……………………………………………………………… |
75 |
|
|
A.15.2 |
unsigned long x_endndx ……………………………………………………………. |
75 |
|
|
A.16 |
struct aux_var — struct/union/enum |
||
|
………………………………………………………………………….. |
75 |
||
|
A.16.1 |
unsigned long x_tagndx ……………………………………………………………. |
75 |
|
|
A.16.2 |
unsigned short x_size ……………………………………………………………… |
75 |
|
|
A.17 |
struct aux_field — ………………………………………….. |
76 |
|
|
A.17.1 |
unsigned short x_size ……………………………………………………………… |
76 |
|
|
B ANSI |
|||
|
B.1 |
……………………………………………………………………………………………… |
77 |
|
|
B.2 |
………………………………………………………………………………………….. |
77 |
|
|
B.3 |
……………………………………………………………………………………………… |
77 |
|
|
B.4 |
……………………………………………………………………………………………… |
78 |
|
|
B.5 |
………………………………………………………………………………………….. |
78 |
|
|
B.6 |
……………………………………………………………………………………. |
79 |
|
|
B.7 |
………………………………………………………………………………………….. |
79 |
|
|
B.8 |
……………………………………………………………………………………. |
79 |
|
|
B.9 |
……………………………………………………………………………………………… |
79 |
|
|
B.10 |
……………………………………………………………………………………………… |
80 |
|
|
B.11 |
Switch …………………………………………………………………………………… |
80 |
|
|
B.12 |
………………………………………………………………………………… |
80 |
|
|
C |
|||
|
D MPLAB C18 |
|||
|
D.1 |
……………………………………………………………………………………………… |
83 |
|
|
D.2 |
……………………………………………………………………………………………… |
93 |
|
|
D.3 |
……………………………………………………………………………………………… |
95 |
|
|
E |
|||
|
E.1 |
………………………………………………………………………………… |
97 |
|
|
E.1.1 |
…………………………………………………………………………………………. |
97 |
|
|
E.1.2 |
static ………………………………………………………………………………… |
97 |
|
|
E.1.3 |
overlay ……………………………………………………………………………… |
97 |
|
|
E.1.4 |
…………………………………………………………………………………………. |
98 |
|
|
E.1.5 |
…………………………………………………………………………………………. |
98 |
|
|
E.2 |
……………………………………………………………………………… |
99 |
|
|
E.3 |
COFF ……………………………………………………………………………… |
99 |
|
|
E.3.1 |
……………………………………………………………………………………… |
99 |
|
|
E.3.2 |
f_flags ……………………………………………………………………. |
99 |
|
|
…………………………………………………………………………………………………………… |
101 |
||
|
……………………………………………………………………………………………………………… |
107 |
||
|
……………………………………………………………………………………….. |
114 |
|
DS51288C_CN vi |
2004 Microchip Technology Inc. |

MPLAB® C18 C
MPLAB® C18 MPLAB C18
•C
•MPLAB
•1 — MPLAB C18
•2 — MPLAB C18 ANSI
•3 — MPLAB C18 PIC18 PICmicro®
•4 — MPLAB C18
•5 —
•A COFF — Microchip COFF
•B ANSI — ANSI MPLAB C18
•C —
•D MPLAB C18 —
•E —
|
2004 Microchip Technology Inc. |
DS51288C_CN 1 |

MPLAB® C18 C
|
Courier |
||
|
Courier |
distance -= time * speed; |
|
|
c:mcc18h |
||
|
_asm, _endasm, static |
||
|
-Opa+, -Opa- |
||
|
Courier |
file.o file |
|
|
[ ] |
mcc18 [options] file [options] |
|
|
… |
var_name [, var_name…] |
|
|
void main (void) |
||
|
{ … |
||
|
} |
||
|
0xnnnn |
n |
0xFFFF, 0x007A |
|
Arial |
||
|
MPLAB User’s Guide |
MPLAB C18
“DS” DS
DSXXXXXA DSXXXXXA_CN
|
DS51288C_CN 2 |
2004 Microchip Technology Inc. |

PIC18
readme.c18
MPLAB C18 C readme.c18ASCII
MPLAB® C18 C DS51295C_CN
MPLAB C18MPLAB IDE
MPLAB® C18 C DS51297C_CN
MPLAB C18 MPLAB C18 C
MPLAB® IDE V6.XX DS51281C_CN
MPLAB IDE
MPASM™ User’s Guide with MPLINK™ Linker and MPLIB™ Librarian (DS33014)
Microchip PICmicro MCU MPASM MPLINK
MPLIB
PICmicro® 18C DS39500A_CN
但没有涉及到每个器件的具体细节。
PIC18 Device Data Sheets and Application Notes
PIC18 PIC18
Microchip www.microchip.com Adobe Acrobat .pdf
|
2004 Microchip Technology Inc. |
DS51288C_CN 3 |

MPLAB® C18 C
C
American National Standard for Information Systems – Programming Language – C. American National Standards Institute (ANSI), 11 West 42nd. Street, New York, New York, 10036.
C C C
Beatman, John B. Embedded Design with the PIC18F452 Microcontroller, First Edition. Pearson Education, Inc., Upper Saddle River, New Jersey 07458.
Microchip PIC18FXXX
Harbison, Samuel P. and Steele, Guy L., C A Reference Manual, Fourth Edition. Prentice-Hall, Englewood Cliffs, New Jersey 07632.
C CC C
Kernighan, Brian W. and Ritchie, Dennis M. The C Programming Language, Second Edition. Prentice Hall, Englewood Cliffs, New Jersey 07632.
ANSI C C
Kochan, Steven G. Programming In ANSI C, Revised Edition. Hayden Books, Indianapolis, Indiana 46268.
ANSI C
Van Sickle, Ted. Programming Microcontrollers in C, First Edition. LLH Technology Publishing, Eagle Rock, Virginia 24085.
Motorola C
|
DS51288C_CN 4 |
2004 Microchip Technology Inc. |
![]()
MICROCHIP
Microchip Microchip
Netscape Navigator® Microsoft® Internet ExplorerInternet Microchip
http://www.microchip.com
笔记、用户指南、文章和示例程序。也可以获得关于Microchip
•FAQ
•—
•Microchip
•Microchip
•Microchip
Microchip microchip
Microchip http://www.microchip.com “ ”
•MPLAB IDE
|
2004 Microchip Technology Inc. |
DS51288C_CN 5 |

MPLAB® C18 C
— Microchip C MPLAB C17 MPLAB C18 MPLAB C30 C MPASM MPLAB ASM30 MPLINK MPLAB LINK30 MPLIB MPLAB LIB30
— Microchip MPLAB ICE 2000 MPLAB ICE 4000
— Microchip MPLAB ICD 2
MPLAB IDE — Microchip MPLAB IDE Windows® MPLAB IDE MPLAB SIM MPLAB IDE
— Microchip MPLAB PM3 PRO MATE® II PICSTART® Plus
Microchip
•FAE
•CAE
FAE
http://support.microchip.comCAE 800-820-6247
1-800-755-2345
1-480-792-7302
|
DS51288C_CN 6 |
2004 Microchip Technology Inc. |

MPLAB® C18 C
1
MPLAB C18 PIC18 PICmicro ANSI CANSI X3.159-1989 PICmicroANSI 32 Windows
Microchip MPLAB IDE MPLAB ICE MPLAB ICD 2 MPLAB SIM
MPLAB C18
•ANSI ’89
•MPLAB IDE
•MPASMC
•/
•PWM SPI™ I2C™ UART USART
MPLAB® C18 C DS51295C_CN MPLAB IDE
C18
mcc18 [options] file [options]
—help-verbose
|
2004 Microchip Technology Inc. |
DS51288C_CN 7 |

MPLAB® C18 C
file.o file-fo
mcc18 -fo bar.o foo.c
file.err file -fe
mcc18 -fe bar.err foo.c
-w -nw -w1 2 3 1-1 -nwD —help-message-list—help-message-all —help-message
mcc18 —help-message=2068
2068: obsolete use of implicit ‘int’ detected.
The ANSI standard allows a variable to be declared without a base type being specified, e.g., «extern x;», in which case a base type of ‘int’ is implied. This usage is deprecated by the standard as obsolete, and therefore a diagnostic is issued to that effect.
|
1-1 |
||
|
1 |
||
|
2 |
1 |
|
|
3 |
2 |
|
DS51288C_CN 8 |
2004 Microchip Technology Inc. |

-D -D -Dname
-Dname=value -Dname name 1 -Dname=valuename value
mcc18 -DMODE
MODE 1
mcc18 -DMODE=2
MODE 2
-D
#if MODE == 1 x = 5;
#elif MODE == 2 x = 6;
#else
x = 7; #endif
1.2.4
MPLAB C18 PIC18 PICmicro-pprocessor processor PIC18F452-p18f452 -p18cxx
PIC18 PICmicro
ADDFSR ADDULNK CALLW MOVSF MOVSS PUSHL SUBFSR SUBULNK —extended —no-extended1-2
|
2004 Microchip Technology Inc. |
DS51288C_CN 9 |

MPLAB® C18 C
|
1-2 |
|||||
|
-p extended |
-p no-extended |
-p18cxx |
|||
|
—extended |
|||||
|
—no-extended |
|||||
mcc18 —help mcc18 —extended
—help
C
|
DS51288C_CN 10 |
2004 Microchip Technology Inc. |

MPLAB® C18 C
2
MPLAB C18 ANSI 2-1
MPLAB C18 24 short long int long short int 2-1 24
|
2-1 |
|||||||
|
char(1,2) |
8 |
-128 |
127 |
||||
|
signed char |
8 |
-128 |
127 |
||||
|
unsigned char |
8 |
0 |
255 |
||||
|
int |
16 |
-32,768 |
32,767 |
||||
|
unsigned int |
16 |
0 |
65535 |
||||
|
short |
16 |
-32,768 |
32,767 |
||||
|
unsigned short |
16 |
0 |
65,535 |
||||
|
short long |
24 |
-8,388,608 |
8,388,607 |
||||
|
unsigned short long |
24 |
0 |
16,777,215 |
||||
|
long |
32 |
-2,147,483,648 |
2,147,483,647 |
||||
|
unsigned long |
32 |
0 |
4,294,967,295 |
||||
|
1 char |
|||||||
|
2 -k char |
|||||||
|
2004 Microchip Technology Inc. |
DS51288C_CN 11 |

MPLAB® C18 C
MPLAB C18 double float 32 2-2
|
2-2 |
|||||
|
float |
32 |
-126 |
128 |
2–126 ≈ 1.17549435e — 38 |
2128 * (2-2–15) ≈ 6.80564693e + 38 |
|
double |
32 |
-126 |
128 |
2–126 ≈ 1.17549435e — 38 |
2128 * (2-2–15) ≈ 6.80564693e + 38 |
MPLAB C18 IEEE 754 MPLAB C18 IEEE 754 9 IEEE 754 9MPLAB C18 MPLAB C18 9IEEE 754 2-3
|
2-3 |
MPLAB C18 IEEE 754 |
|||||
|
0 |
1 |
2 |
||||
|
IEEE 754 |
se0e1e2e3e4e5e6 |
e7ddd dddd |
dddd dddd |
dddd dddd |
||
|
MPLAB C18 |
e0e1e2e3e4e5e6e7 |
sddd dddd |
dddd dddd |
dddd dddd |
||
|
s = |
||||||
|
d = |
||||||
|
e = |
2.2 — ENDIANNESS
Endianness MPLAB C18little-endian “
”
#pragma idata test=0x0200 long l=0xAABBCCDD;
|
0x0200 |
0x0201 |
0x0202 |
0x0203 |
|
|
0xDD |
0xCC |
0xBB |
0xAA |
|
DS51288C_CN 12 |
2004 Microchip Technology Inc. |

MPLAB C18 ANSI auto extern register statictypedef
2.3.1Overlay
MPLAB C18 overlay1.2.5 “ ” overlayoverlay
次进入函数时都要被初始化。例如
void f (void)
{
overlay int x = 5; x++;
}
x x 5
MPLINK overlay
int f (void)
{
overlay int x = 1; return x;
}
int g (void)
{
overlay int y = 2; return y;
}
f g x y
int f (void)
{
overlay int x = 1; return x;
}
int g (void)
{
overlay int y = 2; y = f ( );
return y;
}
f g x y overlay
static
|
2004 Microchip Technology Inc. |
DS51288C_CN 13 |

MPLAB® C18 C
MPLINK overlayMPLINK overlay
auto static overlay-scs static -sco overlayMPLAB C18 -scaauto
2.3.2static
auto static autostaticstatic 1.2.5 “ ”
auto static
-scs -scostatic
ANSI const, volatile MPLAB C18 far near rom ram
ANSI C const volatile 2-4far ram
|
2-4 |
|||
|
rom |
ram |
||
|
far |
|||
|
near |
64K |
2.4.1near/far
far near RAM
2.4.2near/far
far 64K near64K 64K
|
DS51288C_CN 14 |
2004 Microchip Technology Inc. |
![]()
2.4.3ram/rom
PICmicro MPLAB C18 ANSI/ISO C
MPLABC18 rom ram rom
ram
ram rom
ram rom 2-5
rom TBLWT
|
2-5 |
|||
|
char * dmp; |
16 |
||
|
Near |
rom near char * npmp; |
16 |
|
|
Far |
rom far char * fpmp; |
24 |
MCC_INCLUDE -I
#include <filename> MCC_INCLUDE -IMCC_INCLUDE -I-IMCC_INCLUDE
#include “filename”2.5.1 “”
|
2004 Microchip Technology Inc. |
DS51288C_CN 15 |

MPLAB® C18 C
MPLAB C18 __18CXX 1 MPLAB C18
__PROCESSOR 1-p18c452 __18C452 1-p18f258 __18F258 1
__SMALL__ -ms 1 __LARGE__ -ml 1
__TRADITIONAL18__ 2.5.1 “ ”1
__EXTENDED18__ 2.5.1 “ ” 1
2.7ISO
ISO int MPLAB C18 int-Oi ISO
unsigned char a, b; unsigned i;
a = b = 0x80;
i = a + b; /* ISO requires that i == 0x100, but in C18 i == 0 */
#define A 0x10 /* A will be considered a char unless -Oi specified */
#define B 0x10 /* B will be considered a char unless -Oi specified */
#define C (A) * (B)
unsigned i;
i = C; /* ISO requires that i == 0x100, but in C18 i == 0 */
MPLAB C18 0x 00b 237 0b11101101
|
DS51288C_CN 16 |
2004 Microchip Technology Inc. |

MPLAB C18“ char ”
const rom char [] .stringtable romdata 2.9.1 “#pragma sectiontype”
“hello” .stringtable :
strcmppgm2ram (Foo, «hello»);
strcpy
/*
* Copy string s2 in data memory to string s1 in data memory */
char *strcpy (auto char *s1, auto const char *s2);
/*
*Copy string s2 in program memory to string s1 in data
*memory
*/
char *strcpypgm2ram (auto char *s1, auto const rom char *s2);
/*
*Copy string s2 in data memory to string s1 in program
*memory
*/
rom char *strcpyram2pgm (auto rom char *s1, auto const char *s2);
/*
*Copy string s2 in program memory to string s1 in program
*memory
*/
rom char *strcpypgm2pgm (auto rom char *s1,
auto const rom char *s2);
MPLAB C18 :
rom const char table[][20] = { «string 1», «string 2», «string 3», «string 4» };
rom const char *rom table2[] = { «string 1», «string 2»,
«string 3», «string 4» };
table 2080 table2 *rom table2
9 4 table29*4+4*2 = 44 table2 table
MPLAB C18
|
2004 Microchip Technology Inc. |
DS51288C_CN 17 |

MPLAB® C18 C
void str2ram(static char *dest, static char rom *src)
{
while ((*dest++ = *src++) != »)
;
}
PICmicro C
PIC18C452 USART putsUSART(const char *str)
USART
rom char mystring[] = «Send me to the USART»;
void foo( void )
{
char strbuffer[21];
str2ram (strbuffer, mystring); putsUSART (strbuffer);
}
/*
*The only changes required to the library routine are to
*change the name so the new routine does not conflict with
*the original routine and to add the rom qualifier to the
*parameter.
*/
void putsUSART_rom( static const rom char *data )
{
/* Send characters up to the null */ do
{
while (BusyUSART())
;
/* Write a byte to the USART */ putcUSART (*data);
} while (*data++);
}
|
DS51288C_CN 18 |
2004 Microchip Technology Inc. |

MPLAB C18
struct { member-list };
union foo
{
struct
{
int a; int b;
};
char c; } bar; char c;
…
bar.a = c; /* ‘a’ is a member of the anonymous structure located inside ‘bar’ */
union foo
{
struct
{
int a; int b;
} f, *ptr; char c;
} bar; char c:
|
… |
|||
|
bar.a = c; |
/* |
error |
*/ |
|
bar.ptr->a = c; /* |
ok */ |
bar.a
|
2004 Microchip Technology Inc. |
DS51288C_CN 19 |

MPLAB® C18 C
MPLAB C18 MPASM_asm _endasm
[label:] [<instruction> [arg1[, arg2[, arg3]]]]
MPASM
•C C++
•/
—TBLRD
—TBLRDPOSTDEC
—TBLRDPOSTINC
—TBLRDPREINC
—TBLWT
—TBLWTPOSTDEC
—TBLWTPOSTINC
—TBLWTPREINC
•—
•C MPASM0x1234 H’1234’
•[]— CLRF 2,0 CLRF [2]
_asm
/* User assembly code */
MOVLW 10 // Move decimal 10 to count MOVWF count, 0
/* Loop until count is 0 */ start:
DECFSZ count, 1, 0 GOTO done
BRA start done:
_endasm
MPASM MPLINKC
|
DS51288C_CN 20 |
2004 Microchip Technology Inc. |

2.9PRAGMA
2.9.1#pragma sectiontype
pragma MPLAB C18
—code –
—romdata –
—udata–
—idata–
pragma =address SECTION
# pragma udata [ ] [section-name [=address]]
|
| # pragma idata [ |
] [section-name [=address]] |
|||
|
| |
# |
pragma |
romdata |
[overlay] [section-name [=address]] |
|
| |
# |
pragma |
code [overlay] [section-name [=address]] |
|
access | overlay
section-name C
address
|
2004 Microchip Technology Inc. |
DS51288C_CN 21 |

MPLAB® C18 C
code romdata
rom romdataMPASM™ User’s Guide with MPLINK™ and
MPLIB™ (DS33014) MPLINK linker udataidata
2-6
rom int ri;
rom char rc = ‘A’;
int ui; char uc;
int ii = 0; char ic = ‘A’;
void foobar (void)
{
static rom int foobar_ri; static rom char foobar_rc = ‘Z’;
…
}
void foo (void)
{
static int foo_ui; static char foo_uc;
…
}
void bar (void)
{
static int bar_ii = 5; static char bar_ic = ‘Z’;
…
}
|
DS51288C_CN 22 |
2004 Microchip Technology Inc. |

|
2-6 |
||
|
ri |
romdata |
|
|
rc |
romdata |
|
|
foobar_ri |
romdata |
|
|
foobar_rc |
romdata |
|
|
ui |
udata |
|
|
uc |
udata |
|
|
foo_ui |
udata |
|
|
foo_uc |
udata |
|
|
ii |
idata |
|
|
ic |
idata |
|
|
bar_ii |
idata |
|
|
bar_ic |
idata |
|
|
foo |
code |
|
|
bar |
code |
|
|
foobar |
code |
MPLAB C18 2-7
|
2-7 |
||
|
code |
.code_filename |
|
|
romdata |
.romdata_filename |
|
|
udata |
.udata_filename |
|
|
idata |
.idata_filename |
filename
“mcc18 foo.c -fo=foo.o”
“.code_foo.o”
MPLAB C18 D.1“ ”
|
2004 Microchip Technology Inc. |
DS51288C_CN 23 |

MPLAB® C18 C
pragma
/*
*The following statement changes the current code
*section to the absolute section high_vector
*/
#pragma code high_vector=0x08
…
/*
*The following statement returns to the default code
*section
*/
#pragma code
…
MPLAB C18 RAM RAM -Oa+
1.2.5 “ ”-Oa+ #pragma idata [access] name
name RAM RAM
access
#pragma idata [access] name
i u
int i = 5; int u;
void main(void)
{
…
}
far 2.4 “ ”
near 2.4 “ ”near far
-Oa+
|
DS51288C_CN 24 |
2004 Microchip Technology Inc. |
![]()
#pragma sectiontype — access overlay
2.9.1.4.1access
accessPICmicro® 18C DS39500A_CN
access ACCESSBANK
access near
#pragma udata access my_access
/* all accesses to these will be unbanked */ near unsigned char av1, av2;
2.9.1.4.2overlay
overlay overlay access
3.access access
4. 具有overlay overlay
file1.c:
#pragma code overlay my_overlay_scn=0x1000 void f (void)
{
…
}
file2.c:
#pragma code overlay my_overlay_scn=0x1000 void g (void)
{
…
}
|
2004 Microchip Technology Inc. |
DS51288C_CN 25 |

MPLAB® C18 C
overlay overlay file1.c:
#pragma udata overlay my_overlay_data=0x1fc
/* 2 bytes will be located at 0x1fc and 0x1fe */ int int_var1, int_var2;
file2.c:
#pragma udata overlay my_overlay_data=0x1fc /* 4 bytes will be located at 0x1fc */
long long_var;
MPASM™ User’s Guide with MPLINK™ and MPLIB™ (DS33014)
#pragma code#pragma code
#pragma code my_code=0x2000
my_code 0x2000
以用链接器描述文件中的SECTIONmy_code1 page1
SECTION NAME=my_code1 ROM=page1
MPLAB C18
udata
0x120
#pragma udata my_new_data_section=0x120
romromdata
#pragma romdata const_table
const rom char my_const_array[10] = {0, 1, 2, 3, 4, 5, 6, 7, 8, 9};
/* Resume allocation of romdata into the default section */ #pragma romdata
romdata udata idata SECTIONudata my_datagpr1
SECTION NAME=my_data RAM=gpr1
|
DS51288C_CN 26 |
2004 Microchip Technology Inc. |

2.9.2#pragma interruptlow fname / #pragma interrupt fname
interrupt pragma interruptlow pragma
WREG BSR
STATUS “ ”“ ”MOVFF WREG MOVWF MOVF
10
C pragmafname_tmp udata
void foo(void);
…
#pragma interrupt foo void foo(void)
{
/* perform interrupt function here */
}
foo udata foo_tmp
|
2004 Microchip Technology Inc. |
DS51288C_CN 27 |

MPLAB® C18 C
# pragma interrupt function-name
[tmp-section-name][save=save-list]
| # pragma interruptlow function-name
[tmp-section-name][save=save-list]
save-list:
save-specifier
| save-list, save-specifier save-specifier:
symbol-name
| section(«section-name«)
function-name C — C tmp-section-name C — symbol-name C —
section-name C. —
MPLAB C18 Cvolatile
CRETFIE RETURNRETFIE WREG BSR STATUS
|
DS51288C_CN 28 |
2004 Microchip Technology Inc. |

MPLAB C18 GOTO
#include <p18cxxx.h>
void low_isr(void); void high_isr(void);
/*
*For PIC18 devices the low interrupt vector is found at
*00000018h. The following code will branch to the
*low_interrupt_service_routine function to handle
*interrupts that occur at the low vector.
*/
#pragma code low_vector=0x18
void interrupt_at_low_vector(void)
{
_asm GOTO low_isr _endasm
}
#pragma code /* return to the default code section */
#pragma interruptlow low_isr void low_isr (void)
{
/* … */
}
/*
*For PIC18 devices the high interrupt vector is found at
*00000008h. The following code will branch to the
*high_interrupt_service_routine function to handle
*interrupts that occur at the high vector.
*/
#pragma code high_vector=0x08
void interrupt_at_high_vector(void)
{
_asm GOTO high_isr _endasm
}
#pragma code /* return to the default code section */
#pragma interrupt high_isr void high_isr (void)
{
/* … */
}
5 “ ”
|
2004 Microchip Technology Inc. |
DS51288C_CN 29 |

MPLAB® C18 C
MPLAB C18 3.4 “ ” save=
myint pragma
#pragma interrupt high_interrupt_service_routine save=myint
save= mydatapragma
#pragma interrupt high_interrupt_service_routine save=section(«mydata»)
.tmpdata pragma save=section(«.tmpdata»)
#pragma interrupt high_interrupt_service_routine save=section(«.tmpdata»)
save=
32pragma save=
3.2.1 “ ”
16 pragmasave=PROD PROD
#pragma interruptlow low_interrupt_service_routine save=PROD
24 32pragma save=section(«MATH_DATA»)
MATH_DATA
#pragma interrupt high_interrupt_service_routine save=section(«MATH_DATA»)
save=PROD .tmpdata myint mydatapragma save=PROD, section («.tmpdata»), myint, section («mydata»)
#pragma interrupt isr save=PROD, section(«.tmpdata»), myint, section(«mydata»)
|
DS51288C_CN 30 |
2004 Microchip Technology Inc. |
 Loading…

Configuring MPLAB and C18 Compiler,Setting up your first Project
Mplab Ide Installation
C18 Compiler Toolsuite Inslallation
Toolsuite Settings and creating a new project
Library and Path settings
Introduction
Configuring MPLAB with C18 compiler and setting your first project requires some basic set of things which need to be kept in mind all the time while you carry on to avoid un necessary pain. In my previous pic18f4550 programming post we got a quick preliminary description about Programming a Microcontroller. I am assuming that you have already downloaded the tools from, microchip (MPLAB IDE and C18) Compiler from the links provided from the previous post.
If installation for Mplab and C18 Compiler went well for you then, you can quickly skip this part of tutorial and go on the next part with for coding your pic18f4550 microcontroller. PIC18F4550 Blinking LED Method — 1.
Next stage would be to install the weapons, (tools) that we downloaded in our previous post for the war to be won. Snapshot below describes the steps of installation, Configuration of C18 Compiler, creating project and Setting up compiler, library and directories on windows XP OS. Installation and settings won’t be much of a different taste for other Windows OS as well.
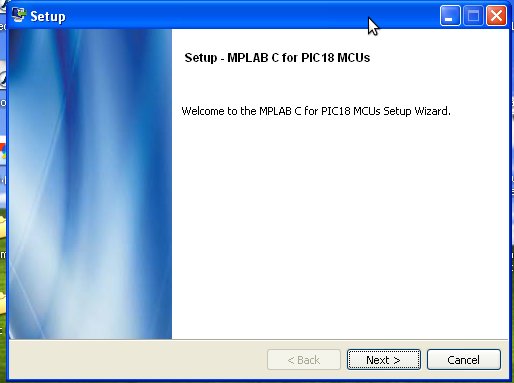
MPLAB Installation
First Install the MPLAB IDE from the setup file you downloaded.
All the system files for MPLAB IDE would be installed in
C:Program FilesMicrochipMPLAB IDE
All the core files are located in
C:Program FilesMicrochipMPLAB IDECore
Incase if in future you loose the shortcut then you can start mplab from
C:Program FilesMicrochipMPLAB IDECoreMPLAB.exe
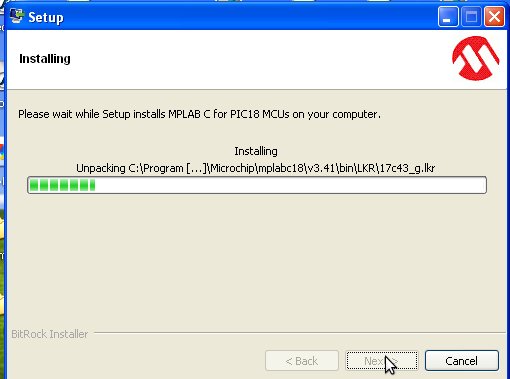
C18 Compiler Toolsuite Installation
All right that enough of MPLAB IDE. Let’s gets go on to C18 compiler now. The lite version of c18 Compiler that we are installing here is version v3.41.
Next you have to run the C18 Compiler setup for installation. The C18 compiler will detect the MPLAB and will install accordingly.
After Installation of C18 Compiler, all the necessary compiler files, Headers, Linker and few Example coding will be installed in following directory.
C:Program FilesMicrochipmplabc18
You can review short example programs
C:Program FilesMicrochipmplabc18v3.41example
Microchip always documents its releases very nicely. Quick getting started documents can be found in
C:Program FilesMicrochipmplabc18v3.41docMPLAB-C18-Getting-Started_51295f.pdf
A personal recommendation. Don’t delete the Setup files after installation. You might need it someday in future just in case if you have to reinstall everything from beginning.
After installation of Mplab and C18, next step is to create a new project from Project Wizard. All the coding would be handled as individual projects which would contain various the blocks of code interconnected.
For demo purpose we are going to create a Dummy project to understand the project setting. First create a new folder in your desktop or on your desired location manually. In our tutorial I have created a folder on Desktop “Project1”. All the project files will be stored here; don’t forget the location where you created your project folder.
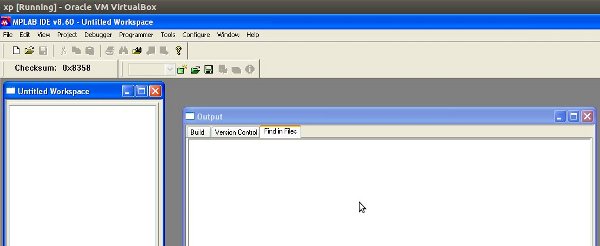
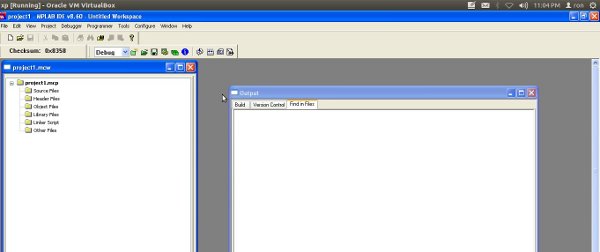
So First start MPLAB IDE, which would start blank as an “Untitled Workspace”.
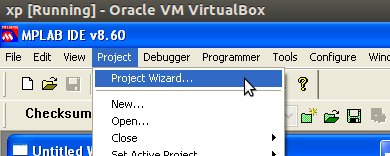
Project Wizard
Create a new project by proceeding through project wizard from top file menus that would help you to setup the setting for your first new project. Project wizard would give you options to select your microcontroller which you intent to code and also it will load the necessary tool suite that you need for project.
Project Wizard
Select the microcontroller from the drop down list menu, which in our case is PIC18F4550.

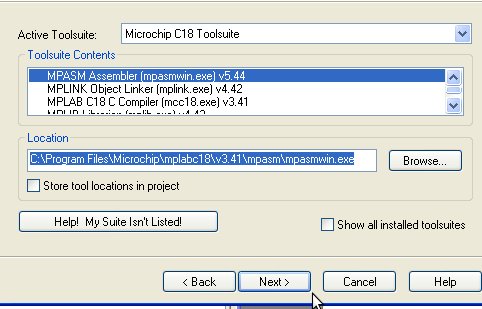
ToolSuite Selection
Next step would be to select the Toolsuite.
In our case we are going to use C18 Compiler Toolsuite, so while creating the project from project wizard when it prompts, select C18 Toolsuite from the top drop down menu.
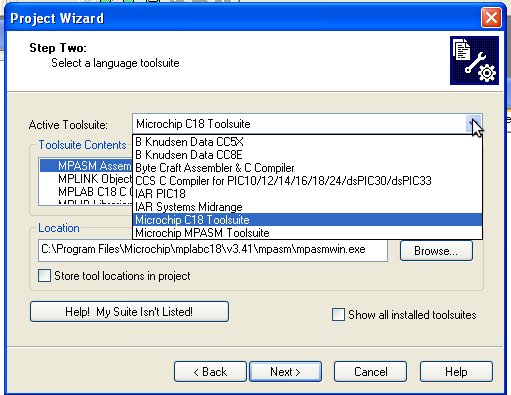
From Drop down menu select Microchip C18 Toolsuite
Most of the time the default would be Microchip C18 Toolsuite if you haven’t installed any other Tool suite.
Select the Microchip C18 Toolsuite from Active Tool suite drop down menu and go on to next settings with defaults.
Next step is to give a name to your project, hit browse and Navigate to the location where you created a folder in the beginning of this session. The folder which was created in the beginning was named as project1 for this tutorial. Navigate to the folder that you created.

Navigate inside the folder and then name the new Project. And then click next.
In the next screen Mplab would prompt you to add some files to your project. This prompt would help you to add already coded files. Since we don’t have anything yet coded for our pic18f4550 so proceed with next button leaving things untouched.
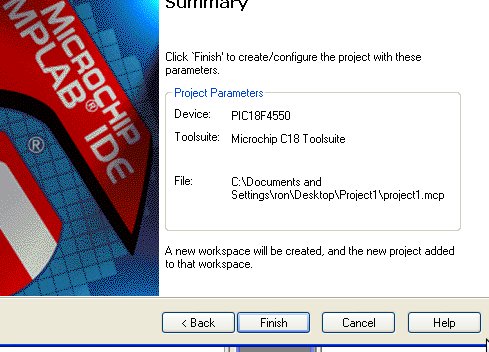
When everything is done mplab would display Project Summary with all project parameters such as Device name, Toolsuite and location of the project. Hit finish.
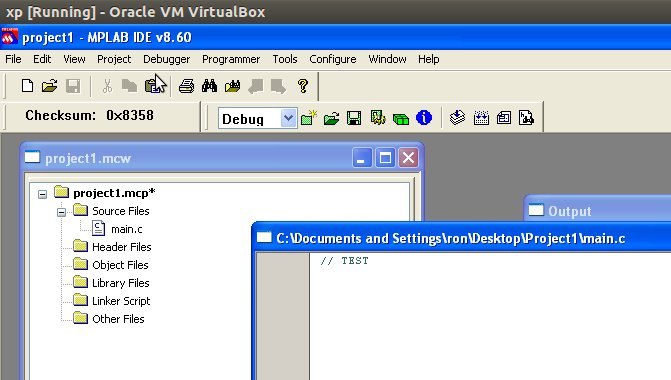
Your project settings are now ready. Created project can be viewed in the same folder where you saved your project few seconds ago. The main project file would be yourprojectname.mcp ( the name which you gave to the project while creating the project inside the folder where you saved ). You can always launch the entire project with your project name. For this tutorial its been named as project1.mcp inside the main project folder project1.
-
Project1 (project Folder)
- Project1.mcp (Project name)
The Project which is created now would be blank without any coding.
Adding a new C File
Now since we have created a project, now we have to add C files for writing our code.
Create a new file by either clicking on File > New or click on New File icon.

That would create a new untitled file. Write some dummy string and then hit save. Name the file while saving it. In our case we would name it as main.c.
NOTE:* While saving the file, remember to check the box. “Add this file to project” or the file saved will not be added to the project workspace and the main.c will be missing from project file explorer.
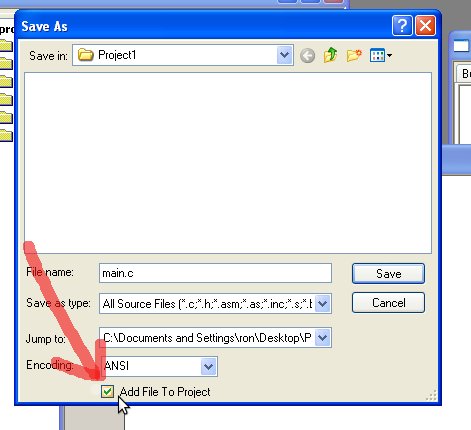
The new added C file would be enlisted in the project explorer Under “Source Files”. Now we have successfully added a C file for writing the codes.
Directory and Compiler library setting
You can review the build (Compile) setting for your Project under the menu
Project > Built Options > Project
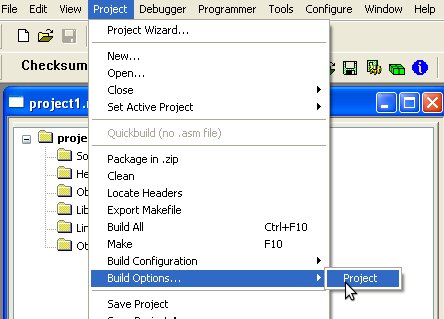
Built options
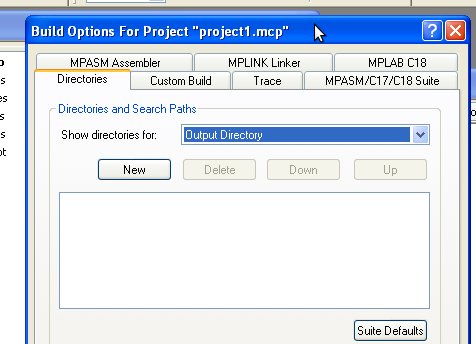
By default when the Microchip C18 Toolsuite was chosen from project wizard, it added the directory paths for the links and library setting for the project, which includes the links to the linker files for linking and other necessary libraries. Just in case if the library settings are not set then you can review the setting under the Directory Search Paths.
From drop down menu under the Directories select Library Search Path.
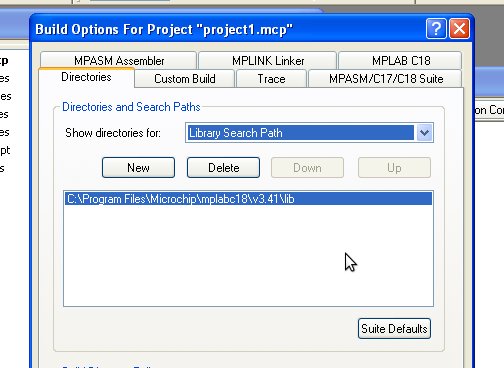
After selecting the Library Search Path, if you find it empty then you can add the path manually.
C:Program FilesMicrochipmplabc18v3.41lib
Output Path Setting
By default if you don ’t choose an output folder then all files created during the compilation of the program would be directly dumped into the main project folder (Project1 folder) where you created the project. That would make things looks messy after you compile, and you would find some extra files that compiler generated during compilation.
To avoid that it’s recommended to add a separate output folder. So that compiler would dump all the files into the Output folder including your .hex file which is your final outcome before burning it into the microcontroller.
- Create a new Folder inside the main Project folder and name it as output.
- Open the Directory Setting in the project Built Option
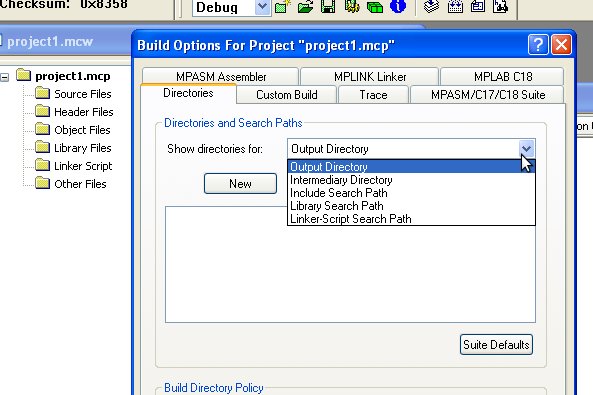
- Select the option from drop down as “Output Directory”

- Hit the browse icon and locate the main project1 folder and then select the folder you just created with name “Output” and then apply settings.
Henceforth whenever you would compile any project all the runtime files and output hex files would be dumped in the output folder. That would make life easy in future.
Hence now we are completely set with MPLAB IDE, compiler and Project settings .. So lets carry on with our first setting on real time coding with hardware c.
Blinking a led – Method 1
Previous Next
The following section will provide a basic tutorial for using the Microchip C18 compiler with MPLAB. The tutorial is based on the PIC18F4620 microcontroller, but will work for any other PIC18F device.
Creating a New Project
Before you can start writing code for the PIC Microcontroller, you have to create a project folder manually (e.g. c:Tutorial). Once you have created folder, follow these steps:
- Start MPLAB (v8.83)
- Select Project → Project Wizard
- Click Next
- Select PIC18F4620 and click Next
- Select Microchip C18 Toolsuite under the Active Toolsuite dropdown box
- Select MPLAB C18 C Compiler (mcc18.exe) under the Toolsuite Contents dropdown box and click Next
- Click Browse under the Create New Project File
- Select the folder where you want to create the project (e.g. c:Tutorial)
- Type the name of the project and try to keep the name of the project the same as the folder name to prevent confusion (e.g.
Tutorial in this case). The project file will now have a .mcp extension. - Click Save.
- Click Next
- Click Next
- Click Finish
A project view of your project should appear in the top-left corner (Source Files, Header Files, etc.). Now you are ready to create a new source file
- Click File → New
- Click File → Save As
- Select your project folder (e.g. c:Tutorial) (make sure you change to the correct folder) and type the name of your source file PLUS the .c extension (e.g. flashleds.c). Do not forget to add the .c after the filename, otherwise it will simply been see as a text file and will not compile. The name of the source file does not have to be the same as the project.
- Click Save
The new source file is now created and needs to be added to the project
- Right-click on Source Files and select Add Files
- Select the source file you just created (flashleds.c) and click Open
The programming device must now be selected to program the source file onto the PIC
- Select Programmer ® Select Programmer ® MPLAB ICD2
An output view window should open now which gives feedback about the compiling and programming process.
At this stage all the windows can be rearranged to fit your needs. T he next time you open the project, the windows will stay in these positions.
Writing C Code, Compiling and Programming
In the flashleds.c window, type the following program to make 8 LEDs connected to PORTD flash at a rate of 250ms:
#include <p18f4620.h>
#include <delays.h>
void main(void)
{
TRISD = 0x00;
while(1)
{
PORTD = 0xFF;
Delay10KTCYx(250);
PORTD = 0x00;
Delay10KTCYx(250);
}
}
To compile the source file, select Project → Make (or just press F10). The output window should now indicate if it compiled successful (“BUILD SUCCEEDED”) or not (“BUILD FAILED”). If there are any errors, fix them first before trying to program the PIC Microcontroller.
Before we can use the PIC18F4620 for our project, we need to indicate what the configuration bits for the device should be (this only needs to be done once).
- Select Configure → Configuration Bits.
- If the Configuration Bits set in code option is ticked, un-tick it.
- You should not be able to select the configuration for each of the configuration bits by clicking in the Settings field. Select the following configurations:
OSC — HS Oscillator, PLL enabled
PWRT — PWRT enabled
WDT — WDT disabled
- Close the Configuration Bits window
- Re-compile the code again (F10).
The above method could be simplified by making use of a user defined Config.h library file (in the Example programs – Libraries section) which must be copied into the project folder. Change the source code to:
#include <p18f4620.h>
#include <delays.h>
#include «Config.h» // *** ADD THIS LINE ***
void main(void)
{
TRISD = 0x00;
while(1)
{
PORTD = 0xFF;
Delay10KTCYx(250);
PORTD = 0x00;
Delay10KTCYx(250);
}
}
and then tick the Configuration Bits set in code option in the Configuration Bits window. Now all the configuration bits will be set to the settings as described in the Config.h file.
Once the code is compiled and the configuration bits are set, the source code can be programmed onto the PIC Microcontroller.
- Select Programmer → Program. This will download the source code to the PIC.
- Select Programmer → Release from Reset to run the code on the PIC Microcontroller.
- Select Programmer → Hold in Reset to stop the code on the PIC Microcontroller and keep it in the reset state.
- There are also short-cut buttons at the top-right corner to program, run, and stop the PIC Microcontroller.
- The code will automatically run when the programmer is removed from the programming (ICSP or RJ-12) port.
Loading an Existing Project
To load an existing project (or a Workspace as it is called in MPLAB), you can:
- Start MPLAB (v8.83)
- Select the .mcp file in your project folder and click Open
OR
- In windows explorer, go to the project folder
- Double-click on the project file (e.g. Tutorial.mcp)
The workspace should open exactly the same way it was when you closed it the previous time.
Adding a New Source File to the Project
If you want to create a new source file for the project, or compile an older source file that you have already created, do the following:
- Remove the previous source file by right-clicking on it in the project window and selecting Remove
- Right-click on Source Files and select Add Files
- Select the new source file and click Open
This is also the method that you will ise to load the example programs.
Программирование
PIC-микроконтроллеров
на
языке Си
Лабораторная
работа № 1
Программирование
на языке Си в среде MPLAB
IDE
1.
Цель работы
Изучить
основы разработки и отладки программ
на языке Си для микроконтроллеров
семейства PIC18 с помощью интегрированной
среды программирования MPLAB IDE.
2.
Основные теоретические сведения
2.1.
Средства для программирования в MPLAB
IDE
2.1.1.
Си компилятор MPLAB
C18.
Это кросс-компилятор, работающий на
персональном компьютере и генерирующий
код, который может выполняться на
микроконтроллерах фирмы Microchip
семейства PIC18.
Как и ассемблер, MPLAB
C18
компилятор переводит понятные и привычные
для человека предложения в набор кодов
из нулей и единиц для выполнения
микроконтроллером. Однако, в отличие
от ассемблера, компилятор не выполняет
буквальный перевод мнемоник команд в
машинные коды.
MPLAB
C18
читает стандартные для языка ANSI
C
выражения, такие как “if
( x
== y
)” или “temp
= 0x27”,
и преобразует их в машинные коды для
микроконтроллеров
семейства
PIC18.
Компилятор проявляет при этом значительный
«интеллект». Он может оптимизировать
код, используя подпрограммы, которые
будут использоваться многими функциями.
Он может перегруппировать коды исходной
программы, исключить при этом коды,
которые не будут исполняться, использовать
одинаковые фрагменты кодов в различных
функциях, может определить данные и
регистры, которые используются не
эффективно, и оптимизировать их работу.
Текст
исходной программы использует стандартную
для языка ANSI
C
нотацию. Исходный текст компилируется
в блоки кодов программ и данных, которые
компонуются с другими блоками и затем
размещаются в различных областях памяти
микроконтроллера PIC18.
Этот процесс называется
build (построение),
и очень часто выполняется многократно
в ходе разработки программы, при котором
код пишется, тестируется и отлаживается.
MPLAB
C18
компилятор и связанные с ним программные
средства, такие как линкер (компоновщик)
и ассемблер, могут запускаться из
командной строки, а могут использоваться
в интегрированной среде разработки
MPLAB
IDE.
При этом графический интерфейс
пользователя служит единственной средой
для написания, компилирования и отладки
программ.
Окна
диалогов MPLAB
IDE
и менеджер проектов управляют всеми
деталями компилирования, ассемблирования
и компоновки, позволяя сосредоточить
все внимание на процесс написания и
отладки программ.
MPLAB
C18
компилятор делает разработку программ
для микроконтроллерных устройств
намного удобнее, так как он использует
стандартный язык Си. Кроме того, компилятор
MPLAB
C18
способен генерировать исключительно
эффективный код для микроконтроллеров
семейства PIC18.
Использование
языка Си имеет следующие преимущества
над программированием на Ассемблере:
-
глубокого
знания системы команд микроконтроллера
не требуется, элементарное знание
архитектуры желательно -
распределение
регистров и способы адресации управляются
полностью компилятором -
лучшая
читаемость программы, используются
ключевые слова и выражения, которые
более свойственны человеческой мысли -
время
разработки программ и их отладки
значительно короче в сравнении с
программированием на Ассемблере -
библиотечные
файлы содержат много стандартных
подпрограмм, которые могут быть включены
в прикладную программу.
2.1.2.
MPASM
кросс-ассемблер и MPLINK
линкер. Очень часто кросс-ассемблер
используется при написании текста
программы в проекте. MPASM
является компонентом MPLAB
IDE
и он работает вместе с линкером MPLINK,
чтобы скомпоновать ассемблерные секции
кода с секциями, сформированными
компилятором MPLAB
C18.
Язык
Ассемблера часто используется для
небольших модулей программы, которые
должны выполняться с максимальной
скоростью или за строго определенное
время.
Проектами
в MPLAB
IDE
принято называть группу файлов,
необходимых для работы различных
инструментальных средств среды
разработки, например, такими как MPLAB
C18.
Проект состоит из исходных файлов,
написанных на языке Ассемблер или Си,
заголовочных, объектных и библиотечных
файлов и файла сценария линкера. Каждый
проект должен иметь один или больше
исходных файлов и один файл сценария
линкера.
Обычно,
по крайней мере, требуется хотя бы один
заголовочный файл для идентификации
регистров целевого микроконтроллера.
Заголовочные файлы обычно включаются
в исходные файлы и поэтому специально
не добавляются в проект.
Выходные
файлы проекта включают HEX-файл
(файл с расширением *.hex),
который может быть записан в память
микроконтроллера с помощью программатора,
а также используется симулятором MPLAB
SIM
для проверки работы программы на
компьютере. Дополнительные отладочные
файлы с расширениями *.cof
и *.map
используются MPLAB
IDE
для корреляции имен переменных и функций
из исходных файлов с исполняемыми кодами
и областями памяти микроконтроллера.
В
данной лабораторной работе проекты
будут состоять только из одного исходного
файла и файла сценария линкера.
3. Порядок выполнения работы
При
первоначальном ознакомлении с
интегрированной средой разработки
обычно используется метод “Quick
start
– быстрый старт”. Цель его состоит в
том, чтобы, не углубляясь в подробности,
дать новичку первое представление о
программном средстве, дать возможность
быстро получить конкретный результат.
Рассмотрим
основные особенности программы на языке
Си с использованием компилятора MPLAB
C18.
В качестве микроконтроллера выберем
PIC18F242
с тремя портами ввода/вывода, которые
обозначаются: PORTA,
PORTB,
PORTC.
Программа будет просто увеличивать
число на 1 и выводить его в порт В.
/*******************************************
primer1.c
– пример программы на Си для PIC18
****************************************************/
#include<p18f242.h>
#pragma
config
WDT = OFF, OSC = HS
unsigned
char
counter; // переменная
counter – беззнаковое
//
однобайтное
целое
число
void
main(void)
// здесь начинается главная программа
{
unsigned
char
counter; // переменная
counter – беззнаковое
//
однобайтное
целое
число
PORTB
= 0;
//
очистить регистр данных порта В
TRISB
= 0;
// настроить все линии порта В на вывод
counter
= 1;
// инициализировать counter
значением 1
while(
1 )
{
PORTB
= counter;
// поместить значение counter
в порт В
counter
= counter + 1; // увеличить
counter
}
}
Рассмотрим
основные составляющие программы на
языке Си.
Комментарии.
Это некоторый поясняющий текст, который
при компиляции не учитывается. Комментарии
бывают двух видов:
-
многострочные
(начинаются с комбинации символов /*
и заканчиваются символами */ ); -
однострочные
(начинаются с комбинации символов //
до конца строки).
Препроцессор.
При транслировании программ на языке
Си текст сначала обрабатывает специальная
программа – препроцессор. Затем
измененный препроцессором текст
обрабатывается компилятором. Препроцессор
обрабатывает так называемые директивы
препроцессора, заменяя их текстом. Любая
директива начинается со знака #. Первой
директивой в рассмотренной программе
является #include<p18f242.h>,
которая вставляет содержимое заголовочного
файла с именем p18f242.h.
В нем содержатся определения и расположение
всех регистров специальных функций
микроконтроллера PIC18F242.
В общем случае файлы с расширением *.h
являются заголовочными файлами
стандартных библиотек языка Си. Вторая
директива в программе #pragma
config определяет биты
конфигурации МК. В данном случае она
отключает сторожевой таймер, чтобы он
не влиял на работу программы (WDT
= OFF), и устанавливает тип
генератора МК — высокочастотный кварцевый
(OSC = HS).
Соседние файлы в предмете [НЕСОРТИРОВАННОЕ]
- #
- #
- #
- #
- #
- #
- #
- #
- #
- #
- #