WHAT TO DO IF YOUR APPLIANCE DOES NOT WORK?
Check:
•
that it is plugged in and switched on
at the mains socket
•
the connection and fuse.
•
that the accessories are correctly
fitted on to the drive.
•
that the lids and handles are
correctly fitted.
If your appliance still does not work or if you have any product problems or queries,
please contact our Customer Relations Team first for expert help and advice:
HELPLINE:
UK 0845 602 1454
Ireland (01) 4751947
www.moulinex.co.uk
or consult our website
ACCESSORIES & REPLACEMENTS
The accessories contained with the model that you
have just bought are shown on the label that appears
on the top of the packaging.
You can buy the following accessories or replacements by mail order from our
approved Moulinex Service Centre (at the telephone number above). They are also
available on our website.
Accessories
French fries disc (disc E)
Grating disc for coconut &
parmesan (disc G)
Coarse grating disc (disc C)
Thick slicing disc (disc H)
Fine grating disc (A)
Thin slicing disc (D)
Grinder
Mini-chopper
Environment protection first!
Your appliance contains valuable materials which an be recovered or recycled.
Leave it at a local civic waste collection point.
Recipes by Glenis Noble, produced by M4 Design Company, © Groupe SEB Moulinex 06/05
•
when using the bowl assembly (B),
that the Liquidiser drive cover (A1)
is locked.
•
when using the Liquidiser, ensure
that the tab on the lid is correctly
locked under the handle
Accessories
Whisk
Plastic kneader blade
Citrus press
Liquidiser jug
Metal blade
Emulsifying disc
Juice extractor
Spatula
0 891 856
Odacio 3 Food Processor
Instructions and Recipes
Models DFC7

Фирма «Мулинекс» благодарит вас за то,
что вы предпочли ее изделие, и напомина-
ет, что ваш электроприбор предназначен
исключительно для приготовления пищи.
a
Д в и г а т е л ь
a 1
крышка верхнего отверстия
a 2
верхнее отверстие
a 3
нижнее отверстие
a 4
клавиша открытия крышки (a1) и
разблокировки приставки,
установленной на верхнем
о т в е р с т и и
a 5
электронный регулятор скоростей
1 — 5
a 6
клавиша Вкл./Выкл. и режима «Vari
Pulse» (импульсный режим)
b
Чаша в комплекте
b 1
т о л к а т е л ь — д о з а т о р
b 2
крышка приемной трубки
b 3
ч а ш а
b 3 — 1
привод
b3-2
резиновая прокладка
b3-3
гайка
b 4
съемная ручка
b 4 — 1 клавиша разблокировки ручки
c
Стержень привода
П
РИНАДЛЕЖНОСТИ (В ЗАВИСИМОСТИ ОТ МОДЕЛИ)
d
Н о ж и
d 1
металлический нож
d 2
пластмассовая мешалка
e
Ломтерезка для овощей
e 1
д и с к — д е р ж а т е л ь
e 2
4 лезвия
. мелкая терка (A)
. ломтерезка для тонких
ломтиков (D)
. крупная терка (C)
. ломтерезка для
толстых ломтиков (H)
e 3
Д и с к и
A/D: мелкая терка / ломтерезка для
тонких ломтиков
C/H: грубая терка / ломтерезка для
толстых ломтиков
E: картофелерезка
G: терка для сыра, кокосов,
шоколада, картофеля
f
М и к с е р
f 1
приводное устройство
f 2
в з б и в а л к а
g
Диск эмульгатора
h
Соковыжималка для цитрусовых
h 1
к о н у с
h 2
к о р з и н к а — ф и л ь т р
h 3
п р и в о д
i
Ч а ш а — м и к с е р
i 1
п р о б к а — д о з а т о р
i 2
к р ы ш к а
i 3
ч а ш а
i 4
съемная ручка
i 4 — 1 клавиша разблокировки ручки
j
Электрическая соковыжималка
j 1
т о л к а т е л ь
j 2
к р ы ш к а
j 3
о б о д
j 4
ф и л ь т р
j 5
держатель фильтра
k
М и н и — м я с о р у б к а
k 1
к р ы ш к а
k 2
ч а ш а
l
« М а к с и п р е с с »
l 1
п о д д о н
l 2
2 решетки
m
Д р о б и л к а
m 1 к р ы ш к а
m 2 ч а ш а
n
Блок двигателя
o
Головка мясорубки
o 1
К о р п у с
o 2
Съемный поддон
o3
Ш н е к
o 4
4-лопастный нож
o 5
Р е ш е т к и
n 5 — 1
Решетка с маленькими
отверстиями: тонкий помол
n 5 — 2
Решетка с большими
отверстиями: грубый помол
o 6
Г а й к а
o 7
Т о л к а т е л ь
p
Насадка для набивки колбас
q
Насадка для печенья
q 1
О п о р а
q 2
Ф о р м а
r
Приставка для кебаба
r 1
К о л ь ц о
r 2
Н а к о н е ч н и к
s
Л о п а т к а
t
Корзина для хранения
— Перед первым использованием при-
бора внимательно прочтите инструк-
цию: фирма «Мулинекс» не несет ни-
1 0 8
О п и с а н и е
Меры безопасности
Принадлежности к модели, кото-
рую вы приобрели, перечислены на
этикетке, расположенной наверху
упаковки.
Odacio 7131 russe.qxd 1/03/06 10:52 Page 108
Здравствуйте.
Кухонный комбайн MOULINEX Odacio 3 Duo Super Press я получила в подарок от мужа.
Хотя, я уважаю технику данной фирмы и с удовольствием пользуюсь некоторыми вещами уже много лет, этот комбайн, к сожалению, не пришёлся мне ко двору и теперь занимает место в кладовке.
Но, обо всём по-порядку.
Кухонный комбайн подразумевает многофункциональное устройство. Это и стационарный блендер,

Кухонный комбайн MOULINEX Odacio 3 Duo
и мини-измельчитель (например, орешков, чеснока или лука)
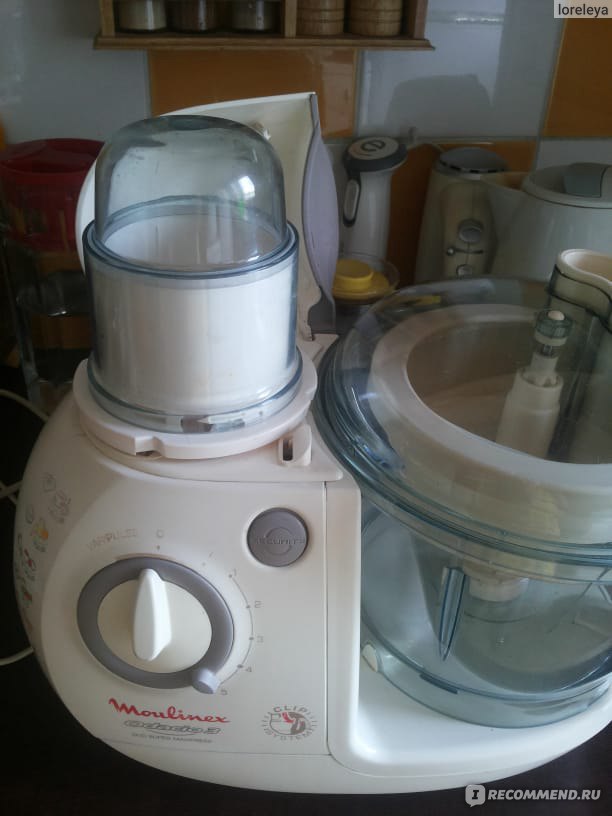
Кухонный комбайн MOULINEX Odacio 3 Duo

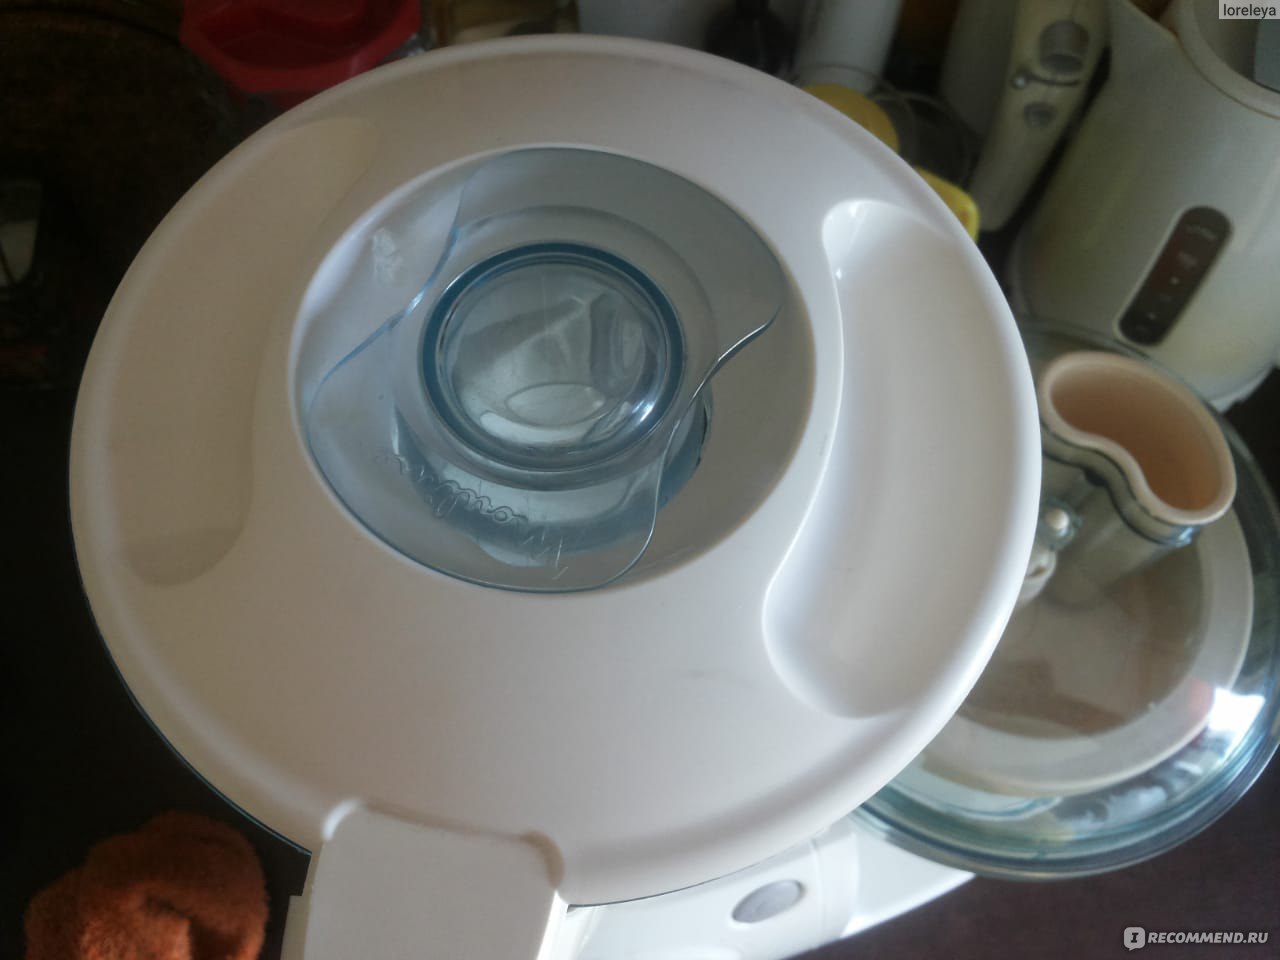
Блендер и мини-измельчитель фиксируются в гнезде пластмассовыми защёлками.
гнездо для блендера и мини-измельчителя
Пластмассовые фиксаторы — это треугольные тонкие выступы на корпусах
Чаша, к которой прилагается множество сменных насадок и можно, в зависимости от них, например, выжимать морковный сок или делать суп-пюре,

или отжимать сок из цитрусовых,
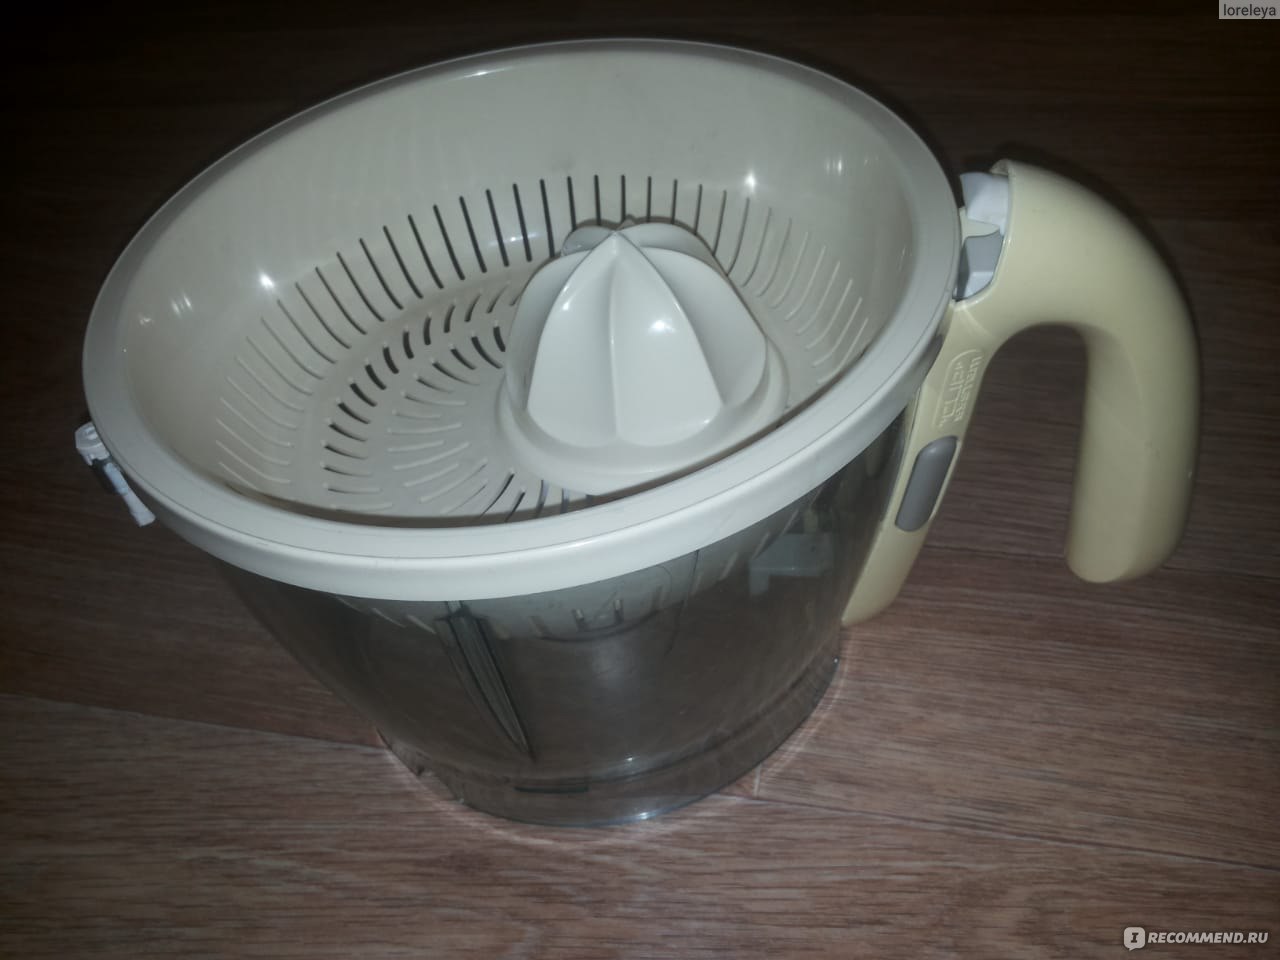
Насадка для выжимания сока из цитрусовых
взбивать яйца или замешивать тесто, насадкой, иммитирующей подобие профессионального планетарного миксера.

Насадка для взбивания а’ля «планетарный миксер»
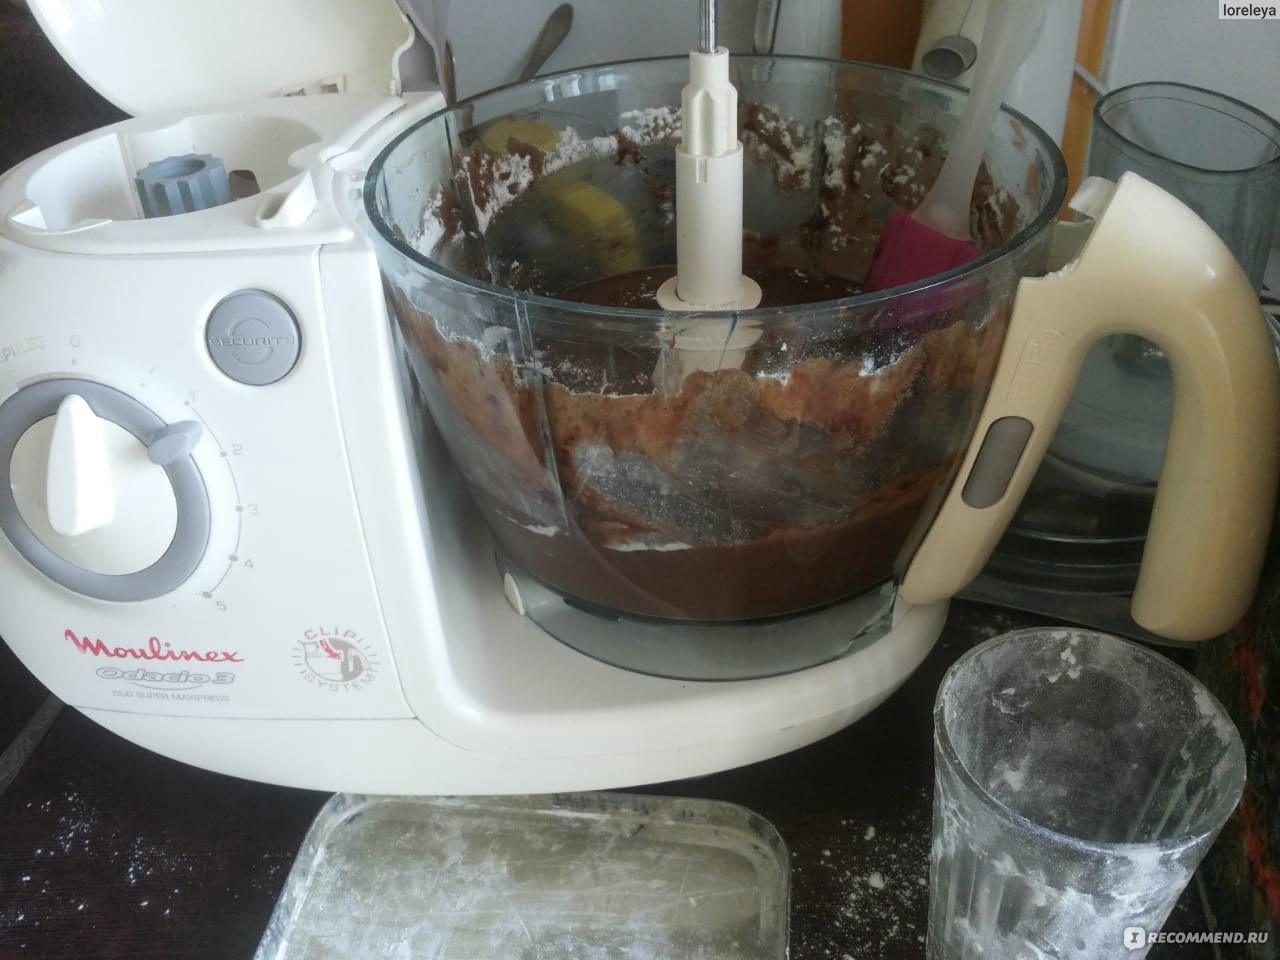
Это замешивается тесто на шоколадный пирог

Или, шинковать как на тёрке, морковь и другие продукты (картофель, капусту, кабачок, тыкву, пастернак и т.п.)
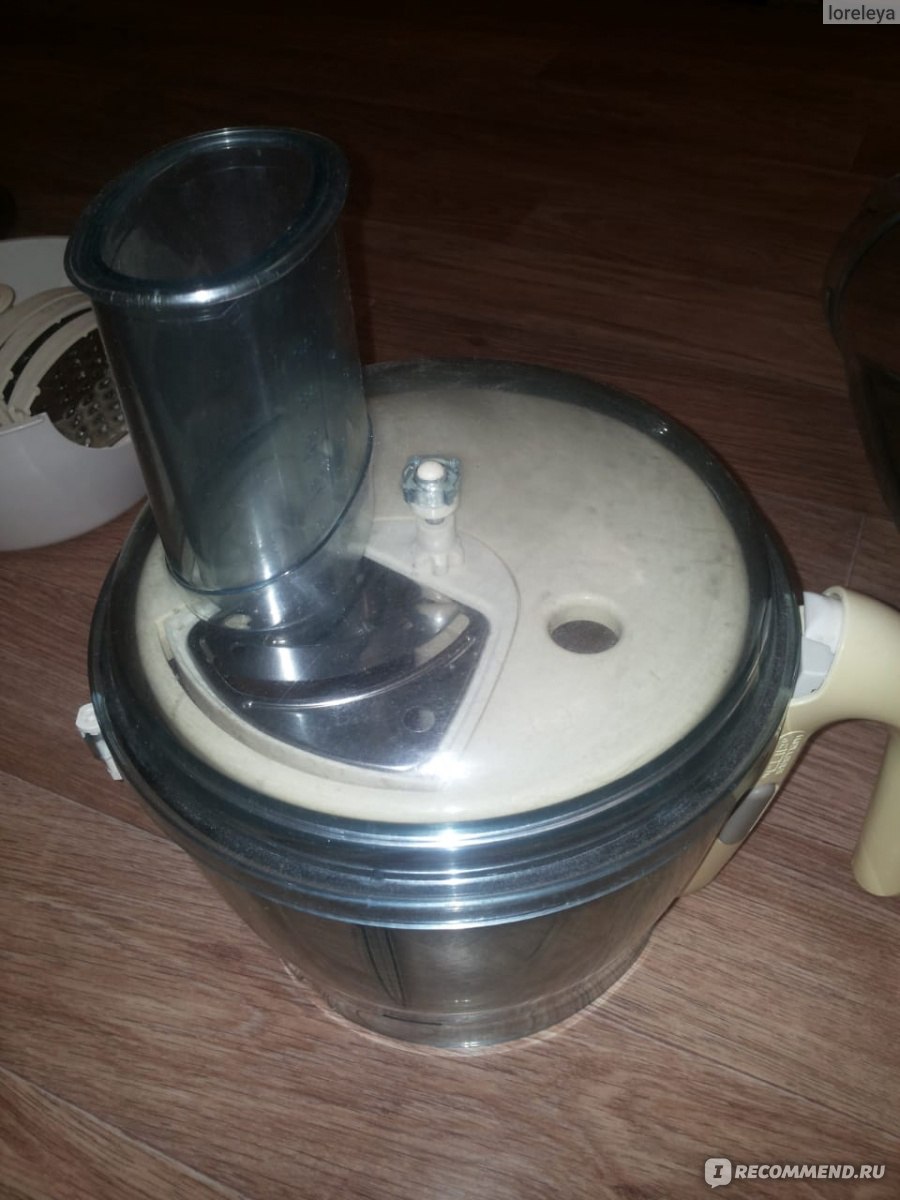
Вот так выглядит чаша, с насадкой для шинковки капусты

Толкатель и, одновременно, мерная емкость
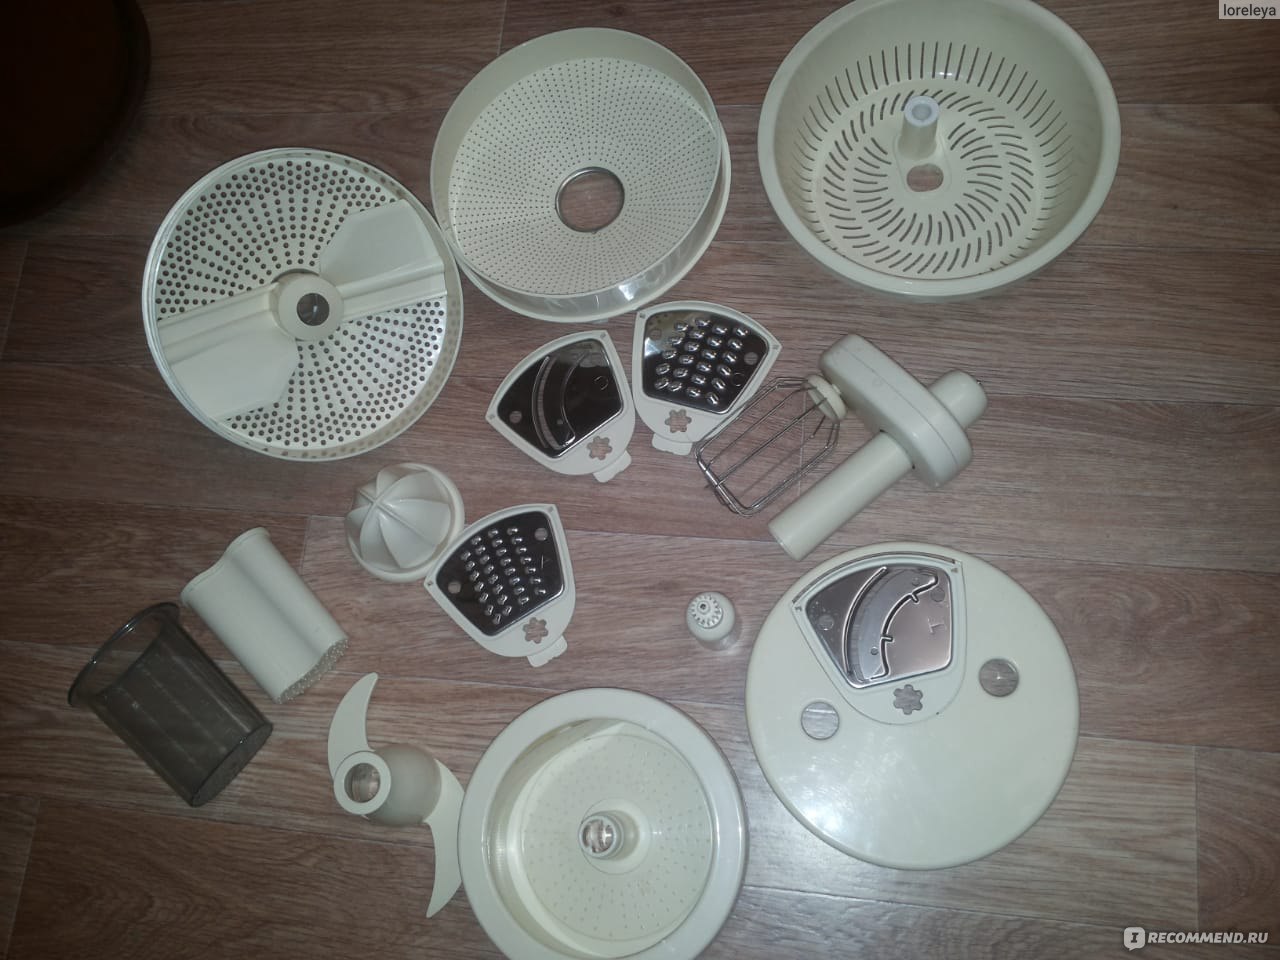
Насадки MOULINEX Odacio 3 Duo Super Press

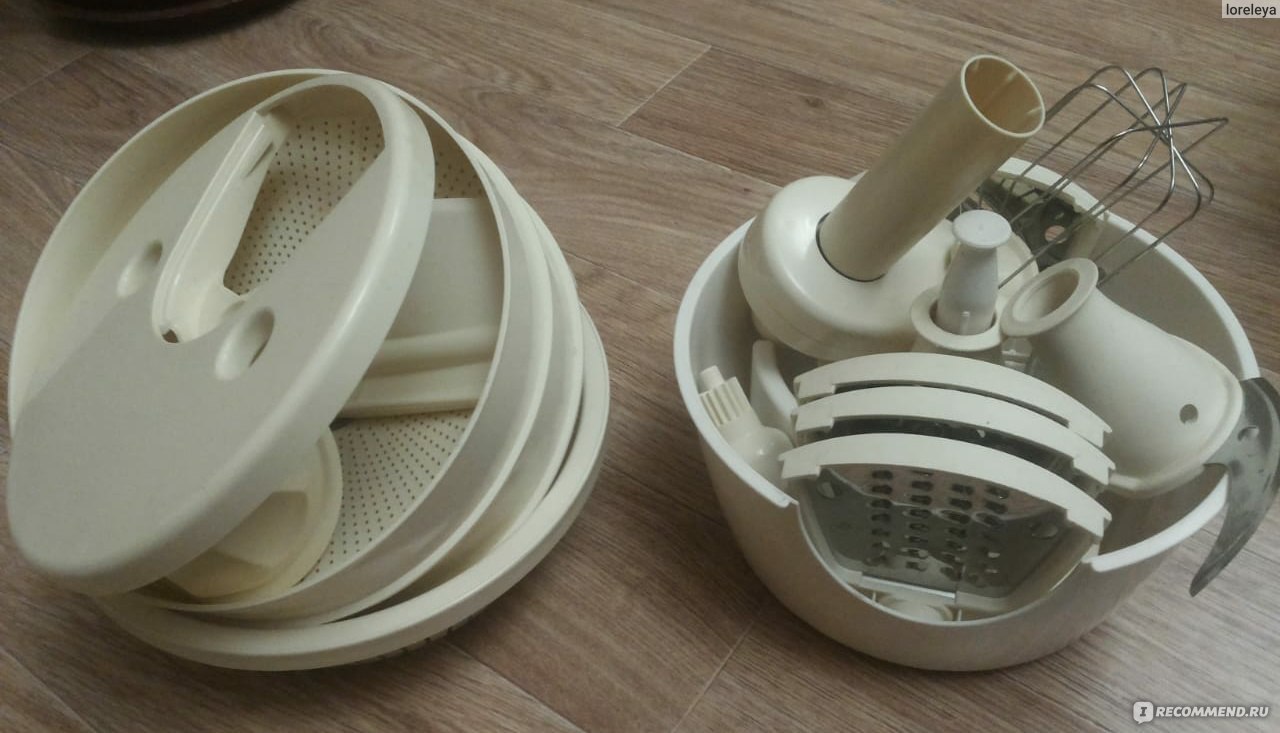
Справа — подставка для хранения некоторых сменных насадок.
Все насадки без особых усилий вставляются на свои места и вынимаются. На корпусе есть подсказки-пиктограммы, поясняющие какая что для чего предназначено.

Кухонный комбайн MOULINEX Odacio 3 Duo
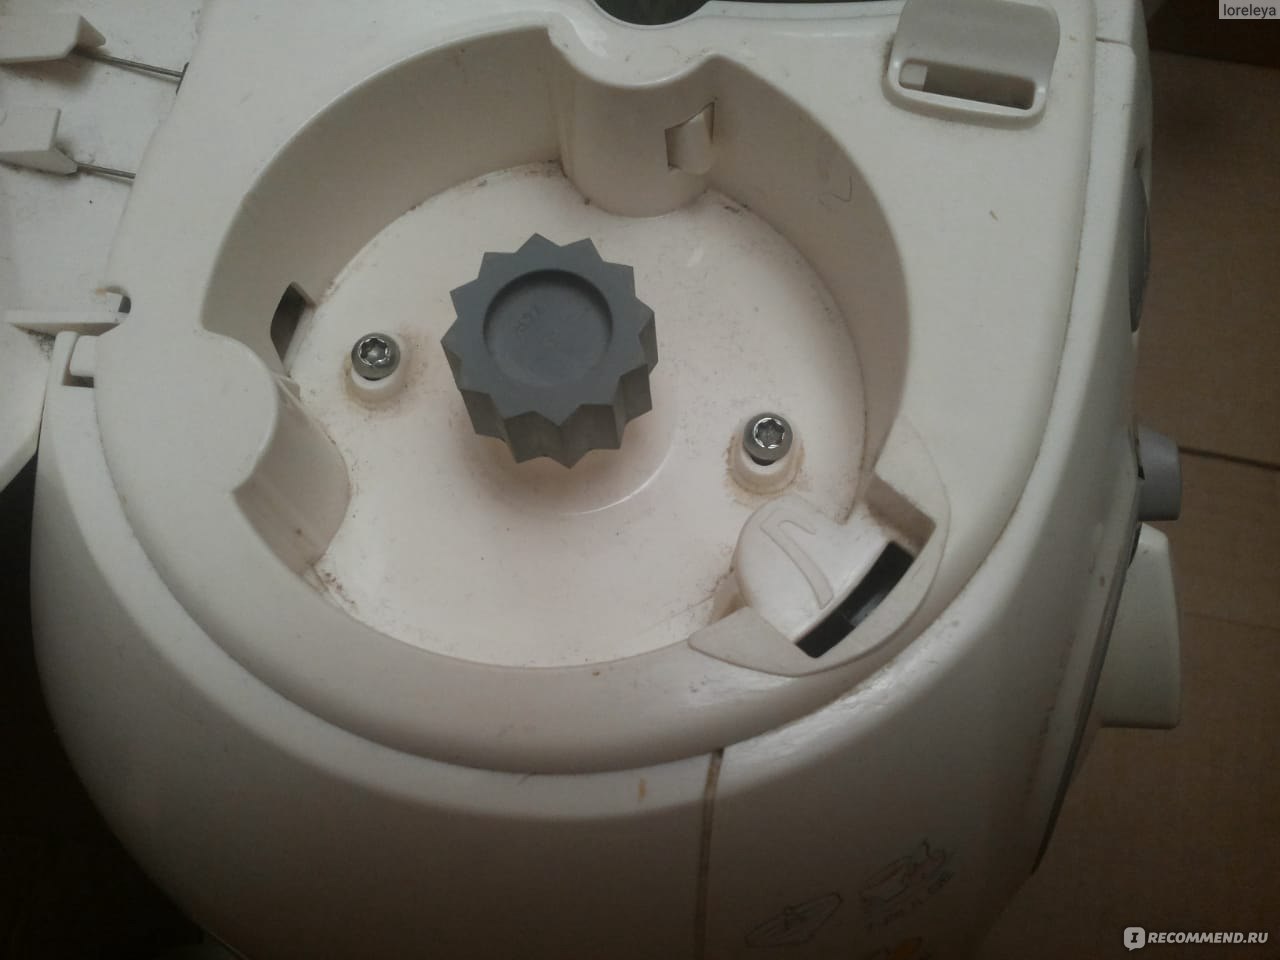
Чаша комбайна тоже фиксируется на корпусе не абы как, а довольно хитроумно: штырьком, который является защитой от случайного включения. То есть, пока он не зафиксируется в своём гнезде, комбайн не запустится.
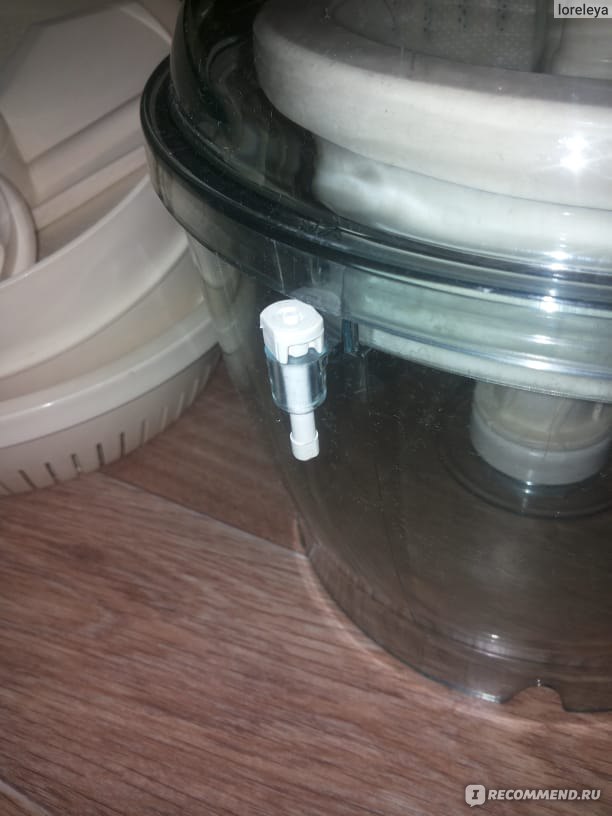
Фиксирующий пластмассовый штырёк на чаше комбайна

Гнездо для фиксации штырька-защиты
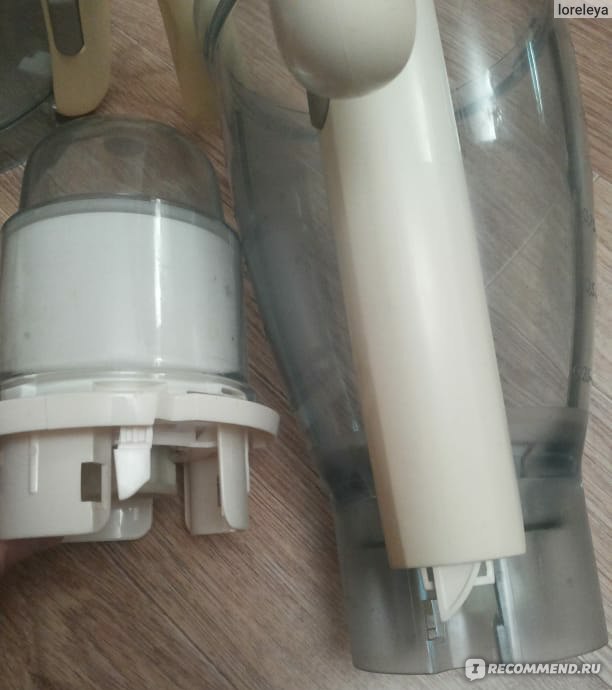
Вот ещё одна особенность данного комбайна: это ручки, которые снимаются с чаши и с блендера. Делается это легко, нажатием кнопки. Удобно для более компактного хранения или мытья, в том числе в посудомоечной машине.
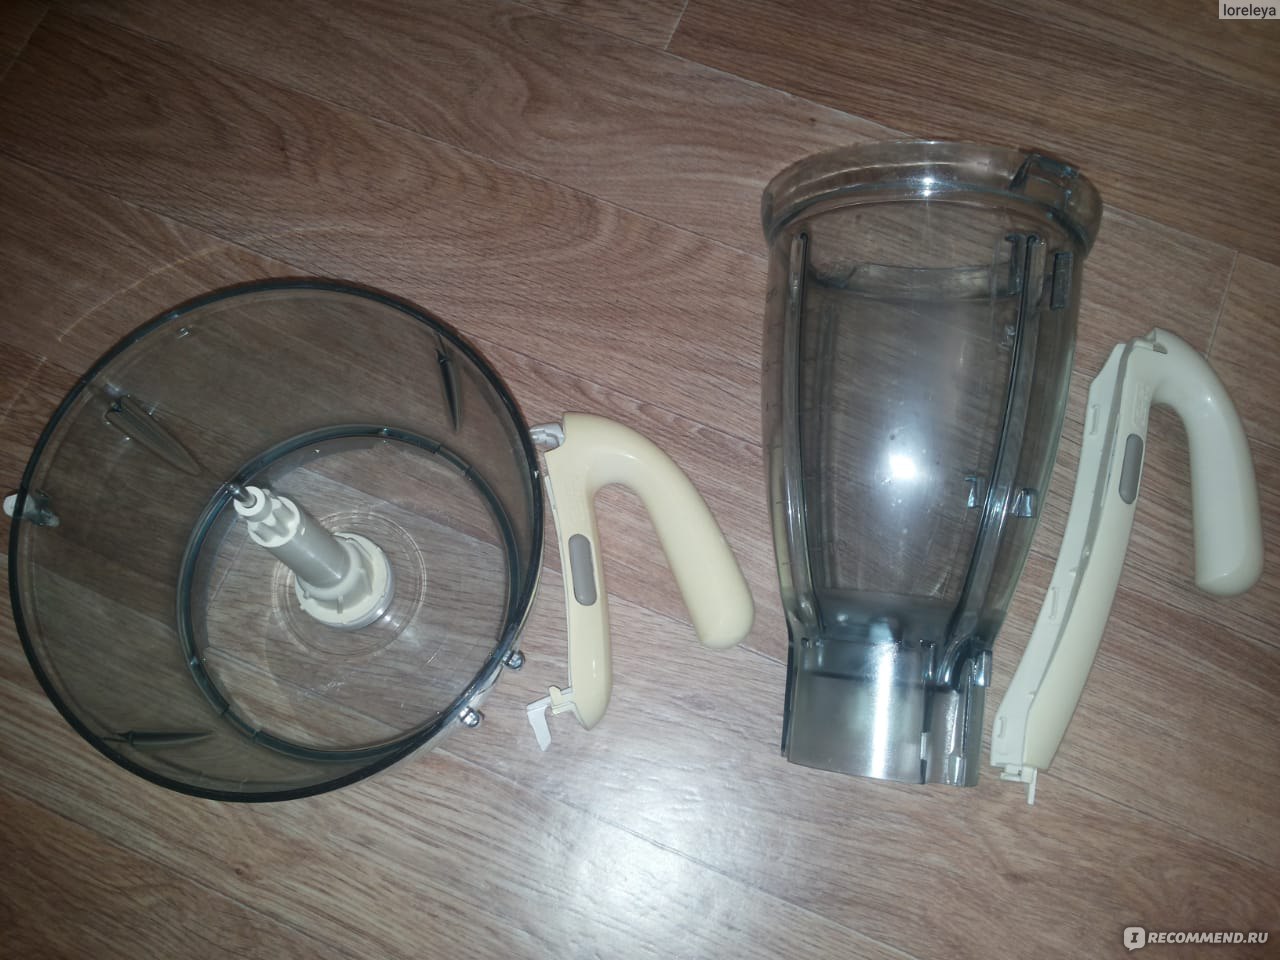
Съёмные ручки
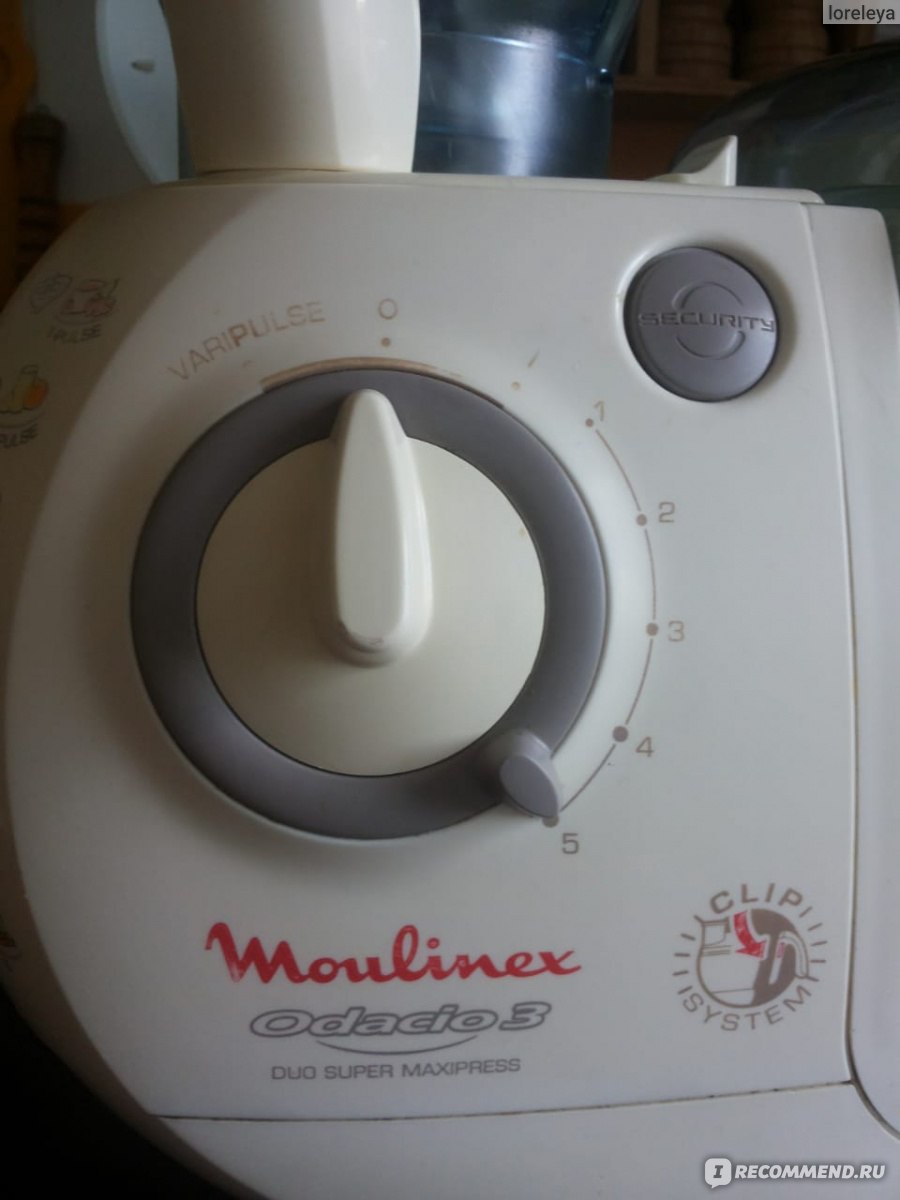
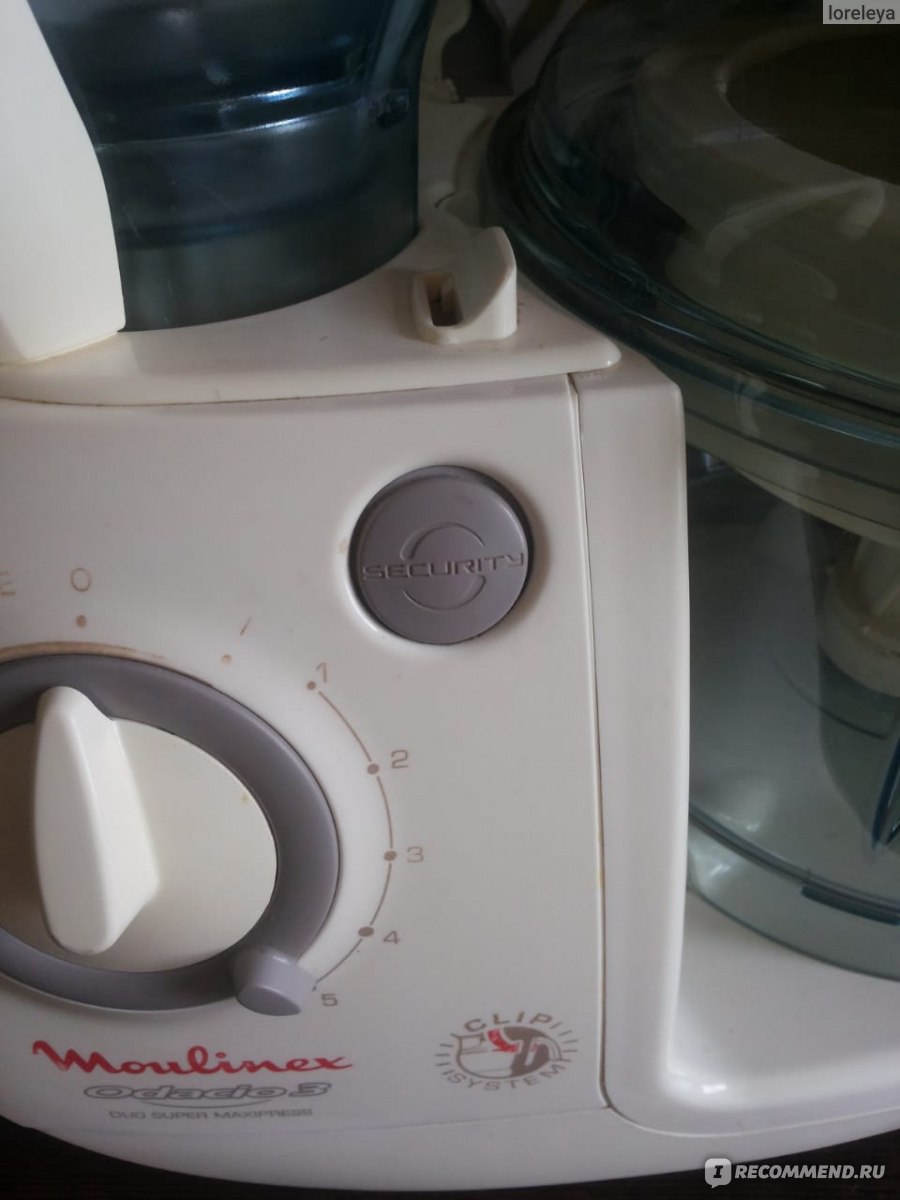
Рычаг вкл/выкл, скорости и импульсного режима.
Включение-выключение, а так же регулировка скорости работы и импульсный режим осуществляются с помощью двух крутящихся рычажков на корпусе.
Рядом с рычагом находится серая кнопка-фиксатор крышки блендерного отсека комбайна на корпусе.
В целом всё сделано гладенько, ровненько, аккуратно. Много приятных мелочей, которые доставляют удовольствие хозяйкам.
Например, острый нож в блендере, который отлично пюрирует продукты и взбивает коктейли.

нож в блендере
Или, чаша, эллипсоидной современной формы с мерными делениями в литрах и унциях

Или, сложная крышка того же блендера, оснащённая заглушкой, позволяющей аккуратно добавлять внутрь что-либо в процессе работы, которая одновременно является мерной ёмкостью.
крышка блендера с заглушкой


заглушка с мерными делениями в мл и унциях
На днище комбайн стоит уверенно, крепко, тем более, оно оснащено ножками-присосками. Шнур длиной 1 м, вилка обычная, мощность 800Вт.
Ах да, к тому же это оригинальная вещь, произведённая во Франции, а не в Китае, как подавляющее большинство современной техники.

Дно комбайна MOULINEX Odacio 3 Duo. Можно прочитать краткие технические характеристики и надпись «Сделано во Франции»
В целом, это действительно многофункциональный прибор, который, по большому счёту справляется с возложенными на него задачами.
Тем не менее, поэксплуатировав его немного я обнаружила в нём недостатки, которые для меня, перевешивают достоинства, поэтому кухонный комбайн MOULINEX Odacio 3 Duo Super Press не прижился у меня на кухне.
1. Пластмасса, из которой изготовлено большинство деталей. Оказалась хрупкой, и некоторые детали треснули или отломились, несмотря на бережное отношение. Треснул корпус основной чаши и отвалился один из фиксаторов на крышке блендера

Трещина на корпусе чаши
Без фиксатора, вставленного в соответствующее гнездо, блендер просто не запускается.
2. Очень неудобно реализованная система сборки комбайна в целом.
Французские инженеры явно перемудрили с техническими сложностями в данной модели в ущерб простоте и не добились при этом адекватной функциональности.
Например, здесь нельзя одновременно установить чашу и блендер (или измельчитель), как это выглядит на рекламной картинке. То есть, поставить таким образом вы их сможете, но запустить из такой позиции можно будет только блендер, или измельчитель. И хранить в таком положении его тоже неудобно.
Чтобы включить чашу, надо убрать блендер/или измельчитель и зафиксировать крышку чаши маленькой крышечкой, закрывающей гнездо блендера.
Вид комбайна будет как на этом фото:
Хитросделанные защёлки, штырьки и т.п. только усложняют пользователю жизнь.
Прочие приспособления, а места они занимают немало, надо где-то хранить.
3. У меня не самая большая кухня и уже имеется в хозяйстве: обычный миксер, погружной блендер, электросоковыжималка и прочие мелкие хозяйственные приспособления, которые по идее, должен заменить кухонный комбайн.
Кроме странной чехарды с перестановкой блендера, главный недостаток комбайна для меня — это его громоздкость.
Ну не выгодно и нерентабельно держать на столе такую бандуру, чтобы натереть одну морковку, или взбить пару-тройку яиц, а потом отмывать и сушить чашу с насадками.
Дрожжевое тесто уже много лет у меня успешно месит хлебопечка и делает это в ней гораздо удобнее, чем в кухонном комбайне.
Если мне надо что-то пюрировать, или взбить майонез, или яйца на выпечку, я использую для этого погружной блендер (он же блендер-нога) или миксер. Цена вопроса: сполоснуть лопасти миксера и ногу блендера вместе с обычной миской, в которой я делаю замес.

Работает погружной блендер
4. Качество работы оказалось тоже посредственным.
Насадка с лопастями как у миксера взбивает слабовато, остаются непромесы. До планетарного миксера ей далеко, даже обычным дешёвым кухонным миксером, рабочей лошадкой, я справляюсь гораздо лучше.
Руки заняты 5 — 10 минут и опять же, на это время проще взять компактный миксер чем загружать целый комбайн.
Равно, как и гонять насадку для цитрусовых ради пары апельсинов.
5. То же самое с шинковками. Проще потереть вручную морковку/свеклу и нарезать капусту на борщ, чем использовать для этого комбайн.
В сезон заготовок использую комбайн для шинковки большого обьема овощей, тыквы, наример или моркови.
Быстро, удобно, НО: ПАРУ РАЗ В ГОД!
6. Шум. Работает в меру громко. Гораздо тише соковыжималки «Скарлет».
7. Многие функции, которые широко реализованны в комбайне MOULINEX Odacio 3 Duo Super Press, такие как всевозможные виды измельчений, больше востребованны в европейской кухне, в частности, во французской.
Именно французы традиционно готовят супы-пюре, ингредиенты для которых необходимо измельчать, пюрировать. И вот здесь-то, скорее можно разгуляться поклонникам французской кухни а так же любителям различных смузи и муссов.
8. Ну и напоследок: вот столько места занимает весь комплект:

Комбайн MOULINEX Odacio 3 Duo Super Press
Как видите, целую коробку, 0,5*0,5м.
Может быть, для большой семьи, где большие объёмы обрабатываемых продуктов или для обладателей больших кухонь, для которых не проблема загромоздить 0,25 кв.м данным девайсом, это будет приемлемое решение.
Ну а для меня, с учётом наличия на кухне компактных приборов, справляющихся со своей работой лучше комбайна, это слишком громоздкое и малополезное приобретение. Поэтому, пока он мирно пылится в кладовке.
Рекомендовать к покупке не буду.
Спасибо за внимание.
Вместе с эти Вы можете посмотреть:
Электросушилка для овощей и фруктов IRIT IR-5921
Лапшерезка IRIT IRH 683
Кофеварка капельная Ufesa CG-1500/F Grace
Йогуртница Binatone YM-80

0
A
B
1
C
B1
A5
2
3
4
2
A1
B3a
PULSE
A6
A2
3
2
B2
4
1
2
A4
C
1
3
B3b
A3
5a
5b
B3
D1
2
I1
I4
D
6
3
L1
I2
L
D2
I
L2
2 1
1
1
I3
E1
2
M
E
7
E2
8
J1
N
J2
3
9
J3
F1
J
F
J4
1
F2
2
2 1
1
J5
1
G
2
H1
K1
H
K
H2
H3
12
02
5
K2
12
02
5
03
02
19
4
Ovatio ATA/AT7.som
4
20/07/04, 10:27
Suomi
s.
Русский
ï
53
Français
p.
6
58
English
p. 11
63
Deutsch
S. 15
68
Nederlands
p. 21
Latvie u
l.
Letuviu
p. 73
Español
p. 26
Eesti
l.
78
Português
p. 30
87
Italiano
p. 35
ó . 88
Dansk
s. 40
94
Norsk
s. 44
Svenska
s.
ΕλληνικÀ
5
Ovatio ATA/AT7.som
5
20/07/04, 10:27
49
Nous vous remercions d’avoir choisi un produit de la gamme Moulinex exclusivement
prévu pour la préparation des aliments.
Conseils de sécurité
- Lisez attentivement le mode d’emploi
avant la première utilisation de votre appareil : une utilisation non conforme au
mode d’emploi dégagerait Moulinex de
toute responsabilité.
- Ne laissez pas l’appareil à la portée des
enfants sans surveillance. L’utilisation de
cet appareil par des jeunes enfants ou
des personnes handicapées doit être
faite sous surveillance.
- Vérifiez que la tension d’alimentation de votre appareil correspond bien à celle de votre installation électrique.
Toute erreur de branchement annule la garantie.
- Votre appareil est destiné uniquement à un
usage domestique et à l’intérieur de la maison.
- Débranchez votre appareil dès que vous
cessez de l’utiliser et lorsque vous le nettoyez.
- N’utilisez pas votre appareil s’il ne fonctionne
pas correctement ou s’il a été endommagé.
Dans ce cas, adressez-vous à un centre
service agréé Moulinex (voir liste dans le livret service).
- Toute intervention autre que le nettoyage et
l’entretien usuel par le client doit être effectuée par un centre service agréé Moulinex
(voir liste dans le livret service).
- Ne mettez pas l’appareil, le câble d’alimentation ou la fiche dans l’eau ou tout autre
liquide.
- Ne laissez pas pendre le câble d’alimentation à portée de mains des enfants.
- Le câble d’alimentation ne doit jamais être
à proximité ou en contact avec les parties
chaudes de votre appareil, près d’une source
de chaleur ou sur un angle vif.
- Si le câble d’alimentation ou la fiche sont
endommagés, n’utilisez pas l’appareil. Afin
d’éviter tout danger, faites-les obligatoirement remplacer par un centre service agréé
Moulinex (voir liste dans le livret service).
- Ne pas utiliser l’appareil si le porte-filtre de
la centrifugeuse est endommagé.
- Pour votre sécurité, n’utilisez que des accessoires et des pièces détachées Moulinex
adaptés à votre appareil.
- Utilisez toujours les poussoirs pour guider les aliments dans les cheminées, jamais
les doigts, ni une fourchette, une cuillère,
un couteau ou tout autre objet.
Description
A
A1
A2
A3
A4
A5
A6
B
B1
B2
B3
C
Bloc moteur
capot de sortie haute
sortie haute
sortie basse
touche d’ouverture du capot (A1)
sélecteur de vitesse 0 - 1 - 2
touche Pulse (marche intermittente)
Ensemble bol
poussoir doseur
couvercle à cheminée
bol
B3a
entraîneur
B3b
écrou
Tige d’entraînement
ACCESSOIRES SELON MODÈLE :
D
D1
D2
E
E1
E2
F
F1
F2
G
H
H1
H2
H3
I
I1
I2
I3
I4
J
J1
J2
J3
J4
J5
K
K1
K2
L
L1
L2
M
N
Couteaux
couteau métal
pétrin plastique
Coupe - légumes
disque-support
4 lames:
. râpé épais (C) / tranché épais (H)
. râpé fin (A) / tranché fin (D)
Batteur
boîtier d’entraînement
fouet
Emulsionneur
Presse-agrumes
cône
panier filtre
entraîneur
Bol mixer
bouchon doseur
couvercle
bol
fente de verrouillage du couvercle
Centrifugeuse
poussoir
couvercle
collerette
bande filtrante
porte-filtre
Mini-hachoir
couvercle
bol
Broyeur
couvercle
bol
Spatule
Accessoire de rangement
6
Ovatio.ATA/AT7.Eu11
6
20/07/04, 10:06
- N’enlevez les accessoires que lorsque
l’appareil est à l’arrêt complet.
- N’introduisez jamais d’ustensiles (cuillère,
spatule ...) par la cheminée du couvercle.
- Ne passez aucun ustensile comportant du
métal dans un four à micro-ondes.
- N’utilisez qu’un accessoire à la fois.
- Manipulez le couteau et les lames avec précaution : ils sont extrêmement coupants.
- Vous devez obligatoirement retirer les
couteaux (D) et la tige d’entraînement (C)
avant de vider le bol de son contenu.
- Ne touchez jamais les pièces en mouvement.
- Ne faites pas fonctionner votre appareil à
vide.
3 MELANGER/MIXER/HACHER/PETRIR
ACCESSOIRES UTILISÉS (SELON MODÈLE)
- Ensemble bol (B) , tige d’entraînement (C),
et couteaux (D) :
. couteau métal (D1) pour mixer, hacher, pétrir ou mélanger.
. pétrin plastique (D2) pour pétrir ou mélanger.
MONTAGE DES ACCESSOIRES
- Vérifiez la fermeture du capot de sortie haute
(A1).
- Positionnez le bol (B3) sur la sortie basse
(A3). Verrouillez-le à l’aide de la poignée.
- Positionnez la tige d’entraînement (C) sur
l’entraîneur du bol.
- Faites coulisser le couteau métal (D1) ou le
pétrin plastique (D2) sur la tige d’entraînement (C), jusqu’au fond du bol.
- Mettez les ingrédients dans le bol.
- Placez le couvercle (B2) sur le bol et verrouillez-le (clic audible).
Attention : Pour le déverrouillage des couteaux (D) de la tige d’entraînement (C) :
- Posez l’ensemble sur une surface stable.
- Tournez la tige d’entraînement (C) dans le
sens des aiguilles d’une montre en maintenant le couteau (D) par la partie supérieure.
Mise en service
- Avant une première utilisation, lavez toutes
les pièces des accessoires à l’eau chaude
savonneuse. Rincez et séchez.
- Placez le bloc moteur sur une surface plane,
propre et séche.
- Branchez votre appareil.
- Pulse (marche intermittente) : appuyez sur
la touche (A6) par impulsions successives
pour un meilleur contrôle de certaines préparations.
- Marche continue : tournez le sélecteur de
vitesse (A5) sur la position désirée «1» ou
«2».
- Arrêt : tournez le sélecteur de vitesse (A5)
sur la position «0».
1 - Utilisation sortie basse : le capot de sortie
haute (A1) doit être verrouillé.
- Utilisation sortie haute : assurez-vous
qu’aucun accessoire n’est verrouillé sur la
sortie basse.
MISE EN MARCHE ET CONSEILS
Mixer
- Tournez le sélecteur de vitesse (A5) sur la
position «2» pour mettre en marche.
Vous pouvez mixer jusqu’à 1 litre de potage,
soupe, compote en 20 s.
Hacher
- Tournez le sélecteur de vitesse (A5) sur la
position «2» pour mettre en marche, ou pour
un meilleur contrôle du hachage, utilisez la
touche Pulse (A6).
En 15 à 30 s, vous hachez jusqu’à 600 g
d’aliments :
. des produits durs : fromage, fruits secs, certains légumes (carottes, céleri...).
. des produits tendres : certains légumes
(oignons, épinards ...).
. des viandes crues et cuites (désossées,
dénervées, et coupées en dés).
. des poissons crus ou cuits...
Pétrir/mélanger
- Tournez le sélecteur de vitesse (A5) sur la
position «2» pour mettre en marche.
- En fonction pétrir, arrêtez l’appareil dès que
vous constatez la formation de la boule de
pâte.
Les fonctions de votre
robot
2
. MONTAGE / DÉMONTAGE DU BOL (B3)
Le bol est utilisé avec les accessoires suivants
(selon modèle):
. couteaux (D), coupe-légumes (E), batteur
(F), émulsionneur (G), presse-agrumes (H),
centrifugeuse (J).
- Positionnez l’entraîneur (B3a) sur le bol.
- Verrouillez l’entraîneur (B3a) avec l’écrou
(B3b) jusqu’à la butée.
- Démontez l’ensemble et nettoyez-le après
chaque utilisation.
7
Ovatio.ATA/AT7.Eu11
7
20/07/04, 10:07
Vous pouvez :
. pétrir jusqu’à 1,2 kg de pâte lourde (sablée,
brisée, à pain) en 40 s environ.
. mélanger jusqu’à 1 litre de pâte à crêpes, à
gaufres, etc. en 1 min à 1 min 30.
. mélanger 1,5 kg de pâte légère (biscuit, quatre-quarts) en 1 min 30 à 3 min 30.
5b
4 TRANCHER/RAPER
MISE EN MARCHE ET CONSEILS
- Tournez le sélecteur de vitesse (A5) sur la
position «1» ou «2» pour mettre en marche.
- N’utilisez jamais ces accessoires pour pétrir
des pâtes lourdes ou mélanger des pâtes
légères.
Vous pouvez préparer : mayonnaise, aïoli,
sauces, blancs en neige (1 à 7), crème fouettée, chantilly (jusqu’à 0,5 litre).
ACCESSOIRES UTILISÉS
- Ensemble bol (B), tige d’entraînement (C),
et coupe-légumes (E)
MONTAGE DES ACCESSOIRES
- Vérifiez la fermeture du capot de sortie haute
(A1).
- Positionnez le bol (B3) sur la sortie basse
(A3). Verrouillez-le à l’aide de sa poignée.
- Emboîtez la lame désirée (E2) sur le disque-support (E1).
- Placez la tige d’entraînement (C) sur l’entraîneur du bol, puis le disque-support (E1)
sur la tige d’entraînement (C).
- Placez le couvercle (B2) sur le bol, puis verrouillez-le (clic audible).
6 HOMOGENEISER/MELANGER/MIXER
TRES FINEMENT
ACCESSOIRE UTILISÉ
- Bol mixer (I)
MONTAGE DE L’ACCESSOIRE
- Appuyez sur la touche d’ouverture (A4) et
relevez le capot de sortie haute (A1).
- Mettez les ingrédients dans le bol mixer (I3),
puis verrouillez le couvercle (I2) sur le bol.
- Placez le bol mixer (I) sur la sortie haute
(A2) (repère “1” aligné avec . sur le bloc moteur) et verrouillez-le à l’aide de sa poignée
(repère “2” aligné avec . sur le bloc moteur).
MISE EN MARCHE ET CONSEILS
- Introduisez les aliments dans la cheminée
et guidez-les à l’aide du poussoir (B1).
- Tournez le sélecteur de vitesse (A5) sur la
position «1» pour trancher ou «2» pour râper et mettre en marche.
Vous pouvez préparer avec les lames (selon
modèle):
. tranché épais (H) / tranché fin (D) : pommes
de terre, oignons, concombres, betteraves,
pommes, carottes, choux...
. râpé épais (C) / râpé fin (A) : céleri-rave,
pommes de terre, carottes râpées, fromage...
MISE EN MARCHE ET CONSEILS
- Tournez le sélecteur de vitesse (A5) sur la
position «1» ou «2» pour mettre en marche,
ou pour un meilleur contrôle du mixage, utilisez la touche Pulse (A6).
Vous pouvez ajouter des ingrédients par l’orifice du bouchon doseur (I1) en cours de préparation.
- Ne remplissez jamais le bol mixer avec un
liquide bouillant.
Vous pouvez :
- préparer jusqu’à 1,5 litre de potage finement
mixé, de velouté, de crème, de compote, de
milk-shake, de cocktail.
- mélanger toutes les pâtes fluides (crêpes,
beignets, clafoutis, far).
BATTRE/FOUETTER/EMULSIONNER
ACCESSOIRES UTILISÉS (selon modèle)
- Ensemble bol (B) et batteur (F)
ou
- Ensemble bol (B), émulsionneur (G) et tige
d’entraînement (C).
MONTAGE DES ACCESSOIRES
5a
Avec l’émulsionneur (G) :
- Placez la tige d’entraînement (C) sur l’entraîneur du bol.
- Faites coulisser l’émulsionneur sur la tige
d’entraînement.
Puis :
- Mettez les ingrédients dans le bol.
- Placez le couvercle (B2) sur le bol, puis verrouillez-le (clic audible).
- Vérifiez la fermeture du capot de sortie haute
(A1).
- Positionnez le bol (B3) sur la sortie basse
(A3). Verrouillez-le à l’aide de sa poignée.
Avec le batteur (F) :
- Placez- le sur l’entraîneur du bol.
7 PRESSER LES AGRUMES (selon modèle)
ACCESSOIRES UTILISÉS
- Bol (B3) et presse-agrumes (H)
8
Ovatio.ATA/AT7.Eu11
8
20/07/04, 10:07
MONTAGE DES ACCESSOIRES
- Mettez les ingrédients dans le bol, puis verrouillez le couvercle sur le bol.
- Posez l’accessoire sur la sortie haute (A2)
(repère “1” aligné avec . du bloc moteur) et
verrouillez-le (repère “2” aligné avec . du bloc
moteur).
S’il y a absence du couvercle ou si celui-ci
est mal positionné, l’accessoire ne peut
être mis en place et le robot ne fonctionne
pas.
- Vérifiez la fermeture du capot de sortie haute
(A1).
- Positionnez le bol (B3) sur la sortie basse
(A3). Verrouillez-le à l’aide de sa poignée.
- Positionnez l’entraîneur (H3) du presseagrumes sur l’entraîneur du bol.
- Placez le panier filtre (H2) en le tournant jusqu’en position de verrouillage.
- Placez le cône (H1) dans l’orifice du panier
filtre.
MISE EN MARCHE ET CONSEILS
MISE EN MARCHE ET CONSEILS
- Tournez le sélecteur de vitesse (A5) sur la
position «2» pour mettre en marche, ou pour
un meilleur contrôle du hachage, utilisez la
touche Pulse (A6).
Vous pouvez avec le mini-hachoir :
. hacher en quelques secondes : gousses
d’ail, fines herbes, persil, fruits secs, pain,
biscottes pour chapelure, jambon, ...
. Quantité maximum fruits secs (noisettes,
amandes, ...) : 80 g.
. préparer des purées pour bébé.
Ce mini-hachoir n’est pas prévu pour des produits durs comme le café.
Vous pouvez avec le broyeur :
. hacher en quelques secondes : coriandre,
poivre, piment de Cayenne, abricots secs,....
. Quantité / Temps maximum abricots secs :
100 g / 4 s.
- Positionnez une moitié d’agrume sur le cône
(H1).
- Tournez le sélecteur de vitesse (A5) sur la
position «1» pour mettre en marche.
Vous pouvez réaliser jusqu’à 1 litre de jus
sans vider le bol.
8 CENTRIFUGER FRUITS ET LEGUMES
(selon modèle)
ACCESSOIRES UTILISÉS
- Bol (B3), tige d’entraînement (C) et centrifugeuse (J)
MONTAGE DES ACCESSOIRES
- Verifiez la fermeture du capot de sortie haute
(A1).
- Positionnez l’ensemble bol (B3) sur la sortie basse (A3). Verrouillez-le à l’aide de sa
poignée.
- Placez la tige d’entraînement (C) sur l’entraîneur du bol.
- Faites coulisser le porte-filtre assemblé
(J3+J4+J5) sur la tige d’entraînement (C).
- Positionnez le couvercle (J2) et verrouillezle.
Nettoyage
- Débranchez l’appareil.
- Pour un nettoyage plus facile, rincez rapidement les accessoires après leur utilisation.
- Lavez et essuyez les accessoires (ils passent au lave-vaisselle à l’exception du boîtier d’entraînement du batteur (F1)).
- Versez de l’eau chaude additionnée de quelques gouttes de savon liquide dans le bol
mixer. Fermez le couvercle. Donnez quelques impulsions en appuyant sur la touche
pulse. Débranchez l’appareil. Rincez le bol
sous l’eau courante et laissez-le sécher.
- L’entraîneur de bol (B3a) est équipé d’un joint
qu’il ne faut pas démonter. Pour le nettoyer,
vous pouvez passer l’entraîneur de bol au
lave-vaisselle ou bien le laver avec de l’eau
chaude.
- En cas de coloration de vos accessoires par
des aliments (carottes, oranges...), frottezles avec un chiffon imbibé d’huile alimentaire, puis procédez au nettoyage habituel.
MISE EN MARCHE ET CONSEILS
- Tournez le sélecteur de vitesse (A5) sur la
position «2» pour mettre en marche.
- Introduisez les aliments dans la cheminée et
pressez lentement à l’aide du poussoir (J1).
- Videz fréquemment les déchets du porte-filtre et nettoyez la bande filtrante. Ne dépassez pas 250 g d’ingrédients.
9 HACHER TRES FINEMENT DES PETITES
QUANTITES (selon modèle)
ACCESSOIRE UTILISÉ
- Mini-hachoir (K) ou Broyeur (L)
MONTAGE DE L’ACCESSOIRE
- Appuyez sur la touche d’ouverture (A4) et
relevez le capot de sortie haute (A1).
9
Ovatio.ATA/AT7.Eu11
9
20/07/04, 10:07
Batteur
Pétrin plastique
Presse-agrumes
Centrifugeuse
- Ne mettez pas le bloc moteur (A), ni le boîtier d’entraînement du batteur (F1) dans l’eau
ni sous l’eau courante. Essuyez-les avec une
éponge humide.
- Les lames des accessoires sont très affûtées. Manipulez-les avec précaution.
5 980 652
5 980 640
5 980 646
0 697 185
Rangement
Votre robot Ovatio est muni :
- d’un accessoire de rangement (N), qui vient
se positionner à l’intérieur de l’ensemble bol
(B). Vous pouvez y ranger les l a m e s
coupe-légumes (E2), le disque-support (E1), le couteau métal (D1), ainsi que
la tige d’entraînement (C).
- d’un enrouleur placé sous le bloc moteur,
pour ranger et régler la longueur du câble
d’alimentation comme vous le désirez.
Si votre appareil ne
fonctionne pas que faire ?
- Vérifiez :
. le branchement
. que les accessoires sont correctement verrouillés sur le bloc moteur.
. que les couvercles sont correctement verrouillés.
. avec l’utilisation de l’ensemble bol (B), que
le capot de sortie haute (A1) est bien fermé.
Votre appareil ne fonctionne toujours pas?
Adressez-vous à un centre service agréé
Moulinex (voir liste dans le livret “Moulinex
Service”).
Accessoires
Vous pouvez personnaliser votre appareil et
vous procurer auprès de votre revendeur habituel ou d’un centre service agréé Moulinex
les accessoires suivants :
Accessoires
Centre
service
agréé
Moulinex
Disque coupe-frites
Disque râpé noix de coco,
parmesan
Disque, râpé fin
Disque, tranché fin
Broyeur
Mini-hachoir
5 980 678
5 980 679
5 980 676
5 980 677
5 966 866
5 980 651
10
Ovatio.ATA/AT7.Eu11
10
20/07/04, 10:07
Thank you for choosing a product from the
Moulinex range. This product is intended
exclusively for preparing food.
Safety recommendations
- Always read the instructions for use
carefully before using your appliance for
the first time: any use which does not
conform to these instructions will absolve Moulinex from any liability.
- Do not leave the appliance within reach
of children without supervision. The use
of this appliance by young children or by
disabled persons must always be
supervised.
- Check that the voltage rating of your
appliance corresponds to that of your
household electrical wiring system.
This appliance complies with the requirements
of the EEC Directive (89/336/EEC).
Any connection error will render the
guarantee null and void.
- Your appliance is intended solely for
domestic use and within the home.
- Unplug your appliance as soon as you have
finished using it and when you are cleaning
it.
- Never use your appliance if it is not working
correctly or if it has been damaged. If this
happens, contact an approved Moulinex
service centre (see list in service booklet).
- Any intervention other than cleaning and
normal maintenance by the customer must
be carried out by an approved Moulinex
approved service centre (see list in service
booklet).
- Do not place the appliance, the power cord
or the plug under running water or in any
other liquid.
- Do not allow the power cord to hang down
within reach of children.
- The power cord must never be close to a
heat source or resting on sharp edges.
- If the power cord or the plug are damaged,
do not use the appliance. To avoid any risk,
these must be replaced by an approved
Moulinex service centre (see list in service
booklet).
- Do not use the appliance if the filter holder
on the juice extractor is damaged.
- For your own safety, use only Moulinex
accessories and spare parts which are
suitable for your appliance.
- Always use the pushers to guide the food
in the feeder tubes, never use your fingers,
nor a fork, a spoon, a knife or any utensil.
- Only remove the accessories when the
appliance has come to a complete stop.
Description
A
A1
A2
A3
A4
A5
A6
B
B1
B2
B3
C
Motor unit
Liquidiser drive cover
Liquidiser cover
Bowl and accessory drive
Cover release button (A1)
0 - 1 - 2 speed selector
Pulse button (intermittent speed)
Bowl assembly
Pusher with measuring section
Lid with feeder tube
bowl
B3a
drive
B3b
nut
Spindle
ACCESSORIES DEPENDING ON MODEL:
D
D1
D2
E
E1
E2
F
F1
F2
G
H
H1
H2
H3
I
I1
I2
I3
I4
J
J1
J2
J3
J4
J5
K
K1
K2
L
L1
L2
M
N
Blades
Metal blade
Plastic kneading blade
Grating/Slicing discs
Disc holder
4 discs:
. coarse grating (C) / coarse slicing (H)
. fine grating (A) / fine slicing (D)
Whisk
Whisk drive
Whisk
Emulsifying disc
Citrus press
Cone
Filter basket
Drive
Liquidiser
Measuring cup
lid
bowl
locking lid slot
Juice extractor
pusher
lid
lid seal
filter band
filter holder
Mini chopper
lid
bowl
Grinder
lid
bowl
Spatula
Storage cage for accessories
11
Ovatio.ATA/AT7.Eu11
11
20/07/04, 10:07
- Do not introduce any utensil (spoon,
spatula...) by the feeder tube.
- Do not place any ustensil which contains
metal in a microwave oven.
- Use the accessories one at a time.
- Handle the metal blade and discs with great
care: they are extremely sharp.
- You must remove the blades (D) and
spindle (C) before emptying the bowl of
its content.
- Never touch the parts when they are moving.
- Do not run your appliance empty.
3 MIXING/BLENDING/CHOPPING/
KNEADING
ACCESSORIES USED (DEPENDING ON MODEL)
- Bowl assembly (B), spindle (C), and blades
(D):
. metal blade (D1) for mixing, chopping,
kneading or blending.
. plastic kneading blade (D2) for kneading or
blending.
FITTING THE ACCESSORIES
- Check that the liquidiser drive cover is closed
(A1).
- Place the bowl (B3) on the bowl and
accessory drive (A3). Lock it into place using
the handle.
- Place the spindle (C) on to the bowl drive.
- Slide the metal blade (D1) or the plastic
kneading blade (D2) on to the spindle (C),
down to the bottom of the bowl.
- Place the ingredients in the bowl.
- Place the lid (B2) on the bowl and lock it into
place until it clicks.
Please note: To unlock the blades (D) from
the spindle (C):
- Place the assembly bowl on a stable worktop.
- Turn the spindle (C) clockwise, holding the
blade (D) by its upper section.
Using your appliance
- Before using for the first time, wash all
accessory parts in warm, soapy water. Rinse
and dry.
- Place the motor unit on a flat, clean and dry
surface.
- Plug the appliance in.
- Pulse (intermittent operation): press the
button (A6) using successive pulses to give
you better control when preparing certain
foods.
- Continuous operation: turn the speed
selector (A5) to the required position «1» or
«2».
- Stop: turn the speed selector (A5) to
position «0».
1 - Using the chopping bowl drive: the
liquidiser drive cover (A1) must be locked.
- Using the liquidiser drive: make sure that
no accessories are locked on the bowl and
accessory drive.
USAGE AND PRACTICAL TIPS
Blending
- Turn the speed selector (A5) to position «2»
to start the appliance.
You can blend up to 1 litre of soup or stewed
fruits in 20 sec.
Chopping
- Turn the speed selector (A5) to position «2»
to start the appliance or for better control over
the chopping use the Pulse button (A6).
In 15 to 30 sec., you can chop up to 600g of
food:
. hard produce: cheese, dried fruits, certain
vegetables (carrots, celery...).
. soft produce: certain vegetables (onions,
spinach...).
. raw or cooked meat (boned, sinew removed
and diced).
. raw or cooked fish...
Kneading/Mixing
- Turn the speed selector (A5) to position «2»
to start the appliance.
- When kneading, stop the appliance as soon
as the pastry starts to form a ball.
You can:
. knead up to 1.2 kg of pastry/dough (biscuit,
shortcrust, and bread) in approximately
40 sec.
Functions of your food
processor
2
. ASSEMBLING / DISMANTLING THE BOWL (B3)
The bowl is used with the following accessories
(depending on model):
. blades (D), discs (E), whisk (F), emulsifying
disc (G), citrus press (H), juice extractor (J).
- Place the drive (B3a) on the bowl.
- Lock the drive (B3a) with the nut (B3b) as
far as it will go.
- Dismantle the bowl assembly and clean it
after each use.
12
Ovatio.ATA/AT7.Eu11
12
20/07/04, 10:07
. mixing up to 1 litre of pancake, waffle batter,
etc. in 1min to 1 min 30.
. mixing up to 1.5 kg of light cake mixture
(biscuit, sponge) in 1 min 30 to 3 min 30.
- Place the ingredients in the bowl.
- Place the lid (B2) on the bowl, then lock it
into place until it clicks.
USAGE AND PRACTICAL TIPS
- Turn the speed selector (A5) to position «1»
or «2» to start the appliance.
- Do not use the balloon whisk or the
emulsifying disc to knead dough or to mix
cake mixtures.
You can prepare: mayonnaise, aioli, sauces,
egg whites (1 to 7), whipped cream (up to 0.5
litre).
4 SLICING/GRATING
ACCESSORIES USED
- Bowl assembly (B), spindle (C), and grating/
slicing discs (E)
FITTING THE ACCESSORIES
- Check that the liquidiser drive cover is locked
(A1).
- Place the bowl (B3) on the bowl and
accessory drive (A3). Lock it into place using
the handle.
- Fit the required disc (E2) on to the disc holder
(E1).
- Place the spindle (C) on the drive, then the
disc holder (E1) on to the spindle (C).
- Place the lid (B2) on the bowl, then lock it
into place until it clicks.
6 BLENDING/MIXING FINELY
ACCESSORY USED
- Liquidiser bowl (I)
FITTING THE ACCESSORY
- Press the cover release button (A4) and lift
the liquidiser drive cover (A1).
- Place the ingredients in the liquidiser jug (I3),
and lock the lid (I2) on the jug.
- Place the liquidiser jug (I) on the liquidiser
drive (A2) (mark “1” aligned with . on the
motor unit) and lock it into place using the
handle (mark “2” aligned with . on the motor
unit).
USAGE AND PRACTICAL TIPS
- Put the food through the feeder tube using
the pusher (B1).
- Turn the speed selector (A5) to position «1»
to slice or «2» to grate and start the
appliance.
The slicing/grating discs can (depending on
model):
. slice thickly (H) / slice finely (D): potatoes,
onions, cucumbers, beetroot, apples,
carrots, and cabbage...
. coarsely grate (C) / finely grate (A): celery,
potatoes, carrots, cheeses...
USAGE AND PRACTICAL TIPS
- Turn the speed selector (A5) to position «1»
or «2» to start blending or for better control
over the blending, use the Pulse button (A6).
You can add ingredients during blending
through the hole of the measuring cup (I1).
- Do not fill the liquidiser jug with boiling liquid.
You can:
- prepare up to 1.5 litre of extra smooth soup,
sauces, cream, stewed fruits, milk shakes
and cocktails.
- blend all types of batter (pancake, fritters,
waffles, custard flan).
BEATING/WHISKING/EMULSIFYING
ACCESSORIES USED (DEPENDING ON MODEL)
- Bowl assembly (B) and balloon whisk (F)
or
- Bowl assembly (B), emulsifying disc (G) and
spindle (C).
7 SQUEEZING CITRUS FRUITS (depending
on model)
FITTING THE ACCESSORIES
ACCESSORIES USED
- Check that the liquidiser drive cover is locked
(A1).
- Place the bowl (B3) on the bowl and
accessory drive (A3). Lock it into place using
the handle.
5a With the balloon whisk (F):
- Place it on to the bowl drive.
5b With the emulsifying disc (G):
- Place the spindle (C) on the bowl drive.
- Slide the emulsifying disc on to the spindle.
Then:
- Bowl (B3) and citrus press (H)
FITTING THE ACCESSORIES
- Check that the liquidiser drive cover is locked
(A1).
- Place the bowl (B3) the bowl and accessory
drive (A3). Lock it into place using the handle.
- Place the citrus press drive (H3) on to the
bowl drive.
- Fit the filter basket (H2) by turning it until it
locks into place.
13
Ovatio.ATA/AT7.Eu11
13
20/07/04, 10:07
- Fit the cone (H1) into the hole of the filter
basket.
You can with the mini chopper:
. chop in seconds: garlic cloves, herbs,
parsley, dried fruits, bread, ham,...
. Maximum quantity of dried fruits (hazelnuts,
almonds...): 80 g.
. prepare baby foods.
This mini chopper is not designed to take hard
ingredients such as coffee beans.
You can with the grinder:
. grind in seconds, pepper, Cayenne pepper,
dried apricots...
. Quantity / Maximum time for dried apricots:
100 g / 4 sec.
USAGE AND PRACTICAL TIPS
- Place half a citrus fruit on to the cone (H1).
- Turn the speed selector (A5) to position «1»
to start the appliance.
You can squeeze up to 1 litre of juice without
emptying the bowl.
8 EXTRACTING JUICE FROM FRUITS AND
VEGETABLES (depending on model)
ACCESSORIES USED
- Bowl (B3), spindle (C) and juice extractor
(J)
Cleaning
FITTING THE ACCESSORIES
- Check that the liquidiser drive cover is locked
(A1).
- Place the bowl assembly (B3) on the
chopping bowl drive (A3). Lock it into place
using the handle.
- Place the spindle (C) on to the bowl drive.
- Slide the filter holder assembly (J3+J4+J5)
on to the spindle (C).
- Place the lid (J2) and lock it into place.
- Unplug the appliance.
- To make cleaning easier, rinse the
accessories straight after use.
- Wash and dry the accessories (they are all
dishwasher safe except for the whisk drive (F1)).
- Pour some hot water containing a few drops
of liquid soap into the mixer bowl. Close the
lid. Operate in short bursts by pressing the
pulse key several times. Unplug the
appliance. Rinse the bowl under running
water and leave to dry.
- The bowl drive (B3a) is equipped with a joint
which must not be removed. For cleaning,
you can place the bowl drive in the
dishwasher or wash it in hot water.
- If the accessories have become discoloured
by food (carrots, oranges...), rub them gently
with a cloth dipped in cooking oil, and then
wash as normal.
- The inside of the bowls may become
scratched or slightly dulled over time
depending on the type of food processed.
- Do not place the motor unit (A), nor the whisk
drive (F1) in water or near running water.
Wipe them with a damp cloth.
- The blades on the accessories are very
sharp. Always handle with care.
USAGE AND PRACTICAL TIPS
- Turn the speed selector (A5) to position «2»
to start the appliance.
- Insert the ingredients through the feeder tube
and gently press with the pusher (J1).
- Remove the pulp regularly from the filter
holder and clean the filter band. Do not use
more than 250 g of ingredients at a time.
9 FINELY CHOPPING SMALL QUANTITIES
(depending on model)
ACCESSORY USED
- Mini chopper (K) or Grinder (L)
FITTING THE ACCESSORY
- Press the lid release button (A4) and lift the
cover (A1).
- Put the ingredients in the bowl, and lock the
lid onto the bowl.
- Place the accessory on the liquidiser drive
(A2) (mark “1” aligned with the . of the motor
unit) and lock it into position (mark “2” aligned
with the . of the motor unit).
If the lid is not locked or is badly positioned
the mini chopper or grinder cannot be
locked into place and will not work.
Storage
Your Ovatio food processor has:
- a storage cage for accessories (N), which
fits inside the bowl (B). You can store the
grating/slicing discs (E2), the disc holder
(E1), the metal blade (D1) as well as the
spindle (C).
- a cord storage facility under the motor unit to
store the mains lead and to adjust its length.
USAGE AND PRACTICAL TIPS
- Turn the speed selector (A5) to position «2»
to start chopping, or for greater control over
the chopping use the Pulse button (A6).
14
Ovatio.ATA/AT7.Eu11
14
20/07/04, 10:07
Vielen Dank, daß Sie sich für den Kauf eines
Moulinex-Gerätes entschieden haben, das
ausschließlich der Zubereitung von
Nahrungsmitteln dient.
What to do if your appliance
does not work?
- Check:
. the connection and fuse.
. that the accessories are properly locked on
to the motor unit.
. that the lids are properly locked.
. when using the bowl assembly (B), that the
upper power outlet hood (A1) is locked.
Your appliance still does not work? Contact
an approved Moulinex centre (see list in
“Moulinex Service” booklet).
Beschreibung
A
A1
A2
A3
A4
A5
A6
HELPLINE
If you have any product problems or queries,
please contact our Customer Relations team
first for expert help and advice :
B
B1
B2
B3
0845 602 14 54 - UK
(01) 47 51 947 - Ireland
C
or consult our website
www.moulinex.co.uk
Motorblock
Sicherheitsdeckel des oberen Antriebs
oberer Antrieb
unterer Antrieb
Taste zum Öffnen des Sicherheitsdeckels (A1)
Geschwindigkeitsregler Stufen 0 -1- 2
Intervallfunktionstaste „Pulse“ (Momentbetrieb)
Arbeitsschüssel
Stopfer mit Maßeinteilung
Deckel mit Einfüllstützen
Arbeitsschüssel
B3a
Mitnehmer
B3b
Verschlußmutter
Antriebsspindel
ZUBEHÖR JE NACH
D
D1
D2
E
E1
E2
Accessories
You can buy the following accessories or
replacements mail order though our approved
Moulinex Service Centre or via our website:
Accessories
F
F1
F2
G
H
H1
H2
H3
I
I1
I2
I3
I4
J
J1
J2
J3
J4
J5
K
K1
K2
L
Approved
Moulinex
Centre
5 980 678
5 980 679
Chipping disc
Grating disc for, coconut
& parmesan
Fine grating disc
Fine slicing disc
Grinder
Mini chopper
Whisk
Plastic kneading blade
Citrus press
Juice extractor
5 980 676
5 980 677
5 966 866
5 980 651
5 980 652
5 980 640
5 980 646
0 697 185
MODELL
Messer
Universalmesser aus Metall
Spezial-Teigkneter
Schnitzelsystem
Trägerscheibe für Schnitzeleinsätze
4 Schnitzeleinsätze:
. Grobraspeln (C) / Grobschneiden (H)
. Feinreiben (A) / Feinschneiden (D)
Metallquirl
Antriebsgehäuse
Metallquirl
Emulgierscheibe
Zitruspresse
Preßkegel
Filterkorb
Mitnehmer
Mixaufsatz
Dosierbecher mit Maßeinteilung
Deckel mit Nachfüllöffnung
Mixbecher mit Maßeinteilung
Einrastschlitz für den Deckel
Entsafter
Stopfer
Deckel
Befestigungsring
Filterband
Filterträger
Mini-Zerkleinerer
Deckel
Arbeitsbehälter
Mahlwerk
15
Ovatio.ATA/AT7.Eu11
15
20/07/04, 10:07
ATA/AT7
Ovatio.ATA/AT7.Dcouv
Eu11/Cei/Ar/Gr/Ca
6
N° 0827 313-A
20/07/04, 10:29

What to do if your appliance does not work?
Check:- The connection and the fuse.- That the accessories are properly locked on the motor unit.- That the lids are properly locked- When using the bowl assembly (B), that the liquidiser drive cover (A1) is locked.
Your appliance still does not work? Contact our Helpline: 0845 330 4554 – UK
(01) 47 51947 – Ireland
AccessoriesIf you require extra or replacement accessories, please call our Helpline above.
Thank you for choosing a product from the Moulinex range. This product is intended exclusively for preparing food.
We hope you will enjoy using this MoulinexOvatio food processor.
Please read this full instruction booklet to help you achieve the bestresults from your processor.
If you have any questions or concerns regarding this or any Moulinexappliance, please call our Customer Relations Team on:
0845 330 4554 — UK(01) 47 51947 — Ireland
You can also e-mail us on:
[email protected]
Ovatio Food ProcessorInstructions
AT7

A B C
1
A1
A2
A4
A3
A6
A5
PULSE
B1
B2
B3
C
D
E
F
G
H
I
J
K
L
M
N
01
2
D1
D2
E1
E2
F1
F2
H1
H2
H3
I1
I2
13
14
J1
J2
J3
J4
J5
K1
K2
L1
L2
Description
A Motor Unit
A1 Liquidiser drive cover
A2 Liquidiser cover
A3 Bowl and accessory drive
A4 Cover release button (A1)
A5 0 – 1 – 2 speed selector
A6 Pulse button (intermittent speed)
B Bowl assembly
B1 Pusher with measuring section
B2 Lid with feeder tube
B3 BowlB3a driveB3b nut
C Spindle
Accessories Depending on Model
D Blades
D1 Metal blade
D2 Plastic kneading blade
E Grating/Slicing discs
E1 Disc holder
E2 4 discsCoarse grating (c) / coarse slicing (H)Fine grating (A) / fine slicing (D)
F Whisk
F1 Whisk drive
F2 Whisk
G Emulsifying disc
H Citrus press
H1 Cone
H2 Filter basket
H3 Drive
I Liquidiser
I1 Measuring cup
I2 Lid
I3 Jug
I4 Locking lid slot
J Juice extractor
J1 Pusher
J2 Lid
J3 Lid seal
J4 Filter band
J5 Filter holder
K Mini chopper
K1 Lid
K2 Bowl
L Grinder
L1 Lid
L2 Bowl
M Spatula
N Storage cage for accessories

Wiring Instructions for UK and Ireland Only
IMPORTANTThe wires in this cord are coloured in accordance withthe following codesBlue: NeutralBrown: Live
Connect the Brown wire to the terminal in the plugmarked “L” or coloured Red. Connect the Blue wire tothe terminal in the plug marked “N” or coloured black. A13amp fuse should be fitted when the appliance isconnected to a BS 1363 plug. Seek professional adviceif you are unsure of the correct procedure of the above.
VoltageThis appliance is designed to work on 230-240 volts AConly. Check that the mains supply corresponds to thatshown on the rating plate of the appliance. If theappliance is to be used in any country other that that ofpurchase, it should be checked by an approved ServiceDealer. Standards can vary from country to country.
About your factory fitted plug FOR UK and Ireland ONLY(Supplied with certain models)The cord is already fitted with a plug incorporating a 13amp fuse, if the plug does not fit your socket outlet, seenext paragraph.
Should you need to replace the fuse in the plug supplied,a 13 amp approved BS 1362 fuse must be used.The fuse cover is an important part of the plug. Please ensureit is always refitted. If you lose this cover please do not usethe plug. You may contact Moulinex for a replacement.
If the plug supplied does not fit your socket outlet, itshould be removed from the mains cord and disposed ofsafely. The flexible cord insulation should be stripped backas appropriate and a suitable alternative plug fitted. Thereplacement plug must be equipped with a 13 amp fuse.
IMPORTANTIf the electrical cord of this appliance is damaged, itmust only be replaced by an authorised Service Dealer.The safety of this appliance complies with the technicalregulations and standards in force.
Safety Recommendations
— Always read the Instructions for Use carefully before using your appliance for the first time: any use which does not conform to these instructions will absolve Moulinex from any liability.
— Unplug your appliance as soon as you have finished using it and when you are cleaning it.
— Any intervention other than cleaning and normal maintenance by the customer must be carried out by Moulinex approved Service Centre (see list in service booklet).
— Do not place the appliance, the power cable or the plug under running water or in any other liquid.
— Do not allow the power cable to hang down within reach of children.
— The power cable must never be close to a heat source or resting on sharp edges.
— For your own safety, use only Moulinex accessories andspare parts which are suitable for your appliance.
— Always use the pushers to guide the food in the feeder tubes, never use your fingers, or a fork, a spoon, a knife or any utensil.
— Only remove the accessories when the appliance has come to a complete stop.
— Do not introduce any utensil (spoon, spatula…) by the feeder tube.
— Use the accessories one at a time.
— Handle the metal blade and discs with great care: they are extremely sharp.
— You must remove the blades (D) and the spindle (C) before emptying the bowl of its content.
— Never touch the parts when they are moving
— Do not run your appliance empty.
This appliance complies with current safetyregulations and requirements as well as directives:
— 89/336/CEE modified by 93/68/CEE
— 73/23/CEE modified by 93/68/CEE
— Do not leave the appliance switched on while unattended- Use and store it out of children’s reach.
— Do not use an extension lead. If you accept liability for doing so, only use an extension lead which is in good condition, has an earthed plug, and is suited to the power of the appliance.
Never use or plug in your appliance if
— Its power cord is faulty of damaged.
— The appliance has been dropped.
— It has visible damage or operating faults.
In such cases, to avoid any danger contact your nearestApproved Service Centre to have the appliance repaired,as special tools are needed.
Never dismantle the appliance yourself. This will negate the guarantee:
— If the power cord is damaged, it must be replaced by an Authorised Service Centre, in order to avoid any danger.
— This appliance has been designed for domestic use only. Any professional use, inappropriate use or failure to comply with the instructions, the manufacturer acceptsno responsibility and the guarantee does not apply.
2
5a
5b
3 4
78
9
6
B3a
B3b
2
2
3
1
1
42
3
2
3
2
2
3
1
1
2
12
12
1

Using Your Appliance
— Plug the appliance in.- Pulse (intermittent operation): press the button (A6)
using successive pulses to give you better control whenpreparing certain foods.
— Continuous operation: turn the speed selector (A5) to the required position <<1>> or <<2>>.
1 — Using the chopping bowl drive: the liquidiser drive cover (A1) must be locked.
— Using the liquidiser drive: make sure that no accessories are locked on the bowl and accessory drive.
Functions Of Your Food Processor
2 Assembling / Dismantling the Bowl (B3)The bowl is used with the following accessories(depending on model):Blades (D), discs (E)¸whisk (F), emulsifying disc (G), citrus press (H), juice extractor (J).- Place the drive (B3a) on the bowl.- Lock the drive (B3a) with the nut (B3b) as far as it will go.- Dismantle the bowl assembly and clean it after each use.
3 Mixing /Blending/Chopping/KneadingAccessories Used (Depending on Model)
— Bowl assembly (B)¸spindle (C), and blades (D):- Metal blade (D1) for mixing, chopping, kneading or blending.- Plastic kneading blade (D2) for kneading or blending.
Fitting the Accessories- Check that the liquidiser drive cover is closed (A1).- Place the bowl (B3) on the bowl & accessory drive
(A3). Lock it into place using the handle- Place the spindle (C) on to the bowl drive.- Slide the metal blade (D1) or the plastic kneading
blade (D2) on to the spindle (C), down to the bottom ofthe bowl.
— Place the lid (B2) on the bowl and lock it into place until it clicks.Please note: To unlock the blades (D) from the spindle (C):
— Place the assembly bowl on a stable worktop.- Turn the spindle (C) clockwise, holding the blade (D) by
its upper section.
Usage and Practical Tips
Blending- Turn the speed selector (A5) to position <<2>> to
start the appliance.You can blend up to 1 litre of soup, stewed fruits in 20 sec.
Chopping- Turn the speed selector (A5) to position <<2>> to
start the appliance, or for better control over the chopping use the Pulse button (A6).In 15 to 20 sec., you can chop up to 600g of food:
— Hard produce: cheese, dried fruits, certain vegetables (carrots, celery…)
— soft produce: certain vegetables (onions, spinach…).- raw or cooked meat (boned, sinew removed and diced).- raw or cooked fish…
Kneading / Mixing- Turn the speed selector (A5) to position <<2>> to
start the appliance.- When kneading, stop the appliance as soon as the
pastry starts to form a ball.You can:
— knead up to 1.2kg of pastry / dough (biscuit / shortcrust, and bread) in approximately 60 sec.
— mixing up to 1 litre of pancake, waffle batter etc. in 1 min to 1 min 30 sec.
— mixing up to 1.5 kg of light cake mixture (biscuit, sponge) in 1 min 30 to 3 min 30 sec.
4 Slicing and GratingAccessories Used- Bowl assembly (B), spindle (C), and grating / slicing discs (E)
Fitting the accessories- Check that the liquidiser drive cover is locked (A1)- Place the bowl (B3) on the bowl & accessory drive (A3)
Lock it into place using the handle.- Fit the required disc (E2) on to the disc holder (E1)- Place the spindle (C) on the drive, then the disc holder (E1)- Place the lid (B2) on the bowl, then lock it into place
until it clicks.
Usage and Practical Tips- Put the food through the feeder tube using the pusher (B1)- Turn the speed selector (A5) to position <<1>> to
slice or <<2>> to grate and then start the appliance.The slicing/grating discs can (depending on model):
— slice thickly (H) / slice finely (D): potatoes, onions, cucumbers, beetroot, apples, carrots and cabbage…
— coarsely grate (C) / finely grate (A): celery, potatoes, carrots, cheeses…
Beating/Whisking/EmulsifyingAccessories Used (Depending on Model)
— Bowl assembly (B), and balloon whisk (F) or- Bowl assembly (B), emulsifying disc (G) and spindle (C).
Fitting the Accessories- Check that the liquidiser drive cover is locked (A1).- Place the bowl (B3) on the bowl accessory drive (A3).
Lock it into place using the handle.5a With the balloon whisk (F):- Place it on to the bowl drive.5b With the emulsifying disc (G):- Place the spindle (C) on the bowl drive.- Slide the emulsifying disc on to the spindle. Then: — Place the ingredients in the bowl.- Place the lid (B2) on the bowl, then lock it into place
until it clicks.
Usage and Practical Tips- Turn the speed selector (A5) to position <<1>> or
<<2>> to start the appliance.- Do not use the balloon whisk or the emulsifying disc to
knead dough or to mix cake mixtures.You can prepare: mayonnaise, aioli, sauces, egg whites(1 to 7), whipped cream (up to 0.5 litre).
6 Blending/Mixing FinelyAccessories Used- Liquidiser jug (I)
Fitting The Accessories- Press the cover release button (A4) and lift the
liquidiser drive cover (A1)- Place the ingredients in the liquidiser jug (I3), and lock
the lid (I2) on the jug — Place the liquidiser jug (I) on the liquidiser drive (A2)
(mark “1” aligned with on the motor unit) and lock it into place using the handle (mark “2” aligned with onthe motor unit).
Usage and Practical Tips- Turn the speed selector (A5) to position <<1>> or
<<2>> to start blending or for better control over blending, use the Pulse button (A6)
If the lid is not locked or badly positioned, theliquidiser jug cannot be locked into place and will notwork. Once the liquidiser jug and its lid are locked intoplace on the motor unit, the lid cannot be removed.You can add ingredients during blending through the holeof the measuring cup (I1). — Do not fill the liquidiser jug with boiling liquid.You can:- Prepare up to 1.5 litre of extra smooth soup, sauces,
cream, stewed fruits, milk shakes and cocktails.- Blend all types of batter (pancake, fritters, waffles,
custard flan).
7 Squeezing Citrus Fruit (depending on model)
Accessories Used- Bowl (B3) and citrus press (H)
Fitting the Accessory — Check that the liquidiser drive cover is locked (A1)- Place the bowl (B3) on the bowl and accessory drive
(A3). Lock it into place using the handle.- Place the citrus press drive (H3) on to the bowl drive.- Fit the filter basket (H2) by turning it until it locks into place.- Fit the cone (H1) into the hole of the filter basket.
Usage and Practical Tips- Place half a citrus fruit on to the cone (H1).- Turn the speed selector (A5) to position <<1>> to
start the appliance.You can squeeze up to 1 litre of juice without emptyingthe bowl.
8 Extracting Juice from Fruits and Vegetables(depending on model)
Accessories Used- Bowl (B3), spindle (C) and juice extractor (J)
Fitting The Accessories- Check that the liquidiser drive cover is locked (A1)- Place the bowl assembly (B3) on the chopping bowl
drive (A3). Lock it into place by using the handle.- Place the spindle (C) on to the bowl drive.- Slide the filter hood assembly (J3+J4+J5) on to the
spindle (C).- Place the lid (J2) and lock it into place.
Usage and Practical Tips- Turn the speed selector (A5) to position <<2>> to
start the appliance- Insert the ingredients through the feeder tube and
gently press with the pusher (J1).- Remove the pulp regularly from the filter holder and
clean the filter band. Do not use more than 250g of ingredients at a time.
9 Finely Chopping Small Quantities (depending on model)
Accessories Used- Mini chopper (K) or Grinder (L)
Fitting the Accessory- Press the lid release button (A4) and lift the cover (A1)- Put the ingredients in the bowl, and lock the lid onto
the bowl.- Place the accessory on the liquidiser drive (A2) (mark “1”
aligned with the of the motor unit) and lock it into position (mark “2” aligned with the of the motor unit).
If the lid is not locked or is badly positioned the mini chopperor grinder cannot be locked into place and will not work.
Usage and Practical Tips- Turn the speed selector (A5) to position <<2>> to
start chopping, or for greater control over the chopping use the Pulse button (A6)You can with the mini chopper
— Chop in seconds: garlic cloves, herbs, parsley, dried fruits, bread, ham,…
— Maximum quantity of dried fruits (hazelnuts, almonds…): 80 g.
— prepare baby foodsThis mini chopper is not designed to take hardingredients such as coffee beans.You can with the grinder:- Grind in seconds, pepper, Cayenne pepper, dried apricots…- Quantity / Maximum time for dried apricots: 90 g / 4 sec.
Cleaning
— Unplug the appliance.- To make cleaning easier, rinse the accessories straight
after use.- Wash and dry the accessories (they are all dishwasher
safe except the whisk drive (F1))- If the accessories have become discoloured by foods
(carrots, oranges…) rub them gently with a cloth dipped in cooking oil, and then wash as normal.
— Do not place the motor unit (A), nor the whisk drive (F1) in water or near running water. Wipe them with a damp cloth.
Storage
Your Ovatio food processor has:- A storage cage for accessories (N), which fits inside the
assembly bowl (B). You can store the grating/slicing discs (E2), in the disc holder (E1), the metal blade (D1)as well as the spindle (C).
— a cord storage facility under the motor unit to store the mains lead and adjust its length.