Главная >
Sharp
Sharp: инструкции для 376 моделей
-
 Sharp 14D1-G
Телевизор
-
Sharp 14D1-S
Телевизор
-
Sharp 14D2-G
Телевизор
-
Sharp 14D2-S
Телевизор
-
Sharp 14LM-40C
Телевизор
-
Sharp 14LT-45C
Телевизор
-
Sharp 20D2-G
Телевизор
-
Sharp 20D2-S
Телевизор
-
Sharp 21A1
Телевизор
-
Sharp 21D2-G
Телевизор
-
Sharp 21D2-S
Телевизор
-
Sharp 21LF-90C
Телевизор
-
Sharp 21LS-90C
Телевизор
-
Sharp 28LF-94EC
Телевизор
-
Sharp 28LF-96EC
Телевизор
-
Sharp 28LS-92EC
Телевизор
-
Sharp 29LF-92EC
Телевизор
-
Sharp 32LF-94EC
Телевизор
-
Sharp 32LF-96EC
Телевизор
-
Sharp 54AT-15SC
Телевизор
-
Sharp 54AT-16SC
Телевизор
-
Sharp 54GT-25SC
Телевизор
-
Sharp 54GT-26SC
Телевизор
-
Sharp 561 RHS
Широкие Холодильники С Верхней Морозильной Камерой
-
Sharp AE-M18AE
Кондиционер
-
Sharp AH-A12BE
Кондиционер
-
Sharp AH-AP24C E
Кондиционер
-
Sharp AH-AP24CE
Кондиционер
-
Sharp AH-X13BE
Кондиционер
-
Sharp AL-1000
Многофункциональное Устройство (Мфу)
-
Sharp AL-800
Многофункциональное Устройство (Мфу)
-
Sharp AL-840
Многофункциональное Устройство (Мфу)
-
Sharp AL-840-2
Многофункциональное Устройство (Мфу)
-
Sharp AR-121E
Многофункциональное Устройство (Мфу)
-
Sharp AR-122EN
Многофункциональное Устройство (Мфу)
-
Sharp AR-151
Многофункциональное Устройство (Мфу)
-
Sharp AR-155
Многофункциональное Устройство (Мфу)
-
Sharp AR-156
Многофункциональное Устройство (Мфу)
-
Sharp AR-161
Многофункциональное Устройство (Мфу)
-
Sharp AR-163
Многофункциональное Устройство (Мфу)
-
Sharp AR-201
Многофункциональное Устройство (Мфу)
-
Sharp AR-205
Многофункциональное Устройство (Мфу)
-
Sharp AR-206
Многофункциональное Устройство (Мфу)
-
Sharp AR-235
Многофункциональное Устройство (Мфу)
-
Sharp AR-250
Многофункциональное Устройство (Мфу)
-
Sharp AR-275-2
Многофункциональное Устройство (Мфу)
-
Sharp AR-287
Многофункциональное Устройство (Мфу)
-
Sharp AR-405
Многофункциональное Устройство (Мфу)
-
Sharp AR-5012
Многофункциональное Устройство (Мфу)
-
Sharp AR-5015
Многофункциональное Устройство (Мфу)
-
Sharp AR-5015N
Многофункциональное Устройство (Мфу)
-
Sharp AR-505
Многофункциональное Устройство (Мфу)
-
Sharp AR-507
Многофункциональное Устройство (Мфу)
-
Sharp AR-5120
Многофункциональное Устройство (Мфу)
-
Sharp AR-M160
Многофункциональное Устройство (Мфу)
-
Sharp AR-M350
Лазерный Принтер
-
Sharp AY-A12BE
Кондиционер
-
Sharp AY-AP07FHR
Кондиционер
-
Sharp AY-AP07FHR-WH
Сплит-Система
-
Sharp AY-AP12FHR
Кондиционер
-
Sharp AY-AP12FHR-WH
Кондиционер
-
Sharp AY-AP24C E
Кондиционер
-
Sharp AY-AP24CE
Кондиционер
-
Sharp AY-M09AE
Кондиционер
-
Sharp AY-M18AE
Кондиционер
-
Sharp AY-X13BE
Кондиционер
-
Sharp AY-XM12CR
Кондиционер
-
Sharp AY-XP08CE
Кондиционер
-
Sharp AY-XP10CE
Кондиционер
-
Sharp AY-XP12ER
Кондиционер
-
Sharp AY-XP12FR
Кондиционер
-
Sharp AY-XP13CE
Кондиционер
-
Sharp AY-XP7FR
Кондиционер
-
Sharp AY-XP9FR
Кондиционер
-
Sharp AY-XPM12CR
Кондиционер
-
Sharp CD-BK2600WR
Музыкальный Центр
-
Sharp CD-BK300WR
Музыкальный Центр
-
Sharp CD-DV600WR
Музыкальный Центр
-
Sharp CD-E700WR
Музыкальный Центр
-
Sharp CD-E800WR
Музыкальный Центр
-
Sharp CD-M10000W
Музыкальный Центр
-
Sharp CD-M4000WR
Музыкальный Центр
-
Sharp CD-M5000WR
Музыкальный Центр
-
Sharp CD-M8000WR
Музыкальный Центр
-
Sharp CD-MPS660HR
Музыкальный Центр
-
Sharp CD-MPX100HR
Музыкальный Центр
-
Sharp CD-XP120WR
Музыкальный Центр
-
Sharp CD-XP160WR
Музыкальный Центр
-
Sharp CD-XP170WR
Музыкальный Центр
-
Sharp CD-XP200WR
Музыкальный Центр
-
Sharp CD-XP250WR
Музыкальный Центр
-
Sharp CD-XP260WR
Музыкальный Центр
-
Sharp CD-XP300WR
Музыкальный Центр
-
Sharp CD-XP350WR
Музыкальный Центр
-
Sharp CD-XP360WR
Музыкальный Центр
-
Sharp CD-XP500WR
Музыкальный Центр
-
Sharp DV-NC100(RU)
Бытовая Техника
-
Sharp DV-NC70RU
DVD-проигрыватель
-
Sharp DV-S1(RU)
Бытовая Техника
-
Sharp DV-SL10(RU)
Бытовая Техника
-
Sharp DV-SV80S
DVD-проигрыватель
-
Sharp DV-SV80S(RU)
Бытовая Техника
-
Sharp DV-SV90S
DVD-проигрыватель
-
Sharp DV-SV90S(RU)
Бытовая Техника
-
Sharp EL-501V
Калькулятор
-
Sharp FO-145
Факсимильный Аппарат (Факс)
-
Sharp FO-155
Факс
-
Sharp FO-165
Факсимильный Аппарат (Факс)
-
Sharp FO-2600
Факс
-
Sharp FO-355
Факс
-
Sharp FO-435
Факсимильный Аппарат (Факс)
-
Sharp FO-455
Факс
-
Sharp FO-50
Факс
-
Sharp FO-51
Факс
-
Sharp FO-90
Факс
-
Sharp FO-A650
Факс
-
Sharp FO-A760
Факсимильный Аппарат (Факс)
-
Sharp FO-P510
Факс
-
Sharp FO-P600
Факс
-
Sharp FU-21SE
Воздухоочиститель
-
Sharp FU-40SE
Воздухоочиститель
-
Sharp FU-425E
Воздухоочиститель
-
Sharp FU-440E
Воздухоочиститель
-
Sharp HT-CN500DVHR
Домашний кинотеатр
-
Sharp HT-M700HR
Домашний кинотеатр
-
Sharp HT-X18HR
Домашний кинотеатр
-
Sharp HT-X1H
Домашний кинотеатр
-
Sharp LC 32 DH77RU
Телевизор
-
Sharp LC-13B4E
Телевизор
-
Sharp LC-13SH1E
Телевизор
-
Sharp LC-15B4E
Телевизор
-
Sharp LC-15SH1E
Телевизор
-
Sharp LC-15SH2E
Телевизор
-
Sharp LC-19 DV200 RU
Жк Телевизор 19″ C Dvd-Плеером
-
Sharp LC-20 D1RU
Телевизор
-
Sharp LC-20 S4 RU
Телевизор
-
Sharp LC-20 T1RU
Телевизор
-
Sharp LC-20 V1RU-BK
Телевизор
-
Sharp LC-20B4E
Телевизор
-
Sharp LC-20B6E
Телевизор
-
Sharp LC-20S4E
Телевизор
-
Sharp LC-20SH1E
Телевизор
-
Sharp LC-20SH2E
Телевизор
-
Sharp LC-22 DV200 RU
Жк Телевизор 22″ С Dvd-Плеером
-
Sharp LC-22SV2E
Телевизор
-
Sharp LC-23LE448RU
Телевизор
-
Sharp LC-24CHF4012E
Телевизор
-
Sharp LC-24CHF4012EW
Телевизор
-
Sharp LC-26 DV200 RU
Жк Телевизор 26″ C Dvd-Плеером
-
Sharp LC-26 P55E
Телевизор
-
Sharp LC-26 P70E
Телевизор
-
Sharp LC-26 SA1 RU
Телевизор
-
Sharp LC-26GA5E
Телевизор
-
Sharp LC-26GA6E
Телевизор
-
Sharp LC-26P50E
Телевизор
-
Sharp LC-30HV4E
Телевизор
-
Sharp LC-32 D44 RU
Телевизор
-
Sharp LC-32 DH500 RU
Телевизор
-
Sharp LC-32 DV200 RU
Жк Телевизор 32″ C Dvd-Плеером
-
Sharp LC-32 GA8 RU
Телевизор
-
Sharp LC-32 GD8 RU
Телевизор
-
Sharp LC-32 LE320 RU
Телевизор
-
Sharp LC-32 LE600 RU
Телевизор
-
Sharp LC-32 P55E
Телевизор
-
Sharp LC-32 P70E
Телевизор
-
Sharp LC-32 RA1RU
Телевизор
-
Sharp LC-32 RD2RU
Телевизор
-
Sharp LC-32 RD8 RU
Телевизор
-
Sharp LC-32 SA1 RU
Телевизор
-
Sharp LC-32 ST1 RUA
Телевизор
-
Sharp LC-32 X20 RU
Телевизор
-
Sharp LC-32 XL8 RU
Телевизор
-
Sharp LC-32GA5E
Телевизор
-
Sharp LC-32GA6E
Телевизор
-
Sharp LC-32P50E
Телевизор
-
Sharp LC-37 D65RU
Телевизор
-
Sharp LC-37 P55 E
Телевизор
-
Sharp LC-37 P70E
Телевизор
-
Sharp LC-37 RA1RU
Телевизор
-
Sharp LC-37 RD2RU
Телевизор
-
Sharp LC-37 SA1 RU
Телевизор
-
Sharp LC-37 X20 RU
Телевизор
-
Sharp LC-37 XD1RU
Телевизор
-
Sharp LC-37GA5E
Телевизор
-
Sharp LC-37GA6E
Телевизор
-
Sharp LC-37P50E
Телевизор
-
Sharp LC-40 LE600 RU
Телевизор
-
Sharp LC-40 LE822ERU
Led Телевизор 40»
-
Sharp LC-42 DH77RU
Телевизор
-
Sharp LC-42 LE320 RU
Led Телевизор 40»
-
Sharp LC-42 SA1RU
Телевизор
-
Sharp LC-42 SB55RU
Телевизор
-
Sharp LC-42 X20 RU
Телевизор
-
Sharp LC-42 XD1RU
Телевизор
-
Sharp LC-42XL2RU
Телевизор
-
Sharp LC-43CUF8472ES
Телевизор
-
Sharp LC-45GD1E
Телевизор
-
Sharp LC-46 HD1RU
Телевизор
-
Sharp LC-46 LE600 RU
Телевизор
-
Sharp LC-46 LE822ERU
Led Телевизор 46″
 Sharp 14D1-G
 Sharp 14D2-G
 Sharp 14D2-S
 Sharp 21A1
 Sharp 21D2-G
 Sharp 21D2-S
 Sharp 21LF-90C
 Sharp 29LF-92EC
 Sharp 32LF-94EC
 Sharp 32LF-96EC
 Sharp 54AT-15SC
 Sharp 54AT-16SC
 Sharp 561 RHS
 Sharp AH-A12BE
 Sharp AH-X13BE
 Sharp AL-1000
 Sharp AL-800
 Sharp AL-840
 Sharp AL-840-2
 Sharp AR-121E
 Sharp AR-122EN
 Sharp AR-151
 Sharp AR-155
 Sharp AR-156
 Sharp AR-161
 Sharp AR-163
 Sharp AR-201
 Sharp AR-205
 Sharp AR-206
 Sharp AR-235
 Sharp AR-250
 Sharp AR-275-2
 Sharp AR-287
 Sharp AR-405
 Sharp AR-5012
 Sharp AR-5015
 Sharp AR-5015N
 Sharp AR-505
 Sharp AR-507
 Sharp AR-5120
 Sharp AR-M160
 Sharp AR-M350
 Sharp AY-A12BE
 Sharp AY-AP07FHR
 Sharp AY-AP07FHR-WH
 Sharp AY-AP12FHR
 Sharp AY-AP12FHR-WH
 Sharp AY-AP24CE
 Sharp AY-X13BE
 Sharp AY-XM12CR
 Sharp AY-XP08CE
 Sharp AY-XP10CE
 Sharp AY-XP12ER
 Sharp AY-XP12FR
 Sharp AY-XP13CE
 Sharp AY-XP7FR
 Sharp AY-XP9FR
 Sharp AY-XPM12CR
 Sharp CD-BK300WR
 Sharp CD-DV600WR
 Sharp CD-E700WR
 Sharp CD-E800WR
 Sharp CD-M10000W
 Sharp CD-M4000WR
 Sharp CD-M5000WR
 Sharp CD-M8000WR
 Sharp CD-MPS660HR
 Sharp CD-MPX100HR
 Sharp CD-XP120WR
 Sharp CD-XP160WR
 Sharp CD-XP170WR
 Sharp CD-XP200WR
 Sharp CD-XP250WR
 Sharp CD-XP260WR
 Sharp CD-XP300WR
 Sharp CD-XP350WR
 Sharp CD-XP360WR
 Sharp CD-XP500WR
 Sharp DV-NC100(RU)
 Sharp DV-NC70RU
 Sharp DV-S1(RU)
 Sharp DV-SL10(RU)
 Sharp DV-SV80S
 Sharp DV-SV80S(RU)
 Sharp DV-SV90S
 Sharp DV-SV90S(RU)
 Sharp EL-501V
 Sharp FO-145
 Sharp FO-155
 Sharp FO-165
 Sharp FO-2600
 Sharp FO-355
 Sharp FO-435
 Sharp FO-455
 Sharp FO-50
 Sharp FO-51
 Sharp FO-90
 Sharp FO-A650
 Sharp FO-A760
 Sharp FO-P510
 Sharp FO-P600
 Sharp FU-21SE
 Sharp FU-40SE
 Sharp FU-425E
 Sharp FU-440E
 Sharp HT-CN500DVHR
 Sharp HT-M700HR
 Sharp HT-X18HR
 Sharp HT-X1H
 Sharp LC 32 DH77RU
 Sharp LC-13B4E
 Sharp LC-13SH1E
 Sharp LC-15B4E
 Sharp LC-15SH1E
 Sharp LC-15SH2E
 Sharp LC-19 DV200 RU
 Sharp LC-20 D1RU
 Sharp LC-20 S4 RU
 Sharp LC-20 T1RU
 Sharp LC-20 V1RU-BK
 Sharp LC-20B4E
 Sharp LC-20B6E
 Sharp LC-20S4E
 Sharp LC-20SH1E
 Sharp LC-20SH2E
 Sharp LC-22 DV200 RU
 Sharp LC-22SV2E
 Sharp LC-23LE448RU
 Sharp LC-24CHF4012E
 Sharp LC-24CHF4012EW
 Sharp LC-26 DV200 RU
 Sharp LC-26 P55E
 Sharp LC-26 P70E
 Sharp LC-26 SA1 RU
 Sharp LC-26GA5E
 Sharp LC-26GA6E
 Sharp LC-26P50E
 Sharp LC-30HV4E
 Sharp LC-32 D44 RU
 Sharp LC-32 DH500 RU
 Sharp LC-32 DV200 RU
 Sharp LC-32 GA8 RU
 Sharp LC-32 GD8 RU
 Sharp LC-32 LE600 RU
 Sharp LC-32 P55E
 Sharp LC-32 P70E
 Sharp LC-32 RA1RU
 Sharp LC-32 RD2RU
 Sharp LC-32 RD8 RU
 Sharp LC-32 ST1 RUA
 Sharp LC-32 X20 RU
 Sharp LC-32 XL8 RU
 Sharp LC-32GA5E
 Sharp LC-32GA6E
 Sharp LC-32P50E
 Sharp LC-37 D65RU
 Sharp LC-37 P55 E
 Sharp LC-37 P70E
 Sharp LC-37 RA1RU
 Sharp LC-37 RD2RU
 Sharp LC-37 SA1 RU
 Sharp LC-37 X20 RU
 Sharp LC-37 XD1RU
 Sharp LC-37GA5E
 Sharp LC-37GA6E
 Sharp LC-37P50E
 Sharp LC-40 LE600 RU
 Sharp LC-40 LE822ERU
 Sharp LC-42 DH77RU
 Sharp LC-42 LE320 RU
 Sharp LC-42 SA1RU
 Sharp LC-42 SB55RU
 Sharp LC-42 X20 RU
 Sharp LC-42 XD1RU
 Sharp LC-42XL2RU
 Sharp LC-43CUF8472ES
 Sharp LC-45GD1E
 Sharp LC-46 HD1RU
 Sharp LC-46 LE600 RU
 Sharp LC-46 LE822ERU
- 1
- 2
Топ 10 инструкций
100.00
Gefest 6100-03
99.98
Alcatel 9008D A3 XL 16Gb White Blue
99.85
Gefest 6100-04 0001
99.85
Alcatel Pixi 4
99.75
Casio EX-H20G Silver
99.72
Tp-Link TL-WA5210G
99.72
Gefest 3102
99.67
Casio CTK-4000
99.64
Gefest 6100-02
99.63
Casio EX-Z1050 Silver
К рейтингу инструкций и мануалов →
Интересные инструкции

Gefest 6100-03

Alcatel 9008D A3 XL 16Gb White Blue

Gefest 6100-04 0001
Alcatel Pixi 4

Casio EX-H20G Silver

Tp-Link TL-WA5210G
DV-NC70RU VCR/DVD COMBINATION MODEL DV-NC70RU OPERATION MANUAL OPERATION MANUAL / ENGLISH …… …… OPERATE EJECT/STOP REW PLAY PLAY/×2 / REC STOP OPEN/CLOSE TIMER CH AV 2 IN VIDEO L(MONO)-AUDIO-R VCR/DVD SELECTOR VCR DVD • The region number for this DVD player is 5. • PAL NTSC 5 TINS-A368WJZZ
About This Manual • All mentions of “the Remote” refer to the remote control unit. • The following table describes the icons used in this Operation Manual. Icon Meaning Tips and Hints for easier operation DVD VIDEO CD CD Functions for DVD Functions for VIDEO CD Functions for Audio CD GENERAL
SAFETY INFORMATION CAUTION: USE OF CONTROLS OR ADJUSTMENTS OR PERFORMANCE OF PROCEDURES OTHER THAN THOSE SPECIFIED HEREIN MAY RESULT IN HAZARDOUS RADIATION EXPOSURE. AS THE LASER BEAM USED IN THIS PRODUCT IS HARMFUL TO THE EYES, DO NOT ATTEMPT TO DISASSEMBLE THE CABINET. REFER SERVICING TO
SAFETY INFORMATION Location and Handling • Do not place your Product in closed spaces or do not cover it to prevent excessive temperatures inside the Product. • Do not place the Product in direct sunlight, or near heat sources. • Keep the Product away from strong magnetic objects. • Do not place
Types of Discs that Can Be Played on This Product This Product can play back discs bearing any of the following marks: DVD DVD-R/DVD-RW* [8cm(3″) disc/12cm(5″) disc] See See 1 2 on the next page VIDEO CDs [8cm(3″) disc/12cm(5″) disc] • Supports up to version 2.0. Audio CDs [8cm(3″) disc/12cm(5″)
Types of Discs that Can Be Played on This Product Disc Function or Operation that is Not Available In the cases listed below, the or indicator may appear on the TV screen, which indicates that the function or operation is not available. • When you intend to perform the function or operation on
Disc Handling and Maintenance Handling Precautions • Hold the disc by the edges so the surface will not be soiled with fingerprints. ( A ) Fingerprints, dirt and scratches can cause skipping and distortion. • Do not write on the label side with a ball-point pen or other writing utensils. • Do not
Contents GENERAL INFORMATION Changing Language ……………………………….. 37 VCR Display Information ………………………. 38 SAFETY INFORMATION ………………………….. 1 Types of Discs that Can Be Played on This Product ………………………………………. 3
Contents Subtitle language setting ……………………………. 83 Angle setting ……………………………………………..84 Audio setting ……………………………………………..85 3D VIRTUAL SURROUND setting ………………. 86 DIGITAL GAMMA setting
Features ■ Common Features • A DVD, AUDIO CD, VIDEO CD player and VCR all in one. • Simultaneous VCR recording and DVD playback. ■ VCR • • • • • • Hi-Fi Stereo Sound, NICAM/IGR System 380-times High Speed Rewind Function (in NTSC) S-VHS Simple Playback HQ (High Quality) Circuitry Simple Recording
Major Components VCR Main Unit (Front) Numbers in refer to the main pages in this Operation Manual where the topic is explained. 52 Cassette compartment Front AUDIO/ VIDEO input jack 70 OPERATE EJECT/STOP / REW 18 OPERATE 18 VCR/DVD SELECTOR 52 EJECT/STOP 67 TIMER indicator PLAY/×2 PLAY REC STOP
Major Components DVD Main Unit (Front) Numbers in refer to the main pages in this Operation Manual where the topic is explained. 75 Disc tray OPERATE 74 75 OPERATE EJECT/STOP REW PLAY/×2 PLAY REC / STOP OPEN/CLOSE OPEN/CLOSE TIMER CH AV 2 IN VIDEO L(MONO)-AUDIO-R VCR/DVD SELECTOR VCR DVD VCR/DVD
Major Components Remote (VCR Operation Buttons) • The explanations on this page use the VCR/DVD CHANGE Switch in the VCR position. Numbers in refer to the main pages in this Operation Manual where the topic is explained. TIMER ON/OFF 67 OPERATE OPERATE 18 FUNCTION CONTROL ON SCREEN 38 CURSOR ( / /
Major Components Remote (DVD Operation Buttons) • The explanations on this page use the VCR/DVD CHANGE Switch in the DVD position. Numbers in refer to the main pages in this Operation Manual where the topic is explained. PROG 89 , REPEAT 92 OPERATE 75 OPERATE ON SCREEN 49 DISPLAY 49 18 VCR/DVD
Major Components Main Unit (Rear) DVD/VCR DVD OUT LINE OUT 1 LINE IN 1 LINE OUT 2 COMPONENT R DIGITAL AUDIO Y L PB (CB) S-VIDEO R VCR ANTENNA IN R AUDIO AUDIO L VIDEO RF OUT VIDEO AUDIO PR (CR) L To an AC outlet 15 DVD/VCR shared AUDIO output jacks VCR AUDIO input jacks DVD Coaxial DIGITAL 17
Basic Connection Caution: • • • • Connecting to ANTENNA IN/RF OUT The connection method differs depending on the type of TV. To ANTENNA IN jack DVD/VCR DVD OUT LINE OUT 1 LINE IN 1 LINE OUT 2 COMPONENT Y R DIGITAL AUDIO AUDIO L PB (CB) S-VIDEO R VIDEO AUDIO PR (CR) L This Product To RF OUT jack TV
Basic Connection Connecting a TV Equipped with VIDEO/AUDIO Input Jacks This Product DVD/VCR DVD OUT LINE OUT 2 (Red) COMPONENT LINE OUT 1 LINE IN 1 R DIGITAL AUDIO Y AUDIO (White)AUDIO L PB (CB) S-VIDEO RF OUT L (Yellow) VIDEO VIDEO AUDIO PR (CR) Required cable R VCR ANTENNA IN R L To DVD/VCR
DVD Audio Connections Connecting a TV Equipped with S-VIDEO Input Jacks When you want to achieve a better video image by connecting a TV equipped with an S-VIDEO input connector to the Product, you should use an S-VIDEO cable (commercially available) to connect the TV to the Product. Connecting to
DVD Audio Connections Playing Dolby Digital (5.1 channel), DTS or MPEG audio Connecting an amplifier with a Dolby Digital/DTS/MPEG Audio digital surround processor or a Dolby Digital/ DTS/MPEG Audio surround processor to your Product’s coaxial digital jack provides richer and more powerful audio
Preparations Before Using the Product Preparing to Watch a VCR or a DVD 1 Turn on the TV and switch the TV channel to the external “VIDEO” or “AV” channel connected to the DVD/VCR shared output jacks. OPERATE EJECT/STOP REW PLAY PLAY/×2 REC / 2 3 Press OPERATE. • The product is turned on. OPERATE
Adjusting the Video Channel To view the output of your Product on the television screen, you must select an unused channel on your TV and tune it to the output of your Product (see Table 1 for factory preset to UHF Channel). 1 Make sure both Products (TV and this Product) are connected (power cord)
Adjusting the Video Channel 7 Press / | to select the RF output system that corresponds to your TV by referring to the chart shown to the below, and press SET. Hong Kong Ex. China, Russia South East Asia Australia New Zealand I,B/G,D/K (RF system) I D/K B/G TIMER OPERATE ON/OFF 8 Press OPERATE to
Auto Tuning System This Product is equipped with an Auto Tuning System to provide easier set up of the Product. After following the instructions for “Basic Connection” on pages 14 and 15 and “Adjusting the Video Channel” on page 19, turn on your TV, press OPERATE to turn on the Product, and select
GB 22
VCR Setup VCR SETUP VCR Setup ………………………………………………………………………… 24 Menu Screen ……………………………………………………………………. 24 Mode Selection
VCR Setup Menu Screen The menu screen is a home screen used to select various screen functions. A sub-menu will appear once you select an item for the menu. See the following pages for details on each menu procedure. Menu Screen MENU TIMER MODE CHANNEL PRESET CLOCK LANGUAGE :SELECT SET:ENTER
VCR Setup Mode Selection You can set the basic functions listed in the table below on the MODE selection screen. Preparation • Press OPERATE. Then move the VCR/DVD CHANGE Switch to VCR. 1 2 Press VCR MENU to display the menu screen. Select “MODE” with ‘ / » and then press SET to confirm. TIMER
VCR Setup 4 Set “NICAM” to “AUTO” or “OFF” with / |. Then press «. COLOUR AUTO PAL MESECAM NTSC NTSC 3.58 4.43 PAL TV BLUE BACK AUTO OFF AUTO RENTAL ON OFF REPEAT ON OFF NICAM AUTO OFF S.PICTURE ON OFF :SELECT :CHANGE SET:ENTER MENU:EXIT TIMER OPERATE ON/OFF AUTO…………. Usually select
VCR Setup Setting the Channels Your Product can receive VHF channels 1A to E12 (C1 to C12), CATV channels S1 to S41 (Z1 to Z37) and UHF channels E21 to E69 (C13 to C57). Your Product has 84 programmable channel positions, each of which can be set to any of the broadcast and CATV channels. • Channel
VCR Setup Auto Tuning Preparation • Press OPERATE. Then move the VCR/DVD CHANGE Switch to VCR. • Ensure the Video channel is selected on the TV. 1 Press VCR MENU. Press ‘ / » to select “CHANNEL PRESET”. Press SET to confirm. TIMER OPERATE ON/OFF MENU TIMER MODE CHANNEL PRESET CLOCK LANGUAGE :SELECT
VCR Setup 5 To change the order of tuned-in broadcast, press ‘ / «/ / | to select the channel to be moved. Press SET to confirm . “SELECTED: CH078” will appear. MOVE 1/5 1CH002 7 13 2CH003 8 14 3CH004 9 15 4CH075 10 16 5CH078 11 17 6 12 18 SELECTED :CH078 :SELECT SET:ENTER MENU:EXIT 6 TIMER
VCR Setup Manual Tuning Preparation • Press OPERATE. Then move the VCR/DVD CHANGE Switch to VCR. • Ensure the Video channel is selected on the TV. Example: Tuning Channel Position 48 to Broadcast TV Channel E7 (VCR CHANNEL 007 for system I area.) 1 Press VCR MENU. Press ‘ / » to select “CHANNEL
VCR Setup 5 Press the number buttons (0 to 9) or / | until you see the desired broadcast channel E7 (VCR CHANNEL 007) on your TV and press «. PRESET CH SYSTEM CHANNEL FINE TUNING SKIP :SELECT SET:ENTER 48 I B/G D/K 007 ON OFF :CHANGE MENU:EXIT TIMER OPERATE ON/OFF For fine tuning, press / |
VCR Setup Channel Skip/Cancelling Skip Channel Skip If there are channel positions that are not preset, you can skip them with the following procedure. Preparation • Press OPERATE. Then move the VCR/DVD CHANGE Switch to VCR. TIMER OPERATE ON/OFF Example: Skip channel position 12. 1 FUNCTION PROG/
VCR Setup 5 Press / | to set “ON” and press SET to confirm. PRESET CH SYSTEM CHANNEL FINE TUNING SKIP :SELECT SET:ENTER 6 7 12 I B/G D/K 012 ON OFFF :CHANGE MENU:EXIT If you wish to set more channels to be skipped, repeat steps 3 through 5. Press VCR MENU to return to the normal screen. TIMER
VCR Setup Cancelling Skip Example: Reset channel position 12. 1 Follow the steps 1 and 2 from “Channel Skip” on page 32. 2 Select the channel position you wish to unskip with / | or number buttons (0 to 9). PRESET CH SYSTEM CHANNEL FINE TUNING SKIP 12 I B/G D/K 012 ON OFF TIMER OPERATE ON/OFF
VCR Setup Setting the Clock When you use the Product for the first time or after a power failure of more than 60 minutes the clock has to be reset. Apply power to the Product to switch it on. Then perform the following procedure. Initial Setting of Clock 1 First set the language and system setting.
VCR Setup 5 Set the year digits with the number buttons (0 to 9) or ‘ / » on the Remote. (If there is only one “year” digit, enter a 0 first.) CLOCK MODE TIME 24H 10:28 DATE YEAR 15/12 00 SELECT : ENTER :SET CHANGE: EXIT :MENU TIMER OPERATE ON/OFF 6 Press SET to return to the normal screen.
VCR Setup Setting the Language This Product is factory preset to display the LANGUAGE setting screen after VCR MENU is pressed when the Product is operated for the first time. In some cases, the retailer may have already set the language, and the CLOCK setting screen will appear after VCR MENU is
VCR Display Information The tape counter and VCR mode can be shown on the screen while you are playing back a tape or watching a broadcast on the video channel. PLAY, ×2 Display example VSF, FF Operating mode S. PICTURE (Sharp Super Picture) VSR, REW STOP, CASSETTE IN F. ADV S.PICTURE ON SP STOP
DVD Setup 40 40 41 42 44 44 45 46 46 47 47 48 49 49 49 50 DVD SETUP DVD Setup …………………………………………………………………………… About the SETUP Screen …………………………………………………….. TV MODE Setting
DVD Setup About the SETUP Screen This section describes how to specify various basic settings using the SETUP screen. The list below shows all the items you can set and adjust. See the following pages for details on each setup procedure. • The setting procedures described on the following pages are
DVD Setup TV MODE Setting Preparation • See Preparing to Watch a VCR or a DVD on page 18. 1 2 While this product is stopped, press DVD SETUP to display the SETUP screen. Use ‘ or » to select the “ TIMER OPERATE ON/OFF PROG DISPLAY FUNCTION PROG/ CONTROL REPEAT TV MODE”. 3 DVD MENU CLEAR RETURN 4:3
DVD Setup PARENTAL Level Setting Certain discs come preset with country codes and parental level settings defined for particular countries. Discs equipped with the parental lock function are rated according to their content. The rated content allowed by a parental lock level and the way a DVD can
DVD Setup 5 Press ‘, «, | or to select the desired parental level and then press ENTER. (Example) Selecting “LEVEL 8” PARENTAL PASSWORD —PASSWORD LEVEL 8 CODE RUSSIA TIMER OPERATE ON/OFF PROG ON VCR/DVD VCR MENU SCREEN SELECTOR DVD SETUP DISPLAY FUNCTION PROG/ CONTROL REPEAT • Level 1: for most
DVD Setup AUDIO Setting COMPRESSION ………… Use this setting for increasing the average volume of Dolby Digital audio when playing a DVD. DIGITAL ……………… Use this setting for specifying the type of digital output when playing a disc. CINEMA VOICE …………. Use the setting for
DVD Setup 3 Use ‘ or » to select “COMPRESSION”. 4 Press ENTER to display the settings you can select. AUDIO COMPRESSION ON OFF ENTER 5 6 SELECT ENTER RETURN Use ‘ or » to select “ON” or “OFF”. • Use of the “OFF” setting is recommended when the product is connected to audio equipment. TIMER OPERATE
DVD Setup Setting the MPEG • Before setting the “MPEG”, perform the step 1 to 2 on pages 47 and 48. 1 2 Press ENTER and then use ‘ or » to select “MPEG”. Press ENTER to display the settings you can select. BITSTREAM TIMER OPERATE ON/OFF ENTER 3 SELECT ENTER ON VCR/DVD VCR MENU SCREEN SELECTOR DVD
DVD Setup DISC LANGUAGE Setting Use this setting for selecting the language for subtitles, audio tracks and disc menu. Setting SUBTITLE, AUDIO and MENU languages Preparation • See Preparing to Watch a VCR or a DVD on page 18. 1 2 TIMER OPERATE ON/OFF PROG EJECT Press DVD SETUP to display the SETUP
DVD Setup Selecting languages from OTHER 1 Select “OTHER” with ‘, «, and |, then press ENTER to set the “OTHER” input item (two letters). • See Language Code List for Disc Language on page 50 when selecting the code. (Example) Selecting “OTHER” in “AUDIO” OTHER AUDIO AUDIO 1 R 2 U TIMER OPERATE
DVD Display Information Operation Mode Indicators Each time ON SCREEN on the Remote is pressed, the display on the TV screen changes the mode in the following sequence: AUTO mode → ON mode → OFF mode • AUTO mode …. Displays indicators for 3 seconds when operation begins. • ON mode ………
Language Code List for Disc Language Code Code Language Name Code Language Name Code Language Name AA Afar FY Frisian MG Malagasy SL Slovenian AB Abkhazian GA Irish MI Maori SM Samoan AF Afrikaans GD Scots Gaelic MK Macedonian SN Shona AM Ameharic GL Galician ML Malayalam SO Somali AR Arabic GN
Watching the VCR 52 52 52 52 53 53 53 53 54 54 54 54 54 55 55 56 57 57 57 58 59 60 61 61 61 62 62 62 62 63 64 64 65 68 69 70 70 71 WATCHING THE VCR Playback ……………………………………………………………………………… Inserting a Video Cassette
Playback Inserting a Video Cassette Gently insert the video cassette into the cassette compartment. The Product turns on automatically. If the cassette is inserted incorrectly, the loading system will not function. Do not force the cassette into the Product. When the cassette has been properly
Playback Fast Forwarding and Rewinding 1 2 3 Press ËSTOP to stop the video tape. Press FFè or È REW. OPERATE EJECT/STOP PLAY REW PLAY/×2 REC / OPEN/CLOSE VCR DVD Press ËSTOP to stop fast forward/rewind. • If you use other than E-90/E-180 cassettes, fast forward and rewind may take somewhat longer.
Playback NTSC Tape Play Back on PAL TV When you play back an NTSC tape on your Product, it is possible to use a PAL or multi-system compatible TV. However, please note the following: • The picture will shrink vertically to some degree, as shown in the diagram, but this does not indicate a
Playback AUTO RENTAL (This function only works when AUTO RENTAL mode on the MODE selection screen is set to “ON”.) The convenient auto rental mode lets you enjoy playback with ease. When you insert a cassette with the erasure protection tab removed (rental videos, etc.), your Product automatically
Playback 2 Press ‘ / » to select “COLOUR”. COLOUR AUTO PAL MESECAM NTSC NTSC 3.58 4.43 PAL TV BLUE BACK AUTO OFF AUTO RENTAL ON OFF REPEAT ON OFF NICAM AUTO OFF S.PICTURE ON OFF :SELECT :CHANGE SET:ENTER MENU:EXIT TIMER OPERATE ON/OFF 3 Press / | to select “AUTO”, “PAL”, “MESECAM” or “NTSC”. 4
Playback Playback of Hi-Fi Recorded Tapes This Product will play back both video and audio, or audio-only tapes recorded in the Hi-Fi mode. • Stereo sound output is only possible using the AUDIO OUT terminals. Sound from the radio frequency converter (RF OUT) is mono only. A blue screen will appear
Sharp Super Picture This function creates clearer picture quality only during playback. 1 2 Press VCR MENU to display the menu screen. Select “MODE” with ‘ / » and then press SET to confirm. MENU TIMER MODE CHANNEL PRESET CLOCK LANGUAGE :SELECT SET:ENTER TIMER OPERATE ON/OFF Select “S.PICTURE” with
Auto Repeat With this feature, the entire tape is played back repeatedly. 1 Press VCR MENU to display the menu screen. 2 Select “MODE” with ‘ / » and then press SET to confirm. MENU TIMER MODE CHANNEL PRESET CLOCK LANGUAGE :SELECT SET:ENTER TIMER OPERATE ON/OFF PROG ON VCR/DVD VCR MENU SCREEN
Auto Zero Back The zero-back function makes the cassette fast forward (or rewind) to the previously set “0:00.00” point and stop there. 1 Make sure the counter is displayed, then press CLEAR on the Remote at the point you wish to return and later “0:00.00” is displayed. 2 Press ZERO BACK on the
DPSS (Digital Program Search System)/Skip Search DPSS With this feature you can quickly locate a desired section of the tape. The DPSS feature makes use of index signals to search for a specified tape segment and begin playback automatically. Index signal An index signal is automatically recorded
TV Programme Recording Cassette Erase Protection A cassette has a removable tab to prevent accidental , erasure of recorded material. Removing the tab prevents recording. To record on a video cassette with the tab removed, place adhesive tape over the tab opening. ERASURE PROTECTION TAB PAL SECAM
TV Programme Recording Recording NICAM/IGR Multiplex Broadcasts This Product is capable of receiving NICAM multiplex broadcasts (PAL-I, B/G, D/K) and IGR multiplex broadcasts (PAL-B/G, D/K). NICAM multiplex broadcasts will be recorded in stereo/bilingual when the NICAM setting on the OSD’s MODE is
Simple Recording Timer Immediate Recording This is convenient function when having an unexpected visitor or telephone call. 1 Select the channel position to be recorded with CH ‘ / «. (Example) Channel position 2 2 S.PICTURE ON I / II SP L R TIMER OPERATE ON/OFF FUNCTION PROG/ CONTROL REPEAT OPEN/
Recording with the Timer The timer can be set manually for automatic recording of up to 8 events over a 365 day period. Preparation • Load the cassette, ensuring the erasure protection hole is covered. The Product power will automatically turn on. • Check that the clock is displaying the correct
Recording with the Timer 4 If you want to record only once, press | and go to step 5. Otherwise, select “D (DAILY)” to record at the same time each day or “W (WEEKLY)” to record at the same time each week with ‘ / «, and then pressing | . 1/2 DATE PR START STOP 15/12 —:—:— SP —/— —:—:—
Recording with the Timer 8 Select the speed with ‘ / «. DATE 15/12 —/—/—/— 1/2 PR START STOP 4 7 1 2 : 0 0 PM1 2 : 3 0 PMS P —:—:— —:—:— —:—:— — • SP: Standard Play, LP: Long Play, EP: Extended Play TIMER OPERATE ON/OFF 9 Press SET. To programme additional timer settings, repeat
Recording with the Timer Confirming Timer Programmes You can see on the On Screen Display a list of all timer programmes that are already set. Preparation • Press OPERATE. Then move the VCR/DVD CHANGE Switch to VCR and select the video channel on the TV. 1 Press VCR MENU. (If the “ ” indicator on
Recording with the Timer Cancelling Timer Programmes Perform the following procedure to cancel timer programmes that have already been set. Preparation • Press OPERATE. Then move the VCR/DVD CHANGE Switch to VCR and select the video channel on the TV. 1 2 Press VCR MENU. (If the “ ” indicator on
Tape Dubbing Tape Dubbing Connection Instructions Your product can dub (copy) video material from another video device. It can also output video and audio signals for recording on other video or audio equipment. Audio/Video dubbing cannot be done separately. TIMER OPERATE ON/OFF DISPLAY 1 Switch
Recording a DVD Disc onto a Video Cassette Use the following procedure to record the images and sounds on a DVD disc onto a video cassette. Recording a DVD disc onto a Video cassette (Tape Editing mode) Preparation OPERATE EJECT/STOP / PLAY REW PLAY/×2 REC STOP OPEN/CLOSE TIMER VCR/DVD SELECTOR CH
Recording a DVD Disc onto a Video Cassette 6 Press ÆREC. • The images on the DVD disc are recorded onto the VCR cassette. • When the VCR is in stop mode, the channel returns to the previously received channel. • The VCR/DVD SELECTOR is fixed to VCR in the Tape Editing mode (VCR DVD indicator
Watching the DVD 74 74 74 75 75 75 76 76 77 77 77 78 79 79 79 80 80 80 81 82 83 84 85 86 87 88 88 88 89 89 90 91 92 92 93 94 WATCHING THE DVD Preparing to Use DVD …………………………………………………………… When connecting a TV with the DVD output Jacks
Preparing to Use DVD The following steps are necessary to display the DVD screen on the TV. When connecting a TV with the DVD output jacks OPERATE EJECT/STOP REW PLAY PLAY/×2 REC / 1 Turn on the TV and switch the TV channel to the external input “VIDEO” or “AV” channel connected to DVD output jack.
Playback Preparation • See Preparing to Use DVD on page 74. OPEN/CLOSE OPERATE DVD CD CD-R/RW VIDEO CD • The icons below are used in this Operation Manual: OPERATE EJECT/STOP REW PLAY PLAY/×2 REC / STOP OPEN/CLOSE TIMER VCR/DVD SELECTOR CH VCR DVD AV 2 IN VIDEO L(MONO)-AUDIO-R DVD
Playback DVD CD CD-R/RW VIDEO CD Fast Forward/Fast Reverse 1 Press FWDè or ÈREV during playback. • The disc begins fast scan at ×2 speed (1). Scanning speed selection OPERATE EJECT/STOP / REW PLAY PLAY/×2 REC PLAY Fast scan image appears here. (No image is shown for Audio CDs.) • Three speeds are
Playback DVD CD CD-R/RW VIDEO CD Still/Pause 1 Press â PAUSE/STILL during playback. 2 If you press ûPLAY while paused (STILL/PAUSE), normal playback resumes. OPERATE EJECT/STOP / REW PLAY PLAY/×2 REC STOP OPEN/CLOSE TIMER VCR/DVD SELECTOR CH VCR DVD AV 2 IN VIDEO L(MONO)-AUDIO-R PLAY DVD VIDEO CD
Angle Selection DVD Some DVD discs contain scenes which have been shot simultaneously from a number of different angles. For these discs, the same scene can be viewed from each of these different angles. (The recorded angles differ depending on the disc used.) 1 While you are playing a DVD disc
Playing MP3 Discs This product is able to play CD-R or CD-RW discs recorded in MP3 format. Regarding MP3 discs • MP3 files are audio data compressed in MPEG1 Audio layer 3 file format. “MP3 files” have “.mp3” as extensions. (Some files that have “.mp3” extensions or files that have not been
Playing MP3 Discs To play MP3 discs 1 Load the MP3 recorded CD-R or the CD-RW. • The folder selection screen will be displayed after the data is read. 1/ 4 MP3 FOLDER1 FOLDER3 2 FOLDER2 FOLDER4 Select the folder you want to play by using ‘, «, or | and then press ENTER. • The file (music title)
About the Function Control Screen Using Function control, you can check at a glance and change the current settings of the following items: SUBTITLE, ANGLE, AUDIO, 3D VIRTUAL SURROUND and, DIGITAL GAMMA. Function control also allows you three ways of direct skips (title [track], chapter and time).
About the Function Control Screen DVD VIDEO CD CD Direct skip (title [track]/chapter/time) Use the following procedure to perform the Direct title [track] skip, Direct chapter skip, or Direct time skip. 1 Press FUNCTION CONTROL during playback. • The Function control screen appears. T T C C G 2 2/5
About the Function Control Screen DVD Subtitle language setting Use the following procedure to perform the Subtitle language setting. 1 Press FUNCTION CONTROL during playback. • The Function control screen appears. T T C C G 2/5 8/3‰ ‰1:3‰:‰8 2 ENGLISH 1 1 D 51ch . ON ON DVD TIMER OPERATE ON/OFF 5
About the Function Control Screen DVD Angle setting You can change the angle of view when playing a DVD disc that contains scenes recorded from multiple angles. Use the following procedure to perform the Angle setting. 1 Press FUNCTION CONTROL during playback. • The Function control screen appears.
About the Function Control Screen DVD VIDEO CD Audio setting A number of different methods are used to record audio onto a DVD disc, including multi-channels (used for voiceovers in other languages), Dolby Digital (5.1ch), DTS, and Linear PCM. This product provides a number of different audio modes
About the Function Control Screen DVD 3D VIRTUAL SURROUND setting This function allows you to enjoy a “surround sound” effect when you are using an analog connection (using AV 1 OUT on this product) to 2-channel audio equipment (TV, etc.). Preparation To use the 3D VIRTUAL SURROUND function • Set
About the Function Control Screen DVD VIDEO CD DIGITAL GAMMA setting DIGITAL GAMMA is a digital image quality enhancement function that gives a richer image by brightening the darker and more obscure portions of the image without altering the brightness of the brighter portions, thereby making the
Direct Selection of Scenes DVD Selecting Scenes by Title Number 1 Press TITLE to show the title screen. (Example) 1 DISCOVERY EUROPE 2 DISCOVERY AFRICA TIMER OPERATE ON/OFF PROG ON VCR/DVD VCR MENU SCREEN SELECTOR DVD SETUP DISPLAY FUNCTION PROG/ CONTROL REPEAT 2 Use ‘, «, | or to highlight the
Programmed Playback The two types of programmed playback provided by this product are chapter programmed playback (DVD discs) and track programmed playback (Audio CD discs). DVD Chapter Programmed Playback 1 Press PROG while the disc is stopped. • The “DVD-VIDEO PROGRAM” screen appears. • Press
Programmed Playback CD VIDEO CD Track Programmed Playback 1 Press PROG while the disc is stopped. • The “PROGRAM” screen appears. • Press PROG to return to the normal screen. Example : CD PROGRAM screen CD PROGRAM 1 2 3 4 5 6 SELECT 2 TIMER OPERATE ON/OFF 1: 2: 3: 4: 5: 6: PROG ON VCR/DVD VCR MENU
Programmed Playback CD-R/RW MP3 Files Programmed Playback 1 Press PROG while the disc is stopped. • The “MP3 PROGRAM” screen appears. • Press PROG to return to the normal screen. MP3 PROGRAM : 1/ 4 SELECT 2 TIMER OPERATE ON/OFF 1: 2: 3: 4: 5: 6: FOLDER1 FOLDER2 FOLDER3 FOLDER4 FOLDER4 FOLDER4
Repeat Playback DVD CD VIDEO CD CD-R/RW Repeat playback 1 Press (REPEAT) while a disc is playing. • The “ ” indicator appears on the DVD Front Panel. • Each time (REPEAT) is pressed, the repeat function changes as follows. • Depending on the disc type, the repeat function will vary. DVD TIMER
Repeat Playback CD DVD VIDEO CD A-B Repeat A-B repeat allows you to repeat specified section on the disc. 1 2 3 Press (REPEAT) three times while a disc is playing. While you are playing a disc, press ENTER when you reach the start of the section to be repeated. While the disc is playing the same
Resume Function DVD CD VIDEO CD This function enables you to resume the playback from the location you specify. 1 Press ËSTOP at the desired point during playback. • “RESUME” appears followed by “RESUME” on the screen. • This product stores the location where you stopped. DVD RESUME TIMER OPERATE
Troubleshooting The following problems do not always denote a malfunction of this Product. Perform the checks listed below before calling service. ■ VCR/DVD Problem Suggested Solution • No power • Is the power cord connected properly? • Is the power cord firmly plugged into the power outlet? • One
Troubleshooting Problem Suggested Solution • Cassette cannot be loaded. • Make sure there is no other cassette inside. • Make sure the cassette is correctly positioned and then reinsert. • Picture does not change even though CH ‘ / » are pressed. • Make sure the Product is not in the timer setting
Definition of Terms ■ VCR Full Automatic Playback This function automatically turns the power on and starts to playback when a tape with the erasure protection tabs removed is inserted. Sharp Super Picture Enhanced picture quality during playback. S-VHS Simple Playback This function facilitates
Definition of Terms DVD This refers to a high-density optical disc on which high-quality pictures and sound have been recorded by means of digital signals. Incorporating a new video compression technology (MPEG II) and high-density recording technology, DVD enables esthetically pleasing full-motion
Definition of Terms Common names Guinea Guinea-Bissau India Kazakhstan Kenya Kyrgyz Republic Latvia Liberia Libya Lithuania Madagascar Malawi Maldives Mali Mauritania Mauritius Moldova Mongolia Morocco Mozambique Namibia Nepal Niger Nigeria North Korea Pakistan Russia Rwanda Sao Tome and Principe
Definition of Terms The world map for all region numbers ;;;;; ; ;;;;; ;; ;;; ;;;;; ;;; ;; ;;; ;;;;; ;;; ;;;;;;;;;;; ;;; ;; ; ; ;;;; ;;;;;;; ;;;;;; ;; ;;;; ;; ;;; ; ;; ;;;;;;; ;;;;;; ;; ; ;;;;;;; ;;;;;; ;;; ;;;; ;; ;;;;;; ;; ;; ; ;;;; ;; ;;; ;; ;;;; ;;;;;; ;;; ;; ;; ;; ; ;; ;;; ; ;;; ;; ; ;;; ;;;
Specifications INPUT/OUTPUT JACKS Signal System DVD/VCR shared output jacks DVD output jacks VIDEO input jacks Video recording system Video signal Recording/playing time VCR Tape width Tape speed (PAL) (MESECAM) (NTSC) Antenna Receiving channel NICAM format IGR stereo format RF converter output
DV-NC70RU VCR/DVD COMBINATION MODEL DV-NC70RU OPERATION MANUAL OPERATION MANUAL / ENGLISH …… …… OPERATE EJECT/STOP REW PLAY PLAY/×2 / REC STOP OPEN/CLOSE TIMER CH AV 2 IN VIDEO L(MONO)-AUDIO-R VCR/DVD SELECTOR VCR DVD • The region number for this DVD player is 5. • PAL NTSC 5 TINS-A368WJZZ
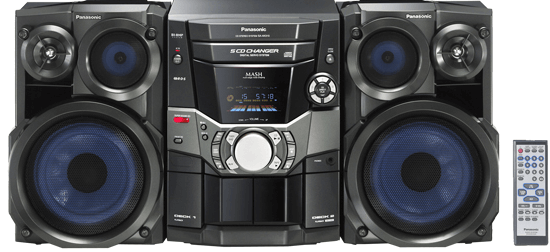
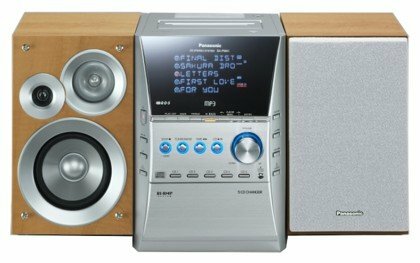
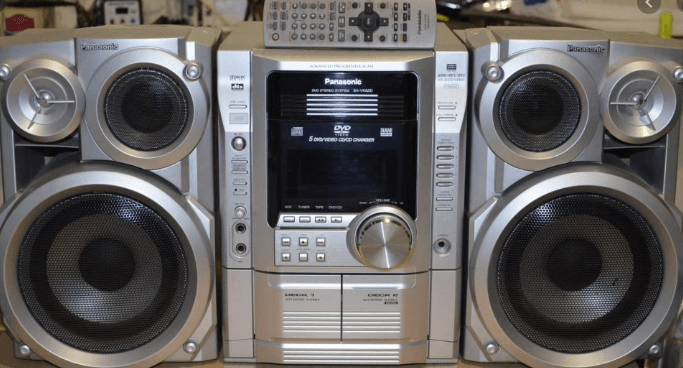
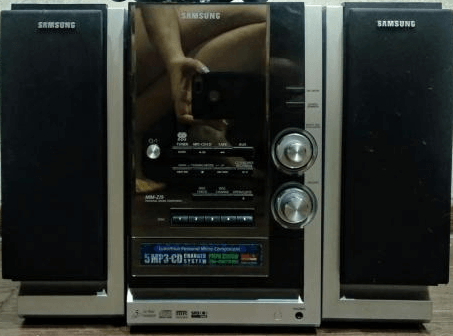
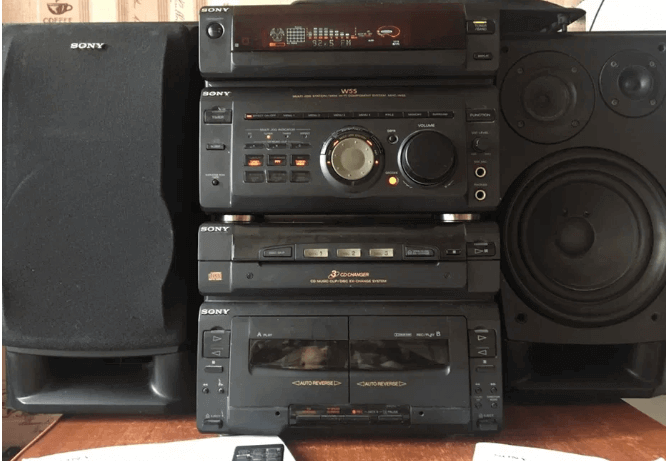
Инструкцию для Sharp CD-S3460H на русском языке, в формате pdf можно скачать с нашего сайта. Наш каталог предоставляем Вам инструкцию производителя фирмы Sharp, которая была взята из открытых источников. Ознакомившись с руководством по эксплуатации от Sharp, Вы на все 100% и правильно сможете воспользоваться всеми функциями устройства.
Для сохранения инструкции «Музыкальный центр Micro Sharp CD-S3460H» на русском языке на вашем компьютере либо телефоне, нажмите кнопку «Скачать инструкцию». Если активна кнопка «Инструкция онлайн», то Вы можете просмотреть документ (manual), в своём браузере онлайн.
Если у Вас нет возможности скачать инструкцию по эксплуатации либо просмотреть её, Вы можете поделиться ссылкой на эту страницу в социальных сетях и при удобном моменте скачать инструкцию. Либо добавьте эту страницу в закладки Вашего браузера, нажав кнопку «Добавить страницу в закладки браузера».
- AUDIO
- Музыкальные центры
Selector

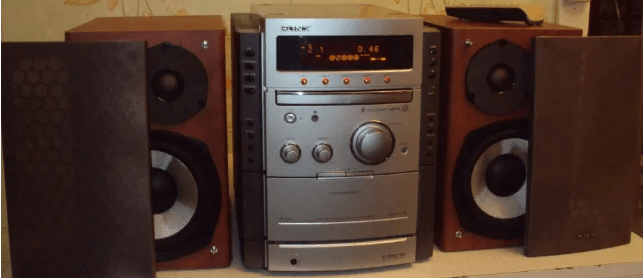
Популярные старые музыкальные центры 90-2000 годов с фото и основными характеристиками. Музыкальный центр (midi, mini, miсro system) — это аудио комплекс, способный воспроизводить звук с разных носителей.
Музыкальные центры 90-2000-характеристики.
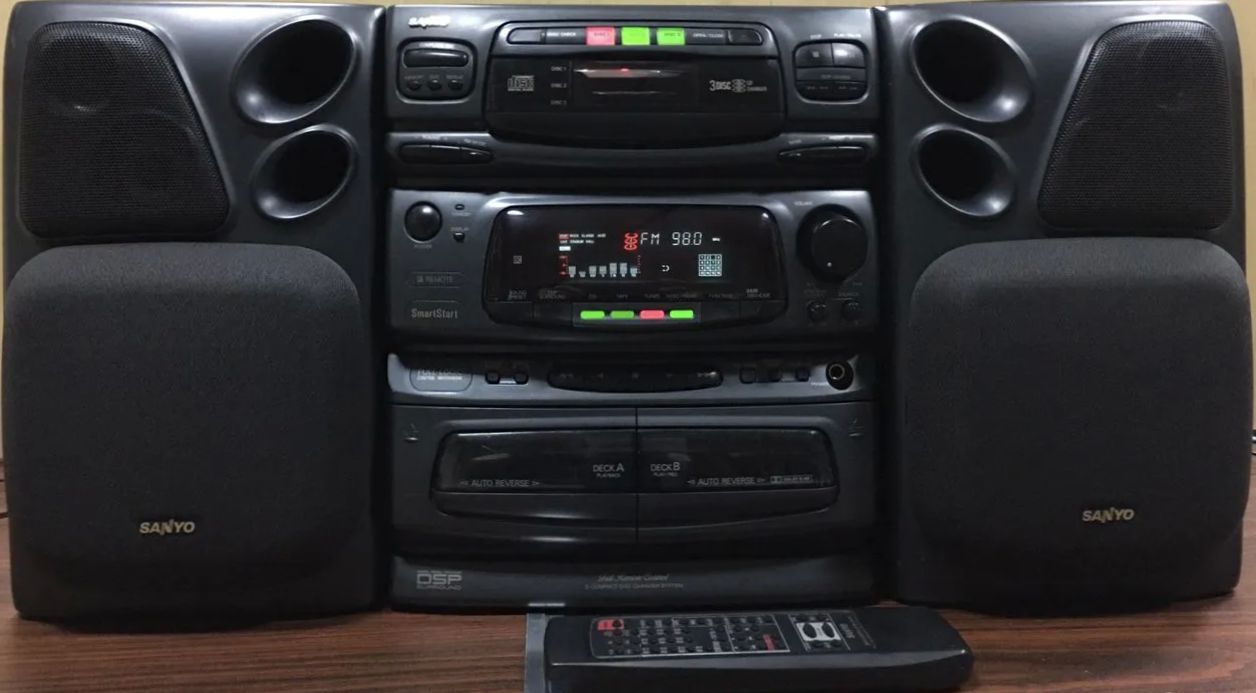
Нельзя точно сказать, какой музыкальный центр лучше или хуже. Существует огромное количество музыкальных систем разных брендов и компоновки. В каждом качественном бренде или линейке есть достойные модели по каким либо параметрам. Первые музыкальные центры — это проигрыватели виниловых пластинок и радиоприемники в одном корпусе. Далее туда добавились кассеты, бобины, затем CD (DVD), позже устройства для считывания флеш накопителей. По размерам, качеству и компоновке музыкальные системы делятся на полные комплексы из отдельных видов аппаратуры (стойки) под одной серией, компонентные midi системы из отдельных блоков, mini и miсro системы. Следует понимать, что качество воспроизведения у центров, в особенности кассет, намного хуже, чем в отдельных деках. Класс зарубежной аппаратуры тем лучше, чем выше цифры в номере модели в конкретной линейке, а не как в аппаратуре СССР, где высший класс — цифра 0. Качественнее по звучанию Hi-Fi, Hi-End системы — блочные полноразмерные музыкальные центры, но они совсем не дешевые. Но и среди миди или мини систем есть достойные модели. В центрах большую роль играют акустические колонки. тут дело вкуса. При выборе лучше всего прослушать как играет система. А еще лучше сравнить несколько. В настоящее время цены старых музыкальных центров 90-2000 годов на вторичном рынке вполне бюджетные и зависят от субъективной оценки продавцом состояния своей аппаратуры.
Таблица основные характеристики музыкальных центров.
Характеристики старых музыкальных центров взяты из официальных инструкций по эксплуатаций (user manual) или сервисных инструкций (service manual) и с официальных сайтов брендов AIWA, AKAI, JVC, KENWOOD, LG, PANASONIC, PHILIPS, PIONEER, SHARP, SONY, SAMSUNG, TECHNICS. Некоторые можно скачать на этой странице. Фото старых музыкальных центров б/у взяты, в основном, из объявлений вторичного рынка. В подборке представлены наиболее популярные бюджетные музыкальные центры 90х-2000х годов. Модели расположены практически по алфавиту. Основные характеристики: название (номер) модели, фото, мощность усилителя RMS (это не советские ватты), частоты воспроизведения, характеристики акустических систем (колонок). Некоторые с указанием особенностей. У некоторых прикреплены инструкции, которые можно скачать. Из за большого количества моделей, более полная информация про модельный ряд старых музыкальных центров PANASONIC представлена на этой странице, TECHNICS на этой.
| RMS Watt | others | speakers — frequency (Hz), impedance |
| Музыкальные центры AIWA | ||
|
Aiwa ncx-sz310 Подробные характеристики, фото и видео здесь
|
||
| 40х2 | 3CD | <Speaker system SX-NSZ312 (for NSX-SZ310)> Speaker system 3 way, bass reflex (magnetic shielded) Speaker units Woofer : 140 mm cone Tweeter : 60 mm cone Super tweeter : 20 mm ceramic Impedance 6 ohms Dimensions (W x H x D) 220 x 324 x 225 mm Weight 3.6 kg |
|
aiwa jax n30
|
||
| 40 |
3 way |
|
|
aiwa nsx-bl44
|
||
| 80 |
3 way |
|
|
aiwa nsx r41
|
||
| 60 |
3 way |
|
|
aiwa nsx v50
|
||
| 40 |
2 way (3 sur+1 woof) |
|
|
aiwa nsx v70
Подробное описание, обзор, фото, видео и характеристики здесь |
||
| 100 | SPEAKER SYSTEM SX-NV70 Cabinet type 3 way , bass reflex (Magnetism sealed type) Speaker Woofer: 140 mm (56/s in.) cone type Tweeter (2 surraund): 80 mm (31A in.) cone type Super tweeter: 50 mm (2 in.) ceramic type Impedance 6 ohms Output sound pressure level 87 dB/W/m Dimensions (WxHxD) 206 x 302 x 265 mm Weight 2.9 kg |
|
|
Aiwa NSX-S556
|
||
| 10+30 | 2 way | |
| Музыкальные центры AKAI | ||
|
akai ac 525
|
||
| 100 | karaoke |
3-way 120W max 55 — 20,000 6 ohms |
| Музыкальные центры JVC | ||
|
JVC CA-D401T
|
||
| 27 watts |
3-way 16 cm (6-5/16 inches) cone 5 cm (2 inches) cone 2 cm (13/16 inches) dome 80 watts 6 ohms 45 — 20,000 90 dB/wm 215х 295х 275 mm |
|
|
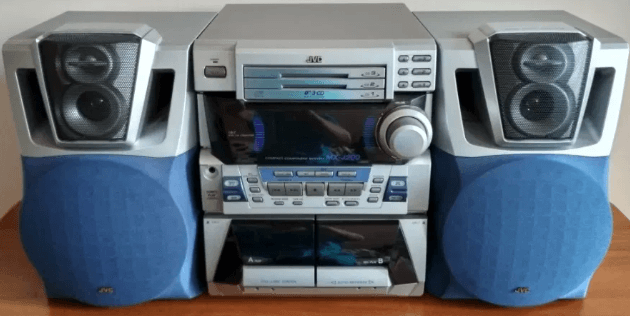
jvc mx-ga77
|
||
|
SUB 120 +main 60 ? Bi Amp |
Mp3 | 3-way bass-reflex |
|
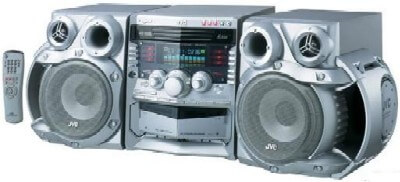
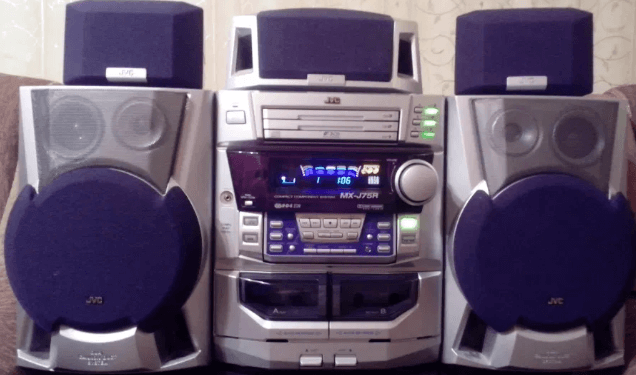
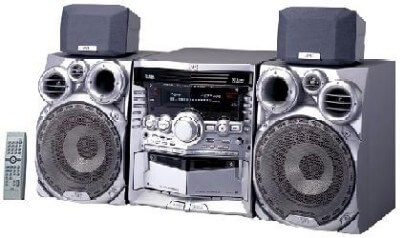
JVC MX-J75R
|
||
| 75+25+12.5 |
3 way + |
|
|
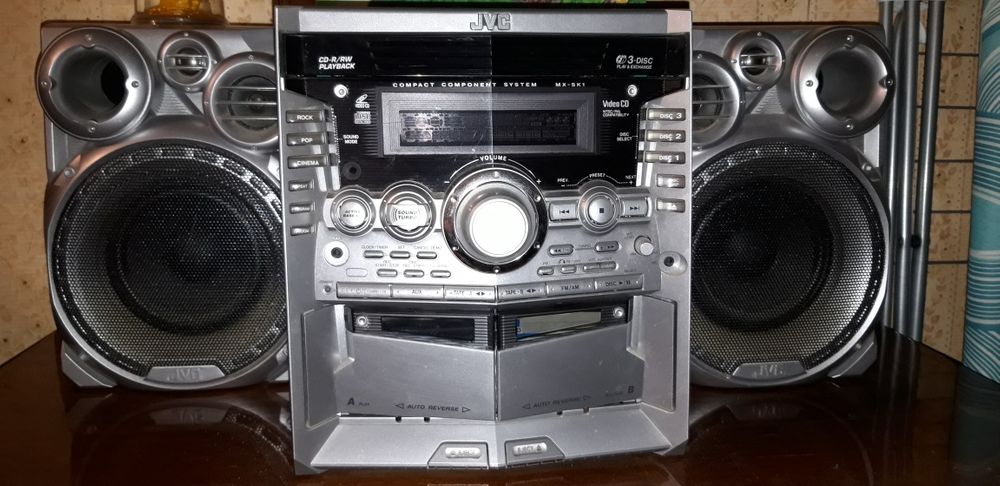
jvc mx-sk1
|
||
| 64 |
3 way 42-30000 80w -? |
|
|
jvc mx-sk3
|
||
|
80 +20 |
3 way 100W 42-30000 +30w 85-20 kHz |
|
|
jvc ca-s50bk
|
||
| 35 |
3 way 50w-? |
|
|
JVC MX-J200
|
||
| 60 |
2 way 45 — 22000 |
|
|
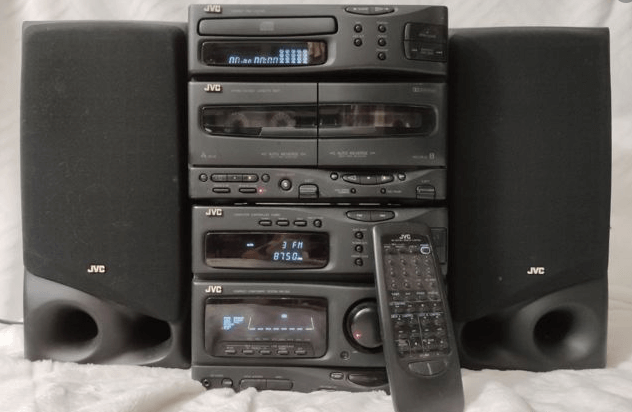
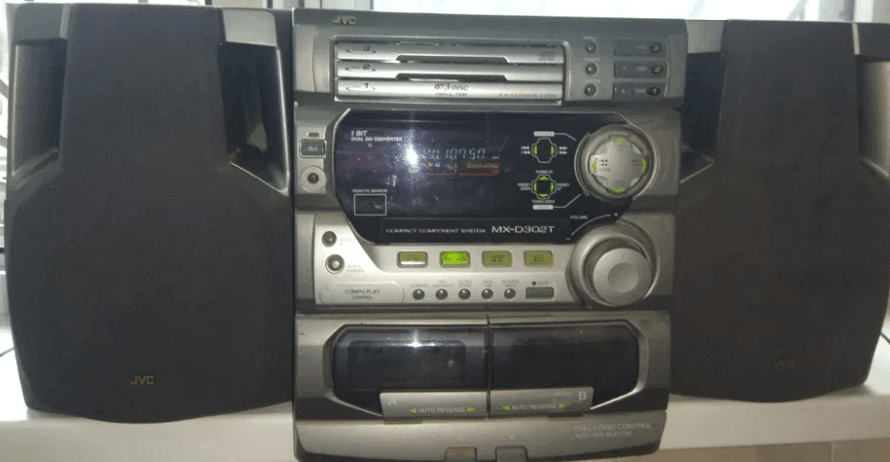
jvc mx-d302t
|
||
| 55 |
2 way 50 — 20000 |
|
|
jvc ca mx k10r
|
||
|
30 45-22 000 Hz |
3 way | |
|
JVC DX-J11
|
||
| 125 |
3 way 6 Ω |
|
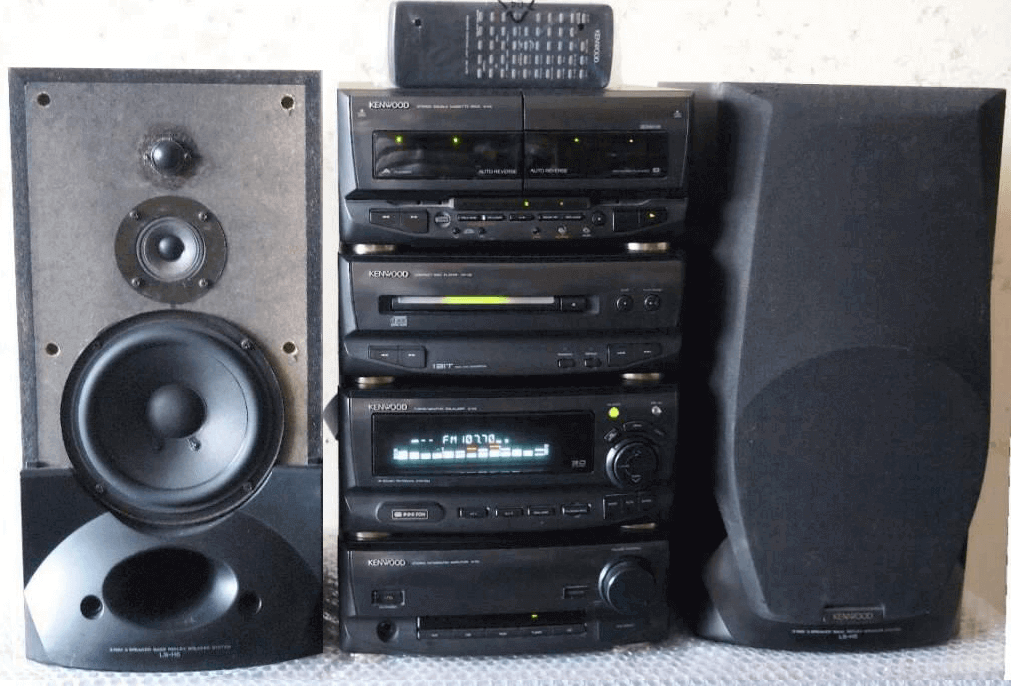
| Музыкальные центры KENWOOD | ||
|
kenwood xd-6551
|
||
| 80 |
3 way 45 — 20000 6 Ω |
|
| Музыкальные центры LG | ||
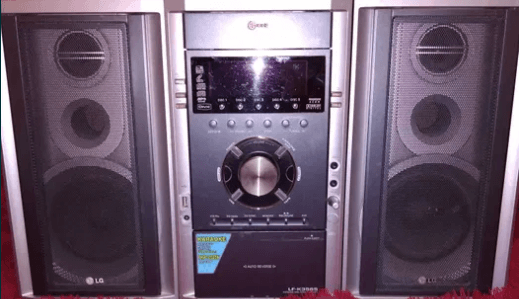
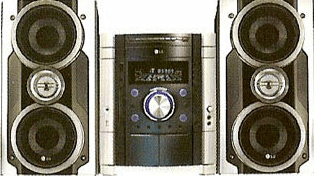
|
lg lf-k3565
|
||
| 50 | usb |
2 way 60 — 20000 |
|
LG lm-k3860
|
||
| 100 | usb |
2 way 3 unit 55 — 20000 4 Ω |
| Музыкальные центры PANASONIC | ||
|
Panasonic SA-AK230
|
||
| 100 |
2 way 35 – 28000 (–16 дБ) 50 – 26000 (–10 дБ) |
|
|
Panasonic SA-AK310
|
||
|
BiAmp 55+55 |
35 –25000 (–16 dB) 47–24000 (–10 dB) 6 Ω+6 Ω |
|
|
Panasonic SA-AK330
|
||
|
BiAmp 90+90 |
37 – 23000 (–16 дБ) 44 – 22000 (–10 дБ 5 Ω+5 Ω |
|
|
Panasonic SA-AK45
|
||
| 100 |
4 way 80 din 45-22000 (-16db) 55-20000 (-10db) |
|
|
panasonic sa-ak520
|
||
|
2х65+160sub =420 |
Mp3 | 37-23000 |
|
panasonic sa-ak55
|
||
| 105 |
4 way Front 105 Center 45 Surr 22,5 45-22000 (-16db) 55-20000 (-10db) |
|
|
Panasonic SC-PM41E-S
|
||
| 80 | 3 way | |
|
Panasonic SC VK450
|
||
| 95 |
3 way 31– 30000 (–16 дБ) 38– 23000 (–10 дБ) 4 Ω |
|
|
Panasonic SC-VK540
|
||
|
Bi−Amp 48+52 |
2 way 35– 22000 (–16 дБ) 40– 20000 (–10 дБ) 6 Ω |
|
|
Panasonic SC-VK61D
|
||
| 100 |
3 way 39 – 21000 (–16 дБ) 52 – 20000 (–10 дБ) 4 Ω |
|
|
Panasonic SC-VK62D
|
||
| 110 |
3 way 39 – 21000 (–16 дБ) 52 Гц – 20000 (–10 дБ) 4 Ω |
|
|
Panasonic SC-VK660 Краткий обзор, видео, фото, характеристики на этой странице
|
||
| 115 | 5 DVD, karaoke |
Front 3 way 30 -280000 (–16 дБ) 38- 21000 (–10 дБ) SubWoofer 28 -173 (–16 дБ) 33- 148 (–10 дБ) |
|
Panasonic SC-VK750
|
||
| 110 |
3 way от 40- 29000 (–16 дБ) от 54- 28000 (–10 дБ) 20 cm Center 95–25000 (–16 dB) 110–22000 (–10 dB) Surround 100–29000 (–16 dB) 110–22000 (–10 dB) 3Ω |
|
|
Panasonic sc-vk91d
|
||
|
Bi−Amp (90+45)x2 Center 100 Surraund 2×45 Subwoofer 95 |
6 Ω Front 40–22000 (–16 dB) 55–20000 (–10 dB) Center 75–22000 (–16 dB) 85–20000 (–10 dB) Surround 55–22000 (–16 dB) 85–20000 (–10 dB) SubWoofer 28–1000 (–16 dB) 37–1.5000 (–10 dB) |
|
| PHILIPS | ||
|
philips fw 630 (karaoke version) Подробнее про характеристики, фото, видео здесь
|
||
|
45×2 surraund (8-16 Ω, 10w+) |
Karaoke, surraund |
6 Ω 3 way 40 – 20 000 + surraund (8-16 Ω, 10w+) |
| PIONEER | ||
|
pioneer xr-a4900
|
||
|
100 40 Hz – 20 kHz |
— |
3 way 40 – 20000 |
|
pioneer xr-p170c
|
||
| 25 | — | 2 way |
| SAMSUNG | ||
|
samsung max kd100
|
||
| 50 | 3 way | |
|
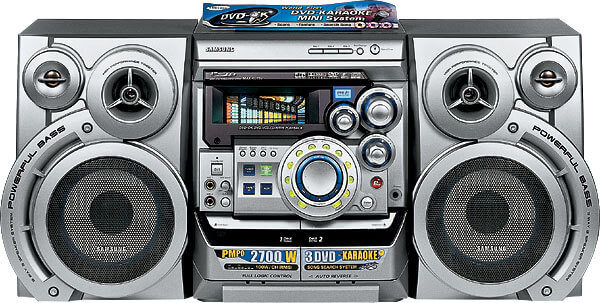
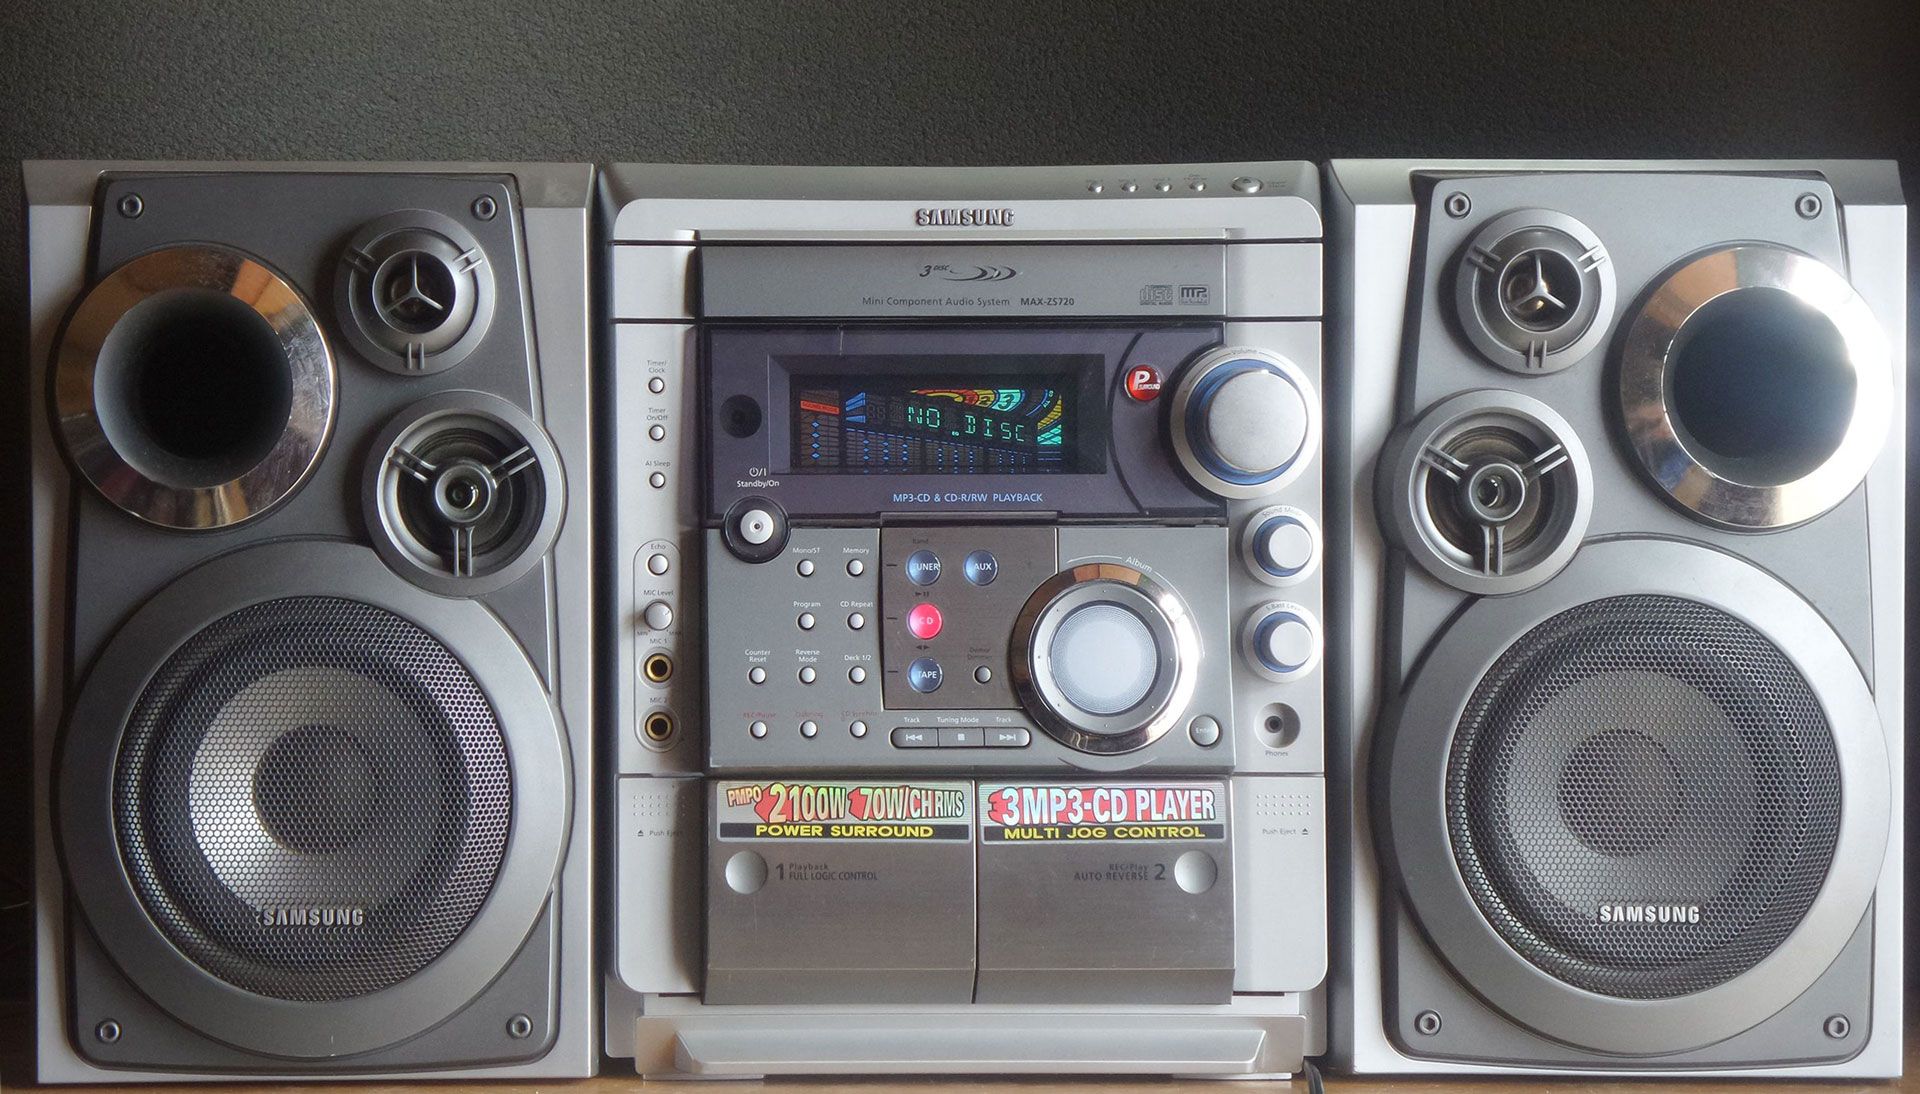
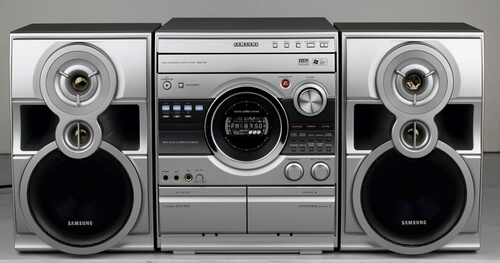
samsung max zs720 Характеристики, видео, фото, краткий обзор здесь
|
||
|
70 ?Hz |
karaoke |
3 way 6 ohms ?Hz |
|
Samsung max KT-55
|
||
| 35 | 3 way | |
|
samsung mm zj9
|
||
| 20 |
3 way |
|
| SANYO | ||
|
sanyo dc-f380
|
||
| 80 | karaoke |
3 way Woofer — 16cm Mid range — 5cm tweeter-piezo 6 Ω Surround 16 Ω |
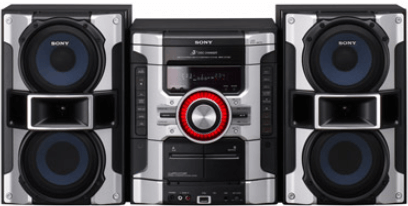
| SHARP | ||
|
sharp gx-68z
|
||
| Rms 20 | — | 2 way |
|
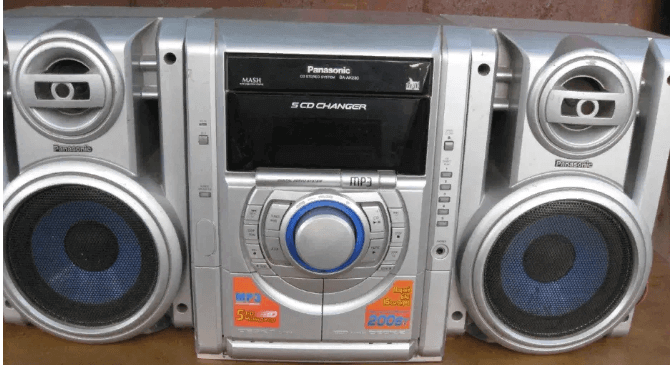
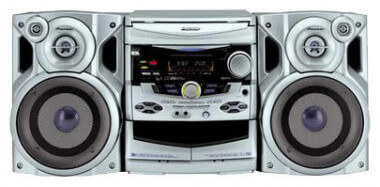
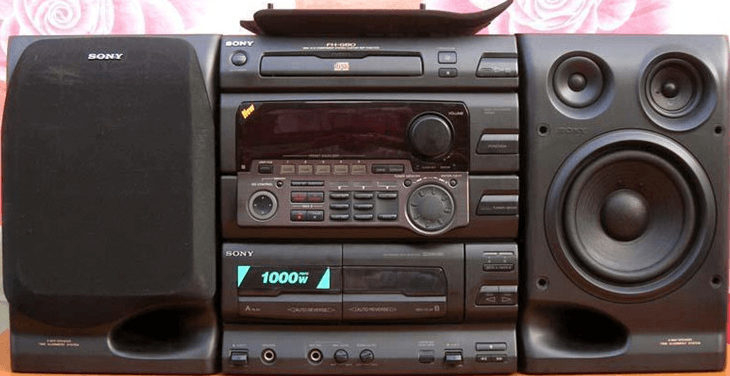
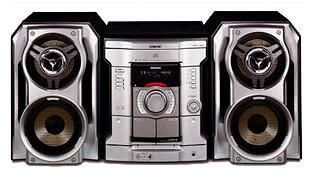
Sharp Cd-M4000
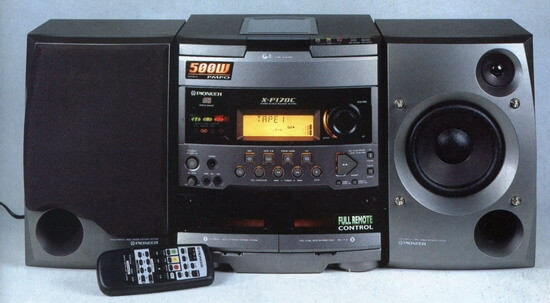
|
||
| 150 |
4-way Super Tweeter Tweeter 8 cm Midrange 8 cm Woofer 25 cm 6 ohms |
|
| SONY | ||
|
sony fh-g80
|
||
|
65 |
3 way 60 Hz – 20 kHz |
|
|
Sony mhc bx5
|
||
| 100 |
3 way 15cm 6 Ω |
|
|
sony hcd-h771
|
||
| 50 ? |
3 way 40 — 20000 |
|
|
Sony Mhc Ec77
|
||
|
BiAmp 95+95 |
3 way 8 Ω |
|
|
sony mhc-rg490s Полные характеристики, видео, фото, краткий обзор здесь.
|
||
|
Front 125х2 Subwoofer 150 |
3 CD, mp3 |
3 way Subwoofer 13см woofer 13см Tweeter 5 cm 6 Ω Subwoofer 20 см 6 Ω |
|
Sony HCD-RG55S
|
||
|
60×2 120 |
3 way 6 Ω Sub 12 Ω |
|
|
sony mhc –gnz8d
|
||
|
100 Surround 40×3 |
2 way 6 Ω 18см 3 x Surround |
|
|
sony mhc -gnz77d
|
||
| 100 |
2 way 6 Ω 18см |
|
|
sony mhc –gnz333d
|
||
| 120 |
2 way 6 Ω 16см |
|
|
sony mhc gt22
|
||
| 110 | 3 way 13см | |
|
sony mhc-gx450
|
||
|
Front 125 Sub 150 |
3 way 13см 6 Ω Sub 20 см 6 Ω |
|
|
sony mhc-rg60
|
||
| 100 |
3 way + surround |
|
|
sony Hcd-rg110
|
||
| 60 | 3 way | |
|
SONY MHC-RG310
|
||
| 100 | 3 way 6 Ω | |
|
Sony HCD-GNZ444D
|
||
| 120 | 3 way | |
|
Sony MHC-RG470
|
||
| 140 | 3 way (4comp) | |
|
Sony MHC-RG475s
|
||
| 140 | 3 way +sub | |
|
sony mhc gt44
|
||
|
2.1 150+150sub |
Mp3 usb |
3 way +sub |
|
Sony MHC-rv20
|
||
| 100 | 3 way 6 Ω | |
|
sony mhc-rv777d
|
||
| 100 | 3 way | |
|
sony rx-77s
|
||
| 80 | 4 way | |
|
Sony mhc-w55
|
||
| 60 | 3 way | |
|
Sony NXM-3
|
||
| 100 | — |
2 way |
|
sony pmc 301s
|
||
| 12,5 | 2 way | |
|
sony rx70
|
||
| Rms 55 | — |
3 way 70-20000 ? |
|
sony rx90
|
||
| 100 |
4 way |
|
Technicsмодельный ряд с характеристиками здесь |
||
|
TECHNICS SC-EH790
|
||
|
Bi Amp 65+35 |
Mp3 |
3 way 42–50000 (–16 dB) 46–36000 (–10 dB) Hight 6 Ω Low 8 Ω Surround 130–20000 (–16 dB) 150–18000 (–10 dB) 8 Ω |
| YAMAHA | ||
|
yamaha gx-700
|
||
| 2×80+80+2×25 |
2 Front 3way Center 2 rear |


Новости
Copyright © Азбука SEO 2013-2022. All Rights Reserved
-
Contents
-
Table of Contents
-
Troubleshooting
-
Bookmarks
Quick Links
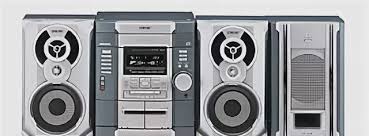
Illustration: CD-BP2000W
Illustration: CD-BK210W
• In the interests of user-safety the set should be restored to its
original condition and only parts identical to those specified be
used.
Safety Precaution For Service Manual …………………………………………………………………………………………….. 2
Voltage Selection ………………………………………………………………………………………………………………………………….. 2
Specifications …………………………………………………………………………………………………………………………………………. 3
Names Of Parts ……………………………………………………………………………………………………………………………………….. 4
Operation Manual ………………………………………………………………………………………………………………………………….. 7
Disassembly ……………………………………………………………………………………………………………………………………………… 9
ADJUSTMENT …………………………………………………………………………………………………………………………………………….. 14
Notes On Schematic Diagram ……………………………………………………………………………………………………………… 16
Waveforms Of Cd Circuit …………………………………………………………………………………………………………………….. 17
Block Diagram ……………………………………………………………………………………………………………………………………….. 18
Voltage …………………………………………………………………………………………………………………………………………………… 42
Troubleshooting ………………………………………………………………………………………………………………………………….. 43
Function Table Of Ic ……………………………………………………………………………………………………………………………… 47
Fl Display …………………………………………………………………………………………………………………………………………………. 55
REPLACEMENT PARTS LIST/EXPLODED VIEW
DIFFERENCE BETWEEN CD-BP2000W/2000A/210W AND CD-BK2000W/210W
SERVICE MANUAL
CONTENTS
CD-BP2000W/2000A/210W
Karaoke
SHARP CORPORATION
CD-BP2000W/210W/2000A/BK2000W/210W
CD-BP2000W
CD-BP210W
CD-BP2000W/BP210W mini component system consisting of
CD-BP2000W/BP210W (main unit) and CP-BP2000/210
CD-BK2000W
CD-BK210W
CD-BK2000W/BK210W mini component system consisting of
CD-BK2000W/BK210W (main unit) and CP-BP2000/210
(speaker system).
CD-BP2000A
CD-BP2000W mini component system consisting of
CD-BP2000W (main unit) and CP-BP2000A (speaker system).
CD-BK2000W/210W
None
– 1 –
No. S4032CDBP2000
Used
This document has been published to be used
for after sales service only.
The contents are subject to change without notice.
Page