-
Contents
-
Table of Contents
-
Troubleshooting
-
Bookmarks
Quick Links
NAVTEX RECEIVER
NX-700A/B
Related Manuals for Furuno NX-700A
Summary of Contents for Furuno NX-700A
-
Page 1
NAVTEX RECEIVER NX-700A/B… -
Page 2
Your Local Agent/Dealer Your Local Agent/Dealer 9-52 Ashihara-cho, 9-52 Ashihara-cho, Nishinomiya 662-8580, JAPAN Nishinomiya 662-8580, JAPAN Telephone : Telephone : 0798-65-2111 0798-65-2111 0798-65-4200 0798-65-4200 FIRST EDITION : FIRST EDITION :MAY. MAY. 2005 2005 All rights reserved. All rights reserved. Printed in Japan Printed in Japan Pub. -
Page 3: Important Notice
• This manual is intended for use by native speakers of English. • FURUNO will assume no responsibility for the damage caused by improper use or modification of the equipment or claims of loss of profit by a third party.
-
Page 4: Safety Instructions
Immediately turn off the power at the switchboard if the equipment is emitting smoke or fire. Continued use of the equipment can cause fire or electrical shock. Contact a FURUNO agent for service. Keep heater away from equipment. A heater can melt the equipment’s power cord, which can cause fire or electrical shock.
-
Page 5
Standard Steering Only qualified personnel ELECTRICAL NX-700A 1.45 m 0.95 m should work inside the Display unit SHOCK NX-700B 0.30 m 0.30 m equipment. -
Page 6
Our extensive global network of agents and dealers furthers this dedication to excellence. The NX-700A/B is just one of the many Furuno developments in the field of marine radio communication. NX-700A: Display unit w/printer… -
Page 7
Meteorological warnings, Search and Rescue (SAR) information and other navigational information for NAVTEX receiver-equipped vessels sailing in coastal waters. The FURUNO NX-700 NAVTEX receiver receives NAVTEX messages and automatically displays them together with station ID and message category information. -
Page 8: Table Of Contents
TABLE OF CONTENTS EQUIPMENT LISTS ………………… vi SYSTEM CONFIGURATIONS …………….viii 1. PRINCIPLE OF NAVTEX SYSTEM …………… 1-1 1.1 How NAVTEX Works ………………..1-1 1.2 NAVTEX System Operation………………1-1 1.3 Message Format ………………….. 1-2 1.4 NAVTEX Station Map ………………..1-3 1.5 NAVTEX Station List………………..
-
Page 9
MENU TREE………………..AP-1 PACKING LISTS ………………..A-1 DRAWINGS ………………….. D-1 INTERCONNECTION DIAGRAM……………S-1 SPECIFICATIONS ………………. SP-1… -
Page 10: Equipment Lists
For Antenna Unit w/o antenna CP08-01863* 004-514-530 cable For Antenna Unit w/ antenna CP08-01864* 004-514-540 cable. CP08-01861* 004-514-350 For Display Unit SP08-02000* 000-040-344 For NX-700A Spare Parts SP08-02101* 004-514-370 Fuse for Receiver Unit *: See the back of this manual. viii…
-
Page 11
Optional Supply Name Type Code No. Remarks Thermal Paper TP058-30CL 000-154-047 1 set For NX-700A, 10 rolls OP08-19 004-514-810 For NX-700A Flush Mount Kit OP08-20 004-514-820 For NX-700B AC-DC Power PR-240-CE 000-053-373 000-041-174 10 m, w/M-A-JJ connector 000-041-175 20 m, w/M-A-JJ connector… -
Page 12: System Configurations
SYSTEM CONFIGURATIONS DISPLAY UNIT DISPLAY UNIT ANTENNA UNIT NX-700A NX-700B NX-7H Max. 15 m Max. 100 m RECEIVER UNIT NX-7001 External Alarm Rectifier Printer (700B only) PR-240 Power supply Power supply PC Converter 100-115/ 12-24 VDC 200-230 VAC. 1 , 50/60 Hz…
-
Page 13: Principle Of Navtex System
PRINCIPLE OF NAVTEX SYSTEM How NAVTEX Works There are many types of navigational and meteorological information available on radio, such as NAVAREA, HYDROPAC, etc. However, these systems rely heavily upon the operator’s experience and skill in tuning the radio and interpreting messages.
-
Page 14: Message Format
1. PRINCIPLE OF NAVTEX SYSTEM Message Format For automatic identification of messages, each message starts with nine control characters, called “Header codes”. The first five characters are always “ZCZC_“ and common to all messages. This part is used for message synchronization. The latter four characters are designed as b1, b2, b3 and b4 indicate origin, category and serial number of the message.
-
Page 15: Navtex Station Map
1. PRINCIPLE OF NAVTEX SYSTEM NAVTEX Station Map…
-
Page 16: Navtex Station List
1. PRINCIPLE OF NAVTEX SYSTEM NAVTEX Station List Frequen Area Station Station Country Latitude Longitude Broadcast schedule (UTC) area cy (kHz) (nm) Belgium Oostende 51 11 N 02 48 E 0310, 0710, 1110, 1510, 1910, 2310 Estonia Tallinn 59 30 N 24 30 E 0320, 0720, 1120, 1520, 1920, 2320 0250, 0650, 1050, 1450, 1850, 2250…
-
Page 17
1. PRINCIPLE OF NAVTEX SYSTEM Frequen Area Station Station Country Latitude Longitude Broadcast schedule (UTC) area cy (kHz) (nm) Bulgaria Varna 43 04 N 27 46 E 0130, 0530, 0930, 1330, 1730, 2130 Croatia Split radio 43 30 N 16 29 E 0240, 0640, 1040, 1440, 1840, 2240 Cyprus Cypradio… -
Page 18
1. PRINCIPLE OF NAVTEX SYSTEM Frequen Area Station Station Country Latitude Longitude Broadcast schedule (UTC) area cy (kHz) (nm) Canada Labrador 53 42 N 57 01 W 0350, 0750, 1150, 1550, 1950, 2350 0310, 0710, 1110, 1510, 1910, 2310 Iqaluit, NU 63 43 N 68 33 W 0300, 0700, 1100, 1500, 1900, 2300… -
Page 19
1. PRINCIPLE OF NAVTEX SYSTEM Frequen Area Station Station Country Latitude Longitude Broadcast schedule (UTC) area cy (kHz) (nm) Saudi Arabia Jeddah 21 23 N 39 10 E 0705, 1305, 1905 Oman Muscat 23 36 N 58 30 E 0200, 0600, 1000, 1400, 1800, 2200 Pakistan Karachi 24 51 N… -
Page 20
1. PRINCIPLE OF NAVTEX SYSTEM Frequen Area Station Station Country Latitude Longitude Broadcast schedule (UTC) area cy (kHz) (nm) Vietnam Ho Chi Minh City 10 47 N 106 40 E 0350, 0750, 1150, 1550, 1950, 2350 0340, 1540 Haiphong 20 44 N 106 44 E 4209.5 0230, 0630, 1030, 1430, 1830, 2230… -
Page 21: Operation
When the results are OK, the list display is shown after five seconds after completion of the check, with frequency last used before turning the power off. DUAL CHANNEL NAVTEX NX-700 FURUNO ELECTRIC CO., LTD. ROM : OK RAM : OK XX: Program version No.
-
Page 22: Confirming The New Message
To read the message later, choose “No” or press the MENU key, and then press the ENT key to close the window. Note: In the default setting, all received messages are printed out automatically for NX-700A only. For further details, see paragraph 2-12.
-
Page 23: Sample Messages
2. OPERATION Sample Messages Press ▲▼ on the cursor pad to choose a message, and then press the ENT key to show the detailed information for that message. These displays can be switched by pressing the ENT key. Frequency (paragraph 2.9) Station ID, type of message, serial No.
-
Page 24: Choosing Up Navtex Station Receive Mode
2. OPERATION Choosing Up Navtex Station Receive Mode The NAVTEX menu allows you to select what station to receive, automatically, manually or from the INS connected. The Auto mode requires navigation data, and stations are automatically selected according to the distance between own ship and NAVTEX stations.
-
Page 25: Choosing The Local Frequency
2. OPERATION Choosing the Local Frequency You can choose 490 kHz or 4209.5 kHz as the local frequency. This function is only available for the Auto and Manual modes. (See paragraph 2.6.) 1. Press the MENU/ESC key to show the main menu. 2.
-
Page 26
2. OPERATION 3. Press ▲ or ▼ to choose Rcv Station & Msg or User Select Station & Msg. 4. Press the ENT key to open the appropriate editing window. (Below is the Rcv Station Msg editing window.) Recieve mode Rcv Station &… -
Page 27: Switching The Frequency To Display
2. OPERATION Switching the Frequency to Display With the message list shown, you can switch the frequency to 518 kHz or 490 (or 4209) kHz by pressing ◄ or ► key. Press 490 (4209) Switching the frequency for display 2.10 Alarm Messages The sequence of events when an alarm message is received is as shown below.
-
Page 28: Processing Messages
2. OPERATION 2.11 Processing Messages Choosing messages to display You can choose which category of messages to display: All, Alarm, User Selected and Good messages. 1. With the message list or detailed message shown, press the LIST key to show the list options. All Messages Alarm Messages User Messages…
-
Page 29: Printing Messages
2.12 Printing Messages Received messages can be printed automatically or manually, from the built-in printer (NX-700A) or external printer (NX-700B). Printing all messages displayed Displayed messages can be arranged on the LIST menu described in paragraph 2.11.
-
Page 30
2. OPERATION Printing messages automatically 1. Press the MENU/ESC key to open the main menu. 2. Press ▲ or ▼ to choose NAVTEX, and then press the ENT key to show the NAVTEX menu. 3. Press ▲ or ▼ to choose Auto Print, and then press the ENT key to open the auto print options. -
Page 31: Editing The Navtex Station List
2. OPERATION 2.13 Editing the NAVTEX Station List Maximum 300 NAVTEX stations can be registered into the memory. Note: To cancel editing of a NAVTEX station, press the MENU/ESC key. The message “Exit without saving?” appears. Choose “Yes”, and then press ENT key.
-
Page 32
2. OPERATION NavArea NAV Area Station Station Name Latitude 0 00’N Latitude Longitude 0 00’E Longitude 518kHz ID1: — ID2: — ID3: — Station ID 490kHz ID1: — ID2: — ID3: — 4209.5kHz ID1: — ID2: — ID3: — Sertvice Area Range 400nm Save data ? -
Page 33
2. OPERATION Editing NAVTEX station Existing NAVTEX station may be edited as follows: 1. Press the MENU/ESC key to show the main menu. 2. Press ▲ or ▼ to choose Service, and then press the ENT key. 3. Press ▲ or ▼ to choose Edit Station List, and then press the ENT key. 4. -
Page 34: Icons
2. OPERATION Edit Delete 7. Press ▲ or ▼ to choose Delete, and then press the ENT key. The message “Delete station?” appears. 8. Press ◄ to choose “Yes”, and then press the ENT key to close the edit window. 9.
-
Page 35: Messages List
2. OPERATION 2.15 Messages List In addition to the message “Received new local (int’l) msg.” the following message-related messages may appear on the display. Message Meaning Remedy Appears when the oldest New message received. message is deleted to Oldest message deleted to Press any key.
-
Page 36: Other Functions
Enter the time difference between local time and +13:30 UTC time. nm, kt, Chooses units of measurement (distance and Units km, km/h, ship speed) to be shown on the User Display. mi, mi/h None, NX-700A, Printer Sets the printer type. (See paragraph 4.6.) Upright, Inverted 2-16…
-
Page 37
2. OPERATION Display menu Item Description Setting Selects the speed of scrolling by pressing ▲ or ▼. Slow: Scrolls by one line. Fast: Scrolls by half of screen. Slow, Fast, Scrolling Skip to $$ Skips to $$: Scrolls line by line in list display; Skips to $$ position in detailed display. -
Page 38
2. OPERATION Service menu Item Description Setting 4800, 9600, INS Input Selects the speed at which to input data from INS.. 19200, Speed 38400 bps 4800, 9600, INS Output Selects the speed to output data to the INS. 19200, Speed 38400 bps Turns the header (Own ship’s position, date, Print Header… -
Page 39: Maintenance & Troubleshooting
MAINTENANCE & TROUBLESHOOTING This chapter provides information necessary for keeping your unit in good working order and remedying simple problems. WARNING WARNING Do not open the equipment. Hazardous voltage which can cause electrical shock exists inside the equipment. Only qualified personnel should work inside the equipment.
-
Page 40: Replacement Of Fuse, Battery And Thermal Paper
3. MAINTENANCE & TROUBLESHOOTING Replacement of Fuse, Battery and Thermal Paper Fuse The fuse inside the receiver unit protects the equipment from overcurrent and reverse polarity. If the fuse blows, contact your dealer about replacement. Name Type Code No. Fuse FGMB 2A 125V 000-103-165 WARNING…
-
Page 41
3. MAINTENANCE & TROUBLESHOOTING Thermal paper (NX-700A only) When the thermal paper runs out completely, the icon appears at the right-hand top corner on the display. Replace the paper as follows. Name Type Code No. Thermal paper TP058-30CL 000-154-047 1. Turn off the power. -
Page 42: Troubleshooting
NAVTEX signal cannot be received. check that the D-sub connector is firmly fastened. check that the antenna cable is firmly fastened. paper does not advance. (NX-700A only) load paper correctly. paper feeds but no recording. (NX-700A check if correct thermal paper is being only) used.
-
Page 43: Diagnostics
3. MAINTENANCE & TROUBLESHOOTING Diagnostics The memory test checks ROM, RAM, data port, battery, keyboard and LCD for proper operation and displays program version numbers. 1. Press the MENU/ESC key to open the main menu. 2. Press ▼ to choose Service, and then press the ENT key. 3.
-
Page 44: Restoring All Default Settings
3. MAINTENANCE & TROUBLESHOOTING 8. When the message “Hit any key” appears on the screen, press any key (except key) to show the Rx test screen. The alarm for receiving monitor sounds while the Rx test is being conducted. Also the test message is printed when the item other than “None” at Printer on System menu.
-
Page 45: Installation
1. Fix the hanger by using four self-tapping screws (5×20). 2. Screw knob bolts in display unit, set it to the hanger, and tighten the knob bolts. Note: For the overhead mounting, reinforce the mounting location and secure the hanger, with bolts, nuts and washers (local supply). NX-700B NX-700A…
-
Page 46
4. INSTALLATION Flush mounting The display unit can be installed flush mounted in a console or panel by using the optional flush mount kit. (For NX-700A) Type: OP08-19 Code No.: 004-514-810 Name Type Code No. Qty Remarks Mounting metal 08-023-1019… -
Page 47: Receiver Unit
4. INSTALLATION Receiver Unit General mounting considerations • The mounting location should be well ventilated and dry. • The unit can be mounted on bulkhead or the desk. • Secure the maintenance space shown in drawing at the back of this manual for ease of maintenance and service.
-
Page 48: Antenna Unit
4. INSTALLATION Antenna Unit Mounting considerations Install the antenna unit referring to the antenna installation diagram at the back of this manual. When selecting a mounting location for the antenna unit, keep in mind the following points: • Do not shorten the antenna cable. •…
-
Page 49: Wiring
4. INSTALLATION Wiring Antenna unit NX-7H Display unit NX-700A or B Antenna cable 04S4168 10/20/30/40/50 m DSUB25P-DSUB25P cable (3 m) Receiver unit NX-7001 Ground cable (Local supply) -INS -Printer (for NX-700B only) -Alarm Power cable (Local supply) 12-24 VDC…
-
Page 50
4. INSTALLATION Receiver unit All cables are gathered to the receiver unit. Connect cables at inside of the receiver unit as shown below. RCV Board 08P3227 TB401 TB402 J402 J403 Antenna cable (to Antenna unit) DPYC-2.5 TTYCS-1Q Printer cable (to 12-24 VDC) (to INS) (to Printer, NX-700B only) DPYC-1.5… -
Page 51
4. INSTALLATION Fabricate these cables as below to connect to the receiver unit. 5 mm 100 mm How to use J402 and 403 connector 1. Insert the terminal opener in connector. 2. Insert a wire in terminal while pressing and holding the terminal opener. 3. -
Page 52
4. INSTALLATION Extending antenna cable length When connecting two cables for extension, use optional extension cable kit OP-04-2. Code No.: 000-041-174 (10 m), 000-041-175 (20 m), 000-041-176 (30 m), 000-041-177 (40 m), 000-041-178 (50 m) Name Type Code No. Remarks 005-948-320 10 m 005-948-330… -
Page 53: Setting Of Printer
4. INSTALLATION Setting of Printer After the connection completely, the setting of printer should be done for NX-700B as shown below. (For NX-700A, use the default setting as is.) 1. Press the key to turn the power on. 2. Press the MENU key to show the main menu.
-
Page 54: Interfacing
4. INSTALLATION Interfacing This equipment can receive navigation data in IEC 61162-1 Ed2/2 format. Priority TIME DATE GNS > GGA > RMC > GLL VTG > VBW > RMC VHW > VBW VTG > RMC Input data sentence description GGA: GPS position fixing condition $—GGA,hhmmss.ss,llll.lll,a,yyyyy.yyy,a,x,xx,x.x,x.x,M,x.x,M,x.x,xxxx*hh<CR><LF>…
-
Page 55
4. INSTALLATION GLL: Latitude and longitude $—GLL,llll.lll,a,yyyyy.yyy,a,hhmmss.ss,A,a*hh<CR><LF> | | | | | +——- 6 | +——— 5 +———— 4 +—————- 3 +——+———————— 2 +—+———————————— 1 1. Latitude, N/S 2. Longitude, E/W 3. UTC of position 4. Status: A=data valid, V=data invalid 5. -
Page 56
4. INSTALLATION RMC: Recommend Minimum Specific GNSS Data $—RMC,hhmmss.ss,A,llll.lll,a,yyyyy.yyy,a,x.x,x.x,xxxxxx,x.x,a,a*hh<CR><LF> | | | | | | | +— 10 | | +—— 9 +—+——- 8 +————— 7 | +——————— 6 | +————————- 5 +—+—————————- 4 +—+—————————————- 3 +————————————————— 2 +———————————————————- 1 1. -
Page 57
4. INSTALLATION ZDA: Time and date $—ZDA,hhmmss.ss,xx,xx,xxxx,xx,xx*hh<CR><LF> | +——— 7 | +———— 6 +————— 5 +—————— 4 | +———————- 3 +————————- 2 +——————————— 1 1. UTC 2. Day, 01 to 31(UTC) 3. Month, 01 to 12(UTC) 4. Year(UTC) 5. Local zone hours, 00h to +-13h 6. -
Page 58
4. INSTALLATION NRQ: Request NAVTEX messages Command to request specific NAVTEX message(s) to be sent to IBS port. Messages may be sent in any order. Each message sent from the IBS port shall be preceded by the NRX sentence. $-NRQ,x,h,h*hh<CR><LF> Note 1: the transmitter coverage area mask is defined as a 32 bit mask 0xFF.FF.FF.FF where the least significant bit represents transmitter coverage area ’A’, the next bit is ’B’… -
Page 59
4. INSTALLATION ACK: Acknowledge $—ACK,xxx*hh<CR><LF> | + ————————2 +——————————1 1. Local alarm number(identifier) 2. Checksum GNS: $—GNS,hhmmss.ss,llll.lll,a,yyyyy.yyy,a,c—c,xx,x.x,x.x,x.x,x.x,x.x*hh<CR><LF> | | | | | | | | | | | | | +— 11 | | | | | +—— 10 | | | | +———- 9 | | | +————— 8 | | +—————— 7 | +———————- 6… -
Page 60
4. INSTALLATION VHW: Water speed and heading $—VHW,x.x,T,x.x,M,x.x,N,x.x,K*hh<CR><LF> | | | | | +——— 5 | | +—+———— 4 | +—+—————— 3 | +—+———————— 2 +—+—————————— 1 1. Heading, degrees true 2. Heading, degrees magnetic 3. Speed, knots 4. Speed, km/h 5. -
Page 61
4. INSTALLATION VBW: Dual ground/water speed $—VBW,x.x,x.x,A,x.x,x.x,A,x.x,A,x.x,A*hh<CR><LF> | +— 11 +—— 10 +——— 9 | +———— 8 +————— 7 | +—————— 6 +——————— 5 | | +———————— 4 | +————————— 3 +—————————— 2 +———————————- 1 1. Longitudial water speed, knots 2. -
Page 62
4. INSTALLATION Output data description NRX: New NAVTEX received message New NAVTEX message to follow in ASCII format $NXNRX,xxxx,x,x,x,xx,xx,xxxx,hhmmss,x.x,n—n*hh<CR><LF> encapsulated message error rate % (xx.x) UTC of receipt of message year month (1-12) day (0-31) freq (‘490’, ‘518’ or ‘4209’) number of lines in message (1 to 999) line number (1 to 999) message identifier (B… -
Page 63
4. INSTALLATION ALR: Set alarms $NXALR,hhmmss.ss,xxx,A,A,c—c*hh<CR><LF> +—————— 6 +—————— 5 | +——————— 4 +———————- 3 +————————- 2 +——————————— 1 1. Time of alarm condition change, UTC 2. Local alarm number(identifier) 3. Alarm condition(A=threshold exceeded, V=not exceeded) 4. Alarm’s acknowledge state, A=acknowledged V=unacknowledged 5. -
Page 64: Menu Tree
Signal Monitor (Off, Int’l, Local) Key Beep (Off, On) Time Offset (-13:30 to +13:30, 0:00) Units (nm, kt, km, km/h, mi, mi/h) Printer (None, NX-700A, Upright, Inverted) Display Scrolling (Slow, Fast, Skip To $$) Font Size (Small, Medium, Large) Time Display (24hour, 12hour)
-
Page 65
ID storage 200 x 2 channels Message storage 200 messages x 2 channels (100,000 characters x 2 channels) PRINTER SECTION (FOR NX-700A ONLY) Printing system Line thermal head printing system Printing paper Thermal paper (58 mm x 30 m) Printing width… -
Page 66
GGA, GLL, RMC, ZDA, NRQ, NMK, ACK, GNS, VHW, VTG, VBW Output data NRX, ALR Alarm Contact closure signal (max. 0.5A, 50V) for SAR alert POWER SUPPLY 12-24VDC: 1.5-0.8A (NX-700A), 0.7-0.4A (NX-700B) ENVIRONMENTAL CONDITION Ambient temperature Antenna unit -25°C to +70°C Receiver / Display unit -15°C to +55°C… -
Page 76
A-10… -
Page 77
A-11…
This manual is also suitable for:
Nx-700b
Скачать файл PDF «Furuno Navtex NX-700-B Инструкция по эксплуатации» (783 Kb)
Популярность:
2382 просмотры
Подсчет страниц:
2 страницы
Тип файла:
Размер файла:
783 Kb

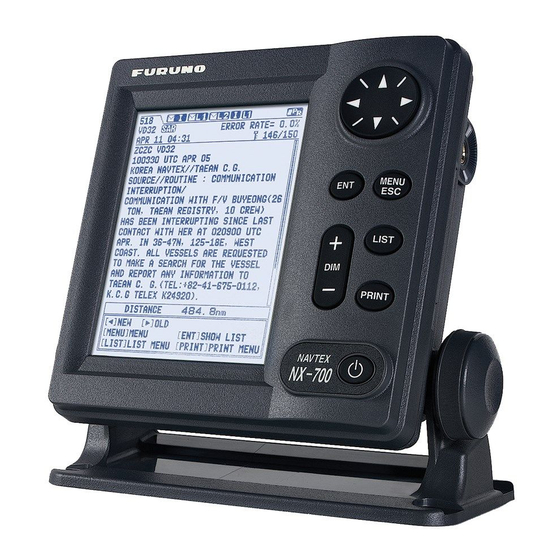
Furuno NX-700A NAVTEX receiver
Приемник сообщений Furuno NX-700A — удобный и функциональный приемник прогноза погоды и навигационных сообщений, которые можно распечатать на встроенном принтере. Прибор работает на частотах 518 кГц и 490 кГц или 4209,5 кГц, и отображает содержимое сообщений на ярком QVGA дисплее диагональю 5 дюймов, дополнительно предусмотрена возможность подключения тревожного оповещателя или навигационных устройств по протоколу NMEA. Приемник одобрен для использования на регистровых судах Российским Морским Регистром Судоходства.
NAVTEX — всемирная система автоматического оповещения судов, предоставляет информацию о прогнозе погоды и навигационных опасностях для повышения безопасности судоходства. Система позволяет корректировать маршрут с учетом актуальной информации в реальном времени. Сообщения передаются в текстовом виде и выводятся либо на экран устройства, либо на внешний или встроенный принтер. Приемники NavTex являются необходимыми компонентами судового оборудования ГМССБ (Глобальной морской системы связи при бедствии и для обеспечения безопасности).
Furuno NX-700A имеет буферную энергонезависимую память на 200 сообщений на канал и одновременно принимает сообщения на двух каналах. Экран имеет три режима отображения данных и три размера шрифта, каждый из которых можно выбрать по своему усмотрению. Для интеграции в судовую информационную сеть предусмотрен порт обмена данными в формате NMEA. При наличии данных GPS, устройство автоматически выбирает оптимальную станцию NAVTEX NAVAREA.
Основные параметры Furuno NX-700A Navtex Receiver:
- Сертификат РМРС
- Встроенный принтер
- Тип печати — термо, бумага 58 мм х 30 м
- Скорость печати — 2 см/сек
- Отвечает требованиям ГМССБ
- Дисплей QVGA 5″ 240×320 пикс
- Работа на двух каналах: 518 кГц и 490 кГц или 4209,5 кГц
- Память на 200 сообщений на канал
- Энергонезависимая память
- Три типоразмера шрифта на экране
- Обмен данными NMEA
- Напряжение питания 12-24 Вольта
- Мощность потребления не более 9 Ватт
- Температура эксплуатации от -15° до 55°C
- Герметичность корпуса дисплея IP20
Комплект поставки: основной блок дисплея/принтера Furuno NX-700A, блок приемника NX-7001, антенна NX-7H, установочный комплект, инструкция, сертификат РМРС (по запросу).
|
Приёмник Navtex Furuno NX-700-A — устройство для приема международных сообщенийПриёмник Navtex Furuno NX-700-A может принимать сообщения по двум каналам одновременно. Один из каналов работает на частоте 518 кГц и принимает международные сообщения NAVTEX; другой канал может настраиваться на любую из частот в диапазоне от 490 до 4209.5 кГц для приема местных сообщений NAVTEX. Сообщения содержат разнообразную информацию о безопасноти на море, включая навигационные предупреждения, метеорологические сводки, информацию по поиску и спасению (SAR) и прочую информацию для судов, плавающих в районе покрытия береговых станций. В случае подключения к приёмнику Navtex Furuno NX-700-A GPS-навигатора передающие станции можно выбирать автоматически в зависимости от местоположения судна. Все входящие сообщения сохраняются в энергонезависимой памяти (информация не разрушается после отключения питания) и выводятся на четкий 5″ серебристый LCD. Предусмотрено три размера шрифта, которые выбираются с помощью меню. Приёмник Navtex Furuno NX-700-A оснащен тонким дисплеем, приемником и антенной — все устройства имеют изящные размеры. Компактная, зонтичная антенна (H-field) не требует заземления. Кроме того, антенна оснащена компактным высококачественным предусилителем, который обеспечивает надежный и бесперебойный прием без дополнительной гибкой антенны. В комплект поставки приёмника Navtex Furuno NX-700-A входит принтер для распечатывания сообщений. Особенности приёмника Navtex Furuno NX-700-A:
Комплектация приёмника Navtex Furuno NX-700-A:
Опционально:
По вопросам цены, наличия, приобретения приёмника Navtex Furuno NX-700-A можно обращаться на электронную почту info@nav-tech.ru или позвонить по телефонам: +7 (495) 502-62-54, +7 (909) 667-58-56 Есть вопросы?Вы можете задать нам вопрос(ы) с помощью следующей формы. Имя: Пожалуйста, сформулируйте Ваши вопросы относительно Приёмник Navtex Furuno NX-700-A:
|
|||

- Главная
-
Furuno
-
Стереоресиверы
-
Navtex NX-700-B
На этой странице вы найдёте полный список документов на Стереоресиверы Furuno Navtex NX-700-B.
Выберите необходимый PDF файл.
-

Стереоресиверы
Furuno Navtex NX-700-B Инструкция по эксплуатацииТип файла
PDFРазмер
783 KbКол-во страниц
2Просмотров
2382Download / Read online

- 1
Другие Furuno Стереоресиверы
-
Furuno Navtex Receiver NX-500 Инструкция по эксплуатации
PDF файлов
1Просмотров
6799 -
Furuno NAVNET 3D MFD8/12/BB Инструкция по эксплуатации
PDF файлов
1Просмотров
4692 -
Furuno Navtex NX-700-B Инструкция по эксплуатации
PDF файлов
1Просмотров
3118 -
Furuno NX-700A Инструкция по эксплуатации
PDF файлов
1Просмотров
2645 -
Furuno NX-700B Инструкция по эксплуатации
PDF файлов
1Просмотров
2445 -
Furuno MF/HF DSC/Watch Receiver DSC-60 Инструкция по эксплуатации
PDF файлов
1Просмотров
1953
Другие устройства Furuno
-
Стереосистемы
Furuno RC-1500-1T Инструкция по эксплуатацииPDF файлов
1Просмотров
24444 -
Телефоны
Furuno FS-1570 Инструкция по эксплуатацииPDF файлов
1Просмотров
19722 -
Судовые радиостанции
Furuno DSC-5R Инструкция по эксплуатацииPDF файлов
1Просмотров
19029 -
Судовые радиостанции
Furuno DSC-5 Инструкция по эксплуатацииPDF файлов
1Просмотров
18626 -
Сетевые карты
Furuno DP-6 Инструкция по эксплуатацииPDF файлов
1Просмотров
12943 -
Телефоны
Furuno FS-1502 Инструкция по эксплуатацииPDF файлов
1Просмотров
12907
Вопросы
-
слабая батарея
Ноутбуки
Acer
1310
Alex 12.02.2016 17:26
Ранее вы смотрели
Производители
Acoustical Solutions
Biogen Idec
Blue Sea Systems
Clarity
Emulex
Ford
Human Touch
Old Town Canoe Co.
SunBriteTV
Wavelink
Типы устройств
Спредеры
Детские качели
Уход за детьми
Средства индивидуальной защиты
Сантехника
Вибраторы для уплотнения бетона
Офисные телефонные системы
Игры для ПК
Дегидраторы
Устройства контроля лая
Устройства
Aquatic AI25AIR7242CFTO
Atlas Sound 8″ 2-Way Stadium Horn System AH94-8ST
Casio 2958 MA0506-EA
Casio Watch 5172
Freedom Villa Table
Ricoh 500SE
Samsung SPF-87H
Tripp Lite N002-014-BK
Tripp Lite NetCommander B070-008-19
freeuserguide.ru
About Us
Contacts
Disclamers
Privacy Policy
Эта страница полезна для вас? Поделитесь ссылкой: