Доброго времени суток Всем, уважаемые автолюбители!

Полный размер
Тот автомобиль, который не даст скучать хозяину…
В данной записи будет приведена — пошаговая инструкция по кодированию BMW, при помощи NCS Expert Tool и NCS Dummy.
Понятно, вроде инструкций во всемирной паутине валом, но, вопросов в личку все равно приходит достаточное количество, о различных ошибках, вопросах о параметрах, да и записей на драйве2 с вопросами по кодированию, просьбе о помощи и т.д. выше крыши. Поэтому я и решил создать так сказать подробный пример, пошаговую инструкцию по этому вопросу, чтобы по 10 раз на неделе не расписывать одно и тоже. Это так же даст понять, что по такому принципу, никаких ошибок и неудачных попыток не будет. Нет, я не против вопросов в личку, на сколько возможно стараюсь помочь Всем и каждому.
Как и раньше, кодирование будет осуществляться в программе NCS Expet Tool, а так же в данной записи приведу пример работы с NCS Dummy, которого считаю отличным помощником при кодировании BMW, и всем настоятельно советую этим помощником пользоваться. Последние версии программы NCS Dummy Вы можете отслеживать и обновлять здесь. Ссылка на скачивание (1.7 МВ), версия 0.6.0.7, нужно распаковать архив, программа не требует установки, просто запускаем для работы файл NcsDummy.exe. В архиве так же присутствуют файлы профиля для NCS-Expert, их нужно скопировать в папку профилей NCS-Expert, т.е. по пути c:NCSEXPERPFL, потом соответственно загрузить в NCS-Expert.
Если хотите узнать о других полезных программах для работы с ЭБУ BMW, то Вам сюда.
При работе с ЭБУ, стоит так же учитывать, что весь софт на ПК настроен и установлен верно, да и я об этом не раз упоминал, что правильно настроенный софт, это уже большая часть успеха, потому как большинство ошибок при работе с ЭБУ, как раз по этой причине и мешают нам работать.
Итак приступим!
Приведу пример по кодированию, путем активации двойного мигания аварийкой, на кузове е39.
— Подключаем кабель к авто (на моем примере используется k+dcan), который может себе позволить каждый, включаем зажигание (в общем ничего нового:), запускаем программу NCS EXpert Tool, выбираем строку загрузки профиля:

Полный размер
Загружаем профиль в NCS Expert
Тут прошу заметить, что профиль я загружаю, который был вместе с программой NCS Dummy, потому как в процессе буду работать с этой программой:
Далее выбираем строку VIN/ZCS/FA:
Затем выбираем строку ZS/FA из ЭБУ :
Выбираем кузов требуемого авто, в моем случае е39:
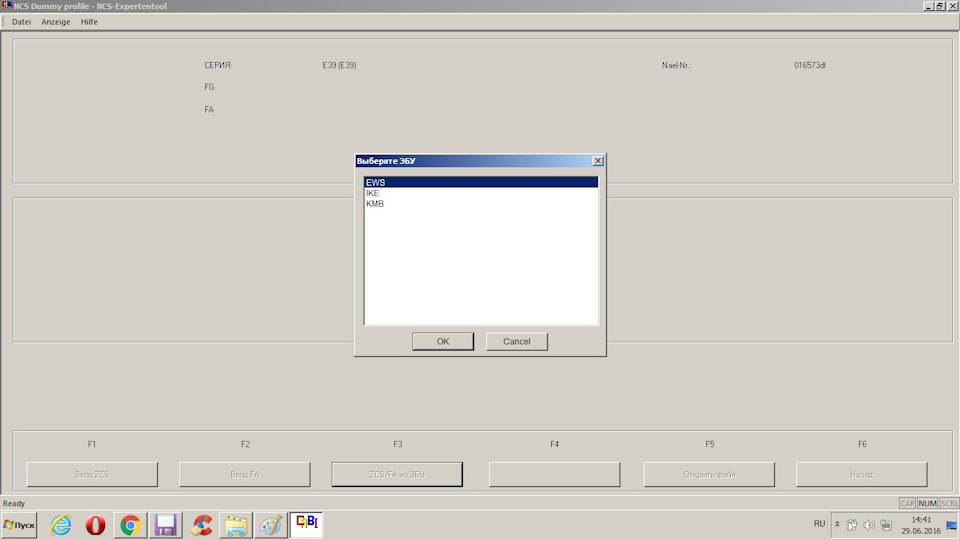
Выбираем ЭБУ, из которого будет считан так называемый контрольный шифр ZCS или FA, в моем случае ZCS. Разницы нет из kmb или ews считывать zcs, но рекомендую VIN брать из EWS, т.к. в приборке хранятся только последние 7 знаков.
Полный размер
Выбираем ЭБУ для считывания ZCS
В итоге получаем номер кузова авто (VIN) и тот самый шифр ZCS.
Данные ZCS раскладываются на 3 составляющие:
1. GM — содержит информацию о кузове, о рулевом управлении, модели двигателя и т.п.
2. SA — опции установленные в машине
3. VN — список версий номеров ЭБУ(типа драйверов) для кодировки
В моделях свежее, комплектация, опции, блоки и оборудование записано в коде FA.
После считывания и идентификации авто, нажимаем кнопку «Назад», затем выбираем «Кодирование ЭБУ», выбираем из списка необходимый блок, в моем случае LCM, нажимаем кнопочку «Базовые функции», выбираем строку «coapiReadSgGetFswPsw«:
В следующем окошке видим маркировку ЭБУ и его кодировочный индекс, в моем случае LCM.C15, эту цифру запоминаем, так как она нам понадобится для Dummy. Нажимаем «ОК» тем самым подтверждая работу с блоком.
Внимание! Если необходимо поправить/отредактировать кодировочный индекс блока на «правильный», то правим его в данном окне, перед подтверждением команды «ОК». Дабы не было в дальнейшем ошибки о несовпадении кодировочного индекса. Зачастую редактировать индекс блока необходимо после его замены. Как например я описывал в записи замены блока света LCMII на LCMIII, соответственно изменился и индекс с 15ого на 18ый, но, так как шифр комплектации остался прежним, то и после считывания zcs из блока ews, индекс блока света будет считываться заводской(т.е. 15ый), даже после установки нового блока с индексом 18. Вот, я просто меняю цифру на 18, и продолжаю работу с блоком, никаких ошибок не будет. Данный вопрос можно решить редактированием шифра ZCS, но, есть вероятность, что обновляя шифр под блок света, мы можем и обновить индексы кодировочные других блоков, что соответственно приведет к другим ошибкам и предупреждениям, поэтому, можно шифр не редактировать, а просто вбивать вручную!
Все это мы сделали для того, чтобы создать файл TRC, со списком параметров требуемого ЭБУ, файл FSW_PSW.TRC создался в папке WORK программы NCS Expert, вот:
Можно было воспользоваться операцией «CODIERDATEN_LESSEN», кому как удобнее, смысл тот же.
Далее можно редактировать файл TRC вручную, сохранять с заменой в файл MAN (рабочий файл), но, я лично пользуюсь утилитой NCS Dummy, о которой упоминал ранее, функционал программы очень большой, а самое главное, подробно расписаны и переведены на английский язык определенные строки и параметры, описаны функции, легко разобраться с помощью переводчика, какая строка за что отвечает, так же можно пользоваться поиском, при поиске определенной строки. Интерфейс удобен и понятен, не составит труда разобраться желающим.
Не закрываем NCS Expert, запускаем программу NCS Dummy. Далее:
1) выбираем кузов авто, в моем случае е39;
2) выбираем номер блока из списка (та самая цифра, которую мы получили при создании файла ЭБУ — LCM.C15), можно конечно загрузить маркировку блока через фильтр Dummy, но разницы нет, кому как удобнее;
3) Выбираем файл FSW_PSW.TRC, который создали ранее;
В принципе в программе по стандарту, указан путь папки WORK, где находится trc файл.
Тем самым загрузили параметры и опции созданного файла в программу Dummy, видим список параметров, с описанием и пояснением.
Так как я собрался активировать функцию — двойного мигания аварийкой, то в поиске по параметрам вбиваю слово «WARNBLINKER»:
По умолчанию стоит «einfachimpuls», чтобы активировать двойное мигание меняем на «doppelimpuls». Если нам необходимо что то еще, то по тому же принципу ищем необходимые строки и меняем на требуемые параметры.
Далее экспортируем файл с измененным параметром в папку WORK программы NCS Expert, нажимаем кнопочку «Export FSW/PSW», затем выбираем строку «Export FSW_PSW.MAN»:
Обратим внимание, что тем самым мы заменили пустой рабочий файл MAN, с измененными требуемым параметрами.
Переключаемся на программу NCS Expert, меняем операцию на «SG_CODIEREN», при помощи кнопочки «Смена операции»:
Проверяем чтобы была запись «JOBNAME =SG_CODIEREN», и нажимаем «Кодировать ЭБУ». Если все сделали правильно и успешно, то будет запись «Код-ние окончено. ОК»
Закрываем программу, отключаем шнурок, радуемся проделанной работе:
Прошу обратить внимание, что программа у меня русифицирована, в версиях с другими языками, строки будут отличаться!
Список полезных опций и параметров, которые еще можно активировать, я описывал в этой записи. По их активации — работаем по тому же принципу.
Это так сказать простейшая опция для примера, на самом деле возможности и хитрости безграничны. Программа Dummy, позволяет так же рассчитывать и создавать свои значения в некоторых параметрах, например интервал ТО, и так далее и тому подобное.
Данной записью, я хотел лишь помочь, и показать, что без каких либо проблем и ошибок можно работать с ЭБУ, с учетом правильного настроенного софта и самого главного времени и желания. Где скачать и как правильно настроить софт, читаем здесь. У меня стоит сборка как раз из этой статьи, проверено не на одном ПК. Буду рад если кому либо помог, для начинающих полезная инструкция.
Всем спасибо за внимание, до встречи!
Кодирование блоков и настройка в программе EDIABAS INPA ELDI NCS NFS
I Кодирование блоков.
- Запускаем программу NCS Expert
- Выбираем профиль (Load Profil) К примеру Expertmode
- Идентифицируем автомобиль (получаем Главный код)
- Нажимаем F1 (VIN/ZCS/FA)
- Далее жмем F3 (ZCS/FA f. ECU), выбираем кузов кодируемого автомобиля и берем главный код из доступных блоков ECU (к примеру из EWS, IKE или KMB)
- Нажимаем F6 (Back) Видим перечень доступных для кодирования блоков.
- Выбираем требующий кодирования блок F3 (Choose ECU)
1 ABS/ASC/ABD Anti-lock Braking System Automatic Stability Control Brake/limited-slip differential
2 ABS…DSC 2 Anti-lock Braking System Automatic Stability Control Brake/limited-slip differential Dynamic Stability Control 2
3 ABS-PG Anti-lock Brakins System tester
4 ADS Autonomous throttle-valve control Автоматическое регулирование дроссельной заслонки
5 AHK Активная кинематика заднего моста
6 AIR Airbag Подушка безопасности
7 AIRBAG Airbag Подушка безопасности
8 AWD, AHK Active rear-axle kinematics Активная кинематика заднего моста
9 BC/MID On-board computer/Multi Information Display
10 Brief test короткий тест (считывание ПЗУ всех блоков управления)
11 CCM Check control module модуль сбора контрольной информации
12 CVM Cabrio soft-top module Мягкий верхний модуль кабриолета
13 DME/DDE Digital Motor Electronics/ Digital Diesel Electronics цифровая моторная электроника/ цифровая дизельная электроника
14 DME/DDE(I) Digital Motor Electronics/ Digital Diesel Electronics I
15 DME/DDE(II) Digital Motor Electronics/ Digital Diesel Electronics II
16 DSC Dynamic Stability Control
17 DSC 1 Dynamic Stability Control 1
18 DSHD Double sliding/tilting sunroof Двойная сдвигаемо-подъемная крышка
19 DWA Burglar alarm system противоугонная сигнальная установка
20 EDC Electronic Damper Control электронный контроль амортизатора
21 EGS Electronic gearbox control электронное управление коробкой передач
22 EGS/AGS Electronic gearbox control электронное управление коробкой передач
23 EHC Electronic height control
24 EKM Electronic body module Электроника кузовного модуля
25 EML Electronic engine-power control электронный регулятор мощности двигателя
26 EWS Electronic car immobilisation system
27 FHK Rear-compartment heating/air conditioning Внутрекузовная обогревательно-кондиционирующая установка
28 GETRIEBE коробка автомат
29 GSA Closed-loop-controller differential lock Регулируемый блокирующийся дифференциал (для всех ведущих колес)
30 GSR Cruise control
31 HEIZ-KLIMAA климат-контроль
32 HK Heating/air conditioning
33 HKM Boot-lid module
34 IHK климат-контроль
35 IR Infrared locking system Инфракрасная запорная система
36 KOM Instrument cluster инструментальная панель
37 KOMBI Instrument cluster инструментальная панель
38 Kurztest короткий тест
39 LCM Light check control module
40 LKM Lamp check module модуль лампового контроля
41 LSM Steering-column memory память стоек рулевого управления
42 LWR регулировка угла наклона фар
43 LWS Steering-angle sensor
44 NAV Navigation system
45 PDC Park Distance Control контроль парковочного расстояния
46 RDC Tyre-pressure control контроль давления шины
47 QUICK CLEARING быстрая очистка всех систем от ошибок
48 QUICK-LOESCHEN быстрая очистка всех систем от ошибок
49 SHD
50 SPG Voltage supply
51 SPM/SM Mirror memory/Seat memory
52 TRANSMISSION коробка автомат
53 URS II Rollover sensor II
54 VMX Top-speed regulation
55 VNC Variable camshaft control
56 XEN Xenon lights
57 XENON-LICHT Xenon lights
58 ZKE/ZVM Central body electronics/Central locking module
Видим JOBNAME = SG_CODIEREN это значит что при нажатии F2 (Execute job), это Клавиша выполнения работы – будет выполнено кодирование блока (SG_CODIEREN ). При нажатии на F1 (Change job), это клавиша изменения работы – есть возможность изменить операцию которую будим производить над блоком, к примеру было JOBNAME = SG_CODIEREN выбрали INFO на экране стало отображаться JOBNAME = INFO значит блок не будет кодироваться а будет выполнена операция INFO
II Работа по настройке блоков (CAR/KEY Memory)
- Запускаем программу NCS Expert
- Выбираем профиль (пункт меню Files — Load Profil) К примеру Expertmode
- Редактируем профиль (пункт меню Files — Edit Profil) просит пароль он у нас есть … . Зашли, Помимо прочих настроек , видим пункт Individualisierung — Car/key Memory, заходим в этот пункт меню и активируем дополнительные функции.
- Выходим предлагает сохранить изменения, соглашаемся.
- У нас на панели появилась дополнительная кнопка Car/key Memory.
- Дальше пишу по памяти поэтому возможны неточности, уточню.
Зашли по кнопке в меню Car/key Memory Видим перечень наворотов и возможные варианты. Значком “S” Отображается опция которая устанавливается на заводе по умолчанию. Текущее закодированное значение отображается значком “I” К примеру наварот SOFT — это плавное потухание света в салоне при открытии и закрытии двери смотрим SOFT S Aktiv no Aktiv Это значит что заводская установка по умолчанию S – напротив Aktiv Чтобы проверить как сейчас включено потухание, делаем опрос данной функции Нажимаем Клавишу Read После чтения можем увидеть к примеру SOFT S I Aktiv или SOFT S Aktiv no Aktiv I no Aktiv Там где стоит значек “I” то состоянии и выбрано на текущий момент. Чтобы Изменить Выбранное состояние делаем его активным ( выделяем мышью) далее просто непомню надо глянуть на подключенной машине но надо переписать на верх текущего состояния то которое мы хотим примерно так это выглядит
Только зарегистрированные и авторизованные пользователи могут оставлять комментарии.
Навигация
- Установка
- Русификация
- Профили
- Скачать NCS Expert
NCS Expert — программа для работы с BMW из пакета BMW Standard Tools. Её основная цель — кодирование опций E-кузова, тогда как для F/G используются E-Sys (или BMWAiCoder) и мобильные программы типа BimmerCode (работает так же и с E-кузовом).
Установка
Установка в обычном режиме и соответствует установке BMW Standard Tools.
Чтобы запустить NCS Expert на Windows 7 x64, необходимо заменить файл NCSEXPER.exe. Для этого скопируйте из папки «Дополнительно» (в подпапке NCS_Expert) этот файл и переместите в папку установки (C:NCSEXPERBIN по-умолчанию). Чтобы работать с этой программой, вам понадобится SP-Daten.
Русификация
Для того, чтобы использовать программу на русском, скопируйте два файла: NCSEXPER.TXT (в папку CFGDAT) и NCSEXPERrus.exe.
Профили
Так же для работой с программой можно использовать профили настроек. В качестве примера рассмотрим профиль программы NCS Dummy. Скачать его можно по ссылке на странице программы.
Чтобы установить профиль, переместите его в папку C:NCSEXPERPFL.
Скачать NCS Expert
Чтобы установить эту программу, нужно скачать BMW Standard Tools последней версии, в пакете которой она находится, и установить. Установка производится многократным нажатием «Далее». Доступная версия — 4.0.1.
Спасибо, что прочитали статью. Надеюсь, вы нашли то, что искали.
Если нет — напишите нам, и мы подготовим материал.
The below is a reproduction of Obioban’s Coding/Tuning thread from M3f (circa 2013 since that’s what archive.org had). His NCS Expert tutorial covers much of non-VO/ZCS information from above, and has pictures, so might be nice to reference
NCS Expert tutorial here: http://lindvigs.com/obioban/NCSExpert_Tutorial.pdf
If you’re having trouble with the information below, there’s an excellent and free program called «NCS dummy» that could make your life a lot easier. It translates the more commonly altered values from BMW speak to english. NCS dummy info here.
Fairly complete coding options: http://www.lindvigs.com/obioban/FSW_PSW.pdf
Especially interesting options:
Airbag Control Module:
-Useful if airbags are to be removed or for aftermarket seats to disable seat sensors. I’d say best use for people that are stripping the car down…
Instrument Cluster:
-Acoustic warnings for belts, key in ignition, frost warning — these are nice to quiet the car down a bit. If these beeps annoy you, they can be removed.
-Cluster offset. The instrument cluster reads high by about 7-8%, this can be adjusted, so it’s closer to actual speed.
-Service interval. This has actually made the service interval feature useful to me. By default it’s set to 25,000km or close to 15,000 miles, I’ve changed mine to 11,000km or close to 7,000 miles, now I can use this as my oil change interval instead of trying to remember halves.
-enable M track mode indicator (2003 or later)
-oil level display on OBD: link to thread
pic of CSL manual discussing functionality: here
Light Control Module:
-halogen highs on with xenon highs
Quote:
Module Field Value Purpose
ALSZ PWM_WERT2_FL_BIXENON wert_01 Halogen High Beams
-fogs stay on with highs
Quote:
Module Field Value Purpose
ALSZ FL_UND_NSW_NICHT_GLEICHZ nicht_aktiv Allows fogs with highbeams
-Check control and warm testing lights are useful for LED tail lights retrofit. If these are disabled, you won’t get a dash light or blinking anymore.
-Daytime running lights. These can be changed, activated or removed, quite a few items in this topic.
Quote:
Module Field Value Purpose
ALSZ GED_FL_ALS_DRL nicht_aktiv Disable DRL
-Home shine — you can pick which lights you want for your home shine or «follow me home» lights.
Quote:
Module Field Value Purpose
ALSZ HEIMLEUCHTEN wert_01-wert_05 changes how long the lights stay on (short to long)
ALSZ HEIMLEUCHTEN_* aktiv/nicht_aktiv enable/disable pathway lighting for specified lights
-Euro sidemarkers — this disables the orange corner lights as running lights, they’ll only work as turn signals, so no orange corners with the headlights on.
Quote:
Module Field Value Purpose
ALSZ SIDEMARKER_US nicht_aktiv disables US-style parking lights
-triple blink turn signals
Mid 2005 and later:
Quote:
Module Field Value Purpose
ALSZ CYCL_TI_BLK dreimal enables triple-flash blinkers
-alternate 4 way flasher flash patterns
Quote:
Module Field Value Purpose
ALSZ BLINKIMPULS_WARNBLK wert_04 Euro Hazards
Rearview mirror module:
-Tilt mirror memory can be programmed, so you can adjust the mirror after it tilts down for reverse.
Quote:
Module Field Value Purpose
BTM MEMORY_SPIEGELABKLAPPEN aktiv User-Definable Reverse
Convertible top module:
This module does not take coding and several people said they’ve burned theirs while trying to code. Shame…
General Module:
-Alarm can be enabled (it’s built into the car, so even if you don’t have the siren, it’ll start blinking the headlights).
Quote:
Module Field Value Purpose
GM5 DWA aktiv enables visual lock/unlock confirmation without alarm installed
-One touch close for coupe rear windows (with hardware mod)
Quote:
Module Field Value Purpose
GM5 KOMFORTSCHLIE_FB_O_FH_HI nicht_aktiv Remote Close Rear Windows
GM5 MAUT_N_ABBRECH_N_TUER_AUF aktiv Rear Window One Touch Close (GM5.C04+)
GM5 MAUT_ZU_STOP_N_TUER_AUF nicht_aktiv Rear Window One Touch Close (GM5.C02)
GM5 FH_TUEREN_HINTEN_TIPP_ZU aktiv Rear Window One Touch Close
GM5 FH_ZTR_SCHALTER_TIPP_ZU aktiv Rear Window One Touch Close
-One click unlock for both doors.
Quote:
Module Field Value Purpose
GM5 FERNBEDIENUNG_* nicht_aktv One Click Unlock (* represents key #)
-Open and close windows/sunroof/convertible top with remote. This can be customized.
Quote:
Module Field Value Purpose
GM5 KOMFORTSCHLIESSUNG_FB aktiv Remote Close Windows/Sunroof/Convert Top
GM5 KOMFORTOEFFNUNG_FB aktiv Remote Open Windows/Sunroof/Convert Top
-Automatic locking based on time or speed. Speed can be customized.
Quote:
Module Field Value Purpose
GM5 VERRIEGELN_AUT_AB_X_KM/H aktiv Auto locking door at specified speed
GM5 VERRIEGELUNGSSCHWELLE *See Below* Sets speed at which doors lock.
klemme_r
4_km/h
8_km/h
12_km/h
16_km/h
20_km/h
24_km/h
28_km/h
-roll up windows remotely with key
Quote:
KOMFORTSCHLIE_FB_OHNE_SHD
-Disable the boot open button on the key when the car is locked
Quote:
-Automatically relock the car if a door is not opened within two minutes
Quote:
VERRIEGELN_AUT_NACH_2_MIN aktiv
-Keep car alarm enabled when car is unlocked using door key cylinder (most common way to break into an e46)
Quote:
SCHAERFEN/ENTSCHAERFEN
schloss_und_fernbedienung ; key will disarm alarm by manual turn in door lock cylinder (default)
nur_mit_fernbedienung ; key will not disarm alarm even if door lock cylinder is turned
AC/Heater system:
-Automatic rear defroster. I love this, I haven’t touched the button since I got my car.
-alter interior temp sensor to taste— so you can make a displayed 70º (on the CC screen) maintain 68º. Good if you have a PITA significant other that likes to keep it warm!
Radio:
-Station key memory can be enabled, so you have different presets for different keys.
Seat Memory:
-Automatic seat adjustment based on which key unlocked the car can be enabled. I can be set to change seat position as soon as you unlock the car with the remote. I see this being useful if you’re a big guy and move the seat every time you get in. I don’t use it.
Quote:
Module Field Value Purpose
SM AUT_SITZVERSTELLUNG nach_fb_entriegeln Seats Revert Memory Position When Unlocked
SM AUT_SITZVERSTELLUNG nach_entr_u_tuer_oeffnen Seats Revert when Doors Opened
DSC module (full thread here, this is a bit of a work in progress):
-M track mode (2003 or later)
-program car for ZCP brakes (2003 or later)
Quote:
Add option code 7MA to the vehicle order
Recode the DSC module (MK60)
Modify the parameters for the steering angle sensor and rear caliper if you didn’t retrofit the corresponding ZCP bits.
Recode the instrument cluster (AKMB)
The bits that are important to enabling M-track mode seem to be
TRAKTIONDIFFERENZREGELUNG
DTC_LAMPE
and possibly PRE_MSR (Not really sure what this one does)
DRUCKMODELL_HINTERACHSE is for the larger piston in the ZCP/CSL calipers
LENKWINKELKENNLINIE_2 is for the quicker steering rack in the ZCP/CSL
Also you must recode the cluster for the M-track symbol to light up. The line you want to set is «ANZEGIE_HOCHLADEN» (set it to aktiv)
-it may be possible to alter the DSC intervention points. This is still under investigation
-BAUART_MK60 seems to control when ABS intervenes (some people buy ZCP modules because apparently ABS doesn’t kick in as early)
SMG module— CSL programming
-give you REAL launch control and faster shifts
-thread here
AKMB module:
Quote:
mit_gurtschlosskontakt* — enable visible seatbelt warning lamp
ohne_gurtschlosskontakt — disable visible seatbelt warning lamp
AKUSTIK_GURT_WARN
aktiv* — enable acoustic seatbelt warning
nicht_aktiv — disable acoustic seatbelt warning
WARNUNG_GESCHW_LIMIT
nicht_aktiv* — disable speed limit warning
120_km/h — enable audible/visual speed limit warning for 120 km/h (~74 mph) (other speeds not available, unfortunately).
This is a little NCS expert software tutorial on coding BMW E46. Aim to help if anyone has any questions and of course can carry out any coding changes.
Equipment:
NCS expert coding software
A hardware cable (BMW INPA K+DCAN cable/BMW ICOM etc)
First we will need to set up a coding profile within NCS expert.
1) Open NCS Expert.
2) Open up the ‘Expertmode’ profile.
3) Save as a new profile (give it a name, like the godfather or something powerful sounding).
4) Load the ‘godfather’ profile.
5) Edit it (file –> edit. Password is repxet).
6) Make sure under button ‘Individualisierung’ all options are crossed.
7) Make sure under button ‘FSW/PSW’, that ‘from CVT’ is chosen, and that the bottom two boxes are crossed.
 Finally, press ‘consistence check’ and check it works.
9) Then press okay
You should now have a coding profile!
You read using the ‘Expertmode’ profile, and code using the ‘Godfather’ profile. (Ignore the other profile)
Once NCS is open Choose File from the top menu
Select Load Profile
Choose Expertmode profile.
Then Press F1 or choose VIN/ZCS/FA

Now press F3 or choose ZCS/FA f. Ecu

Select the model car E46
Chose the Module in which to read the ZCS/FA, In this case we select the top one. If that one doesn’t work for you, choose the next one below, etc until you find one that works. Bear in mind that the bottom two will not let you read all options. If you find that you cannot read the top one, then you may have a key programming issue (i.e. previous owner losing a key, and BMW not programming the new one properly), or that your car has had an ECU changed that doesn’t match the car’s VIN.
Upon seeing the below screen with the FG and FA Values displayed simply hit F6 or Back.

Click Process ECU

You will now get a list of installed modules that were identified when communication with the chosen “main” module as before.

Select the Module/ECU you would like to work with, In this case the GM5

Now you can choose READ ECU to perform a read out of the module.

You will get a NETTODAT.TRC file popup simply close it.

Navigate to the Work folder which resides in your NCSEXPER directory. You will locate a file FSW_PSW.TRC
This file was created when READ ECU was performed and contains the coding values for that module.
Remember this file is overwritten each time a read out of a module is performed. It would be advised to make a back up of this file in the event you need to restore coding settings. (Just right click and copy and paste the whole file on your desktop or somewhere you can remember in case there is any mistake, if you have this copy of original you can fix.)
NOTE:!!! AT THIS POINT, you have not done any programming, you have simply read the module. You should make a copy as above, but at this point you can exit NCS & disconnect from your car…. and take your time to read this copy of the trc file, and decide what you want to change… and come back to it later. When you go to the next steps, this tells you how to actually change things in your car. If you make some mistake, use your original as the .man file to change them back…
THE NEXT STEPS ARE FOR ACTUALLY CODING TO THE CAR:
Once you have made a backup, Right click and rename the file to FSW_PSW.MAN
*Once you have a .man file and are ready to code your changes to the car, you can do this step, or if you prefer, DELETE the .man file in work folder, and start over again from top.. Just make sure there is only one .man folder in work and that this includes the coding you want to change in the car.
Yes to make the change.

Now right click and choose Open With…

Select Notepad and tick always use the selected program to open this kind of file. Then Press OK.

Now we can make changes to the coding file.

Please see below list of some of the most popular available options that can be changed and their respective modules:-
Module Names
ABG – Airbag Module
AEWS – Immobilizer
AKMB – Instrument Cluster
ALSZ – Light Switch Center
BTM – Passenger mirror Module
CVM – Vert Module – don’t touch this, apparently it’s sensitive
DSC – DSC
FTM – Driver rearview mirror module
GM5 – ZKE – Central Body Electronics
GT – Navigation
IHK – AC
LWS – Light Switch
RAD – Radio
RLS – Rain Sensor
SM – Seat Memory
UEB – Rollover Sensor
GM5:
QUIT_AKUST_ENTSCH : alarm beep on unlock (two beeps)
QUIT_AKUST_SCHAERF : alarm beep on lock (one beep)
QUIT_OPT_ENTSCH : optical Acknowledge remote un-locking (two flashes)
QUIT_OPT_SCHAERF : optical Acknowledge remote locking (one flash)
ALARM_OPT_ABBLENDLICHT : alarm flashes low beam when tripped
ALARM_OPT_WARNBLINKER : ” ” emergency flashers when tripped
ALARM_OPT_FERNLICHT : ” ” high beam when tripped
BEIKLAPPEN_B_KOMFORTSCHL : press the unlock button twice, and the drivers window will open
FH_TUEREN_HINTEN_TIPP_AUF :rear window power down one touch
FH_TUEREN_HINTEN_TIPP_ZU : rear window power up one touch
FH_ZTR_SCHALTER_TIPP_AUF : window switch down one touch
FH_ZTR_SCHALTER_TIPP_ZU : ” ” up ” ”
(do these after modifying the switches)
KOMFORTOEFFNEN_FB_O_FH_HI :remote opens rear window (this has to be nicht_aktiv)
KOMFORTSCHLIE_FB_O_FH_HI : remote closes rear window (this has to be nicht_aktiv)
KOMFORTOEFFNEN_FB_O_SHD : holding open button on remote opens windows without sun roof
KOMFORTSCHLIE_FB_OHNE_SHD : holding close button on remote closes windows without sun roof
KOMFORTOEFFNUNG_FB : convertible top opens by holding the open button on remote..Or opens all windows & sun roof on non convertible
KOMFORTSCHLIESSUNG_FB : convertible top closes by holding the close button on remote..Or closes all windows &sun roof on non convertible
MAUT_N_ABBRECH_N_TUER_AUF – windows carry on opening/closing even when you open the door
VERRIEGELN_AUT_AB_X_KMH : automatic central locking after X KMH
VERRIEGELN_AUT_NACH_2_MIN : automatic central locking is re -locked after 2 MIN if you dont open a door
VERRIEGELUNGSSCHWELLE : locking Device-swells (threshold) (speed of X above)
VERRIEGELN_XKM/H_SENDER_1
VERRIEGELN_XKM/H_SENDER_2
VERRIEGELN_XKM/H_SENDER_3
VERRIEGELN_XKM/H_SENDER_4
(these all have to be aktiv for the auto central locking to work on all keys)
PANIK_MODUS – panic mode! press and hold boot button for the siren
—
CYCL_TI_BLK;1-touch on turn signal blinks. einmal-1 . zweimal-2 . dreimal-3.
One touch indicators, lane change.
BLINKIMPULS_WARNBLK to wert_04 – double impulse hazards
HHS_AUTOMATIK – enable auto rear window fogger
(I haven’t found the last three in any module, but I can see it in the full read-out. So if you find it, then tell!!)
FTM/BTM:
SPIEGELABKLAPPEN_GM – folding mirrors with lock/unlock
ABKLAPPWERT_GM (in GM5) – mirror tilt value
ABKLAPPWERT – mirror tilt value
SPIEGELMEMORY – gives you the option to change the mirror tilt value whilst it’s in reverse
ALSZ:
HEIMLEUCHTEN : home lights activated by flashing high beam with key off
HEIMLEUCHTEN_ABBRUCH : home light stop
HEIMLEUCHTEN_AL :home lights are low beam
HEIMLEUCHTEN_BL : ” ” ” turn signals
HEIMLEUCHTEN_FL : ” ” ” high beam
HEIMLEUCHTEN_FUNKSCHL :lights on on closing car with remote (only on e39 )
HEIMLEUCHTEN_KL58G : home lights are interior backlighting, cluster, ashtray etc.
HEIMLEUCHTEN_KZL : ” ” ” license plate
HEIMLEUCHTEN_NSL : ” ” ” rear foglight
HEIMLEUCHTEN_NSW : ” ” ” front foglight
HEIMLEUCHTEN_RFS : ” ” ” reverse light
HEIMLEUCHTEN_SL_H :” ” ” rear parking lights
HEIMLEUCHTEN_SL_V :” ” ” forward parking lights
FL_UND_NSW_NICHT_GLEICHZ : high beam & fog lights come on together when nicht_aktiv (I haven’t got this working yet)
Xenons with high beam:
PWM_WERT2_FL_BIXENON
wert_02
to
PWM_WERT2_FL_BIXENON
wert_01
(I haven’t tried this yet)
LED (ALSZ) upgrade:
KALTUEBERWACHUNG_BL_MI : ” ” ” ” brake light
WARMUEBERWACHUNG_BL_MI : ” ” ” ” brakes
FEHLER_BL_BLINKEN
(if these don’t work, then retrofit with GT1 instead).
Seat:
AUT_SPIEGELVERSTELLUNG : automatic mirror adjustment linked to specific key
AUT_SITZVERSTELLUNG :choose between automatic seat adjustment [nach_fb_entriegeln] when remote signals door open or[nach_entr_u_tuer_oeffnen] when door opened
(A bit hit and miss with these)
IHK:
1. DISPLAYANZEIGE_HIGH :temp. display on ihka shows HI if aktive 32*C if not aktive
2. DISPLAYANZEIGE_LOW :temp. display on ihka shows LO if aktive 16*C if not aktive
Others:
REGENSCHLIESSEN – Rain sensor closes sunroof! (I haven’t found these yet!)
REGENSCHLIESSENTILT
Car Key memory:
A heres a guide to car/key profile and button in NCS:
The typical sequence for the customization is as follows:
1. Button Select the “individualization”.
-> The operating side, the potential for the individualization ZCS FSWs customizable displays the selectable PSWs. The intended state of PSWs is marked with a prefix ‘S’.
2. Button Select the “READ”.
-> The actual state of the customizable PSWs FSWs is determined and with a leading ‘I’ marked.
3. Button Select the “TAKE OVER”.
-> The currently selected PSW becomes the new target value for the vehicle in the list of gänderten PSWs.
4. Button select “BROADCAST”.
-> The controllers of the vehicle in which PSWs have changed are encoded. Amended by promoting PSWs the list of changed PSWs.
Anyway, back to coding. Once you’ve made the changes you want, save the file.

Choose file and click save. (common mistakes here is saving the .man folder incorrectly as a .txt file, make sure when saving you have a .man file, not .man.txt! will not work. If problem saving, choose instead “save as” and where box says file type. Choose “all files” not text.

Now click Load Profile

Choose the Godfather Profile

Now press Process ECU so we can tell NCS Expert what module we would like to code to.
Choose the Module and press ok. (Make sure this is same modules you read from!)
Press Ok.

Now we are ready to code the PSW_FSW.man to our GM5 unit. Make sure the JOBNAME is set to SG_CODIEREN.
If it is not simply click ‘job’ and choose SG_CODIEREN. Make sure you’re using the module you previously read from: in this case the GM5 (Or the unit you will be working with)
Hit Execute Job to perform coding.
Underneath GM5 a status will appear initially saying CODING ACTIV and then CODING ENDED. Depending on size of file and can be a few seconds or a few minutes… very important not to disturb car or computer here… if battery dies, coding incomplete… you will have to use your back up… not very common, but it’s always possible! Always back up original!!
Once this is completed you may power off the car wait 10 seconds and repower up to see whether your coding changes have taken.
Hope this guide can be of some help and if deemed to be useful if a mod wants to sticky it feel free.
www.obdii365.com