Ключевые преимущества
- 1 порт GPON
- гигабитный роутер
- порт FXS для подключения телефонов
- 2 порта USB 2.0 для подключения сетевого накопителя
- Wi-Fi 802.11a/b/g/n/ac
ELTEX NTU-RG-1421G-Wac rev.A1 [HW: 3v2] – ONT серии NTU – высокопроизводительные многофункциональные абонентские терминалы, предназначенные для доступа к современным услугам телефонии, IPTV, OTT и высокоскоростному Интернету. Кроме того, абонентские терминалы серии NTU-RG дают возможность операторам предоставлять пользователям широкий набор услуг и возможностей.
Технические характеристики
Рекомендованное оборудование РТ ДА
Устаревшее оборудование РТ НЕТ
Подключение по технологии – GPON
Порты – 1 WAN (SFP), 4 LAN, 1 FXS, 2 USB
Скорость LAN – 4 x Gigabit Ethernet 100/1000Base-T
Wi-Fi – 2,4 (802.11 b/g/n) и 5 ГГц (802.11 n/ac)
IP телефония – Протоколы H.248, SIP, 1 FXS
Основной чипсет – BCM68380IFSBG
WiFi 2 GHz – BCM43217TKMLG
WiFi 5 GHz – BCM43602KMLG
FXS чипсет – 9541CUQC
Объем ПЗУ – 128 MB
ОЗУ — 256 MB
Актуальная прошивкаИстория изменений прошивкиФото
Настройка
IP адресЛогин/ПарольИнструкцииСсылки
IP-адрес WEB интерфейса: 192.168.1.1
альтернативный адрес: http://rt
Логин admin, пароль по умолчанию индивидуален для каждого устройства и написан на наклейке нижней части корпуса.
Пароль для superadmin – в генераторе паролей “superadmin” (отдельный ресурс в КСПД).
ССЫЛКИ
Примечания
—
-
Contents
-
Table of Contents
-
Bookmarks
Quick Links
NTU-RG-1421G-Wac
NTU-RG-1431G-Wac
NTU-RG-1421GC-Wac
Operation Manual, version 1.2 (July 2017)
Optical Network Terminals
IP address:
192.168.1.1
User name:
user
password:
user
http://eltex-co.ru/support/downloads/
Related Manuals for ELTEX NTU-RG-1421G-Wac
Summary of Contents for ELTEX NTU-RG-1421G-Wac
-
Page 1
NTU-RG-1421G-Wac NTU-RG-1431G-Wac NTU-RG-1421GC-Wac Operation Manual, version 1.2 (July 2017) Optical Network Terminals IP address: 192.168.1.1 User name: user password: user http://eltex-co.ru/support/downloads/… -
Page 2
____________________________________________________________________________________ Document Suitable Issue date Revisions version firmware version Version 1.2 3.28.2 July 2017 Third issue Version 1.1 3.28.1 December 2016 Second issue Version 1.0 3.28.0 August 2016 First issue NOTES AND WARNINGS Notes contain important information, tips or recommendations on device operation and setup. Warnings inform users about hazardous conditions, which may cause injuries or device damage and may lead to the device malfunctioning or data loss. -
Page 3: Table Of Contents
Design …………………………. 11 2.5.1 NTU-RG-1421G-Wac/NTU-RG-1431G-Wac ………………. 11 2.5.2 NTU-RG-1421GC-Wac ……………………13 LED Indication ……………………….14 2.6.1 NTU-RG-1421G-Wac, NTU-RG-1431G-Wac ………………. 14 2.6.2 NTU-RG-1421GС-Wac ……………………15 2.6.3 Indication of LAN Interfaces ………………….16 Reboot/Reset to factory defaults ………………….16 Delivery Package ……………………….16 ARCHITECTURE OF DEVICES ……………………..
-
Page 4
____________________________________________________________________________________ 4.3.4 Wireless Bridge submenu. Wireless Connection Settings in Bridge Mode ……..43 4.3.5 Advanced submenu ……………………44 Storage Service menu. File storage service ………………..46 4.4.1 Storage Device Info submenu. Information about connected USB devices ……..46 4.4.2 User Accounts submenu. Configuration of Samba users ………….. 47 Management menu. -
Page 5: Introduction
ONT is designed to connect terminal equipment of user to broadband access services. ONT can be used in residential estates and offices. The range of ONT NTU equipment produced by ELTEX comprises of the following terminals: …
-
Page 6: Product Description
USB ports can be used for connection of USB devices (USB flash drives, external HDD). NTU-RG-1421G-Wac, NTU-RG-1431G-Wac network routers allow Wi-Fi clients to be connected using IEEE 802.11a/b/g/n/ac standard. 802.11ac standard support ensures data transfer rate of 1.3 Gbps and allows wireless network to be used for delivery of modern high-speed services to client equipment.
-
Page 7: Models
____________________________________________________________________________________ Models NTU-RG series devices are designed to support various interfaces and features—see Table 1. Table 1—Models Wi-Fi Wi-Fi Model Name 802.11 802.11 b/g/n/ac b/g/n NTU-RG-1421G- 1xGPON 4х1Gigabit 802.11n, 2*2 -300Mbps –2.4GHz 802.11ac, 3*3 -1.3Gbps – 5 GHz+ NTU-RG-1431G- 1xGPON 4х1Gigabit 802.11n, 3*3 -450Mbps — 2.4GHz 802.11ac, 3*3 -1.3Gbps –…
-
Page 8
____________________________________________________________________________________ Simultaneous dual-band operation: 2.4GHz and 5GHz – VoIP: – SIP protocol support Audio codecs: G.729 (A), G.711(A/U), G.723.1 – – ToS for RTP packets – ToS for SIP packets Echo cancellation (G.164, G.165 guidelines) – – Silence detector (VAD) –… -
Page 9: Main Specifications
____________________________________________________________________________________ Fig. 1—Application diagram for NTU-RG-1421G-Wac, NTU-RG1431G-Wac, and NTU-RG-1421GC-Wac Main Specifications Table 2 lists main specifications of the terminals. Table 2—Main specifications VoIP Protocols Supported protocols Audio Codecs Codecs G.729, annex A G.711(A/µ) G.723.1 (5.3 Kbps) Fax transmission: G.711, T.38…
-
Page 10
Number of ports Loop resistance up to 2kΩ Dialling pulse/frequency (DTMF) Caller ID display Wi-Fi Interface Specifications Model NTU-RG-1421G-Wac, NTU-RG-1421GC-Wac NTU-RG-1431G-Wac Standard 802.11a/b/g/n/ac 802.11a/b/g/n/ac Frequency range 2400 ~ 2483.5MHz, 5150 ~ 5350MHz, 5650 2400 ~ 2483.5MHz, 5150 ~ 5350MHz, 5650 ~… -
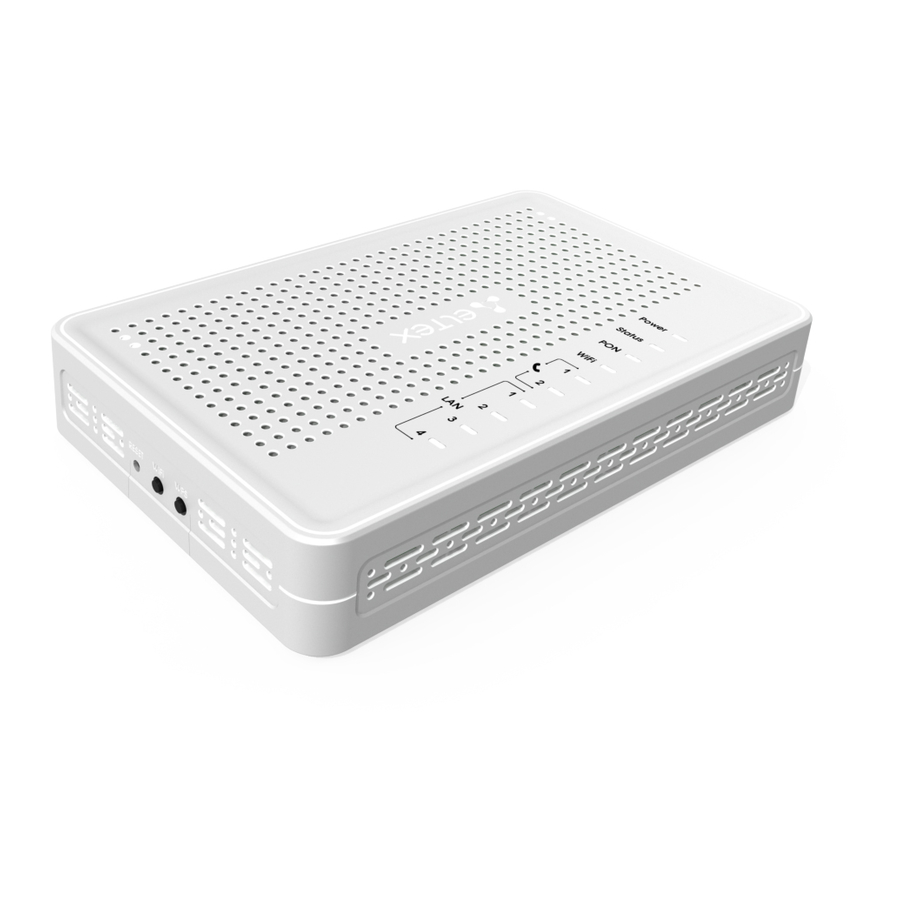
Page 11: Design
Network terminal is a desktop device enclosed in plastic housing. The rear panel of the device is shown in Fig. 2. Fig. 2—NTU-RG-1421G-Wac, NTU-RG-1431G-Wac rear panel layout Connectors and controls located on the rear panel of are listed in Table 3.
-
Page 12
____________________________________________________________________________________ Fig. 3—NTU-RG Side and Top Panels Top panel LED indicators are listed in Table 4. Table 4—Description of Top Panel LEDs Top Panel Element Description power and activity status indicator optical interface activity indicator Internet service status indicator FXS port activity indicator Wi-Fi activity indicator for 2.4GHz Wi-Fi activity indicator for 5GHz… -
Page 13: Ntu-Rg-1421Gc-Wac
____________________________________________________________________________________ Table 5—Description of Side Panel Buttons Side Panel Element Description functional key that reboots the device and resets it to the factory Reset settings Wi-Fi Wi-Fi enabling/disabling button enables automatically protected Wi-Fi connection for device 2.5.2 NTU-RG-1421GC-Wac Subscribe terminal is designed as a desktop device in a plastic housing. Fig.
-
Page 14: Led Indication
Power power indicator LED Indication 2.6.1 NTU-RG-1421G-Wac, NTU-RG-1431G-Wac LED indicators located on the front panel represent the current state of the device. Possible states of the LEDs are listed in Table 8. Table 8— Light indication of the device LED indicator…
-
Page 15: Ntu-Rg-1421Gс-Wac
____________________________________________________________________________________ Wi-Fi is not active interface with the Internet identifier is not configured interface with the Internet identifier is configured and green IP address is obtained interface with the Internet identifier is configured but orange IP address is not obtained flashes green device firmware update is in progress device startup is in progress…
-
Page 16: Indication Of Lan Interfaces
____________________________________________________________________________________ The device is disconnected from the power source or faulty green The current device configuration differs from the default Power orange The default configuration is set device booting 2.6.3 Indication of LAN Interfaces Table 10 lists operation modes shown by LAN ports LEDs located on the rear panel of the device. Table 10 —…
-
Page 17: Architecture Of Devices
____________________________________________________________________________________ ARCHITECTURE OF DEVICES NTU-RG architecture Fig. 6—Logical Architecture of a Device with Factory Settings Main Components of the Device: optical receiver/transmitter (SFF module) for conversion of an optical signal into electric one – – processor (PON chip) which converts Ethernet and GPON interfaces; and –…
-
Page 18
____________________________________________________________________________________ IPInterface block is a logical entity that the IP address is provided for the access in LAN and DHCP server distributing addresses to clients. The ppp0.1 block is WAN interface of the router. In the factory default configuration, this interface is a default interface for such services as the Internet, VoIP, TR-069 device management and IPTV. -
Page 19: Configuration Of Ntu-Rg-1421G-W, Ntu-Rg-1431G-W, And Ntu-Rg-1421Gc-W Via Web Interface
____________________________________________________________________________________ CONFIGURATION OF NTU-RG-1421G-W, NTU-RG-1431G-W, AND NTU-RG-1421GC-W VIA WEB INTERFACE. USER ACCESS In order to configure the device it’s necessary to connect to it in web browser (hypertext document viewer), such as Firefox or Google Chrome. To do this, enter the device IP address in the browser address bar (factory default IP: 192.168.1.1, subnet mask: 255.255.255.0).
-
Page 20: Device Info Menu
____________________________________________________________________________________ Device Info menu 4.1.1 Summary submenu 4.1.2 WAN submenu. The Status of Services This tab displays general information about existing WAN interface configurations. ____________________________________________________________________________________ Optical Network Terminals…
-
Page 21: Detail Submenu. Detailed Information
____________________________________________________________________________________ 4.1.2.1 Detail submenu. Detailed Information contains detailed information about existing configurations of the WAN interface. The following information about services can be displayed: – Interface—interface name – Type—interface operation mode – Connection type – NAT—NAT status – Firewall – Firewall status; –…
-
Page 22: Route Submenu. Routing Table Preview
____________________________________________________________________________________ WAN Service: Optical interface: If a device supports measurement of optical signal parameters , the menu displays an additional table: In order to clear the statistics and start gathering it from the beginning, click the Reset Statistic button. 4.1.5 Route submenu.
-
Page 23: Arp Submenu. Display Of The Arp Protocol Cache
____________________________________________________________________________________ – D—the route was created after receiving a redirected ICMP message; – M—the route was changed by a redirected ICMP message; Metrics—route priority; Service—a service the route is associated with; Interface—an interface the route is associated with. 4.1.6 ARP submenu.
-
Page 24: Wireless Monitor Submenu. Discovered Wi-Fi Networks
____________________________________________________________________________________ Authorized—authorisation status SSID—identifier of the network that the client belongs to Interface—access interface Click the Refresh button to refresh the information. 4.1.9 Wireless Monitor submenu. Discovered Wi-Fi networks This menu contains the list of discovered wireless networks. The device information is shown in the table with the following parameters: …
-
Page 25: Advanced Setup Menu. Advanced Configuration
____________________________________________________________________________________ Status—the status of voice daemon – – Number—phone number Advanced Setup menu. Advanced configuration 4.2.1 LAN submenu. Configuration of Main Parameters The menu allows you to configure main parameters of the LAN interface. – IP Address—device address in local network DHCP Server DHCP server (Dynamic Host Configuration Protocol) enables automatic configuration of local PC to work in network.
-
Page 26: Nat Submenu. Nat Settings
____________________________________________________________________________________ – IP Address— device IP address MAC Address—МАС address – Click the Apply/Save button to accept and save the changes. 4.2.2 NAT submenu. NAT Settings The use of the NAT settings can be efficient when the device operates in the router mode. 4.2.2.1 Virtual Servers submenu.
-
Page 27: Port Triggering Submenu. Port Triggering Settings
____________________________________________________________________________________ Only interfaces that are fit for operation in router mode with enabled network address translation will be available. – Service name—service settings: – Select a service—select a preconfigured rule – Custom Service—create new rules not listed in the Select a service list –…
-
Page 28: Dmz Host Submenu. Demilitarized Zone Settings
____________________________________________________________________________________ – Utilized interface Only interfaces that are fit for operation in router mode with enabled network address translation will be available. – Application name—application settings: – Select application—select a preconfigured rule – Custom an application—create new rules not listed in the Select an application list. As opposed to the Virtual Server function, PC’s IP address should not be fixed in LAN.
-
Page 29: Security Submenu. Security Settings
____________________________________________________________________________________ Click the Apply/Save button to accept and save the changes. 4.2.3 Security submenu. Security Settings This submenu allows you to configure the device security settings. 4.2.3.1 IP filtering submenu. Address Filtering Settings The IP Filtering function filters router traffic by IP addresses and ports. Filtration Settings for Outgoing Traffic All outgoing traffic will be transmitted by default.
-
Page 30
____________________________________________________________________________________ – Protocol—selected protocol (TCP/UDP, TCP, UDP, ICMP) – MAC address—source MAC address – Source IP address[/prefix length]—source IP address (prefix length can be specified after slash) – Source port (port or port:port)—source port or a range of ports separated by a colon –… -
Page 31
____________________________________________________________________________________ – Destination Port (port or port:port)—destination port or port range can be specified after double point WAN (configured in the router mode and having firewall enabled) and LAN Interfaces – Select All—when checked, choose all available interfaces Or choose an interface from the list by selecting the checkbox next to it. Click the Apply/Save to accept and save the settings. -
Page 32: Mac Filtering Submenu. Filtering Settings For Mac Addresses
____________________________________________________________________________________ 4.2.3.2 MAC filtering submenu. Filtering Settings for MAC Addresses MAC filtration allows traffic to be transferred or blocked depending on source and destination MAC addresses. МАС filtration can be applied only to interfaces in the bridge mode. In order to change the global policy, set a flag in front of a corresponding interface and click the Change Policy button.
-
Page 33: Parental Control Submenu: Restriction Settings
____________________________________________________________________________________ 4.2.4 Parental Control submenu: restriction settings 4.2.4.1 Time Restriction submenu. Session Time Restriction Settings The menu allows schedule configuration (days and hours) for computers use. The schedule will be used to block Internet access for a definite computer in local network at a definite time. Click Add button to create a new schedule.
-
Page 34: Url Filter Submenu. Internet Access Restriction Settings
____________________________________________________________________________________ 4.2.4.2 Url Filter submenu. Internet Access Restriction Settings Url Filter—is a function of comprehensive analysis and control of access to certain Internet resources. This parameter defines a list of prohibited/allowed URLs. – URL List Type—type of the list: – Exclude—prohibited URLs –…
-
Page 35
____________________________________________________________________________________ To add a record, click Add button; to remove a record, click Remove button for the selected record. D-DNS provider—type of D-DNS service (provider): DynDNS.org, TZO.com, ZoneEdit.com, – freedns.afraid.org, easyDNS.com, 3322.org, DynSIP.org, No-IP.com, dnsomatic.com, sitelutions.com – Custom—another provider chosen by user. In this case user will need to specify the provider’s name and address: –… -
Page 36
____________________________________________________________________________________ DDNS Provider Server Name—name of the DDNS provider – – DDNS Provider address—address of the DDNS provider Hostname—host name registered at the DDNS provider – – Interface—access interface The following fields will be available depending on the selected provider: –… -
Page 37: Print Server Submenu. Print Server Configuration
____________________________________________________________________________________ 4.2.6 Print Server submenu. Print Server Configuration Print server is a software or hardware solution that allows users of wired or wireless networks to share a printer at home or at the office. This printer is completely independent from network computers and significantly reduces the burden on user’s working environment.
-
Page 38: Upnp Submenu. Autoconfiguration Of Network Devices
____________________________________________________________________________________ 4.2.8 UPnP submenu. Autoconfiguration of network devices Use the menu to configure Universal Plug and Play (UPnP™) function. UPnP ensures compatibility with network equipment, software and peripheral devices. Configure NAT on an active WAN interface, to use UPnP. Set the Enable UPnP flag to enable UPnP. Click Apply/Save button to accept and save the settings.
-
Page 39
____________________________________________________________________________________ – Enable Wireless — enables Wi-Fi on the device Wireless —Access Point—wireless network configuration: – Enable Access Point—enable Hotspot2.0 support on the device – Hide Access Point—access point hidden operation mode (in this mode, wireless network SSID won’t be broadcast by the router) Clients Isolation—when checked, wireless clients will not be able to interact with each other –… -
Page 40: Security Submenu. Security Settings
____________________________________________________________________________________ 4.3.2 Security submenu. Security settings Use this menu to configure general data encryption settings for a wireless network. The client wireless equipment can be configured either manually or automatically with the help of WPS. WPS (Wi-Fi Protected Setup)—a standard developed by Wi-Fi Alliance to simplify setup of wireless networks.
-
Page 41
____________________________________________________________________________________ Shared—this mode enables user authentication by their SSID or WEP key – – 802.1x—enables 802.1x standard (enables user authentication with a RADIUS server, WEP key is used for data encryption) RADIUS Server IP Address RADIUS Port—port number of the RADIUS server The default port is 1812 … -
Page 42
____________________________________________________________________________________ Network Re-auth Interval—time interval for repeated authentication. The parameter defines how often the access points sends an authentication message to clients and requires a reply with valid authentication data WPA Group Rekey Interval—the period of time (in seconds) between automatic changes of WPA encryption keys used to strengthen wireless network security. -
Page 43: Mac Filtering Submenu. Filtering Settings Of Mac Addresses
____________________________________________________________________________________ Network Key 1..4—allows specification of 4 different keys, which comprise of 10 hex – characters of 5 ASCII characters for 64-bit encryption. Other options are 26 hex characters or 13 ASCII characters for 128-bit encryption. Click the Apply/Save to accept the changes. 4.3.3 MAC Filtering submenu.
-
Page 44: Advanced Submenu
____________________________________________________________________________________ In Wireless/Bridge mode, you can configure the following settings: Bridge Restrict—select bridge operation mode: – Enabled—enable filtering for MAC addresses (only specified addresses are allowed) – – Enabled (scan)—search for remote bridges Disabled—no restrictions for MAC addresses – Remote Bridges MAC Address—addresses of remote bridges –…
-
Page 45
____________________________________________________________________________________ Band—set the frequency band (2.4/5GHz) – – Channel—active channel of the router. Changing operating channel can eliminate interference or problems that occur in wireless network operation. It is recommended to set this value to ‘Auto’ to avoid the interference caused by the neighbouring networks. –… -
Page 46: Storage Service Menu. File Storage Service
____________________________________________________________________________________ 802.11n/EWC—compatibility mode for 802.11n Draft2.0 and EWC (Enhanced Wireless Consortium) – equipment. – Bandwidth—define the channel width to 20MHzor 40MHz. In 40MHz mode, two adjacent 20MHz bands are used to increase the channel bandwidth. – Control Sideband—select the second channel (Lower or Upper) in 40MHz mode. –…
-
Page 47: User Accounts Submenu. Configuration Of Samba Users
____________________________________________________________________________________ – Volume name– device name; – File System – type of file system; – Unmount – click this button to safely remove the device. 4.4.2 User Accounts submenu. Configuration of Samba users Use the menu to configure Samba user accounts. To add record, click Add button.
-
Page 48: Pon Password Submenu. Change The Pon Access Password
____________________________________________________________________________________ When the operation is completed, all settings will be lost. Click Restore Default Settings button to restore the default settings. When factory reset is completed the device will be automatically rebooted. 4.5.2 PON Password submenu. Change the PON access password Use this menu to change the password for ONT authorization on the PON station device.
-
Page 49: Ping Submenu. Test The Availability Of Network Devices
____________________________________________________________________________________ – Automatically synchronize with Internet time servers—when checked, enables automatic synchronisation with Internet precision time servers – First NTP time server—the main precision time server – Second NTP time server—the second precision time server (none—do not use supplementary servers) –…
-
Page 50: System Log Submenu. System Log Review And Configuration
____________________________________________________________________________________ 4.5.6 System Log submenu. System Log Review and Configuration 4.5.6.1 Configuration submenu. System Log Configuration Use the menu to configure events occurring on the router. – System log – enable/disable system log; – Log level – verbosity of the event log. Severity levels in the descending order: –…
-
Page 51: Update Software Submenu
____________________________________________________________________________________ Use the Refresh button to refresh the information. 4.5.7 Update Software submenu In order to update software, select the software in the Software File name field (use the Choose File button) and click Update Software. Do not switch off or reboot the device during software update. The firmware update takes a few minutes to complete and then the device will reboot.
-
Page 52: Ntu-Rg Acceptance Certificate And Warranty
Equipment shipping and storage should be conducted in accordance with GOST 15150 Conditions 5 and Conditions 1 respectively. The manufacturer, Eltex Enterprise Ltd., guarantees that optical network gateway complies with technical specifications RPTL.465600.108TU under operational conditions described in this manual, which should be maintained by the user.
На чтение 5 мин Просмотров 22.5к. Опубликовано 28 августа 2021
Обновлено 22 апреля 2023
Идея написания данной инструкции по настройке WiFi роутера Eltex возникла совершенно случайно. Дело в том, что мой новый провайдер предоставил вместе с пакетом интернета свой GPON модем Eltex NTU RG-1421G WAC в заводской прошивке. Данный бренд особенно известен тем, что довольно широко распространен среди устройств от отечественных поставщиков услуг (Ростелеком, Билайн и т.д.), которые они предоставляют своим абонентом. Особенно часто используются коммутаторы Eltex 1402g WAC и 1421g WAC. В данной статье речь пойдет про другой маршрутизатор, но алгоритм действий не сильно отличается, и руководство пригодится широкому кругу пользователей.
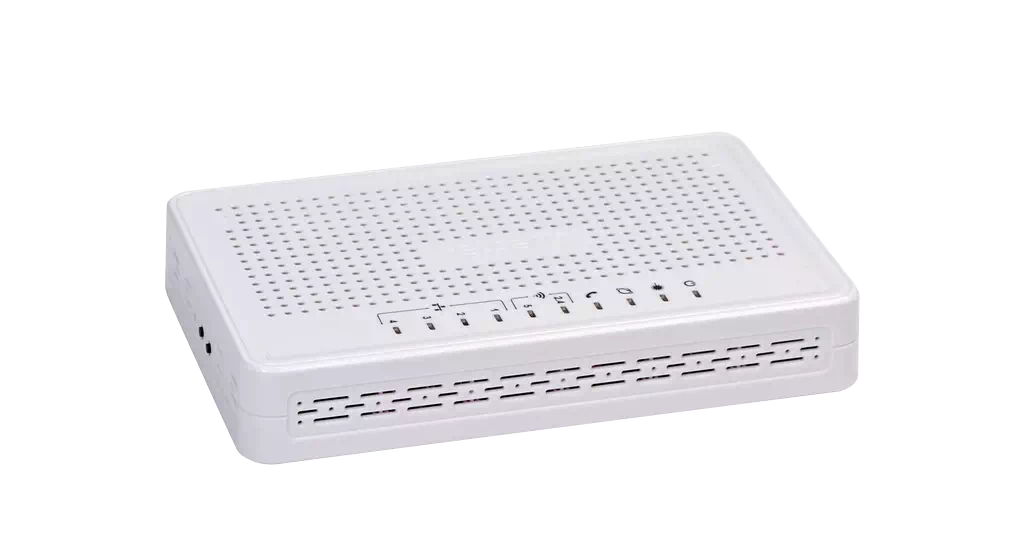
Порты WAN-LAN, разъемы USB, кнопки управления
Для начала быстренько пройдемся по внешним разъемам, чтобы понимать вообще, с чем имеем дело. В основном роутеры Eltex преддставляют из себя довольно утилитарную пластиковую коробку без дизайнерских изысков с набором портов и кнопок для управления. Основная задача — раздавать интернет, будучи спрятанным где-нибудь в силовом щитке.

Модем Eltex NTU RG-1421G как раз и представляет из себя такое зрелище. Белая квадратная коробка с решетками охлаждения, несколькими индикаторами режимов работы и разъемами. Кстати, портов тут огромное количество. Помимо 4 LAN для подклчюения компьютеров и других устройств по кабелю имеется сразу два USB разъема. Можно одновременно использовать и жесткий диск, и 4G модем. Также есть вход для телефонной линии и, разумеется, розетка для подключения оптоволокна (GPON).

Отдельно есть кнопки для сброса настроек, выключения Wi-Fi и быстрого подключения по WPS

Подключение к роутеру Eltex
В целом, роутер-модем Eltex NTU RG-1421G WAC оказался очень функциональным, что не может не радовать. Но давайте перейдем непосредственно к настройке.
- Прежде всего нужно подключить кабель провайдера в порт «PON» зеленого цвета. Маршрутизатор автоматически начнет транслировать два защищенных беспроводных сигнала.
- Для начала настройки нам необходимо будет подключить ноутбук к любому из них. Пароль указан на этикетке на корпусе.

- Соответственно, заходим в параметры WiFi и присоединяемся к сети, используя пароль с наклейки

- Далее запускаем браузер и вводим в адресную строку «http://192.168.1.1» — это адрес входа для большинства моделей Eltex и не только.
- Попадаем на страницу авторизации, где надо ввести логин и пароль, чтобы попасть в администраторский раздел. Они также написаны на стикере и выглядят как «user/user»

- Открывается стартовая страница панели управления со сводной информацией о системе
К сожаленью, удобного мобильного приложения для смартфона не существует, поэтому для работы доступна только веб-версия панели администратора. А значит и подключаться к Eltex удобнее всего именно с ноутбука. Или стационарного компьютера, если присоединить его к роутеру по кабелю через порт LAN.
Стандартный логин и пароль по умолчанию для роутеров и коммутаторов Eltex — «user»
Настройка сети
Поскольку интернет на модем Eltex подается через GPON сеть, все настройки для подключения к нему находятся у провайдера. А значит при оплаченном тарифе интернет у нас уже есть и ничего дополнительно менять не нужно. Все, что надо сделать для комфортной работы, это поменять имя сетей в диапазонах 2.4 и 5 ГГц и пароли от них.
WiFi
Для этого открываем меню «Беспроводная связь» и открываем раздел «Мастер настройки». Здесь отображаются текущие названия сетей и ключи доступа к ним. Достаточно просто ввести свои значения и нажать на кнопку «Применить»
После чего маршрутизатор Eltex перезагрузится, а нам нужно будет уже подключиться к сети с новым только что заданным именем
Основные настройки
Далее опять авторизуется в системе по адресу 192.168.1.1 и возвращаемся в рубрику «Беспроводная связь». Для расширенной настройки того или иного диапазона сети нужно открыть раздел «2.4ГГЦ» или «5ГГЦ».
Из основного здесь можно:
- Отключить данную сеть WiFi,
- Поменять имя,
- Скрыть точку доступа для других устройств,
- Изолировать клиентов роутера друг от друга
Безопасность
В подменю «Безопасность» можно отключить автоматическое подключение по WPS. А также сменить пароль и тип шифрования сети
Тут же есть функция посмотреть текущий пароль от WiFi, который появится в отдельном окне в углу экрана.
Фильтрация по MAC
Фильтрация устройств по MAC адресу позволяет создать «белый список» для тех, кому можно работать в интернете. Или наоборот, по отдельности заблокировать тех или иных пользователей сети
Расширенные настройки
В «Расширенных» скрываются настройки выбора канала WiFi и его ширины (до 40 MHz)
Хранилища
В меню «Хранилища» находится управление подключенными к USB порту внешними жесткими дисками. Как только вы подключите накопитель к роутеру Eltex, он будет отображаться здесь.
И начнет работать в качестве FTP сервера на 21 порту. Для подключения к нему нужно использовать адрес «ftp://192.168.1.1:21». Его можно ввести прямо в браузер или в отдельной программе «ftp-клиенте». В качестве пароля для входа используем данные для администраторского доступа (user-user по умолчанию). Этот «суперюзер» будет иметь полный доступ ко всему диску.
Если зайти в «Пользовательские аккаунты», то можно создать дополнительных пользователей FTP сервера, которым будет открыт доступ к папкам накопителя, но закрыт к настройкам самого роутера. Для создания жмем на «Добавить»
И задаем имя, пароль и название папки, куда будет открыт вход
Управление
В разделе «Управления» скрываются системные конфигурации роутера Eltex. Прежде всего нас интересуют «Пароли». Тут обязательно необходимо поменять пароль администратора по умолчанию (user) на свой собственный. Чтобы обезопасить панель настроек от посторонних. Напомню, логин и ключ для входа указаны на наклейке на самом роутере, и их может увидеть любой желающий.
Сброс настроек
В меню «Заводские настройки» можно нажатием одной кнопки сбросить роутер Eltex в то состояние, в котором он находился из коробки.
Обновление прошивки
Сменить текущую прошивку можно в разделе «Обновить ПО». Онлайн через интернет этого сделать невозможно. Поэтому для перепрошивки роутера Eltex необходимо сначала скачать файл с новой версией микропрограммы с официального сайта разработчика по номеру и ревизии вашей модели. А потом импортировать этот файл на данной странице и нажать на кнопку «Обновить».
Актуальные предложения:
Задать вопрос
- 10 лет занимается подключением и настройкой беспроводных систем
- Выпускник образовательного центра при МГТУ им. Баумана по специальностям «Сетевые операционные системы Wi-Fi», «Техническое обслуживание компьютеров», «IP-видеонаблюдение»
- Автор видеокурса «Все секреты Wi-Fi»
Note for Owners:
Guidesimo.com webproject is not a service center of ELTEX trademark and does not carries out works for diagnosis and repair of faulty ELTEX NTU-RG-1421G-Wac equipment. For quality services, please contact an official service center of ELTEX company. On our website you can read and download documentation for your ELTEX NTU-RG-1421G-Wac device for free and familiarize yourself with the technical specifications of device.
More Touch terminals Devices:
-
UTC RETAIL 2250
© 2008 UTC RETAIL. All rights reserved. 11501020 Rev C 1 2200 Series POS System 2250 / 2270 Installation Guide Thank you for selecting UTC RETAIL’s innovative 2200 Series Point of Sale solution! This guide is designed to help you efficiently assemble the 2200 Series POS System. …
2250 Touch terminals, 8
-
Baseline BL-5200R Series Powered biCoder
BL-5200R Series Powered biCoder™ Installation Guide 1-866-294-5847 Rev 10.3.2016 www.baselinesystems.com Each terminal of the Baseline’s Powered biCoder has a serial number which is used as an address to identify it to the BaseStation controller. The BaseStation broadcasts a message along the two-wire and the biCoder responds by turning the a …
BL-5200R Series Powered biCoder Touch terminals, 2
-
Four-Faith F2164
F2X64 Series UserManualDocument VersionPageV2.0.0Product Name:F2X64Total:99F2X64 Series User ManualThe user manual is suitable for the following model:ModelProduct TypeF2164GPRS RTUF2264CDMA RTUF2464WCDMA RTUF2664EVDO RTUF2764TDD-LTE RTUF2864FDD-LTE RTUF2A64LTE RTUFour-Faith Smart Power Technology Co., Ltd.Add:Floor 11, Area A06, No 370, chengyi street, Jimei, XiamenTel:+86-17750019379 Email …
F2164 Remote Control, 103
-
Festo VIFB8-03 Series
Kurz−beschreibungBrief descriptionF eldbus kn o te n 8für VentilinselTyp 03/05VIFB8−..−Fieldbus node 8for valve terminaltype 03/05VIFB8−..− Deutsch English Español Français Italiano Svenska 669 9150208aVentilinsel Typ 03/05 …
VIFB8-03 Series Touch terminals, 50
-
Prestel VCS-G2PRO
Split HD Video Conference Terminal User GuideSplit HD Video Conference TerminalUser GuideEnglish (V1.0)Copyright NoticeAll contents of this manual, whose copyright belongs to our Corporation cannot be cloned,copied or translated without the permission of the company. Product specifications andinformation which were referred to in this document are for reference only. We may change,delete, or updat …
VCS-G2PRO Touch terminals, 17