|
Всего инструкций в разделе: 212 |
|
Мануал к автомобильной магнитоле, DVD, MP3 проигрывателю, ресиверу JVC поможет разобраться с настройками часов, подсветкой, каналами радиостанции и множеством другого необходимого функционала автомультимедийного устройства. |

ENGLISH
CASSETTE RECEIVER
РЕСИВЕР С КАССЕТНЫМ ПРОИГРЫВАТЕЛЕМ
РУССКИЙ
KS-FX725R/KS-F525
KS-FX725R
DISP
TP
DAB
RDS
PTY
8 9 10 11 127
MO
KS-F525
LOUD
DISP
Multi
Music
SCAN
Scan
В соответствии с Законом Российской Федерации “О защите прав
потребителей” срок службы (г одности) данного товара “по истечении
For installation and
которого он может представлять опасность для жизни, здоровья
connections, refer to the
потребителя, причинять вре д его имуществу или окружающей сре де”
составляет семь (7) лет со дня произво дства. Этот срок является
separate manual.
временем, в течение которого потребитель данног о товара может
Указания по установке
безопасно им пользова ться при у словии соблю дения инструкции по
и выполнению
эк сплуатации данного товара, проводя необходимое обслуживание,
включающее замену р асходных ма териалов и/или соответствующее
соединений приводятся
ремонтное обеспечение в специализированном сервисном центре.
в отдельной
Дополнительные к осметические материалы к данному товар у,
инструкции.
поставляемые вместе с ним, могут хр аниться в течение дв ух (2) лет со
дня его производства.
Срок службы (г одности), кроме срока хранения дополнительных
косметических материалов, упомянутых в пре дыдущих дв ух пунктах, не
затрагивает никаких других прав потребителя, в частности, гарантийного
свидетельства JV C, которое он может получить в соответствии с зак оном
о правах потребителя или других законов, связанных с ним.
INSTRUCTIONS
ИНСТРУКЦИИ ПО ЭКСПЛУАТАЦИИ
GET0057-001A
[EE]
COVERKS-FX725R001A[EE]f.pm5 7/12/01, 9:46 AM3
Thank you for purchasing a JVC product. Please read all instructions carefully before operation,
to ensure your complete understanding and to obtain the best possible performance from the unit.
CONTENTS
Control panel—KS-FX725R ………………… 3
Using the sound control memory …………. 20
Storing your own sound adjustments ……. 22
LOCATION OF THE BUTTONS………… 3
ENGLISH
Control panel—KS-FX725R ………………… 3
OTHER MAIN FUNCTIONS …………… 23
Control panel—KS-F525 …………………….. 4
Setting the clock ……………………………….. 23
Changing the general settings (PSM) …… 23
BASIC OPERATIONS …………………. 5
Detaching the control panel…………………. 26
Turning on the power ………………………….. 5
CD CHANGER OPERATIONS …………. 27
RADIO BASIC OPERATIONS …………. 6
(only for KS-FX725R)
Listening to the radio ………………………….. 6
Playing CDs ……………………………………… 27
Storing stations in memory………………….. 8
Selecting CD playback modes……………… 28
Tuning in to a preset station ………………… 9
Scanning broadcast stations
EXTERNAL COMPONENT OPERATIONS .. 29
(only for KS-F525) …………………………… 9
(only for KS-FX725R)
Playing an external component ……………. 29
RDS OPERATIONS …………………… 10
(only for KS-FX725R)
DAB TUNER OPERATIONS …………… 30
What you can do with RDS………………….. 10
(only for KS-FX725R)
Other convenient RDS functions and
Tuning in to an ensemble and one of the
adjustments……………………………………. 13
services …………………………………………. 30
Storing DAB services in memory …………. 32
TAPE OPERATIONS ………………….. 16
Tuning in to a preset DAB service ………… 33
Listening to a cassette………………………… 16
Finding the beginning of a tune ……………. 17
TROUBLESHOOTING…………………. 34
Other convenient tape functions…………… 18
MAINTENANCE ………………………. 36
SOUND ADJUSTMENTS ……………… 19
Adjusting the sound …………………………… 19
SPECIFICATIONS …………………….. 37
Turning on/off loudness function
(only for KS-F525) …………………………… 20
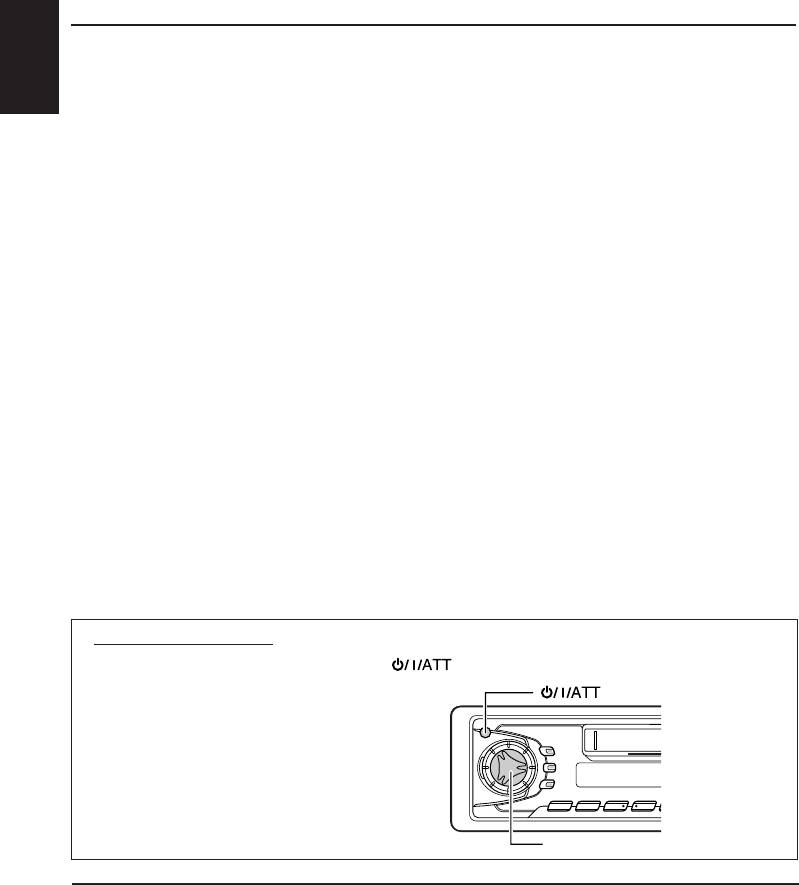
How to reset your unit
Press and hold both the SEL (select) and (standby/on/attenuator) buttons at the same
time for several seconds.
(standby/on/attenuator)
This will reset the built-in microcomputer.
Note:
Your preset adjustments – such as preset channels or
sound adjustments – will also be erased.
SEL (select)
BEFORE USE
*
For safety….
*
Temperature inside the car….
• Do not raise the volume level too much, as this will
If you have parked the car for a long time in hot or
block outside sounds, making driving dangerous.
cold weather, wait until the temperature in the car
• Stop the car before performing any complicated
becomes normal before operating the unit.
operations.
2
EN02-04KS-FX725R_F525[EE]f.pm5 7/12/01, 9:48 AM2
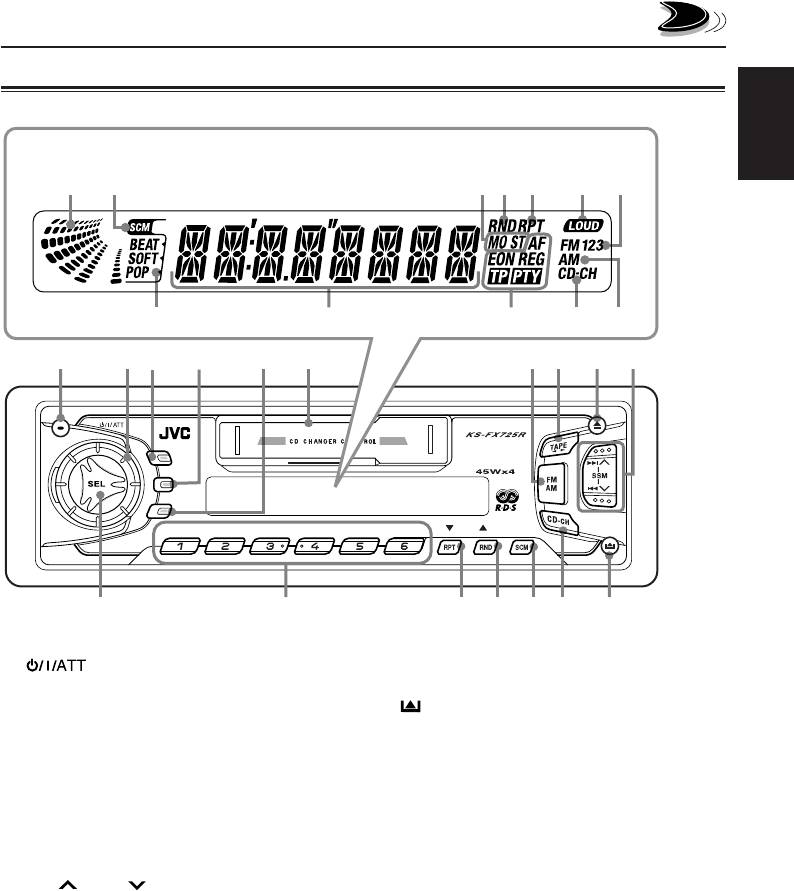
LOCATION OF THE BUTTONS
Control panel—KS-FX725R
Display window
ENGLISH
i
o
;
a
sd
f
h
j
klg
1
32
4
5
6
78 9
p
DISP
DAB
TP
RDS
PTY
8 9 10 11 127
MO
q
w
yuret
1 (standby/on/attenuator) button
t SCM (sound control memory) button
2 Control dial
y CD-CH (CD changer) button
3 DISP (display) button
u (control panel release) button
4 TP (traffic programme)
RDS (radio data system) button
Display window
5 PTY (programme type) button
i Volume (or audio) level indicator
6 Cassette compartment
o SCM (sound control memory) indicator
7 FM AM button
; Tuner reception indicators
• Also functions as the DAB button.
MO (monaural), ST (stereo)
8 TAPE 23 button
a RND (random) indicator
9 0 (eject) button
s RPT (repeat) indicator
p ¢ / 4 buttons
d LOUD (loudness) indicator
•
Also functions as SSM buttons when pressed
f FM band number indicators
together.
FM1, FM2, FM3
q SEL (select) button
g Sound mode indicators
w Number buttons
BEAT, SOFT, POP
e RPT (repeat) button
h Main display
• Also functions as ∞ (DAB service selection).
j RDS indicators
r RND (random) button
AF, EON, REG, TP, PTY
• Also functions as 5 (DAB service selection) or
k CD-CH (CD changer) indicator
MO (monaural).
l AM band indicator
3
EN02-04KS-FX725R_F525[EE]f.pm5 7/12/01, 9:48 AM3
Сейчас в базе инструкций для JVC насчитывается 1474 бесплатных инструкций.
NA
CRT телевизор
GPS навигатор
Кассетная дека
Спутниковое оборудование
Часы
Мебель
Охранное оборудование
Радиостанция
Blu-ray проигрыватель
Видеорегистратор
Фотокамера / видеокамера
Автоакустика
Разное
LED телевизор
Телевизор / 3D очки
домашний кинотеатр
автосабвуфер
Инструкция и руководство для
JVC KS-F525 RU  на русском на английском


30 страниц подробных инструкций и пользовательских руководств по эксплуатации
 03:55
03:55
Подключаем AUX к магнитоле JVC KD-G511
 04:30
04:30
обзор усилителя jvc ks — ax4302
 05:43
05:43
Новинки от JVC. Новый модельный ряд. Бюджетные модели JVC. Автомагнитолы.
 03:50
03:50
Автомагнитола JVC KD-X362BT
 06:42
06:42
Автомагнитола JVC (мелкий ремонт)
 03:52
03:52
Автомагнитола JVC KD-X151
CASSETTE RECEIVER РЕСИВЕР С КАССЕТНЫМ ПРОИГРЫВАТЕЛЕМ ENGLIS…
Instructions, Cassette receiver, Ресивер с кассетным проигрывателем
- Изображение
- Текст
- Содержание
GET0057-001A
[EE]
CASSETTE RECEIVER
РЕСИВЕР С КАССЕТНЫМ ПРОИГРЫВАТЕЛЕМ
ENGLISH
Р
УССКИЙ
INSTRUCTIONS
ИНСТРУКЦИИ ПО ЭКСПЛУАТАЦИИ
KS-FX725R/KS-F525
В соответствии с Законом Российской Федерации “О защите прав
потребителей” срок службы (г одности) данного товара “по истечении
которого он может представлять опасность для жизни, здоровья
потребителя, причинять вре д его имуществу или окружающей сре де”
составляет семь (7) лет со дня произво дства. Этот срок является
временем, в течение которого потребитель данног о товара может
безопасно им пользова ться при у словии соблю дения инструкции по
эк сплуатации данного товара, проводя необходимое обслуживание,
включающее замену р асходных ма териалов и/или соответствующее
ремонтное обеспечение в специализированном сервисном центре.
Дополнительные к осметические материалы к данному товар у,
поставляемые вместе с ним, могут хр аниться в течение дв ух (2) лет со
дня его производства.
Срок службы (г одности), кроме срока хранения дополнительных
косметических материалов, упомянутых в пре дыдущих дв ух пунктах, не
затрагивает никаких других прав потребителя, в частности, гарантийного
свидетельства JV C, которое он может получить в соответствии с зак оном
о правах потребителя или других законов, связанных с ним.
KS-FX725R
For installation and
connections, refer to the
separate manual.
Указания по установке
и выполнению
соединений приводятся
в отдельной
инструкции.
DISP
SCAN
LOUD
Multi
Music
Scan
KS-F525
MO
TP
RDS
PTY
DISP
8
9
10
11
12
7
DAB
COVERKS-FX725R001A[EE]f.pm5
7/12/01, 9:46 AM
3

ENGLISH Thank you for purchasing a JVC product. Please read…
Страница 2
- Изображение
- Текст
2
ENGLISH
Thank you for purchasing a JVC product. Please read all instructions carefully before operation,
to ensure your complete understanding and to obtain the best possible performance from the unit.
Control panel—KS-FX725R …………………
3
LOCATION OF THE BUTTONS …………
3
Control panel—KS-FX725R …………………
3
Control panel—KS-F525 ……………………..
4
BASIC OPERATIONS ………………….
5
Turning on the power …………………………..
5
RADIO BASIC OPERATIONS ………….
6
Listening to the radio …………………………..
6
Storing stations in memory …………………..
8
Tuning in to a preset station …………………
9
Scanning broadcast stations
(only for KS-F525) ……………………………
9
RDS OPERATIONS …………………… 10
(
only for KS-FX725R
)
What you can do with RDS …………………..
10
Other convenient RDS functions and
adjustments …………………………………….
13
TAPE OPERATIONS ………………….. 16
Listening to a cassette …………………………
16
Finding the beginning of a tune …………….
17
Other convenient tape functions ……………
18
SOUND ADJUSTMENTS ……………… 19
Adjusting the sound ……………………………
19
Turning on/off loudness function
(only for KS-F525) ……………………………
20
Using the sound control memory ………….
20
Storing your own sound adjustments …….
22
OTHER MAIN FUNCTIONS …………… 23
Setting the clock ………………………………..
23
Changing the general settings (PSM) ……
23
Detaching the control panel ………………….
26
CD CHANGER OPERATIONS …………. 27
(
only for KS-FX725R
)
Playing CDs ………………………………………
27
Selecting CD playback modes ………………
28
EXTERNAL COMPONENT OPERATIONS .. 29
(
only for KS-FX725R
)
Playing an external component …………….
29
DAB TUNER OPERATIONS …………… 30
(
only for KS-FX725R
)
Tuning in to an ensemble and one of the
services ………………………………………….
30
Storing DAB services in memory ………….
32
Tuning in to a preset DAB service …………
33
TROUBLESHOOTING …………………. 34
MAINTENANCE ………………………. 36
SPECIFICATIONS …………………….. 37
CONTENTS
How to reset your unit
Press and hold both the SEL (select) and
(standby/on/attenuator) buttons at the same
time for several seconds.
This will reset the built-in microcomputer.
Note:
Your preset adjustments – such as preset channels or
sound adjustments – will also be erased.
SEL (select)
BEFORE USE
*
For safety….
• Do not raise the volume level too much, as this will
block outside sounds, making driving dangerous.
• Stop the car before performing any complicated
operations.
*
Temperature inside the car….
If you have parked the car for a long time in hot or
cold weather, wait until the temperature in the car
becomes normal before operating the unit.
(standby/on/attenuator)
EN02-04KS-FX725R_F525[EE]f.pm5
7/12/01, 9:48 AM
2

Location of the buttons, Control panel―ks-fx725r, Control panel—ks-fx725r
English, Display window
- Изображение
- Текст
3
ENGLISH
LOCATION OF THE BUTTONS
Control panel—KS-FX725R
1
(standby/on/attenuator) button
2
Control dial
3
DISP (display) button
4
TP (traffic programme)
RDS (radio data system) button
5
PTY (programme type) button
6
Cassette compartment
7
FM AM button
• Also functions as the DAB button.
8
TAPE
23
button
9
0
(eject) button
p
¢
/
4
buttons
• Also functions as SSM buttons when pressed
together.
q
SEL (select) button
w
Number buttons
e
RPT (repeat) button
• Also functions as
∞ (DAB service selection).
r
RND (random) button
• Also functions as
5 (DAB service selection) or
MO (monaural).
t
SCM (sound control memory) button
y
CD-CH (CD changer) button
u
(control panel release) button
Display window
i
Volume (or audio) level indicator
o
SCM (sound control memory) indicator
;
Tuner reception indicators
MO (monaural), ST (stereo)
a
RND (random) indicator
s
RPT (repeat) indicator
d
LOUD (loudness) indicator
f
FM band number indicators
FM1, FM2, FM3
g
Sound mode indicators
BEAT, SOFT, POP
h
Main display
j
RDS indicators
AF, EON, REG, TP, PTY
k
CD-CH (CD changer) indicator
l
AM band indicator
MO
8
9
10
11
12
7
1
3
2
4
5
w
7 8
9 p
y
u
r
e
t
q
6
TP
RDS
PTY
DISP
DAB
a s
d
k
l
g
f
;
o
i
h
j
Display window
EN02-04KS-FX725R_F525[EE]f.pm5
7/12/01, 9:48 AM
3

Control panel―ks-f525, Location of the buttons, Control panel—ks-f525
Страница 4
- Изображение
- Текст
4
ENGLISH
LOCATION OF THE BUTTONS
Control panel—KS-F525
1
(standby/on/attenuator) button
2
Control dial
3
LOUD (loudness) button
4
DISP (display) button
5
SCAN button
6
Cassette compartment
7
TAPE button
8
FM button
9
0
(eject) button
p
¢
/
4
buttons
• Also functions as SSM buttons when pressed
together.
q
SEL (select) button
w
Number buttons
e
RPT (repeat) button
r
MO (monaural) button
t
SCM (sound control memory) button
y
AM button
u
(control panel release) button
Display window
i
Volume (or audio) level indicator
o
SCM (sound control memory) indicator
;
Tuner reception indicators
MO (monaural), ST (stereo)
a
RPT (repeat) indicator
s
LOUD (loudness) indicator
d
FM band number indicators
FM1, FM2, FM3
f
Sound mode indicators
BEAT, SOFT, POP
g
Main display
h
AM band indicator
1
3
2
4
5
w
7 8
9 p
y
u
r
e
t
q
6
DISP
SCAN
LOUD
a
s
f
d
o
i
g
;
h
Multi
Music
Scan
Display window
EN02-04KS-FX725R_F525[EE]f.pm5
15/12/01, 10:26 AM
4

Basic operations, Turning on the power, Turning on the power 1
English
- Изображение
- Текст
5
ENGLISH
3
Adjust the volume.
4
Adjust the sound as you want.
(See pages 19 – 22.)
To drop the volume in a moment
Press
briefly while listening to any
source. “ATT” starts flashing on the display, and
the volume level will drop in a moment.
To resume the previous volume level, press the
button briefly again.
• If you turn the control dial clockwise, you can
also restore the sound.
To turn off the power
Press and hold
until “SEE YOU” appears
on the display.
Note:
When you use this unit for the first time, set the built-in
clock correctly, see page 23.
BASIC OPERATIONS
To decrease the volume.
To increase the volume.
Volume level appears.
Volume level indicator
KS-FX725R
Turning on the power
1
Turn on the power.
Note on One-Touch Operation:
When you select a source in step 2 below, the
power automatically comes on. You do not have
to press this button to turn on the power.
2
Select the source.
To operate the tuner (FM or AM),
see pages 6 – 15.
To operate the tape,
see pages 16 – 18.
Only for KS-FX725R:
To operate the CD changer,
see pages 27 – 28.
To operate the external component,
see page 29.
To operate the DAB tuner,
see pages 30 – 33.
KS-F525
TAPE
KS-FX725R
KS-F525
MO
TP
RDS
PTY
DISP
8
9
10
11
12
7
DAB
1 3
2
2
EN05-05KS-FX725R_F525[EE]f.pm5
7/12/01, 9:49 AM
5

Radio basic operations, Listening to the radio, Searching a station automatically: auto search
English
- Изображение
- Текст
6
ENGLISH
RADIO BASIC OPERATIONS
MO
TP
RDS
PTY
DISP
8
9
10
11
12
7
DAB
Listening to the radio
You can use either automatic searching or manual
searching to tune in to a particular station.
Searching a station automatically:
Auto search
1
Select the band (FM1 – 3, AM).
Note:
This receiver has three FM bands (FM1, FM2,
FM3). You can use any one of them to listen to an
FM broadcast.
FM1
FM2
FM3
AM
KS-FX725R
KS-F525
AM
FM1
FM2
FM3
2
Start searching a station.
When a station is received, searching stops.
To stop searching before a station is received,
press the same button you have pressed for
searching.
Note:
FM1 and FM2 : 87.5 MHz – 108.0 MHz
FM3 : 65 MHz – 74 MHz
Press
¢
to search
stations of higher
frequencies.
Press
4
to search
stations of lower
frequencies.
KS-FX725R
KS-F525
Audio (see page 25) or
volume level indicator
Selected band appears.
EN06-09KS-FX725R_F525[EE]f.pm5
7/12/01, 9:50 AM
6

7
ENGLISH
Searching a station manually:
Manual search
1
Select the band (FM1 – 3, AM).
Note:
This receiver has three FM bands (FM1, FM2,
FM3). You can use any one of them to listen to an
FM broadcast.
2
Press and hold
¢
or
4
until
“M (manual)” starts flashing on the
display.
Lights up when receiving
an FM broadcast in stereo.
MO
MO
RND
FM1
FM2
FM3
AM
AM
FM1
FM2
FM3
KS-FX725R
Selected band appears.
KS-F525
3
Tune in to a station you want while “M”
is flashing.
• If you release your finger from the button,
the manual mode will automatically turn off
after 5 seconds.
• If you hold down the button, the frequency
keeps changing (in 50 kHz intervals (87.5
MHz – 108 MHz), in 30 KHz intervals (65
MHz – 74 MHz) for FM and 9 kHz intervals
for AM – MW/LW) until you release the
button.
When an FM stereo broadcast is hard to
receive:
Press MO RND (for KS-FX725R) or MO (for KS-
F525) while listening to an FM stereo broadcast.
• Each time you press the button, the MO
indicator lights up and goes off alternately.
When the MO indicator is lit on the display, the
sound you hear becomes monaural but the
reception will be improved (the ST indicator
goes off).
To restore the stereo effect, press the same
button again.
KS-FX725R
KS-F525
Press
4
to tune
in to stations of lower
frequencies.
Press
¢
to tune
in to stations of higher
frequencies.
EN06-09KS-FX725R_F525[EE]f.pm5
7/12/01, 9:50 AM
7

8
ENGLISH
Local FM stations with the strongest signals are
searched and stored automatically in the band
number you have selected (FM1, FM2 or FM3).
These stations are preset in the number buttons —
No.1 (lowest frequency) to No.6 (highest frequency).
When automatic preset is over, the station stored
in number button 1 will be automatically tuned in.
Manual preset
You can preset up to 6 stations in each band (FM1,
FM2, FM3 and AM) manually.
Ex.: Storing an FM station of 88.3 MHz into the
preset number 1 of the FM1 band
1
Select the band (FM1 – 3, AM) you
want to store stations into (in this
example, FM1).
Storing stations in memory
You can use one of the following two methods to
store broadcasting stations in memory.
• Automatic preset of FM stations: SSM (Strong-
station Sequential Memory)
• Manual preset of both FM and AM stations
FM station automatic preset: SSM
You can preset 6 local FM stations in each FM band
(FM1, FM2 and FM3).
1
Select the FM band (FM1 – 3) you want
to store FM stations into.
2
Press and hold both buttons for more
than 2 seconds.
FM1
FM2
FM3
AM
FM1
FM2
FM3
KS-F525
KS-FX725R
KS-FX725R
FM1
FM2
FM3
AM
KS-F525
AM
FM1
FM2
FM3
“SSM” appears, then disappears when automatic
preset is over.
EN06-09KS-FX725R_F525[EE]f.pm5
7/12/01, 9:50 AM
8

Tuning in to a preset station, Scanning broadcast stations
Страница 9
- Изображение
- Текст
9
ENGLISH
Tuning in to a preset station
You can easily tune in to a preset station.
Remember that you must store stations first. If you
have not stored them yet, see “Storing stations in
memory” on pages 8 and 9.
1
Select the band (FM1 – 3, AM).
2
Select the number (1 – 6) for the preset
station you want.
Scanning broadcast stations
(only for KS-F525)
When you press SCAN while listening to the
radio, station scanning starts.
Each time a broadcast is tuned
in, scanning stops for about 5
seconds (tuned frequency
number flashes on the display),
and you can check what program
is now being broadcast.
If you want to listen to that program, press the
same button again to stop scanning.
2
Tune in to a station (in this example,
of 88.3 MHz).
3
Press and hold the number button
(in this example, 1) for more than 2
seconds.
4
Repeat the above procedure to store
other stations into other preset
numbers.
Notes:
• A previously preset station is erased when a new station
is stored in the same preset number.
• Preset stations are erased when the power supply to
the memory circuit is interrupted (for example, during
battery replacement). If this occurs, preset the stations
again.
SCAN
AM
FM1
FM2
FM3
“P 1” flashes for a few seconds.
KS-FX725R
KS-F525
Press
4
to tune
in to stations of lower
frequencies.
Press
¢
to tune
in to stations of higher
frequencies.
FM1
FM2
FM3
AM
EN06-09KS-FX725R_F525[EE]f.pm5
7/12/01, 9:50 AM
9

10
ENGLISH
RDS OPERATIONS
To use Network-Tracking Reception, press and
hold TP RDS (Traffic Programme/Radio Data
System) for more than 1 second. Each time you
press and hold the button, Network-Tracking
Reception modes change as follows:
Mode 1
The AF indicator lights up but the REG indicator
does not.
Network-Tracking Reception is activated with
Regionalization set to “off.”
Switches to another station within the same
network when the receiving signals from the
current station become weak.
•
In this mode, the programme may differ from the one
currently received.
Mode 2
Both the AF indicator and the REG indicator light
up.
Network-Tracking Reception is activated with
Regionalization set to “on.”
Switches to another station, within the same
network, broadcasting the same programme
when the receiving signals from the current
station become weak.
Mode 3
Neither the AF indicator nor the REG indicator
lights up.
Network-Tracking Reception is deactivated.
TP
RDS
Mode 1
Mode 2
Mode 3
This section is only for KS-FX725R.
What you can do with RDS
RDS (Radio Data System) allows FM stations to
send an additional signal along with their regular
programme signals. For example, the stations send
their station names, as well as information about
what type of programme they broadcast, such as
sports or music, etc.
Another advantage of RDS function is called
“Enhanced Other Networks.” The EON indicator
lights up while receiving an FM station with the
Enhanced Other Networks data. By using the
Enhanced Other Networks data sent from a station,
you can tune in to a different station of a different
network broadcasting your favorite programme or
traffic announcement while listening to another
programme or to another source such as tape.
By receiving the RDS data, this unit can do the
following:
• Tracing the same programme automatically
(Network-Tracking Reception)
• Standby Reception of TA (Traffic
Announcement) or your favorite programme
• PTY (Programme Type) search
• Programme search
• And some other functions
Tracing the same programme
automatically (Network-Tracking
Reception)
When driving in an area where FM reception is not
good, the tuner built in this unit automatically tunes
in to another RDS station, broadcasting the same
programme with stronger signals. So, you can
continue to listen to the same programme in its
finest reception, no matter where you drive. (See
the illustration on the next page.)
Two types of the RDS data are used to make
Network-Tracking Reception work correctly — PI
(Programme Identification) and AF (Alternative
Frequency).
Without receiving these data correctly from the RDS
station you are listening to, Network-Tracking
Reception will not operate.
REG indicator
AF indicator
EN10-15KS-FX725R_F525[EE]f.pm5
7/12/01, 9:51 AM
10

Комментарии
Главная > Производители > JVC > Автомобильные магнитолы JVC
![]() Головные устройства производителя JVC являются очень популярными, так как они надежные, простые в использовании и высококачественные, по дизайну, они, также, не уступают своим конкурентам.
Головные устройства производителя JVC являются очень популярными, так как они надежные, простые в использовании и высококачественные, по дизайну, они, также, не уступают своим конкурентам.
Автомобильные аудиосистемы ДЖЕВИСИ многофункциональные, имеют отличное звучание. Они станут отличным подарком любому автомобилисту.
Инструкция к магнитоле JVC по моделям:
- KD-AVX1
- KD-AVX2
- KD-AVX33
- KD-AVX44
- KD-DV4207
- KD-DV6207
- KD-DV7307
- KD-G227
- KD-G332
- KD-G337
- KD-G342
- KD-G347
- KD-G387
- KD-G405
- KD-G427
- KD-G447
- KD-G527
- KD-G531
- KD-G537
- KD-G611
- KD-G617
- KD-G727
- KD-G737
- KD-G747
- KD-G807
- KD-G827
- KD-G847
- KD-R35
- KD-R38
- KD-R45
- KD-R47
- KD-R48
- KD-R307
- KD-R402
- KD-R407
- KD-R412
- KD-R417
- KD-R422
- KD-R427
- KD-R431
- KD-R441
- KD-R447
- KD-R457
- KD-R461
- KD-R501
- KD-R521
- KD-R527
- KD-R647
- KD-X30
- KD-X40
- KD-X100
- KD-X115
- KD-X120
- KD-X125
- KD-X150
- KD-X250BTEE
- KD-X320BT
- KW-AV50
- KW-AV50
- KW-AV51
- KW-AVX706
- KW-AVX810
- KW-AVX900
- KW-R400
- KW-R500
- KW-R510
- KW-V10
- KW-V220BT
- KW-XC838
- KW-XC939
- KW-XG707
- KW-XR417
Автомагнитола JVC, инструкция по эксплуатации которой размещена на нашем сайте, имеет очень приятный и красивый дизайн. Яркая подсветка и удобный дисплей делаю ее еще лучше. Управление очень простое и удобное.
Также, компания производит специальную серию головных устройств серии KD, которые представлены на высшем уровне, они очень качественные, простые, яркие и мощные по звучанию. У нас Вы сможете скачать мануал по эксплуатации к любой модели.
Вы решили купить мультимедийную систему для авто бренда ДЖЕЙВИСИ, а мы поможем Вам найти к ней руководство пользователя на русском языке. Бесплатно и без регистраций скачайте сервис-мануал у нас.
Руководство по эксплуатации автомагнитолы JVC
Наш сайт сервис-мануалов с радостью поможет Вам найти необходимый мануал. Скачать свой сервис-мануал можно на нашем сайте. Чтобы быстрее найти тот файл, который Вам нужен, укажите на сайте модель своей техники.
В формате PDF размещено руководство пользователя к автомобильной аудио-системе ДЖЕЙВИСИ, кликните на файл и скачайте свой мануал. Чтобы не потерять — сохраните на компьютере документ в формате PDF.
Обязательно читайте мануал перед началом эксплуатации своей техники чтобы узнать всю необходимую информацию. Руководство пользователя дает возможность узнать, как правильно использовать автомобильную аудиосистему, какие ее основные и дополнительные функции.
Также, документ подключения поможет понять, как правильно подключать ее. Желаем вам успешной эксплуатации устройства.