If you’re a TOP Server for AVEVA (formerly Wonderware) user, you’ve certainly connected to a device configured in TOP Server using the included OPC Quick Client at one time or another. But if you’ve just been launching the Quick Client from the TOP Server toolbar, you may be missing some very useful features.
Continuing our Tech Support Corner blog series, this blog post covers five tips you can use to get the most out of your experience using the OPC Quick Client with TOP Server and other OPC DA servers.
Having an easy way to test your settings is important for any OPC server. Anyone who has configured OPC connections (or other client interfaces) knows that it can be more involved than just clicking a button. As part of a methodical troubleshooting process, having an easy way to quickly test your communications settings is key to pinpointing where any issues might exist.
To that end, TOP Server includes the OPC Quick Client — an easy-to-use OPC DA test client for proofing out your channel/device and other communications settings in TOP Server. If OPC Quick Client can successfully communicate with your devices, you know any issues are between the client and TOP Server. Many over the years have even leveraged OPC Quick Client for the same purpose with other OPC servers.
 The most common use of OPC Quick Client is simply launching it from the toolbar of TOP Server. By default, when launching it this way, OPC Quick Client will automatically connect, generate OPC groups and items and subscribe to those items at a default update rate of 1000 ms.
This is why we generally recommend having at least one known address with a good value configured as a static tag for each device in TOP Server — this makes it easy to quickly test your communications settings even if you plan to use dynamic address reference from your HMI, SCADA or other client application.
That being said, if that’s the only way you’ve used OPC Quick Client in the past, it’s possible there are some tools and settings that you may not be aware of that are useful. OPC Quick Client can also be launched from the Windows Start menu under Software Toolbox where it can be manually configured. Keep reading to find out some of the tips for enhancing usage whether your launching from TOP Server or manually.
1. Key Settings Under Tools > Options to Know About
In the OPC Quick Client there are a number of settings available by selecting the Tool menu then Options.
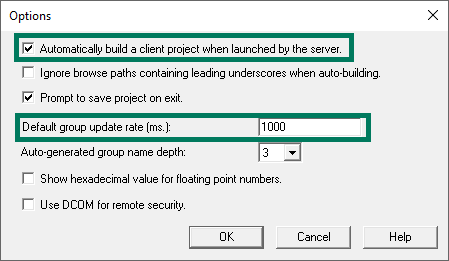
There are two of these settings that I want to call out and focus on in the post that are specifically related to behavior when you’re launching OPC Quick Client from the TOP Server toolbar:
- Automatically build a client project when launched by the server — This setting is the reason why OPC Quick Client automatically connects and subscribes to all items in your TOP Server project when launching it from the toolbar in TOP Server.
If you’d prefer that auto-build behavior to not occur, simply disable this setting and OPC Quick Client will launch with a blank configuration, just like when launching from the Start menu.
- Default group update rate (ms.) — This setting controls the group update for the groups that are auto-generated when launching OPC Quick Client from the TOP Server toolbar. This update rate is also the default when you manually create an OPC group (though you can change it to the desired update rate, at that time).
This setting defaults to 1,000 milliseconds which can be very fast if you have a lot of channels, devices and tags configured in TOP Server — this has the potential to negatively impact your communications network.
As such, be aware of this setting and if you plan to use OPC Quick Client by launching from the toolbar, make sure to set this default group update rate to an acceptably slow update rate that won’t negatively impact your network (NOTE: You can launch OPC Quick Client manually from the Start menu under «Software Toolbox» and change this rate and it will be applied the next time you launch from the toolbar).
2. How to Auto-Create All OPC Items from Your Server
Now, as I mentioned, you can also launch the OPC Quick Client from the Start menu with a blank configuration. You can connect to any OPC DA server for testing purposes. One handy feature when doing this is the «Auto Create Tags» menu option when right-clicking on a connection you’ve made to your OPC server.

This option is essentially the same as launching from the TOP Server toolbar with respect to auto-generating groups and items based on the structure and static tag database in the server. However, this option allows you to do the same thing for any OPC DA server you may be testing with OPC Quick Client. Again, refer to Tip #1 above about the default update rate of 1000 milliseconds prior to using this option.
Also, this will only work if your OPC server actually has static tags defined that can be auto-created. If you have a static tag database, though, this option can greatly ease your configuration of the OPC Quick Client (not that it’s hard to begin with but time is money and this can be a time-saver).
3. Setting Groups or Items Inactive to Isolate Reads/Writes for Testing
As you’re probably aware, TOP Server also has communication diagnostics for viewing sends and receives for all of your channel and device communications with devices. Since a subscription for an OPC client such as the OPC Quick Client can generate a substantial amount of communications transactions in the communications diagnostics, it can make it harder to diagnose issues, especially if your update rate is really fast.
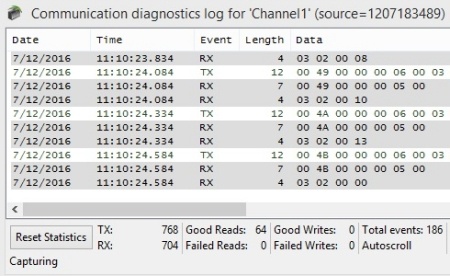
To that end, it’s possible to sent one or more OPC groups or items in those groups to an «Inactive» state, which effectively stops the subscription and ceases communications for the OPC Quick Client items (it’s important to note that if you have other client applications connected, this won’t stop all communications for a channel or device).
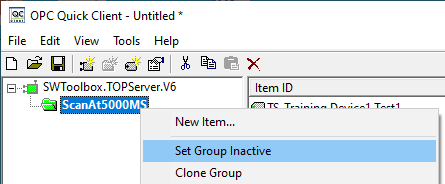
Setting the OPC group Inactive in the OPC Quick Client
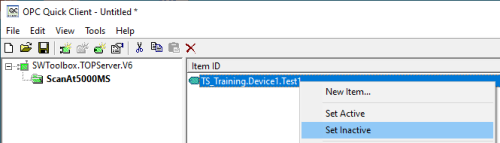
Setting Items in an OPC group Inactive in the OPC Quick Client
Once the items are inactive (any items in an inactive group will also be inactive, as a result), you can right-click on an item or items (you can multi-select items using the Shift and CTRL buttons) and perform Sync or Asycn OPC reads and/or writes for those items, resulting in transactions in the communications diagnostics being much more manageable and easier to use.

4. Getting a More Meaningful Description for OPC Errors
If you’ve ever seen an OPC error code, is a long hexadecimal code (i.e. 0xC0040007, 0x80004002, etc) that certainly means something specific but without looking it up for a description, it generally means nothing to a casual observer. Now you can certainly perform a web search for an OPC error code and get a valid description. However, there’s an easier way that actually pulls the OPC server’s own description of the error code it returned to the OPC Quick Client.
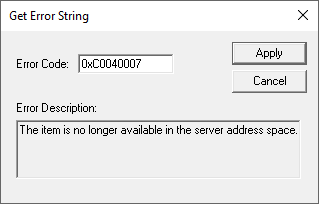
Under the Tools menu and Server options, you can select the «Get Error String» tool. Then simply enter the OPC Error code in question that would be displayed in the OPC Quick Client event log at the bottom, click Apply and OPC Quick Client will query the OPC server and get the description of that error back. This should help clarify why the error was generated so you can resolve any issues.
5. Test Mode for Benchmarking Performance on OPC Operations
And last, but not least, it’s not uncommon to be curious about OPC performance capabilities between a client and a specific server. For some quick and useful performance statistics, the OPC Quick Client has a «Test Mode» that is accessible from the Tools menu.
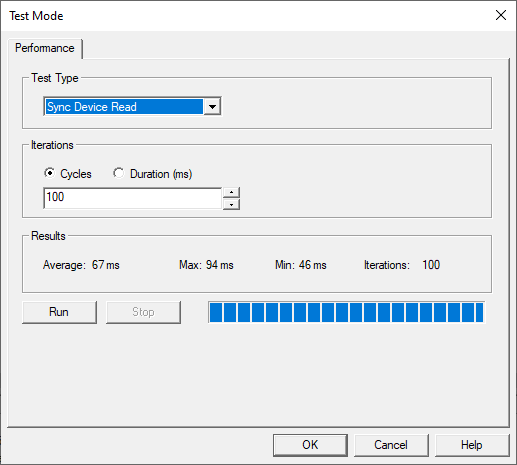
This option will only be available if you have at least one OPC Server connection and at least one OPC group containing at least one item. There are several types of performance test available including Sync Device Read, Sync Cache Read and Sync Write for testing the performance of each of those operations.
The selected operation type will be performed on each existing OPC item in your OPC Quick Client with the frequency determined by the options you specify for the «Iterations» section. «Cycles» will complete the operation once for each item and will repeat that sequence for the specified number of Cycles.
«Duration (ms)» will perform the selected operation type for each item and continue doing so for the specified amount of time in milliseconds.
After clicking «Run», the test will be performed and you will be presented with an average time, maximum time and minimum time to complete the selected operation type plus the number of times the operations was completed. This is very useful for just getting a rough idea of how quickly your OPC server can perform for the selected operations.
To summarize, the OPC Quick Client is a useful tool that has multiple uses for testing and troubleshooting with TOP Server and other OPC DA servers. A simple tool on the surface, OPC Quick Client provides a lot of functionality in a straightforward interface.
Don’t forget to subscribe to our blog for other useful how-tos, tips and updates like this. And if you don’t already have it, download the latest version of TOP Server with OPC Quick Client for connecting to and testing your devices.

This 4 minute video tutorial gives you all the information you need to get started with Kepware’s® OPC Quick Client application. This application can be used to test other OPC applications, troubleshoot OPC connectivity issues and diagnose other OPC client application problems.
Kepware’s OPC Quick Client supports all of the operations available in any OPC client application.
Once you have watched the video, head over to the «Free OPC Products» section of the OPCTI website and download Kepware’s OPC Quick Client application, or click here to get it.

Produced by:
OPC Training Institute
view complete
profile
OPCTI is the global leader in OPC training for automation professionals, and is the largest OPC training company in the world. OPCTI offers hands-on training workshops in-person and online.
OPCTI is vendor-neutral, meaning that we will teach you how to establish and implement a robust and secure communication infrastructure, no matter what OPC products you use — the training that you receive from OPCTI can be immediately implemented at your workplace. Our progressive training will enable you to increase your efficiency, security, and productivity.
The Certified OPC Professional (COP) designation is only offered by OPCTI. The designation is awarded to those who have successfully completed our training, and who demonstrate proficiency with OPC technology, design architecture, and installations. The COP designation is endorsed by many OPC Foundation member companies.
OPCTI is an active member and a strong supporter of the OPC Foundation. Randy Kondor, President and Chief Instructor at OPCTI currently serves as the Vice President of Education at the OPC Foundation.
Visit our Training Schedule to see where OPCTI is currently offering training workshops, or contact us to find out more about private trainings for you and your team at your site.
OPC DA Client Tools OPC Quick Client
What is OPC?
OPC is an interface standard for hardware and software used in industrial control and production automation to read and write data between applications and process control devices. O represents OLE (object links and embedded), p (process procedure), C (Control Control).
The OPC server includes a 3-class object (Object): Server Object, Item (Item), and Group Objects.
The OPC standard uses a C / S mode, and the OPC server is responsible for providing data to the OPC client.
OPC DA introduction
-
OPC — OLE for Process Control, Microsoft Object Links and embedded technology applies to process control, is a series of interfaces, methods, and attributes. It is based on OLE, COM, DCOM Technology, XML, using the client / server structure, and the technology that is used to isolate communication protocols and devices / applications. Microsoft’s OLE, COM defines how different software interacts to use and share data, allowing OPC to provide universal interface specifications for communication between various process control devices, regardless of the application software in the process and hardware equipment.
-
OLE — Object Linking & Embeding, object links and embedding, that is, Microsoft’s ActiveX.
-
OPC DA: DATA Access protocol is the most basic OPC protocol. The OPC DA server itself does not store data, only responsible for displaying the current value of the data collection point. The client can set a refresh Interval, which is regularly refreshed. The currently common protocol version number is 2.0 and 3.0, and two agreements are incompletely compatible. That is, the client of the OPC DA 2.0 protocol can not connect to the server of OPC DA 3.0.
Local connection OPC
Choose Local Machine to connect local, you can see which OPC services installed locally
Can connect to the local OPC service, view data, and write data
For example: connect Kepware.kepServerex.v6

After connecting, right click to create a new group, write a group name, such as: AAA

Right click on the new Item Select the mesh to listen to the measurement points to listen, you can see the changes in data in real time, or modify its value, such as right -… -> asynchronous 2.0 Write

Remote Connection
Note: —— Use the tool remote connection, the user of the currently logged in user and the password should be the same as the user password of the remote OPC service.
This tool uses the current username and password to connect

Remote connection related information
ProgID: Kepware.KEPServerEX.V6
Remote Machine Name: 192.168.0.204

ProgID: OPC.FlyFishOpc
Remote Machine Name: 192.168.0.204

ProgID: OPCServer.WinCC.1
Remote Machine Name: 10.1.0.51

ProgID: OPCServer.WinCC
Remote Machine Name: 192.168.0.187

ProgID: KEPware.KEPServerEx.V4
ProgID: Kepware.KEPServerEX.V6
ProgID: Matrikon.OPC.Simulation.1
ProgID: OPC.FlyFishOpc
ProgID: OPCServer.WinCC.1

Wincc clsId: 75d00bbb-dda5-11d1-b944-9e614d000000
kepserver6 :7BC0CC8E-482C-47CA-ABDC-0FE7F9C6E729
kepserver4 :6E6170F0-FF2D-11D2-8087-00105AA8F840
MatrikonOPC: F8582CF2-88FB-11D0-B850-00C0F0104305
RSLinx OPC Server: A05BB6D6-2F8A-11D1-9BB0-080009D01446
OPC.FlyFishOpc: 623DC2C9-2378-46F6-BF49-298CAC49F65A
Code connection
Use CLSID and username and password to connect directly, so it doesn’t matter what the current user is
ci.setHost(“192.168.0.204”);
ci.setUser(“OPCUser”);
ci.setPassword(“opcuser”);
Ci.setClsid («7BC0CC8E-482C-47CA-ABDC-0FE7F9C6E729»); // Successful
final String itemId = “tongdao.tag1.aaa”;
Code connection example, back pilot introduction
OPC Specification
Open Process Connectivity (OPC) is a technology standard used to exchange information between hardware and software through specialized drivers. Information is exchanged between items such as programmable logic controllers (PLCs), gauges, and databases. OPC is published and maintained by the OPC Foundation, an organization comprised of hundreds of member companies that strives to ensure interoperability on the plant floor and beyond.
The original OPC specifications used Microsoft Distributed Component Object Model (DCOM) technology to provide a uniform way for industrial applications to share data. There were several separate specifications that provided functions such as Data Access (OPC-DA), Alarms and Events (A&E), and Historical data (HDA).
DCOM always proved difficult to work with, and by 2004 it was clear that a more modern solution was needed. Therefore, a new specification was developed that used common networking principles (like TCP/IP) instead of DCOM, was platform independent, and combined the various separate specifications into one: Open Process Connectivity Unified Architecture (OPC UA).
OPC UA is the leading industrial standard for platform and vendor-neutral data access. Connecting any PLC device to Ignition is easy with OPC UA. Device connections are done over the Ethernet for those devices that have an Ignition device driver. The OPC UA Module makes Ignition act as an OPC UA server, serving data collected by its built in drivers to other Ignition modules, as well as to third-party OPC UA clients.
OPC UA is the latest revision of the OPC specification, which offers platform and vendor neutral transfer and use of industrial data. The specification plays a crucial role in Ignition, and is the primary data access specification used in the Gateway. Ignition supports connections to any number of OPC UA servers created by any manufacturer, provided that they are compliant to the specification. The data is then used to drive all aspects of the system. Creating connections to OPC UA servers is described below in Connecting with OPC UA.
Distributed Systems with OPC UA
OPC UA breaks down boundaries and enables free data flow. Using standard TCP/IP instead of legacy DCOM, OPC UA makes it easy to securely transfer data between networks and though firewalls. All OPC UA connections are based on the same technology, which means that a connection to your local machine is not entirely different than a connection to a machine that’s far away. This enables the creation of a highly distributed system, and in combination with other features of Ignition can lead to more connected enterprises.
For example, imagine a corporate network with an office in the center, and remote processes connected through a VPN, which would pass through a variety of connections. Each remote site could have an Ignition installation running only an OPC UA module that would report data back to a central facility and record it in a database. The overall system cost would be very low. The data could be managed centrally in a single location, and then made available to all interested parties through the Vision module or any application that could access the database.
Servers and Clients
When discussing OPC (as the specifications are often called collectively), it is common to hear about OPC servers and OPC clients. An OPC server is a piece of software that implements the OPC interface and provides data. An OPC client is an application which connects to an OPC server and uses the specification to retrieve and work with data.
The Ignition platform inherently offers OPC UA client functionality. Even with no modules installed, the Gateway can connect to any compliant OPC UA server and work with data. With the addition of the OPC UA module, Ignition becomes an OPC server as well, hosting device drivers that read and publish data.
The OPC COM module is available to provide client access to older, DCOM based, OPC-DA servers.
Technology
The OPC UA specification offers a wide range of flexibility in choosing technologies, from the transport mechanism, to the way data is encoded, to the encryption used to secure the data. Ignition supports the UA/TCP transport with the UA/Binary encoding scheme for maximum performance.
Additionally, Ignition supports all of the common encryption schemes. This means that Ignition connects to OPC UA servers (and allows connections from clients) over TCP/IP using encryption, and sends data by first encoding it into an efficient format defined by the OPC UA specification. This is in contrast to other schemes outlined in the specification, which can use web services and XML encoding that are not as efficient.

OPC Quick Client
©2015 Kepware, Inc.

OPC Quick Client
Table of ContentsTable of Contents 2
OPCQuick Client 3
Overview 3
Main Window 4
Server Connection 5
Group 7
Items 9
Data Types Description 12
Operations 13
Options 16
Test Mode 18
License Agreement 22
Index 23
www. kepware.com
2

OPC Quick Client
OPC Quick ClientHelp version 1.033
CONTENTS
OverviewWhat is the OPC Quick Client and how is it used?
The Main WindowWhat does the OPC Quick Client do?
Server ConnectionHow do I connect to a server and start receiving data?
OperationsWhat type of operations can I perform?
Test ModeHow can I perform a series of tests on an OPC server?
License AgreementIt is recommended that users review the license agreement.
OverviewThe OPC Quick Client assists in the testing and development of the OPC Data Access 1.0 and 2.0 servers. Itsupports both local and remote OPC server connections. Remote connections are handled through the operatingsystem’s DCOM interface.
Note: The OPC Quick Client does not fully support OPC DA 3.0. This help file assumes the use of Windows XP orServer 2003. Service Pack 4 is recommended.
Client PreparationFor information on how to prepare the client, follow the instructions below.
1. To start, create a server connection (which will be used to connect to an OPC server).
2. Next, add a group to the connection that contains varying properties (such as update rate, dead band andtime bias).
3. Add items to the individual groups. The groups contain properties such as an initial active state, datatype, and access path.
Note: Active items will automatically receive data change notifications. The current value and quality will bedisplayed in the Item View.
See Also: Server, Group, and Items.
www. kepware.com
3

OPC Quick Client
Main WindowThe following image is a view of the application.
Title BarThe Title Bar displays the name of the loaded project file. An asterisk (*) following the name indicates that it hasbeen modified.
ToolbarDescriptions of the icons are as follows:
Creates a new project.Opens an existing project from disk.Saves the current project to disk.Creates a new server connection.Creates a new group.Creates a new item.Edits the properties of the selected server, group, or item.Cuts the current selection to the clipboard.Copies the current selection to the clipboard.Pastes the server, group, or items from the clipboard.Deletes the current selection.
Group WindowThe Group window manages a list of server connections along with their group objects. To display a menu ofoptions applicable to the server/group, right-click on it. To display the property sheet for the server/group,double-click on it. For more information, refer to Server and Group.
Item WindowThe Item window displays a list of item information for the selected group. To display a menu of optionsapplicable to the item, right-click on it. To display the properties dialog for the item, double-click on it. For moreinformation, refer to Items.
Note: Clicking on the Item ID column heading will cause the item list to be sorted based on the Item ID. Tochange column widths, click and drag the header for the desired column to the left or right end of the headerbutton until the column is the desired size.
Message LogThe Message Log window logs status messages generated by the application. As with the Item window, thecolumn headers may be resized. This window does not support sorting.
www. kepware.com
4

OPC Quick Client
Server ConnectionA server connection provides a link between an OPC server and this client. Groups are added through thisconnection. To create a new server connection, click Edit | New Server Connection. Alternatively, click theNew Server toolbar button.
Descriptions of the parameters are as follows:
l Prog ID: This parameter specifies the Prog ID of the OPC Server to which the client will connect. Use thetree display to browse for registered servers. The Prog ID field can be automatically updated by double-clicking on any registered server.
l Remote Machine Name: This parameter specifies the name of the machine on which the OPC serverresides. This field should be left blank if the server is located on the samemachine as the client.
l Connection Type: This parameter specifies the type of connection the client should establish with theOPC server on the local machine. The options are InProc, Local, or Any. If the server is registered asInProc, then an InProc connection is attempted; otherwise, a Local connection will be attempted. Thisoption is not available when connecting to a remote machine.
Server PropertiesOnce the client makes a successful connection to a server, the Server Properties dialog may be invoked byclicking Edit | Properties.
StatusThe Status tab is the default display, and details the server’s current status.
www. kepware.com
5

OPC Quick Client
The client queries the server’s status and obtains the following information:
Status Item DescriptionProg ID The Prog ID of the OPC Server to which the client will connect.Vendor A string that specifies vendor-specific information.Start Time Time at which the server was started.Current Time Current time as recognized by the server.Last UpdateTime
Time that the server sent the last data update to the client on this connection.
Server State The current state of the server. Valid states are Running, Failure, No Configuration,Suspended, and Test.
Major Version Major version of the server software.Minor Version Minor version of the server software.Build Number Build number of the server software.ConnectionType
Type of connection with the server. This connection may be inproc, local, or any that the OSchooses.
InterfacesThe Interfaces tab lists the interfaces that are required at the server level. Interfaces that are not required areconsidered optional. The Supported column states which interfaces are supported.
www. kepware.com
6

OPC Quick Client
IdentificationThe Identification tab allows users to enter an optional name to identify the client to the server. The default clientname is «Quick Client».
Visual/Operational ChangesWhen the OPC Quick Client adds, connects, or disconnects a server connection, there will be a change in itsappearance. The image that appears to the left of each server connection will change to one of the following:
The client is connected to the server.The client is disconnected from the server.The client could not connect to the server (the server may not be properly registered).
GroupA group is used to organize a collection of items with a common set of properties. The group also specifies severalproperties, such as group name, update rate, time bias, percent dead band, Language ID, active state, and thedata connection type (among others). To create a new group, click Edit | New Group. Alternatively, clickNewGroup in the toolbar.
General
www. kepware.com
7

OPC Quick Client
Descriptions of the parameters are as follows:
l Name: This parameter specifies a name that will identify the group. If it is left empty, the OPC server willgenerate a unique name.
l Update Rate: This parameter specifies how often the OPC server will provide updates for changing data.The default setting is 1000 milliseconds.
l Time Bias: This parameter specifies the time difference between the client/server and the actual device.The information allows the client to convert the timestamp received by the server back to the local time ofthe device. The default setting is 0 minutes.
l Percent Dead Band: This parameter specifies the percent change in data required to notify the client ofa data change. When scaling is enabled for the item, the required data change will be calculated using thescaled range. When scaling is not enabled for the item, the required data change will be calculated usingthe full range of the specified data type. The default setting is 0.
l Language ID: This parameter specifies the language that will be used by the server when returningvalues as text for operations on this group.
l Update Notification: This parameter specifies the method to be used when receiving data changenotifications or initiating asynchronous requests. Valid selections are OPC 1.0 (No Timestamp), OPC 1.0(With Timestamp) and OPC 2.0/3.0. Data Access 2.0/3.0 servers automatically supply timestamps withall data transactions.
l Active State: This parameter specifies the active state of the group. When the group is active, the clientwill receive data change updates for all active items at the specified update rate. The default setting ischecked.
l Keep Alive Rate: This parameter specifies the amount of time between keep-alive messages sent fromthe server to the client. The default setting is 0 milliseconds.
InterfacesOnce a group has been successfully added to the project, click Edit | Properties and then select Interfaces.This will display the information on the interfaces that are required at the group level.
www. kepware.com
8

OPC Quick Client
Note: Interfaces that are not required are considered optional. The Supported column states which groupinterfaces are supported by the server.
Visual/Operational ChangesWhen the OPC Quick Client adds, activates, or deactivates a group, the appearance of the folder icon will changeto one of the following:
The group is active.The group is inactive.The client could not add the specified group to the server connection.
ItemsItems represent data that may be accessed via an OPC server. An item specifies the following properties: Item ID,access path, requested data type, and active state. To define an item using the Item Editor dialog, click Edit |New Item. Alternatively, clickNew Item on the toolbar.
www. kepware.com
9

OPC Quick Client
Descriptions of the parameters are as follows:
l Access Path: This parameter is required by some OPC servers to complete an item definition. Todetermine whether an access path is needed, refer to the OPC server’s help documentation.
l Item ID: This parameter specifies the OPC server item that will be used to reference data. To determinevalid item names for the location in question, refer to the OPC server’s help documentation. If the serversupports tag browsing, then an item can be selected by using the browse controls.
l Data Type: This parameter specifies the requested data type that will be used when communicatingbetween the OPC server and the OPC Quick Client. This should be specified to agree with the size and typeof the register or memory location that is being addressed. For more information, refer toData TypesDescription.
l Active: This parameter specifies the item’s initial active state. It may be changed later. The defaultsetting is checked.
l Browse flat address space on selected branch:When checked, this option modifies the item list byattaching the channel and device name. The default setting is unchecked.
l Validate item before adding it to the list:When checked, this option validates the item before it isadded to the item list. The default setting is checked.
l Add Leaves:When clicked, this button adds the item that is currently selected in the item list to the ItemID field.
Button DefinitionsDescriptions of the icons are as follows:
Applies changes to the current tag and fills the dialog with properties of the previous tag in the list.Applies changes to the current tag and fills the dialog with properties of the next tag in the list. If no next tag
exists, the client will attempt to automatically increment the current Item ID.Creates a new item definition.Duplicate (decimal, hexadecimal, or octal format) current item definition up to 32,767 items (automatically
increments).Deletes the current item definition.Validates the current item definition.
www. kepware.com
10

OPC Quick Client
BrowsingIf the server supports browsing, the browsing controls will be available for use in searching for selected items.Filters can be applied as needed in order to simplify the search.
Visual/Operational ChangesWhen the OPC Quick Client adds, activates, or deactivates an item, the appearance of the tag icon will change toone of the following:
The item is active.The item is inactive.The client could not add the specified item to the group.
www. kepware.com
11

OPC Quick Client
Data Types DescriptionThe OPC Quick Client supports the data types listed in the table below. Their default description is determined bythe OPC server.
Native DescriptionBoolean Single bitBoolean Array Single bit arrayChar Signed 8-bit valueChar Array Signed 8-bit value arrayByte Unsigned 8-bit valueByte Array Unsigned 8-bit value arrayShort Signed 16-bit valueShort Array Signed 16-bit value arrayWord Unsigned 16-bit value.Word Array Unsigned 16-bit value arrayLong Signed 32-bit valueLong Array Signed 32-bit value arrayDWord Unsigned 32-bit valueDWord Array Unsigned 32-bit value arrayLLong Signed 64-bit valueLLong Array Signed 64-bit value arrayQWord Unsigned 64-bit valueQWord Array Unsigned 64-bit value arrayFloat Single precision floating-point value (32 bits)*Float Array Single precision floating-point value (32 bits) array*Double Double precision floating-point value (64 bits)*Double Array Double precision floating-point value (64 bits) array*String Zero-terminated character arrayString Array Zero-terminated string arrayDate YYYY-MM-DDThh:mm:ss.000
*When a floating-point value is Infinite, Indeterminate, or NaN, the following is displayed in the Value column ofits Item Properties:
l 1.#INFl -1.#INFl -1.#INDl 1.#QNANl -1.#QNAN
See Also: Options and Items.
www. kepware.com
12

OPC Quick Client
OperationsThe OPC Quick Client performs operations on an OPC server at the Server, Group, and Item level. This allowsusers to test the functionality of an OPC server.
Server OperationsConnectTo establish a connection to the server, click Tools | Server and then select Connect. All groups and items willbe added.
DisconnectTo disconnect from the server, click Tools | Server and then select Disconnect.
ReconnectTo re-establish a connection to the server, click Tools | Server and then select Reconnect.
Get Error StringTo obtain an error description for any valid error codes, click Tools | Server and then select Get Error String.
Note: To request an error description from the server, enter the error code and then press Apply. If the servercan translate the error code, the description will appear. An OPC server should be able to translate any OPC errorcode, in addition to Win32 errors.
This operation tests the following server functionality: IOPCServer::GetErrorString ( ).
Enumerate GroupsTo enumerate groups available to the server connection, click Tools | Server and then select EnumerateGroups.
www. kepware.com
13

OPC Quick Client
Note: The server can be requested to enumerate groups by name or by object. When enumerating by name, theserver passes back an enumeration of strings each containing the name of a group. When enumerating byobject, the server passes back an enumeration of group interface pointers (IUnknown), which the client canmake use of by querying for other interfaces. Either way, the client uses both mechanisms to obtain the sameresults: a list of group names along with the properties of each group. The client can request that only privategroups (groups this client added to the server connection), public groups (groups that may have been added byanother client, but are made available) or all groups be enumerated.
This operation tests the following server functionality: IOPCServer::CreateGroupEnumerator ( ).,IOPCServer::GetGroupByName ( ), IOPCGroupStateMgt::GetState ( ).
Get Group By NameTo obtain group properties by name, click Tools | Server and then select Get Group By Name.
www. kepware.com
14

OPC Quick Client
Note: To request group properties by name, enter the name of the group and then press Apply. If the server canresolve the group name, the client will proceed to obtain the properties for that group.
This operation tests the following server functionality: IOPCServer::GetGroupByName ( ),IOPCGroupStateMgt::GetState ( ).
Auto Create TagsTo automatically create tags from the connected OPC server, click Tools | Server and then select Auto CreateTags. For more information, refer toOptions.
Group OperationsClone GroupTo clone the selected group, click Tools | Group and then select Clone Group. The OPC server should create anew group with a unique name and with identical properties to the group that is being cloned. If the cloned groupcontains items, those items should also be cloned. The state of the cloned group and items should be set toinactive.
This operation tests the following server functionality: IOPCGroupStateMgt::CloneGroup, SetState ( ),IOPCItemMgt::CreateEnumerator, SetClientHandles ( ), IEnumOPCItemAttributes::Reset, Next ( ).
Asynchronous Refresh (Cache/Device)To perform an asynchronous refresh from cache/device on the selected items, click Tools | Group and thenselect Asynchronous 1.0/2.0 Cache Refresh or Asynchronous 1.0/2.0 Device Refresh. Refreshes doneusing 1.0 use IAdviseSink to return refresh notifications. Refreshes done using 2.0 use connection points toexchange data between client and server.
Item OperationsSet Active/InactiveTo activate/inactivate the selected item(s), click Tools | Item and then select Set Active | Inactive. Only activeitems should receive on data change updates.
Note: The group must be set to active.
Synchronous Read (Cache/Device)
www. kepware.com
15

OPC Quick Client
To perform a synchronous read from the cache/device on the selected items, click Tools | Item and then selectSynchronous Cache Read or Synchronous Device Read.
Asynchronous Read (Cache/Device)To perform an asynchronous read from the cache/device on the selected items, click Tools | Item and thenselect Asynchronous 1.0/2.0 Cache Read or Asynchronous 1.0/2.0 Device Read. Reads done using 1.0use IAdviseSink to return read complete notifications. Reads done using 2.0 use connection points to exchangedata between the client and server.
Synchronous/Asynchronous WriteTo perform a synchronous/asynchronous write on the selected items, click Tools | Item and then selectSynchronous Write or Asynchronous 1.0/2.0 Write.
Note: Both types of writes utilize the same dialog. The dialog displays the current value at a 100 millisecondrefresh rate. To send the data to the server, enter the data to write in the Write Value column and then pressApply. To apply the write and close the dialog, clickOK. To abort the operation, click Cancel.
OptionsThe OPC Quick Client is used to configure many settings. To open the Options dialog, click Tools | Options.
Descriptions of the parameters are as follows:
l Automatically Build a Client Project When Launched by the Server: When checked, the OPCQuick Client will automatically build a client project with all the tags in the OPC server when it is launchedfrom the OPC server. The default setting is checked.
l Ignore Browse Paths Containing Leading Underscores When Auto-Building:When checked,items that belong to browse path segments beginning with an underscore will not be included inautomatically built projects. These paths may include system or internal device tags. The default settingis unchecked (all available items will be included in the project).
www. kepware.com
16

OPC Quick Client
l Prompt to Save Project on Exit:When checked, users will be prompted to save the project beforeexiting the application. The default setting is checked.
l Default Group Update Rate (ms): This parameter specifies the default update rate for automaticallygenerated groups. The update rate determines how often the OPC server will provide updates forchanging data. The default setting is 1000 milliseconds. For more information, refer toGroup.
l Auto-Generated Group Name Depth: This field specifies the depth level for names of automaticallygenerated groups. The default setting is 3. For more information, refer to «Group Name Depth» below.
l Show hexadecimal value for floating point numbers: When enabled, this option will affect howfloating point numbers are displayed and written.
l In terms of display, this option causes Float or Double data types to display the floating pointnumber in addition to the hexadecimal value. For example, «12.34 (0X414570A4)».
l In terms of writing, this option allows hexadecimal values to be written for Float and Double datatypes. The hexadecimal value should be in the form «0x12345678″ for Floats (8 digits) and»0x123456789ABCDEF1» for Doubles (16 digits). Inputs that are not in a hexadecimal formatwill be treated as normal floating point inputs.
l Use DCOM for remote security:When checked, the OPC Quick Client, opens on next launch withsystem-level DCOM security settings. When unchecked, the OPC Quick Client opens with “wide-open”DCOM security settings. The default is unchecked.
Note: This option will also increase the Floating Point Precision to 17.Group Name DepthThe higher the group name depth, the more sub-groups that will be created. For example, tags structured like»Channel1.Device1.Tag1″ and «Channel1.Device1.Group1.Tag1» in OPC server will be added differently in OPCQuick Client depending on the Group Name depth setting.
Depth Level Description1 The group «Channel1» (name depth: 1) will be created. Both tags will be added to this
group.2 The group «Channel1.Device1» (name depth: 2) will be created. Both tags will be added to
this group.3 The group «Channel1.Device1» (name depth: 3. Tag names do not form a part of the group
name) will be created. The tag «Channel.Device1.Tag1» will be added to this group.
The group «Channel1.Device1.Group1″ (name depth: 3) will be created. The tag»Channel.Device1.Group1.Tag1» will be added to this group.
Note: The maximum allowed group name depth is 3. In the example above, if there were any more sub-groupsinside Group1, they would be added to the OPC Quick Client group «Channel1.Device1.Group1».
www. kepware.com
17

OPC Quick Client
Test ModeThe OPC Quick Client Test Mode includes both functional and performance tests to run on projects. Projects mustcontain at least one server connection with one group that contains one item.
Functional TestFunctional tests perform set routines on the project. When enabled, the OPC Quick Client will run the first test inthe selected list for the amount of time specified in the Test Interval parameter (which may be 1 to 360 minutes).Once the interval expires, the client will stop the first test and move onto the next. When the last test in the listhas finished, the client will sit idle for the same interval before repeating the test suite.
Note: Users cannot change the project while the functional test is running.
Test 1 DescriptionThis test simulates an HMI product by treating each group as a panel. The test first sets all items to an inactivestate. Then, it selects the first group in the list, sets all of the group’s items active, and receives data updates forapproximately 5 seconds. After the 5 second period, the active items are set to an inactive state and the testproceeds to the next group. The procedure continues cycling through all the groups and starting over when thelast group is complete.
Test 2 DescriptionThis test performs read, write, and refresh operations on active and inactive items. The test first sets all items toan inactive state. Then, it proceeds through the following sequence:
www. kepware.com
18

OPC Quick Client
1. Select the next group in the list.
2. Perform a synchronous read from device for all items (all group items are active).
3. Perform a synchronous write to all items (all group items are active).
4. Perform a synchronous read from device for all items (all group items are inactive).
5. Perform a synchronous write to all items (all group items are inactive).
6. Perform an asynchronous read from device for all items (all group items are active).
7. Perform an asynchronous write to all items (all group items are active).
8. Perform an asynchronous read from device for all items (all group items are inactive).
9. Perform an asynchronous write to all items (all group items are inactive).
10. Perform an asynchronous refresh from device (all group items are active).
The sequence will repeat until the test interval time is reached.
Test 3 DescriptionThis test duplicates Test 2, except all operations are done from cache instead of device.
Test 4 DescriptionThis test performs synchronous read and write operations on active items. The test first sets all items in theproject to an active state. Then, it performs a synchronous write every 2 seconds and a synchronous read fromdevice every 5 seconds. If there is more than one group, the test performs 2 writes to 1 read, and then movesonto the next group.
Test 5 DescriptionThis test duplicates Test 4, except that all operations are done from cache instead of device.
Test 6 DescriptionThis test performs the adding and removal of all items in the project. The test first removes all items in theproject. After a 2 second period the test re-adds all the items in the project. The test continues to transitionbetween the two states every 2 seconds.
Test 7 DescriptionThis test shows the performance of the server when reading items from cache. The test first activates all items inthe project, which is a requirement for cache reads. Then, it proceeds to the first group in the project andperforms as many synchronous reads as it can in 1 second. The number of items read in 1 second is displayed inthe message log. The test continues by selecting the next group and proceeding with the same tests.
Note: If a group contains multiple items, each synchronous read request includes all the items in one call to theserver.
Test 8 DescriptionThis test activates all items in a project (including all connections and groups). It updates the display window,pauses for the test interval selected by the user, and then inactivates all items.
The sequence will complete once per test interval.
Test 9 DescriptionThis test activates all items in a project (including all connections and groups). It performs a random number ofsynchronous writes (between 5 and 100) to all items in a project in the following sequence:
1. Get the first connection, first group.
2. Perform a random number of synchronous writes (between 5 and 100) to each item in the group.
3. Pause for 1 second between each item in the group.
4. Pause for 10 seconds between groups.
5. Repeat for each connection in the project.
The sequence will repeat until the test interval time is reached.
Test 10 Description
www. kepware.com
19

OPC Quick Client
This test activates all items in a project (including all connections and groups). It performs an asynchronousread for all items in a project in the following sequence:
1. Get the first connection, first group.
2. Perform an asynchronous read for all items in the group.
3. Pause for 1 second between each item in the group.
4. Pause for 10 seconds between groups.
5. Repeat for each connection in the project.
The sequence will repeat until the test interval time is reached.
Test 11 DescriptionThis test inactivates all items in a project (including all connections and groups). It performs an asynchronousread for all items in a project in the following sequence:
1. Get the first connection, first group.
2. Perform an asynchronous read for all items in the group.
3. Pause for 1 second between each item in the group.
4. Pause for 10 seconds between groups.
5. Repeat for each connection in the project.
The sequence will repeat until the test interval time is reached.
Test 12 DescriptionThis test is a server connection stress test. It creates the maximum allowable number of server connections. In aseparate thread for each connection, it automatically creates tags and performs random sync and async Read andWrite requests to all items in all non-system groups. The test will verify that incomplete transactions are handledcorrectly when the client disconnects with a transaction pending. After writing to each non-system group, eachthread in Test 12 will close its connection.
The sequence will end when all connections are closed or the test interval time is reached.
Performance TestPerformance tests measure the amount of time it takes to execute an operation on each item configured in theOPC Quick Client.
www. kepware.com
20

OPC Quick Client
Descriptions of the parameters are as follows:
l Test Type: This parameter specifies the test type. Tests are named after the operation that they perform.Options include Sync Device Read, Sync Cache Read, and Sync Write (which writes a random value toeach item). The default setting is Sync Device Read.
l Iterations: This parameter specifies the iteration. An iteration is complete when the test has performedonce on each item. Options include Cycles and Duration. The default setting is 100 cycles. Descriptions ofthe options are as follows:
l Cycles: The test will iterate for as many times as entered in the field.l Duration (ms): The test will run for as many milliseconds as entered in the field.
l Results: This parameter displays the results of the performance test. The following fields will bedisplayed:
l Average: This specifies the median time per iteration in milliseconds.l Max: This specifies the maximum time for an iteration in milliseconds.l Min: This specifies the minimum time for an iteration in milliseconds.l Iterations: This specifies the number of iterations.
Running a Performance TestFor more information, refer to the instructions below.
1. To start, use the drop-down menu to specify the test type.
2. Next, select the type of iteration. Then, specify the amount.
3. Click Run.
Note: Users can stop a test at any time by clicking Stop. A progress bar will display how far the test hasprogressed.
www. kepware.com
21

OPC Quick Client
License AgreementLicense and WarrantyThe license and warranty refer to the OPC Quick Client provided with the OPC Server. It does not refer to any othersoftware provided by the supplier.
The OPC Quick Client Software accompanying this license agreement is the property of supplier and is protectedby copyright law. A user’s rights and obligations in its use are described as follows:
1. Users may not modify or attempt to reverse engineer the software, or make any attempt to change orexamine the source code of the Software.
2. Users may not give or distribute copies of the Software or written materials associated with the Softwareto others.
3. Users may not sub-license, sell or lease the Software to any person or business.
WarrantyThe Supplier does not guarantee that the Software will satisfy application needs or be error free.
Disclaimer of DamagesEven if the Software does not satisfy the customer’s needs or is viewed as failing to perform, in no event will theSupplier be liable to users for any direct or indirect damages, including lost profits or lost data. The Supplier’sliability shall never exceed the purchase price for the Software.
www. kepware.com
22

OPC Quick Client
Index
A
Access Path 9
Asynchronous Refresh 15
B
Browsing Items 9
D
Data Type 9
Data Types Description 12
E
Enumerate Groups 13
G
Get Error String 13
Get Group By Name 14
Group 7
Group Name 7
I
Item Active State 9
Item ID 9
Items 9
L
Language ID 7
License Agreement 22
www. kepware.com
23

OPC Quick Client
M
Main Window 4
O
OPC Quick Client Help 3
Operations 13
Options 16
Overview 3
P
Prog ID 5
R
Remote Machine Name 5
S
Server Connection 5
Server Interfaces 5
T
Test Mode 18
Time Bias 7
U
Update Notification 8
Update Rate 8
www. kepware.com
24