Opel будет прилагать все необходимые усилия, чтобы обеспечить точность и актуальность данных, содержащихся на Сайте. Часть информации, размещенной на данном сайте, может не соответствовать действительности по причине изменений характеристик продукта, произошедших с момента запуска его в производство. Некоторое оборудование, указанное на данном сайте, может быть доступно только в определенных странах или только за дополнительную плату. Opel оставляет за собой право в любое время вносить изменения в перечень и спецификацию продукции. Для получения актуальной информации о продукции пожалуйста обращайтесь к официальному дилеру Opel.

OPEL ASTRA
Инструкция по эксплуатации
- Manuals
- Brands
- Opel Manuals
- Automobile
- 2011 Astra J
- Owner’s manual
-
Contents
-
Table of Contents
-
Bookmarks
Related Manuals for Opel 2011 Astra J
Summary of Contents for Opel 2011 Astra J
-
Page 1: Table Of Contents
Contents Introduction ……..2 In brief ……….6 Keys, doors and windows …. 20 Seats, restraints ……36 Storage ……..54 Instruments and controls ….. 83 Lighting ……..119 Climate control ……130 Driving and operating ….138 Vehicle care ……. 166 Service and maintenance ..
-
Page 2: Introduction
Introduction Introduction Back to overview…
-
Page 3: Using This Manual
«Service and prices. Experienced mechanics ■ The Owner’s Manual uses the maintenance» and «Technical data» trained by Opel work according to factory engine designations. The as well as on the identification plate. specific Opel instructions. corresponding sales designations…
-
Page 4
Disregarding this information may lead to vehicle damage. Symbols Page references are indicated with 3. 3 means «see page». We wish you many hours of pleasurable driving. Adam Opel AG Back to overview… -
Page 5
Introduction Back to overview… -
Page 6: In Brief
In brief In brief Vehicle unlocking Seat adjustment Seat positioning Initial drive information Press button c to unlock the doors and load compartment. Open the Pull handle, slide seat, release doors by pulling the handles. To open handle. the tailgate, push the touchpad switch below the handle.
-
Page 7
In brief Seat backrests Seat height Seat inclination Pull lever, adjust inclination and Lever pumping motion Lever pumping motion release lever. Allow the seat to = seat higher = front end higher engage audibly. down = seat lower down = front end lower Seat position 3 38, Seat adjustment Seat position 3 38, Seat adjustment Seat position 3 38, Seat adjustment… -
Page 8: Head Restraint Adjustment
In brief Head restraint adjustment Seat belt Mirror adjustment Interior mirror Press the button, adjust height and Pull out the seat belt and engage in engage. belt buckle. The seat belt must not be twisted and must fit close against the To reduce dazzle, adjust the lever on Head restraints 3 36.
-
Page 9
In brief Steering wheel adjustment Exterior mirrors Select the relevant exterior mirror and Unlock the lever, adjust the steering adjust it. wheel, then engage the lever and Convex exterior mirrors 3 29, ensure it is fully locked. Electric adjustment 3 29, Folding Do not adjust the steering wheel exterior mirrors 3 29, Heated unless the vehicle is stationary and… -
Page 10
In brief Back to overview… -
Page 11
In brief Instrument panel overview 11 Info-Display ……103 22 Ignition switch with steering wheel lock …. 139 12 Anti-theft alarm system Light switch ……119 status LED ……26 23 Brake pedal ……149 Headlight range 13 Central locking system ..22 24 Clutch pedal ……. -
Page 12
In brief Back to overview… -
Page 13: Exterior Lighting
In brief Exterior lighting Press light switch Headlight flash, high beam and low beam > = front fog lights r = rear fog light Lighting 3 119. Turn light switch headlight flash = pull lever AUTO = automatic light control: high beam = push lever Headlights are switched…
-
Page 14
In brief Horn Turn and lane-change signals Hazard warning flashers Operated with the ¨ button. lever up = right turn signal Press j. lever down = left turn signal Hazard warning flashers 3 124. Turn and lane-change signals 3 124, Parking lights 3 125. Back to overview… -
Page 15: Washer And Wiper Systems
In brief Washer and wiper systems Windscreen and headlight Rear window wiper and washer washer systems systems Windscreen wiper Pull lever. Press the rocker switch to activate the = fast rear window wiper: Windscreen and headlight washer = slow system 3 85, Washer fluid 3 170. upper = continuous P = timed interval wiping or…
-
Page 16: Climate Control
In brief Climate control Demisting and defrosting the windows Heated rear window, heated exterior mirrors Push lever. Washer fluid is sprayed on the rear window and the wiper wipes a few Press button V. times. Set the temperature control to the The heating is operated by pressing highest level.
-
Page 17: Starting Off
In brief Transmission Starting off Automatic transmission Manual transmission Check before starting off ■ Tyre pressure and condition 3 190, 3 230. ■ Engine oil level and fluid levels 3 168. ■ All windows, mirrors, exterior lighting and number plates are free from dirt, snow and ice and are operational.
-
Page 18
In brief Parking Starting the engine Stop-start system ■ Always apply the parking brake. Activate the manual parking brake without pressing the release button. Apply as firmly as possible on a downhill slope or uphill slope. Depress foot brake at the same time to reduce operating force. -
Page 19
In brief selector lever to P before switching off the ignition. Turn the front wheels towards the kerb. ■ Lock the vehicle with button e on the radio remote control. Activate the anti-theft alarm system 3 26. ■ Do not park the vehicle on an easily ignitable surface. -
Page 20: Keys, Doors And Windows
Keys, doors and windows Keys, doors and Keys, locks Press button to extend. To fold the key, first press the button. windows Keys Car Pass Replacement keys The Car Pass contains security Keys, locks ……..20 The key number is specified in the related vehicle data and should Car Pass or on a detachable tag.
-
Page 21
Keys, doors and windows Used to operate: ■ Overload of the central locking Key with foldaway key section system by operating at frequent ■ Central locking system intervals, the power supply is ■ Anti-theft locking system interrupted for a short time ■… -
Page 22: Central Locking System
Keys, doors and windows Memorised settings Central locking system Unlocking Whenever the key is removed from Unlocks and locks doors, load the ignition switch, the following compartment and fuel filler flap. settings are automatically memorised A pull on an interior door handle by the key: unlocks the respective door.
-
Page 23
Keys, doors and windows The setting can be saved for the key Unlocking and opening the being used. Memorised settings tailgate 3 22. Locking Close doors, load compartment and fuel filler flap. Press the e button to lock. Press the c button to unlock. Press button c when the ignition is off. -
Page 24: Automatic Locking
Keys, doors and windows Fault in radio remote control Fault in central locking system the ignition key is removed (manual transmission) or the selector lever is system Unlocking moved to P position (automatic transmission). Manually unlock the driver’s door by Unlocking turning the key in the lock.
-
Page 25: Doors
Keys, doors and windows Doors Central locking system 3 22. 9 Warning Closing Load compartment Use the child locks whenever children are occupying the rear Tailgate seats. Opening Using a key or suitable screwdriver, turn the child lock in the rear door to the horizontal position.
-
Page 26: Vehicle Security
Keys, doors and windows Vehicle security General hints for operating Activating tailgate Anti-theft locking system 9 Warning 9 Warning Do not drive with the tailgate open or ajar, e.g. when transporting Do not use the system if there are bulky objects, since toxic exhaust people in the vehicle! The doors gases, which can not be seen or cannot be unlocked from the…
-
Page 27
Keys, doors and windows Activation Activation without monitoring of 1. Close tailgate, bonnet, windows and sunroof. passenger compartment and ■ Self-activated 30 seconds after locking the vehicle (initialisation of vehicle inclination 2. Press button o. LED in the the system) button o illuminates for a maximum of 10 minutes. -
Page 28
Keys, doors and windows Status during the first 30 seconds of lights flash simultaneously. The If the control indicator continues anti-theft alarm system activation: number and duration of alarm signals flashing, attempt to start the engine are stipulated by legislation. using the spare key and seek the = test, arming delay. -
Page 29: Exterior Mirrors
Keys, doors and windows Exterior mirrors In position 0 no mirror is selected. Electric folding Convex shape Folding The convex exterior mirror contains an aspherical area and reduces blind spots. The shape of the mirror makes objects appear smaller, which will affect the ability to estimate distances.
-
Page 30: Interior Mirrors
Keys, doors and windows Interior mirrors Heated Automatic anti-dazzle Manual anti-dazzle Dazzle from following vehicles at Operated by pressing the Ü button. night is automatically reduced. Heating works with the engine To reduce dazzle, adjust the lever on running and is switched off the underside of the mirror housing.
-
Page 31: Windows
Keys, doors and windows Windows Safety function If the window glass encounters Manual windows resistance above the middle of the window during automatic closing, it is The door windows can be opened or immediately stopped and opened closed with the window winders. again.
-
Page 32
Keys, doors and windows Child safety system for rear Initialising the power windows windows If the windows cannot be closed automatically (e.g. after disconnecting the vehicle battery), a warning message or a warning code is displayed in the Driver Information Center. -
Page 33: Roof
Keys, doors and windows Roof Heated rear window If the sun visors have integral mirrors, the mirror covers should be closed when driving. Sunroof A ticket holder is located on the backside of the sun visor. 9 Warning Take care when operating the sunroof.
-
Page 34
Keys, doors and windows Raise or close Closing sunroof from outside The sunroof can be closed remotely Press q or r: sunroof is raised or from outside the vehicle. closed automatically with safety function enabled. If the sunroof is raised, it can be opened in one step by pressing p. -
Page 35
Keys, doors and windows ■ If sunroof is closed, press the switch r gently to the first detent for 10 seconds. ■ If sunroof is open, keep the switch r pressed until sunroof is fully closed. Then release switch briefly and press it again gently to the first detent for 10 seconds. -
Page 36: Seats, Restraints
Seats, restraints Seats, restraints Head restraints Adjustment Head restraints on front seats Position Head restraints ……36 9 Warning Front seats ……..38 Rear seats ……..41 Only drive with the head restraint Seat belts ……..42 set to the proper position. Airbag system ……
-
Page 37: Active Head Restraints
Seats, restraints Horizontal adjustment Head restraints on rear seats forwards. Thus the head is supported so that the risk of whiplash injury is reduced. Note Approved accessories may only be attached if the seat is not in use. To adjust horizontally, pull the head Height adjustment restraint forwards.
-
Page 38: Front Seats
Seats, restraints Front seats ■ Sit with shoulders as far back ■ Adjust the lumbar support so that it against the backrest as possible. supports the natural shape of the Set the backrest rake so that it is spine. Seat position possible to easily reach the steering wheel with arms slightly Seat adjustment…
-
Page 39
Seats, restraints Seat positioning Seat backrests Seat height Pull handle, slide seat, release Pull lever, adjust inclination and Lever pumping motion handle. release lever. Allow the backrest to = seat higher engage audibly. down = seat lower Back to overview… -
Page 40
Seats, restraints Seat inclination Lumbar support Adjustable thigh support Lever pumping motion Adjust lumbar support using the four- Pull the lever and slide the thigh way switch to suit personal support. = front end higher requirements. down = front end lower Moving support up and down: push switch up or down. -
Page 41: Rear Seats
Seats, restraints Rear seats Armrest Heating Armrest The armrest can be slid forwards by Adjust heating to the desired setting 10 cm. Under the armrest there is by pressing the ß button for the a storage compartment. respective seat one or more times. Fold armrest down.
-
Page 42: Seat Belts
Seats, restraints Seat belts Seat belts are designed to be used by 9 Warning only one person at a time. They are not suitable for people smaller than Incorrect handling (e.g. removal or 150 cm. Child restraint system fitting of belts) can trigger the belt 3 49.
-
Page 43: Three-Point Seat Belt
Seats, restraints Three-point seat belt Height adjustment Fastening Loose or bulky clothing prevents the belt from fitting snugly. Do not place 1. Pull belt out slightly. objects such as handbags or mobile 2. Press button. phones between the belt and your Withdraw the belt from the retractor, body.
-
Page 44
Seats, restraints Removing Using the seat belt while pregnant Adjust the height so that the belt lies across the shoulder. It must not lie To release belt, press red button on across the throat or upper arm. belt buckle. Do not adjust while driving. 9 Warning Seat belts on the rear seats The lap belt must be positioned as… -
Page 45: Airbag System
Seats, restraints Airbag system Each airbag is triggered only once. Have deployed airbags replaced by a workshop. Furthermore, it might be The airbag system consists of necessary to have the steering a number of individual systems wheel, the instrument panel, parts of depending on the scope of the panelling, the door seals, equipment.
-
Page 46: Side Airbag System
Seats, restraints Fit the seat belt correctly and engage securely. Only then the airbag is able to protect. Side airbag system The inflated airbags cushion the The inflated airbags cushion the impact, thereby reducing the risk of impact, thereby reducing the risk of injury to the upper body and head of injury to the upper body and pelvis in the front seat occupants…
-
Page 47: Curtain Airbag System
Seats, restraints Curtain airbag system 9 Warning The curtain airbag system consists of an airbag in the roof frame on each Keep the area in which the airbag side. This can be identified by the inflates clear of obstructions. word AIRBAG on the roof pillars. The hooks on the handles in the roof frame are only suitable for The curtain airbag system is triggered…
-
Page 48
Seats, restraints Use the ignition key to choose the Status remains until the next change. position: Control indicator for airbag * = front passenger airbag is deactivation 3 95. deactivated and will not inflate in the event of a collision. Control indicator * illuminates continuously in the centre console. -
Page 49: Child Restraints
Child restraint systems used on the front passenger seat. Ensure that the mounting location of We recommend the Opel child the child restraint system within the Selecting the right system restraint system which is tailored vehicle is correct.
-
Page 50: Child Restraint Installation Locations
Seats, restraints Child restraint installation locations Permissible options for fitting a child restraint system On front passenger seat Weight and age class activated airbag deactivated airbag On rear outboard seats On rear centre seat Group 0: up to 10 kg or approx.
-
Page 51
Seats, restraints Permissible options for fitting an ISOFIX child restraint system Weight class Size class Fixture On front passenger seat On rear outboard seats On rear centre seat Group 0: up to 10 kg ISO/R1 Group 0+: up to 13 kg ISO/R1 ISO/R2 ISO/R3… -
Page 52
Seats, restraints ISOFIX size class and seat device A – ISO/F3 = Forward-facing child restraint system for children of maximum size in the weight class 9 to 18 kg. B – ISO/F2 = Forward-facing child restraint system for smaller children in the weight class 9 to 18 kg. B1 –… -
Page 53: Top-Tether Fastening Eyes
Seats, restraints ISOFIX child restraint Top-tether fastening eyes systems Top-Tether fastening eyes are marked with the symbol : for a child seat. Fasten vehicle-approved ISOFIX child restraint systems to the ISOFIX mounting brackets. Specific vehicle In addition to the ISOFIX mounting ISOFIX child restraint system fasten the Top-Tether strap to the positions are marked in the table by…
-
Page 54: Storage
Storage Storage Storage compartments Cupholders Glovebox Storage compartments ….54 Load compartment ……. 67 Roof rack system ……81 Loading information ….. 81 Cupholders are located in the centre console. The glovebox features a pen holder, a credit card holder and a coin holder. The intermediate shelf can be removed.
-
Page 55: Front Storage
Storage Front storage Sunglasses storage Depending on the version, cupholders are located under a cover in the centre console. Slide cover backwards. Bottles can be stowed after folding up the intermediate shelf 3 57. A storage compartment is located Fold down and open. next to the steering wheel.
-
Page 56: Underseat Storage
Storage Underseat storage Armrest storage Storage in the rear armrest Storage under the front armrest Fold down armrest and open cover. Press button in the recess and pull out drawer. Maximum load: 3 kg. To Close cover before folding the Press button to fold up the armrest.
-
Page 57: Centre Console Storage
Storage Centre console storage A further storage compartment is located under the intermediate shelf. Fold up the intermediate shelf and fix Front console it in the vertical position. The frame of the cupholder can be reintegrated to stow bottles. Rear console Press button to remove the frame of the cupholder.
-
Page 58: Rear Carrier System
Storage Rear carrier system There must not be any objects on the bicycles that could become loose during transportation. Caution Do not attach bicycles with carbon pedal cranks to bicycle carriers. The bicycles might get damaged. Extending Open the tailgate. Pull release lever up.
-
Page 59
Storage Completely pull out the rear carrier Install the tail lamps Open out the lamp support on the system until you hear it engage. back of the tail lamp completely. Ensure that it is not possible to push in the rear carrier system without pulling the release lever again 9 Warning It is only permissible to fit objects… -
Page 60
Storage Lock the rear carrier system Check the cable and lamp position to The rear carrier system is locked make sure these are correctly when the clamping levers are Swivel the right clamping lever (1) installed and are securely located. swivelled by approx. -
Page 61
Storage Unfold pedal crank recesses Adapting the rear carrier system to a bicycle Remove the pedal crank mounts from the pedal crank recesses. Fold one or both pedal crank recesses upwards until the diagonal Press the release lever and withdraw support engages. -
Page 62
Storage Prepare the bicycle for Attaching a bicycle to the rear attachment carrier system Push the release lever on the strap retainer and remove the strap retainer. Note With the rotary lever on the pedal The maximum width for the pedal crank recess, roughly adapt the crank is 38.3 mm and the maximum adjustable pedal crank unit to the… -
Page 63
Storage Put on the bicycle. The pedal crank here must be placed in the pedal crank recess opening as shown in the illustration. Caution Make sure that the pedal does not touch the surface of the rear end carrier. Otherwise the crankset might be damaged during the transport. -
Page 64
Storage Place the wheel recesses such that Align the bicycle in the longitudinal Tighten the attachment screw for the the bicycle is more or less horizontal. direction of the vehicle: Slightly pedal bearing mount to its maximum Here, the distance between the loosen the pedal mount. -
Page 65
Storage Undo strap retainers on both bicycle Press release lever and slide in wheel tyres. recesses all the way as far as they will Hold on to the bicycle, loosen the attachment screw for the pedal bearing mount, then lift the pedal bearing mount to remove it. -
Page 66
Storage Push the clamping lever down and pull both lamp supports out of the recesses. Open the tailgate. Swivel first the left clamping lever (1), Pull the release lever up and push the followed by the right clamping lever system into the bumper until it (2), until they stop. -
Page 67: Load Compartment
Storage Load compartment Guide the seat belts through side Ensure that the seat belts of the supports to protect them against outboard seats are placed in the damage. When folding the backrests, corresponding belt guides. The rear seat backrest is divided into pull the seat belts along with them.
-
Page 68
Storage Load compartment extension, Pull the release lever on one or both 9 Warning sides and fold down the backrests Sports tourer onto the seat cushion. Only drive the vehicle if the Folding down rear backrests On vehicles with electric seat folding, backrests are securely locked into Remove the load compartment cover the rear seats can also be folded from… -
Page 69
Storage To fold up, raise the backrests and 9 Warning 9 Warning guide them into an upright position until they engage audibly. Take care when operating the Only drive the vehicle if the Ensure that the seat belts of the electric foldable rear seats. -
Page 70
Storage Raise the seat cushion and fold the Remove the seat cushion backrest To attach, apply seat cushion as shown in the illustration and engage Push both levers forward and remove both levers. Pull the strap on one or both seat seat cushion to extend the loading cushions and lift the rear of the area. -
Page 71: Load Compartment Cover
Storage 5-door hatchback Removing Pull the grip and open the cover. The closed cover can be secured from the side of the load Suitable for loading long, narrow compartment. Turn the knob 90°: objects. knob = cover secured from Ensure that the cover engages after Unhook retaining straps from tailgate.
-
Page 72
Storage Lift cover at the rear and push it Opening cover Cover in upper position upwards at the front. Remove the cover. If the height adjustable cover is mounted in the middle or upper position, the load compartment cover can be stowed below it. Height adjustable cover 3 73. -
Page 73: Rear Floor Storage Cover
Storage Rear floor storage cover Removing cover Rear floor cover, 5-door hatchback The removed cover can be stored under the rear floor cover like shown Open the load compartment cover. in the graphic. Pull the release lever on the right side Rear floor storage cover 3 73.
-
Page 74
Storage Height adjustable cover, 5-door Lifting Lowering hatchback To lift the cover to a higher level, pull To lower the cover, pull the strap the loop backwards and lift the rear backwards and push down the front The height adjustable cover can be edge of the cover onto the center of the cover at the same time. -
Page 75
Storage Note Rear floor cover, Sports tourer ■ If mounted in position 2 or 3, the space between the rear floor cover and the height adjustable cover can be used as a stowage compartment. ■ The height adjustable cover can be lifted and hooked in with the strap when it is mounted in position 1 or 2. -
Page 76: Lashing Eyes
Storage Lashing eyes ■ hooks, plate upwards to lock the adapter. To remove, turn the handle plate down ■ service box, and move out of the rail. ■ strap set. Variable partition net The components are fitted in rails on both side panels using adapters and hooks.
-
Page 77
Storage Net pocket Installation of hooks in the rails Service box Insert adapters into the required Insert the hook in the desired position Install two hooks in the upper rail. position in the rails. The net pocket first in the upper groove of the rail and Insert the upper brackets of the box can be suspended from the adapters. -
Page 78: Safety Net
Storage Strap set Passengers must not be transported behind the safety net. Installation Alternatively install both hooks in the lower rail. Plug in the lower brackets Insert the adapters of the strap set in of the box from above into the lower a rail.
-
Page 79: Warning Triangle
Storage Behind the rear seats Behind front seats The removed safety net can be stored under the rear floor cover 3 73. Warning triangle 5-door hatchback Adjust strap length on safety net by Attach strap to eyes underneath the attaching the upper hook to the eyes rear seat cushion.
-
Page 80: First Aid Kit
Storage First aid kit Sports tourer Sports tourer 5-door hatchback Fold down straps. Stow the warning Fold down strap. Stow the first aid kit triangle in the space behind the straps in the space behind a strap on the on the inside of the tailgate. inside of the tailgate.
-
Page 81: Roof Rack System
Storage Roof rack system Loading information Detach the cover from each mounting point by using a coin. Roof rack Sports tourer with roof railing For safety reasons and to avoid damage to the roof, the vehicle approved roof rack system is recommended.
-
Page 82
Storage ■ Use the four hooks at the sidewalls ■ Do not allow the load to protrude vehicle weight (see identification of the load compartment for above the upper edge of the plate 3 212) and the EC kerb hanging up carrier bags. Maximum backrests. -
Page 83: Instruments And Controls
Instruments and controls Instruments and Controls Steering wheel controls controls Steering wheel adjustment Controls ……..83 Warning lights, gauges and indicators ……..90 Information displays ….101 Vehicle messages …… 105 Trip computer ……112 Vehicle personalisation ….113 The Infotainment system, the cruise control and a connected mobile phone can be operated via the Unlock lever, adjust steering wheel,…
-
Page 84: Heated Steering Wheel
Instruments and controls Heated steering wheel Horn The recommended grip areas of the steering wheel are heated quicker Activate heating by pressing * and to a higher temperature than the Press j. other areas. button. Activation is indicated by the LED in the button.
-
Page 85: Windscreen Wiper/Washer
Instruments and controls Windscreen wiper/washer Adjustable wiper interval Automatic wiping with rain sensor Windscreen wiper Wiper lever in position P. P = automatic wiping with rain sensor Turn the adjuster wheel to adjust the = fast desired wipe interval: The rain sensor detects the amount of = slow short = turn adjuster wheel…
-
Page 86
Instruments and controls Adjustable sensitivity of the rain Windscreen and headlight sensor washer Keep the sensor free from dust, dirt and ice. Turn the adjuster wheel to adjust the Pull lever. Washer fluid is sprayed sensitivity: onto the windscreen and the wiper = turn adjuster wheel wipes a few times. -
Page 87: Outside Temperature
Instruments and controls Rear window wiper/washer The rear window washer system is deactivated when the fluid level is low. Outside temperature Push lever. Washer fluid is sprayed onto the rear window and the wiper Press the rocker switch to activate the wipes a few times.
-
Page 88
Instruments and controls Set date and time ■ Set date format: Changes indication of date between MM/DD/ Press the CONFIG button. The menu YYYY and DD.MM.YYYY. Settings is displayed. ■ Display digital clock: Switches on/ Select Time & Date. off indication of time on the display. ■… -
Page 89: Power Outlets
Instruments and controls Power outlets Cigarette lighter A further 12 Volt power outlet is located in the rear console. Fold the cover downwards. Sports tourer: A 12 Volt power outlet is located at the left sidewall in the load compartment. Do not exceed the maximum power consumption of 120 watts.
-
Page 90: Warning Lights, Gauges And Indicators
Instruments and controls Warning lights, gauges Odometer and indicators Speedometer The portable ashtray can be placed in the cupholders. The bottom line displays the recorded distance. Trip odometer Indicates vehicle speed. The top line displays the recorded distance since the last reset. To reset, hold the reset knob depressed for a few seconds with the ignition on.
-
Page 91: Fuel Gauge
Instruments and controls Tachometer Fuel gauge Engine coolant temperature gauge Displays the engine speed. Displays the fuel level in the tank. Drive in a low engine speed range for Control indicator i illuminates if the Displays the coolant temperature. each gear as much as possible. level in the tank is low.
-
Page 92: Service Display
Instruments and controls In the Uplevel-Display, the remaining Turn the adjuster wheel to select Caution oil life duration is displayed in the Remaining Oil Life. Vehicle Information Menu. The system must be reset every time If engine coolant temperature is In the Midlevel-Display, the remaining the engine oil is changed to allow too high, stop vehicle, switch off…
-
Page 93: Control Indicators
Instruments and controls Service information 3 209. Control indicators The control indicators described are not present in all vehicles. The description applies to all instrument versions. Depending on the equipment, the position of the control indicators may vary. When the ignition is switched on, most control indicators will illuminate briefly as a functionality test.
-
Page 94
Instruments and controls Control indicators in the instrument cluster Back to overview… -
Page 95: Seat Belt Reminder
Instruments and controls Control indicators in the centre Bulb replacement 3 173, Fuses When the ignition is switched on, the control indicator illuminates for 3 182. console approx. 4 seconds. If it does not Turn signals 3 124. illuminate, does not go out after 4 seconds or illuminates whilst Seat belt reminder driving, there is a fault in the airbag…
-
Page 96: Malfunction Indicator Light
Instruments and controls Malfunction indicator light * illuminates yellow. Seek the assistance of a workshop. The front passenger airbag is Vehicle messages 3 105. Z illuminates or flashes yellow. deactivated 3 47. Illuminates when the ignition is Brake and clutch system switched on and goes out shortly after 9 Danger the engine starts.
-
Page 97: Electrical Parking Brake
Instruments and controls Electrical parking brake Illuminates If the control indicator does not go out after a few seconds, or if it illuminates Brake pedal needs to be operated to fault while driving, there is a fault in the release the electrical parking brake ABS.
-
Page 98: Lane Departure Warning
Instruments and controls Illuminates with power steering Have the cause of the fault remedied by a workshop. disabled Interference due to external sources of ultrasound. Once the source of Failure in the power steering system. Flashes interference is removed, the system Consult a workshop.
-
Page 99: Engine Oil Pressure
Instruments and controls Continue driving until % goes out. If Flashes 3. Move out of the flow of traffic as quickly as possible without possible, do not allow engine speed Fault in system or tyre without impeding other vehicles. to drop below 2000 rpm. pressure sensor mounted (e.g.
-
Page 100: Rear Fog Light
Instruments and controls Rear fog light Flashes Illuminated when high beam is on and during headlight flash 3 120. Fuel used up. Refuel immediately. r illuminates yellow. Never run the tank dry. l illuminates green. The rear fog light is on 3 125. Catalytic converter 3 144.
-
Page 101: Information Displays
Instruments and controls Information displays Selecting menus and functions The menus and functions can be Driver Information Center selected via the buttons on the turn signal lever. The following main menus, depending on the vehicle configuration, can be selected: ■ Vehicle Information Menu The Driver Information Center (DIC) ■…
-
Page 102
Instruments and controls Press the SET/CLR button to select ■ Remaining Oil Life: 3 92 a function or to confirm a message. ■ Coolant Temperature: Display of engine coolant temperature 3 91 Vehicle Information Menu ■ Relearn Remote Key: Relearn after Press the MENU button to select the battery replacement Vehicle Information Menu. -
Page 103
Instruments and controls Graphic-Info-Display Trip/Fuel Information Menu, Trip Graphic-Info-Display indicates: Computer 3 112. ■ time 3 88 Depending on the Infotainment Traffic sign assistant 3 108. ■ outside temperature 3 87 system, the Graphic-Info-Display is Tyre pressure monitoring system available in two versions. ■… -
Page 104
Instruments and controls Colour-Info-Display ■ vehicle messages 3 105 Selecting with the Infotainment system ■ settings for vehicle personalisation 3 113 The type of information and how it is displayed depends on the equipment of the vehicle and the settings made. Selecting menus and settings Menus and settings are accessed via the display. -
Page 105: Vehicle Messages
Instruments and controls Vehicle messages Press (the outer ring) Vehicle messages on the Midlevel-Display ■ To select or activate the marked option Messages are indicated mainly in the Driver Information Center (DIC), in ■ To confirm a set value some cases together with a warning ■…
-
Page 106
Instruments and controls No. Vehicle message No. Vehicle message No. Vehicle message Depress brake pedal to release 24 Number plate light failure 50 Activated pedestrian protection electrical parking brake system, reset bonnet 25 Left front turn signal failure Turn steering wheel, switch 53 Tighten gas cap 26 Left rear turn signal failure ignition off and then on… -
Page 107
Instruments and controls The vehicle messages are displayed No. Vehicle message No. Vehicle message as text. Follow the instructions given 65 Theft attempted 83 Service adaptive cruise control in the messages. The system displays messages 66 Service theft alarm system 84 Engine power is reduced regarding the following topics: 67 Service steering wheel lock… -
Page 108: Warning Chimes
Instruments and controls Vehicle messages on the ■ If the reverse gear is engaged and ■ end of speed limit the rear end carrier extended. Colour-Info-Display ■ end of no passing ■ If the diesel particle filter has Some important messages appear Speed limit signs are displayed in the reached the maximum filling level.
-
Page 109
Instruments and controls The system is active at an indicated Traffic signs are displayed on the speed above 14 km/h and is active up page Traffic sign detection in the Trip/ to a speed of 200 km/h depending on Fuel Information Menu, chosen via the lighting conditions. -
Page 110
Instruments and controls The content of the traffic sign page is Pop-up function also cleared during driving by pushing the SET/CLR button on the turn signal lever. Once setting page is displayed, select Off to deactivate pop-up function. The pop-up function can be Reactivate by selecting On or with deactivated on the traffic sign page by each switching on of the ignition. -
Page 111: Battery Voltage
Instruments and controls Fault 1. Switch off immediately electrical Caution consumers which are not required The traffic sign assistant system may for a safe ride, such as seat not operate correctly when: The system is intended to help the heating, heated rear window or ■…
-
Page 112: Trip Computer
Instruments and controls Trip computer The menus and functions can be selected via the buttons on the turn signal lever. Turn the adjuster wheel to select one The information of the two trip of the submenus: computers can be reset separately, ■…
-
Page 113: Vehicle Personalisation
Instruments and controls Vehicle personalisation Average consumption Display of average consumption. The measurement can be reset at any The vehicle’s behaviour can be time and starts with a default value. personalised via changing the settings in the Info-Display. To reset, press the SET/CLR button for a few seconds.
-
Page 114
Instruments and controls Personal settings in the Sport mode settings The driver can select the functions Graphic-Info-Display which will be activated in Sport mode 3 153. ■ Sport suspension: Damping becomes harder. ■ Sport powertrain performance: Accelerator pedal and gear change characteristics become more responsive. -
Page 115
Instruments and controls Phone settings selecting the necessary settings ■ Park assist / Collision detection and auto air conditioning mode. See description for Infotainment Park assist: Activate or deactivate system in the Infotainment system Auto rear demist: Automatic the ultrasonic parking assist. manual. -
Page 116
Instruments and controls Remote unlock feedback: Activate Personal settings in the or deactivate the hazard warning Colour-Info-Display flasher feedback whilst unlocking. Remote door unlock: Change the configuration to unlock only the driver’s door or the whole vehicle whilst unlocking. Auto relock doors: Activate or deactivate the automatic relock function after unlocking without opening the vehicle. -
Page 117
Instruments and controls Sport mode settings Phone settings Auto demist: Supports windscreen dehumidification by automatically The driver can select the functions See description for Infotainment selecting the necessary settings which will be activated in Sport mode system in the infotainment manual. and auto air conditioning mode. -
Page 118
Instruments and controls Park assist: Activate or deactivate Remote door unlock: Change the the ultrasonic parking assist . configuration to unlock only the driver’s door or the whole vehicle ■ Exterior ambient lighting whilst unlocking. Duration upon exit of vehicle: Auto relock doors: Activate or Activate or deactivate and change deactivate the automatic relock… -
Page 119: Lighting
Lighting Lighting Exterior lighting On vehicles without automatic light control: Light switch 7 = off In the Driver Information Center with Exterior lighting ……119 Uplevel-Display, the current status of Interior lighting ……126 the automatic light control is Lighting features ……127 displayed.
-
Page 120: Automatic Light Control
Lighting Automatic light control While the daytime running light is To switch from low to high beam, active, the tail lights are switched on push lever. or off depending on country-specific To switch to low beam, push lever variant. again or pull. Automatic headlight activation Headlight flash During poor lighting conditions the…
-
Page 121: Adaptive Forward Lighting
Lighting To adapt headlight range to the Vehicles with Xenon headlight For deactivation operate the same vehicle load to prevent dazzling: turn procedure as described above. f will system thumb wheel ? to required position. not flash when function is deactivated.
-
Page 122
Lighting Playstreet lighting Country lighting Adverse weather lighting Activated automatically at low speed Activated automatically at a speed Activated automatically up to a speed up to approx. 20 mph. The light beam range between approx. 34 and of approx. 43 mph, when the rain is turned at an angle of 8°… -
Page 123
Lighting Dynamic curve lighting On tight bends or when turning off, This feature allows high beam as depending on the steering angle or main driving light by night and when the turn signal light, an additional left vehicle speed is faster than 40 km/h. or right reflector is switched on which It switches to low beam when: illuminates the road at an right angle… -
Page 124: Hazard Warning Flashers
Lighting If a headlight flash is activated when Fault in Adaptive forward In the event of an accident with airbag the high beam is on, the high beam deployment the hazard warning lighting system assist will be deactivated. flashers are activated automatically. When the system detects a failure in If a headlight flash is activated when the Adaptive forward lighting system,…
-
Page 125: Parking Lights
Lighting Parking lights For three flashes, e.g. when changing Light switch in position AUTO: lanes, press the lever until resistance switching on front fog lights will switch is felt and then release. headlights on automatically. When a trailer is connected, turn Rear fog lights signal flashes six times when pressing the lever until resistance is…
-
Page 126: Interior Lighting
Lighting Interior lighting Reversing lights On vehicles with light sensor, the brightness can only be adjusted when The reversing light comes on when the exterior lights are on and the light Instrument panel the ignition is on and reverse gear is sensor detects night conditions.
-
Page 127: Lighting Features
Lighting Lighting features Reading lights Operate rocker switch: = automatic switching on Centre console lighting and off. press u = on. Spotlight incorporated in the interior press v = off. lighting comes on when headlights are switched on. Rear courtesy lights Entry lighting Welcome lighting Headlights, tail lights, reversing lights,…
-
Page 128: Exit Lighting
Lighting The following lights will additionally Exit lighting is switched off switch on when the driver’s door is immediately if the turn signal lever is opened: pulled while the driver’s door is open. ■ All switches Activation, deactivation and duration of this function can be changed in the ■…
-
Page 129
Lighting In the second stage a message which confirms the activation of the battery discharge protection will be displayed in the Driver Information Center. Switching off electric lights To prevent discharge of the battery when the ignition is switched off, some interior lights are switched off automatically after some time. -
Page 130: Climate Control
Climate control Climate control Climate control systems Heating will not be fully effective until the engine has reached normal operating temperature. Heating and ventilation system Air distribution Climate control systems ….. 130 s = to windscreen and front door Air vents ……..135 windows Maintenance ……
-
Page 131: Air Conditioning System
Climate control Air conditioning system The air conditioning system cools and In warm and very humid ambient air dehumidifies (dries) as soon as the conditions, the windscreen might mist outside temperature is slightly above up from outside, when cold air is the freezing point.
-
Page 132: Electronic Climate Control
Climate control Electronic climate control Demisting and defrosting the AUTO = automatic mode = manual air recirculation windows V system = demisting and defrosting The dual zone climate control allows Heated rear window Ü 3 33. different climatisation temperatures The preselected temperature is for driver and front passenger side.
-
Page 133
Climate control The electronic climate control system The fan speed regulation in automatic If the maximum temperature is set, is only fully operational when the mode can be changed in the menu the climate control system runs at engine is running. Settings. -
Page 134
Climate control Manual settings To return to automatic mode: Press If no cooling or drying is required, AUTO button. switch the cooling system off to save Climate control system settings can fuel. be changed by activating the buttons Air distribution and rotary knobs as follows. -
Page 135: Air Vents
Climate control Air vents Auxiliary heater In warm and very humid ambient air conditions, the windscreen might mist up from outside, when cold air is Air heater Adjustable air vents directed to it. If windscreen mists up Quickheat is an electric auxiliary air At least one air vent must be open from outside, activate windscreen heater which automatically warms up…
-
Page 136: Fixed Air Vents
Climate control Maintenance 9 Warning Air intake Do not attach any objects to the slats of the air vents. Risk of damage and injury in case of an accident. Fixed air vents Additional air vents are located beneath the windscreen and door windows and in the foot wells.
-
Page 137: Air Conditioning Regular
Climate control Air conditioning regular operation In order to ensure continuously efficient performance, cooling must be operated for a few minutes once a month, irrespective of the weather and time of year. Operation with cooling is not possible when the outside temperature is too low.
-
Page 138: Driving And Operating
Driving and operating Driving and operating Driving hints Pedals To ensure the pedal travel is Control of the vehicle uninhibited, there must be no mats in the area of the pedals. Driving hints ……. 138 Never coast with engine not Starting and operating ….
-
Page 139: Starting And Operating
Driving and operating Starting and operating Ignition switch positions ■ Power windows ■ Sunroof New vehicle running-in ■ Power outlets Do not brake unnecessarily hard for Power to the Infotainment system will the first few journeys. continue to operate for 30 minutes or until the key is removed from the During the first drive, smoke may ignition switch, regardless of whether…
-
Page 140: Overrun Cut-Off
Driving and operating Do not operate the accelerator pedal. Starting the vehicle at low Possible reasons for a non-starting engine: temperatures Diesel engine: turn the key to position 2 for preheating until control ■ Clutch pedal not operated (manual The start of the engine without indicator ! goes out.
-
Page 141
Driving and operating Stop-start system Deactivation The stop-start system helps to save fuel and to reduce the exhaust emissions. When conditions allow, it switches off the engine as soon as the vehicle is at a low speed or at a standstill, e.g. at a traffic light or in a traffic jam. -
Page 142
Driving and operating ■ the driver’s door is closed or the Certain settings of the climate control The engine start is indicated by the driver’s seat belt is fastened system may inhibit an Autostop. See needle at the idle speed position in climate control chapter for more the tachometer. -
Page 143: Engine Exhaust
Driving and operating Engine exhaust ■ the vehicle starts to move ■ Switch off the engine and ignition. Turn the steering wheel until the ■ the climate control system requests steering wheel lock engages. an engine start 9 Danger ■ If the vehicle is on a level surface or ■…
-
Page 144: Catalytic Converter
Driving and operating take up to 25 minutes. Typically it full continue driving or warning Cleaning takes place quickest at high needs between 7 and 12 minutes. code 55 appears in the Driver engine speeds and loads. Autostop is not available and fuel Information Center.
-
Page 145: Automatic Transmission
Driving and operating Automatic transmission Selector lever rectified by a workshop as soon as possible. In an emergency, driving can be continued for a short period, The automatic transmission permits keeping vehicle speed and engine automatic gearshifting (automatic speed low. mode) or manual gearshifting (manual mode).
-
Page 146: Manual Mode
Driving and operating Manual mode Do not accelerate while engaging a gear. Never depress the accelerator pedal and brake pedal at the same time. When a gear is engaged, the vehicle slowly begins to creep when the brake is released. Engine braking To utilise the engine braking effect, select a lower gear in good time when…
-
Page 147
Driving and operating Interruption of power In manual mode no automatic shifting Kickdown to a higher gear takes place at high If the accelerator pedal is pressed supply engine revolutions. down completely in automatic mode, In the event of an interruption of the transmission shifts to a lower gear power supply, the selector lever Electronic driving… -
Page 148: Manual Transmission
Driving and operating Manual transmission 2. Release the selector lever trim Caution from the centre console at the front, fold it upwards and rotate it It is not advisable to drive with the to the left. hand resting on the selector lever. To engage reverse, with the vehicle stationary press the release button on 3.
-
Page 149: Brakes
Driving and operating Brakes ABS starts to regulate brake pressure Fault as soon as a wheel shows a tendency to lock. The vehicle remains 9 Warning The brake system comprises two steerable, even during hard braking. independent brake circuits. If there is a fault in the ABS, the ABS control is made apparent If a brake circuit fails, the vehicle can wheels may be liable to lock due…
-
Page 150: Parking Brake
Driving and operating Parking brake Electrical parking brake Before leaving the vehicle, check the electrical parking brake status. Manual parking brake Control indicator m 3 96. Releasing Switch on ignition. Keep brake pedal depressed and then push switch m. Drive away function Depressing clutch pedal (manual transmission) or engaging drive gear (automatic transmission) and then…
-
Page 151: Ride Control Systems
Driving and operating Ride control systems Brake assist As soon as the switch m is released, dynamic braking will be stopped. If the brake pedal is depressed Traction Control system quickly and forcefully, maximum Fault brake force is automatically applied The Traction Control system (TC) is Failure mode of electrical parking (full braking).
-
Page 152: Electronic Stability Control
Driving and operating TC is reactivated by pressing the b 9 Warning 9 Warning button again. TC is also reactivated the next time Do not let this special safety Do not let this special safety the ignition is switched on. feature tempt you into taking risks feature tempt you into taking risks when driving.
-
Page 153: Interactive Driving System
Driving and operating ESC is reactivated by pressing the In each driving mode Flex Ride SPORT mode b button again. If the TC system was networks the following electronic The settings of the systems are systems: previously disabled, both TC and adapted to a sportier driving style: ESC are reactivated.
-
Page 154: Cruise Control
Driving and operating Cruise control ■ Shift points of automatic into sporty settings. The DMC transmission occur in a comfort changes to Sport mode in case of mode. very sporty driving behaviour. The cruise control can store and ■ Illumination of main instruments is If, for example, TOUR mode is maintain speeds of approx.
-
Page 155
Driving and operating Activation Reduce speed Accelerate to the desired speed and With cruise control active, hold thumb turn thumb wheel to SET/-, the wheel turned to SET/- or briefly turn current speed is stored and to SET/- repeatedly: speed maintained. -
Page 156: Object Detection Systems
Driving and operating Object detection ■ engine speed in a very low range, parking assist the system consists of four additional ultrasonic parking systems ■ the Traction Control system or sensors in the front bumper. Electronic Stability Control is operating. Control indicator r 3 98.
-
Page 157
Driving and operating An obstacle is indicated by a buzzing Additionally, r illuminates or Caution sound. The interval between the a vehicle message is displayed in the sounds becomes shorter as the Driver Information Center if Performance of the sensor can be vehicle gets closer to the obstacle. -
Page 158
Driving and operating Note Activation When the system recognizes an The parking assist system unintended lane change, the control automatically detects factory-fitted indicator ) changes to yellow and towing equipment. It is deactivated flashes. Simultaneously a chime when the connector is plugged in. sound is activated. -
Page 159: Fuel
Driving and operating Fuel Fuel for diesel engines Fault The lane departure warning system Only use diesel fuel that complies Fuel for petrol engines may not operate properly when: with DIN EN 590 . The fuel must ■ the windscreen is not clean have low sulphur content (max.
-
Page 160
Driving and operating Refuelling 9 Danger Fuel is flammable and explosive. No smoking. No naked flames or sparks. If you can smell fuel in your vehicle, have the cause of this remedied immediately by a workshop. Caution The fuel filler flap can only be opened In case of misfuelling, do not if the vehicle is unlocked. -
Page 161: Towing
Driving and operating Towing The fuel filler cap can be retained in The specification of CO emission is the bracket on the fuel filler flap. also a constituent of the directive. General information The figures given must not be taken Caution as a guarantee for the actual fuel Only use towing equipment that has…
-
Page 162: Trailer Towing
Driving and operating Trailer towing For trailers with low driving stability The permissible gross train weight and caravan trailers with a permitted must not be exceeded. This weight is gross vehicle weight of more than specified on the identification plate Trailer loads 1300 kg the use of a stabiliser is 3 212.
-
Page 163: Towing Equipment
Driving and operating permissible rear axle load is Stowage of coupling ball bar Fitting the coupling ball bar exceeded, a maximum speed of 60 mph applies. When the trailer is coupled and the towing vehicle fully loaded, the permissible rear axle load (see identification plate or vehicle documents) may be exceeded by 60 kg, the gross vehicle weight rating…
-
Page 164
Driving and operating Disengage and fold down the socket. Otherwise, the coupling ball bar must Inserting the coupling ball bar Remove the sealing plug from the be tensioned before being inserted: opening for the coupling ball bar and ■ Unlock coupling ball bar by turning stow it. -
Page 165: Trailer Stability Assist
Driving and operating Eye for break-away stopping cable ■ The coupling ball bar must be firmly Open the protective flap and turn the engaged in the opening. key to position c to unlock the coupling ball bar. ■ The coupling ball bar must be locked and the key removed.
-
Page 166: Vehicle Care
Vehicle care Vehicle care General Information Vehicle storage Accessories and vehicle Storage for a long period of time If the vehicle is to be stored for several modifications General Information ….166 months: We recommend to use genuine parts Vehicle checks ……167 ■…
-
Page 167: Vehicle Checks
Vehicle care Vehicle checks ■ Disconnect the clamp from the 9 Danger negative terminal of the vehicle battery. Beware that all systems are Performing work The ignition system and Xenon not functional, e.g. anti-theft alarm headlights use extremely high system. voltage.
-
Page 168
Vehicle care If the bonnet is opened during an Autostop, the engine will be restarted automatically for safety reasons. Closing Before closing the bonnet, press the support into the holder. Lower the bonnet and allow it to drop into the catch. Check that the bonnet is engaged. -
Page 169: Engine Coolant
Vehicle care When the engine oil level has Fit the cap on straight and tighten it. dropped to the MIN mark, top up engine oil. Engine coolant The coolant provides freeze protection down to approx. -28 °C. Caution Only use approved antifreeze. Coolant level If the cooling system is cold, the Caution…
-
Page 170: Washer Fluid
Vehicle care the coolant concentration checked Caution and have the cause of the coolant loss remedied by a workshop. Only washer fluid with a sufficient antifreeze concentration provides Washer fluid protection at low temperatures or a sudden drop in temperature. Brakes In the event of minimum thickness of the brake lining, a squealing noise…
-
Page 171
Using an AGM battery different from ensure to have the battery replaced point. the original Opel battery might result with an AGM (Absorptive Glass Mat) in a lower performance of the stop- Laying up the vehicle for more than battery. -
Page 172: Wiper Blade Replacement
Vehicle care Wiper blade replacement Charging the battery Wiper blade on the rear window 9 Warning On vehicles with stop-start system, ensure that the charging potential does not exceed 14.6 volts when using a battery charger. Otherwise the battery might be damaged. Jump starting 3 202.
-
Page 173: Bulb Replacement
Vehicle care Bulb replacement Headlights have separate systems for low beam 1 (outer bulbs) and high beam 2 (inner bulbs). Switch off the ignition and switch off the relevant switch or close the doors. Low beam Only hold a new bulb at the base! Do not touch the bulb glass with bare hands.
-
Page 174
Vehicle care 3. Detach the bulb from the bulb 3. Detach the bulb from the bulb holder and replace the bulb. holder and replace the bulb. 4. Insert the bulb holder, engaging 4. Insert the bulb holder, engaging the two lugs into the reflector and the two lugs into the reflector and rotate clockwise to secure. -
Page 175: Xenon Headlights
Vehicle care 3. Remove the bulb from the socket 3. Disengage the bulb holder from and replace the bulb. the plug connector by pressing the retaining lug. 4. Insert the bulb holder into the reflector. Fit the cap and rotate 4.
-
Page 176: Fog Lights
Vehicle care Fog lights Tail lights 1. Turn the bulb holder anti- clockwise and remove it from the reflector. Saloon/Hatchback The bulbs are accessible from beneath the vehicle. 2. Disengage the bulb holder from 1. Release the cover and remove it. the plug connector by pressing the retaining lug.
-
Page 177
Vehicle care 2. Unscrew the plastic securing nut Tail lights (1) from the inside by hand. Brake light (2) Turn signal light (3) 8. Insert the bulb carrier into the tail light assembly and screw into place. Connect the wiring plug and press the cable into the retainer. -
Page 178
Vehicle care 1. Open the tailgate and remove the Sports tourer three covers. 2. Unscrew the three screws and remove. 3. Remove the tail light assembly. Make sure that the cable duct remains in position. 5. To replace the tail light (1), remove and replace the bulb 1. -
Page 179
Vehicle care 2. Remove cover. 4. Carefully remove tail light assembly. Take care that the cable duct remains in position. Detach wiring plug from bulb holder. When assembling press the blind into the rubber grommets to reach 3. Unscrew two plastic securing nuts full retention force. -
Page 180
Vehicle care Tail light in the tailgate Rear fog light / reverse light in the tailgate 4. Remove and replace the bulb. 1. Open the tailgate and remove the 5. Install the tail light assembly in the covers. 1. Remove cover. tailgate and tighten the screws. -
Page 181: Instrument Panel
Vehicle care Interior lights 2. Remove and replace the bulb of 2. Remove the bulb holder rear fog light. downwards, taking care not to pull on the cable. Courtesy light, reading lights 3. Close cover. Have bulbs replaced by a workshop. For replacing reverse light bulb on the right side of the tailgate, proceed in Load compartment light…
-
Page 182: Electrical System
Vehicle care Electrical system Fuses Data on the replacement fuse must match the data on the defective fuse. There are three fuse boxes in the vehicle: ■ in the front left of the engine compartment, ■ in left-hand drive vehicles, in the interior behind the storage compartment, or, in right-hand drive vehicles, behind the…
-
Page 183: Engine Compartment Fuse
Vehicle care Engine compartment fuse Place the fuse extractor on the various types of fuse from the top or side, and withdraw fuse. The fuse box is in the front left of the engine compartment. Disengage the cover, lift it upwards and remove.
-
Page 184
Vehicle care No. Circuit No. Circuit No. Circuit Engine control module 17 Transmission control module 34 – Lambda probe 18 Heated rear window 35 Power windows Fuel injection, ignition system 19 Front power windows 36 – Fuel injection, ignition system 20 Rear power windows 37 Canister vent solenoid –… -
Page 185: Instrument Panel Fuse Box
Vehicle care Instrument panel fuse box No. Circuit 50 Headlamp levelling 51 Air shutter 52 Auxiliary heater, diesel engine 53 Transmission control module, Engine control module 54 Wiring monitoring After having changed defective fuses close the fuse box cover and press In right-hand drive vehicles, the fuse until it engages.
-
Page 186
Vehicle care No. Circuit No. Circuit Displays 17 Air conditioning system Exterior lights 18 Prefuse: radio, Infotainment, displays Exterior lights 19 Brake lights, tail lights, interior Radio lights Infotainment system, 20 – instrument 21 – Power outlet front 22 Ignition switch Power outlet rear seat Remove the cover. -
Page 187
Vehicle care Fuse assignments No. Circuit Trailer module Trailer outlet Parking assist – – – – Fold down the blind and remove. Anti-theft alarm system – 10 – 11 Trailer module, Trailer socket 12 – 13 Trailer outlet 14 – 15 –… -
Page 188: Vehicle Tools
Vehicle care Vehicle tools No. Circuit 18 – Tools 19 Steering wheel heating Vehicles with tyre repair kit 20 Sunroof 21 Seat heating 22 – 23 – 24 – When assembling press the blind into 25 – the rubber grommets to reach full retention force.
-
Page 189: Wheels And Tyres
Vehicle care Wheels and tyres Vehicles with spare wheel, Tyres of size 235/40 R 19 and 235/45 R 18 and 225/45 R 18 must variant 1 not be used as winter tyres. The jack, the tools and a strap for Tyre condition, wheel condition Tyres of size 215/60 R 16 must not…
-
Page 190: Tyre Pressure
Vehicle care Speed code letter: 9 Warning Q = up to 100 mph S = up to 112 mph If the pressure is too low, this can T = up to 118 mph result in considerable tyre warm- H = up to 130 mph up and internal damage, leading to V = up to 150 mph tread separation and even to tyre…
-
Page 191
Vehicle care The menu can be selected by the Control indicator w 3 99. buttons on the turn signal lever. Vehicle messages 3 105. If the tyre pressure shall be reduced or increased, switch off ignition. If a complete set of wheels without sensors is mounted (e.g. -
Page 192: Tread Depth
Vehicle care The tyre pressure monitoring system driving with a minimum speed of valve cores and sealing rings must be 20 km/h. In this case $ can be replaced each time the tyres are displayed or pressure values can changed. swap in the Driver Information Center.
-
Page 193: Tyre Chains
Vehicle care Changing tyre and wheel If the wheel covers and tyres used are Tyre chains are only permitted on the not factory approved, the tyres must front wheels. size not have a rim protection ridge. Always use fine mesh chains that add If tyres of a different size than those Wheel covers must not impair brake no more than 10 mm to the tyre tread…
-
Page 194
Vehicle care Tyre damage exceeding 4 mm or that is at tyre’s sidewall near the rim cannot be repaired with the tyre repair kit. 9 Warning Do not drive faster than 50 mph. Do not drive faster than 80 km/h. Do not use for a lengthy period. -
Page 195
Vehicle care 4. Screw the compressor air hose to 9. Connect the compressor plug to 12. All of the sealant is pumped into the connection on the sealant the power outlet or cigarette the tyre. Then the tyre is inflated. bottle. -
Page 196
Vehicle care tyre is too badly damaged. Seek hose directly onto tyre valve and not be used. Seek the assistance the assistance of a workshop. compressor when doing this. of a workshop. Drain excess tyre pressure with Continue driving immediately so 18. -
Page 197: Wheel Changing
Vehicle care Wheel changing Note ■ Never crawl under a jacked-up The driving characteristics of the vehicle. Some vehicles are equipped with repaired tyre is severely affected, ■ Do not start the vehicle when it is a tyre repair kit instead of a spare therefore have this tyre replaced.
-
Page 198
Vehicle care the wheel cover with the hook. 3. Ensure the jack is correctly Vehicle tools 3 188. positioned under the relevant vehicle jacking point. Alloy wheels: Disengage wheel nut caps with a screwdriver and 4. Variant 1: remove. To protect the wheel, place a soft cloth between the screwdriver and the alloy wheel. -
Page 199
Vehicle care Attach wheel wrench and with the jack correctly aligned rotate wheel wrench until wheel is clear of the ground. 5. Unscrew the wheel nuts. 6. Change the wheel. 7. Screw on the wheel nuts. 8. Lower vehicle. 9. Install the wheel wrench ensuring that it locates securely and tighten each nut in a crosswise Set the jack to the necessary… -
Page 200: Spare Wheel
Vehicle care Jacking position for lifting The use of a spare wheel that is smaller than the other wheels or in platform combination with winter tyres could affect driveability. Have the defective tyre replaced as soon as possible. Front arm position of the lifting platform at the underbody.
-
Page 201
Vehicle care Stowing a damaged wheel in the load compartment, 5-door hatchback A damaged wheel must be stowed in the load compartment and secured with a strap. Vehicle tools 3 188 1. Position the wheel close to one sidewall of the load compartment. 4. -
Page 202: Jump Starting
Vehicle care Jump starting Replace the long bolt before fitting the Only mount one temporary spare spare wheel in the well after renewing wheel. Do not drive faster than or repairing the defective wheel. 50 mph. Take curves slowly. Do not Do not start with quick charger.
-
Page 203
Vehicle care ■ A discharged battery can already ■ The vehicles must not come into 3. Connect the black lead to the freeze at a temperature of 0 °C. contact with each other during the negative terminal of the booster Defrost the frozen battery before jump starting process. -
Page 204: Towing
Vehicle care Towing 4. Switch on electrical consumers (e.g. headlights, heated rear window) of the vehicle receiving Towing the vehicle the jump start. 5. Reverse above sequence exactly when removing leads. Screw in the towing eye as far as it will go until it stops in a horizontal position.
-
Page 205: Towing Another Vehicle
Vehicle care Seek the assistance of a workshop. Caution After towing, unscrew the towing eye. Insert cap at the bottom and close. Drive slowly. Do not drive jerkily. Excessive tractive force can damage the vehicle. Towing another vehicle When the engine is not running, considerably more force is needed to brake and steer.
-
Page 206: Appearance Care
Vehicle care Appearance care If using a vehicle wash, comply with Caution the vehicle wash manufacturer’s instructions. The windscreen wiper Exterior care Drive slowly. Do not drive jerkily. and rear window wiper must be Excessive tractive force can switched off. Remove antenna and Locks damage the vehicle.
-
Page 207
Vehicle care Exterior lights For mechanical removal of ice, use Paintwork damage a sharp-edged ice scraper. Press the Headlight and other light covers are Rectify minor paintwork damage with scraper firmly against the glass so made of plastic. Do not use any a touch-up pen before rust forms. -
Page 208: Interior Care
Vehicle care Rear carrier system Clean fabric upholstery with a vacuum cleaner and brush. Clean the rear carrier system with Remove stains with an upholstery a steam-jet or high-pressure jet cleaner. cleaner at least once a year. Clean seat belts with lukewarm water Operate the rear carrier system or interior cleaner.
-
Page 209: Service And Maintenance
Service and maintenance Service and General information Andorra, Austria, Belgium, Bosnia- Herzegovina, Bulgaria, Croatia, maintenance Cyprus, Czech Republic, Denmark, Service information Estonia, Finland, France, Germany, In order to ensure economical and Greece, Greenland, Hungary, safe vehicle operation and to Iceland, Ireland, Israel, Italy, Latvia, General information ….
-
Page 210: Recommended Fluids
Service and maintenance Recommended fluids, Service display 3 92. aging control, whereas viscosity grade gives information on the oil’s lubricants and parts Confirmations thickness over a temperature range. Confirmation of service is recorded in Dexos is the newest engine oil quality Recommended fluids and the Service and Warranty Booklet.
-
Page 211
Service and maintenance Select the appropriate engine oil Coolant and antifreeze Brake fluid should be stored in based on its quality and on the a sealed container to avoid water Use only silicate-free long life coolant minimum ambient temperature absorption. (LLC) antifreeze. -
Page 212: Technical Data
Technical data Technical data Vehicle identification Identification plate Vehicle Identification Number Vehicle identification ….212 Vehicle data ……. 214 The identification plate is located on the front left door frame. The Vehicle Identification Number is visible through the windscreen. Back to overview…
-
Page 213
Technical data Information on identification label: = Type approval number the right to make modifications. = Manufacturer Specifications in the vehicle 1 = Manufacturer = Model name documents always have priority over 2 = Type approval number = Vehicle Identification Number those given in this manual. -
Page 214: Vehicle Data
Technical data Vehicle data Recommended fluids and lubricants European service schedule Required engine oil quality All European countries (except Belarus, Moldova, Russia, Serbia, Turkey) Only Israel Engine oil quality Petrol engines Diesel engines Petrol engines Diesel engines (including CNG, LPG, E85) (including CNG, LPG, E85) dexos 1 –…
-
Page 215
Technical data International service schedule Required engine oil quality All countries outside Europe except Israel Only Belarus, Moldova, Russia, Serbia, Turkey Engine oil quality Petrol engines Diesel engines Petrol engines Diesel engines (including CNG, LPG, E85) (including CNG, LPG, E85) dexos 1 ✔… -
Page 216
Technical data All countries outside Europe except Israel Only Belarus, Moldova, Russia, Serbia, Turkey Engine oil quality Petrol engines Diesel engines Petrol engines Diesel engines (including CNG, LPG, E85) (including CNG, LPG, E85) ACEA A3/B3 ✔ – ✔ – ACEA A3/B4 ✔… -
Page 217: Engine Data
Technical data Engine data Sales designation Engine identifier code A14XEL A14XER A14NEL A14NET A16XER A16LET Number of cylinders 1398 1398 1364 1364 1598 1598 Piston displacement [cm Engine power [kW] at rpm 6000 6000 4200-6000 4900-6000 6000 5500 Torque [Nm] at rpm 4000 4000…
-
Page 218
Technical data Sales designation 2.0 Turbo Engine identifier code A13DTE A17DTJ A17DTR A20DTH Number of cylinders 1248 1686 1686 1956 Piston displacement [cm Engine power [kW] at rpm 4000 3800 4000 4000 Torque [Nm] at rpm 1750-3250 1700-2550 2000-2700 1750-2500 Fuel type Diesel Diesel… -
Page 219
Technical data Performance 5-door hatchback Engine A14XEL A14XER A14NEL A14NET A16LET A16XER Maximum speed [mph] Manual transmission Automatic transmission – – – Engine A14XEL A14XER A14NEL A14NET A16LET A16XER Maximum speed [km/h] Manual transmission Automatic transmission – – – The maximum speed indicated is achievable at kerb weight (without driver) plus 200 kg payload. Optional equipment could reduce the specified maximum speed of the vehicle. -
Page 220
Technical data Engine A13DTE A17DTJ A17DTR A20DTH Maximum speed [mph] Manual transmission Automatic transmission – – – Engine A13DTE A17DTJ A17DTR A20DTH Maximum speed [km/h] Manual transmission Automatic transmission – – – The maximum speed indicated is achievable at kerb weight (without driver) plus 200 kg payload. Optional equipment could reduce the specified maximum speed of the vehicle. -
Page 221
Technical data Sports tourer Engine A14XER A14NEL A14NET A16LET A16XER Maximum speed [mph] Manual transmission Automatic transmission – – Engine A13DTE A17DTJ A17DTR A20DTH Maximum speed [mph] Manual transmission Automatic transmission – – – The maximum speed indicated is achievable at kerb weight (without driver) plus 200 kg payload. Optional equipment could reduce the specified maximum speed of the vehicle. -
Page 222
Technical data Engine A14XER A14NEL A14NET A16LET A16XER Maximum speed [km/h] Manual transmission Automatic transmission – – Engine A13DTE A17DTJ A17DTR A20DTH Maximum speed [km/h] Manual transmission Automatic transmission – – – The maximum speed indicated is achievable at kerb weight (without driver) plus 200 kg payload. Optional equipment could reduce the specified maximum speed of the vehicle. -
Page 223
Technical data Fuel consumption — CO -emissions 5-door hatchback Manual transmission / automatic transmission. Engine A14XEL A14XER A14NEL A14NET A16XER A16LET urban [l/100 km] 7.1/– 7.1/– 8.0/– 8.0/9.6 8.4/9.9 8.9/9.9 extra-urban [l/100 km] 4.6/– 4.6/– 4.7/– 4.7/5.5 5.2/5.7 5.6/5.7 total [l/100 km] 5.5/–… -
Page 224
Technical data Sport tourer Manual transmission / automatic transmission. Engine A14XER A14NEL A14NET A16XER A16LET urban [l/100 km] 7.6/– 8.2/– 8.2/9.6 8.6/9.9 8.8/10.1 extra-urban [l/100 km] 5.1/– 4.9/– 4.9/5.5 5.3/5.7 5.6/5.8 total [l/100 km] 5.9/– 6.1/– 6.1/7.0 6.6/7.2 6.8/7.4 [g/km] 139/–… -
Page 225: Vehicle Weight
Technical data Vehicle weight Kerb weight, basic model without any optional equipment 5-door hatchback Engine Manual transmission Automatic transmission without/with air conditioning A14XEL 1373/1388 – [kg] A14XER 1373/1388 – A14NEL 1393/1408 – A14NET 1393/1408 –/1453 A16LET –/1490 –/1503 A16XER 1393/1408 –/1443 A13DTE 1393/1408…
-
Page 226
Technical data Kerb weight, basic model with all optional equipment 5-door hatchback Engine Manual transmission Automatic transmission without/with air conditioning A14XEL –/1545 – [kg] A14XER –/1545 – A14NEL –/1611 – A14NET –/1611 –/1613 A16LET –/1613 –/1665 A16XER –/1578 –/1613 A13DTE –/1571 –… -
Page 227
Technical data Kerb weight, basic model without any optional equipment Sports tourer Engine Manual transmission Automatic transmission without/with air conditioning A14XER 1393/1408 – [kg] A14NEL 1471/1486 –/1503 A14NET 1437/1452 –/1503 A16LET –/1503 –/1550 A16XER 1437/1452 –/1503 A17DTJ 1503/1518 – A17DTR 1503/1518 –… -
Page 228: Vehicle Dimensions
Technical data Kerb weight, basic model with all optional equipment Sports tourer Engine Manual transmission Automatic transmission without/with air conditioning A14XER –/1571 – [kg] A14NEL –/1664 –/1664 A14NET –/1664 –/1664 A16LET –/1664 –/1701 A16XER –/1613 –/1664 A17DTJ –/1733 – A17DTR –/1733 –…
-
Page 229
Technical data 5-door hatchback Sports tourer Length of load compartment with folded rear seats [mm] 1549 1835 Load compartment width [mm] 1027 1026 Load compartment height [mm] Wheelbase [mm] 2685 2685 Turning circle diameter [m] 11.5 11.5 Capacities Engine oil Engine A14XEL A14XER… -
Page 230: Tyre Pressures
Technical data Fuel tank Petrol/diesel, nominal capacity [l] Tyre pressures Comfort with up to 3 people ECO with up to 3 people With full load Engine Tyres front rear front rear front rear [kPa/bar] [kPa/bar] [kPa/bar] [kPa/bar] [kPa/bar] [kPa/bar] ([psi]) ([psi]) ([psi]) ([psi])
-
Page 231
Technical data Comfort with up to 3 people ECO with up to 3 people With full load Engine Tyres front rear front rear front rear [kPa/bar] [kPa/bar] [kPa/bar] [kPa/bar] [kPa/bar] [kPa/bar] ([psi]) ([psi]) ([psi]) ([psi]) ([psi]) ([psi]) A16LET 205/65 R16 230/2.3 (33) 230/2.3 (33) 270/2.7 (39) 270/2.7 (39) 240/2.4 (35) 280/2.8 (41) 12)11) 215/60 R16,… -
Page 232
Technical data Comfort with up to 3 people ECO with up to 3 people With full load Engine Tyres front rear front rear front rear [kPa/bar] [kPa/bar] [kPa/bar] [kPa/bar] [kPa/bar] [kPa/bar] ([psi]) ([psi]) ([psi]) ([psi]) ([psi]) ([psi]) A17DTJ 205/65 R16 230/2.3 (33) 230/2.3 (33) 270/2.7 (39) 270/2.7 (39) 240/2.4 (35) 280/2.8 (41) 12)11) 215/60 R16,… -
Page 233
Technical data Comfort with up to 3 people ECO with up to 3 people With full load Engine Tyres front rear front rear front rear [kPa/bar] [kPa/bar] [kPa/bar] [kPa/bar] [kPa/bar] [kPa/bar] ([psi]) ([psi]) ([psi]) ([psi]) ([psi]) ([psi]) A17DTR 205/65 R16 230/2.3 (33) 230/2.3 (33) 270/2.7 (39) 270/2.7 (39) 240/2.4 (35) 280/2.8 (41) 12)11) 215/60 R16,… -
Page 234
Technical data Comfort with up to 3 people ECO with up to 3 people With full load Engine Tyres front rear front rear front rear [kPa/bar] [kPa/bar] [kPa/bar] [kPa/bar] [kPa/bar] [kPa/bar] ([psi]) ([psi]) ([psi]) ([psi]) ([psi]) ([psi]) A20DTH 205/65 R16 230/2.3 (33) 230/2.3 (33) 270/2.7 (39) 270/2.7 (39) 240/2.4 (35) 280/2.8 (41) 12)11) 215/60 R16,… -
Page 235
Technical data Towing hitch installation dimensions Back to overview… -
Page 236: Customer Information
Customer information Customer information Vehicle data recording ■ with the consent of the vehicle owner or, if the vehicle is leased, and privacy with the consent of the lessee, ■ in response to an official request of Event data recorders Vehicle data recording and police or similar government office, privacy ……..
-
Page 237
RFID technology in Opel vehicles does not use or record personal information or link with any other Opel system containing personal information. -
Page 238: Index
Index Battery voltage ……111 Bicycle rack……..58 Accessories and vehicle Bonnet ……..167 modifications ……166 Brake and clutch fluid….210 Active head restraints….37 Brake and clutch system ….. 96 Adaptive forward lighting … 100, 121 Brake assist ……. 151 Adjustable air vents ….
-
Page 239
Convex shape ……29 Engine coolant temperature Coolant and antifreeze….210 gauge ……..91 General information ….161 Cruise control ….100, 154 Engine data ……. 217 Glovebox ……..54 Cupholders ……..54 Engine exhaust ……143 Graphic-Info-Display, Colour- Curtain airbag system ….47 Engine oil …. -
Page 240
Instrument panel illumination ..181 Power steering……97 Instrument panel illumination Power windows ……31 Malfunction indicator light …. 96 control ……..126 Preheating ……..98 Manual anti-dazzle …… 30 Instrument panel overview … 11 Manual mode ……146 Interactive driving system… 153 Manual transmission …. -
Page 241
Seat belts ……..42 Towing equipment ….. 163 Seat position …….. 38 Towing hitch installation Vehicle dimensions ….228 Selector lever ……145 dimensions ……235 Vehicle Identification Number ..212 Service ……. 137, 209 Towing the vehicle ….. 204 Vehicle messages ….. -
Page 242
Back to overview…
ЕСЛИ ВЫ ВИДИТЕ ОШИБКУ 406 Not Acceptable и не видите документ, то скорей всего у Вас IP РФ и его надо сменить, на любой другой страны, с помощью VPN ( Scribd и SlideShare блокируют посетителей с Российским IP).
Видео замена ламп дальнего и ближнего света автомобиля Opel Astra Family 2011 года выпуска
Opel Astra Family 2011 общая информация (Опель Астра)
Аудиоплейеры
Дополнительные устройства
К входу AUX с помощью штыревого концентрического штекера диаметром 3,5 мм можно подключить внешний источник аудиосигнала, например, переносной проигрыватель компакт-дисков. Следите, чтобы вход AUX был чистым и сухим. Информационно- развлекательная система на задних сиденьях Аудиосистема на задних сиденьях Twin Audio позволяет выбирать между источником звукового сигнала информационно-развлекательной системы и другим источником звукового сигнала. Управлять можно только таким источником звукового сигнала, который не включен в информационно-развлекательной системе. Предусмотрено два гнезда для подключения наушников с раздельной регулировкой громкости.
Телефон
Мобильные телефоны и радиооборудование CB
Инструкции по установке и рекомендации по эксплуатации
При установке и работе с мобильным телефоном следует руководствоваться специальными инструкциями изготовителей мобильного телефона и системы громкой связи по их установке и эксплуатации на автомобиле. Несоблюдение этих указаний может привести к аннулированию разрешения на эксплуатацию данного типа транспортного средства (директива Европейского Союза 95/54/EC). Как обеспечить безотказную работу:
■ используйте профессионально смонтированную внешнюю антенну, обеспечивающую максимальную дальность действия;
■ максимальная мощность передачи не должна превышать 10 Вт;
■ устанавливайте телефон в подходящем месте. Примечание Для получения сведений по рекомендуемым местам установки наружной антенны или держателей оборудования, а также о возможности использования передатчиков мощностью более 10 Вт необходима отдельная консультация. Использования устройства громкой связи с телефонами стандартов GSM 900/1800/1900 и UMTS без наружной антенны допускается только в том случае, если максимальная излучаемая мощность мобильного телефона не превышает 2 Вт для GSM 900, а в остальных случаях — 1 Вт. Из соображений безопасности не пользуйтесь телефоном во время движения. Даже разговор через устройство громкой связи может отвлекать водителя во время движения.
Предупреждение
Не соответствующие вышеуказанным стандартам мобильные телефоны и радиоаппаратура могут использоваться только с антенной, установленной снаружи автомобиля.
Внимание
Если не соблюдать упомянутых выше предписаний, включение мобильных телефонов и радиоаппаратуры в салоне при отсутствии внешней антенны может привести к нарушению работоспособности электронной системы автомобиля.
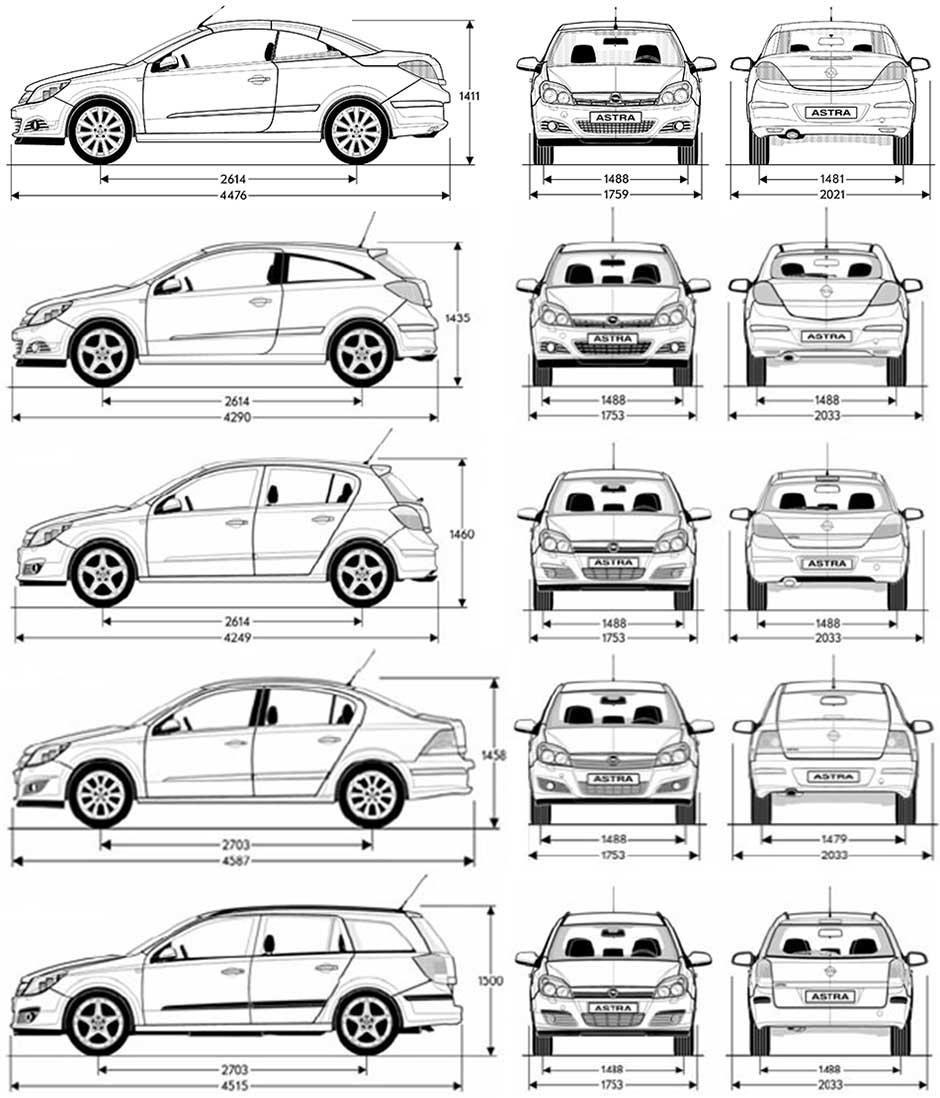
| № | Спецификация / Specs | Данные |
| Габариты (мм/mm) и масса (кг/kg) / Dimensions and Weight | ||
| 1 | Длина / Length | 4249 |
| 2 | Ширина (без/с зеркалами) / Width | 1753/2032 |
| 3 | Высота (загружен/пустой) / Height | 1460 |
| 4 | Колёсная база / Wheelbase | 2614 |
| 5 | Дорожный просвет (клиренс) / Ground clearance | 130 |
| 6 | Снаряжённая масса / Total (curb) weight | 1355 |
| Полная масса / Gross (max.) weight | 1800 | |
|
Двигатель / Engine |
||
| 7 | Тип / Engine Type, Code | Бензиновый, жидкостного охлаждения, четырехтактный, Z16LET |
| 8 | Количество цилиндров / Cylinder arrangement: Total number of cylinders, of valves | 4-цилиндровый, 16V, рядный, DOHC с верхним расположением двух распределительных валов |
| 9 | Диаметр цилиндра / Bore | 79.0 мм |
| 10 | Ход поршня / Stroke | 81.5 мм |
| 11 | Объём / Engine displacement | 1598 см³ |
| 12 | Система питания / Fuel supply, Aspiration | Распределенный впрыск топлива |
| Турбонаддув и охлаждение наддувочного воздуха | ||
| 13 | Степень сжатия / Compression ratio | 9.8:1 |
| 14 | Максимальная мощность / Max. output power kW (HP) at rpm | 132 кВт (177 л.с.) при 5500 об/мин |
| 15 | Максимальный крутящий момент / Max. torque N·m at rpm | 230 Нм при 1980-5500 об/мин |
|
Трансмиссия / Transmission |
||
| 16 | Сцепление / Clutch type | Однодисковое, сухое, с диафрагменной нажимной пружиной и гасителем крутильных колебаний, постоянно замкнутого типа |
| 17 | КПП / Transmission type | МКПП 6 шестиступенчатая механическая, двухвальная, с синхронизаторами на всех передачах переднего хода |
О Книге
- Название: Opel Astra Family 2011 руководство по эксплуатации
- Бензиновые двигатели: Z12XEP, Z14XEP, Z16LET, Z16XER, Z18XER, Z20LER, Z13DTH, Z20LEH, A17DTJ, Z17DTJ, Z19DTL, Z17DTH, A17DTR, Z17DTR, Z19DT
- Выпуск с 2004 года
- Серия: «Owner Guide»
- Год издания: 2011
- Автор: Коллектив авторов
- Издательство: «ADAM OPEL AG, Rüsselsheim, Germany»
- Формат: PDF
- Страниц в книге: 290
- Размер: 55.76 МБ
- Язык: Русский
- Количество электросхем: 0

Поиск по сайту
Остались вопросы или пожелания? Пишите на почту: support@vnx.su
Комментарии
10
Войдите или зарегистрируйтесь, чтобы писать комментарии, задавать вопросы и участвовать в обсуждении.
Войти
Зарегистрироваться

BronsonZ
Я езжу на Opel Astra J
А для j gtc такое есть?)
5 месяцев

Anton-Kurilov
Я езжу на Opel Astra J
Спасибо за книгу!
1 год

MihaMM77
Я езжу на Opel Astra J
Подскажите как это называется?

2 года

SDudin
Я езжу на Volkswagen Teramont
opelastraj.ru/
4 года

1-vip
Я езжу на Subaru Impreza (GJ, GP)
А есть ли мануал в котором не такой мотор, как в этом? Надо помпу поменять охладительную, а тут все по-другому.
5 лет
1-vip
Я езжу на Subaru Impreza (GJ, GP)
Красиво, но ни одного момента затяжки. Так и должно быть?
Нашел, они в конце.
5 лет

docdizel
Я езжу на Toyota Estima (II)
Спасибо!
6 лет

usenger
Я езжу на Opel Astra J
спасибо!
6 лет

Strelec4
Я езжу на KIA Sportage (4G)
спасибо. нужная вещь )))
8 лет

dence
Без машины
спасибо большое за ссылку!
9 лет
инструкцияOpel Astra (2011)

Introduction ……………………………… 2
In brief …………………………………….. 6
Keys, doors and windows ………… 20
Seats, restraints ……………………… 47
Storage …………………………………. 67
Instruments and controls …………. 86
Lighting ……………………………….. 117
Infotainment system ………………. 124
Climate control ……………………… 127
Driving and operating …………….. 135
Vehicle care …………………………. 162
Service and maintenance ………. 209
Technical data ……………………… 213
Customer information ……………. 263
Index …………………………………… 266
Contents
Посмотреть инструкция для Opel Astra (2011) бесплатно. Руководство относится к категории автомобили, 9 человек(а) дали ему среднюю оценку 8.2. Руководство доступно на следующих языках: английский. У вас есть вопрос о Opel Astra (2011) или вам нужна помощь? Задайте свой вопрос здесь
Главная
Не можете найти ответ на свой вопрос в руководстве? Вы можете найти ответ на свой вопрос ниже, в разделе часто задаваемых вопросов о Opel Astra (2011).
Не нашли свой вопрос? Задайте свой вопрос здесь
- Кузов
- Общая информация
- Силовой агрегат
- Трансмиссия
- Шасси
- Электрооборудование
Данное руководство содержит информационные материалы по ремонту и обслуживанию автомобиля Opel Astra J (2009-2015, бензин). Вы найдете инструкции по снятию и установке различных узлов и агрегатов Opel Astra J, схемы электрооборудования, справочные данные и реккомендации по уходу.