MULTI-CHANNEL
CABLE FREE
REMOTE THERMO SENSOR
MODEL: THC268
1
I
J
1
1
ENGLISH
USE’S MANUAL
INTRODUCTION
Congratulations on your purchasing the THC-268 Remote Thermo Sensor.
The Remote Thermo Sensor is used with the Oregon Scientific 433MHz
Multi-Channel In-Out Thermometers , Wireless Weather Stations, Weather
Clocks etc. to monitor temperature changes of remote or outdoor sites.
Operation is easy and no wire installation is required.
MAIN FEATURES:
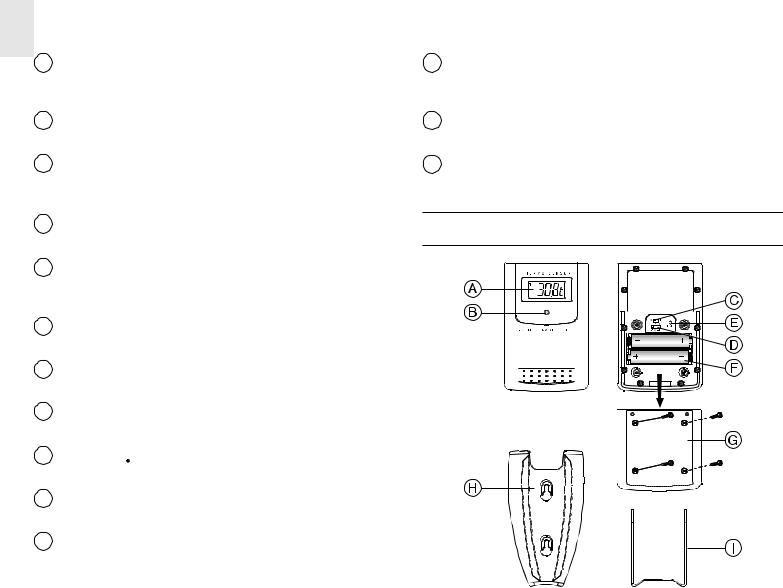
A LCD
Displays the current temperature monitored by the remote unit and
indicates the selected channel
B LED INDICATOR
Flashes when the remote unit transmits a reading
C TEMPERATURE SENSOR PROBE
On 10 feet ( 3 meters ) cable.
D °C/°F SLIDE SWITCH
Selects between Centigrade ( °C ) and Fahrenheit ( °F )
E CHANNEL SLIDE SWITCH
Designates the remote unit Channel 1, Channel 2 or Channel 3
F RESET BUTTON
Returns all settings to default values
G BATTERY COMPARTMENT
Accommodates two AA-size batteries
H BATTERY DOOR
I WALL-MOUNT HOLDER
Supports the remote unit in wall-mounting
J REMOVABLE TABLE STAND
For standing the remote unit on a flat surface
COMPATIBLE PRODUCTS
Following is the list of some Oregon Scientific products that the THC268
is compatible with:
Cable Free Weather Forecaster with Thermo-Hygrometer and Radio
Controlled Clock: BAR122HGA
Cable Free Weather Forecaster with Thermo-Hygrometer, Radio Con-
trolled Clock and Ice Alarm: BAR913HGA
Cable Free Weather Station with Thermo-Hygrometer and Radio Con-
trolled Clock: BAR938HGA
Cable Free Thermo-Hygrometer: EMR963HG
Cable Free Thermometer with Radio Controlled Clock: RMR112
Cable Free Weather station: WMR968
Cable Free Weather station: WMR112
BEFORE YOU BEGIN
For best operation,
1. Assign different channels to different remote units.
2. Insert batteries for remote units before doing so for the main unit.
( Main unit of models listed under optional items )
3. Place the main unit as close as possible next to the remote unit, reset
the main unit after installing batteries. This will ensure easier
synchronization between the transmission and reception of signals.
4. Position the remote unit and main unit within effective transmission
range, which, in usual circumstances, is 20 to 30 meters(upto 100 feet).
Note that the effective range is vastly affected by the
building materials and where the main and remote units are
positioned. Try various setups for best result.
Though the sensor is weather proof and meant to be used outdoors,
it should be placed away from direct sunlight, rain or snow.
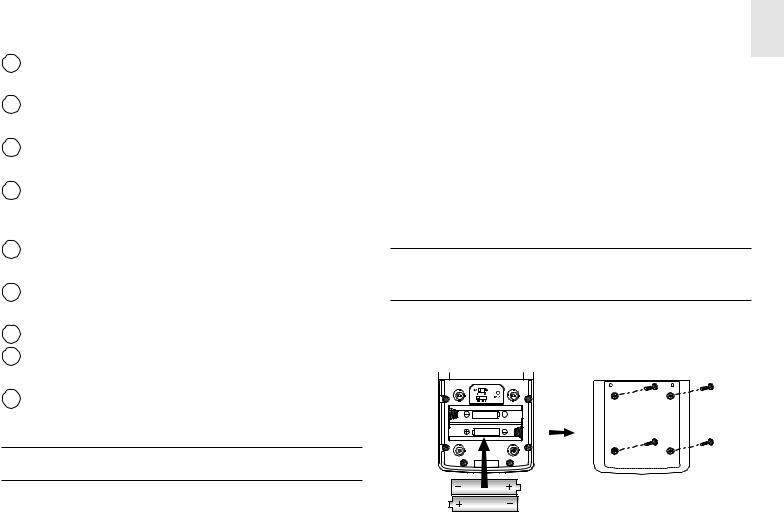
BATTERY AND CHANNEL INSTALLATION
The remote unit uses two AA-size batteries. To install them,
1. Remove the screws on the battery compartment.
2. Select the channel number on the CHANNEL slide switch.
3. Select the temperature display unit on the °C/°F slide switch.
4. Insert the batteries strictly according to the polarities shown inside.
5. Replace the battery compartment door and secure its screws.
CHANGE CHANNEL
Once a channel is assigned to a unit, you can only change it by removing
the batteries and repeating the above procedure.
LOW-BATTERY WARNING
Replace the batteries of the sensor when the low-battery indicator of the
channel represented by the sensor shows up on the main unit.
OPERATION
Once batteries are in place, the sensor will start transmitting samplings
at 40-second intervals.
The current temperature will be shown on the LCD in the selected unit
( °C/°F ) at the designated channel. The unit ( °C/°F ) shown on the main
unit is determined by the setting on the main unit.
HOW TO INSTALL THE TEMPERATURE
SENSING CABLEG
Secure the sensor to an area you want to monitor. Do not expose it to
direct sunlight.
THE RESET BUTTON
See the user’s manual of your main unit for further information.
This button is only used when the unit is operation in an unfavorable
way or malfunctioning. Use a blunt stylus to hold down the button. All
settings will return to their default values.
HOW TO USE THE TABLE STAND OR WALL
MOUNTING
This sensor comes with a wall-mount holder and a removable stand.
Use either to set up the unit.
PRECAUTIONS
This product is engineered to give you years of satisfactory service if
you handle it carefully. Here are a few precautions:
1. Do not immerse the unit in water.
2. Do not clean the unit with abrasive or corrosive materials. They may
scratch the plastic parts and corrode the electronic circuit.
3. Do not subject the unit to excessive force, shock, dust, temperature
or humidity, which may result in malfunction, shorter electronic life
span, damaged battery and distorted parts.
4. Do not tamper with the unit’s internal components. Doing so will
invalidate the warranty on the unit and may cause unnecessary dam-
age. The unit contains no user-serviceable parts.
5. Only use fresh batteries as specified in the user’s manual. Do not mix
new and old batteries as the old ones may leak.
6. Always read the user’s manual thoroughly before operating the unit.
SPECIFICATIONS
Temperature Measurement
Displayed range
: -50.0°C to + 70.0°C
( -58.0°F to 158.0°F )
Proposed operating range
: -20.0°C to + 60.0°C
( 4.0°F to 140.0°F )
Temperature resolution
: 0.1°C ( 0.2°F )
RF Transmission Frequency
: 433 MHz
No. of Remote unit
: Maximum of 3
RF Transmission Range
: Maximum 30 meters (100 feet)
Temperature sensing cycle
: around 40 seconds
Power
: use 2 pcs UM-3 or «AA»
1.5V alkaline battery
Weight
: 80.5 g (2.84ounces)
Dimension
: 105 x 70 x 21mm
(4.13 x 2.76 x.83 inches)
NOTE ON COMPLIANCE
This device complies with Part 15 of the FCC Rules. Operation is sub-
ject to the following two conditions: (1) This device may not cause
harmful interference, and (2) This device must accept any interference
received, including interference that may cause undesired operations.
Warning: Changes or modifications to this unit not expressly approved
by the party responsible for compliance could void the user’s authority
to operate the equipment.
FCC :
NOTE: This equipment has been tested and found to comply with the
limits for a Class B digital device, pursuant to Part 15 of the FCC Rules.
These limits are designed to provide reasonable protection against harmful
interference in a residential installation. This equipment generates, uses
and can radiate radio frequency energy and, if not installed and used in
accordance with the instructions, may cause harmful interference to
radio communications.
However, there is no guarantee that interference will not occur in a
particular installation. If this equipment does cause harmful interference
to radio or television reception, which can be determined by turning the
equipment off and on, the user is encouraged to try to correct the inter-
ference by one or more of the following measures:
orient or relocate the receiving antenna.
—
Increase the separation between the equipment and receiver.
—
Connect the equipment into an outlet on a circuit different from that
to which the receiver is connected.
—
Consult the dealer of an experienced radio/TV technician for help.
Company Name: Oregon Scientific, Inc.
Address: 19861 SW 95th Place, Tualatin, Oregon 97062, USA
Telephone Number: 1-800-853-8883
CUSTOMER ASSISTANCE
Should you require assistance regarding this product and its operation,
please contact our customer care department at 800-853-8883 or via
email at helpme@oscientific.com.
CAUTION
— The content of this manual is subject to change without
further notice.
— Due to printing limitation, the displays shown in this
manual may differ from the actual display.
— The contents of this manual may not be reproduced
without the permission of the manufacturer.
WARRANTY
This product is warranted to be free of defects in manufacturing
for 90 days after purchase. For technical support please call
800-853-8883 ( Monday-Friday; 8am-5pm PST ).
Defective product returns should be directed to the place of retail
purchase. If this is not possible, all direct returns must include a
Return Authorization Number from Oregon Scientific, together
with proof of purchase date, your name and address, shipped
prepaid to Oregon Scientific Inc, 19861 SW 95th place Tualatin,
OREGON 97062, USA.
This warranty does not cover a product subjected to abuse,
misuse of accidental damage.

1
GB
MULTI-CHANNEL IN-OUT
CABLE FREE THERMOMETER
MODEL: EMR812
USER’S MANUAL
INTRODUCTION
Congratulations on your purchase of the EMR812 Multi-Channel
In-Out Thermometer with 433MHz cable free sensor.
The EMR812 is an easy-to-use, state-of-the-art thermometer. The
basic package comes with a main unit, which is the temperature
station, and a remote unit, the thermo sensor.
The main unit has extra-large read-outs for indoors temperature
and for that collected and transmitted by the remote unit. The main
unit can support up to three remote units.
The main unit is capable of monitoring temperature changes of
remote sites. By setting the upper and lower temperature limits the
alarm will activate when those limits are exceeded. Also, the maxi-
mum and minimum temperature of different sites can also be
retrieved quickly.
No wire installation is required between the main and remote units.
As the EMR812 operates at 433MHz, it can be used in the U.S. and
most places in Continental Europe.
MAIN FEATURES: MAIN UNIT
H I
O N /O FF
R ESET
T EM P AL
° C
° F
L O
C H A N N E L
M E M
C LE A R
4 3 3 M H z C A B L E F R E E

1
GB
Long-Range Multi-Channel
In-Out Thermometer
with Cable Free Sensor and RF Clock
MODEL: RMR183/RMR183U
USER’S MANUAL
INTRODUCTION
Congratulations on your purchase of the RMR183/RMR183U
Long-Range (60 meters) Multi-Channel In-Out Thermometer with
433MHz cable free sensor and radio-controlled calendar clock.
The basic package comes with a main unit, which is the temperature
and calendar clock station, and a remote unit, the thermo sensor.
The main unit has a large display for indoor temperature,
calendar clock and temperatures collected and transmitted by the
remote unit. The main unit can support up to three remote units.
The main unit is capable of keeping track of the maximum and
minimum temperature of different sites. No wire installation is
required as the RMR183/RMR183U operates at 433MHz.
As for the calendar clock, it is radio-controlled. It automatically
synchronizes its current time and date when it is brought within
an approximate 1500km radius of the radio signal generated from
Frankfurt, Germany (DCF77) (or Radio signal MSF-60 from
Rugby, England for UK version).
You can also set the calendar clock manually when it is off range.
Other features include five-language display, crescendo daily
alarm and interchangeable display modes.
MAIN FEATURES: MAIN UNIT
Смотреть руководство для Oregon Scientific RMR112 ниже. Все руководства на ManualsCat.com могут просматриваться абсолютно бесплатно. Нажав кнопку «Выбор языка» вы можете изменить язык руководства, которое хотите просмотреть.

MANUALSCAT | RU
Вопросы и ответы
У вас есть вопрос о Oregon Scientific RMR112, но вы не можете найти ответ в пользовательском руководстве? Возможно, пользователи ManualsCat.com смогут помочь вам и ответят на ваш вопрос. Заполните форму ниже — и ваш вопрос будет отображаться под руководством для Oregon Scientific RMR112. Пожалуйста, убедитесь, что вы опишите свои трудности с Oregon Scientific RMR112 как можно более детально. Чем более детальным является ваш вопрос, тем более высоки шансы, что другой пользователь быстро ответит на него. Вам будет автоматически отправлено электронное письмо, чтобы проинформировать вас, когда кто-то из пользователей ответит на ваш вопрос.
Добрый день. Скажите где я могу купить датчик для этой станции? Спасибо.
Константин 2019-11-22
Задать вопрос о Oregon Scientific RMR112
- Бренд:
- Oregon Scientific
- Продукт:
- термометры
- Модель/название:
- RMR112
- Тип файла:
- Доступные языки:
- английский
Сопутствующие товары Oregon Scientific RMR112
![]()
GB
Multi-Channel IN-OUT Thermometer
with Cable Free Sensor and RF Clock
MODEL: RMR112
USER’S MANUAL
INTRODUCTION
Congratulations on your purchase of the RMR112 Multi-Channel In-Out Thermometer with 433MHz cable free sensor and radio-controlled calendar clock.
The basic package comes with a main unit, which is the temperature and calendar clock station, and a remote unit, the thermo sensor.
The main unit has large read-outs for indoors temperature, calendar clock and temperatures collected and transmitted by the remote unit. The main unit can support up to three remote units.
The main unit is capable of keeping track of the maximum and minimum temperature of different sites. And no wire installation is required and the RMR112 operates at 433MHz.
As for the calendar clock, it is radio-controlled. It automatically synchronizes its current time and date when it is brought within an approximate 1500km radius of the radio signal generated from Frankfurt, Germany (DCF77).
You can also set the calendar clock manually when it is off range. Other features include four-language display, four-step crescendo dual alarms and interchangeable display modes.
MAIN FEATURES
1
GB
AFOUR-LINE DISPLAY
Facilitates easy reading of remote and indoors temperatures and calendar clock
BCHANNEL BUTTON
Selects among different channels
CMEMORY BUTTON
Recalls the maximum or minimum temperature of individual channels
D ALARM [24HR  OFF] BUTTON
Sets the time for the alarms
EMODE/SET BUTTON
Toggles the display modes and confirms entry while setting the values for display
FRADIO RECEPTION SIGNAL
Indicates the condition of radio reception
GUP ( ▲ ) BUTTON
Advances the value of a setting
HDOWN ( ▼) BUTTON
Decreases the value of a setting
I ALARM [ AL ON/OFF] BUTTON
Enables or disables the alarms
J RESET BUTTON
Returns all settings to default values
K ° C/° F SLIDE SWITCH
Selects between degree Centigrade ( C) and Fahrenheit° (° F)
2
L BATTERY COMPARTMENTS
Accommodates two UM-3 or “AA” size 1.5V alkaline batteries
MREMOVABLE TABLE STAND
For standing the main unit on a flat surface
NWALL-MOUNT RECESSED HOLE
For mounting the main unit on a wall
MAIN FEATURES: REMOTE UNIT
ALCD
Displays the current temperature monitored by the remote unit
BLED INDICATOR
Flashes when the remote unit transmits a reading
C° C/° F SLIDE SWITCH
Selects between Centigrade (° C) and Fahrenheit (° F)
DCHANNEL SLIDE SWITCH
Designates the remote unit Channel 1, Channel 2 or Channel 3
GB
reset the main unit after installing batteries. This will ensure easier synchronization between the transmission and reception of signals.
4.Position the remote unit and main unit within effective transmission range, which, in usual circumstances, is 20 to 30 meters.
Note that the effective range is vastly affected by the building materials and where the main and remote units are positioned. Try various set-ups for best result.
Though the remote units are weather proof, they should be placed away from direct sunlight, rain or snow.
ERESET BUTTON
Returns all settings to default values
FBATTERY COMPARTMENT
Accommodates two AAA-size batteries
GBATTERY DOOR
HWALL-MOUNT HOLDER
Supports the remote until in wall-mounting
IMOVABLE TABLE STAND
For standing the remote unit on a flat surface
BEFORE YOU BEGIN
BATTERY AND CHANNEL INSTALLATION: REMOTE UNIT
1.Remove the screws on the battery compartment.
2.Select the channel number on the CHANNEL slide switch.
3.Select the temperature display unit on the C/F slide switch.
For best operation,
1.Assign different channels to different remote units.
2.Insert batteries for remote units before doing so for the main unit.
3.Place the main unit as close as possible next to the remote unit,
4.Install 2 alkaline batteries (UM-4 or “AAA” size 1.5V) strictly according to the polarities shown.
5.Replace the battery compartment door and secure its screws.
3

GB
Note that once a channel is assigned to a remote unit, you can only change it by removing the batteries or resetting the unit.
BATTERY INSTALLATION: MAIN UNIT
1.Slide open the battery compartment door.
2.Install 2 alkaline batteries (UM-3 or “AA” size 1.5V) strictly according to the polarities shown.
3. Replace the battery compartment door.
HOW TO USE THE TABLE STAND
OR WALL MOUNTING
The main unit has a removable table stand, which when connected, can support the unit on a flat surface. Or you can remove the stand and mount the unit on a wall using the recessed screw hole.
As for the remote unit, it comes with a wall-mount holder and a removable stand. Use either to hold the unit in place.
Main unit
LOW BATTERY WARNING
When it is time to replace batteries, the respective low-battery indicator will show up when the respective channel is selected. The battery level of the main unit will be shown on the indoor temperature when it is running low.
4
 Loading…
You can only view or download manuals with
Sign Up and get 5 for free
Upload your files to the site. You get 1 for each file you add
Get 1 for every time someone downloads your manual
Buy as many as you need