Для ознакомления с инструкцией необходимо нажать на ссылку «ЗАГРУЗИТЬ», чтобы скачать pdf файл. Если есть кнопка «ПРОСМОТР», то можно просто посмотреть документ онлайн.
Для удобства, Вы можете сохранить данную страницу с файлом руководства по эксплуатации в свой список «избранное» прямо на сайте (доступно для зарегистрированных пользователей).
Смотрите инструкцию для похожих моделей:

Вы можете задать вопрос посетителям сайта по модели OWON HDS1022M-N. Если Вы являетесь её пользователем, то пожалуйста оставьте, по возможности развёрнутый отзыв:
Перед вами файл pdf, где представлена инструкция (руководство) на русском для OWON HDS1022M-N. Вы можете скачать ее либо изучить в онлайн режиме.
Подробные сведения об инструкции:
Устройство из раздела: портативный двухканальный осциллограф
Бренд-производитель: OWON
Наименование модели: OWON HDS1022M-N
Язык: Руководство на русском языке
Файл: pdf
Размер файла: 1,65 MB

Скачать инструкцию к HARPER HDT2-1110
ЗАГРУЗИТЬ
Просмотр инструкции онлайн

ИНСТРУКЦИЯ
ПО
ЭКСПЛУАТАЦИИ
OWON
Fujian Lilliput Optoelectronics Technology Co.,Ltd,
Китай
OWON
Ручные
цифровые
осциллографы
серии
HDS-N
•
HDS1022M-N
•
HDS2062M-N
•
HDS3102M-N
СОДЕРЖАНИЕ
Гарантийные
обязательства
……………………………………………… 2
1.
ЗАЯВЛЕНИЕ
О
СООТВЕТСТВИИ
…………………………………… 2
1.1
Заявление
о
соответствии
……………………………………………
2
1.2
Комплект
поставки
………..……………………………………………
2
2.
ИНФОРМАЦИЯ
ПО
БЕЗОПАСНОСТИ
…………………………….. 2
2.1
Символы
и
правила
техники
безопасности
…………………….. 3
2.1.1
Предупреждающие
символы
…………………………………. 3
2.1.2
Правила
техники
безопасности
……………………………… 3
2.2
Общая
информация
по
технике
безопасности
………………… 3
3.
ОСНОВНЫЕ
ХАРАКТЕРИСТИКИ
……………………………………
3
4.
ПЕРВИЧНЫЙ
ОСМОТР
ПРИБОРА
…….………………………….. 4
4.1
Первичный
осмотр
прибора
………………………………………….. 4
4.1.1
Выявление
повреждений
при
транспортировке
………. 4
4.1.2
Проверка
принадлежностей
………………………………….. 4
4.1.3
Проверка
прибора
……………………………………………. 4
5.
ВХОДНЫЕ
РАЗЪЕМЫ
И
ПРИСПОСОБЛЕНИЯ
………………. 4
5.1
Входные
разъемы
и
приспособления
……………………………. 4
5.1.1
Входные
разъемы
и
приспособления
…………………….. 4
5.1.2
Подключение
тестового
прямоугольного
сигнала
1
кГц
/5
В
………………………………………………………………… 4
5.2
Описание
передней
панели
и
кнопок
…..………………………… 4
6.
РАБОТА
С
ФУНКЦИЯМИ
ОСЦИЛЛОГРАФА
……………………. 5
6.1
Краткое
содержание
главы
…………………………………………… 5
6.2
Включение
осциллографа
…………………………………………….. 5
6.3
Рабочее
окно
осциллографа
………………………………………..
5
6.4
Описание
меню
……….…………………………………………………
6
6.5
Ручная
настройка
вертикальной
и
горизонтальной
развертки
и
положения
запуска
………………………………………….
6
6.5.1
Настройка
вертикальной
развертки
……………………. 6
6.5.2
Настройка
горизонтальной
развертки
и
положения
запуска
……………………………………………………………………….. 6
6.6
Восстановление
заводских
настроек
……………………………… 7
6.7
Входные
разъемы
…………………………………………………… 7
6.8
Отображение
неизвестного
сигнала
в
автоматическом
режиме
……………………………………………………………………………. 7
6.9
Автоматический
возврат
на
ноль
горизонтальной
позиции
запуска
и
позиции
уровня
запуска
………………………………………. 7
6.10
Автоматические
измерения
………………………………………. 7
6.11
Фиксация
изображения
на
экране
.………………………………. 8
6.12
Использование
функции
усреднения
для
сглаживания
осциллограмм
…………………………………………………………
8
6.13
Использование
функции
послесвечения
для
отображения
осциллограмм
…………………………………………………………
8
6.14
Использование
функции
обнаружения
пиков
для
отображения
всплесков
сигнала
..…………………………………
8
6.15
Включение
связи
по
переменному
току
…………….……..… 9
6.16
Обращение
полярности
отображения
осциллограммы
..… 9
6.17
Математические
операции
над
осциллограммами
….……. 9
6.18
Использование
USB-
накопителей
данных
для
сохранения
осциллограмм
…………………………………. ……… 10
7.
РАБОТА
С
ФУНКЦИЯМИ
МУЛЬТИМЕТРА
………………………. 10
7.1
Краткое
содержание
главы
…………………………………………… 10
7.2
Подключение
к
прибору
в
режиме
мультиметра
…………….. 10
7.3
Рабочее
окно
мультиметра
………………………………………….. 10
7.4
Выполнение
измерений
в
режиме
мультиметра
……………… 10
7.4.1
Измерение
сопротивления
………………………………. 10
7.4.2
Тестирование
диодов
……………………………………. 10
7.4.3
Прозвонка
электрических
цепей
….……………………. 11
7.4.4
Измерение
емкости
………………………………………. 11
7.4.5
Измерение
постоянного
напряжения
………………….
11
7.4.6
Измерение
переменного
напряжения
…………………. 11
7.4.7
Измерение
постоянного
тока
……………………………. 11
7.4.8
Измерение
переменного
тока
………..………………….. 12
7.5
Фиксация
показания
дисплея
…………………………………….. 12
7.6
Выполнение
относительных
измерений
………………………… 12
7.7
Автоматический
и
ручной
выбор
предела
измерения
………. 13
8.
ДОПОЛНИТЕЛЬНЫЕ
ФУНКЦИИ
ОСЦИЛЛОГРАФА
………….. 13
8.1
Краткое
содержание
главы
…………………………………………….. 13
8.2
Настройка
каналов
1
и
2
по
вертикали
…………………………… 13
8.2.1
Установка
типа
развязки
канала
..……….………………. 13
8.2.2
Открытие
и
закрытие
канала
……….…….………………. 13
8.2.3
Настройка
ослабления
щупа
……….…….………………. 14
8.2.4
Настройка
обращенной
осциллограммы
……….…….. 14
8.3
Настройка
параметров
вычислительных
операций
………….. 14
8.4
Настройка
системы
запуска
……………………………………….. 14
8.5
Управление
запуском
……………………………………………….. 14
8.5.1
Запуск
по
фронту
…………….…………….………………. 15
8.5.2
Запуск
по
видеосигналу
…….…………….………………. 15
8.5.3
Поочередный
запуск
………….…………….….…………. 16
8.6
Выбор
режима
сбора
данных
для
осциллограммы
………….. 17
8.7
Настройки
дисплея
….………………………………………………. 17
8.7.1
Формат
отображения
осциллограмм
..….………………. 17
8.7.2
Послесвечение
……………….…………….………………. 17
8.7.3
Режим
Х
Y…..………………….…………….………………. 17
8.7.4
Частотомер
..………………….…………….………………. 18
8.8
Настройки
функции
сохранения
осциллограмм
…..………….. 18
8.8.1
Сохранение
осциллограмм
в
нормальном
режиме
…. 18
8.8.2
Сохранение
осциллограмм
в
режиме
БПФ
(FFT)……. 18
8.9
Меню
настройки
функций
…………………..………………………. 18
8.10
Выполнение
автоматических
измерений
………………………. 19
8.11
Выполнение
курсорных
измерений
……..………………………. 19
8.11.1
Настройка
курсорных
измерений
в
нормальном
режиме
………………………………………………………………………… 19
8.11.2
Настройка
курсорных
измерений
в
режиме
БПФ
……. 20
8.12
Автоматическое
масштабирование
……..………………………. 21
8.13
Запись
………………………………………………………………… 21
8.14
Использование
БПФ
(FFT)……………………………………….. 22
8.15
Меню
состояния
системы
..……………………………………….. 24
8.15.1
Часы
реального
времени
…………………………………. 24
8.16
Установка
окна
горизонтальной
шкалы
….…………………….. 25
8.17
Передача
данных
……………………….………………………….. 25
9.
ПОИСК
И
УСТРАНЕНИЕ
НЕИСПРАВНОСТЕЙ
………………….. 25
10.
ПРИЛОЖЕНИЯ
……………………………………………………………… 26
10.1
Приложение
А
:
Технические
характеристики
…………………. 26
10.1.1
Осциллограф
……………………………….………………. 27
10.1.2
Мультиметр
..……………………………….………………. 27
10.1.3
Общие
характеристики
………….……….………………. 27
10.2
Приложение
Б
:
Уход
и
обслуживание
………………………….. 27
10.2.1
Обслуживание
.…………………………….………………. 27
10.2.2
Хранение
осциллографа
…………………………………. 27
10.2.3
Замена
литиевой
батареи
…………….…………………. 27
Инструкция
выпущена
в
марте
2013.
Версия
1.5.2
Авторские
права
на
инструкцию
: ©
компания
Lilliput.
Все
права
защищены
.
Продукция
компании
Lilliput
защищена
патентами
США
и
других
стран
,
включая
уже
полученные
и
находящиеся
в
стадии
рас
—
смотрения
заявок
.
Информация
,
представленная
в
инструкции
,
замещает
ранее
опубликованные
материалы
.
Информация
,
представленная
в
данной
инструкции
,
являлась
корректной
на
момент
ее
издания
. OWON
продолжает
улучшать
продукцию
и
оставляет
за
собой
право
вносить
изменения
в
ее
технические
характеристики
без
предупреждения
.
OWON
является
зарегистрированной
торговой
маркой
компании
Lilliput
Головной
офис
: Fujian Lilliput Optoelectronics Technology Co.,Ltd.:
корпус
оптоэлектроники
,
дорога
Хэмин
, 19,
промышленная
зона
Ланьтянь
,
г
.
Чжанчжоу
,
Фуцзянь
,
Китай
.
(Fujian Lilliput Optoelectronics Technology Co.,Ltd.: The mansion of
optoelectronics, 19 Heming Road, Lantian industrial zone, Zhang-
zhou, Fujian, China).
-
Contents
-
Table of Contents
-
Troubleshooting
-
Bookmarks
Quick Links
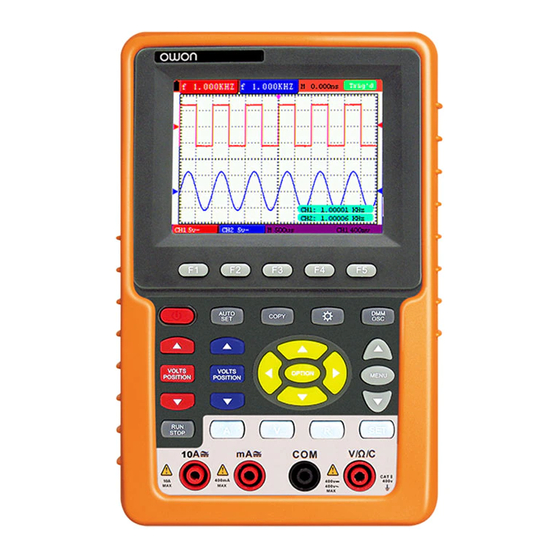
HDS-N Series Handheld Digital Storage
Oscilloscope & Multimeter
User Manual
HDS1022M-N
HDS2062M-N
HDS3102M-N
WWW.OWON.COM.HK
Related Manuals for Owon HDS-N series
Summary of Contents for Owon HDS-N series
-
Page 1
HDS-N Series Handheld Digital Storage Oscilloscope & Multimeter User Manual HDS1022M-N HDS2062M-N HDS3102M-N WWW.OWON.COM.HK… -
Page 2
The information in this manual was correct at the time of printing. However, OWON will continue to improve products and reserves the rights to changes specification at any time without notice. -
Page 3
Please contact the nearest Lilliput’s Sales and Service Offices for services or a complete copy of the warranty statement. For better after-sales service, please visit www.owon.com.hk and register the purchased product online. Excepting the after-sales services provided in this summary or the applicable warranty… -
Page 4: Table Of Contents
OWON HDS-N Series Handheld DSO & DMM Contents Table of Contents 1. DECLARATION OF CONFORMITY················································· 1 1.1 Declaration of Conformity ·······································································································1 1.2 Package Contents ······················································································································2 2. SAFETY INFORMATION···································································· 3 2.1 Safety Symbols and Terms ·······································································································3 2.1.1 Safety Symbols·············································································································· 3 2.1.2 Safety Terms.················································································································· 3 2.2 General Safety Information ·····································································································3…
-
Page 5
OWON HDS-N Series Handheld DSO & DMM Contents 6.13 Using Persistence to Display Waveforms ············································································22 6.14 Using Peak Detection to Display Glitches ···········································································23 6.15 Selecting AC-coupling···········································································································24 6.16 Reversing the Polarity of the Displayed Waveform ···························································25 6.17 Using Waveform Mathematics Functions···········································································26 6.18 Use USB mass storage device to save waveform data ························································27… -
Page 6
OWON HDS-N Series Handheld DSO & DMM Contents 8.8 Waveform Saving Setups ········································································································52 8.8.1 Waveform Saving Setups in normal mode········································································52 8.8.2 Waveform Saving Setups in FFT mode ············································································54 8.9 Function Setting Menu ···········································································································55 8.10 Making Automatic Measurements·······················································································55 8.11 Setting the Cursor Measurements························································································57 8.11.1 Setting the cursor measurement in normal mode ····························································57… -
Page 7: Declaration Of Conformity
OWON HDS-N Series Handheld DSO & DMM 1-Declaration of Conformity 1. Declaration of Conformity 1.1 Declaration of Conformity HDS-N Series Handheld Digital Storage Oscilloscope & Multimeter Manufacturer: Fujian Lilliput Optoelectronic Technology Co., Ltd. Statement of Conformity Base on the result using appropriate standards, the product is in conformity with…
-
Page 8: Package Contents
OWON HDS-N Series Handheld DSO & DMM 1-Declaration of Conformity 1.2 Package Contents See the picture below. This picture is only for your reference. If any discrepancy found between certain picture and product, please look the actual product. Description Standard…
-
Page 9: Safety Information
OWON HDS-N Series Handheld DSO & DMM 2-Safety information 2. Safety Information In order to ensure the correct using and the best efficient service, please carefully read this user’s manual. 2.1 Safety Symbols and Terms 2.1.1 Safety Symbols These symbols may appear in this manual or on the instrument.
-
Page 10
● Use only insulated voltage probes, test leads and adapter supplied with the test tool, or indicated by OWON as suitable for the Oscilloscope & Multimeter. ● Before use, inspect voltage probes, test leads and accessories for mechanical damage and replace when damaged. -
Page 11
OWON HDS-N Series Handheld DSO & DMM 2-Safety information ● Always connect the power adapter first to the AC outlet before connecting it to the Oscilloscope & Multimeter. ● Do not apply voltages that differ more than 400 V from earth ground to any input when measuring in a CAT Ⅱ… -
Page 12: General Characteristics
OWON HDS-N Series Handheld DSO & DMM 3-General Characteristics 3. General Characteristics Oscilloscope 2 in 1 (Multimeter function support); Record length of 6,000 points for each channel; Reading-out with the cursor; Twenty automatic measurement functions; Autoscale function; Color liquid crystal display of high resolution and high contrast with adjustable back light;…
-
Page 13: Performing The General Inspection
If the instrument is damaged in its appearance or it fails in normal operation or performance test, consult the OWON dealer responsible for such a business or the local office of OWON. If the instrument is damaged due to transportation, keep the packing in a proper place and consult the transportation department and the OWON dealer responsible for such business, who will provide an instrument replacement or maintenance.
-
Page 14: Input Connections
OWON HDS-N Series Handheld DSO & DMM 5-Input Connections 5. Input Connections 5.1 Input Connections 5.1.1 Input connections See the following Figure 2: Figure 2:Input connections Description: 1. The power adapter is supplied for AC power supply and battery recharging.
-
Page 15: The Connection Of 1Khz/5V Square-Wave Test Signal
OWON HDS-N Series Handheld DSO & DMM 5-Input Connections 5.1.2 The connection of 1KHz/5V Square-wave test signal At the left side of the oscilloscope, it is a port for testing 1 KHz/5V square-wave signal which is used to adjust the probe, shown as Fig.3 Fig.3.
-
Page 16
OWON HDS-N Series Handheld DSO & DMM 5-Input Connections Figure 4:Front Panel Description: 1. AC adapter Port 2. RS-232C Port. 3. USB Port. 4. USB Mass Storage Port. 5. Power switch. 6. F1~F5: Switch or Adjust options for each menu. -
Page 17
OWON HDS-N Series Handheld DSO & DMM 5-Input Connections 7. AUTO SET: Under DSO mode, automatically selects the horizontal scales, vertical scale, and trigger level according to the input signal. 8. COPY: Press to save the waveform data into the USB Mass Storage Device. -
Page 18: Using The Oscilloscope
OWON HDS-N Series Handheld DSO & DMM 6-Using the Oscilloscope 6. Using the Oscilloscope 6.1 About this Chapter This chapter provides a step-by-step introduction to the scope functions. The introduction does not cover all of the capabilities of the scope functions but gives basic examples to show how to use the menus and perform basic operations.
-
Page 19
OWON HDS-N Series Handheld DSO & DMM 6-Using the Oscilloscope Description: Battery electric quantity indicating symbols, including Auto measurement window 1, in which «f «means frequency, «T» means cycle, «V» means the average value, «Vp» the peak-peak value ,»Vk» the root-mean-square value,. «Ma» the maximum amplitude value, «Mi»… -
Page 20: Menu Description
OWON HDS-N Series Handheld DSO & DMM 6-Using the Oscilloscope 15. These graphics show the coupling mode of CH1, among which the graphic «~» express indicates AC, the graphic «-» indicates DC, the graphic » » indicates GND. 16. This reading shows the vertical Voltage Unit Scale of CH1.
-
Page 21: Manually Setting The Vertical System, Horizontal System And Trigger Position
OWON HDS-N Series Handheld DSO & DMM 6-Using the Oscilloscope 6.5 Manually Setting the Vertical System, Horizontal System and Trigger Position 6.5.1 Setting the Vertical System To set the vertical system of CH1: (1) Press VOLTS POSITION (red) key to toggle between bellows displayed at the bottom left of the screen: ▲/▼…
-
Page 22
OWON HDS-N Series Handheld DSO & DMM 6-Using the Oscilloscope ◄/► – Time Base ▲/▼ – Trig See the following figure 7: Figure 7 Press ◄ (yellow) or ► (yellow) to adjust the main time base; press ▲ (yellow) or▼ (yellow) to adjust trigger level position, press R key to «zero»… -
Page 23
OWON HDS-N Series Handheld DSO & DMM 6-Using the Oscilloscope horizontal position; press ▲(yellow) or ▼(yellow) to adjust trigger level position, press R key to «zero» the trigger level position. 5. Press OPTION again to back up operation 1. The following guidance is for the operation on the mode of alternative triggering. -
Page 24: Recall Factory Settings
OWON HDS-N Series Handheld DSO & DMM 6-Using the Oscilloscope Figure 10: Adjust Time Base and Trig 1 Press ◄(yellow) or ► (yellow) to adjust main time base; press ▲(yellow) or▼(yellow) to adjust trigger level position in Channel 1 (or Channel 2), press R key to «zero» the trigger level position.
-
Page 25: Input Connections
OWON HDS-N Series Handheld DSO & DMM 6-Using the Oscilloscope 4. Press F2 key to select «Auto calibration». If the ambient temperature variation is up to or larger than 5 Celsius degree, the Auto calibration function should be performed. But this will…
-
Page 26: Automatic Zero-Returning Of Trigger Horizontal Position And Trigger Level Position
OWON HDS-N Series Handheld DSO & DMM 6-Using the Oscilloscope 6.9 Automatic Zero-returning of Trigger Horizontal Position and Trigger Level Position When we adjust the trigger horizontal position and trigger level position to be maximal to make it off the screen center remotely, then we perform the following steps to make trigger horizontal position and trigger level position return to zero automatically.
-
Page 27: Freezing The Screen
OWON HDS-N Series Handheld DSO & DMM 6-Using the Oscilloscope Figure 12: Automatic Scope Measurements 6.11 Freezing the Screen You can freeze the screen (all readings and waveforms) Press the RUN/STOP key to freeze the screen and STOP appears at top right side of the screen.
-
Page 28: Using Average For Smoothing Waveforms
OWON HDS-N Series Handheld DSO & DMM 6-Using the Oscilloscope 6.12 Using Average for Smoothing Waveforms Using the Average acquisition mode, you can smooth out the displayed waveform by averaging multiple data samples. The number of averaging is selectable from 4, 16, 64, and 128.
-
Page 29: Using Peak Detection To Display Glitches
OWON HDS-N Series Handheld DSO & DMM 6-Using the Oscilloscope Look at the display, a screen like the following figure 15 can be shown. Figure 15: Persistence to Observe Dynamic Signals 6.14 Using Peak Detection to Display Glitches You can use this function to display events (glitches or other asynchronous waveforms) of 50 ns or wider.
-
Page 30: Selecting Ac-Coupling
OWON HDS-N Series Handheld DSO & DMM 6-Using the Oscilloscope Term interpretation Collecting mode: The oscilloscope transforms the collected analog data into a digital form after they are gathered in the following three different modes, that is, sampling, peak value detection and averaging values.
-
Page 31: Reversing The Polarity Of The Displayed Waveform
OWON HDS-N Series Handheld DSO & DMM 6-Using the Oscilloscope Figure 17: AC-Coupling 6.16 Reversing the Polarity of the Displayed Waveform To invert the input CH1 waveform, do the following: Press the MENU key and the function menu appears at the right side of the screen.
-
Page 32: Using Waveform Mathematics Functions
OWON HDS-N Series Handheld DSO & DMM 6-Using the Oscilloscope 6.17 Using Waveform Mathematics Functions When adding (CH1 + CH2), subtracting (CH1 – CH2, CH2 – CH1), multiplying (CH1 * CH2) or dividing (CH1 / CH2) the input waveforms of CHI and CH2, the Oscilloscope will display the mathematical result waveform M and the input waveforms of CH1 and CH2 on the screen.
-
Page 33: Use Usb Mass Storage Device To Save Waveform Data
OWON analysis software, or direct open the bitmap. Note: It has clew in a series of process USB operation storage, such as «USB save successfully».
-
Page 34: Using The Multimeter
OWON HDS-N Series Handheld DSO & DMM 7-Using the Multimeter 7. Using the Multimeter 7.1 About this Chapter This chapter provides a step-by-step introduction to the multi-meter functions of the test tool hereafter. The introduction gives basic examples to show how to use the menus and perform basic operations.
-
Page 35: Making Multimeter Measurements
OWON HDS-N Series Handheld DSO & DMM 7-Using the Multimeter Measurement mode indicators: DCV: Direct voltage measurement ACV: Alternating voltage measurement DCA: Direct current measurement ACA: Alternating current measurement R: Resistance measurement : Diode measurement : On/Off measurement C: Capacitance measurement The relative magnitude measurement indicator.
-
Page 36: Measuring Diode
OWON HDS-N Series Handheld DSO & DMM 7-Using the Multimeter Insert the black lead into the COM banana jack input and the red lead into the V/Ω/C banana jack input. Connect the red and black test leads to the resistor. The resistor value readings are shown on the screen in Ohm.
-
Page 37: On-Off Test
OWON HDS-N Series Handheld DSO & DMM 7-Using the Multimeter Figure 22: Diode Measurement 7.4.3 On-off Test To perform an On-off test, do the following: Press the R key and R appears on the top of the screen. Press the SET key till the following is shown on the screen.
-
Page 38: Measuring Dc Voltage
OWON HDS-N Series Handheld DSO & DMM 7-Using the Multimeter Press the R key and R appears on the top of the screen Press the SET key until C appears at the top of the screen. Insert the black leads to COM jack, and red leads to V/Ω/C jack.
-
Page 39: Measuring Ac Voltage
OWON HDS-N Series Handheld DSO & DMM 7-Using the Multimeter Figure 25: DC Voltage Measurement 7.4.6 Measuring AC Voltage To measure the AC voltage, do the following: Press the V key and DCV appears at the top of the screen.
-
Page 40: Measuring Dc Current
OWON HDS-N Series Handheld DSO & DMM 7-Using the Multimeter 7.4.7 Measuring DC Current To measure a DC current which is less than 400 mA, do the following: Press the A key and DCA appears at the top of the screen. The unit on the main reading screen is mA.
-
Page 41: Measuring Ac Current
OWON HDS-N Series Handheld DSO & DMM 7-Using the Multimeter Figure 28: DC Current Measurement for 10A 7.4.8 Measuring AC Current To measure an AC current which is less than 400 mA, do the following: Press the A key and DCA appears at the top of the screen. The unit on the main reading screen is mA.
-
Page 42: Freezing The Readings
OWON HDS-N Series Handheld DSO & DMM 7-Using the Multimeter To measure an AC current which is larger than 400 mA, do the following: Press the A key, an instruction prompt you to plug the multimeter test leads in the right position.
-
Page 43: Taking A Relative Measurement
OWON HDS-N Series Handheld DSO & DMM 7-Using the Multimeter Figure 31: Freezing the Readings 7.6 Taking a Relative Measurement A currently measured result relative to the defined reference value is displayed in a relative measurement. The following example shows how to take a relative measurement. At first, it is required to acquire a reference value.
-
Page 44: Selecting Automatic/Manualrange Adjustment
OWON HDS-N Series Handheld DSO & DMM 7-Using the Multimeter Figure 32: Relative Measurement 7.7 Selecting Automatic/ManualRange Adjustment The defaulted range mode of the instrument is automatic range. To switch to the manual range, perform the following steps: Press F1 key and MANUAL is displayed on the top left side of the screen to enter the manual range mode.
-
Page 45: Advanced Function Of Oscilloscope
OWON HDS-N Series Handheld DSO & DMM 8-Advanced Function of Oscilloscope 8. Advanced Function of Oscilloscope 8.1 About this Chapter This chapter will detail the oscilloscope function of the test tool. 8.2 Setting the Vertical CH1 and CH2 Each channel has its own independent vertical menu and each item can be set respectively based on the specific channel.
-
Page 46: Setting The Channel Coupling
OWON HDS-N Series Handheld DSO & DMM 8-Advanced Function of Oscilloscope The following Table describes the Vertical Channel menu: Function menu Setting Description The dc component in the input signal is blocked. Coupling The ac and dc components of the input signal are allowed.
-
Page 47: Open And Close Settings On Channel
OWON HDS-N Series Handheld DSO & DMM 8-Advanced Function of Oscilloscope Figure 36: DC Coupling Figure 37: Ground Coupling 8.2.2 Open and Close Settings on Channel Take CH1 for example: Press F2 Channel key first, and then OFF to make a Close setting on CH1.
-
Page 48: Setting Of Inverted Waveform
OWON HDS-N Series Handheld DSO & DMM 8-Advanced Function of Oscilloscope Press F3 Probe to adjust the probe attenuation level. Table: Probe attenuation level and the corresponding menu setting Probe attenuation level Corresponding Menu Setting 10:1 10 X 100:1 100 X…
-
Page 49: Setting The Trigger System
OWON HDS-N Series Handheld DSO & DMM 8-Advanced Function of Oscilloscope ► Press ◄ (yellow) or (yellow) to adjust the range of M waveform Press ▲ (yellow) or ▼ (yellow) to adjust the position of M waveform Now, look at the display and you will find a screen that looks like the following figure 38.
-
Page 50: Triggering Control
OWON HDS-N Series Handheld DSO & DMM 8-Advanced Function of Oscilloscope Left bottom display as below during alternate trigger: —Time Base — Time —Trig1 (or 2) — Trig2 (or 1) Press ▲ (yellow) or ▼ (yellow) to adjust trigger vertical position, Press ◄ (yellow) or ►…
-
Page 51: Video Trigger
OWON HDS-N Series Handheld DSO & DMM 8-Advanced Function of Oscilloscope Function menu Settings Description Rising Triggering on the rise edge of the signal. Slope Falling Triggering on the fall edge of the signal. CH1 is used as the trigger source.
-
Page 52
OWON HDS-N Series Handheld DSO & DMM 8-Advanced Function of Oscilloscope Designed Designed Figure 42: Video Line trigger (Page1) Figure 43: Video Line trigger (Page2) The Video trigger menu is described in the following table (First page): Function menu Settings Description Select CH1 as the trigger source. -
Page 53: Alternate Trigger
OWON HDS-N Series Handheld DSO & DMM 8-Advanced Function of Oscilloscope 8.5.3 Alternate trigger During alternate trigger, the trigger signal mainly comes from two vertical channels and it can be used to observe two irrelevant signals. You can set different trigger type for two vertical channels in this menu (optional for edge trigger and video trigger).
-
Page 54
OWON HDS-N Series Handheld DSO & DMM 8-Advanced Function of Oscilloscope Holdoff To go to holdoff menu --> Back to previous menu When the type is set as video type, Function menu Settings Description Setting trigger type and others info for Channel 1. -
Page 55: Selecting The Acquisition Mode
OWON HDS-N Series Handheld DSO & DMM 8-Advanced Function of Oscilloscope the Holdoff menu is described in the following table: Function menu Settings Description Off Time Set time slot before another trigger event. Increase Set the off time to increase.
-
Page 56: Display Setting
OWON HDS-N Series Handheld DSO & DMM 8-Advanced Function of Oscilloscope 4, 16, 64 Select the average number. Averages or 128 8.7 Display Setting The DISP SET menu is described in the following table. Function menu Settings Description Vectors The vector drawing mode shows the waveform as a smooth line, connecting each data point.
-
Page 57: Persistence
OWON HDS-N Series Handheld DSO & DMM 8-Advanced Function of Oscilloscope Figure 47: Vectors Style 8.7.2 Persistence With Persist function selected, the displayed saved original data gradually decay in color and the new data are bright in color; with infinite persistence mode selected, the oscilloscope keeps all past traces of the displayed waveform.
-
Page 58: Cymometer
OWON HDS-N Series Handheld DSO & DMM 8-Advanced Function of Oscilloscope 8.7.4 Cymometer It is a 6 digits cymometer. Its measurement range of frequency is 2Hz to full bandwidth. Set up cymometer limit to «ON» status. When the triggering mode is edge triggering, it is a one channel cymometer and it can only measure the frequency of the triggering channel.
-
Page 59
OWON HDS-N Series Handheld DSO & DMM 8-Advanced Function of Oscilloscope Function menu Setups Description Make sure the waveform you want to save appears in the Source display. Select the displayed waveform which you want to Math save. WAVE A, B, C and D Select the address for saving or recalling a waveform. -
Page 60: Waveform Saving Setups In Fft Mode
OWON HDS-N Series Handheld DSO & DMM 8-Advanced Function of Oscilloscope 8.8.2 Waveform Saving Setups in FFT mode FFT being on, the WAVE SAVE is described in the following list. Function menu Setups Description CH1 OFF Source CH2 OFF Only FFT waveform you can to save appears in the display.
-
Page 61: Function Setting Menu
OWON HDS-N Series Handheld DSO & DMM 8-Advanced Function of Oscilloscope 8.9 Function Setting Menu The FUNCTION menu is described in the following list. Function menu Setting Description Recall Factory Resume the instrument to its factory settings. Auto calibration Perform the Auto-calibration procedure.
-
Page 62
OWON HDS-N Series Handheld DSO & DMM 8-Advanced Function of Oscilloscope Measure the peak-to-peak value of CH1. PK-PK Measure the peak-to-peak value of CH2. Measure Root Mean Square (RMS) value of CH1. Cyc RMS Measure Root Mean Square (RMS) value of CH2. -
Page 63: Setting The Cursor Measurements
OWON HDS-N Series Handheld DSO & DMM 8-Advanced Function of Oscilloscope Press the MENU ▲ or MENU ▼ key to select MEAS SET 2. Five options appear at the bottom of the screen. Press the F4 key to jump to the PK-PK measurement as CH2. The measurement window on the screen turns into one blue in color and shows the peak-to-peak value of CH2.
-
Page 64
OWON HDS-N Series Handheld DSO & DMM 8-Advanced Function of Oscilloscope To make a voltage measurement on CH1, doing the following: Press the MENU key and the function menus are displayed at the right of the screen. Press the MENU ▲ or MENU ▼ key to select CURS MEAS. Five options are shown at the bottom of the screen. -
Page 65
OWON HDS-N Series Handheld DSO & DMM 8-Advanced Function of Oscilloscope Figure 53 To use the cursor for a time measurement on CH1, do the following: Press the MENU key and the function menus are displayed at the right of the screen. -
Page 66: Setting The Cursor Measurement In Fft Mode
OWON HDS-N Series Handheld DSO & DMM 8-Advanced Function of Oscilloscope When log out submenu, every value will show on the right bottom of the screen as figure 55: Figure 55: Use the Cursor for a Time Measurement 8.11.2 Setting the cursor measurement in FFT mode FFT being on, the cursor measurement menus are listed and described in the following table.
-
Page 67: Autoscale
OWON HDS-N Series Handheld DSO & DMM 8-Advanced Function of Oscilloscope —Cursor 2 Press ▲ (yellow) or ▼ (yellow) to see V1 move up and down and the panel will display the voltage value match V1 and Channel 1 Zero; Press ◄ (yellow) or ► (yellow) to see V2 move up and down and panel will display the voltage value match V2 to Channel 1 Zero.
-
Page 68
OWON HDS-N Series Handheld DSO & DMM 8-Advanced Function of Oscilloscope Display only one or two cycles in waveform. Display Multi-cycles in waveform. If you want to measure voltage of Channel 1, you can do as the follows: Press MENU, the function menu will appear on the right of the screen. -
Page 69: Record
OWON HDS-N Series Handheld DSO & DMM 8-Advanced Function of Oscilloscope division, trigger level or time scale for CH1 or CH2. To back to Autoscale, Press AUTOSET. 6. The oscilloscope is always on main time base. 7. The oscilloscope is turned into Peak Detection mode if it is in Average mode.
-
Page 70
OWON HDS-N Series Handheld DSO & DMM 8-Advanced Function of Oscilloscope Play back: Play back the recorded waveforms. Play back menu list: Menu Setting Instruction Loop Set repeat play mode. Play mode Single Set single time play mode. Play Press to start playback. -
Page 71
OWON HDS-N Series Handheld DSO & DMM 8-Advanced Function of Oscilloscope Record the waveform as follows: Press the MENU key and the function menu appears at the right of the screen. Press the MENU ▲ or MENU ▼ key to select RECORD and five options are displayed at the bottom of the screen. -
Page 72: Using Fft
OWON HDS-N Series Handheld DSO & DMM 8-Advanced Function of Oscilloscope 8.14 Using FFT An FFT breaks down sign als into component frequencies, which the oscilloscope uses to display a graph of the frequency domain of a signal, as opposed to the oscilloscope’s standard time domain graph.
-
Page 73
OWON HDS-N Series Handheld DSO & DMM 8-Advanced Function of Oscilloscope Press F2 to switch between channel CH1 and CH2 and the current status of channel shows on the top left. Press F3 to switch over Window including Hamming, Rectangle, Blackman and Hanning Press F4 to swit ch over Format dB and Vrms. -
Page 74
OWON HDS-N Series Handheld DSO & DMM 8-Advanced Function of Oscilloscope ▲/▼ —CH1 OFF When FFT source is CH1: ▲/▼ If left bottom of the s creen displays » —FFT dB Scale «, press ▲(red) and ▼(red) button to adjust dB val ue of each DIV, including 1dB, 2dB, 5dB, 10dB, 20dB;… -
Page 75
OWON HDS-N Series Handheld DSO & DMM 8-Advanced Function of Oscilloscope Figure 60 The Shown Frequency of M Selecting an FFT Window The FFT feature provides four windows. Each is a trade-off between frequency ■ resolution and magnitude accuracy. What you want to measure and your source signal characteristics help determine which window to use. -
Page 76
OWON HDS-N Series Handheld DSO & DMM 8-Advanced Function of Oscilloscope This is a very good window for measuring amplitude accuracy but less so for resolving frequencies. Hanning Use Hanning for measuring sine, periodic and narrow band random noise. This window works on transients or bursts where the signal levels before and after the event are significantly different. -
Page 77
OWON HDS-N Series Handheld DSO & DMM 8-Advanced Function of Oscilloscope Fig.63. Hanning window window Fig.64. Hamming Quick Tips If desired, use the zoom feature to magnify the FFT waveform. Use the default dB scale to see a detailed view of multiple frequencies, even if they have very Vrms different amplitudes. -
Page 78: System State Menu
OWON HDS-N Series Handheld DSO & DMM 8-Advanced Function of Oscilloscope «False Wave» phenomenon will appear. So pay more attention to the relation between the frequency being sampled and measured. NOTE: While FFT mode is turned on, DO NOT USE THESE SETTINGS: Horizontal window setting.
-
Page 79: Real Time Clock
OWON HDS-N Series Handheld DSO & DMM 8-Advanced Function of Oscilloscope 8.15.1 Real time clock Function: Be synchronous with the U disk storage time. Do below steps to set up the real time clock: 1. Press MENU key and the function menu is displayed on the right side of the screen.
-
Page 80
OWON HDS-N Series Handheld DSO & DMM 8-Advanced Function of Oscilloscope Press MENU key, display the function menu on the right side of the screen. Press MENU ▲ or MENU ▼ key to select TIME MODE, display three options at the bottom. -
Page 81: Data Transmission
Press F4 key, select the Bitmap or Vectors for data transmission. Use a data line to connect the oscilloscope and the PC. Open the OWON software that had been installed completely. Setting the parameter under the use’s manual, and then starts data transmission.
-
Page 82: Trouble Shooting
Firstly, charge the battery and supply the oscilloscope with power through the battery charger. However, don’t switch on the oscilloscope till waiting for 15 minutes. If the oscilloscope still cannot start, please contact OWON for service. 2. The oscilloscope stops working only after operating for several seconds Probably the battery is dead;…
-
Page 83: Appendix
OWON HDS-N Series Handheld DSO & DMM 10-Appendix 10. Appendix 10.1 Appendix A: Specifications 10.1.1 Oscilloscope Only if other instructions are provided, are all technical specifications applicable to the probe with the 10X attenuation switch setting and the HDS-N series digital type oscilloscope. In order to be up to these specifications, the oscilloscope should meet the following requirement.
-
Page 84
OWON HDS-N Series Handheld DSO & DMM 10-Appendix Record length 6K points on each channel 5ns/div ~ 100s/div, stepping «1-2.5-5» mode—-HDS1022M-N Scanning speed range(S/div) 5ns/div ~ 100s/div, stepping «1-2-5» mode—-HDS2062M-N,HDS3102M-N Sampling rate and delay time ±100ppm accuracy (any time interval which is equal to or larger than 1ms) Single: Time interval (△T)measurement… -
Page 85: Meter
OWON HDS-N Series Handheld DSO & DMM 10-Appendix Make a 50% level setting Operation with the input signal frequency equal to or larger (Typical). than 50Hz. Signal system and line/field Support the NTSC, PAL and SECAM broadcasting systems frequency (Video triggering mode) of any field or line frequency.
-
Page 86
OWON HDS-N Series Handheld DSO & DMM 10-Appendix Voltage (VAC) Input Impedance: 10MΩ Max Input Voltage: 750V (AC, virtual value) Frequency range: from 40Hz to 400Hz Display: Virtual value of the sine wave Range Accuracy Resolution 4.000V ±1%±3 digits 40.00V 10mV 400.0V… -
Page 87: General Specifications
OWON HDS-N Series Handheld DSO & DMM 10-Appendix Diode Voltage reading: 0 V ~1.5 V. On-off Test There is a beep sound when the on-resistance is less than 50Ω. 10.1.3 General Specifications Basic parameter Mechanical dimension 18 cm×11.5cm×4cm Weight 645 g <…
-
Page 88: Appendix B: Maintenance And Cleaning
OWON HDS-N Series Handheld DSO & DMM 10-Appendix 10.2 Appendix B: Maintenance and Cleaning 10.2.1 Maintenance Do not store or place the instrument in locations where the liquid crystal display (LCD) may be directly exposed to the sunshine for a long time.
Осциллограф OWON HDS1022M практика эксплуатации прибора
Ну, собственно, вот, как и обещал, рассказываю…
С чего начать? Естественно с первых впечатлений, а оные происходят в момент знакомства с будущей покупкой. Знакомство произошло достаточно давно, примерно с год тому назад, как водится в магазине. Не то, чтобы я специально ходил по магазинам и вынюхивал, где осциллографы продаются, но и пройти мимо такого экспоната спокойно не смог, долго стоял, разглядывал. В конце концов не выдержал и попросил продавца показать. Прикинулся ну типа не лохом и все такое. Тут то и зародилась будущая мечта. Но что такое мечта? Мало ли о чем можно мечтать? Ну, скажем, завезли в автосалон новейщую модель машины и что, я должен сказать, что совершенно не хочу ее купить? Ну конечно нет! Хочу новую, крутую машину, яхту, дачу на берегу, и вообще еще много чего приятного и совершенно законного, чего хотеть не вредно, а совсем даже наоборот. И ведь на этой планете я такой не один, нас много, мы все, кроме тех, что лечатся в психушках и других спец-больницах… Мечтать не вредно, однако полезно понимать две вещи. Во-первых все мечты делятся на сбыточные и нет. Конечно, для каждого человека этот критерий строго индивидуален. Например, если для меня дача на берегу пока находится в разряде несбыточных, то для кого-то она давно реальность. Во-вторых стоит подумать, а нафига оно надо, в смысле то, о чем мечтаешь? Может стоит задуматься о чем то другом, не столь привлекательном, но более для жизни полезным? И вот тут то я стал считать откровенно потерянные деньги за работу, которую не смог сделать по причине отсутствия прибора. Вот пример… Ломается у чела сплит. Приезжаю а он тупо включается и выключается. Все! Никаких зацепок. Аппарат отработал год и теперь канючит, а чего хочет – неясно! Снимаю электронику, привожу в мастерскую, и понимаю, что работать она без остальной обвески не хочет. Разбираю такой же сплит, подключаю проверяемую электронику к остальному содержимому и что вижу? Правильно! Работает на зависть всем! Падла! Как часы. И вот тут просто бы проверить бы импульсы с таходатчика мотора вентилятора внутреннего блока, а чем? А нечем! Конечно можно и мотор снять и датчики и дисплей и все остальное, притащить в мастерскую, но сколько это занимает времени? А что делать с инверторными сплитами или, скажем, с «мультиками»? Что везти в мастерскую на ремонт? А между прочем клиент в это время готов тупо оплатить любую мало — мальски разумную сумму ремонта! Ему ведь жарко не до шуток. И вот однажды, прозевав очередной заказ я понял, что прибор назрел. Тут же сложился список требований. Во-первых и главных, это должен быть переносной прибор обязательно с, автономным питанием. Во-вторых очень желательно, чтобы он был достаточно функциональным в смысле не игрушка, а настоящий измерительный прибор, так сказать, на вырост. А рости есть куда. Опять же пример… Совсем недавно приходит один хороший знакомый и просит помочь разобраться с системой видеонаблюдения. И задача то совсем плевая – надо просто измерить сигнал, приходящий с камер на регистратор. И какой из моих осциллографов я должен с собой взять, девяноста третий или стосемнадцатый? Вот тут то, поняв, что хрен редьки не слаще, я пошел покупать себе новый карманный осциллограф!
Покупка.
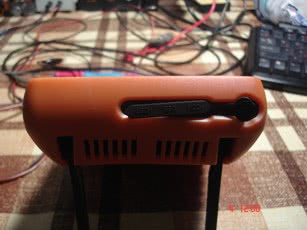
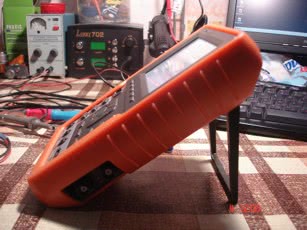
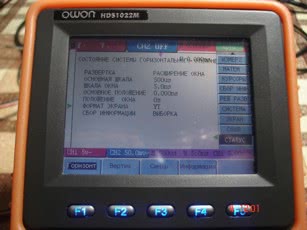
Коробка с ручкой, достаточно строгого дизайна, что нехарактерно для китайцев. Внутри, в толстенных обоймах из какой то пено-фигни находится чемодан, больше похожий на емкость для миллиона баксов из плохого американского боевика про спасение всего мира. Внутри чемодана черный поролон, в котором вырезаны ниши для прибора и его прибамбасов. В комплекте имеются два щупа с переключаемыми делителями, шнуры для мультиметра, пара примочек для измерения тока и емкости, кабель USB, сетевой адаптер, пакет с инструкцией на английском и CD-диск с ПО. Собственно прибор, как уже давно повелось среди носимых измерительных приблуд, обернут в оранжевую резиновую обойму. Оная, судя по всему, предназначена для защиты осциллографа при ударах. Экран защищен пластиной из оргстекла. Вообще то про экран стоит рассказать дополнительно… Он сделан по хитрой технологии, название которой я все никак не могу вспомнить, смысл которой в том, что он не просвечивается насквозь, как обычные TFT панели, а отражает свет, как обычный циферблат в электронных часах. При этом он цветной! Т.е. он способен показывать цветное, вполне читаемое изображение без подсветки! Я думаю, что это нелишнее, т.к. позволяет экономить заряд батареи. Еще одной весьма положительной особенностью экрана является то, что он хорошо читаем с разных углов обзора и с большого расстояния. В общем к качеству и функциональности экрана у меня вопросов нет. Его размер 3.8 дюйма при 320Х240 точек. В инструкции написано, что он может отображать 4096 цветов, но судя по всему реально используется шетснадцатицветный режим, что впрочем меня устраивает вполне, чего нельзя сказать про кнопки! В целом панель управления сделана вполне функционально и достаточно практично. Относительно крупные серые кнопки с синей яркой подсветкой и крупными надписями выглядят вполне солидно. Нажимаются они с хорошо ощутимым щелчком, что исключает случайные нажатия. В целом управление прибора вполне логичное и достаточно продуманное, но есть и один очень серьезный недостаток – отсутствие шаттла! Кроме того, для оперативного перехода из одного режима управления в другой иногда приходится делать много нажатий и я боюсь, что кнопок на долго не хватит. Еще не хватает банка памяти для заранее запрограммированых индивидуальных настроек, что также делает управление громоздким и медленным. Разьемы для подключения щупов расположены на правой боковой панели прибора, что также не слишком удобно, хотя, если учесть, что на передней панели их расположить просто негде, то такое решение вполне логично. Правда есть к ним и претензии. Они пластиковые! Я не знаю, насколько они хлипкие. Проверять мне это не хочется, но по внешнему виду они не внушают такого доверия, как, скажем, разьемы в отечественных приборах измерительного назанчения. Кроме того на передней панели расположены клеммы для подключения щупов мультиметра и разьем для подключения измеряемых емкостей. Эти прибамбасы ничем не отличаются от аналогичных в портативных цифровых мультиметрах и никаких эмоций у меня не вызвали. Так сказать, все как обычно. Правда само наличие возможности измерения емкости меня порадовало. Я особенно не страдал раньше отсутствием портативного измерителя емкости, но и наличие оного не помешает. На левой боковой панели имеется выключатель подсветки дисплея. На задней стороне корпуса имеется нога для установки прибора на столе. К стати оная нога имеет в себе некий пружинный механизм, который при откидывании издает неприятный скрежечащий звук и мне кажется, что он долго не прослужит. Сверху, на торцевой панели расположен разьем для подключения внешнего питания DC-8.8 вольт и отверстия с надписями COM, USB, HOST. Причем USB разьем реально запаян в плату, а два остальных отсутствуют. Батарейный отсек отсутствует! Т.е. аккумулятор встроен в прибор навечно.
Первый опыт.
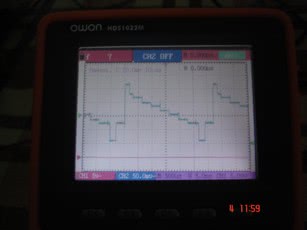
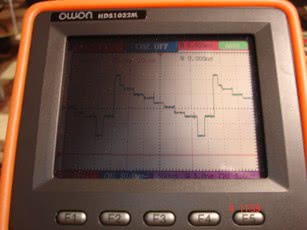
В инструкции заявлено, что преобразователь прибора делает сто мегавыборок в секунду! Цифра, для портативного прибора, внушительная. При этом гарантированная полоса измерительных каналов рассчитана на двадцать мегагерц. На практике оказалось, что, например, вспышки на видеосигнале можно не только рассматривать, но и измерять с помощью курсоров, записав предварительно сигнал в память. К стати эта особенность цифрового прибора меня привела в неописуемый восторг. Я раньше никогда не работал с цифровыми осциллами, хотя кое что читал про их возможности и достаточно хорошо представлял себе процесс измерения с их помощью. Но на практике это выглядит гораздо забавнее. Это не просто удобно, это фантастика! Это именно то, что делает из цифрового осциллографа совершенно иной, непохожий и незаменимый аналоговым прибором инструмент! В конкретной модели имеется всего четыре банка памяти по шесть киловыборок с разрешением 8 бит. При этом как все сразу, так и конкретно выбранная одна или несколько заранее записанных осциллограмм могут воспроизводиться на экране одновременно с работой двух или одного канала, работающего в реальном времени. Записанные осциллограммы нельзя изменить, но можно растягивать во всех направлениях с целью рассматривания, а также с ними можно проводить курсорные измерения. Сам алгоритм курсорных измерений имеет всего два курсора, которые в зависимости от выбранного режима представляют собой либо горизонтальные, либо вертикальные линии, в промежутке между которыми и производится измерение. Результат выводится на экран цифрами. В качестве источника для алгоритма курсорных измерений может использоваться любой из шести каналов, т.е. любой из двух реальных измерительных каналов или любой из четырех каналов памяти с предварительно записанной в них осциллограммой. А еще в приборе имеется алгоритм математических функций над двумя сигналами, работающий в реальном времени и выводящий результат, как отдельный сигнал на экран! В общем два сигнала можно вычесть, сложить, перемножить или разделить. Пока я не придумал применения этим режимам. Сказывается отсутствие опыта работы с подобными аппаратами. Ну и конечно нельзя не упомянуть «магическую кнопку» нажатие на которую заставляет прибор самостоятельно выбирать пределы и режимы измерения. И еще одна «крутая» кнопка, позволяющая «заморозить» экран. В общем с таким набором функций я пока осциллографа не видел! Он реально не просто заменяет собой любой осцилл из тех, с которыми я раньше имел дело, но и значительно превосходит их функционально!
Неразрешенные вопросы.
Пока неясно где и как производится ремонт подобных осциллов и возможно ли на него заказать детали. В инструкции дан адрес сайта, через который можно связаться с сервисом, но я пока этого не делал. В общем с гарантиями и сервисом вопрос открытый. Вопрос надежности и долговечности опять же остается вопросом. Тут уже только время покажет. Еще сильно интересует время наработки от одного заряда батареи. Уже ясно, что это время никак не меньше, чем два часа. Во всяком случае прибор отработал не менее двух часов и индикатор батареи показывает половину. Правда при этом подсветка экрана отключена, хотя я подозреваю, что подсветка в нем далеко не самый энергоемкий потребитель электричества. Во время работы аппарат заметно теплеет. Опять же неясно, способен ли прибор одновременно заряжать батарею и работать от внешнего адаптера? Ответ на этот вопрос будет получен экспериментально, методом научного тыка после полного разряда батареи.
ссылка скрыта от публикации