-
Инструкции по эксплуатации
1

Panasonic CS-E12PKDW инструкция по эксплуатации
(52 страницы)
- Языки:Русский
-
Тип:
PDF -
Размер:
5.05 MB -
Описание:
Кондиционер
Просмотр
На NoDevice можно скачать инструкцию по эксплуатации для Panasonic CS-E12PKDW. Руководство пользователя необходимо для ознакомления с правилами установки и эксплуатации Panasonic CS-E12PKDW. Инструкции по использованию помогут правильно настроить Panasonic CS-E12PKDW, исправить ошибки и выявить неполадки.
![]()
Инструкции по эксплуатации
Кондиционер
Модель №. Внутренний блок
CS-E7PKDW CS-E9PKDW CS-E12PKDW CS-E15PKDW CS-E18PKDW CS-E24PKDW
|
Наружный блок |
|
|
Сплит-система |
Мульти сплит-система |
|
CU-E7PKD |
CU-2E15PBD |
|
CU-E9PKD |
CU-2E18PBD |
|
CU-E12PKD |
CU-4E27PBE |
|
CU-E15PKD |
CU-5E34PBE |
|
CU-E18PKD |
U-3E18JBE |
|
CU-E24PKD |
U-4E23JBE |
Название и адрес завода-изготовителя указаны на упаковке и на изделии.
ME67
Обеспечение максимального комфорта, чистого воздуха и оптимальной экономии энергии
ECONAVI и AUTO COMFORT
Благодаря датчику человеческой активности кондиционер обеспечивает подачу холодного или теплого воздуха и поддерживает комфортные климатические условия в помещении при минимальном потреблении энергии.
Дополнительные сведения см. в разделе “Дополнительная информация…”.
nanoe-G
Поддерживает чистоту воздуха, устраняя из него вредные микроорганизмы, такие как вирусы, бактерии и т.д.
Также уничтожает вирусы и бактерии на фильтре для поддержания чистоты внутри аппарата.
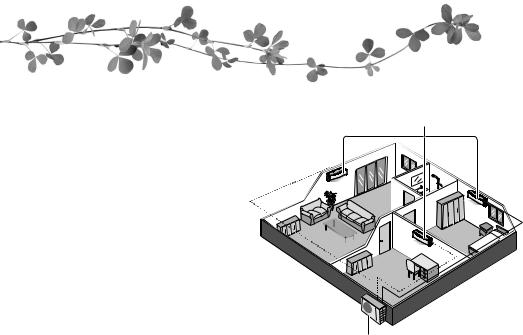
Система с несколькими кондиционерами воздуха
Система с несколькими кондиционерами экономит место, позволяя вам подключить несколько внутренних блоков к одному наружному блоку.
•Чтобы ознакомиться со всеми функциями изделия, см. каталог.
Внутренние блоки
•Возможно индивидуальное или одновременное управление внутренними блоками. При выполнении функций приоритетным является первый включенный блок.
•Невозможно, чтобы разные внутренние блоки одновременно работали в режимах НАГРЕВА и ОХЛАЖДЕНИЯ.
•Мигание индикатора питания указывает на то, что внутренний блок находится в ожидании другого режима работы.
Внутренние блоки
Наружный блок
(CU-2E15PBD, CU-2E18PBD, CU-4E27PBE, CU-5E34PBE, U-3E18JBE, U-4E23JBE)
14
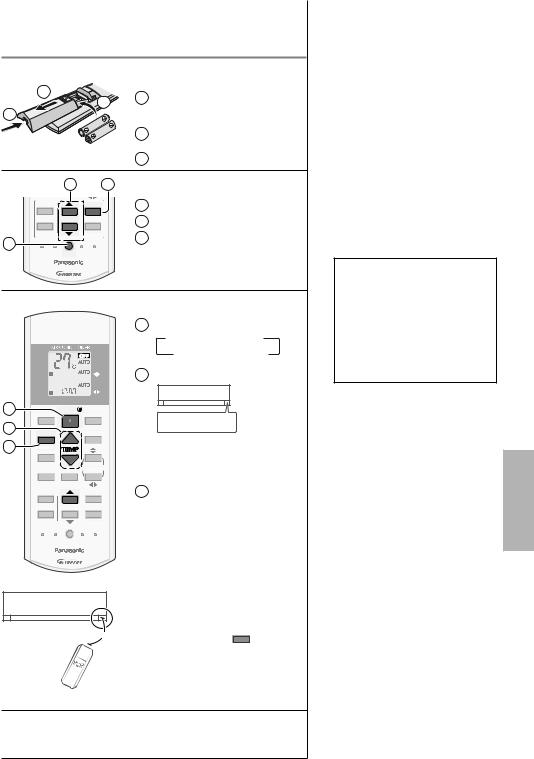
Краткая инструкция
Вставьте элементы питания
|
1 |
2 |
1 |
Потяните и снимите заднюю |
|
3 |
крышку пульта дистанционного |
||
|
управления |
|||
|
2 |
Вставьтебатарейки(AAA илиR03) |
||
|
(можетиспользоваться~ 1 год) |
|||
|
3 |
Закройте крышку |
|
2 |
3 |
Установка часов |
||
|
TIMER |
1 |
Нажмите кнопку CLOCK |
||
|
ON |
SET |
|||
|
2 |
Установите время |
|||
|
1 |
2 |
3 |
||
|
OFF |
CANCEL |
3 |
Подтверждение |
|
|
1 |
AC RC |
|||
|
SET CHECK CLOCK |
RESET |
|
AUTO |
FAN |
|
|
HEAT |
SPEED |
|
|
COOL |
||
|
DRY |
AIR |
|
|
MILD |
SWING |
|
|
DRY |
||
|
2 |
ECONAVI |
AUTO |
|
COMFORT |
||
|
3 |
NANOE-G |
|
|
1 |
MILD DRY |
|
|
COOLING |
||
|
POWERFUL/ |
AIR SWING |
|
|
QUIET FAN SPEED |
||
|
TIMER |
||
|
ON |
SET |
|
|
2 |
3 |
|
|
OFF |
CANCEL |
|
|
AC RC |
||
|
SET CHECK CLOCK |
RESET |
 8m
8m
Основные функции
1 Выберите необходимый режим
 AUTO
AUTO  HEAT DRY
 COOL
COOL
2 Включить/остановить работу


 POWER
POWER
•Обратите внимание на то, что для включения устройства индикация ВЫКЛЮЧЕНИЯ должна указывать на .
.
3Выберите необходимую температуру
•Диапазон выбора: 16 °C ~ 30 °C.
•Использование кондиционера в диапазоне рекомендованных температур способствует экономии электроэнергии.
НАГРЕВ: 20 °C ~ 24 °C. ОХЛАЖДЕНИЕ: 26 °C ~ 28 °C.
ОСУШЕНИЕ: 1 °C ~ 2 °C ниже комнатной температуры.
•Нажмите и удерживайте  в течение
5секунд, чтобы уменьшить или восстановить яркость индикатора блока.
•Используйте пульт дистанционного управления в радиусе 8 метров от приемника сигнала дистанционного управления внутреннего блока.
Иллюстрации в данном руководстве предназначены для пояснительных целей и могут отличаться для конкретного кондиционера. В связи с последующим совершенствованием конструкции могут вноситься изменения без предварительного уведомления.
|
Содержание |
|
|
Меры предосторожности… |
16-17 |
|
Как пользоваться …………… |
18-19 |
|
Дополнительная |
|
|
информация… ………………20-21 |
|
|
Инструкции по чистке…………. |
22 |
|
Устранение |
|
|
неисправностей …………………. |
23 |
|
Информация………………………. |
24 |
Принадлежности
•Дистанционное управление
•Батарейки AAA или R03 × 2
•Держатель пульта дистанционного управления
•Винты для держателя пульта дистанционного управления × 2
Руccкий
15

Меры предосторожности
Во избежание получения травм, нанесения телесных повреждений другим лицам и ущерба имуществу следует соблюдать следующие инструкции:
Неправильная эксплуатация вследствие несоблюдения инструкций нанесет вред или ущерб, степень серьезности которых классифицируется следующим образом:
Этот символ
предупреждает о ПРЕДУПРЕЖДЕНИЕ смертельной опасности
или о риске получения серьезной травмы.
Этот символ
предупреждает об
ПРЕДОСТЕРЕЖЕНИЕ опасности травмы или нанесения вреда
имуществу.
Инструкции, которые следует выполнять, обозначаются следующими символами:
Этот символ обозначает действие как ЗАПРЕЩЕННОЕ.

 Эти символы обозначают
  действия как ОБЯЗАТЕЛЬНЫЕ.
Электросна-
бжение
Внутренний блок Воздухозаборник
Воздуховыпускное
отверстие
Дистанционное Воздухозаборник
управление
|
Наружный |
|
|
блок |
Воздуховыпускное |
|
отверстие |
 ПРЕДУПРЕЖДЕНИЕ
Внутренний и наружный блоки
Данное устройство может использоваться лицами с ограниченными физическими, чувствительными или умственными способностями (включая детей) или лицами с отсутствием опыта или знания только при условии, что они находятся под надзором или
получили от лица, ответственного за их безопасность, соответствующие инструкции по использованию изделия. Дети должны находиться под наблюдением. Необходимо следить за тем, чтобы они не играли с устройством.
Для чистки внутренних деталей, ремонта, установки, переноса и переустановки блока следует обращаться к официальному дилеру. Неправильная установка и обращение могут привести к утечке, поражению электрическим током или пожару.
Проконсультируйтесь с авторизованным дилером или специалистом относительно использования любого указанного типа хладагента.
Использование хладагента другого типа может привести к повреждению изделия, взрыву или телесным повреждениям и т. д.
Не устанавливайте блок в потенциально взрывоили огнеопасной среде. Несоблюдение данного условия может привести к пожару.
Не вставляйте пальцы или другие предметы в наружный или внутренний блок кондиционера, поскольку вращающиеся части могут нанести травму.
Не прикасайтесь к наружному блоку кондиционера во время грозы, это может привести к поражению электрическим током.
Во избежание переохлаждения не подвергайте себя прямому воздействию холодного воздуха в течение длительного времени.
Не садитесь и не становитесь на устройство, вы можете упасть.
Дистанционное управление
Держите пульт ДУ вдали от грудных и маленьких детей, во избежание случайного проглатывания батарей.
Электроснабжение
Во избежание перегрева и возникновения пожара не 

 используйте модифицированный

 шнур, сращенный шнур, удлинитель или шнур, не соответствующий техническим условиям.
16
 Loading…
- Manuals
- Brands
- Panasonic Manuals
- Air Conditioner
- CS-E12PKDW
Manuals and User Guides for Panasonic CS-E12PKDW. We have 1 Panasonic CS-E12PKDW manual available for free PDF download: Operating Instructions Manual
Order No: PAPAMY1302030CE
Air Conditioner
Indoor Unit
Outdoor Unit
CS-E7PKDW
CS-E9PKDW
CS-E12PKDW
CS-E15PKDW
CS-E18PKDW
CS-E24PKDW
CU-E7PKD
CU-E9PKD
CU-E12PKD
CU-E15PKD
CU-E18PKD
CU-E24PKD
Destination
CIS
Please file and use this manual together with the service manual for Model No. CU-2E15PBD, CU-2E18PBD,
Order No. PAPAMY1303101CE, Model No. U-3E18JBE, U-4E23JBE, Order No. PHAAM1004141C2 and Model No. CU-4E27PBD,
CU-5E34PBD, Order No. PAPAMY1304104CE.
PRECAUTION OF LOW TEMPERATURE
In order to avoid frostbite, be assured of no refrigerant leakage during the installation or repairing of refrigerant circuit.
This service information is designed for experienced repair technicians only and is not designed for use by the general public.
It does not contain warnings or cautions to advise non-technical individuals of potential dangers in attempting to service a product.
Products powered by electricity should be serviced or repaired only by experienced professional technicians. Any attempt to service
or repair the product or products dealt with in this service information by anyone else could result in serious injury or death.
WARNING
2
TABLE OF CONTENTS
1.
Safety Precautions ……………………………………… 3
2.
Specification ………………………………………………. 5
3.
Features ……………………………………………………. 20
4.
Location of Controls and Components ………. 21
4.1
Indoor Unit ………………………………………….. 21
4.2
Outdoor Unit ……………………………………….. 21
4.3
Remote Control …………………………………… 21
5.
Dimensions ………………………………………………. 22
5.1
Indoor Unit ………………………………………….. 22
5.2
Outdoor Unit ……………………………………….. 24
6.
Refrigeration Cycle Diagram ……………………… 26
6.1
CU-E7PKD CU-E9PKD CU-E12PKD
CU-E15PKD ……………………………………….. 26
6.2
CU-E18PKD ……………………………………….. 27
6.3
CU-E24PKD ……………………………………….. 28
7.
Block Diagram ………………………………………….. 29
7.1
CU-E7PKD …………………………………………. 29
7.2
CU-E9PKD CU-E12PKD CU-E15PKD ….. 30
7.3
CU-E18PKD ……………………………………….. 31
7.4
CU-E24PKD ……………………………………….. 32
8.
Wiring Connection Diagram ………………………. 33
8.1
Indoor Unit ………………………………………….. 33
8.2
Outdoor Unit ……………………………………….. 34
9.
Electronic Circuit Diagram ………………………… 38
9.1
Indoor Unit ………………………………………….. 38
9.2
Outdoor Unit ……………………………………….. 39
10.
Printed Circuit Board ………………………………… 43
10.1
Indoor Unit ………………………………………….. 43
10.2
Outdoor Unit ……………………………………….. 46
11.
Installation Instruction ………………………………. 50
11.1
Select the Best Location ……………………….. 50
11.2
Indoor Unit ………………………………………….. 51
11.3
Outdoor Unit ……………………………………….. 55
12.
Operation and Control ………………………………. 58
12.1
Basic Function …………………………………….. 58
12.2
Indoor Fan Motor Operation ………………….. 59
12.3
Outdoor Fan Motor Operation ……………….. 60
12.4
Airflow Direction …………………………………… 60
12.5
Quiet operation (Cooling Mode/Cooling area
of Dry Mode) ……………………………………….. 62
12.6
Quiet operation (Heating) ……………………… 62
12.7
Powerful Mode Operation ……………………… 63
12.8
Timer Control ………………………………………. 63
12.9
Auto Restart Control …………………………….. 63
12.10
Indication Panel …………………………………… 64
12.11
nanoe-G Operation ………………………………. 64
12.12
Mild Dry Cooling Operation …………………… 66
12.13
AUTO COMFORT and ECONAVI
Operation ……………………………………………. 67
13.
Operation Control (For Multi Split
Connection) ………………………………………………. 77
13.1
Cooling operation …………………………………77
13.2
Soft Dry Operation ………………………………..77
13.3
Heating Operation ………………………………..77
13.4
Automatic Operation ……………………………..78
13.5
Indoor Fan Motor Operation …………………..78
13.6
Powerful Mode Operation ………………………78
13.7
Auto restart control ……………………………….78
13.8
Indication Panel ……………………………………78
13.9
Mild Dry Cooling Operation ……………………78
14.
Protection Control (E7 ~ 18PK) …………………..79
14.1
Protection Control For All Operations ………79
14.2
Protection Control For Cooling & Soft Dry
Operation …………………………………………….81
14.3
Protection Control For Heating
Operation …………………………………………….82
15.
Protection Control (E24PK) ………………………..83
15.1
Protection Control For All Operations ………83
15.2
Protection Control For Cooling & Soft Dry
Operation …………………………………………….85
15.3
Protection Control For Heating
Operation …………………………………………….86
16.
Servicing Mode ………………………………………….87
16.1
Auto OFF/ON Button …………………………….87
16.2
Remote Control Button ………………………….88
17.
Troubleshooting Guide ………………………………89
17.1
Refrigeration Cycle System ……………………89
17.2
Breakdown Self Diagnosis Function ………..91
17.3
Error Code Table ………………………………….92
17.4
Self-diagnosis Method …………………………..94
18.
Disassembly and Assembly Instructions … 122
18.1
CS-E7PK CS-E9PK CS-E12PK
CS-E15PK ……………………………………….. 122
18.2
CS-E18PK CS-E24PK ………………………. 126
18.3
Outdoor Electronic Controller Removal
Procedure ………………………………………… 130
19.
Technical Data ……………………………………….. 133
19.1
Operation Characteristics …………………… 133
19.2
Sensible Capacity Chart …………………….. 157
20.
Exploded View and Replacement Parts
List ………………………………………………………… 159
20.1
Indoor Unit ……………………………………….. 159
20.2
Outdoor Unit …………………………………….. 165
3
CAUTION
WARNING
WARNING
1. Safety Precautions
Read the following “SAFETY PRECAUTIONS” carefully before perform any servicing.
Electrical work must be installed or serviced by a licensed electrician. Be sure to use the correct rating of the
power plug and main circuit for the model installed.
The caution items stated here must be followed because these important contents are related to safety. The
meaning of each indication used is as below. Incorrect installation or servicing due to ignoring of the instruction
will cause harm or damage, and the seriousness is classified by the following indications.
This indication shows the possibility of causing death or serious injury.
This indication shows the possibility of causing injury or damage to properties.
The items to be followed are classified by the symbols:
Carry out test run to confirm that no abnormality occurs after the servicing. Then, explain to user the operation,
care and maintenance as stated in instructions. Please remind the customer to keep the operating instructions for
future reference.
1. Do not modify the machine, part, material during repairing service.
2. If wiring unit is supplied as repairing part, do not repair or connect the wire even only partial wire break. Exchange the whole wiring unit.
3. Do not wrench the fasten terminal. Pull it out or insert it straightly.
4. Engage authorized dealer or specialist for installation and servicing. If installation or servicing done by the user is defective, it will cause
water leakage, electrical shock or fire.
5. Install according to this installation instructions strictly. If installation is defective, it will cause water leakage, electric shock or fire.
6. Use the attached accessories parts and specified parts for installation and servicing. Otherwise, it will cause the set to fall, water leakage,
fire or electrical shock.
7. Install at a strong and firm location which is able to withstand the set’s weight. If the strength is not enough or installation is not properly done,
the set will drop and cause injury.
8. For electrical work, follow the local national wiring standard, regulation and the installation instruction. An independent circuit and single
outlet must be used. If electrical circuit capacity is not enough or defect found in electrical work, it will cause electrical shock or fire.
9. This equipment is strongly recommended to install with Earth Leakage Circuit Breaker (ELCB) or Residual Current Device (RCD).
Otherwise, it may cause electrical shock and fire in case equipment breakdown or insulation breakdown.
10. Do not use joint cable for indoor/outdoor connection cable. Use the specified indoor/outdoor connection cable, refer to installation instruction
CONNECT THE CABLE TO THE INDOOR UNIT and connect tightly for indoor/outdoor connection. Clamp the cable so that no external force
will be acted on the terminal. If connection or fixing is not perfect, it will cause heat up or fire at the connection.
11. Wire routing must be properly arranged so that control board cover is fixed properly. If control board cover is not fixed perfectly, it will cause
heat-up or fire at the connection point of terminal, fire or electrical shock.
12. When install or relocate air conditioner, do not let any substance other than the specified refrigerant, eg. air etc. mix into refrigeration
cycle (piping). (Mixing of air etc. will cause abnormal high pressure in refrigeration cycle and result in explosion, injury etc.).
13. Do not install outdoor unit near handrail of veranda. When installing air-conditioner unit at veranda of high rise building, child may climb up to
outdoor unit and cross over the handrail and causing accident.
14. This equipment must be properly earthed. Earth line must not be connected to gas pipe, water pipe, earth of lightning rod and
telephone. Otherwise, it may cause electric shock in case equipment breakdown or insulation breakdown.
15. Keep away from small children, the thin film may cling to nose and mouth and prevent breathing.
16. Do not use unspecified cord, modified cord, joint cord or extension cord for power supply cord. Do not share the single outlet with
other electrical appliances. Poor contact, poor insulation or over current will cause electrical shock or fire.
17. Tighten the flare nut with torque wrench according to specified method. If the flare nut is over-tightened, after a long period, the flare
may break and cause refrigerant gas leakage.
18. For R410A model, use piping, flare nut and tools which is specified for R410A refrigerant. Using of existing (R22) piping, flare nut and
tools may cause abnormally high pressure in the refrigerant cycle (piping), and possibly result in explosion and injury.
Thickness or copper pipes used with R410A must be more than 0.8 mm. Never use copper pipes thinner than 0.8 mm.
It is desirable that the amount of residual oil less than 40 mg/10 m.
This symbol denotes item that is PROHIBITED from doing.
4
CAUTION
WARNING
19. During installation, install the refrigerant piping properly before run the compressor. (Operation of compressor without fixing refrigeration piping
and valves at opened condition will cause suck-in of air, abnormal high pressure in refrigeration cycle and result in explosion, injury etc).
20. During pump down operation, stop the compressor before remove the refrigeration piping. (Removal of refrigeration piping while compressor is
operating and valves are opened condition will cause suck-in of air, abnormal high pressure in refrigeration cycle and result in explosion,
injury etc.)
21. After completion of installation or service, confirm there is no leakage or refrigerant gas. It may generate toxic gas when the refrigerant
contacts with fire.
22. Ventilate if there is refrigerant gas leakage during operation. It may cause toxic gas when the refrigerant contacts with fire.
23. Do not insert your fingers or other objects into the unit, high speed rotating fan may cause injury.
24. Must not use other parts except original parts describe in catalog and manual.
25. Using of refrigerant other than the specified type may cause product damage, burst and injury etc.
1. Do not install the unit at place where leakage of flammable gas may occur. In case gas leaks and accumulates at surrounding of the
unit, it may cause fire.
2. Carry out drainage piping as mentioned in installation instructions. If drainage is not perfect, water may enter the room and damage
the furniture.
3. Tighten the flare nut with torque wrench according to specified method. If the flare nut is over-tightened, after a long period, the flare
may break and cause refrigerant gas leakage.
4. Do not touch outdoor unit air inlet and aluminium fin. It may cause injury.
5. Select an installation location which is easy for maintenance.
6. Pb free solder has a higher melting point than standard solder; typically the melting point is 50°F – 70°F (30°C – 40°C) higher. Please use
a high temperature solder iron. In case of the soldering iron with temperature control, please set it to 700 ± 20°F (370 ± 10°C).
Pb free solder will tend to splash when heated too high (about 1100°F / 600°C).
7. Power supply connection to the room air conditioner.
Use power supply cord 3 x 1.5 mm
2
(3/4 ~ 1.75HP), 3 x 2.5 mm
2
(2.0 ~ 2.5HP) or 3 x 4.0 mm
2
( 3.0HP) type designation 60245 IEC 57 or
heavier cord.
Connect the power supply cord of the air conditioner to the mains using one of the following method.
Power supply point should be in easily accessible place for power disconnection in case of emergency.
In some countries, permanent connection of this air conditioner to the power supply is prohibited.
i. Power supply connection to the receptacle using power plug.
Use an approved 15/16A (3/4~1.75HP), 16A (2.0HP), 20A (2.5HP) or 25A (3.0HP) power plug with earth pin for the connection to the
socket.
ii. Power supply connection to a circuit breaker for the permanent connection.
Use an approved 16A (3/4~2.0HP), 20A (2.5HP) or 25A (3.0HP) circuit breaker for the permanent connection. It must be a double pole
switch with a minimum 3.0 mm contact gap.
8. Do not release refrigerant during piping work for installation, servicing, reinstallation and during repairing a refrigerant parts.
Take care of the liquid refrigerant, it may cause frostbite.
9. Installation or servicing work: It may need two people to carry out the installation or servicing work.
10. Do not install this appliance in a laundry room or other location where water may drip from the ceiling, etc.
11. Do not sit or step on the unit, you may fall down accidentally.
12. Do not touch the sharp aluminium fins or edges of metal parts.
If you are required to handle sharp parts during installation or servicing, please wear hand glove.
Sharp parts may cause injury.