
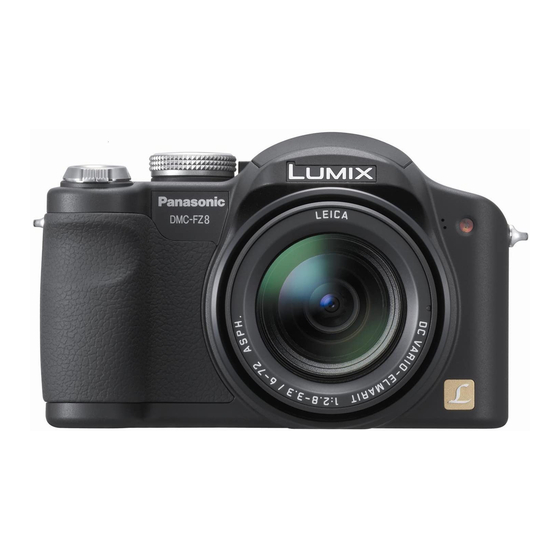
Инструкция по эксплуатации
Цифровая фотокамера
Модель №.
DMC-FZ8
VQT1B39
Перед пользованием прочтите,
пожалуйста, эту инструкцию
полностью.
EE
 06:58
06:58
Panasonic DMC-FZ8 Digital Camera
 16:46
16:46
обзор lumix dmc-fz50
 04:32
04:32
Panasonic Lumix DMC LZ40: Обзор ультразум-фотоаппарата
 07:56
07:56
Panasonic Lumix DMC-FZ8 video review
 03:23
03:23
Panasonic Lumix DMC-FZ8
 05:22
05:22
Panasonic Lumix DMC-SZ8: Обзор фотоаппарата
 08:22
08:22
Test Panasonic Lumix DMC-TZ8
Инструкция по эксплуатации Цифровая фотокамера Модель…
Dmc-fz8, Инструкция по эксплуатации
- Изображение
- Текст
Инструкция по эксплуатации
Цифровая фотокамера
Модель №.
DMC-FZ8
VQT1B39
Перед пользованием прочтите,
пожалуйста, эту инструкцию
полностью.
EE

Перед использованием
2
VQT1B39
Перед использованием
Уважаемый покупатель!
Благодарим вас за приобретение этой
цифровой камеры Panasonic.
Прочитайте, пожалуйста, внимательно
эту инструкцию по эксплуатации и
держите ее всегда под рукой.
Информация для
вашей безопасности
Тщательно соблюдайте законы об
авторских правах.
Запись с предварительно
записанных магнитных лент или
дисков, а также других
опубликованных или
телевещательных материалов с
целью, отличной от вашего личного
пользования, является нарушением
закона об авторских правах. Даже с
целью вашего личного пользования
запись определённого материала
может быть запрещена.
•Просьба обратить внимание, что органы
управления, составные части и меню
вашей цифровой камеры могут несколько
отличаться от тех, что представлены на
рисунках этой инструкции.
•Логотип SDHC является торговым
знаком.
•Leica является зарегистрированным
торговым знаком компании Leica
Microsystems IR GmbH.
•Elmarit является зарегистрированным
торговым знаком компании Leica
Camera AG.
•Другие названия, названия фирм и
изделий, отмеченные в этой инструкции,
являются торговыми знаками или
зарегистрированными товарными знаками
соответствующих компаний.
ПРЕДУПРЕЖДЕНИЕ:
ЧТОБЫ УМЕНЬШИТЬ ОПАСНОСТЬ
ВОЗНИКНОВЕНИЯ ПОЖАРА,
ПОРАЖЕНИЯ ЭЛЕКТРИЧЕСКИМ
ТОКОМ ИЛИ ПОВРЕЖДЕНИЯ
ИЗДЕЛИЯ,
•НЕ ПОДВЕРГАЙТЕ ЭТОТ АППАРАТ
ВОЗДЕЙСТВИЮ ДОЖДЯ, ВЛАГИ,
КАПЕЛЬ ИЛИ БРЫЗГ, И НЕ
ПОМЕЩАЙТЕ НА АППАРАТ
НИКАКИЕ ПРЕДМЕТЫ,
НАПОЛНЕННЫЕ ВОДОЙ,
НАПРИМЕР, ВАЗЫ.
•ИСПОЛЬЗУЙТЕ ТОЛЬКО
РЕКОМЕНДУЕМЫЕ
ПРИНАДЛЕЖНОСТИ.
•НЕ СНИМАЙТЕ КРЫШКУ (ИЛИ
ЗАДНЮЮ КРЫШКУ); ВНУТРИ НЕТ
ЧАСТЕЙ ДЛЯ ОБСЛУЖИВАНИЯ
ПОЛЬЗОВАТЕЛЕМ. ЗА
ОБСЛУЖИВАНИЕМ ОБРАЩАЙТЕСЬ
К КВАЛИФИЦИРОВАННОМУ
ОБСЛУЖИВАЮЩЕМУ ПЕРСОНАЛУ.
РАЗЪЕМ ДОЛЖЕН НАХОДИТЬСЯ
ВБЛИЗИ АППАРАТУРЫ И ДОСТУП К
НЕМУ НЕ ДОЛЖЕН БЫТЬ
ЗАТРУДНЕН.
ПРЕДУПРЕЖДЕНИЕ
При неправильной замене
аккумулятора возникает опасность
взрыва. Производить замену,
используя только тот же тип
аккумулятора, или равноценный ему,
рекомендуемый производителем.
Размещение в отходы
использованных аккумуляторов
производить согласно инструкциям
производителя.
Предупреждение
Существует риск возгорания, взрыва
или ожогов. Запрещается разбирать,
нагревать свыше 60
xC или сжигать.
Маркировка продукта находится на
нижней панели устройства.

Перед использованием
3
VQT1B39
-Если Вы увидите такой символ-
∫ О зарядном устройстве батареи
•Если питание переменного тока
включено, зарядное устройство
батареи находится в режиме
ожидания.
Первичная цепь всегда “работает”,
если адаптер переменного тока
подключен к электрической розетке.
Информация по обращению с
отходами для стран, не входящих в
Европейский Союз
Действие этого символа
распространяется только на
Европейский Союз.
Если Вы собираетесь выбросить данный
продукт, узнайте в местных органах
власти или у дилера, как следует
поступать с отходами такого типа.
ПРЕДОСТЕРЕЖЕНИЕ!
•НЕ СЛЕДУЕТ УСТАНАВЛИВАТЬ
ИЛИ РАЗМЕЩАТЬ ДАННЫЙ
АППАРАТ В КНИЖНОМ ШКАФУ,
ВСТРОЕННОМ ШКАФУ ИЛИ
ДРУГОМ ОГРАНИЧЕННОМ
ПРОСТРАНСТВЕ ДЛЯ ТОГО,
ЧТОБЫ СОХРАНИТЬ УСЛОВИЯ
ХОРОШЕЙ ВЕНТИЛЯЦИИ.
УДОСТОВЕРЬТЕСЬ, ЧТО ШТОРЫ
И ДРУГИЕ ПОДОБНЫЕ
ПРЕДМЕТЫ НЕ ПРЕПЯТСТВУЮТ
НОРМАЛЬНОЙ ВЕНТИЛЯЦИИ
ДЛЯ ПРЕДОТВРАЩЕНИЯ РИСКА
ПОРАЖЕНИЯ ЭЛЕКТРИЧЕСКИМ
ТОКОМ ИЛИ ВОЗНИКНОВЕНИЯ
ПОЖАРА ИЗ-ЗА ПЕРЕГРЕВА.
•НЕ ЗАКРЫВАЙТЕ
ВЕНТИЛЯЦИОННЫЕ ОТВЕРСТИЯ
АППАРАТА ГАЗЕТАМИ,
СКАТЕРТЯМИ, ШТОРАМИ И
ПОДОБНЫМИ ПРЕДМЕТАМИ.
•НЕ РАЗМЕЩАЙТЕ НА АППАРАТ
ИСТОЧНИКИ ОТКРЫТОГО
ПЛАМЕНИ, ТАКИЕ, КАК ГОРЯЩИЕ
СВЕЧИ.
•ВЫБРАСЫВАЙТЕ БАТАРЕИ В
МУСОР, УЧИТЫВАЯ ОХРАНУ
ОКРУЖАЮЩЕЙ СРЕДЫ.

Перед использованием
4
VQT1B39
∫ Уход за камерой
•Нельзя сильно трясти или ударять
камеру.
Данный аппарат может выйти из строя,
запись изображений может стать
невозможной, или может повредиться
объектив либо монитор ЖКД.
•Сложите объектив перед переносом
камеры или воспроизведением
снимков.
•Будьте особенно осторожны в
перечисленных ниже местах,
поскольку они могут стать причиной
неисправности данной камеры.
– Места с большим количеством песка
или пыли.
– Места возможного контакта данной
камеры с водой, например, при
использовании камеры в дождливый
день или на пляже.
•В случае попадания на камеру
пресной или морской воды
осторожно протрите корпус камеры
сухой тканью.
∫ О конденсации (Когда объектив или
видоискатель затуманиваются)
•Конденсация происходит, когда
окружающая температура или
влажность изменяются, как описано
ниже. Остерегайтесь конденсации,
поскольку она вызывает появление
пятен на объективе, грибки или сбои в
работе камеры.
– Когда камера с холода заносится в
теплое помещение.
– Когда камера с улицы заносится в
автомобиль со включенной системой
кондиционирования.
– Когда холодный воздух из
кондиционера или аналогичных
приборов направлен
непосредственно на камеру.
– Во влажных местах
•Для предотвращения конденсации
поместите камеру в пластиковый
пакет и подождите, пока температура
камеры сравняется с температурой
окружающего воздуха. Если
конденсация все-таки произошла,
выключите камеру и оставьте ее на
2 часа. Конденсация исчезнет сама
собой, когда температура камеры
сравняется с окружающей
температурой.
•Читайте вместе с разделом
“Предосторожности при
использовании фотокамеры”. (P130)
∫ Карты памяти, которые можно
использовать с данным
устройством
Допускается использование карт
памяти SD, SDHC и MultiMediaCard.
•Когда слово карта упоминается в
данных инструкциях по эксплуатации,
имеются в виду следующие типы карт
памяти.
– Карта памяти SD (от 8 МБ до 2 ГБ)
– Карта памяти SDHC (4 ГБ)
– MultiMediaCard
Более детальная информация о картах
памяти, которые могут использоваться
с данным устройством.
•При использовании карт емкостью
4 ГБ или более можно использовать
только карту памяти SDHC.
•Карта памяти на 4 ГБ без логотипа
SDHC не основана на стандарте SD и
не будет функционировать с данным
продуктом.
•Карта MultiMediaCard совместима
только с фотоснимками.
4
4
OK

Содержание Перед использованием Информация для вашей безопа…
Страница 5
- Изображение
- Текст
5
VQT1B39
Содержание
Перед использованием
Информация для вашей безопасности ….. 2
Подготовка
Стандартные принадлежности……………… 7
Названия составных частей………………….. 7
Крышка объектива/Ремешок ………………… 9
Присоединение бленды объектива……… 10
Краткое руководство………………………….. 12
Подзарядка аккумулятора при помощи
зарядного устройства ……………………… 13
Об аккумуляторах (время заряда/и
количество снимков)……………………….. 14
Установка и удаление батареи/карты
(поставляется отдельно) …………………. 15
Встроенная память/карта
(поставляется отдельно) …………………. 16
Настройка даты/времени
(Настройка часов) …………………………… 18
• Изменение настроек часов …………… 18
Информация о диске рабочего режима ….. 19
Настройка меню …………………………………. 20
О меню НАСТР. (НАСТРОЙКА) …………… 21
Отображение на мониторе
ЖКД/переключение отображения на
мониторе ЖКД ………………………………… 25
Основные сведения
Съемка ………………………………………………. 27
Съемка в простом режиме ………………….. 30
Съемка с увеличением ……………………….. 33
• Использование оптического
увеличения…………………………………… 33
• Использование дополнительного
оптического увеличения (EZ)………… 34
• Использование цифрового увеличения
Дальнейшее увеличение…………………. 34
Проверка записанного снимка
(просмотр) ………………………………………. 36
Воспроизведение/удаление снимков…… 37
Дополнительные операции
(запись снимков)
Информация о мониторе
ЖКД/Видоискателе…………………………. 39
• Изменение набора отображаемой
информации …………………………………. 39
• Свечение монитора ЖКД
(режим усиления яркости монитора
ЖКД/режим верхнего ракурса) ……… 42
Съемка со встроенной вспышкой………… 44
Съемка с автоматическим таймером…… 48
Компенсация экспозиции ……………………. 50
Съемка с автоматической настройкой
значений экспозиции ………………………. 51
Оптический стабилизатор изображения…. 52
Съемка в режиме серийной съемки …….. 53
Изменение светочувствительности при
движении записываемого объекта…… 55
Съемка крупным планом …………………….. 56
Режим приоритета диафрагмы AE………. 58
Режим приоритета скорости затвора
AE…………………………………………………… 58
Ручная экспозиция ……………………………… 59
Показатель диафрагмы и скорость
затвора …………………………………………… 60
Съемка в режиме ручной фокусировки ….. 61
Съемка в соответствии с
записываемой сценой (Режим сцены) …. 64
– [ПОРТРЕТ]…………………………………. 65
– [РОВНАЯ КОЖА] ……………………….. 65
– [ПЕЙЗАЖ] ………………………………….. 66
– [СПОРТ] …………………………………….. 66
– [ПАНОРАМИРОВ.] ……………………… 66
– [НОЧН. ПОРТРЕТ] ……………………… 67
– [НОЧН. ПЕЙЗАЖ]……………………….. 67
– [ЕДА]………………………………………….. 68
– [ВЕЧЕРИНКА] …………………………….. 68
– [СВЕЧИ] …………………………………….. 68
– [РЕБЕНОК1]/[РЕБЕНОК2] …………… 69
– [
ДОМ.ЖИВОТНОЕ]
…………………… 70
– [ЗАКАТ] ……………………………………… 70
– [ВЫС. ЧУВСТВ.] …………………………. 70
– [ЗВЕЗДНОЕ НЕБО] …………………….. 71
– [ФЕЙЕРВЕРК]…………………………….. 71
– [ПЛЯЖ]………………………………………. 72
– [СНЕГ] ……………………………………….. 72
– [
АЭРОСЪЕМКА
] ……………………….. 73
Режим видео………………………………………. 73
При съемке записывается день отпуска,
когда была сделана фотография ……….. 75
Отображение времени в пункте
назначения поездки (Мировое Время) … 77
Использование меню [ЗАП.]. ……………….. 79
• [БАЛ. БЕЛ.]
Корректировка баланса цветов для
достижения естественного цвета….. 80
• [НАСТР.БАЛ.БЕЛ.]
Точная настройка баланса белого…. 82

Дополнительные операции (воспроизведение), Подсоединение к другому оборудованию, Другое
Страница 6
- Изображение
- Текст
6
VQT1B39
• [СВЕТОЧУВСТ.]
Установка светочувствительности ……83
• [ФОРМАТ]
Установка формата снимков………….83
• [РАЗР. КАДРА]/[КАЧЕСТВО]
Установка размера изображения и
качества, соответствующего
снимку …………………………………………..84
• [ЗАП. ЗВУКА]
Запись со звуком …………………………..86
• [РЕЖИМ ЗАМЕРА]
Определяет метод измерения яркости…86
• [РЕЖИМ АФ]
Метод установки фокуса ……………….87
• [НЕПРЕР. АФ]
Непрерывная фокусировка на
предмете……………………………………….89
• [ВСП. ЛАМП. АФ]
Облегчается фокусировка в условиях
недостаточной освещенности …………..89
• [ЦВЕТ. ЭФФЕКТ]
Установка цветовых эффектов для
записываемых снимков ………………….90
• [НАСТР. ИЗОБР.]
Настройка качества изображения
при съемке…………………………………….90
• [АНИМАЦИЯ]
Объединение снимков для создания
файла покадровой анимации …………91
• [ПРЕОБ. ЛИНЗА]
Использование дополнительных
объективов ……………………………………93
• [УСТ. ЧАСОВ]
Установка даты, времени и
отображения …………………………………95
Дополнительные операции
(воспроизведение)
Отображение нескольких экранов
(мульти воспроизведение) ………………. 96
Отображение в порядке даты съемки
(воспроизведение в хронологическом
порядке)…………………………………………. 97
Использование функции увеличения
при воспроизведении ……………………… 98
Воспроизведение видео/снимков со
звуком ……………………………………………. 99
Создание фотоснимков из видео ……… 100
Использование меню режима [ВОСП.] …. 102
• [ПОК. СЛАЙД.]
Воспроизведение снимков в определенном
порядке с воспроизведением каждого
снимка на протяжении одного и того же
времени ………………………………………..102
• [ИЗБРАННОЕ]
Выбор избранных снимков……………104
• [ПОВЕРН. ЖКД]/[ПОВЕРН.]
Для поворота снимка……………………105
• [
ОТПЕЧ.ДАТЫ
]
Печать такой информации, как
дата, на записанных снимках ……….106
• [DPOF ПЕЧ.]
Выбор печатаемых снимков и
количество отпечатков ………………..109
• [ЗАЩИТИТЬ]
Предотвращение случайного
удаления снимков ………………………..110
• [ДУБЛ. ЗВУК.]
Запись звука после съемки…………..111
• [ИЗМ. РАЗР.]
Уменьшение размеров снимка ……..112
• [ПОДРЕЗКА]
Увеличение и подрезка снимка…….113
• [ИЗМ. ФОРМАТ]
Изменение формата кадра на 16:9 ….114
• [КОПИЯ]
Копирование изображений …………..115
• [ФОРМАТИР.]
Инициализация карты ………………….116
Подсоединение к другому
оборудованию
Подключение к персональному
компьютеру…………………………………… 118
Печать снимков………………………………… 120
Воспроизведение фотоснимков на
экране телевизора………………………… 125
Другое
Использование защитного устройства
MC/фильтра ND…………………………….. 126
Вид экрана……………………………………….. 127
Предосторожности при использовании
фотокамеры …………………………………. 130
Сообщения……………………………………….. 132
Устранение неисправностей……………… 134
Количество записываемых снимков и
доступное время записи………………… 141
Технические характеристики ……………. 144

Подготовка
7
VQT1B39
Подготовка
Стандартные
принадлежности
Перед использованием фотокамеры
убедитесь, что имеются все принадлежности.
1
Блок аккумулятора
(В тексте упоминается как
Аккумулятор)
2
Зарядное устройство
(В тексте упоминается как
Зарядное устройство)
3
Кабель питания
4
Кабель USB
5
Кабель аудио-видео
6
Компакт-диск
7
Наплечный ремень
8
Крышка объектива/Шнурок крышки
объектива
9
Бленда объектива/переходник
бленды
A: Серебристый
B: Черный
•В дальнейшем по тексту карта памяти
SD, карта памяти SDHC и
MultiMediaCard обозначаются как
карта.
•Карта поставляется отдельно.
Без карты памяти записывать и
воспроизводить снимки можно с
использованием встроенной
памяти. (P16)
Названия составных
частей
1 Объектив (P131)
2 Вспышка (P44)
3 Микрофон (P86, 111)
K2CQ2CA00006
3
1
2
4
5
6
7
8
9
VFC4160
DE-A44B
K1HA08CD0013
K1HA08CD0014
VYK1T69
CGR-S006E
A: VYQ3997/VYQ3998
B: VYQ3981/VYQ3797
1
2
3 4

Подготовка
8
VQT1B39
4 Индикатор автоматического таймера
(P48)
Вспомогательная лампочка
автофокусировки (P89)
5 Кнопка открытия вспышки (P44)
6 Регулятор диоптрий (P40)
7 Видоискатель (P39, 127)
8 Громкоговоритель (P99)
9 Кнопка [EVF/LCD] (P39)
10 Переключатель включения/
выключения фотокамеры (P12, 18)
11 Джойстик (P29, 37, 58, 59)
12 Монитор ЖКД (P39, 127)
13 Кнопка [DISPLAY/LCD MODE] (P39, 42)
14 Индикатор состояния (P27)
15 Кнопка переключения между
режимами одиночных снимков или
серийной съемки (P53)/кнопка
удаления (P38)
16 Кнопки курсора
2/Кнопка автоматического таймера
(P48)
4/Кнопка [REV] (P36)
1/Кнопка настройки вспышки (P44)
3/Компенсация экспозиции (P50)/
Автоматическая настройка
значений экспозиции (P51)/
Настройка силы вспышки (P47)/
Кнопка компенсации контрового
света в простом режиме (P32)
17 Кнопка [MENU/SET] (P21)
18 Рычажок трансфокатора (P33)
19 Кнопка затвора (P27, 73)
20 Диск рабочего режима (P19)
21
Кнопка переключателя
фокусировки (P61)
22 Кнопка оптического стабилизатора
изображения (P52)
В этой инструкции по эксплуатации
работа с джойстиком объясняется
на примере рисунков.
например: При наклоне джойстика
вправо
например: При нажатии на центр
джойстика
8
13
11
12
14 15 16
10
9
5 6
7
17
В данном руководстве операции с
использованием кнопок курсора
объясняются с помощью
иллюстраций.
Например:при нажатии кнопки
4
20 21 22
18 19

Подготовка
9
VQT1B39
23 Отверстие для крепления ремешка
(P9)
24 Гнездо [DIGITAL/AV OUT] (P118, 120,
125
)
25 Гнездо [DC IN] (P118, 120)
•Всегда используйте только
исходный сетевой адаптер
переменного тока производства
Panasonic (DMW-AC7E; не входит в
комплект поставки).
•Фотокамера на заряжает
аккумуляторов, даже если
присоединен адаптер переменного
тока (DMW-AC7E; не входит в
комплект поставки).
26 Дверца гнезд
27 Корпус объектива
28 Дверца для ввода карты памяти/
аккумулятора (P15)
29 Гнездо штатива
•При использовании штатива перед
установкой на него фотокамеры
убедитесь, что штатив установлен
устойчиво.
Крышка объектива/
Ремешок
∫ Крышка объектива (поставляется)
1 Пропустите ремешок через
отверстие в крышке
объектива.
2 Пропустите тот же ремешок
через отверстие в в
фотокамере.
3 Наденьте крышку объектива.
•При выключении, переноске камеры
или воспроизведении снимков, чтобы
защитить поверхность объектива,
надевайте крышку.
•Перед включением фотокамеры в
режиме съемки снимите крышку
объектива.
•Будьте осторожны чтобы не потерять
крышку объектива.
24
25
26
23
27
28 29

Подготовка
10
VQT1B39
∫ Ремешок (поставляется)
1 Пропустите ремешок через
отверстие для крепления
ремешка.
2 Пропустите ремешок через
пряжку и затяните.
A: Вытяните ремешок на 2 см или больше.
•Присоедините ремешок на другой
стороне фотокамеры не перекручивая
его.
•Убедитесь, что ремешок надежно
прикреплен к фотокамере.
•Прикрепите ремешок таким образом,
чтобы ЛОГОТИП “L
UMIX
” был обращен
наружу.
Присоединение
бленды объектива
При ярком солнечном свете или в
условиях контрового освещения, бленда
позволяет свести к минимуму блики и
ореолы в объективе и улучшить
качество изображения.
•Убедитесь, что фотокамера
выключена.
•Закройте вспышку.
1 Присоедините переходник
бленды (поставляется в
комплекте).
•Не затягивайте винт переходника
бленды слишком сильно.
2 Переверните фотокамеру
“вверх ногами”, совместите
метку на бленде с меткой
A на
камере и вставьте бленду
объектива.
•Убедитесь, что винт ослаблен и
присоедините бленду.
3 Затяните винт.
•Не перетягивайте винт.

Комментарии
- Manuals
- Brands
- Panasonic Manuals
- Digital Camera
- Lumix DMC-FZ8
- Operating instructions manual
-
Contents
-
Table of Contents
-
Troubleshooting
-
Bookmarks
Quick Links
Panasonic
Operating Instructions
Digital Camera
_o_e,,o.
DMC-FZ8
LEICA
DC VARIO=ELMARIT
Before connecting,
operating
or
adjusting
this product,
please read
the instructions
completely.
[_
VQT1 B25
Related Manuals for Panasonic Lumix DMC-FZ8
Summary of Contents for Panasonic Lumix DMC-FZ8
-
Page 1
Panasonic Operating Instructions Digital Camera _o_e,,o. DMC-FZ8 Before connecting, operating adjusting this product, please read the instructions completely. LEICA DC VARIO=ELMARIT VQT1 B25… -
Page 2: Before Use
Before Information for Your Dear Customer, Thank you for choosing Panasonic! Safety You have purchased one of the most sophisticated and reliable products on the market today. Used properly, we’re sure it WARNING: will bring you and your family years of enjoyment.
-
Page 3
Before • Please note that the actual controls and THE FOLLOWING APPLIES ONLY IN THE U.S.A. components, menu items, etc. of your Digital Camera may look somewhat FCC Note: different from those shown in the This equipment has been tested and illustrations in these Operating found to comply with the limits for a Instructions. -
Page 4
Trade Name: Panasonic CAUTION Model No.: DMC-FZ8 Battery pack (Lithium ion battery pack) Responsible party: Panasonic • Use the specified unit to recharge the Corporation of battery pack. North America • Do not use the battery pack with One Panasonic Way,… -
Page 5
Before • Care of the camera • About cards that can be used in this unit • Do not strongly shake or bump the camera. You can use an SD Memory Card, an This unit may malfunction, recording SDHC Memory Card and a pictures may no longer be possible or the MultiMediaCard. -
Page 6: Table Of Contents
Contents Taking Pictures using the Built-in Flash ..43 Taking Pictures with the Self-timer ..47 Compensating the Exposure ….48 Before Use Taking Pictures using Auto Bracket ..49 Optical Image Stabilizer ……Taking Pictures using Burst Mode ..51 Information for Your Safety …….
-
Page 7
•[PICT.SIZE]/[Q UALITY] • [DATE STAMP] Setting apicture size and quality that Stamping information such as matches your use ofthe pictures ..80 the date on the recorded pictures..100 •[AUDIO REC.] • [DPOF PRINT] Recording still pictures with audio ..8 2 Setting the picture to print and •[METERING MODE]… -
Page 8: Preparation
Preparation Standard Accessories 1 Battery Pack (Indicated as battery in the text) 2 Battery Charger Check that all the accessories are included (Indicated as charger in the text) before using the camera. 3 USB Connection Cable 4 AV Cable 5 CD-ROM 6 Shoulder Strap 7 Lens Cap/Lens Cap String 8 Lens Hood/Hood…
-
Page 9: Names Of The Components
Preparation Names of the 11 Joystick (P29, 36, 56, 57) Components In these operating instructions, operations using the joystick are described as illustrated below shown. e.g.: When you tilt the joystick right e.g.: When you press the center of the joystick 1 Lens (P123) 2 Flash (P43)
-
Page 10
23 Strap eyelet (P11) 24 [DIG ITAL/AV OUT] Socket (P110, 113, 117) 25 [DC IN] Socket (Pl10, 113) • Always use a genuine Panasonic AC adaptor (DMW-AC7PP; optional). • The camera cannot charge the battery even if the AC adaptor (DMW-AC7PP;… -
Page 11: Attaching The Lens Cap/Strap
Preparation • Strap (supplied) Attaching the Lens Cap/Strap ] Pass the strap through the hole at the strap eyelet. • Lens Cap (supplied) ] Pass the string through the hole on the lens cap. 2 Pass the strap through stopper and fasten the strap.
-
Page 12: Attaching The Lens Hood
Preparation Attaching the Lens 3 Tighten the screw. Hood In bright sunlight or backlight, the lens hood will minimize lens flare and ghosting. The lens hood cuts off excess lighting and improves the picture quality. • Check that the camera is turned off. •…
-
Page 13
• The lens adaptor (DMW-LA2; optional) is necessary to attach a conversion lenses. • If any accessories are lost, customers the USA should contact Panasonic’s parts department at 1 800 833-9626 and customers in Canada should contact… -
Page 14: Quick Guide
Preparation Quick Guide Turn the camera on to take pictures. This is an overview of how to record and • Set the clock. (P19) playback pictures with the camera. For each step, be sure to refer to the pages indicated in brackets. | Charge the battery.
-
Page 15: Charging The Battery With The Charger
Preparation Charging the Battery • After charging is completed, be sure to with the Charger disconnect the charger from the electrical outlet. The battery is not charged when the • The battery becomes warm after using it camera is shipped. Charge the battery and during and after charging.
-
Page 16: About The Battery (Charging/ Number Of Recordable Pictures)
• Temperature: 23 °C (73,4 °F)/ of the battery, Humidity: 50% when LCD monitor is on. • Using a Panasonic SD Memory Card • Charging (16 MB). Charging time IAppr°x 120 min • Using the supplied battery. Charging time and number of recordable •…
-
Page 17: Inserting And Removing The Battery/ The Card (Optional)
• If the card/battery door cannot be completely closed, remove the card, check its direction and then insert it again. • Always use genuine Panasonic • Remove the battery after use. batteries (CG R-S006A). • If you use other batteries, we cannot •…
-
Page 18: About The Built-In Memory/The Card (Optional)
Preparation About the Built-in • This unit (SDHC compatible equipment) is compatible with SD Memory Cards based Memory/the Card on SD Memory Card Specifications formatted in FAT12 system and FAT16 (optional) system. It is also compatible with SDHC Memory Cards based on SD Memory The built-in memory can be used as a Card Specifications and formatted in…
-
Page 19: Setting Date/Time (Clock Set)
Preparation Setting Date/Time 3 Press [MENU/SET] to set. (Clock Set) •Turn the camera off after setting the clock. Then set the mode dial to a recording mode to turn the camera on and check whether or not the clock setting is correct. •…
-
Page 20: About The Mode Dial
Preparation About the Mode Dial • Basic : Program AE mode (P27) The exposure is automatically adjusted by If you turn on this unit and then rotate the camera. the mode dial, you can not only switch between recording and playback but : Simple mode (P30) also switch to a scene mode that…
-
Page 21: Setting The Menu
Preparation Setting the Menu | Press &IT to select the menu item. • Displaying the menu screens Press [MENU/SET]. (‘A_Menu icons (‘@Current page (‘@Menu items and settings • Rotate the zoom lever to switch to the next/previous page easily. • The menu icons and the menu items that •…
-
Page 22: About The Setup Menu
Preparation About the Setup Menu • Closing the menu screen Press [MENU/SET]. • When the mode dial is set to • Set items as required. (Refer to P22 to 25 for each menu item.) • Select [RESET] to return the settings to [[]], you can also close the menu the initial settings at the time of purchase.
-
Page 23
Preparation I_ [TRAVELDATE](P72) i_zZ [POWER SAVE] (Turning off this unit automatically.) Press [ _ ] to display the [SETUP] menu Press [_] to display the [SETUP] menu and select the item to set. (P21) and select the item to set. (P21) Set the departure date and the return date Power save mode is activated (the camera… -
Page 24
Preparation [NO.RESET] MFck[MFASSIST] (P59) (Recording mode only) Press [_] to display the [SETUP] menu and select the item to set. (P21) Press [ _ ] to display the [SETUP] menu and select the item to set. (P21) The folder number is updated and the file In manual focus, the assistance screen number starts from 0001. -
Page 25
Preparation [VIDEO OUT] (Pl17) [SCENE MENU] (P62) (Playback mode only) Press [ _ ] to display the [SETUP] menu and select the item to set. (P21) Press [_] to display the [SETUP] menu and select the item to set. (P21) Set the screen that will appear when the mode dial is set to [[]]. -
Page 26: Lcd Monitor Display/Switching The Lcd Monitor Display
Preparation LCD Monitor Display/ • The access indication lights red when pictures are being recorded on the Switching the LCD built-in memory (or the card). -When using the built-in memory Monitor Display -When using the card • Screen display in program AE mode [[]_] (at the time of purchase) •…
-
Page 27: Taking Pictures
Bash Taking Pictures Press the shutter button halfway to focus. The camera automatically sets the shutter speed and the aperture value according to the brightness of the subject. • The focus indication _2_ lights green and the AF area _1_ turns white to green. (3: Aperture value (©: Shutter speed •…
-
Page 28
Basic • Exposure (P48) • When you want to take a subject • The exposure is automatically adjusted to outside the AF area (AF/AE Lock) the appropriate exposure on this unit When recording a picture of people with a (AE=Auto Exposure). However, composition like the following picture, you will not be able to focus the camera on the… -
Page 29
Bash • Preventing jitter (camera shake) • Be careful of jittering when pressing the shutter button. • If jitter could occur because of slow shutter speed, the jitter alert _,_ appears. • When the jitter alert appears, we recommend using a tripod. If you cannot use a tripod, be careful how you hold the camera (P27). -
Page 30: Taking Pictures In Simple Mode
Basic Taking Pictures in [AUTO REVIEW] Simple Mode _[OFF] The recorded picture does not automatically appear. _)[ON] The recorded picture automatically appears on the screen for about 1 second. This mode allows beginners to take pictures easily. Only the basic functions appear in the menu to make operations [BEEP] simple.
-
Page 31
Basic • [SENSITIVITY] (P79): • Focus range in simple mode This setting becomes the same as when the highest ISO sensitivity is set to i 5 cm (0.17 feet) [ISO800] in intelligent ISO sensitivity mode [(_]. (P62) • [ASPECT RATIO]/[PICT.SIZE]/[QUALITY] (PSO): — [_ ENLARGE]:… -
Page 32: Taking Pictures With The Zoom
Basic • Changing the zoom speed Taking Pictures with You can operate the zoom at 2 speeds the Zoom depending on the rotation angle of the zoom lever. The zoom speed becomes slower when the rotation angle is small and the zoom speed becomes faster when the rotation angle is large.
-
Page 33: Using The Extended Optical Zoom (Ez)
Basic • «EZ» is an abbreviation «Extended optical Zoom». • If you set a picture size that activates the extended optical zoom, the extended optical zoom icon [[«_1] is displayed on the This camera has a 12× optical zoom. screen when you use the zoom function. However, if the picture size is not set to the •…
-
Page 34: Using The Digital Zoom
Basic • Entering the digital zoom range The on-screen zoom indication may momentarily stop moving when you rotate the zoom lever to the extreme Tele position. You can enter the digital zoom range by continuously rotating the zoom lever to Tele A maximum of 48x zoom can be achieved or releasing the zoom lever once and then with the 12×…
-
Page 35: Checking The Recorded Picture (Review)
Basic • Enlarging the picture Checking the Recorded Picture I Rotate the zoom lever towards (T). (Review) • Rotate the zoom lever to [0_] [T] for a 4× magnification and then rotate it even more for a 8× magnification. When you rotate the zoom lever You can check the recorded pictures while towards [_] [W] after enlarging the…
-
Page 36: Playing Back/Deleting Pictures
Basic • In review playback in recording mode Playing back/Deleting and in multi playback (P91), the Pictures pictures can only be forwarded or rewound one by one. • This camera is based on the DCF The picture data on the built-in memory is standard «Design rule for Camera File played back or deleted when a card is not system»…
-
Page 37
Basic • To delete [MULTI DELETE]/ 5 Press • to select [YES] and then [ALL DELETE] press [MENU/SET] to set. I Press [_] twice. (Screen when selecting [MULTI DELETE]) 2 Press to select © [MULTI DELETE] [ALL DELETE] and then press [MENU/SET]. -
Page 38: Advanced (Recording Pictures)
Advanced (Recording pictures) About the LCD In simple mode [V] Monitor/Viewfinder (c’) Normal display @ No display In recording mode (1_ Switching the LCD monitor/ Viewfinder Press the [EVF/LCD] button to switch the monitor screen. (_A) L CD monitor (LCD) (‘B)Viewfinder (EVE) •…
-
Page 39
Advanced (Recording pictures) In playback mode • Out-of-frame display Recording information is displayed on the ® bottom and right edges of the screen. You can therefore concentrate on the subject when taking pictures without being obstructed by information displayed on the screen. -
Page 40
Advanced (Recording pictures) • Monitor priority • Histogram When [PLAY ON LCD] is set to [ON] on the • A histogram is a graph that displays [SETUP] menu (P23), the LCD monitor is brightness along the horizontal axis (black turned on in the following cases. to white) and the number of pixels at each You can save the time it would take to brightness level on the vertical axis. -
Page 41: Brightening The Lcd Monitor (Power Lcd/High Angle Mode)
Advanced (Recording pictures) • When the recorded picture and the histogram do not match each other under the following conditions, histogram is displayed in orange. -When the manual exposure assistance 1 Press [LCD MODE] Q for is other than [÷0EV] during exposure 1 second.
-
Page 42
Advanced (Recording pictures) • Canceling Power LCD or High angle [FZ]: The LCD monitor mode [POWER LCD] becomes brighter and • If you press and hold [LCD MODE] again easier to see even when for 1 second the screen shown in step 2 taking pictures outdoors. -
Page 43: Taking Pictures Using The Built-In Flash
Advanced (Recording pictures) Taking Pictures using I_r4J_m: AUTO The flash is automatically activated when the Built-in Flash the recording conditions make it necessary, : AUTO/Red-eye reduction The flash is automatically activated when the recording conditions make it necessary. It is activated once before the actual ®…
-
Page 44
Advanced (Recording pictures) • Available flash settings by recording • The flash setting may change if the mode recording mode is changed. Set the flash The available flash settings depend on the setting again if necessary. recording mode. • The flash setting is memorized even if the camera is turned off. -
Page 45
Advanced (Recording pictures) [ISO1250] • Shutter speed for each flash setting Wide • Shutter speed 1 m (3.28 feet) to Flash setting (Secl) 8.5 m (27.9 feet) Tele AUTO 1 m (3.28 feet) to AUTO/ 7.7 m (25.2 feet) Red-eye reduction •… -
Page 46
Advanced (Recording pictures) • Adjusting flash output Adjust the flash output when the subject is • Do not look directly at the flash at small or reflection ratio is extremely high or close range when it is activated. low. • Do not bring the flash too close to objects or close the flash while it is ] Press •… -
Page 47: Taking Pictures With The Self-Timer
Advanced (Recording pictures) • The self-timer indicator Taking Pictures with the Self-timer (c) blinks and the shutter is activated after 10 seconds (or 2 seconds]. • If you press [MENU/SET] while the self-timer is set, the self-timer setting is ] Press <…
-
Page 48: Compensating The Exposure
Advanced (Recording pictures) • Operation with the joystick Compensating Exposure 1 Select [_]] with .4 on the joystick and then compensate exposure with •IT. Use this function when you cannot achieve appropriate exposure due to the difference in brightness between the subject and the background.
-
Page 49: Taking Pictures Using Auto Bracket
Advanced (Recording pictures) Taking Pictures using • The auto bracket setting is canceled if you turn the camera off or power save mode is Auto Bracket activated. • When setting auto bracket and burst mode simultaneously, auto bracket will be performed.
-
Page 50: Optical Image Stabilizer
Advanced (Recording pictures) • About the jitter/movement detection Optical Image demonstration screen Stabilizer Press I_ on the screen shown in step 2 to display the jitter/movement detection demonstration screen. (You cannot take pictures while the demonstration screen is displayed,) Press I_ to exit the demonstration screen.
-
Page 51: Taking Pictures Using Burst Mode
Advanced (Recording pictures) Taking Pictures using • Number of pictures recorded in burst mode Burst Mode Burst speed Number of recordabJe (pictures/ pictures (pictures) second) max. 5 max. 7 | Press and hold the burst mode button. Depends on the approx.
-
Page 52: Changing The Sensitivity According To The Movement Of The Subject Being Recorded
Advanced (Recording pictures) • The exposure and the white balance vary Changing depending on the burst mode setting. sensitivity according When burst mode is set to [_], they are to the movement of the fixed to the values set for the first picture. When the burst speed is set to [_] subject being…
-
Page 53
Advanced (Recording pictures) • Jitter is avoided when taking pictures indoors of a moving subject by increasing • When the flash is activated, the ISO the ISO sensitivity and making the shutter sensitivity is automatically increased to a speed faster. maximum of [ISO400]. -
Page 54: Taking Close-Up Pictures
Advanced (Recording pictures) Taking Close-up range • Focus Pictures This mode allows you to take close-up pictures of a subject, e.g. when taking pictures of flowers. You can take pictures of a subject as close as 5 cm (0.17 feet) from the lens by rotating the zoom lever upmost to Wide (1 ×).
-
Page 55
Advanced (Recording pictures) ….• The available flash range is about 30 cm (0.98 feet) to 6 m (19.7 feet) (Wide). • We recommend using a tripod and the (When the ISO sensitivity is set to self-timer (P47) in macro mode. [AUTO].) We recommend setting the flash •… -
Page 56: Aperture-Priority Ae
Advanced (Recording pictures) Aperture-priority Shutter-priority Set the aperture value to a higher number When you want to take a sharp picture of a when you want a sharp focus background. fast moving subject, set with a faster Set the aperture value to a lower number shutter speed.
-
Page 57: Manual Exposure
Advanced (Recording pictures) Manual exposure 3 Take the picture. Determine the exposure by manually setting the aperture value and the shutter speed. | Tilt the joystick towards AlVl411 • Manual Exposure Assistance I_ to set the aperture value and the shutter speed.
-
Page 58: Aperture Value And Shutter Speed
Advanced (Recording pictures) Aperture Value and Manual exposure Shutter Speed Aperture=priority F2.8 to F3.6 60 to 1/1000 F4.0 to F5.0 60 to 1/1300 F5.6 to F7.1 60 to 1/1600 F8.0 60 to 1/2000 F8.0 8 to 1/2000 F7.1 F6.3 F5.6 8 to 1/1600 F5.0 F4.5…
-
Page 59: Taking Pictures With Manual Focus
Advanced (Recording pictures) Taking Pictures with 4 Tilt the joystick towards &IT Manual Focus focus on the subject. Use this function when you want to fix the focus or when the distance between the lens and the subject is determined and you do not want to activate auto focus.
-
Page 60
Advanced (Recording pictures) • MF ASSIST 4 Press A/• to select [MF1] If you tilt the joystick towards A/T when [MF2] and then press [MENU/ [MF ASSIST] is set to [MF1] or [MF2], MF SET]. assistance is activated and the screen is enlarged•… -
Page 61
Advanced (Recording pictures) • Prefocus This is a technique for focusing in advance • You can also record with manual focus in on the point the pictures will be taken when motion picture mode [_]. However the it is difficult to focus on the subject with focus is fixed while recording motion auto focus due to its quick motion. -
Page 62: Gpictures That Match The Scene Being Recorded (Scene Mode)
Advanced (Recording pictures) Taking pictures that 3 Press [MENU/SET] to set. match the scene being • You can also press the center of the joystick to set. recorded (Scene mode) • The menu screen is switched to the recording screen in the selected scene mode.
-
Page 63: [Portrait]
Advanced (Recording pictures) Press [ _ ] to display the [SCENE MODE] Press [_] to display the [SCENE MODE] menu and select a scene mode. (P62) menu and select a scene mode. (P62) The person stands out from the This allows you to take pictures of a wide background and has a healthier landscape.
-
Page 64: [Panning]
Advanced (Recording pictures) Press [_] to display the [SCENE MODE] Press [_] to display the [SCENE MODE] menu and select a scene mode. (P62) menu and select a scene mode. (P62) When you move the camera to follow a This allows you to take pictures of a person subject moving in one direction such as a and the background with near real-life…
-
Page 65: [Night Scenery]
Advanced (Recording pictures) Press [ _ ] to display the [SCENE MODE] Press [_] to display the [SCENE MODE] menu and select a scene mode. (P62) menu and select a scene mode. (P62) This allows you to take vivid pictures of the Select this when you want to take pictures at a wedding reception, an indoor party etc.
-
Page 66: [Baby1 ]/[Baby2]
Advanced (Recording pictures) • The focus range is 5 cm (0.16 feet) (Wide)/2 m (6.56 feet) (Tele) to x Press [_] to display the [SCENE MODE] • The ISO sensitivity becomes the same as menu and select a scene mode. (P62) when intelligent ISO sensitivity mode [[_] is set to a highest ISO sensitivity…
-
Page 67: Pet
Advanced (Recording pictures) Press [_] to display the [SCENE MODE] Press [_ ] to display the [SCENE MODE] menu and select a scene mode. (P62) menu and select a scene mode. (P62) Select this mode for high-sensitivity Select this when you want to take pictures processing.
-
Page 68: [Fireworks]
Advanced (Recording pictures) 2 Taking Pictures. Press [M_,u_ ] to display the [SCENE MODE] menu and select a scene mode. (P62) This mode allows you to take beautiful pictures of fireworks exploding in the night sky. • Press the shutter button fully to display the countdown screen.
-
Page 69: [Beach]
Advanced (Recording pictures) Press [ ;_7_ ] to display the [SCENE MODE] Press [_] to display the [SCENE MODE] menu and select a scene mode. (P62) menu and select a scene mode. (P62) This mode allows you to take pictures This allows you to take even more vivid through an airplane window.
-
Page 70: Motion Picture Mode
Advanced (Recording pictures) Motion Picture Mode • Changing the settings for the aspect ratio and the picture quality 1 Press [MENU/SET]. 2 Press &/T to select ] Press the shutter button halfway [ASPECT RATIO] and then press to focus and then press it fully start recording.
-
Page 71
• Depending on the type of the card, recording may stop in the middle. • We recommend using Panasonic’e Memory Card/SDHC Memory Card. • Depending on the type of the card, the card access indication may appear for a while after recording motion pictures. -
Page 72: Recording Which Day Of The Vacation You Take The Picture
Advanced (Recording pictures) • Setting the departure/return date Recording which clay (The following screens are shown when of the vacation program AE mode [ p ] is selected.) take the picture 1 Press [MENU/SET] and then press «4. 2 Press •…
-
Page 73
Advanced (Recording pictures) • Canceling the travel date 6 Press AI_’I4111_ to set the return The travel date is automatically canceled if date and then press [MENU/SET]. the current date is after the return date. If you want to cancel the travel date before the end of the vacation, select [OFF] on the screen shown in step 4. -
Page 74: Displaying The Time At The Travel Destination (World Time)
Advanced (Recording pictures) • Setting the home area [HOME] Displaying the time at (Perform steps 1,2 the travel destination O Press • to select [HOME] and then (World Time) press [MENU/SET] to set. © If you set your home area and the travel MENU destination area when traveling abroad etc., the local time at the travel destination…
-
Page 75
Advanced (Recording pictures) • The current time at the selected travel • Finishing setting the home area • If you are setting the home area for the destination area is displayed on the top first time, the screen returns to the screen right of the screen and the time difference from the home area is shown in step O of «Setting the home… -
Page 76: Using The [Rec] Mode Menu
Advanced (Recording pictures) • Using quick setting Using the [REC] Mode You can use the joystick to easily set the Menu following items when recording. (in program AE mode [[_]) • AF mode (P83) • Metering mode (P82) • White balance (P77) Increase the variey of pictures you can take •…
-
Page 77: [W.balance] Adjusting The Hue For A More Natural Picture
Advanced (Recording pictures) 1 Auto white balance will work within this range. 2 Blue sky 3 Cloudy sky (Rain) 4 Shade 5 TV screen 6 Sunlight Press [_ ] to display the [REC] mode 7 White fluorescent light menu and select the item to set. (P76) 8 Incandescent light bulb This function allows you to reproduce a…
-
Page 78: Finely Adjusting The White Balance
Advanced (Recording pictures) 3 Aim the camera at a sheet of white paper etc, so that the frame in the center is filled by the white object only and then press [MENU/SET]. Press [_] to display the [REC] mode MENU menu and select the item to set.
-
Page 79: Setting The Light Sensitivity
Advanced (Recording pictures) ISO sensitivity 100 _ 1250 • You can finely adjust the white balance Use in bright independently for each white balance item. )laces Suitable Not suitable • The white balance fine adjustment setting is (e.g. outdoors) reflected in the picture when using the flash. Use in dark Not suitable Suitable…
-
Page 80: Setting The Aspect Ratio Of Pictures
Advanced (Recording pictures) Press [ _N_ ] to display the [REC] mode menu and select the item to set. (P76) By changing the aspect ratio, you can Press [_] to display the [REC] mode select an angle of view that matches the menu and select the item to set.
-
Page 81: [Aspect Ratio]
Advanced (Recording pictures) • When the aspect ratio is [_]. • If a RAW picture is recorded with the builtqn memory, it will take time to write the picture data. pixels (2.5M EZ) 12048x 1360 pixels • When the quality is set to [RAW], the digital zoom cannot be used.
-
Page 82
Advanced (Recording pictures) Press [ _N_ ] to display the [REC] mode Press [ _(#_ ] to display the [REC] mode menu and select the item to set. (P76) menu and select the item to set. (P76) You can record audio with the still picture if You can switch to the following metering this is set to [ON]. -
Page 83
Advanced (Recording pictures) • About [I H] or[[]HI • You can focus on the subject more quickly than other AF modes, • The picture may stop moving for a moment before being brought into focus when you press the shutter button Press [_ ] to display the [REC] mode halfway. -
Page 84
Advanced (Recording pictures) • About AF area selection When selecting [[_] You can select AF areas as shown in the You can select the AF area when [[_], [E_H], [E_] or [[_] is selected. following illustration by tilting the joystick towards A/V/_I/•. -
Page 85: Recording Still Pictures With Audio
Advanced (Recording pictures) — Do not look at the AF assist lamp from close up. •The battery will b econsumed faster than — Detach the lens hood. usual. not cover the AF assist lamp with •Itmay t ake t ime t ofocus onthe subject if your fingers or other objects.
-
Page 86
Advanced (Recording pictures) leea[]81 Press [ _(#_ ] to display the [REC] mode Press [_] to display the [REC] mode menu and select the item to set. (P76) menu and select the item to set. (P76) This camera allows you to create motion Select an effect that matches the recording picture files up to 20 seconds long by situation and your image of the recording. -
Page 87: Set]
Advanced (Recording pictures) ! Press A/V to select [FLIP ANIM.] 4 Press [MENU/SET], press A/V select and then press I_. [CREATE MOTION PICTURE] and then press I_. © MENU ©, 2 Select [PICTURE CAPTURE] and then press I_. 5 Select [FRAME RATE] and then press I_.
-
Page 88
Advanced (Recording pictures) 7 Press • to select [CREATE MOTION PICTURE], press I_ and then create a flip animation. Press [_] to display the [REC] mode menu and select the item to set. (P76) The tele conversion lens (DMW-LT55; FRAME RATE 5fps optional) allows you to record even more ©,… -
Page 89
Advanced (Recording pictures) Attach the conversion lens or 5 Press A/_’ to set to [_], close-up lens. [01_1 ] and then press [MENU/SET]. MENU • [OFF]: When you do not attach the conversion lens. «[_]: When you attach the wide conversion lens. -
Page 90: Set T He Date, Time And Display
Advanced (Recording pictures) • Recordable range when using a The actual magnification when using the conversion lens digital zoom (P34) and the extended optical zoom (P33) is 1.7× the zoom When attaching the tele conversion lens magnification displayed when set to Tele. •…
-
Page 91: Displaying Multiple Screens (Multi Playback)
Advanced (Playback) — [[_] (Flip animation) Displaying Multiple — [_-l] (Pictures stamped with Screens (Multi Playback) [DATE STAMP]) • Examples of 25 screens 1 Rotate the zoom lever towards [W] to display multiple screens. (Screen when 9 screens are displayed) •…
-
Page 92: Displaying Pictures By Recording Date (Calendar Playback)
Advanced (Playback) Displaying pictures 4 Press A/V/41/I_ to select recording date picture and then press [MENU/ SET]. (Calendar playback) • The picture that was selected will appear. • To return to the 1 screen playback screen. You can display pictures by recording date using the calendar playback function.
-
Page 93: Using The Playback Zoom
Advanced (Playback) • To stop using the playback zoom Using the Playback Rotate the zoom lever towards [_ ] [W] or Zoom press [MENU/SET]. • To delete a picture during playback zoom 1 Press [@ ]. 2 Press • to select [YES]. | Rotate the zoom lever towards…
-
Page 94: Playing Back Motion Pictures/Pictures With Audio
Advanced (Playback) Stopping motion picture playback Playing Back Motion Press Y. Pictures/Pictures with Fast forwarding/Fast rewinding Audio Press and hold 41/1_ during motion picture playback. _1: Fast rewind I_: Fast forward • The camera returns to normal motion • Motion pictures picture playback when 41/1_ is released.
-
Page 95: Creating Still Pictures From A Motion Picture
Advanced (Playback) ….Creating still pictures • Sound can be heard through the speaker. from a motion picture Refer to [VOLUME] (P24) for information about how to adjust the volume in the [SETUP] menu. • The file format that can be played back You can create still pictures from a motion with this camera is QuickTime Motion picture that has been recorded.
-
Page 96
Advanced(P_ybac_ Rotate the zoom lever towards 4 Press the shutter button. • The message [SAVE THESE NINE [W] to display the 9 screens PICTURES AS ONE SINGLE playback screen. PICTURE ?] appears, Also, the message [SAVE AS A SINGLE PICTURE ?] appears if you saved the picture in step 2. -
Page 97: Using The [Play] Mode Menu
Advanced (Playback) Items that can be set Using the [PLAY] mode menu screen : [SLIDE SHOW] (P97) -_ : [FAVORITE] (P99) You can use various functions in playback F_A : [ROTATE DISR] (P99) mode to rotate pictures, set protection for them etc.
-
Page 98
Advanced (Playback) • Setting the audio, duration and effect 1 Press &/• to select [ALL] or [_] Select [DURATION], [EFFECT] or [AUDIO] and then press [MENU/SET]. on the screen shown in step 2 and set. [DURATION] Can be set to [1SEC.], ©… -
Page 99: Setting Your Favorite Pictures
Advanced (Playback) • Deleting all favorites 1 Select [CANCEL] on the screen shown in step | and then press MENU/SET]. 2 Press • to select [YES] and then press Press [_ ] to display the [PLAY] mode [MENU/SET], menu and select the item to set. (P97) 3 Press [MENU/SET] to close the menu.
-
Page 100: Stamping Information Such As The Date On The Recorded Pictures
Advanced (Playback) • Rotate • When you play back pictures on a PC, they cannot be displayed in the rotated (The picture is rotated manually.) direction unless the OS or software is | Press _1/1_ to select the picture compatible with Exif. Exif is a file format for still pictures which allows recording and then press information etc.
-
Page 101
Advanced {Playback) • Single s etting 4 Press A/_’ to select [YES] I Press _1/1_ to select the picture [NO] and then press [MENU/SET]. and then press (The screen shown appears when yeu select a picture recorded with a [[_] picture size.) ©… -
Page 102: [Date Stamp]
(P108) 2 Press [MENU/SET]. and then set the DPOP setting. • After performing step 2, perform For more information visit: step 2 onwards in «When [SINGLE] http://panasonic.jp/dc/dpof_l selected». white_e.htm Press A/• to select [SINGLE], [MULTI] or [CANCEL] and then •…
-
Page 103: The Number Of Prints
Advanced (Playback) • Single setting • To cancel all settings 1 Press </1_ to select the picture | Press • to select [YES] and then to print and then press •/, press [MENU/SET]. set the number of prints. ,©, © MENU 2 Press [MENU/SET]…
-
Page 104: Preventing Accidental Erasure Of Pictures
Advanced (Playback) ….• Single setting • DPOF is an abbreviation of «Digital Print ] Press _1/1_ to select the picture Order Format». This feature allows you to and then press • to set/cancel. write print information to media and then use the information on a DPOF-compliant system.
-
Page 105: Adding Audio After Taking Pictures
Advanced (Playback) Press [_ ]te display the [PLAY] mode Press [ _ ] to display the [PLAY] mode menu and select the item te set. (P97) menu and select the item te set. (P97) You can add the audio after taking a This function is useful if you want to reduce picture, the file size of a picture to attach it to an…
-
Page 106: Enlarging A Picture And Trimming It
Advanced (Playback) 2 Press _1/1_ to select the size then press Press [_] to display the [PLAY] mode menu and select the item to set. (P97) You can enlarge and then clip the important part of the recorded picture. ] Press _1/1_ to select the picture and then…
-
Page 107: [Aspect Conv.] Changing The Aspect Ratio Of A 16:9 Picture
Advanced (Playback) 4 Press shutter button. • The message [DELETE ORIGINAL PICTURE?] appears. 5 Press to select [YES] Press [_ ] to display the [PLAY] mode [NO] and then press [MENU/SET]. menu and select the item to set. (P97) You can convert pictures taken with a aspect ratio to a [_] or a [L_] aspect ratio.
-
Page 108: Copying The Picture Data
Advanced (Playback) 3 Press _1/1_ to determine horizontal position and press shutter button to set. Press [_] to display the [PLAY] mode menu and select the item to set. (P97) You can copy recorded picture data from the built-in memory to a card or vice versa. ] Press to select the copy…
-
Page 109: Initializing The Card
• If the card has been formatted on a PC or • It may take time to copy the picture data. other equipment, format it on the camera • Only pictures recorded with a Panasonic again. digital camera (LUMIX) will be copied•…
-
Page 110: Connecting To Other Equipment
Connecting to other equipment • Set the camera to a mode other than Connecting to a PC [ J-h.] mode. ] Turn on the camera and the PC. 2 Connect the camera to a PC via You can acquire recorded pictures to a PC the USB connection cable (_) by connecting the camera and the PC.
-
Page 111
Com_ecting to other equipment • Conditions under which a different • About motion picture playback on a PC folder number is used Use the software «QuickTime» (for Windows 2000/XP) in the CD-ROM In the following cases, the picture is not (supplied) to play back motion pictures recorded in the same folder as the recorded on this camera on a PC. -
Page 112
Connecting to other equipment Pictures edited or rotated with a PC may be displayed in black in playback mode • Do not use any other USB connection (P36), multi playback (P91) and calendar cables except the supplied one. playback (P92). •… -
Page 113: Printing The Pictures
Connecr#lg to other equipment Printing the Pictures ] Turn on the camera and the printer. 2 Set the mode dial to [_]. By connecting the camera directly to a 3 Connect the camera to a printer printer supporting PictBridge via the USB via the USB connection cable (_ connection cable (supplied), you can select…
-
Page 114
Connecting to other equipment • Selecting a single picture and printing • Selecting multiple pictures and printing them | Press | Press _1/1_ to select the picture and then press [MENU/SET]. ; 2 Press to select an item and then press [MENU/SET]. ©… -
Page 115
Connecting to other equipment • [PRINT WITH DATE] 3 Press • to select [PRINT START] and then press [MENU/SET]. [OFF] Date is not printed. [ON] Date spr nted. © • If the printer does not support date printing, the date cannot be printed on the picture. -
Page 116
Connecting to other equipment • Setting the date printing with the • The camera is receiving an error message DPOF print in advance from the printer when the [O] indication We recommend setting DPOF date printing lights orange during printing. After with [DPOF PRINT] (P103) in advance finishing printing, make sure there are no when the printer supports it. -
Page 117: Playing Back Pictures On A Tv Screen
Connectirlg to other equipment Playing Back Pictures on a TV Screen • Depending on the aspect setting, black bands may be displayed on the top and bottom or the left and right of the pictures. • Do not use any other AV cables except the supplied one.
-
Page 118: Using The Mc Protector/Nd Filter
Others Using the MC Protector/N D Filter • You cannot attach the MC protector and the ND filter at the same time. • If the MC protector/ND filter are tightened The MC protector (DMW-LMC52; optional) too much, you may not be able to remove is a transparent filter which affects neither them.
-
Page 119: Screen Display
Others Screen Display (_ In recording 1 Recording mode 2 Flash mode (P43) 3 Focus (P27) _4— 4 Picture size (PB0) Z2— 5 Quality (P80) 21— —10 In Motion picture mode (P70) 20— 19— —11 18— —12 _»_: Jitter alert (P29) 6 Battery indication (P26) 27 28 —29…
-
Page 120
Others 24 Optical image stabilizer (P50) 25 White balance (P77) ® White balance fine adjustment (P78) 18½® 26 ISO sensitivity (P79) _/_/_: ISO limit (P52) 167; 27 Flip animation (P86) 28 Burst (P51) Audio recording (P70, 82) 29 Color effect mode (P85) Recording in simple mode… -
Page 121
O#lers 10 Cable disconnection warning icon (P116) • This is displayed when printing using a printer supporting PictBridge. (Depending on the printer, the icon may not be displayed.) Motion picture recording time (P94): 11 Histogram (P40) 12 Recording information 13 Favorites settings (P99)/Elapsed ©… -
Page 122: Cautions For Use
Others Cautions for Use Do not spray the camera with insecticides or volatile chemicals. • if the camera is sprayed with such • Optimal use of the camera chemicals, the body of the camera may be damaged and the surface finish may peel Take care not to drop or knock the unit off.
-
Page 123
O_e_ • About the Lens Dispose of unusable battery. • Batteries have a limited life. • Do not press the lens with excessive force. • Do not throw batteries into fire because it • Do not leave the camera with the lens may cause an explosion. -
Page 124: Message Display
Others Message Display [CANNOT BE SET ON THIS PICTURE] DPOF print cannot be set for pictures not based on the DCF standard. Confirmation messages or error messages will be displayed on the screen in some [NOT ENOUGH SPACE ON BUILT-IN cases.
-
Page 125
Others [PLEASE TURN CAMERA OFF AND [A FOLDER CANNOT BE CREATED] A folder cannot be created because there THEN ON AGAIN] This message appears when the camera is are no remaining folder numbers that can not operating properly. Turn the camera off be used. -
Page 126: Troubleshooting
Others Troubleshooting • Recording 1 : The picture cannot be recorded. • Is the mode dial correctly set? If you return the menu settings to the initial • Is there any memory remaining on the settings at the time of purchase, the built-in memory or the card? condition may improve.
-
Page 127
Others 7: The recorded picture looks rough. 10: Motion picture recording stops in the middle. Noise appears on the picture. • Is the ISO sensitivity high or the shutter • Are you using a MultiMediaCard? speed slow? -This unit does not support MultiMediaCards. -
Page 128
Others 5: Black, red, blue and green dots • Playback appear on the LCD monitor. 1 : The picture being played back is • These pixels do not affect the recorded rotated and displayed in an pictures. unexpected direction. This is not a malfunction. The camera has a function that automatically rotates the display of… -
Page 129
Others •Did you record the pictures after setting 6: The card is not recognized by the PC. the clock correctly onthis unit? ( P19) (The built-in memory is recognized.) For e xample, ifthe clock setting onthe • Disconnect the USB connection cable. camera isdifferent from the date and Connect it again while the card is time set o nthe PC and you acquire… -
Page 130
Others 4: A red lamp sometimes turns on when 9: The displayed picture is slightly distorted. the shutter button is pressed halfway. • In dark places, the AF assist lamp (P85) • Depending on the zoom magnification, lights red to make it easier to focus on a the recorded picture is slightly distorted. -
Page 131: Available Recording Time
Others Number of recordable pictures and available recording time • The number of recordable pictures and the available recording time are an approximation. (These vary depending on the recording conditions and the type of card.) • The number of recordable pictures and the available recording…
-
Page 132
Others Built-in Memory (Approx. 27 MB) 16 MB 32 MB 64 MB 128 MB Card 256 MB 1900 1170 3770 1370 2320 512MB 7550 1470 2740 4640 12290 2920 5120 8780 24130 5740 10050 17240 Built-in Memory (Approx. 27 MB) 16 MB 32 MB 64 MB… -
Page 133
Others iii i iii i i iii i ii iLii i iii ii i iiiiiiHiii..iiiii i iii Built-in Memory (Approx 27 MB) 16MB 32 MB 64 MB 128MB Card 256 MB 512 MB 1720 2 GB 1420 1800 3410 4 GB 1450 2800 3540… -
Page 134: Specifications
Others Specifications Digital Camera: Information for your safety Camera effective pixels: 7,200,000 pixels Image sensor: 1/2.5″ CCD, total pixel number 7,380,000 pixels Primary color filter Lens: Optical 12× zoom, f 6 mm to 72 mm (35 mm film camera equivalent: 36 mm to 432 mm)/F2.8 to F3.3 Max.
-
Page 135
Approx. 310 g/10.9 oz (excluding card and battery), Approx. 357 g/12.6 oz (with card and battery) Operating temperature: 0 °C to 40 °C (32 °F to 104 °F) 10% to 80% Operating humidity: Battery Charger (Panasonic DE-A43B): Information for your safety Output: CHARGE 84V=0.43A Equipment mobility: Movable… -
Page 136: Digital Camera Accessory System
Others Digital Camera Accessory System CGR-S006A Lithum Ion Battery w o7PP (A}: DMW-CZS7 (A}: Soft Case @: DMW-CHFZ8 @: Semi Hard Case (c): DMW-LMC52 (s): M© Protector @): DMW-LND52 _rD}: ND Filter _: DMW-LT55 _}: Tele Conversion Lens (F}: DMW-LW55 (F}: Wide Conversion Lens DMW-LC55…
-
Page 137: Digital Camera Accessory Order Form (For Usa Customers)
VISITYOUR LOCAL PANASONIC DEALER CALL PANASONIC’S ACCESSORY ORDER LINE AT 1-800-332-5368 [6 AM-6 PM M-E PACIFIC TIME] MAIL THIS ORDER TO: PANASONIC SERVICE AND TECHNOLOGY COMPANY ACCESSORY ORDER OFFICE 20421 84th Avenue South Kent, WA. 98032 In CANADA, please contact your local Dealer for more information about accessories.
-
Page 138: Request For Service Notice (For Usa Only)
Mail this completed form and your Proof of Purchase along with your unit to: Panasonic Camera and Digital Service Center 1590 Touhy Ave. Elk Grove Village, IL 60007 VQT1B25…
-
Page 139: Limited Warranty (For Usa Only)
(For USA Only) PANASONIC CONSUMER ELECTRONICS COMPANY, DIVISION OF PANASONIC CORPORATION OF NORTH AMERICA One Panasonic Way, Secaucus, New Jersey 07094 PANASONIC PUERTO RICO, INC. Ave. 65 de Infanterfa, Km. 9.5, San Gabriel Industrial Park, Carolina, Puerto Rico 00985 Panasonic…
-
Page 140
Carry-In or Mail-In Service For Carry-In or Mail-In Service in the United States call 1-800-272-7033. For assistance in Puerto Rico call Panasonic Puerto Rico, Inc. (787)-750-4300 or fax (787)-768-2910. This warranty ONLY COVERS failures due to defects in materials or… -
Page 141: Customer Services Directory (For Usa Only)
Personal Checks) Centralized Factory Service Center Panasonic Camera and Digital Service Center MAIL TO : 1590 Touhy Ave. Elk Grove Village, IL 60007 Please carefully pack and ship, prepaid and insured, to the Elk Grove Village Centralized Factory Service Center.
-
Page 142: (Pour Le Canada)
DE CHOC I_LECTRIQUE OU DE DOMMAGES h. L’APPAREIL, • N’EXPOSEZ PAS CET APPAREIL h. • Assurez-vous d’utiliser un adaptateur LA PLUIE, A L’RUMIDITI_, .& secteur de marque Panasonic (DMW- L’I_GOUTTEMENT OU AUX AC7PP; en option). I_CLABOUSSEMENTS, ET NE • Assurez-vous…
-
Page 143
Others I_vitez d’approcher I’appareil photo de • .&.propos du bloc-batterie tout equipement magndtisd (four ATTENTION micro-ondes, t_l_viseur, _quipement Batterie (batterie au lithium-ion) jeux video, etc.). • Utilisez I’unite specifiee pour recharger • Si vous utilisez I’appareil photo _. la batterie. proximite d’un televiseur, les radiations •… -
Page 144: Index
Others Index Date Printing ……103, 115, 116 Date Stamp ………. Deleting Picture ……..Dial Display ……….AC Adaptor ……..110, 113 Digital Zoom ……….. Adjusting Flash Output ……Aerial Photo Mode ……… Diopter Adjustment …….. AF Area Selection ……..DPOF Print Setting ……
-
Page 145
Others Macro Mode ……….. Quality ………… MANUAL ……….. Manual Exposure ……57, 58 Manual Exposure Assistance ….57 RAW …………Manual Focus ……..Reset of Setting ……..MC Protector ……..Resizing ……….Metering Mode ……..Review ……….. MF Assist ……… 24, 60 Rotate ………… -
Page 146
Panasonic Consumer Electronics Company, Division of Panasonic Corporation of North America One Panasonic Way, Secaucus, NJ 07094 Panasonic Puerto Rico, Inc. Ave. 68 de Infanteria, Kin. 9.8, San Gabriel Industrial Park, Carolina, Puerto Rico 00988 Panasonic Canada Inc. 5770 Ambler Drive, Mississauga, Ontario, L4W 2T3 2007 Matsushita Electric Industrial Co., Ltd.
Инструкция по эксплуатации
Цифровая фотокамера
Модель №. DMC-FZ8
Перед пользованием прочтите,
пожалуйста, эту инструкцию
полностью.
EE
VQT1B39

Перед использованием
Ïåðåä èñïîëüçîâàíèåì
Уважаемый покупатель!
•Просьба обратить внимание, что органы
Благодарим вас за приобретение этой
управления, составные части и меню
цифровой камеры Panasonic.
вашей цифровой камеры могут несколько
Прочитайте, пожалуйста, внимательно
отличаться от тех, что представлены на
эту инструкцию по эксплуатации и
рисунках этой инструкции.
держите ее всегда под рукой.
•Логотип SDHC является торговым
знаком.
Информация для
•Leica является зарегистрированным
торговым знаком компании Leica
вашей безопасности
Microsystems IR GmbH.
•Elmarit является зарегистрированным
торговым знаком компании Leica
ПРЕДУПРЕЖДЕНИЕ:
Camera AG.
•Другие названия, названия фирм и
ЧТОБЫ УМЕНЬШИТЬ ОПАСНОСТЬ
изделий, отмеченные в этой инструкции,
ВОЗНИКНОВЕНИЯ ПОЖАРА,
являются торговыми знаками или
ПОРАЖЕНИЯ ЭЛЕКТРИЧЕСКИМ
зарегистрированными товарными знаками
ТОКОМ ИЛИ ПОВРЕЖДЕНИЯ
соответствующих компаний.
ИЗДЕЛИЯ,
•НЕ ПОДВЕРГАЙТЕ ЭТОТ АППАРАТ
РАЗЪЕМ ДОЛЖЕН НАХОДИТЬСЯ
ВОЗДЕЙСТВИЮ ДОЖДЯ, ВЛАГИ,
ВБЛИЗИ АППАРАТУРЫ И ДОСТУП К
КАПЕЛЬ ИЛИ БРЫЗГ, И НЕ
НЕМУ НЕ ДОЛЖЕН БЫТЬ
ПОМЕЩАЙТЕ НА АППАРАТ
ЗАТРУДНЕН.
НИКАКИЕ ПРЕДМЕТЫ,
НАПОЛНЕННЫЕ ВОДОЙ,
НАПРИМЕР, ВАЗЫ.
ПРЕДУПРЕЖДЕНИЕ
•ИСПОЛЬЗУЙТЕ ТОЛЬКО
При неправильной замене
РЕКОМЕНДУЕМЫЕ
аккумулятора возникает опасность
ПРИНАДЛЕЖНОСТИ.
взрыва. Производить замену,
•НЕ СНИМАЙТЕ КРЫШКУ (ИЛИ
используя только тот же тип
ЗАДНЮЮ КРЫШКУ); ВНУТРИ НЕТ
аккумулятора, или равноценный ему,
ЧАСТЕЙ ДЛЯ ОБСЛУЖИВАНИЯ
рекомендуемый производителем.
ПОЛЬЗОВАТЕЛЕМ. ЗА
Размещение в отходы
ОБСЛУЖИВАНИЕМ ОБРАЩАЙТЕСЬ
использованных аккумуляторов
К КВАЛИФИЦИРОВАННОМУ
производить согласно инструкциям
ОБСЛУЖИВАЮЩЕМУ ПЕРСОНАЛУ.
производителя.
Тщательно соблюдайте законы об
авторских правах.
Запись с предварительно
Предупреждение
записанных магнитных лент или
Существует риск возгорания, взрыва
дисков, а также других
или ожогов. Запрещается разбирать,
опубликованных или
нагревать свыше 60 xC или сжигать.
телевещательных материалов с
целью, отличной от вашего личного
пользования, является нарушением
закона об авторских правах. Даже с
Маркировка продукта находится на
целью вашего личного пользования
нижней панели устройства.
запись определённого материала
может быть запрещена.
2
VQT1B39
Перед использованием
-Если Вы увидите такой символ- ∫ О зарядном устройстве батареи
Информация по обращению с
ПРЕДОСТЕРЕЖЕНИЕ!
отходами для стран, не входящих в
•НЕ СЛЕДУЕТ УСТАНАВЛИВАТЬ
Европейский Союз
ИЛИ РАЗМЕЩАТЬ ДАННЫЙ
Действие этого символа
АППАРАТ В КНИЖНОМ ШКАФУ,
распространяется только на
ВСТРОЕННОМ ШКАФУ ИЛИ
Европейский Союз.
ДРУГОМ ОГРАНИЧЕННОМ
Если Вы собираетесь выбросить данный
ПРОСТРАНСТВЕ ДЛЯ ТОГО,
продукт, узнайте в местных органах
ЧТОБЫ СОХРАНИТЬ УСЛОВИЯ
власти или у дилера, как следует
ХОРОШЕЙ ВЕНТИЛЯЦИИ.
поступать с отходами такого типа.
УДОСТОВЕРЬТЕСЬ, ЧТО ШТОРЫ
И ДРУГИЕ ПОДОБНЫЕ
ПРЕДМЕТЫ НЕ ПРЕПЯТСТВУЮТ
НОРМАЛЬНОЙ ВЕНТИЛЯЦИИ
ДЛЯ ПРЕДОТВРАЩЕНИЯ РИСКА
ПОРАЖЕНИЯ ЭЛЕКТРИЧЕСКИМ
ТОКОМ ИЛИ ВОЗНИКНОВЕНИЯ
ПОЖАРА ИЗ-ЗА ПЕРЕГРЕВА.
•НЕ ЗАКРЫВАЙТЕ
ВЕНТИЛЯЦИОННЫЕ ОТВЕРСТИЯ
АППАРАТА ГАЗЕТАМИ,
СКАТЕРТЯМИ, ШТОРАМИ И
ПОДОБНЫМИ ПРЕДМЕТАМИ.
•НЕ РАЗМЕЩАЙТЕ НА АППАРАТ
ИСТОЧНИКИ ОТКРЫТОГО
ПЛАМЕНИ, ТАКИЕ, КАК ГОРЯЩИЕ
СВЕЧИ.
•ВЫБРАСЫВАЙТЕ БАТАРЕИ В
МУСОР, УЧИТЫВАЯ ОХРАНУ
ОКРУЖАЮЩЕЙ СРЕДЫ.
•Если питание переменного тока
включено, зарядное устройство
батареи находится в режиме
ожидания.
Первичная цепь всегда “работает”,
если адаптер переменного тока
подключен к электрической розетке.
3
VQT1B39

Перед использованием
∫ Уход за камерой
камеры сравняется с температурой
•Нельзя сильно трясти или ударять
окружающего воздуха. Если
камеру.
конденсация все-таки произошла,
Данный аппарат может выйти из строя,
выключите камеру и оставьте ее на
запись изображений может стать
2 часа. Конденсация исчезнет сама
невозможной, или может повредиться
собой, когда температура камеры
объектив либо монитор ЖКД.
сравняется с окружающей
•Сложите объектив перед переносом
температурой.
камеры или воспроизведением
•Читайте вместе с разделом
снимков.
“Предосторожности при
•Будьте особенно осторожны в
использовании фотокамеры”. (P130)
перечисленных ниже местах,
поскольку они могут стать причиной
∫ Карты памяти, которые можно
неисправности данной камеры.
использовать с данным
– Места с большим количеством песка
устройством
или пыли.
Допускается использование карт
– Места возможного контакта данной
памяти SD, SDHC и MultiMediaCard.
камеры с водой, например, при
•Когда слово карта упоминается в
использовании камеры в дождливый
данных инструкциях по эксплуатации,
день или на пляже.
имеются в виду следующие типы карт
•В случае попадания на камеру
памяти.
пресной или морской воды
– Карта памяти SD (от 8 МБ до 2 ГБ)
осторожно протрите корпус камеры
– Карта памяти SDHC (4 ГБ)
сухой тканью.
– MultiMediaCard
∫
О конденсации (Когда объектив или
Более детальная информация о картах
видоискатель затуманиваются)
памяти, которые могут использоваться
•Конденсация происходит, когда
с данным устройством.
окружающая температура или
•При использовании карт емкостью
влажность изменяются, как описано
4 ГБ или более можно использовать
ниже. Остерегайтесь конденсации,
только карту памяти SDHC.
поскольку она вызывает появление
•Карта памяти на 4 ГБ без логотипа
пятен на объективе, грибки или сбои в
SDHC не основана на стандарте SD и
работе камеры.
не будет функционировать с данным
– Когда камера с холода заносится в
продуктом.
теплое помещение.
– Когда камера с улицы заносится в
OK
автомобиль со включенной системой
кондиционирования.
– Когда холодный воздух из
44
кондиционера или аналогичных
приборов направлен
•Карта MultiMediaCard совместима
непосредственно на камеру.
только с фотоснимками.
– Во влажных местах
•Для предотвращения конденсации
поместите камеру в пластиковый
пакет и подождите, пока температура
4
VQT1B39

• Изменение набора отображаемой
Содержание
информации …….……..…………..……….. 39
• Свечение монитора ЖКД
Перед использованием
(режим усиления яркости монитора
ЖКД/режим верхнего ракурса)……... 42
Информация для вашей безопасности…..2
Съемка со встроенной вспышкой…………44
Съемка с автоматическим таймером……48
Компенсация экспозиции ………………..….. 50
Подготовка
Съемка с автоматической настройкой
значений экспозиции ……………..……….. 51
Стандартные принадлежности……………… 7
Оптический стабилизатор изображения
…. 52
Названия составных частей…….……..……..7
Съемка в режиме серийной съемки…..…53
Крышка объектива/Ремешок……………..…. 9
Изменение светочувствительности при
Присоединение бленды объектива……… 10
движении записываемого объекта…...55
Краткое руководство……..…………..………. 12
Съемка крупным планом .…………..……….. 56
Подзарядка аккумулятора при помощи
Режим приоритета диафрагмы AE……….58
зарядного устройства ……………..………. 13
Режим приоритета скорости затвора
Об аккумуляторах (время заряда/и
AE…..……..…………..…………..…………..….. 58
количество снимков)…..……..………….... 14
Ручная экспозиция…….…………..……………59
Установка и удаление батареи/карты
Показатель диафрагмы и скорость
(поставляется отдельно).……..…………. 15
затвора……..………………..………….……….60
Встроенная память/карта
Съемка в режиме ручной фокусировки
….. 61
(поставляется отдельно).……..…………. 16
Съемка в соответствии с
Настройка даты/времени
записываемой сценой (Режим сцены)
…. 64
(Настройка часов) ………………..…………. 18
– [ПОРТРЕТ].…………..…………..……….. 65
• Изменение настроек часов ………..…. 18
– [РОВНАЯ КОЖА] ..……..…………..….. 65
Информация о диске рабочего режима
…..19
– [ПЕЙЗАЖ] ……..…………..…………..….. 66
Настройка меню…….…….…………..…………20
– [СПОРТ] …..……………..…………..…….. 66
О меню НАСТР. (НАСТРОЙКА) ……..……. 21
– [ПАНОРАМИРОВ.] ……..……..……….. 66
Отображение на мониторе
– [НОЧН. ПОРТРЕТ] ……..…………..….. 67
ЖКД/переключение отображения на
– [НОЧН. ПЕЙЗАЖ]..……..…………..….. 67
мониторе ЖКД.…………..…………..………. 25
– [ЕДА]…………..…………..…………..…….. 68
– [ВЕЧЕРИНКА]…..……..…………..…….. 68
– [СВЕЧИ] ………..…………..…………..….. 68
Основные сведения
– [РЕБЕНОК1]/[РЕБЕНОК2] …….…….. 69
– [
ДОМ.ЖИВОТНОЕ] ……..…..……….. 70
Съемка ………..…………..…………..………….... 27
– [ЗАКАТ] ….……..…………..…………..….. 70
Съемка в простом режиме…..…..…………. 30
– [ВЫС. ЧУВСТВ.] …………………..…….. 70
Съемка с увеличением …..……..………….... 33
– [ЗВЕЗДНОЕ НЕБО] ….…………..…….. 71
• Использование оптического
– [ФЕЙЕРВЕРК]……..…..…………..…….. 71
увеличения…………….…………………….. 33
– [ПЛЯЖ]…..…..…………..…………..…….. 72
• Использование дополнительного
– [СНЕГ] ………..…………..…………..…….. 72
оптического увеличения (EZ)…..……. 34
– [
АЭРОСЪЕМКА] ….…………..……….. 73
•
Использование цифрового увеличения
Режим видео..…..…………..…………..……….. 73
Дальнейшее увеличение
…………………. 34
При съемке записывается день отпуска,
Проверка записанного снимка
когда была сделана фотография
……….. 75
(просмотр) ………..…..…………..………….... 36
Отображение времени в пункте
Воспроизведение/удаление снимков……37
назначения поездки (Мировое Время)
…77
Использование меню [ЗАП.]. .…………..….. 79
Дополнительные операции
• [БАЛ. БЕЛ.]
(запись снимков)
Корректировка баланса цветов для
достижения естественного цвета…..80
Информация о мониторе
• [НАСТР.БАЛ.БЕЛ.]
ЖКД/Видоискателе.…………..………….... 39
Точная настройка баланса белого.… 82
5
VQT1B39

• [СВЕТОЧУВСТ.]
• [ПОК. СЛАЙД.]
Установка светочувствительности
……83
Воспроизведение снимков в определенном
• [ФОРМАТ]
порядке с воспроизведением каждого
Установка формата снимков……..…..83
снимка на протяжении одного и того же
• [РАЗР. КАДРА]/[КАЧЕСТВО]
времени
…….…………..………..…………...102
Установка размера изображения и
• [ИЗБРАННОЕ]
качества, соответствующего
Выбор избранных снимков….………..104
снимку …………..…………..…………..……..84
• [ПОВЕРН. ЖКД]/[ПОВЕРН.]
• [ЗАП. ЗВУКА]
Для поворота снимка….…..…………...105
Запись со звуком ……..…..…………..…..86
• [
ОТПЕЧ.ДАТЫ]
• [РЕЖИМ ЗАМЕРА]
Печать такой информации, как
Определяет метод измерения яркости
…86
дата, на записанных снимках……….106
• [РЕЖИМ АФ]
• [DPOF ПЕЧ.]
Метод установки фокуса ………..……..87
Выбор печатаемых снимков и
• [НЕПРЕР. АФ]
количество отпечатков ……..…………109
Непрерывная фокусировка на
• [ЗАЩИТИТЬ]
предмете…..……..…………..…………..…..89
Предотвращение случайного
• [ВСП. ЛАМП. АФ]
удаления снимков…………..…………...110
Облегчается фокусировка в условиях
• [ДУБЛ. ЗВУК.]
недостаточной освещенности
…………..89
Запись звука после съемки….……….111
• [ЦВЕТ. ЭФФЕКТ]
• [ИЗМ. РАЗР.]
Установка цветовых эффектов для
Уменьшение размеров снимка ……..112
записываемых снимков ……………..…..90
• [ПОДРЕЗКА]
• [НАСТР. ИЗОБР.]
Увеличение и подрезка снимка…….113
Настройка качества изображения
• [ИЗМ. ФОРМАТ]
при съемке..…..…………..…………..……..90
Изменение формата кадра на 16:9
….114
• [АНИМАЦИЯ]
• [КОПИЯ]
Объединение снимков для создания
Копирование изображений …………..115
файла покадровой анимации ……..….91
• [ФОРМАТИР.]
• [ПРЕОБ. ЛИНЗА]
Инициализация карты ……….…………116
Использование дополнительных
объективов ………………..…………..……..93
Подсоединение к другому
• [УСТ. ЧАСОВ]
Установка даты, времени и
оборудованию
отображения ……………..…………..……..95
Подключение к персональному
компьютеру…………..………………..…….. 118
Дополнительные операции
Печать снимков………..…………..………….. 120
(воспроизведение)
Воспроизведение фотоснимков на
экране телевизора…….…………..……… 125
Отображение нескольких экранов
(мульти воспроизведение) ….…………... 96
Другое
Отображение в порядке даты съемки
(воспроизведение в хронологическом
Использование защитного устройства
порядке)……………..…………..…………..…. 97
MC/фильтра ND…..…..…………..……….. 126
Использование функции увеличения
Вид экрана…..…………..…………..………….. 127
при воспроизведении ……..………….…… 98
Предосторожности при использовании
Воспроизведение видео/снимков со
фотокамеры ….……..…………..………….. 130
звуком .…..…………..…………..…………..…. 99
Сообщения…..………………..…………..…….. 132
Создание фотоснимков из видео …..…. 100
Устранение неисправностей…..…………. 134
Использование меню режима [ВОСП.]
…. 102
Количество записываемых снимков и
доступное время записи…….………….. 141
Технические характеристики….……..…. 144
6
VQT1B39

Данная инструкция на русском языке предназначена для фотокамеры
Panasonic Lumix DMC-FZ8, описывает принцип работы и основные моменты эксплуатации устройства.
Производитель настойчиво рекомендует перед включением фотокамеры
внимательно изучить настоящую инструкцию.
Инструкция для фотокамеры
представлена в формате PDF. Все современные браузеры уже поддерживают данный формат и сложностей с открытием файла возникнуть не должно.
Но если открыть инструкцию все же не удается, то необходимо установить на компьютер программу для чтения PDF файлов, например, Acrobat Reader. Если у вас возникли сложности с открытием инструкции на смартфоне под управлением Android, нужно установить, например, Adobe Acrobat Reader.
Комментарии (0)
Комментарии про другие Фотокамеры
Другие Фотокамеры Panasonic