
P000-005(ER217欧州)06.01.2611:01ページ1
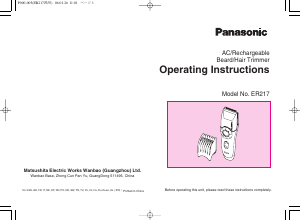
AC/Rechargeable
Beard/Hair Trimmer
Operating Instructions
Model No. ER217
Matsushita Electric Works Wanbao (Guangzhou) Ltd.
Wanbao Base, Zhong Cun Pan Yu, GuangDong 511495, China
No.3 EN, GR, FR, IT, NE, SP, DN, PO, NR, SW, FN, TU, Po, Cz, Hu, Ru, Russi, Uk (
欧州
)
Printed in China
Before operating this unit, please read these instructions completely.
32
M
G
C
H
J
I
L
K
E
D
N
A
F
B
O
1
8 9 10
11 12 13
2 3 4
14 15 16
5 6 7
charge
P000-005(ER217欧州)06.01.2611:01ページ2
Index
ENGLISH Page 6
SVENSKA Sid 65
DEUTSCH Seite 12
SUOMI Sivu 71
FRANÇAIS Page 19
TÜRKÇE Sayfa 77
ITALIANO Pagina 26
POLSKI Strona 83
NEDERLANDS Pagina 32
ČESKY Strona 90
ESPAÑOL Pagina 39
MAGYAR Oldal 96
DANSK Side 46
ROMANA Pagina 103
PORTUGÊS Pagina 52
êìëëäàâ
ëÚ‡Ìˈ‡
110
NORSK Side 59
ì͇ªÌҸ͇
ëÚÓ¥Ì͇
117
54
(c)
(d)
(a)
(e)
(f)
(b)
(i)
(k)
(j)
P000-005(ER217欧州)06.01.2611:01ページ4
17 18
20
K
Thinning Plate
The charge indicator lamp will glow
When thinning, slide the thinning
red and it will stay on until the adap-
plate up until it firmly clicks in
tor is disconnected from the AC out-
position. (see fig. 7)
let. (see fig. 4)
You can fully charge the trimmer in 8
L
Thinning Plate Lock Button
hours if it seems to be losing speed.
Press and hold while sliding the
A full charge will supply enough
Thinning plate down to set the
power for approx. 10 trims (5 minutes
Thinning Plate back to its original
per trim for a normal beard).
position.
M Adaptor
Use this to connect the trimmer
AC operation
to an AC power source for re-
Connect the AC adaptor to the body
charging or for AC operation.
in the same way as for charging, and
N Oil
set the switch to “1” to use the trim-
Lubricate the space between the
mer.
stationary and moving blade with
If the trimmer does not operate after
2 or 3 drops of oil after use. (see
connection as mentioned above, re-
fig. 16)
turn switch to “0•charge” position for
1 minute and then set switch back to
O Cleaning Brush
“1” position.
READ ALL INSTRUCTIONS BE-
FORE USE.
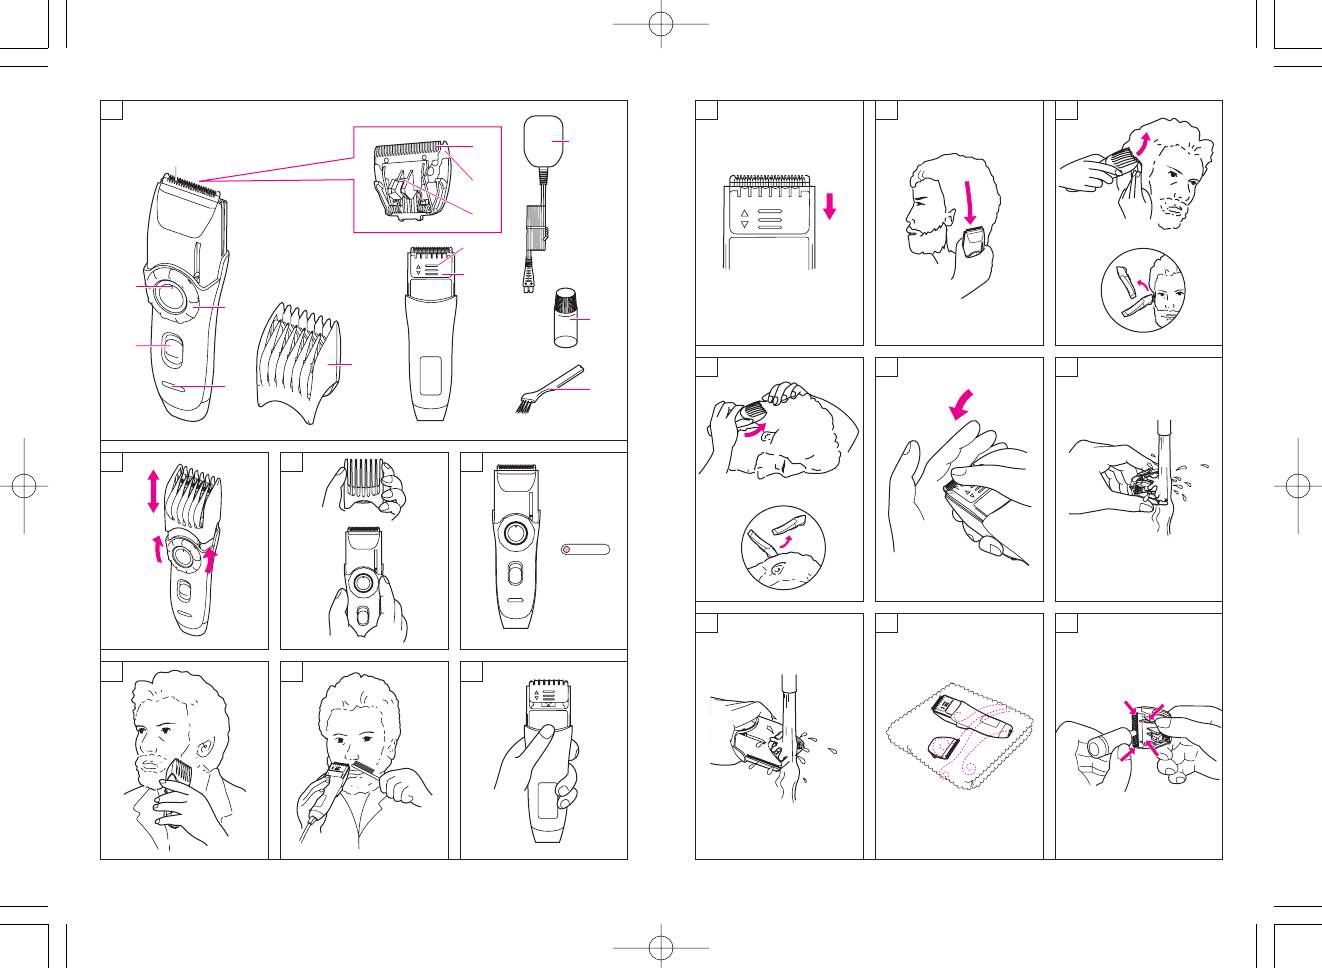
Trimming of beard
Place the angled face of the comb
against the skin and cut the beard
Operation
by moving the trimmer in all direc-
Charging and cordless trimming
tions to obtain a uniform cut. (see fig.
When charging the beard/hair trim-
5)
mer for the first time or when it has
With curly facial hair, the comb at-
not been in use for more than 6
tachment may not cut all of the hair.
months, charge it for the activation
In this case, remove the comb attach-
for at least 16 hours before use.
ment and use a conventional comb
Connect the power cord to the beard/
to draw out the remaining uncut, hair.
hair trimmer, and plug the adaptor to
(see fig. 6)
an AC outlet.
When shaping the beard, remove the
In some areas, a special plug adap-
comb attachment. Place the angled
tor may be required.
edge against the skin and make the
border of the beard even.
This Beard/Hair Trimmer is for the
E Trimming Length Indicator
trimming and care of mustaches,
Indicator Trimming Length
beards and hair. Trimming length can
be adjusted between 1 to 20 mm. The
1 1.0 mm
trimmer can be operated either from
2 2.0 mm
an AC power source or on its own
• 3.5 mm
rechargeable battery.
5 5.0 mm
• 6.5 mm
Parts identification
8 8.0 mm
(see fig. 1)
• 9.5 mm
A Switch
Slide up to turn on, slide down to
11 11.0 mm
turn off.
• 12.5 mm
B Charge Indicator Lamp
14 14.0 mm
Lights when the unit is connected
• 15.5 mm
with the adaptor to an AC
M
17 17.0 mm
power source for charging.
• 18.5 mm
C Main Blade
A precision 39 mm-wide blade
20 20.0 mm
which can be used with the comb
attachment F
.
• The actual hair length may be
D Quick Adjust Dial
longer than the set trimming length.
Turn the dial to a higher setting to
F Comb Attachment
raise or lower the comb attach-
Use this to control the trimming
ment F to the desired length (be-
length. (see fig. 3)
tween 1 and 20 mm) (see fig. 2).
G Moving Blade
The comb attachment is locked
in position when the switch is set
H Stationary Blade
to “1”.
I Cleaning Lever
Push this lever to remove bits of
hair caught between the station-
ary blade and the moving blade.
J Blade Block
Release to remove the blade
block from the housing to clean
or replace the blade. (see fig. 12)
P006-018(ER217欧州)06.01.2611:02ページ6
76
WARNING: Detach the trimmer from
ing charged for more than 6 months,
the AC adaptor before cleaning it in
the charge will drain from the battery
water.
and their service life may be short-
ened. Therefore, even when not us-
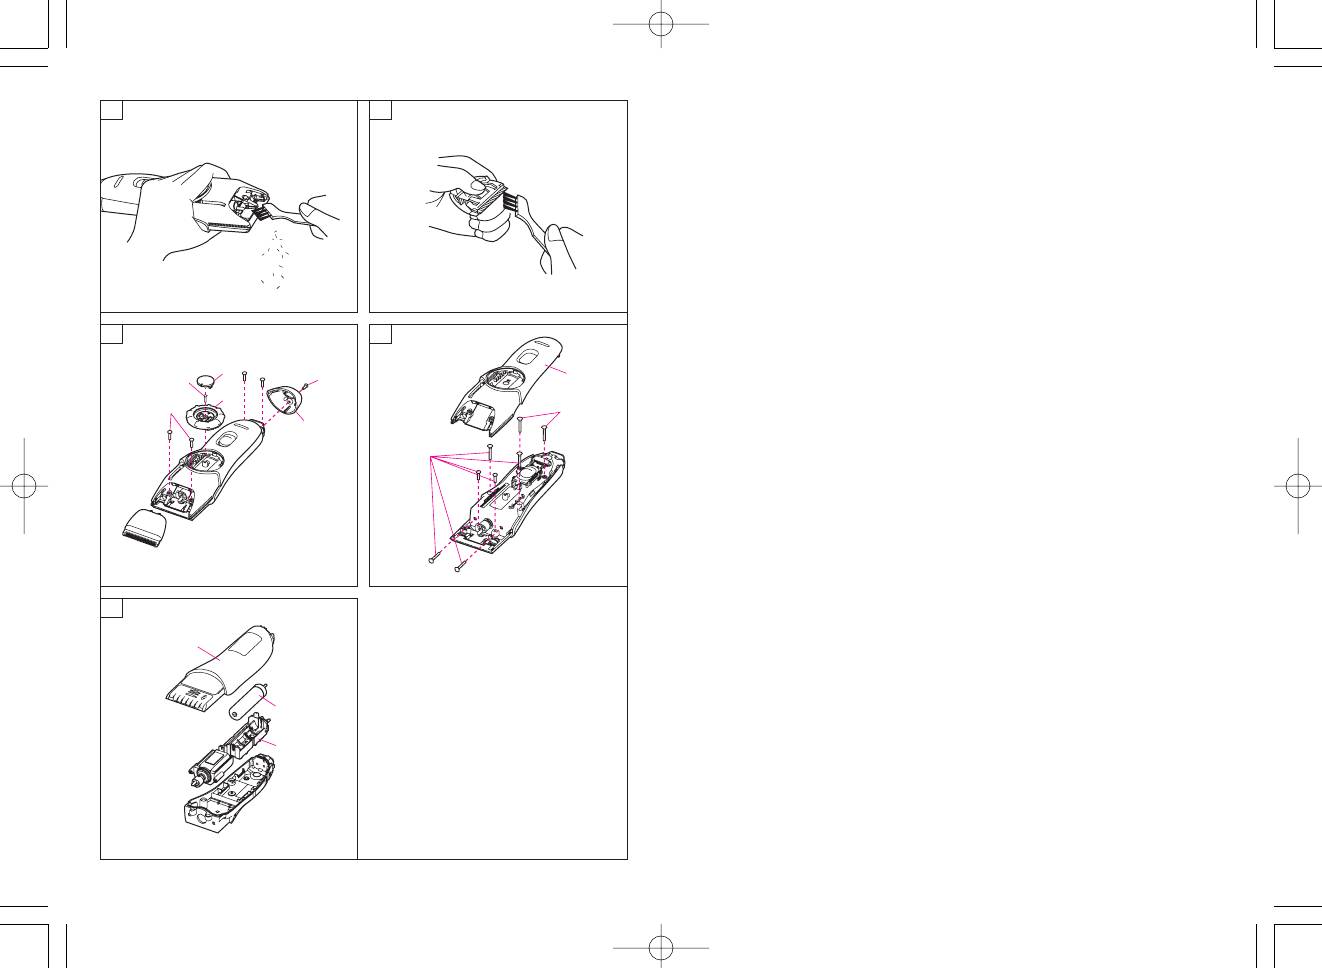
• If cleaning with brush
ing regularly, it is recommended that
1. Remove the blade and brush off
the unit be recharged at least once
the cut hairs from the blade edge.
every 6 months.
2. Use the cleaning brush to brush
off the cut hairs from the trimmer
For environmental protec-
body and from around the blade.
(see fig. 17)
tion and recycling of
3. Brush the cut hairs out from be-
materials
tween the stationary blade and
This trimmer contains Nickel-Metal
the moving blade. Press down on
Hydride battery.
the lever for cleaning in order to
Please make sure that the battery is
raise the moving blade, and brush
disposed of at an officially assigned
the cut hairs out from between the
location, if there is one in your coun-
blades. (see fig. 18)
try.
4. Apply a few drops of the oil to the
points indicated by the arrows.
How to remove the built-in re-
(see fig. 16)
chargeable battery before dis-
5. Remount the blade on the trim-
posal of the trimmer
mer body.
The battery in this trimmer is not in-
tended to be replaced by consum-
Blade life
ers. However, the battery may be re-
Blade life will vary according to the
placed at an authorized service
frequency and length of use. For ex-
center. The procedure described be-
ample, using the unit for 10 minutes
low is intended only for removal of
every 3 days, the life expectancy is
the rechargeable battery for the pur-
approximately 3 years. If cutting effi-
pose of proper disposal.
ciency is reduced substantially de-
Always make sure that the battery
spite proper maintenance, the blades
have been removed from the trimmer
have exceeded their service life and
before disposing of it.
should be changed.
1. Disconnect the adaptor from the
AC outlet, and remove the power
cord from the trimmer.
Battery life
2. Remove the blade from the trim-
Battery life will vary according to the
mer.
frequency and length of use. If the
Remove the screw (a) and detach
battery is charged 3 times a month,
the bottom cover (b). (see fig. 19)
the service life will be approximately
3. Detach the dial cover (c), remove
6 years. If the unit is left without be-
the screw (d) and disconnect the
How to use the thinning function
Turn off the trimmer (“0•charge”) be-
(see fig. 9)
fore changing the trim height or re-
First, slide the Thinning plate up to
moving the attachment.
“1/3” until it clicks. (see fig. 7) While
applying the blade point at right
Maintenance
angles to the hair, run the trimmer
The following is the symbol of
slowly across the head as if
washable trimmer. The symbol
combing the hair. After thinning,
means that hand-held part may be
slide the thinning plate back while
cleaned under water.
pushing the Thinning Plate Lock
Button. (see fig. 
Notes on thinning
For thinning, confirm that the
thinning plate is set to the right
position. Incorrect setting may result
Hold body of the trimmer with
in excessive cutting.
Panasonic mark upwards, place the
If a difference in level is produced,
thumb against the blades, and push
lightly thin to compensate.
them away from the main body. (see
If thick and thin portions are
fig. 12)
produced, or if there are portions with
an excessive amount of hair, thin the
• If washing in water
appropriate portions to compensate.
1. Rinse off any hairs that are stick-
Point:
ing to the blade in running water.
Thin the hair gradually while
(see fig. 13)
checking the overall balance.
2. Rinse out any hairs that are in-
side the trimmer with running wa-
ter. (see fig. 14)
Cutting of hair
3. Shake the trimmer 4-5 times gen-
Cut hair to the correct height by mov-
tly, wipe off any water drops from
ing the trimmer back against the flow
the trimmer and blade, and then
of the hair.
place it onto a towel with the
Cutting around the ears
“Washable” indicator facing
Cut a little, and then gently separate
downward to let it fully dry. (see
the trimmer from the hair (see fig. 10).
fig. 15)
4. Apply a few drops of the oil to the
Cutting the nape of the neck
points indicated by the arrows.
Bring the trimmer gently away from
(see fig. 16)
the hair to finish (see fig. 11).
5. Remount the blade on the trim-
(Do not use the trimmer in an in-
mer body.
verted position. This can cut hair too
deeply.)
P006-018(ER217欧州)06.01.2611:02ページ8
98
Машинки для стрижки Panasonic ER217 — инструкция пользователя по применению, эксплуатации и установке на русском языке. Мы надеемся, она поможет вам решить возникшие у вас вопросы при эксплуатации техники.
Вы можете скачать инструкцию к Panasonic ER217 по ссылке ниже, если не хотите ждать загрузки. Если остались вопросы, задайте их в комментариях после инструкции.
«Загружаем инструкцию», означает, что нужно подождать пока файл загрузится и можно будет его читать онлайн. Некоторые инструкции очень большие и время их появления зависит от вашей скорости интернета.
Остались вопросы?
Не нашли свой ответ в руководстве или возникли другие проблемы? Задайте свой вопрос в форме ниже с подробным описанием вашей ситуации, чтобы другие люди и специалисты смогли дать на него ответ. Если вы знаете как решить проблему другого человека, пожалуйста, подскажите ему


Часто задаваемые вопросы

Как посмотреть инструкцию к Panasonic ER217?
Необходимо подождать полной загрузки инструкции в сером окне на данной странице или скачать кликнув по специальной кнопке.
Руководство на русском языке?
Все наши руководства представлены на русском языке или схематично, поэтому вы без труда сможете разобраться с вашей моделью
Как можно распечатать инструкцию?
Скачайте ее по специальной кнопке над формой чтения на ваше устройства и отправьте на печать.
Требуется руководство для вашей Panasonic ER-217 Машинка для стрижки волос? Ниже вы можете просмотреть и загрузить бесплатно руководство в формате PDF. Кроме того, приведены часто задаваемые вопросы, рейтинг изделия и отзывы пользователей, что позволит оптимально использовать ваше изделие. Если это не то руководство, которое вы искали, – свяжитесь с нами.
Ваше устройство неисправно, и в руководстве отсутствует решение? Перейдите в Repair Café для получения бесплатных ремонтных услуг.
Руководство

Рейтинг
Сообщите нам, что вы думаете о Panasonic ER-217 Машинка для стрижки волос, оставив оценку продукта. Хотите поделиться вашими впечатлениями от данного изделия или задать вопрос? Вы можете оставить комментарий в нижней части страницы.
Довольны ли вы данным изделием Panasonic?
Да Нет
Будьте первым, кто оценит это изделие
0 голоса
Часто задаваемые вопросы
Наша служба поддержки выполняет поиск полезной информации по изделиям и отвечает на часто задаваемые вопросы. Если вы заметили неточность в наших часто задаваемых вопросах, сообщите нам об этом с помощью нашей контактной формы.
Что означают размеры машинки для стрижки? Проверенный
Размер машинки для стрижки обычно указывает количество волос, которое останется после стрижки. Чем больше цифра, тем длиннее стрижка.
Это было полезно (207)
Могу ли я использовать машинку для стрижки влажных волос? Проверенный
Никогда не используйте машинку для стрижки влажных волос. Машинка для стрижки волос может застрять и причинить боль. Вода также может вызвать ржавчину лезвия машинки для стрижки волос.
Это было полезно (90)
Страницы и текст этой инструкции
 Инструкция машинки для стрижки Panasonic ER217
 Информация отображена на картинке
 Информация отображена на картинке
 Информация отображена на картинке
 Информация отображена на картинке
Как использовать наш сайт инструкций OnlineManuals.ru
Наша цель состоит в том, чтобы предоставить вам быстрый доступ к содержанию инструкции для машинки для стрижки Panasonic ER217.
С помощью онлайн просмотра, Вы можете быстро просмотреть содержимое инструкции и найти решение проблемы с машинки для стрижки Panasonic ER217.
Для Вашего удобства
Если листать руководство пользователя машинки для стрижки Panasonic ER217 прямо на сайте, не очень удобно для Вас, есть два возможных решения:
• Просмотр в полноэкранном режиме — легко просмотреть руководство пользователя (без загрузки его на свой компьютер), Вы можете использовать режим полноэкранного просмотра.
Для просмотра инструкции пользователя машинки для стрижки Panasonic ER217 на полном экране, используйте кнопку «Открыть в Pdf-viewer».
• Загрузка на компьютер — Вы можете также скачать Инструкция машинки для стрижки Panasonic ER217 на свой компьютер и сохранить его в файлах.
Многие люди предпочитают читать документы не на экране, а в печатной версии.
Возможность печати руководства пользователя также была предусмотрена на нашем сайте,
и вы можете использовать ее, нажав на иконку «печать» в Pdf-viewer.
Нет необходимости печатать все руководство машинки для стрижки Panasonic ER217, можно выбрать только нужные страницы инструкции.
Для ознакомления с инструкцией необходимо нажать на ссылку «ЗАГРУЗИТЬ», чтобы скачать pdf файл. Если есть кнопка «ПРОСМОТР», то можно просто посмотреть документ онлайн.
Для удобства, Вы можете сохранить данную страницу с файлом руководства по эксплуатации в свой список «избранное» прямо на сайте (доступно для зарегистрированных пользователей).
Смотрите инструкцию для похожих моделей:

Вы можете задать вопрос посетителям сайта по модели PANASONIC ER217. Если Вы являетесь её пользователем, то пожалуйста оставьте, по возможности развёрнутый отзыв: