5. OPERATION
● Performing the temperature adjustment
When replacing the iron, heater or tip, a temperature adjustment may be required.
Use adjustment mode to perform the temperature adjustment.
CAUTION
• Enter the observed value in the adjustment mode after the tip temperature stabilizes.
• The maximum single adjustment that can be made is ±150℃ (270℉) relative to the set temperature.
If a larger adjustment is needed, make the first adjustment at the maximum value of 150℃ (270℉),
then repeat the adjustment process.
Example : If the measured temperature is 380℃,
and the set temperature is 400℃.
* How to distinguish between
Temperature Setting Mode and Adjustment Mode.
1. Press and hold the
button down
UP
for at least two seconds.
The display differs in the temperature setting
and the adjustment mode.
● The hundreds digits in the display will begin
to flash when shifting to the adjustment mode.
In the Temperature
It indicates that you can enter the value.
Setting Mode
2. Changing from
to
● The procedure for changing the value in
adjustment mode is the same as setting
the temperature in normal mode.
Please refer to Section 5 — OPERATION.
CAUTION
NOTE :
Please be sure to confirm the status of the
During adjustment mode, the hundreds digit will
identification lamps so that you do not enter
accept values from 0 through 6 if the temperature
a value in the wrong mode.
is set to display in ℃, or the values 0 through 9
if the temperature is set to display in ℉.
3. Press the
button to exit the setting
ENTER
after changing the values.
● The tip temperature will be adjusted accordingly.
● Restriction on setting changes (Password function)
It is possible to restrict certain setting changes to the unit.
There are three choices for the password setting. (The factory default is «0 : Open»)
0 : Open
1 : Partial
Move to the parameter setting mode
○
×
Move to the temperature setting mode
○
△
Move to the preset selection mode
○
△
Move to the adjust mode
○
△
○ : You can make changes without entering a password.
△ : You can choose whether or not a password is needed to make changes.
× : A password is required to make changes.
Select and input three letters for password
from six letters on the right.
Example:The procedure for changing the set temperature when the unit is restricted by a password.
(Password is «AbC»)
Press the
button once.
Hold down the
button
UP
ENTER
for at least two seconds.
Press the
button once.
ENTER
Press the
button twice.
Press the
button once.
UP
ENTER
Press the
button three times.
UP
CAUTION
・ If the password you entered is incorrect,
Press the
button once.
ENTER
the display will show three dashes for you
to re-enter the password.
・ If you enter the password incorrectly twice in a row,
the display will return to the previous screen.
The unit will move to the change setting screen for each mode after entering the password.
Please change the setting for each mode according to the procedure.
(In the above example, please refer to the procedure for setting the temperature
in normal mode [Section 5 — OPERATION].)
6. PARAMETER SETTING
The FX-888D has the following parameters.
Parameter name
℃/F selection
Low temperature error setting
Setting mode selection
The number of preset *
Password setting
Temperature setting mode **
Preset selection mode **
Adjust mode **
Password ***
*It is displayed only when «1:Preset mode» is selected in the setting mode.
**It is displayed only when «1:Custom» is selected in the password setting.
***It is displayed only when either «1:Custom» or «2:valid» is selected in the password setting.
The HAKKO FX-888D has the following four parameters. Turn the power on while pressing the
In the Adjustment Mode
Perform the setting to select the desired parameter No..
Press the
button to change the values, and press the
UP
℃ or ℉ temperature display seletion
● :
The displaed temperature can be switched between Celsius and Fahrenheit.
Identification lamps are on
Low temperature error setting
in the adjustment mode.
● :
If the sensor temperature goes below the low-limit temperature although heating element is on,
an error will be displayed.
Setting mode selection
● :
Temperature setting can be switched between the normal mode and the preset mode.
If selecting the preset mode, you will be asked for the number of preset you required.
Press the
button to set the number.
UP
Password setting
● :
Select «Open», «Partial» or «Restricted» for password setting.If selecting the Restricted, perform the setting
for password. If selecting the partial, choose whether or not the password function is needed when moving
to the temperature setting mode, the preset mode and the adjust mode and set the password.
■ Parameter entering mode
2 : Restricted
1. Turn off the power switch.
×
2. Turn on the power switch while pressing the
×
3. When the display shows
×
×
● ℃ or ℉ temperature display selection
1. Either
or
2.
and
The letters
3. The display will return to
for password
● Low temperature error setting
1. Press the
button to change the display to
UP
2. The low-limit temperature will be displayed if you press the
manner as described in the normal mode [5. OPERATION ●The normal mode]
3. The display will return to
● Setting mode selection
1. Press the
button to change the display to
UP
2. If you press the
the
button,
UP
3. The display will return to
* If you select the preset mode, the display will move to the preset selection screen.
4.The number of active preset will be displayed If you press the
(Example : If the number is three,
5. Press the
UP
The unit will accept values from 2 through 5.
6. The display will return to
Parameter No.
Valeur
℃ / ℉
30 ~ 150℃ (54 ~ 270℉)
0:Mode normal / 1:Mode présélection
(2 pcs)
~
(5 pcs)
0:Ouvert / 1:Partiel / 2:Limité
:○ / :×
:○ / :×
:○ / :×
Sélectionner trois lettres
button.
UP
button to execute.
ENTER
button.
UP
, the station is in parameter entering mode.
will be displayed if you press the
button when
is displayed.
ENTER
will be switched alternately If you press the
button.
UP
if you press the
button after selecting.
ENTER
.
button. Enter the value in the same
ENTER
if you press the
button after setting.
ENTER
.
button, the display will move to the setting mode selection screen. If you press
ENTER
(The normal mode) and
(The preset mode) will be switched alternately.
if you press the
button after selecting.*
ENTER
button at 3.
ENTER
is displayed.)
button to change the value and select the number of active preset you required.
if you press the
button after selecting.
ENTER
6. PARAMETER SETTING
● Password setting
1. Press the
button to change the display to
Initial value
UP
℃
2. If you press the
button, the display will move to the setting mode selection screen.
ENTER
150℃
If you press the
button,
UP
0
alternately.
0
3. If you press the
button after selecting, the display will return to
ENTER
※1 The display will move to the following selection screen if you select
—
4. If you press the
button at 3, you will be asked whether or not the password function is needed when
ENTER
moving to the temperature setting mode.
5. Either
(without password) or
6. If you press the
button after selecting, you will be asked whether or not the password function is
ENTER
needed when moving to the preset selection mode.
7. Either
(without password) or
8. If you press the
button after selecting, you will be asked whether or not the password function is
ENTER
needed when moving to the adjust mode.
9. Either
(without password) or
10. If you press the
button after selecting, the display will move to password setting screen.
ENTER
※2 If you select
(Restricted), the display will move to the following password setting screen.
If you select
(Partial), the display will move to the following the password setting screen after selecting ※1 .
11. The hundreds digits in the display will begin to flash. It indicates that you can enter the value.
Press the
button to enter the letter you required.
UP
12. The tens digits in the display will begin to flash if you press the
Use the same procedure to enter the letters for tens and units digit.
13. The display will return to
After changing parameters, press and hold the
At this time, you can switch between
finished making changes or
if you need to go back and make more changes. Press the
confirm you selection.
Changes will not be completed until
Please note that no changes will be made if you turn off the power while making changes.
7. MAINTENANCE
Performing proper and periodic maintenance extends product life. Efficient soldering depends upon
the temperature, quality and quantity of the solder and flux.
Apply the following service procedure as dictated by the conditions of usage.
Since the soldering iron can reach a very high temperature, please work carefully. Except the case
especially indicated, always turn the power switch OFF and disconnect the power plug before performing
any maintenance procedure.
●Tip Maintenance
1. Set the temperature to 250℃ (482℉).
2. When the temperature stabilizes, clean the tip with the cleaning sponge and check the condition of the tip.
3. If the solder plated part of the tip is covered with black oxide, apply fresh solder containing flux, and clean
the tip again. Repeat until all the oxide is removed, then coat the tip with fresh solder.
4. If the tip is deformed or heavily eroded, replace it with a new one.
■ Cleaning the tip using the iron holder
1. Using the cleaning sponge
Use the cleaning sponge that comes with the product
to clean the tip. It offers wide-ranging uses, from simple
removal of excess solder to complete elimination of
matter occurring as a result of oxidization.
.
(Open),
(Partial) and
(Restricted) will be switched
. ※1、2
(Partial).
(with password) will be displayed if you press the
button.
UP
(with password) will be displayed if you press the
button.
UP
(with password) will be displayed if you press the
button.
UP
button after entering.
ENTER
if you press the
button after entering the units digit.
ENTER
button down for at least two seconds until
is displayed.
ENTER
and
by pressing the
button. Select
if you are
UP
button to
ENTER
is displayed and you press the
button.
ENTER
2. Using the cleaning wire
Material that is not removed easily with the cleaning
sponge can likely be removed using the cleaning wire.
|
Detail Specifications: 2106/2106610-fx888d.pdf file (06 Nov 2022) |
Accompanying Data:
Hakko Electronics FX-888D Power Tool, Soldering Gun PDF Manual (Updated: Sunday 6th of November 2022 11:41:39 AM)
Rating: 4.6 (rated by 65 users)
Compatible devices: 807, C5045, FX-301B, FM-2030, 942, FR8601-01, FP-102, 485.
Recommended Documentation:
Text Version of Manual
(Ocr-Read Summary of Contents, UPD: 06 November 2022)
-
1, Soldering iron • Digital model in an analog-model price bracket • Features adjustment mode, preset mode, and password function • Separable tip/heater design provides excellent value for money • Supports the N 2 system. Model No. FX888D Power consumption 70W Temperature range 200-480ºC Temperature stability ±1ºC at idle …
-
2, Model No. Unit Color Iron Holder Color Packing list No.FX888 Blue-Yellow Blue-Yellow Soldering station (FX-888D), Soldering iron (FX-8801 with soldering tip type B), Iron holder (with cleaning wire, cleaning sponge), Instruction Manual *Rubber cleaner sold separately. Reliable digital technology by HAKKO – Introducing the HAKKO FX-888D Excellent thermal recover…
-
3, Designed to be User-Friendly • Small footprint Compact station body requires a space of only 100 (W) x 120 (D) mm. What’s more, points that come into contact with the floor are positioned as close to the outer edge of the body as possible to improve stability and make the station difficult to fall over. • Simple and easy operation With only two opera…
-
4, Strict temperature management • Digital display The FX-888D’s digital display makes it easy to check the set temperature at a glance. • Password function Settings can be locked using a password to prevent them from being changed unexpectedly. Of course, it is possible to restrict all setting changes or prevent users from switching to particular modes. It allows you …
-
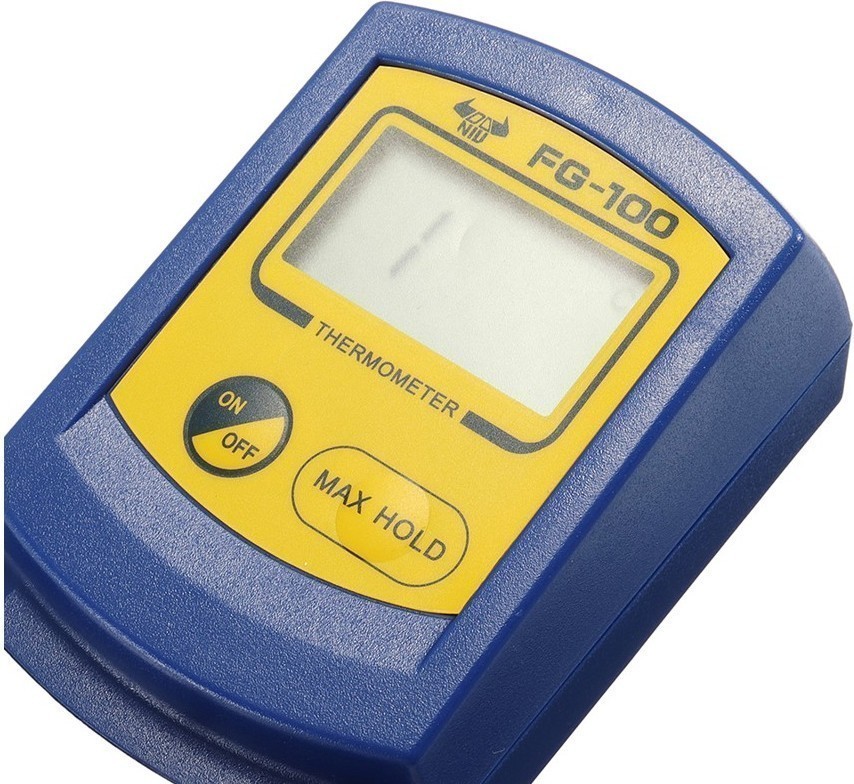
5, Measuring tip temperature with a tip thermometer (HAKKO FG-100) HAKKO FX-8802 N 2 (nitrogen) gas system A space-saving N2 system. Anti-oxidation and pre-heating significantly improve solderability. —Example Configuration (N 2 System) Soldering station, Iron holder, N2 gas generator, and N2 flowmeter must be purchased separately. HAKKO FX-8803 One-hand, manual-solder-…
-
6, Hakko Electronics FX-888D — Example Configuration (One-hand, Manual-Solder-Feed System) Soldering station and Iron holder must be purchased separately. HAKKO FX-8804 Hot tweezers —Example Configuration (Hot Tweezer System) Soldering station, cap, and Iron holder must be purchased separately. How to remove the bottom plate. 1. Press the slide lock button inward. Note…
-
7, Hakko Electronics FX-888D 3. Remove the solder waste in the bottom plate. T18 Series Shape BC/C T18-C05 Shape-0.5C T18-C08 Shape-0.8C T18-C1 Shape-1C T18-C2 Shape-2C
… -
8, Hakko Electronics FX-888D T18-C3 Shape-3C T18-C4 Shape-4C T18-C5 Shape-5C T18-CF1 Shape-1CF Tinned cut surface only T18-CF15 Shape-1.5CF Tinned cut surface only T18-CF2 Shape-2CF Tinned cut surface only T18-CF3 Shape-3CF Tinned cut surface only T18-CF4 Shape-4CF
… -
9, Hakko Electronics FX-888D Tinned cut surface only T18-CSF25 Shape-2.5CSF This type has good heat transfer with short tip end design, tinned cut surface ony. T18-S6 Shape-S6 Shape B T18-B Shape-B T18-BL Shape-BL T18-S4 Shape-S4 T18-SB Shape-SB
… -
10, Shape D T18-D08 Shape-0.8D T18-D12 Shape-1.2D T18-D16 Shape-1.6D T18-D24 Shape-2.4D T18-D32 Shape-3.2D T18-DL12 Shape-1.2DL T18-DL2 Shape-2DL
… -
11, T18-DL32 Shape-3.2DL T18-S3 Shape-S3 T18-S9 Shape-S9 Shape I T18-I Shape-I Shape J T18-BR02 Shape-0.2BR Shape K T18-K Shape-K
… -
12, Part No. Name Specifications FH800- 01SV Iron holder <w/ cleaning sponge, rubber cleaner, cleaning wire> silver FH800- 01BY Iron holder <w/ cleaning sponge, rubber cleaner, cleaning wire> blue & yellow FX8801-01 Soldering iron FX-8801 65W (26V) A1560 Heating element 65W (26V) B1785 Nut B2022 Nipple B3469 Tip enclosure …
Recommended Instructions:
192B, S50, RC71105, SCX-4828FN, KT-10F v2, ScanExpress S80


-
PBL122Kwww.grupostayer.comManual de instruccionesESÁrea Empresarial Andalucía — Sector ICalle Sierra de Cazorla nº7C.P: 28320 Pinto (Madrid) SPAINEmail: [email protected]: [email protected] d’usoITOperating instructionsGBBedienungsanleitungDEInstructions d’emploiFRManual de instruçõesPKullanma KılavuzuTR …
PBL122K 36
-
Save This ManualFor Future ReferenceMODEL NO.113.213213DRILL PRESSWITHMAXIMUM DEVELOPED2 HP MOTORSerialNumberModel and serial numbermay be found at the leftside of the head.You should record bothmodel and serial number ina safe place for future use.YOSAFETY:READ ALLINSTRUCTIONSCAREFULLYMOTORIZED20-1NCHiNDUSTRIAL RATED DRILL PRESSo assembly• operating• repair part …
113.213213 40
-
Instruction SheetPRO- CRIMPER* III Hand CrimpingTool Assembly 58530- 1 with408—4005LOC B1 of 6E2009 Tyco Electronics Corporation, Harrisburg, PAAll International Rights ReservedTE logo and Tyco Electronics are trademarks.*Trademark. Other products, logos, and company names used are the property of their respective owners.TOOLING ASSISTANCE CENTER 1—800—722—1111PRODUCT INFORMATION 1—800- …
Pro-Crimper III 7
-
Originalbetriebsanleitung Elektronisches HandrührwerkOriginal Operating Instructions Electronic Hand-MixerDĂŶƵĞůĚŝŶƐƚƌƵĐƟŽŶƐĚŽƌŝŐŝŶĞ DĠůĂŶŐĞƵƌĠůĞĐƚƌŽƉŽƌƚĂƟĨManual de servicio original Mezcladora manual electrónica/ŶƐƚƌƵĕƁĞƐĚĞƵƟůŝnjĂĕĆŽŽƌŝŐŝŶĂŝƐ DŝƐƚƵƌĂĚ …
Xo 33R duo 110
Popular Right Now:
Operating Impressions, Questions and Answers:
Hakko Electronics Manuals and Guides:
The main types of Hakko Electronics FX-888D instructions: user guide — rules of useing and characteristics, service manual — repair, diagnostics, maintenance, operation manual — description of the main functions of Hakko Electronics FX-888D equipment, etc.
Most of the instructions, that you can see on the site are uploaded by our users. If you have available a manual or document for Hakko Electronics FX-888D, which is currently not on the site or present in a different language version, we ask you to upload your document on website, using the «uploading form» available to all registered users.
![]()
Instruction Manual
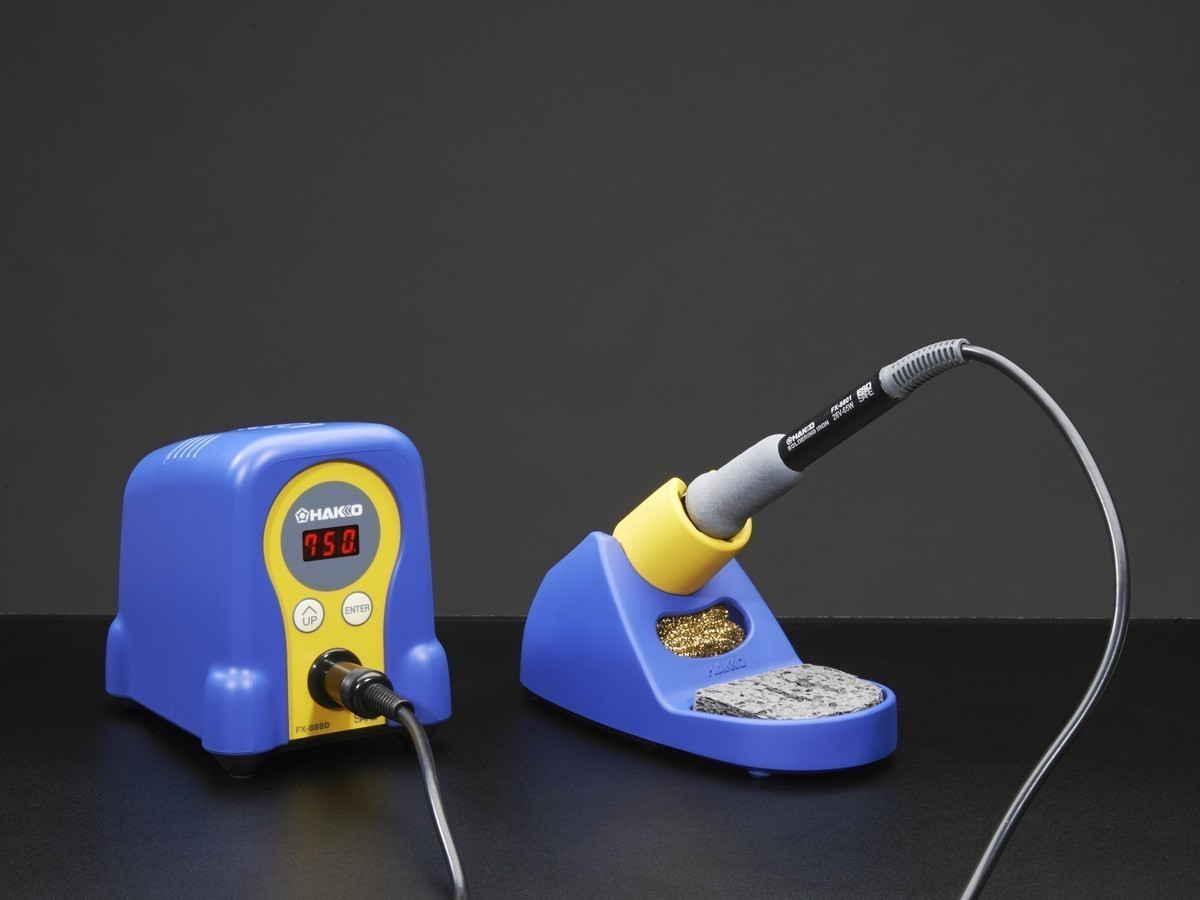
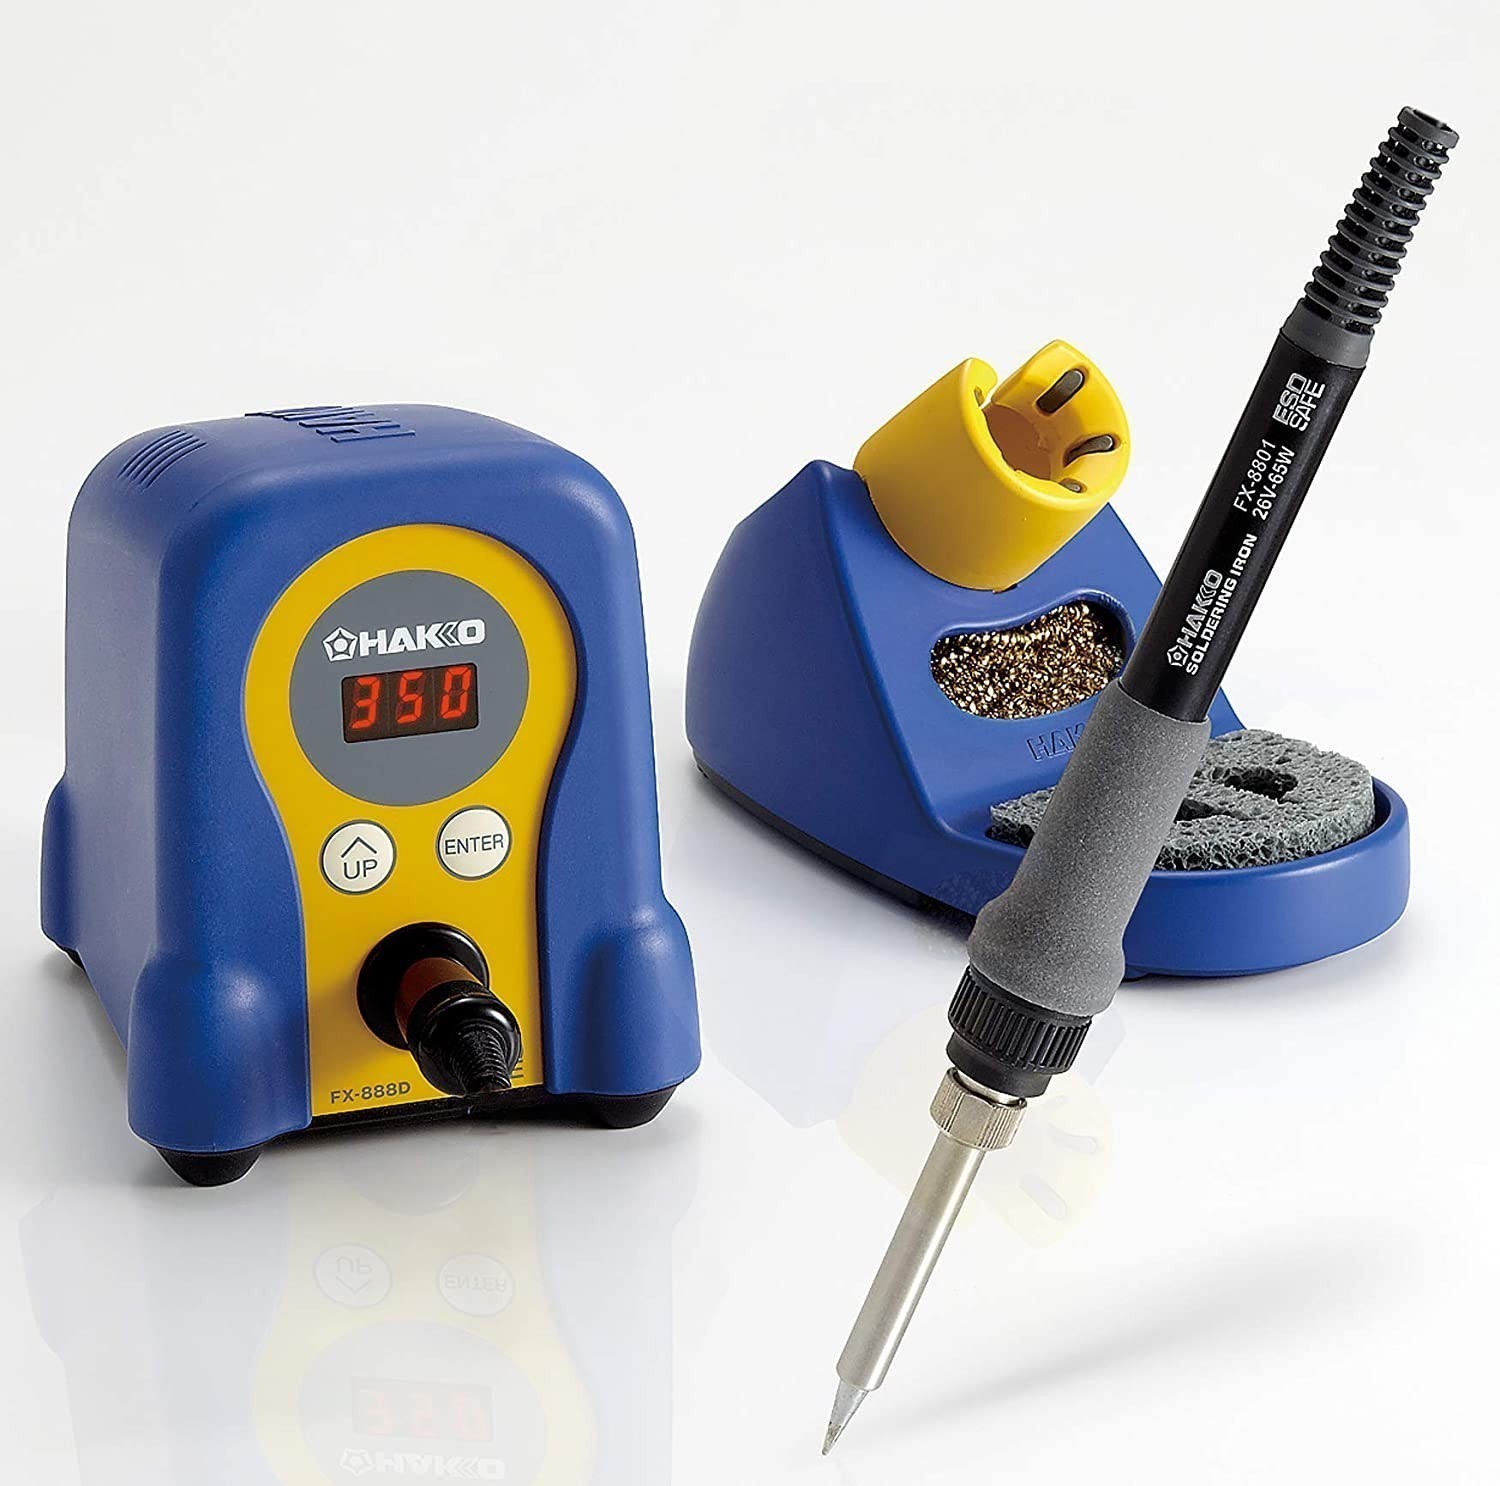
Thank you for purchasing the HAKKO FX-888D soldering station.
Please read this manual before operating the HAKKO FX-888D.
Keep this manual readily accessible for reference.
|
1. PACKING LIST AND PART NAMES |
Please check to make sure that all items listed |
|
below are included in the package. |
HAKKO FX-888D Station
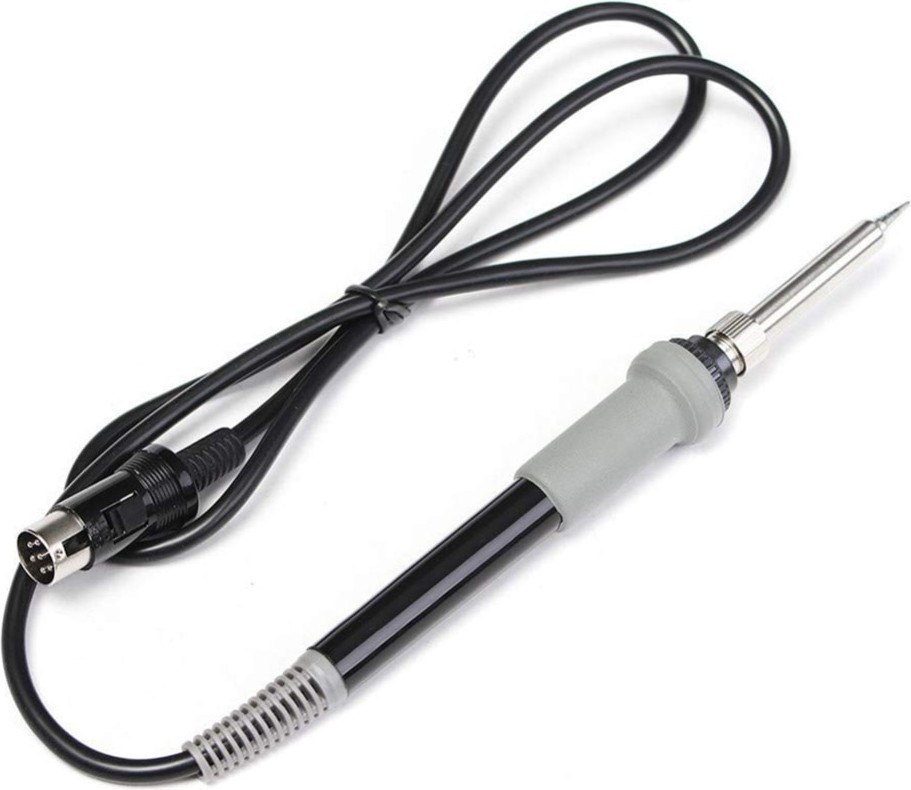
HAKKO FX-8801 Soldering iron
Iron holder (with cleaning sponge)
Instruction Manual
ON
OFF


HAKKO FX-888D Station
|
1 |
Cleaning wire |
1 |
|
1 |
||
|
1 |
HAKKO FX-8801 |
|
|
1 |
Cord assembly
Iron receptacle
Cleaning sponge
|
Cleaning wire |
Iron holder |
|
|
Iron holder |
base |
|
*HAKKO FX-8802 / FX-8803 / FX-8804 (not included) can be connected to HAKKO FX-888D station. *When using the HAKKO FX-8802/FX-8803/FX-8804, please use it with the applicable iron holder.
2. SPECIFICATIONS
Power consumption 70W
● Station
|
Output voltage |
AC 26V |
|
Temperature range |
400 — 899 (200 — 480 ) |
|
Temperature stability |
±1.8 (±1 ) at idle temperature |
|
Dimensions (W × H × D) |
3.9(W) × 4.7(H) × 4.7(D) in. |
|
(100 × 120 × 120 mm) |
|
|
Weight (w/o cord) |
2.6 lb. (1.2kg) |
● HAKKO FX-8801 Soldering iron
|
Power consumption |
65W (26V) |
|
Tip to ground resistance |
< 2 Ω |
|
Tip to ground potential |
< 2 mV |
|
Heating element |
Ceramic heater |
|
Cord length |
3.9 ft. (1.2m) |
|
Total length (w/o cord) |
8.5 in. (217mm) with 1.6D tip |
|
Weight (w/o cord) |
0.10 lb. (46g / 1.62 oz.) with 1.6D tip |
*The temperature was measured using the FG-100 thermometer. * This product is protected against electrostatic discharge.
*Specifications and design are subject to charge without notice.
■ Electrostatic Protection
This product includes such features as electrically conductive plastic parts and grounding of the unit
as measures to protect the device to be soldered from the effects of static electricity. Be sure to observe the following instructions:
1.The plastic parts are not insulators, they are conductors. When making repairs or replacing parts, take sufficient care not to expose live electrical parts or damage insulation materials.
2.Be sure to ground the unit during use.

3. WARNINGS, CAUTIONS AND NOTES
Warnings, cautions and notes are placed at critical points in this manual to direct the operator’s attention to significant items. They are defined as follows:
 WARNING: Failure to comply with a WARNING may result in serious injury or death.
 CAUTION : Failure to comply with a CAUTION may result in injury to the operator, or damage to the items involved. Two examples are given below.
 WARNING
When power is ON, tip temperatures will be between 400 to 899 . (200 and 480 ) To avoid injury or damage to personnel and items in the work area, observe the following:
●Do not touch the tip or the metal parts near the tip.
●Do not allow the tip to come close to, or touch, flammable materials.
●Inform others in the area that the unit is hot and should not be touched.
●Turn the power off when not in use, or left unattended.
●Turn the power off when changing parts or storing the HAKKO FX-888D.
●This appliance is not intended for use by persons (including children) with reduced physical, sensory or mental capabilities, or lack of experience and knowledge, unless they have been given supervision or instruction concerning use of the appliance by a person responsible for their safety.
●Children should be supervised to ensure that they do not play with the appliance.
●If the power cord is damaged, it must be replaced by the manufacturer, its service agent or similarly qualified person in order to avoid personal injury or damage to the unit.
●The unit is for a counter or workbench use only.
●To prevent accidents or damage to the HAKKO FX-888D, be sure to observe the following:
●Do not use the HAKKO FX-888D for applications other than soldering.
●Do not strike the iron against hard objects to remove excess solder. This will damage the iron.
●Do not modify the HAKKO FX-888D.
●Use only genuine Hakko replacement parts.
●Do not allow the HAKKO FX-888D to become wet, or use it with wet hands.
●Remove power and iron cords by holding the plug. not the wires.
●Be sure the work area is well ventilated. Soldering produces smoke.
●While using the HAKKO FX-888D, don’t do anything which may cause bodily harm or physical damage.
4.INITIAL SETUP
A. Setup the iron holder
1.Fit the small sponge pieces into the hollows of the iron holder base.
2.Add an appropriate amount of water into the iron
holder base. The small sponge will absorb water and help keep the large sponge damp at all times.
3.Dampen the large sponge and place it on the iron holder base.
 CAUTION
Be sure the sponge is moistened with water before use to avoid damaging the tip.
*When using a Cleaning Wire
Place it in the iron holder as shown on the right. See «2.Using a Cleaning Wire» in section «7. MAINTENANCE»
Large sponge
Small sponge  pieces
B. Connect the iron to the station
 CAUTION
Be sure to turn off the power before connecting or disconnecting the cord assembly for the iron to and from the receptacle to avoid damaging the circuit board.
1. Connect the cord assembly to the receptacle.
 CAUTION
Do not use any iron other than those listed in Section 1 of this manual. Doing so may result in inadequate performance and / or possible damage to the unit.
2.Place the iron into the iron holder.
3.Plug the power cord into an appropriate power supply.
 CAUTION
The unit is protected against electrostatic discharge and must be grounded for full efficiency.
|
Push on the plug until |
Receptacle |
|
it stops, making sure it is |
|
|
securely connected. |
 To disconnect, hold the plug and pull it out of the receptacle.

5. OPERATION
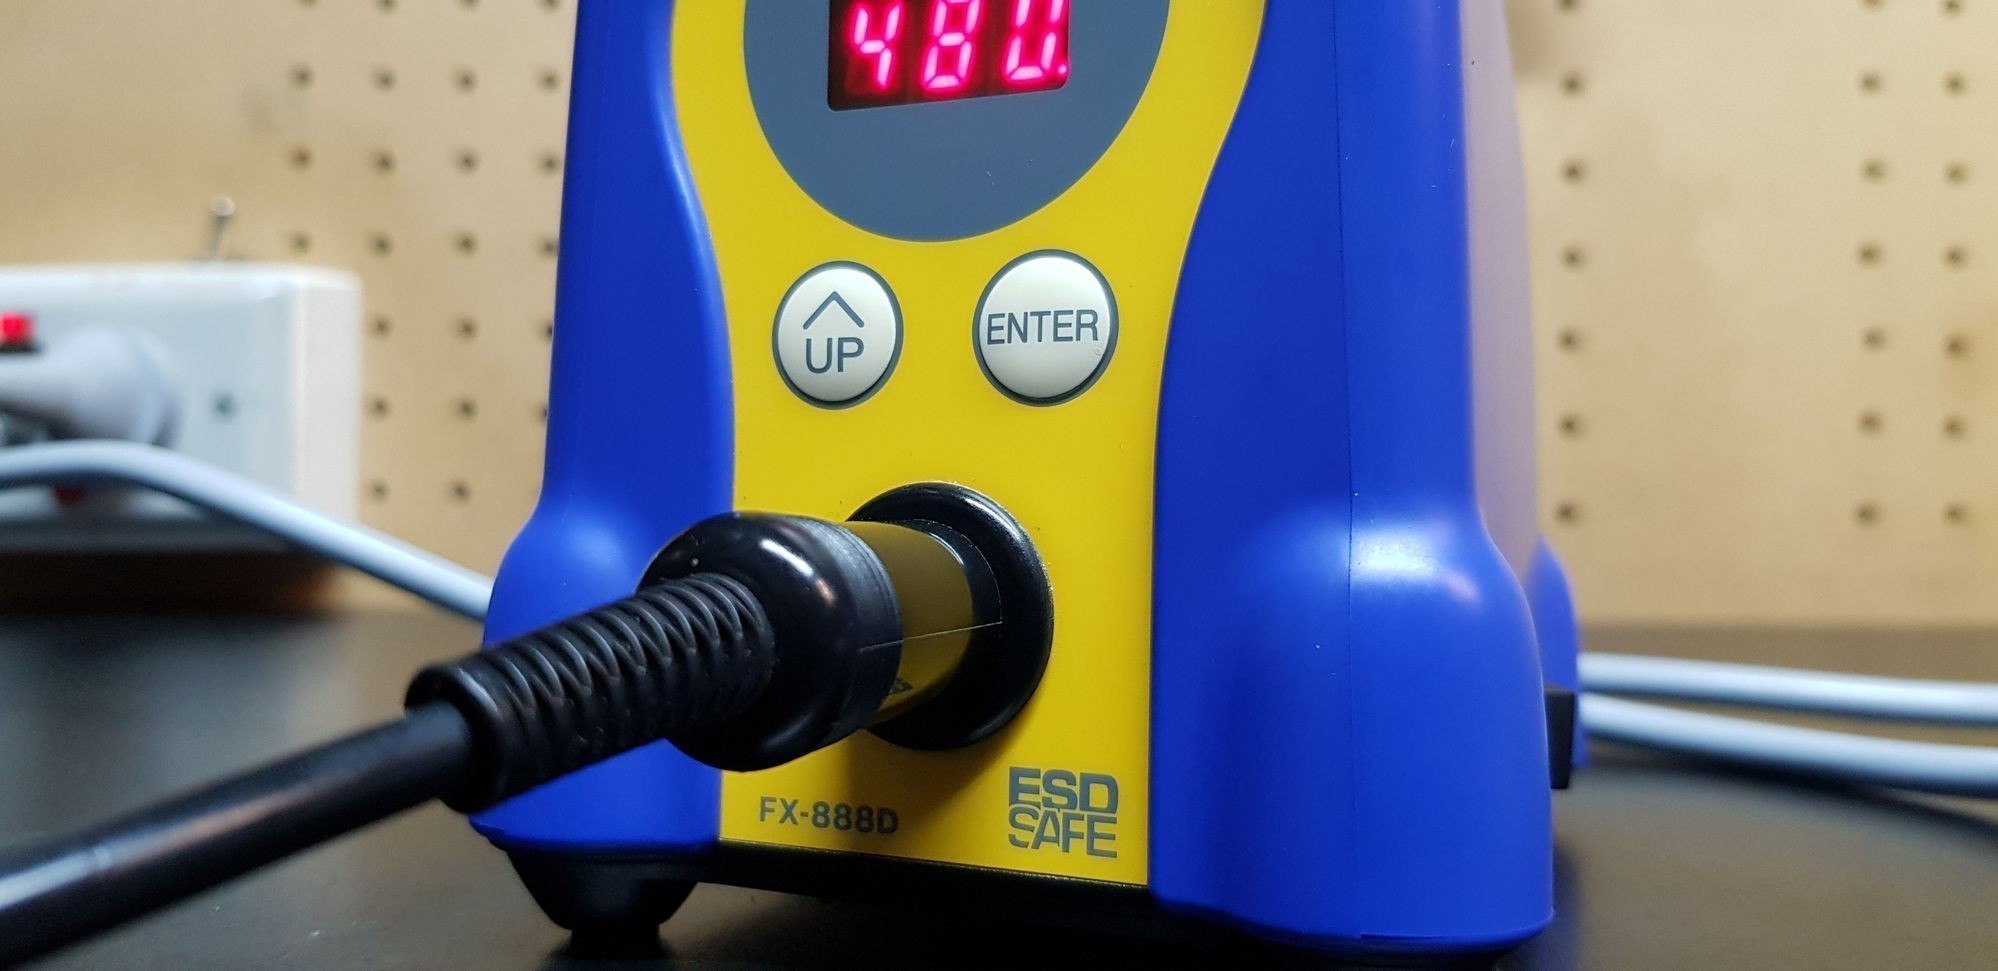
● Operation and indication
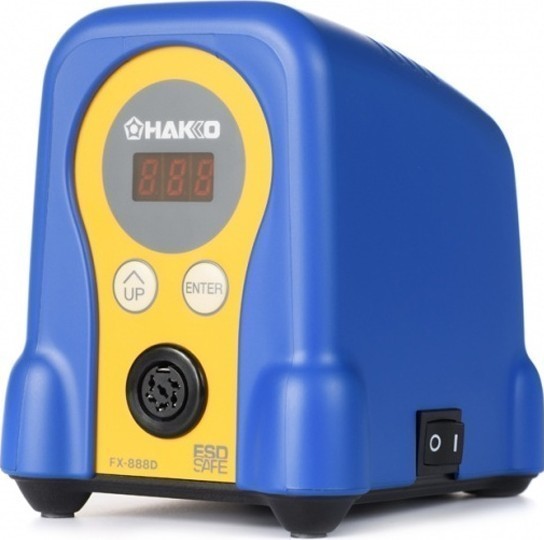
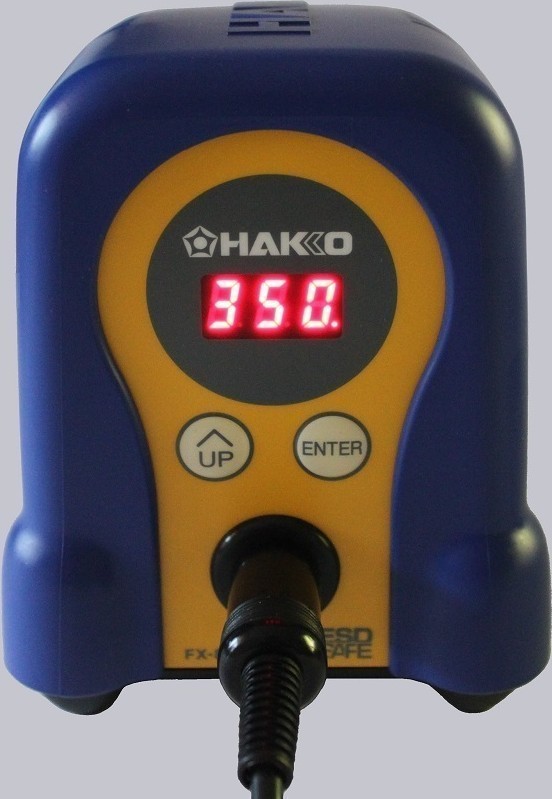
Switch and control button
UP ENTER
FX-888D
The front panel for the FX-888D has the following two control buttons.
UP Use this button to select and change settings.
In the temperature preset mode,
pressing this button will change the selected preset temperature while the unit is in operation.
Pressing and holding the button will start the adjustment mode.
ENTER Use this button to make and confirm selections.
Pressing this button will display the current set temperature.
Pressing and holding the button will start the temperature setting mode.
A. Turn on the power switch
After turning on the power switch,  will be displayed
for two seconds, and current temperature will be displayed. When the display stabilizes, the LED heater lamp will begin to flash.
Heater lamp
 CAUTION
Place the iron in the iron holder when not in use.
Turn the power off when the FX-888D is not in use for an extended period.
B. After use
Always clean the tip and coat it with fresh solder after use.
■ Making Changes to Settings
 CAUTION
If no buttons are pressed for at least one minute during the process of changing settings of the unit, the system will exit and return to operating mode and display the current temperature.
● Changing the set temperature
There are two ways to change the setting temperature : normal mode or preset mode. The temperature setting range is from 400 to 899 . (from 200 to 480 )
By default, the temperature is set to 750 . (399 )
● The normal mode
Example : Changing from 750 to 800
Hold down the ENTER button for at least one second.
Press the
Press the UP button five times.
Press the
ENTER button once.
Press the
button once.
button once.
Press the ENTER button once.
The desired temperature is saved to the system memory.
Heater control will begin after the new set temperature is displayed.
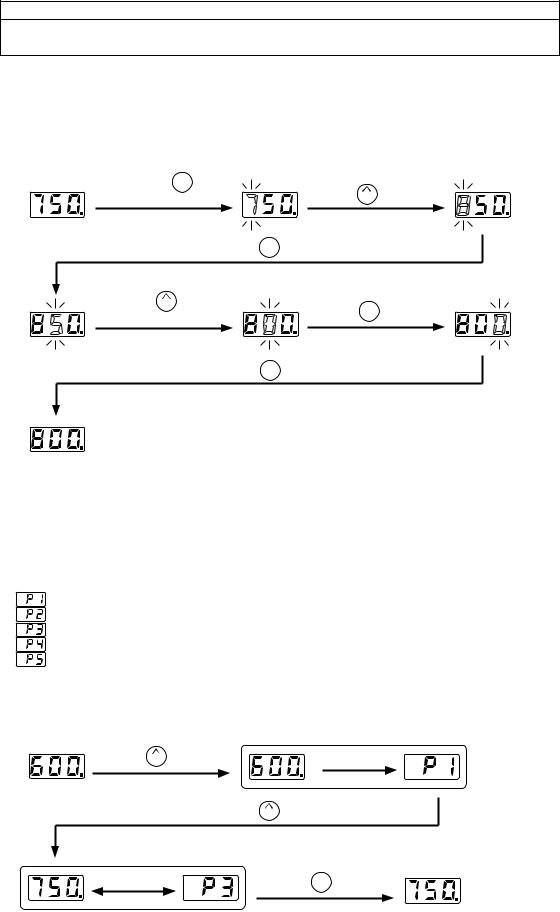
● The preset mode
The FX-888D has a preset mode that will allow the unit to store up to 5 preset temperatures you can change between instead of using the above normal mode.
Initial preset temperatures
: 600 (316 )
: 700 (371 )
: 750 (399 )
: 800 (427 )
: 850 (454 )
The initial number of active presets is set to 5 at the factory.
The default selected preset is set to P3 at the factory.
Example : Changing preset temperature from preset No.1(600 ) to No.3(750 ).
|
Press the UP button once. |
Be displayed |
 alternately.
Press the UP button twice.
|
Be displayed |
Press the ENTER button once. |
|
alternately. |
*Preset selection screen
Heater control will begin with new preset temperature.
The procedure for making changes to the preset temperatures is the same as changing the set temperature in normal mode.
5.OPERATION
●Performing the temperature adjustment
When replacing the iron, heater or tip, a temperature adjustment may be required. Use Adjustment Mode to perform the temperature adjustment.
 CAUTION
•Enter the observed value in the adjustment mode after the tip temperature stabilizes.
•The maximum single adjustment that can be made is ±270 (150 ) relative to the set temperature. If a larger adjustment is needed, make the first adjustment at the maximum value of 270 (150 ), then repeat the adjustment process.
Example : If the measured temperature is 760, and the set temperature is 800 .
1.Press and hold the UP button down for at least two seconds.
●The hundreds digits in the display will begin to flash when shifting to the adjustment mode. It indicates that you can enter the value.
2. Changing from  to
to 
●The procedure for changing the value in adjustment mode is the same as setting the temperature in normal mode.
Please refer to Section 5 — OPERATION.
NOTE :
During adjustment mode, the hundreds digit will accept values from 0 through 6 if the temperature is set to display in , or the values 0 through 9 if the temperature is set to display in .
3.Press the ENTER button to exit the setting after changing the values.
● The tip temperature will be adjusted accordingly.
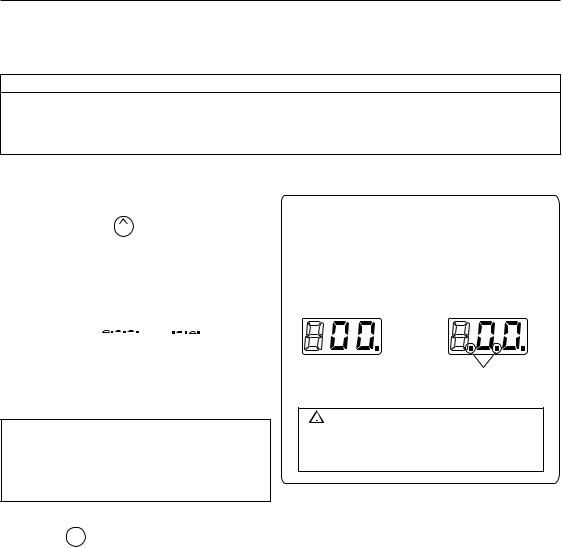
* How to distinguish between
Temperature Setting Mode and Adjustment Mode.
The display differs in the temperature setting and the adjustment mode.
|
In the Temperature |
In the Adjustment Mode |
|
Setting Mode |
Identification lamps are on in the adjustment mode.
 CAUTION
Please be sure to confirm the status of the identification lamps so that you do not enter a value in the wrong mode.
 Loading…
Паяльная станция FX-888D от HAKKO – обновленная цифровая версия популярной паяльной станции FX-888 с новыми функциями: цифровой калибровки, упрощающей настройку и эксплуатацию; защиты паролем; пятью предустановленными температурными режимами. Станция имеет небольшие размеры и позволяет экономить рабочее пространство.
- Цифровая модель по цене аналоговой
- Режим настройки, режим предварительной установки, функция пароля
- Конструкция с отдельным наконечником обеспечивает отличное соотношение цены/качества
- Возможность замены паяльника для использования в системе N2
Надежные цифровые технологии от HAKKO: представляем станцию HAKKO FX-888D
Высокая производительность
Мощность нагревателя станции FX-888D повышена на 30% выше по сравнению с моделями HAKKO 936/937. Станция характеризуется высоким уровнем термического восстановления при использовании наконечников серии T18, обладающих высокой теплопроводностью. Это позволяет снизить температурный режим пайки, минимизировав отрицательное термическое воздействие на компоненты и окисление наконечника, тем самым увеличивая время его службы.
- Высокий уровень термического восстановления
До 350°C паяльник нагревается за 20 секунд. При продолжительной работе температура наконечника снижается незначительно. - Производительность HAKKO FX-888D
По сравнению с другими станциями HAKKO FX-888D позволяет снизить время процесса пайки, увеличив тем самым эффективность работы.
Удобство эксплуатации
- Экономия места
Компактный прибор размера 100 (ширина) x 120 (длина) мм. Ножки станции расположены как можно ближе к краям корпуса, что повышает устойчивость и снижает риск падения станции. - Простота и удобство эксплуатации
Управление станцией осуществляется двумя кнопками: «Up/Вверх» и «Enter/Ввод». Даже если вы не умеете управлять оборудованием, вы сможете легко управлять станцией. - Держатель паяльника с полным набором функций
Держатель паяльника одного цвета со станцией и поставляется в наборе. Высокофункциональный держатель не только упрощает работу с паяльником, но и создает визуальную гармонию на рабочем месте.
Прямая регулировка температуры

- Цифровой экран
Цифровой дисплей FX-888D позволяет легко и быстро устанавливать и проверять температуру паяльника. - Пароль
Возможность установить пароль, который защитит настройки от нежелательного изменения. Есть возможность защитить настройки, запретив пользователям переключаться в некоторые режимы. Пароль также позволяет выбрать режим использования, подходящий именно вам. - Режим предварительной установки
Данная функция очень удобна, когда необходимо установить значение температуры, подходящей для конкретной детали, компонента или формы наконечника. Необходимо просто выбрать необходимое значение температуры из диапазона рабочих температур, заданных заранее. Можно задавать до 5 значений. Режим предварительной установки предохраняет от ошибок и увеличивает производительность.

- Режим настройки
Настройка температуры* – это неотъемлемая часть системы контроля качества. Раньше настройка температуры была довольно сложной процедурой, но теперь она проста и позволяет вводить измеренную температуру наконечника.
*Отрегулируйте температуру наконечника в соответствии с установленной рабочей температурой в случае, если появилась разница между двумя этим значениями из-за формы наконечника, замены нагревателя или других факторов.


Измерение температуры наконечника с помощью специального термометра (HAKKO FG-100)
Газовая система HAKKO FX-8802 N2 (азот)

Компактная система N2 экономит пространство. Оснащена функцией уменьшения окисления и функцией предварительного нагрева, что значительно улучшает паяемость.
Пример конфигурации (Система N2)

Паяльная станция, держатель паяльника, генератор азота и измеритель расхода азота должны заказываться отдельно.
Паяльная станция HAKKO FX-8803 с паяльником с ручной подачей припоя
Пример конфигурации (одна ручка, система ручной подачи припоя)

Паяльная станция и держатель паяльника должны заказываться отдельно.
Горячие щипцы HAKKO FX-8804
Пример конфигурации (система горячих щипцов)

Паяльная станция, накладка и держатель паяльника должны заказываться отдельно.
L-образный паяльник HAKKO FX-8805
Пример конфигурации (Паяльник L-образной формы)

Паяльная станция и держатель паяльника должны заказываться отдельно.
Как снять нижнюю пластину
Универсальная паяльная станция FX-888D — продукт японской компании Hakko. Это обновленная цифровая версия аналоговой модели FX-888, оснащенная новыми опциями.

Компактное оборудование отличается высокой производительностью, длительным поддержанием температуры и удобством использования. Рассмотрим подробнее.
5%скидка
Для читателей нашего блога
скидка 5% на весь
ассортимент
Ваш промокод:BLOGСмотреть все паяльные станции
Внешний вид и технические характеристики
Японская станция FX-888D представляет собой сине-желтый корпус, паяльник и подставку. Она имеет 5 температурных режимов в диапазоне от 50 до 480°C. При этом до максимального значения паяльник нагревается за 30 секунд, а во время эксплуатации температура наконечника практически не снижается.
Установить нужный температурный режим можно с помощью цифрового дисплея и кнопки, расположенной на корпусе. По умолчанию показатель нагрева составляет 350°C. Защитить настройки от нежелательных изменений поможет установка пароля.
Если вы хотите дополнительно проверить температуру наконечника, воспользуйтесь фирменным термометром FG-100.
Паяльник оснащен шершавым абразивом, благодаря которому он отлично лежит в руке, не жирнится и не соскальзывает во время работы.

Агрегат имеет наконечник серии T18-B формы B.
Корпус оснащен резиновыми ножками, которые гарантируют устойчивое и стабильное положение во время работы. Прибор прост в управлении. Он имеет всего 2 кнопки: ENTER и UP, поэтому с настройками разберется даже начинающий пользователь.
Благодаря длинному кабелю вы легко сможете дотянуться до нужной зоны даже на большой рабочей поверхности.
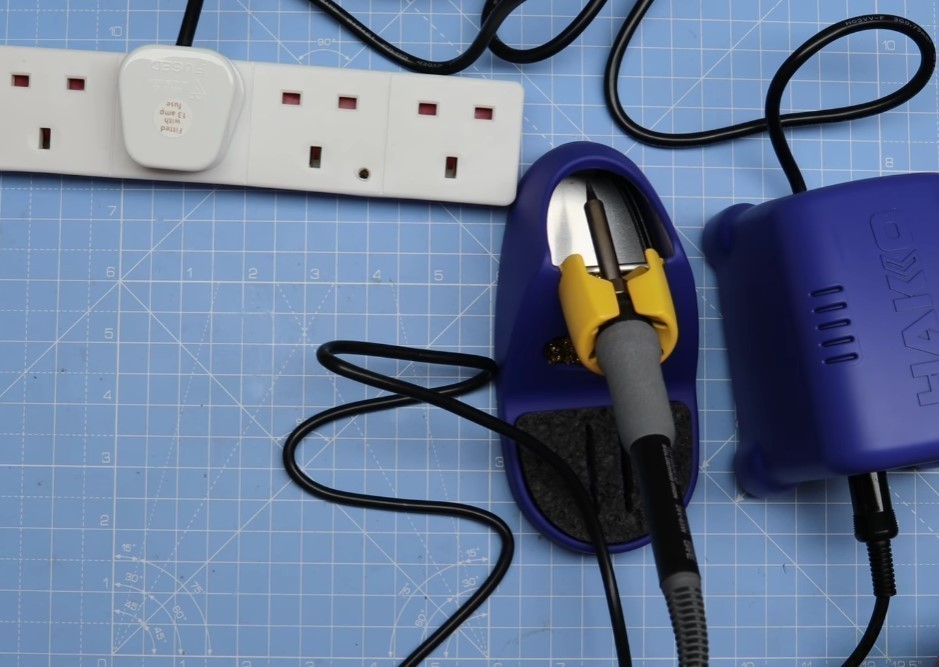
Подставка выполнена из металла и отличается прочностью и долговечностью. Она оснащена очищающей стружкой и губкой. Если паяльник включен, но вы его не используете — помещайте его на подставку.
Оригинальное жало имеет фирменную лазерную гравировку.
Паяльная одноканальная станция Hakko обладает следующими техническими характеристиками:
- мощность — 70 Вт;
- выходное напряжение — 26 В;
- предельное сопротивление — 2 Ом;
- габариты — 10х12х12 см;
- длина кабеля — 1,2 м;
- вес станции/паяльника — 1,2 кг/46 г;
- страна производства — Япония.
При желании к данной станции можно подключить паяльники FX-8802, FX-8803, FX-8804. Они приобретаются отдельно.
Чтобы прибор прослужил дольше, после каждого использования тщательно очищайте наконечник и покрывайте его новым припоем.
Комплектация
В фирменной коробке, кроме FX-888D, находится наконечник T18-B, фирменный паяльник, подставка и сопроводительная документация.
Заключение
Одноканальная станция Hakko идеально подходит для пайки радиоэлементов, микросхем и прочих подобных устройств. Модель FX-888D проста и удобна в использовании, а также отличается надежностью и долговечностью.