
Register your product and get support at
www.philips.com/welcome
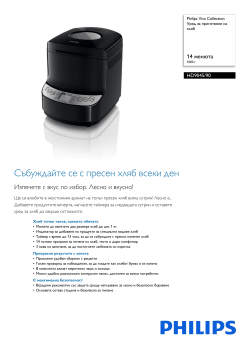
HD9045
RU Руководство пользователя
 08:32
08:32
Кухонный блог 8 — Хлебопечка Philips HD9045
 05:56
05:56
Red Bean Swirl Bread with Philips HD9045
 03:07
03:07
Baking Bread Using Philips HD9045 Bread Maker
 02:54
02:54
Хлебопечка Philips HD9045: рецепт лепешек с зеленью
 22:31
22:31
Хлебопечка Philips HD 904690
 04:00
04:00
Philips, Bread Maker HD9045/30 Pembuat Roti (Unboxing)
 06:32
06:32
Французский хлеб в хлебопечке Philips HD9046
 16:18
16:18
Преимущества хлебопечек Philips и видеорецепты
Register your product and get support at
www.philips.com/welcome
HD9045
RU Руководство пользователя

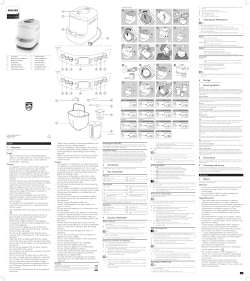
a
c
b
d
a
b
e
d
c
a b c
d
e f g

1
2
2
3
5
2
1
4
10
14
1
6
7
12
15
11
BEEP
9
13
X7
X8
X9
X10
X11
X12
X13
X1
X2
X3
X4
X5
X6
8
Русский
1 Важная информация
Перед эксплуатацией прибора внимательно ознакомьтесь с настоящим руководством и
сохраните его для дальнейшего использования в качестве справочного материала.
Опасно!
•
Запрещается погружать корпус хлебопечи в воду или другие жидкости, а также
промывать его под струей воды.
•
Не закрывайте отверстия выхода пара и вентиляционные отверстия во время
работы хлебопечи.
Внимание!
• Данным прибором могут пользоваться
дети старше 8 лет и лица с ограниченными
возможностями сенсорной системы,
интеллектуальными или физическими
возможностями, а также лица с недостаточным
опытом и знаниями под присмотром других
лиц или после инструктирования о безопасном
использовании прибора и потенциальных
опасностях.
• Не позволяйте детям играть с прибором. Дети
могут осуществлять очистку и уход за прибором,
только если они старше 8 лет и только под
присмотром взрослых.
• Храните прибор и шнур в месте, недоступном
для детей младше 8 лет. Не допускайте свисания
шнура с края стола или места установки прибора.

В случае повреждения сетевого шнура его необходимо заменить…
Страница 5
- Изображение
- Текст
• В случае повреждения сетевого шнура его
необходимо заменить. Чтобы обеспечить
безопасную эксплуатацию прибора, заменяйте
шнур только в авторизованном сервисном
центре Philips или в сервисном центре с
персоналом высокой квалификации.
• Данное устройство нельзя подключать
к внешнему таймеру или системам
дистанционного управления.
• Добавляйте не более 560 г муки и 9 г, 12 г,
14 г дрожжей при использовании программ
приготовления обычного хлеба, экспресс-
выпечки и куличей соответственно.
•
Перед подключением прибора убедитесь, что указанное на нем номинальное
напряжение соответствует напряжению местной электросети.
•
Подключайте прибор только к заземленной розетке. Убедитесь, что сетевая
вилка правильно вставлена в розетку электросети.
•
Не пользуйтесь прибором, если поврежден сетевой шнур, штепсельная вилка,
корпус прибора или форма для выпечки.
•
Перед тем как вставить вилку в розетку электросети, убедитесь, что
нагревательный элемент, вращающийся вал формы для выпечки и внешняя
поверхность формы для выпечки являются чистыми и сухими.
•
Не используйте прибор для целей, отличных от описанных в данном руководстве.
•
Запрещается включать устройство в сеть или пользоваться панелью управления с
мокрыми руками.
•
Во время работы прибора соблюдайте достаточное расстояние от отверстий
выхода пара и вентиляционных отверстий, чтобы не обжечь лицо и руки.
•
Не открывайте крышку в процессе выпекания, т.к. тесто может осесть.
•
В процессе выпекания прибор и крышка являются очень горячими. Соблюдайте
осторожность, чтобы не обжечься.
•
Не извлекайте форму для выпечки во время использования.
•
В процессе выпекания не перемешивайте ингредиенты в форме для выпечки
кухонными принадлежностями.
•
Кладите ингредиенты только в форму для выпечки. Не кладите ингредиенты
и/или добавки непосредственно в прибор, чтобы не повредить нагревательный

элемент.Чтобы переложить варенье из формы для выпечки, наден…
Страница 6
- Изображение
- Текст
элемент.Чтобы переложить варенье из формы для выпечки, наденьте кухонные
рукавицы, двумя руками поднимите форму для выпечки и слейте горячее варенье.
•
Чтобы удалить повидло из формы для выпечки, наденьте кухонные рукавицы,
двумя руками поднимите форму для выпечки и слейте горячее повидло.
Предупреждение
• Прибор предназначен только для домашнего
использования. В случае нарушения
правил использования устройства, при его
использовании в качестве профессионального
или полупрофессионального оборудования,
а также при нарушении правил данного
руководства гарантийные обязательства
утрачивают свою силу, и в этом случае компания
Philips не несет ответственности за какой бы то
ни было причиненный ущерб.
•
Запрещается пользоваться какими-либо аксессуарами или деталями других
производителей, не имеющих специальной рекомендации Philips. При
использовании таких аксессуаров и деталей гарантийные обязательства теряют
силу.
•
Не касайтесь формы для выпечки острыми кухонными принадлежностями, чтобы
не повредить ее.
•
Не подвергайте прибор воздействию высоких температур, а также не
устанавливайте его на работающую или неостывшую печь или плиту.
•
Ставьте прибор только на ровную и устойчивую горизонтальную поверхность.
•
Перед подключением вилки к розетке электросети и включением прибора всегда
устанавливайте в прибор форму для выпечки.
•
После завершения работы отключите прибор от розетки электросети.
•
Прежде чем мыть или переставлять прибор, дождитесь, когда он остынет.
•
Не помещайте форму для выпечки в обычную печь, чтобы приготовить хлеб.
•
Во время работы прибора некоторые его поверхности могут нагреваться.
Прежде чем поднять форму для выпечки за ручку или взять в руки горячую форму
для выпечки, нож для замешивания или горячий хлеб, всегда надевайте кухонные
рукавицы.
•
Остерегайтесь горячего пара, выходящего из паровых клапанов во время
выпекания или из хлебопечи при открывании крышки во время или после
завершения процесса выпекания.

Утилизация, Электромагнитные поля (эмп), Возобновление работы в случае сбоя электропитания
Страница 7
- Изображение
- Текст
•
Не поднимайте и не перемещайте прибор во время работы.
•
Не касайтесь движущихся частей.
•
Не подвергайте прибор воздействию прямых солнечных лучей.
•
Не вставляйте в паровые клапаны металлические или посторонние предметы.
•
Не используйте поврежденную форму для выпечки.
•
Всегда очищайте прибор после использования.
•
Запрещается мыть прибор в посудомоечной машине.
•
Не используйте прибор вне помещения.
•
Оставьте не менее 10 см свободного пространства от верхней, задней и
боковых панелей прибора, чтобы предотвратить повреждение в результате
излучаемого тепла.
•
Не устанавливайте форму для выпечки или другие предметы на верхнюю панель
прибора, чтобы не повредить прибор.
Утилизация
Изделие разработано и изготовлено с применением высококачественных
деталей и компонентов, которые подлежат переработке и повторному
использованию.
Если изделие маркировано значком с изображением перечеркнутого мусорного
бака, это означает, что изделие подпадает под действие директивы Европейского
Парламента и Совета 2002/96/EC:
Не выбрасывайте изделие вместе с бытовыми отходами. Для утилизации
электрических и электронных изделий необходимы сведения о местной системе
отдельной утилизации отходов. Правильная утилизация отработавшего изделия
поможет предотвратить возможные негативные последствия для окружающей среды и
здоровья человека.
Электромагнитные поля (ЭМП)
Данный прибор Philips соответствует стандартам по электромагнитным полям (ЭМП).
При правильной эксплуатации в соответствии с инструкциями в данном руководстве
прибор абсолютно безопасен в использовании, что подтверждается имеющимися на
сегодня научными данными.
Возобновление работы в случае сбоя электропитания
Для данного прибора предусмотрена функция, которая позволяет «запомнить»
этап приготовления перед отключением электричества при условии, что подача
электричества будет восстановлена не более чем через 10 минут. Если отключение
электричества происходит в процессе приготовления, отсчет времени приготовления
возобновляется после восстановления подачи электричества. Если подача
электроэнергии прекращается более чем на 10 минут, и ее отключение произошло
в процессе приготовления, хлебопечь автоматически восстанавливает заданную
настройку, после того как подача электроэнергии будет восстановлена. Откройте

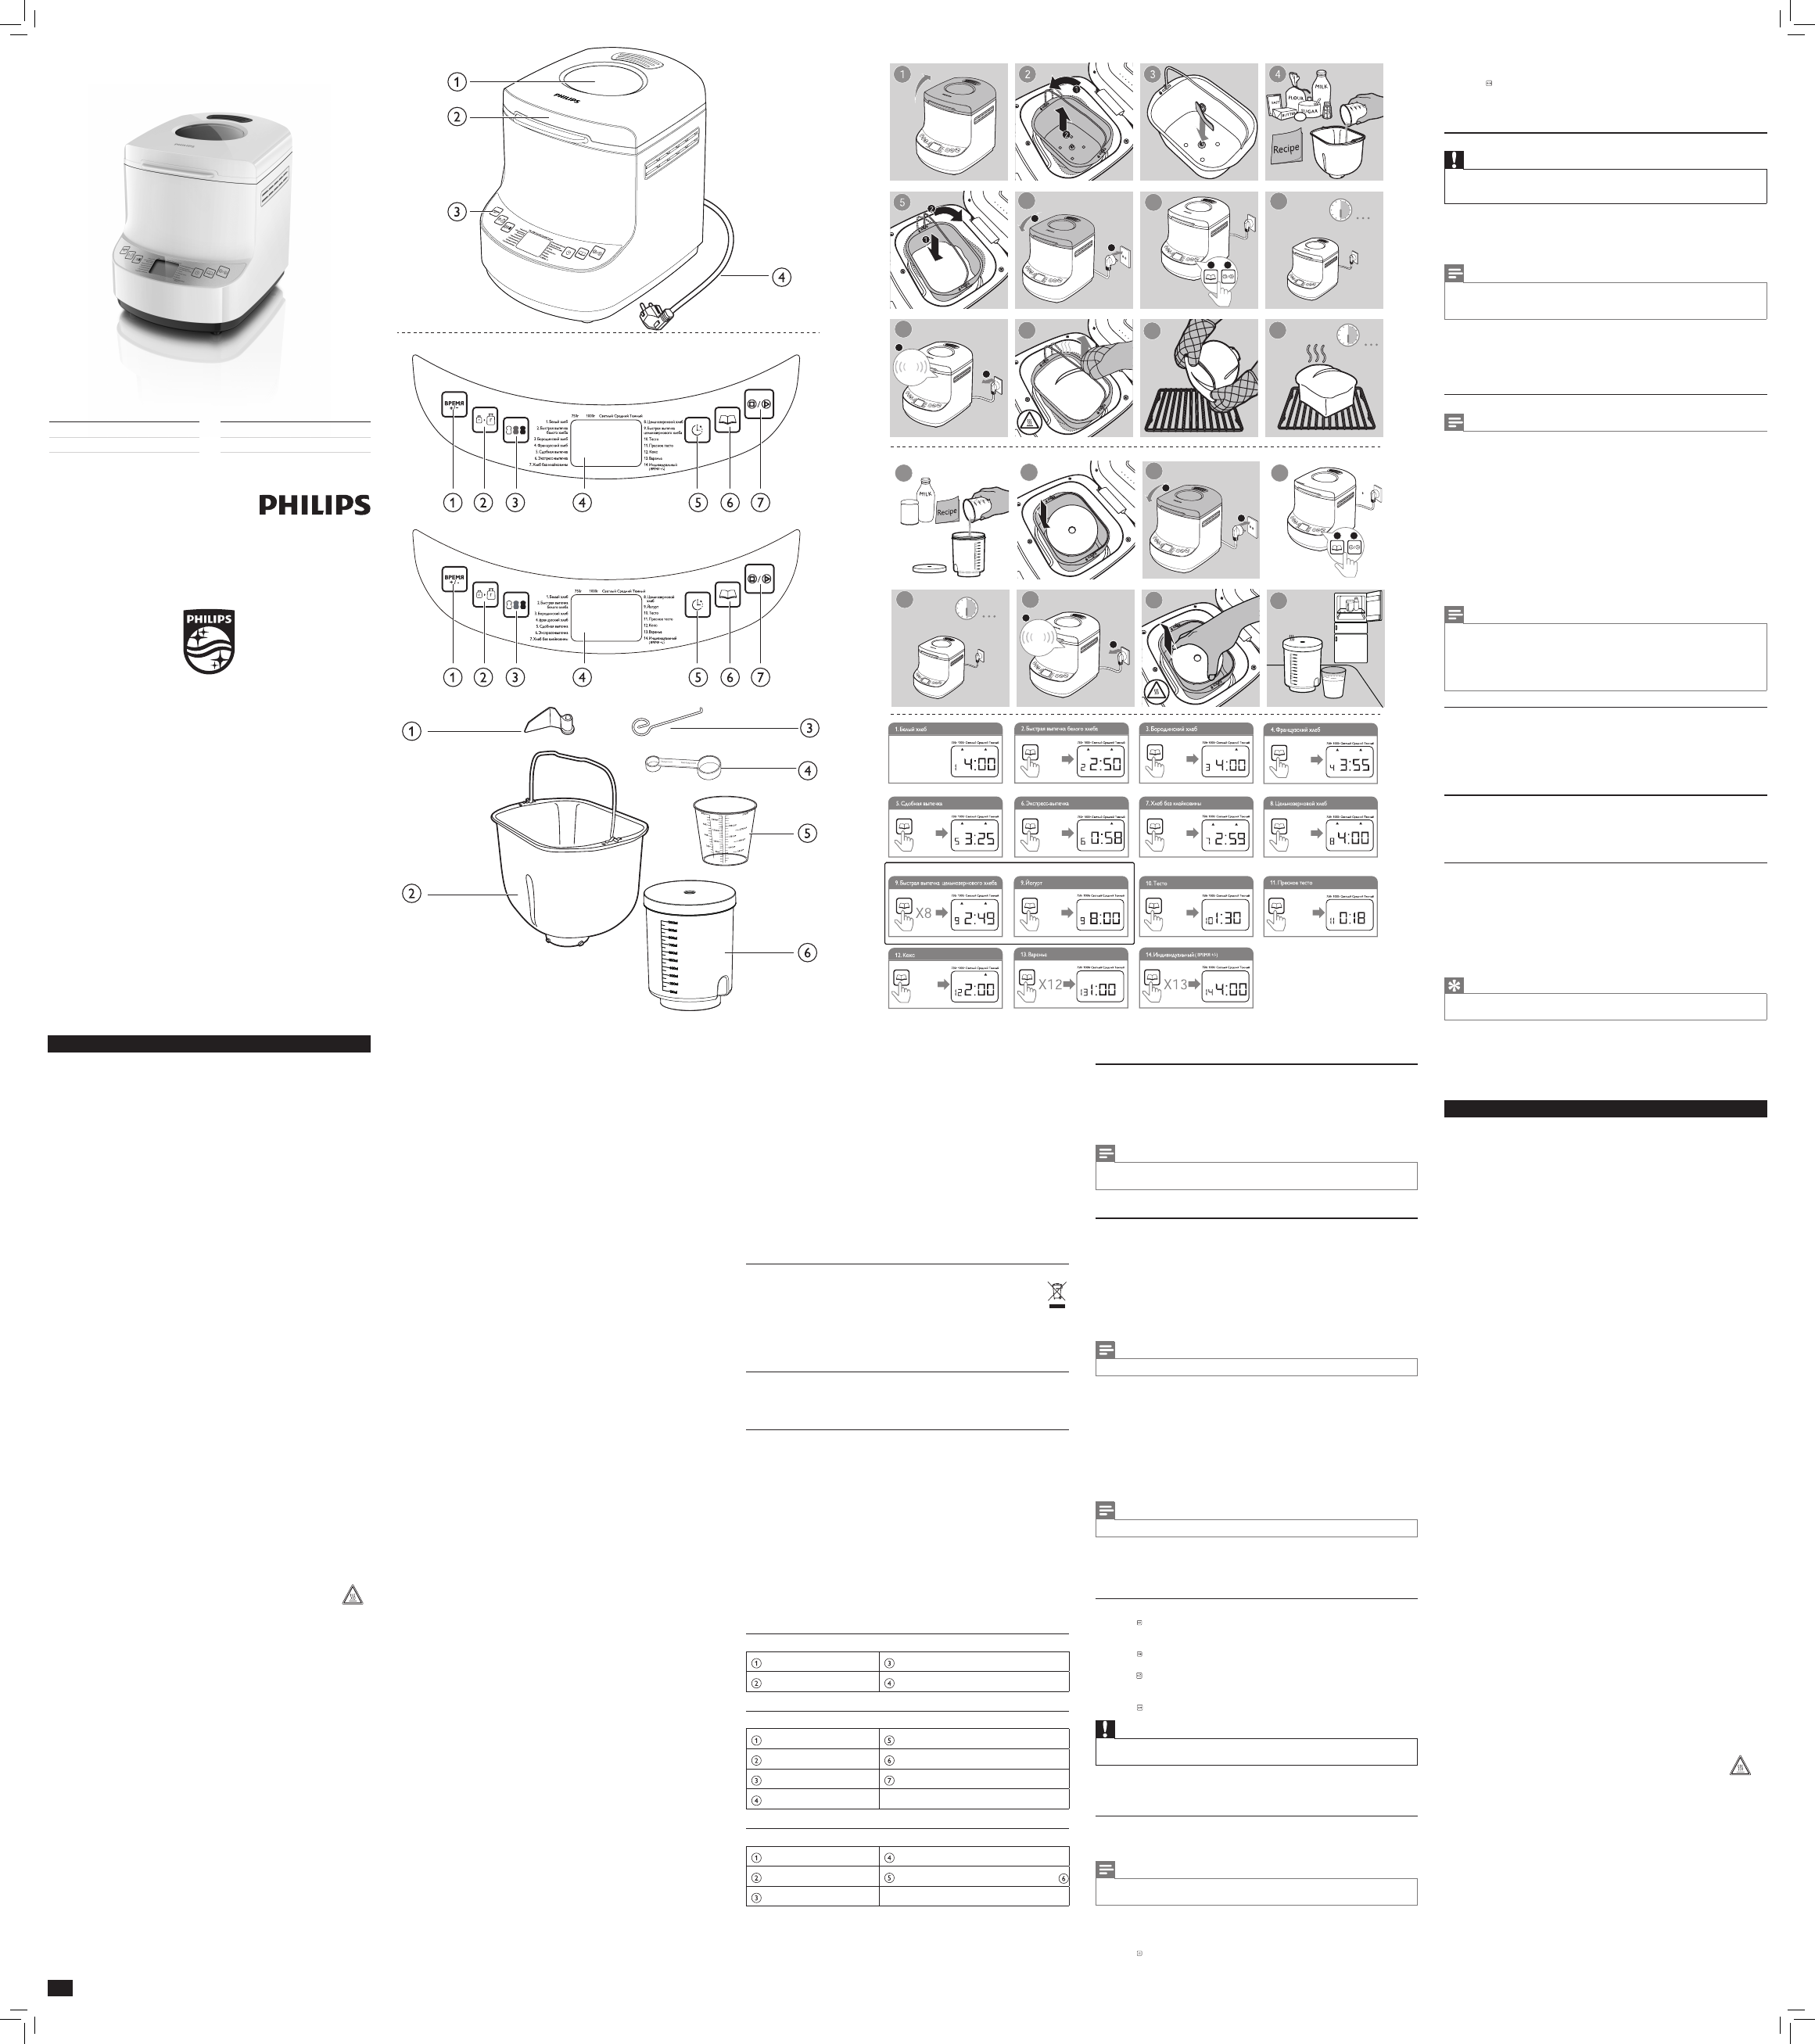
2 введение, 3 хлебопечь, Основное устройство
Панель управления, Дополнительные принадлежности
- Изображение
- Текст
хлебопечь, извлеките ее содержимое и начните процесс приготовления заново. Если
на момент отключения электричества таймер и программа были заданы, и процесс
приготовления не начался, хлебопечь автоматически восстанавливает заданную
настройку после возобновления подачи электричества. Откройте хлебопечь, извлеките
ее содержимое и начните процесс приготовления заново.
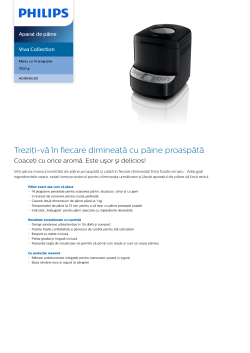
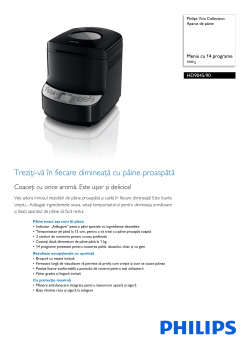
2 Введение
Поздравляем с покупкой и приветствуем в клубе Philips! Чтобы воспользоваться всеми
преимуществами поддержки Philips, зарегистрируйте приобретенное устройство на
сайте www.philips.com/welcome.
3 Хлебопечь
Основное устройство
Смотровое окно
Панель управления
Крышка
Вилка сетевого шнура
Панель управления
ЦИКЛ
Таймер отсрочки
Вес буханки
Меню программ
Цвет корочки
Кнопка «Старт»/»Стоп»/»Отмена»
ЖК-дисплей
Дополнительные принадлежности
Нож для замешивания
Мерная ложка
Форма для выпечки
Мерный стакан
Крючок

4 использование хлебопечи, Перед первым использованием, Подготовка хлебопечи и ингредиентов
Страница 9
- Изображение
- Текст
4 Использование хлебопечи
Перед первым использованием
1
Снимите весь упаковочный материал с прибора. Будьте внимательны, чтобы не
выбросить нож для замешивания.
2
Снимите с корпуса прибора все наклейки.
3
На приборе может скопиться пыль. Протрите внешнюю поверхность прибора,
форму для выпечки и нож для замешивания влажной тканью.
Примечание
• Запрещается использовать для чистки прибора губки с абразивным покрытием,
абразивные чистящие средства или растворители типа бензина или ацетона.
4
Перед использованием прибора тщательно просушите все его части.
Подготовка хлебопечи и ингредиентов
1
Поставьте прибор на устойчивую горизонтальную и ровную поверхность.
2
Поверните форму для выпечки против часовой стрелки и поднимите ее, чтобы
извлечь.
3
Плотно установите нож для замешивания на вал.
4
Взвесьте ингредиенты, которые вам потребуются для приготовления хлеба по
желаемому рецепту (см. раздел «Рецепты хлеба» ниже).
• Всегда взвешивайте ингредиенты точно.
• Все ингредиенты должны быть комнатной температуры, если в рецепте не
указано иное.
5
Поместите ингредиенты в форму для выпечки в порядке, указанном в рецепте.
Примечание
• Не добавляйте ингредиентов больше, чем указано в рецепте, так как это может
повредить хлебопечь.
• В хлебопечь необходимо добавлять сухие дрожжи отдельно от других
ингредиентов.
• Прежде чем положить сливочное масло и другие жиры в форму для выпечки,
порежьте их на кусочки для более тщательного перемешивания.
• При необходимости с помощью лопаточки соберите со стенок формы для
выпечки приставшую смесь и смешайте с основной частью смеси.
• Во время замешивания теста будут звучать сигналы, уведомляющие о
возможности добавить такие дополнительные ингредиенты, как орехи.

Настройка хлебопечи, Время отсрочки для выпекания с задержкой
Страница 10
- Изображение
- Текст
6
Поместите форму для выпечки в прибор. Поворачивайте форму для выпечки по
часовой стрелке, пока она не встанет на место.
Примечание
• Если форма для выпечки установлена неправильно, нож для замешивания не будет
вращаться.
7
Опустите ручку формы для выпечки и закройте крышку прибора.
8
Вставьте вилку сетевого шнура в розетку электросети.
»
Прибор издаст звуковой сигнал, и на дисплее отобразится значение «1» и
«3:55», что обозначает программу «Белый хлеб».
Настройка хлебопечи
1
Последовательно нажимайте кнопку (кнопка меню) для выбора программы.
• Отобразится номер выбранной программы и время приготовления.
• Подробное описание программы см. в разделе «Рецепт хлеба» ниже.
2
Последовательно нажимайте кнопку (кнопка цвета корочки) для выбора цвета
корочки.
• Выбранный цвет корочки можно изменить с темного на светлый.
3
Последовательно нажимайте кнопку (кнопку веса буханки) для выбора веса
буханки.
• Убедитесь, что выбранный вес соответствует количеству ингредиентов
выбранного рецепта. См. раздел «Рецепт хлеба» ниже.
4
Нажмите кнопку (кнопка старт/стоп), чтобы начать процесс приготовления
хлеба.
Внимание
• В процессе выпекания хлебопечь и крышка очень сильно нагреваются. Соблюдайте
осторожность, чтобы не обжечься.
»
На дисплее отображается обратный отсчет времени до готовности хлеба.
»
После завершения процесса выпекания хлебопечь издаст звуковой сигнал и
переключится в режим поддержания температуры (на 60 минут).
Время отсрочки для выпекания с задержкой
Если вы хотите испечь хлеб к заданному времени, вы можете воспользоваться
таймером отсрочки старта. Максимальное время отсрочки составляет 13 часов.

Комментарии
Инструкции и Руководства для Philips HD9045/90.
Мы нашли 11
инструкции доступные для бесплатного скачивания:
Инструкция по применению, Руководство пользователя
Philips HD9045/90 Viva Collection Хлебопечь Руководство пользователя
Бренд:
Philips
Размер:
490 KB
Страниц:
3
Язык(и):
Русский
Открыть в новой вкладке

Philips HD9045/30 Руководство пользователя
Бренд:
Philips
Категория:
Bread making machines
Размер:
7 MB
Страниц:
4
Язык(и):
Английский, Русский, Украинский
Открыть в новой вкладке
Philips HD9046/90 Viva Collection Хлебопечь Руководство пользователя
Бренд:
Philips
Категория:
Bread making machines
Размер:
6 MB
Страниц:
4
Язык(и):
kk, Русский, Украинский
Открыть в новой вкладке
Philips HD9046/90 User manual User manual
Бренд:
Philips
Категория:
Bread making machines
Размер:
2 MB
Страниц:
8
Язык(и):
Английский
Открыть в новой вкладке

Philips Viva Collection Хлебопечь HD9045/90 Буклет с инструкциями
Бренд:
Philips
Категория:
Bread making machines
Размер:
2 MB
Страниц:
40
Язык(и):
Японский, Польский, Украинский
Открыть в новой вкладке
Philips HD9045/90 Viva Collection Aparat de pâine Manual de utilizare
Бренд:
Philips
Размер:
473 KB
Страниц:
3
Язык(и):
Румынский
Открыть в новой вкладке

Philips HD9045/90 Viva Collection Уред за приготвяне на хляб Ръководство за употреба
Бренд:
Philips
Размер:
489 KB
Страниц:
3
Язык(и):
Болгарский
Открыть в новой вкладке
Philips HD9046/90 Viva Collection Aparat de pâine Manual de utilizare
Бренд:
Philips
Размер:
496 KB
Страниц:
8
Язык(и):
Румынский
Открыть в новой вкладке
Philips Viva Collection Maizes krāsniņa HD9046/90 Lietotāja rokasgrāmata
Бренд:
Philips
Категория:
Bread making machines
Размер:
3 MB
Страниц:
8
Язык(и):
Эстонский, Хорватский, kk, Литовский, Польский, Румынский, Словацкий, Словенский
Открыть в новой вкладке
Philips HD9045/90 Viva Collection Aparat de pâine Manual de utilizare
Бренд:
Philips
Размер:
537 KB
Страниц:
3
Язык(и):
Румынский
Открыть в новой вкладке
Philips HD9045/90 Viva Collection Уред за приготвяне на хляб Ръководство за употреба
Бренд:
Philips
Размер:
525 KB
Страниц:
3
Язык(и):
Болгарский
Открыть в новой вкладке
Register your product and get support at
HD9045
HD9046
www.philips.com/welcome
Specifications are subject to change without notice
© 2014 Koninklijke Philips N.V.
All rights reserved.
HD9045/HD9046_UM_V2.0
EN
User manual
RU
Руководство пользователя
UK
Посібник користувача
KK
Қолданушының нұсқасы
•
Do not expose the appliance to direct sunlight.
•
Do not insert metallic objects or alien substances
into the steam vents.
•
Do not use the bread pan if it is damaged.
•
Always clean the appliance after use.
•
Do not clean the appliance in the dishwasher.
•
Do not use the appliance outdoors.
•
Leave a free space of at least 10cm above, behind
and on both sides of the appliance to prevent
damage due to radiated heat.
•
To avoid damage to the appliance, do not place
the bread pan or any other object on top of the
appliance.
Recycling
Your product is designed and manufactured with high quality materials and
components, which can be recycled and reused.
When you see the crossed-out wheel bin symbol attached to a product, it means the
product is covered by the European Directive 2002/96/EC:
Never dispose of your product with other household waste. Please inform yourself about
the local rules on the separate collection of electrical and electronic products. The correct
disposal of your old product helps prevent potentially negative consequences on the
environment and human health.
Electromagnetic fields (EMF)
This Philips appliance complies with all standards regarding electromagnetic fields (EMF). If
handled properly and according to the instructions in this user manual, the appliance is safe
to use based on scientific evidence available today.
Power failure backup
This appliance has a backup function that remembers the status before a power failure,
provided the power supply resumes within 10 minutes. If the power failure occurs during
a cooking process, the countdown of the cooking time continues where it left off when
the power supply resumes. If the power failure lasts longer than 10 minutes and the failure
occurs during a cooking process, the breadmaker automatically resets to the preset setting
when the power supply resumes. Open the breadmaker, remove its contents and start all
over again. If you have set the timer and the preset cooking process has not yet started when
a power failure occurs, the breadmaker automatically resets to the preset setting when the
power supply resumes. Open the breadmaker, remove its contents and start all over again.
2 Introduction
Congratulations on your purchase and welcome to Philips! To fully benefit from the support
that Philips offers, register your product at www.philips.com/welcome.
3 Your breadmaker
Main unit
Viewing window
Control panel
Cover lid
Mains plug
Control panel
CYCLE
Preset timer
Loaf weight
Program menu
Crust color
Start/stop/cancel button
LCD status display
Accessories
Kneading blade
Measuring spoon
Bread pan
Measuring cup
Hook
Yoghurt container with lid (HD9046 only)
4 Use your breadmaker
Before the first use
1
Remove all packaging material from the appliance. Be careful not to throw away the
kneading blade.
2
Remove any labels from the body of the appliance.
3
To remove any dust that may have accumulated on the appliance, wipe the outside of
the appliance, the bread pan and the kneading blade with a damp cloth.
Note
• Never use scouring pads, abrasive cleaning agents or aggressive liquids such as petrol or
acetone to clean the appliance.
4
Dry all parts thoroughly before you start to use the appliance.
Prepare your breadmaker and ingredients
1
Put your breadmaker on a stable, horizontal and level surface.
2
Turn the bread pan anticlockwise and lift it out.
3
Push the kneading blade firmly onto the shaft.
4
Measure the ingredients for the recipe you want to prepare (see the recipes booklet).
• Always measure ingredients accurately.
• All ingredients should be at room temperature unless recipe suggests otherwise.
5
Put ingredients in the bread pan in the order they are listed in the recipe.
• Always add liquid ingredient first, and then add dry ingredients.
• Do not let the yeast touch the salt.
Note
• Do not add more quantities than mentioned in the recipe as it may damage the breadmaker.
• Always use active dry yeast with this breadmaker.
• The yeast should be dry and separate from other ingredients when it is added to
the bread pan.
• Butter and other fats should be cut into small pieces before putting in the bread
pan to aid the mixing.
• If necessary, use a spatula to scrape down the sides of the bread pan to get the
mixture sticking to the wall back to the mix.
• During the mixing stage, there will be beep sounds to alert you to add additional
ingredients such as nuts if you wish.
6
Put the bread pan in the appliance. Turn the bread pan clockwise until it locks into
position.
Note
• If the bread pan is not assembled properly, the kneading blade does not turn.
7
Put down the handle of the bread pan and close the lid of the appliance.
8
Put the mains plug in the wall socket.
»
The appliance beeps and ‘1’ and ‘3:55’ appear on the display, which refers to the
‘White’ program.
Set your breadmaker
1
Press (menu button) repeatedly to select the program.
• The select program number and processing time are displayed.
• For detailed program description, see section ‘Bread recipe’ below.
2
Press (crust color button) repeatedly to select the crust color.
• The selected crust color can be changed from light to dark.
3
Press (loaf weight button) repeatedly to select the loaf weight.
• Make sure the selected weight is appropriate for the amount of ingredients of the
selected recipe. See section ‘Bread recipe’ below.
4
Press (Start/stop button) to start bread making process.
Caution
• During the baking process, the breadmaker itself and the lid become extremely hot. Be careful
not to burn yourself.
»
The display counts down the processing time until the bread is ready.
»
When the baking process is finished, the breadmaker beeps and goes to the keep-
warm mode (for 60 minutes).
Preset time for delayed baking
You can use the timer if you want the bread to be ready at a later time. The maximum delay
time that can be set is 13 hours.
Note
• Do not use the timer function with recipes that require fresh ingredients that may go bad, for
instance eggs, fresh milk, sour cream or cheese.
1
Put all ingredients in the bread pan.
2
Select the appropriate program, loaf size and crust color for your recipe.
»
The total processing time is shown on the display.
3
Press (preset timer button) to choose the desired preset time.
»
The breadmaker enters preset mode.
• For example, if the current time is 19:00 and you want your bread ready at 7:00
next morning (12 hours later), you can set set the preset time to 12:00.
3140 035 30603
English
1 Important
Read this user manual carefully before you use
the appliance, and save the user manual for future
reference.
Danger
•
Never immerse the body of the breadmaker in
water or any other liquid, nor rinse it under the tap.
•
Do not cover the steam and air vents while the
breadmaker is operating.
Warning
• This appliance can be used by children aged from 8
years and above and persons with reduced physical,
sensory or metal capabilities or lack of experience
and knowledge if they have been given supervision
or instruction concerning use of the appliance in a
safe way and understand the hazards involved.
• Children shall not play with the appliance. Cleaning
and user maintenance shall not be made by children
unless they are older than 8 and supervised.
• Keep the appliance and its cord out of reach of
children less than 8 years. Do not let the mains cord
hang over the edge of the table or worktop on
which the appliance stands.
• If the mains cord is damaged, you must have it
replaced by Philips, a service centre authorised by
Philips or similarly qualified persons in order to
avoid a hazard.
• The appliance is not intended to be operated by
means of an external timer or a separate remote
control system.
• The accessible surfaces may become hot during use.
• Do not put over 560 g flour, and 9 g, 12 g, 14 g
yeast for general bread, super rapid bread, and cake
programs respectively.
•
Check if the voltage indicated on the appliance
corresponds to the local mains voltage before you
connect the appliance.
•
Only connect the appliance to an earthed wall
socket. Always make sure that the plug is inserted
firmly into the wall socket.
•
Do not use the appliance if the plug, the mains
cord, the body of the appliance or the bread pan is
damaged.
•
Make sure that the heating element, the rotating
shaft of the bread pan and the outside of the bread
pan are clean and dry before you put the plug in the
wall socket.
•
Do not use the appliance for any other purpose
than described in this manual.
•
Do not plug in the appliance or operate the control
panel with wet hands.
•
Do not come near the steam and air vents with
your face or hands when the appliance is operating.
•
Do not open the lid during the baking process, as
this may cause the dough or bread to collapse.
•
During the baking process, the appliance itself and
the lid become extremely hot. Be careful not to
burn yourself.
•
Do not remove the bread pan from the appliance
during use.
•
Never use any utensils to mix the ingredients in the
bread pan during a baking program.
•
Only put ingredients in the bread pan. Do not put
or spill any ingredients and/or additives in the inside
of the appliance to avoid damage to the heating
element.
•
When you remove jam from the bread pan, lift the
bread pan with both hands in oven mitts to pour
out the hot jam.
Caution
• This appliance is intended for household use only. If
the appliance is used improperly or for professional
or semi-professional purposes or if it is not used
according to the instructions in the user manual, the
guarantee becomes invalid and Philips refuses any
liability for damage caused.
•
Never use any accessories or parts from other
manufacturers or that Philips does not specifically
recommend. If you use such accessories or parts,
your guarantee becomes invalid.
•
Do not touch the bread pan with sharp utensils to
avoid damage.
•
Do not expose the appliance to high temperatures,
nor place it on a working or still hot stove or
cooker.
•
Always place the appliance on a stable, level and
horizontal surface.
•
Always put the bread pan in the appliance before
you put the plug in the wall socket and switch on
the appliance.
•
Always unplug the appliance after use.
•
Always let the appliance cool down before you
clean or move it.
•
Do not place the bread pan in a conventional oven
to bake bread.
•
The accessible surfaces may become hot when the
appliance is operating. Always use oven mitts when
you lift the bread pan by its handle or when you
handle the hot bread pan, the kneading blade or the
hot bread.
•
Beware of the hot steam that comes out of the
steam vents during baking or out of the breadmaker
when you open the lid during or after the baking
process.
•
Do not lift and move the appliance while it is
operating.
•
Do not touch moving parts.
(HD9046 only)
HD9045
HD9046
X7
X8
X9
X10
X11
X1
X2
X3
X4
X5
X6
HD9045
HD9046
HD9045/HD9046
6
8
7
1
1
2
2
9
10
11
12
2
BEEP
1
5
4
2
7
3
6
2
BEEP
1
1
YOGHTURT
8
1
1
2
2
• If you keep the button pressed, the time increases more quickly.
• If the time on the display reaches 13 hours and you still keep the timer button
pressed, the display goes back to the baking time of the set program.
4
Press (start/stop/cancel button).
»
The timer counts down the set time in minutes.
»
The bread is ready when the timer has counted down to 0:00 and the
breadmaker beeps.
Finish the baking process
Caution
• The inside of the breadmaker, the bread pan, the kneading blade and the bread are very hot.
• Always use oven mitts when you remove the bread pan at the end of the baking cycle or at
any time during the keep-warm mode.
1
To power off the breadmaker, remove the mains plug from the wall socket.
2
Using pot holders or oven mitts, open the lid and turn the bread pan anticlockwise.
3
Grab the bread pan by its handle and lift it out.
4
Turn the pan upside down, hold the handle and shake the bread out.
Note
• Do not use metal utensils to remove the bread, as these may damage the non-stick coating of
the bread pan.
• Be careful, the bread pan and the bread are hot.
5
Use the hook supplied to remove the kneading blade from the shaft/bread.
• Always make sure that the kneading blade does not stay inside the bread,
otherwise you may damage the kneading blade when you slice the bread.
6
Let the breadmaker cool down before you clean it.
Making Yoghurt (HD9046 only)
Note
• Ensure the yogurt container is thoroughly washed with warm water and soap, and it is
dried before making yoghurt.
• Full fat, skim, or 2% milk can be used.
• Make sure the yoghurt is fresh and thus the culture starter is active.
1
The milk and yoghurt mixture proportion is 10:1 (For example: 400ml milk with 40ml
yoghurt).
2
Pour milk into the yoghurt container.
3
Add yoghurt into the yoghurt container, and mix well.
4
Close and tighten the lid.
5
Start the yoghurt program.
»
Yoghurt will be ready in 8 hours.
5 Cleaning and Maintenance
Note
• Uplug the breadmaker before starting to clean it.
• Wait until the breadmaker has cooled down sufficiently before cleaning it.
• Never immerse the appliance in water or any other liquid, nor rinse it under the tap.
• Never use scouring pads, abrasive cleaning agents or aggressive liquids such as petrol or
acetone to clean the appliance.
• For maximum safety, keep the appliance clean and free of grease and food residues.
Interior
Inside of the cover and the main body:
• Wipe with wrung out and damp cloth.
• Make sure to remove all the food residues stuck to the breadmaker.
Heating element:
• Wipe with wrung out and damp cloth.
• Remove sfood residues with wrung out and damp cloth or toothpicks.
Exterior
Surface of the cover lid and outside of the main body:
• Wipe with a cloth damped with soap water.
• ONLY use soft and dry cloth to wipe the control panel.
• Make sure to remove all the food residues around the control buttons.
Accessories
Bread pan:
• Clean the bread pan with a soft cloth moistened with hot water or washing-up
liquid.
• Do not immerse the bread pan in water and do not clean it in the dishwasher.
Kneading blade, measuring spoon and cup, and hook:
• Soak in hot water and clean with sponge.
Yoghurt container with lid:
• Thoroughly washed with warm water and soap.
• Make sure it is dried before use.
Tip
• After baking, immediately remove the kneading blade from the bread pan to prevent it from
getting stuck.
6 Storage
Store your breadmaker in a safe and dry place.
Русский
1 Важная информация
Перед эксплуатацией прибора внимательно
ознакомьтесь с настоящим руководством и
сохраните его для дальнейшего использования в
качестве справочного материала.
Опасно!
•
Запрещается погружать корпус хлебопечи в воду
или другие жидкости, а также промывать его
под струей воды.
•
Не закрывайте отверстия выхода пара и
вентиляционные отверстия во время работы
хлебопечи.
Внимание!
• Данным прибором могут пользоваться
дети старше 8 лет и лица с ограниченными
возможностями сенсорной системы,
интеллектуальными или физическими
возможностями, а также лица с недостаточным
опытом и знаниями под присмотром других
лиц или после инструктирования о безопасном
использовании прибора и потенциальных
опасностях.
• Не позволяйте детям играть с прибором. Дети
могут осуществлять очистку и уход за прибором,
только если они старше 8 лет и только под
присмотром взрослых.
• Храните прибор и шнур в месте, недоступном
для детей младше 8 лет. Не допускайте свисания
шнура с края стола или места установки прибора.
• В случае повреждения сетевого шнура его
необходимо заменить. Чтобы обеспечить
безопасную эксплуатацию прибора, заменяйте
шнур только в авторизованном сервисном
центре Philips или в сервисном центре с
персоналом высокой квалификации.
• Данное устройство нельзя подключать
к внешнему таймеру или системам
дистанционного управления.
• Во время использования устройства некоторые
поверхности могут нагреваться.
• Добавляйте не более 560 г муки и 9 г, 12 г,
14 г дрожжей при использовании программ
приготовления обычного хлеба, экспресс-
выпечки и куличей соответственно.
•
Перед подключением прибора убедитесь, что
указанное на нем номинальное напряжение
соответствует напряжению местной
электросети.
1/2

EN User manual
RU Руководствопользователя
UK Посібниккористувача
KK Қолданушыныңнұсқасы
• Do not lift and move the appliance while it is
operating.
• Do not touch moving parts.
• Do not expose the appliance to direct sunlight.
• Do not insert metallic objects or alien substances
into the steam vents.
• Do not use the bread pan if it is damaged.
• Always clean the appliance after use.
• Do not clean the appliance in the dishwasher.
• Do not use the appliance outdoors.
• Leave a free space of at least 10cm above, behind
and on both sides of the appliance to prevent
damage due to radiated heat.
• To avoid damage to the appliance, do not place
the bread pan or any other object on top of the
appliance.
Recycling
This symbol means that this product shall not be disposed of with normal household
waste (2012/19/EU).
Follow your country’s rules for the separate collection of electrical and electronic
products. Correct disposal helps prevent negative consequences for the environment
and human health.
Electromagneticelds(EMF)
This Philips appliance complies with all standards regarding electromagnetic elds (EMF). If
handled properly and according to the instructions in this user manual, the appliance is safe
to use based on scientic evidence available today.
Power failure backup
This appliance has a backup function that remembers the status before a power failure,
provided the power supply resumes within 10 minutes. If the power failure occurs during
a cooking process, the countdown of the cooking time continues where it left off when
the power supply resumes. If the power failure lasts longer than 10 minutes and the failure
occurs during a cooking process, the breadmaker automatically resets to the preset setting
when the power supply resumes. Open the breadmaker, remove its contents and start all
over again. If you have set the timer and the preset cooking process has not yet started when
a power failure occurs, the breadmaker automatically resets to the preset setting when the
power supply resumes. Open the breadmaker, remove its contents and start all over again.
2 Introduction
Congratulations on your purchase and welcome to Philips! To fully benet from the support
that Philips offers, register your product at www.philips.com/welcome.
3 Yourbreadmaker
Mainunit
Viewing window Control panel
Cover lid Mains plug
Control panel
CYCLE Preset timer: preset time for delayed baking
Loaf weight: to select bread
loaf weight
Program menu: to select a baking program
Crust color: to select a crust
color (light/medium/dark)
Start/stop/cancel button: to start or stop bread
making processe
LCD status display
CYCLE: cycle button allows you to select and set processing steps in the homemade mode.
For details, see the homemade program in the recipe book.
Accessories
Kneading blade Measuring spoon
Bread pan Measuring cup
Hook Yoghurt container with lid (HD9046 only)
4 Useyourbreadmaker
Beforetherstuse
1 Remove all packaging material from the appliance. Be careful not to throw away the
kneading blade.
2 Remove any labels from the body of the appliance.
3 To remove any dust that may have accumulated on the appliance, wipe the outside of
the appliance, the bread pan and the kneading blade with a damp cloth.
Note
• Never use scouring pads, abrasive cleaning agents or aggressive liquids such as petrol or
acetone to clean the appliance.
4 Dry all parts thoroughly before you start to use the appliance.
Prepareyourbreadmakerandingredients
1 Put your breadmaker on a stable, horizontal and level surface.
2 Turn the bread pan anticlockwise and lift it out.
3 Push the kneading blade rmly onto the shaft.
4 Measure the ingredients for the recipe you want to prepare (see the recipes booklet).
• Always measure ingredients accurately.
• All ingredients should be at room temperature unless recipe suggests otherwise.
5 Put ingredients in the bread pan in the order they are listed in the recipe.
• Always add liquid ingredient rst, and then add dry ingredients.
• Do not let the yeast touch the salt.
Note
• Do not add more quantities than mentioned in the recipe as it may damage the breadmaker.
• Always use active dry yeast with this breadmaker.
• The yeast should be dry and separate from other ingredients when it is added to
the bread pan.
• Butter and other fats should be cut into small pieces before putting in the bread
pan to aid the mixing.
• If necessary, use a spatula to scrape down the sides of the bread pan to get the
mixture sticking to the wall back to the mix.
• During the mixing stage, there will be beep sounds to alert you to add additional
ingredients such as nuts if you wish.
6 Put the bread pan in the appliance. Turn the bread pan clockwise until it locks into
position.
Note
• If the bread pan is not assembled properly, the kneading blade does not turn.
7 Put down the handle of the bread pan and close the lid of the appliance.
8 Put the mains plug in the wall socket.
» The appliance beeps and ‘1’ and ‘3:55’ appear on the display, which refers to the
‘White’ program.
Setyourbreadmaker
1 Press (menu button) repeatedly to select the program.
• The select program number and processing time are displayed.
• For detailed program description, see section ‘Bread recipe’ below.
2 Press (crust color button) repeatedly to select the crust color.
• The selected crust color can be changed from light to dark.
3 Press (loaf weight button) repeatedly to select the loaf weight.
• Make sure the selected weight is appropriate for the amount of ingredients of the
selected recipe. See section ‘Bread recipe’ below.
4 Press (Start/stop button) to start bread making process.
Caution
• During the baking process, the breadmaker itself and the lid become extremely hot. Be careful
not to burn yourself.
» The display counts down the processing time until the bread is ready.
» When the baking process is nished, the breadmaker beeps and goes to the keep-
warm mode (for 60 minutes).
Presettimefordelayedbaking
You can use the timer if you want the bread to be ready at a later time. The maximum delay
time that can be set is 13 hours.
Note
• Do not use the timer function with recipes that require fresh ingredients that may go bad, for
instance eggs, fresh milk, sour cream or cheese.
1 Put all ingredients in the bread pan.
2 Select the appropriate program, loaf size and crust color for your recipe.
» The total processing time is shown on the display.
3 Press (preset timer button) to choose the desired preset time.
» The breadmaker enters preset mode.
• For example, if the current time is 19:00 and you want your bread ready at 7:00
next morning (12 hours later), you can set set the preset time to 12:00.
English
1 Important
Read this user manual carefully before you use
the appliance, and save the user manual for future
reference.
Danger
• Never immerse the body of the breadmaker in
water or any other liquid, nor rinse it under the tap.
• Do not cover the steam and air vents while the
breadmaker is operating.
Warning
• This appliance can be used by children aged from 8
years and above and persons with reduced physical,
sensory or metal capabilities or lack of experience
and knowledge if they have been given supervision
or instruction concerning use of the appliance in a
safe way and understand the hazards involved.
• Children shall not play with the appliance. Cleaning
and user maintenance shall not be made by children
unless they are older than 8 and supervised.
• Keep the appliance and its cord out of reach of
children less than 8 years. Do not let the mains cord
hang over the edge of the table or worktop on
which the appliance stands.
• If the mains cord is damaged, you must have it
replaced by Philips, a service centre authorised by
Philips or similarly qualied persons in order to
avoid a hazard.
• The appliance is not intended to be operated by
means of an external timer or a separate remote
control system.
• The accessible surfaces may become hot during use.
• Do not put over 560 g our, and 9 g, 12 g, 14 g
yeast for general bread, super rapid bread, and cake
programs respectively.
• Check if the voltage indicated on the appliance
corresponds to the local mains voltage before you
connect the appliance.
• Only connect the appliance to an earthed wall
socket. Always make sure that the plug is inserted
rmly into the wall socket.
• Do not use the appliance if the plug, the mains
cord, the body of the appliance or the bread pan is
damaged.
• Make sure that the heating element, the rotating
shaft of the bread pan and the outside of the bread
pan are clean and dry before you put the plug in the
wall socket.
• Do not use the appliance for any other purpose
than described in this manual.
• Do not plug in the appliance or operate the control
panel with wet hands.
• Do not come near the steam and air vents with
your face or hands when the appliance is operating.
• Do not open the lid during the baking process, as
this may cause the dough or bread to collapse.
• During the baking process, the appliance itself and
the lid become extremely hot. Be careful not to
burn yourself.
• Do not remove the bread pan from the appliance
during use.
• Never use any utensils to mix the ingredients in the
bread pan during a baking program.
• Only put ingredients in the bread pan. Do not put
or spill any ingredients and/or additives in the inside
of the appliance to avoid damage to the heating
element.
• When you remove jam from the bread pan, lift the
bread pan with both hands in oven mitts to pour
out the hot jam.
Caution
• This appliance is intended for household use only. If
the appliance is used improperly or for professional
or semi-professional purposes or if it is not used
according to the instructions in the user manual, the
guarantee becomes invalid and Philips refuses any
liability for damage caused.
• Never use any accessories or parts from other
manufacturers or that Philips does not specically
recommend. If you use such accessories or parts,
your guarantee becomes invalid.
• Do not touch the bread pan with sharp utensils to
avoid damage.
• Do not expose the appliance to high temperatures,
nor place it on a working or still hot stove or
cooker.
• Always place the appliance on a stable, level and
horizontal surface.
• Always put the bread pan in the appliance before
you put the plug in the wall socket and switch on
the appliance.
• Always unplug the appliance after use.
• Always let the appliance cool down before you
clean or move it.
• Do not place the bread pan in a conventional oven
to bake bread.
• The accessible surfaces may become hot when the
appliance is operating. Always use oven mitts when
you lift the bread pan by its handle or when you
handle the hot bread pan, the kneading blade or the
hot bread.
• Beware of the hot steam that comes out of the
steam vents during baking or out of the breadmaker
when you open the lid during or after the baking
process.
• If you keep the button pressed, the time increases more quickly.
• If the time on the display reaches 13 hours and you still keep the timer button
pressed, the display goes back to the baking time of the set program.
4 Press (start/stop/cancel button).
» The timer counts down the set time in minutes.
» The bread is ready when the timer has counted down to 0:00 and the
breadmaker beeps.
Finishthebakingprocess
Caution
• The inside of the breadmaker, the bread pan, the kneading blade and the bread are very hot.
• Always use oven mitts when you remove the bread pan at the end of the baking cycle or at
any time during the keep-warm mode.
1 To power off the breadmaker, remove the mains plug from the wall socket.
2 Using pot holders or oven mitts, open the lid and turn the bread pan anticlockwise.
3 Grab the bread pan by its handle and lift it out.
4 Turn the pan upside down, hold the handle and shake the bread out.
Note
• Do not use metal utensils to remove the bread, as these may damage the non-stick coating of
the bread pan.
• Be careful, the bread pan and the bread are hot.
5 Use the hook supplied to remove the kneading blade from the shaft/bread.
• Always make sure that the kneading blade does not stay inside the bread,
otherwise you may damage the kneading blade when you slice the bread.
6 Let the breadmaker cool down before you clean it.
MakingYoghurt(HD9046only)
Note
• Ensure the yogurt container is thoroughly washed with warm water and soap, and it is
dried before making yoghurt.
• Full fat, skim, or 2% milk can be used.
• Make sure the yoghurt is fresh and thus the culture starter is active.
1 The milk and yoghurt mixture proportion is 10:1 (For example: 400ml milk with 40ml
yoghurt).
2 Pour milk into the yoghurt container.
3 Add yoghurt into the yoghurt container, and mix well.
4 Close and tighten the lid.
5 Start the yoghurt program.
» Yoghurt will be ready in 8 hours.
5 CleaningandMaintenance
Note
• Uplug the breadmaker before starting to clean it.
• Wait until the breadmaker has cooled down sufciently before cleaning it.
• Never immerse the appliance in water or any other liquid, nor rinse it under the tap.
• Never use scouring pads, abrasive cleaning agents or aggressive liquids such as petrol or
acetone to clean the appliance.
• For maximum safety, keep the appliance clean and free of grease and food residues.
Interior
Inside of the cover and the main body:
• Wipe with wrung out and damp cloth.
• Make sure to remove all the food residues stuck to the breadmaker.
Heating element:
• Wipe with wrung out and damp cloth.
• Remove sfood residues with wrung out and damp cloth or toothpicks.
Exterior
Surface of the cover lid and outside of the main body:
• Wipe with a cloth damped with soap water.
• ONLY use soft and dry cloth to wipe the control panel.
• Make sure to remove all the food residues around the control buttons.
Accessories
Bread pan:
• Clean the bread pan with a soft cloth moistened with hot water or washing-up
liquid.
• Do not immerse the bread pan in water and do not clean it in the dishwasher.
Kneading blade, measuring spoon and cup, and hook:
• Soak in hot water and clean with sponge.
Yoghurt container with lid:
• Thoroughly washed with warm water and soap.
• Make sure it is dried before use.
Tip
• After baking, immediately remove the kneading blade from the bread pan to prevent it from
getting stuck.
1/2
1
8
6
1
2
10
11
12
9
2
BEEP
1
7
1 2
7
5
8
4
1 2
3
1
2
2
Y
O
G
H
T
U
R
T
11
6
2
BEEP
1
6
X9
X10
X11
X4
X6
X2
X3
X7
X5
X1
X12
X13
X8
HD9045 HD9046
X8
HD9045/HD9046
1
2
2
4
5
2
1
7
7
3
(HD9046 only)
HD9046
HD9045
©2017KoninklijkePhilipsN.V.
Allrightsreserved.
3140 035 30605
HD9045
HD9046
Условияхранения/Сақтау
шарттары
Условияэксплуатации/
пайдаланушарттары
Температура/Температура -20°C ~+60 °C +10°C ÷ +40°C
Относительная
влажность/ Салыстырмалы
ылғалдылық
20% ÷ 95% 20% ÷ 90%
Атмосферное давление/
Атмосфералық қысым
98 ÷ 102 kPa 98 ÷ 102 kPa