Support for MVH-X460UI | Pioneer
- Главная
- Продукция
- Автомобильные ресиверы
- Support for MVH-X460UI
Support for MVH-X460UI
Автомобильный бездисковый ресивер с RDS-тюнером, USB, AUX, RGB-подсветкой и поддержкой iPod/iPhone

- Программное обеспечение
- Назад к обзору
Программное обеспечение
Для данного продукта нет файлов, доступных для загрузки
Руководства
Найти продукт

Данная инструкция на русском языке предназначена для автомагнитолы
Pioneer MVH-X460UI, описывает принцип работы и основные моменты эксплуатации устройства.
Производитель настойчиво рекомендует перед включением автомагнитолы
внимательно изучить настоящую инструкцию.
Инструкция для автомагнитолы
представлена в формате PDF. Все современные браузеры уже поддерживают данный формат и сложностей с открытием файла возникнуть не должно.
Но если открыть инструкцию все же не удается, то необходимо установить на компьютер программу для чтения PDF файлов, например, Acrobat Reader. Если у вас возникли сложности с открытием инструкции на смартфоне под управлением Android, нужно установить, например, Adobe Acrobat Reader.
Комментарии (0)
Комментарии про другие Автомагнитолы
Другие Автомагнитолы Pioneer
Инструкция и руководство для
Pioneer MVH-X460UI  на русском на английском


40 страниц подробных инструкций и пользовательских руководств по эксплуатации
 22:23
22:23
Выбираем магнитолу Pioneer — 3 часть
 09:15
09:15
Видеообзор Pioneer MVH-X460UI
 04:19
04:19
Автомагнитола Pioneer MVH-X460UI Поддержка iPhone | Android avtozvuk.ua
 08:02
08:02
Автомагнитола Pioneer MVH-X460UI
 07:28
07:28
Обзор магнитолы Pioneer MVH-X460UI
 05:59
05:59
Обзор pioneer mvh-x460ui
 04:00
04:00
Автомагнитола Pioneer MVH-X460UI Поддержка iPhone | Android

Black plate (2,1)
Thank you for purchasing this PIONEER
product
To ensure proper use, please read through this
manual before using this product. It is especially
important that you read and observe WARN-
INGs and CAUTIONs in this manual. Please
keep the manual in a safe and accessible place for
future reference.
Information for users on
collection and disposal of old
equipment and used batteries
(Symbol for equipment)
(Symbol examples for batteries)
These symbols on the products, packaging,
and/or accompanying documents mean that
used electrical and electronic products and
batteries should not be mixed with general
household waste.
For proper treatment, recovery and recy-
cling of old products and used batteries,
please take them to applicable collection
points in accordance with your national
legislation.
By disposing of these products and batteries
correctly, you will help to save valuable resour-
ces and prevent any potential negative effects
on human health and the environment which
could otherwise arise from inappropriate waste
handling.
For more information about collection and recy-
cling of old products and batteries, please con-
tact your local municipality, your waste disposal
service or the point of sale where you purchased
the items.
These symbols are only valid in the Euro-
pean Union.
For countries outside the
European Union:
If you wish to discard these items, please con-
tact your local authorities or dealer and ask for
the correct method of disposal.
About this unit
The tuner frequencies on this unit are allocated
for use in Western Europe, Asia, the Middle
East, Africa and Oceania. Use in other areas
may result in poor reception. The RDS (radio
data system) function only works in areas that
broadcast RDS signals for FM stations.
WARNING
! Do not attempt to install or service this
product by yourself. Installation or serv-
icing of this product by persons without
training and experience in electronic
equipment and automotive accessories
may be dangerous and could expose you
to the risk of electric shock, injury or
other hazards.
! Do not attempt to operate the unit while driv-
ing. Make sure to pull off the road and park
your vehicle in a safe location before at-
tempting to use the controls on the device.
CAUTION
! Do not allow this unit to come into contact
with liquids. Electrical shock could result.
Also, damage to this unit, smoke, and over-
heating could result from contact with
liquids.
! The Pioneer CarStereo-Pass is for use only in
Germany.
! Always keep the volume low enough to hear
outside sounds.
! Avoid exposure to moisture.
If you experience problems
Should this unit fail to work properly, please con-
tact your dealer or nearest authorized PIONEER
Service Station.
Before you start
2
Section
Before you start
En
01
<QRD3244-A>2

Black plate (3,1)
Head unit
5
9
1 23 4
6
8
7
b
a
1
SRC/OFF
2
LEVER
3
MULTI-CONTROL (M.C.)
4
(list)
5
APP
6
BAND/
(iPod control)
7
(back)/
DIMMER (dimmer)
8
MIX (MIXTRAX)
9
1/
to
6/
a
DISP
b
Detach button
Remote control
c
j
h
1
6
d
g
f
i
e
c
VOLUME
Press to increase or decrease volume.
d
MUTE
Press to mute. Press again to unmute.
e
a/b/c/d
Press to perform manual seek tuning, fast
forward, reverse and track search controls.
Also used for controlling functions.
f
AUDIO
Press to select an audio function.
g
DISP/SCRL
Press to select different displays.
Press and hold to turn dimmer on or off.
h
f
Press to pause or resume playback.
i
FUNCTION
Press to select functions.
j
LIST/ENTER
Press to display the list depending on the
source.
While in the operating menu, press to con-
trol functions.
Display indication
1
7
b
9
6
8
a
5
4
2
3
1
Main information section
! Tuner: band and frequency
! RDS: program service name, PTY infor-
mation and other literal information
! USB storage device and iPod: elapsed
playback time and text information
2
Appears when a lower tier of folder or menu
exists.
3
(list)
4
Sub information section
5
LOC (local seek tuning)
6
TP (traffic program identification)
7
TA (traffic announcements)
8
(sound retriever)
9
(random/shuffle)
a
(repeat)
b
(iPod control)
This unit
’s iPod function is operated from
your iPod.
Set up menu
1
After installation of this unit, turn the
ignition switch to ON.
SET UP appears.
2
Turn M.C. to switch to YES.
# If you do not use the unit for 30 seconds, the set
up menu will not be displayed.
# If you prefer not to set up at this time, turn M.C.
to switch to
NO.
3
Press M.C. to select.
4
Follow these steps to set the menu.
To proceed to the next menu option, you need to
confirm your selection.
LANGUAGE (multi-language)
This unit can display the text information from a
compressed audio file even for information em-
bedded in English, Russian or Turkish.
! If the embedded language and the selected
language setting are not the same, text infor-
mation may not display properly.
! Some characters may not be displayed prop-
erly.
1 Turn M.C. to select the desired setting.
РУС (Russian)—TUR (Turkish)—ENG (Eng-
lish)
2 Press M.C. to confirm the selection.
CLOCK SET (setting the clock)
1 Turn M.C. to adjust hour.
2 Press M.C. to select minute.
3 Turn M.C. to adjust minute.
4 Press M.C. to confirm the selection.
FM STEP (FM tuning step)
Use
FM STEP to set FM tuning step options (seek
step settings).
1 Turn M.C. to select the FM tuning step.
100 (100 kHz)
—50 (50 kHz)
2 Press M.C. to confirm the selection.
QUIT appears.
! The manual tuning step is fixed at 50 kHz.
English
Using this unit
3
Section
Using this unit
En
02
<QRD3244-A>3

Basic operations, Use and care of the remote control, Frequently used menu operations
Using this unit
- Изображение
- Текст
Black plate (4,1)
5
To finish your settings, turn M.C. to select
YES.
# If you prefer to change your setting again, turn
M.C. to switch to NO.
6
Press M.C. to select.
Notes
! You can set up the menu options from the
system menu and initial menu. For details
about the settings, refer to System menu on
page 9 and Initial menu on page 10.
! You can cancel set up menu by pressing
SRC/OFF.
Basic operations
Important
! Handle the front panel with care when re-
moving or attaching it.
! Avoid subjecting the front panel to excessive
shock.
! Keep the front panel out of direct sunlight
and high temperatures.
! To avoid damaging the device or vehicle inte-
rior, remove any cables and devices attached
to the front panel before detaching it.
Removing the front panel
1 Press the detach button to release the front
panel.
2 Push the front panel upward (M) and then pull
it toward (
N) you.
3 Always store the detached front panel in a pro-
tective case or bag.
Re-attaching the front panel
1 Slide the front panel to the left.
2 Press the right side of the front panel until it is
firmly seated.
Forcing the front panel into place may result in
damage to the front panel or head unit.
Turning the unit on
1 Press SRC/OFF to turn the unit on.
Turning the unit off
1 Press and hold SRC/OFF until the unit turns
off.
Selecting a source
1 Press SRC/OFF to cycle between:
RADIO
—USB/iPod—APP (application)—AUX
! USB MTP displays while the MTP connection
is in use.
! When there is an iPod connected and a source
other than
APP is selected, you can switch to
APP by pressing APP.
Adjusting the volume
1 Turn M.C. to adjust the volume.
Note
When this unit
’s blue/white lead is connected to
the vehicle
’s auto-antenna relay control termi-
nal, the vehicle
’s antenna extends when this
unit
’s source is turned on. To retract the anten-
na, turn the source off.
Use and care of the remote
control
Using the remote control
1 Point the remote control in the direction of the
front panel to operate.
When using for the first time, pull out the film
protruding from the tray.
Replacing the battery
1 Slide the tray out on the back of the remote
control.
2 Insert the battery with the plus (+) and minus
(
–) poles aligned properly.
WARNING
! Keep the battery out of the reach of children.
Should the battery be swallowed, consult a
doctor immediately.
! Batteries (battery pack or batteries installed)
must not be exposed to excessive heat such
as sunshine, fire or the like.
CAUTION
! Remove the battery if the remote control is
not used for a month or longer.
! There is a danger of explosion if the battery is
incorrectly replaced. Replace only with the
same or equivalent type.
! Do not handle the battery with metallic tools.
! Do not store the battery with metallic ob-
jects.
! If the battery leaks, wipe the remote control
completely clean and install a new battery.
! When disposing of used batteries, comply
with governmental regulations or environ-
mental public institutions
’ rules that apply in
your country/area.
Important
! Do not store the remote control in high tem-
peratures or direct sunlight.
! The remote control may not function properly
in direct sunlight.
! Do not let the remote control fall onto the
floor, where it may become jammed under
the brake or accelerator pedal.
Frequently used menu
operations
Returning to the previous display
Returning to the previous list (the folder one level
higher)
1 Press
/
DIMMER.
Returning to the ordinary display
Canceling the main menu
1 Press BAND/ .
Returning to the ordinary display from the list
1 Press BAND/ .
Using this unit
4
Section
Using this unit
En
02
<QRD3244-A>4

Black plate (5,1)
Radio
Basic operations
Selecting a band
1 Press BAND/ until the desired band (FM1,
FM2,FM3 for FM or MW/LW) is displayed.
Switching preset stations
1 Turn LEVER.
! Select PCH (preset channel) under SEEK to
use this function.
Manual tuning (step by step)
1 Turn LEVER.
! Select MAN (manual tuning) under SEEK to
use this function.
Seeking
1 Turn and hold down LEVER.
! While turning and holding down LEVER, you
can skip stations. Seek tuning starts as soon
as you release
LEVER.
Notes
! For details about SEEK, refer to SEEK (LEVER
tuning setting) on page 5.
! This unit’s AF (alternative frequencies
search) function can be turned on and off.
AF should be off for normal tuning operation
(refer to
AF (alternative frequencies search)
on page 5).
Storing and recalling stations
for each band
Using preset tuning buttons
1
To store: Press and hold down one of the
preset tuning buttons (1/
to 6/
) until
the number stops flashing.
2
To recall: Press one of the preset tuning
buttons (1/
to 6/
).
Switching the display
Selecting the desired text information
1 Press DISP to cycle between the following:
! FREQUENCY (program service name or
frequency)
! BRDCST INFO (program service name/PTY
information)
! CLOCK (source name and clock)
Notes
! If the program service name cannot be ac-
quired in
FREQUENCY, the broadcast fre-
quency is displayed instead. If the program
service name is detected, the program serv-
ice name will be displayed.
! Depending on the band, text information can
be changed.
! Text information items that can be changed
depend on the area.
Using PTY functions
You can tune in to a station using PTY (program
type) information.
Searching for an RDS station by PTY information
1 Press
(list).
2 Turn M.C. to select a program type.
NEWS/INFO
—POPULAR—CLASSICS—
OTHERS
3 Press M.C. to begin the search.
The unit searches for a station broadcasting
that type of program. When a station is found,
its program service name is displayed.
! To cancel the search, press M.C. again.
! The program of some stations may differ
from that indicated by the transmitted PTY.
! If no station is broadcasting the type of
program you searched for,
NOT FOUND is
displayed for about two seconds and then
the tuner returns to the original station.
PTY list
For more details about PTY list, visit the follow-
ing site:
http://www.pioneer.eu/eur/products/25/121/tech/
CarAudio/PTY.html
Function settings
1
Press M.C. to display the main menu.
2
Turn M.C. to change the menu option
and press to select FUNCTION.
3
Turn M.C. to select the function.
Once selected, the following functions can be
adjusted.
# If MW/LW band is selected, only BSM, LOCAL
and
SEEK are available.
BSM (best stations memory)
BSM (best stations memory) automatically stores
the six strongest stations in the order of their sig-
nal strength.
1 Press M.C. to turn BSM on.
To cancel, press
M.C. again.
REGIONAL (regional)
When AF is used, the regional function limits the
selection of stations to those broadcasting region-
al programs.
1 Press M.C. to turn the regional function on or
off.
LOCAL (local seek tuning)
Local seek tuning allows you to tune in to only
those radio stations with sufficiently strong sig-
nals for good reception.
1 Press M.C. to select the desired setting.
FM:
OFF
—LV1—LV2—LV3—LV4
MW/LW:
OFF
—LV1—LV2
The highest level setting allows reception of
only the strongest stations, while lower levels
allow the reception of weaker stations.
TA (traffic announcement standby)
1 Press M.C. to turn traffic announcement
standby on or off.
AF (alternative frequencies search)
1 Press M.C. to turn AF on or off.
NEWS (news program interruption)
1 Press M.C. to turn the NEWS function on or
off.
SEEK (LEVER tuning setting)
You can assign a function to the
LEVER on the
unit.
Select
MAN (manual tuning) to tune up or down
manually or select
PCH (preset channel) to switch
between preset channels.
1 Press M.C. to select MAN or PCH.
USB storage device
MTP connection
MTP-compatible Android devices (running
Android OS 4.0 or higher) can be connected by
MTP connection using the USB source. To con-
nect an Android device, use the cable that came
with the device.
Notes
! This function is not compatible with
MIXTRAX.
! This function is not compatible with WAV.
English
Using this unit
5
Section
Using this unit
En
02
<QRD3244-A>5

Black plate (6,1)
Basic operations
Playing songs on a USB storage device
1 Plug in the USB storage device using the USB
cable.
Stopping playback of files on a USB storage de-
vice
1 Disconnect the USB storage device.
Selecting a folder
1 Press 1/ or 2/ .
Selecting a track
1 Turn LEVER.
Fast forwarding or reversing
1 Turn and hold down LEVER to the right or left.
! When playing compressed audio, there is no
sound during fast forward or reverse.
Returning to root folder
1 Press and hold BAND/ .
Switching between playback memory devices
You can switch between playback memory devices
on USB storage devices with more than one Mass
Storage Device-compatible memory device.
1 Press BAND/ .
! You can switch between up to 32 different
memory devices.
Note
Disconnect USB storage devices from the unit
when not in use.
Operations using the MIXTRAX
button
Turning MIXTRAX on or off
You cannot use this function with
USB MTP.
1 Press MIX to turn MIXTRAX on or off.
! For more details about MIXTRAX, refer to
About MIXTRAX on page 10.
! When MIXTRAX is in use, the sound retriever
function is disabled.
Switching the display
Selecting the desired text information
1 Press DISP to cycle between the following:
MP3/WMA/WAV
! TRACK INFO (track title/artist name/album
title)
! FILE INFO (file name/folder name)
! ELAPSED TIME (track number and play-
back time)
! CLOCK (source name and clock)
! SPEANA (spectrum analyzer)
Selecting and playing files/
tracks from the name list
1
Press
to switch to the file/track name
list mode.
2
Use M.C. to select the desired file name
(or folder name).
Selecting a file or folder
1 Turn M.C.
Playing
1 When a file or track is selected, press M.C.
Viewing a list of the files (or folders) in the se-
lected folder
1 When a folder is selected, press M.C.
Playing a song in the selected folder
1 When a folder is selected, press and hold M.C.
Operations using special buttons
Selecting a repeat play range
1 Press 6/
to cycle between the following:
! ALL – Repeat all files
! ONE – Repeat the current file
! FLD – Repeat the current folder
Playing tracks in random order
1 Press 5/
to turn random play on or off.
Tracks in a selected repeat range are played in
random order.
! To change songs during random play, turn
LEVER to the right to switch to the next track.
Turn
LEVER to the left to restart playback of
the current track from the beginning of the
song.
Pausing playback
1 Press 4/f to pause or resume.
Enhancing compressed audio and restoring rich
sound (sound retriever)
1 Press 3/S.Rtrv to cycle between:
1
—2—OFF (off)
1 is effective for low compression rates, and 2
is effective for high compression rates.
! Key operation is disabled when MIXTRAX is
on.
Function settings
1
Press M.C. to display the main menu.
2
Turn M.C. to change the menu option
and press to select FUNCTION.
Once selected, the function below can be ad-
justed.
! S.RTRV is not available when MIXTRAX is
turned on.
S.RTRV (sound retriever)
Automatically enhances compressed audio and
restores rich sound.
1 Press M.C. to select the desired setting.
For details, refer to Enhancing compressed
audio and restoring rich sound (sound retriever)
on page 6.
iPod
Basic operations
Playing songs on an iPod
1 Connect an iPod to the USB cable.
Selecting a song (chapter)
1 Turn LEVER.
Fast forwarding or reversing
1 Turn and hold down LEVER to the right or left.
Selecting an album
1 Press 1/ or 2/ .
Notes
! The iPod cannot be turned on or off when the
control mode is set to
CONTROL AUDIO.
! Disconnect headphones from the iPod be-
fore connecting it to this unit.
! The iPod will turn off about two minutes after
the ignition is switched off.
Operations using the MIXTRAX
button
Turning MIXTRAX on or off
1 Press MIX to turn MIXTRAX on or off.
! For more details about MIXTRAX, refer to
About MIXTRAX on page 10.
Using this unit
6
Section
Using this unit
En
02
<QRD3244-A>6

Black plate (7,1)
Switching the display
Selecting the desired text information
1 Press DISP to cycle between the following:
! TRACK INFO (track title/artist name/album
title)
! ELAPSED TIME (track number and play-
back time)
! CLOCK (source name and clock)
! SPEANA (spectrum analyzer)
Browsing for a song
1
Press
to switch to the top menu of list
search.
2
Use M.C. to select a category/song.
Changing the name of the song or category
1 Turn M.C.
Playlists
—artists—albums—songs—podcasts
—genres—composers—audiobooks
Playing
1 When a song is selected, press M.C.
Viewing a list of songs in the selected category
1 When a category is selected, press M.C.
Playing a song in the selected category
1 When a category is selected, press and hold
M.C.
Searching the list by alphabet
1 When a list for the selected category is dis-
played, press
to switch to alphabet search
mode.
2 Turn M.C. to select a letter.
3 Press M.C. to display the alphabetical list.
! To cancel searching, press
/
DIMMER.
Notes
! You can play playlists created with the com-
puter application (MusicSphere). The appli-
cation will be available on our website.
! Playlists that you created with the computer
application (MusicSphere) are displayed in
abbreviated form.
Operations using special buttons
Selecting a repeat play range
1 Press 6/
to cycle between the following:
! ONE – Repeat the current song
! ALL – Repeat all songs in the selected list
! When the control mode is set to CONTROL
iPod, the repeat play range will be same as
what is set for the connected iPod.
Selecting a random play range (shuffle)
1 Press 5/
to cycle between the following:
! SNG – Play back songs in the selected list
in random order.
! ALB – Play back songs from a randomly se-
lected album in order.
! OFF – Not play back in random order.
Playing all songs in random order (shuffle all)
1 Press and hold 5/
to turn shuffle all on.
! To turn off shuffle all, select OFF in shuffle. For
details, refer to Selecting a random play range
(shuffle) on page 7.
Pausing playback
1 Press 4/f to pause or resume.
Enhancing compressed audio and restoring rich
sound (sound retriever)
1 Press 3/S.Rtrv to cycle between:
1
—2—OFF (off)
1 is effective for low compression rates, and 2
is effective for high compression rates.
Playing songs related to the
currently playing song
You can play songs from the following lists.
• Album list of the currently playing artist
• Song list of the currently playing album
• Album list of the currently playing genre
1
Press and hold
to switch to link play
mode.
2
Turn M.C. to change the mode; press to
select.
! ARTIST – Plays an album by the artist cur-
rently playing.
! ALBUM – Plays a song from the album cur-
rently being played.
! GENRE – Plays an album from the genre cur-
rently being played.
The selected song/album will be played after the
currently playing song.
Notes
! The selected song/album may be canceled if
you use functions other than link search (e.g.
fast forward and reverse).
! Depending on the song selected to play, the
end of the currently playing song and the be-
ginning of the selected song/album may be
cut off.
Using this unit
’s iPod function
from your iPod
This unit
’s iPod function can be controlled by
using the connected iPod.
CONTROL iPod is not compatible with the fol-
lowing iPod models.
! iPod nano 1st generation
! iPod with video
% Press BAND/ to switch the control
mode.
! CONTROL iPod – This unit’s iPod function
can be operated from the connected iPod.
! CONTROL AUDIO – This unit’s iPod function
can be controlled by using this unit.
Notes
! Switching the control mode to
CONTROL iPod pauses song playback. Use
the iPod to resume playback.
! The following operations are still accessible
from the unit even if the control mode is set
to
CONTROL iPod.
— Pausing
— Fast forward/reverse
— Selecting a song (chapter)
! The volume can only be adjusted from this
unit.
Function settings
1
Press M.C. to display the main menu.
2
Turn M.C. to change the menu option
and press to select FUNCTION.
3
Turn M.C. to select the function.
Once selected, the following functions can be
adjusted.
! AUDIO BOOK is not available when
CONTROL iPod is selected in the control
mode. For details, refer to Using this unit
’s
iPod function from your iPod on page 7.
AUDIO BOOK (audiobook speed)
1 Press M.C. to display the setting mode.
2 Turn M.C. to select your favorite setting.
! FASTER – Playback at a speed faster than
normal
! NORMAL – Playback at normal speed
! SLOWER – Playback at a speed slower
than normal
S.RTRV (sound retriever)
1 Press M.C. to select the desired setting.
For details, refer to Enhancing compressed
audio and restoring rich sound (sound retriever)
on page 7.
English
Using this unit
7
Section
Using this unit
En
02
<QRD3244-A>7

Using connected device applications, Audio adjustments, Using this unit
Страница 8
- Изображение
- Текст
Black plate (8,1)
Using connected device
applications
You can use this unit to perform streaming play-
back of and control tracks in iPhone applica-
tions or just for streaming playback.
Important
Use of third party apps may involve or require
the provision of personally identifiable infor-
mation, whether through the creation of a
user account or otherwise, and for certain ap-
plications, the provision of geolocation data.
ALL THIRD PARTY APPS ARE THE SOLE RE-
SPONSIBILITY OF THE PROVIDERS, INCLUD-
ING WITHOUT LIMITATION COLLECTION AND
SECURITY OF USER DATA AND PRIVACY
PRACTICES. BY ACCESSING THIRD PARTY
APPS, YOU AGREE TO REVIEW THE TERMS
OF SERVICE AND PRIVACY POLICIES OF THE
PROVIDERS. IF YOU DO NOT AGREE WITH
THE TERMS OR POLICIES OF ANY PROVIDER
OR DO NOT CONSENT TO THE USE OF GEO-
LOCATION DATA WHERE APPLICABLE, DO
NOT USE THAT THIRD PARTY APP.
Information for compatibility of
connected devices
The following is the detailed information regard-
ing the terminals required to use the application
for iPhone on this unit.
For iPhone users
! This function is compatible with iPhone and
iPod touch.
! The device has iOS 5.0 or higher.
Notes
! Please check our website for a list of sup-
ported iPhone applications for this unit.
! Pioneer is not liable for any issues that may
arise from incorrect or flawed app-based
content.
! The content and functionality of the sup-
ported applications are the responsibility of
the App providers.
Starting procedure for iPhone users
1
Connect an iPhone to USB cable.
2
Switch the source to APP.
3
Start up the application on the iPhone
and initiate playback.
Basic operations
Selecting a track
1 Turn LEVER.
Fast forwarding or reversing
1 Turn and hold down LEVER to the right or left.
Pausing playback
1 Press BAND/ to pause or resume.
Switching the display
Selecting the desired text information
1 Press DISP to cycle between the following:
! TRACK INFO (track title/artist name/album
title)
! APP NAME (application name)
! ELAPSED TIME (playback time)
! CLOCK (source name and clock)
! SPEANA (spectrum analyzer)
Function settings
1
Press M.C. to display the main menu.
2
Turn M.C. to change the menu option
and press to select FUNCTION.
3
Turn M.C. to select the function.
Once selected, the following functions can be
adjusted.
PAUSE (pause)
1 Press M.C. to pause or resume.
S.RTRV (sound retriever)
1 Press M.C. to select the desired setting.
1
—2—OFF (off)
1 is effective for low compression rates, and 2
is effective for high compression rates.
Audio adjustments
1
Press M.C. to display the main menu.
2
Turn M.C. to change the menu option
and press to select AUDIO.
3
Turn M.C. to select the audio function.
Once selected, the following audio functions
can be adjusted.
! FADER is not available when SUB.W/SUB.W
is selected in
SP-P/O MODE. For details, refer
to
SP-P/O MODE (rear output and preout set-
ting) on page 11.
! SUB.W and SUB.W CTRL are not available
when
REAR/REAR is selected in
SP-P/O MODE. For details, refer to
SP-P/O MODE (rear output and preout set-
ting) on page 11.
! SUB.W CTRL is not available when SUB.W is
selected in
OFF. For details, refer to SUB.W
(subwoofer on/off setting) on page 8.
! SLA is not available when FM is selected as
the source.
FADER (fader adjustment)
1 Press M.C. to display the setting mode.
2 Turn M.C. to adjust the front/rear speaker bal-
ance.
BALANCE (balance adjustment)
1 Press M.C. to display the setting mode.
2 Turn M.C. to adjust the left/right speaker bal-
ance.
EQ SETTING (equalizer recall)
1 Press M.C. to display the setting mode.
2 Turn M.C. to select the equalizer.
POWERFUL
—NATURAL—VOCAL—CUS-
TOM1
—CUSTOM2—FLAT—SUPER BASS
The equalizer band and equalizer level can be
customized when
CUSTOM1 or CUSTOM2 is
selected.
If selecting
CUSTOM1 or CUSTOM2, complete
the procedures outlined below. If selecting
other options, press
M.C. to return to the pre-
vious display.
! CUSTOM1 can be set separately for each
source. However,
USB, iPod and APP are
all set to the same setting automatically.
! CUSTOM2 is a shared setting used in com-
mon for all sources.
3 Press M.C. to display the setting mode.
4 Press M.C. to cycle between the following:
Equalizer band
—Equalizer level
5 Turn M.C. to select the desired setting.
Equalizer band:
80HZ
—250HZ—800HZ—
2.5KHZ
—8KHZ
Equalizer level:
+6 to
–6
LOUDNESS (loudness)
Loudness compensates for deficiencies in the low-
frequency and high-frequency ranges at low vol-
ume.
1 Press M.C. to select the desired setting.
OFF (off)
—LOW (low)—MID (mid)—HI (high)
SUB.W (subwoofer on/off setting)
Using this unit
8
Section
Using this unit
En
02
<QRD3244-A>8

System menu, Selecting the illumination color, Using this unit
Страница 9
- Изображение
- Текст
Black plate (9,1)
This unit is equipped with a subwoofer output
which can be turned on or off.
1 Press M.C. to select the desired setting.
NOR (normal phase)
—REV (reverse phase)—
OFF (subwoofer off)
SUB.W CTRL (subwoofer adjustment)
Only frequencies lower than those in the selected
range are outputted from the subwoofer.
1 Press M.C. to display the setting mode.
2 Press M.C. to cycle between the following:
Cut-off frequency
—Output level—Slope level
Rates that can be adjusted will flash.
3 Turn M.C. to select the desired setting.
Cut-off frequency:
50HZ
—63HZ—80HZ—
100HZ
—125HZ—160HZ—200HZ
Output level:
–24 to +6
Slope level:
–12— –24
BASS BOOST (bass boost)
1 Press M.C. to display the setting mode.
2 Turn M.C. to select a desired level.
0 to +6 is displayed as the level is increased or
decreased.
HPF SETTING (high pass filter adjustment)
Use this function when wanting to listen only to
high-frequency sounds. Only frequencies higher
than the high-pass filter (HPF) cutoff are output
from the speakers.
1 Press M.C. to display the setting mode.
2 Press M.C. to cycle between the following:
Cut-off frequency
—Slope level
3 Turn M.C. to select the desired setting.
Cut-off frequency:
OFF
—50HZ—63HZ—80HZ
—100HZ—125HZ—160HZ—200HZ
Slope level:
–12— –24
SLA (source level adjustment)
This function prevents the volume from changing
too dramatically when the source switches.
! Settings are based on the FM volume level,
which remains unchanged.
! The MW/LW volume level can also be adjusted
with this function.
! USB, iPod and APP are all set to the same set-
ting automatically.
1 Press M.C. to display the setting mode.
2 Turn M.C. to adjust the source volume.
Adjustment range:
+4 to
–4
System menu
Important
PW SAVE (power saving) is canceled if the ve-
hicle battery is disconnected and will need to be
turned back on once the battery is reconnected.
When
PW SAVE (power saving) is off, depend-
ing on connection methods, the unit may con-
tinue to draw power from the battery if your
vehicle
’s ignition doesn’t have an ACC (acces-
sory) position.
1
Press M.C. to display the main menu.
2
Turn M.C. to change the menu option
and press to select SYSTEM.
3
Turn M.C. to select the system menu
function.
Once selected, the following system menu func-
tions can be adjusted.
LANGUAGE (multi-language)
1 Press M.C. to select the desired setting.
РУС (Russian)—TUR (Turkish)—ENG (Eng-
lish)
CLOCK SET (setting the clock)
1 Press M.C. to display the setting mode.
2 Press M.C. to select the segment of the clock
display you wish to set.
Hour
—Minute
3 Turn M.C. to adjust the clock.
12H/24H (time notation)
1 Press M.C. to select the desired setting.
12H (12-hour clock)
—24H (24-hour clock)
INFO DISPLAY (sub information)
The type of text information displayed in the sub
information section can be toggled.
1 Press M.C. to display the setting mode.
2 Turn M.C. to select the desired setting.
SPEANA
—LEVEL METER—SOURCE—CLOCK
—OFF
! The signal bar indicator displays for SPEANA
or
LEVEL METER when the source is set to
RADIO.
AUTO PI (auto PI seek)
The unit can automatically search for a different
station with the same programming, even during
preset recall.
1 Press M.C. to turn Auto PI seek on or off.
AUX (auxiliary input)
Activate this setting when using an auxiliary de-
vice connected to this unit.
1 Press M.C. to turn AUX on or off.
DIMMER (dimmer)
1 Press M.C. to turn the dimmer on or off.
! You can also change the dimmer setting by
pressing and holding
/
DIMMER.
BRIGHTNESS (brightness adjustment)
You can use this setting to adjust the display
brightness.
The range of settings available for
BRIGHTNESS
will vary depending on whether
DIMMER is on or
off. For details, refer to
DIMMER (dimmer) on page
9.
1 Press M.C. to display the setting mode.
2 Turn M.C. to select the desired setting.
DIMMER on: 1 to 4
DIMMER off: 1 to 5
PW SAVE (power saving)
Switching this function on enables you to reduce
the consumption of battery power.
! Turning on the source is the only operation al-
lowed when this function is on.
1 Press M.C. to turn the power save on or off.
Selecting the illumination color
Illumination function menu
1
Press M.C. to display the main menu.
2
Turn M.C. to display ILLUMI and press to
select.
3
Turn M.C. to select the illumination func-
tion.
Once selected, the following audio functions
can be adjusted.
KEY COLOR (key section color setting)
You can select desired colors for the keys of this
unit.
1 Press M.C. to display the setting mode.
2 Turn M.C. to select the illumination color.
! Preset colors (ranging from WHITE to
BLUE)
! SCAN (cycle through a variety of colors au-
tomatically)
! CUSTOM (customized illumination color)
English
Using this unit
9
Section
Using this unit
En
02
<QRD3244-A>9

Black plate (10,1)
DISP COLOR (display section color setting)
You can select the desired colors for the display of
this unit.
1 Press M.C. to display the setting mode.
2 Turn M.C. to select the illumination color.
! Preset colors (ranging from WHITE to
BLUE)
! SCAN (cycle through a variety of colors au-
tomatically)
! CUSTOM (customized illumination color)
BOTH COLOR (key and display color setting)
You can select the desired colors for the keys and
display of this unit.
1 Press M.C. to display the setting mode.
2 Turn M.C. to select the illumination color.
! Preset colors (ranging from WHITE to
BLUE)
! SCAN (cycle through a variety of colors au-
tomatically)
ILLUMI FX (illumination effect mode)
When this mode is enabled, an illumination effect
with lights that slowly fade in and out in a set pat-
tern will appear on the display and keys to signify
changes.
1 Press M.C. to turn ILLUMI FX on or off.
! The illumination effect will flash momentarily
when the ignition is turned ON/OFF, regardless
of whether the
ILLUMI FX setting is on or off.
Notes
! When CUSTOM is selected, the customized
color saved is selected.
! CUSTOM can be set separately from the
DIMMER on/off setting.
Customizing the illumination color
You can create custom illumination colors for
both
KEY COLOR and DISP COLOR.
1
Press M.C. to display the main menu.
2
Turn M.C. to display ILLUMI and press to
select.
3
Turn M.C. to display KEY COLOR or
DISP COLOR. Press to select.
4
Press M.C. and hold until the customizing
illumination color setting appears in the dis-
play.
5
Press M.C. to select the primary color.
R (red)
—G (green)—B (blue)
6
Turn M.C. to adjust the brightness level.
Adjustment range:
0 to 60
# You cannot select a level below 20 for all three of
R (red), G (green), and B (blue) at the same time.
# You can also perform the same operation on
other colors.
Note
You cannot create a custom illumination color
while
SCAN is selected.
About MIXTRAX
MIXTRAX technology is used to insert a variety
of sound effects in between songs, allowing you
to experience your music as a nonstop mix com-
plete with visual effects.
Notes
! Depending on the file/song, sound effects
may not be available.
! Turn MIXTRAX off if the visual effects it pro-
duces have adverse effects on driving. Refer
to Operations using the MIXTRAX button on
page 6.
MIXTRAX menu
1
Press M.C. to display the main menu.
2
Turn M.C. to change the menu option
and press to select MIXTRAX.
3
Turn M.C. to select the MIXTRAX func-
tion.
Once selected, the following MIXTRAX functions
can be adjusted. The function is enabled when
MIXTRAX is on.
SHORT PLAYBCK (short playback mode)
You can select the length of the playback time.
1 Press M.C. to display the setting mode.
2 Turn M.C. to select the desired setting.
1.0 MIN (1.0 minute)
—1.5 MIN (1.5 minutes)—
2.0 MIN (2.0 minutes)
—2.5 MIN (2.5 minutes)
—3.0 MIN (3.0 minutes)—OFF (off)
FLASH AREA (flash area)
You can select areas for flashing colors.
1 Press M.C. to display the setting mode.
2 Turn M.C. to select the desired setting.
KEY/DISPLAY (key and display)
—KEY (key)—
OFF (off)
! When OFF is selected, the color set under IL-
LUMI is used as the display color.
FLASH PATTERN (flash pattern)
The flashing color and MIXTRAX special effects
display change with changes in the sound and
bass levels.
1 Press M.C. to display the setting mode.
2 Turn M.C. to select the desired setting.
! SOUND LEVEL 1 to SOUND LEVEL 6 – The
flash pattern changes according to the
sound level. Select a desired mode.
! LOW PASS 1 to LOW PASS 6 – The flash
pattern changes according to the bass
level. Select a desired mode.
! RANDOM 1 – The flash pattern changes
randomly according to the sound level
mode and low pass mode.
! RANDOM 2 – The flash pattern changes
randomly according to the sound level
mode.
! RANDOM 3 – The flash pattern changes
randomly according to the low pass mode.
DISPLAY FX (display effect)
The MIXTRAX special effects display can be turned
on or off.
1 Press M.C. to select the desired setting.
ON (MIXTRAX special effects display)
—OFF
(normal display)
CUT IN FX (manual cut-in effect)
You can turn on or off the MIXTRAX sound effects
while manually changing tracks.
1 Press M.C. to select the desired setting.
ON (on)
—OFF (off)
Initial menu
1
Press and hold SRC/OFF until the unit
turns off.
2
Press and hold SRC/OFF until the main
menu appears in the display.
3
Turn M.C. to change the menu option
and press to select INITIAL.
4
Turn M.C. to select the initial menu func-
tion.
Once selected, the following initial menu func-
tions can be adjusted.
FM STEP (FM tuning step)
1 Press M.C. to select the FM tuning step.
100 (100 kHz)
—50 (50 kHz)
Using this unit
10
Section
Using this unit
En
02
<QRD3244-A>10

Комментарии
Главная > Головные устройства > Автопроигрыватель Pioneer MVH-X460UI
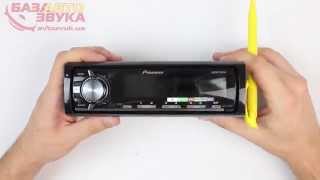
Автопроигрыватель Pioneer MVH-X460UI
Pioneer MVH-X460UI видео-обзор, характеристики и отзывы
| Модель: | Формат: | Размер: | Язык: | Скачать: |
| Pioneer MVH-X460UI USB | 1.54 MB | english русский |
 |
Автомагнитола Pioneer MVH-X460UI характеристики
| Монтажный размер | 1-DIN |
| Тип дисплея | сегментный (1.5 строчный, 12 символьный) |
| Цветность дисплея | монохромный дисплей |
| Цвет подсветки кнопок | голубой, красный и зеленый |
| Защита от кражи | съемная лицевая панель |
| Форматы воспроизведения | MP3, WMA, WAV |
| Функции воспроизведения | воспроизведение в случайном порядке, запоминание последней позиции, повторное воспроизведение, отображение тегов ID3 |
| Максимальная мощность на канал | 50 Вт |
| Количество каналов | 4 канала |
| Свойства аудио | фильтр высоких частот, фильтр низких частот, эквалайзер (5-полосный графический эквалайзер) |
| Тип тюнера | AM, FM |
| Количество в памяти | 24 радио-станции |
| Совместимость | Android, iOS (Apple) |
| Разъемы | RCA, AUX, USB, выход на сабвуфер |
USB автомагнитола Pioneer MVH-X460UI обзор от Автозвук
Магнитола Pioneer MVH-X460UI отзывы покупателей
Преимущества:
- приятный внешний вид, солидный дизайн;
- красивая и яркая настраиваемая подсветка;
- много настроек звука;
- качественная сборка и материалы;
- USB вход на задней панели;
- хорошо воспроизводит басы;
- меню понятное и удобное;
- простая настройка и установка устройства;
- большой и хорошо читаемый дисплей;
- работает с устройствами Эппл;
- быстро читает большие флешки;
- удобный механизм переключения треков;
- грамотно русифицирован дисплей;
- удобный пульт дистанционного управления;
- легкое, маленькое и компактное устройство.
Недостатки:
- мелкие кнопки для переключения радио каналов;
- плохо ловит радиосигнал;
- непонятно написано руководство от производителя;
- на солнце не видно экрана;
- на панели нет кнопки «тихо» при работе радио;
- на холоде подсветка меняет цвет;
- в комплекте нет кабеля USB.
Отзывы владельцев составлены на базе 31 отзыва пользователей в Яндекс Маркет.
Руководство пользователя. Как скачать сервис-мануал?
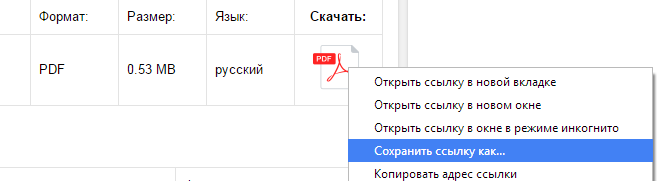
Руководство по эксплуатации легко скачивается, в начале страницы перед Вами будет таблица:

Нажимайте правой кнопкой на изображении PDF, после чего ищите в списке «Сохранить как», далее сохраняете на Вашем ПК магнитола Pioneer MVH-X460UI инструкция на русском языке, например:
И последний шаг, выбираете папку, в которой желаете сохранить автомагнитола Пионер MVH-X460UI инструкция по эксплуатации, например на рабочем столе:
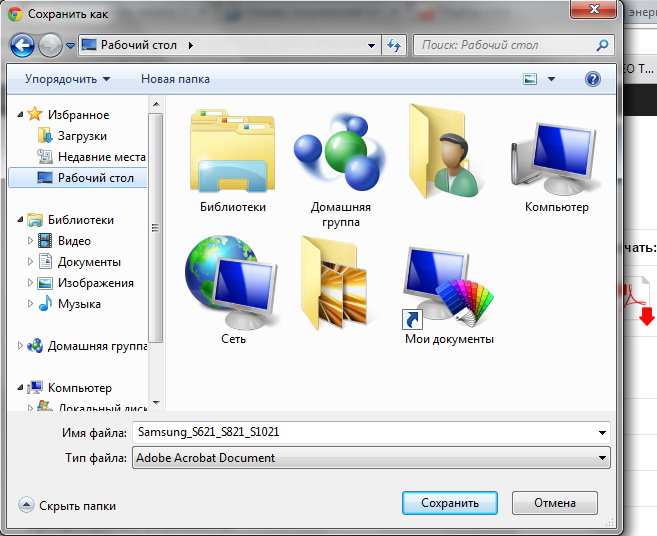
Надеемся, у Вас получилось найти руководство для автопроигрывателя Pioneer, скачать и успешно ею воспользоваться. Желаем Вам приятного пользования Вашим устройством от компании Пионер.

Краткие характеристики
Состояние товара
витринный образец
Состояние упаковки
незначительные повреждения
Функциональность
полностью исправен
Гарантия
согласно гарантии изготовителя
Перейти к характеристикам
![]()
+ 242 бонуса
Варианты получения заказа
Самовывоз из магазина
сегодня, бесплатно
Видеоконсультация по товару
Получите видеообзор и ответы на вопросы по товару в онлайн-режиме от наших продавцов-консультантов.
Описание
Магнитола Pioneer MVH-X460UI – любимая музыка в прекрасном качестве! Pioneer MVH-X460UI подарит глубокое и пространственное звучание. Громкость звука приведет вас в восторг — пиковая мощность составляет 4×50 Вт. Прослушивать песни вы сможете с флешек.
Характеристики
Состав
Радиоприемник
есть, цифровой тюнер
Blu-ray-проигрыватель
нет
Все характеристики
Не является публичной офертой
Информация о товаре носит справочный характер и не является публичной офертой. Характеристики, комплект поставки и внешний вид товара могут отличаться от указанных или быть изменены производителем без предварительного уведомления. Перед покупкой проверяйте информацию на официальном сайте производителя.
Если вы заметили ошибку или неточность в описании товара, пожалуйста, выделите часть текста с ошибкой и нажмите кнопку «Сообщить об ошибке».
4.8
5 звёзд
19
4 звезды
4
3 звезды
1
2 звезды
0
1 звезда
0
Достоинства
Не плохая автомогнитола, соответствует цене и качеству. В комплекте кейс для съёмной панели и пульт управления автомагнитолой. Регулироваемая подсветка, как по цвету (4 цвета) так и по яркости.
Недостатки
Разъём usb и aux находятся с задней стороны магнитолы (мне кажется это не очень удобно)
Комментарий
Соответствует своей цене, надеюсь прослужит долго.
Дмитрий Котов
Достоинства
Много настроек. Есть пульт. Всё заиграло намного эффективней. Снаружи не торчат провода и флешки.
Комментарий
Хорошая магнитола
Любовь
Достоинства
Интерфейс, разная подсветка, выход на дистанционное управление, aux и разъем USB с тыльной стороны.
Недостатки
Переключение трека своеобразное на этой модели, но у меня ду, так что я не переживаю.
Комментарий
Хорошая подсветка, удобный интерфейс. Все отлично, но самое главное, USB с тыльной стороны и флешки ломаться не будут. Пользуюсь почти год, доволен.
Денис
Достоинства
Качественная магнитолла, за относительно не большую сумму.
Недостатки
Не заметил в процессе эксплуатации.
Комментарий
Советую брать тем кто хочет наслаждаться звуком музыки в своем авто.
Холостых Игорь
Достоинства
дизайн, добротная сборка
Недостатки
некрасивое меню
Комментарий
покупке очень рад
Перешивкин Венедикт
Достоинства
простая в использовании и настройке магнитола, воспроизводит все что можно, удобный пульт
Комментарий
отличный звук, с этой магнитолой даже не нужен сабвуфер, радио ловит везде на ура
Все отзывы