- Manuals
- Brands
- Sony Manuals
- Tablet
- Xperia Tablet Z SGP321
- User manual
-
Contents
-
Table of Contents
-
Bookmarks
Quick Links
User guide
Xperia
Tablet Z
™
SGP341
Related Manuals for Sony Xperia Tablet Z SGP321
Summary of Contents for Sony Xperia Tablet Z SGP321
-
Page 1: User Guide
User guide Xperia Tablet Z ™ SGP341…
-
Page 2: Table Of Contents
Contents Xperia™ Tablet Z User guide…………5 Getting started…………….6 Device overview……………..6 Assembly……………….7 Turning the device on and off …………8 Setup guide………………9 Screen lock………………9 Accounts and services……………9 Multiple user accounts…………..10 Getting to know your device…………11 Using the keys……………..11 Battery………………..11 Using the touchscreen…………..14 Using the lock screen…………..16 Home screen………………17 Accessing and using applications………..19…
-
Page 3
Text and multimedia message options……….37 Email…………………38 Getting started with Email…………..38 Using email………………39 «WALKMAN» application ………….41 About the «WALKMAN» application……….41 Transferring media files to your device ………..41 Using the «WALKMAN» application ……….42 Visualiser ………………43 Getting more information about a track or artist……43 Using My music to organise your tracks ……..43 Managing playlists…………….45 «WALKMAN»… -
Page 4
Sharing content with DLNA Certified™ devices……72 Using your device as a remote control……….74 NFC………………..75 Bluetooth® wireless technology…………76 Connecting your device to a computer………..79 Connecting your device to a TV set……….80 Screen mirroring…………….81 Smart Connect……………..81 Synchronising data on your device……….83 About synchronising data on your device……..83 Synchronising your corporate email, calendar and contacts..83 Maps and locations…………..84 About location services…………..84… -
Page 5: Xperia™ Tablet Z User Guide
Xperia™ Tablet Z User guide All illustrations are for illustration purposes only and may not accurately depict the actual device. This is an Internet version of this publication. © Print only for private use.
-
Page 6: Getting Started
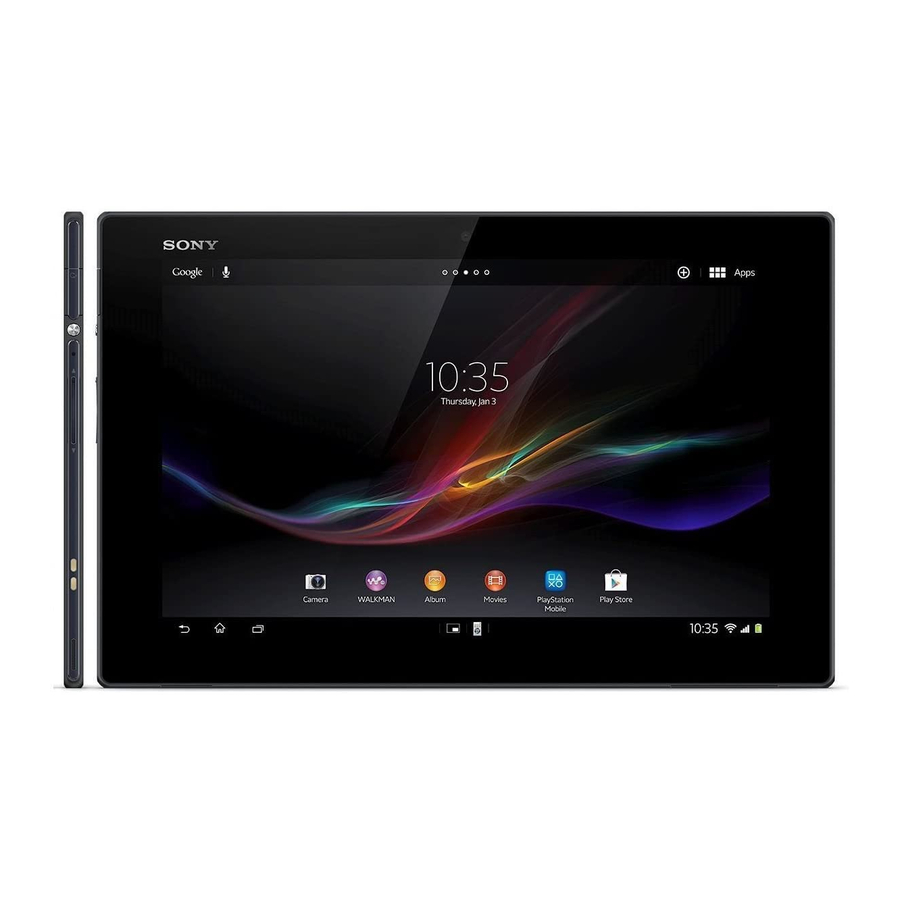
Getting started Device overview Light sensor Front camera Speaker A Speaker B Charging dock connector Volume key Notification light Power key Headset jack 10 Microphone 11 Infrared sensor 12 Main camera 13 Speaker B (same as 4) 14 Port for charger/USB cable 15 Hole for attaching the charger port cover 16 SIM card slot 17 Memory card slot…
-
Page 7: Assembly
Assembly To insert the memory card Do not insert a micro SIM card into the memory card slot. Insert a fingernail into the gap between the memory card cover and the bottom side of the device, then detach the memory card cover. Place the memory card in the memory card slot, with the gold-coloured contacts facing down, then push the memory card all the way into the slot until you hear a locking sound.
-
Page 8: Turning The Device On And Off
Re-attach the micro SIM card slot cover. Inserting the micro SIM card into the device without the SIM card holder could damage your micro SIM card or your device, and Sony does not warrant and will not be responsible for any damage caused by such action.
-
Page 9: Setup Guide
For example, if you have a Sony Entertainment Network account, you can sign in to it and start enjoying music, videos and games from the Sony Entertainment Network on your device. Or you can create a new account directly on your device.
-
Page 10: Multiple User Accounts
® ® Microsoft Exchange ActiveSync account ® ® Synchronise your device with your corporate Microsoft Exchange ActiveSync account. This way, you keep your work email, contacts and calendar events with you at all times. Multiple user accounts Your device supports multiple user accounts so that different users can log in separately to the device and use it.
-
Page 11: Getting To Know Your Device
Getting to know your device Using the keys Back • Go back to the previous screen • Close the on-screen keypad, a dialog box, an options menu, the Notification panel, or an application Home • Go to the Home screen Task •…
-
Page 12
Notes on USB cable usage and battery charging • To charge your device, Sony strongly recommends that you use only Sony branded original batteries, a power supply and the USB cable supplied with your device. The use of third-party products may decrease the performance of your device and/or pose a risk to your health or safety. -
Page 13
Otherwise, your device repeatedly scans for available networks, and this consumes power. • Use a Sony™ original handsfree device to listen to music. Handsfree devices demand less battery power than your device’s own loudspeakers. • Keep your device in standby whenever possible. Standby time refers to the time during which your device is connected to the network and is not being used. -
Page 14: Using The Touchscreen
To change the settings for STAMINA mode From your Home screen, tap Find and tap Settings > Power management. To open the settings menu, tap STAMINA mode. Add or remove applications, as desired. When you’re finished, tap Done. Estimating the standby time of your device Standby time refers to the amount of time the battery can last when your device is connected to the network but is not in active use.
-
Page 15
Cases of negligent care are not covered by the Sony warranty service. To open or highlight an item • Tap the item. Marking options Marked checkbox Unmarked checkbox Marked list option Unmarked list option To mark or unmark options •… -
Page 16: Using The Lock Screen
To scroll • Drag or flick your finger in the direction you want to scroll on the screen. To scroll more quickly, flick your finger in the direction you want to go on the screen. To flick • To scroll more quickly, flick your finger in the direction you want to go on the screen.
-
Page 17: Home Screen
Home screen You can customise your Home screen with widgets, shortcuts, folders, themes, wallpaper and other items. You can also add more panes to it. You can view content in other panes of the Home screen by flicking left or right. shows which part of the Home screen you are in.
-
Page 18
Widgets Widgets are small applications that you can use directly on your Home screen. For example, the “WALKMAN” widget allows you to start playing music directly. Some widgets are resizable, so you can expand them to view more content or shrink them to save space on your Home screen. -
Page 19: Accessing And Using Applications
To add items to a folder on the Home screen • Touch and hold an item until it magnifies, then drag the item to the folder. To rename a folder Tap the folder to open it. Touch the folder’s title bar to show the Folder name field. Enter the new folder name and tap Done.
-
Page 20: Opening And Closing Applications
Opening and closing applications To open an application • From your Home screen or the Application screen, tap the application. To close an application • Press Some applications are paused when you press to exit, while other applications may continue to run in the background. In the first case, the next time you open the application, you can continue where you left off.
-
Page 21: Status And Notifications
To add a widget as a small app To make the small apps bar appear, press > > Select a widget. Enter a name for the widget, if desired, then tap OK. Application menu You can open a menu at any time when you are using an application. The menu will look different depending on which application you are using.
-
Page 22
Checking notifications and ongoing activities You can drag down the status bar to open the Notification panel and get more information. For example, you can use the panel to view a calendar event. You can also open some applications that run in the background, such as the music player. To open the Notification panel •… -
Page 23: Settings Menu
To control the WLAN function from the Notification panel Drag the status bar downwards. To enable or disable data traffic from the Notification panel Drag the status bar downwards. Customising quick settings from the Notification panel You can open the settings menu from the Notification panel to adjust basic device settings.
-
Page 24
Delete a character before the cursor. Confirm text input. Enter separator. Display numbers and symbols. Enter a space. Display smileys. All illustrations are for illustration purposes only and may not accurately depict the actual device. To display the on-screen keyboard to enter text •… -
Page 25: Chinese Input
Chinese input • Stroke input • Pinyin input General instructions Your device has a function to speed up the entry of Chinese characters. Whenever you enter a stroke or a Pinyin letter, a candidate row of the most frequently used characters containing that stroke or relating to that letter appears at the bottom of the screen.
-
Page 26: Screen Settings
To set the date manually From the Home screen, tap Find and tap Settings > Date & time. Unmark the Automatic date & time checkbox, if it is marked. Tap Set date. Adjust the date by scrolling up and down. Tap Set.
-
Page 27: Enhancing The Sound Output
The activation of the xLOUD™ feature has no effect on voice communication applications. Using S-Force Front Surround 3D Use S-Force Front Surround 3D technology from Sony to get the best sound from your device for watching movies. This technology creates a realistic 3D surround sound using your device’s speakers.
-
Page 28: Using A Headset
Memory card Your device supports a microSD™ memory card, which is used for storing content, such as downloaded applications, music, photos and videos. This type of card can also be used as a portable memory card with other compatible devices. You may have to purchase a memory card separately.
-
Page 29: Internet And Messaging Settings
Internet and messaging settings To send text and multimedia messages and to access the Internet, you must have a mobile data connection and the correct settings. There are different ways to get these settings: • For most mobile networks and operators, Internet and messaging settings come pre- installed on your device.
-
Page 30: Controlling Data Usage
Controlling data usage You can keep track of the amount of data transferred to and from your device over your mobile data or WLAN connection during a given period. For example, you can view the amount of data used by individual applications. For data transferred over your mobile data connection, you can also set data usage warnings and limits to avoid additional charges.
-
Page 31: Mobile Network Settings
Mobile network settings Your device automatically switches between mobile networks depending on what mobile networks are available in different areas. You can also manually set your device to use a particular mobile network mode, for example, WCDMA or GSM. If you are using a device with multiple users, only the owner, that is, the primary user, can adjust mobile network settings, and the settings made by the owner affect all other users.
-
Page 32: Contacts
Contacts Transferring contacts using a computer Contacts Setup is an application within the PC Companion and the Sony™ Bridge for Mac applications which helps you to gather contacts from your old device and transfer them to your new device. The Contacts Setup application supports several device brands, including iPhone, Samsung, HTC and Nokia.
-
Page 33: Avoiding Duplicate Entries In The Contacts Application
Avoiding duplicate entries in the Contacts application If you synchronise your contacts with a new account or import contact information in other ways, you could end up with duplicate entries in the Contacts application. If this happens, you can join such duplicates to create a single entry. And if you join entries by mistake, you can separate them again later.
-
Page 34: Searching And Viewing Contacts
To edit contact information about yourself From your Home screen, tap , then tap . Tap Myself, then tap Enter the new information or make the changes you want. When you are done, tap Done. Searching and viewing contacts Shortcut tabs Search for contacts Create a contact Edit a contact’s details…
-
Page 35: Sending Contact Information
To view your favourite contacts From your Home screen, tap , then tap . Tap Favorites. To assign a contact to a group In the Contacts application, tap the contact that you want to assign to a group. , then tap the bar directly under Assign to group. Mark the checkboxes for the groups to which you want to add the contact, then tap Done.
-
Page 36: Messaging
Messaging Using text and multimedia messaging You can send and receive text messages from your device using SMS (Short Message Service). If your subscription includes MMS (Multimedia Messaging Service), you can also send and receive messages that contain media files, for example, pictures and videos.
-
Page 37: Text And Multimedia Message Options
To delete a message From your Home screen, tap , then find and tap Tap the conversation containing the message you want to delete. Touch and hold the message you want to delete, then tap Delete message > Delete. To delete conversations From your Home screen, tap , then find and tap Press , then tap Delete conversations.
-
Page 38: Email
Email Getting started with Email You can handle several email accounts at the same time using the Email application, including corporate Microsoft Exchange Active Sync accounts. Using email accounts To set up an email account on your device From your Home screen, tap Find and tap Email.
-
Page 39: Using Email
Using email To create and send an email message From your Home screen, tap , then find and tap Email. If you are using several email accounts, tap at the top of the screen and select the account you want to send the message from, then tap Tap To and start typing the recipient’s address.
-
Page 40
To forward an email message From your Home screen, tap Find and tap Email. In your email inbox, find and tap the message you want to forward, then tap Forward. Tap To and enter the recipient’s email address manually, or tap to select a recipient from your contacts. -
Page 41: Walkman» Application
«WALKMAN» application About the «WALKMAN» application Get the most out of your «WALKMAN» application. Listen to and organise music and audio books that you have transferred to your device from a computer, or purchased and downloaded from online stores. To make content easily available to the «WALKMAN» application, you can use the Media Go™…
-
Page 42: Using The «Walkman» Application
Using the «WALKMAN» application To play audio content From your Home screen, tap , then find and tap In My music, select a music category and browse to the track that you want to open. Tap a track to play it. You might not be able to play copyright-protected items.
-
Page 43: Visualiser
To send a track In My music, when browsing your tracks , touch and hold a track title. Tap Send. Select an application from the list, and follow the on-screen instructions. You can also send albums and playlists in the same way. Visualiser The Visualiser adds visual effects to your music tracks as you play them.
-
Page 44
Browse audio by track Go back to the current track Browse by album Browse your music by artist Browse all playlists Picture of the currently playing artist (if available) Categorise your music using SensMe™ channels Browse your favourite playlists To add a shortcut to a track In My music, tap , then browse to the track for which you want to create a shortcut. -
Page 45: Managing Playlists
Managing playlists In My music, you can create your own playlists from the music that is saved on your device. In addition, you can install the Media Go™ application on a computer and use it to copy playlists from the computer to your device. For more information, see Connecting your device to a computer on page 79.
-
Page 46: Music Services
Music services TrackID™ technology Identifying music using TrackID technology Use the TrackID™ music recognition service to identify a music track you hear playing in your surroundings. Just record a short sample of the song and you’ll get artist, title and album info within seconds. For best results, use TrackID™ technology in a quiet area.
-
Page 47: About The Playnow™ Service
About the PlayNow™ service You can use the PlayNow™ service to browse, purchase and download applications and games. Note that payment options for non-free applications may vary per country. The PlayNow™ service is not available in all countries. Before you download content Before you download, make sure that you have an Internet connection.
-
Page 48: Fm Radio
FM radio About the FM radio The FM radio in your device works like any FM radio. For example, you can browse and listen to FM radio stations and save them as favourites. You must connect a wired headset or headphones to your device before you can use the radio. This is because the headset or headphones act as an antenna.
-
Page 49: Using Your Favourite Radio Channels
Favourites list Launch the TrackID™ music recognition application Radio on/off button View menu options Move up the frequency band to search for a channel A saved faviourte channel Move down the frequency band to search for a channel Tuning dial Save or remove a channel as a favourite 10 Tuned frequency 11 Swtich between speaker or headphone mode…
-
Page 50: Identifying Radio Tracks Using Trackid
Switching between mono and stereo sound mode You can listen to your FM radio in either mono or stereo mode. In some situations, switching to mono mode can reduce noise and improve sound quality. To switch between mono and stereo sound mode When the radio is open, press .
-
Page 51: Camera
Camera About the camera The camera in your device is equipped with the highly sensitive Exmor R sensor, which enables sharp photos and videos even in low lighting conditions. From the camera, you can, for example, send your photos and videos to friends as messages, or upload them to a web service.
-
Page 52: Face Detection
To take a photo by tapping the on-screen camera button Activate the camera. Point the camera towards the subject. Tap the on-screen camera button . The photo is taken as soon as you release your finger. To take a self-portrait using the front camera Activate the camera.
-
Page 53: Using Still Camera Settings
To take a photo using Smile Shutter™ When the camera is open and Smile Shutter is turned on, point the camera at your subject. The camera selects which face to focus on. The face selected appears inside a green frame and the photo is taken automatically.
-
Page 54: Quick Launch
1920×1080(16:9) 2 megapixel picture size with 16:9 aspect ratio. Suitable for photos that you want to view on widescreen displays. 640×480(4:3) VGA format with 4:3 aspect ratio. 7MP is the maximum resolution available when photos are taken using Superior auto mode, when HDR is turned on in Normal mode, or when Scenes is selected in Backlight correction HDR) mode.
-
Page 55
tapping it on the screen. When you tap the camera screen, a blue frame shows which face is selected and in focus. Face detection cannot be used for all scene types. Continuous autofocus is Touch focus Touch a specific area on the camera screen to set the area of focus. Continuous autofocus is off. Touch and hold the camera screen until the yellow focus frame turns blue, indicating that the focus is set. -
Page 56: Data Storage
1600 Sets the ISO sensitivity to 1600. This setting is only available in Normal capturing mode. Metering This function automatically determines a well-balanced exposure by measuring the amount of light striking the image you want to capture. Center Adjusts the exposure to the centre of the image. Average Calculates the exposure based on the amount of light striking the whole image.
-
Page 57: Using The Video Camera
Using the video camera To record a video by tapping the screen Activate the camera. Point the camera towards the subject. to start recording. to stop recording. Shoot your videos in landscape orientation to get the best results. To play recorded videos Activate the camera.
-
Page 58
When turned on, light sensitivity is increased. Use in poorly lit environments. Videos of fast-moving objects may get blurred. Hold your hand steady, or use a support. Turn off night mode when lighting conditions are good, to improve the video quality. Beach Use in bright environments to avoid overexposed videos. -
Page 59
Single autofocus The camera automatically focuses on the selected subject. Continuous autofocus is on. Face detection The camera automatically detects up to five human faces, indicated by frames on the screen. The camera automatically focuses on the nearest face. You can also select which face to focus on by tapping it on the screen. -
Page 60
Shutter sound Choose to turn on or turn off the shutter sound when you record a video. Data storage You can choose to save your data either to a removable SD card or to your device’s internal storage. Internal storage Photos or videos are saved on the device memory. -
Page 61: Album
Find and tap Album. Mobile BRAVIA® Engine Sony’s Mobile BRAVIA® Engine technology improves the viewing quality of photos and videos after you take them, giving you clearer, sharper and more natural images. Mobile BRAVIA Engine is turned on by default, but you can turn it off if you want to reduce battery consumption.
-
Page 62: Viewing Photos And Videos In The My Albums Tab
Overview of Pictures tab Grid view of photos and videos. View menu options. Scroll up or down to view content. Tap a photo or video to view it. The date and number of items in the group below. To view photos and videos in grid view From your Home screen, tap Find and tap Album.
-
Page 63
Overview of My albums tab To view content in list view in the Camera albums tile From your Home screen, tap Find and tap Album > My albums > Camera albums. Tap a folder that you want to open. The folder’s content appears in a chronologically ordered grid. -
Page 64
To watch a slideshow of your photos with music When you are viewing a photo, tap the screen to display the toolbars, then tap > SensMe™ slideshow. Select the music and theme that you want to use for the slideshow, then tap . -
Page 65
To adjust the light settings for a photo When you are viewing a photo, tap the screen to display the toolbars, then tap Edit photo > Select an option. To save a copy of the edited photo, tap Save. After you save the edited photo, the original unchanged version of the photo remains on your device. -
Page 66
Working with videos in Album To play a video Open the Pictures tab or the My albums tab in Album. Using grid view or list view, locate the video that you want to open. Tap the video to play it. If the playback controls are not displayed, tap the screen to display them. -
Page 67: Movies
Movies About Movies Use the Movies application to play movies and other video content that you’ve saved on your device. The Movies application also helps you get poster art, plot summaries, genre info and director details for each movie. You can also play your movies on other devices that are connected to the same network.
-
Page 68
To share a video When a video is playing, tap , then tap Share. In the menu that opens, tap the application that you want to use to share the selected video, then follow the relevant steps to send it. To get movie information manually Make sure that your device has an active data connection. -
Page 69: Web Browser
Web browser About the web browser Use your web browser to view and navigate web pages, add pages as bookmarks, and save pages for offline viewing. You can open up to 16 windows at the same time and switch among them easily. You can also request the desktop version of a web page if you don’t want to view the mobile version.
-
Page 70: Connectivity
Connectivity Connecting to wireless networks You can access the Internet wirelessly from your device using WLAN technology. This way you can browse the web and share media files over the same WLAN network with other DLNA Certified™ devices, for example, TVs and computers. If your company or organisation has a virtual private network (VPN), you can connect to this network using your device.
-
Page 71
To add a WLAN network manually Make sure that WLAN is turned on. From the Home screen, tap Find and tap Settings > WLAN . Enter the Network SSID for the network. Tap the Security field to select a security type. If required, enter a password. -
Page 72: Sharing Content With Dlna Certified™ Devices
To connect to a virtual private network From your Home screen, tap Find and tap Settings > More… > VPN. In the list of available networks, tap the VPN that you want to connect to. Enter the required information. Tap Connect. To disconnect from a virtual private network Drag the status bar downwards.
-
Page 73
as client devices. Your device works as a media server when it makes content available to client devices. When you set up file sharing on your device, you must also give access permission to client devices. After you do so, such devices appear as registered devices. -
Page 74: Using Your Device As A Remote Control
render, or play, content received from your device. A DMR device can be, for example, a TV with DLNA function, or a PC running Windows® 7 or higher. The settings for enabling the Digital Media Renderer may vary depending on the device used. Refer to the user guide for the respective device for more detailed information.
-
Page 75: Nfc
To edit the information for a device From your Home screen, tap , then find and tap . Touch and hold the name of the device that you want to edit, then tap Edit device information. Edit the desired information. When you are finished, tap Done.
-
Page 76: Bluetooth® Wireless Technology
To share a music file with another device using NFC Make sure that both your device and the receiving device have the NFC function turned on, and that both screens are active. To open the «WALKMAN» application, tap , then find and tap Tap the My music tab to open the music library.
-
Page 77
® To turn on the Bluetooth function and make your device visible Drag the status bar downwards, then tap ® Tap the on-off switch beside Bluetooth to turn on the Bluetooth function. ® Tap Bluetooth. Your device and a list of available Bluetooth devices appear. -
Page 78
® To connect your device to another Bluetooth device ® If you are connecting to a Bluetooth device that requires you to first pair your device before connecting, follow the relevant steps to pair your device with that device. Drag the status bar downwards, then tap Find and tap Bluetooth. -
Page 79: Connecting Your Device To A Computer
Connecting your device to a computer Connect your device to a computer and start transferring pictures, music and other file types. The easiest ways to connect are using a USB cable or Bluetooth wireless technology. When you connect your device to the computer using a USB cable, you are prompted to install the PC Companion application on your computer.
-
Page 80: Connecting Your Device To A Tv Set
• Microsoft® Windows Vista® • Microsoft® Windows® XP (Service Pack 3 or higher) To start PC Companion Make sure that PC Companion is installed on your PC. Open the PC Companion application on the PC, then click Start to open one of the features that you want to use.
-
Page 81: Screen Mirroring
Screen mirroring Use Screen mirroring to show the screen of your device on a TV or other large display without using a cable connection. WLAN Direct™ technology creates a wireless connection between the two devices, so you can sit back and enjoy your favourite photos from the comfort of your couch.
-
Page 82
To edit a Smart Connect event Start the Smart Connection application. On the Events tab, tap an event. If the event is switched off, drag the slider to the right. Adjust the settings as desired. To remove an event, tap the event’s row, then tap > Delete event and tap Delete to confirm. This is an Internet version of this publication. -
Page 83: Synchronising Data On Your Device
Synchronising data on your device About synchronising data on your device You can sync contacts, email, calendar events, and other information with your device from multiple email accounts, synchronisation services and other kinds of accounts, depending on the applications installed on your device. Synchronising your device with other information sources is an easy and practical way to stay up to date.
-
Page 84: Maps And Locations
GPS option. In situations where the wireless network connection is weak, you should enable both options to ensure that your location is found. Sony does not warrant the accuracy of any location services including but not limited to navigational services.
-
Page 85: Calendar And Alarm Clock
Calendar and alarm clock Calendar Your device has a calendar application for managing your time schedule. To set the calendar view From your Home screen, tap , then find and tap Calendar. Select an option. To view multiple calendars From your Home screen, tap , then find and tap Calendar.
-
Page 86
To edit an existing alarm From your Home screen, tap Find and tap Alarm & clock. Tap the alarm that you want to edit. Tap Set time and adjust the time by scrolling up or down. Tap Set. If desired, edit other alarm settings. Tap Done. -
Page 87
To turn off an alarm when it sounds • Slide to the right. This is an Internet version of this publication. © Print only for private use. -
Page 88: Support And Maintenance
Support and maintenance Updating your device Update your device to the most recent software version to get optimal performance and the latest enhancements. You can use the Update center application on your device to run a wireless update or you can use the PC Companion application on a computer to run an update using a USB cable connection.
-
Page 89: Resetting Your Device
Using a USB cable, connect your device to the Apple computer. Computer: Launch Sony™ Bridge for Mac application. After a few moments, Sony™ Bridge for Mac application detects your device and searches for new software for it. Computer: If a new software update is detected, a popup window appears.
-
Page 90
It is very important that you remember your screen unlock pattern, PIN or password. If you forget this information, it may not be possible to restore important data such as contacts and messages. Refer to Sony customer support for more information. To set a screen lock From your Home screen, tap >… -
Page 91
To disable the Face Unlock feature From your Home screen, tap > Settings > Security > Screen lock. Draw your backup screen unlock pattern or enter your PIN. Tap Slide. To create a screen unlock pattern Drag the status bar downwards, then tap Tap Security >… -
Page 92: Support Application
Support application To access the support application From your Application screen, find and tap Find and tap the required support item. Recycling your device Got an old device lying around the house? Why not recycle it? By doing so, you will help us reuse its materials and components, and you’ll protect the environment, too! Find out more about the recycling options in your region at blogs.sonymobile.com/ about-us/sustainability/commitment/overview/.
-
Page 93: Reference
Reference Settings overview Get to know the settings in your device so that you can personalise them to your own requirements. More… Turn Airplane mode on or off, configure settings for VPN and mobile networks, and enable your device to share its mobile data connection as a portable hotspot, or through USB tethering or Bluetooth™…
-
Page 94: Application Overview
Sending and downloading EDGE data Sending and downloading 3G data Battery status The battery is charging GPS is activated Airplane mode is activated The Bluetooth® function is activated The SIM card is not inserted The microphone is muted The speakerphone is on Silent mode An alarm is set Synchronisation is ongoing…
-
Page 95
Use the camera to take photos and record video clips. Access your downloaded applications. Use the Email application to send and receive emails through both private and corporate accounts. Browse and listen to FM radio stations. Use the Album application to view and to work with your photos and videos. Use the WALKMAN application to organise and play music, audio books and podcasts. -
Page 96: Important Information
Important information Important information leaflet Before you use your device, please read the Important information leaflet provided in the Setup guide in your device or in the box. To access the setup guide manually From the Home screen, tap Tap Settings > Setup guide. Limitations to services and features Some of the services and features described in this User guide are not supported in all countries/regions or by all networks and/or service providers in all areas.
-
Page 97: Legal Information
Sony does not guarantee the accuracy, integrity or quality of any additional content or any other third party content. Under no circumstances will Sony be liable in any way for your improper use of additional content or other third party content.
-
Page 98
MPEG LA, L.L.C. See http://www.mpegla.com. MPEG Layer-3 audio decoding technology licensed from Fraunhofer IIS and Thomson. Note: Sony advises users to backup their personal data information. Please visit www.sonymobile.com to get the latest version of this User’s Guide. -
Page 99: Index
Index picture ………….33 accounts …………..9 sending …………35 Exchange Active Sync® ……..10 sharing ………….35 adjusting volume ………….42 transferring …………32 Airplane mode …………26 corporate email, calendar and contacts ….83 alarm …………….85 cropping Album …………..61, 62 photos ………….64 My albums …………63 opening …………61 data traffic ……………30 pictures …………62 date…
-
Page 100
Phonepad …………..23 keyboard …………..23 photo albums keys ……………..11 viewing …………61 photos …………..65 analysing …………65 language …………..26 associating with a contact ……33 LCD backlight control ……….26 cropping …………64 live wallpaper …………19 deleting …………65 location …………..84 editing …………64, 65 locks photo viewer …………62 activating the screen ………9 rotating …………64 locking the screen ……….9… -
Page 101
searching transferring music using TrackID™ ……..46 contacts …………32 track information ……….46 turning off …………..8 self-portrait …………..51 turning on …………..8 sending business cards ……….35 updating your device ……….88 contacts …………35 USB connection …………79 items using Bluetooth® ……..78 using Movies …………67 music ……………43 using the equaliser ……….42 SensMe™…
Для ознакомления с инструкцией необходимо нажать на ссылку «ЗАГРУЗИТЬ», чтобы скачать pdf файл. Если есть кнопка «ПРОСМОТР», то можно просто посмотреть документ онлайн.
Для удобства, Вы можете сохранить данную страницу с файлом руководства по эксплуатации в свой список «избранное» прямо на сайте (доступно для зарегистрированных пользователей).
Смотрите инструкцию для похожих моделей:

Вы можете задать вопрос посетителям сайта по модели SONY XPERIA Tablet Z. Если Вы являетесь её пользователем, то пожалуйста оставьте, по возможности развёрнутый отзыв:
-
Инструкции по эксплуатации
1

SONY Xperia Tablet Z 16Gb LTE (SGP-321RU) инструкция по эксплуатации
(123 страницы)
- Языки:Русский
-
Тип:
PDF -
Размер:
2.54 MB -
Описание:
Планшетный компьютер
Просмотр
На NoDevice можно скачать инструкцию по эксплуатации для SONY Xperia Tablet Z 16Gb LTE (SGP-321RU). Руководство пользователя необходимо для ознакомления с правилами установки и эксплуатации SONY Xperia Tablet Z 16Gb LTE (SGP-321RU). Инструкции по использованию помогут правильно настроить SONY Xperia Tablet Z 16Gb LTE (SGP-321RU), исправить ошибки и выявить неполадки.
- Manuals
- Brands
- Sony Manuals
- Tablet
- Xperia Tablet Z SGP311
- User manual
-
Contents
-
Table of Contents
-
Bookmarks
Quick Links
User guide
Xperia
Tablet Z
™
SGP311/SGP312
Related Manuals for Sony Xperia Tablet Z SGP311
Summary of Contents for Sony Xperia Tablet Z SGP311
-
Page 1: User Guide
User guide Xperia Tablet Z ™ SGP311/SGP312…
-
Page 2: Table Of Contents
Contents Xperia™ Tablet Z User guide…………6 Getting started…………….7 Device overview………………7 Assembly………………..8 Turning the device on and off ………….8 Setup guide………………9 Screen lock………………9 Accounts and services…………..10 Multiple user accounts…………..10 Getting to know your device…………12 Using the keys………………12 Battery………………..12 Using the touchscreen…………..15 Using the lock screen…………….17 Home screen………………17 Accessing and using applications…………20…
-
Page 3
Email…………………38 Getting started with Email…………..38 Using e-mail………………39 Socialife™………………41 Using the Socialife™ application…………41 «WALKMAN» application ………….42 About the «WALKMAN» application………..42 Transferring media files to your device ……….42 Using the «WALKMAN» application ……….43 Visualizer ………………44 Getting more information about a track or artist……..44 Using My music to organize your tracks ………..44 Managing playlists…………….46 «WALKMAN»… -
Page 4
Video Unlimited…………….75 Video Unlimited service…………..75 Web browser…………….76 About the web browser…………..76 Connectivity……………..77 Connecting to wireless networks…………77 Sharing content with DLNA Certified™ devices………79 Using your device as a remote control……….81 NFC………………..82 Bluetooth® wireless technology…………83 Connecting your device to a computer……….86 Connecting your device to a TV set………..88 Screen mirroring…………….88 Smart Connect………………89 Synchronizing data on your device……….90… -
Page 5
Water resistance…………….106 Legal information…………….107 Index……………….109 This is an Internet version of this publication. © Print only for private use. -
Page 6: Xperia™ Tablet Z User Guide
Xperia™ Tablet Z User guide This is an Internet version of this publication. © Print only for private use.
-
Page 7: Getting Started
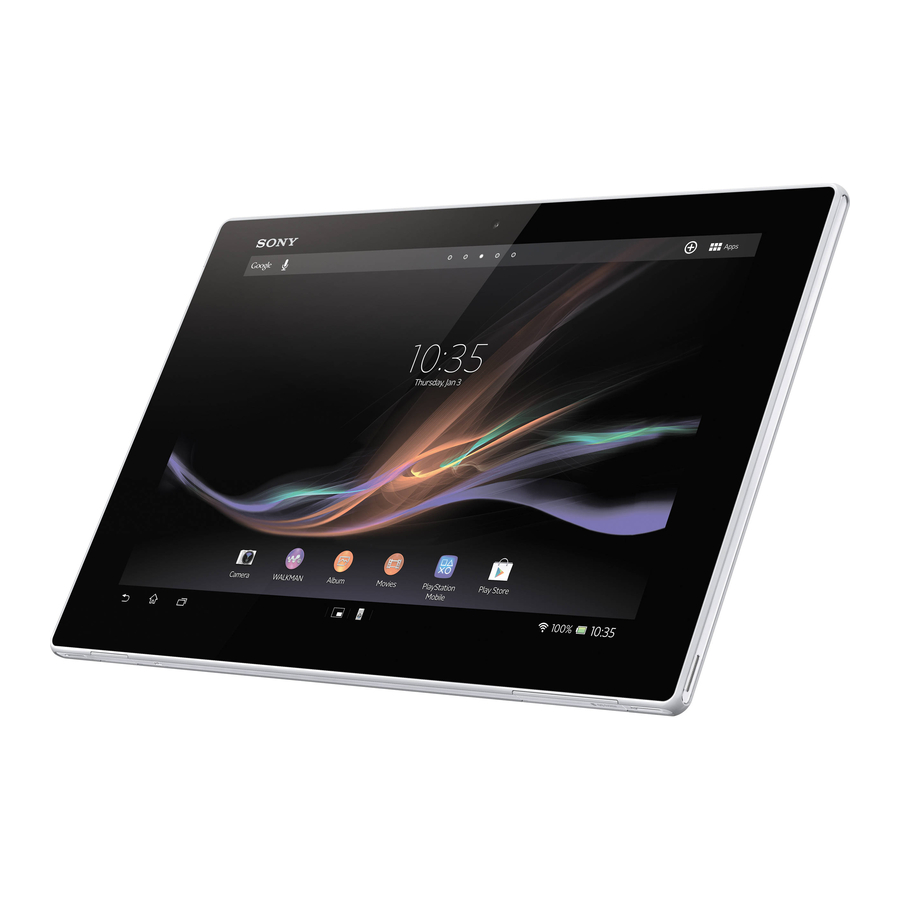
Getting started Device overview Light sensor Front camera Speaker A Speaker B Charging dock connector Volume key Notification light Power key Headset jack 10 Microphone 11 Infrared sensor 12 Main camera 13 Speaker B (same as 4) 14 Port for charger/USB cable 15 Hole for attaching the charger port cover 16 Memory card slot 17 Speaker A (same as 3)
-
Page 8: Assembly
Assembly To insert the memory card Insert a fingernail into the gap between the memory card cover and the bottom side of the device, then detach the memory card cover. Place the memory card in the memory card slot, with the gold-colored contacts facing down, then push the memory card all the way into the slot until you hear a locking sound.
-
Page 9: Setup Guide
For example, if you have a Sony Entertainment Network account, you can sign in to it and start enjoying music, videos and games from the Sony Entertainment Network on your device. Or you can create a new account directly on your device.
-
Page 10: Accounts And Services
To unlock the screen using the Swipe feature Swipe up or down on the lower part of the screen. • To lock the screen manually When the screen is active, briefly press the power key • Accounts and services Sign in to your online service accounts from your device to get easy access when you’re on the move.
-
Page 11
Using multiple user accounts To add a new user Make sure you are logged in as the owner, that is, the user who set up the device for the first time. Drag the status bar downwards, then tap Find and tap Users > Add user. Tap OK >… -
Page 12: Getting To Know Your Device
Getting to know your device Using the keys Back • Go back to the previous screen • Close the on-screen keypad, a dialog box, an options menu, the Notification panel, or an application Home • Go to the Home screen Task •…
-
Page 13
To charge your device Plug the charger into a power outlet. Plug one end of the USB cable into the charger (or into the USB port of a computer). Plug the other end of the cable into the micro USB port on your device, with the USB symbol facing up. -
Page 14
Otherwise, your device repeatedly scans for available networks, and this consumes power. • Use a Sony™ original handsfree device to listen to music. Handsfree devices demand less battery power than your device’s own loudspeakers. • Keep your device in standby whenever possible. Standby time refers to the time during which your device is connected to the network and is not being used. -
Page 15: Using The Touchscreen
The device screen is made from glass. Do not touch the screen if the glass is cracked or shattered. Avoid trying to repair a damaged screen yourself. Glass screens are sensitive to drops and mechanical shocks. Cases of negligent care are not covered by the Sony warranty service.
-
Page 16
To zoom • Place two fingers on the screen at once and pinch them together (to zoom out) or spread them apart (to zoom in). When you use two fingers on the screen to zoom, it is only possible to zoom if both fingers are within the zoomable area. -
Page 17: Using The Lock Screen
To flick • To scroll more quickly, flick your finger in the direction you want to go on the screen. You can wait for the scrolling movement to stop by itself, or you can stop it immediately by tapping the screen. Sensors Your device has a sensor that detects light.
-
Page 18
The items in the bar at the top of the screen are always available for quick access. To go to the Home screen • Press To browse the Home screen • Flick right or left. To set a pane as the main Home screen pane Touch and hold an empty area on your Home screen. -
Page 19
To resize a widget Touch and hold a widget until it magnifies, then release the widget. If the widget can be resized, for example, the Calendar widget, then a highlighted frame and resizing dots appear. Drag the dots inward or outward to shrink or expand the widget. To confirm the new size of the widget, tap anywhere on the Home screen. -
Page 20: Accessing And Using Applications
To change your Home screen wallpaper Touch and hold an empty area on your Home screen. Tap Wallpapers and select an option. To set a theme for your Home screen Touch and hold an empty area on your Home screen. Tap Themes, then select a theme.
-
Page 21
Recently used applications window You can switch between recently used applications from this window. You can also open small apps. To open the recently used applications window • Press Using small apps From the recently used applications window, you can get quick access to several small apps at any time using the small apps bar. -
Page 22: Status And Notifications
Application menu You can open a menu at any time when you are using an application. The menu will look different depending on which application you are using. To open a menu in an application • While using the application, press . A menu is not available in all applications.
-
Page 23
To open the Notification panel • Drag the status bar downwards. To close the Notification panel • Drag the tab at the bottom of the Notification panel upward. To open a running application from the Notification panel • Tap the icon for the running application to open it. To dismiss a notification from the Notification panel •… -
Page 24: Settings Menu
Customizing quick settings from the Notification panel You can customize quick settings from the Notification panel by selecting the quick settings you want and rearranging their order. You can select up to 10 quick settings, or you can also select none of them. To select quick settings from the Notification panel Drag the status bar downwards, then tap Find and tap Display >…
-
Page 25
7 Display numbers and symbols. All illustrations are for illustration purposes only and may not accurately depict the actual device. To display the on-screen keyboard to enter text • Tap a text entry field. To hide the on-screen keyboard • When the on-screen keyboard is open, tap To personalise the on-screen keyboard Open the on-screen keyboard, then tap… -
Page 26: Keyboard Settings
To select text Enter some text, then double-tap the text. The word you tap gets highlighted by tabs on both sides. Drag the tabs to the left or right to select more text. To edit text Enter some text, then double-tap the entered text to make the application bar appear.
-
Page 27: Customizing Your Device
To access the on-screen keyboard and Phonepad settings When you enter text using the on-screen keyboard, tap , then tap Keyboard settings. To add a writing language for text input When you enter text using the on-screen keyboard, tap , then tap Keyboard settings. Tap Languages >…
-
Page 28: Time And Date
To set your device to silent mode Press and hold down the power key until the options menu opens. In the options menu, tap appears in the status bar. To enable touch tones From your Home screen, tap Find and tap Settings > Sound. Mark the Touch sounds checkbox.
-
Page 29: Enhancing The Sound Output
The activation of the Clear Phase™ feature has no effect on voice communication applications. Using xLOUD™ technology Use xLOUD™ audio filter technology from Sony to enhance the speaker volume without sacrificing quality. Get a more dynamic sound as you listen to your favorite songs. To enhance the speaker volume using xLOUD™…
-
Page 30: Memory
Using S-Force Front Surround 3D Use S-Force Front Surround 3D technology from Sony to get the best sound from your device for watching movies. This technology creates realistic 3D surround sound using your device’s speakers. To use S-Force Front Surround 3D technology From your Home screen, tap Find and tap Settings >…
-
Page 31: Using A Headset
Using a headset Use the accessories provided with your device, or other compatible accessories, for optimal performance. This is an Internet version of this publication. © Print only for private use.
-
Page 32: Google Play
Google Play™ Getting started with Google Play™ Open Google Play™ and enter a world of applications and games. You can browse these applications and games through different categories. You can also rate an application or game and send feedback on it. To use Google Play™, you need to have a Google™…
-
Page 33: Permissions
However, you can change this setting and allow installations from unknown sources. Sony does not warrant or guarantee the performance of any third-party applications or content transferred via download or other interface to your device. Similarly, Sony is not responsible for any damage or reduced performance of your device attributable to the transfer of third- party content.
-
Page 34: Contacts
Your old device. Your new Android™ device. • To transfer contacts to your new device using a computer Make sure that PC Companion is installed on your PC or that Sony™ Bridge for ® ® Mac is installed on your Apple computer.
-
Page 35: Avoiding Duplicate Entries In The Contacts Application
Avoiding duplicate entries in the Contacts application If you synchronize your contacts with a new account or import contact information in other ways, you could end up with duplicate entries in the Contacts application. If this happens, you can join such duplicates to create a single entry. And if you join entries by mistake, you can separate them again later.
-
Page 36: Searching And Viewing Contacts
To edit contact information about yourself From your Home screen, tap , then tap . Tap Myself, then tap Enter the new information or make the changes you want. When you are done, tap Done. Searching and viewing contacts Shortcut tabs Search for contacts Create a contact Edit a contact’s details…
-
Page 37: Sending Contact Information
To view your favorite contacts From your Home screen, tap , then tap . Tap Favorites. To assign a contact to a group In the Contacts application, tap the contact that you want to assign to a group. , then tap the bar directly under Assign to group. Mark the checkboxes for the groups to which you want to add the contact, then tap Done.
-
Page 38: Email
Email Getting started with Email You can handle several email accounts at the same time using the Email application, including corporate Microsoft Exchange Active Sync accounts. Emails you receive to your Gmail™ account can be accessed on your device from both the Email and the Gmail™…
-
Page 39: Using E-Mail
To set up a Google™ account on your device From your Home screen, tap Find and tap Settings > Add account > Google. Follow the registration wizard to create a Google™ account, or sign in if you already have an account. You can also sign in to or create a Google™…
-
Page 40
To save a sender’s email address to your contacts From your Home screen, tap Find and tap Email. Find and tap a message in your email inbox. Tap the name of the sender, then tap OK. Select an existing contact, or tap Create new contact. Edit the contact information, if desired, then tap Done. -
Page 41: Socialife
Socialife™ Using the Socialife™ application Use the Socialife™ application from Sony to get your favorite news, videos and social networking feeds in one place. The Socialife™ home screen gives a clear overview of friends’ Facebook and Twitter activity, plus news feeds that you have subscribed to. It color codes and sizes articles for easy reading, adding photos and cropping images of your friends’…
-
Page 42: Walkman» Application
«WALKMAN» application About the «WALKMAN» application Get the most out of your «WALKMAN» application. Listen to and organize music and audio books that you have transferred to your device from a computer, or purchased and downloaded from online stores. To make content easily available to the «WALKMAN» application, you can use the Media Go™…
-
Page 43: Using The «Walkman» Application
Using the «WALKMAN» application To play audio content From your Home screen, tap , then find and tap In My music, select a music category and browse to the track that you want to open. Tap a track to play it. You might not be able to play copyright-protected items.
-
Page 44: Visualizer
To send a track In My music, when browsing your tracks, touch and hold a track title. Tap Send. Select an application from the list, and follow the on-screen instructions. You can also send albums and playlists in the same way. To «Like»…
-
Page 45
Overview of My music Browse audio by track Go back to the current track Browse by album Browse your music by artist Browse all playlists Picture of the currently playing artist (if available) Collect links to music and related content that you and friends have shared using online services Categorize your music using SensMe™… -
Page 46: Managing Playlists
Categorizing your music using SensMe™ channels The SensMe™ channels application helps you arrange your music by mood and tempo. SensMe™ groups all your tracks into several categories, or channels, so you can select music that matches your mood or suits the time of day. To enable the SensMe™…
-
Page 47: Walkman» Application Widget
To play your own playlists In My music, tap . Under Playlists, tap a playlist. Tap a track to play it. To remove a track from a playlist In a playlist, touch and hold the title of the track you want to delete. Tap Delete from playlist from the list that appears.
-
Page 48: Music Services
Music services TrackID™ technology Identifying music using TrackID technology Use the TrackID™ music recognition service to identify a music track you hear playing in your surroundings. Just record a short sample of the song and you’ll get artist, title and album info within seconds.
-
Page 49: Music Unlimited
Windows operating system. Go to www.sonyentertainmentnetwork.com for more information. Sony Entertainment Network with Video Unlimited and Music Unlimited™ is not available in every market. Separate subscription required. Additional terms and conditions apply. To open Music Unlimited™ From your Home screen, tap Find and tap About the PlayNow™…
-
Page 50: Fm Radio
FM radio About the FM radio The FM radio in your device works like any FM radio. For example, you can browse and listen to FM radio stations and save them as favorites. You must connect a wired headset or headphones to your device before you can use the radio. This is because the headset or headphones act as an antenna.
-
Page 51: Using Your Favorite Radio Channels
Favorites list Launch the TrackID™ music recognition application Radio on/off button View menu options Move up the frequency band to search for a channel A saved favorite channel Move down the frequency band to search for a channel Tuning dial Save or remove a channel as a favorite 10 Tuned frequency 11 Switch between speaker or headphone mode…
-
Page 52: Identifying Radio Tracks Using Trackid
Switching between mono and stereo sound mode You can listen to your FM radio in either mono or stereo mode. In some situations, switching to mono mode can reduce noise and improve sound quality. To switch between mono and stereo sound mode When the radio is open, press .
-
Page 53: Camera
Camera About the camera The camera in your device is equipped with the highly sensitive Exmor R sensor, which helps you capture sharp photos and videos even in low lighting conditions. From the camera, you can, for example, send your photos and videos to friends as messages, or upload them to a web service.
-
Page 54: Face Detection
To take a photo by tapping the on-screen camera button Activate the camera. Point the camera toward the subject. Tap the on-screen camera button . The photo is taken as soon as you release your finger. To take a self-portrait using the front camera Activate the camera.
-
Page 55: Adding The Geographical Position To Your Photos
To take a photo using Smile Shutter™ When the camera is open and Smile Shutter™ is turned on, point the camera at your subject. The camera selects which face to focus on. The face selected appears inside a colored frame and the photo is taken automatically.
-
Page 56: Quick Launch
Resolution Choose between several picture sizes and aspect ratios before taking a photo. A photo with a higher resolution requires more memory. 3264×2448(4:3) 8 megapixel picture size with 4:3 aspect ratio. Suitable for photos that you want to view on non- widescreen displays or print in high resolution.
-
Page 57
Focus mode The focus function controls which part of a photo should be sharp. When continuous autofocus is on, the camera keeps adjusting focus so that the area within the yellow focus frame stays sharp. Single autofocus The camera automatically focuses on the selected subject. Continuous autofocus is on. Touch and hold the camera screen until the yellow focus frame turns blue, indicating that the focus is set. -
Page 58
You can reduce image blurring caused by dark conditions or moving subjects by increasing the ISO sensitivity. Auto Sets the ISO sensitivity automatically. Sets the ISO sensitivity to 100. Sets the ISO sensitivity to 200. Sets the ISO sensitivity to 400. Sets the ISO sensitivity to 800. -
Page 59: Using The Video Camera
3 seconds The preview of the photo or video appears for 3 seconds after you have taken. The photo or video has been saved after you have taken, no preview appears. This setting is only available in Normal capturing mode. Touch capture Identify a particular focus area by touching the camera screen with your finger.
-
Page 60
Using the video camera settings To adjust the video camera settings Activate the camera. Tap one of the settings icons on the screen. To display all settings, tap Select the setting that you want to adjust, then make your changes. To customize the video camera settings panel When the video camera is open, tap to display all settings. -
Page 61
176×144(11:9) Record videos suitable for sending in multimedia messages. The recording time of this video format is limited to fit in a multimedia message. Self-timer With the self-timer you can record a video without holding the device. Use it to record group videos where everyone can be in the video. -
Page 62: Data Storage
Fluorescent Adjust the color balance for fluorescent lighting. Daylight Adjust the color balance for sunny outdoor conditions. Cloudy Adjust the color balance for a cloudy sky. Metering This function automatically determines a well-balanced exposure by measuring the amount of light striking the image that you want to capture. Center Adjust the exposure to the center of the image.
-
Page 63
Photos or videos are saved on the SD card. This is an Internet version of this publication. © Print only for private use. -
Page 64: Album
Find and tap Album. Mobile BRAVIA® Engine Sony’s Mobile BRAVIA® Engine technology improves the viewing quality of photos and videos after you take them, giving you clearer, sharper, and more natural images. Mobile BRAVIA Engine is turned on by default, but you can turn it off if you want to reduce battery consumption.
-
Page 65: Viewing Photos And Videos In The My Albums Tab
Overview of Pictures tab Grid view of photos and videos. View menu options. Scroll up or down to view content. Tap a photo or video to view it. The date and number of items in the group below. To view photos and videos in grid view From your Home screen, tap Find and tap Album.
-
Page 66
Overview of My albums tab View photos and videos on Facebook™. View photos and videos using the PlayMemories online service. View photos and videos in Picasa™. View all photos and videos taken with your device’s camera. View your photos in globe mode. View your photos on a map. -
Page 67
Working with photos in Album You can edit photos in Album. For example, you can crop photos, associate them with contacts, or use them as wallpaper. To zoom a photo • When you are viewing a photo, double-tap the screen to zoom in. Double-tap again to zoom out. -
Page 68
To improve a photo using advanced settings When you are viewing a photo, tap the screen to display the toolbars, then tap Edit photo > Select an option. To save a copy of the edited photo, tap Save. After you save the edited photo, the original unchanged version of the photo remains on your device. -
Page 69: Viewing Your Photos On A Map
To turn off the photo analysis feature From your Home screen, tap Find and tap Album > My albums > Faces. Tap , then tap Photo analysis. Drag the slider to the left to turn off the photo analysis feature. To name a face In the Faces tile, browse to the Unnamed faces folder, and choose the face that you want to name.
-
Page 70
that contain location-specific information. If photos are not already geotagged, you can geotag them manually in Album. Overview of Maps tab Search a location on the map. View menu options. A group of photos and/or videos geotagged with the same location. Double tap to zoom in. -
Page 71: Viewing Online Albums
To add a geotag when viewing the map in Album When viewing the map in Album, tap , then tap Add geotag. Find and tap the photo to which you want to add the geotag. Tap the desired location on the map to set the geotag, then tap OK. To edit the geotag of a photo in Album When viewing a photo on the map in Album, touch and hold the photo until its frame turns blue.
-
Page 72
To view photos from online services in Album Make sure you are signed in to the online service that you want to use, for example, Facebook™. From your Home screen, tap Find and tap Album > My albums. Tap the desired online service. Tap Connect. -
Page 73: Movies
Browse all TV shows saved to your device Browse content on other connected DLNA Certified™ devices Sony Entertainment Network with Video Unlimited and Music Unlimited is not available in every market. Separate subscription required. Additional terms and conditions apply. This is an Internet version of this publication. © Print only for private use.
-
Page 74: Using Movies
Using Movies To play a video in Movies From your Home screen, tap , then find and tap Movies. Find and tap the video that you want to play. If the video is not displayed on the screen, tap More in the My Collection tab, then find and tap the video that you want to play.
-
Page 75: Video Unlimited
If you are using a device with multiple users, you must log in as the owner, that is, the primary user, to use the Video Unlimited service. Sony Entertainment Network with Video Unlimited and Music Unlimited is not available in every market. Separate subscription required. Additional terms and conditions apply.
-
Page 76: Web Browser
Web browser About the web browser The Google Chrome™ web browser for Android™ devices comes preinstalled in most markets. Go to http://support.google.com/chrome and click the «Chrome for Mobile» link to get more detailed information about how to use this web browser. Google Chrome™…
-
Page 77: Connectivity
Connectivity Connecting to wireless networks You can access the Internet wirelessly from your device using Wi-Fi® technology. This way you can browse the web and share media files over the same Wi-Fi® network with other DLNA Certified™ devices, for example, TVs and computers. If your company or organization has a virtual private network (VPN), you can connect to this network using your device.
-
Page 78: Advanced Wi-Fi® Settings
To add a Wi-Fi® network manually Make sure that Wi-Fi® is turned on. From the Home screen, tap Find and tap Settings > Wi-Fi . Enter the Network SSID for the network. Tap the Security field to select a security type. If required, enter a password.
-
Page 79: Sharing Content With Dlna Certified™ Devices
To connect to a virtual private network From your Home screen, tap Find and tap Settings > More… > VPN. In the list of available networks, tap the VPN you want to connect to. Enter the required information. Tap Connect. To disconnect from a VPN Tap the status bar to open the Notification panel.
-
Page 80
devices. Your device works as a media server when it makes content available to client devices. When you set up file sharing on your device, you must also give access permission to client devices. After you do so, such devices appear as registered devices. Devices that are waiting for access permission are listed as pending devices. -
Page 81: Using Your Device As A Remote Control
play, content received from your device. A DMR device can be, for example, a TV with DLNA function, or a PC running Windows® 7 or higher. The settings for enabling the Digital Media Renderer may vary depending on the device used. Refer to the user guide for the respective device for more detailed information.
-
Page 82: Nfc
To edit the information for a device From your Home screen, tap , then find and tap . Touch and hold the name of the device that you want to edit, then tap Edit device information. Edit the desired information. When you are finished, tap Done.
-
Page 83: Bluetooth® Wireless Technology
To share a music file with another device using NFC Make sure that both your device and the receiving device have the NFC function turned on, and that both screens are active. To open the “WALKMAN” application, tap , then find and tap Tap the My music tab to open the music library.
-
Page 84
® To turn on the Bluetooth function and make your device visible Drag the status bar downward, then tap ® Tap the on-off switch beside Bluetooth to turn on the Bluetooth function. ® Tap Bluetooth. Your device and a list of available Bluetooth devices appear. -
Page 85
® To connect your device to another Bluetooth device ® If you are connecting to a Bluetooth device that requires you to first pair your device before connecting, follow the relevant steps to pair your device with that device. Drag the status bar downward, then tap Find and tap Bluetooth. -
Page 86: Connecting Your Device To A Computer
Connecting your device to a computer Connect your device to a computer and start transferring pictures, music, and other file types. The easiest ways to connect are using a USB cable or Bluetooth wireless technology. When you connect your device to the computer using a USB cable, you are prompted to install the PC Companion application on your computer.
-
Page 87
To pair your device wirelessly with a computer using Media transfer mode Make sure Media transfer mode is enabled on your device. It is normally enabled by default. Connect your device to the computer using a USB cable. Computer: Once the name of your device appears on the screen, click Network configuration and follow the instructions to pair the computer. -
Page 88: Connecting Your Device To A Tv Set
Microsoft® Windows Vista® • Microsoft® Windows® XP, Service Pack 3 or higher • To transfer content using the Media Go™ application Connect your device to a computer using a supported USB cable. Device: In the status bar, Internal storage connected appears. Computer: Open the PC Companion application on the PC first.
-
Page 89: Smart Connect
To mirror the screen of your device on a TV screen Follow the instructions in the User guide for your TV to turn on the screen mirroring function. If you are using a device with multiple users, make sure you are logged in as the owner, that is, the primary user of the device.
-
Page 90: Synchronizing Data On Your Device
Synchronizing data on your device About synchronizing data on your device You can sync contacts, email, calendar events, and other information with your device from multiple email accounts, synchronization services, and other kinds of accounts, depending on the applications installed on your device. Synchronizing your device with other information sources is an easy and practical way to stay up to date.
-
Page 91: Synchronizing With Facebook
For example, you can share music in the «WALKMAN» application on your device via Facebook. To synchronize your device with Facebook, you must first set up an «Xperia™ with Facebook» account — a solution developed by Sony to enable easy integration.
-
Page 92
To remove an «Xperia™ with Facebook» account When you remove an «Xperia™ with Facebook» account from your device, the associated online Facebook account is not deleted and you can still access it from a computer. From your Home screen, tap Tap Settings >… -
Page 93: Maps And Locations
GPS option. In situations where the wireless network connection is weak, you should enable both options to ensure that your location is found. Sony does not warrant the accuracy of any location services including but not limited to navigational services.
-
Page 94: Using Google Maps™ To Get Directions
So it’s a good idea to download and save maps to your device before you take a trip. Sony does not warrant the accuracy of any directional services. Using the Navigation application Use the Navigation application in your device to get turn-by-turn instructions on how to get places.
-
Page 95: Calendar And Alarm Clock
Calendar and alarm clock Calendar Your device has a calendar application for managing your time schedule. If you have a Google™ account, you can also synchronize the calendar application on your device with your web calendar. To set the calendar view From your Home screen, tap , then find and tap Calendar.
-
Page 96
To edit an existing alarm From your Home screen, tap Find and tap Alarm & clock. Tap the alarm that you want to edit. Tap Set time and adjust the time by scrolling up or down. Tap Set. If desired, edit other alarm settings. Tap Done. -
Page 97
To turn off an alarm when it sounds Slide to the right. • This is an Internet version of this publication. © Print only for private use. -
Page 98: Support And Maintenance
Support and maintenance Updating your device Update your device to the most recent software version to get optimal performance and the latest enhancements. You can use the Update center application on your device to run a wireless update or you can use the PC Companion application on a computer to run an update using a ®…
-
Page 99: Resetting Your Device
Using a USB cable, connect your device to the Apple computer. Computer: Launch Sony™ Bridge for Mac application. After a few moments, Sony™ Bridge for Mac application detects your device and searches for new software for it. Computer: If a new software update is detected, a popup window appears.
-
Page 100
It is very important that you remember your screen unlock pattern, PIN or password. If you forget this information, it may not be possible to restore important data such as contacts and messages. Refer to Sony customer support for more information. To set a screen lock From your Home screen, tap >… -
Page 101: Finding Your Device
To disable the screen unlock pattern From your Home screen, tap > Settings > Security > Screen lock. Draw the screen unlock pattern. Tap Slide. To create a screen unlock PIN From your Home screen, tap > Settings > Security > Screen lock > PIN. Enter a numeric PIN.
-
Page 102: Support Application
Support application To access the support application From your Application screen, find and tap Find and tap the required support item. Recycling your device Got an old device lying around the house? Why not recycle it? By doing so, you will help us reuse its materials and components, and you’ll protect the environment, too! Find out more about the recycling options in your region at blogs.sonymobile.com/about-us/ sustainability/commitment/overview/.
-
Page 103: Reference
Reference Settings overview Get to know the settings in your device so that you can personalize them to your own requirements. Wi-Fi Turn Wi-Fi® on or off, scan available Wi-Fi® networks, or connect to a Wi-Fi® network. Bluetooth Turn Bluetooth® on or off; search for available Bluetooth® devices; make your device visible or invisible to other Bluetooth®…
-
Page 104: Status And Notification Icons Overview
About tablet View information about your device, such as the model number. You can also update your software to the latest version. Status and notification icons overview Status icons The following status icons may appear on your screen: NFC is activated Battery status The battery is charging GPS is activated…
-
Page 105
Use the Calendar application to keep track of your events and manage your appointments. Use the camera to take photos and record video clips. Use the Contacts application to manage phone numbers, email addresses and other information related to your contacts. Access your downloaded applications. -
Page 106: Important Information
Important information Important information leaflet Before you use your device, please read the Important information leaflet provided in the Setup guide in your device or in the box. To access the setup guide manually From the Home screen, tap Tap Settings > Setup guide. Limitations to services and features Some of the services and features described in this User guide are not supported in all countries/regions or by all networks and/or service providers in all areas.
-
Page 107: Legal Information
Sony does not guarantee the accuracy, integrity, or quality of any additional content or any other third-party content. Under no circumstances will Sony be liable in any way for your improper use of additional content or other third-party content.
-
Page 108
use WMDRM to play or copy protected content. Revocation does not affect unprotected content. When you download licenses for protected content, you agree that Microsoft may include a revocation list with the licenses. Content owners may require you to upgrade WMDRM to access their content. If you decline an upgrade, you will not be able to access content that requires the upgrade. -
Page 109: Index
Index connectivity ………….77 accounts …………..10 contacts Exchange Active Sync® ……..10 backing up …………37 Facebook™ ………….10 copying …………37 Google™ …………10 favorite ………….36 adjusting volume ………….43 groups ………….36 Airplane mode …………29 joining contact information ……35 alarm …………….95 picture ………….35 Album …………..64, 65 sending …………37 map …………..70 sharing ………….37…
-
Page 110
Google™ account setup ………39 transferring to/from a computer ……42 Google™ synchronization ……..90 viewing artist info ……….48 GPS ……………..93 Visualizer …………44 music services …………48 Music Unlimited™ ………..49 headset …………..31 My music …………..45 Home screen …………17 customizing ………….19 Navigation application ……….94 notification ………….104 icons …………..104 customizing ………….24 in the camera ………..60… -
Page 111
searching for channels ……..51 taking photos …………53 selecting a channel ……….50 by tapping …………54 stereo sound ………..52 self-portraits …………54 visualizer …………50 using face detection ……..54 radio sound ………….51 using smile detection ……..55 receiving items using Bluetooth® ……85 using Smile Shutter™ ……..55 recently used applications window ……21 text input method …………24 recommending music ……….44… -
Page 112
wallpaper …………..19 web browser …………76 widgets …………..18 resizing …………19 wireless networks …………93 zoom …………….54 zooming photos ………….67 This is an Internet version of this publication. © Print only for private use.

Руководство по
запуску
SGP311/SGP312
SGP311/SGP312
Xperia
™
Tablet Z
SGP311/SGP312
Sony Mobile Communications AB
SE-221 88 Lund, Sweden
www.sonymobile.com
1270-4841.2
Разблокирование экрана
•
Перетащите
вверх или
вниз.
Основные параметры
При первом запуске устройства запускается руководство по
настройке, которое поясняет базовые функции устройства и
помогает ввести необходимые параметры. Кроме того,
впоследствии мастер настройки может быть запущен в любой
момент.
Получение доступа к мастеру настройки
вручную
1
На
Начальный экран
коснитесь .
2
Коснитесь
Настройки
>
Руководство по
настройке
.
В поисках пути
Использование клавиш
Назад
•
Служит для возврата к предыдущему экрану.
•
Закрывает экранную клавиатуру, диалоговое окно,
меню функций или панель уведомлений.
Домой
•
Перейдите на
Начальный экран
.
Задание
•
Коснитесь, чтобы открыть окно с последними
использовавшимися приложениями.
Меню запуска Small Apps
•
Коснитесь, чтобы открыть список всех приложений в
Small Apps.
Ярлык Small Apps
•
Коснитесь, чтобы запустить предварительно выбранное
небольшое приложение.
Для любого небольшого приложения можно
создать ярлык. Для этого коснитесь и
удерживайте значок небольшого
приложения в меню запуска
Small Apps.
Начальный экран
Индивидуальная настройка
Начальный экран
осуществляется с
помощью виджетов, ярлыков, папок, тем, фоновых рисунков и
других объектов. Также можно добавлять дополнительные
расширения.
Содержимое можно просматривать через другие расширения
начального экрана, пролистывая влево или вправо. Индикатор
Объекты панели, расположенной в верхней части
экрана, обеспечивают быстрый доступ к
соответствующим функциям.
Переход к главному экрану
•
Нажмите
.
Навигация по главному экрану
•
Пролистайте экран вправо или влево.
Добавление виджета на главный экран
1
Коснитесь пустой зоны и удерживайте ее на
Начальный
экран
, затем коснитесь
Виджеты
.
2
Найдите и коснитесь виджета, который следует добавить на
экран.
Экран приложений
Экран приложений, открываемый вами из
Начальный экран
,
содержит приложения, предустановленные на вашем устройстве, и
загруженные вами приложения.
Размер экрана приложений превышает ширину стандартного
экрана, поэтому для просмотра всего его содержимого
используется прокрутка влево или вправо.
Открытие экрана приложений
•
Находясь на
Начальный экран
, коснитесь .
Состояния и уведомления
В строке состояния в правом нижнем углу экрана отображается
информация о текущем состоянии устройства. Например, здесь
выводятся уведомления о новых сообщениях и записях
календаря.
Открытие панели уведомлений
•
Коснитесь строки состояния.
Приветствие
Важная информация
Перед началом использования устройства прочтите
Важную информацию
, содержащуюся на устройстве
или в коробке.
Стойкость к воздействию
воды и пыли
Ваше устройство обладает степенями защиты IP (защита от
проникновения пыли и воды) IP5X, IPX5 и IPX7. Это значит, что
устройство защищено от опадания пыли, а также от попадания
воды при погружении на глубину от 0 до 100 см в течение 30 мин.
Кроме того, он может противостоять воздействию струи воды
низкого давления.
Крышки порта micro USB и микро-SD-карты должны быть плотно
закрыты, чтобы обеспечить соответствие устройства заявленному
классу защиты IP.
Более подробную информацию о классах защиты IP и важные
сведения об обеспечении стойкости устройства к воздействию
влаги см. в «Руководстве по эксплуатации» вашего устройства и на
веб-сайте поддержки Sony Mobile.
www.sonymobile.com/support
Детали устройства
Установка карты памяти
1
2
1
Вставьте ноготь в зазор между крышкой гнезда карты памяти и
нижней частью устройства, после чего снимите крышку гнезда
карты памяти.
2
Поместите карту памяти в гнездо позолоченными контактами
вниз и продвиньте ее полностью в гнездо до тех пор, пока не
услышите звук закрытия.
3
Присоедините крышку гнезда карты памяти.
Карта памяти может не входить в комплект
поставки.
Обзор устройства
1 2
3
4
6
7
5
8
9
Not For Sales 00440254-021066-7 FFGG 2012/10 MADE IN CHINA
10 11
14
15
16
12
13
17
18
1. Датчик освещенности
2. Передняя камера
3. Динамик A
4. Динамик B
5. Разъем зарядной станции
6. Клавиша регулировки
громкости
7. Индикатор уведомлений
8. Кнопка питания
9. Разъем мини-гарнитуры
10. Микрофон
11. Инфракрасный датчик
12. Основная камера
13. Динамик B (то же, что 4)
14. Порт зарядного устройства/
кабеля USB
15. Отверстие для крепления
крышки порта зарядного
устройства
16. Гнездо карты памяти
17. Динамик А (то же, что 3)
18. Зона обнаружения NFC™
Для достижения оптимального
функционирования используйте аксессуары из
комплекта поставки устройства или совместимые
с ним.
Включение устройства
Включение устройства
Перед первым включением устройства
убедитесь, что заряда аккумулятора хватит не
менее чем на 30 минут работы.
1
Нажмите и удерживайте клавишу питания , пока
индикатор уведомлений не мигнет один раз.
2
Дождитесь окончания запуска устройства.
Активация экрана
Включение экрана
•
Нажмите и сразу отпустите клавишу питания .
•
Если включен режим «Пробуждение касанием», дважды
коснитесь экрана.
Чтобы включить режим «Пробуждение
касанием», перейдите на начальный экран, а
потом коснитесь >
Настройки
>
Дисплей
>
Выход из режима сна
.
March 28, 2013 08:55:50
SGP311-SGP312__Booklet_RU_1270-4841.2.pdf 1 of 2