- Manuals
- Brands
- Televic Manuals
- Conference System
- Plixus AE-R
Manuals and User Guides for Televic Plixus AE-R. We have 2 Televic Plixus AE-R manuals available for free PDF download: Installation Manual, User Manual
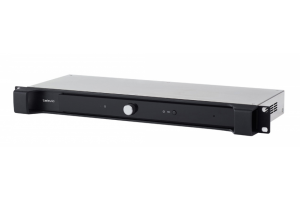
Overview
Figure 1-6
Plixus AE-R front view
The Plixus audio engine is a 19″ rack mountable device that provides audio processing and signal handling
required for the Plixus network. It controls all delegate units and interconnects to other systems either via
the external audio connections or control ports.
With the volume dial you can adjust the volume and using the record button you can easily start or stop
recording the meeting. In contrast to the multimedia engine the Plixus AE-R does not have an internal
power supply, meaning you will need at least one external power supply.
Recording Feature
Figure 1-7
How to use the recording feature
With the Plixus AE-R you can record the floor and up to three different languages. You can use the button
on the engine or the Plixus Core web server to control recording.
The LED next to the recording button shows the status of recording. The Plixus AE-R has an internal
recording capacity of 8 GB. Depending on the selected bitrate you can record over 100 hours of audio. Use
the USB port on the back to expand the recording memory.
You can download all Recorded meetings from the Plixus Core web server. There is an option to configure
different recording features using the web server. See «Recording» on page 88 for more information.
PL IX US AE- R
2 6
|
Detail Specifications: 1381/1381643-plixus.pdf file (06 Dec 2022) |
Accompanying Data:
Televic PLIXUS Engine, Gateway PDF User’s Installation Manual (Updated: Tuesday 6th of December 2022 09:21:12 AM)
Rating: 4.8 (rated by 78 users)
Compatible devices: DAG2000-24S, Porta KSI4300000.300, AT-iMG634 – R2, J8S, 6738, Thunderbird, S6S, AMG1000ALx-VCM.
Recommended Documentation:
Text Version of User’s Installation Manual
(Ocr-Read Summary of Contents, UPD: 06 December 2022)
-
108, 1. Select Confidea G3 coupling in the main menu. 2. When there is a WCAP available to transfer units to (i.e. with no units associated in the Plixus network) you will see the button Takeover under the WCAP that can transfer units. Click the button. 3. Select the WCAP to transfer the units to. 4. All units are now transferred to the selected WCAP. COUPL E WITH CONF IDEA G 3 108
… -
83, d. Serial number: of the unit e. Booths: all available booths together with the amount of desk per booth and the units. How To Initialize Units There are two initialization modes possible: Open access and Manual initialization. OPEN ACCESS This is the default mode. The main purpose of this mode is to provide a quick way to set up and/or test the system. Seats are automatically assign…
-
90, Manage Recorded Files Figure 1-39 How do download and remove your recorded files 1. Go to the location where your files were recorded: on the engine itself or on an external USB device. 2. You can search for specific files using the Search bar. 3. Download or remove single files using the buttons next to the file. 4. Select multiple files using the check boxes next to the file names. 5. Do…
-
6, General volume 91 Dynamics processing 91 Auto gain reduction 92 Audio routing 93 Audio routing configuration 93 Auxiliary levels 95 Additional options 95 Interpretation 96 Add new language 96 Add Interpretation configuration from CoCon 97 Operator 98 Regional settings 99 Network settings 100 Network information 100 Camera protocol 100 REST API 101 Users 102 System info 103 Couple with Co…
-
64, Televic PLIXUS INSTALL MICROPHONES General Microphone Characteristics All Plixus compatible units have a screw-lock connector to insert pluggable microphones. The recommended speaking distance from the mouth to the top of the microphone is between 20 to 40cm. In order to accommodate the variety of speakers and speaking distances, microphones are available in three different lengths: 30cm (D-MI…
-
87, VOX Voice activation (VoX) is a mode where the microphone button is not used. The microphone becomes active when it detects sound above a certain threshold. You can configure Voice activation in the Group discussion mode. The following settings can be configured: Parameter Description Threshold The system will monitor the ambient sound level and will activate…
-
38, DELEGATE EQUIPMENT You can add different types of units and other peripherals to your Plixus architecture depending on your requirements. Below you can find a list of all delegate equipment that you can combine with Plixus together with a short description. Audio Only Equipment Product Description Confidea (tabletop or flushmount) The audio only unit of the Plixus network. Lingua interpr…
-
69, CONFIGURATION This chapter describes how to configure the Plixus network using the Plixus Core web server. It includes a description of how to connect to the built-in web server together with how to initialize units and configure audio settings to guarantee a successful meeting.
… -
71, the difference between the two, see the table below. Plixus Core CoCon 5.2 Start/Stop initialization Yes Yes Retrieve initialization Yes Yes Creation of synoptics No Yes Support for multiple synoptics No Yes Configuration of interpreter booths Yes Yes Changing seat priority (delegate – chairman) Yes Yes Default microphone mode No default, the last configured mode is used Yes Me…
-
105, Televic PLIXUS COUPLE WITH CONFIDEA G3 With Plixus it is possible to combine wired units with wireless ones. You can add one or more Confidea G3 WCAPs to your Plixus network simply by connecting them to one of the conference ports. For more information on the installation of the WCAPs in the Plixus network see «Install Confidea G3» on page68 We advise to first coup…
-
51, Televic PLIXUS POWER SUPPLY DESIGN Power Availability And Consumption Table Power availability Plixus MME total power supply 500W (400W available for Plixus ports Plixus AE-R power supply 220W One single Plixus port allows 100W (engine ports or extension ports) Maximum power consumption Confidea F/T 5W Confidea CS 2W uniCOS 7″ 15W Plixus NEXT 7W Lingua Interpreter Desk — Au…
Recommended Instructions:
TS1000, MEX-M71BT, 700w — Treo Smartphone 60 MB, AWHE50HN — HD INTEGRATED CAMERA, Valvestate 2000 AVT series


-
OVERHEAD V-VALVE V-TWINDUAL ELEMENT AIR CLEANERPRESSURIZED LUBRICATION SYSTEMFULL TRANSISTOR IGNITION431cm3,9.7kW (13.0Hp) / 3600rpmLet the good times roll.PERFORMANCE CURVESEngine Type Forced air cooled 4-stroke, vertical shaft, OHV gasoline engineCylinder Layout 90°V-TwinBore x Stroke 65 x 65mm ( 2.56 x 2.56in. )Piston Displacement 431cm3( 26.3cu.in. )Compression Ratio 8.5 …
FH381V — 2
-
Operation: 1. Himax Brushless motors require brushless sensorless speed controls. Failure to use a brushless sensorless electronic speed control (ESC) can result in damage to the motor and/or ESC. A Castle Creations Phoenix series ESC is recommended for best performance. The standard setting for timing advance is recommended for best operation. 2. The three wires of the motor can be …
HC3510-1100 2
-
INSTRUCTIONS-PARTS LIST This manual contains IMPORTANT WARNINGS and INFORMATION G 308-105 REA0 AND RETAIN FOR REFERENCE ORACO Rev A LINE LAZER- GM 5000 . ‘ 3000 psi (210 bar) MAXIMUM WORKlN GASOLINE-POWERED AIRLESS Model 231-133, Series A With one gun, RAC [email protected] Dripless»» Tip Guard, Size 219 & 517 Switci-Tip&quo …
Series A 48
-
ENGLISHOwner’s Manual 212CCViper 4-Cycle EngineModel #’s: 24129 / 25145 / 31776 GAS/OILRATIO50:1© 2019 ArdisamAll Rights ReservedP/N: 31756 REV 2: 08/30/2019Get parts or technical assistance online at www.GetEarthquake.com or call (800) 345-6007FRANÇAIS — PAGE 21THIS INSTRUCTION BOOKLET CONTAINS IMPORTANT SAFETY INFORMATION. PLEASE READ AND KEEP FOR FUTURE REFERENCE.24129 SHOWN31776 S …
24129 40
Additional Information:
Popular Right Now:
Operating Impressions, Questions and Answers:
Артикул: 11171
Центральный блок конференц-систем Plixus с функцией записи
Сумму предоплаты уточняйте у менеджера.
- Описание
- Скачать
Televic Plixus AE-R Центральный блок конференц-систем Plixus с функцией записи
| Название файла | Размер файла | Тип материала | Описание | Скачать |
|---|---|---|---|---|
| Plixus AE-R Leaflet_ru.pdf | 1.7 Мб | Брошюра | Plixus AE-R Leaflet_ru | Скачать |
| Plixus_AE_R_71.98.2902-1.2a_ru.pdf | 3.84 Мб | Брошюра | Plixus_AE_R_71.98.2902 | Скачать |
Table of Contents for Televic Plixus Series:
-
VIDEO-IN Video-In Box Through the Plixus Video-IN (V-IN) box you can insert a HDMI video stream anywhere in the Plixus network. There are two modes available for the V-IN box: Fixed routing Push to show You can use multiple V-IN boxes in a Plixus network. Group V-IN boxes in order to create a presentation stream based on a push to show principle (using the Video-Request button or dry contacts). A total of six streams ca
-
Install Confidea FLEX MANAGE LICENSES In comparison to the Confidea Tabletop, there is only one Confidea FLEX unit. Through licenses, you can activate more functions whenever you want. To activate or deactivate a license, follow the procedure described below: 1. Go to the Initialization page of the Plixus web server. 2. Select Manual initialization and click Open initialization. 3. All units now show the License screen. 4. Press the microphone button to initialize the unit, this activates the license screen. 5. Blue buttons indicate
-
UNIBOX The uniBOX comes with all connections to combine almost any screen with different Confidea F modules such as a microphone button, a voting board, an RFID badge reader, and different other components. Link the uniBOX to a desktop screen or go for a more integrated look, and combine the uniBOX with a motorized screen that disappears into the table. You can power the uniBOX over the Plixus network or you can power it using the snap and lock mini DIN power connector, for more information s
-
Figure 1-21 Plixus top view Figure 1-22 Plixus bottom view The Plixus has the following components: 1. Front screen 2. LED light: lights up when you press the request button on the nameplate 3. Back screen: can be different from the front screen 4. Request button: push button to indicate request to speak 5. USB connection 6. Two Plixus conference ports When the nameplate is connected via USB as well as the Plixus conference ports, then the nameplate will always use the USB connection. PLIX US NAMEPL ATE PRO PERTIES 4
-
INSTALL THE UNICOS UNITS IN THE RESPECTIVE MOUNTING BRACKET You can mount the uniCOS F/MM7 and uniCOS F/MM10 as a tabletop unit using the available brackets (uniCOS F/MM7 bracket: 71.98.0012; uniCOS F/MM10 bracket 71.98.0013). Follow the descriptions described here to mount the brackets on a fixed surface and insert the units into the bracket. Mount UniCOS F/MM 7 In The Bracket 1 2 TORX T10 69 27.5 27.5 69 101 34.4 10 40 Ø 2.5 Ø 2.5Ø 2.5 Ø 2.5 Ø 3 TABLE CUTOUT INSTAL L THE UNICO S UNITS IN THE RESPECTIV E
-
OPERATOR On the Operator page you can control the microphones in the meeting and see how is speaking or requesting to speak. The Operator page consists out of two parts: Figure 1-69 The Operator page List Description Speakers & request Shows all active microphones , all requests (only possible with Request microphone mode) and replies (if configured). Click on an active microphone to switch it off. Click on a microphone i
-
INSTALL CABLES Use CAT 5e cables to connect Plixus AE-R or MME to the delegate and chairmen units, and to connect the different units in a branch / loop. For more information on cable details, see «Cable requirements» on page63. Televic has standard pre-made cables available in different lengths: ICC5/2 2 m ICC5/5 5 m ICC5/10 10 m ICC5/20 20 m The voltage level at the output of the central unit is 48 V. A voltage drop is caused by the length of the cable and the number of units. The last unit of the branch should receive at least 36 V. INSTAL
-
Combine Interpretation With Wireless Units In the Confidea G3 unit product range, multiple units that can support that support channel selection are available. Couple such units with the Plixus engine to receive the channels from the Lingua Interpreter Desks in your Plixus network. televic REC Interpretation over RF FLOOR MICROPHONE MUTE ! » # $ % & ‘ FLOOR MICROPHONE MUTE ! » # $ % & ‘ Figure 1-34 How to distribute languages using radio f
-
Activate/deactivate intercom: click the intercom icon to activate the intercom function of your unit or booth. Click the icon to deactivate it. Intercom allows the operator or participants with a Lingua ID, multimedia or Confidea units to call each other. If Intercom is active on a uniCOS unit then the uniCOS interface has an additional tab. On this tab the participant can accept the call or initiate a new call. Lingua ID units have an additional menu item. See «Use Intercom on delegate unit
-
INTERPRETATION On the Interpretation page you configure the languages needed for the meeting. You can add up to eleven channels. Figure 1-66 Interpretation page Add New Language To add a language configuration, click the bottom empty field in the table in the Column Name. You can define the following parameters: Parameter Description Name Name the language, not used for display but is used for the API output. Display Text to disp
-
PLIXUS AE-R Overview Figure 1-6 Plixus AE-R front view The Plixus audio engine is a 19″ rack mountable device that provides audio processing and signal handling required for the Plixus network. It controls all delegate units and interconnects to other systems either via the external audio connections or control ports. With the volume dial you can adjust the volume and using the record button you can easily start or stop recording the meeting. In contrast to the multimedia engine the Plixus AE-R does not have an internal p
-
CONFIGURATION This chapter describes how to configure the Plixus network using the Plixus Core web server. It includes a description of how to connect to the built-in web server together with how to initialize units and configure audio settings to guarantee a successful meeting.
-
Plixus AE-R power supply 32 Plixus power supply 32 Plixus NEXT 33 DIP switch table 34 General Network Extender Guidelines 34 Redundancy 35 Video-IN 37 Video-In box 37 Video request 38 Video-OUT 39 Video-Out box 39 Video selection 40 Video stream routing 41 uniBOX 42 Delegate equipment 44 Audio only equipment 44 Multimedia equipment 44 Advanced delegate equipment 44 Interpreter equipment 46 Plixus Nameplate Properties 47 Overview 47 Installation design Plixus component properties 50 100 Mbit powered over Plixus Ca
Questions, Opinions and Exploitation Impressions:
You can ask a question, express your opinion or share our experience of Televic Plixus Series device using right now.