Прибор представляет собой недорогой автоматический проектор знаков с галогенной лампой и дистанционным пультом управления. Рабочее расстояние e CСР-3100 от 2.5 до 8 метров, что позволяет использовать его и в самых маленьких и больших кабинетах. ССР-3100 имеет 5 вариантов комплектов оптотипов: подковы и буквы «Ш», повернутые в разные стороны, картинки для детей, русский алфавит и цифры. Существенное преимущество ССР-3100 заключается в наличии у него большого количества специальных тестов. ССР-3100 имеет таблицы для проведения следующих тестов:
Функции ССР-3100
1) Тесты на форию.
2) Таблицы для теста на вертикальное и горизонтальное совпадение (Используется для определения анизектонии (различие в восприятии размеров объекта) и для коррекции вертикальной и горизонтальной форий).
3) Специальная таблица по Шоберу (Используется для коррекции гиперфории)
4) Таблицы горизонтальных и вертикальных линий для проведения тестов по Ф. Граффе (для вертикальной и горизонтальной форий).
5) Таблица решетки для уточнения сферической составляющей при зрении «вдаль».
6) Таблица стерео теста. Исследование проводится в поляризационных очках. Приобретается как дополнительная опция.
7) Специальная таблица для бинокулярного балансового теста.
 Таблица для определения фории с фиксационными точками.
 Таблица для определения фории с фиксационными точками.
 9) Таблица с часовым диском для определения углов астигматизма.
10) Таблица с точками для цилиндрического теста с использованием кросс цилиндрических (XC) линз.
11) Красно/зеленая таблица.
12) Специальная четырех точечная таблица по Ворсу. Определение ведущего, ведомого галаза. Исследование бинокулярного зрения. Проиводится в крано-зеленых очках. Опция приробретается дополнительно.
Возможно управление показом слайдов с пульта электронного фороптора CDR-3100, что дает дополнительные удобства врачу и пациенту. Функция сохранения энергии выключает прибор после 10 мин бездействия. Цена и функциональность прибора очень привлекательны.
13) Проекция изображения на экран, обладающий поляризационным эффектом. Экран размером 400х500 мм. в комплекте поставки.
Технические характеристики ССР-3100
Параметры ССР-3100
Разрешающая спосособность……………………..50 линий на миллиметр
Рабочее состояние…………………………………….2.5 — 8 метров (на расстоянии 8 метров нужен
опциональный экран)
Количество слайдов, масок и оптотипов…….41 таблица — 34 маски, 5 вариантов комплектов
оптотипов.
Фильтры…………………………………………………….Красный/зеленый и поляризационный фильтры
Возможность фронтального угла наклона……+/- 15 градусов
Увеличение при проекции…………………………..21.5х (на расстоянии 5 м)
Возможность программирования…………………Возможно, самостоятельно программировать 2
программы до 30 элементов каждая или
пользоваться одной встроенной программой.
Время смены слайдов…………………………………0,15 сек.
Используемая лампа………………………………….. 6 В, 30 Вт.
Возможна поставка проектора знаков
с настенным креплением.
Подвижная конструкция дает
возможность легкого
позиционирования прибора.
Характеристики кронштейна:
1. Площадка крепления к стене — 180х70 мм.
2. Угол свободного перемещения относительно
крепления к стене — 180 градусов.
3. Вылет относительно осей вращения — 170 мм.

-
Contents
-
Table of Contents
-
Bookmarks
Quick Links
Service Manual
Chart Projector CCP-3100
1
Related Manuals for Huvitz CCP-3100
Summary of Contents for Huvitz CCP-3100
-
Page 1
Service Manual Chart Projector CCP-3100… -
Page 2: How To Use The Manual
1. GENERAL 1-1 How to use the manual Use this manual in accordance with the following flowchart at the time of initial inspection or when inspection, adjustment or repair are needed to correct problems: Manual Operation sequence Reference Page Occurrence of Initial Inspection a problem P.
-
Page 3: Product Outline
2. PRODUCT OUTLINE 2-1 Nomenclature [Fig. 1 Front View with Remote Control] [Fig. 2 Rear View] 1. Focusing Wheel & Lens 2. IR receiving window 3.Stand(table mount) 4. Wireless remote control 5. RS-232 Comm.Port 6. Cover Release 7. AC Power Inlet 8.
-
Page 4: Position Of Chart Projector
2-2 Optical system (Layout Drawing) 2-2-1 Position of Chart Projector The single tube projector must be installed at the same distance from the screen as the patient. [Fig. 3 Installation without mirrors] Install chart projector at desired position within 2.5~8m (8~26 feet). Set the projection angle of chart processor based on Screen.
-
Page 5
2-3 Electrical Construction Diagram CDR-3100 OP SERIAL PORT (OPTION) CHART PI MOTOR ASSY ASSY(CHART) VOUT DC12V DC12V Mask PI ASSY CONTROL PCB ASSY MOTOR VOUT ASSY(M) DC12V DC12V INLET SWITCH 220V/AC RED 220V/AC FUSE 110V/AC BROWN 110V/AC TRANSFORMER FUSE 0V/AC 110/220V LAMP INPUT… -
Page 6: Basic Principle
2-4 Basic Principle 2-4-1 Visual angle ※ Optometric standards The circular symbol corresponding to a visual acuity of 1.0, has a notch forming a visual angle of 1’ when viewed from a distance of 5 m. General Chart: [Fig. 4 E2]…
-
Page 7: Pcb Layout Drawing
2-5 PCB layout drawing 2-5-1 CONTROL PCB PILOT LAMP < Fig E3 > To connect TRANSFORMER(18V/AC) ASSY(2pins) To communicate RS-232(3pins) To communicate CAN(2pins) To connect CHART PI ASSY(5pins) To connect MASK PI ASSY(5pins) To connect MOTOR(CHART) ASSY(6pins) J10: To connect MOTOR(MASK) ASSY(6pins) J11: To connect TRANSFORMER(6V/AC 5A RED LINE) J12: To connect LAMP(6V, 30W Halogen)
-
Page 8: Repair Work
3. REPAIR WORK 3-1 Inspection/adjustment procedures 3-1-1 Inspection items ① If the pilot lamp(green) lights when the power is turned on ② If the halogen lamp lights about 10 seconds after the power is turned on ③ If the entire chart is uniformly bright ④…
-
Page 9: Inspection Criteria
3-1-2 Inspection criteria Positional relationship between chart and mask When a vertical line mask is used: No right and left parts of the chart must be visible (when viewed from the correct position). (Chart symbols must virtually align with the center of the mask.) No adjoining parts of the chart must be visible.
-
Page 10
3-2 Disassembly/Reassembly Producedures 3-2-1 NAME OF ILLUSTRATED PARTS NAME OF PART STAND ASS’Y & BODY ASS’Y disassembly and assembly BODY COVER(U) ASS’Y & FRONT COVER ASS’Y disassembly and assembly PCB ASS’Y & POWER SOCKET ASS’Y disassembly and assembly MECHA ASS’Y & BODY COVER(L) ASS’Y disassembly and assembly MECHA ASS’Y disassembly and assembly STAND ASS’Y disassembly and assembly BODY COVER(L) ASS’Y &… -
Page 11
3-2-2 Parts Exchange Exchange Parts Exchange Method Sequence STAND ASS’Y 1. Disassembly & ① To untie 1pcs of SCREW(2) BODY ASS’Y through six angles wrench and Disassembly and assembly disconnect STAND ASS’Y(3) 2. Assembly ① On the contrary to above sentence #1… -
Page 12
Exchange Parts Exchange Method Sequence BODY COVER(U) ASS’Y 1. Disassembly & ② To untie 2pcs of SCREW(2) FRONT COVER ASS’Y through six angles wrench and disconnect BODY COVER-U(1) Disassembly and assembly ③ To untie 2pcs SCREW(5) and 1pcs of SCREW(6) through + driver and disconnect FRONT COVER ASS’Y(4) 2. -
Page 13
Exchange Parts Exchange Method Sequence PCB ASS’Y 1. Disassembly & ① To untie 4pcs of SCREW(2) through POWER SOCKET ASS’Y + driver and disconnect PCB ASS’Y(1) Disassembly and assembly ② To disconnect all connectors on the PCB ASS’Y(1) ③ To untie 4pcs of SCREW(4) through + driver and disconnect POWER SOCKET ASS’Y(3) 2. -
Page 14
Exchange Parts Exchange Method Sequence MECHA ASS’Y 1. Disassembly & ① To untie 4pcs of SCREW(2) through BODY COVER(L) ASS’Y + driver and disconnect MECHA ASS’Y(1) Disassembly and assembly 2. Assembly ① On the contrary to above sentence #1… -
Page 15
Exchange Parts Exchange Method Sequence MECHA ASS’Y 1. Disassembly Disassembly and ① To untie 1pcs of SCREW(1) and 2pcs of SCREW(2) assembly through + driver and disconnect MAIN PLATE ASS’Y(3) ② Remove CHART COVER(4) from CHART BODY(21) ③ To untie 4pcs of SCREW(5) through six angles wrench and disconnect MASK F/L ASS’Y(6) ④… -
Page 17
Exchage Parts Exchange Items Sequence STAND ASS’Y 1. Disassembly Disassembly and assembly ① To untie 3pcs of SCREW(3) through + driver and disconnect STAND HOLD GUIDE(2) ② To untie 4pcs of SCREW(5) through + driver and disconnect FOOT(4) 2. Assembly ①… -
Page 18
Exchange Parts Exchange Method Sequence BODY COVER(L)ASS’Y 1. Disassembly & ① To untie 2pcs of SCREW(3) through + driver BUTTON ASS’Y and disconnect BUTTON ASS’Y(2) Disassembly and assembly * Part No.(1) : BODY COVER(L) ② To untie 2pcs of SCREW(4) through + driver and disconnect BUTTON(5) &… -
Page 19
Exchange Parts Exchange Method Sequence BODY COVER(U) ASS’Y 1. Disassembly Disassembly and assembly ① To untie 2pcs of SCREW(3) through + driver and disconnect LOCK(U)(2) Part No.(1) : BODY COVER(U) 2. Assembly ② On the contrary to above sentence #1… -
Page 20
Exchange Parts Exchange Method Sequence POWER SOCKET ASS’Y 1. Disassembly Disassembly and assembly ① Take out POWER S/W(1) from POWER SOCKET PLATE(1) ② Take out FUSE INLET(3) from POWER SOCKET PLATE(1) ③ To untie 2pcs of POST NUT(5) through HEXAGON BOX driver and disconnect SERIAL DESUB(4) ④… -
Page 21
Exchange Parts Exchange Method Sequence MAIN PLATE ASS’Y 1. Disassembly Disassembly and assembly ① To untie 3pcs of SCREW(3) & WASHER(4) through + driver and disconnect TRANSFORMER(2) ② To untie 3pcs of SCREW(6) through + driver and disconnect CYLINDER SUPPORT(5) Part No.(1) : MAIN PLATE 2. -
Page 22
Exchange Parts Exchange Method Sequence CHART ASS’Y 1. Disassembly & ① To untie 2pcs of SCREW(3) through + driver MOTOR and disconnect CHART SUB ASS’Y(2) Disassembly and assembly Part No.(1) : STEPPING MOTOR ② To untie 2pcs of SCREW(6) through + driver and disconnect SENSOR GUIDE(5) Part No.(4) : CHART ASS’Y 2. -
Page 23
Exchange Parts Exchange Method Sequence MASK ASS’Y 1. Disassembly & ① To untie 2pcs of SCREW(3) through + driver MOTOR and disconnect CHART ASS’Y(2) Disassembly and assembly Part No.(1) : STEPPING MOTOR ② To untie 2pcs of SCREW(6) through + driver and disconnect SENSOR GUIDE(5) Part No.(4) : CHART(4) 2. -
Page 24
3-2-3 CCP-3100 DRAWING… -
Page 25: Part List
3-2-4 PART LIST Exchange Sequence #1> < CODE PARTS NAME REMARK BODY ASS’Y STAND ASS’Y STAND HOLD GUIDE & STAND HOLD SCREW Exchange Sequence #2> < CODE PARTS NAME REMARK E0MASSY004 BODY COVER(U) ASS’Y WRENCH SCREW , M3*25L , BLACK EOMASSY005 FRONT COVER ASS’Y PH SCREW , M3X12L, FZY , WITH WASHER &…
-
Page 26
Exchange Sequence #4> < CODE PART NAME REMARK MECHA ASS’Y PH SCREW ,M4X6L , FZY Exchange Sequence #5> < PARTS NAME REMARK PH SCREW , M3X8L, FZB , WITH WASHER PH SCREW , M3X8L, FZB , WITH WASHER MAIN PLATE ASS’Y 2010A00E001 CHART COVER WRENCH SCREW , M4X10L , BLACK , NYLOCK… -
Page 27
PH SCREW , M3X6L, FZY OPTION EOEHAR3001 HARNESS(PHOTO INTERRUPTER CHART) PH SCREW , M3X6L, FZY EOEHAR3001 HARNESS(PHOTO INTERRUPTER MASK) 1100MP0E003 CHART BODY(20W) Exchange Sequence #6> < PARTS NAME REMARK 1100MS0E001 STAND 1210A00E001 STAND HOLD GUIDE PH SCREW , M3X12L, FZY , WITH WASHER 3000A00E001 FOOT PH SCREW , M3X8L, FZB , WITH WASHER… -
Page 28
Exchange Sequence #8> < PARTS NAME REMARK 2000A00E001 BODY COVER(U) 1020A00E001 LOCK(U) TAPING SCREW , Φ3X7L, FZY Exchange Sequence #9> < PARTS NAME REMARK 1030MP0E004 POWER SOCKET PLATE 7600S0F0010 POWER S/W 7604ACI0002 FUSE INLET(SCHURTER) E0EHAR2001 HARNESS(SERIAL DESUB) POST NUT , M3/5L E0EHAR2000 HARNESS(CAN) WASHER — HARNESS(CAN) -
Page 29
Exchange Sequence #11> < PARTS NAME REMARK 6430TMT2300 STEPPING MOTOR CHSRT SUB ASS’Y SCREW , M4X10L E0MASSY003 CHART ASS’Y 1030MP0E001 SENSOR GUIDE PH SCREW , M2X4L, FZB Exchange Sequence #12> < PARTS NAME REMARK 6430TMT2300 STEPPING MOTOR MASK SUB ASS’Y SCREW , M4X10L E0MASSY010 MASK ASS’Y… -
Page 30: Troubleshooting Procedure
3-3 Troubleshooting Procedure This section deals with potential problems mainly associated with the electric system that can be corrected only by PCB or unit replacement. 1. Abnormalities in Transformer · Pilot lamp does not light. 2. Incorrect initial setting · Chart or mask keeps scrolling. ·…
-
Page 31
3-3-1 Abnormalities in power transformer MAIN BOARD 6VAC 6VAC 18VAC 18VAC WHITE WHITE INLET SWITCH 220V/AC RED 220V/AC FUSE 110V/AC BROWN 110V/AC FUSE 0V/AC TRANSFORMER < Fig E5 > CHECK POINTS Check J1 AC input -> If abnormal: When Inspect the J1, voltage level is 18V/AC(±3V/AC). ->… -
Page 32
3-3-2 Incorrect initial setting Chart or Mask keeps scrolling Halogen lamp does not light Initial setting sequence: Chart zero detection 2. Mask zero detection 3. Halogen lamp lighting CHECK POINTS — In the case of abnormal zero detection(to be checked for by connecting a oscilloscope). At this time, GND should be connected to GND. -
Page 33
3-3-3 Abnormalities in remote control Remote control is inoperable Inspect battery of remote controller. Change the remote controller. And check again If it does not work, change the main PCB 3-3-4 Misalignment Operation is impossible Operating position is incorrect CHECK POINTS — Malfunctions of Main PCB 1.
-
Contents
-
Table of Contents
-
Bookmarks
Quick Links
Related Manuals for Huvitz CCP-3100
Summary of Contents for Huvitz CCP-3100
-
Page 2
——————————————————————— CCP-3100 Opreator’s Manual Operator’s Manual Chart Projector… -
Page 3: Important Notice
HUVITZ reserves the right to make changes in its products or product specifications at any time and without prior notice, and is not required to update this documentation to reflect such changes.
-
Page 4: Table Of Contents
——————————————————————— CCP-3100 Opreator’s Manual All rights are reserved. Under copyright laws, this manual may not be copied, in whole or in part, without the prior written consent of HUVITZ Co., Ltd. Document Number: 9000OMCP001-A, published in 2006/07/20 CONTENTS Introduction ………………….5 1.1.
-
Page 5
CCP-3100 Operator’s Manual ———————————————————————— Input and Use of Program ………………18 7.1. How to input user’s program …………….18 7.2. How to use your stored programs…………..19 Types of Chart (Type C is Standard)…………..20 Maintenance and Repair………………21 9.1. Lamp Replacement………………21 9.2. Fuse Replacement……………….22 The battery of Remote Controller Replacement …..……………………….23… -
Page 6: Introduction
1.1. Outline of product HUVITZ CCP-3100 is an automatic chart projector which provides 41 different charts including red/green and polarized filters for the eye optometry. Users can select the desired charts instantaneously by cordless remote controller. Charts move quickly and quietly.
-
Page 7: Safety Information
CCP-3100 Operator’s Manual ———————————————————————— 2.Safety Information 2.1 Introduction Safety is everyone’s responsibility. The safe use of this equipment is largely dependent upon the installer, user, operator, and maintainer. It is imperative that personnel study and become familiar with this entire manual before attempting to install, use, clean, service or adjust this equipment and any associated accessories.
-
Page 8: Safety Symbols
——————————————————————— CCP-3100 Opreator’s Manual 2.2 Safety Symbols The International Electrotechnical Commission (IEC) has established a set of symbols for medical electronic equipment, which classify a connection or warn of any potential hazards. The classifications and symbols are shown below. Save these instructions I and O on the power switch represent ON and OFF respectively.
-
Page 9: Environmental Factors
CCP-3100 Operator’s Manual ———————————————————————— 2.3 Environmental factors Avoid the following environments for operation or storage: Where the equipment is exposed to water vapor. Don’t operate an equipment with a wet hand. Where the equipment is exposed to direct sunlight. Where the temperature changes extremely.
-
Page 10: Safety Precautions
The equipment must be operated only by, or under direct supervision of a properly trained and qualified person. Customer maintenance of this equipment may only be performed as stated in the User’s Manual. Any additional maintenance may only be performed by HUVITZ service technicians or other authorized persons.
-
Page 11
CCP-3100 Operator’s Manual ———————————————————————— The manufacturer is only responsible for effects on safety, reliability, and performance of this equipment when the following requirements are fulfilled: (1) The electrical installation in the respective room corresponds to the specifications stated in this manual and (2) This equipment is used, operated, and maintained according to this manual. -
Page 12: Features
Aniseikonia tests. 34 Masks (vertical line, horizontal line, and single character) 2.5 ~ 8 m (8 ~ 26 feet) projection range Cordless Remote Control User Programmable (2 programs up to 30 charts each) Easily networked with HUVITZ’s Digital Refractor…
-
Page 13: Notes For Using The Instrument
Don’t use organic solution such as alcohol, thinner, benzene, etc. to clean the surface of this instrument. It may damage the instrument. When moving the CCP-3100, always make sure the power supply is off, and then lift the bottom of the unit with both hands.
-
Page 14: Configurations
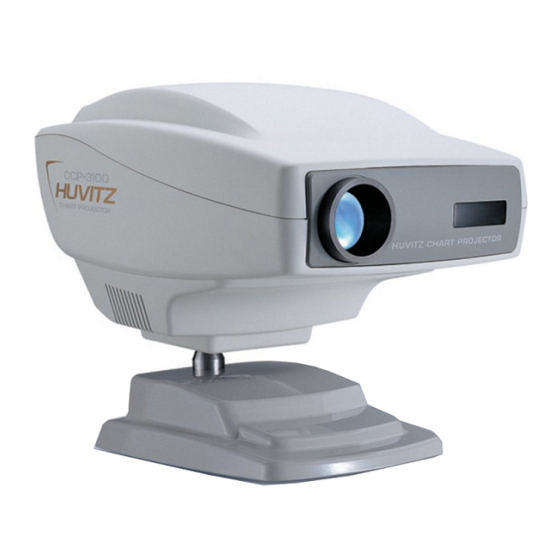
——————————————————————— CCP-3100 Opreator’s Manual 5.Configurations 5.1 Main Body The CCP-3100 Chart Projector is mainly composed of the body, stand, screen and remote control. [Fig. 1 Front View with Remote Control] 1. Projection lens 2. IR receiving window 3. Stand (table mount)
-
Page 15: Main Body Cont
CCP-3100 Operator’s Manual ———————————————————————— 5.2 Main Body cont. [Fig. 2 Bottom View] [Fig. 3 Rear View] 1. Focusing Wheel 2. Power ON/OFF LED 3.110/220 Volt Switch 4. Power On/Off Switch 5. Tilting Adjustment 6. RS-232 Comm.Port 7. CAN (Controller Area Network) 8. AC Power Inlet 9.
-
Page 16: Accessories
——————————————————————— CCP-3100 Opreator’s Manual 5.3 Accessories [Fig.4 Accessories] 1. Screen 2. Allen wrench (5mm) 3. Allen wrench (2.5mm) 4. Power cable 5. Dust Cover 6. Batteries (2 size AA(LR6) 1.5V) 7. Polaroid glasses (Optional) 8. Red/Green glasses (Optional) 9. Fuse 10.
-
Page 17: Installation
CCP-3100 Operator’s Manual ———————————————————————— 6.Installation 6.1 Position of Chart Projector The single tube projector must be installed at the same distance from the screen as the patient. [Fig. 6 Installation without mirrors] Install chart projector at desired position within 2.5~8m (8~26 feet).
-
Page 18: How To Obtain Correct Letter Size And Focus (Zooming Type Only)
——————————————————————— CCP-3100 Opreator’s Manual 6.2 How to obtain correct Letter Size and focus (Zooming Type only) Install chart projector at desired position of 2.5~8m (8~26 feet) Measure the distance from patient to screen Refer to the test scale shown in the Appendix A Have someone hold the test scale at the screen Project the 20/400(6/120, 0.05) alphabet “C”…
-
Page 19: Input And Use Of Program
CCP-3100 Operator’s Manual ———————————————————————— 7.Input and Use of Program 7.1 How to input user’s program Step 1. Press the “LIGHT” button once. Results: The light goes out. Step 2. Press the “PGM 1” button three times. Results: The light will come on and the chart projector will display the first chart of the default program.
-
Page 20: How To Use Your Stored Programs
——————————————————————— CCP-3100 Opreator’s Manual 7.2 How to use your stored programs. Step 1. Press “ PGM 1 ” or “PGM 2” to select the program of your choice. Step 2. Use the “Program ” or “Program ” to scroll through your stored…
-
Page 21: Types Of Chart (Type C Is Standard)
CCP-3100 Operator’s Manual ———————————————————————— 8.Types of Chart (Type C is Standard) [Fig. 7 Types of Chart]…
-
Page 22: Maintenance And Repair
——————————————————————— CCP-3100 Opreator’s Manual 9.Maintenance and Repair Maintenance : There is no periodic or routine user maintenance required. 9.1 Lamp Replacement Turn off power and disconnect the power cord. Allow the projector to cool down for about 5 minutes before replacing the lamp.
-
Page 23: Fuse Replacement
CCP-3100 Operator’s Manual ———————————————————————— [Fig. 8 Lamp assembly] Install the lamp securely as showen in the Fig.8 Make sure that you install it in the correct direction. 9.2 Fuse Replacement Turn off power, and disconnect the power cord. Pull out the plastic cover at the lower part of power socket, to replace the fuse.
-
Page 24: The Battery Of Remote Controller Replacement
——————————————————————— CCP-3100 Opreator’s Manual [Fig. 9 Fuse assembly] 9.3 Replacement the Battery of Remote Controller Remove the battery cover of the remote controller. Replace the batteries and the battery cover to the remote controller. NOTE : Be sure to observe the polarity marks (plus + & minus — ) inside the battery compartment.
-
Page 25: Cleaning
CCP-3100 Operator’s Manual ———————————————————————— 9.4 Cleaning There are no cleaning requirements other than regular office housekeeping, such as dusting. 1. Wipe the cover and the screen with a dry soft cloth when they get dirty. 2. If for some reason the projector should become soiled,wipe it clean with the damp lint-free cloth and mild detergent.
-
Page 26: Specifications
——————————————————————— CCP-3100 Opreator’s Manual 10.Specifications 41charts -34 mask, Red/green& Polarization Charts Filters Distance of projection 2.5~8m(Optional: 8m screen) Chart Rotation Speed Average 0.15 sec Chart magnification 30X (When 5m distance) Power saving Automatic Lamp Off (10 min) Program 2 programs with a maximum of 30 charts each…
-
Page 27: Components List
CCP-3100 Operator’s Manual ———————————————————————— 11.Components List 11.1 Standard accessories 1. Remote control -1 2. Screen (400X500mm) -1 3. Table stand -1 4. Dust cover -1 5. Power cable –1 For use of equipment in rated voltage less than 125Vac,minimum 6A,Type SJT or SVT , 18/3AWG,10A, max 3.0m long : One end with Hospital Grade…
-
Page 28: Service Information
——————————————————————— CCP-3100 Opreator’s Manual 12.Service Information How to contact service: If there are any problems with the equipment, please follow the steps below: First of all, refer to the 9. Maintenance and Repair sections according to the problem that you are encountered. And then follow the suggested sequences.
-
Page 29
CCP-3100 Operator’s Manual ———————————————————————— If you can’t contact with your local distributor, you can directly get in touch with the service department of the HUVITZ using the phone number and the address written in the below table. How to Contact HUVITZ Co., Ltd… -
Page 30
——————————————————————— CCP-3100 Opreator’s Manual Appendix A Test Scale Hold this test scale at the Screen, and according to the refracting distance from the patient’s eye to the screen such as 3m, 4m, 5m or 6m position the projector backward and forward to fit the projector Alphabet 400 chart “C” with this Scale… -
Page 31
CCP-3100 Operator’s Manual ————————————————————————… -
Page 32
——————————————————————— CCP-3100 Opreator’s Manual… -
Page 33
CCP-3100 Operator’s Manual ————————————————————————…
Регистрационное удостоверение на медицинское изделие РЗН 2013/1168
Внимание, документ содержит изменения:
История вносимых изменений
Фактический адрес заявителя
Юридический адрес заявителя
Фактический адрес изготовителя
Юридический адрес изготовителя
118500
Проектор знаков ССР-3100
Проектор знаков ССР-31001. Экран проекционный к CCP-3100.
2. Крепление настенное для CCP-3100.
3. Подставка для CCP-3100.
4. Пульт дистанционного управления для CCP-3100.
5. Батарейки (стартовый набор).
6. Чехол для CCP-3100.
7. Кабель сетевой.
8. Комплект сервисный: предохранители, лампа запасная для CCP-3100.
9. Инструкция по эксплуатации.
Подробнее
Развернуть
Проектор знаков ССР-3100I. Проектор знаков ССР-3100:
1. Экран проекционный к CCP-3100;
2. Крепление настенное для CCP-3100;
3. Подставка для CCP-3100;
4. Пульт дистанционного управления для CCP-3100;
5. Батарейки (стартовый набор);
6. Чехол для CCP-3100;
7. Кабель сетевой;
8. Комплект сервисный: предохранители, лампа запасная для CCP-3100;
9. Инструкция по эксплуатации.
Подробнее
Развернуть
Проектор знаков ССР-3100 (см. Приложение на 1 листе)1.Экран проекционный к ССР-3100
2.Крепление настенное для ССР-3100
3.Подставка для ССР-3100 4.Пульт дистанционного управления для ССР-3100
5.Батарейки (стартовый набор)
6.Чехол для ССР-3100 7.Кабель сетевой
8.Комплект сервисный: предохранители, лампа запасная для ССР-3100
9.Инструкция по эксплуатации
Подробнее
Развернуть
|
Detail Specifications: 754/754462-ccp3100.pdf file (26 Dec 2022) |
Accompanying Data:
Huvitz CCP-3100 Projector PDF Operator’s Manual (Updated: Monday 26th of December 2022 02:52:03 AM)
Rating: 4.2 (rated by 64 users)
Compatible devices: XS 2000 HT, EIP-10V, HCP-7000, LP400, 8107HWI, FLATCOB40, PLC-SU20E, PJ258D — XGA DLP Projector.
Recommended Documentation:
Text Version of Operator’s Manual
(Ocr-Read Summary of Contents, UPD: 26 December 2022)
-
2, Huvitz CCP-3100 ——————————————————————— CCP-3100 Opreator’s Manual 1 Operator’s Manual Chart Projector
… -
32, ——————————————————————— CCP-3100 Opreator’s Manual 31 5 m
… -
10, Huvitz CCP-3100 ——————————————————————— CCP-3100 Opreator’s Manual 9 Avoid places where the ambient temperature falls below 10℃ or exceeds 40℃ for normal operation, or below -10℃ or exceeds 40℃ (14℉-104℉) for transportation and storage. Humidity should be maintained between 30 and 75% for normal operation, transportation and …
-
5, 4 CCP-3100 Operator’s Manual ———————————————————————— 7. Input and Use of Program ………………………………………………………………………….18 7.1. How to input user’s program ………………………………………………………………….18 7.2. How to use your stored programs. …
-
19, Huvitz CCP-3100 18 CCP-3100 Operator’s Manual ———————————————————————— 7.Input and Use of Program 7.1 How to input user’s program Step 1. Press the “LIGHT” button once. Results: The light goes out. Step 2. Press the “PGM 1” button three times. Results: The light …
-
17, 16 CCP-3100 Operator’s Manual ———————————————————————— 6.Installation 6.1 Position of Chart Projector The single tube projector must be installed at the same distance from the screen as the patient. [Fig. 6 Installation without mirrors] 1. Install chart projector at desired position within…
-
30, ——————————————————————— CCP-3100 Opreator’s Manual 29 Appendix A Test Scale Hold this test scale at the Screen, and according to the refracting distance from the patient’s eye to the screen such as 3m, 4m, 5m or 6m position the projector backward and forward to fit the projector Alphabet 400 chart “C” with this Scale …
-
26, ——————————————————————— CCP-3100 Opreator’s Manual 25 10.Specifications Charts 41charts -34 mask, Red/green& Polarization Filters Distance of projection 2.5~8m(Optional: 8m screen) Chart Rotation Speed Average 0.15 sec Chart magnification 30X (When 5m distance) Power saving Automatic Lamp Off (10…
-
25, 24 CCP-3100 Operator’s Manual ———————————————————————— 9.4 Cleaning There are no cleaning requirements other than regular office housekeeping, such as dusting. 1. Wipe the cover and the screen with a dry soft cloth when they get dirty. 2. If for some reason the projector should bec…
-
12, ——————————————————————— CCP-3100 Opreator’s Manual 11 3.Features Bright (halogen), high quality images Quiet, instantaneous chart selection 41 different charts including: red/green and polarizing filters, binocular balance tests, stereo tests, fixation disparity tests, fusion tests and Aniseikonia tests. 34 Masks …
-
11, 10 CCP-3100 Operator’s Manual ———————————————————————— 5. The manufacturer is only responsible for effects on safety, reliability, and performance of this equipment when the following requirements are fulfilled: (1) The electrical installation in the respective room corresponds to the specifications stated in this manual and (2)…
Recommended Instructions:
2409TL, VP940, MGR6875ADB — Gas Double Oven Range, FO611C070000000


-
Portable ProjectorLT260/LT240/LT220User’s ManualAbout this user’s manualThe fastest way to get started is to take your time and do every-thing right the first time. Take a few minutes now to review theuser’s manual. This may save you time later on. At the begin-ning of each section of the manual you’ll find an overview. If thesection doesn’t apply, you can s …
LT260 149
-
1PG-A10SPG-A10S-SLAN-A10TIn the interests of user-safety (Required by safety regulations in some countries) the set should be restoredto its original condition and only parts identical to those specified should be used.MODELSMODELLEPG-A10SPG-A10S-SLLCD PROJECTORLCD PROJEKTORIm lnteresse der Benutzersicherheit (erforderliche Sicherheitsregeln in einigen Ländern) muß das …
PG-A10S — Notevision SVGA LCD Projector 128
-
ENGLISH1LCD Projector8960WUSS/8951WUSS 8960WSS/8951WSSUser’s Manual (concise)Thank you for purchasing this product.Visit Dukane AV website at www.dukaneav.com and look for the downloads pertaining to this model. The manuals , specifications, and links to the software for this product, will be listed.The web site SUPPORT page has the Product Downloads for all Data Video ProjectorsWARN …
8960WUSS 34
-
Connect the supplied power cord.Connecter le câble d’alimentation fourni.Conecte el cable de alimentación suministrado.Conecte o cabo de alimentação fornecido.Connect your computer to the projector.Connecter l’ordinateur au projecteur.Conectar el ordenador al proyector.Conecte seu computador ao projetor.Supplied computer cable (VGA)Câble d’ordinateur fourni (VGA)Cable de ordenador …
PJ WX5361N 6