CPS (ПО для пользовательской настройки радиостанций)
есть
Блокировка при занятом канале
есть
Возможность передачи текстовых сообщений
есть
Голосовое оповещение
есть
Индивидуальные вызовы
есть
Интегрированные каналы передачи голоса и данных
есть
Интеллектуальная аудиосистема
есть
Оповещение о пропущенных вызовах
есть
Переадресация вызовов
есть
Поддержка GPS
L1 = 1575,42 МГц* L2 = 1227,60 МГц* L5 = 1176,45 МГц*
Программируемые кнопки
есть
Сигнализация
MDC (кодирование/декодирование), Quik-Call II (кодирование/декодирование), DTMF (кодирование)
Таймер времени ожидания
есть
Типы сканирования
Обычный набор, Приоритет, Двойной приоритет, Удаление мешающего канала, По группам пользователей, Группа «Все», Система, Возврат в исходную позицию
Функция «Одинокий работник»
есть
Цифровая частная линия
есть
Диапазон частот, МГц
136-174
Ёмкость аккумулятора, мАч
1600
Кодирование DCS / CTCSS
есть
Мощность передатчика, Вт
5
Напряжение питания, В
7.4
Переключение мощности передатчика
есть
Рабочая температура, °C
от -30 до +60
Стабильность частоты, ±ррт
0.5
Стандарт безопасности
IP 67, MID, ATEX
Чувствительность, мкВ
0.25
Шаг частоты, кГц
12,5 / 25

ID: 68012007050
Likes:
0
Download
Other languages
Additional Information
Technology:
PCR
Model:
DP4401Ex MA , DP4401Ex
Version:
CP
Type:
User Guide
Language:
Русский
- Description
Описание
Руководство пользователя портативной радиостанции DP4401 EX/DP4401 EX MA без клавиатуры

Содержание
Русский
i
В данном руководстве содержится вся н
пользователю информация по эксплуата
систем серии MOTOTRBO.
Содержание
В данном руководстве содержится вся необходимая
пользователю информация по эксплуатации
портативных систем серии MOTOTRBO.
Важная информация по безопасности . . . . . . . . iv
Сведения о безопасности и воздействии
излучаемой радиочастотной энергии . . . . . . . . .iv
Версия П/О . . . . . . . . . . . . . . . . . . . . . . . . . . . . . . . . iv
Информация об авторском праве на
компьютерное программное обеспечение . . . . . v
Меры предосторожности при обращении . . . . . vi
Начало работы . . . . . . . . . . . . . . . . . . . . . . . . . . . . . 1
Как пользоваться данным руководством . . . . . . . 1
О чем спросить у вашего
дилера/системного
администратора . . . . . . . . . . . . . . . . . . . . . . . . . . . 1
Подготовка радиостанции к работе . . . . . . . . . . . 2
Зарядка аккумулятора . . . . . . . . . . . . . . . . . . . . . . 2
Установка аккумулятора . . . . . . . . . . . . . . . . . . . . . 3
Установка антенны . . . . . . . . . . . . . . . . . . . . . . . . . 3
Установка поясного зажима . . . . . . . . . . . . . . . . . . 4
Установка крышки универсального разъема
(пылезащитной крышки) . . . . . . . . . . . . . . . . . . . . 4
Включение питания радиостанции . . . . . . . . . . . . 5
Регулировка громкости . . . . . . . . . . . . . . . . . . . . . . 5
Органы управления радиостанции . . . . . . . . . . . . 6
Органы управления радиостанции . . . . . . . . . . . . 6
Программируемые кнопки . . . . . . . . . . . . . . . . . . . 7
Назначаемые функции . . . . . . . . . . . . . . . . . . . . 7
Назначаемые настройки/Дополнительные
функции . . . . . . . . . . . . . . . . . . . . . . . . . . . . . . . . 8
Тангента РТТ . . . . . . . . . . . . . . . . . . . . . . . . . . . . . . 8
Переключение между конвенциональными
Аналоговым и Цифровым режимами
. . . . . . . . . . 9
Соединение IP-сайта . . . . . . . . . . . . . . . . . . . . . . 10
Capacity Plus . . . . . . . . . . . . . . . . . . . . . . . . . . . . . 10
Linked Capacity Plus . . . . . . . . . . . . . . . . . . . . . . . 11
Средства индикации радиостанции . . . . . . . . . . 12
Светодиодный индикатор . . . . . . . . . . . . . . . . . . . 12
Индикаторные тоны . . . . . . . . . . . . . . . . . . . . . . . 13
Звуковые тоны . . . . . . . . . . . . . . . . . . . . . . . . . . . . 13
Прием и выполнение вызовов . . . . . . . . . . . . . . 14
Выбор зоны . . . . . . . . . . . . . . . . . . . . . . . . . . . . . . 14
Выбор канала . . . . . . . . . . . . . . . . . . . . . . . . . . . . 14
Прием радиовызова . . . . . . . . . . . . . . . . . . . . . . . 15
Прием Группового вызова . . . . . . . . . . . . . . . . . 15
Прием Частного вызова . . . . . . . . . . . . . . . . . . 16
Прием выборочного вызова и ответ
на него . . . . . . . . . . . . . . . . . . . . . . . . . . . . . . . . 17
Прием Общего вызова . . . . . . . . . . . . . . . . . . . 17

Содержание
Русский
ii
Выполнение радиовызова . . . . . . . . . . . . . . . . . . 18
Выполнение вызова с помощью Ручки
выбора каналов . . . . . . . . . . . . . . . . . . . . . . . . . 18
Выполнение Группового вызова . . . . . . . . . . 18
Выполнение Частного вызова . . . . . . . . . . . 19
Выполнение выборочного вызова . . . . . . . . 19
Выполнение Общего вызова . . . . . . . . . . . . . 20
Прекращение радиовызова . . . . . . . . . . . . . . . . 21
Прямая связь . . . . . . . . . . . . . . . . . . . . . . . . . . . . 21
Функции мониторинга . . . . . . . . . . . . . . . . . . . . . . 22
Мониторинг канала . . . . . . . . . . . . . . . . . . . . . . 22
Непрерывный мониторинг . . . . . . . . . . . . . . . . 22
Продвинутые функции . . . . . . . . . . . . . . . . . . . . . 23
Списки сканирования . . . . . . . . . . . . . . . . . . . . . . 23
Сканирование . . . . . . . . . . . . . . . . . . . . . . . . . . . . 24
Включение и выключение сканирования . . . . 24
Ответ на вызов во время сканирования . . . . . 24
Удаление мешающего канала . . . . . . . . . . . . . 25
Восстановление мешавшего
канала . . . . . . . . 25
Многочастотное сканирование . . . . . . . . . . . . . . 25
Настройки сигналов оповещения о вызовах . . . 26
Функция Оповещение с нарастающей
громкостью . . . . . . . . . . . . . . . . . . . . . . . . . . . . . 26
Функция Оповещение о вызове . . . . . . . . . . . . . . 26
Прием Оповещения о вызове . . . . . . . . . . . . . 26
Посылка Оповещения о вызове с
помощью кнопки Вызов одним нажимом . . . . 26
Экстренный режим . . . . . . . . . . . . . . . . . . . . . . . . 27
Посылка Экстренного тревожного сигнала . . . 27
Посылка Экстренного тревожного сигнала
с вызовом . . . . . . . . . . . . . . . . . . . . . . . . . . . . . . 28
Посылка Экстренного тревожного сигнала
с последующей голосовой
передачей . . . . . . 28
Возврат в Экстренный режим . . . . . . . . . . . . . 30
Выход из Экстренного режима . . . . . . . . . . . . . 30
Работа с Текстовыми сообщениями . . . . . . . . . 30
Посылка Быстрого текстового сообщения . . . 30
Шифрование . . . . . . . . . . . . . . . . . . . . . . . . . . . . 31
Многосайтовые функции
управления . . . . . . . . . . . . . . . . . . . . . . . . . . . . . 32
Включение автоматического поиска сайта . . . 32
Выключение автоматического поиска сайта . . 32
Включение ручного поиска сайта . . . . . . . . . . . 32
Функция Одинокий работник . . . . . . . . . . . . . . . . 33
Функции блокировки с паролем . . . . . . . . . . . . . 33
Доступ к радиостанции через пароль . . . . . . . 33
Разблокирование заблокированной
радиостанции . . . . . . . . . . . . . . . . . . . . . . . . . . 34
Bluetooth . . . . . . . . . . . . . . . . . . . . . . . . . . . . . . . . 34
Обнаружение Bluetooth-устройства
и
соединение с ним . . . . . . . . . . . . . . . . . . . . . . . 35
Отсоединение Bluetooth-устройства . . . . . . . . 35

Содержание
Русский
iii
В данном руководстве содержится вся н
пользователю информация по эксплуата
систем серии MOTOTRBO.
Перенаправление звука . . . . . . . . . . . . . . . . . . 35
Дополнительные функции . . . . . . . . . . . . . . . . . . 36
Регулировка уровня шумоподавления . . . . . . 36
Регулировка уровня мощности . . . . . . . . . . . . . 36
Активация и деактивация функций
функциональной платы . . . . . . . . . . . . . . . . . . . 36
Включение и выключение функции
голосового управления передачей (VOX) . . . . 36
Активация и деактивация
тонов/оповещений . . . . . . . . . . . . . . . . . . . . . . . 37
Проверка уровня заряда аккумулятора . . . . . . 37
Голосовое объявление . . . . . . . . . . . . . . . . . . . 37
Умное аудио . . . . . . . . . . . . . . . . . . . . . . . . . . . . 38
GPS . . . . . . . . . . . . . . . . . . . . . . . . . . . . . . . . . . . 38
Гарантия на аккумуляторы и зарядные
устройства . . . . . . . . . . . . . . . . . . . . . . . . . . . . . . . . 39
Ограниченная гарантия . . . . . . . . . . . . . . . . . . . . . 40

Важная информация по безопасности
Русский
iv
Важная информация по
безопасности
Сведения о безопасности и воздействии
излучаемой радиочастотной энергии
ВНИМАНИЕ!
Чтобы были соблюдены требования FCC/ICNIRP по
воздействию РЧ—энергии, данная радиостанция должна
использоваться только в служебных целях. С целью
недопущения превышения пределов воздействия
излучаемой радиочастотной энергии перед началом
использования этого изделия ознакомьтесь с информацией
о радиочастотной энергии и инструкциями по эксплуатации
в буклете «Сведения о безопасности и воздействии
излучаемой радиочастотной энергии» (номер
по каталогу
публикаций Motorola: 6864117B25).
С перечнем одобренных компанией Motorola антенн,
аккумуляторов и других аксессуаров можно ознакомиться
на следующем интернет—сайте:
http://www.motorolasolutions.com
Версия П/О
Все описанные в последующих разделах функции
поддерживаются П/О радиостанции версии R02.04.00.
За дополнительной информацией обо всех
поддерживаемых функциях обратитесь к вашему дилеру
или системному администратору.
Перед началом использования этого изделия
ознакомьтесь с инструкциями по эксплуатации и
технике безопасности, приведенными в буклете
«Сведения о безопасности и воздействии
излучаемой радиочастотной энергии«, который
входит в комплект поставки вашей
радиостанции.
Осторожно!

Информация об авторском праве на компьютерное
программное обеспечение
Русский
v
Информация об авторском праве на
компьютерное программное
обеспечение
Описанные в данном руководстве изделия компании
Motorola могут содержать защищенные авторскими
правами компьютерные программы компании
Motorola, хранящиеся на полупроводниковых ЗУ или
других носителях. Законы Соединенных Штатов
Америки и некоторых других стран обеспечивают
компании Моторола некоторые эксклюзивные права в
отношении защищенных авторским правом
компьютерных программ, включая, в частности,
эксклюзивное право на копирование и
воспроизведение в любой форме защищенных
авторским правом компьютерных программ. В связи с
этим никакие защищенные авторским правом
Motorola компьютерные программы, содержащиеся в
изделиях Motorola, описанных в данном руководстве,
не разрешается копировать, воспроизводить,
модифицировать, подвергать инженерному анализу
для создания аналога или распространять каким бы
то ни было способом без явного письменного
разрешения компании
Motorola. Кроме того, покупка
изделий Motorola не дает никаких явных или
подразумеваемых прав или прав на лицензии,
например, не подразумевает отказа владельцев от
своих прав и т.п., в отношении авторства, патентов
или заявок на патенты компании Motorola за
исключением обычных, неисключительных прав на
лицензию на использование этих изделий,
вытекающих из закона о
продаже изделий.
Используемая в этом изделии технология
кодирования речи AMBE+2
TM
защищена правами на
интеллектуальную собственность, включая авторские
права, а также права на патенты и коммерческую
тайну, принадлежащими компании Digital Voice
Systems, Inc.
Лицензия на использование этой технологии
распространяется только на данную аппаратуру
связи. Пользователю этой технологии строго
запрещается декомпилировать, подвергать
инженерному анализу для создания аналога или
дизассемблировать объектный код, а также любым
другим способом
преобразовывать объектный код в
читаемую человеком форму.
Пат. США #5,870,405, #5,826,222, #5,754,974,
#5,701,390, #5,715,365, #5,649,050, #5,630,011,
#5,581,656, #5,517,511, #5,491,772, #5,247,579,
#5,226,084 и #5,195,166.

Меры предосторожности при обращении
Русский
vi
Меры предосторожности при
обращении
Портативная цифровая радиостанция серии
MOTOTRBO соответствует требованиям IP57, что
позволяет устройству выдерживать сложные условия,
такие как погружение в воду.
• Если радиостанция оказалась погруженной в воду,
хорошо встряхните ее, чтобы удалить воду из решетки
динамика и гнезда микрофона. Вода может ухудшить
характеристики звука.
• Если вода попала на участок контактов
аккумуляторной батареи радиостанции, то прочистите
и высушите контакты батареи и радиостанции перед
тем, как присоединять батарею к радиостанции.
Оставшаяся вода может вызвать короткое замыкание
в радиостанции.
• Если радиостанция оказалась погруженной в
коррозийную среду (например, в соленую воду),
промойте радиостанцию и аккумуляторную батарею
пресной водой, а затем просушите.
• Для очистки наружных поверхностей радиостанции
используйте разбавленный раствор слабого бытового
моющего средства и пресную воду (т.е. чайная ложка
моющего средства на 4 литра воды).
• Ни в коем случае ничем не вставляйте ничего в
отверстие, расположенное в корпусе радиостанции
под контактом аккумуляторной батареи. Это отверстие
позволяет выровнять давление в радиостанции. В
противном случае герметичность и водостойкость
радиостанции может быть нарушена.
• Ни в коем случае на закрывайте и не блокируйте это
отверстие, даже этикеткой.
• Обеспечьте, чтобы отверстие не контактировало с
маслянистыми веществами.
• Радиостанция с правильно прикрепленной антенной
может быть погружена в воду на глубину не более 1
метра и не дольше, чем на 30 минут. Выход за эти
пределы или использование радиостанции без
антенны может привести к повреждению
радиостанции.
• При очистке радиостанции не направляйте на нее
сильную струю воды, потому что такая струя превысит
значение давления воды на глубине 1 м и может
вызвать попадание воды внутрь радиостанции.
Не разбирайте радиостанцию. Разборка может
повредить уплотнения и привести к нарушению
герметичности радиостанции. Техобслуживание
радиостанции должно выполняться только в
сервисном центре, оснащенном средствами
проверки и замены уплотнений.

Начало работы
Русский
1
Начало работы
Ознакомьтесь со следующей информацией:
Как пользоваться данным руководством . . . . . . . . . . . . . стр. 1
О чем спросить у вашего дилера/системного
администратора . . . . . . . . . . . . . . . . . . . . . . . . . . . . . . . стр. 1
Как пользоваться данным
руководством
В данном Руководстве пользователя описаны основные
принципы эксплуатации портативных систем MOTOTRBO без
дисплея.
Не исключено, что ваш дилер или системный администратор
внесли изменения в настройки вашей радиостанции исходя из
ваших конкретных потребностей. За соответствующей
информацией обратитесь к вашему дилеру или системному
администратору.
В данной публикации для обозначения функций, работающих
только в конвенциональном
Аналоговом или
конвенциональном Цифровом режиме, используются
следующие значки:
Функции, работающие как в конвенциональном Аналоговом,
так и в конвенциональном Цифровом режимах, значками не
обозначаются.
Дополнительную информацию о функциях, доступных в
конвенциональном многосайтовом режиме, см. в разделе
Соединение IP-сайта на стр. 10.
Кроме того, некоторые функции доступны в односайтовом
транкинговом режиме, Capacity Plus. Дополнительно об этом
см. в разделе
Capacity Plus на стр. 10.
Отдельные функции также доступны в многосайтовом режиме
транкинга Linked Capacity Plus. Дополнительную информацию
смотрите в разделе
Linked Capacity Plus на стр. 11.
О чем спросить у вашего дилера/
системного администратора
Вы можете проконсультироваться с вашим дилером или
системным администратором по следующим вопросам:
• Была ли ваша радиостанция предварительно
запрограммирована на какие—либо конвенциональные
каналы?
• Какие кнопки запрограммированы на доступ к другим
функциям?
• Какие вам могут понадобиться дополнительные аксессуары?
• Как лучше всего использовать радиостанцию для
максимально эффективной связи?
• Какие процедуры техобслуживания способствуют продлению
срока службы радиостанции?
Указывает на функцию, работающую только в
конвенциональном Аналоговом режиме.
Указывает на функцию, работающую только в
конвенциональном Цифровом режиме.

Подготовка радиостанции к работе
Русский
2
Подготовка радиостанции к работе
Чтобы подготовить вашу радиостанцию к работе, выполните
следующие операции:
Зарядка аккумулятора . . . . . . . . . . . . . . . . . . . . . . . . . . . . стр. 2
Установка аккумулятора . . . . . . . . . . . . . . . . . . . . . . . . . . стр. 3
Установка антенны . . . . . . . . . . . . . . . . . . . . . . . . . . . . . . . стр. 3
Установка поясного зажима. . . . . . . . . . . . . . . . . . . . . . . . стр. 4
Установка крышки универсального разъема
(пылезащитной крышки). . . . . . . . . . . . . . . . . . . . . . . . . стр. 4
Включение питания радиостанции . . . . . . . . . . . . . . . . . . стр. 5
Регулировка громкости . . . . . . . . . . . . . . . . . . . . . . . . . . . стр. 5
Зарядка аккумулятора
Ваша радиостанция работает лучше всего, когда она получает
электропитание от одобренной компанией Motorola никель—
металл—гибридной (NiMH) или литий—ионной (Li-lon)
аккумуляторной батареи. Во избежание повреждений и в целях
соблюдения условий гарантии заряжайте аккумулятор только в
зарядном устройстве Motorola и в точном соответствии с
инструкциями, содержащимися в руководстве пользователя
зарядного устройства.
Чтобы обеспечить оптимальную работу
аккумулятора, заряжайте
новый аккумулятор в течение 14 — 16 часов перед первым
использованием.
ВАЖНО: Во избежание потери данных аккумулятора IMPRES и
для оптимизации его срока службы ВСЕГДА
заряжайте аккумулятор IMPRES в зарядном
устройстве IMPRES. Гарантия на аккумуляторы
IMPRES, заряжаемые только в зарядном устройстве
IMPRES, действует на 6 месяцев дольше, чем
стандартная гарантия Motorola на аккумуляторы
Premium.
Подготовка радиостанции к работе
Русский
3
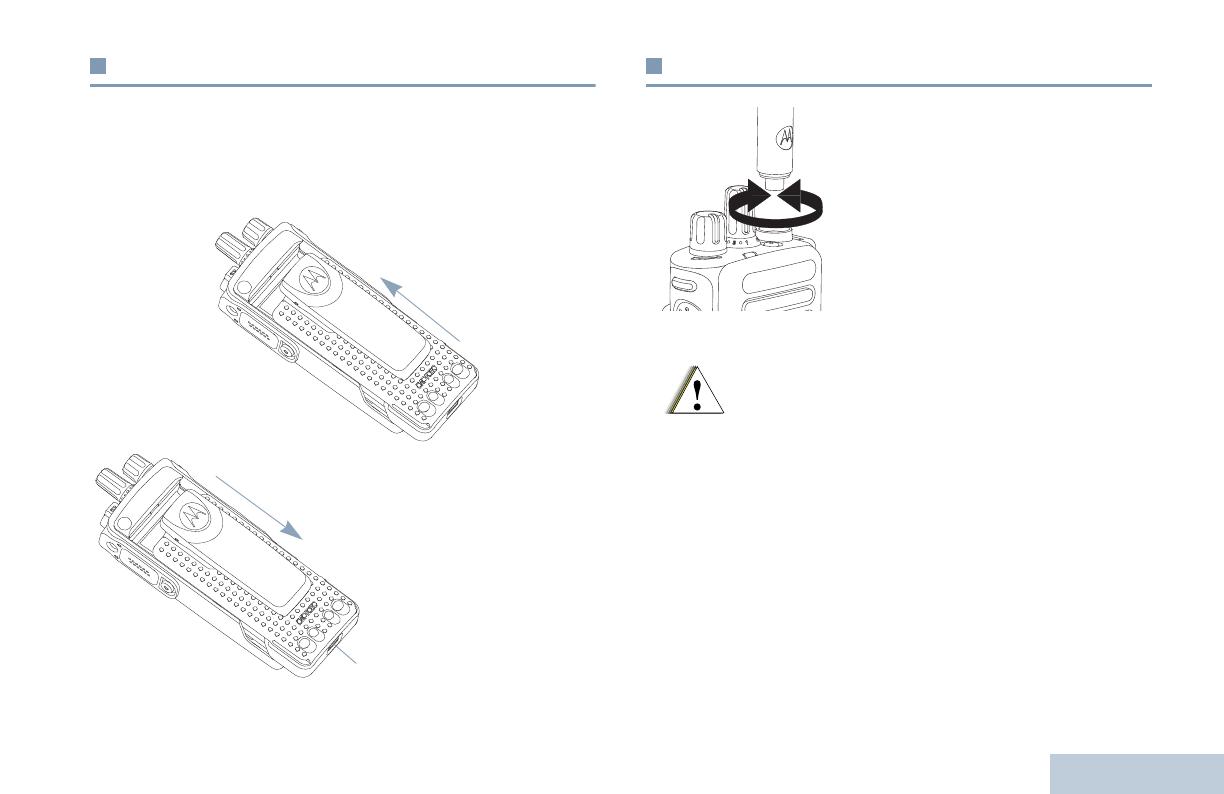
Установка аккумулятора
Выровняйте аккумулятор относительно направляющих,
расположенных на задней стороне корпуса радиостанции.
Твердым нажатием передвиньте аккумулятор вверх до
защелкивания фиксатора. Переведите фиксатор аккумулятора
в запертое положение.
Чтобы извлечь
аккумулятор:
выключите
радиостанцию;
отоприте и
удерживайте
фиксатор
аккумулятора;
передвиньте
аккумулятор вниз и
снимите его с
направляющих.
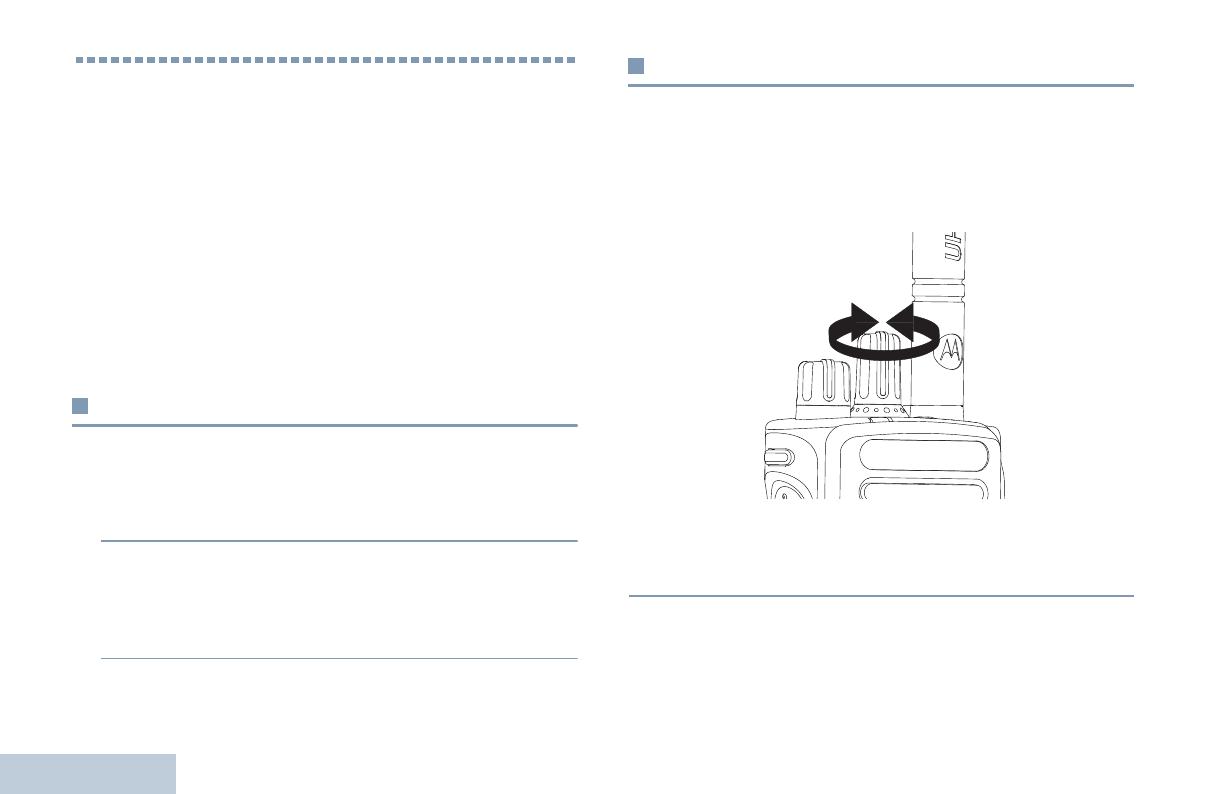
Установка антенны
Выключив радиостанцию, установите
антенну в соответствующее гнездо и
поверните по часовой стрелке
Чтобы снять антенну, поверните ее
против часовой стрелки.
Если антенну потребуется заменить, во избежание
повреждения радиостанции, используйте только
антенны MOTOTRBO.
Подготовка радиостанции к работе
Русский
4
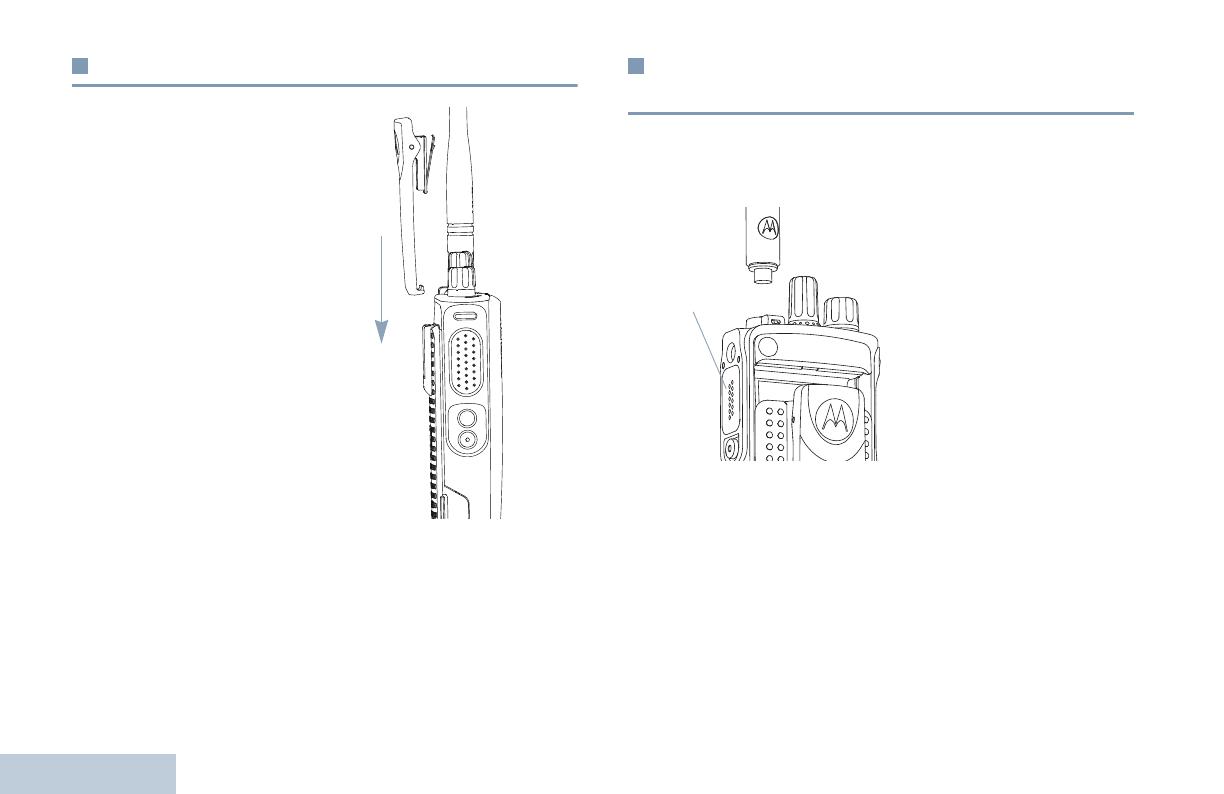
Установка поясного зажима
Совместите направляющие
на поясном зажиме с
направляющими
аккумулятора и нажмите на
поясной зажим сверху вниз до
щелчка.
Чтобы снять зажим,
отожмите язычок зажима
для крепления на ремне от
аккумулятора. Это удобно
делать ключом. Чтобы
снять поясной зажим,
отожмите его лапку от
аккумулятора с помощью
ключа, затем передвиньте
зажим вверх до
отсоединения
от
радиостанции.
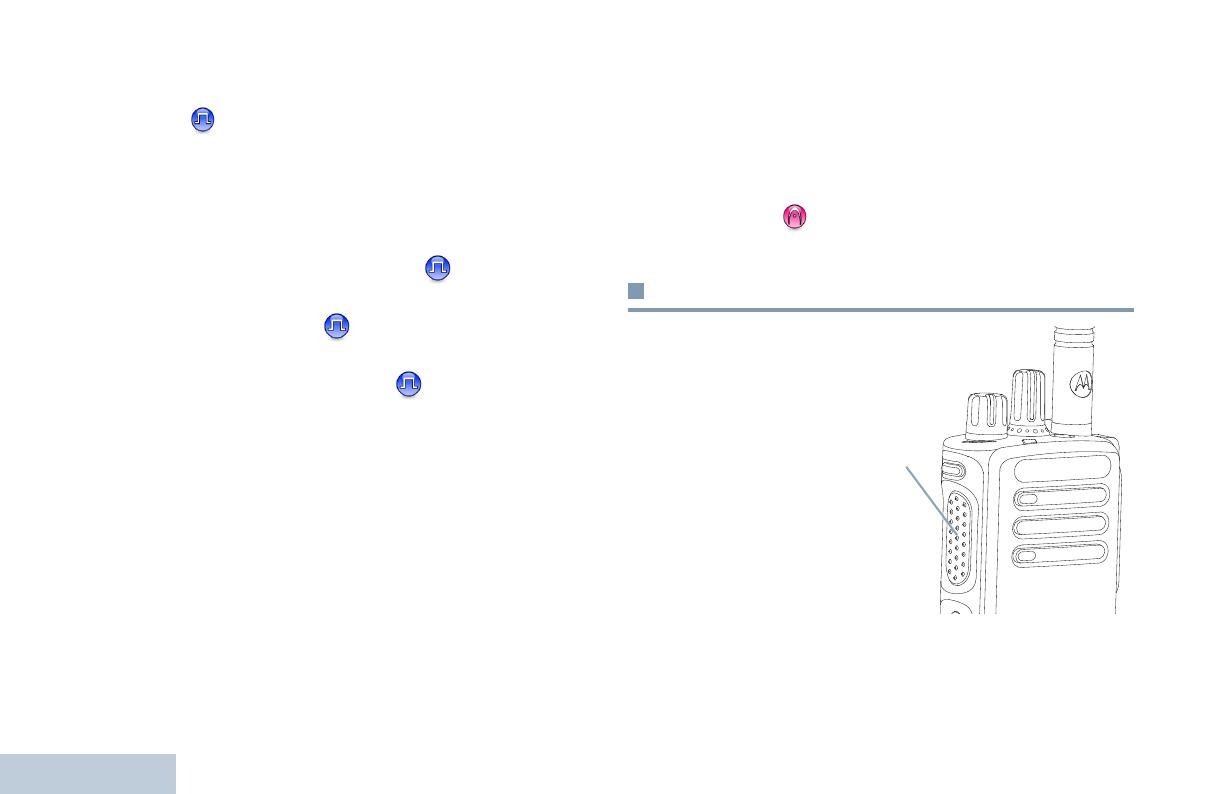
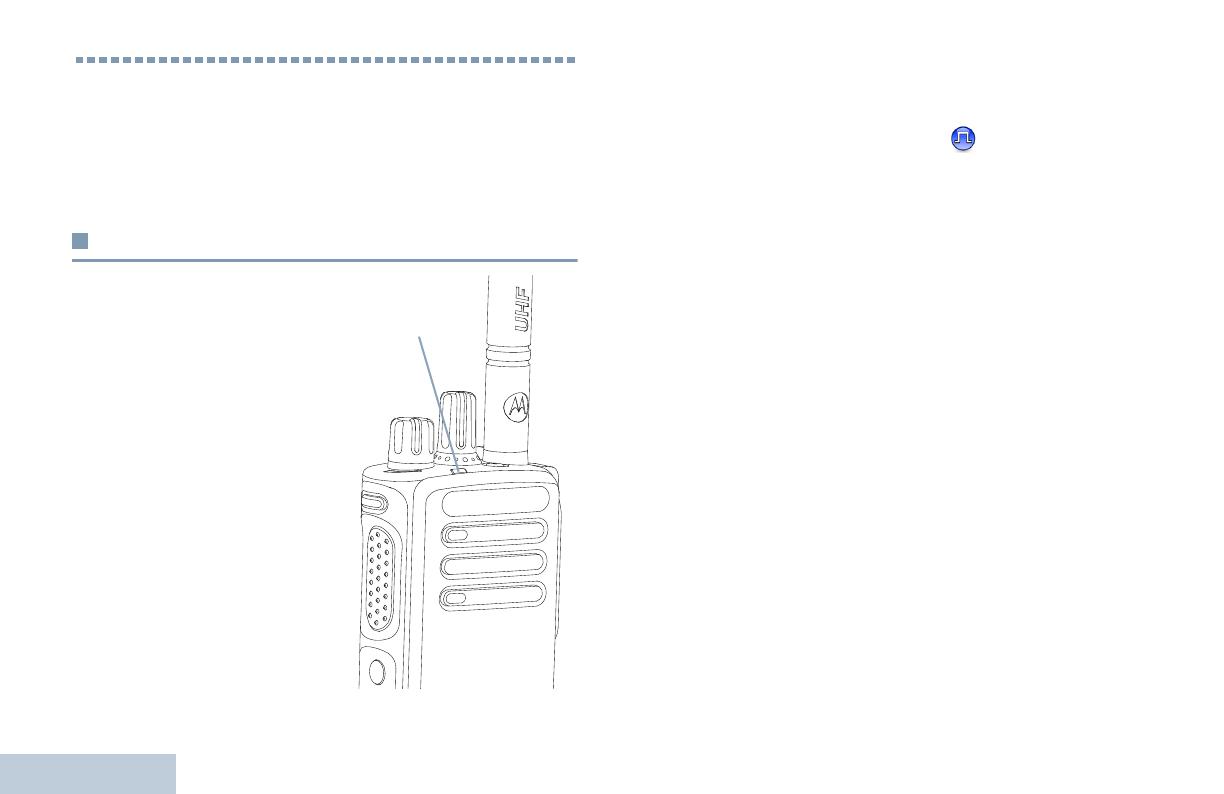
Установка крышки универсального
разъема (пылезащитной крышки)
Универсальный разъем находится на корпусе радиостанции со
стороны антенны. Он предназначен для подключения к
радиостанции аксессуаров MOTOTRBO.
Вставьте загнутый конец
крышки в пазы над
универсальным разъемом.
Нажмите на крышку сверху
вниз, чтобы нижняя лапка
правильно вошла в
РЧ—разъем.
Закрепите крышку разъема на
корпусе радиостанции,
повернув винт по часовой
стрелке.
Чтобы снять
крышку
универсального разъема, нажмите на крышку сверху вниз и
поверните винт против часовой стрелки.
Когда универсальный разъем не используется, он должен быть
закрыт пылезащитной крышкой.
Подготовка радиостанции к работе
Русский
5
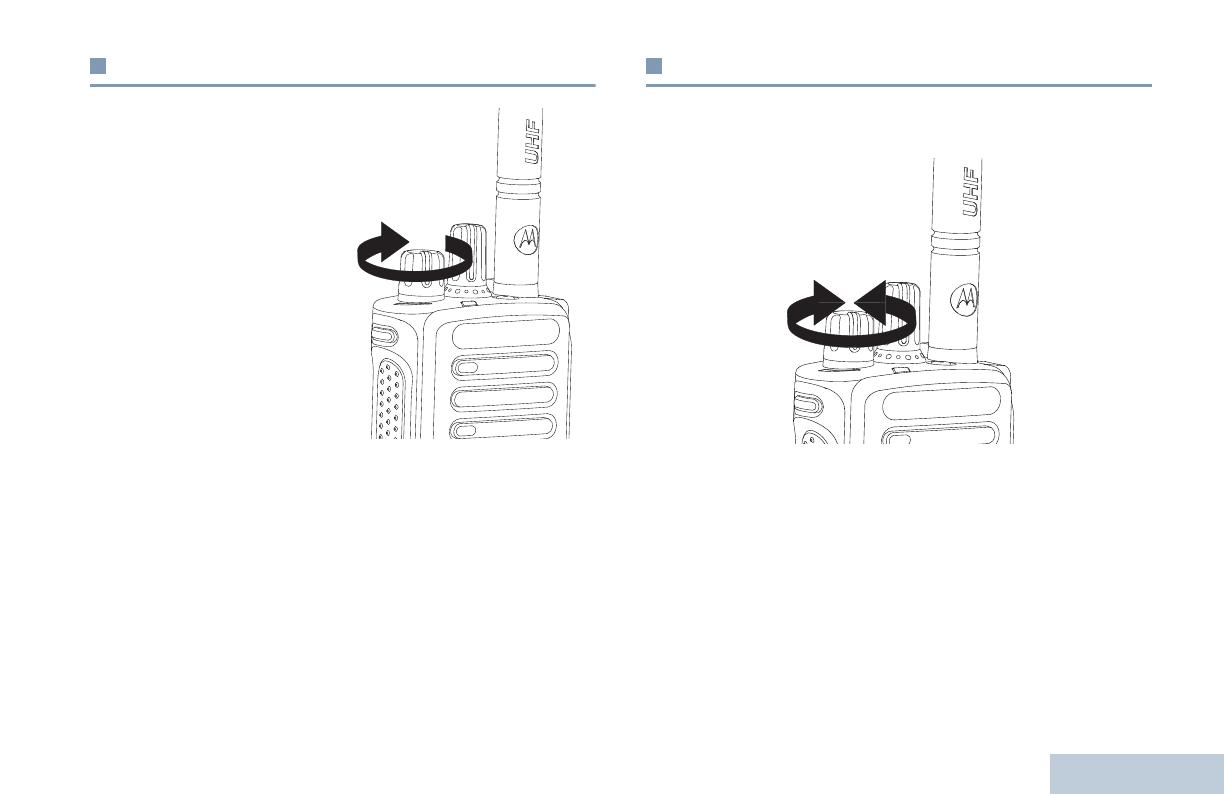
Включение питания радиостанции
Поверните ручку Вкл./
Выкл./Громкость по
часовой стрелке до щелчка.
Непрерывным светом
загорится зеленый светодиод.
Звучит короткий тональный
сигнал, означающий, что
тестирование, выполняемое
при включении питания,
прошло успешно.
ПРИМЕЧАНИЕ:Если тоны/
оповещения
радиостанции
деактивированы, то
при включении
питания тон не
звучит (см. Активация и деактивация тонов/
оповещений на стр. 37).
Если питание радиостанции не включается, проверьте
аккумулятор. Убедитесь, что он заряжен и правильно
установлен. Если питание радиостанции по—прежнему не
включается, обратитесь к вашему дилеру.
Чтобы выключить радиостанцию, поверните ручку против
часовой стрелки до щелчка.
Регулировка громкости
Чтобы увеличить громкость, поверните ручку Вкл./Выкл./
Громкость по часовой стрелке.
Чтобы уменьшить громкость, поверните эту ручку против
часовой стрелки.
ПРИМЕЧАНИЕ: Радиостанцию можно запрограммировать на
минимальный уровень громкости, чтобы звук
нельзя было выключить полностью.
Дополнительную информацию узнайте у
дилера или администратора системы.
Органы управления радиостанции
Русский
6
Органы управления радиостанции
Ознакомьтесь со следующей информацией:
Органы управления радиостанции . . . . . . . . . . . . . . . . . . стр. 6
Программируемые кнопки . . . . . . . . . . . . . . . . . . . . . . . . . стр. 7
Тангента РТТ . . . . . . . . . . . . . . . . . . . . . . . . . . . . . . . . . . . . стр. 8
Переключение между конвенциональными
Аналоговым и Цифровым режимами . . . . . . . . . . . . . . стр. 9
Соединение IP-сайта . . . . . . . . . . . . . . . . . . . . . . . . . . . . стр. 10
Capacity Plus . . . . . . . . . . . . . . . . . . . . . . . . . . . . . . . . . . . стр. 10
Linked Capacity Plus . . . . . . . . . . . . . . . . . . . . . . . . . . . . . стр. 11
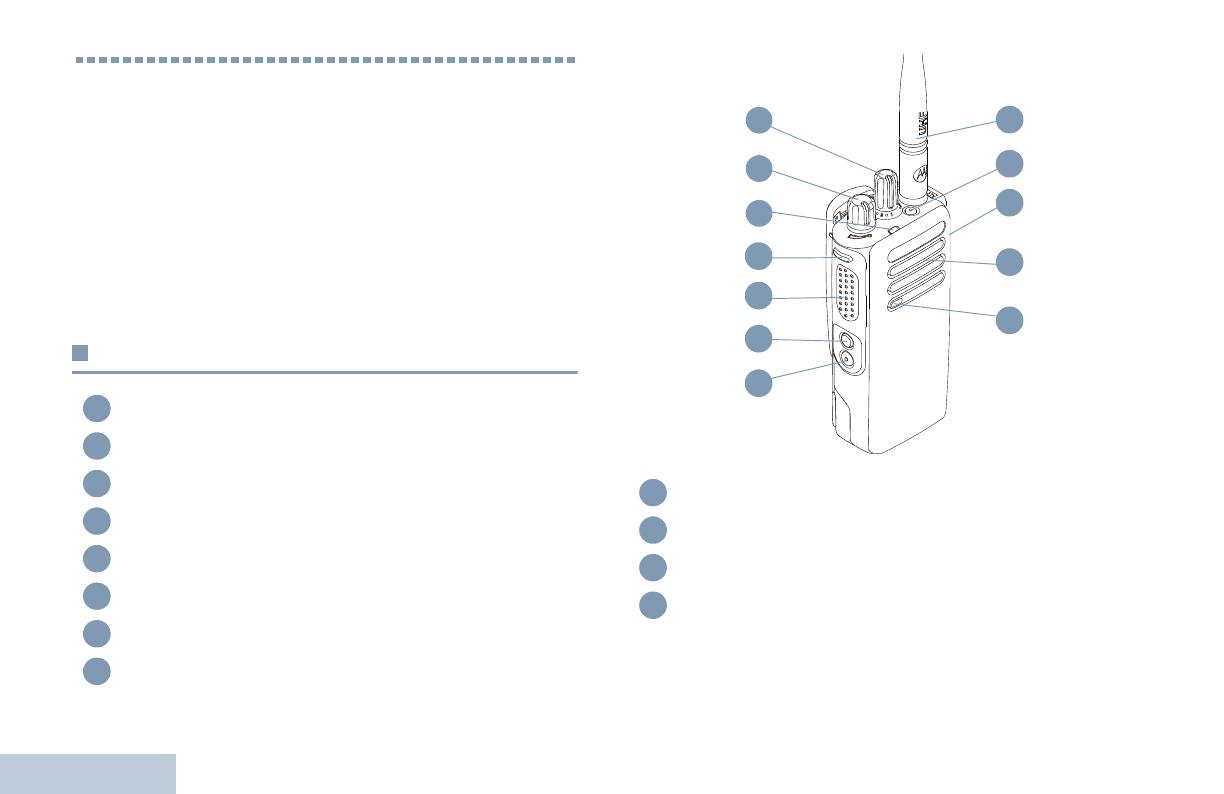
Органы управления радиостанции
Ручка выбора каналов
Ручка Вкл./Выкл./Громкость
Светодиодный индикатор
Боковая кнопка 1*
Тангента РТТ
Боковая кнопка 2*
Боковая кнопка 3*
Микрофон
Динамик
Универсальный аксессуарный разъем
Экстренная кнопка*
Антенна
* Эти кнопки являются программируемыми.

Органы управления радиостанции
Русский
7
Программируемые кнопки
Программируемые кнопки могут быть запрограммированы
дилером для быстрого доступа к определенным функциям
радиостанции и установленным каналам/группам каналов в
зависимости от длительности нажатия кнопки:
• Короткое нажатие – нажатие и быстрое отпускание кнопки.
• Длительное нажатие – продолжительное нажатие
программируемой кнопки.
• Удерживание – удерживание кнопки нажатой.
ПРИМЕЧАНИЕ: Запрограммированная длительность нажатия
кнопки применима ко всем назначаемым
функциям и настройкам, общим и
специфическим для радиостанции. Hа стр. 27
в разделе Экстренный режим в разделе
смотрите информацию о
запрограммированной длительности нажатия
Экстренной кнопки.
Назначаемые функции
Переключатель Bluetooth
TM
—аудио – перенаправление звука
на встроенный динамик радиостанции или на Bluetooth-
аксессуар.
Соединение Bluetooth – инициация операции поиска и
соединения Bluetooth.
Отсоединение Bluetooth – прекращение всех существующих
Bluetooth-соединений радиостанции и Bluetooth-устройств.
Переадресация вызовов – включение и выключение
переадресации вызовов.
Голосовое объявление канала – проигрывание голосовых
сообщений зоны и канала для текущего канала. Эта функция не
действует, если деактивирована функция Голосовое объявление.
Экстренный режим – инициирование или отмена Экстренного
тревожного сигнала или вызова в зависимости от программных
настроек.
Умное аудио вкл/выкл – включение и выключение функции
Умное аудио.
Ручной сайт—роуминг*
‡
– включение ручного поиска сайта.
АРУ микрофона вкл/выкл – включение и выключение
автоматической регулировки усиления (АРУ) встроенного
микрофона. Не действует во время работы в режиме Bluetooth.
Мониторинг – проверка выбранного канала на наличие
активности.
Удаление мешающего канала*
‡
– временное удаление
ненужного канала (кроме Выбранного канала) из списка
сканирования. Под Выбранным каналом понимается выбранная
пользователем комбинация зона/канал, откуда инициируется
сканирование.
Вызов одним нажимом
– непосредственное выполнение
заданного частного группового вызова, отправление оповещения
о вызове или быстрого текстового сообщения.
Функция функциональной платы – активация и деактивация
функции (функций) функциональной платы для соответствующих
каналов.
* Неприменимо в режиме Capacity Plus
‡
Не относится к режиму Linked Capacity Plus
Органы управления радиостанции
Русский
8
Непрерывный мониторинг*
‡
– мониторинг всего радиообмена
на выбранном канале до выключения этой функции.
Шифрование – активация и деактивация функции
шифрования.
Ретранслятор/Прямая связь*
‡
– переключение между режимом
Ретрансляция и режимом Прямой связи с другой радиостанцией.
Сканирование*
‡
– Функция сканирования активирована.
Включение/выключение фиксации сайта* – включение и
выключение автоматического сайт—роуминга.
Телеметрическое управление
– управление Выходным
контактом местной или удаленной радиостанции.
Дистанционное прерывание передачи
– прекращение
прерываемого вызова для того, чтобы освободить канал.
Голосовое сообщение вкл/выкл – включение и выключение
функции Голосовое сообщение.
Голосовое управление передачей (VOX) – включение и
выключение функции VOX.
Зона – выбор зоны из списка зон.
Заряд батареи – отображение заряда батареи с помощью
СИД—индикатора.
Назначаемые настройки/Дополнительные
функции
Все тоны/оповещения – активация и деактивация всех тоновых
сигналов и оповещений.
Уровень мощности – переключение между высоким и низким
уровнями мощности передачи.
Шумоподавление
– переключение между высоким и
нормальным уровнями шумоподавления.
Тангента РТТ
Тангента РТТ (Push-To-
Tal k) расположена на
боковой стороне
радиостанции и
выполняет две основные
функции:
• Во время вызова
тангента РТТ переводит
радиостанцию в режим
передачи вашей речи
на другие участвующие
в вызове радиостанции.
Для передачи нажмите
тангенту РТТ и удерживайте ее. Для прослушивания отпустите
тангенту РТТ.
При нажатии тангенты РТТ включается микрофон.
* Неприменимо в режиме Capacity Plus
‡
Не относится к режиму Linked Capacity Plus

Органы управления радиостанции
Русский
9
• Тангента РТТ также служит для выполнения новых вызовов (см
Выполнение радиовызова на стр. 18).
В зависимости от программных настроек, если тон
Разрешение разговора активирован или активирован
вспомогательный тон тангенты PTT , не начинайте
говорить, пока не закончится этот короткий оповещающий
тон.
Если на вашей радиостанции активирована функция
Индикация свободного канала (программируется дилером),
то
в момент отпускания тангенты РТТ на вызываемой
(принимающей ваш вызов) радиостанции вы услышите
короткий тон, оповещающий о том, что канал свободен
для вашей ответной передачи.
Если вызов прерван (например, в случае получения
экстренного вызова), то также прозвучит непрерывный
тон запрета передачи, который означает, что нужно
отпустить кнопку тангенты.
Переключение между
конвенциональными Аналоговым и
Цифровым режимами
Каждый канал радиостанции
может быть настроен на
работу в конвенциональном
Аналоговом или
конвенциональном
Цифровом режиме.
Переключение между
аналоговыми и цифровыми
каналами осуществляется
Ручкой выбора каналов.
При переключении с
Цифрового на Аналоговый
режим некоторые функции становятся недоступными.
Некоторые функции радиостанции доступны как в Аналоговом,
так и в Цифровом режимах. Небольшие различия в
работе
каждой функции НЕ отражаются на качестве работы
радиостанции.
ПРИМЕЧАНИЕ: Радиостанция также переключается между
Цифровым и Аналоговым режимами во время
двухрежимного сканирования (см.
Сканирование на стр. 24).

Органы управления радиостанции
Русский
10
Соединение IP-сайта
Эта функция позволяет расширить конвенциональную связь
радиостанции за пределы одного сайта и соединяться с разными
доступными сайтами посредством сети
Интернет—протокола (IP).
Когда радиостанция выходит из зоны доступности одного сайта и
попадает в зону доступности другого сайта, она соединяется с
ретранслятором нового сайта и может отправлять и принимать
вызовы/данные. В
зависимости от настроек радиостанции эта
процедура выполняется автоматически или вручную.
Если радиостанция настроена на автоматический поиск сайта, то
при слишком низкой силе сигнала текущего сайта или
невозможности его обнаружить радиостанция сканирует все
доступные сайты и фиксируется на базовой станции с самым
высоким значением RSSI (уровня принимаемого сигнала). Затем
она фиксируется на ретрансляторе
с самым высоким значением
силы принимаемого сигнала (RSSI).
При ручном поиске сайта радиостанция ищет следующий
доступный сайт из списка роуминга (не обязательно с самым
сильным сигналом) и фиксируется на нем.
ПРИМЕЧАНИЕ: Для каждого канала может быть активирована
либо функция сканирования, либо функция
роуминга, но не обе одновременно.
Каналы, для которых активирована
эта функция, могут быть
включены в список роуминга. Во время автоматического роуминга
радиостанция осуществляет поиск канала(ов) в списке роуминга,
чтобы определить самый лучший сайт.
В списке роуминга может быть не более 16 каналов (включая
Выбранный канал).
Пункты списка роуминга нельзя удалять или добавлять вручную.
За соответствующей информацией обратитесь к вашему
дилеру
или системному администратору.
Capacity Plus
Capacity Plus — это односайтовая транкинговая конфигурация
радиосистемы MOTOTRBO с использованием пула каналов,
обеспечивающего связь между сотнями пользователей и
поддержку до 254 групп. Эта функция позволяет радиостанции
эффективно использовать доступное количество
запрограммированных каналов в режиме связи через
ретранслятор.
При попытке доступа к функции, которая не относится к режиму
Capacity Plus с помощью нажатия программируемой кнопки,
прозвучит отрицательный
индикаторный тон.
В радиостанции также имеются функции, доступные в
конвенциональном цифровом режиме, режимах Соединение
IP-сайта, Capacity Plus и Linked Capacity Plus. Небольшие
различия в работе каждой функции НЕ отражаются на качестве
работы радиостанции.
Дополнительную информацию о данной конфигурации узнавайте
у своего дилера или администратора системы.

Органы управления радиостанции
Русский
11
Linked Capacity Plus
Linked Capacity Plus — это многосайтовая и многоканальная
транкинговая конфигурация системы радиостанций MOTOTRBO,
сочетающая в себе самой лучшее из конфигураций Capacity Plus
и Соединение IP-сайта.
Linked Capacity Plus позволяет расширить транкинговую связь за
пределы одного сайта и соединяться с разными доступными
сайтами посредством сети Интернет—протокола (IP). Также
увеличивается емкость сети, благодаря эффективному
использованию всех доступных запрограммированных каналов,
которые поддерживает каждый
из доступных сайтов.
Когда радиостанция выходит из зоны доступности одного сайта и
попадает в зону доступности другого сайта, она соединяется с
ретранслятором нового сайта и может отправлять и принимать
вызовы/данные. В зависимости от настроек радиостанции эта
процедура выполняется автоматически или вручную.
Если радиостанция настроена на автоматический поиск сайта, то
при слишком низкой силе сигнала текущего сайта или
невозможности его обнаружить радиостанция сканирует все
доступные сайты и фиксируется на базовой станции с самым
высоким значением RSSI (уровня принимаемого сигнала). Затем
она фиксируется на ретрансляторе с самым высоким значением
силы принимаемого сигнала (RSSI).
При ручном поиске сайта радиостанция ищет следующий
доступный сайт из
списка роуминга (не обязательно с самым
сильным сигналом) и фиксируется на нем.
Любой канал, на котором активирован режим Linked Capacity
Plus, можно добавлять в конкретный список роуминга. Во время
автоматического роуминга радиостанция осуществляет поиск
этих каналов, чтобы определить самый лучший сайт.
ПРИМЕЧАНИЕ: Пункты списка роуминга нельзя удалять или
добавлять вручную. За соответствующей
информацией
обратитесь к вашему дилеру или
системному администратору.
Как и в случае режима Capacity Plus, в меню отсутствуют значки и
функции, не относящиеся к режиму Linked Capacity Plus. При
попытке доступа к функции, которая не относится к режиму,
Linked Capacity Plus с помощью нажатия программируемой
кнопки, прозвучит отрицательный индикаторный тон.
Дополнительную информацию о данной конфигурации узнавайте
у своего дилера
или администратора системы.
Средства индикации радиостанции
Русский
12
Средства индикации радиостанции
У радиостанции имеются следующие средства индикации:
Светодиодный индикатор . . . . . . . . . . . . . . . . . . . . . . . . стр. 12
Звуковые тоны . . . . . . . . . . . . . . . . . . . . . . . . . . . . . . . . . стр. 13
Индикаторные тоны . . . . . . . . . . . . . . . . . . . . . . . . . . . . . стр. 13
Светодиодный индикатор
Визуальным средством
оповещения о состоянии
радиостанции является
светодиодный индикатор.
Мигающий красный –
Pадиостанция ведет передачу
при низком заряде
аккумулятора, принимает
Экстренную передачу или не
прошла самотестирование при
включении питания.
Непрерывный зеленый –
радиостанция включается или
ведет передачу. При нажатии
кнопки Заряд батареи этот
сигнал также означает полный
заряд аккумулятора.
Мигающий
зеленый –
радиостанция принимает вызов
или данные без активации конфиденциальности или ведет
обнаружение активности в эфире.
Двойное мигание зеленым светом – Pадиостанция принимает
вызов или данные со скремблированием
.
Непрерывный желтый – Радиостанция ведет мониторинг на
цифровом конвенциональном канале. При нажатии клавиши
Заряд батареи этот сигнал означает хороший заряд
аккумулятора.
Мигающий желтый – Радиостанция ведет сканирование или
принимает оповещение о вызове, или все локальные каналы
Linked Capacity Plus заняты.
Двойное мигание желтым светом – Соединение радиостанции
с ретранслятором в Capacity Plus или Linked Capacity Plus
прекращено, все
каналы Capacity Plus и Linked Capacity Plus в
данный момент заняты, активирована функция Автоматический
роуминг, радиостанция активно ищет новый сайт. Этот сигнал
также может означать, что радиостанция еще не отреагировала
на оповещение о групповом вызове или заблокирована.
ПРИМЕЧАНИЕ:В конвенциональном режиме светодиод мигает
зеленым, когда радиостанция обнаруживает
активность в эфире. В силу особенностей
цифрового протокола эта активность может
влиять или не влиять на использование
запрограммированного канала радиостанции.
В режимах Capacity Plus и Linked Capacity Plus
обнаружение активности в эфире не
сопровождается светодиодной индикацией.
Средства индикации радиостанции
Русский
13
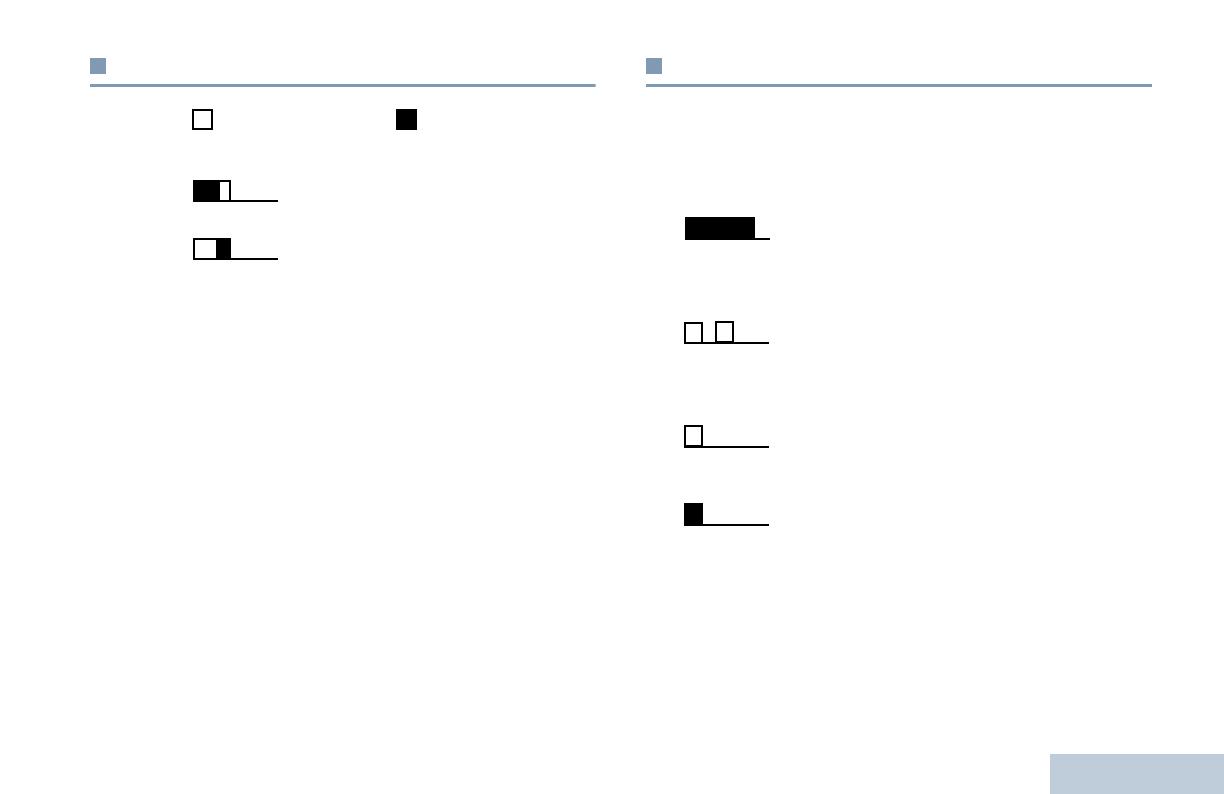
Индикаторные тоны
Высокий тон Низкий тон
Звуковые тоны
Тоны служат для звукового оповещения о состоянии
радиостанции или об ответе радиостанции на полученные
данные.
Положительный
индикаторный тон
Отрицательный
индикаторный тон
Непрерывный тон
Непрерывный сигнал, который звучит,
пока не будет выключен пользователем.
Периодический
тон
Включается с периодичностью,
определяемой настройками
радиостанции. Сигнал прекращается,
затем повторяется.
Повторяющийся
тон
Одиночный сигнал, который повторяется
до выключения пользователем.
Однократный тон
Включается только один раз на короткое
время, определяемое настройками
радиостанции.
Прием и выполнение вызовов
Русский
14
Прием и выполнение вызовов
Освоив устройство радиостанции, можно приступать к
пользованию ей.
Ознакомьтесь со следующей информацией об основных
функциях управления вызовами:
Выбор зоны . . . . . . . . . . . . . . . . . . . . . . . . . . . . . . . . . . . . . .стр. 14
Выбор канала. . . . . . . . . . . . . . . . . . . . . . . . . . . . . . . . . . . . .стр. 14
Прием радиовызова. . . . . . . . . . . . . . . . . . . . . . . . . . . . . . . .стр. 15
Выполнение радиовызова. . . . . . . . . . . . . . . . . . . . . . . . . . .стр. 18
Прекращение радиовызова. . . . . . . . . . . . . . . . . . . . . . . . . .стр. 21
Прямая связь . . . . . . . . . . . . . . . . . . . . . . . . . . . . . . . . . . . . .стр. 21
Функции мониторинга . . . . . . . . . . . . . . . . . . . . . . . . . . . . . .стр. 22
Выбор зоны
Ваша радиостанция поддерживает до 32 каналов и до 2 зон, где в
зоне не более 16 каналов.
Процедура:
1 Нажмите запрограммированную кнопку Зона.
2 Звучит положительный тон, означающий, что радиостанция
переключилась с Зоны 1 на Зону 2.
ИЛИ
Звучит отрицательный тон, означающий, что радиостанция
переключилась с Зоны 2 на Зону 1.
Выбор канала
Прием и передача осуществляются на канале. В зависимости от
конфигурации радиостанции каждый канал можно
программировать по—разному, чтобы на нем были доступны
разные группы пользователей или разные функции. Выбрав
нужную зону, выберите канал, который нужен для выполнения
передачи или приема.
Процедура:
Поворотом ручки выбора каналов выберите канал с активным
псевдонимом или идентификатором группы.
В представленном списке руководства для конкретной модели Рации — Motorola DP4401Ex. Вы можете скачать инструкции к себе на компьютер или просмотреть онлайн на страницах сайта бесплатно или распечатать.
В случае если инструкция на русском не полная или нужна дополнительная информация по этому устройству, если вам нужны
дополнительные файлы: драйвера, дополнительное руководство пользователя (производители зачастую для каждого
продукта делают несколько различных документов технической помощи и руководств), свежая версия прошивки, то
вы можете задать вопрос администраторам или всем пользователям сайта, все постараются оперативно отреагировать
на ваш запрос и как можно быстрее помочь. Ваше устройство имеет характеристики:Стандарт: VHF/UHF, Диапазон частот: 136-174 МГц, 403-470 МГц, Мощность передатчика: 1 Вт, Переключение мощности передатчика: есть, Вид модуляции: FM, Чувствительность: 0.25 мкВ (12 дБ SINAD), полные характеристики смотрите в следующей вкладке.
Для многих товаров, для работы с Motorola DP4401Ex могут понадобиться различные дополнительные файлы: драйвера, патчи, обновления, программы установки. Вы можете скачать онлайн эти файлы для конкретнй модели Motorola DP4401Ex или добавить свои для бесплатного скачивания другим посетителями.
Если вы не нашли файлов и документов для этой модели то можете посмотреть интсрукции для похожих товаров и моделей, так как они зачастую отличаются небольшим изменениями и взаимодополняемы.
Обязательно напишите несколько слов о преобретенном вами товаре, чтобы каждый мог ознакомиться с вашим отзывом или вопросом. Проявляйте активность что как можно бльше людей смогли узнать мнение настоящих людей которые уже пользовались Motorola DP4401Ex.

Вадим
2017-06-09 10:00:02
Необходимо более подробное описание на русском языке, столкнулись с недостаточно подробным описанием радио на русском.
Yurii
2019-03-11 16:15:58
слабый сигнал
GreyWolf
2019-05-16 08:23:22
Качественная радиостанция!
Сергей
2019-05-24 08:10:12
День добрый. Отличная радиостанция. С качественной батареей на 2000 mAh работает уже третий год. Всем советую. Однако надо отметить что недавно получил ещё 4 радиостанции, и все имеют одну и ту же проблему. После включения питания и нажатии PTT, передача сигнала не происходит, нет световой индикации о передаче сигнала и звучит противный звук все время нажатия PTT. Причем надо отметить что получил я 2 станции DP4401ex и 2 станции DP4400e. И у всех одна и та же проблема. Пока так и не смог разобраться с причиной проблемы. Придется сдавать станции в ремонт.
филипп
2019-09-19 09:15:45
Отличный аксессуар
После подключения гарнитуры пропал звук на динамике радиостанции и динамике гарнитуры.
варвпарвпарвпарвпа
2020-09-29 22:02:17
пварвпарваиваприварпвпарвпа
Основные и самые важные характеристики модели собраны из надежных источников и по характеристикам можно найти похожие модели.
| Диапазон | |
| Стандарт | VHF/UHF |
| Диапазон частот | 136-174 МГц, 403-470 МГц |
| Параметры приемника/передатчика | |
| Мощность передатчика | 1 Вт |
| Переключение мощности передатчика | есть |
| Вид модуляции | FM |
| Чувствительность | 0.25 мкВ (12 дБ SINAD) |
| Количество каналов | 32 |
| Функции | |
| Голосовая активация через гарнитуру (VOX) | есть |
| Функция «нажми и говори» (PTT) | есть |
| Сканирование каналов | есть |
| Мониторинг каналов | есть |
| Быстрая настройка на аварийный канал | есть |
| GPS | есть |
| Таймер разговора | есть |
| Конструкция | |
| Антенна | съемная |
| Дисплей | нет |
| Корпус | влагозащищенный, ударопрочный |
| Поддержка стандарта влагозащиты | IPX7 |
| Поддержка стандарта MIL-STD-810 | есть |
| Питание | |
| Время работы | 19 ч |
| Количество элементов питания | 1 |
| Формат | свой собственный |
| Тип аккумулятора | Li-Ion |
| Емкость аккумулятора | 2250 мА?ч |
| Подключение зарядного устройства | есть |
| Звук | |
| Шумоподавление | есть |
| Мощность громкоговорителя | 500 мВт |
| Регулировка громкости | есть |
| Подключение гарнитуры | есть |
| Комплектация | |
| Количество раций в комплекте | 1 |
| Зарядное устройство | есть |
| Подставка для зарядки | есть |
| Аккумуляторы | есть |
| Клипса | есть |
| Дополнительно | |
| Размеры (ШхВхТ) | 57x139x38 мм |
| Вес | 456 г |
| Рабочая температура | -20 — 55 ?C |
| Особенности | поддержка Bluetooth, IP Site Connect, передача текстовых сообщений, сертификат ATEX, взрывобезопасная |
Здесь представлен список самых частых и распространенных поломок и неисправностей у Раций. Если у вас такая поломка то вам повезло, это типовая неисправность для Motorola DP4401Ex и вы можете задать вопрос о том как ее устранить и вам быстро ответят или же прочитайте в вопросах и ответах ниже.
| Название поломки | Описание поломки | Действие |
|---|---|---|
| Не Включается | ||
| Хрипит Звук | ||
| Нет Звука | ||
| Нет Сигнала | ||
| Пропало Автосканирование Фм | Перестал Работать Автопоиск Вещательных Радиостанций Фм Диаппазона,В Ручную Станции Находит | |
| Сбиваются Частоты | ||
| Пропадает Связь | Связь Пропадает И Индикатор Мигает А Когда Нажимаю На Большую Кнопку Для Передачи Издаёт Звуки Как Будто Занято. | |
| На Одной Волне Не Слышно Друг Друга | ||
| Тк-3406 | Издает Звуковые Сигналы | |
| Не Работает На Прём | ||
| Во Время Зарядки Красный Свет Мигает | Во Время Зарядки Красный Свет Мигает |
В нашей базе сейчас зарегестрированно 18 353 сервиса в 513 города России, Беларусии, Казахстана и Украины.

НАВИТЕКС
⭐
⭐
⭐
⭐
⭐
Адресс:
ул. Маршала Новикова, д. 3
Телефон:
74995020572
Сайт:
n/a
Время работы
Будни: с 1000 до 1800
Суббота: с 1100 до 1500
Воскресенье: выходной
ГЛАВКОМП
⭐
⭐
⭐
⭐
⭐
Адресс:
Покрышкина дом 8 корпус 3
Телефон:
74952369676
Сайт:
n/a
Время работы
Ежедневно: с 1000 до 2030
АЛЬФА2
⭐
⭐
⭐
⭐
⭐
Адресс:
Пр. Мира 101
Телефон:
Сайт:
n/a
Время работы
Время работы не указано
СЕРВИСНЫЙ ЦЕНТР
⭐
⭐
⭐
⭐
⭐
Адресс:
Генерала Кузнецова, 28 к1
Телефон:
74957048101
Сайт:
n/a
Время работы
Будни: с 1000 до 2200
Суббота: с 1000 до 2200
Воскресенье: с 1000 до 2000
ГЛАВКОМП
⭐
⭐
⭐
⭐
⭐
Адресс:
22-ой км. Киевского шоссе
Телефон:
74952369676
Сайт:
n/a
Время работы
Ежедневно: с 0930 до 2200
User Guide for motorola models including: MOTOTRBO, Non-keypad Portable Radio, DP4401 Ex, motorola
MOTOTRBO DP4401 Ex NON-KEYPAD PORTABLE RADIO USER GUIDE
Motorola Solutions, Inc.
2021 Motorola Solutions, Inc. All rights reserved. en-US … 4.9.8.1 Enabling Manual Site. Search. … In a manual site search, the radio searches for the next site.
PROFESSIONAL DIGITAL TWO-WAY RADIO MOTOTRBO™
4.9.8.1 Enabling Manual Site Search…..51 4.9.8.2 Site Lock On/Off…..51 4.9.9 Home Channel Reminder…..51
- PDF Viewer
- Universal Document Viewer
- Google Docs View
- Google Drive View
- Download Document [pdf]
- Download Document [Optimized]
- Document:
- Text
- References
Not Your Device? Search For Manuals / Datasheets:
File Info : application/pdf, 123 Pages, 3.23MB
Document68012008015-DL enus MOTOTRBO DP4401 Ex NON-KEYPAD PORTABLE RADIO USER GUIDE
PROFESSIONAL DIGITAL TWO-WAY RADIO
MOTOTRBOTM
DP4401 Ex NON-KEYPAD PORTABLE RADIO
USER GUIDE
en-US
FEBRUARY 2021
© 2021 Motorola Solutions, Inc. All rights reserved.
@68012008015@ 68012008015-DL
English
Contents
Important Safety Information........................................ 10 Software Version.......................................................... 11 Copyrights.................................................................... 12 Computer Software Copyrights.................................... 14 Radio Care................................................................... 15 Chapter 1: Introduction...............................................17
1.1 Icon Information...........................................17 1.2 Conventional Analog and Digital Modes......17 1.3 IP Site Connect............................................18 1.4 Capacity PlusSingle-Site........................... 18 1.5 Capacity PlusMulti-Site .............................19 Chapter 2: Getting Started......................................... 21 2.1 Charging the Battery....................................21 2.2 Attaching the Battery................................... 21 2.3 Attaching the Antenna................................. 22 2.4 Attaching the Belt Clip................................. 22 2.5 Attaching the Universal Connector Cover... 23 2.6 Turning the Radio On.................................. 24 2.7 Adjusting the Volume...................................24
2
Chapter 3: Radio Controls..........................................25 Part I: Capacity Max................................................... 26
4.1 Push-To-Talk Button....................................26 4.2 Programmable Buttons................................26 4.3 Assignable Radio Functions........................ 26 4.4 Assignable Settings or Utility Functions...... 28 4.5 Status Indicators..........................................28
4.5.1 LED Indicator................................. 28 4.5.2 Tones.............................................29
4.5.2.1 Audio Tones.....................29 4.5.2.2 Indicator Tones................ 30 4.6 Registration................................................. 30 4.7 Zone and Channel Selections..................... 31 4.7.1 Selecting Zones ............................ 31 4.7.2 Selecting a Call Type.....................32 4.7.3 Selecting a Site..............................32 4.7.4 Roam Request...............................33 4.7.5 Site Lock On/Off............................ 33 4.7.6 Site Restriction...............................33 4.7.7 Site Trunking .................................34 4.8 Calls.............................................................34
4.8.1 Group Calls....................................35 4.8.1.1 Making Group Calls......... 35 4.8.1.2 Responding to Group Calls............................................. 35
4.8.2 Broadcast Call .............................. 36 4.8.2.1 Making Broadcast Calls .. 36 4.8.2.2 Receiving Broadcast Calls ............................................ 37
4.8.3 Private Call.................................... 37 4.8.3.1 Making Private Calls........ 38 4.8.3.2 Making a Private Call with a One Touch Call Button ..... 38 4.8.3.3 Receiving Private Calls.... 39 4.8.3.4 Accepting Private Calls ... 39 4.8.3.5 Declining Private Calls .... 40
4.8.4 All Calls .........................................40 4.8.4.1 Receiving All Calls .......... 41 4.8.4.2 Making All Calls .............. 41
4.8.5 Phone Calls................................... 41 4.8.5.1 Making Phone Calls......... 42 4.8.5.2 Making Phone Calls with the Programmable Button ........... 43
English
4.8.5.3 Responding to Phone Calls as All Calls.......................... 44 4.8.5.4 Responding to Phone Calls as Group Calls.................... 44 4.8.5.5 Responding to Phone Calls as Private Calls................... 45 4.8.6 Initiating Transmit Interrupt............ 45 4.8.7 Call Preemption............................. 45 4.8.8 Voice Interrupt............................... 46 4.8.8.1 Enabling Voice Interrupt...46 4.9 Advanced Features..................................... 47 4.9.1 Call Queue.....................................47 4.9.2 Priority Call.................................... 47 4.9.3 Talkgroup Scan .............................48 4.9.3.1 Turning Talkgroup Scan On or Off...................................... 48 4.9.4 Receive Group List........................ 49 4.9.5 Priority Monitor...............................49 4.9.6 Multi-Talkgroup Affiliation.............. 50 4.9.7 Talkback ....................................... 50 4.9.8 Multi-Site Controls......................... 50
3
English 4
4.9.8.1 Enabling Manual Site Search..........................................51
4.9.8.2 Site Lock On/Off...............51
4.9.9 Home Channel Reminder.............. 51
4.9.9.1 Muting the Home Channel Reminder....................... 52
4.9.9.2 Setting New Home Channels...................................... 52
4.9.10 Remote Monitor........................... 52
4.9.10.1 Initiating Remote Monitor......................................... 52
4.9.11 Call Indicator Settings..................53
4.9.11.1 Escalating Alarm Tone Volume......................................... 53
4.9.12 Call Alert Operation..................... 53
4.9.12.1 Making Call Alerts.......... 53
4.9.12.2 Responding to Call Alerts ...........................................54
4.9.13 Mute Mode...................................54
4.9.13.1 Turning On Mute Mode.. 54
4.9.13.2 Exiting Mute Mode......... 55
4.9.14 Emergency Operation..................55
4.9.14.1 Sending Emergency Alarms.......................................... 57
4.9.14.2 Sending Emergency Alarms with Call........................... 57
4.9.14.3 Sending Emergency Alarms with Voice to Follow......... 59
4.9.14.4 Receiving Emergency Alarms ......................................... 60
4.9.14.5 Responding to Emergency Alarms with Call........ 60
4.9.14.6 Exiting Emergency Mode............................................ 61
4.9.15 Status Message........................... 61
4.9.15.1 Sending Status Messages.....................................61
4.9.16 Privacy......................................... 62
4.9.16.1 Turning Privacy On or Off................................................ 62
4.9.17 Response Inhibit.......................... 63
4.9.17.1 Turning Response Inhibit On or Off............................63
4.9.18 Stun/Revive................................. 63
4.9.19 Radio Kill......................................64
4.9.20 Lone Worker................................ 64
4.9.21 Password Lock............................ 64
4.9.21.1 Accessing the Radio by Using Password........................... 65
4.9.21.2 Unlocking Radios in Locked State................................ 65
4.9.22 Over-the-Air Programming ..........66
4.9.23 Dynamic Group Number Assignment (DGNA)............................... 66
4.9.23.1 Making DGNA Calls....... 67
4.9.23.2 Making Non-DGNA Calls............................................. 67
4.9.23.3 Receiving and Responding to DGNA Calls......... 67
4.10 Utilities....................................................... 68
4.10.1 Turning Acoustic Feedback Suppressor On or Off..............................68
4.10.2 Checking Battery Strength...........68
4.10.3 Text-to-Speech............................ 68
4.10.3.1 Setting Text-to-Speech.. 69
4.10.4 Turning Global Navigation Satellite System On or Off...................... 69
English
4.10.5 Turning Radio Tones/Alerts On or Off.......................................................69 4.10.6 Power Levels............................... 70
4.10.6.1 Setting Power Levels..... 70 4.10.7 Turning Option Board On or Off...70 4.10.8 Turning Voice Announcement On or Off ................................................ 70 4.10.9 Switching Audio Route between Internal Radio Speaker and Wired Accessory............................................... 71 4.10.10 Turning Intelligent Audio On or Off........................................................... 71 4.10.11 Turning Trill Enhancement On or Off.......................................................72 Part II: Other Systems................................................ 73 5.1 Push-To-Talk Button....................................73 5.2 Programmable Buttons................................73 5.3 Assignable Radio Functions........................ 73 5.4 Assignable Settings or Utility Functions...... 75 5.5 Status Indicators..........................................75 5.5.1 LED Indicators .............................. 76 5.5.2 Tones.............................................77
5.5.2.1 Indicator Tones................ 77
5
English
5.5.2.2 Audio Tones.....................77 5.6 Zone and Channel Selections..................... 78
5.6.1 Selecting Zones ............................ 78 5.6.2 Selecting Channels........................78 5.7 Calls.............................................................78 5.7.1 Group Calls....................................79
5.7.1.1 Responding to Group Calls............................................. 79 5.7.1.2 Making Group Calls......... 80 5.7.1.3 Making Group Calls by Using the Channel Selector Knob.............................................80 5.7.2 Private Calls ............................. 81 5.7.2.1 Responding to Private Calls ........................................81 5.7.2.2 Making Private Calls ... 82 5.7.3 All Calls..........................................83 5.7.3.1 Receiving All Calls........... 83 5.7.3.2 Making All Calls............... 83 5.7.4 Selective Calls .......................... 84 5.7.4.1 Responding to Selective Calls ........................................84
6
5.7.4.2 Making Selective Calls..... 84
5.7.4.3 Making Selective Calls by Using the Channel Selector Knob.............................................85
5.7.5 Phone Calls .............................. 86
5.7.5.1 Responding to Phone Calls as Private Calls ..............86
5.7.5.2 Responding to Phone Calls as Group Calls ............... 87
5.7.5.3 Responding to Phone Calls as All Calls ..................... 87
5.7.5.4 Making Phone Calls ....87
5.7.6 Initiating Transmit Interrupt .......88
5.7.7 Broadcast Voice Calls....................88
5.7.7.1 Making Broadcast Voice Calls............................................. 89
5.7.7.2 Making Broadcast Voice Calls by Using the Programmable Number Key ....... 89
5.7.7.3 Making Broadcast Voice Calls by Using the Alias Search
................................................. 90
5.7.7.4 Receiving Broadcast Voice Calls................................... 90
5.7.8 Unaddressed Calls........................ 90
5.7.8.1 Making Unaddressed Calls............................................. 91
5.7.8.2 Responding to Unaddressed Calls.......................91
5.7.9 Open Voice Channel Mode (OVCM)...................................................92
5.7.9.1 Making OVCM Calls.........92
5.7.9.2 Responding to OVCM Calls............................................. 93
5.8 Advanced Features..................................... 94
5.8.1 Multi-Site Control
................ 94
5.8.1.1 Starting Automatic Site Search..........................................94
5.8.1.2 Stopping Automatic Site Search..........................................95
5.8.1.3 Enabling Manual Site Search..........................................95
5.8.2 Talkaround.....................................95
English
5.8.2.1 Toggling Between Repeater and Talkaround Modes.......................................... 96 5.8.3 Monitor Feature ............................ 96 5.8.3.1 Monitoring Channels........ 96 5.8.3.2 Permanent Monitor ......... 96
5.8.3.2.1 Turning Permanent Monitor On or Off..................................... 97 5.8.4 Remote Monitor............................. 97 5.8.4.1 Initiating Remote Monitor ..................................................... 97 5.8.5 Scan Lists...................................... 98 5.8.6 Scan...............................................98 5.8.6.1 Turning Scan On or Off ... 99 5.8.6.2 Responding to Transmissions During Scanning.. 99 5.8.6.3 Deleting Nuisance Channels.................................... 100 5.8.6.4 Restoring Nuisance Channels.................................... 100
5.8.7 Vote Scan
......................... 100 7
English 8
5.8.8 Call Indicator Settings..................101
5.8.8.1 Escalating Alarm Tone Volume....................................... 101
5.8.9 Call Alert Operation..................... 101
5.8.9.1 Responding to Call Alerts .........................................101
5.8.9.2 Making Call Alerts.......... 101
5.8.10 Mute Mode.................................102
5.8.10.1 Turning On Mute Mode 102
5.8.10.2 Exiting Mute Mode....... 102
5.8.11 Emergency Operation ...............103
5.8.11.1 Receiving Emergency Alarms........................................ 104
5.8.11.2 Sending Emergency Alarms ....................................... 105
5.8.11.3 Sending Emergency Alarms with Call ........................ 105
5.8.11.4 Emergency Alarms with Voice to Follow ..........................106
5.8.11.5 Sending Emergency Alarms with Voice to Follow ..107
5.8.11.6 Reinitiating Emergency Mode.......................................... 107
5.8.12 Text Messaging ........................ 108 5.8.12.1 Quick Text Messages ............................................... 108 5.8.12.1.1 Sending Quick Text Messages................ 108
5.8.13 Privacy ..................................109 5.8.13.1 Turning Privacy On or Off ......................................... 109
5.8.14 Response Inhibit........................ 110 5.8.14.1 Turning Response Inhibit On or Off..........................110
5.8.15 Lone Worker.............................. 110 5.8.16 Auto-Range Transponder
System
.......................................111
5.8.17 Over-the-Air Programming ... 111
5.8.18 Password Lock.......................... 112
5.8.18.1 Accessing the Radio by Using Password......................... 112
5.8.18.2 Unlocking Radios in Locked State.............................. 113
5.9 Utilities....................................................... 113
5.9.1 Checking Battery Strength...........113
5.9.2 Setting Text-to-Speech................ 113
5.9.3 Turning Acoustic Feedback Suppressor On or Off ...................... 114
5.9.4 Turning Global Navigation Satellite System On or Off.................... 114
5.9.5 Turning Radio Tones/Alerts On or Off......................................................... 114
5.9.6 Voice Operating Transmission.....115
5.9.6.1 Turning Voice Operating Transmission On or Off.............. 115
5.9.7 Turning Option Board On or Off...116
5.9.8 Turning Voice Announcement On or Off ....................................................116
5.9.9 Switching Audio Route between Internal Radio Speaker and Wired Accessory............................................. 116
5.9.10 Turning Intelligent Audio On or Off......................................................... 117
5.9.11 Turning Trill Enhancement On or Off.....................................................117
Limited Warranty........................................................ 118
English MOTOROLA SOLUTIONS COMMUNICATION PRODUCTS.................... 118 I. WHAT THIS WARRANTY COVERS AND FOR HOW LONG:........................................... 118 II. GENERAL PROVISIONS............................ 119 III. STATE LAW RIGHTS:................................119 IV. HOW TO GET WARRANTY SERVICE......119 V. WHAT THIS WARRANTY DOES NOT COVER............................................................ 120 VI. PATENT AND SOFTWARE PROVISIONS120 VII. GOVERNING LAW................................... 121 VIII. For Australia Only.................................... 122
9
English
Important Safety Information
RF Energy Exposure and Product Safety Guide for Portable Two-Way Radios
CAUTION: This radio is restricted to Occupational use only. Before using the radio, read the RF Energy Exposure and Product Safety Guide for Portable Two-Way Radios which contains important operating instructions for safe usage and RF energy awareness and control for Compliance with applicable standards and Regulations.
10
Software Version
All the features described in the following sections are supported by the software version R02.21.01.0000 or later. Contact your dealer or administrator for more information.
English
11
English
Copyrights
The Motorola Solutions products described in this document may include copyrighted Motorola Solutions computer programs. Laws in the United States and other countries preserve for Motorola Solutions certain exclusive rights for copyrighted computer programs. Accordingly, any copyrighted Motorola Solutions computer programs contained in the Motorola Solutions products described in this document may not be copied or reproduced in any manner without the express written permission of Motorola Solutions.
© 2021 Motorola Solutions, Inc. All Rights Reserved
No part of this document may be reproduced, transmitted, stored in a retrieval system, or translated into any language or computer language, in any form or by any means, without the prior written permission of Motorola Solutions, Inc.
Furthermore, the purchase of Motorola Solutions products shall not be deemed to grant either directly or by implication, estoppel or otherwise, any license under the copyrights, patents or patent applications of Motorola Solutions, except for the normal non-exclusive, royalty-free license to use that arises by operation of law in the sale of a product.
Disclaimer
Please note that certain features, facilities, and capabilities described in this document may not be applicable to or licensed for use on a specific system, or may be dependent upon the characteristics of a specific mobile subscriber unit or configuration of certain parameters. Please refer to your Motorola Solutions contact for further information.
Trademarks
MOTOROLA, MOTO, MOTOROLA SOLUTIONS, and the Stylized M Logo are trademarks or registered trademarks of Motorola Trademark Holdings, LLC and are used under license. All other trademarks are the property of their respective owners.
Open Source Content
This product contains Open Source software used under license. Refer to the product installation media for full Open Source Legal Notices and Attribution content.
12
European Union (EU) Waste of Electrical and Electronic Equipment (WEEE) directive
The European Union's WEEE directive requires that products sold into EU countries must have the crossed out trash bin label on the product (or the package in some cases).
As defined by the WEEE directive, this cross-out trash bin label means that customers and end-users in EU countries should not dispose of electronic and electrical equipment or accessories in household waste.
Customers or end-users in EU countries should contact their local equipment supplier representative or service centre for information about the waste collection system in their country.
English 13
English
Computer Software Copyrights
The Motorola Solutions products described in this manual may include copyrighted Motorola Solutions computer programs stored in semiconductor memories or other media. Laws in the United States and other countries preserve for Motorola Solutions certain exclusive rights for copyrighted computer programs including, but not limited to, the exclusive right to copy or reproduce in any form the copyrighted computer program. Accordingly, any copyrighted Motorola Solutions computer programs contained in the Motorola Solutions products described in this manual may not be copied, reproduced, modified, reverse-engineered, or distributed in any manner without the express written permission of Motorola Solutions. Furthermore, the purchase of Motorola Solutions products shall not be deemed to grant either directly or by implication, estoppel, or otherwise, any license under the copyrights, patents or patent applications of Motorola Solutions, except for the normal non-exclusive license to use that arises by operation of law in the sale of a product.
The AMBE+2TM voice coding Technology embodied in this product is protected by intellectual property rights including
patent rights, copyrights and trade secrets of Digital Voice Systems, Inc.
This voice coding Technology is licensed solely for use within this Communications Equipment. The user of this Technology is explicitly prohibited from attempting to decompile, reverse engineer, or disassemble the Object Code, or in any other way convert the Object Code into a human-readable form.
U.S. Pat. Nos. #5,870,405, #5,826,222, #5,754,974, #5,701,390, #5,715,365, #5,649,050, #5,630,011, #5,581,656, #5,517,511, #5,491,772, #5,247,579, #5,226,084 and #5,195,166.
14
English
Radio Care
This section describes the basic handling precaution of the radio.
Table 1: IP Specification IP Specification IP67
Description
Allows your radio to withstand adverse field conditions such as being submersed in water.
CAUTION: Do not disassemble your radio. This could damage radio seals and result in leak paths into the radio. Radio maintenance should only be done in service depot that is equipped to test and replace the seal on the radio.
· If your radio has been submersed in water, shake your radio well to remove any water that may be trapped inside the speaker grille and microphone port. Trapped water could cause decreased audio performance.
· If your radio's battery contact area has been exposed to water, clean and dry battery contacts on both your radio
and the battery before attaching the battery to radio. The residual water could short-circuit the radio.
· If your radio has been submersed in a corrosive substance (for example, saltwater), rinse radio and battery in fresh water then dry radio and battery.
· To clean the exterior surfaces of your radio, use a diluted solution of mild dishwashing detergent and fresh water (for example, one teaspoon of detergent to one gallon of water).
· Never poke the vent (hole) located on the radio chassis below the battery contact. This vent allows for pressure equalization in the radio. Doing so may create a leak path into radio and your radio's submersibility may be lost.
· Never obstruct or cover the vent, even with a label.
· Ensure that no oily substances come in contact with the vent.
· Your radio with antenna attached properly is designed to be submersible to a maximum depth of 1 m (3.28 ft) and a maximum submersion time of 30 minutes. Exceeding either maximum limit or use without antenna may result in damage to your radio.
15
English · When cleaning your radio, do not use a high pressure
jet spray on radio as this will exceed the 1 m depth pressure and may cause water to leak into your radio.
16
English
Introduction
This user guide covers the operation of your radios.
Your dealer or system administrator may have customized your radio for your specific needs. Check with your dealer or system administrator for more information.
You can consult your dealer or system administrator about the following:
· Is your radio programmed with any preset conventional channels?
· Which buttons have been programmed to access other features?
· What optional accessories may suit your needs?
· What are the best radio usage practices for effective communication?
· What maintenance procedures that helps promote longer radio life?
1.1
Icon Information
Throughout this publication, the icons described are used to indicate features supported in either the conventional analog or conventional digital mode.
Indicates a conventional Analog Mode-Only feature.
Indicates a conventional Digital Mode-Only feature. For features that are available in both conventional analog and digital modes, both icons are not shown.
1.2
Conventional Analog and Digital Modes
Each channel in your radio can be configured as a conventional analog or conventional digital channel.
1 : Channel Selector Knob
17
English
Certain features are unavailable when switching from digital to analog mode.
Your radio also has features available in both analog and digital modes. The minor differences in the way each feature works do not affect the performance of your radio.
NOTICE: Your radio also switches between digital and analog modes during a dual mode scan. See Scan on page 98 for more information.
1.3
IP Site Connect
This feature allows your radio to extend conventional communication beyond the reach of a single site by connecting to different available sites by using an Internet Protocol (IP) network. This is a conventional multi-site mode.
When the radio moves out of range from one site and into the range of another, the radio connects to the repeater of the new site to send or receive calls or data transmissions. This is done either automatically or manually depending on your settings.
In an automatic site search, the radio scans through all available sites when the signal from the current site is weak
18
or when the radio is unable to detect any signal from the current site. The radio then locks on to the repeater with the strongest Received Signal Strength Indicator (RSSI) value.
In a manual site search, the radio searches for the next site in the roam list that is currently in range but which may not have the strongest signal and locks on to the repeater.
NOTICE: Each channel can only have either Scan or Roam enabled, not both at the same time.
Channels with this feature enabled can be added to a particular roam list. The radio searches the channels in the roam list during the automatic roam operation to locate the best site. A roam list supports a maximum of 16 channels, including the selected channel.
NOTICE: You cannot manually add or delete an entry in the roam list. Contact your dealer for more information.
1.4
Capacity PlusSingle-Site
Capacity PlusSingle-Site is a single-site trunking configuration of the MOTOTRBO radio system, which uses a pool of channels to support hundreds of users and up to
English
254 Groups. This feature allows your radio to efficiently utilize the available number of programmed channels while in Repeater Mode.
You hear a negative indicator tone if you try to access a feature not applicable to Capacity PlusSingle-Site by using a programmable button press.
Your radio also has features that are available in conventional digital mode, IP Site Connect, and Capacity Plus. However, the minor differences in the way each feature works does not affect the performance of your radio.
Check with your dealer or system administrator for more information on this configuration.
1.5
Capacity PlusMulti-Site
Capacity PlusMulti-Site is a multi-channel trunking configuration of the MOTOTRBO radio system, combining the best of both Capacity Plus and IP Site Connect configurations.
Capacity PlusMulti-Site allows your radio to extend trunking communication beyond the reach of a single site, by connecting to different available sites which are connected with an IP network. It also provides an increase
in capacity by efficiently utilizing the combined available number of programmed channels supported by each of the available sites.
When the radio moves out of range from one site and into the range of another, it connects to the repeater of the new site to send or receive calls/data transmissions. Depending on your settings, this is done automatically or manually.
If the radio is set to do this automatically, it scans through all available sites when the signal from the current site is weak or when the radio is unable to detect any signal from the current site. It then locks on to the repeater with the strongest RSSI value.
In a manual site search, the radio searches for the next site in the roam list that is currently in range (but which may not have the strongest signal) and locks on to it.
Any channel with Capacity PlusMulti-Site enabled can be added to a particular roam list. The radio searches these channels during the automatic roam operation to locate the best site.
NOTICE: You cannot manually add or delete an entry to the roam list. Check with your dealer or system administrator for more information.
19
English Similar to Capacity PlusSingle Site, icons of features not applicable to Capacity PlusMulti-Site are not available in the menu. You hear a negative indicator tone if you try to access a feature not applicable to Capacity PlusMulti-Site by using a programmable button press.
20
English
Getting Started
Getting Started provides instructions to prepare your radio for use.
2.1
Charging the Battery
For best performance, your radio is powered by a Motorola Solutions-approved Lithium-Ion (Li-lon) battery.
· Charge your battery only in non-hazardous areas. After battery is charged, allow your radio to rest for at least 3 minutes.
· To avoid damage and comply with warranty terms, charge the battery using a Motorola Solutios charger exactly as described in the charger user guide.
· Charge your battery only in non-hazardous areas. After battery is charged, allow your radio to rest for at least 3 minutes.
· If battery is attached to your radio, ensure that your radio remains powered off while charging.
· Charge a new battery 14 to 16 hours before initial use for best performance.
· Always charge your IMPRES battery with an IMPRES charger for optimized battery life and valuable battery data.
IMPRES batteries charged exclusively with IMPRES chargers receive a 6-month capacity warranty extension over the standard Motorola Solutions Premium battery warranty duration.
2.2
Attaching the Battery
Follow the procedure to attach the battery to your radio.
When the radio is attached with non-Motorola Solutions battery, an alert tone sounds.
1 Align the battery with the rails on the back of the radio.
21
English
2 Press the battery firmly, and slide upward until the latch snaps into place.
NOTICE: To remove the antenna, turn the antenna
counterclockwise.
3 Slide battery latch into lock position.
2.3
Attaching the Antenna
Turn off your radio.
CAUTION: To prevent damages, replace the faulty antenna with only MOTOTRBO antennas.
2.4
Attaching the Belt Clip
Set the antenna in the receptacle and turn clockwise.
NOTICE: To protect best against water and dust, ensure that antenna is tightly fitted.
1 To attach the belt clip, align the grooves on the clip with those on the battery and press downward until
you hear a click.
22
English
2 To remove the belt clip, press the belt clip tab away from the battery using a key. Then slide the clip
upward and away from the radio.
Attaching the Universal Connector Cover
The universal connector is located on the antenna side of the radio. It is used to connect MOTOTRBO accessories to the radio.
Replace the universal connector cover or dust cover when the universal connector is not in use.
1 Insert the slanted end of the cover into the slots above the universal connector.
2 Press downwards on the cover to seat the dust cover properly on the universal connector.
2.5
23
English
3 Secure the connector cover to the radio by turning the thumbscrew clockwise.
2.6
Turning the Radio On
Rotate the On/Off/Volume Control knob clockwise until it clicks.
If successful, your radio shows the following indications:
· A tone sounds.
NOTICE: If the Tones/Alerts function is disabled, there is no tone upon powering up.
· The green LED lights up.
NOTICE: During the initial power-up after a software version update to R02.07.00.0000 or later, a GNSS firmware upgrade takes place for 20 seconds. After the upgrade, the radio resets and turns on. This firmware upgrade is only applicable for portable models with the latest software and hardware.
If your radio does not power up, check your battery. Make sure that the battery is charged and properly attached. Contact your dealer if your radio still does not power up.
2.7
Adjusting the Volume
To adjust the volume of your radio, perform one of the following actions:
· To increase the volume, turn the On/Off/Volume Control knob clockwise.
· To decrease the volume, turn the On/Off/Volume Control knob counterclockwise.
NOTICE: Your radio can be programmed to have a minimum volume offset where the volume level cannot be lowered past the programmed minimum volume.
24
Radio Controls
This chapter explains the buttons and functions to control the radio.
1
12
2
11
3 10
4 9
5
8
6 7
2 On/Off/Volume Control Knob 3 LED Indicator 4 Side Button 11 5 Push-to-Talk (PTT) Button 6 Side Button 21 7 Side Button 31 8 Microphone 9 Speaker 10 Universal Connector for Accessories 11 Emergency Button1 12 Antenna
English
1 Channel Selector Knob
1 These buttons are programmable. 25
English
Capacity Max
Capacity Max is MOTOTRBO control channel based trunked radio system.
MOTOTRBO digital radio products are marketed by Motorola Solutions primarily to business and industrial users. MOTOTRBO uses the European Telecommunications Standards Institute (ETSI) Digital Mobile Radio (DMR) standard, that is, two-slot Time Division Multiple Access (TDMA), to pack simultaneous voice or data in a 12.5 kHz channel (6.25 kHz equivalent).
4.1
Push-To-Talk Button
The Push-to-Talk (PTT) button serves two basic purposes:
· While a call is in progress, the PTT button allows the radio to transmit to other radios in the call. The microphone is activated when the PTT button is pressed.
· While a call is not in progress, the PTT button is used to make a new call.
Long press the PTT button to talk. Release the PTT button to listen.
26
If the Talk Permit Tone is enabled, wait until the short alert tone ends before talking.
4.2
Programmable Buttons
Depending on the duration of a button press, your dealer can program the programmable buttons as shortcuts to radio functions.
Short press Pressing and releasing rapidly.
Long press Pressing and holding for the programmed duration.
NOTICE: See Emergency Operation on page 103 for more information on the programmed duration of the Emergency button.
4.3
Assignable Radio Functions
The following radio functions can be assigned to the programmable buttons by your dealer or system administrator.
English
Audio Toggle Toggles audio routing between the internal radio speaker and the speaker of a wired accessory.
Battery Strength Indicates battery strength by using the LED Indicator.
Cancel Allows users to end selected calls.
Call Priority High Indicating Call Priority Level High is enabled.
Emergency Depending on the programming, initiates or cancels an emergency.
Intelligent Audio Toggles intelligent audio on or off.
Manual Site Roam Starts the manual site search.
Mic AGC Toggles the internal microphone automatic gain control (AGC) on or off.
One Touch Access Directly initiates a predefined Broadcast, Private, Phone or Group Call, a Call Alert, or a Quick Text message.
Option Board Feature Toggles option board feature(s) on or off for option board-enabled channels.
Phone Exit Ends a Phone Call.
Privacy Toggles privacy on or off.
Reset Home Channel Sets a new home channel.
Silence Home Channel Reminder Mutes the Home Channel Reminder.
Site Info Plays site announcement voice messages for the current site when Voice Announcement is enabled.
Telemetry Control Controls the Output Pin on a local or remote radio.
Toggle Call Priority Level Enables your radio to enter Call Priority Level High/ Normal.
Trill Enhancement Toggles trill enhancement on or off.
Voice Announcement On/Off Toggles voice announcement on or off.
27
English
Zone Toggle Allows radio user to toggle between Zone 1 and Zone 2.
4.4
Assignable Settings or Utility Functions
The following radio settings or utility functions can be assigned to the programmable buttons.
Tones/Alerts Toggles all tones and alerts on or off.
Power Level Toggles transmit power level between high and low.
4.5
Status Indicators
This chapter explains the status indicators and audio tones used in the radio.
4.5.1
LED Indicator
The LED indicator shows the operational status of your radio.
Blinking Red Radio has failed the self-test upon powering up.
Radio is receiving an emergency transmission.
Radio is transmitting in low battery state.
Radio has moved out of range if Auto-Range Transponder System is configured.
Mute Mode is enabled.
Solid Green Radio is powering up.
Radio is transmitting.
Indicates full battery capacity when the programmed Battery Strength button is pressed.
Radio is sending a Call Alert or an emergency transmission.
Blinking Green Radio is receiving a call or data.
Radio is retrieving Over-the-Air Programming transmissions over the air.
28
Radio is detecting activity over the air.
NOTICE: This activity may or may not affect the programmed channel of the radio due to the nature of the digital protocol.
Double Blinking Green Radio is receiving a privacy-enabled call or data.
Solid Yellow Radio is in Bluetooth Discoverable Mode.
Indicates fair battery capacity when the programmed Battery Strength button is pressed.
Blinking Yellow Radio has yet to respond to a Call Alert.
Double Blinking Yellow Radio has Auto Roaming enabled.
Radio is actively searching for a new site.
Radio has yet to respond to a Group Call Alert.
Radio is locked.
4.5.2
English
Tones
The following are the tones that sound through on the radio speaker.
High Pitched Tone
Low Pitched Tone
4.5.2.1
Audio Tones
Audio tones provide you with audible indications of the status, or response to data received on the radio.
Continuous Tone A monotone sound. Sounds continuously until termination.
Periodic Tone Sounds periodically depending on the duration set by the radio. Tone starts, stops, and repeats itself.
29
English
Repetitive Tone A single tone that repeats itself until it is terminated by the user.
Momentary Tone Sounds once for a short duration set by the radio.
4.5.2.2
Indicator Tones
Indicator tones provide you with audible indications of the status after an action to perform a task is taken.
Positive Indicator Tone
Negative Indicator Tone 4.6
Registration
There are a number of registration-related messages that you may receive.
Registering
Typically, registration is sent to the system during powerup, Talkgroup change, or during site roaming. If a radio fails registration on a site, the radio automatically attempts to roam to another site. The radio temporarily removes the site where registration was attempted from the roaming list.
The indication means that the radio is busy searching for a site to roam, or that the radio has found a site successfully but is waiting for a response to the registration messages from the radio.
When a radio is registering, a tone sounds and the yellow LED double flashes to indicate a site search.
If the indications persist, the user should change locations or if allowed, manually roam to another site.
Out of Range
A radio is deemed to be out of range when the radio is unable to detect a signal from the system or from the current site. Typically, this indication means that the radio is outside of the geographic outbound radio frequency (RF) coverage range.
When a radio is out of range, a repetitive tone sounds and the red LED flashes.
30
English
Contact your dealer or system administrator if the radio still receives out of range indications while being in an area with good RF coverage.
Talkgroup Affiliation Failed
A radio tries to affiliate to the Talkgroup specified in the channels or Unified Knob Position (UKP) during registration.
A radio that is in affiliation fail state is unable to make or receive calls from the Talkgroup that the radio is trying to affiliate to.
Contact your dealer or system administrator if the radio receives affiliation failure indications.
Register Denied
Registration denied indicators are received when the registration with the system is not accepted.
The radio does not indicate to the radio user the specific reason the registration was denied. Normally, a registration is denied when the system operator has disabled the access of the radio to the system.
When a radio is denied registration, the yellow LED double flashes to indicate a site search.
4.7
Zone and Channel Selections
This chapter explains the operations to select a zone or channel on your radio.
The radio can be programmed with a maximum of 250 Capacity Max Zones with a maximum of 160 Channels per zone. Each Capacity Max zone contains a maximum of 16 assignable positions.Each Capacity Max zone contains a maximum of 16 assignable positions.
4.7.1
Selecting Zones
Follow the procedure to select the required zone on your radio.
Press the programmed Zone Toggle button.
One of the following tone sounds: Positive Indicator Tone Radio is in Zone 2.
31
English
Negative Indicator Tone Radio is in Zone 1.
NOTICE: For all Non-keypad radio, you are recommended to enable Voice Announcement feature for selecting zone. The Voice Announcement feature can only be enabled through CPS.
4.7.2
Selecting a Call Type
Use the Channel Selector Knob to select a call type. This can be a Group Call, Broadcast Call, All Call, or Private Call, depending on how your radio is programmed. If you change the Channel Selector Knob to a different position (that has a call type assigned to it), this causes the radio to re-register with the Capacity Max System. The radio registers with the Talkgroup ID that has been programmed for the new Channel Selector Knob position call type.
Your radio does not operate when selected to an unprogrammed channel, use the Channel Selector Knob to select a programmed channel instead.
Once the required zone is set (if you have multiple zones in your radio), turn the programmed Channel Selector Knob to select the call type.
4.7.3
Selecting a Site
A site provides coverage for a specific area. In a multi-site network, the Capacity Max radio will automatically search for a new site when the signal level from the current site drops to an unacceptable level.
The Capacity Max system can support up to 250 sites.
32
English
4.7.4
Roam Request
A Roam Request tells the radio to search for a different site, even if the signal from the current site is acceptable. If there are no sites available: · The radio continues to search through the list of sites. · The radio will return to the previous site, if the previous
site is still available. NOTICE: This is programmed by your dealer.
Press the programmed Manual Site Roam button. You hear a tone, indicating the radio has switched to a new site.
4.7.5
Site Lock On/Off
When toggled on, the radio searches the current site only. When toggled off, the radio searches other sites in addition to the current site.
Press the programmed Site Lock button. If the Site Lock function is toggled on: · You hear a positive indicator tone, indicating the
radio has locked to the current site. If the Site Lock function is toggled off: · You hear a negative indicator tone, indicating the
radio is unlocked.
4.7.6
Site Restriction
In Capacity Max system, your radio administrator has the ability to decide which network sites your radio is and is not allowed to use. The radio does not have to be reprogrammed to change the list of allowed and disallowed sites. If your radio attempts to register at a disallowed site, your radio receives
33
English
indication that the site is denied. The radio then searches for a different network site.
When experiencing site restrictions, the yellow LED double flashes to indicate a site search.
4.7.7
Site Trunking
Site Trunking is only available with Capacity Max system. A site must be able to communicate with the Trunk Controller to be considered as System Trunking.
If the site cannot communicate with the Trunk Controller in the system, a radio enters Site Trunking mode. While in Site Trunking, the radio provides a periodic audible and visual indication to the user to inform the user of their limited functionality.
When a radio is in Site Trunking, a repetitive tone sounds.
The radios in Site Trunking are still able to make group and individual voice calls as well as send text messages to other radios within the same site. Voice consoles, logging recorders, phone gateways, and data applications cannot communicate to the radios at the site.
Once in Site Trunking, a radio that is involved in calls across multiple sites will only be able to communicate with
other radios within the same site. Communication to and from other sites would be lost.
NOTICE: If there are multiple sites that cover the current location of the radio and one of the sites enters Site Trunking, the radio roams to another site if within coverage.
4.8
Calls
This chapter explains the operations to receive, respond to, make, and stop calls.
You can select a subscriber alias or ID, or group alias or ID after you have selected a channel by using one of these features: Programmed One Touch Access Button
This method is used for Group, Private, and Phone Calls only.
You can only have one ID assigned to a One Touch Access button with a short or long programmable button press.
Programmable Button This method is used for Phone Calls only.
34
English
4.8.1
Group Calls
Your radio must be configured as part of a group to receive a call from or make a call to the group of users.
4.8.1.1
Making Group Calls
To make a call to a group of users, your radio must be configured as part of that group.
1 Do one of the following: · Select a channel with the active group alias or ID. See Selecting a Call Type on page 32. · Press the programmed One Touch Access button.
· Wait for the PTT Sidetone to end and speak clearly into the microphone if enabled.
4 Release the PTT button to listen.
The green LED lights up when the target radio responds.
5 If the Channel Free Indication feature is enabled, you hear a short alert tone the moment the transmitting radio releases the PTT button, indicating the channel is free for you to respond. Press the PTT button to respond to the call.
The call ends when there is no voice activity for a predetermined period. The call initiator can press the programmed Cancel button to end a Group Call.
2 Press the PTT button to make the call. The green LED lights up.
3 Do one of the following: · Wait for the Talk Permit Tone to end and speak clearly into the microphone if enabled.
4.8.1.2
Responding to Group Calls
When you receive a Group Call:
· The green LED blinks.
35
English
· Your radio unmutes and the incoming call sounds through the speaker.
The call ends when there is no voice activity for a predetermined period.
1 Do one of the following:
· If the Channel Free Indication feature is enabled, you hear a short alert tone the moment the transmitting radio releases the PTT button, indicating the channel is free for you to respond. Press the PTT button to respond to the call.
· If the Voice Interrupt feature is enabled, press the PTT button to interrupt the audio from the transmitting radio and free the channel for you to respond.
The green LED lights up.
4.8.2
Broadcast Call
A Broadcast Call is a one-way voice call from any user to an entire talkgroup.
The Broadcast Call feature allows only the call initiating user to transmit to the talkgroup, while the recipients of the call cannot respond.
The broadcast initiator can also end the broadcast call. To receive a call from a group of users, or to call a group of users, the radio must be configured as part of a group.
2 Do one of the following: · Wait for the Talk Permit Tone to end and speak clearly into the microphone if enabled. · Wait for the PTT Sidetone to end and speak clearly into the microphone if enabled.
3 Release the PTT button to listen.
4.8.2.1
Making Broadcast Calls
1 Do one of the following: · Select a channel with the active group alias or ID. See Selecting a Call Type on page 32.
· Press the programmed One Touch Access button.
36
English
2 Press the PTT button to make the call. The green LED lights up.
3 Do one of the following: · Wait for the Talk Permit Tone to end and speak clearly into the microphone if enabled. · Wait for the PTT Sidetone to end and speak clearly into the microphone if enabled. The call initiator can press the programmed Cancel button to end the Broadcast Call.
4.8.2.2
Receiving Broadcast Calls
Follow the procedure to receive a Broadcast Call on your radio. When you receive a Broadcast Call: · The green LED blinks. · Your radio unmutes and the incoming call sounds
through the speaker.
NOTICE: Recipient users are not allowed to Talkback during a Broadcast Call. The Talkback Prohibit Tone plays momentarily if the PTT button is pressed during a Broadcast Call.
4.8.3
Private Call
A Private Call is a call from an individual radio to another individual radio.
There are two ways to set up a Private Call.
· The first call type is called Off Air Call Set-Up (OACSU). OACSU sets up the call after performing a radio presence check and completes the call automatically.
· The second type is called Full Off Air Call Set-Up (FOACSU). FOACSU also sets up the call after performing a radio presence check. However, FOACSU calls require user acknowledgment to complete the call and allows the user to either Accept or Decline the call.
37
English
The type of call is configured by the system administrator.
NOTICE: Both the call initiator and recipient are able to terminate an on-going Private Call by pressing the programmed Cancel button.
4.8.3.1
Making Private Calls
Your radio must be programmed for you to initiate a Private Call. If this feature is not enabled, you hear a negative indicator tone when you initiate the call. If the target radio is not available, a short tone sounds.
3 Wait for the Talk Permit Tone to end and speak clearly into the microphone if enabled.
4 Release the PTT button to listen. The green LED lights up when the target radio responds.
5 The call ends when there is no voice activity for a predetermined period. You will hear a short tone. Both the call initiator and recipient are able to terminate an on-going Private Call by pressing the programmed Cancel button.
1 Do one of the following: · Select a channel with the active subscriber alias or ID. See Selecting a Call Type on page 32. · Press the programmed One Touch Access button.
2 Press the PTT button to make the call. The green LED lights up.
4.8.3.2
Making a Private Call with a One Touch Call Button
The One Touch Call feature allows you to easily make a Private Call to a pre-defined Private Call alias or ID. This feature can be assigned to a short or long programmable button press.
38
English
You can only have one alias or ID assigned to a One Touch Call button. Your radio can have multiple One Touch Call buttons programmed.
1 Press the programmed One Touch Call button to make a Private Call to the pre-defined Private Call alias or ID.
2 Press the PTT button to make the call. The LED lights up solid green.
3 Wait for the Talk Permit Tone to finish (if enabled) and speak clearly into the microphone.
4 Release the PTT button to listen. When the target radio responds, the LED blinks green. If there is no voice activity for a predetermined period of time, the call ends. Both the call initiator and recipient are able to terminate an on-going Private Call by pressing the programmed Cancel button.
4.8.3.3
Receiving Private Calls
When you receive Private Calls configured as Off Air Call Set-Up (OACSU):
· The green LED blinks.
· Your radio unmutes and the incoming call sounds through the speaker.
NOTICE: Depending on how your radio is configured, either OACSU or Full Off Air Call Set-Up (FOACSU), responding to Private Calls may or may not require user acknowledgment.
For the OACSU configuration, your radio unmutes and the call connects automatically.
4.8.3.4
Accepting Private Calls
When you receive Private Calls configured as Full Off Air Call Set-Up (FOACSU):
39
English
· The green LED blinks.
· The green LED blinks.
1 To accept a Private Call, perform the following action: · Press the PTT button on any entry. The green LED lights up.
2 Wait for the Talk Permit Tone to end and speak clearly into the microphone if enabled.
3 Release the PTT button to listen. The call ends when there is no voice activity for a predetermined period. A tone sounds. NOTICE: Both the call initiator and recipient are able to terminate an on-going Private Call by pressing the programmed Cancel button.
4.8.3.5
Declining Private Calls
When you receive Private Calls configured as Full Off Air Call Set-Up (FOACSU):
To decline a Private Call, perform the following action:
· Press the programmed Cancel button.
4.8.4
All Calls
An All Call is a call from an individual radio to every radio on the site or every radio at a group of sites, depending on system configuration.
An All Call is used to make important announcements, requiring full attention from the user. The users on the system cannot respond to an All Call.
Capacity Max supports Site All Call and Multi-site All Call. The system administrator may configure one or both of these in your radio.
NOTICE: Subscribers can support System-Wide All Calls but Motorola Solutions infrastructure does not support System-Wide All Calls.
40
English
4.8.4.1
Receiving All Calls
When you receive an All Call, the following occur:
· A tone sounds.
· The green LED blinks.
· Your radio unmutes and the incoming call sounds through the speaker.
If the Channel Free Indication feature is enabled, you hear a short alert tone when the transmitting radio releases the PTT button, indicating the channel is free for you to use. You cannot respond to an All Call.
NOTICE: The radio stops receiving the All Call if you switch to a different channel while receiving the call. You are not able to continue with any programmed button functions until the call ends during an All Call.
4.8.4.2
Making All Calls
Your radio must be programmed for you to make an All Call.
1 Select a channel with the active All Call group alias or ID. See Selecting a Call Type on page 32.
2 Press the PTT button to make the call. The green LED lights up.
3 Do one of the following: · Wait for the Talk Permit Tone to end and speak clearly into the microphone if enabled. · Wait for the PTT Sidetone to end and speak clearly into the microphone if enabled. Users on the channel cannot respond to an All Call.
4.8.5
Phone Calls
A Phone Call is a call in between an individual radio or a group of radios and a telephone. Depending on how the radio is configured, the following features may or may not be made available: · Access code · Dual Tone Multi Frequency (DTMF) tone
41
English
· De-access code · Displaying of caller alias or ID on receiving a phone call · Ability to reject or accept a phone call The Phone Call capability can be enabled by assigning and setting up phone numbers on the system. Check with your system administrator to determine how your radio has been programmed.
4.8.5.1
Making Phone Calls
Follow the procedure to make Phone Calls on your radio.
When you attempt to make or end a Phone Call without the access and deaccess codes preconfigured, the attempt fails and a negative indicator tone sounds.
1 Press the programmed One Touch Access button to the predefined alias or ID. If the entry for the One Touch Access button is empty, a negative indicator tone sounds. If successful: · The DMTF Tone sounds.
· You hear the call waiting tone of the telephone user.
If unsuccessful: · A negative indicator tone sounds. · The phone call fails. Repeat this step.
2 Press the PTT button to make the call.
3 Release the PTT button to listen.
4 Press the programmed Phone Exit button to end the call. If end-call-setup is successful: · A tone sounds. If end-call-setup is unsuccessful: · A negative indicator tone sounds. · Repeat this step, or wait for the telephone user to end the call.
42
4.8.5.2
Making Phone Calls with the Programmable Button
Follow the procedure to make Phone Calls with the programmable button.
1 Press the programmed Phone button to enter into the Phone Entry list.
2 Press or to the required alias or ID. Press
to select. The green LED lights up. The display shows Phone Call icon, subscriber alias or ID, and call status. If the call-setup is successful: · The DTMF tone sounds. · You hear the call waiting tone of the telephone
user. · The display shows Phone Call icon, subscriber
alias or ID, Phone Call, and call status. If call-setup is unsuccessful: · A tone sounds.
English
· The display shows Phone Call Failed. · Your radio returns to the Access Code input
screen. If the access code was preconfigured in the Contacts list, the radio returns to the screen you were on prior to initiating the call.
3 Press the PTT button to talk. Release the PTT button to listen.
4 Press
to end the call.
If the end-call-setup is successful, a tone sounds and the display shows Call Ended.
If the end-call-setup is unsuccessful, your radio returns to the Phone Call screen.
When you press PTT button while in the Phone Contacts screen, a tone sounds and the display shows Press OK to Place Call.
43
English
When the telephone user ends the call, a tone sounds and the display shows Phone Call Ended.
NOTICE:
During channel access, press
to dismiss
the call attempt and a tone sounds.
During the call, when you press One Touch Access button with the deaccess code preconfigured or enter the deaccess code as
the input for extra digits, your radio attempts
to end the call.
Responding to Phone Calls as Group Calls
Follow the procedure to respond to Phone Calls as Group Calls on your radio.
When you receive a Phone Call as a Group Call: · The green LED blinks. · Your radio unmutes and the incoming call sounds
through the speaker.
1 Press the PTT button to respond to the call.
4.8.5.3
Responding to Phone Calls as All Calls
When you receive a Phone Call as an All Call, the receiving radio is unable to talkback or respond. The recipient user is also not allowed to end the All Call.
· The green LED blinks.
· Your radio unmutes and the incoming call sounds through the speaker.
2 Release the PTT button to listen.
3 If there is no voice activity for a predetermined period of time, the call ends.
NOTICE: Your radio is not able to terminate a phone call as a group call. The telephone user must end the call. The recipient user is only allowed to talk back during the call.
You hear a short tone.
4.8.5.4
44
English
4.8.5.5
Responding to Phone Calls as Private Calls
Follow the procedure to respond to Phone Calls as Private Calls on your radio.
When you receive a Phone Call as a Private Call:
· The green LED blinks.
· Your radio unmutes and the incoming call sounds through the speaker.
1 Press the PTT button to respond to the call.
2 Release the PTT button to listen.
3 If there is no voice activity for a predetermined period of time, the call ends.
NOTICE: Your radio is not able to terminate a phone call as a group call. The telephone user must end the call. The recipient user is only allowed to talk back during the call.
You hear a short tone.
4.8.6
Initiating Transmit Interrupt
An ongoing call is interrupted, when you perform the following actions:
· Press the Voice PTT button.
· Press the Emergency button.
4.8.7
Call Preemption
Call Preemption allows a radio to stop any in-progress voice transmission and initiate a priority transmission.
With the Call Preemption feature, the system interrupts and preempts ongoing calls in instances where trunked channels are unavailable.
Higher priority calls such as an Emergency Call or an All Call preempt the transmitting radio to accommodate the higher priority call. If no other Radio Frequency (RF) channels are available, an Emergency Call preempts an All Call as well.
45
English
4.8.8
Voice Interrupt
Voice Interrupt allows the user to shut down an in-progress voice transmission.
This feature uses reverse channel signaling to stop the inprogress voice transmission of a radio, if the interrupting radio is configured to Voice Interrupt, and the transmitting radio is configured to be Voice Call Interruptible. The interrupting radio is then allowed to make a voice transmission to the participant in the stopped call.
The Voice Interrupt feature significantly improves the probability of successfully delivering a new transmission to the intended parties when a call is in progress.
Voice Interrupt is accessible to the user only if this feature has been set up in the radio. Check with your dealer or system administrator for more information.
4.8.8.1
Enabling Voice Interrupt
Follow the procedure to initiate Voice Interrupt on your radio.
Your radio must be programmed to allow you to use this feature. Check with your dealer or system administrator for more information.
1 To interrupt the transmission during an on-going call, press the PTT button. The radio sounds a negative indicator tone until the PTT button is released.
2 Wait for acknowledgment. If successful: · A positive indicator tone sounds. If unsuccessful: · A negative indicator tone sounds.
3 Do one of the following: · Wait for the Talk Permit Tone to end and speak clearly into the microphone if enabled. · Wait for the PTT Sidetone to end and speak clearly into the microphone if enabled.
46
English
4.9
Advanced Features
This chapter explains the operations of the features available in your radio.
Your dealer or system administrator may have customized your radio for your specific needs. Check with your dealer or system administrator for more information.
4.9.1
Call Queue
When there are no resources available to process a call, Call Queue enables the call request to be placed in the system queue for the next available resources.
You hear a Call Queue Tone after pressing the PTT button and radio screen displays Call In Queue indicating that the radio has entered Call Queue State. The PTT button may be released once the Call Queue Tone is heard.
If the call setup is successful, the following occur:
· The green LED blinks.
· If enabled, the Talk Permit Tone sounds.
· The radio user has up to 4 seconds to press the PTT button to begin voice transmission.
If the call setup is unsuccessful, the following occur:
· If enabled, the Reject Tone sounds.
· The call is terminated and the radio exits the call setup.
4.9.2
Priority Call
Priority Call allows the system to preempt one of the ongoing non-priority calls and initiate the requested high priority call when all channels are busy.
With all channels occupied with high priority calls, the system does not preempt any calls, and places the requesting high-priority call into call queue. If the system fails to place the requesting high-priority call into call queue, it declares failure.
The default settings for Priority Call are preconfigured. Press the programmable button to toggle between normal and high priority level. When you use the following features, the call priority level reverts automatically to the preconfigured setting.
· All voice calls
47
English
· DMR Text Message/Text Message
· Job Ticket
· Remote monitor
The following are the types of Priority Call:
High Priority The radio displays Next Call: High Priority.
Call Priority High icon appears at the top of your radio display.
Voice Announcement sounds Next Call: High Priority.
Normal Priority The radio displays Next Call: Normal Priority.
Call Priority High icon disappears. Voice Announcement sounds Next Call: Normal Priority.
4.9.3
Talkgroup Scan
This feature allows your radio to monitor and join calls for groups defined by a Receive Group List.
When scan is enabled, your radio unmutes to any member in its Receive Group List.
When scan is disabled, your radio does not receive transmission from any members of the Receive Group List, except for All Call, Permanent Talkgroup, and the selected Talkgroup.
4.9.3.1
Turning Talkgroup Scan On or Off
Follow the procedure to turn Talkgroup Scan on or off on your radio.
Press the programmed Scan button.
If scan is enabled: · The yellow LED blinks. · A positive indicator tone sounds. If scan is disabled: · The LED turns off. · A negative indicator tone sounds.
48
English
4.9.4
Receive Group List
Receive Group List is a feature that allows you to create and assign members on the talkgroup scan list.
This list is created when your radio is programmed and it determines which groups can be scanned. Your radio can support a maximum of 16 members in this list.
If a talkgroup is programmed as Permanent Talkgroup, you are unable to edit the talkgroup from the scan list.
NOTICE: Receive Group List is programmed by the system administrator. Check with your dealer or system administrator for more information.
4.9.5
Priority Monitor
The Priority Monitor feature allows the radio to automatically receive transmission from talkgroups with higher priority even when radio is in a talkgroup call.
Radio leaves lower priority talkgroup call for higher priority talkgroup call.
NOTICE: This feature can only be accessed when Talkgroup Scan feature is enabled.
Priority Monitor feature applies only to members in the Receive Group List. There are two Priority Talkgroups: Priority 1 (P1) and Priority 2 (P2). P1 has higher priority than P2. In Capacity Max system, the radio receives transmission according to the priority order below:
1 Emergency Call for P1 Talkgroup
2 Emergency Call for P2 Talkgroup
3 Emergency Call for Non-priority Talkgroups in the Receive Group List
4 All Call
5 P1 Talkgroup Call
6 P2 Talkgroup Call
7 Non-priority Talkgroups in the Receive Group List
NOTICE: This feature is programmed by the system administrator. Check with your dealer or system administrator for more information.
49
English
4.9.6
Multi-Talkgroup Affiliation
Your radio can be configured for up to seven talkgroups at a site.
Of the 16 talkgroups in the Receive Group List, up to seven talkgroups can be assigned as affiliation talkgroups. The selected talkgroup and the priority talkgroups are automatically affiliated.
4.9.7
Talkback
The Talkback feature allows you to respond to a transmission while scanning.
If your radio scans into a call from the selectable group scan list, and if the PTT button is pressed during the scanned call, the operation of the radio depends on whether Talkback was enabled or disabled during radio programming. Check with your dealer or system administrator for more information.
Talkback Disabled The radio leaves the scanned call and attempts to transmit on the contact for the currently selected channel position. After the Call Hang Time on the
currently selected contact expires, the radio returns to the home channel and starts the Scan Hang Time Timer. The radio resumes group scan after its Scan Hang Time Timer expires.
Talkback Enabled If the PTT button is pressed during the Group Hang Time of the scanned call, the radio attempts to transmit to the scanned group.
NOTICE: If you scan into a call for a group that is not assigned to a channel position in the currently selected zone and the call ends, switch to the proper zone and then select the channel position of the group to talk back to that group.
4.9.8
Multi-Site Controls
These features are applicable when your current radio channel is configured to a Capacity Max system.
50
English
4.9.8.1
Enabling Manual Site Search
Press the programmed Manual Site Roam button. · A tone sounds. · The green LED blinks.
If the radio finds a new site, your radio shows the following indications: · A positive tone sounds. · The LED extinguishes. If the radio fails to find a new site, your radio shows the following indications: · A negative tone sounds. · The LED extinguishes.
4.9.8.2
Site Lock On/Off
When toggled on, the radio searches the current site only. When toggled off, the radio searches other sites in addition to the current site.
Press the programmed Site Lock button. If the Site Lock function is toggled on: · You hear a positive indicator tone, indicating the
radio has locked to the current site. If the Site Lock function is toggled off: · You hear a negative indicator tone, indicating the
radio is unlocked.
4.9.9
Home Channel Reminder
This feature provides a reminder when the radio is not set to the home channel for a period of time. If this feature is enabled when your radio is not set to the home channel for a period of time, the following occurs periodically:
51
English
· The Home Channel Reminder tone and announcement sound.
4.9.9.1
Muting the Home Channel Reminder
When the Home Channel Reminder sounds, you can temporarily mute the reminder.
Press the programmed Silence Home Channel Reminder button.
4.9.9.2
Setting New Home Channels
When the Home Channel Reminder occurs, you can set a new home channel.
Press the Reset Home Channel programmable button to set the current channel as the new Home Channel.
4.9.10
Remote Monitor
This feature is used to turn on the microphone of a target radio with a subscriber alias or ID. You can use this feature to remotely monitor any audible activity surrounding the target radio.
Both your radio and the target radio must be programmed to allow you to use this feature.
If initiated, the green LED blinks once on the target radio. This feature automatically stops after a programmed duration or when there is any user operation on the target radio.
4.9.10.1
Initiating Remote Monitor
Follow the procedure to initiate Remote Monitor on your radio.
1 Press the programmed Remote Monitor button.
2 Wait for acknowledgment. If successful:
· A positive indicator tone sounds.
52
English
If unsuccessful: · A negative indicator tone sounds.
4.9.11
Call Indicator Settings
This feature allows you to configure call or text message ringing tones.
4.9.11.1
Escalating Alarm Tone Volume
The radio can be programmed to continually alert, when a radio call remains unanswered. This is done by automatically increasing the alarm tone volume over time. This feature is known as Escalert.
4.9.12
Call Alert Operation
Call Alert paging enables you to alert a specific radio user to call you back when they are able to do so. This feature is accessible by using a programmed One Touch Access button.
In Capacity Max, the Call Alert feature allows a radio user or a dispatcher to send an alert to another radio user requesting the radio user to call back the initiating radio user when available. Voice communication is not involved in this feature. The Call Alert Operation can be configured by the dealer or the system administrator to allow the user to press the PTT button to respond directly to the call initiator by making a Private Call. An Off Air Call Set-Up (OACSU) private call allows the user to respond immediately while a Full Off Air Call Set-Up (FOACSU) private call requires user acknowledgment for the call. OACSU type calls are therefore, recommended being used for the Call Alert feature. See Private Call on page 37.
4.9.12.1
Making Call Alerts
Follow the procedure to make Call Alerts on your radio.
1 Press the programmed One Touch Access button. The green LED lights up.
53
English
2 Wait for acknowledgment. If the Call Alert acknowledgment is received, a positive indicator tone sounds. If the Call Alert acknowledgment is not received, a negative indicator tone sounds.
4.9.12.2
Responding to Call Alerts
When you receive a Call Alert: · A repetitive tone sounds. · The yellow LED blinks.
When Mute Mode is initiated, all audio indicators are muted except higher priority features such as emergency operations.
When Mute Mode is exited, your radio resumes playing ongoing tones and audio transmissions.
IMPORTANT: You can only enable either Face Down or Man Down one at a time. Both features cannot be enabled together.
4.9.13.1
Turning On Mute Mode
Follow the procedure to turn on Mute Mode.
Press the PTT button within 4 seconds of receiving a Call Alert page to respond with a Private Call.
4.9.13
Mute Mode
Mute Mode provides an option to silence all audio indicators on your radio.
Do one of the following:
· Access this feature by using the programmed Mute Mode button.
· Access this feature by placing the radio in a facedown position momentarily.
Depending on radio model, the Face Down feature can be enabled either through the radio menu or by
54
English
your system administrator. Check with your dealer or system administrator for more information.
IMPORTANT: User can only enable either Man Down or Face Down at a time. Both features cannot be enabled together.
The following occurs when Mute mode is enabled: · Positive Indicator Tone sounds. · The red LED light starts blinking and remains blinking
until Mute Mode is exited. · Radio is muted. · Mute Mode Timer begins counting down the duration
that is configured.
4.9.13.2
Exiting Mute Mode
This feature can be exited automatically once the Mute Mode Timer expires.
Do one of the following to exit Mute mode manually: · Press the programmed Mute Mode button.
· Press the PTT button on any entry. · Place the radio in a face-up position momentarily.
The following occurs when Mute mode is disabled:
· Negative Indicator Tone sounds.
· The blinking red LED turns off.
· Your radio unmutes and speaker state is restored.
· If the timer has not expired, Mute mode timer is stopped.
NOTICE: Mute Mode is also exited if the user transmits voice or switches to an unprogrammed channel.
4.9.14
Emergency Operation
An Emergency Alarm is used to indicate a critical situation. You are able to initiate an Emergency at any time even when there is activity on the current channel.
In Capacity Max, the receiving radio can only support a single Emergency Alarm at a time. If initiated, a second Emergency Alarm will override the first alarm.
55
English
When an Emergency Alarm is received, the recipient may choose to either delete the alarm and exit the Alarm List, or respond to the Emergency Alarm by pressing the PTT button and transmitting non-emergency voice.
Your dealer or system administrator can set the duration of a button press for the programmed Emergency button, except for long press, which is similar with all other buttons:
Short Press Duration between 0.05 seconds and 0.75 seconds.
Long Press Duration between 1.00 second and 3.75 seconds.
The Emergency button is assigned with the Emergency On/Off feature. Check with your dealer for the assigned operation of the Emergency button.
NOTICE: If short press the Emergency button is assigned to turn on the Emergency mode, then long press the Emergency button is assigned to exit the Emergency mode.
If long press the Emergency button is assigned to turn on the Emergency mode, then short press the Emergency button is assigned to exit the Emergency mode.
Your radio supports three Emergency Alarms:
56
· Emergency Alarm
· Emergency Alarm with Call
· Emergency Alarm with Voice to Follow
In addition, each alarm has the following types:
Regular Radio transmits an alarm signal and shows audio and/or visual indicators.
Silent Radio transmits an alarm signal without any audio or visual indicators. Radio receives calls without any sound through the speaker, until the programmed hot mic transmission period is over and/or you press the PTT button.
Silent with Voice Radio transmits an alarm signal without any audio or visual indicators, but allow incoming calls to sound through the speaker. If hot mic is enabled, the incoming calls sound through the speaker after the programmed hot mic transmission period is over. The indicators only appear once you press the PTT button.
NOTICE: Only one of the Emergency Alarms above can be assigned to the programmed Emergency button.
English
4.9.14.1
Sending Emergency Alarms
This feature allows you to send an Emergency Alarm, a non-voice signal, which triggers an alert indication on a group of radios. Follow the procedure to send Emergency Alarms on your radio.
Your radio does not display any audio or visual indicators during Emergency mode when it is set to Silent.
1 Press the programmed Emergency On button. The green LED lights up.
NOTICE: If programmed, the Emergency Search tone sounds. This tone is muted when the radio transmits or receives voice, and stops when the radio exits Emergency mode. The Emergency Search tone can be programmed by the dealer or system administrator.
2 Wait for acknowledgment. If successful:
· The Emergency tone sounds.
· The green LED blinks.
If unsuccessful after all retries have been exhausted:
· A low-pitched tone sounds. (Applicable to PMUE4426B only)
The radio exits the Emergency Alarm mode.
NOTICE: When configured for Emergency Alarm only, the emergency process consists only of the Emergency Alarm delivery. The emergency ends when an acknowledgment is received from the system, or when channel access attempts have been exhausted.
No voice call is associated with the sending of an Emergency Alarm when operating as Emergency Alarm Only.
4.9.14.2
Sending Emergency Alarms with Call
This feature allows you to send an Emergency Alarm with Call to a group of radios or a dispatcher. Upon acknowledgment by the infrastructure within the group, a
57
English
group of radios can communicate over a programmed Emergency channel.
The radio must be configured for Emergency Alarm and Call to perform an emergency call after the alarm process.
1 Press the programmed Emergency On button. The green LED lights up.
NOTICE: If your radio is programmed, the Emergency Search tone sounds. This tone is muted when the radio transmits or receives voice, and stops when the radio exits Emergency mode.
If an Emergency Alarm acknowledgment is successfully received:
· The Emergency tone sounds.
· The green LED blinks.
If an Emergency Alarm acknowledgment is not successfully received:
· All retries are exhausted.
· A low-pitched tone sounds.
· The radio exits the Emergency Alarm mode.
2 Press the PTT button to initiate a voice transmission. The green LED lights up.
3 Do one of the following: · Wait for the Talk Permit Tone to end and speak clearly into the microphone if enabled. · Wait for the PTT Sidetone to end and speak clearly into the microphone if enabled.
4 Release the PTT button to listen.
5 Press the PTT button to respond to the call. If the Channel Free Indication feature is enabled, you hear a short alert tone the moment the transmitting radio releases the PTT button, indicating the channel is free for you to respond.
58
English
6 Press the Emergency Off button to exit the Emergency mode.
NOTICE: Depending on how your radio is programmed, you may or may not hear a Talk Permit tone. Your radio dealer or system administrator can provide more information on how your radio has been programmed for Emergency.
The Emergency Call initiator may press the programmed Cancel button to end an ongoing emergency call. The radio returns to a call idle state.
4.9.14.3
Sending Emergency Alarms with Voice to Follow
This feature allows you to send an Emergency Alarm with Voice to Follow to a group of radios. Your radio microphone is automatically activated, allowing you to communicate with the group of radios without pressing the PTT button. This activated microphone state is also known as hot mic.
If your radio has Emergency Cycle Mode enabled, repetitions of hot mic and receiving period are made for a programmed duration. During Emergency Cycle Mode, received calls sound through the speaker.
If you press the PTT button during the programmed receiving period, you hear a prohibit tone, indicating that you should release the PTT button. The radio ignores the PTT button press and remains in Emergency mode. If you press the PTT button during hot mic, and continue to press it after the hot mic duration expires, the radio continues to transmit until you release the PTT button.
If the Emergency Alarm request fails, the radio does not retry to send the request, and enters the hot mic state directly.
NOTICE: Some accessories may not support hot mic. Check with your dealer or system administrator for more information.
Follow the procedure to send Emergency Alarms with voice to follow on your radio.
1 Press the programmed Emergency On button.
The green LED lights up.
59
English
2 Once the Emergency tone sounds, speak clearly into the microphone.
The radio automatically stops transmitting when: · The cycling duration between hot mic and
receiving calls expires, if Emergency Cycle Mode is enabled. · The hot mic duration expires, if Emergency Cycle Mode is disabled.
4.9.14.4
Receiving Emergency Alarms
The receiving radio can only support a single Emergency Alarm at a time. If initiated, a second Emergency Alarm will override the first alarm. Follow the procedure to receive and view Emergency Alarms on your radio.
When you receive an Emergency Alarm:
· A tone sounds.
· The red LED blinks.
NOTICE: Your radio automatically acknowledges the Emergency Alarm (if enabled).
You can silence the tone. Do one of the following:
· Press the PTT button to call the group of radios which received the Emergency Alarm.
· Press any programmable button.
· Exit Emergency mode.
4.9.14.5
Responding to Emergency Alarms with Call
Follow the procedure to respond to Emergency Alarms with Call on your radio.
When you receive an Emergency Call:
· The Emergency Call Tone sounds if the Emergency Call Indication and Emergency Call Decode Tone is enabled. The Emergency Call Tone will not sound if only the Emergency Call Indication is enabled.
· Your radio unmutes and the incoming call sounds through the speaker.
1 If the Channel Free Indication feature is enabled, you hear a short alert tone the moment the transmitting radio releases the PTT button, indicating
60
English
the channel is free for you to respond. Press the PTT button to respond to the call. The green LED lights up.
2 Wait for the Talk Permit Tone to end and speak clearly into the microphone if enabled.
3 Release the PTT button to listen. When the emergency initiating radio responds: · The red LED blinks.
4.9.14.6
Exiting Emergency Mode
Press the programmed Emergency Off button. Your radio shows the following indications: · The tone ceased. · The red LED extinguished.
4.9.15
Status Message
This feature allows the user to send status messages to other radios. The Quick Status list is configured by using CPS-RM and comprises up to a maximum of 99 statuses. The maximum length for each status message is 16 characters. The Text-to-Speech feature if enabled, allows the radio to audibly indicate the status messages that are received.
NOTICE: Text-to-Speech is configured using CPS. Check with your dealer or system administrator to determine how your radio has been programmed.
4.9.15.1
Sending Status Messages
Follow the procedure below to send a status message.
Press the programmed One Touch Access button.
If successful: · A positive indicator tone sounds.
61
English
· The LED turns off.
If unsuccessful:
· A negative indicator tone sounds.
· The LED turns off.
4.9.16
Privacy
This feature helps to prevent eavesdropping by unauthorized users on a channel by the use of a softwarebased scrambling solution. The signaling and user identification portions of a transmission are not scrambled.
Your radio must have privacy enabled on the channel to send a privacy-enabled transmission, although this is not a necessary requirement for receiving a transmission. While on a privacy-enabled channel, the radio is still able to receive clear or unscrambled transmissions.
Your radio supports Enhanced Privacy.
To unscramble a privacy-enabled call or data transmission, your radio must be programmed to have the same Key Value and Key ID for Privacy as the transmitting radio.
If your radio receives a scrambled call that is of a different Key Value and Key ID, you hear nothing at all for Enhanced Privacy.
On a privacy-enabled channel, your radio is able to receive clear or unscrambled calls, depending on how your radio is programmed. In addition, your radio may play a warning tone or not, depending on how it is programmed.
The green LED lights up when the radio is transmitting, and double blinks when the radio is receiving an ongoing privacy-enabled transmission.
NOTICE: Some radio models may not offer this Privacy feature, or may have a different configuration. Check with your dealer or system administrator for more information.
4.9.16.1
Turning Privacy On or Off
Follow the procedure to turn privacy on or off on your radio.
Press the programmed Privacy button.
62
English
4.9.17
Response Inhibit
This feature helps prevent your radio from responding to any incoming transmissions.
NOTICE: Contact your dealer to determine how your radio has been programmed.
If enabled, your radio does not generate any outgoing transmissions in respond to incoming transmissions, such as Radio Check, Call Alert, Radio Disable, Remote Monitor, Automatic Registration Service (ARS), Responding to Private Messages, and Sending GNSS location reports.
Your radio cannot receive Confirmed Private Calls when this feature is enabled. However, your radio is able to manually send transmission.
4.9.17.1
Turning Response Inhibit On or Off
Follow the procedure to enable or disable Response Inhibit on your radio.
Press the programmed Response Inhibit button.
If successful:
· A positive indicator tone sounds.
If unsuccessful:
· A negative indicator tone sounds.
4.9.18
Stun/Revive
This feature allows you to enable or disable any radio in the system. For example, the dealer or system administrator may want to disable a stolen radio to prevent unauthorized users from using it, and enable the radio when it is recovered.
A radio can be disabled (stunned) or enabled (revived) either through the console or through a command initiated by another radio.
Once a radio is disabled, the radio sounds a negative indicator tone.
When a radio is stunned, the radio cannot request nor receive any user initiated services on the system that performed the Stun procedure. However, the radio can switch to another system. The radio continues to send
63
English
GNSS location reports and can be monitored remotely when it was stunned.
NOTICE: The dealer or system administrator may permanently disable a radio. See Radio Kill on page 64 for more information.
4.9.19
Radio Kill
This feature is an enhanced security measure to restrict unauthorized access to a radio.
Radio Kill causes a radio to be rendered inoperable. For example, the dealer may want to kill a stolen or misplaced radio to prevent unauthorized usage.
NOTICE: A killed radio can only be revived at a Motorola Solutions service depot. Contact your dealer for more information.
4.9.20
Lone Worker
This feature prompts an emergency to be raised if there is no user activity, such as any radio button press or activation of the channel selector, for a predefined time.
Following no user activity for a programmed duration, the radio pre-warns you using an audio indicator once the inactivity timer expires.
If there is still no acknowledgment by you before the predefined reminder timer expires, the radio initiates an emergency condition as programmed by the dealer.
4.9.21
Password Lock
You can set a password to restrict access to your radio. Each time you turn on your radio, you are asked to enter the password.
Your radio supports a 4-digit password input.
Your radio is unable to receive calls in locked state.
64
English
4.9.21.1
Accessing the Radio by Using Password
Turn on your radio.
1 Enter the four-digit password. a To enter the first digit of the password, use the Channel Selector Knob. b To enter each digit of the remaining three digits of the password, press Side Button 1, 2, or 3.
2 Your radio automatically checks the validity of the password when you enter the last digit of the password.
If you enter the password correctly, the radio powers up.
If you enter the wrong password after the first and second attempt, your radio shows the following indications:
· A continuous tone sounds.
Repeat step 1.
If you enter the wrong password after the third attempt, your radio shows the following indications:
· A tone sounds.
· The yellow LED double blinks.
· Your radio enters into locked state for 15 minutes.
Wait for the 15-minute locked state timer to end and then repeat step 1.
NOTICE: If you turn off and turn your radio on again, the 15minute timer restarts.
4.9.21.2
Unlocking Radios in Locked State
Your radio is unable to receive calls in locked state. Follow the procedure to unlock your radio in locked state.
Do one of the following:
· If the radio is powered on, wait for 15 minutes and then repeat the steps in Accessing the Radio by Using Password on page 65 to access the radio.
· If the radio is powered off, power up the radio. Your radio restarts the 15-minute timer for locked state. A tone sounds. The yellow LED double blinks.
65
English
Wait for 15 minutes and then repeat the steps in Accessing the Radio by Using Password on page 65 to access the radio.
4.9.22
Over-the-Air Programming
Your dealer can remotely update your radio by using Overthe-Air Programming (OTAP) without physical connection. Additionally, some settings can also be configured by using OTAP.
When your radio undergoes OTAP, the green LED blinks.
When your radio receives high volume data:
· The channel becomes busy.
· A negative tone sounds if you press the PTT button.
Once the programming update is complete, a tone sounds, and your radio restarts (powers off and on again).
If the programming update is unsuccessful, a tone sounds and the red LED blinks once.
NOTICE: If the programming update is unsuccessful, the software update failure indications appear every time you turn on your radio. Contact your dealer to reprogram your radio with the latest software to eliminate the software update failure indications.
4.9.23
Dynamic Group Number Assignment (DGNA)
Dynamic Group Number Assignment (DGNA) is a feature which allows the console to assign and remove a new talkgroup from your radio over the air.
When the console assigns DGNA to your radio, your radio is in DGNA mode:
· A tone sounds.
When the console removes DGNA from your radio, your radio returns to the previous talkgroup:
· A tone sounds.
Depending on how your radio is programmed, you can view, edit, and listen to the original scan lists channels and the non-DGNA talkgroups.
66
English
When your radio is in DGNA mode, pressing the PTT button allows you to communicate only with the current DGNA talkgroup. To communicate with the previous nonDGNA talkgroup, program the One Touch Access button. See Making Non-DGNA Calls on page 67.
NOTICE: Check with your dealer or system administrator to determine how your radio has been programmed.
4.9.23.1
Making DGNA Calls
When your radio is in DGNA mode, press the PTT button to make the call.
· A DGNA tone sounds.
NOTICE: If your radio is not in DGNA mode and you press the One Touch Access button, your radio sounds a tone, indicating error.
4.9.23.2
Making Non-DGNA Calls
1 Press the programmed One Touch Access button. · A positive tone sounds. · Voice Announcement sounds One Touch Replaced Call. NOTICE: If your radio is not in DGNA mode and you press the One Touch Access button, your radio sounds a negative tone, indicating error.
2 Press PTT button before a negative tone sounds. NOTICE: A PTT press after the tone makes call to the DGNA talkgroup.
4.9.23.3
Receiving and Responding to DGNA Calls
When you receive a DGNA call:
67
English
· A DGNA tone sounds. · Your radio unmutes and the incoming call sounds
through the speaker.
1 Press the PTT button to respond to the call.
2 Release the PTT button to listen.
4.10
Utilities
This chapter explains the operations of the utility functions available in your radio.
4.10.1
Turning Acoustic Feedback Suppressor On or Off
The feature allows you to minimize acoustic feedback in received calls. Follow the procedure to turn Acoustic Feedback Suppressor on or off on your radio.
Press the programmed AF Suppressor button.
68
4.10.2
Checking Battery Strength
Follow the procedure to check the battery level of your radio.
Press the programmed Battery Strength button.
One of the following occurs:
· The LED lights up solid yellow indicating fair battery capacity.
· The LED lights up solid green indicating full battery capacity.
· The LED blinks red indicating low battery capacity.
4.10.3
Text-to-Speech
The Text-to-Speech feature can only be enabled by your dealer. If Text-to-Speech is enabled, the Voice Announcement feature is automatically disabled. If Voice Announcement is enabled, then the Text-to-Speech feature is automatically disabled.
This audio indicator can be customized per customer requirements.
English
4.10.3.1
Setting Text-to-Speech
Follow the procedure to set the Text-to-Speech feature.
Press the programmed Text-to-Speech button to listen to the received text message.
4.10.4
Turning Global Navigation Satellite System On or Off
Global Navigation Satellite System (GNSS) is a satellite navigation system that determines the radio precise location. GNSS includes Global Positioning System (GPS), Global Navigation Satellite System (GLONASS), and BeiDou Navigation Satellite System (BDS).
NOTICE: Selected radio models may offer GPS, GLONASS, and BDS. GNSS constellation is configured by using CPS. Check with your dealer or system administrator to determine how your radio has been programmed.
Press the programmed GNSS button to toggle GNSS on or off on your radio.
4.10.5
Turning Radio Tones/Alerts On or Off
You can enable and disable all radio tones and alerts, if needed, except for incoming Emergency alert tone . Follow the procedure to turn tones and alerts on or off on your radio.
Press the programmed All Tones/Alerts button. If successful: · The Positive Indicator Tone sounds. · All tones and alerts are turned on. If unsuccessful:
69
English
· The Negative Indicator Tone sounds. · All tones and alerts are turned off.
4.10.6
Power Levels
You can customize the power setting to high or low for each channel. High
This enables communication with radios located at a considerable distance from you. Low This enables communication with radios in closer proximity.
4.10.6.1
Setting Power Levels
Follow the procedure to set the power levels on your radio.
Press the programmed Power Level button. If successful: · The Positive Indicator Tone sounds.
70
· Radio transmits at low power. If unsuccessful: · The Negative Indicator Tone sounds. · Radio transmits at high power.
4.10.7
Turning Option Board On or Off
Option board capabilities within each channel can be assigned to programmable buttons. Follow the procedure to turn option board on or off on your radio.
Press the programmed Option Board button.
4.10.8
Turning Voice Announcement On or Off
This feature enables the radio to audibly indicates the current zone or channel the user has just assigned, or the programmable button the user has just pressed.
English
This audio indicator can be customized according to customer requirements. Follow the procedure to turn Voice Announcement on or off on your radio.
Press the programmed Voice Announcement button. If successful: · The Positive Indicator Tone sounds. · All tones and alerts are turned on. If unsuccessful: · The Negative Indicator Tone sounds. · All tones and alerts are turned off.
4.10.9
Switching Audio Route between Internal Radio Speaker and Wired Accessory
Follow the procedure to toggle audio routing between internal radio speaker and wired accessory.
You can toggle audio routing between the internal radio speaker and the speaker of a wired accessory with the condition that:
· The wired accessory with speaker is attached.
Press the programmed Audio Toggle button.
A tone sounds when the audio route has switched.
Powering down the radio or detaching the accessory resets the audio routing to the internal radio speaker.
4.10.10
Turning Intelligent Audio On or Off
Your radio automatically adjusts the audio volume to overcome current background noise in the environment, inclusive of both stationary and non-stationary noise sources. This is a receive-only feature and does not affect transmission audio. Follow the procedure to turn Intelligent Audio on or off on your radio.
Press the programmed Intelligent Audio button.
71
English
NOTICE: This feature is not applicable during a Bluetooth session.
4.10.11
Turning Trill Enhancement On or Off
You can enable this feature when you are speaking in a language that contains many words with alveolar trill (rolling "R") pronunciations. Follow the procedure to turn Trill Enhancement on or off on your radio.
Press the programmed Trill Enhancement button to toggle the feature on or off. If successful: · The Positive Indicator Tone sounds. · All tones and alerts are turned on. If unsuccessful: · The Negative Indicator Tone sounds. · All tones and alerts are turned off.
72
English
Other Systems
Programmable Buttons
Features that are available to the radio users under this system are available in this chapter.
5.1
Push-To-Talk Button
The Push-to-Talk (PTT) button serves two basic purposes:
· While a call is in progress, the PTT button allows the radio to transmit to other radios in the call. The microphone is activated when the PTT button is pressed.
· While a call is not in progress, the PTT button is used to make a new call.
Long press the PTT button to talk. Release the PTT button to listen.
If the Talk Permit Tone is enabled, wait until the short alert tone ends before talking.
5.2
Depending on the duration of a button press, your dealer can program the programmable buttons as shortcuts to radio functions.
Short press Pressing and releasing rapidly.
Long press Pressing and holding for the programmed duration.
NOTICE: See Emergency Operation on page 103 for more information on the programmed duration of the Emergency button.
5.3
Assignable Radio Functions
The following radio functions can be assigned to the programmable buttons.
Audio Toggle Toggles audio routing between the internal radio speaker and the speaker of a wired accessory.
73
English
Battery Strength Indicates battery strength by using the LED Indicator.
Call Forwarding Toggles Call Forwarding on or off.
Channel Announcement Plays zone and channel announcement voice messages for the current channel.
Emergency Depending on the programming, initiates or cancels an emergency.
Intelligent Audio Toggles intelligent audio on or off.
Manual Site Roam 2 Starts the manual site search.
Mic AGC Toggles the internal microphone automatic gain control (AGC) on or off.
Monitor Monitors a selected channel for activity.
Nuisance Channel Delete2 Temporarily removes an unwanted channel, except for the Selected Channel, from the scan list. The Selected Channel refers to the selected zone or channel combination of the user from which scan is initiated.
One Touch Access Directly initiates a predefined Private, Phone or Group Call, a Call Alert, a Quick Text message, or Home Revert.
Option Board Feature Toggles option board feature(s) on or off for option board-enabled channels.
Permanent Monitor2 Monitors a selected channel for all radio traffic until function is disabled.
Phone Exit Ends a Phone Call.
Privacy Toggles privacy on or off.
Repeater/Talkaround2 Toggles between using a repeater and communicating directly with another radio.
2 Not applicable in Capacity Plus. 74
English
Reset Home Channel Sets a new home channel.
Silence Home Channel Reminder Mutes the Home Channel Reminder.
Scan 3 Toggles scan on or off.
Site Info Plays site announcement voice messages for the current site when Voice Announcement is enabled.
Site Lock2 When toggled on, the radio searches the current site only. When toggled off, the radio searches other sites in addition to the current site.
Telemetry Control Controls the Output Pin on a local or remote radio.
Transmit Interrupt Remote Dekey Stops an ongoing interruptible call to free the channel.
Trill Enhancement Toggles trill enhancement on or off.
Voice Announcement On/Off Toggles voice announcement on or off.
Voice Operating Transmission (VOX) Toggles VOX on or off.
Zone Toggle Allows radio user to toggle between Zone 1 and Zone 2.
5.4
Assignable Settings or Utility Functions
The following radio settings or utility functions can be assigned to the programmable buttons.
Tones/Alerts Toggles all tones and alerts on or off.
Power Level Toggles transmit power level between high and low.
5.5
Status Indicators
This chapter explains the status indicators and audio tones used in the radio.
3 Not applicable in Capacity PlusSingle-Site. 75
English
5.5.1
LED Indicators
LED indicators show the operational status of your radio.
Blinking Red Radio is indicating a battery mismatch. Radio has failed the self-test upon powering up. Radio is receiving an emergency transmission. Radio is transmitting in low battery state. Radio has moved out of range if Auto-Range Transponder System is configured. Mute Mode is enabled.
Solid Green Radio is powering up. Radio is transmitting. Radio is sending a Call Alert or an emergency transmission. Indicates full battery capacity when the programmed Battery Strength button is pressed.
Blinking Green Radio is receiving a call or data.
76
Radio is retrieving Over-the-Air Programming transmissions.
Radio is detecting activity over the air.
NOTICE: This activity may or may not affect the programmed channel of the radio due to the nature of the digital protocol.
There is no LED indication when the radio is detecting activity over the air in Capacity Plus.
Double Blinking Green Radio is receiving a privacy-enabled call or data.
Solid Yellow Radio is monitoring a conventional channel.
Indicates fair battery capacity when the programmed Battery Strength button is pressed.
Blinking Yellow Radio is scanning for activity.
Radio has yet to respond to a Call Alert.
All Capacity PlusMulti-Site channels are busy.
Double Blinking Yellow Radio has Auto Roaming enabled.
Radio is actively searching for a new site.
English
Radio has yet to respond to a Group Call Alert. Radio is locked. Radio is not connected to the repeater while in Capacity Plus. All Capacity Plus channels are busy.
5.5.2
Tones
The following are the tones that sound through on the radio speaker.
Negative Indicator Tone
5.5.2.2
Audio Tones
Audio tones provide you with audible indications of the status, or response to data received on the radio.
Continuous Tone A monotone sound. Sounds continuously until termination.
High Pitched Tone Low Pitched Tone
Periodic Tone Sounds periodically depending on the duration set by
the radio. Tone starts, stops, and repeats itself.
5.5.2.1
Indicator Tones
Indicator tones provide you with audible indications of the status after an action to perform a task is taken.
Positive Indicator Tone
Repetitive Tone A single tone that repeats itself until it is terminated by the user.
Momentary Tone Sounds once for a short duration set by the radio.
77
English
5.6
Zone and Channel Selections
This chapter explains the operations to select a zone or channel on your radio. A zone is a group of channels. Your radio supports up to 32 channels and 2 zones, with a maximum of 16 channels per zone. Each channel can be programmed with different features and/or support different groups of users.
5.6.1
Selecting Zones
Follow the procedure to select the required zone on your radio.
Press the programmed Zone Toggle button. One of the following tone sounds: Positive Indicator Tone Radio is in Zone 2. Negative Indicator Tone Radio is in Zone 1.
78
NOTICE: For all Non-keypad radio, you are recommended to enable Voice Announcement feature for selecting zone. The Voice Announcement feature can only be enabled through CPS.
5.6.2
Selecting Channels
Follow the procedure to select the required channel on your radio.
Turn the Channel Selector Knob to select the channel, subscriber ID, or group ID.
5.7
Calls
This chapter explains the operations to receive, respond to, make, and stop calls.
English
You can select a subscriber alias or ID, or group alias or ID after you have selected a channel by using one of these features: Programmed One Touch Access Button
This method is used for Group, Private, and Phone Calls only.
You can only have one ID assigned to a One Touch Access button with a short or long programmable button press.
Programmable Button This method is used for Phone Calls only.
5.7.1
Group Calls
Your radio must be configured as part of a group to receive a call from or make a call to the group of users.
5.7.1.1
Responding to Group Calls
To receive a call from a group of users, your radio must be configured as part of that group. Follow the procedure to respond to Group Calls on your radio.
When you receive a Group Call:
· The green LED blinks. · Your radio unmutes and the incoming call sounds
through the speaker.
1 Do one of the following:
· If the Channel Free Indication feature is enabled, you hear a short alert tone the moment the transmitting radio releases the PTT button, indicating the channel is free for you to respond. Press the PTT button to respond to the call.
· If the Voice Interrupt feature is enabled, press the PTT button to interrupt the audio from the transmitting radio and free the channel for you to respond.
The green LED lights up.
2 Do one of the following: · Wait for the Talk Permit Tone to end and speak clearly into the microphone if enabled.
· Wait for the PTT Sidetone to end and speak clearly into the microphone if enabled.
3 Release the PTT button to listen.
79
English
The call ends when there is no voice activity for a predetermined period.
5.7.1.2
Making Group Calls
Follow the procedure to make Group Calls on your radio.
1 Do one of the following: · Select a channel with the active group alias or ID. · Press the programmed One Touch Access button.
4 Release the PTT button to listen.
The green LED lights up when the target radio responds.
5 If the Channel Free Indication feature is enabled, you hear a short alert tone the moment the transmitting radio releases the PTT button, indicating the channel is free for you to respond. Press the PTT button to respond to the call.
The call ends when there is no voice activity for a predetermined period.
2 Press the PTT button to make the call. The green LED lights up.
3 Do one of the following: · Wait for the Talk Permit Tone to end and speak clearly into the microphone if enabled. · Wait for the PTT Sidetone to end and speak clearly into the microphone if enabled.
5.7.1.3
Making Group Calls by Using the Channel Selector Knob
Follow the procedure to make Group Calls by using the Channel Selector Knob.
1 Do one of the following:
· Select a channel with the active group alias or ID.
· Press the programmed One Touch Access button.
80
English
2 Press the PTT button to make the call. The green LED lights up.
3 Do one of the following: · Wait for the Talk Permit Tone to end and speak clearly into the microphone if enabled. · Wait for the PTT Sidetone to end and speak clearly into the microphone if enabled.
5.7.2
Private Calls
A Private Call is a call from an individual radio to another individual radio.
There are two ways to set up a Private Call. The first type sets up the call after performing a radio presence check, while the second type sets up the call immediately. Only one of these types can be programmed to your radio by your dealer.
4 Release the PTT button to listen.
The green LED blinks when the target radio responds.
5 If the Channel Free Indication feature is enabled, you hear a short alert tone the moment the transmitting radio releases the PTT button, indicating the channel is free for you to respond. Press the PTT button to respond to the call.
The call ends when there is no voice activity for a predetermined period.
A tone sounds.
5.7.2.1
Responding to Private Calls
Follow the procedure to respond to Private Calls on your radio.
When you receive a Private Call: · The green LED blinks. · Your radio unmutes and the incoming call sounds
through the speaker.
1 Do one of the following:
· If the Channel Free Indication feature is enabled, you hear a short alert tone the moment
81
English
the transmitting radio releases the PTT button, indicating the channel is free for you to respond. Press the PTT button to respond to the call.
· If the Transmit Interrupt Remote Dekey feature is enabled, press the PTT button to stop an ongoing interruptible call and free the channel for you to respond.
The green LED lights up.
2 Wait for the Talk Permit Tone to end and speak clearly into the microphone if enabled.
3 Release the PTT button to listen. The call ends when there is no voice activity for a predetermined period. A tone sounds.
5.7.2.2
Making Private Calls
Your radio must be programmed to initiate a Private Call. If this feature is not enabled, a negative indicator tone sounds when you initiate the call. Follow the procedure to make Private Calls on your radio.
1 Do one of the following: · Select a channel with the active subscriber alias or ID. · Press the programmed One Touch Access button.
2 Press the PTT button to make the call.
The green LED lights up.
3 Wait for the Talk Permit Tone to end and speak clearly into the microphone if enabled.
4 Release the PTT button to listen. The green LED blinks when the target radio responds.
5 If the Channel Free Indication feature is enabled, you hear a short alert tone the moment the transmitting radio releases the PTT button, indicating the channel is free for you to respond. Press the PTT button to respond to the call.
82
English
The call ends when there is no voice activity for a predetermined period. A tone sounds.
5.7.3
All Calls
An All Call is a call from an individual radio to every radio on the channel. An All Call is used to make important announcements, requiring full attention from the user. The users on the channel cannot respond to an All Call.
5.7.3.1
Receiving All Calls
When you receive an All Call: · A tone sounds. · The green LED blinks. · Your radio unmutes and the incoming call sounds
through the speaker. An All Call does not wait for a predetermined period before ending.
If the Channel Free Indication feature is enabled, you hear a short alert tone when the transmitting radio releases
the PTT button, indicating the channel is free for you to use. You cannot respond to an All Call.
NOTICE: The radio stops receiving the All Call if you switch to a different channel while receiving the call. You are not able to continue with any programmed button functions until the end of an All Call.
5.7.3.2
Making All Calls
Your radio must be programmed for you to make an All Call. Follow the procedure to make All Calls on your radio.
1 Select a channel with the active All Call group alias or ID.
2 Press the PTT button to make the call. The green LED lights up.
3 Do one of the following: · Wait for the Talk Permit Tone to end and speak clearly into the microphone if enabled.
83
English
· Wait for the PTT Sidetone to end and speak clearly into the microphone if enabled.
Users on the channel cannot respond to an All Call.
5.7.4
Selective Calls
A Selective Call is a call from an individual radio to another individual radio. It is a Private Call on an analog system.
5.7.4.1
Responding to Selective Calls
Follow the procedure to respond to Selective Calls on your radio. When you receive a Selective Call: · The green LED blinks. · Your radio unmutes and the incoming call sounds
through the speaker.
1 Press the PTT button to respond to the call. The green LED lights up.
2 Wait for the Talk Permit Tone to end and speak clearly into the microphone if enabled.
3 Release the PTT button to listen. The call ends when there is no voice activity for a predetermined period. A tone sounds.
5.7.4.2
Making Selective Calls
Your radio must be programmed for you to initiate a Selective Call. Follow the procedure to make Selective Calls on your radio.
1 Select a channel with the active subscriber alias or ID.
2 Press the PTT button to make the call. The green LED lights up.
3 Do one of the following: · Wait for the Talk Permit Tone to end and speak clearly into the microphone if enabled.
84
· Wait for the PTT Sidetone to end and speak clearly into the microphone if enabled.
4 Release the PTT button to listen.
The green LED lights up when the target radio responds.
5 If the Channel Free Indication feature is enabled, you hear a short alert tone the moment the transmitting radio releases the PTT button, indicating the channel is free for you to respond. Press the PTT button to respond to the call.
The call ends when there is no voice activity for a predetermined period.
5.7.4.3
Making Selective Calls by Using the Channel Selector Knob
Just like a Private Call, while you can receive and/or respond to a Selective Call initiated by an authorized individual radio, your radio must be programmed for you to initiate a Selective Call.
English
1 Select the channel with the active subscriber alias or ID.
2 Press the PTT button to make the call.
3 Do one of the following: · Wait for the Talk Permit Tone to end and speak clearly into the microphone if enabled. · Wait for the PTT Sidetone to end and speak clearly into the microphone if enabled.
4 Release the PTT button to listen. The green LED blinks when the target radio responds.
5 If the Channel Free Indication feature is enabled, you hear a short alert tone the moment the transmitting radio releases the PTT button, indicating the channel is free for you to respond. The call ends when there is no voice activity for a predetermined period. A tone sounds.
85
English
5.7.5
Phone Calls
A Phone Call is a call from an individual radio to a telephone.
If Phone Call capability is not enabled in your radio:
· Your radio mutes the call.
· Your radio returns to the previous screen when the call ends.
During the Phone Call, your radio attempts to end the call when:
· You press the One Touch Access button with the deaccess code preconfigured.
· You enter the deaccess code as the input for extra digits.
During channel access, access or deaccess code, or extra digits transmission, your radio responds to the On/Off , Volume Control, and Channel Selector buttons or knobs only. A tone sounds for every invalid input.
NOTICE: Check with your dealer or system administrator for more information.
5.7.5.1
Responding to Phone Calls as Private Calls
Follow the procedure to respond to Phone Calls as Private Calls on your radio.
When you receive a Phone Call as a Private Call:
· The green LED lights up.
· Your radio unmutes and the incoming call sounds through the speaker.
If Phone Call capability is not enabled on your radio, your radio mutes the call.
1 Press the PTT button to respond to the call. Release the PTT button to listen.
2 The call ends when there is no voice activity for a predetermined period.
A tone sounds.
86
English
5.7.5.2
Responding to Phone Calls as Group Calls
Follow the procedure to respond to Phone Calls as Group Calls on your radio.
When you receive a Phone Call as a Group Call:
· The green LED blinks.
· Your radio unmutes and the incoming call sounds through the speaker.
If Phone Call capability is not enabled on your radio, your radio mutes the call.
Responding to Phone Calls as All Calls
When you receive a Phone Call as an All Call, you can respond to or end the call, only if an All Call type is assigned to the channel. Follow the procedure to respond to Phone Calls as All Calls on your radio. If Phone Call capability is not enabled on your radio, your radio mutes the call.
1 Press the PTT button to respond to the call.
2 Release the PTT button to listen.
1 Press the PTT button to respond to the call. Release the PTT button to listen.
2 The call ends when there is no voice activity for a predetermined period. A tone sounds.
5.7.5.4
Making Phone Calls
Follow the procedure to make Phone Calls on your radio.
When you attempt to make or end a Phone Call without the access and deaccess codes preconfigured, the attempt fails and a negative indicator tone sounds.
5.7.5.3
1 Press the programmed One Touch Access button to the predefined alias or ID.
87
English
If the entry for the One Touch Access button is empty, a negative indicator tone sounds. If successful: · The (Dual Tone Multi Frequency) DMTF Tone
sounds. · You hear the dialling tone of the telephone user. If unsuccessful: · A negative indicator tone sounds. · The phone call fails. Repeat this step.
2 Press the PTT button to make the call. Release the PTT button to listen.
3 Press the programmed Phone Exit button to end the call. If end-call-setup is successful: · A tone sounds. If end-call-setup is unsuccessful: · A negative indicator tone sounds.
· Repeat this step, or wait for the telephone user to end the call.
5.7.6
Initiating Transmit Interrupt
An ongoing call is interrupted, when you perform the following actions: · Press the Voice PTT button. · Press the Emergency button. · Perform data transmission.
5.7.7
Broadcast Voice Calls
A Broadcast Voice Call is a one-way voice call from any user to an entire talkgroup. The Broadcast Voice Call feature allows only the call initiating user to transmit to the talkgroup, while the recipients of the call cannot respond (no Call Hang Time).
88
English
Your radio must be programmed to allow you to use this feature. Check with your dealer or system administrator for more information.
NOTICE: Users on the channel cannot respond to
Broadcast Voice Calls.
5.7.7.1
Making Broadcast Voice Calls
Program your radio to make Broadcast Voice Calls.
1 Select a channel with the active group alias or ID.
2 Do one of the following: · Select a channel with the active group alias or ID. · Press the programmed One Touch Access button.
3 Press the PTT button to make the call. The green LED lights up.
4 Do one of the following: · Wait for the Talk Permit Tone to end and speak clearly into the microphone if enabled. · Wait for the PTT Sidetone to end and speak clearly into the microphone if enabled.
The radio returns to the previous menu after the call ends.
5.7.7.2
Making Broadcast Voice Calls by Using the Programmable Number Key
Follow the procedure to make Broadcast Voice Call on your radio by using the programmable number key.
1 On the Home screen, long press the programmed number key assigned to the predefined alias or ID.
If the number key is assigned to an entry in a particular mode, this feature is not supported when you long press the number key in another mode.
If the number key is not associated to an entry, a negative indicator tone sounds
89
English
2 Press the PTT button to make the call. The green LED lights up. The first text line shows the subscriber alias. The second text line shows the call status.
3 Wait for the Talk Permit Tone to end and speak clearly into the microphone if enabled. Users on the channel cannot respond to a Broadcast Voice Call. The radio returns to the previous menu after the call ends.
See Assigning Entries to Programmable Number Keys for more information.
5.7.7.3
Making Broadcast Voice Calls by Using the Alias Search
5.7.7.4
90
Receiving Broadcast Voice Calls
When you receive a Broadcast Voice Call:
· A tone sounds.
· The green LED blinks.
· Your radio unmutes and the incoming call sounds through the speaker.
A Broadcast Voice Call does not wait for a predetermined period before ending.
You cannot respond to a Broadcast Voice Call.
NOTICE: The radio stops receiving the Broadcast Voice Call if you switch to a different channel while receiving the call. You cannot continue with any programmed button functions until the end of the Broadcast Voice Call.
5.7.8
Unaddressed Calls
An Unaddressed Call is a group call to one of the 16 predefined group IDs.
This feature is configured using CPS-RM. A contact for one of the predefined IDs is required to initiate and/or receive
English
an Unaddressed Call. Check with your dealer or system administrator for more information.
5.7.8.1
Making Unaddressed Calls
1 Select a channel with the active group alias or ID.
2 Do one of the following: · Select a channel with the active group alias or ID. · Press the programmed One Touch Access button.
3 Press the PTT button to make the call. The green LED lights up.
4 Do one of the following: · Wait for the Talk Permit Tone to end and speak clearly into the microphone if enabled. · Wait for the PTT Sidetone to end and speak clearly into the microphone if enabled.
5 Release the PTT button to listen. The green LED lights up when the target radio responds. A momentary tone sounds.
6 If the Channel Free Indication feature is enabled, you hear a short alert tone the moment the transmitting radio releases the PTT button, indicating that the channel is free for you to respond. Press the PTT button to respond to the call. The call ends when there is no voice activity for a predetermined period. The call initiator can press the programmed Cancel button to end a Group Call.
5.7.8.2
Responding to Unaddressed Calls
When you receive an Unaddressed Call:
· The green LED blinks.
· A momentary tone sounds.
91
English
· Your radio unmutes and the incoming call sounds through the speaker.
The call ends when there is no voice activity for a predetermined period.
1 Do one of the following:
· If the Channel Free Indication feature is enabled, you hear a short alert tone the moment the transmitting radio releases the PTT button, indicating the channel is free for you to respond. Press the PTT button to respond to the call.
· If the Voice Interrupt feature is enabled, press the PTT button to interrupt the audio from the transmitting radio and free the channel for you to respond.
The green LED lights up.
2 Do one of the following:
· Wait for the Talk Permit Tone to end and speak clearly into the microphone if enabled.
· Wait for the PTT Sidetone to end and speak clearly into the microphone if enabled.
3 Release the PTT button to listen.
5.7.9
Open Voice Channel Mode (OVCM)
An Open Voice Channel Mode (OVCM) allows a radio that is not preconfigured to work in a particular system to both receive and transmit during a group or individual call. The OVCM group call also supports broadcast calls. Program your radio to use this feature. Check with your dealer or system administrator for more information.
5.7.9.1
Making OVCM Calls
Your radio must be programmed for you to make an OVCM Call. Follow the procedure to make OVCM Calls on your radio.
1 Select a channel with the active group alias or ID.
2 Do one of the following: · Select a channel with the active group alias or ID.
92
· Press the programmed One Touch Access button.
3 Press the PTT button to make the call. The green LED lights up.
4 Do one of the following: · Wait for the Talk Permit Tone to end and speak clearly into the microphone if enabled. · Wait for the PTT Sidetone to end and speak clearly into the microphone if enabled.
5.7.9.2
Responding to OVCM Calls
When you receive an OVCM Call: · The green LED blinks. · Your radio unmutes and the incoming call sounds
through the speaker.
English
NOTICE: Recipient users are not allowed to Talkback during a Broadcast Call. If the PTT button is pressed during a Broadcast Call, the Talkback Prohibit Tone sounds momentarily.
1 Do one of the following: · If the Channel Free Indication feature is enabled, you hear a short alert tone the moment the transmitting radio releases the PTT button, indicating the channel is free for you to respond. Press the PTT button to respond to the call. · If the Voice Interrupt feature is enabled, press the PTT button to interrupt the audio from the transmitting radio and free the channel for you to respond. The green LED lights up.
2 Do one of the following: · Wait for the Talk Permit Tone to end and speak clearly into the microphone if enabled. · Wait for the PTT Sidetone to end and speak clearly into the microphone if enabled.
93
English
3 Release the PTT button to listen. The call ends when there is no voice activity for a predetermined period.
5.8
Advanced Features
This chapter explains the operations of the features available in your radio. Your dealer or system administrator may have customized your radio for your specific needs. Check with your dealer or system administrator for more information.
5.8.1
Multi-Site Control
Your radio is able to search for sites and switch between sites when signal is weak or your radio is unable to detect any signal from the current site. When the signal is strong, the radio remains on the current site.
This setting is applicable when your current radio channel is part of an IP Site Connect or Capacity PlusMulti-Site configuration.
Your radio can perform either one of the following site searches:
· Automatic Site Search
· Manual Site Search
If the current channel is a multi-site channel with an attached roam list and is out of range, and the site is unlocked, your radio also performs automatic site search.
5.8.1.1
Starting Automatic Site Search
Press the programmed Site Lock On/Off button. · A tone sounds.
· The LED blinks yellow rapidly when the radio is actively searching for a new site.
· The yellow LED turns off once the radio locks on to a site.
94
English
5.8.1.2
Stopping Automatic Site Search
Follow the procedure to stop automatic site search when your radio is actively searching for a new site.
Press the programmed Site Lock On/Off button. · A tone sounds. · The LED turns off.
5.8.1.3
Enabling Manual Site Search
Press the programmed Manual Site Roam button. · A tone sounds. · The green LED blinks.
If the radio fails to find a new site, your radio shows the following indications:
· A negative tone sounds.
· The LED extinguishes.
5.8.2
Talkaround
This feature allows you to continue communicating when your repeater is non-operational, or when your radio is out of range from the repeater but within the talk range of other radios.
The talkaround setting is retained even after powering down.
NOTICE: This feature is not applicable in Capacity Plus Single-Site, Capacity PlusMulti-Site, and Citizens Band channels that are in the same frequency.
If the radio finds a new site, your radio shows the following indications:
· A positive tone sounds.
· The LED extinguishes.
95
English
5.8.2.1
Toggling Between Repeater and Talkaround Modes
Follow the procedure to toggle between Repeater and Talkaround modes on your radio.
Press the programmed Repeater/Talkaround button. One of the following tones sounds: Positive Indicator Tone Radio is in talkaround mode. Negative Indicator Tone Radio is in repeater mode.
5.8.3
Monitor Feature
The feature allows you to ensure that a channel is free before transmitting.
NOTICE: This feature is not applicable in Capacity Plus Single-Site and Capacity PlusMulti-Site.
96
5.8.3.1
Monitoring Channels
Follow the procedure to monitor channels.
1 Long press the programmed Monitor button. If the channel is in use: · You hear radio activity or total silence. · The yellow LED lights up. If the monitored channel is free, you hear a "white noise".
2 Press the PTT button to talk. Release the PTT button to listen.
5.8.3.2
Permanent Monitor
The Permanent Monitor feature is used to continuously monitor a selected channel for activity.
English
5.8.3.2.1
Turning Permanent Monitor On or Off
Follow the procedure to turn Permanent Monitor on or off on your radio.
Press the programmed Permanent Monitor button. When the radio enters the mode: · An alert tone sounds. · The yellow LED lights up. When the radio exits the mode: · An alert tone sounds. · The yellow LED turns off.
· Remote Monitor without Authentication
· Remote Monitor with Authentication.
Authenticated Remote Monitor is a purchasable feature. In Authenticated Remote Monitor, verification is required when your radio turns on the microphone of a target radio.
When your radio initiates this feature on a target radio with User Authentication, a passphrase is required. The passphrase is preprogrammed into the target radio through CPS.
Both your radio and the target radio must be programmed to allow you to use this feature.
This feature stops after a programmed duration or when there is any user operation on the target radio.
5.8.4
Remote Monitor
This feature is used to turn on the microphone of a target radio with a subscriber alias or ID. You can use this feature to remotely monitor any audible activity surrounding the target radio.
There are two types of Remote Monitor:
5.8.4.1
Initiating Remote Monitor
Follow the procedure to initiate Remote Monitor on your radio.
1 Press the programmed Remote Monitor button.
2 Wait for acknowledgment. If successful:
97
English
· A positive indicator tone sounds. If unsuccessful: · A negative indicator tone sounds.
5.8.5
Scan Lists
Scan lists are created and assigned to individual channels or groups. Your radio scans for voice activity by cycling through the channel or group sequence specified in the scan list for the current channel or group. Your radio can support up to 250 scan lists, with a maximum of 16 members in a list. Each scan list supports a mixture of both analog and digital entries.
NOTICE: This feature is not applicable in Capacity Plus.
5.8.6
Scan
Your radio cycles through the programmed scan list for the current channel looking for voice activity when you start a scan.
NOTICE: This feature is not applicable in Capacity Plus.
During a dual-mode scan, if you are on a digital channel, and your radio locks onto an analog channel, it automatically switches from digital mode to analog mode for the duration of the call. This is also true for the reverse.
There are two ways of initiating scan: Main Channel Scan (Manual)
Your radio scans all the channels or groups in your scan list. On entering scan, your radio may, depending on the settings, automatically start on the last scanned active channel or group, or on the channel where scan was initiated.
Auto Scan (Automatic) Your radio automatically starts scanning when you select a channel or group that has Auto Scan enabled.
98
5.8.6.1
Turning Scan On or Off
Follow the procedure to turn scan on or off on your radio.
Do one of the following: · Press the programmed Scan button to start or
stop Scan. · Turn the Channel Selector Knob to select a
channel programmed with Auto Scan enabled.
If scan is enabled: · The yellow LED blinks. · A positive indicator tone sounds. If scan is disabled: · The LED turns off. · A negative indicator tone sounds.
5.8.6.2
English
Responding to Transmissions During Scanning
During scanning, your radio stops on a channel or group where activity is detected. The radio stays on that channel for a programmed duration known as hang time. Follow the procedure to respond to transmissions during scanning.
1 If the Channel Free Indication feature is enabled, you hear a short alert tone the moment the transmitting radio releases the PTT button, indicating the channel is free for you to respond. Press the PTT button during hang time. The green LED lights up.
2 Do one of the following: · Wait for the Talk Permit Tone to end and speak clearly into the microphone if enabled.
· Wait for the PTT Sidetone to end and speak clearly into the microphone if enabled.
3 Release the PTT button to listen. The radio returns to scanning other channels or groups if you do not respond within the hang time.
99
English
5.8.6.3
Deleting Nuisance Channels
If a channel continually generates unwanted calls or noise, (termed a "nuisance" channel), you can temporarily remove the unwanted channel from the scan list. This capability does not apply to the channel designated as the Selected Channel. Follow the procedure to delete nuisance channels on your radio.
1 When your radio locks on to an unwanted or nuisance channel, press the programmed Nuisance Channel Delete button until you hear a tone.
2 Release the programmed Nuisance Channel Delete button. The nuisance channel is deleted.
5.8.6.4
Restoring Nuisance Channels
Follow the procedure to restore nuisance channels on your radio.
· Turn the radio off and then power it on again. · Change the channel using the Channel Selector
Knob.
5.8.7
Vote Scan
Vote Scan provides you with wide area coverage in areas where there are multiple base stations transmitting identical information on different analog channels. Your radio scans analog channels of multiple base stations and performs a voting process to select the strongest received signal. Once that is established, your radio receives transmissions from that base station. During a vote scan, the yellow LED blinks. To respond to a transmission during a vote scan, see Responding to Transmissions During Scanning on page 99.
Do one of the following:
100
English
5.8.8
Call Indicator Settings
This feature allows you to configure call or text message ringing tones.
5.8.8.1
Escalating Alarm Tone Volume
The radio can be programmed to continually alert, when a radio call remains unanswered. This is done by automatically increasing the alarm tone volume over time. This feature is known as Escalert.
5.8.9
Call Alert Operation
Call Alert paging enables you to alert a specific radio user to call you back. This feature is accessible using a programmed One Touch Access button.
5.8.9.1
Responding to Call Alerts
When you receive a Call Alert: · A repetitive tone sounds. · The yellow LED blinks.
Press the PTT button within 4 seconds of receiving a Call Alert page to respond with a Private Call.
5.8.9.2
Making Call Alerts
Follow the procedure to make Call Alerts on your radio.
1 Press the programmed One Touch Access button. The green LED lights up.
2 Wait for acknowledgment. If the Call Alert acknowledgment is received, a positive indicator tone sounds. If the Call Alert acknowledgment is not received, a negative indicator tone sounds.
101
English
5.8.10
Mute Mode
Mute Mode provides an option to silence all audio indicators on your radio. When Mute Mode is initiated, all audio indicators are muted except higher priority features such as emergency operations. When Mute Mode is exited, your radio resumes playing ongoing tones and audio transmissions.
IMPORTANT: You can only enable either Face Down or Man Down one at a time. Both features cannot be enabled together.
5.8.10.1
Turning On Mute Mode
Follow the procedure to turn on Mute Mode.
Do one of the following: · Access this feature by using the programmed
Mute Mode button.
102
· Access this feature by placing the radio in a facedown position momentarily.
Depending on radio model, the Face Down feature can be enabled either through the radio menu or by your system administrator. Check with your dealer or system administrator for more information.
IMPORTANT: User can only enable either Man Down or Face Down at a time. Both features cannot be enabled together.
The following occurs when Mute mode is enabled:
· Positive Indicator Tone sounds.
· The red LED light starts blinking and remains blinking until Mute Mode is exited.
· Radio is muted.
· Mute Mode Timer begins counting down the duration that is configured.
5.8.10.2
Exiting Mute Mode
This feature can be exited automatically once the Mute Mode Timer expires.
English
Do one of the following to exit Mute mode manually: · Press the programmed Mute Mode button. · Press the PTT button on any entry. · Place the radio in a face-up position momentarily.
The following occurs when Mute mode is disabled: · Negative Indicator Tone sounds. · The blinking red LED turns off. · Your radio unmutes and speaker state is restored. · If the timer has not expired, Mute mode timer is
stopped. NOTICE: Mute Mode is also exited if the user transmits voice or switches to an unprogrammed channel.
5.8.11
Emergency Operation
An Emergency Alarm is used to indicate a critical situation. You are able to initiate an Emergency at any time even when there is activity on the current channel.
Your dealer can set the duration of a button press for the programmed Emergency button, except for long press, which is similar with all other buttons: Short Press
Duration between 0.05 seconds and 0.75 seconds.
Long Press Duration between 1.00 second and 3.75 seconds.
The Emergency button is assigned with the Emergency On/Off feature. Check with your dealer for the assigned operation of the Emergency button.
NOTICE: If a short press to the Emergency button initiates Emergency mode, then a long press to the same enables the radio to exit Emergency mode.
If a long press to the Emergency button initiates Emergency mode, then a short press to the same enables the radio to exit Emergency mode.
Your radio supports three Emergency Alarms:
· Emergency Alarm
· Emergency Alarm with Call
103
English
· Emergency Alarm with Voice to Follow
NOTICE: Only one of the Emergency Alarms above can be assigned to the programmed Emergency button.
In addition, each alarm has the following types:
Regular Radio transmits an alarm signal and shows audio and/or visual indicators.
Silent Radio transmits an alarm signal without any audio or visual indicators. Radio receives calls without any sound through the speaker, until the programmed hot mic transmission period is over and/or you press the PTT button.
Silent with Voice Radio transmits an alarm signal without any audio or visual indicators, but allow incoming calls to sound through the speaker. If hot mic is enabled, the incoming calls sound through the speaker after the programmed hot mic transmission period is over. The indicators only appear once you press the PTT button.
Receiving Emergency Alarms
When you receive an Emergency Alarm: · A tone sounds. · The red LED blinks.
NOTICE: Your radio automatically acknowledges the Emergency Alarm (if enabled).
To return to home screen, perform the following actions:
a Press . b Press or to Yes.
c Press
to select.
The radio returns to the home screen and the display shows the Emergency icon.
5.8.11.1
104
English
5.8.11.2
Sending Emergency Alarms
This feature allows you to send an Emergency Alarm, a non-voice signal, which triggers an alert indication on a group of radios. Your radio does not display any audio or visual indicators during Emergency mode when it is set to Silent.
Follow the procedure to send Emergency Alarms on your radio.
1 Press the programmed Emergency On button.
The green LED lights up.
NOTICE: If programmed, the Emergency Search tone sounds. This tone is muted when the radio transmits or receives voice, and stops when the radio exits Emergency mode. The Emergency Search tone can be programmed through CPS.
2 Wait for acknowledgment.
If successful:
· The Emergency tone sounds.
· The red LED blinks. If unsuccessful after all retries have been exhausted: · A low-pitched tone sounds. The radio exits the Emergency Alarm mode.
5.8.11.3
Sending Emergency Alarms with Call
This feature allows you to send an Emergency Alarm with Call to a group of radios. Upon acknowledgement by a radio within the group, the group of radios can communicate over a programmed Emergency channel. If your radio is set to Silent, it does not display any audio or visual indicators during Emergency mode, or allow any received calls to sound through the radio's speaker, until you press the PTT button to initiate the call. If your radio is set to Silent with Voice, it does not display any audio or visual indicators during Emergency mode, but allow incoming calls to sound through the radio's speaker. The indicators only appear once you press the PTT button to initiate, or respond to, the call.
105
English
Follow the procedure to send Emergency Alarms with call on your radio.
1 Press the programmed Emergency On button. The green LED lights up. NOTICE: If programmed, the Emergency Search tone sounds. This tone is muted when the radio transmits or receives voice, and stops when the radio exits Emergency mode. The Emergency Search tone can be programmed by your dealer or system administrator.
2 Wait for acknowledgment. If successful: · The Emergency tone sounds. · The red LED blinks.
3 Press the PTT button to make the call. The green LED lights up.
4 Do one of the following:
106
· Wait for the Talk Permit Tone to end and speak clearly into the microphone if enabled.
· Wait for the PTT Sidetone to end and speak clearly into the microphone if enabled.
5 Release the PTT button to listen.
6 If the Channel Free Indication feature is enabled, you hear a short alert tone the moment the transmitting radio releases the PTT button, indicating the channel is free for you to respond. Press the PTT button to respond to the call.
7 To exit the Emergency mode once the call ends, press the Emergency Off button.
5.8.11.4
Emergency Alarms with Voice to Follow
This feature allows you to send an Emergency Alarm with Voice to Follow to a group of radios. Your radio microphone is automatically activated, allowing you to communicate with the group of radios without pressing the PTT button. This activated microphone state is also known as hot mic.
English
If your radio has Emergency Cycle Mode enabled, repetitions of hot mic and receiving period are made for a programmed duration. During Emergency Cycle Mode, received calls sound through the speaker.
If you press the PTT button during the programmed receiving period, you hear a prohibit tone, indicating that you should release the PTT button. The radio ignores the PTT button press and remains in Emergency mode. If you press the PTT button during hot mic, and continue to press it after the hot mic duration expires, the radio continues to transmit until you release the PTT button.
If the Emergency Alarm request fails, the radio does not retry to send the request, and enters the hot mic state directly.
NOTICE: Some accessories may not support hot mic. Check with your dealer or system administrator for more information.
5.8.11.5
Sending Emergency Alarms with Voice to Follow
1 Press the programmed Emergency On button. The green LED lights up.
2 Once the Emergency tone sounds, speak clearly into the microphone. The radio automatically stops transmitting when: · The cycling duration between hot mic and receiving calls expires, if Emergency Cycle Mode is enabled. · The hot mic duration expires, if Emergency Cycle Mode is disabled.
5.8.11.6
Reinitiating Emergency Mode
Perform one of the following actions:
107
English
· Change the channel while the radio is in Emergency mode.
NOTICE: You can reinitiate emergency mode only if you enable emergency alarm on the new channel.
· Press the programmed Emergency On button during an emergency initiation or transmission state.
The radio exits the Emergency mode, and reinitiates Emergency.
5.8.12
Text Messaging
Your radio is able to receive data, for example a text message, from another radio or a text message application.
There are two types of text messages, Digital Mobile Radio (DMR) Short Text Message and text message. The maximum length of a DMR Short Text Message is 23 characters. The maximum length of a text message is 280 characters, including the subject line. The subject line only
appears when you receive messages from e-mail applications.
NOTICE: The maximum character length is only applicable for models with the latest software and hardware. For radio models with older software and hardware, the maximum length of a text message is 140 characters. Contact your dealer for more information.
5.8.12.1
Quick Text Messages
Your radio supports Quick Text messages as programmed by your dealer.
5.8.12.1.1
Sending Quick Text Messages
Follow the procedure to send Quick Text messages on your radio.
1 Press the programmed Text Message button. The LED lights up solid green.
108
English
2 Wait for acknowledgment. If successful:
· A positive indicator tone sounds.
If unsuccessful:
· A negative indicator tone sounds.
5.8.13
Privacy
This feature helps to prevent eavesdropping by unauthorized users on a channel by the use of a softwarebased scrambling solution. The signaling and user identification portions of a transmission are not scrambled.
Your radio must have privacy enabled on the channel to send a privacy-enabled transmission, although this is not a necessary requirement for receiving a transmission. While on a privacy-enabled channel, the radio is still able to receive clear or unscrambled transmissions.
Some radio models may not offer Privacy feature, or may have a different configuration. Check with your dealer or system administrator for more information.
Your radio supports the following types of privacy, but only one can be assigned to your radio. They are:
· Basic Privacy
· Enhanced Privacy
To unscramble a privacy-enabled call or data transmission, your radio must be programmed to have the same Privacy Key for Basic Privacy, or the same Key Value and Key ID for Enhanced Privacy as the transmitting radio.
If your radio receives a scrambled call that is of a different Privacy Key, or different Key Value and Key ID, you either hear a garbled transmission for Basic Privacy or nothing at all for Enhanced Privacy.
On a privacy-enabled channel, your radio is able to receive clear or unscrambled calls, depending on how your radio is programmed. In addition, your radio may play a warning tone or not, depending on how it is programmed.
The green LED lights up when the radio is transmitting, and double blinks when the radio is receiving an ongoing privacy-enabled transmission.
5.8.13.1
Turning Privacy On or Off
Follow the procedure to turn privacy on or off on your radio.
109
English
Press the programmed Privacy button.
Press the programmed Response Inhibit button.
5.8.14
Response Inhibit
This feature helps prevent your radio from responding to any incoming transmissions.
NOTICE: Contact your dealer to determine how your radio has been programmed.
If enabled, your radio does not generate any outgoing transmissions in respond to incoming transmissions, such as Radio Check, Call Alert, Radio Disable, Remote Monitor, Automatic Registration Service (ARS), Responding to Private Messages, and Sending GNSS location reports.
Your radio cannot receive Confirmed Private Calls when this feature is enabled. However, your radio is able to manually send transmission.
5.8.14.1
Turning Response Inhibit On or Off
Follow the procedure to enable or disable Response Inhibit on your radio.
If successful:
· A positive indicator tone sounds.
If unsuccessful:
· A negative indicator tone sounds.
5.8.15
Lone Worker
This feature prompts an emergency to be raised if there is no user activity, such as any radio button press or channel selection, for a predefined time.
Following no user activity for a programmed duration, the radio pre-warns you using an audio indicator once the inactivity timer expires.
If there is still no acknowledgment by you before the predefined reminder timer expires, the radio initiates an Emergency Alarm.
Only one of the following Emergency Alarms is assigned to this feature:
· Emergency Alarm
· Emergency Alarm with Call
110
English
· Emergency Alarm with Voice to Follow The radio remains in the emergency state, allowing voice messages to proceed until action is taken. See Emergency Operation on page 103 for more information on ways to exit Emergency.
NOTICE: Check with your dealer or system administrator for more information.
5.8.16
Auto-Range Transponder System
The Auto-Range Transponder System (ARTS) is an analog-only feature designed to inform you when your radio is out-of-range of other ARTS-equipped radios. ARTS-equipped radios transmit or receive signals periodically to confirm that they are within range of each other. Your radio provides indications of states as follows: First-Time Alert
A tone sounds.
ARTS-in-Range Alert A tone sounds, if programmed.
ARTS-Out-of-Range Alert A tone sounds. The red LED rapidly blinks.
NOTICE: Check with your dealer or system administrator for more information.
5.8.17
Over-the-Air Programming
Your dealer can remotely update your radio through Overthe-Air Programming (OTAP) without any physical connection. Additionally, some settings can also be configured by using OTAP.
When your radio undergoes OTAP, the green LED blinks.
When your radio receives high volume data:
· The channel becomes busy.
· A negative tone sounds if you press the PTT button.
Once the programming update is complete, a tone sounds, and your radio restarts (powers off and on again).
111
English
If the programming update is unsuccessful, a tone sounds and the red LED blinks once.
NOTICE: If the programming update is unsuccessful, the software update failure indications appear every time you turn on your radio. Contact your dealer to reprogram your radio with the latest software to eliminate the software update failure indications.
5.8.18
Password Lock
You can set a password to restrict access to your radio. Each time you turn on your radio, you are asked to enter the password.
Your radio supports a 4-digit password input.
Your radio is unable to receive calls in locked state.
5.8.18.1
Accessing the Radio by Using Password
Turn on your radio.
1 Enter the four-digit password. a To enter the first digit of the password, use the Channel Selector Knob. b To enter each digit of the remaining three digits of the password, press Side Button 1, 2, or 3.
2 Your radio automatically checks the validity of the password when you enter the last digit of the password.
If you enter the password correctly, the radio powers up.
If you enter the wrong password after the first and second attempt, your radio shows the following indications:
· A continuous tone sounds.
Repeat step 1.
If you enter the wrong password after the third attempt, your radio shows the following indications:
· A tone sounds.
· The yellow LED double blinks.
· Your radio enters into locked state for 15 minutes.
112
English
Wait for the 15-minute locked state timer to end and then repeat step 1.
NOTICE: If you turn off and turn your radio on again, the 15minute timer restarts.
5.8.18.2
Unlocking Radios in Locked State
Your radio is unable to receive calls in locked state. Follow the procedure to unlock your radio in locked state.
Do one of the following:
· If the radio is powered on, wait for 15 minutes and then repeat the steps in Accessing the Radio by Using Password on page 65 to access the radio.
· If the radio is powered off, power up the radio. Your radio restarts the 15-minute timer for locked state. A tone sounds. The yellow LED double blinks.
Wait for 15 minutes and then repeat the steps in Accessing the Radio by Using Password on page 65 to access the radio.
5.9
Utilities
This chapter explains the operations of the utility functions available in your radio.
5.9.1
Checking Battery Strength
Follow the procedure to check the battery level of your radio.
Press the programmed Battery Strength button.
One of the following occurs: · The LED lights up solid yellow indicating fair battery
capacity. · The LED lights up solid green indicating full battery
capacity. · The LED blinks red indicating low battery capacity.
5.9.2
Setting Text-to-Speech
Follow the procedure to set the Text-to-Speech feature.
113
English
Press the programmed Text-to-Speech button to listen to the received text message.
5.9.3
Turning Acoustic Feedback Suppressor On or Off
The feature allows you to minimize acoustic feedback in received calls. Follow the procedure to turn Acoustic Feedback Suppressor on or off on your radio.
Press the programmed AF Suppressor button.
5.9.4
Turning Global Navigation Satellite System On or Off
Global Navigation Satellite System (GNSS) is a satellite navigation system that determines the radio precise location. GNSS includes Global Positioning System (GPS), Global Navigation Satellite System (GLONASS), and BeiDou Navigation Satellite System (BDS).
114
NOTICE: Selected radio models may offer GPS, GLONASS, and BDS. GNSS constellation is configured by using CPS. Check with your dealer or system administrator to determine how your radio has been programmed.
Press the programmed GNSS button to toggle GNSS on or off on your radio.
5.9.5
Turning Radio Tones/Alerts On or Off
You can enable and disable all radio tones and alerts, if needed, except for incoming Emergency alert tone . Follow the procedure to turn tones and alerts on or off on your radio.
Press the programmed All Tones/Alerts button. If successful:
· The Positive Indicator Tone sounds.
· All tones and alerts are turned on.
If unsuccessful:
English
· The Negative Indicator Tone sounds.
· All tones and alerts are turned off.
5.9.6
Voice Operating Transmission
The Voice Operating Transmission (VOX) allows you to initiate a hands-free voice-activated call on a programmed channel. The radio automatically transmits, for a programmed period, whenever the microphone on the VOX-capable accessory detects voice.
You can enable or disable VOX by doing one of the following:
· Turn the radio off and then power it on again to enable VOX.
· Change the channel by using the Channel Selector knob to enable VOX.
· Turn VOX on or off by using the programmed VOX button.
· Press the PTT button during radio operation to disable VOX.
NOTICE: Turning this feature on or off is limited to radios with this function enabled. Check with your dealer or system administrator for more information.
5.9.6.1
Turning Voice Operating Transmission On or Off
Follow the procedure to turn VOX on or off on your radio.
Press the programmed VOX button to toggle the feature on or off.
NOTICE: If the Talk Permit Tone is enabled, use a trigger word to initiate the call. Wait for the Talk Permit Tone to finish before speaking clearly into the microphone. See Turning Talk Permit Tone On or Off for more information.
115
English
5.9.7
Turning Option Board On or Off
Option board capabilities within each channel can be assigned to programmable buttons. Follow the procedure to turn option board on or off on your radio.
· All tones and alerts are turned on. If unsuccessful: · The Negative Indicator Tone sounds. · All tones and alerts are turned off.
Press the programmed Option Board button.
5.9.8
Turning Voice Announcement On or Off
This feature enables the radio to audibly indicates the current zone or channel the user has just assigned, or the programmable button the user has just pressed.
This audio indicator can be customized according to customer requirements. Follow the procedure to turn Voice Announcement on or off on your radio.
5.9.9
Switching Audio Route between Internal Radio Speaker and Wired Accessory
Follow the procedure to toggle audio routing between internal radio speaker and wired accessory.
You can toggle audio routing between the internal radio speaker and the speaker of a wired accessory with the condition that:
· The wired accessory with speaker is attached.
Press the programmed Voice Announcement button. If successful: · The Positive Indicator Tone sounds.
116
Press the programmed Audio Toggle button.
A tone sounds when the audio route has switched. Powering down the radio or detaching the accessory resets the audio routing to the internal radio speaker.
5.9.10
Turning Intelligent Audio On or Off
Your radio automatically adjusts the audio volume to overcome current background noise in the environment, inclusive of both stationary and non-stationary noise sources. This is a receive-only feature and does not affect transmission audio. Follow the procedure to turn Intelligent Audio on or off on your radio.
Press the programmed Intelligent Audio button.
NOTICE: This feature is not applicable during a Bluetooth session.
5.9.11
Turning Trill Enhancement On or Off
You can enable this feature when you are speaking in a language that contains many words with alveolar trill (rolling "R") pronunciations. Follow the procedure to turn Trill Enhancement on or off on your radio.
English
Press the programmed Trill Enhancement button to toggle the feature on or off. If successful: · The Positive Indicator Tone sounds. · All tones and alerts are turned on. If unsuccessful: · The Negative Indicator Tone sounds. · All tones and alerts are turned off.
117
English
Limited Warranty
MOTOROLA SOLUTIONS COMMUNICATION PRODUCTS
I. WHAT THIS WARRANTY COVERS AND FOR HOW LONG:
Motorola Solutions, Inc. ("Motorola Solutions") warrants the Motorola Solutions manufactured Communication Products listed below ("Product") against defects in material and workmanship under normal use and service for a period of time from the date of purchase as scheduled below:
Portable Radios
Product Accessories (Including Batteries and Chargers)
Two (2) Years One (1) Year
Motorola Solutions, at its option, will at no charge either repair the Product (with new or reconditioned parts), replace it (with a new or reconditioned Product), or refund the purchase price of the Product during the warranty
period provided it is returned in accordance with the terms of this warranty. Replaced parts or boards are warranted for the balance of the original applicable warranty period. All replaced parts of Product shall become the property of Motorola Solutions.
This express limited warranty is extended by Motorola Solutions to the original end user purchaser only and is not assignable or transferable to any other party. This is the complete warranty for the Product manufactured by Motorola Solutions. Motorola Solutions assumes no obligations or liability for additions or modifications to this warranty unless made in writing and signed by an officer of Motorola Solutions.
Unless made in a separate agreement between Motorola Solutions and the original end user purchaser, Motorola Solutions does not warrant the installation, maintenance or service of the Product.
Motorola Solutions cannot be responsible in any way for any ancillary equipment not furnished by Motorola Solutions which is attached to or used in connection with the Product, or for operation of the Product with any ancillary equipment, and all such equipment is expressly excluded from this warranty. Because each system which may use the Product is unique, Motorola Solutions
118
English
disclaims liability for range, coverage, or operation of the system as a whole under this warranty.
II. GENERAL PROVISIONS
This warranty sets forth the full extent of Motorola Solutions responsibilities regarding the Product. Repair, replacement or refund of the purchase price, at Motorola Solutions option, is the exclusive remedy. THIS WARRANTY IS GIVEN IN LIEU OF ALL OTHER EXPRESS WARRANTIES. IMPLIED WARRANTIES, INCLUDING WITHOUT LIMITATION, IMPLIED WARRANTIES OF MERCHANTABILITY AND FITNESS FOR A PARTICULAR PURPOSE, ARE LIMITED TO THE DURATION OF THIS LIMITED WARRANTY. IN NO EVENT SHALL MOTOROLA SOLUTIONS BE LIABLE FOR DAMAGES IN EXCESS OF THE PURCHASE PRICE OF THE PRODUCT, FOR ANY LOSS OF USE, LOSS OF TIME, INCONVENIENCE, COMMERCIAL LOSS, LOST PROFITS OR SAVINGS OR OTHER INCIDENTAL, SPECIAL OR CONSEQUENTIAL DAMAGES ARISING OUT OF THE USE OR INABILITY TO USE SUCH PRODUCT, TO THE FULL EXTENT SUCH MAY BE DISCLAIMED BY LAW.
III. STATE LAW RIGHTS:
SOME STATES DO NOT ALLOW THE EXCLUSION OR LIMITATION OF INCIDENTAL OR CONSEQUENTIAL DAMAGES OR LIMITATION ON HOW LONG AN IMPLIED WARRANTY LASTS, SO THE ABOVE LIMITATION OR EXCLUSIONS MAY NOT APPLY.
This warranty gives specific legal rights, and there may be other rights which may vary from state to state.
IV. HOW TO GET WARRANTY SERVICE
You must provide proof of purchase (bearing the date of purchase and Product item serial number) in order to receive warranty service and, also, deliver or send the Product item, transportation and insurance prepaid, to an authorized warranty service location. Warranty service will be provided by Motorola Solutions through one of its authorized warranty service locations. If you first contact the company which sold you the Product (for example, dealer or communication service provider), it can facilitate your obtaining warranty service. You can also call Motorola Solutions at 1-800-927-2744.
119
English
V. WHAT THIS WARRANTY DOES NOT COVER
1 Defects or damage resulting from use of the Product in other than its normal and customary manner.
2 Defects or damage from misuse, accident, water, or neglect.
3 Defects or damage from improper testing, operation, maintenance, installation, alteration, modification, or adjustment.
4 Breakage or damage to antennas unless caused directly by defects in material workmanship.
5 A Product subjected to unauthorized Product modifications, disassembles or repairs (including, without limitation, the addition to the Product of nonMotorola Solutions supplied equipment) which adversely affect performance of the Product or interfere with Motorola Solutions normal warranty inspection and testing of the Product to verify any warranty claim.
6 Product which has had the serial number removed or made illegible.
7 Rechargeable batteries if:
· any of the seals on the battery enclosure of cells are broken or show evidence of tampering.
· the damage or defect is caused by charging or using the battery in equipment or service other than the Product for which it is specified.
8 Freight costs to the repair depot.
9 A Product which, due to illegal or unauthorized alteration of the software/firmware in the Product, does not function in accordance with Motorola Solutions published specifications or the FCC certification labeling in effect for the Product at the time the Product was initially distributed from Motorola Solutions.
10 Scratches or other cosmetic damage to Product surfaces that does not affect the operation of the Product.
11 Normal and customary wear and tear.
VI. PATENT AND SOFTWARE PROVISIONS
Motorola Solutions will defend, at its own expense, any suit brought against the end user purchaser to the extent that it is based on a claim that the Product or parts infringe a United States patent, and Motorola Solutions will pay those
120
English
costs and damages finally awarded against the end user purchaser in any such suit which are attributable to any such claim, but such defense and payments are conditioned on the following:
1 Motorola Solutions will be notified promptly in writing by such purchaser of any notice of such claim,
2 Motorola Solutions will have sole control of the defense of such suit and all negotiations for its settlement or compromise, and
3 Should the Product or parts become, or in Motorola Solutions opinion be likely to become, the subject of a claim of infringement of a United States patent, that such purchaser will permit Motorola Solutions, at its option and expense, either to procure for such purchaser the right to continue using the Product or parts or to replace or modify the same so that it becomes non-infringing or to grant such purchaser a credit for the Product or parts as depreciated and accept its return. The depreciation will be an equal amount per year over the lifetime of the Product or parts as established by Motorola Solutions.
Motorola Solutions will have no liability with respect to any claim of patent infringement which is based upon the combination of the Product or parts furnished hereunder with software, apparatus or devices not furnished by
Motorola Solutions, nor will Motorola Solutions have any liability for the use of ancillary equipment or software not furnished by Motorola Solutions which is attached to or used in connection with the Product. The foregoing states the entire liability of Motorola Solutions with respect to infringement of patents by the Product or any parts thereof.
Laws in the United States and other countries preserve for Motorola Solutions certain exclusive rights for copyrighted Motorola Solutions software such as the exclusive rights to reproduce in copies and distribute copies of such Motorola Solutions software. Motorola Solutions software may be used in only the Product in which the software was originally embodied and such software in such Product may not be replaced, copied, distributed, modified in any way, or used to produce any derivative thereof. No other use including, without limitation, alteration, modification, reproduction, distribution, or reverse engineering of such Motorola Solutions software or exercise of rights in such Motorola Solutions software is permitted. No license is granted by implication, estoppel or otherwise under Motorola Solutions patent rights or copyrights.
VII. GOVERNING LAW
This Warranty is governed by the laws of the State of Illinois, U.S.A.
121
English
VIII. For Australia Only
This warranty is given by Motorola Solutions Australia Pty Limited (ABN 16 004 742 312) of Tally Ho Business Park, 10 Wesley Court. Burwood East, Victoria. Our goods come with guarantees that cannot be excluded under the Australia Consumer Law. You are entitled to a replacement or refund for a major failure and compensation for any other reasonably foreseeable loss or damage. You are also entitled to have the goods repaired or replaced if the goods fail to be of acceptable quality and the failure does not amount to a major failure. Motorola Solutions Australia's limited warranty above is in addition to any rights and remedies you may have under the Australian Consumer Law. If you have any queries, please call Motorola Solutions Australia at 1800 457 439. You may also visit our website: http:// www.motorolasolutions.com/XA-EN/Pages/Contact_Us for the most updated warranty terms.
122
www.motorolasolutions.com/mototrbo
MOTOROLA, MOTO, MOTOROLA SOLUTIONS and the Stylized M Logo are trademarks or registered trademarks of Motorola Trademark Holdings, LLC and are used under license. All other trademarks are the property of their respective owners. © 2012 and 2021 Motorola Solutions, Inc. All rights reserved.
References
 MOTOTRBO Digital Mobile Radios (DMR) — Motorola Solutions
Adobe Acrobat Pro DC 20.13.20074