Motorola TLKR T40 Walkie Talkie Manual
Product Safety and RF Exposure for Portable Two-Way Radios
Before using this product, read the operating instructions for safe usage contained in the Product Safety and RF Exposure booklet enclosed with your radio.
Attention!
Before using this product, read the RF energy awareness information and operating instructions in the Product Safety and RF Exposure booklet to ensure compliance with RF energy exposure limits.
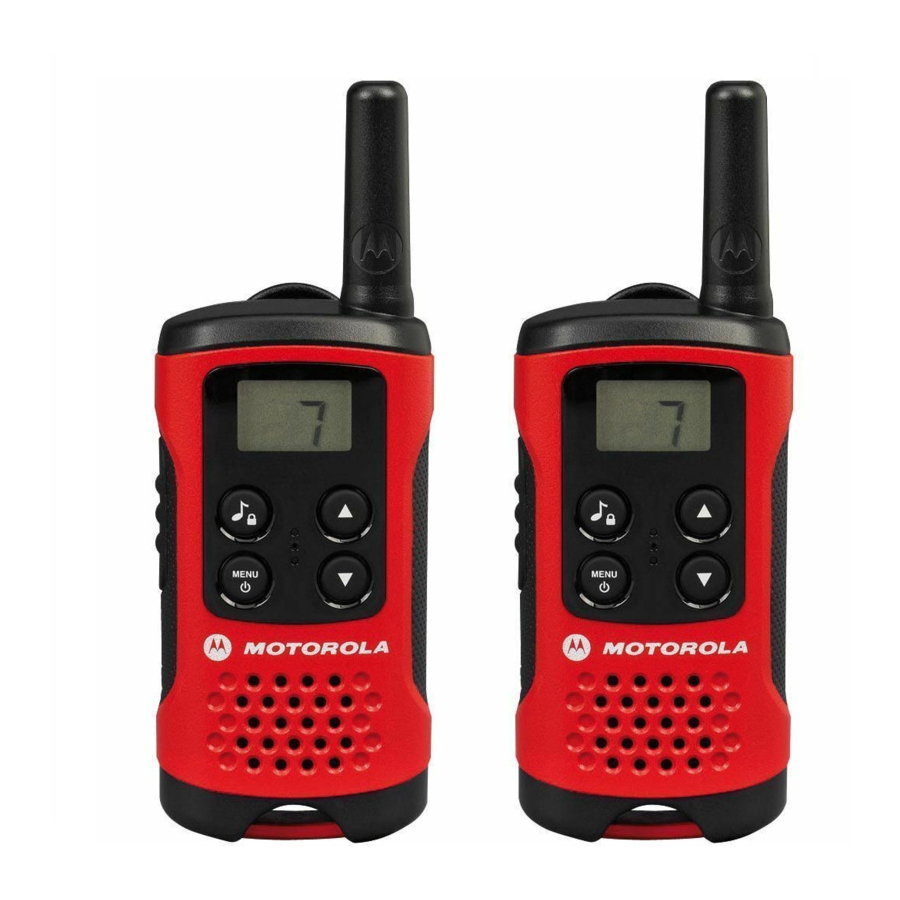
Package Contents
- TLKR T40 Radio* (2 units)
- Belt Clip (2 units)
- TLKR T40 Owner’s Manual
Radio Controls

Preparing Your Radio
Display

- Volume Level Indicator
- Transmit/Receive Indicator
- Keypad Lock Indicator
- Scan Indicator
- Battery Level Meter
- Channel Indicator
Installing the Battery
- Make sure your radio is OFF.
- To remove the battery compartment door, by pressing the tab at the bottom of the compartment door. Remove the door. Insert 3 AAA batteries into the battery compartment.
- Replace the battery compartment door.
Battery Level and Low Battery Alert
Basic Radio Operations
Read this reference guide completely before attempting to operate the unit.
Turning Your Radio On/Off
Press and hold the MENU/  button to turn your radio ON/OFF.
Adjusting the Volume
Adjust the volume by pressing the  and
and  buttons.
Adjusting the Sound (Key Beeps)
Your radio emits a beep each time one of the buttons is pressed (except the PTT button).
Press and hold the  button while turning the radio ON to switch the sound OFF.
To turn this sound ON, turn the radio OFF and ON again without pressing the button.
Selecting a Channel
In order to speak to someone, both your radios must be set to the same channel.
To select a channel:
- MENU/
 button to enter Menu.
 - or to the required channel.
- Press PTT button to confirm the selection.
Talking on Your Radio
- Hold your radio 5–8 cm from your mouth.
- Press and hold the PTT button while speaking. The appears on the display.
- Release the PTT button. You can now receive incoming calls. When you do, the appears on the display. To respond, repeat procedure from step 1.
 appears on the display. To respond, repeat procedure from step 1.
Note: When you continue to transmit for 60 seconds, the radio emits TX Time Out tone and the  icon flashes. The radio will stop transmitting.
- To enter the Menu, press the MENU/ button.
- Additional presses of the MENU/ buttonwill advance you through the Menu.
- To exit the Menu function, do one of the following:
- Press and hold the MENU/ button.
- Press the PTT button.
- Wait 10 seconds until the unit automatically returns to «Normal» mode.
- Press and hold the MENU/
Features on Your Radio
Call Tone
Your radio is equipped with a call tone.
To transmit a call tone, press the  /
/  button.
Channel Scan Mode
Enables your radio to scan for active channels. When activity is detected, your radio lands (stays) on that channel (for 2 seconds). To transmit on that channel, press the PTT button.
When activity on the landed channel ends, your radio continues scanning other channels.
To turn the channel scan ON:
- MENU/ to enter Menu. Advance until blinks.
- / to turn ON channel scan.
 blinks.
MENU/ or PTT to turn OFF Scan mode.
Key Lock
Press and hold / until appears to lock the keypad.
Press and hold / until disappears to unlock the keypad.
Monitor Mode
Enables you to listen for weak signals on the current channel. To turn the Monitor Mode ON:
- MENU/ button to enter menu. Advance through the menu until icon blinks.
- Press the / button for continuous listening. The icon continues to blink.
To turn the Monitor Mode OFF:
Press the MENU/ button to return to «Normal» mode. The icon stops blinking.
Roger Beep
Sounds to indicate the end of a PTT transmission. It can be heard through the speaker when Key Beep is on. It cannot be heard through the speaker if Key Beep is turned off.
Press and hold the  button while turning the radio ON to turn the Roger Beep ON. Repeat the step to turn Roger Beep OFF.
Automatic Power Save
For better battery life, your radio is designed to switch to Power Save mode when there has been no transmissions after 3 seconds. The radio can receive transmissions in this mode.
Specifications
| Channels | 8 PMR |
| Frequency | 446.00625 — 446.09375 MHz |
| Power Source | 3 AAA Alkaline Batteries |
| Range | Up to 4 km* |
| Battery Life | 16 Hours (under typical use conditions) |
*Range may vary depending on environmental and/or topographical conditions.
Frequency Chart
| Channel | Freq. (MHz) | Channel | Freq. (MHz) |
| 1 | 446.00625 | 5 | 446.05625 |
| 2 | 446.01875 | 6 | 446.06875 |
| 3 | 446.03125 | 7 | 446.08125 |
| 4 | 446.04375 | 8 | 446.09375 |
Warranty Information
The authorized Motorola dealer or retailer where you purchased your Motorola two-way radio and/or original accessories will honour a warranty claim and/or provide warranty service.
Please return your radio to your dealer or retailer to claim your warranty service. Do not return your radio to Motorola.
In order to be eligible to receive warranty service, you must present your receipt of purchase or a comparable substitute proof of purchase bearing the date of purchase. The two-way radio should also clearly display the serial number. The warranty will not apply if the type or serial numbers on the product have been altered, deleted, removed, or made illegible.
Copyright Information
The Motorola products described in this manual may include copyrighted Motorola computer programs stored in semiconductor memories or other media. Laws in the United States and other countries preserve for Motorola certain exclusive rights for copyrighted computer programs including, but not limited to, the exclusive right to copy or reproduce in any form the copyrighted computer program. Accordingly, any copyrighted Motorola computer programs contained in the Motorola products described in this manual may not be copied, reproduced, modified, reverse-engineered, or distributed in any manner without the express written permission of Motorola. Furthermore, the purchase of Motorola products shall not be deemed to grant either directly or by implication, estoppel, or otherwise, any license under the copyrights, patents or patent applications of Motorola, except for the normal non-exclusive license to use that arises by operation of law in the sale of a product.

Documents / Resources
Download manual
Here you can download full pdf version of manual, it may contain additional safety instructions, warranty information, FCC rules, etc.
Download Motorola TLKR T40 Walkie Talkie Manual
-
Инструкции по эксплуатации
1

Motorola TLKR-T40 инструкция по эксплуатации
(16 страниц)
- Языки:Русский
-
Тип:
PDF -
Размер:
892.22 KB -
Описание:
Радиостанция
Просмотр
На NoDevice можно скачать инструкцию по эксплуатации для Motorola TLKR-T40. Руководство пользователя необходимо для ознакомления с правилами установки и эксплуатации Motorola TLKR-T40. Инструкции по использованию помогут правильно настроить Motorola TLKR-T40, исправить ошибки и выявить неполадки.

TLKR T40
Owner’s Manual
English
TLKR T40 Owner’s Manual
Product Safety and RF Exposure for Portable
Two-Way Radios
Attention!
Before using this product, read the RF energy awareness
information and operating instructions in the Product Safety
and RF Exposure booklet to ensure compliance with RF
energy exposure limits.
Package Contents
•
TLKR T40 Radio* (2 units)
•
Belt Clip (2 units)
•
TLKR T40 Owner’s Manual
EN
Before using this product, read the operating
instructions for safe usage contained in the
Product Safety and RF Exposure booklet
enclosed with your radio.
Caution
Radio Controls
Antenna
Volume/
Channel
Buttons
Call Button
Speaker
Microphone
Menu/Power
button
PTT
Button
Display
Preparing Your Radio
Installing the Battery
1. Make sure your radio is OFF.
2. To remove the battery compartment door, by pressing the
tab at the bottom of the compartment door. Remove the
door. Insert 3 AAA batteries into the battery compartment.
3. Replace the battery compartment door.
Battery Level and Low Battery Alert
1. Volume Level Indicator
2. Transmit/Receive
Indicator
3. Keypad Lock Indicator
4. Scan Indicator
5. Battery Level Meter
6. Channel Indicator
Indicates that the battery is fully charged.
Blinks when battery is low; replace batteries
immediately.
1
2
3
4
5
6
Basic Radio Operations
Read this reference guide completely before attempting to
operate the unit.
Turning Your Radio On/Off
Press and hold the
MENU/
button to turn your radio ON/
OFF.
Adjusting the Volume
Adjust the volume by pressing the and buttons.
Adjusting the Sound (Key Beeps)
Your radio emits a beep each time one of the buttons is
pressed (except the PTT button).
Press and hold the button while turning the radio ON to
switch the sound OFF.
To turn this sound ON, turn the radio OFF and ON again
without pressing the
button.
Selecting a Channel
In order to speak to someone, both your radios must be set to
the same channel.
To select a channel:
1.
MENU/
button to enter Menu.
2. or to the required channel.
3. Press
PTT
button to confirm the selection.
Talking on Your Radio
1. Hold your radio 5–8 cm from your mouth.
2. Press and hold the
PTT
button while speaking. The
appears on the display.
3. Release the
PTT
button. You can now receive incoming
calls. When you do, the appears on the display. To
respond, repeat procedure from step 1.
Note: When you continue to transmit for 60 seconds, the
radio emits TX Time Out tone and the
icon
flashes. The radio will stop transmitting.
Navigating through the Menu
1. To enter the Menu, press the
MENU/
button.
2. Additional presses of the
MENU/
buttonwill advance you
through the Menu.
3. To exit the Menu function, do one of the following:
a. Press and hold the
MENU/
button.
b.Press the
PTT
button.
c.Wait 10 seconds until the unit automatically returns to
“Normal” mode.
Features on Your Radio
Call Tone
Your radio is equipped with a call tone.
To transmit a call tone, press the
/
button.
Channel Scan Mode
Enables your radio to scan for active channels. When activity
is detected, your radio lands (stays) on that channel (for 2
seconds). To transmit on that channel, press the
PTT
button.
When activity on the landed channel ends, your radio
continues scanning other channels.
To turn the channel scan ON:
1.
MENU/
to enter Menu. Advance until
blinks.
2.
/
to turn ON channel scan.
MENU/
or PTT to turn OFF Scan mode.
Key Lock
Press and hold
/ until appears to lock the keypad.
Press and hold
/ until disappears to unlock the
keypad.
Monitor Mode
Enables you to listen for weak signals on the current channel.
To turn the Monitor Mode ON:
1.
MENU/
button to enter menu.Advance through the menu
until
icon blinks.
2. Press the
/
button for continuous listening. The
icon continues to blink.
To turn the Monitor Mode OFF:
Press the
MENU/
button to return to “Normal” mode. The
icon stops blinking.
Roger Beep
Sounds to indicate the end of a
PTT
transmission. It can be
heard through the speaker when Key Beep is on. It cannot be
heard through the speaker if Key Beep is turned off.
Press and hold the button while turning the radio ON to
turn the Roger Beep ON. Repeat the step to turn Roger Beep
OFF.
Automatic Power Save
For better battery life, your radio is designed to switch to
Power Save mode when there has been no transmissions
after 3 seconds. The radio can receive transmissions in this
mode.
Specifications
Channels
8 PMR
Frequency
446.00625 — 446.09375 MHz
Power Source 3 AAA Alkaline Batteries
Range
Up to 4 km*
Battery Life
16 Hours (under typical use conditions)
*Range may vary depending on environmental and/or topographical
conditions.
Frequency Chart
Channel
Freq. (MHz)
Channel
Freq. (MHz)
1
446.00625
5
446.05625
2
446.01875
6
446.06875
3
446.03125
7
446.08125
4
446.04375
8
446.09375
Warranty Information
The authorized Motorola dealer or retailer where you
purchased your Motorola two-way radio and/or original
accessories will honour a warranty claim and/or provide
warranty service.
Please return your radio to your dealer or retailer to claim
your warranty service. Do not return your radio to Motorola.
In order to be eligible to receive warranty service, you must
present your receipt of purchase or a comparable substitute
proof of purchase bearing the date of purchase. The two-way
radio should also clearly display the serial number. The
warranty will not apply if the type or serial numbers on the
product have been altered, deleted, removed, or made
illegible.
What Is Not Covered By The Warranty
Defects or damage resulting from use of the Product in other
than its normal and customary manner or by not following the
instructions in this user manual.
Defects or damage from misuse, accident or neglect.
Defects of damage from improper testing, operation,
maintenance, adjustment, or any alteration or modification of
any kind.
Breakage or damage to aerials unless caused directly by
defects in material or workmanship.
Products disassembled or repaired in such a manner as to
adversely affect performance or prevent adequate inspection
and testing to verify any warranty claim.
Defects or damage due to range.
Defects or damage due to moisture, liquid or spills.
All plastic surfaces and all other externally exposed parts that
are scratched or damaged due to normal use.
Products rented on a temporary basis.
Periodic maintenance and repair or replacement of parts due
to normal usage, wear and tear.
Copyright Information
The Motorola products described in this manual may include
copyrighted Motorola computer programs stored in
semiconductor memories or other media. Laws in the United
States and other countries preserve for Motorola certain
exclusive rights for copyrighted computer programs including,
but not limited to, the exclusive right to copy or reproduce in
any form the copyrighted computer program. Accordingly,
any copyrighted Motorola computer programs contained in
the Motorola products described in this manual may not be
copied, reproduced, modified, reverse-engineered, or
distributed in any manner without the express written
permission of Motorola. Furthermore, the purchase of
Motorola products shall not be deemed to grant either directly
or by implication, estoppel, or otherwise, any license under
the copyrights, patents or patent applications of Motorola,
except for the normal non-exclusive license to use that arises
by operation of law in the sale of a product.
Notes
Notes
*68015000921*
68015000921-A(EN)
U01UT070ZZA
Printed in China
MOTOROLA, MOTO, MOTOROLA SOLUTIONS and the
Stylized M logo are trademarks or registered trademarks of
Motorola Trademark Holdings, LLC and are used under
license. All other trademarks are the property of their
respective owners.
© 2012 Motorola Solutions, Inc. All rights reserved.
 Подробный обзор радиостанции Motorola TLKR T40.
На День рождения получил от друзей в подарок пару портативных радиостанций Motorola TLKR T40.
Давно хотел купить себе что-то похожее, чтобы пользоваться в походах и на рыбалке, но все как-то руки не доходили. Также планирую их использовать в велопутешествиях за границу, чтобы не переплачивать за звонки по мобильному. Еще можно дать одну станцию ребенку и держать с ним связь, а не кричать с балкона.
Корпус радиостанции изготовлен из качественного пластика с шероховатой поверхностью, который не боится оставаться на солнце. В руке лежит очень удобно. Есть пара клипс для крепление на ремень. Предусмотрено отверстие для шнурка.
Питание от стандартных батареек типа ААА полностью решает проблему с зарядным устройством. Их можно купить в любом месте.

Так как радиостанция работает в стандарте PMR, то не нужно получать разрешение на ее использование в России, Украине, Беларуси и многих странах Европы.
В черте города дальность действия составляет 1-1.5 км.
Режим поиска активных каналов поможет найти собеседника, если вы забыли на каком канале договорились общаться или вызвать помощь в случае необходимости.
При общении рекомендую говорить в микрофон на расстоянии 40-50 см. При меньшем расстоянии звук немного захлебывается.
К недостаткам могу отнести отсутствие возможности подключения гарнитуры, но для меня это не критично.
В целом радиостанциями очень доволен. Могу рекомендовать их к покупке всем желающим.
Если есть лишняя денежка, то можете купить флагмана серии TLKR — радиостанцию Motorola TLKR T80 Extreme. В комплект поставки T80 Extreme входят проводные гарнитуры и настольное зарядное устройство. Дальность связи заявлена до 10 км. Эта модель оснащена светодиодным фонарем.
Подготовил небольшую инструкцию по пользованию радиостанциями Motorola TLKR T40. Вдруг, кому-то пригодится.
Технические характеристики Motorola TLKR T40
- Каналы: 8 PMR
- Частота: 446.00625-446.09375 МГц
- Источник питания: 3 батарейки типа ААА
- Выходная мощность передатчика 0.5 Вт
- Дальность: до 4 км в зоне прямой видимости
- Время работы от батареи: 16 часов в режиме стандартного использования
Таблица частот каналов радиостанции Motorola TLKR T40
- 446.00625 МГц
- 446.01875 МГц
- 446.03125 МГц
- 446.04375 МГц
- 446.05625 МГц
- 446.06875 МГц
- 446.08125 МГц
- 446.09375 МГц
Назначение функциональных клавиш радиостанции Motorola TLKR T40

- Кнопка 1 — вызов/подтверждение
- Кнопка 2 — громкость/каналы
- Кнопка 3 — громкость/каналы
- Кнопка 4 — меню/питание
- Кнопка 5 — передача
Работа с радиостанцией Motorola TLKR T40
Включение/выключение
Включение/выключение радиостанции производится нажатием кнопки MENU (Кнопка 4).
Регулировка громкости
Установка требуемого уровня громкости производится путем нажатия кнопки 2 (громче) и кнопки 3 (тише).
Сигналы кнопок
Радиостанция издает короткий звуковой сигнал при нажатии кнопок управления.
Нажмите и удерживайте кнопку 3 во время включения для выключение звукового сигнала. Для включения сигнала необходимо при следующем включении снова нажать на кнопку 3.
Выбор канала
Для выбора канала нажмите кнопку MENU (Кнопка 4). С помощью кнопки 2 и кнопки 3 установите требуемый канал. Нажмите боковую кнопку «передача (Кнопка 5)» для подтверждения выбора.
Разговор по радиостанции
Для начала разговора необходимо нажать на кнопку «передача (Кнопка 5)». После отпускания этой кнопки вы снова сможете принимать входящие вызовы.
Через 60 секунд после нажатия кнопки «передача» радиостанция издает звуковой сигнал и прекращает передачу.
Сигнал вызова
Радиостанция оснащена сигналом вызова. Для передачи его в эфир необходимо кратковременно нажать на кнопку 1.
Отключение шумоподавителя
Услышать слабые сигналы может помочь отключение шумоподавителя радиостанции.
Для этого необходимо нажать кнопку MENU (Кнопка 4) три раза — в верхней части экрана будет моргать значок с символом радиостанции.

Далее необходимо нажать на кнопку 1. Вы сразу услышите шум эфира.
Для отключения этой функции нажмите на кнопку MENU (Кнопка 4).
Сигнал окончания передачи
Если включен сигнал кнопок, то по окончании передачи в динамике можно услышать звуковой сигнал окончания вызова.
Нажмите и удерживайте кнопку 2 во время включения для выключение сигнала передачи. Для включения сигнала необходимо при следующем включении снова нажать на кнопку 2.
Режим поиска каналов
Позволяет искать активные каналы. При обнаружении активности поиск останавливается на активном канале на 2 секунды. При исчезновении активности на канале — поиск продолжится.
Для включения поиска каналов нажимайте на кнопку Меню (Кнопка 4) два раза. Вверху экрана начнет мигать значок Z:

Нажмите Кнопку 1 для начала поиска.
Нажатие на Кнопку 4 остановит поиск.
Блокировка кнопок
Нажмите и удерживайте Кнопку 1, пока на экране не появится значок с символом замка.

Повторное нажатие и удерживание Кнопки 1 разблокирует все кнопки.

Подключение внешней антенны
В радиостанции предусмотрена возможность для подключения внешней антенны.
На антенне радиостанции имеется выемка с заглушкой.

Если убрать заглушку, то под ней будет винт, к которому можно подключить внешнюю антенну.


TLKR T40
Owner’s Manual
English
TLKR T40 Owner’s Manual
Product Safety and RF Exposure for Portable
Two-Way Radios
Attention!
Before using this product, read the RF energy awareness
information and operating instructions in the Product Safety
and RF Exposure booklet to ensure compliance with RF
energy exposure limits.
Package Contents
•
TLKR T40 Radio* (2 units)
•
Belt Clip (2 units)
•
TLKR T40 Owner’s Manual
EN
Before using this product, read the operating
instructions for safe usage contained in the
Product Safety and RF Exposure booklet
enclosed with your radio.
Caution
Radio Controls
Antenna
Volume/
Channel
Buttons
Call Button
Speaker
Microphone
Menu/Power
button
PTT
Button
Display
Preparing Your Radio
Installing the Battery
1. Make sure your radio is OFF.
2. To remove the battery compartment door, by pressing the
tab at the bottom of the compartment door. Remove the
door. Insert 3 AAA batteries into the battery compartment.
3. Replace the battery compartment door.
Battery Level and Low Battery Alert
1. Volume Level Indicator
2. Transmit/Receive
Indicator
3. Keypad Lock Indicator
4. Scan Indicator
5. Battery Level Meter
6. Channel Indicator
Indicates that the battery is fully charged.
Blinks when battery is low; replace batteries
immediately.
1
2
3
4
5
6
Basic Radio Operations
Read this reference guide completely before attempting to
operate the unit.
Turning Your Radio On/Off
Press and hold the
MENU/
button to turn your radio ON/
OFF.
Adjusting the Volume
Adjust the volume by pressing the and buttons.
Adjusting the Sound (Key Beeps)
Your radio emits a beep each time one of the buttons is
pressed (except the PTT button).
Press and hold the button while turning the radio ON to
switch the sound OFF.
To turn this sound ON, turn the radio OFF and ON again
without pressing the
button.
Selecting a Channel
In order to speak to someone, both your radios must be set to
the same channel.
To select a channel:
1.
MENU/
button to enter Menu.
2. or to the required channel.
3. Press
PTT
button to confirm the selection.
Talking on Your Radio
1. Hold your radio 5–8 cm from your mouth.
2. Press and hold the
PTT
button while speaking. The
appears on the display.
3. Release the
PTT
button. You can now receive incoming
calls. When you do, the appears on the display. To
respond, repeat procedure from step 1.
Note: When you continue to transmit for 60 seconds, the
radio emits TX Time Out tone and the
icon
flashes. The radio will stop transmitting.
Navigating through the Menu
1. To enter the Menu, press the
MENU/
button.
2. Additional presses of the
MENU/
buttonwill advance you
through the Menu.
3. To exit the Menu function, do one of the following:
a. Press and hold the
MENU/
button.
b.Press the
PTT
button.
c.Wait 10 seconds until the unit automatically returns to
“Normal” mode.
Features on Your Radio
Call Tone
Your radio is equipped with a call tone.
To transmit a call tone, press the
/
button.
Channel Scan Mode
Enables your radio to scan for active channels. When activity
is detected, your radio lands (stays) on that channel (for 2
seconds). To transmit on that channel, press the
PTT
button.
When activity on the landed channel ends, your radio
continues scanning other channels.
To turn the channel scan ON:
1.
MENU/
to enter Menu. Advance until
blinks.
2.
/
to turn ON channel scan.
MENU/
or PTT to turn OFF Scan mode.
Key Lock
Press and hold
/ until appears to lock the keypad.
Press and hold
/ until disappears to unlock the
keypad.
Monitor Mode
Enables you to listen for weak signals on the current channel.
To turn the Monitor Mode ON:
1.
MENU/
button to enter menu.Advance through the menu
until
icon blinks.
2. Press the
/
button for continuous listening. The
icon continues to blink.
To turn the Monitor Mode OFF:
Press the
MENU/
button to return to “Normal” mode. The
icon stops blinking.
Roger Beep
Sounds to indicate the end of a
PTT
transmission. It can be
heard through the speaker when Key Beep is on. It cannot be
heard through the speaker if Key Beep is turned off.
Press and hold the button while turning the radio ON to
turn the Roger Beep ON. Repeat the step to turn Roger Beep
OFF.
Automatic Power Save
For better battery life, your radio is designed to switch to
Power Save mode when there has been no transmissions
after 3 seconds. The radio can receive transmissions in this
mode.
Specifications
Channels
8 PMR
Frequency
446.00625 — 446.09375 MHz
Power Source 3 AAA Alkaline Batteries
Range
Up to 4 km*
Battery Life
16 Hours (under typical use conditions)
*Range may vary depending on environmental and/or topographical
conditions.
Frequency Chart
Channel
Freq. (MHz)
Channel
Freq. (MHz)
1
446.00625
5
446.05625
2
446.01875
6
446.06875
3
446.03125
7
446.08125
4
446.04375
8
446.09375
Warranty Information
The authorized Motorola dealer or retailer where you
purchased your Motorola two-way radio and/or original
accessories will honour a warranty claim and/or provide
warranty service.
Please return your radio to your dealer or retailer to claim
your warranty service. Do not return your radio to Motorola.
In order to be eligible to receive warranty service, you must
present your receipt of purchase or a comparable substitute
proof of purchase bearing the date of purchase. The two-way
radio should also clearly display the serial number. The
warranty will not apply if the type or serial numbers on the
product have been altered, deleted, removed, or made
illegible.
What Is Not Covered By The Warranty
Defects or damage resulting from use of the Product in other
than its normal and customary manner or by not following the
instructions in this user manual.
Defects or damage from misuse, accident or neglect.
Defects of damage from improper testing, operation,
maintenance, adjustment, or any alteration or modification of
any kind.
Breakage or damage to aerials unless caused directly by
defects in material or workmanship.
Products disassembled or repaired in such a manner as to
adversely affect performance or prevent adequate inspection
and testing to verify any warranty claim.
Defects or damage due to range.
Defects or damage due to moisture, liquid or spills.
All plastic surfaces and all other externally exposed parts that
are scratched or damaged due to normal use.
Products rented on a temporary basis.
Periodic maintenance and repair or replacement of parts due
to normal usage, wear and tear.
Copyright Information
The Motorola products described in this manual may include
copyrighted Motorola computer programs stored in
semiconductor memories or other media. Laws in the United
States and other countries preserve for Motorola certain
exclusive rights for copyrighted computer programs including,
but not limited to, the exclusive right to copy or reproduce in
any form the copyrighted computer program. Accordingly,
any copyrighted Motorola computer programs contained in
the Motorola products described in this manual may not be
copied, reproduced, modified, reverse-engineered, or
distributed in any manner without the express written
permission of Motorola. Furthermore, the purchase of
Motorola products shall not be deemed to grant either directly
or by implication, estoppel, or otherwise, any license under
the copyrights, patents or patent applications of Motorola,
except for the normal non-exclusive license to use that arises
by operation of law in the sale of a product.
Notes
Notes
*68015000921*
68015000921-A(EN)
U01UT070ZZA
Printed in China
MOTOROLA, MOTO, MOTOROLA SOLUTIONS and the
Stylized M logo are trademarks or registered trademarks of
Motorola Trademark Holdings, LLC and are used under
license. All other trademarks are the property of their
respective owners.
© 2012 Motorola Solutions, Inc. All rights reserved.