Manuals Directory
Manualsdir.ru — Онлайн поиск инструкций и руководств
Инструкция по эксплуатации
-
Инструкции по эксплуатации
1

Yamaha RX-V371 инструкция по эксплуатации
(68 страниц)
- Языки:Русский
-
Тип:
PDF -
Размер:
5.71 MB -
Описание:
Ресивер
Просмотр
На NoDevice можно скачать инструкцию по эксплуатации для Yamaha RX-V371. Руководство пользователя необходимо для ознакомления с правилами установки и эксплуатации Yamaha RX-V371. Инструкции по использованию помогут правильно настроить Yamaha RX-V371, исправить ошибки и выявить неполадки.
- Manuals
- Brands
- Yamaha Manuals
- Receiver
- RX-V371 Series
Manuals and User Guides for Yamaha RX-V371 Series. We have 5 Yamaha RX-V371 Series manuals available for free PDF download: Service Manual, Owner’s Manual, Quick Reference Manual
Yamaha RX-V371 Series Service Manual (103 pages)
Brand: Yamaha
|
Category: Receiver
|
Size: 14.12 MB
Table of Contents
-
Table of Contents
1
-
Important Notice
1
-
To Service Personnel
2
-
About Lead Free Solder
2
-
Top View
3
-
Front View
3
-
-
Front Panels
3
-
RX-V371 (U, C Models)
5
-
Rear Panels
5
-
Remote Control Panels
10
-
Specifications
11
-
Sound Field Parameters
13
-
Select Menu
13
-
Set Menu Table
14
-
Safety Measures
16
-
-
Internal View
16
-
Service Precautions
16
-
Removal of Top Cover
17
-
Removal of Front Panel Unit
17
-
-
Disassembly Procedures
17
-
Removal of DIGITAL P.C.B.
18
-
Removal of OPERATION P.C.B.
18
-
When Checking the DIGITAL P.C.B.
19
-
When Checking the MAIN P.C.B.
19
-
Initializing the Back-Up IC (EEPROM: IC222 on DIGITAL P.C.B.)
20
-
Required Tools
20
-
Confirmation of Firmware Version and Checksum
20
-
-
Updating Firmware
20
-
Connection
21
-
Example of Connection between Digital OPTICAL Jacks
21
-
Example of Connection between Digital COAXIAL Jacks
21
-
Operation Procedures
22
-
-
Self-Diagnostic Function
23
-
Starting Self-Diagnostic Function
25
-
Starting Self-Diagnostic Function in the Protection Cancel Mode
25
-
Canceling Self-Diagnostic Function
25
-
Display Provided When Self-Diagnostic Function Started
26
-
When the Power Is Turned off Normally
26
-
When the Protection Function Worked to Turn off the Power
26
-
When the Protection Function Worked Due to Abnormal DC Output
27
-
Functions in Self-Diagnostic Function Mode
29
-
Operation Procedure of Main Menu and Sub-Menu
29
-
Sub-Menu Selection
29
-
Main Menu Selection
29
-
Details of Self-Diagnostic Function Menu
30
-
Bypass
30
-
Analog Bypass
30
-
Ram through
31
-
Ram Margin
31
-
Ram Full All
31
-
Ram Full Center
31
-
Ram Full Surround
32
-
Ram Full Surround Back
32
-
Hdmi Audio
33
-
Speaker Set
33
-
Input: Av5 Analog
34
-
Limiter Control
35
-
MIC Check
35
-
Fl/Monitor Check
36
-
Manual Test
37
-
A/D Data Check
37
-
Amp/Dk
38
-
DOCK Detection for AD Port
38
-
K1/K2
38
-
Video Check
39
-
I2C Check
39
-
No Menu
39
-
BT (Bluetooth Version)
40
-
Dock
40
-
Hdmi Information
41
-
Hdmi Select
41
-
If Status
42
-
Bus Check
42
-
Protection History
43
-
Soft Switch
44
-
Switch Mode
44
-
Model
44
-
Destination
44
-
Update Ti
45
-
Factory Preset
45
-
Rom Ver/Sum/Port
46
-
Grid Assignment
47
-
Pin Connection
47
-
-
Display Data
47
-
Anode Connection
48
-
IC Data
49
-
Ic241: D70Ye101Brfp266 (Digital P.C.b.)
52
-
Ic221: R5F364Amnfb (Digital P.C.b.)
56
-
Key Detection for A/D Port
60
-
Key Input (A/D) Pull-Up Resistance 10 K-Ohms
60
-
-
Block Diagram
61
-
Printed Circuit Boards
62
-
Digital
63
-
Operation
64
-
Main
72
-
Transistors
76
-
Ics
76
-
Diodes
76
-
-
Pin Connection Diagrams
76
-
Schematic Diagrams
77
-
Electrical Component Parts
86
-
Replacement Parts List
86
-
Overall Assembly
93
-
Remote Control
95
-
Key No. Layout
96
-
Key Code
96
-
Amp Mode
96
-
Displaying/Setting the Advanced Setup Menu
100
-
Setting the Impedance of Speakers
100
-
Initializing Various Settings for this Unit
100
-
-
Advanced Setup
100
Advertisement
Yamaha RX-V371 Series Owner’s Manual (88 pages)
Owners Manual
Brand: Yamaha
|
Category: Receiver
|
Size: 7.53 MB
Table of Contents
-
Table of Contents
2
-
Introduction
3
-
Features and Capabilities
3
-
About this Manual
4
-
Supplied Accessories
4
-
-
Part Names and Functions
5
-
Front Panel
5
-
Rear Panel
6
-
Front Panel Display
7
-
Remote Control
8
-
-
Connections
9
-
Connecting Speakers
9
-
Speaker Channels and Functions
9
-
Speaker Layout
10
-
Connecting Speakers
10
-
Changing Speaker Impedance
10
-
-
Connecting External Devices
13
-
Cable Plugs and Jacks
13
-
Connecting Tv/Hdmi Monitor
14
-
Connecting a TV Monitor
14
-
Connecting a Video Monitor
15
-
Connecting BD/DVD Players and Other Devices
16
-
Connecting Video Cameras and Portable Audio Players
20
-
Transmitting Input A/V to External Devices
20
-
-
Connecting the FM/AM Antennas
21
-
Setting up Speaker Parameters
22
-
STEP 1: Display the Setting Menu
22
-
STEP 2: Set the Speaker Status and Size
22
-
STEP 3: Set the Distance from the Listening Point
23
-
STEP 4: Playback a Test Tone
24
-
STEP 5: Adjust the Volume
24
-
-
Playback
25
-
Basic Playback Procedure
25
-
Adjusting High/Low-Frequency Sound (Tone Control)
25
-
-
Changing Input Settings with a Single Key (SCENE Function)
26
-
Registering Input Sources/Sound Field Program
26
-
-
Enjoying Sound Field Programs
26
-
Selecting Sound Field Programs and Sound Decoders
26
-
Sound Field Programs
28
-
-
FM/AM Tuning
30
-
Selecting a Frequency for Reception (Normal Tuning)
30
-
Registering and Recalling a Frequency (Preset Tuning)
31
-
Clearing Preset Stations
32
-
Video out
33
-
-
Playing Back Tunes from Your Ipod™/Iphone
34
-
Connecting the Yamaha Ipod Universal Dock
34
-
Controlling an Ipod/Iphone
34
-
-
Playing Back Tunes from Bluetooth™ Components
36
-
Connecting a Yamaha Bluetooth Wireless Audio Receiver
36
-
Pairing Bluetooth™ Components
36
-
Using Bluetooth™ Components
37
-
-
Setup
38
-
Configuring the Settings Specific for each Input Source (Option Menu)
38
-
Option Menu Display and Setup
38
-
Option Menu Items
38
-
Video and Audio
39
-
-
Setting Various Functions (Setup Menu)
41
-
Setup Menu Display and Settings
41
-
Setup Menu Items
41
-
Manages Settings for Speakers
42
-
Setting the Audio Output Function of this Unit
45
-
Setting HDMI Functions
46
-
Making the Receiver Easier to Use
48
-
Setting Sound Field Program Parameters
49
-
Prohibiting Setting Changes
49
-
-
Setting Sound Field Program Parameters
50
-
Setting Sound Field Parameters
50
-
Parameters Usable in Surround Decoder
51
-
-
Controlling Other Components with the Remote Control
52
-
Keys Connecting External Components
52
-
Default Remote Control Code Settings
52
-
Registering Remote Control Codes for External Component Operations
53
-
Resetting All Remote Control Codes
54
-
-
Extended Functionality that Can be Configured as Needed (Advanced Setup Menu)
55
-
Displaying/Setting the Advanced Setup Menu
55
-
Setting the Impedance of Speakers
55
-
Avoiding Crossing Remote Control Signals When Using Multiple Yamaha Receivers
56
-
Initializing Various Settings for this Unit
56
-
-
Using the HDMI Control Function
57
-
Appendix
60
-
Troubleshooting
60
-
General
60
-
Hdmi
63
-
Tuner (FM/AM)
63
-
Remote Control
64
-
Ipod™/Iphone
65
-
Bluetooth
65
-
-
Glossary
66
-
Audio Information
66
-
Sound Field Program Information
67
-
Video Information
67
-
-
Information on HDMI
68
-
About Trademarks
68
-
Specifications
69
-
Index
70
-
Quick Reference Guide
73
-
Preparing the Remote Control
73
-
External Components
73
-
Connecting the Subwoofer
75
-
Speaker Setup
78
-
Operation Guide
80
-
Yamaha RX-V371 Series Owner’s Manual (68 pages)
Owners Manual
Brand: Yamaha
|
Category: Receiver
|
Size: 5.67 MB
Table of Contents
-
Table of Contents
2
-
Introduction
3
-
Features and Capabilities
3
-
About this Manual
4
-
Supplied Accessories
4
-
-
Part Names and Functions
5
-
Front Panel
5
-
Rear Panel
6
-
Front Panel Display
7
-
Remote Control
8
-
-
Connections
9
-
Connecting Speakers
9
-
Speaker Channels and Functions
9
-
Speaker Layout
10
-
Connecting Speakers
10
-
Connecting Speakers
11
-
-
Connecting External Devices
12
-
Cable Plugs and Jacks
12
-
Connecting a TV Monitor
13
-
TV Connection
14
-
Connecting BD/DVD Players and Other Devices
15
-
Connecting Video Cameras and Portable Audio Players
19
-
Transmitting Input A/V to External Devices
19
-
-
Connecting the FM/AM Antennas
20
-
Set up the Speaker Parameters Automatically (YPAO)
21
-
Message List
24
-
Error Message
24
-
-
Playback
25
-
Basic Playback Procedure
25
-
Adjusting High/Low-Frequency Sound (Tone Control)
25
-
-
Changing Input Settings with a Single Key (SCENE Function)
26
-
Registering Input Sources/Sound Field Program
26
-
-
Enjoying Sound Field Programs
26
-
Selecting Sound Field Programs and Sound Decoders
26
-
Stereo Playback
27
-
Sound Field Programs
28
-
-
FM/AM Tuning
30
-
Selecting a Frequency for Reception (Normal Tuning)
30
-
Registering and Recalling a Frequency (Preset Tuning)
31
-
Auto Preset
31
-
Clearing Preset Stations
32
-
Radio Data System Tuning
32
-
Automatic Traffic Information Reception
33
-
Video out
34
-
-
-
Playing Back Tunes from Your Ipod™/Iphone
35
-
Connecting the Yamaha Ipod Universal Dock
35
-
Controlling an Ipod/Iphone
35
-
-
Playing Back Tunes from Bluetooth™ Components
37
-
Connecting a Yamaha Bluetooth Wireless Audio Receiver
37
-
Pairing Bluetooth™ Components
37
-
Using Bluetooth™ Components
38
-
-
Setup
39
-
Configuring the Settings Specific for each Input Source (Option Menu)
39
-
Option Menu Display and Setup
39
-
Option Menu Items
39
-
Adjusting Volume between Input Sources <Volume Trim
40
-
-
Setting Various Functions (Setup Menu)
42
-
Setup Menu Display and Settings
42
-
Setup Menu Items
42
-
Manages Settings for Speakers
43
-
Setting the Audio Output Function of this Unit
46
-
Setting HDMI Functions
47
-
Making the Receiver Easier to Use
49
-
Setting Sound Field Program Parameters
50
-
Prohibiting Setting Changes
50
-
-
Setting Sound Field Program Parameters
51
-
Setting Sound Field Parameters
51
-
Parameters Usable in Surround Decoder
52
-
-
Extended Functionality that Can be Configured as Needed (Advanced Setup Menu)
53
-
Displaying/Setting the Advanced Setup Menu
53
-
Avoiding Crossing Remote Control Signals When Using Multiple Yamaha Receivers
53
-
Initializing Various Settings for this Unit
53
-
-
Using the HDMI Control Function
54
-
Appendix
57
-
Troubleshooting
57
-
General
57
-
Hdmi
60
-
Tuner (FM/AM)
60
-
Remote Control
61
-
Ipod™/Iphone
62
-
Bluetooth
62
-
-
Glossary
63
-
Audio Information
63
-
Sound Field Program Information
64
-
Video Information
64
-
-
Information on HDMI
65
-
About Trademarks
65
-
Specifications
66
-
Index
67
Advertisement
Yamaha RX-V371 Series Quick Reference Manual (9 pages)
Quick Reference Guide
Brand: Yamaha
|
Category: Receiver
|
Size: 1.03 MB
Table of Contents
-
Preparing the Remote Control
1
-
Connect the Speakers
3
-
Listening to TV Audio
4
-
Connect a Tv
4
-
Connect AC Power Cord, Turn Power on
5
-
Set Distance from Listening Point
6
-
Set up Speaker Parameters
6
-
Speaker Setup
6
-
Adjust Volume
7
-
Playback Test Tone
7
-
Operation Guide
8
Yamaha RX-V371 Series Quick Reference Manual (9 pages)
Quick Reference Guide
Brand: Yamaha
|
Category: Receiver
|
Size: 1.04 MB
Table of Contents
-
Preparing the Remote Control
1
-
Connect the Speakers
3
-
Connecting the Subwoofer
3
-
Listening to Tv Audio
4
-
Connect a Tv
4
-
Connect AC Power Cord, Turn Power on
5
-
Set up the Speaker Parameters Automatically (YPAO)
6
-
Operation Guide
8
Advertisement
Related Products
-
Yamaha RX-V371BL
-
Yamaha RX-V373BL
-
YAMAHA RX-V373
-
Yamaha RX-V375U
-
Yamaha RX-V375K
-
Yamaha RX-V375F
-
Yamaha RX-V375T
-
Yamaha RX-V375A
-
Yamaha RX-V375H
-
Yamaha RX-V375G
Yamaha Categories
Motorcycle
Musical Instrument
Electronic Keyboard
Receiver
Amplifier
More Yamaha Manuals

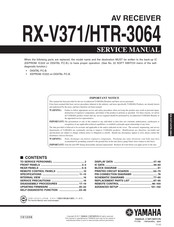
Инструкция по эксплуатации
АВ ресивер Русский для Европы

СОДЕРЖАНИЕ
Изменение установок входного сигнала с помощью
Установка функций HDMI………….………………….… 47
ВВЕДЕНИЕ
одной клавиши (функция SCENE)……….……………… 26
Настройка ресивера в режим,
Функции и возможности ……………………………..………….3
Сохранение источников входного сигнала/
более удобный для пользования……………………….. 49
О данном руководстве………….…………………..………….4
программы звукового поля…………………….…………. 26
Установка параметров программы
Поставляемые принадлежности………………………….4
звукового поля ……………..……………..………………….… 50
Использование программ звукового поля……..……. 26
Запрет на изменение установок ……………………….. 50
Названия компонентов и их функции…………………….5
Выбор программ звукового поля
Установка параметров программы
Передняя панель…………………..……………..……………….5
и звуковых декодеров …………………………….…………. 26
звукового поля………………………………..………………….… 51
Задняя панель………..…………………..……………..………….6
Программы звукового поля…….…………………..……. 28
Установка параметров звукового поля ……..…….. 51
Дисплей передней панели..………………….……………....7
Настройка FM/AM-приема ………..……………..…………. 30
Пульт ДУ……………….……………..…………………..………….8
Выбор частоты для приема
Настройка расширенных функций по мере
(Нормальная установка) ……………………………..……. 30
надобности (меню Advanced Setup)…………………….. 53
ПОДКЛЮЧЕНИЯ
Сохранение и вызов частоты (Предустановка) ….. 31
Отображение/установка меню Advanced Setup.…. 53
Очистка предустановленных станций………………. 32
Предотвращение перекрытия сигналов ДУ при
Подключение колонок …………………………………………... 9
Настройка системы радиоданных ………….…………. 32
использовании нескольких ресиверов Yamaha……. 53
Каналы и функции колонок …………..…………………...9
Инициализация различных установок для
Воспроизведение мелодий с iPod™/iPhone™………. 35
Расположение колонок ………..…………………..………..10
данного аппарата …………………………………..………….. 53
Подключение универсальной док-станции
Подключение колонок ……………..………………….……10
Yamaha для iPod…………………..………………….…………. 35
Использование функции управления HDMI ..…….. 54
Подключение внешних устройств …….………………….12
Управление iPod/iPhone ……………….…………………... 35
Штекеры кабелей и гнезда …………….…………….……12
ПРИЛОЖЕНИЕ
Воспроизведение мелодий с компонентов
Подключение ТВ-монитора ..…………………..………..13
Bluetooth™……………………………..………………….…………. 37
Подключение BD/DVD-проигрывателей
Поиск и устранение неисправностей …………………… 57
Подключение беспроводного Bluetooth-
и других устройств …………..………………….……………..15
Неисправности общего характера………..………….. 57
приемника аудиосигнала Yamaha ……………………... 37
Подключение видеокамер и портативных
HDMI™………….……………..………………….……………….. 60
Спаривание компонентов Bluetooth™ ………..……. 37
аудиоплееров…….………………….…………………..………..19
Тюнер (FM/AM)……………………..……………..………….. 60
Передача входного аудио/видеосигнала на
Использование компонентов Bluetooth™………... 38
Пульт ДУ….…………………..………………….……………..… 61
внешние устройства……………..……………..……………..19
iPod™/iPhone™……………..………………….……………….. 62
УСТАНОВКА
Подключение FM/AM-антенн ……..………………….……20
Bluetooth™ .…………………..………………….……………….. 62
Автоматическая установка параметров колонок
Глоссарий ………….………………….……………..……………….. 63
Настройка установок, относящихся к каждому
(YPAO)…………………………..…………………..………………….21
источнику входного сигнала (меню Option)………… 39
Информация об аудиосигнале ………………………….. 63
Отображение и установка меню Option…………... 39
Информация о программах звукового поля…….. 64
ВОСПРОИЗВЕДЕНИЕ
Пункты меню Option …….…………………..……………... 39
Информация о видеосигналах .…………………..…….. 64
Установка различных функций (меню Setup) …….. 42
Информация о HDMI™ ………………………………..…….. 65
Основная процедура воспроизведения …………………25
Отображение и установка меню Setup …………….. 42
Регулировка звука высокой/низкой частоты
О товарных знаках……………….…………………..………….. 65
(контроль тональности)…………….………………….……25
Пункты меню Setup……….……………..…………………... 42
Технические характеристики……………………………….. 66
Управление установками для колонок ……….……. 43
Индекс .………………….…………………..……………..………….. 67
Настройка функции вывода аудиосигнала
данного аппарата………………………………..……………… 46
Ru 2

ВВЕДЕНИЕ
Функции и возможности
■ Встроенный высококачественный 5-канальный усилитель высокой
■ FM/AM-тюнер
мощности
– Прослушивание FM/AM-трансляции…………..………….………..………….…………..…………..…………...30
– Простая предустановка……….…………..…………..………….…………..…………..……….…………..…………...31
■ Переключение входа/программы звукового поля с помощью 1-й кнопки
– Настройка системы радиоданных…………………..…………..………….…………..…………..………….……...32
(функция SCENE) ……………………………………………………………………………………….26
– Автоматический прием информации о дорожном движении ……..…………..…………..……….…..33
■ Подключение колонок для конфигураций, предусматривающих
■ Воспроизведение многоканального, многоформатного сигнала
от 2 до 5.1 каналов
– Выбор эффекта звукового поля……..…………..………….…………..…………..……….…………..……………26
– Каналы и функции колонок…………..………….…………..…………..………….…………..……….…………..……9
– Воспроизведение без использования эффектов звукового поля ……………….………..…………...27
– Расположение колонок ………..…………..…………..………….…………..…………..………….………..…………..10
– Стереофоническое воспроизведение…………..………….…………..…………..………….………..…………...27
– Подключение кабеля колонки ………………………..……….…………..…………..………….…………..………..10
– Настройка эффектов звукового поля………….……….…………..………….…………..…………..…………...51
– Подключение кабеля сабвуфера .…………..…………..……….………….…………..…………..………….……..11
– Воспроизведение сжатых музыкальных файлов ……………..………….………..………….…………..…..26
■ Регулировка акустических параметров в зависимости от используемых
■ Отображение информации на передней панели
колонок и среды для прослушивания
– Переключение информации на дисплее передней панели…….………..………….…………..…………..7
– Автоматические настройки для акустических параметров колонок
– Регулировка яркости дисплея передней панели <Dimmer>..…………..………….…………..…………50
(YPAO — Yamaha Parametric Room Acoustic Optimizer).………….…………..……….…………..………..21
– Отображение информации о цифровом видео/аудиосигнале <Signal Info> ………..……….…..40
– Выбор настроек для каждой колонки……….…………..…………..………….…………..…………..…………..43
– Регулировка громкости для каждой колонки …….……….………….…………..…………..………….……..44
■ Функции регулировки громкости/качества звука
– Установки расстояния до колонки ……..…………..…………..………….………..………….…………..………..44
– Облегчение прослушивания при низкой громкости <Adaptive DRC> ………….……….…………46
– Управление качеством звука с помощью эквалайзера <Graphic Equalizer>…….…………..….45
– Установки максимальной громкости……….…………..…………..………….………..………….…………..…..47
– Регулировка колонок с помощью тестовых тональных сигналов…………………..………….……..45
– Установки начальной громкости….………….…………..……….…………..…………..………….………….......47
– Настройка уровня басов и высоких частот <контроль тональности> ……..…………..…………..25
– Регулировка громкости различных источников входного сигнала <Volume Trim> ………….40
■ Подключение внешних устройств и воспроизведение с них
■ Управление с помощью пульта ДУ
– Кабели и входные/выходные гнезда данного аппарата ……………..………….…………..……….……..12
– Названия и функции элементов пульта ДУ………….……….…………..…………..………….…………..…….8
– Подключение телевизора………..………….…………..…………..……….…………..………….…………..………..13
– Установка батареек в пульт ДУ……………………..….………….……….…………..…………..………….………..4
– Воспроизведение аудиосигнала телевизора через данный ресивер…………………..…………..….14
– Управление несколькими ресиверами Yamaha без помех для сигналов
– Подключения для BD/DVD-проигрывателей (рекордеров) и других устройств…………..….15
<Переключение идентификационного кода ДУ>………………….…………..…………..………….………53
– Вывод аудиосигнала на телевизор, подключенный через гнездо HDMI ………….…………..….48
■ Другие функции
– Коррекция задержки между аудио и видеосигналом <Lipsync> ..………….…………..…………..….46
– Режим ожидания после длительного перерыва в работе <функция Auto Power Down>.…50
– Подключение внешнего аудио и видеомагнитофона….………….………..………….…………..………..19
– Режим ожидания после заданного интервала времени <Sleep timer> .…………..………….………..8
– Объединение видеовхода HDMI/AV с другим аудиовходом ….……………..…………..……………...40
– Для выполнения зарядки iPod/iPhone, когда данный аппарат находится в режиме
– Подключения внешних устройств к передней панели (для видеокамер, портативных
ожидания <зарядка iPod в режиме ожидания > …………………..…………..………….…………..…………36
музыкальных плееров и т.п.)………….………….………..………….…………..………….…………..…………..….19
– Инициализация различных установок для данного аппарата …………………….…………..…………53
– Защитная крышка для гнезд передней панели……..…………..………….……….…………..…………..……4
– Запрет на изменение установки <Memory Guard>…….………….…………..…………..……….…………50
– Изменение названий источников входного сигнала <Input Rename> …..…………..…………..….49
– Настройка установок, относящихся к каждому источнику входного сигнала
(меню <Option>)……………..……….………….…………..…………..………….…………..…………..……….………..39
– Воспроизведение с внешних устройств …….…………..…………..………….…………..…………..…………..25
– Воспроизведение с iPod/iPhone (iPod/iPhone и продаваемых отдельно компонентов)……..35
– Воспроизведение с компонента Bluetooth (Bluetooth и продаваемых
отдельно компонентов)………..…………..…………..………….…………..……….…………..…………....…………37
Ru 3
ВВЕДЕНИЕ
Функции и возможности
О данном руководстве
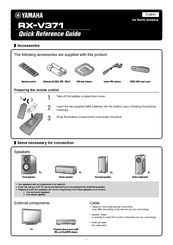
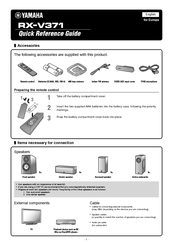
■ Установка крышки входа VIDEO AUX
■ Установка батареек в пульт ДУ
(прилагается)
При установке батареек в пульт ДУ снимите крышку
Для защиты от пыли установите поставляемую
отделения для батареек с обратной стороны пульта
• Данное руководство отпечатано до начала производства.
крышку входа VIDEO AUX на гнезда VIDEO AUX,
ДУ и вставьте две батарейки AAA в отделение для
Дизайн и технические характеристики могут частично
если они не используются. Для снятия крышки
батареек таким образом, чтобы они совпадали
измениться в результате усовершенствования и т.д.
нажмите на ее левую сторону.
с обозначениями полярности (+ и -).
В случае расхождений между руководством и аппаратом,
приоритет отдается аппарату.
• “
cHDMI1” (пример) используется для обозначения
a
c
Крышка отсека для
названий элементов на пульте ДУ. Информация
батареек
о расположении элементов приведена в разделе
“Пульт ДУ” (☞
c. 8).
•
J1 указывает на то, что справка размещена в сноске.
b
См. соответствующие номера внизу страницы.
• ☞
используется для обозначения страницы, на которой
приведена относящаяся к данному пункту информация.
Отсек для батареек
• Нажмите на значок “ ” внизу страницы для
Установка крышки
отображения соответствующей страницы в разделе
Замените батарейки новыми при возникновении
“Названия компонентов и их функции.”
следующих симптомов:
Передняя панель
• Пульт ДУ работает только в узком диапазоне.
Задняя панель
•
bTRANSMIT не загорается или горит очень тускло.
Дисплей передней панели
Пульт ДУ
ПРИМЕЧАНИЕ
PUSH
Если для пульта ДУ сохранены коды ДУ для внешних
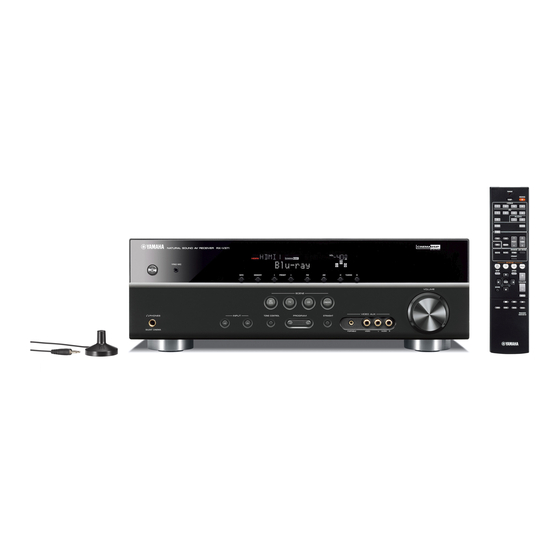
Поставляемые принадлежности
компонентов, извлечение батареек более чем на две
минуты или оставление в пульте ДУ разряженных
Убедитесь в наличии всех перечисленных ниже деталей.
батареек может привести к очистке кодов ДУ. Если это
Снятие крышки
• Пульт ДУ
произойдет, замените батарейки новыми и установите
• Батарейки (AAA, R03, UM-4) x 2
коды ДУ.
• Микрофон YPAO
• Рамочная AM-антенна
• Комнатная FM-антенна
• Крышка входа VIDEO AUX
Ru 4
ВВЕДЕНИЕ
Названия компонентов и их функции
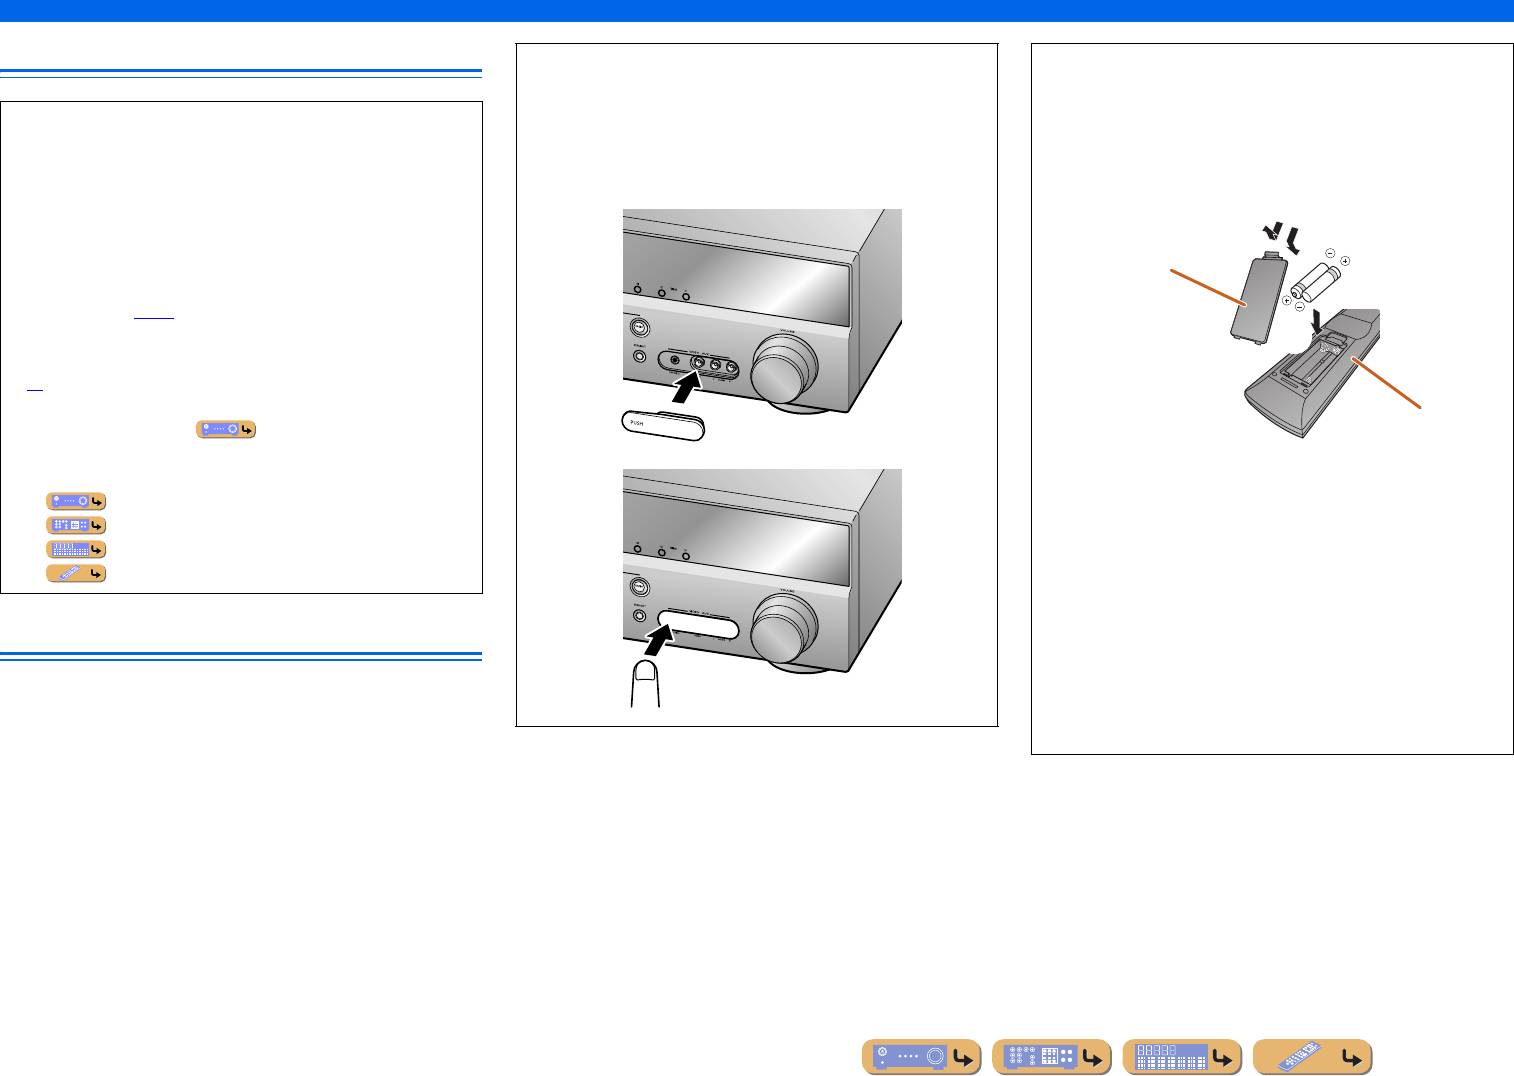
g AM
m TONE CONTROL
Передняя панель
Установка диапазона FM/AM-тюнера в положение AM
Регулировка выходной мощности высоких/низких частот
(☞
c. 30). J1
колонок/наушников (☞
c. 25).
a A (Питание)
h TUNING jj / ii
n PROGRAM l / h
Переключение данного аппарата между режимами
Изменение частот FM/AM-тюнера (☞
c. 30). J1
Переключение между используемыми эффектами
включения и ожидания.
i Дисплей передней панели
звукового поля (программами звукового поля) и декодерами
b Гнездо YPAO MIC
Отображение информации на данном устройстве (☞
c. 7).
окружающего звучания (☞
c. 26). Нажимайте повторно
j Гнездо PHONES
левую или правую кнопку для циклического
Подключите поставляемый микрофон YPAO и
последовательного переключения между источниками
автоматически отрегулируйте баланс колонок (☞
c. 21).
Подключение наушников. Звуковые эффекты,
c INFO
применяемые во время воспроизведения, также будут
входного сигнала.
o STRAIGHT
Изменение информации, отображаемой на дисплее передней
слышны через наушники.
k INPUT l / h
Переключение программы звукового поля в режим прямого
панели (☞
c. 7).
Выбор источника входного сигнала для воспроизведения.
декодирования (☞
c. 27).
d MEMORY
Нажимайте повторно левую или правую кнопку для
p Гнезда VIDEO AUX
Сохранение FM/AM-станций в качестве предустановленных
циклического последовательного переключения между
Для временного подключения к данному аппарату
станций (☞
c. 31). J1
источниками входного сигнала.
видеокамер, игровых приставок и портативных
e PRESET j / i
l SCENE
музыкальных плееров.
Выбор предустановленной FM/AM-станции (☞
c. 32). J1
Переключение источника входного сигнала и программы
Установите поставляемую крышку входа VIDEO AUX,
f FM
звукового поля с помощью одной кнопки (☞
c. 26). Для
когда это гнездо не используется.
Установка диапазона FM/AM-тюнера в положение FM
включения данного аппарата нажмите эту кнопку, когда
q VOLUME
(☞
c. 30). J1
аппарат находится в режиме ожидания.
Регулировка уровня громкости.
a
b
c fe gd h
i
YPAO MIC
INFO
MEMORY
PRESET
FM AM
TUNING
VOLUME
SCENE
BD
DVD
TV
CD
RADIO
PHONES
INPUT
TONE
CONTROL
PROGRAM
STRAIGHT
VIDEO
AUX
SILENT
CINEMA
PORTABLE
VIDEO
LR
AUDI O
lj q
m ok n
p
J
1 : Используется в случае выбора входного сигнала тюнера.
Ru 5
ВВЕДЕНИЕ
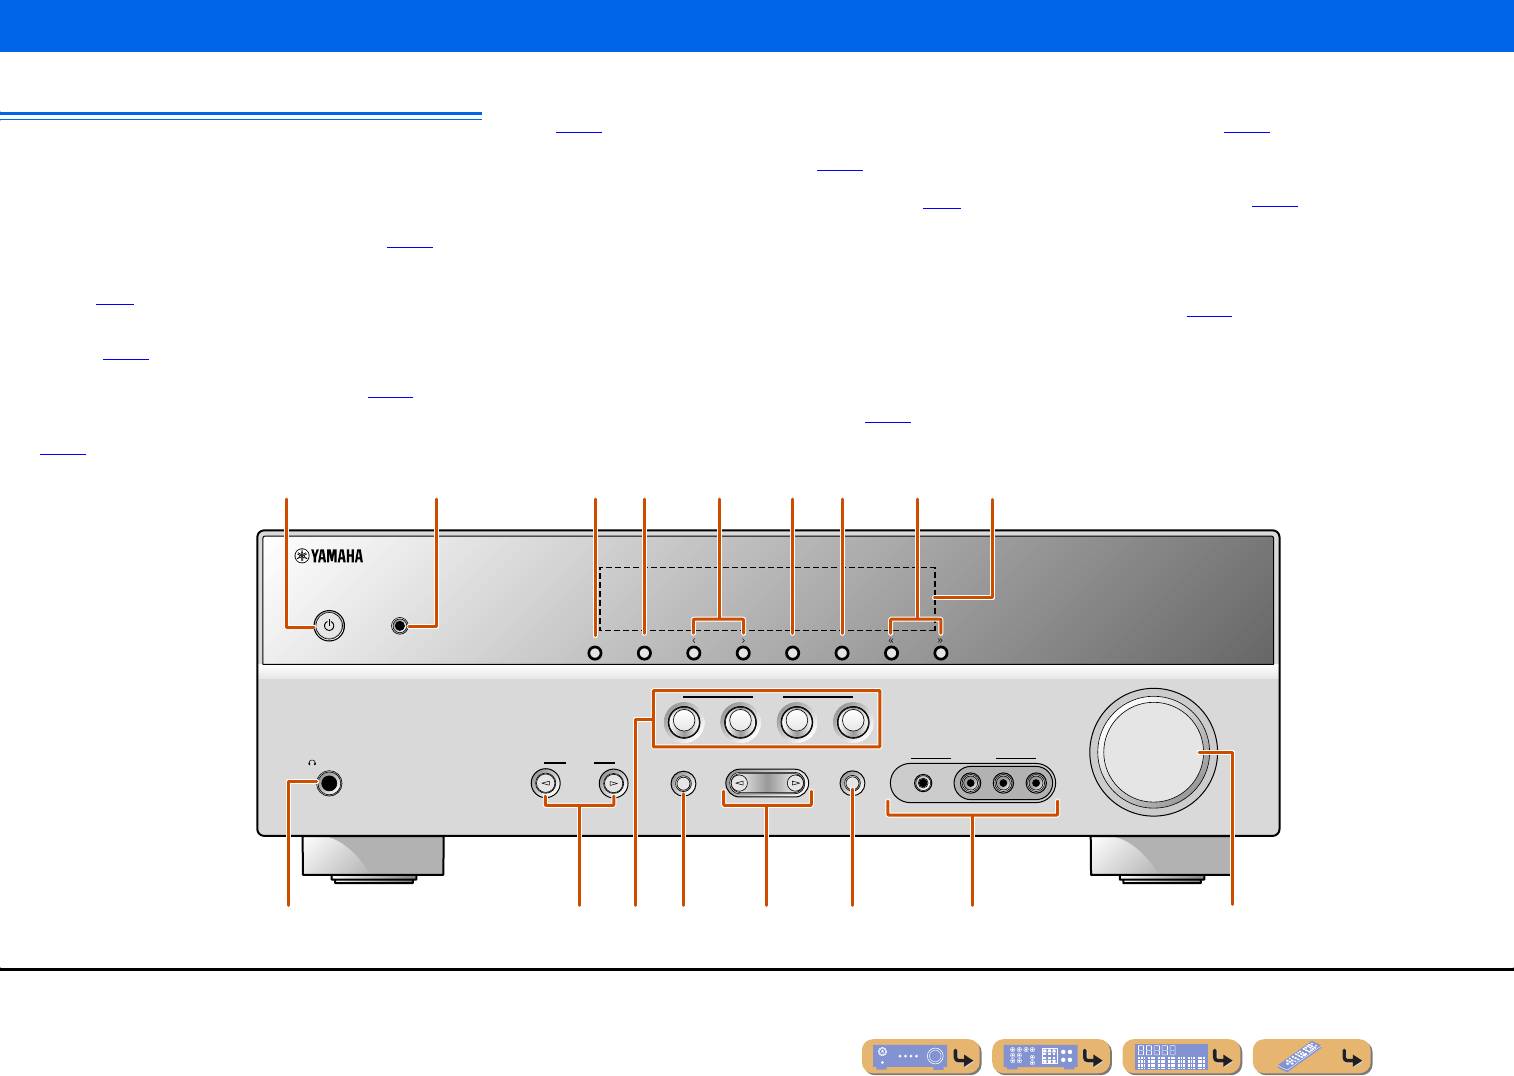
Названия компонентов и их функции
e Гнезда COMPONENT VIDEO
i Гнездо MONITOR OUT
Задняя панель
Для подключения телевизоров, совместимых
Для подключения телевизора, способного принимать
с компонентными видеосигналами, для вывода
видеосигнал, и вывода на него видеосигналов (☞
c. 14).
a Гнездо DOCK
видеосигнала с помощью трех кабелей (☞
c. 13).
j Гнезда AUDIO OUT
Для подключения дополнительной универсальной док-
f Гнезда AV1-5
Для вывода аудиосигналов, полученных в случае выбора
станции Yamaha для iPod (например, YDS-12) (☞
c. 35) или
Для подключения к внешним устройствам, оснащенным
таких аналоговых входов, как гнезда AV5 или AUDIO1-2
беспроводного Bluetooth-приемника аудиосигнала (YBA-10)
аудио/видеовыходами, чтобы этот аппарат мог принимать
(☞
c. 19).
(☞
c. 37).
аудио/видеосигналы (☞
c. 16, c. 17).
k Гнездо SUBWOOFER
b Гнездо HDMI OUT
g Гнезда AV OUT
Для подключения сабвуфера со встроенным усилителем
Для подключения HDMI-совместимого телевизора для
Для вывода аудио/видеосигналов, полученных в случае
(☞
c. 11).
вывода на него аудио/видеосигналов (☞
c. 13).
выбора аналоговых входов (AV3-5 или AUDIO1-2) (☞
c. 19).
l Разъемы SPEAKER
c Гнезда HDMI1-4
h Гнезда AUDIO1-2
Для подключения фронтальных колонок, центральной
Для подключения внешних компонентов, оснащенных
Для подключения к внешним компонентам, оснащенным
колонки и колонок окружающего звучания (☞
c. 11).
HDMI-совместимыми выходами для приема от них аудио/
аналоговыми аудиовыходами, для подачи звука на данный
m Шнур питания
видеосигналов (☞
c. 15).
аппарат (☞
c. 18).
Для подключения данного аппарата к настенной розетке
d Гнезда ANTENNA
переменного тока.
Для подключения AM и FM-антенн (☞
c. 20).
HDMI
OUT
(
BD/DVD
)
ANTENNA
HDMI 1
HDMI 2 HDMI 3
HDMI 4
FM
GND
AM
COMPONENT
VIDEO
P
R
P
R
P
B
P
B
FRONT
SURROUND
CENTER
Y
Y
MONITOR OUT
COMPONENT
VIDEO
MONITOR OUT
VIDEO
HDMI
OUT
COMPONENT
VIDEO
P
R
P
B
MONITOR OUT
Y
MONITOR OUT
OPTICAL
COAXIAL
COAXIAL
OPTICAL
(
CD
)
TV
(
)
AV
AV 1
AV 2
AV 3
AV 4
OUT
AUDIO
AV 5
AUDIO 1
OUT
SUBWOOFER
AUDIO 2
OUT
AV
SUBWOOFER
Ru 6
ANTENNA
FM
G
ND
C
OMPONENT
VIDEO
P
R
P
B
Y
O
PTI
C
A
L
(
TV
)
AV 1
AV 2
AV 3
AV 4
AV 5
AUDIO 1
AUDIO 2
CO
AXIA
L
(
CD
)
CO
AXIA
L
O
PTI
C
VIDE
AL
O
SURRO
U
H
DMI 1
(
BD
/
DVD
)
H
DMI
2
H
DMI
3
HDMI 4
DOC
ac
b
d
Выбор входных и выходных гнезд
Область вокруг выходных аудио/видеогнезд
обозначена белым цветом, чтобы
ARC
предотвратить ошибочное подключение.
DOCK
Используйте эти гнезда для вывода аудио/
видеосигналов на телевизор или другие
внешние компоненты.
Выходные гнезда
SPEAKERS
ARC
K
e i
fg khj l
m
ВВЕДЕНИЕ
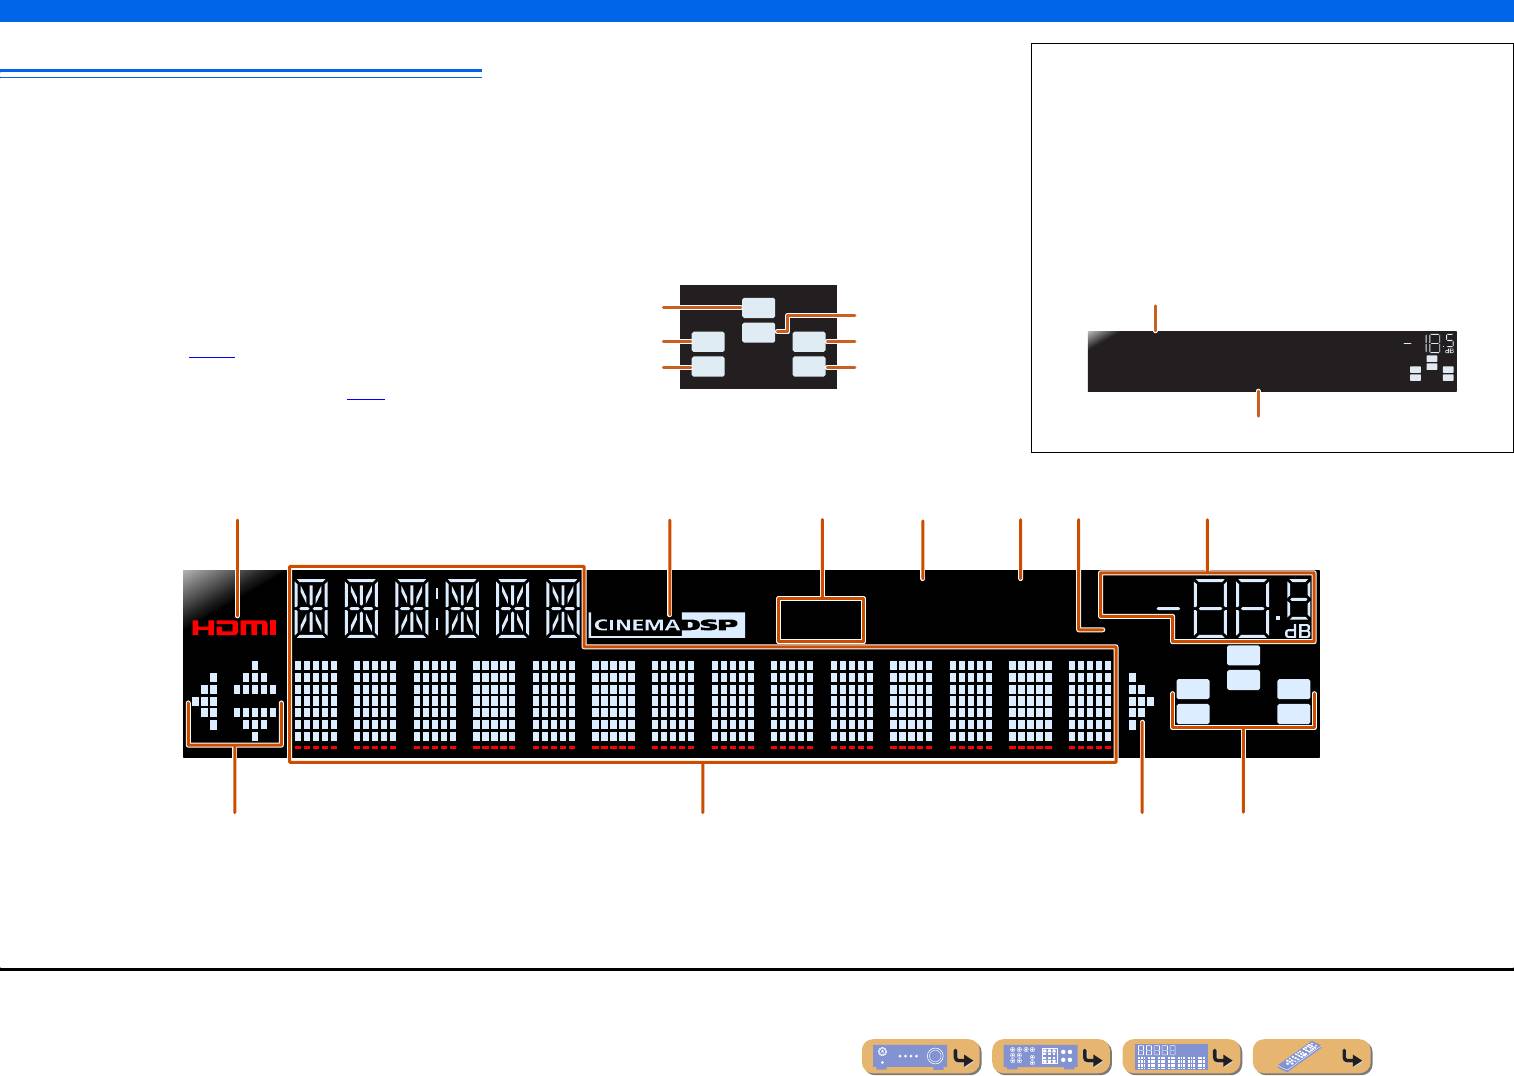
Названия компонентов и их функции
g Индикатор VOLUME
Дисплей передней панели
Используется для отображения текущего уровня громкости.
■ Переключение дисплея на передней панели
h Индикаторы курсора
На передней панели могут отображаться программы
a Индикатор HDMI
Загораются, если соответствующие курсоры на пульте ДУ
звукового поля и названия декодеров окружающего
Загораются при вводе сигналов HDMI на выбранном
доступны для управления.
звучания, а также активный источник входного
источнике входного сигнала HDMI.
i Многофункциональный информационный дисплей
сигнала.
b Индикатор CINEMA DSP
Используется для отображения различной информации
Загорается в случае выбора эффекта звукового поля,
Нажимайте повторно кнопку eINFO для циклического
о пунктах меню и установках.
использующего технологию CINEMA DSP.
j Индикаторы колонок
последовательного переключения между источником
c Индикатор тюнера
Используются для обозначения разъемов колонок,
входного сигнала → программой звукового поля →
Загорается во время приема FM/AM-трансляции.
через которые выводятся сигналы.
декодером окружающего звучания.
J1
d Индикатор вывода через iPod CHARGE
Загорается при подключении iPod/iPhone через
Название источника входных сигналов
дополнительную универсальную док-станцию Yamaha iPod
Сабвуфер
SW
Центральная
колонка
(например, YDS-12), когда активна функция зарядки iPod
Фронтальная
C
Фронтальная
VOL.
в режиме ожидания (☞
c. 36).
левая колонка
LR
правая колонка
HDMI1
SW
Левая колонка
e Индикатор SLEEP
SL SR
Правая колонка
L
C
R
окружающего
окружающего
SL SR
STRAIGHT
Загорается при включенном таймере сна (☞
c. 8).
звучания
звучания
f Индикатор MUTE
Программа звукового поля (программа DSP)
Мигает во время приглушения аудиосигнала.
abcedgf
iPod
CHARGE
SLEEP
VOL.
STEREO
TUNED
MUTE
SW
C
LR
SL SR
hi jh
J
1 : Во время выбора входа тюнера вместо источника входного сигнала будет отображаться FM/AM-частота.
Ru 7
ВВЕДЕНИЕ
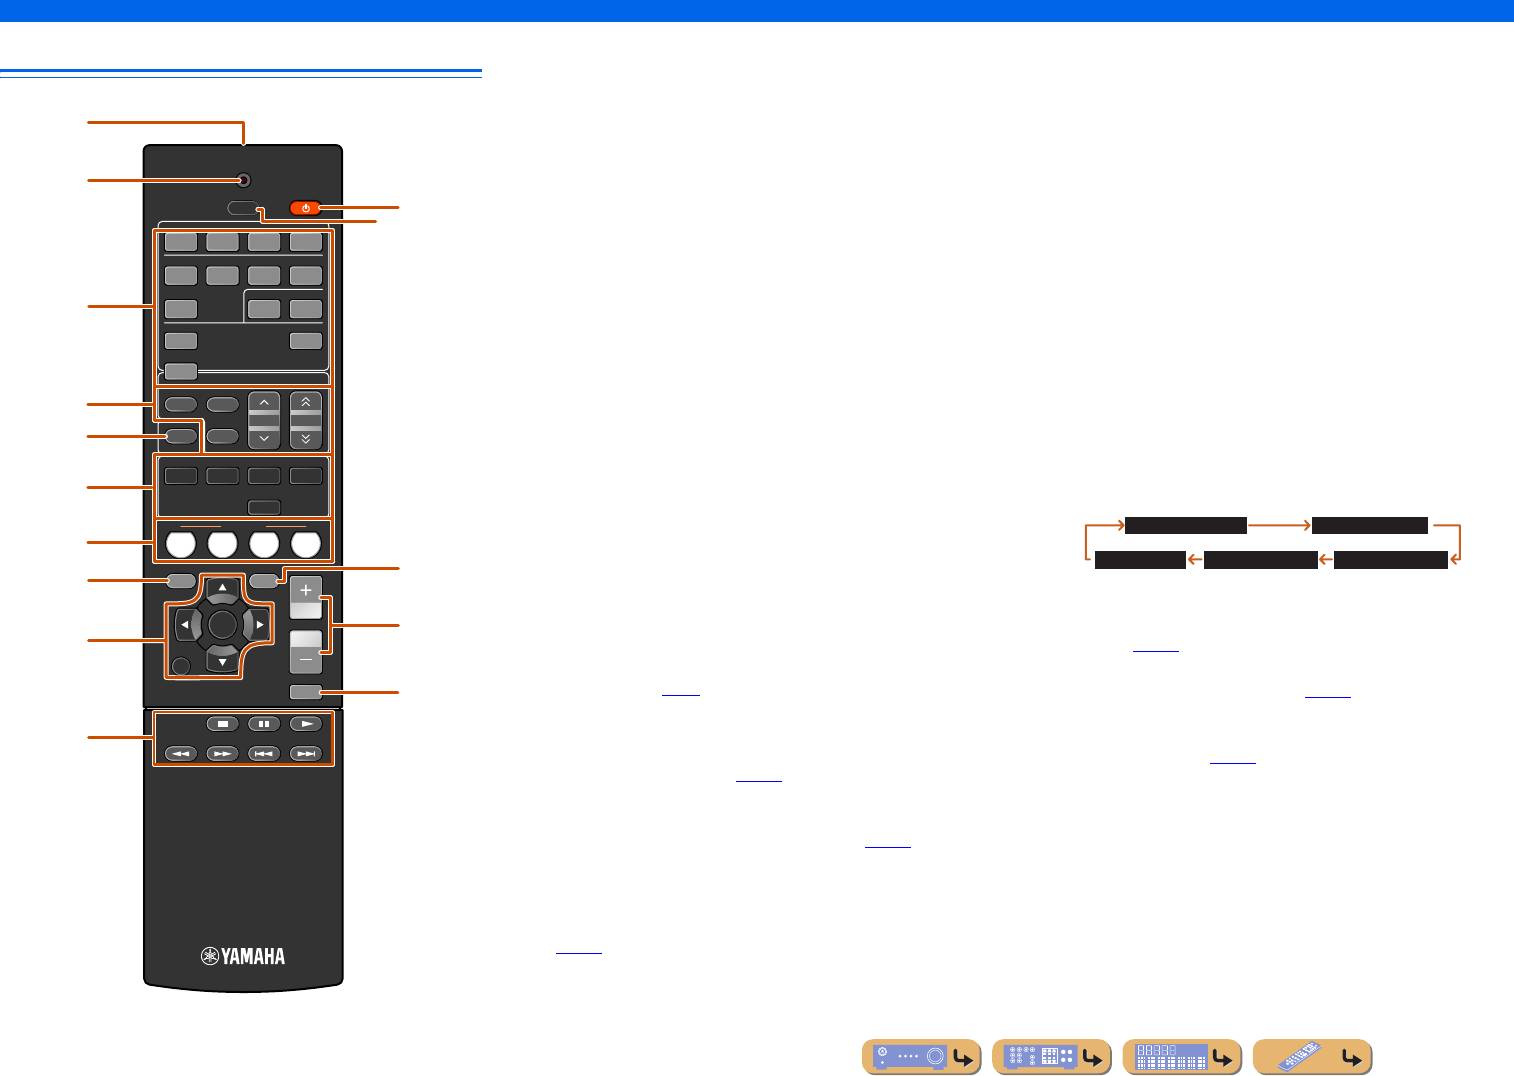
Названия компонентов и их функции
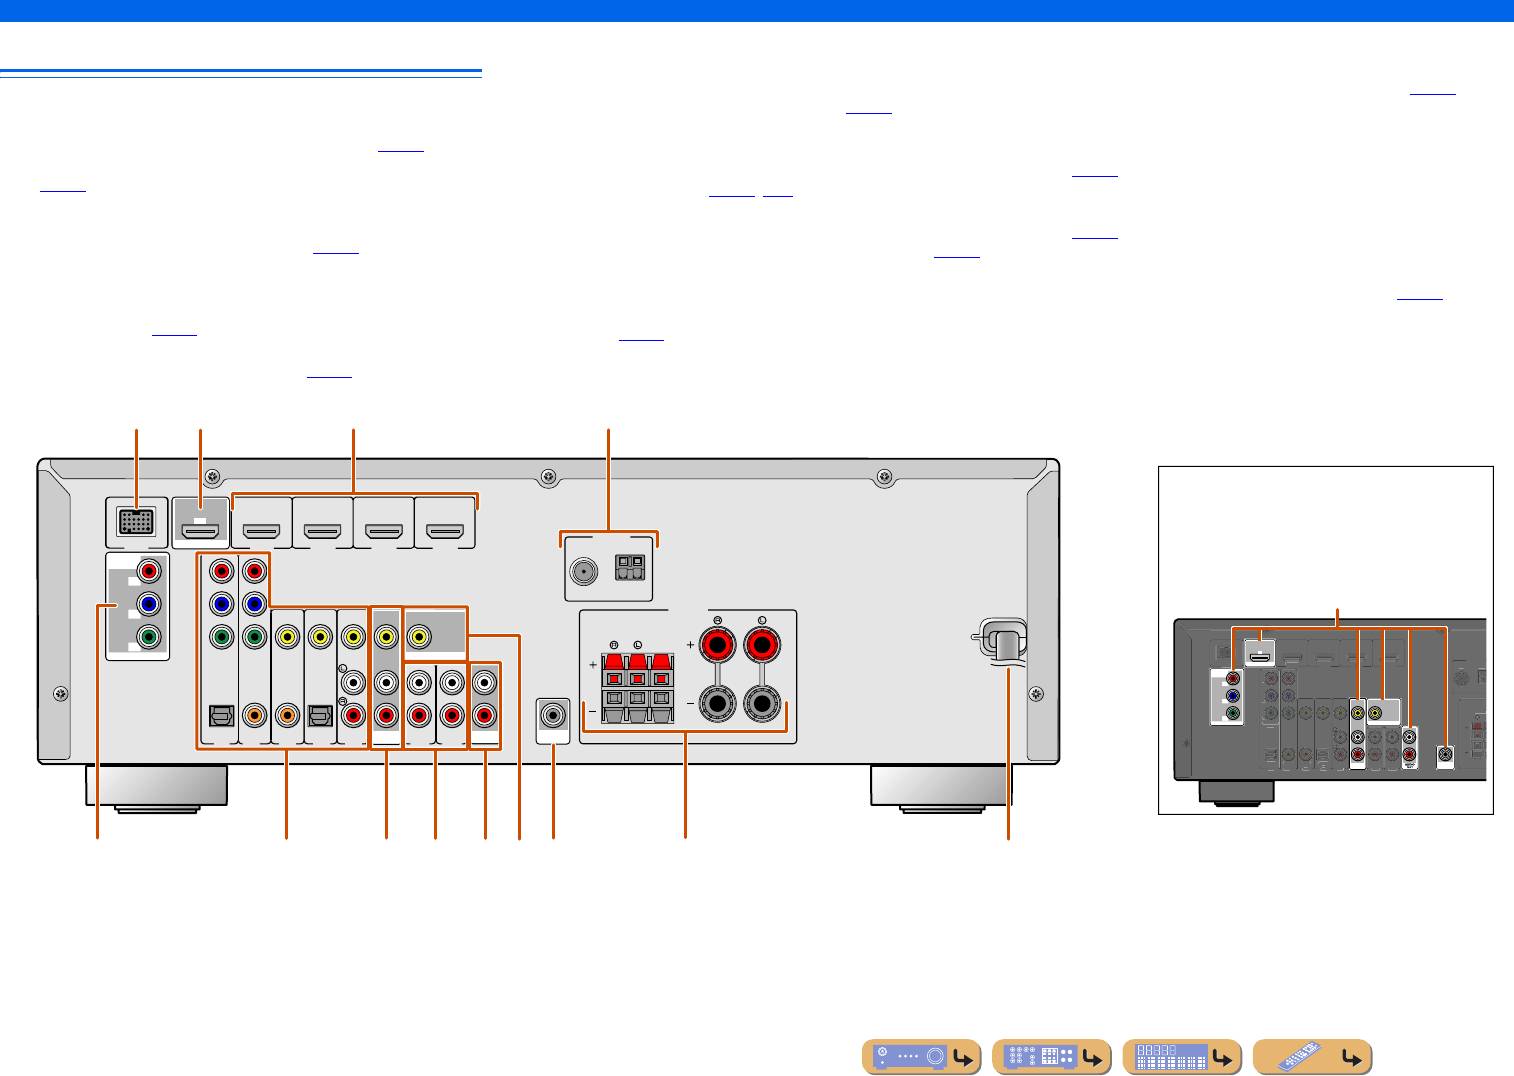
a Передатчик сигнала ДУ
i Курсор B / C / D / E, ENTER, RETURN
Пульт ДУ
Передача инфракрасных сигналов.
Курс ор B / C / D / E Выбор пунктов меню и изменение
b TRANSMIT
установок во время отображения меню
Загорается во время передачи сигнала с пульта ДУ.
установок и т.п.
a
c Переключатель входных сигналов
ENTER Подтверждение выбранного пункта.
Выбор источника входного сигнала для воспроизведения на
RETURN Возврат к предыдущему экрану во время
TRANSMIT
b
данном аппарате.
отображения меню установки или
RECEIVER
завершение экрана меню.
SLEEP
k
HDMI1-4 Гнезда HDMI1-4
HDMI
l
AV 1— 5 Гнезда AV1-5
j Клавиши управления iPod/iPhone
1234
AUDIO 1-2 Гнезда AUDIO1—2
Используются для управления операциями воспроизведения,
AV
V-AUX Гнезда VIDEO AUX на передней панели
остановки и т.п. для iPod или iPhone.
1234
DOCK Универсальная док-станция Yamaha для
AUDIO
k RECEIVER A (Питание RECEIVER)
c
125
iPod или беспроводной Bluetooth-приемник
Переключение данного аппарата между режимами
аудиосигнала подключен к гнезду DOCK.
включения и ожидания.
V-AU X
DOCK
TUNER FM/AM-тюнер
l SLEEP
TUNER
d Клавиши тюнера
Настройка данного аппарата на автоматический переход
Управление FM/AM-тюнером. Эти клавиши используются
в режим ожидания через заданный период времени (таймер
d
FM
AM
во время работы с входом тюнера.
PRESET
TUNING
сна). Нажимайте повторно данную клавишу для установки
e
INFO
MEMORY
времени включения функции таймера сна. При включении
FM Установка диапазона FM/AM-тюнера
ENHANCER
SUR. DECODE
таймера сна загорится индикатор на дисплее передней
в положение FM.
MOVIE MUSIC
STEREO
панели.
AM Установка диапазона FM/AM-тюнера
f
STRAIGHT
в положение AM.
SCENE
MEMORY Предустановка радиостанций.
Sleep 120min. Sleep 90min.
BD
g
DVD
TV
CD
RADIO
PRESET F / G Выбор предустановленной станции.
TUNING H / I Изменение частот настройки.
SETUP
Sleep 60min.Sleep 30min.Sleep Off
OPTION
m
h
e INFO
Циклическое переключение информации, отображаемой на
m OPTION
ENTER
VOLUME
n
дисплее передней панели (название выбранного в данный
Отображение меню Option для каждого источника входного
i
момент источника входного сигнала, программы звукового
сигнала (☞
c. 39).
RETURN
поля, декодера окружающего звучания, частоты FM/AM-
n VOLUME +/—
MUTE
тюнера и т.п.) (☞
c. 7).
Регулировка уровня громкости (☞
c. 25).
o
f Клавиши выбора звука
o MUTE
Переключение между используемыми эффектами
j
Включение и выключение функции приглушения
звукового поля (программами звукового поля) и декодерами
выводимого звука (☞
c. 25).
окружающего звучания (☞
c. 26).
g SCENE
Переключение источника входного сигнала и программы
звукового поля с помощью одной кнопки (☞
c. 26). Для
включения данного аппарата нажмите эту кнопку, когда
аппарат находится в режиме ожидания.
h УСТАНОВКА
Отображение подробного меню Setup для данного аппарата
(☞
c. 42).
Ru 8
-
Contents
-
Table of Contents
-
Troubleshooting
-
Bookmarks
Quick Links
Owner’s Manual
AV Receiver
English for Europe
Related Manuals for Yamaha RX-V371BL
Summary of Contents for Yamaha RX-V371BL
-
Page 1
Owner’s Manual AV Receiver English for Europe… -
Page 2: Table Of Contents
FM/AM tuning …………..30 Using the HDMI Control function ……… 54 Selecting a frequency for reception (Normal tuning)..30 APPENDIX Registering and recalling a frequency (Preset tuning) … 31 Features and capabilities ……….. 3 Clearing preset stations ……….32 About this manual…………. 4 Troubleshooting ……………
-
Page 3: Features And Capabilities
– Standby mode after a specific amount of time <Sleep timer>…………..8 – Protective cover for front panel jacks ………………….4 – To charge the iPod/iPhone when this unit is in standby mode <iPod Standby Charge> ……36 – Changing the input source names <Input Rename> …………….49 –…
-
Page 4: About This Manual
To protect against dust, attach the supplied VIDEO AUX input When inserting batteries in the remote control, remove the cover to the VIDEO AUX jacks when you do not use the jacks. battery compartment cover from the reverse side of the remote •…
-
Page 5: Part Names And Functions
INPUT l / h VIDEO AUX jacks MEMORY For connecting video cameras, game consoles, and portable music Selects an input source from which to playback. Press either the left or Registers FM/AM stations as preset stations (☞p. 31). players to this unit temporarily.
-
Page 6: Rear Panel
Rear panel ANTENNA jacks MONITOR OUT jack For connecting AM and FM antennas (☞p. 20). For connecting a TV capable of receiving video input, and outputting video signals to it (☞p. 14). COMPONENT VIDEO jacks DOCK jack For connecting TV that are compatible with component video signals,…
-
Page 7: Front Panel Display
Front speaker R SLEEP indicator Surround speaker L Lights up when the sleep timer is activated (☞p. Surround speaker R VOL. CHARGE SLEEP iPod STEREO MUTE TUNED While selecting a tuner input, the FM/AM frequency is displayed instead of the input source.
-
Page 8: Remote Control
Displays a detailed Setup menu for this unit (☞p. 42). Cursor B / C / D / E, ENTER, RETURN Cursor B / C / D / E Select menu items and change settings when settings menus, etc are displayed. ENTER Confirms a selected item.
-
Page 9: Connections
Connecting speakers This unit uses acoustic field effects and sound decoders to bring you the impact of a real movie theater or concert hall. These effects will be brought to you with ideal speaker positioning and connections in your listening environment.
-
Page 10: Speaker Layout
(minus, black) terminal. ■ CRT monitors • Be careful that the core of the speaker cable does not touch anything or come into contact with the metal We recommend that you use magnetically shielded speakers to avoid video distortion, especially for areas of this unit.
-
Page 11: Connecting Speakers
Loosen the speaker terminals. half). Lift the tab to fix the speaker cable in place. Crossover frequency (if available): Set to maximum. Insert the bare wire of the speaker cable into the gap on the side of the terminal. CROSSOVER/ VOLUME HIGH CUT Tighten the terminal.
-
Page 12: Connecting External Devices
Audio jacks OPTICAL jacks COAXIAL jacks The main unit is equipped with the following input/output jacks. Use jacks and cables appropriate for These jacks transmit optical digital audio signals. These jacks transmit coaxial digital audio signals. components that you are going to connect.
-
Page 13: Connecting A Tv Monitor
Connect the HDMI cable to the HDMI OUT jack. This unit is equipped with the following three types of output jack for connection to a TV. HDMI OUT, COMPONENT VIDEO or VIDEO. Select the proper connection according to the input HDMI signal format supported by your TV.
-
Page 14: Tv Connection
When using other TVs Connect the video pin cable to the VIDEO (MONITOR OUT) jack. To transmit sound from the TV to this unit, connect its AV1-5 or AUDIO1-2 jacks to the TV’s audio output jacks. Depending on the connection on TV, connect the TV’s audio output to the AV1-5 or AUDIO1-2.
-
Page 15: Connecting Bd/Dvd Players And Other Devices
Once you have completed the setup, press to close the HDMI Option menu. OPTICAL COAXIAL COAXIAL OPTICAL AUDIO (CD) ( TV ) See the section on “Configuring the settings specific for each input source (Option menu)” for details on BD/DVD player the Option menu (☞p. 39).
-
Page 16
Game console OPTICAL COAXIAL COAXIAL OPTICAL You can use the video input from the AV1-2 jacks in combination with the audio input from other AUDIO (CD) ( TV ) AV inputs or AUDIO1-2. When connecting these devices, select the AV3-5 or the AUDIO1-2 jacks as the audio input for AV1 BD/DVD player or AV2. -
Page 17
Using analog stereo audio output sources Select the AV5 input that the external device is connected to for playback. Connect the external device with a video pin cable to one of the AV3-5 input jacks. Using optical digital audio output sources Select the AV4 input that the external device is connected to for playback. -
Page 18
We recommend connecting audio devices with an coaxial digital output to the AV3 coaxial digital jack on this unit. This connection allows you to switch to the AV input 3 just by pressing the “CD” Using optical digital output sources SCENE key (☞p. -
Page 19: Connecting Video Cameras And Portable Audio Players
This receiver can transmit selected incoming analog audio/video signals to external devices through the portable audio devices to the receiver. AV OUT and AUDIO OUT jacks. You can record these input audio and video signals to VCRs or Select the V-AUX input to use these connected devices.
-
Page 20: Connecting The Fm/Am Antennas
■ Improving AM reception Connect this unit to an outdoor antenna with a 5-10 m vinyl-coated wire. Make sure the AM loop antenna is still connected. Connecting the GND jack can reduce noise. Connect the jack to a store-bought ground bar or copper plate with a vinyl-covered wire and bury this new attachment in moist ground.
-
Page 21: Set Up The Speaker Parameters Automatically (Ypao)
Set up the speaker parameters automatically (YPAO) This unit is equipped with a YPAO (Yamaha Parametric room Acoustic Optimizer) that adjusts the status, size, and volume balance of the speakers in order to provide an optimal sound field. Using YPAO allows you to automatically configure settings for which specialist knowledge is usually needed, such as adjusting speaker output and acoustic parameters to suit your listening room (the room in which this unit is placed).
-
Page 22
Disconnect MIC V V UX DOCK measurement. TUNER • Wait in the corner of the listening room during measurement or leave it entirely, to avoid becoming an You can use the following method to cancel PRESET TUNING obstruction between the speakers and the YPAO… -
Page 23
SLEEP during measurement after measurement HDMI Check that the environment is suitable for Check the content of the message from the list of Check the content of the message from the list of accurate measurement. messages (☞p. 24) to resolve the problem, and carry out messages (☞p. -
Page 24: Message List
If “W-2” or “W-3” appears, you can apply measurement results, cancelled the measuring operate this unit by, for but they will not give optimal results. We recommend that you process. example, adjusting the resolve the problem and carry out the measurement process volume.
-
Page 25: Playback
VOLUME Press TONE CONTROL on the front panel RETURN repeatedly to select “Treble” or “Bass.” For details on how to tune in to FM/AM stations, refer MUTE to “FM/AM tuning” (☞p. 30). TONE CONTROL…
-
Page 26: Changing Input Settings With A Single Key (Scene Function)
Enjoying sound field programs This unit is also equipped with a Yamaha digital sound field processing (DSP) chip. You can enjoy multi-channel playback for almost any sound source using various sound field programs stored on the chip, and a range of sound decoders.
-
Page 27: Stereo Playback
Use straight decoding mode when you want to playback when you want to playback 2-channel stereo sound This unit allows you to use virtual surround speakers to sound without sound field processing. You can playback (from the front speakers only), regardless of the…
-
Page 28: Sound Field Programs
This program simulates a live house with a low ceiling and homey atmosphere. A realistic, created virtual spaces reproduced with clear separation between dialog, sound effects and live sound field features powerful sound as if the listener is in a row in front of a small stage. background music.
-
Page 29
Suitable for listening to stereo sources. 2ch Stereo Use this program to mix down multi-channel sources to 2 channels. When multi-channel signals are input, they are down mixed to 2 channels and output from the front left and right speakers. 5ch Stereo Use this program to output sound from all speakers. -
Page 30: Fm/Am Tuning
Cursor B / C / D / E ENTER OPTION When searching for a station, release the key once the search has started. See the section on “Configuring the settings specific for each input source (Option menu)” for details on the Option menu (☞p.
-
Page 31: Registering And Recalling A Frequency (Preset Tuning)
“Auto Preset” and “Manual Preset.” Use one of these you select a preset number. referring to “Selecting a frequency for TUNER methods to register stations. If you do not select a preset number, Auto Preset will reception (Normal tuning)” (☞p. 30). begin approximately 5 seconds after “READY” is ■…
-
Page 32: Clearing Preset Stations
Blinks Empty, or the frequency registered information SETUP OPTION most previously. CLEAR You can display the 4 types of the Radio Data System VOL. dPRESET F / G Press to select the preset to register ENTER VOLUME information: “Program Service,” “Program Type,”…
-
Page 33: Automatic Traffic Information Reception
Press to switch to the tuner input. Radio Text When a traffic station is found, it will appear on the Displays the information on the Radio Data System program display and the Option menu will close. currently being received.
-
Page 34: Video Out
For example, when watching the sports AV1-2 Video signals input from either one of the relay on the TV, only audio can be switched to the radio V V UX DOCK AV1 and AV2 are output from the audio.
-
Page 35: Playing Back Tunes From Your Ipod™/Iphone
MP3 a sharper, more dynamic sound. AUDIO • iPhone 4, iPhone 3GS, iPhone 3G, iPhone, iPod touch (1st, 2nd, 3rd, and 4th generation), iPod (4th, and 5th generation, and Classic), iPod nano (1st, 2nd, 3rd, 4th, 5th, and 6th V V UX DOCK generation) and iPod mini are supported (As of October 2010).
-
Page 36
Check the iPod CHARGE indicator ( iPod CHARGE PRESET TUNING MEMORY on the front panel display of this unit to check ENHANCER SUR. DECODE whether this unit is charging an iPod/iPhone while in MUSIC STEREO standby mode. While charging an iPod/iPhone, the STRAIGHT iPod charge indicator lights. -
Page 37: Playing Back Tunes From Bluetooth™ Components
AUDIO NOTE When playing back from a Bluetooth component for the first time, you must first pair the devices (register the Bluetooth components). When establishing a wireless connection V V UX DOCK you must carry out pairing on both this unit and on the Bluetooth component.
-
Page 38: Using Bluetooth™ Components
STRAIGHT not necessary to carry out the following procedure. connection again. SCENE RADIO • Both this unit and the Bluetooth component are paired. SETUP OPTION • The Bluetooth component is switched on. Press cDOCK to switch to the DOCK input.
-
Page 39: Setup
RECEIVER SLEEP HDMI This receiver has a unique option menu specific for each type of input source, such as volume trim for compatible input sources, audio/video data display for signals from external devices, and other frequently used menu items. AUDIO…
-
Page 40: Adjusting Volume Between Input Sources
Information as the video input first, and then select audio input jacks in this menu. AV5 or AUDIO1-2 are also available when the “Audio Return Channel” function is on, and the source is used for the TV audio input (TVAudio).
-
Page 41
Pairs your Bluetooth wireless device and this receiver (☞p. 37). Video Out Input source: TUNER Select the type of video signals to be output from the video output jack on this unit when TUNER is selected as the input source (☞p. 34). ■ Searching for traffic information… -
Page 42: Setting Various Functions (Setup Menu)
SETUP Setting various functions (Setup menu) TRANSMIT RECEIVER SLEEP You can configure various function settings of this unit using the Setup menu. HDMI Setup menu display and settings Setup menu items AUDIO iCursor B / C to navigate the submenus to find the desired setting and…
-
Page 43: Manages Settings For Speakers
When “Subwoofer” is set to “None,” you can only choose “Large.” If the front speaker setting is “Small” and you change “Subwoofer” to “None,” it will…
-
Page 44
Surround speaker R to your listening position. SWFR Phase SWFR Subwoofer Sets the phase of the subwoofer if the bass audio is lacking or Unit Selects the distance unit (meters or feet). unclear. Front L Front speaker L Adjustable range -10.0 dB to +10.0 dB… -
Page 45
When you have finished making adjustments, press hSETUP to close the Setup menu. The speaker you are adjusting Using YPAO to carry out acoustic measurement selects “PEQ” automatically. “PEQ” does not appear if the measurement process has not been carried out at least once. -
Page 46: Setting The Audio Output Function Of This Unit
Adjusts the dynamic range in conjunction with the volume level SETUP VOL. (from minimum to maximum). When you play audio at night or at HDMI Auto Sound Setup low volumes, it is a good idea to set parameter to “On.”…
-
Page 47: Setting Hdmi Functions
Sets the initial volume for when this receiver is turned on. When SETUP VOL. Selects the dynamic range adjustment method for audio bitstream this parameter is set to “Off,” the volume is set at the level when the HDMI Setup (Dolby Digital and DTS) playback. receiver last entered standby mode.
-
Page 48
Default setting Return Channel function” (☞p. 56) for setting instructions. While the Audio Return Channel function is on, the jack selected for the input source cannot be used. When “TV” is selected, the speakers of this unit do not output sound. -
Page 49: Making The Receiver Easier To Use
Input Rename • 0 to 9 HDMI1 VOL. • Symbols (#, *, -, +, etc.) Changes the input source names to be shown on the front MUTE Blu-ray • Space panel display. You can change an input source name by choosing from Repeat step 4 until you have entered the a list of templates, or make one of your own.
-
Page 50: Setting Sound Field Program Parameters
You can set the parameters for the sound field programs (☞p. 51). AutoPowerDown If you do not operate this unit or use the remote control for an SETUP VOL. extended period of time, it will automatically go into standby mode DSP Parameter (Auto Power Down function).
-
Page 51: Setting Sound Field Program Parameters
RECEIVER SLEEP Although the sound field programs would satisfy you as they are with the default parameters, you can arrange the effect by setting the sound field elements (parameters). HDMI To adjust the sound effects suitable for acoustical conditions of audio/video sources or rooms, perform the following operations.
-
Page 52: Parameters Usable In Surround Decoder
Set this parameter to 0 SL Level for outputting the center sound from the center speaker only, or to 7 Adjusts the volume of the surround L channel. for outputting it from the front left/right speaker only.
-
Page 53: Extended Functionality That Can Be Configured As Needed (Advanced Setup Menu)
Extended functionality that can be configured as needed (Advanced Setup menu) TRANSMIT RECEIVER SLEEP The Advanced Setup menu can be used for unit initialization and other useful extended functions. The Advanced Setup menu can be operated as follows. HDMI Displaying/Setting the Advanced AUDIO ■…
-
Page 54: Using The Hdmi Control Function
HDMI. If you connect devices Control to this unit’s HDMI output jack. Confirm that this unit has turned on in conjunction with the TV. If that support HDMI Control (ex. Panasonic VIERA Link- compatible TVs, DVD/Blu-ray Disc recorders, etc.) J1, you can it is still off, turn it on manually.
-
Page 55
SETUP Using the HDMI Control function TRANSMIT ■ Switching the input source on this To use other jacks to input audio signals from TV, carry RECEIVER SLEEP iCursor B / C to select “HDMI Setup” unit automatically when listening out the following procedure. -
Page 56
AUDIO HDMI VOL. Audio Return Channel function, audio/video output Control;;;;Off from this unit to the TV or audio output from the TV to V V UX DOCK this unit can be transmitted through a single HDMI cable TUNER (Audio Return Channel function). Audio signals Make sure that “Control”… -
Page 57: Appendix
Refer to the table below when this unit does not function properly. If the problem you are experiencing is not listed below, or if the instructions below do not help, turn off this unit, disconnect the power cable, and contact the nearest authorized Yamaha dealer or service center.
-
Page 58
Incorrect input or output cable Connect the cables properly. If the problem No sound is output The speaker is malfunctioning. If sound is not output, the unit may be connections. persists, the cables may be defective. from a specific Check the Speaker indicators on malfunctioning. -
Page 59
When the component connected to the — be increased, or the output jacks of this unit is not output jacks of this unit is not turned on, the The subwoofer is turned off. Turn the subwoofer power on. — sound is distorted. -
Page 60: Hdmi
Confirm that HDMI video that is not indicator is flashing. is noisy. transmitter, or the input from the supported by the unit is not being input Switch to monaural mode. antenna is weak. (HDMI Input → Option menu → “Signal Replace the outdoor antenna with a more —…
-
Page 61: Remote Control
Wrong distance or angle. The remote control will function within a — with the automatic does not work or maximum range of 6 m / 20 ft, and no more tuning method. function properly. than 30 degrees off-axis from the front Automatic station Automatic station preset is not Use manual station preset.
-
Page 62: Ipod™/Iphone
The pairing is completed. — Remove your iPod/iPhone from the Yamaha Canceled The pairing is canceled. — iPod universal dock and then place it back in BT connected The connection between the — the dock. Yamaha Bluetooth wireless audio Unknown iPod…
-
Page 63: Glossary
Dolby Surround is widely used with nearly all playing the main program. signals synchronized during post-production and transmission. video tapes and laser discs, as well as in many TV and cable broadcasts. DTS-HD High Resolution Audio Whereas the audio and video latency requires complex end-user…
-
Page 64: Sound Field Program Information
Deep Color refers to the use of various color depths in displays, up from the range from 20 Hz to 120 Hz. This channel is counted as 0.1, because it only listening experience by regenerating the missing harmonics in compression 24-bit depths in previous versions of the HDMI specification.
-
Page 65: Information On Hdmi
High Resolution Audio, DTS Express Video signals • If the input source component can decode the bitstream audio signals of audio commentaries, you can play back the audio This unit is compatible with the video signals of the following resolutions: sources with the audio commentaries mixed down by using the digital audio input (optical or coaxial) connections.
-
Page 66: Specifications
AV5, etc. to FRONT — DTS Neo:6 Music, DTS Neo:6 Cinema [U.S.A. and Canada models] (1 kHz, 50 W, 8 Ω)..0.06% or less • AUDIO output x 1 [Other models] (1 kHz, 50 W, 6 Ω) ……0.06% or less [Audio] Analog jack x 1 ■…
-
Page 67: Index
Component …… 1 Vp-p/75 Ω (Y), 0.7 Vp-p/75 Ω (P ■ AM SECTION • Dimensions (W x H x D) 435 x 151 x 315 mm (17-1/8 x 6 x 12-3/8 in) • Maximum Input Level (Video Conversion Off)..1.5 Vp-p or more • Tuning Range •…
-
Page 68
© 2011 Yamaha Corporation YD282A0/OMEN2…
This manual is also suitable for:
Rx-v371