| title | description | author | ms.author | ms.reviewer | ms.date | ms.service | ms.subservice | ms.topic | helpviewer_keywords | |||||||
|---|---|---|---|---|---|---|---|---|---|---|---|---|---|---|---|---|
|
Use RAW Mode with FOR XML |
Learn how using RAW mode with the FOR XML clause in an SQL query transforms the resulting XML data. |
MikeRayMSFT |
mikeray |
randolphwest |
05/05/2022 |
sql |
xml |
conceptual |
|
[!INCLUDE SQL Server Azure SQL Database]
RAW mode transforms each row in the query result set into an XML element that has the generic identifier <row>, or the optionally provided element name. By default, each column value in the rowset that is not NULL is mapped to an attribute of the <row> element. If the ELEMENTS directive is added to the FOR XML clause, each column value is mapped to a subelement of the <row> element. Together with the ELEMENTS directive, you can optionally specify the XSINIL option to map NULL column values in the result set to an element that has the attribute, xsi:nil="true".
You can request a schema for the resulting XML. Specifying the XMLDATA option returns an in-line XDR schema. Specifying the XMLSCHEMA option returns an in-line XSD schema. The schema appears at the start of the data. In the result, the schema namespace reference is repeated for every top-level element.
The BINARY BASE64 option must be specified in the FOR XML clause to return the binary data in base64-encoded format. In RAW mode, retrieving binary data without specifying the BINARY BASE64 option will result in an error.
Next steps
This section contains the following examples:
- Example: Retrieving Product Model Information as XML
- Example: Specifying XSINIL with the ELEMENTS Directive
- Request schemas as results with XMLDATA & XMLSCHEMA
- Example: Retrieving Binary Data
- Example: Renaming the <row> Element
- Example: Specifying a Root Element for the XML Generated by FOR XML
- Example: Querying XMLType Columns
See also
- Add Namespaces to Queries with WITH XMLNAMESPACES
- Use AUTO Mode with FOR XML
- Use EXPLICIT Mode with FOR XML
- Use PATH Mode with FOR XML
- SELECT (Transact-SQL)
- FOR XML (SQL Server)
The FOR XML clause in SQL Server causes a lot of difficulty, mainly because it is rather poorly explained in Books-on-Line. We challenged Bob Sheldon to make it seem simple. Here is his sublime response.
SQL Server lets you retrieve data as XML by supporting the FOR XML clause, which can be included as part of your query. You can use the FOR XML clause in the main (outer) query as well as in subqueries. The clause supports numerous options that let you define the format of the XML data.
When you include the FOR XML clause in your query, you must specify one of the four supported modes-RAW, AUTO, EXPLICIT, or PATH. The options available to each mode vary according to that mode; however, many of the options are shared among the modes. In this article, I explain how to use each of these modes to retrieve data as XML and provide examples that demonstrate how they use the various options.
The RAW Mode
The RAW mode generates a single XML element for each row in the result set returned by the query.
To use the FOR XML clause in RAW mode, you simply append the clause and RAW keyword to your SELECT statement, as shown in the following example:
|
SELECT e.EmployeeID, c.FirstName, c.MiddleName, c.LastName FROM HumanResources.Employee e INNER JOIN Person.Contact c ON c.ContactID = e.ContactID WHERE c.FirstName = ‘Rob’ FOR XML RAW; |
Notice that the SELECT statement itself is a very basic query. (The statement pulls data from the AdventureWorks sample database.) Without the FOR XML clause, the statement would return the following results:
|
EmployeeID FirstName MiddleName LastName ———- ——— ———- ——— 4 Rob NULL Walters 168 Rob T Caron |
With the addition of the FOR XML clause, the statement returns the data as the following XML:
|
<row EmployeeID=«4« FirstName=«Rob« LastName=«Walters« /> <row EmployeeID=«168« FirstName=«Rob« MiddleName=«T« LastName=«Caron« /> |
As you can see, each <row> element maps to a row that is returned by the SELECT statement, and each column, by default, is treated as an attribute of that element.
Note: You can include a FOR XML clause only in SELECT statements, if those statements define the outer, or top-level, query. However, you can also include the clause in INSERT, UPDATE, and DELETE statements that are part of a subquery.
In the preceding example, each element in the XML is named <row> by default. However, you can override the default behavior by providing a name for the element, as the following example shows:
|
SELECT e.EmployeeID, c.FirstName, c.MiddleName, c.LastName FROM HumanResources.Employee e INNER JOIN Person.Contact c ON c.ContactID = e.ContactID WHERE c.FirstName = ‘Rob’ FOR XML RAW (‘Employee’); |
Now the element associated with each row returned by the query will be named <Employee>, rather than the default <row>:
|
<Employee EmployeeID=«4« FirstName=«Rob« LastName=«Walters« /> <Employee EmployeeID=«168« FirstName=«Rob« MiddleName=«T« LastName=«Caron« /> |
In addition to being able to provide a name for the row element, you can also specify that a root element be created to wrap all other elements. To create a root element, add the ROOT keyword to your FOR XML clause:
|
SELECT e.EmployeeID, c.FirstName, c.MiddleName, c.LastName FROM HumanResources.Employee e INNER JOIN Person.Contact c ON c.ContactID = e.ContactID WHERE c.FirstName = ‘Rob’ FOR XML RAW (‘Employee’), ROOT; |
Notice that you must include a comma when adding an option such as ROOT in order to separate the elements. As the following results show, a <root> element is now included in the XML:
|
<root> <Employee EmployeeID=«4« FirstName=«Rob« LastName=«Walters« /> <Employee EmployeeID=«168« FirstName=«Rob« MiddleName=«T« LastName=«Caron« /> </root> |
As with the row element, you can also provide a specific name for the root element:
|
SELECT e.EmployeeID, c.FirstName, c.MiddleName, c.LastName FROM HumanResources.Employee e INNER JOIN Person.Contact c ON c.ContactID = e.ContactID WHERE c.FirstName = ‘Rob’ FOR XML RAW (‘Employee’), ROOT (‘Employees’); |
In this case, I’ve named the root element <Employees>, as shown in the following results:
|
<Employees> <Employee EmployeeID=«4« FirstName=«Rob« LastName=«Walters« /> <Employee EmployeeID=«168« FirstName=«Rob« MiddleName=«T« LastName=«Caron« /> </Employees> |
Up to this point, the examples I’ve shown you have added column values as attributes to each row element. This is the default behavior of the RAW mode. However, you can instead specify that the column values be added as child elements to the row element by including the ELEMENTS option in the FOR XML clause:
|
SELECT e.EmployeeID, c.FirstName, c.MiddleName, c.LastName FROM HumanResources.Employee e INNER JOIN Person.Contact c ON c.ContactID = e.ContactID WHERE c.FirstName = ‘Rob’ FOR XML RAW (‘Employee’), ROOT (‘Employees’), ELEMENTS; |
Once again, I’ve added a comma to separate the options. As you can see in the following results, each <Employee> element now includes a set of child elements that correspond to the columns returned by the query:
|
<Employees> <Employee> <EmployeeID>4</EmployeeID> <FirstName>Rob</FirstName> <LastName>Walters</LastName> </Employee> <Employee> <EmployeeID>168</EmployeeID> <FirstName>Rob</FirstName> <MiddleName>T</MiddleName> <LastName>Caron</LastName> </Employee> </Employees> |
Now the <Employee> elements no longer include any attributes and all data is rendered through individual child elements.
If you refer back to the XML returned by the previous example, you’ll notice that the data for employee 4 (Rob Walters) does not include a middle name. This is because that MiddleName value is null in the source data, and by default, no elements are created for a column whose value is null. However, you can override this behavior by adding the XSINIL keyword to the ELEMENTS option:
|
SELECT e.EmployeeID, c.FirstName, c.MiddleName, c.LastName FROM HumanResources.Employee e INNER JOIN Person.Contact c ON c.ContactID = e.ContactID WHERE c.FirstName = ‘Rob’ FOR XML RAW (‘Employee’), ROOT (‘Employees’), ELEMENTS XSINIL; |
Now the results will include an element for the MiddleName column and will include the xsi:nil attribute with a value of true when a value is null, as shown in the following XML:
|
<Employees xmlns:xsi=«http://www.w3.org/2001/XMLSchema—instance«> <Employee> <EmployeeID>4</EmployeeID> <FirstName>Rob</FirstName> <MiddleName xsi:nil=«true« /> <LastName>Walters</LastName> </Employee> <Employee> <EmployeeID>168</EmployeeID> <FirstName>Rob</FirstName> <MiddleName>T</MiddleName> <LastName>Caron</LastName> </Employee> </Employees> |
Notice that the xmlns:xsi attribute has also been added to the root node and provides the name of the default schema instance.
Another important option that is supported by the RAW node is XMLSCHEMA, which specifies that an inline W3C XML Schema (XSD) be included in the XML data. You add the XMLSCHEMA option in the same way you add other options:
|
SELECT e.EmployeeID, c.FirstName, c.MiddleName, c.LastName FROM HumanResources.Employee e INNER JOIN Person.Contact c ON c.ContactID = e.ContactID WHERE c.FirstName = ‘Rob’ FOR XML RAW (‘Employee’), ROOT (‘Employees’), ELEMENTS XSINIL, XMLSCHEMA; |
As you can see in the following results, the schema is fully defined and is incorporated in the XML results:
|
1 2 3 4 5 6 7 8 9 10 11 12 13 14 15 16 17 18 19 20 21 22 23 24 25 26 27 28 29 30 31 32 33 34 35 36 37 38 39 40 41 42 43 44 45 |
<Employees xmlns:xsi=«http://www.w3.org/2001/XMLSchema—instance«> <xsd:schema targetNamespace=«urn:schemas—microsoft—com:sql:SqlRowSet1« xmlns:xsd=«http://www.w3.org/2001/XMLSchema« xmlns:sqltypes=«http://schemas.microsoft.com/sqlserver/2004/sqltypes« elementFormDefault=«qualified«> <xsd:import namespace=«http://schemas.microsoft.com/sqlserver/2004/sqltypes« schemaLocation=«http://schemas.microsoft.com/sqlserver/2004/sqltypes/sqltypes.xsd« /> <xsd:element id=«Employee«»> <xsd:complexType> <xsd:sequence> <xsd:element id=«Employee«ID« type=«sqltypes:int« nillable=«1« /> <xsd:element id=«FirstName«» nillable=«1«> <xsd:simpleType sqltypes:sqlTypeAlias=«[AdventureWorks].[dbo].[Name]«> <xsd:restriction base=«sqltypes:nvarchar« sqltypes:localeId=«1033« sqltypes:sqlCompareOptions=«IgnoreCase IgnoreKanaType IgnoreWidth« sqltypes:sqlSortId=«52«> <xsd:maxLength value=«50« /> </xsd:restriction> </xsd:simpleType> </xsd:element> <xsd:element id=«MiddleName«» nillable=«1«> <xsd:simpleType sqltypes:sqlTypeAlias=«[AdventureWorks].[dbo].[Name]«> <xsd:restriction base=«sqltypes:nvarchar« sqltypes:localeId=«1033« sqltypes:sqlCompareOptions=«IgnoreCase IgnoreKanaType IgnoreWidth« sqltypes:sqlSortId=«52«> <xsd:maxLength value=«50« /> </xsd:restriction> </xsd:simpleType> </xsd:element> <xsd:element id=«LastName«» nillable=«1«> <xsd:simpleType sqltypes:sqlTypeAlias=«[AdventureWorks].[dbo].[Name]«> <xsd:restriction base=«sqltypes:nvarchar« sqltypes:localeId=«1033« sqltypes:sqlCompareOptions=«IgnoreCase IgnoreKanaType IgnoreWidth« sqltypes:sqlSortId=«52«> <xsd:maxLength value=«50« /> </xsd:restriction> </xsd:simpleType> </xsd:element> </xsd:sequence> </xsd:complexType> </xsd:element> </xsd:schema> <Employee xmlns=«urn:schemas—microsoft—com:sql:SqlRowSet1«> <EmployeeID>4</EmployeeID> <FirstName>Rob</FirstName> <MiddleName xsi:nil=«true« /> <LastName>Walters</LastName> </Employee> <Employee xmlns=«urn:schemas—microsoft—com:sql:SqlRowSet1«> <EmployeeID>168</EmployeeID> <FirstName>Rob</FirstName> <MiddleName>T</MiddleName> <LastName>Caron</LastName> </Employee> </Employees> |
When you specify that a schema be created, you can also specify the name of the target namespace. For example, the following FOR XML clause includes the XMLSCHEMA option, followed by the name of the target namespace (urn:schema_example.com):
|
SELECT e.EmployeeID, c.FirstName, c.MiddleName, c.LastName FROM HumanResources.Employee e INNER JOIN Person.Contact c ON c.ContactID = e.ContactID WHERE c.FirstName = ‘Rob’ FOR XML RAW (‘Employee’), ROOT (‘Employees’), ELEMENTS XSINIL, XMLSCHEMA (‘urn:schema_example.com’); |
The statement will return the same results as the previous example, except that the XML will now include the new name of the target namespace.
The SELECT statements shown in the preceding examples have retrieved data from non-XML columns (in this case, integer and string columns). However, your queries might also retrieve data from XML columns. In such cases, the FOR XML clause will incorporate the data retrieved from an XML column into the XML result set.
For example, the following SELECT statement uses the XML query() method to retrieve education-related data from the Resume column in the JobCandidate table:
|
SELECT e.EmployeeID, c.FirstName, c.LastName, jc.Resume.query(‘declare namespace ns= «http://schemas.microsoft.com/sqlserver/2004/07/adventure-works/Resume»; /ns:Resume/ns:Education’) FROM HumanResources.Employee e INNER JOIN Person.Contact c ON c.ContactID = e.ContactID INNER JOIN HumanResources.JobCandidate jc ON e.EmployeeID = jc.EmployeeID WHERE e.EmployeeID = 268 FOR XML RAW (‘Employee’), ELEMENTS; |
The query() method itself retrieves the following data from the Resume column:
|
1 2 3 4 5 6 7 8 9 10 11 12 13 14 15 16 17 18 |
<ns:Education xmlns:ns=«http://schemas.microsoft.com/sqlserver/2004/07/adventure—works/Resume«> <ns:Edu.Level>Bachelor</ns:Edu.Level> <ns:Edu.StartDate>1986—09—15Z</ns:Edu.StartDate> <ns:Edu.EndDate>1990—05—20Z</ns:Edu.EndDate> <ns:Edu.Degree>Bachelor of Arts and Science</ns:Edu.Degree> <ns:Edu.Major>Business</ns:Edu.Major> <ns:Edu.Minor /> <ns:Edu.GPA>3.3</ns:Edu.GPA> <ns:Edu.GPAScale>4</ns:Edu.GPAScale> <ns:Edu.School>Louisiana Business College of New Orleans</ns:Edu.School> <ns:Edu.Location> <ns:Location> <ns:Loc.CountryRegion>US </ns:Loc.CountryRegion> <ns:Loc.State>LA</ns:Loc.State> <ns:Loc.City>New Orleans</ns:Loc.City> </ns:Location> </ns:Edu.Location> </ns:Education> |
This data is incorporated into the rest of the result set when you use the FOR XML clause, as shown in the following results:
|
1 2 3 4 5 6 7 8 9 10 11 12 13 14 15 16 17 18 19 20 21 22 23 |
<Employee> <EmployeeID>268</EmployeeID> <FirstName>Stephen</FirstName> <LastName>Jiang</LastName> <ns:Education xmlns:ns=«http://schemas.microsoft.com/sqlserver/2004/07/adventure—works/Resume«> <ns:Edu.Level>Bachelor</ns:Edu.Level> <ns:Edu.StartDate>1986—09—15Z</ns:Edu.StartDate> <ns:Edu.EndDate>1990—05—20Z</ns:Edu.EndDate> <ns:Edu.Degree>Bachelor of Arts and Science</ns:Edu.Degree> <ns:Edu.Major>Business</ns:Edu.Major> <ns:Edu.Minor /> <ns:Edu.GPA>3.3</ns:Edu.GPA> <ns:Edu.GPAScale>4</ns:Edu.GPAScale> <ns:Edu.School>Louisiana Business College of New Orleans</ns:Edu.School> <ns:Edu.Location> <ns:Location> <ns:Loc.CountryRegion>US </ns:Loc.CountryRegion> <ns:Loc.State>LA</ns:Loc.State> <ns:Loc.City>New Orleans</ns:Loc.City> </ns:Location> </ns:Edu.Location> </ns:Education> </Employee> |
As you can see, the <ns:Education> element and its child elements have been added to the XML data. The namespace defined on the source data in the XML column is also included.
The AUTO Mode
The AUTO mode in a FOR XML clause is slightly different from the RAW mode in the way that it generates the XML result set. The AUTO mode generates the XML by using heuristics based on how the SELECT statement is defined. The best way to understand how this works is to look at an example. The following SELECT statement, as in the previous examples, retrieves employee data from the AdventureWorks database:
|
SELECT Employee.EmployeeID, ContactInfo.FirstName, ContactInfo.MiddleName, ContactInfo.LastName FROM HumanResources.Employee AS Employee INNER JOIN Person.Contact AS ContactInfo ON ContactInfo.ContactID = Employee.ContactID WHERE ContactInfo.FirstName = ‘Rob’ FOR XML AUTO, ROOT (‘Employees’); |
Notice that I’ve provided meaningful alias names to the tables (Employee and Contact info). These names are used in defining the XML element names, so you’ll want to construct your SELECT statements accordingly. Now take a look at the results returned by this query:
|
<Employees> <Employee EmployeeID=«4«> <ContactInfo FirstName=«Rob« LastName=«Walters« /> </Employee> <Employee EmployeeID=«168«> <ContactInfo FirstName=«Rob« MiddleName=«T« LastName=«Caron« /> </Employee> </Employees> |
As you can see, the <Employee> element has been named automatically based on the table alias name. Notice too that the <ContactInfo> element is a child element of <Employee>. The structure of the elements is based on the order in which the columns are defined in the SELECT list and the tables that are specified in the FROM clause. In this case, because EmployeeID is the first column in the SELECT list and the Employee table is included in the FROM clause, the first element is <Employee>. And because the remaining columns, which are associated with the ContactInfo table, appear next in the SELECT list, they are added as a child element. If an additional table and its columns were included in the SELECT list, after the other columns, they would appear as a child element of <ContactInfo>.
In addition, the columns and their values are added as attributes to the table-related elements. This structure is similar to what you saw in the RAW mode examples. And in the same way, you can override the default behavior by using the ELEMENTS option:
|
SELECT Employee.EmployeeID, ContactInfo.FirstName, ContactInfo.MiddleName, ContactInfo.LastName FROM HumanResources.Employee AS Employee INNER JOIN Person.Contact AS ContactInfo ON ContactInfo.ContactID = Employee.ContactID WHERE ContactInfo.FirstName = ‘Rob’ FOR XML AUTO, ROOT (‘Employees’), ELEMENTS; |
As you can see in the following XML result set, the column values are now included as child elements, rather than attributes:
|
1 2 3 4 5 6 7 8 9 10 11 12 13 14 15 16 17 |
<Employees> <Employee> <EmployeeID>4</EmployeeID> <ContactInfo> <FirstName>Rob</FirstName> <LastName>Walters</LastName> </ContactInfo> </Employee> <Employee> <EmployeeID>168</EmployeeID> <ContactInfo> <FirstName>Rob</FirstName> <MiddleName>T</MiddleName> <LastName>Caron</LastName> </ContactInfo> </Employee> </Employees> |
Notice that the <ContactInfo> element also contains child elements, one for each column.
If you want to include an element for columns with null values, you can use the XSINIL option, as you saw when using the RAW mode:
|
SELECT ContactInfo.FirstName, ContactInfo.MiddleName, ContactInfo.LastName, Employee.EmployeeID FROM HumanResources.Employee AS Employee INNER JOIN Person.Contact AS ContactInfo ON ContactInfo.ContactID = Employee.ContactID WHERE ContactInfo.FirstName = ‘Rob’ FOR XML AUTO, ROOT (‘Employees’), ELEMENTS XSINIL; |
Now the results will include all elements. That means, if a value is null, the xsi:nil attribute is included:
|
1 2 3 4 5 6 7 8 9 10 11 12 13 14 15 16 17 18 |
<Employees xmlns:xsi=«http://www.w3.org/2001/XMLSchema—instance«> <ContactInfo> <FirstName>Rob</FirstName> <MiddleName xsi:nil=«true« /> <LastName>Walters</LastName> <Employee> <EmployeeID>4</EmployeeID> </Employee> </ContactInfo> <ContactInfo> <FirstName>Rob</FirstName> <MiddleName>T</MiddleName> <LastName>Caron</LastName> <Employee> <EmployeeID>168</EmployeeID> </Employee> </ContactInfo> </Employees> |
As you’ve seen in these examples, the XML is based on how the columns are listed in the SELECT list. However, as I mentioned earlier, the XML is also based on the tables listed in the FROM clause. In the preceding examples, the SELECT list contained only columns that are referenced in the FROM clause. If a column is not directly associated with a table in the FROM clause (as in a computed or aggregate column), the column is nested at the deepest level wherever it appears.
For example, the following SELECT statement includes the FullName computed column, which concatenates the first and last names:
|
SELECT Employee.EmployeeID, (ContactInfo.FirstName + ‘ ‘ + ContactInfo.LastName) AS FullName, ContactInfo.EmailAddress FROM HumanResources.Employee AS Employee INNER JOIN Person.Contact AS ContactInfo ON ContactInfo.ContactID = Employee.ContactID WHERE ContactInfo.FirstName = ‘Rob’ FOR XML AUTO, ROOT (‘Employees’), ELEMENTS XSINIL; |
Because the FullName column appears in the SELECT list after the EmployeeID column, the FullName column is added as a child element of <Employee>, as shown in the following XML:
|
<Employees xmlns:xsi=«http://www.w3.org/2001/XMLSchema—instance«> <Employee> <EmployeeID>4</EmployeeID> <FullName>Rob Walters</FullName> <ContactInfo> <EmailAddress>rob0@adventure—works.com</EmailAddress> </ContactInfo> </Employee> <Employee> <EmployeeID>168</EmployeeID> <FullName>Rob Caron</FullName> <ContactInfo> <EmailAddress>rob1@adventure—works.com</EmailAddress> </ContactInfo> </Employee> </Employees> |
As I’ve mentioned, the placement of columns in the SELECT list impacts the resulting XML. This is also the case with computed columns. For example, in the following SELECT statement, I’ve added the FullName column after the EmailAddress column:
|
SELECT Employee.EmployeeID, ContactInfo.EmailAddress, (ContactInfo.FirstName + ‘ ‘ + ContactInfo.LastName) AS FullName FROM HumanResources.Employee AS Employee INNER JOIN Person.Contact AS ContactInfo ON ContactInfo.ContactID = Employee.ContactID WHERE ContactInfo.FirstName = ‘Rob’ FOR XML AUTO, ROOT (‘Employees’), ELEMENTS XSINIL; |
Now the FullName column will be added as a child element to the <ContactInfo> element, as the following XML demonstrates.
|
<Employees xmlns:xsi=«http://www.w3.org/2001/XMLSchema—instance«> <Employee> <EmployeeID>4</EmployeeID> <ContactInfo> <EmailAddress>rob0@adventure—works.com</EmailAddress> <FullName>Rob Walters</FullName> </ContactInfo> </Employee> <Employee> <EmployeeID>168</EmployeeID> <ContactInfo> <EmailAddress>rob1@adventure—works.com</EmailAddress> <FullName>Rob Caron</FullName> </ContactInfo> </Employee> </Employees> |
As these results show, you must be aware of the order you place columns when you define your SELECT list.
Now let’s take a look at another aspect of the AUTO mode. One of the limitations of this mode (as well as the RAW mode) is that the column data is added as either attributes or child elements, depending on whether you specify the ELEMENTS option. However, there might be times when you want to return some of the data as attributes and some as child elements. One method you can use with the AUTO mode is to return some of the data in a subquery. For example, the following SELECT statement includes a subquery that returns the employee’s first and last names:
|
SELECT EmployeeID, LoginID, (SELECT FirstName, LastName FROM Person.Contact AS EmployeeName WHERE EmployeeName.ContactID = Employee.ContactID FOR XML AUTO, TYPE, ELEMENTS) FROM HumanResources.Employee AS Employee WHERE EmployeeID = 168 FOR XML AUTO; |
Notice that the subquery includes a FOR XML clause that uses AUTO mode and includes the ELEMENTS option. The FOR XML clause also includes the TYPE option, which specifies that the data returned by the subquery be returned as the XML type. You must include the TYPE option to preserve the data as XML in the outer SELECT statement.
The outer SELECT statement also includes a FOR XML clause, but the ELEMENTS option is not included. As a result, only the first and last names will be returned as child elements, but the employee ID and login ID will be returned as attributes, as shown in the following XML:
|
<Employee EmployeeID=«168« LoginID=«adventure—worksrob1«> <EmployeeName> <FirstName>Rob</FirstName> <LastName>Caron</LastName> </EmployeeName> </Employee> |
As you can see, subqueries let you maintain some control over the output. However, the AUTO mode (and the RAW mode, for that matter) provides little control over the XML returned by your query. For greater control, you’ll want to use the EXPLICIT mode or the PATH mode.
The EXPLICIT Mode
The EXPLICIT mode provides very specific control over your XML, but this mode is much more complex to use than the RAW or AUTO modes. To use this mode, you must build your SELECT statements in such as way as to define the XML hierarchy and structure. In addition, you must create a SELECT statement for each level of that hierarchy and use UNION ALL clauses to join those statements.
There are a number of rules that describe how to define your SELECT statements when using the EXPLICIT mode, and it is beyond the scope of this article to review all those rules, so be sure to refer to the topic “Using EXPLICIT Mode” in SQL Server Books Online for the details about how to construct your SELECT statements. In the meantime, let’s take a look at a few examples that help demonstrate some of the basic elements of the EXPLICIT mode.
When constructing your SELECT statement, you must include two columns in your SELECT list that describe the XML hierarchy. The first column, Tag, is assigned a numerical value for each level of the hierarchy. For instance, the first SELECT statement should include a Tag column with a value of 1. This is the top level of the hierarchy. The second SELECT statement should include a Tag column with a value of 2, and so on.
The second column that you should include in your SELECT statement is Parent. Again, this is a numerical value that identifies the parent of the hierarchy based on the Tag values you’ve assigned. In the first SELECT statement, the Parent value should be null to indicate that this is a top level hierarchy.
Your first SELECT statement should also include a reference to all the columns that will make up the XML structure. The columns must also include aliases that define that structure. Let’s look at an example to help understand how this all works. The following SELECT statements return results similar to what you’ve seen in previous examples; however, the SELECT statements themselves are more detailed:
|
1 2 3 4 5 6 7 8 9 10 11 12 13 14 15 16 17 18 19 20 21 |
SELECT 1 AS Tag, NULL AS Parent, e.EmployeeID AS [Employee!1!EmployeeID], NULL AS [ContactInfo!2!FirstName!ELEMENT], NULL AS [ContactInfo!2!MiddleName!ELEMENT], NULL AS [ContactInfo!2!LastName!ELEMENT] FROM HumanResources.Employee e INNER JOIN Person.Contact c ON c.ContactID = e.ContactID WHERE c.FirstName = ‘Rob’ UNION ALL SELECT 2 AS Tag, 1 AS Parent, e.EmployeeID, c.FirstName, c.MiddleName, c.LastName FROM HumanResources.Employee e INNER JOIN Person.Contact c ON e.ContactID = c.ContactID WHERE c.FirstName = ‘Rob’ ORDER BY [Employee!1!EmployeeID], [ContactInfo!2!FirstName!ELEMENT] FOR XML EXPLICIT; |
In the first SELECT statement, I begin by defining the Tag column and assigning a value of 1 to that column. Next I define the Parent column and assign a null value. I then define the EmployeeID column and assign an alias to that column. Notice that I use a very specific structure to define the alias name:
|
<ElementName>!<TagNumber>!<AttributeName>[!<OptionalDirective>] |
As the syntax shows, the first three components are required, and the last is optional:
<ElementName>:The name of the element that the value should be assigned to.<TagNumber>:The tag number associated with the hierarchy that the value should be assigned to, as defined in the Tag column.<AttributeName>:The name of the attribute associated with the column value, unless an optional directive is specified. For example, if the ELEMENT directive is specified, <AttributeName> is the name of the child element.<OptionalDirective>:Additional information for how to construct the XML.
For example, based on the alias name assigned to the EmployeeID column, you can see that the EmployeeID attribute will be associated with the <Employee> element on the first level of the hierarchy.
Because the next three columns in the SELECT list are associated with the second level of the XML hierarchy, which is defined in the second SELECT statement, null values are assigned to the alias names for the column. This will provide the XML structure necessary to join the two SELECT statements.
The second SELECT statement is much simpler, but it still includes the Tag and Parent columns in the SELECT list. The remaining columns in the SELECT list are defined as you would normally define columns in your query.
The result set for the two SELECT statements is then ordered by the EmployeeID and FirstName columns. This is necessary so that null values appear first in the result set to ensure that the XML is properly formatted. The FOR XML clause is then appended to the end of the SELECT statement in order to generate the following XML:
|
<Employee EmployeeID=«4«> <ContactInfo> <FirstName>Rob</FirstName> <LastName>Walters</LastName> </ContactInfo> </Employee> <Employee EmployeeID=«168«> <ContactInfo> <FirstName>Rob</FirstName> <MiddleName>T</MiddleName> <LastName>Caron</LastName> </ContactInfo> </Employee> |
The EmployeeID column has now been added as an attribute to the <Employee> element. However, you can change the EmployeeID column to a child element simply by adding the ELEMENT directive, as I did with the other columns:
|
1 2 3 4 5 6 7 8 9 10 11 12 13 14 15 16 17 18 19 20 21 |
SELECT 1 AS Tag, NULL AS Parent, e.EmployeeID AS [Employee!1!EmployeeID!ELEMENT], NULL AS [ContactInfo!2!FirstName!ELEMENT], NULL AS [ContactInfo!2!MiddleName!ELEMENT], NULL AS [ContactInfo!2!LastName!ELEMENT] FROM HumanResources.Employee e INNER JOIN Person.Contact c ON c.ContactID = e.ContactID WHERE c.FirstName = ‘Rob’ UNION ALL SELECT 2 AS Tag, 1 AS Parent, e.EmployeeID, c.FirstName, c.MiddleName, c.LastName FROM HumanResources.Employee e INNER JOIN Person.Contact c ON e.ContactID = c.ContactID WHERE c.FirstName = ‘Rob’ ORDER BY [Employee!1!EmployeeID!ELEMENT], [ContactInfo!2!FirstName!ELEMENT] FOR XML EXPLICIT; |
Now the EmployeeID value will be displayed as a child element of <Employee>,the first level element:
|
<Employee> <EmployeeID>4</EmployeeID> <ContactInfo> <FirstName>Rob</FirstName> <LastName>Walters</LastName> </ContactInfo> </Employee> <Employee> <EmployeeID>168</EmployeeID> <ContactInfo> <FirstName>Rob</FirstName> <MiddleName>T</MiddleName> <LastName>Caron</LastName> </ContactInfo> </Employee> |
You can also ensure that columns with null values will still display the element by changing the ELEMENTS directive to ELEMENTSXSINIL, as shown in the following SELECT statement:
|
1 2 3 4 5 6 7 8 9 10 11 12 13 14 15 16 17 18 19 20 21 |
SELECT 1 AS Tag, NULL AS Parent, e.EmployeeID AS [Employee!1!EmployeeID!ELEMENT], NULL AS [ContactInfo!2!FirstName!ELEMENT], NULL AS [ContactInfo!2!MiddleName!ELEMENTXSINIL], NULL AS [ContactInfo!2!LastName!ELEMENT] FROM HumanResources.Employee e INNER JOIN Person.Contact c ON c.ContactID = e.ContactID WHERE c.FirstName = ‘Rob’ UNION ALL SELECT 2 AS Tag, 1 AS Parent, e.EmployeeID, c.FirstName, c.MiddleName, c.LastName FROM HumanResources.Employee e INNER JOIN Person.Contact c ON e.ContactID = c.ContactID WHERE c.FirstName = ‘Rob’ ORDER BY [Employee!1!EmployeeID!ELEMENT], [ContactInfo!2!FirstName!ELEMENT] FOR XML EXPLICIT; |
Now the results will include the xsi:nil attribute where values are null in the MiddleName column, as shown in the following XML:
|
<Employee xmlns:xsi=«http://www.w3.org/2001/XMLSchema—instance«> <EmployeeID>4</EmployeeID> <ContactInfo> <FirstName>Rob</FirstName> <MiddleName xsi:nil=«true« /> <LastName>Walters</LastName> </ContactInfo> </Employee> <Employee xmlns:xsi=«http://www.w3.org/2001/XMLSchema—instance«> <EmployeeID>168</EmployeeID> <ContactInfo> <FirstName>Rob</FirstName> <MiddleName>T</MiddleName> <LastName>Caron</LastName> </ContactInfo> </Employee> |
As you can see from these examples, the EXPLICIT mode can cause your SELECT statements to become quite complex, especially if you want to add more levels to the hierarchy or want to create more intricate SELECT statements. Fortunately, most of what you can do with the EXPLICIT mode, you can do with the PATH mode, and do it in a much simpler way.
The PATH Mode
When you specify the PATH mode in the FOR XML clause, column names (or their aliases) are treated as XPath expressions that determine how the data values will be mapped to the XML result set. By default, XML elements are defined based on column names. You can modify the default behavior by using the at (@) symbol to define attributes or the forward slash (/) to define the hierarchy. Let’s take a look at a few examples to demonstrate how all this works.
We’ll begin with the PATH mode’s default behavior. The following example includes a FOR XML clause that specifies only the PATH option:
|
SELECT e.EmployeeID, c.FirstName, c.MiddleName, c.LastName FROM HumanResources.Employee AS e INNER JOIN Person.Contact AS c ON c.ContactID = e.ContactID WHERE c.FirstName = ‘Rob’ FOR XML PATH; |
Because no specific attributes or hierarchies have been defined, the query will return the following XML:
|
<row> <EmployeeID>4</EmployeeID> <FirstName>Rob</FirstName> <LastName>Walters</LastName> </row> <row> <EmployeeID>168</EmployeeID> <FirstName>Rob</FirstName> <MiddleName>T</MiddleName> <LastName>Caron</LastName> </row> |
As you can see, each column is added as a child element to the <row> element. You do not have to specify the ELEMENTS directive because individual elements are returned by default, based on the column names.
You can also rename the row element and define a root element, as you’ve seen in earlier examples:
|
SELECT e.EmployeeID, c.FirstName, c.MiddleName, c.LastName FROM HumanResources.Employee AS e INNER JOIN Person.Contact AS c ON c.ContactID = e.ContactID WHERE c.FirstName = ‘Rob’ FOR XML PATH (‘Employee’), ROOT (‘Employees’); |
As the following results show, the XML now includes the <Employees> root element and the individual <Employee> row elements:
|
<Employees> <Employee> <EmployeeID>4</EmployeeID> <FirstName>Rob</FirstName> <LastName>Walters</LastName> </Employee> <Employee> <EmployeeID>168</EmployeeID> <FirstName>Rob</FirstName> <MiddleName>T</MiddleName> <LastName>Caron</LastName> </Employee> </Employees> |
Suppose, now, that you want to include the EmployeeID value as an attribute of <Employee>.You can easily do this by adding an alias to the EmployeeID column in the SELECT clause and preceding the alias name with @, as shown in the following example:
|
SELECT e.EmployeeID AS «@EmpID«, c.FirstName, c.MiddleName, c.LastName FROM HumanResources.Employee AS e INNER JOIN Person.Contact AS c ON c.ContactID = e.ContactID WHERE c.FirstName = ‘Rob’ FOR XML PATH (‘Employee’), ROOT (‘Employees’); |
Now the <Employee>elements contain the EmpID attribute, along with the employee ID:
|
<Employees> <Employee EmpID=«4«> <FirstName>Rob</FirstName> <LastName>Walters</LastName> </Employee> <Employee EmpID=«168«> <FirstName>Rob</FirstName> <MiddleName>T</MiddleName> <LastName>Caron</LastName> </Employee> </Employees> |
You can see how easy it is to return both attributes and child elements by using the PATH mode. And if you want to include elements with null values, you simply include the ELEMENTS XSINIL option in your FOR XML clause:
|
SELECT e.EmployeeID AS «@EmpID«, c.FirstName, c.MiddleName, c.LastName FROM HumanResources.Employee AS e INNER JOIN Person.Contact AS c ON c.ContactID = e.ContactID WHERE c.FirstName = ‘Rob’ FOR XML PATH (‘Employee’), ROOT (‘Employees’), ELEMENTS XSINIL; |
Now your results include the xsi:nil attribute for those fields that contain null values:
|
<Employees xmlns:xsi=«http://www.w3.org/2001/XMLSchema—instance«> <Employee EmpID=«4«> <FirstName>Rob</FirstName> <MiddleName xsi:nil=«true« /> <LastName>Walters</LastName> </Employee> <Employee EmpID=«168«> <FirstName>Rob</FirstName> <MiddleName>T</MiddleName> <LastName>Caron</LastName> </Employee> </Employees> |
As you can see, the xsi:nil attribute in the <MiddleName> element has been set to true.
Note: Because the PATH mode automatically returns values as individual child elements, the ELEMENTS directive has no effect when used by itself in a FOR XML clause. It is only when the XSINIL option is also specified that the ELEMENTS directive adds value to the clause.
In addition to defining attributes within your column aliases in the SELECT list, you can also define hierarchies. You define hierarchies by using the forward slash and specifying the element names. For example, the following SELECT defines the <EmployeeName> element and its three child elements: <FirstName>, <MiddleName>, and <LastName>:
|
SELECT e.EmployeeID AS «@EmpID«, c.FirstName AS «EmployeeName/FirstName«, c.MiddleName AS «EmployeeName/MiddleName«, c.LastName AS «EmployeeName/LastName« FROM HumanResources.Employee AS e INNER JOIN Person.Contact AS c ON c.ContactID = e.ContactID WHERE c.FirstName = ‘Rob’ FOR XML PATH (‘Employee’), ROOT (‘Employees’), ELEMENTS XSINIL; |
The statement returns the following XML result set:
|
<Employees xmlns:xsi=«http://www.w3.org/2001/XMLSchema—instance«> <Employee EmpID=«4«> <EmployeeName> <FirstName>Rob</FirstName> <MiddleName xsi:nil=«true« /> <LastName>Walters</LastName> </EmployeeName> </Employee> <Employee EmpID=«168«> <EmployeeName> <FirstName>Rob</FirstName> <MiddleName>T</MiddleName> <LastName>Caron</LastName> </EmployeeName> </Employee> </Employees> |
Notice that each <Employee>element now includes an <EmployeeName> element, and each of those elements includes the individual parts of the name.
Suppose that you now want to add an email address to your result set. You can simply add the column to the SELECT list after the other columns, as shown in the following example:
|
SELECT e.EmployeeID AS «@EmpID«, c.FirstName AS «EmployeeName/FirstName«, c.MiddleName AS «EmployeeName/MiddleName«, c.LastName AS «EmployeeName/LastName«, c.EmailAddress FROM HumanResources.Employee AS e INNER JOIN Person.Contact AS c ON c.ContactID = e.ContactID WHERE c.FirstName = ‘Rob’ FOR XML PATH (‘Employee’), ROOT (‘Employees’), ELEMENTS XSINIL; |
Because the column name is EmailAddress and no alias has been defined on that column, your XML results will now include the <EmailAddress> element as a child element to <Employee>,right after <EmployeeName>:
|
1 2 3 4 5 6 7 8 9 10 11 12 13 14 15 16 17 18 |
<Employees xmlns:xsi=«http://www.w3.org/2001/XMLSchema—instance«> <Employee EmpID=«4«> <EmployeeName> <FirstName>Rob</FirstName> <MiddleName xsi:nil=«true« /> <LastName>Walters</LastName> </EmployeeName> <EmailAddress>rob0@adventure—works.com</EmailAddress> </Employee> <Employee EmpID=«168«> <EmployeeName> <FirstName>Rob</FirstName> <MiddleName>T</MiddleName> <LastName>Caron</LastName> </EmployeeName> <EmailAddress>rob1@adventure—works.com</EmailAddress> </Employee> </Employees> |
You must be careful on how you order your columns in the SELECT list. For example, in the following SELECT statement, I added the EmailAddress column after MiddleName, but before LastName:
|
SELECT e.EmployeeID AS «@EmpID«, c.FirstName AS «EmployeeName/FirstName«, c.MiddleName AS «EmployeeName/MiddleName«, c.EmailAddress, c.LastName AS «EmployeeName/LastName« FROM HumanResources.Employee AS e INNER JOIN Person.Contact AS c ON c.ContactID = e.ContactID WHERE c.FirstName = ‘Rob’ FOR XML PATH (‘Employee’), ROOT (‘Employees’), ELEMENTS XSINIL; |
Because I do not list the parts of the employee names consecutively, they are separated in the XML results:
|
1 2 3 4 5 6 7 8 9 10 11 12 13 14 15 16 17 18 19 20 21 22 |
<Employees xmlns:xsi=«http://www.w3.org/2001/XMLSchema—instance«> <Employee EmpID=«4«> <EmployeeName> <FirstName>Rob</FirstName> <MiddleName xsi:nil=«true« /> </EmployeeName> <EmailAddress>rob0@adventure—works.com</EmailAddress> <EmployeeName> <LastName>Walters</LastName> </EmployeeName> </Employee> <Employee EmpID=«168«> <EmployeeName> <FirstName>Rob</FirstName> <MiddleName>T</MiddleName> </EmployeeName> <EmailAddress>rob1@adventure—works.com</EmailAddress> <EmployeeName> <LastName>Caron</LastName> </EmployeeName> </Employee> </Employees> |
As the XML shows, there are now two instances of the <EmployeeName> child element in each <Employee> element. The way to address this issue is to make certain you list the columns in your SELECT list in the order you want the XML rendered.
In an earlier example, I demonstrated how to include an XML column in your query. You can also include an XML column when using the PATH mode. The XML data returned by the column is incorporated into the XML that is returned by the query. For instance, the following SELECT statement adds education data to the result set:
|
SELECT e.EmployeeID AS «@EmpID«, c.FirstName AS «EmployeeName/FirstName«, c.MiddleName AS «EmployeeName/MiddleName«, c.LastName AS «EmployeeName/LastName«, c.EmailAddress, jc.Resume.query(‘declare namespace ns= «http://schemas.microsoft.com/sqlserver/2004/07/adventure-works/Resume»; /ns:Resume/ns:Education’) FROM HumanResources.Employee e INNER JOIN Person.Contact c ON c.ContactID = e.ContactID INNER JOIN HumanResources.JobCandidate jc ON e.EmployeeID = jc.EmployeeID WHERE e.EmployeeID = 268 FOR XML PATH (‘Employee’); |
The <Education> element and child elements are now included the XML result set:
|
1 2 3 4 5 6 7 8 9 10 11 12 13 14 15 16 17 18 19 20 21 22 23 24 25 26 |
<Employee EmpID=«268«> <EmployeeName> <FirstName>Stephen</FirstName> <MiddleName>Y</MiddleName> <LastName>Jiang</LastName> </EmployeeName> <EmailAddress>stephen0@adventure—works.com</EmailAddress> <ns:Education xmlns:ns=«http://schemas.microsoft.com/sqlserver/2004/07/adventure—works/Resume«> <ns:Edu.Level>Bachelor</ns:Edu.Level> <ns:Edu.StartDate>1986—09—15Z</ns:Edu.StartDate> <ns:Edu.EndDate>1990—05—20Z</ns:Edu.EndDate> <ns:Edu.Degree>Bachelor of Arts and Science</ns:Edu.Degree> <ns:Edu.Major>Business</ns:Edu.Major> <ns:Edu.Minor /> <ns:Edu.GPA>3.3</ns:Edu.GPA> <ns:Edu.GPAScale>4</ns:Edu.GPAScale> <ns:Edu.School>Louisiana Business College of New Orleans</ns:Edu.School> <ns:Edu.Location> <ns:Location> <ns:Loc.CountryRegion>US </ns:Loc.CountryRegion> <ns:Loc.State>LA</ns:Loc.State> <ns:Loc.City>New Orleans</ns:Loc.City> </ns:Location> </ns:Edu.Location> </ns:Education> </Employee> |
As these preceding examples demonstrate, the PATH mode provides a relatively easy way to define elements and attributes in your XML result set. However, the PATH mode, like the other FOR XML modes, supports additional options. For that reason, be sure to check out SQL Server Books Online for more information about each mode and about the FOR XML clause in general. Despite how basic the clause itself might seem, it provides numerous options for returning exactly the type of XML data you need.
Microsoft SQL Server позволяет формировать XML документы на языке T-SQL на основе реляционных данных, которые хранятся в таблицах, это можно реализовать с помощью конструкции FOR XML, сейчас я Вам покажу, как именно это делается.
Данные в формате XML – это очень удобные данные, такой формат очень часто используют для обмена данными между различными приложениями. Детально говорить о том, что такое XML я не буду, если кого интересует, можете почитать соответствующий материал – «Основы XML для начинающих».
Поэтому в Microsoft SQL Server, конечно же, есть специальный функционал для работы с XML, начиная с 2005 версии SQL Server, даже существует специальный тип данных XML, у которого есть свои собственные методы, позволяющие выполнять запросы к экземпляру XML документа, хранящемуся в переменной или столбце с типом XML (некоторые из них мы рассматривали в материале – Transact-SQL — функции для работы с XML).
Также в языке T-SQL существует несколько конструкций для работы с XML данными, которые позволяют нам как сформировать XML документ, так и извлечь данные из XML документа. Например, с помощью конструкции OPENXML мы можем из XML данных получить привычные нам табличные данные, а с помощью конструкции FOR XML мы можем сформировать XML документ из табличных данных, для того чтобы сохранить его в базе данных или передать клиентскому приложению. В данной статье мы поговорим о том, как можно сформировать XML данные с помощью FOR XML, в следующих материалах я расскажу про конструкцию OPENXML.
Содержание
- Конструкция FOR XML в T-SQL
- Режимы работы конструкции FOR XML
- Параметры конструкции FOR XML
- Примеры создания XML данных с помощью конструкции FOR XML на T-SQL
- 1. Пример использования режима RAW в конструкции FOR XML
- 2. Пример использования режима AUTO в конструкции FOR XML
- 3. Пример использования режима EXPLICIT в конструкции FOR XML
- 4. Пример использования режима PATH в конструкции FOR XML
FOR XML – конструкция языка T-SQL, позволяющая получить результаты SQL запроса в формате XML. Данная конструкция определяется после определения всего SQL запроса, в случае необходимости в определение списка выборки вносятся изменения с целью формирования определённой структуры XML документа. Конструкцию FOR XML можно использовать также и во вложенных запросах. У данной конструкции есть несколько режимов работы.
Режимы работы конструкции FOR XML
- RAW – режим, при котором в XML документе создается одиночный элемент <row> для каждой строки результирующего набора данных инструкции SELECT;
- AUTO – в данном режиме структура XML документа создается автоматически, в зависимости от инструкции SELECT (объединений, вложенных запросов и так далее);
- EXPLICIT – самый расширенный режим работы конструкции FOR XML, при котором Вы сами формируете структуру итогового XML документа, за счет чего этот режим самый трудоемкий. Данный режим в основном используется для создания XML документов с очень сложной структурой, которую не получается реализовать с помощью других режимов;
- PATH – это своего рода упрощенный режим EXPLICIT, который хорошо справляется со множеством задач по формированию XML документов, включая формирование атрибутов для элементов. Если Вам нужно самим сформировать структуру XML данных, то рекомендовано использовать именно этот режим.
У конструкции FOR XML есть еще и параметры, с помощью которых мы также можем влиять на структуру итогового XML документа. Давайте рассмотрим несколько полезных параметров конструкции FOR XML.
Параметры конструкции FOR XML
- TYPE – возвращает сформированные XML данные с типом XML, если параметр TYPE не указан, данные возвращаются с типом NVARCHAR(MAX). Параметр необходим в тех случаях, когда над итоговыми XML данными будут проводиться операции, характерные для XML данных, например, выполнение инструкций на языке XQuery;
- ELEMENTS – если указать данный параметр, столбцы возвращаются в виде вложенных элементов;
- ROOT – параметр добавляет к результирующему XML-документу один элемент верхнего уровня (корневой элемент), по умолчанию «root», однако название можно указать произвольное.
Примеры создания XML данных с помощью конструкции FOR XML на T-SQL
Сначала давайте создадим тестовые данные, которые мы будет использовать в примерах. Все примеры будут выполнены в Microsoft SQL Server 2016 Express.
   --Инструкция создания таблицы 1
   CREATE TABLE TestTable(
        [ProductId] INT IDENTITY(1,1) NOT NULL,
        [CategoryId] INT NOT NULL,
        [ProductName] VARCHAR(100) NOT NULL,
        [Price] MONEY NULL
   )
   GO
   --Инструкция создания таблицы 2
   CREATE TABLE TestTable2(
        [CategoryId] INT IDENTITY(1,1) NOT NULL,
        [CategoryName] VARCHAR(100) NOT NULL
   )
   GO
   --Инструкция добавления данных
   INSERT INTO TestTable
        VALUES (1,'Клавиатура', 100),
                   (1, 'Мышь', 50),
                   (2, 'Телефон', 300)
   GO
   INSERT INTO TestTable2
        VALUES ('Комплектующие компьютера'),
                   ('Мобильные устройства')
   GO
   --Запросы на выборку
   SELECT * FROM TestTable
   SELECT * FROM TestTable2
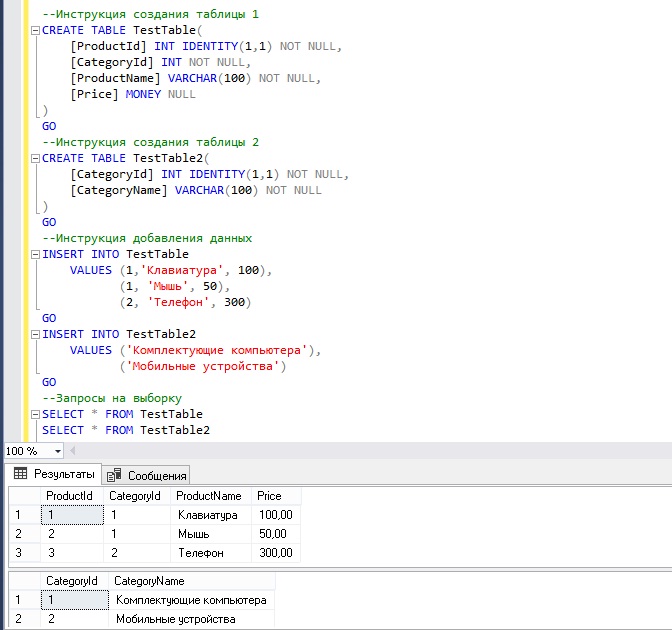
Данные созданы, теперь переходим к самим примерам.
1. Пример использования режима RAW в конструкции FOR XML
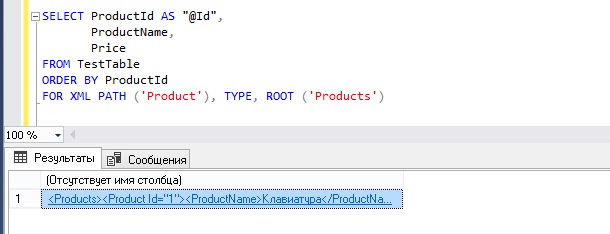
В этом примере мы используем режим RAW (режим указывается после ключевых слов FOR XML), а также параметр TYPE, для этого мы просто после основного запроса SELECT напишем данную конструкцию с указанием нужного режима и параметра.
   SELECT ProductId, ProductName, Price
   FROM TestTable
   ORDER BY ProductId
   FOR XML RAW, TYPE
Этот и все запросы в остальных примерах будут возвращать XML данные, нажав на которые, мы сможем посмотреть структуру итогового XML документа.
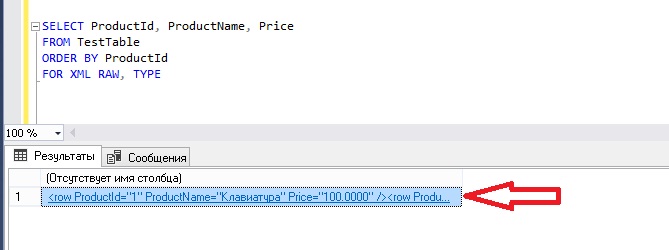
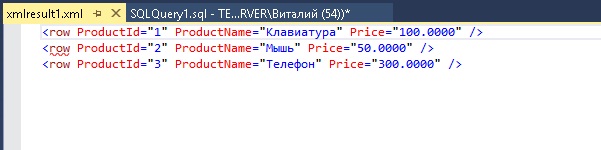
Запрос нам вернул XML данные, где каждая строка таблицы TestTable является элементом row, а все столбцы отображены в виде атрибутов этого элемента.
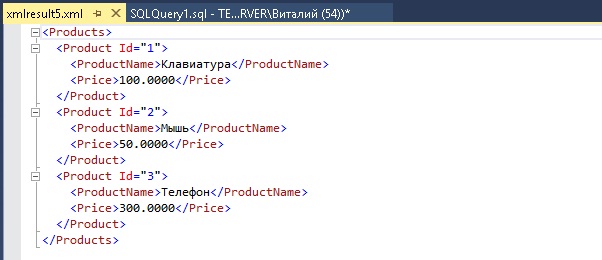
В следующем запросе мы укажем дополнительные параметры конструкции FOR XML.
   SELECT ProductId, ProductName, Price
   FROM TestTable
   ORDER BY ProductId
   FOR XML RAW ('Product'), TYPE, ELEMENTS, ROOT ('Products')
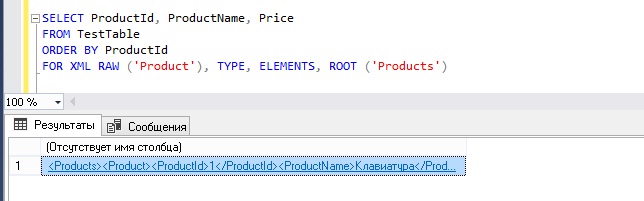

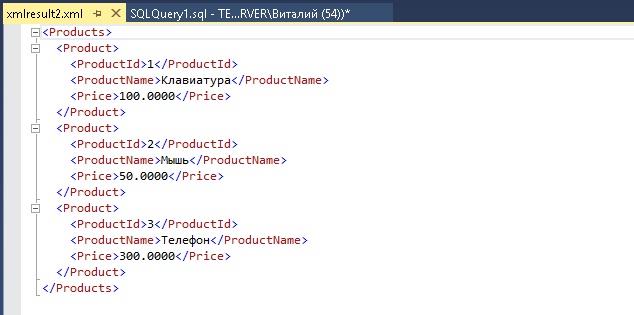
В данном случае мы изменили название каждого элемента на Product, для этого указали соответствующий параметр, добавили параметр ELEMENTS, для того чтобы столбцы были отображены в виде вложенных элементов, а также добавили корневой элемент Products с помощью параметра ROOT.
2. Пример использования режима AUTO в конструкции FOR XML
Сейчас давайте попробуем режим AUTO, при этом мы еще модифицируем запрос, например, добавим в него объединение для наглядности.
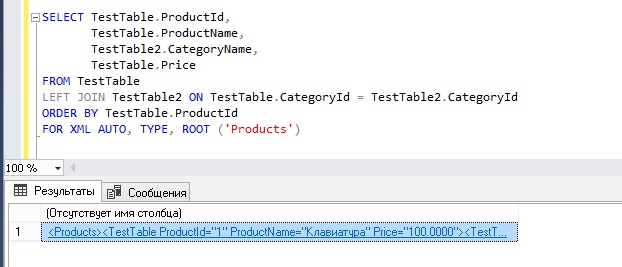
   SELECT TestTable.ProductId,
           TestTable.ProductName,
           TestTable2.CategoryName,
           TestTable.Price
   FROM TestTable
   LEFT JOIN TestTable2 ON TestTable.CategoryId = TestTable2.CategoryId
   ORDER BY TestTable.ProductId
   FOR XML AUTO, TYPE, ROOT ('Products')
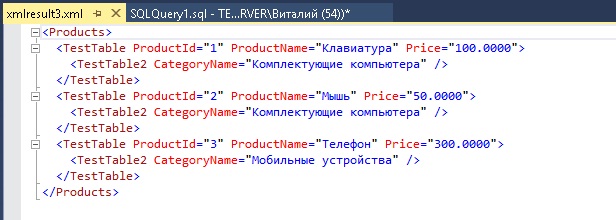
В данном режиме нам вернулись XML данные, где записи таблицы TestTable представлены в виде элементов, ее столбцы — в виде атрибутов, а соответствующие записи (на основе объединения) таблицы TestTable2 — в виде вложенных элементов с атрибутами. Параметром ROOT мы также задали корневой элемент.
3. Пример использования режима EXPLICIT в конструкции FOR XML
В режиме EXPLICIT мы уже можем сами указывать, что именно будет элементом, а что атрибутом.
   SELECT 1 AS Tag,
       NULL AS Parent,
       ProductId AS [Product!1!Id],
       ProductName AS [Product!1!ProductName!ELEMENT],
       Price AS [Product!1!Price!ELEMENT]
   FROM TestTable
   ORDER BY [Product!1!Id]
   FOR XML EXPLICIT, TYPE, ROOT ('Products')
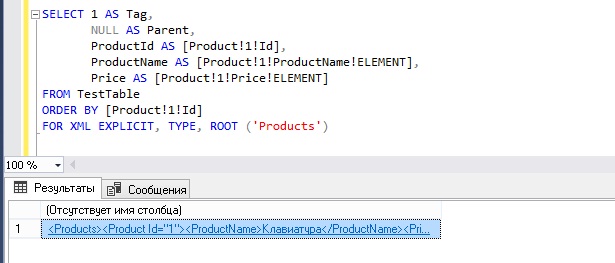
В данном случае мы указали, что у нас будет всего один уровень в иерархии (1 AS Tag), если нужно несколько, то пишутся дополнительные запросы и объединяются с помощью UNUON ALL, в Parent при этом указывается номер родительского элемента, для верхнего уровня в Parent, как в нашем случае, ничего не указывается.
С помощью специального синтаксиса мы определили, что значение ProductId будет атрибутом Id у элемента Product, а ProductName и Price будут вложенными элементами элемента Product, для этого мы в имена этих столбцов добавили директиву ELEMENT. Параметры TYPE и ROOT мы здесь также использовали.
4. Пример использования режима PATH в конструкции FOR XML
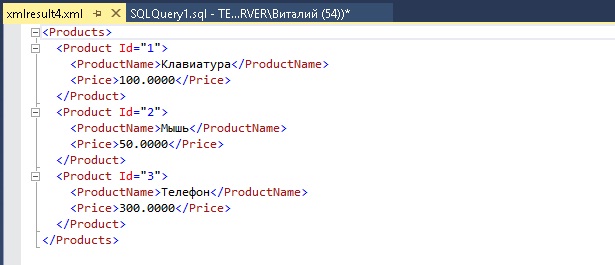
Точно такой же результат, как и в примере выше, можно получить и с помощью режима PATH, только делается это немного проще.
   SELECT ProductId AS "@Id",
           ProductName,
           Price
   FROM TestTable
   ORDER BY ProductId
   FOR XML PATH ('Product'), TYPE, ROOT ('Products')
В этом запросе мы с помощью параметра задали название элементов для каждой строки данных, т.е. Product, указали корневой элемент с помощью параметра ROOT. С помощью символа @, указали, что значение столбца ProductId должно быть атрибутом Id у элемента строки (если имя столбца начинается с символа @ и не содержит косую черту /, то SQL сервер создает атрибут элемента). В итоге структура XML данных у нас получилась точно такая же, как и при использовании режима EXPLICIT в примере 3.
Заметка! Для изучения языка T-SQL на профессиональном уровне рекомендую посмотреть мои видеокурсы по T-SQL.
У меня все, пока!
Introduction
A while ago, I was given a task to generate an XML file from database using stored procedure and was given a stored procedure as reference. The reference stored procedure fetched data into a cursor and then processed each record and created XML elements by appending string literals and then returned the generated string «XML». After looking at that stored procedure, I thought to myself that there must be a better way to do this and there was. Using FOR XML clause, one can return table records as XML data. After learning about it, I decided to write an article about it.
Article Series Roadmap
This is article 1 of a 4 part series. Other articles are listed below:
- FOR XML Basics (RAW Mode): 1 of 4
- FOR XML Basics (AUTO Mode): 2 of 4
- FOR XML Basics (EXPLICIT Mode): 3 of 4
- FOR XML Basics (PATH Mode): 4 of 4
Contents
- Background
- Using the Code
- FOR XML Modes
- RAW Mode
- Wrapping Up
Background
Basic understanding of SQL Joins is required to follow along.
Using the Code
The article below will use the following database. You can copy/paste the following code to follow along or create your own database and tweak the queries.
Create database as shown below:
CREATE DATABASE FOR_XML_TUTORIAL;
Execute the below statements to create CUSTOMER and ORDER tables and populate it with data.
USE [FOR_XML_TUTORIAL];

CREATE TABLE [CUSTOMER]
(
    CUSTOMER_ID INT PRIMARY KEY NOT NULL,
    FIRST_NAME VARCHAR(25) NOT NULL,
    LAST_NAME VARCHAR(25) NOT NULL,
    POSTAL_CODE VARCHAR(2) NOT NULL,
);

CREATE TABLE [ORDER]
(
    ORDER_ID INT PRIMARY KEY NOT NULL,
    CUSTOMER_ID INT NOT NULL REFERENCES CUSTOMER(CUSTOMER_ID),
    TOTAL_ITEMS INT NOT NULL,
    TOTAL_AMOUNT NUMERIC(18,2) NOT NULL
);

INSERT INTO CUSTOMER VALUES (1, 'John', 'Michaels', 'TX');

INSERT INTO CUSTOMER VALUES (2, 'Shawn', 'Cena', 'MA');

INSERT INTO CUSTOMER VALUES (3, 'Dwayne', 'Austin', 'TX');

INSERT INTO CUSTOMER VALUES (4, 'Steve', 'Johnson', 'FL');

INSERT INTO [ORDER] VALUES (1, 1, 5, 32.50);

INSERT INTO [ORDER] VALUES (2, 1, 2, 21.36);

INSERT INTO [ORDER] VALUES (3, 2, 7, 59.00);

INSERT INTO [ORDER] VALUES (4, 3, 2, 18.24);

INSERT INTO [ORDER] VALUES (5, 4, 3, 30.00);

INSERT INTO [ORDER] VALUES (6, 4, 6, 66.00);
FOR XML Modes
When using FOR XML clause, a mode must be specified which returns XML accordingly. Following is a list of available modes:
RAWAUTOEXPLICITPATH
We will be using the below query to return customer information along with orders.
SELECT        C.FIRST_NAME,
              C.LAST_NAME,
              C.POSTAL_CODE,
              O.ORDER_ID,
              O.TOTAL_ITEMS,
              O.TOTAL_AMOUNT
FROM          [CUSTOMER] C
INNER JOIN    [ORDER] O
ON            C.CUSTOMER_ID = O.CUSTOMER_ID
The query returns.
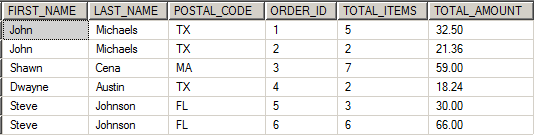
To return XML data in RAW mode, simply append FOR XML RAW in the above query.
SELECT        C.FIRST_NAME,
              C.LAST_NAME,
              C.POSTAL_CODE,
              O.ORDER_ID,
              O.TOTAL_ITEMS,
              O.TOTAL_AMOUNT
FROM          [CUSTOMER] C
INNER JOIN    [ORDER] O
ON            C.CUSTOMER_ID = O.CUSTOMER_ID
FOR XML RAW
The above query returns:

As you can see, each record returned by the query was converted to an XML element «row» and columns into attributes with attribute values set to values returned by query.
To change the element name, append the desired element name after RAW keyword as below:
SELECT        C.FIRST_NAME,
              C.LAST_NAME,
              C.POSTAL_CODE,
              O.ORDER_ID,
              O.TOTAL_ITEMS,
              O.TOTAL_AMOUNT
FROM          [CUSTOMER] C
INNER JOIN    [ORDER] O
ON            C.CUSTOMER_ID = O.CUSTOMER_ID
FOR XML RAW('Customer')
The above query returns:

This changed each element’s name from row to Customer.
To change attribute’s name, simply provide alias to columns as below:
SELECT        C.FIRST_NAME AS 'FirstName',
              C.LAST_NAME AS 'LastName',
              C.POSTAL_CODE AS 'PostalCode',
              O.ORDER_ID AS 'OrderId',
              O.TOTAL_ITEMS AS 'Items',
              O.TOTAL_AMOUNT AS 'Amount'
FROM          [CUSTOMER] C
INNER JOIN    [ORDER] O
ON            C.CUSTOMER_ID = O.CUSTOMER_ID
FOR XML RAW('Customer')
The above query returns data with new attribute names:

To nest each element inside a root element, append ROOT keyword as below:
SELECT        C.FIRST_NAME AS 'FirstName',
              C.LAST_NAME AS 'LastName',
              C.POSTAL_CODE AS 'PostalCode',
              O.ORDER_ID AS 'OrderId',
              O.TOTAL_ITEMS AS 'Items',
              O.TOTAL_AMOUNT AS 'Amount'
FROM          [CUSTOMER] C
INNER JOIN    [ORDER] O
ON            C.CUSTOMER_ID = O.CUSTOMER_ID
FOR XML RAW('Customer'), ROOT
The data returned is now nested inside a parent element named «root«.

To change root element’s name, append the desired name after ROOT keyword as below:
SELECT        C.FIRST_NAME AS 'FirstName',
              C.LAST_NAME AS 'LastName',
              C.POSTAL_CODE AS 'PostalCode',
              O.ORDER_ID AS 'OrderId',
              O.TOTAL_ITEMS AS 'Items',
              O.TOTAL_AMOUNT AS 'Amount'
FROM          [CUSTOMER] C
INNER JOIN    [ORDER] O
ON            C.CUSTOMER_ID = O.CUSTOMER_ID
FOR XML RAW('Customer'), ROOT('Customers')
The above query returns data with root element’s name changed to «Customers«.

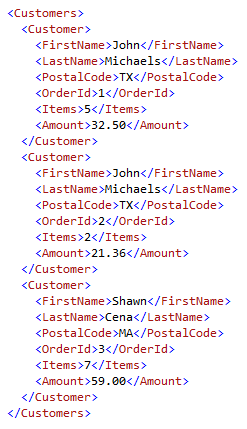
Till now, all the queries we executed returned XML data in a format in which each column was converted to an attribute. To change this format and return XML in which each column is mapped to its own element, append ELEMENTS keyword as below:
SELECT        C.FIRST_NAME AS 'FirstName',
              C.LAST_NAME AS 'LastName',
              C.POSTAL_CODE AS 'PostalCode',
              O.ORDER_ID AS 'OrderId',
              O.TOTAL_ITEMS AS 'Items',
              O.TOTAL_AMOUNT AS 'Amount'
FROM          [CUSTOMER] C
INNER JOIN    [ORDER] O
ON            C.CUSTOMER_ID = O.CUSTOMER_ID
FOR XML RAW('Customer'), ROOT('Customers'), ELEMENTS
Now each record’s attribute is converted into an element with its name set to its alias and value set to the value returned by query.
Note: I reduced the number of rows to make the below image smaller:
Wrapping Up
That is all for RAW mode in FOR XML clause. In the next article, we will learn about AUTO mode.
Software Engineer and a clean code proponent, working on various .NET, Oracle and front end technologies including Web Forms, MVC, Web API, LINQ, EF, T-SQL, PL/SQL, SSIS, JavaScript, jQuery.