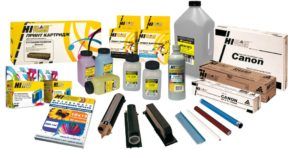
Расходные материалы и ЗИП для оргтехники в Екатеринбурге
Отправка ежедневно в Ваш город через СДЭК, Почта России и транспортными компаниями на Ваш выбор
Маркет

- Описание
Описание
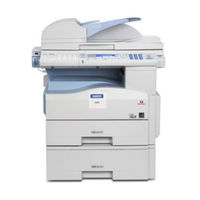
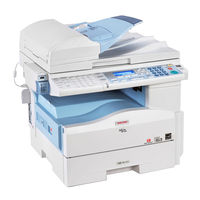
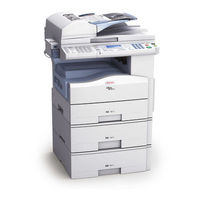
Инструкция пользователя Ricoh Aficio MP 201F/201SPF (Русская) Тип OI201SPFRU
Производитель: RICOH
Похожие товары
- previous post: Интерфейс беспроводной сети IEEE 802.11a/g/n тип M2 416572
- next post: Наклейка с названием бренда для DD4450
Нашли дешевле в Екатеринбурге – снизим цену специально для Вас! Не нашли что искали, свяжитесь с нами!
- Manuals
- Brands
- Ricoh Manuals
- All in One Printer
- Aficio MP 201SPF
Manuals and User Guides for Ricoh Aficio MP 201SPF. We have 5 Ricoh Aficio MP 201SPF manuals available for free PDF download: Operating Instructions Manual, Service Manual, Quick Manual

Ricoh Aficio MP 201SPF Operating Instructions Manual (1660 pages)
Brand: Ricoh
|
Category: All in One Printer
|
Size: 50.73 MB
Table of Contents
-
Table of Contents
4
-
About this Machine
1
-
Documentation for this Machine
3
-
Table of Contents
4
-
Manuals for this Machine
8
-
Manuals List
10
-
What You Can Do with this Machine
11
-
Using this Machine as a Copier
11
-
Using this Machine as a Printer
11
-
Paperless Fax Transmission
12
-
Fax Transmission and Reception over the Internet
13
-
Using the Scanner in a Network Environment
14
-
Administrating the Machine (Security Functions)
14
-
Monitoring the Machine Via Computer
15
-
-
Notice
16
-
Important
16
-
-
How to Read this Manual
17
-
Symbols
17
-
Name of Major Item
17
-
Note
18
-
-
Safety Information
19
-
Safety During Operation
19
-
Safety Precautions to be Followed
19
-
Handling the Main Machine
22
-
-
Safety Labels of this Machine
27
-
Positions of WARNING and CAUTION Labels
27
-
Power Switch Symbols
28
-
-
Energy Saving Functions
29
-
Laws and Regulations
30
-
Legal Prohibition
30
-
Laser Safety
30
-
Notes to Users in the United States of America
30
-
Important Safety Instructions
31
-
-
1 Simple Search
34
-
Searching by What You Want to Do
34
-
I Want to Save My Paper Document
34
-
I Want to Convert Documents to Electronic Formats Easily
35
-
I Want to Register Destinations
35
-
I Want to Operate the Machine more Effectively
36
-
-
Searching by Keyword
38
-
Paper
38
-
Register/Change/Delete
38
-
Settings
39
-
Forwarding
39
-
Install
39
-
-
-
2 Getting Started
42
-
Guide to Components
42
-
Other Items
45
-
External Items
45
-
Internal Items
45
-
-
Control Panel
47
-
• P.50 «Display Panel
50
-
Reading the Display and Using Keys
51
-
-
Display Panel
51
-
Changing the Display Language
52
-
-
When the Authentication Screen Is Displayed
53
-
User Code Authentication (Using the Control Panel)
53
-
User Code Authentication (Using a Printer Driver)
54
-
Login (Using the Control Panel)
54
-
Logout (Using the Control Panel)
54
-
Login (Using a Printer Driver)
55
-
Login (Using Web Image Monitor)
55
-
Logout (Using Web Image Monitor)
55
-
-
Changing Modes
57
-
System Reset
57
-
-
Turning On/Off the Power
59
-
Turning on the Main Power
59
-
Turning on the Power
60
-
Turning off the Power
60
-
Turning off the Main Power
61
-
Saving Energy
61
-
-
-
3 Adding Paper
64
-
Loading Paper
64
-
Loading Paper into the Paper Trays
64
-
Orientation-Fixed Paper or Two-Sided Paper
66
-
-
Changing the Paper Size
69
-
Changing the Paper Size in the Paper Tray (Tray 1)
69
-
Changing the Paper Size in the Optional Paper Tray Unit (Tray 2 and Tray 3)
72
-
Selecting the Paper Size with User Tools
74
-
-
Recommended Paper Sizes and Types
76
-
Envelopes
79
-
Unusable Paper
81
-
Paper Storage
82
-
-
4 Adding Toner
84
-
Replacing Toner
85
-
Sending Faxes or Scanned Documents When Toner Has Run out
86
-
Used Toner
87
-
-
5 Entering Text
88
-
Available Characters
88
-
Keys
88
-
How to Enter Text
89
-
Entering Symbols
93
-
Entering Numbers
96
-
Deleting Characters
96
-
-
6 Operating Instructions
98
-
Installing Operating Instructions
98
-
PDF Manuals
98
-
-
How to Use the Operating Instructions
100
-
Opening from the Icon
100
-
Opening from the [Start] Menu
100
-
Opening from the CD-ROM
101
-
-
-
7 Remarks
102
-
Dos and Don’ts
102
-
Where to Put Your Machine
104
-
Machine Environment
104
-
Optimum Environmental Conditions
105
-
Environments to Avoid
106
-
-
Power Connection
106
-
-
Maintaining Your Machine
109
-
Cleaning the Exposure Glass
109
-
Cleaning the ADF
109
-
Cleaning the Power Cable Plug
110
-
-
Counter
111
-
Displaying the Total Counter
111
-
-
-
8 Appendix
112
-
Software and Utilities Included on the CD-ROM
112
-
Viewing the Contents of the CD-ROM
112
-
Printer Drivers for this Machine
112
-
TWAIN Driver
114
-
LAN-Fax Driver
114
-
Desktopbinder Lite
115
-
Smartdevicemonitor for Admin
115
-
Desktopbinder-Smartdevicemonitor for Client
117
-
-
Specifications for the Main Unit
118
-
Specifications for Auto Document Feeder
122
-
Specifications for Paper Tray Unit (Tray 2 and Tray 3)
123
-
Specifications for Wireless LAN Board
124
-
Trademarks
125
-
Index
128
-
Copy Reference
136
-
-
-
-
Table of Contents
138
-
Manuals for this Machine
140
-
Notice
142
-
Important
142
-
-
How to Read this Manual
143
-
Symbols
143
-
Name of Major Item
143
-
Note
143
-
-
Laws and Regulations
144
-
Legal Prohibition
144
-
-
Display
145
-
Reading the Display and Using Keys
145
-
Scroll Keys
146
-
Placing Originals
148
-
-
Originals
148
-
Sizes and Weights of Recommended Originals
148
-
Sizes Selectable as Regular Size Originals
149
-
Missing Image Area
150
-
-
Placing Originals
152
-
Original Orientation
152
-
Placing Originals on the Exposure Glass
152
-
Placing Originals in the ADF
153
-
Regular Sizes
154
-
Specifying Original Size When a Paper Tray Is Selected
154
-
Specifying Original Size When the Bypass Tray Is Selected
157
-
-
2 Copying
162
-
Basic Procedure
162
-
Copying from the Bypass Tray
164
-
Copying Onto Regular Size Paper
166
-
Copying Onto Custom Size Paper
167
-
Copying Onto OHP Transparencies
168
-
Copying Onto Thick Paper
169
-
Copying Onto Envelopes
170
-
-
Reducing or Enlarging Originals
175
-
Preset Reduce/Enlarge
175
-
Zoom
177
-
-
Duplex Copying
180
-
Combined Copying
184
-
One-Sided Combine
184
-
Two-Sided Combine
188
-
-
Series Copies
191
-
Finishing
193
-
Sort
193
-
-
Adjusting Copy Image Density
195
-
Selecting the Original Type
196
-
Selecting Copy Paper
197
-
-
3 Copier Features
198
-
Accessing User Tools
198
-
Changing Default Settings
198
-
Quitting User Tools
199
-
-
User Tools Menu
200
-
-
4 Appendix
204
-
Function Compatibility
204
-
Trademarks
206
-
Index
208
-
Printer Reference
212
-
-
-
-
Table of Contents
214
-
Manuals for this Machine
218
-
Notice
220
-
Important
220
-
-
How to Read this Manual
221
-
Symbols
221
-
Note
221
-
-
Laws and Regulations
222
-
Legal Prohibition
222
-
-
Model-Specific Information
223
-
1 Preparing the Machine
224
-
Confirming the Connection Method
224
-
Network Connection
224
-
Local Connection
226
-
-
Installing the Printer Driver
227
-
Quick Install
227
-
Using the Smartdevicemonitor for Client Port
228
-
Using the Standard TCP/IP Port
233
-
Using the LPR Port
234
-
Using the WSD Port
236
-
-
Using as a Windows Network Printer
238
-
Using as a Netware Print Server/Remote Printer
240
-
Form Feed
241
-
Banner Page
242
-
Printing after Resetting the Printer
242
-
-
Installing the Printer Driver Using USB
243
-
Windows 2000/XP, Windows Server 2003/2003 R2 — USB
243
-
Windows Vista, Windows Server 2008 — USB
244
-
-
Printing with Parallel Connection
246
-
Making Option Settings for the Printer
248
-
Conditions for Bidirectional Communication
248
-
If Bidirectional Communication Is Disabled
249
-
-
Installing Font Manager
250
-
Using Adobe Pagemaker Version 6.0, 6.5, or 7.0
251
-
-
2 Printing Documents
252
-
Displaying the Printer Driver Settings Screen
252
-
Making Printer Default Settings — the Printer Properties
252
-
Making Printer Default Settings — Printing Preferences
252
-
Making Printer Settings from an Application
253
-
-
Setting Paper on the Bypass Tray
254
-
Setting the Paper Size Using the Control Panel
256
-
Setting Custom Size Paper Using the Control Panel
258
-
Setting Thick Paper or OHP Transparencies Using the Control Panel
260
-
Setting Envelopes Using the Control Panel
262
-
-
Printing on Orientation-Fixed or Two-Sided Paper
268
-
Frequently Used Print Methods
270
-
Standard Printing
270
-
Printing on both Sides of Sheets
271
-
Combining Multiple Pages into Single Page
273
-
Pages Per Sheet
275
-
Using One Click Presets
276
-
-
Advanced Printing
278
-
Menu Names and Brief Overview of each Function
278
-
Collate
278
-
-
If Error Occurs with the Specified Paper Size and Type
280
-
Printing from a Selected Tray
280
-
Canceling a Print Job
281
-
-
Spool Printing
283
-
Registering Classification Codes
284
-
Configuring Classification Codes
285
-
Specifying the Classification Code for a Print Job
285
-
-
-
3 Printing Stored Documents
288
-
Display
288
-
Reading the Display and Using Keys
288
-
-
Using the Print Job Function
290
-
Print Job Screen
290
-
-
Printing from the Print Job Screen
293
-
Sample Print
293
-
Locked Print
296
-
Hold Print
300
-
Stored Print
303
-
Deleting Stored Print Files
306
-
-
Printing from the User ID Screen
307
-
Printing the Selected Print Job
307
-
Printing All Print Jobs
308
-
-
Canceling a Print Job
310
-
Canceling a Print Job Using the Control Panel
310
-
Windows — Canceling a Print Job from the Computer
310
-
Mac os — Canceling a Print Job from the Computer
311
-
-
Checking the Error Log
312
-
-
4 Printing from Desktopbinder Lite
314
-
Printing a PDF File Directly
314
-
Printing Method
314
-
Using Desktopbinder Lite
314
-
PDF Direct Print Properties
316
-
Using Commands
317
-
-
-
5 Printer Features
318
-
Accessing User Tools
318
-
Changing Default Settings
318
-
Quitting User Tools
318
-
Menu Protect
319
-
-
List/Test Print
320
-
Printing the Configuration Page
320
-
-
Maintenance
323
-
System
324
-
Host Interface
328
-
PCL Menu
329
-
PS Menu
331
-
PDF Menu
333
-
-
6 Appendix
334
-
Using the Virtual Printer
334
-
Adding a Virtual Printer
334
-
Changing a Virtual Printer Configuration
335
-
Confirming a Virtual Printer Configuration
335
-
Deleting a Virtual Printer
336
-
Printing Using a Virtual Printer
336
-
-
Specifications
338
-
Trademarks
340
-
Index
342
-
Scanner Reference
348
-
-
-
-
Table of Contents
350
-
Manuals for this Machine
354
-
Troubleshooting
354
-
Notice
356
-
Important
356
-
-
How to Read this Manual
357
-
Symbols
357
-
Note
357
-
-
Laws and Regulations
358
-
Legal Prohibition
358
-
-
About the Scanner Functions
359
-
Display Panel
361
-
Reading the Display and Using Keys
361
-
Confirmation Displays
362
-
-
1 Sending Scan Files by E-Mail
364
-
Before Sending Scan Files by E-Mail
364
-
Overview of Sending Scan Files by E-Mail
364
-
Preparation for Sending by E-Mail
365
-
Registering E-Mail Addresses in the Address Book
367
-
E-Mail Screen
368
-
-
Basic Procedure for Sending Scan Files by E-Mail
370
-
Specifying E-Mail Destinations
373
-
Selecting a Destination Registered to a Quick Dial Key
373
-
Selecting the Destination from the Machine’s Address Book
373
-
Entering an E-Mail Address Manually
379
-
Selecting Destinations by Searching an LDAP Server
380
-
Registering a Directly-Entered Destination in the Address Book
383
-
-
Specifying the E-Mail Sender
385
-
Selecting a Sender Registered to a Quick Dial Key
385
-
Selecting a Sender from the List
386
-
Using a Registration Number to Specify a Sender Name
388
-
Searching for a Sender by Name
389
-
Searching for a Sender by E-Mail Address
391
-
-
Setting the Return Receipt Function
394
-
Entering the E-Mail Subject
395
-
Security Settings to E-Mails
396
-
Sending Encrypted E-Mail
396
-
Sending E-Mail with a Signature
397
-
-
-
2 Sending Scan Files to Folders
400
-
Before Sending Files by Scan to Folder
400
-
Overview of Sending Scan Files by Scan to Folder
400
-
Preparation for Sending by Scan to Folder
402
-
Registering Destination Folders in the Address Book
404
-
Scan to Folder Screen
405
-
-
Basic Procedure When Using Scan to Folder
407
-
Specifying Scan to Folder Destinations
409
-
Selecting a Destination Registered to a Quick Dial Key
409
-
Selecting the Destination from the Machine’s Address Book
409
-
Sending Files to a Shared Folder
415
-
Sending Files to an FTP Server
420
-
Sending Files to Netware Server
422
-
Registering the Path to the Selected Destination in the Address Book
427
-
-
-
3 Sending Scan Files Using WSD
430
-
Before Sending Scan Files Using WSD
430
-
Overview of Sending Scan Files Using WSD
430
-
Preparation for Sending Files Using WSD
432
-
-
Using the WSD Scanner (Push Type)
436
-
WSD Scanner (Push Type) Screen
436
-
Basic Procedure for Sending Scan Files Using WSD (Push Type)
436
-
Specifying the Destination Client Computer
438
-
-
Using the WSD Scanner (Pull Type)
442
-
Basic Procedure for Sending Scan Files Using WSD (Pull Type)
442
-
-
Configuring the Scan Settings on a Client Computer
444
-
Changing a Scan Profile
444
-
Creating a New Scan Profile
445
-
Scan Profile Items and Settings
445
-
-
-
4 Saving Scan Files on a Removable Memory Device
448
-
Before Saving Files on a Removable Memory Device
448
-
Overview of Saving Files on a Removable Memory Device
448
-
-
Basic Procedure for Saving Scan Files on a Removable Memory Device
450
-
-
5 Delivering Scan Files
452
-
Before Delivering Files
452
-
Overview of Scan File Delivery
452
-
Preparing to Deliver Files
453
-
Installing Desktopbinder Lite from the Supplied CD-ROM
455
-
Network Delivery Scanner Screen
456
-
-
Add Dest
457
-
Basic Procedure for Delivering Files
458
-
Specifying Delivery Destinations
461
-
Selecting a Destination Using a Quick Dial Key
461
-
Selecting a Destination Registered in the Destination List of the Delivery Server
461
-
-
Specifying the Sender
467
-
Selecting a Sender Registered to a Quick Dial Key
467
-
Selecting a Sender by Searching the Delivery Server’s Destination List
468
-
-
Entering the Subject of the E-Mail to be Transmitted Via the Delivery Server
474
-
-
6 Scanning Originals with the Network TWAIN Scanner
476
-
Before Using the Network TWAIN Scanner
476
-
Overview of the Network TWAIN Scanner
476
-
Preparing to Use the Network TWAIN Scanner
477
-
Installing the TWAIN Driver from the Supplied CD-ROM
479
-
-
Basic Network TWAIN Scanner Procedure
481
-
Scan Settings When Using TWAIN Scanner
483
-
Setting Original Orientation on the TWAIN Scanner
483
-
-
-
7 Various Scan Settings
486
-
Specifying Send Options
486
-
Resolution
486
-
Original Orientation
487
-
-
-
1 Placing Originals
488
-
Original Setting
489
-
Scan Size
490
-
File Type
492
-
Notes about and Limitations of File Types
494
-
PDF Security Encryption
494
-
PDF Security Permissions
497
-
-
Selecting Original Type
500
-
Adjusting Image Density
502
-
-
8 Scanner Features
504
-
Accessing User Tools
504
-
Changing User Tools
504
-
Closing User Tools
505
-
-
Scan Settings
506
-
Destination List Settings
508
-
Send Settings
509
-
Output Settings
512
-
Administrator Tools
513
-
-
9 Appendix
514
-
Relationship between Resolution and Scan Size
514
-
When Using the E-Mail, Folder Sending, WSD Scanner, or Network Delivery Functions
514
-
When Using as a TWAIN Scanner
515
-
-
Software Supplied on CD-ROM
517
-
Auto-Run Program
517
-
TWAIN Driver
517
-
Desktopbinder Lite
518
-
-
Values of Various Set Items for Transmission/Delivery Function
520
-
Transmission Function
520
-
Network Delivery Function
522
-
-
About WIA Scanning
524
-
Specifications
527
-
Trademarks
530
-
Index
532
-
-
-
Table of Contents
542
-
Manuals for this Machine
548
-
Notice
550
-
Important
550
-
-
How to Read this Manual
551
-
Symbols
551
-
Names of Major Functions
551
-
Notes
551
-
-
Laws and Regulations
552
-
Legal Prohibition
552
-
Notes to Users in the United States of America
552
-
Notes to Users in Canada
553
-
-
Reading the Display
554
-
Reading the Display Panel and Using Keys
554
-
-
1 Transmission
558
-
Transmission Modes
558
-
Selecting Type of Transmission
559
-
Memory Transmission
560
-
Parallel Memory Transmission
563
-
Automatic Redial
564
-
Broadcasting Sequence
564
-
Immediate Transmission
565
-
If Memory Runs out While Storing an Original
565
-
Ecm (Error Correction Mode)
565
-
-
IP-Fax Functions
568
-
Terminology
570
-
Notes on Using IP-Fax
570
-
Gatekeeper (Voip Gatekeeper)
570
-
Gateway (Voip Gateway)
570
-
Functions Not Available for IP-Fax Transmission
571
-
-
Internet Fax Functions
572
-
Notes on Using Internet Fax
573
-
Functions Not Available for Internet Fax Transmission
574
-
Functions Not Available for Internet Fax Reception
575
-
E-Mail Subject
575
-
T.37 Full Mode
575
-
-
Placing Originals
577
-
Acceptable Original Sizes
578
-
Paper Size and Scanned Area
579
-
Detecting Blank Sheet
580
-
-
Scan Settings
582
-
Original Type
582
-
Resolution
583
-
Jbig Transmission
583
-
Image Density (Contrast)
584
-
Mixing Scan Settings for a Multiple Page Original
585
-
-
Specifying a Destination
587
-
Sending over a Fax Line
587
-
Entering a Pause
588
-
Entering a Tone
588
-
Sending by IP-Fax
590
-
Setting a Port Number
594
-
Sending to an E-Mail Address
594
-
Bypassing the Smtp Server
597
-
Using the Quick Dial Keys
599
-
Checking the Specified Destination
601
-
Redial
603
-
Preventing Transmission to the Wrong Destination
604
-
Re-Entering a Fax Number to Confirm Destination
604
-
-
Programming Destinations in the Address Book
607
-
Registering a Fax Destination
607
-
Changing a Fax Destination
609
-
Deleting a Fax Destination
612
-
Programming Destinations from Check Destination Screen
613
-
Programming Destinations from Redial Screen
614
-
-
Searching for a Destination in the Address Book
616
-
Search by Name
616
-
Search by Destination List
618
-
Search by Registration Number
620
-
Search by Fax Number
621
-
Search by E-Mail Address
623
-
Search by IP-Fax Destination
625
-
Search by LDAP Server
627
-
-
On Hook Dial
631
-
Manual Dial
633
-
Canceling a Transmission
634
-
Before the Original Is Scanned
634
-
While the Original Is Being Scanned
634
-
While the Original Is Being Transmitted
635
-
Before the Transmission Is Started
636
-
-
Checking the Storage Result (Memory Storage Report)
638
-
Setting Transmission Function Defaults (Home Position)
639
-
-
2 Other Transmission Features
640
-
Sending at a Specific Time (Send Later)
640
-
Sender Settings
642
-
E-Mail Options
645
-
Entering the Subject
645
-
Requesting a Reception Notice
646
-
-
Fax Header Print
649
-
Label Insertion
651
-
Setting SUB Codes for Transmission
653
-
Setting a Password
655
-
-
Setting SEP Codes for Reception
657
-
Entering a Password
659
-
SEP Code RX Reserve Report
659
-
SEP Code RX Result Report
659
-
-
Two-Sided Transmission (Double-Sided Transmission)
661
-
-
3 Reception
664
-
Types of Reception
664
-
Immediate Reception
664
-
Memory Reception
665
-
Substitute Reception
665
-
Receiving Documents Unconditionally
666
-
-
Reception Modes
669
-
Auto Switch
669
-
Manual Reception
669
-
Auto Reception
670
-
Switching the Reception Mode
670
-
-
Receiving E-Mail
672
-
Receiving Internet Fax Documents
673
-
Auto E-Mail Reception
673
-
Manual E-Mail Reception
674
-
Received Images
675
-
Mail to Print
676
-
-
Reception Functions
678
-
Forwarding Received Documents
678
-
SMTP Reception Using Internet Fax
679
-
Routing E-Mail Received Via Smtp
680
-
JBIG Reception
682
-
Auto Fax Reception Power-Up
682
-
-
Printing Options
684
-
Print Completion Beep
684
-
Checkered Mark
684
-
Center Mark
684
-
Reception Time
685
-
Two-Sided Printing
685
-
Combine Two Originals
687
-
Page Separation and Length Reduction
687
-
TSI Print (Transmitting Subscriber Identification Print)
688
-
If There Is no Paper of the Correct Size
689
-
Setting Priority Trays
689
-
-
-
4 Confirming Communication Information
692
-
Printing a List of Files in Memory (Print TX Standby File List)
692
-
Printing a File from Memory
694
-
Checking the Transmission Result (TX File Status)
696
-
Confirming on Display
696
-
Confirming by Report
697
-
Confirming by E-Mail
698
-
Confirming by Report and E-Mail
699
-
Communication Result Report (Memory Transmission)
699
-
Immediate TX Result Report (Immediate Transmission)
700
-
Communication Failure Report
700
-
-
Checking the Reception Result (RX File Status)
702
-
Confirming on Display
702
-
Confirming by Report
703
-
-
Printing the Journal
704
-
Journal
705
-
Transmitting Journal by E-Mail
707
-
Journal by E-Mail
708
-
-
Printing a File Received with Memory Lock
709
-
-
5 Fax Via Computer
712
-
Sending Fax Documents from Computers
712
-
Before Use
713
-
Using the Software
713
-
Address Book
714
-
Auto Run Program
714
-
Installing Individual Applications
715
-
Setting LAN-Fax Driver Properties
716
-
Setting Print Properties
716
-
Making Settings for Option Configuration
716
-
Basic Transmission
717
-
Entering a Destination Directly
720
-
Specifying Options
721
-
Saving as Files
723
-
Checking Transmission Using LAN-Fax Driver
724
-
Confirming Transmission Results by E-Mail
724
-
LAN-Fax Result Report
725
-
Printing and Saving
726
-
Editing Address Book
726
-
Programming New Destinations
726
-
Editing Programmed Destinations
727
-
Editing Fax Cover Sheets
728
-
Deleting Programmed Destinations
728
-
Managing Facsimile Functions Using Smartdevicemonitor for Admin
730
-
Using the Machine’s Address Book as the LAN-Fax Destination List
730
-
LAN-Fax Operation Messages
732
-
-
Viewing Fax Information Using a Web Browser
733
-
Viewing, Printing, and Deleting Received Fax Documents Using Web Image Monitor
733
-
Printing Fax Information Using a Web Browser
734
-
Programming Destination Information from Web Browser
735
-
Deleting Fax Information Using a Web Browser
735
-
To Edit Machine Properties Already Programmed
736
-
-
Accessing User Tools
738
-
Changing Default Settings
738
-
Quitting User Tools
739
-
-
-
6 Fax Features
738
-
General Settings/Adjust
740
-
Reception Settings
742
-
E-Mail Settings
744
-
IP-Fax Settings
746
-
Gateway Settings
747
-
-
Administrator Tools
749
-
Memory File Transfer
753
-
Reception File Setting
755
-
Specifying Automatic Deletion of Incoming Faxes When an Error Occurs
756
-
Reception Report E-Mail
757
-
-
Registering Fax Information
758
-
Deleting Fax Information
761
-
-
Forwarding
763
-
Programming an End Receiver
764
-
Quitting the Forwarding Function
765
-
Forwarding Mark
766
-
-
Parameter Settings
767
-
User Parameter List
767
-
Changing the User Parameters
775
-
Printing the Parameter Settings List
776
-
-
Home Position
778
-
Home Position Parameter List
778
-
Changing the Home Position
779
-
-
Program Special Sender
782
-
Authorized Reception
783
-
Forwarding
784
-
Memory Lock
784
-
Sided Print
785
-
Programming/Changing Special Senders
785
-
Programming Initial Set up of a Special Sender
790
-
Deleting a Special Sender
791
-
Printing Special Sender List
792
-
-
-
7 Appendix
794
-
Optional Equipment
794
-
Handset
794
-
-
Specifications
795
-
Specifications Required for the Internet Fax Destination Machines
797
-
-
Maximum Values
799
-
Trademarks
801
-
Index
804
-
-
Advertisement

Ricoh Aficio MP 201SPF Service Manual (542 pages)
D115/D116
Brand: Ricoh
|
Category: Printer
|
Size: 7.37 MB
Table of Contents
-
Table of Contents
13
-
Product Information
21
-
Product Information
27
-
Specifications
29
-
Machine Configuration
31
-
System Components
31
-
-
Overview
32
-
Component Layout
32
-
Mainframe
32
-
Ardf
34
-
-
Electrical Components
35
-
Electrical Components 1
35
-
Electrical Components 2
36
-
Ardf
37
-
-
Paper Path
38
-
Drive Layout
39
-
Mainframe
39
-
Ardf
40
-
-
-
Guidance for those Who Are Familiar with Predecessor Products
41
-
-
Installation
43
-
Installation Cautions
45
-
Installation Requirements
46
-
Environment
46
-
Machine Level
46
-
Minimum Operational Space Requirements
47
-
Power Requirements
48
-
-
Copier
49
-
Accessory Check
49
-
Printer/Scanner and Fax Model (D115)/ Fax Model (D116)
49
-
Installation Procedure
50
-
Interface Settings
54
-
Copier Settings
55
-
Fax Settings
55
-
-
Optional Handset
56
-
Accessory Check
58
-
Installation Procedure
58
-
-
-
Paper Tray Unit (D567)
58
-
Paper Tray Unit Heater
60
-
Accessory Check
60
-
Installation Procedure
61
-
-
Usb 2.0/Sd Slot Type B
67
-
Accessory Check
67
-
Installation Procedure
67
-
When Installing the Handset
71
-
-
Testing the Sd Card/Usb Slot
72
-
-
Optional Paper Tray Grip Handle
73
-
Accessories
73
-
Installation Procedure
73
-
-
-
Controller Options
75
-
Overview
75
-
Wireless Lan (Ieee 802.11A/G) Installation
76
-
Accessories
76
-
Installation Procedure
76
-
SP Mode Settings for IEEE 802.11A/G Wireless LAN
77
-
-
Ieee 1284 Installation
78
-
Accessories
78
-
Installation Procedure
78
-
-
VM Card Type L (D467)
79
-
Accessories
79
-
Installation
79
-
-
Gigabit Ethernet
80
-
Hdd Option (D577)
81
-
Component Check
81
-
Installation Procedure
81
-
After Installing the HDD
83
-
Installing the Security Card
83
-
Activating the Security Applications
84
-
HDD Encryption Recovery from a Device Problem
85
-
Restoring the Encryption Key
86
-
Clearing the NVRAM
87
-
-
-
Key Counter (Card) Interface Type a
88
-
-
Preventive Maintenance
91
-
Maintenance Tables
93
-
How to Clear the Pm Counter
94
-
-
Replacement and Adjustment
95
-
Precautions
97
-
General
97
-
Lithium Batteries
97
-
Halogen-Free Cable
97
-
Static Electricity
97
-
-
Special Tools and Lubricants
98
-
Exterior Covers and Operation Panel
99
-
Rear Cover
99
-
Copy Tray
100
-
Operation Panel and Upper Covers
101
-
Right Door
102
-
Bypass Tray
102
-
Platen Cover Sensor
103
-
-
Scanner Unit
104
-
Exposure Glass
104
-
Lens Block
105
-
Exposure Lamp, Lamp Stabilizer Board
106
-
Scanner Motor
107
-
Scanner Hp Sensor
108
-
Scanner Alignment Adjustment
108
-
-
Fusing
110
-
Fusing Unit
110
-
Exit Sensor
111
-
Hot Roller Stripper Pawls
112
-
Hot Roller and Fusing Lamp
113
-
Thermoswitches and Thermistor
114
-
Pressure Roller
115
-
Checking the Nip Band
116
-
-
Pcu and Quenching Lamp
117
-
Pcu
118
-
Quenching Lamp
119
-
-
Exhaust Fan and Main Motor
120
-
Exhaust Fan
120
-
Main Motor
121
-
-
Paper Feed
122
-
Paper Feed Roller and Friction Pad
122
-
Paper End Sensor
122
-
Registration Sensor
123
-
Bypass Paper End Sensor
124
-
Bypass Feed Roller
125
-
Bypass Feed Clutch and Friction Pad
126
-
Paper Feed and Registration Clutches
127
-
-
Image Transfer
128
-
Transfer Roller
128
-
ID Sensor and Duplex Roller
129
-
Discharge Plate
130
-
-
Bicu and Controller Board
131
-
Bicu
131
-
Preparation
131
-
Procedure
131
-
-
Controller Board
132
-
Preparation
132
-
Procedure
132
-
When Installing a New Controller Board
135
-
When Replacing the NVRAM on the Controller Board
136
-
-
-
Other Replacements
138
-
Duplex Motor
138
-
High-Voltage Power Supply Board
139
-
Psu
140
-
Contact-Release Solenoid
141
-
Toner Supply Clutch
142
-
Fcu
143
-
Lithium Batteries
143
-
Procedure
143
-
-
-
Laser Unit
145
-
Location of the Caution Decal
145
-
Laser Unit
146
-
Ld Unit and Polygon Mirror Motor
147
-
-
Ardf
148
-
Ardf
149
-
Df Rear Cover
149
-
Original Feed Unit
150
-
Separation Roller
150
-
Df Drive Board
151
-
Original Set and Df Inverter Sensor
151
-
Df Registration and Df Exit Sensor
152
-
DF Registration Sensor Reflector
153
-
-
Df Feed Motor
154
-
Df Transport Motor
154
-
Df Feed Clutch
155
-
-
Adjusting Copy Image Area
156
-
Printing
156
-
Adjusting Registration
156
-
Adjusting Blank Margin
158
-
Adjusting Main-Scan Magnification
159
-
-
Scanning
159
-
Adjusting Registration
159
-
Adjusting Magnification
160
-
Scan Auto Adjustment
161
-
-
Df Image Adjustment
162
-
-
-
System Maintenance Reference
165
-
Service Program
167
-
Sp Tables
167
-
Using Sp and Ssp Modes
167
-
Starting SP Mode
168
-
Selecting Programs
168
-
Specifying Values
168
-
Activating Copy Mode
168
-
Quitting Programs/Ending (S) SP Mode
169
-
Conventions Used in the Tables
169
-
-
-
Using Sp Mode
170
-
Nvram Data Upload/Download
170
-
Uploading Content of NVRAM to an SD Card
170
-
Downloading an SD Card to NVRAM
171
-
-
Firmware Update Procedure
172
-
Before You Begin
172
-
Firmware Update Procedure
173
-
-
Test Pattern Print (Sp5-902-001)
178
-
Executing Test Pattern Printing
178
-
Test Patterns
178
-
-
Memory Clear
181
-
GW Machine
181
-
Exceptions
182
-
Memory Clear Procedure
182
-
-
Machine No. Setting (Sp5-811-001)
183
-
Specifying Characters
183
-
GW Machine
183
-
Serial Number and NVRAM
183
-
-
Smc Print (Sp5-990)
183
-
ID Sensor Error Analysis (Sp2-221)
184
-
-
Fax Service Tables
185
-
-
Troubleshooting
187
-
Sc Tables
189
-
Engine Sc Code Descriptions
190
-
Gw Sc Code Descriptions
201
-
Sc6Xx
201
-
Sc8Xx
204
-
Sc9Xx
219
-
-
-
Electrical Component Defects
224
-
Blown Fuse Conditions
224
-
Bicu Led Display
224
-
-
Card Save Function
225
-
Overview
225
-
Card Save
225
-
-
Procedure
226
-
Error Messages
227
-
-
-
Fax Troubleshooting Guide
228
-
-
Energy Saving
229
-
Energy Save
231
-
Energy Saver Modes
231
-
Timer Settings
231
-
Recommendation
232
-
-
Energy Save Effectiveness
232
-
-
Paper Save
234
-
Effectiveness of Duplex/Combine Function
234
-
Duplex
234
-
Combine Mode
234
-
Duplex + Combine
235
-
Recommendation
235
-
-
-
-
Ricoh Aficio MP 201SPF Operating Instructions Manual (404 pages)
Network and System Settings Guide
Brand: Ricoh
|
Category: All in One Printer
|
Size: 11.11 MB
Table of Contents
-
Operating Instructions
1
-
Table of Contents
3
-
Manuals for this Machine
12
-
Notice
14
-
Important
14
-
-
How to Read this Manual
15
-
Symbols
15
-
Names of Major Items
15
-
Note
15
-
About IP Address
16
-
-
Laws and Regulations
17
-
Legal Prohibition
17
-
-
Display Panel
18
-
Reading the Display and Using Keys
18
-
-
Accessing User Tools
20
-
Changing Default Settings
20
-
Exiting User Tools
21
-
-
1 System Settings
23
-
General Features
23
-
Tray Paper Settings
26
-
Timer Settings
28
-
Interface Settings
30
-
Network
30
-
Parallel Interface
34
-
Wireless LAN
35
-
Print I/F Settings List
36
-
-
File Transfer
38
-
Administrator Tools
42
-
Programming the LDAP Server
48
-
Changing the LDAP Server
55
-
Deleting the LDAP Server
56
-
-
Programming the Realm
58
-
Changing the Realm
60
-
Deleting the Realm
60
-
-
-
2 Connecting the Machine
63
-
Connecting to the Interfaces
63
-
Connecting to the Ethernet Interface
64
-
Connecting to the Gigabit Ethernet Interface
65
-
Connecting to the USB Interface
67
-
Connecting to the IEEE 1284 Interface
68
-
Connecting to the Wireless LAN Interface
68
-
Setup Procedure
69
-
-
Network Settings Required to Use the Printer/Lan-Fax
71
-
Ethernet
71
-
Wireless LAN
72
-
-
Network Settings Required to Use Internet Fax
74
-
Ethernet
74
-
Wireless LAN
76
-
-
Network Settings Required to Use E-Mail Function
78
-
Ethernet
78
-
Wireless LAN
79
-
-
Network Settings Required to Use Scan to Folder Function
82
-
Ethernet
82
-
Wireless LAN
83
-
-
Network Settings Required to Use the Network Delivery Scanner
85
-
Ethernet
85
-
Wireless LAN
86
-
-
Network Settings Required to Use WSD Scanner
88
-
Ethernet
88
-
Wireless LAN
89
-
-
Network Settings Required to Use Network TWAIN Scanner
91
-
Ethernet
91
-
Wireless LAN
92
-
-
Using Utilities to Make Network Settings
94
-
Interface Settings
94
-
File Transfer
100
-
-
Connecting the Machine to a Telephone Line and Telephone
103
-
Connecting the Telephone Line
103
-
Selecting the Line Type
103
-
Connecting the Optional Handset or an External Telephone
103
-
-
-
3 Using a Printer Server
107
-
Preparing Printer Server
107
-
Using Netware
108
-
Setting up as a Print Server (Netware 3.X)
109
-
Setting up as a Print Server (Netware 4.X, 5/5.1, 6/6.5)
110
-
Using Pure IP in the Netware 5/5.1 or 6/6.5 Environment
111
-
Setting up as a Remote Printer (Netware 3.X)
113
-
Setting up as a Remote Printer (Netware 4.X, 5/5.1, 6/6.5)
115
-
-
-
4 Monitoring and Configuring the Printer
119
-
Using Web Image Monitor
119
-
Displaying Top Page
120
-
When User Authentication Is Set
122
-
About Menu and Mode
122
-
Administrator Mode
123
-
Access in the Administrator Mode
124
-
List of Setting Items
125
-
Displaying Web Image Monitor Help
131
-
-
Using Smartdevicemonitor for Admin
133
-
Installing Smartdevicemonitor for Admin
134
-
Changing the Network Interface Board Configuration
135
-
Locking the Menus on the Machine’s Control Panel
136
-
Changing the Paper Type
137
-
Managing User Information
137
-
Configuring Energy Save Mode
143
-
Setting a Password
143
-
Checking the Machine Status
144
-
Changing Name and Comment
145
-
Load Fax Journal
146
-
Viewing and Deleting Spool Print Jobs
147
-
Managing Address Information
147
-
-
Using Smartdevicemonitor for Client
149
-
Monitoring Printers
149
-
Checking the Machine Status
150
-
When Using IPP with Smartdevicemonitor for Client
150
-
-
Printer Status Notification by E-Mail
152
-
Setting the Account for E-Mail Notification
153
-
Mail Authentication
154
-
Auto E-Mail Notification
155
-
On-Demand E-Mail Notification
156
-
Format of On-Demand E-Mail Messages
156
-
-
Remote Maintenance by Telnet
158
-
Using Telnet
158
-
8021X
159
-
Access
160
-
Appletalk
161
-
Authfree
162
-
Autonet
162
-
Bonjour
163
-
Devicename
165
-
Dhcp
165
-
Dhcp6
166
-
Diprint
167
-
Dns
167
-
Domainname
169
-
Etherauth
170
-
Etherconfig
170
-
Help
170
-
Hostname
171
-
Ifconfig
171
-
Info
172
-
Ipp
173
-
Ipsec
173
-
Ipv6
174
-
Logout
174
-
Lpr
174
-
Netware
175
-
Pathmtu
176
-
Prnlog
177
-
Rhpp
177
-
Route
177
-
Set
179
-
Show
182
-
Slp
182
-
Smb
182
-
Snmp
183
-
Sntp
186
-
Spoolsw
187
-
Ssdp
188
-
Ssh
188
-
Status
189
-
Syslog
189
-
Upnp
189
-
Web
190
-
Wiconfig
191
-
Wins
194
-
Wsmfp
196
-
-
Snmp
197
-
Getting Printer Information over the Network
198
-
Current Printer Status
198
-
Printer Configuration
204
-
-
Understanding the Displayed Information
206
-
Print Job Information
206
-
Print Log Information
206
-
Configuring the Network Interface Board
207
-
-
Message List
218
-
System Log Information
218
-
-
Advertisement
Ricoh Aficio MP 201SPF Quick Manual (5 pages)
Quick Guide
Brand: Ricoh
|
Category: All in One Printer
|
Size: 0.96 MB
Table of Contents
-
2-Sided Copies
2
-
2-Sided Originals into 1-Sided Copies
2
-
Send Fax
2
-
Send Fax 2-Sided Original
3
-
Program Fax Numbers in Address Book
3
-
Send Document to E-Mail Address/Folder
4
-
Scan 2 SIDED ORIGINAL
4
-
Change File Format When Scanning
5
-
To Programm Addresses in Address Book
5
Ricoh Aficio MP 201SPF Quick Manual (6 pages)
Digital Imaging System Power, Performance and Exceptional Security
Brand: Ricoh
|
Category: All in One Printer
|
Size: 0.38 MB
Advertisement
Related Products
-
Ricoh MP 2014AD
-
Ricoh MP 2014
-
Ricoh MP 2014D
-
Ricoh Aficio MP 201F
-
Ricoh MP2000SPF — Aficio MP B/W Laser
-
Ricoh MP 2002sp
-
Ricoh MP 2050
-
Ricoh MP 2001SP
-
Ricoh Aficio MP 2000L2
-
Ricoh Aficio MP 2000LN2
Ricoh Categories
![]()
All in One Printer
![]()
Printer
![]()
Digital Camera
Copier
Printer Accessories
More Ricoh Manuals
ОПИСАНИЕ МОДЕЛИ
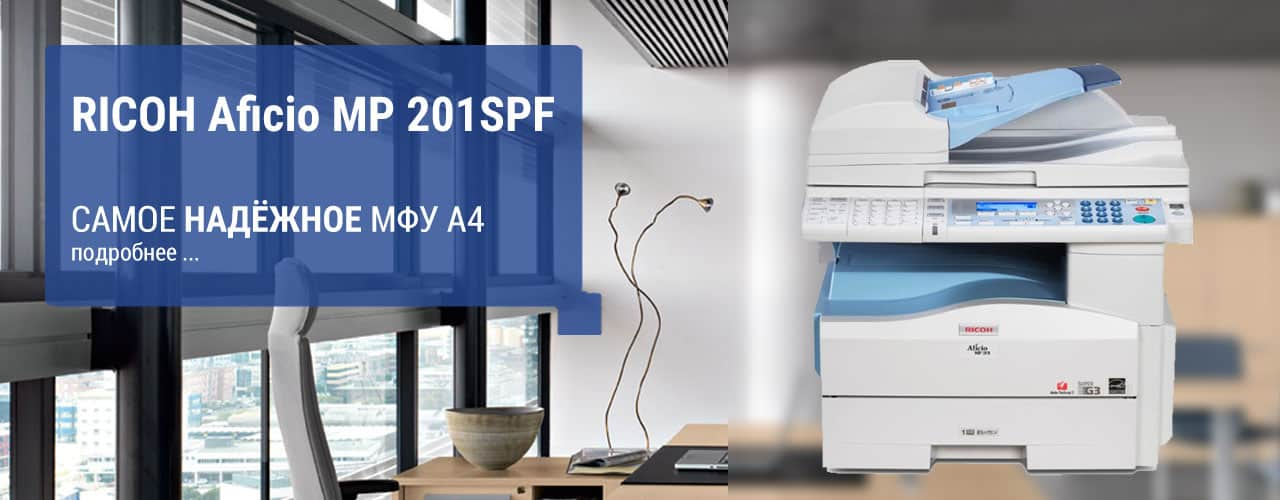
RICOH Aficio MP 201SPF — многофункциональное устройство формата А4: копир, сетевой принтер, полноцветный сканер и факс со скоростью дуплексной печати 20 страниц в минуту.
Это МФУ — самое надёжное решение для офисного документооборота в классе SOHO, приходящее на смену уже популярной линейке RICOH Aficio MP171. Основное отличие от предыдущей модели заключается в увеличении скорости до 20 копий в минуту, стандартные возможности прямой печати PDF, а также использования VM-карты для программирования на языке Java.
Устройства серии Aficio MP 201 очень надежны, компактны, просты в управлении и сочетают отличное качество печати и высокую производительность с низкой стоимостью эксплуатации.
Существует современная тенденция к замене отдельно стоящих копиров, принтеров, сканеров и факсов одним компактным, но более производительным устройством.
Данная серия всецело отвечает этому веянию в улучшении документооборота и повышении безопасности. Благодаря высокой скорости копирования и печати в сочетании с исключительной для этого класса оборудования ёмкостью лотков подачи, эти МФУ быстро и эффективно обрабатывают задания и не требуют частого вмешательства пользователя. Дополнительные возможности по аутентификации пользователей, а также шифрованию жёсткого диска и защищенной или отложенной печати обеспечивают безопасность данных и документооборота. Более того, MP 201SPF гармонично интегрируются в существующие сетевые системы заказчика посредством инструмента для разработчиков аппаратного программного обеспечения Device SDK (Software Development Kit). Также стандарно можно использовать VM-карту для программирования и применения Java-приложений сторонних разработчиков. Такая опция впервые появилась для устройств формата А4.
Для обеспечения эффективности документооборота в МФУ предусмотрены дополнительные функции печати и сканирования. Опциональный жёсткий диск позволяет осуществлять пробные распечатки и сохранять задания для повторной печати. Цветной сканер обладает возможностями «безбумажного» распространения документов – отправки на e-mail или в папку. Благодаря опциональному слоту для переносных носителей SD/USB можно сканировать напрямую на USB-память или карту SD. Дополнительным примером эффективности и учета экологических факторов служит факс Super G3. Факсимильное сообщение передается всего за 2 секунды. Интернет-факс, IP-факс и LAN-факс характеризуются высочайшей скоростью и способствуют экономии бумаги.
RICOH Aficio MP 201SPF обладает рядом функций и характеристик, которые делают его очень экономичным. Время прогрева составляет всего 30 секунд, а быстрый выход из режима ожидания снижает энергопотребление. Экономия бумаги и снижение расходов возможны благодаря использованию режима двусторонней печати/копирования. Исключительная ёмкость лотков подачи (максимально 1350 листов) избавляет от необходимости частого пополнения бумаги, что, в свою очередь, экономит время и снижает трудозатраты. Все три устройства характеризуются свойственной оборудованию Ricoh простотой использования. С выпуском серии МФУ MP 201 компания Ricoh прекращает поддержку языка принтера ™ и представляет новый драйвер AIRFace™, который обеспечивает значительное усовершенствование пользовательского интерфейса драйверов принтера PCL6 и AdobePostScript™3, построенного на базе пиктограмм, что ранее являлось отличительной особенностью драйвера принтера ™, что позволяет осуществлять управление «одним кликом».
МФУ RICOH Aficio MP 201SPF — это еще один шаг к увеличению надежности и функциональности в формате А4!
Низкая стоимость владения в данной категории
Адаптирование к ПО заказчика благодаря SDK
Скоростной факс стандартной совместимости
Высокая надежность и дешёвые отпечатки
Установка кодов пользователей и считывателя карт доступа
Двухстронний податчик оригиналов обеспечивает полноценное автоматическое копирование
Полноцветное сканирование со скоростью до 22 стр/мин
Возможность сканирования на сервер, в рабочую папку, в электронную почту, на USB-носитель или карту SD
Компактный дизайн с внутренним выходным лотком
Модель снята с производства и в настоящее время представлена RICOH IM 350F >>>
ПАРАМЕТРЫ И ХАРАКТЕРИСТИКИ
| ФУНКЦИОНАЛЬНОСТЬ МОДЕЛИ | |
|---|---|
| Aficio MP 201SPF | • цифровое монохромное многофукциональное устройство с автоматическим дуплексом формата A4: копировальный аппарат, сетевой PCL-принтер, полноцветный сканер и G3 факс с автоматическим податчиком документов. Cкорость непрерывного копирования и печати 20 страниц A4 в минуту |
| КОПИРОВАЛЬНЫЙ АППАРАТ | |
| Конфигурация | • настольный (рекомендуется установка на специальную тумбу) |
| Технология печати | • электрографическая печать с экспонированием лазерным лучом, двухкомпонентная система проявки методом сухого электростатического переноса |
| Разрешение | • 1200 × 1200 dpi |
| Множественное копирование | • до 99 копий |
| Время прогрева | • менее 30 с |
| Время выхода первой копии | • менее 7,5 сек |
| Диапазон масштабирования | • 50 ÷ 200% с шагом 1% |
| Объём общей памяти | • стандартно: 640 Mb • опционально: 640 Mb + 80 Gb HDD |
| Запас бумаги | • стандартно: ÷ фронтальный лоток на 250 листов ÷ обходной лоток на 100 листов • максимально: 1350 листов |
| Ёмкость выходных лотков | • внутренний лоток на 250 л |
| Формат бумаги | • фронтальный лоток, дуплекс: А5 ÷ А4 • обходной лоток: А6 ÷ А4 • дополнительный лоток: А4 |
| Плотность бумаги | • фронтальный и дополнительный лоток: 60 ÷ 90 г/м² • обходной лоток: 60 ÷ 158 г/м² • дуплекс: 75 ÷ 90 г/м² |
| Дуплекс | • стандартно |
| Габаритные размеры (Ш×Г×В) | • 485 × 450 × 481 мм |
| Масса | • менее 29 кг |
| Напряжение питания | • 220 ÷ 240 В, 50/60 Гц |
| Потребляемая мощность | • в рабочем режиме: до 900 Вт • в режиме экономии энергии: до 30 Вт |
| Податчик документов | • автоматический реверсивный на 50 оригиналов |
| ПРИНТЕР | |
| Процессор | • RM5231 400МГц |
| Разрешение | • 1200 × 1200 dpi |
| Интерфейс | • стандартно: Ethernet 100Base-TX/10Base-Т, USB 2.0 • опционально : IEEE 1284, Wi-Fi (IEEE 802.11a/b/g), Gigabit Ethernet |
| Поддерживаемые сетевые протоколы | • TCP/IP (IPv4, IPv6) • IPX/SPX |
| Поддерживаемые ОС | • Windows® 8.1/10/11 Server 2012/2016/2019/2022/R2 • Macintosh® OS × v.10.2 или более поздние • UNIX Filter • SAP |
| Языки описания страниц | • стандартно: PCL6, PS |
| СКАНЕР | |
| Скорость сканирования | • монохромное: до 22 оригиналов в минуту • полноцветное: до 10 оригиналов в минуту |
| Разрешение | • 1200 × 1200 dpi |
| Формат оригинала | • А5 ÷ А4 |
| Поддерживаемые форматы файлов | • TIFF, PDF, JPEG |
| Стандартный драйвер | • Network TWAIN, Network WIA |
| Сканирование в в электронную почту | • SMTP, TCP/IP (IPv4) |
| Адреса получателя | • максимум 100 за задание |
| Память адресов | • максимум 150 |
| Адресная книга | • через LDAP или через операционную панель |
| Сканирование в папку | • SMB, FTP, NCP |
| Количество папок | • максимум 32 за задание |
| ПРОГРАММНОЕ ОБЕСПЕЧЕНИЕ | |
| Стандартно | • SmartDeviceMonitor™ • Java • Device Manager NX • Web Image Monitor |
| Опционально | • @Remote • doc-Q-manager • doc-Q-route |
| ФАКС | |
| Тип линии | • PSTN, PBX |
| Совместимость | • ITU-T (CCITT) G3 |
| Скорость модема | • до 33,6 кбит/с |
| Разрешение | • 200 × 100 ÷ 200 dpi |
| Метод сжатия | • MH, MR, MMR, JBIG |
| Скорость сканирования | • 2 сек (200 × 200 dpi, A4) |
| Адресная книга | • 150 номеров |
| Быстрый набор | • 16 номеров |
| Объём памяти | • 4 Мб (320 страниц) |
| Резервное питание памяти | • есть (до 12 часов) |
| Стандартный драйвер | • LAN fax |
| ОПЦИИ | |
| Внешние опции | • тумба-подставка (высокая, средняя, низкая) тип B/W 13/17 • дополнительный лоток бумаги тип PS480 на 500 листов (возможна установка двух лотков) • ручка для удобства открывания стандартного лотка тип С |
| Внутренние опции | • разъем для подключения внешнего аудитрона тип A • параллельный интерфейс IEEE 1284 тип A • адаптор Wi-Fi IEEE 802.11a/g тип M для беспроводной связи |
| Другие опции | • инструкция пользователя на русском языке |
| НАГРУЗКИ | |
| Рекомендуемая нагрузка | • 2k в месяц |
| Максимальная нагрузка | • 5k в месяц |
| Пиковая нагрузка | • 15k в месяц |
| Срок службы | • 300k или 5 лет |
| k = 1000 отпечатков А4 |
РАСХОДНЫЕ МАТЕРИАЛЫ
| Код EDP | Name | Наименование | Упаковка | Кол-во | Ресурс | Доступность |
| Aficio MP 201 171 161 | 1515 | ||||||
|---|---|---|---|---|---|---|
| 842338 | Toner Type MP 201 (1270D) | Тонер тип MP 201 | туба | 1 | 7k | Распродажа |
| 411844 | Photo Conductor Unit Type 1515 | Фотопроводниковый блок тип 1515 | коробка | 1 | 45k | Распродажа |
| 201PM90 | Maintenance Kit MP 201 | Комплект для технического обслуживания MP 201 | набор | 1 | 90k | В магазин |
| k = 1000 |
ГАРАНТИЙНЫЕ ОБЯЗАТЕЛЬСТВА
СЕРВИСНОЕ ОБСЛУЖИВАНИЕ И РЕМОНТ
РАЗОВЫЙ РЕМОНТ
2140 рублей — стоимость услуг сервисного специалиста по проведению разового технического обслуживания и ремонта одного устройства (минимальная суммарная стоимость работ составляет 2850 рублей)
в стоимость включены: диагностика и мелкий ремонт без замены деталей в пределах 60 минут
время реакции не превышает 12 рабочих часов с момента поступления предоплаты
выезд в пределах МКАД 950 рублей
дополнительные работы и выезд за пределы МКАД оплачиваются по текущему прейскуранту
ТАРИФ «ПРЕМИУМ»
8550 рублей — ежеквартальный платёж
включено: 1 обязательный и 8 дополнительных выездов в квартал сервисного специалиста в пределах МКАД каждый длительностью до 60 минут для проведения технического обслуживания, диагностики неисправности, любого вида ремонта
время реакции не превышает 6 рабочих часов с момента вызова
дополнительные вызовы, выезд за пределы МКАД оплачиваются по текущему прейскуранту со скидкой 20%
запасные части и расходные материалы оплачиваются по текущему прайсу со скидкой 6%
27360 рублей — фиксированный годовой единовременный платёж со скидкой 20%
ТАРИФ «ОПТИМУМ»
6410 рублей — ежеквартальный платёж
включено: 1 обязательный и 5 дополнительных выездов в квартал сервисного специалиста в пределах МКАД каждый длительностью до 60 минут для проведения технического обслуживания, диагностики неисправности, любого вида ремонта
время реакции не превышает 8 рабочих часов с момента вызова
дополнительные вызовы, выезд за пределы МКАД оплачиваются по текущему прейскуранту со скидкой 20%
запасные части и расходные материалы оплачиваются по текущему прайсу со скидкой 5%
20520 рублей — фиксированный годовой единовременный платёж со скидкой 20%
ТАРИФ «АТРИУМ»
4280 рублей — ежеквартальный платёж
включено: 1 обязательный и 2 дополнительных выезда в квартал сервисного специалиста в пределах МКАД, каждый длительностью до 30 минут для проведения технического обслуживания, диагностики неисправности, мелкого ремонта без замены деталей
время реакции не превышает 12 рабочих часов с момента вызова
дополнительные вызовы и ремонтные работы, выезд за пределы МКАД оплачиваются по текущему прейскуранту со скидкой 10%
запасные части и расходные материалы оплачиваются по текущему прайсу со скидкой 4%
15390 рублей — фиксированный годовой единовременный платёж со скидкой 10%
ТАРИФ «СТАДИУМ»
2850 рублей — ежеквартальный платёж
включено: 1 обязательный и 1 дополнительный выезд в квартал сервисного специалиста в пределах МКАД, каждый длительностью до 30 минут для проведения технического обслуживания, диагностики неисправности, мелкого ремонта без замены деталей
время реакции не превышает 12 рабочих часов с момента вызова
дополнительные вызовы и ремонтные работы, выезд за пределы МКАД оплачиваются по текущему прейскуранту со скидкой 5%
запасные части и расходные материалы оплачиваются по текущему прайсу со скидкой 3%
10260 рублей — фиксированный годовой единовременный платёж со скидкой 10%
ТАРИФ «МИНИМУМ»
1430 рублей — ежеквартальный платёж
включено: 1 обязательный выезд в квартал сервисного специалиста в пределах МКАД длительностью до 30 минут для проведения технического обслуживания, диагностики неисправности, мелкого ремонта без замены деталей
время реакции не превышает 12 рабочих часов с момента вызова
дополнительные вызовы и ремонтные работы, выезд за пределы МКАД оплачиваются по текущему прейскуранту
запасные части и расходные материалы оплачиваются по текущему прайсу со скидкой 2%
5130 рублей — фиксированный годовой единовременный платёж со скидкой 10%
указана стоимость за обслуживание единицы оборудования, совокупная минимальная стоимость ежеквартального контракта не может быть ниже 3800 рублей, а годового — 13680 рублей
IT УСЛУГИ
3000 рублей
включает дистанционную работу IT-специалиста в пределах 1 нормочаса для диагностики неисправности, настройки или установки программного обеспечения
время реакции не превышает 8 рабочих часов с момента оплаты заявки
дополнительные работы оплачиваются по тарифу 1500 рублей за каждый полный и неполный нормочас
выезд в офис клиента в пределах МКАД 950 рублей
дополнительные работы и выезд за пределы МКАД оплачиваются по текущему прейскуранту
ДОКУМЕНТАЦИЯ ПОЛЬЗОВАТЕЛЯ И ИНСТРУКЦИИ
Черно-белое МФУ А4 • 20 ppm • 600 dpi • 640 Mb + 80 Гб HDD (опция) • 158 г/м² • до 5k • факс • Опции: тумба, дополнительные лотки.
RICOH Aficio MP 201SPF — самое надёжное монохромное МФУ A4: копировальный аппарат с автоподатчиком документов и дуплексом, сетевой PCL-принтер и цветной сканер, факс SuperG3. Cкорость непрерывного копирования или печати 20 страниц в минуту.
Модель снята с производства и недоступна для продажи.
Видеоклипы Aficio MP 201
Документация пользователя Aficio MP 201
Конфигурация Aficio MP 201
Драйверы печати и сканирования Aficio MP 201
| ОБЩИЕ | |
| Конфигурация | настольный (возможна установка на специальную тумбу) |
| Технология | электрографическая печать с экспонированием лазерным лучом, двухкомпонентная система проявки методом сухого электростатического переноса |
| Процессор | RM5231 400MHz |
| Автоподатчик документов | стандартно: реверсивный на 50 листов 60-90 г/м² |
| Время прогрева | 30 с |
| Время выхода первой копии | 7.5 с |
| Объем памяти общего использования | 640 Мб + 80 Гб HDD (опция) |
| Автоматический дуплекс | есть |
| Питание | AC 220 V ~ 240 V, 50/60 Hz |
| КОПИР | |
| Множественное копирование | 1–99 |
| Диапазон масштабирования | 25–400 % с шагом в 1% |
| Фиксированные кратности | 5 уменьшение / 5 увеличение |
| Возможности | одно сканирование — много копий, электронная сортировка копий, копирование с сортировкой и поворотом*, автоматический выбор бумаги, двухстороннее копирование**, комбинированное копирование с размерами в дюймах/в метрической системе, режимы компоновки «2 страницы на листе» и «4 страницы на листе», режим программных кнопок |
| Экспозиция | авто, ручной на 7 ступеней |
| Режимы | текст + фото, текст, фото |
| ПРИНТЕР | |
| Скорость печати | до 20 ppm A4 |
| Разрешение печати | 600 x 600 dpi |
| БУМАГА | |
| Формат бумаги | А6 — А4 |
| Стандартные лотки | 500 листов, 60–90 г/м2 |
| Лоток ручной подачи | на 30 листов 60-157 г/м² |
| Запас бумаги максимально | 1350 листов |
| Емкость стандартного выходного лотка | 100 листов изображением вниз |
| ЭКОЛОГИЯ | |
| Максимальная потребляемая мощность | 1.1 кВт |
| Стандарты безопасности | GS, TÜV, CE, ISO 9001, ISO 14001 |
| РАСХОДНЫЕ МАТЕРИАЛЫ | |
| Тонер-картридж | тип MP201+ на 7k страниц формата A4 при 6% заполнении |
| Фотобарабан | на 45k страниц |
| НАГРУЗКИ | |
| Максимальная нагрузка | 5k в месяц |