Не хотите изучать утомительное руководство по настройке робота-пылесоса Roborock Sweep One или не имеете его? Простая инструкция ниже поможет вам быстро разобраться с основными кнопками и элементами пылесоса, способами зарядки, подключением к телефону и освоить все способы уборки.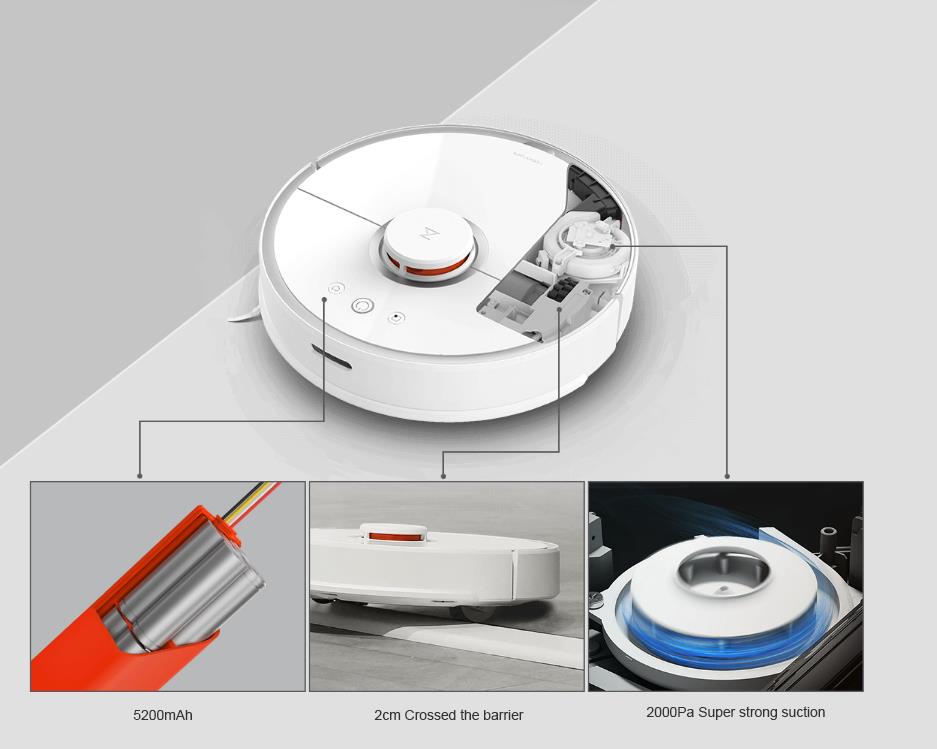
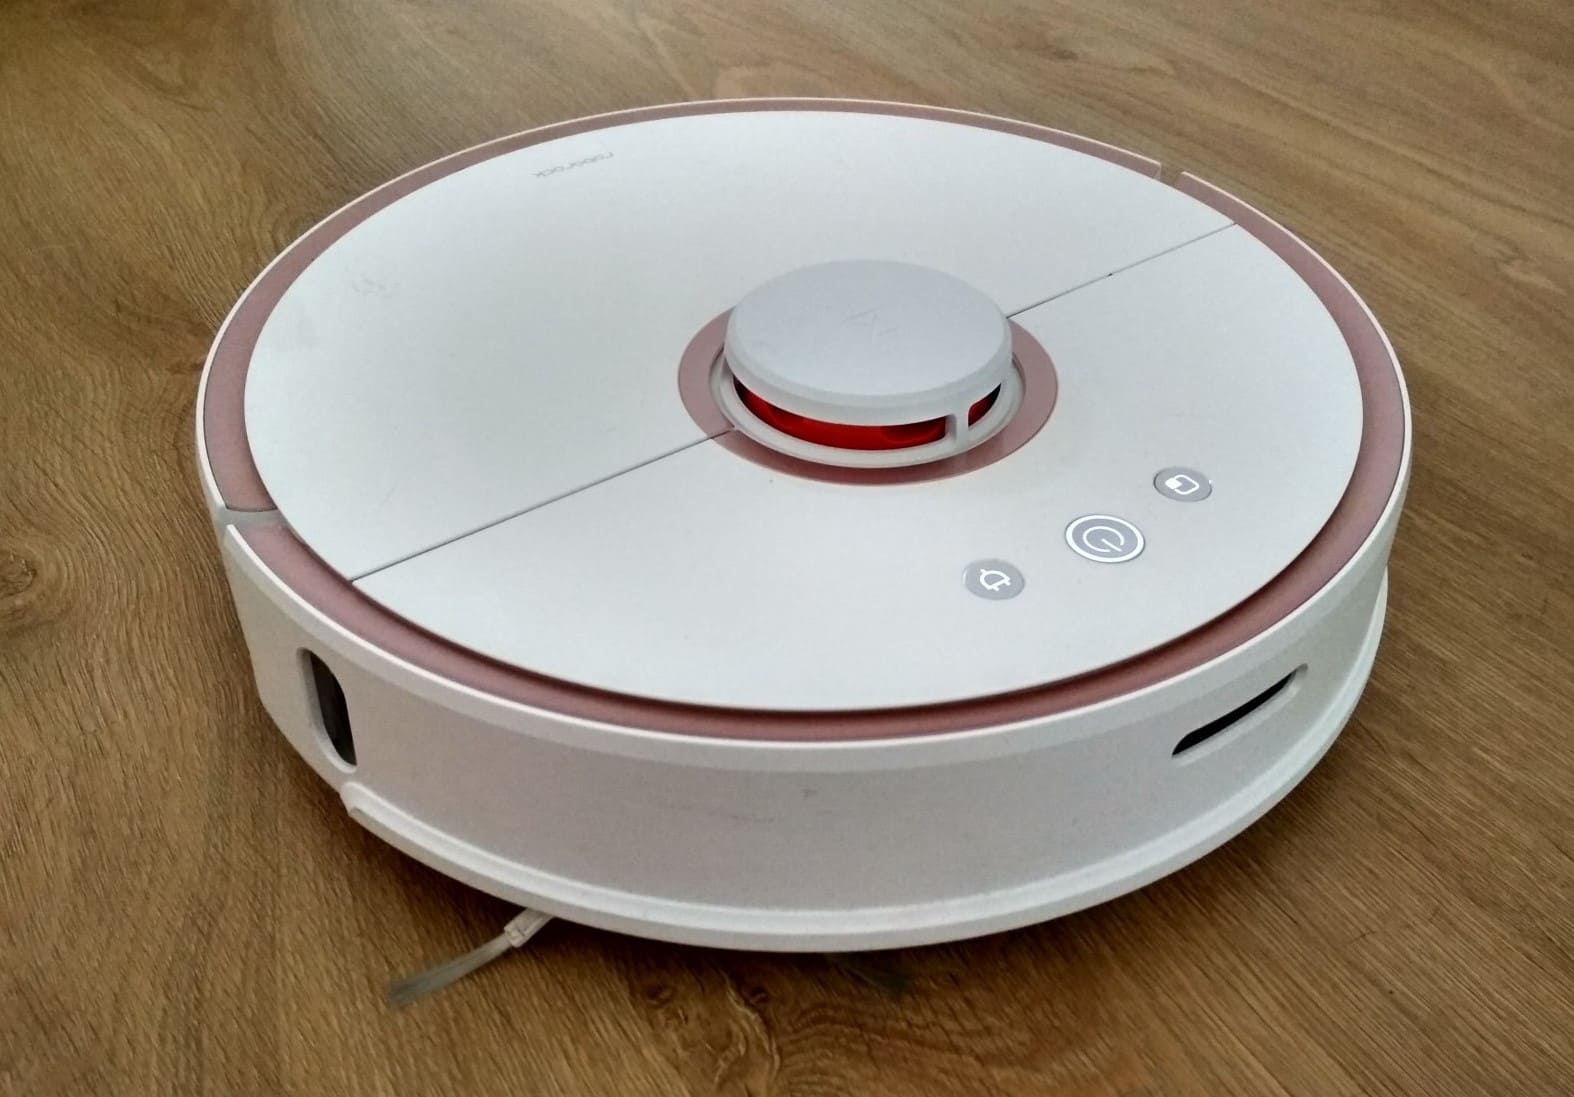
Устройство пылесоса
Робот-пылесос имеет множество датчиков, которые расположены по всему его корпусу. Так, снизу корпуса находятся датчики падения, сбоку — датчики определения расстояния до стен, столкновения, возвращения на док-станцию, сверху (в башне) — лазерные датчики. Все они помогают агрегату ориентироваться в пространстве и строить карты.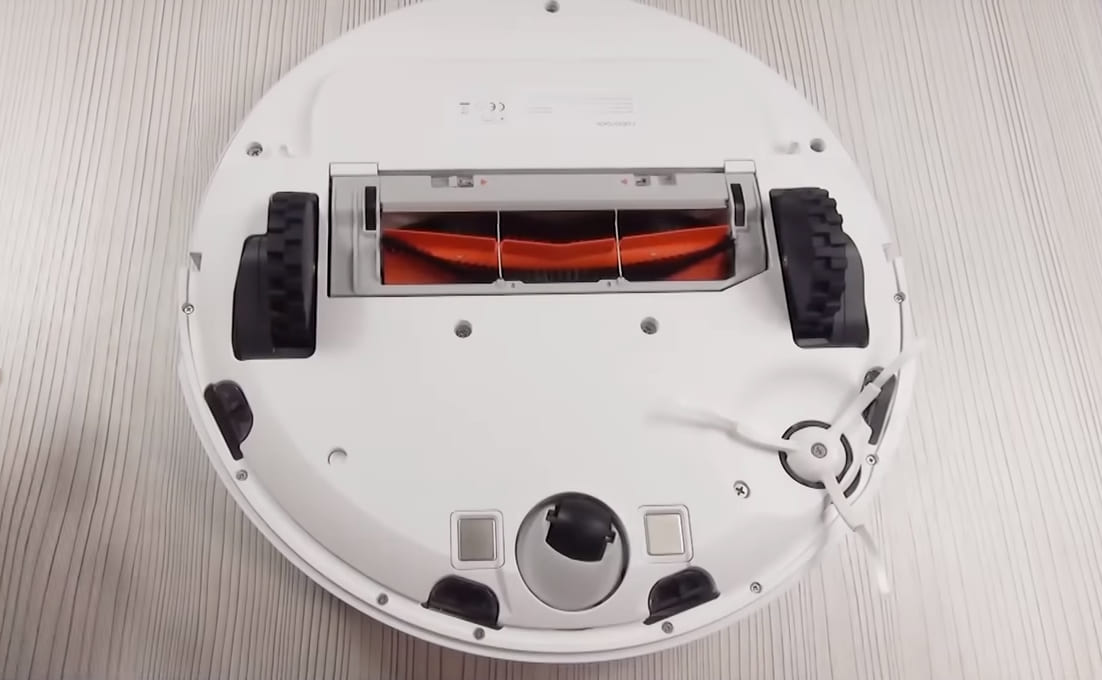
На верхней части пылесоса находится башня с датчиками и три кнопки управления. С помощью центральной кнопки вы можете включить и выключить прибор (долгим нажатием на кнопку), а также запустить основную уборку. Вторая кнопка призвана запустить частичную уборку, третья нужна для зарядки пылесоса. О них мы подробнее поговорим позже.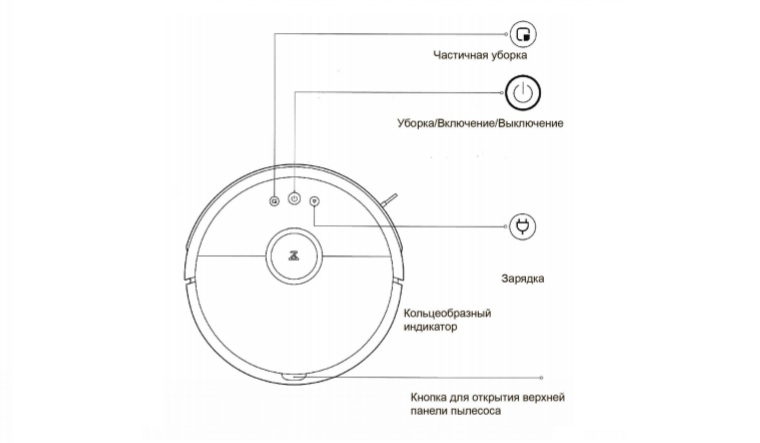
У верхней части пылесоса есть откидная крышка. Открыв ее, вы увидите под ней емкость для сбора мусора с фильтром. Вы можете без труда вынимать ее после каждой уборки и очищать от грязи, равно как и вытряхивать съемный фильтр. Рядом с пылесборником уложена в паз щеточка для срезания волос с основной щетки пылесоса и чистки других элементов.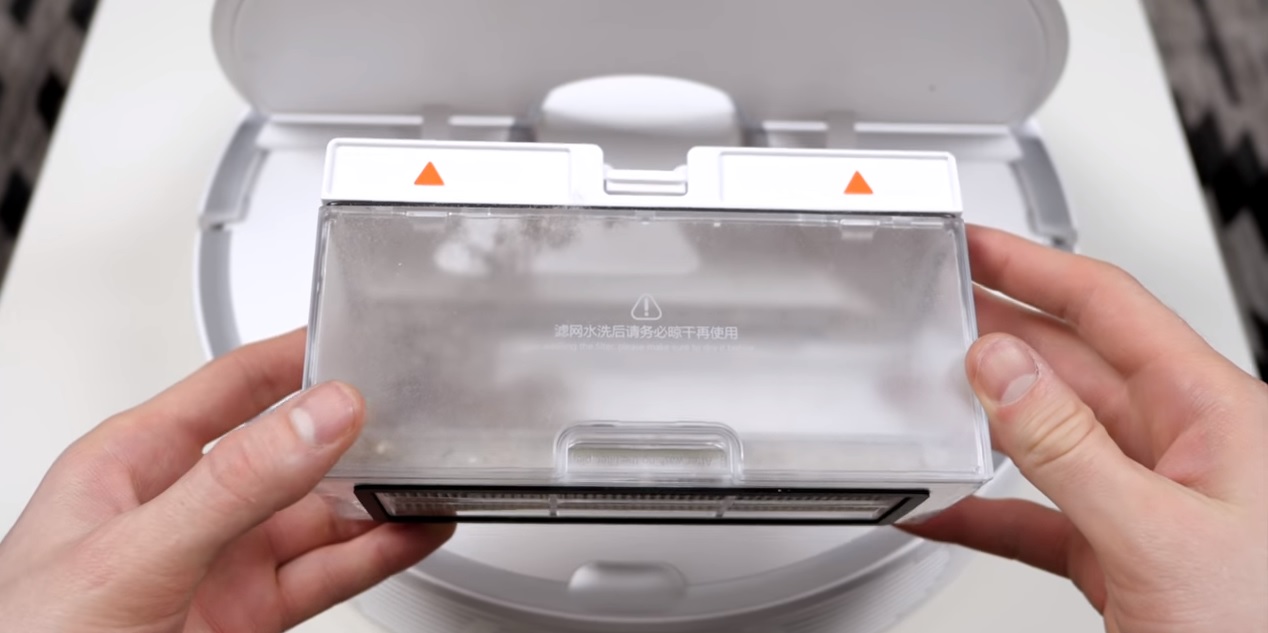
На боковой поверхности есть динамик, с помощью которого робот будет информировать вас о своей работе голосовыми командами. Здесь же находятся вентиляционные отверстия и подвижный бампер для защиты агрегата от ударов.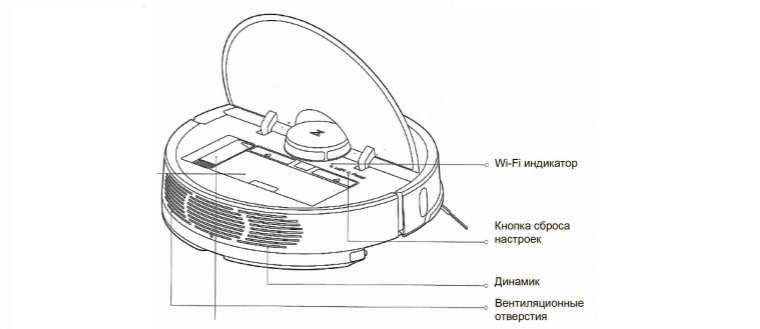
В нижней части корпуса есть основная щетка и боковая. Основная щетка находится по центру и закрыта специальной защитной панелью. Но снять ее для чистки труда не составит. Боковая щетка выглядит миниатюрной, но она достаточно эффективна в плане направления мусора к центральной щетке. С этой же стороны корпуса расположено несколько колес, с помощью которых робот свободно двигается во всех направлениях, и контакты для зарядки пылесоса от док-станции.
Снизу крепится насадка для влажной уборки. Это пластиковая емкость, которая заполняется водой и вставляется в паз до щелчка.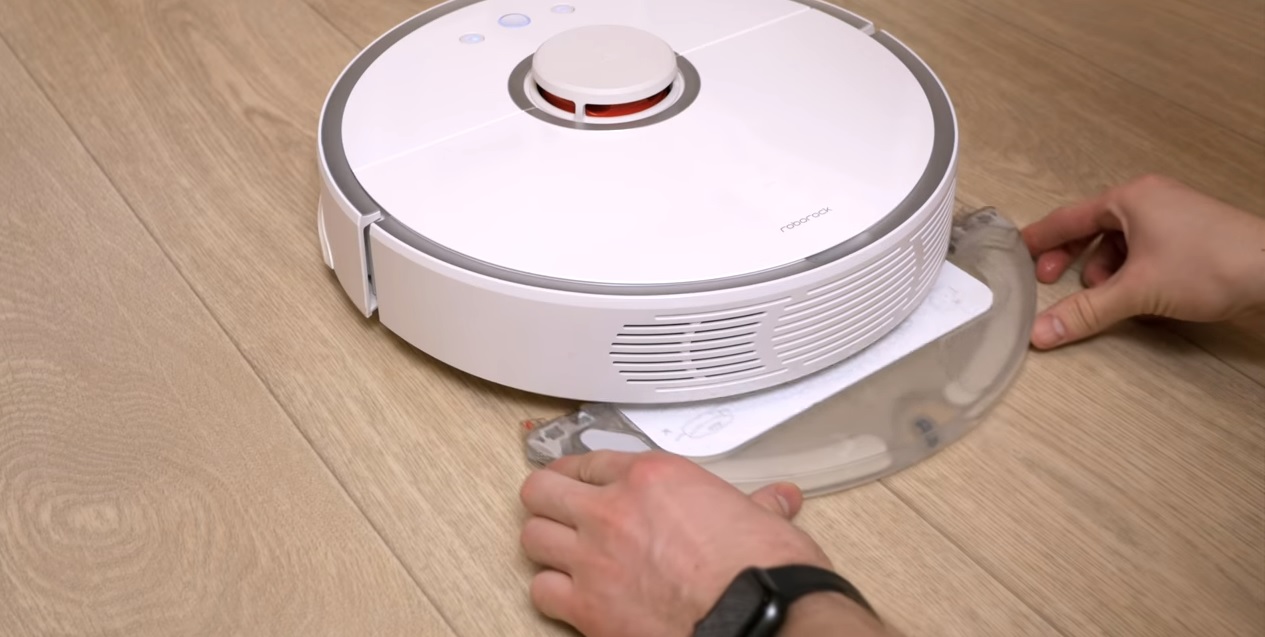
Устройство док-станции
Зарядная станция представляет собой небольшую платформу с площадкой, на которую будет заезжать пылесос. На площадке есть две зарядные клеммы, к которым и будет прижиматься агрегат своими контактами. Сверху на корпусе док-станции находится светодиод, а сбоку гнездо для подключения кабеля. Сам кабель никуда смотать и уложить, как в модели Xiaomi Mi Robot Vacuum Cleaner, нельзя, поэтому для его фиксации используется липучка. Для защиты деревянного пола от возможной протечки воды предусмотрен специальный влагозащитный коврик.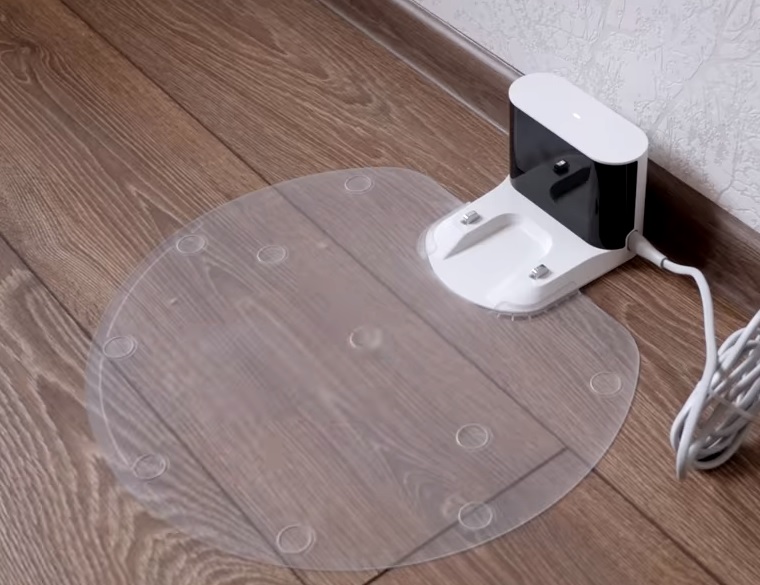
Настройка пылесоса Xiaomi Mi Roborock Sweep One
Зарядка Xiaomi Roborock
Перед зарядкой пылесоса найдите подходящее место для док-станции. Ее нужно расположить возле стены таким образом, чтобы слева и справа оставалось не менее 0,5 метра свободной площади и 1,5 метра спереди. Следите за тем, чтобы территория вокруг станции была свободной, чтобы робот мог заехать на нее. Шнур сделан с запасом, но если вы не пользуетесь им на всю длину, тогда смотайте его и закрепите при помощи липучки. Так вы снизите вероятность того, что пылесос во время работы запутается в проводе и выдернет вилку из розетки.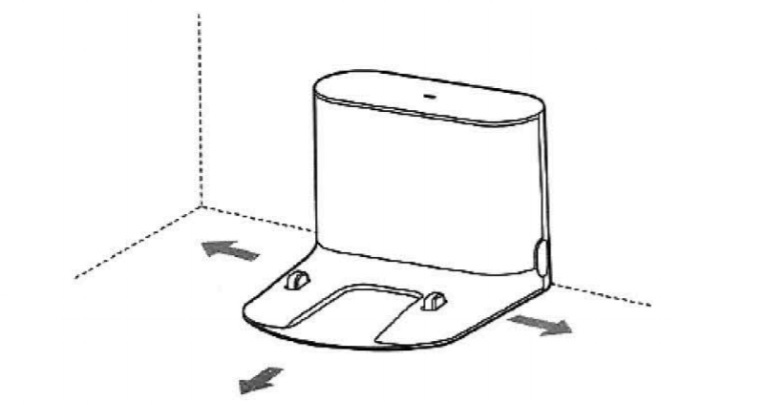
Чтобы зарядить Xiaomi Roborock Sweep One, включите его (долгое нажатие кнопки питания) и дождитесь загорания кольцеобразного индикатора. После этого поставьте пылесос на док-станцию так, чтобы их зарядные контакты совпадали. Во время зарядки индикатор на зарядной станции горит постоянно, а по завершению зарядки гаснет. Цвет кольцеобразного индикатора подскажет вам, сколько заряда осталось в аккумуляторе пылесоса. Если он горит белым, значит уровень заряда превышает 20%, а если красным, то заряда меньше 20%. Во время зарядки этот индикатор будет мигать. Имейте в виду, что при низком заряде батареи робот-пылесос может не включиться. Если такое случится, отнесите его на зарядку.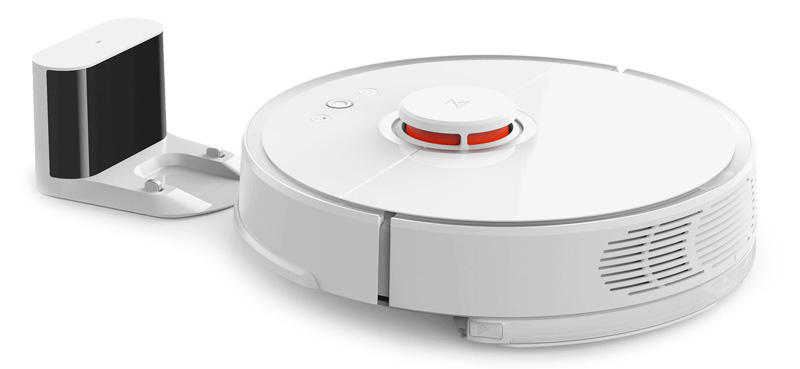
Xiaomi Roborock Sweep One запрограммирован таким образом, что после каждой уборки он будет сам возвращаться на зарядную станцию. Если вы хотите отправить его туда вручную, нажмите кнопку зарядки рядом с кнопкой включения. В случае затруднений пылесоса вернуться на базу (не смог найти ее), отнесите его туда самостоятельно.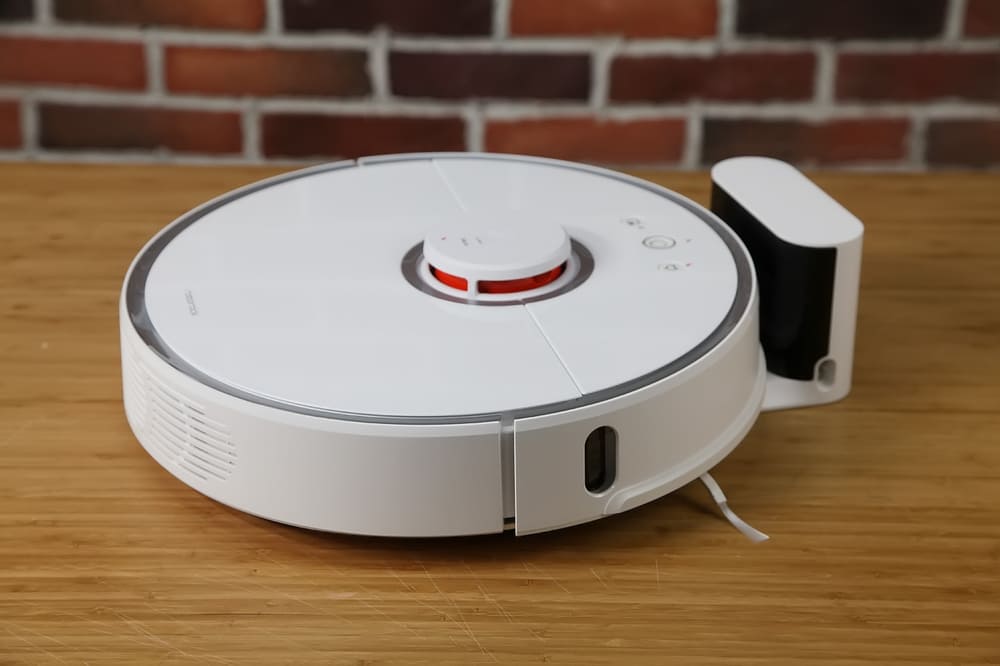
Подключение Xiaomi Roborock к телефону
В качестве альтернативы кнопочному управлению вы можете запускать уборку с телефона. Для этого скачайте и установите на телефон приложение Mi Home из App Store или Google Play. Если это ваше первое использование приложения, ознакомьтесь с условиями его использования, зарегистрируйтесь и зайдите в свой профиль.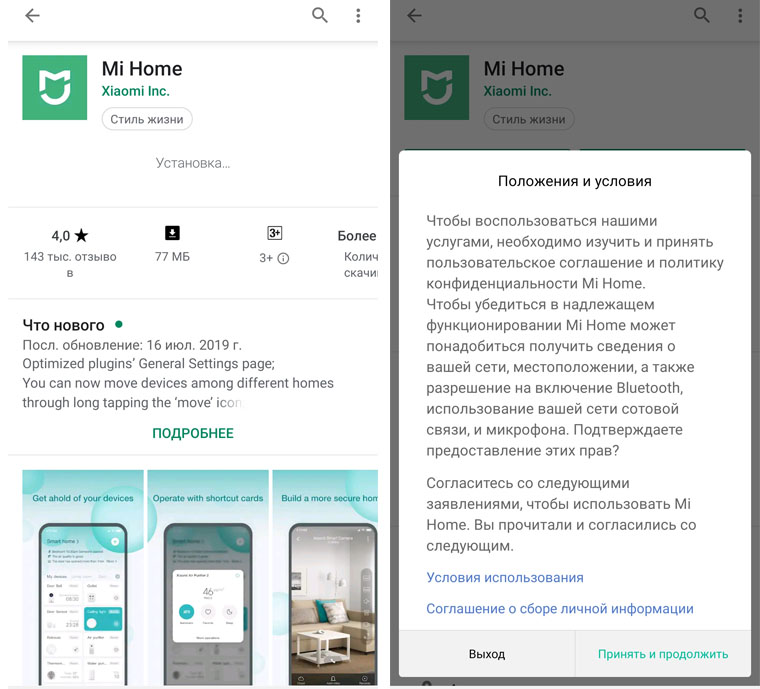
Кликните на «Добавить устройство» и выберите «Устройства поблизости» или «Добавить вручную». Чтобы телефон нашел пылесос, подключите модули Bluetooth, Wi-Fi и GPS, включите пылесос и следуйте указаниям приложения. Во время подключения устройств вам также понадобятся данные о вашей Wi-Fi сети: ее название и пароль.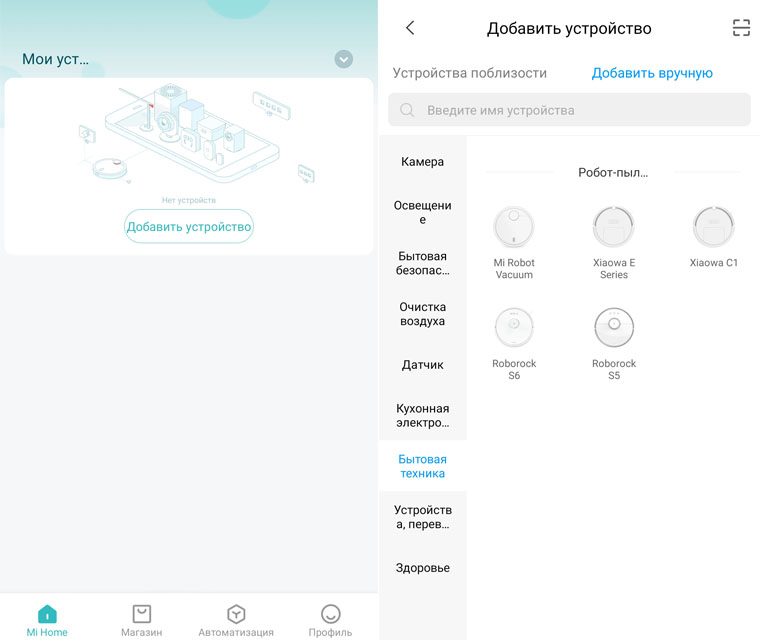
С телефона вам доступна более тонкая настройка работы робота-пылесоса. Если вы хотите убрать определенную зону комнаты, можете в пару кликов задать ее на смартфоне и тем самым отправить агрегат работать на небольшую площадку или выбрать несколько комнат для уборки. Здесь же вы задаете расписание, просматриваете статистику по каждой уборке, настраиваете уборку ковровых покрытий, сами управлять движениями прибора как машинкой на радиоуправлении и другое. Весь функционал описан в приложении Mi Home.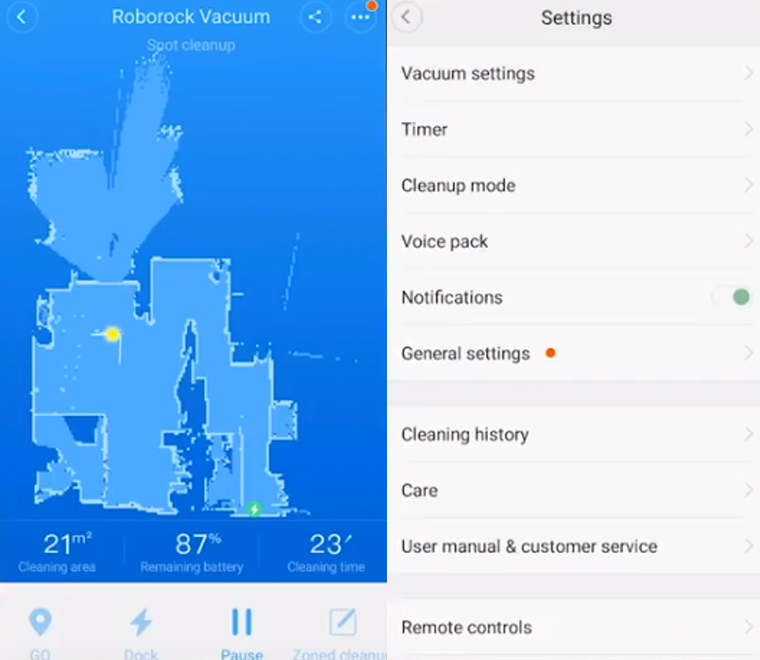
Режимы уборки
Что нужно делать перед каждой уборкой
Перед запуском любого из описанных ниже режимов уборки просмотрите помещение и уберите с пола все предметы, которые могут пострадать от движущегося робота-пылесоса. Это не только мелкие вещицы, которые может засосать в него, но и такие, которые при наезде пылесоса могут упасть, хрупкие, ценные и другие вещи. Уберите и такие вещи, в которых пылесос может запутаться и застрять (провода, ленты и т. д.). Также не помешает обзавестись барьерами. Они помогут вам ограничивать зоны, в которые пылесос заезжать не должен.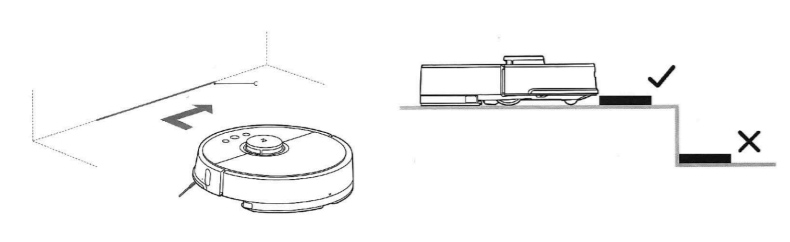
Первая уборка
Она будет такой же, как обычная, с той разницей, что вам стоит присматривать за пылесосом и помогать ему в затруднительных ситуациях. В будущем это поможет роботу убирать без посторонней помощи.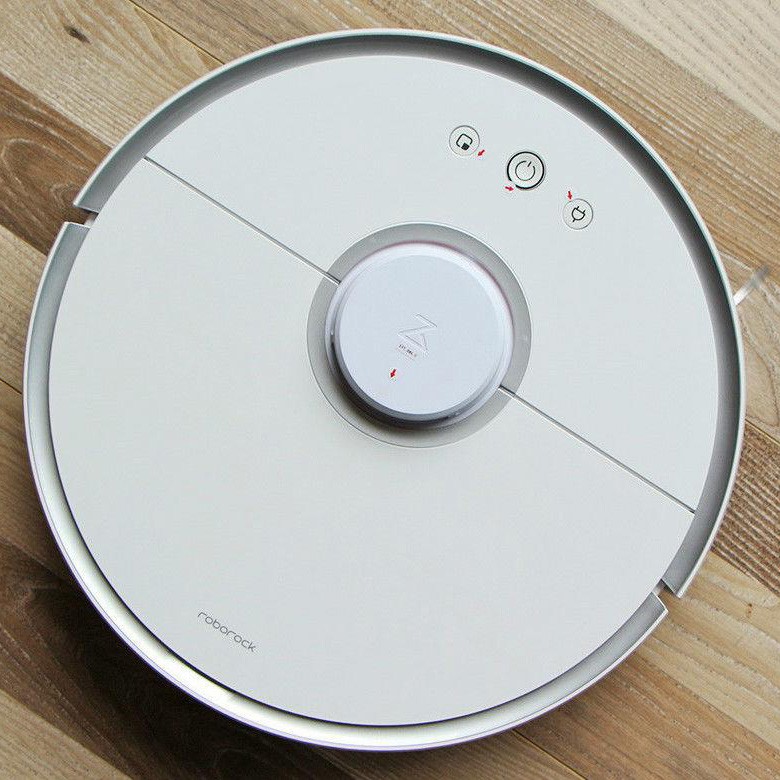
Обычная уборка
Для запуска основного режима уборки достаточно коротко нажать на кнопку питания. При этом робот-пылесос пройдется по периметру помещения, просканирует его и отрисует карту. Если комната велика, он разделит ее на зоны и будет убирать каждую из них отдельно. Движение по каждой зоне происходит по серпантину от одной стены до другой. Если уборка затратила всего 10 минут, пылесос пройдется по этой же территории второй раз. По завершению уборки прибор сам отправится на док-станцию.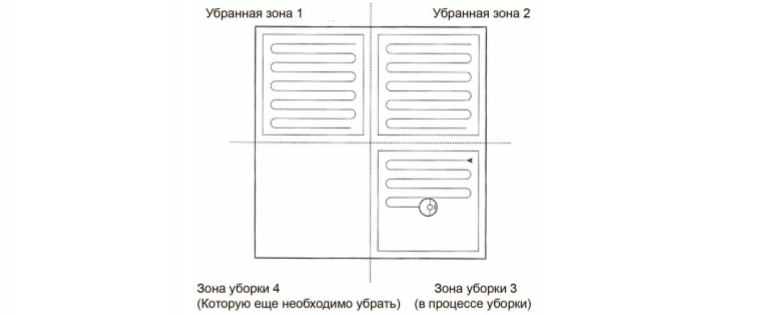
Может оказаться, что пылесосу не хватит заряда на уборку всего дома. В этом случае он отправится на зарядную станцию, подзарядится до необходимого уровня, вернется в точку, в которой прервал работу, и продолжит уборку до ее завершения. Если вам нужно поставить уборку на паузу, нажмите любую кнопку на пылесосе. Продолжить процесс можно коротким нажатием кнопки питания. Для срочного прекращения уборки с режима приостановки нажмите кнопку возврата на станцию. Но не забывайте, что в этом случае уборка всего дома прекратится.
Частичная уборка
Можно заставить пылесос убрать не всю комнату или дом, а небольшой участок, на котором образовался мусор. Для этого нажмите кнопку частичной уборки, когда пылесос находится на паузе. Пылесос уберет центральную площадь комнаты размером полтора на полтора метра. Правда, при этом основная уборка прекратится, так что при необходимости ее придется запускать заново.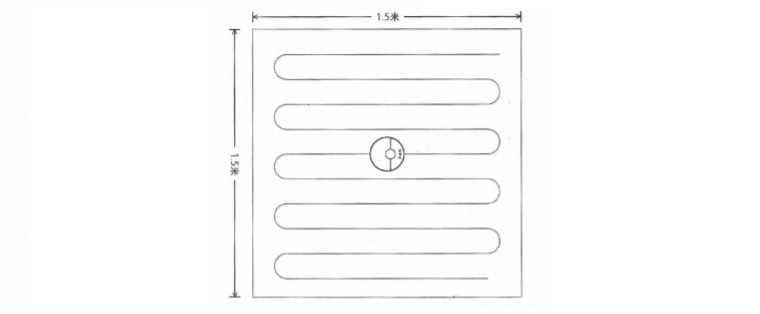
Влажная уборка
Перед влажной уборкой комнат наполните контейнер для влажной уборки водой и закройте крышечку. Вставьте в паз контейнера швабру (ткань) и закрепите ее на контейнере при помощи липучек. Смочите швабру водой и установите емкость в соответствующие пазы пылесоса. Этот тип уборки не рекомендуется запускать тогда, когда дома никого нет. Чтобы уборка прошла эффективнее, желательно каждые полчаса работы споласкивать швабру и как следует вымыть ее в конце уборки. Перед споласкиванием швабры ставьте пылесос на паузу.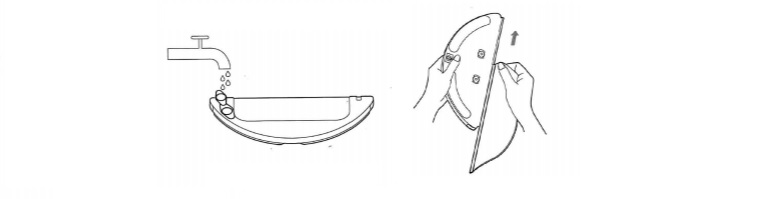
Если ваша док-станция стоит на деревянном полу, во избежание его повреждения от влажного дна пылесоса постелите у станции водостойкий коврик. Также обратите внимание на то, что пылесос работает только на чистой воде (рекомендуется фильтрованная вода). Добавление в емкость для влажной уборки даже небольшого количества моющих средств может привести к выходу фильтров из строя.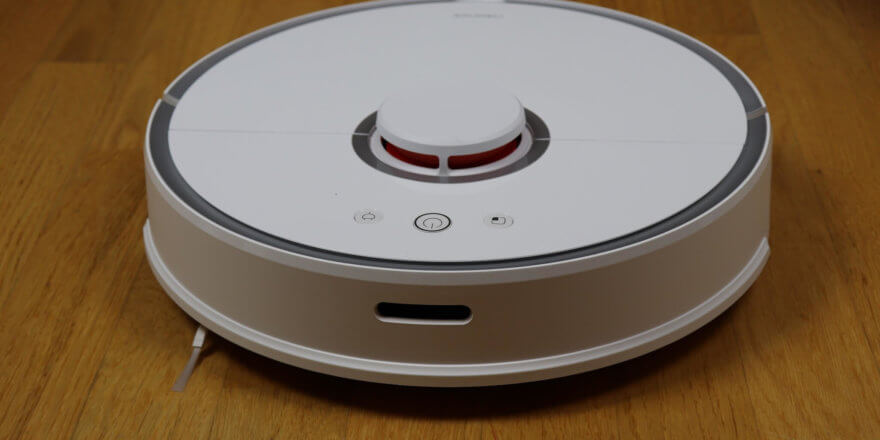
Устранение проблем с работой пылесоса
Пылесос не включается. Причина может быть в низком заряде пылесоса. Поставьте его на зарядку. Возможно, вы пытаетесь включать его при минусовой или слишком высокой температуре. Диапазон работы Xiaomi Roborock Sweep One составляет 0-40 градусов Цельсия.
Пылесос не реагирует на кнопки или ведет себя странным образом. В этом случае выключите его и включите снова или сделайте сброс настроек системы, нажав на скрытую кнопку сброса под крышкой верхней панели прибора. Если возникли проблемы с Wi-Fi, сделайте сброс Wi-Fi, зажав одновременно кнопку частичной уборки и кнопку зарядки до голосовой команды о сбросе настроек. Если индикатор медленно мигает, значит, настройки сброшены. 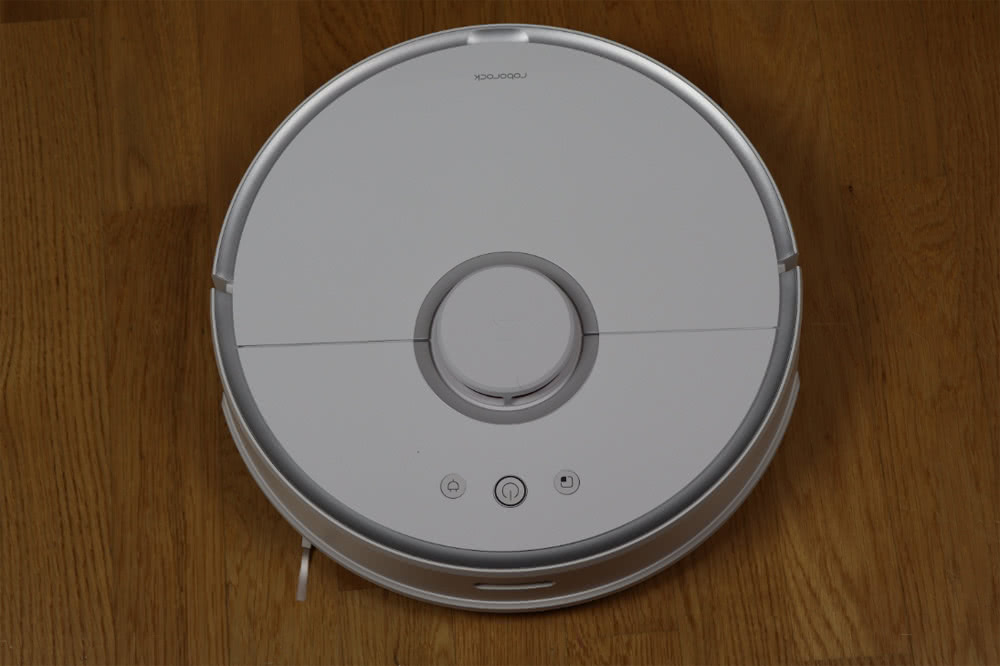
Робот-пылесос не может вернуться на базу. Убедитесь, что рядом со станцией достаточно свободного места для подъезда пылесоса. Если причина не в этом, поставьте пылесос недалеко от станции и повторите попытку ручного возврата. Проблемы с возвратом на базу могут возникнуть и после частичной уборки, так как робот создает себе новую карту. Также сильная удаленность от док-станции мешает вернуться на нее. В этом случае отнесите агрегат на зарядку самостоятельно. Пылесос не заряжается. Проверьте, что индикатор зарядной станции горит. Если он не горит, проверьте, не выпал ли кабель из гнезда. Очистите контакты от возможной грязи и убедитесь в том, что контакты пылесоса и станции совпадают.
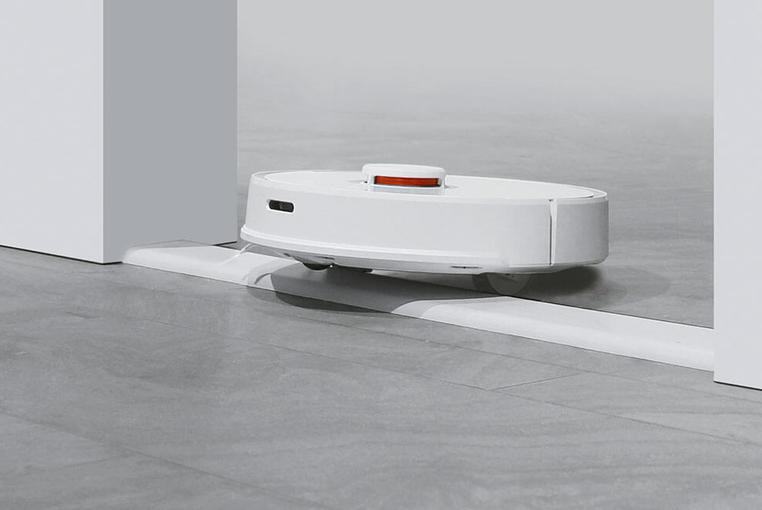 Пылесос не убирает по расписанию. Это означает, что уровень заряда в нем составляет менее 20%. Поставьте его на зарядку и повторите попытку после пополнения энергией.
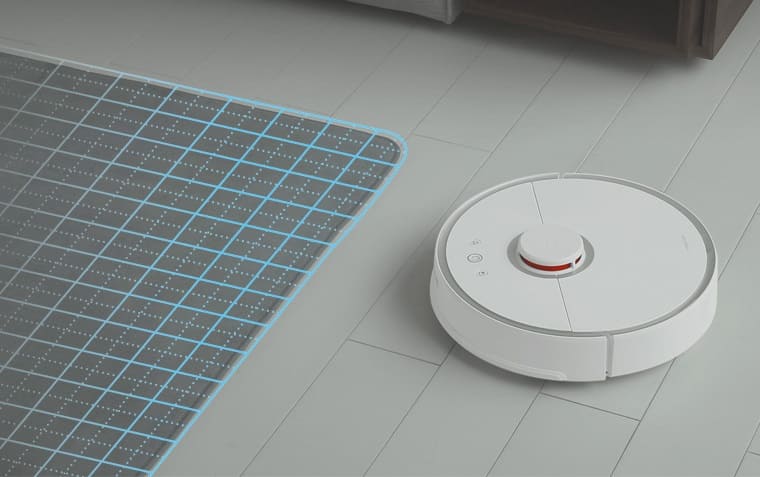 Управлять роботом-пылесосом немного труднее, чем обычным. Но постепенное освоение всех его возможностей и ошибок в работе поможет приобрести хорошего помощника по поддержанию дома в постоянной чистоте.
инструкцияRoborock S5

Руководство пользователя для
робота-пылесоса Roborock
Обязательно ознакомьтесь с этим руководством пользователя перед
использованием и храните на случай необходимости
Посмотреть инструкция для Roborock S5 бесплатно. Руководство относится к категории роботы-пылесосы, 8 человек(а) дали ему среднюю оценку 8.7. Руководство доступно на следующих языках: русский. У вас есть вопрос о Roborock S5 или вам нужна помощь? Задайте свой вопрос здесь
Нужна помощь?
У вас есть вопрос о Roborock а ответа нет в руководстве? Задайте свой вопрос здесь Дай исчерпывающее описание проблемы и четко задайте свой вопрос. Чем детальнее описание проблемы или вопроса, тем легче будет другим пользователям Roborock предоставить вам исчерпывающий ответ.
Артем • 20-8-2021Нет комментариев
Sergej • 6-1-2023Нет комментариев
Количество вопросов: 2
Главная
Не можете найти ответ на свой вопрос в руководстве? Вы можете найти ответ на свой вопрос ниже, в разделе часто задаваемых вопросов о Roborock S5.
С какой частотой необходимо пылесосить помещения?
Инструкция Roborock S5 доступно в русский?
Не нашли свой вопрос? Задайте свой вопрос здесь
Здесь вы узнаете как пользоваться Xiaomi RoboRock S50 (S502-00), фишки, основные функции и возможности.
Ми РобоКоп С50 — лучший робот-пылесос с целой системой датчиков, от одного заряда убирает периметр до 250 м2, возможная сухая и влажная уборка, аккумулятор 5200 мА*ч, время зарядки — около 3 часов.
Для управления устройством вам понадобится приложение для смартфона Mi Home и смартфон под управлением Android 4.4 и выше или iOS 8.0 и выше. Синхронизация и управление выполняется через Wi-Fi.
Руководство по эксплуатации Xiaomi S50
| модель: | размер файла: | формат файла: | скачать: |
| Mi RoboRock Sweep One S50 | 1.01 мегабайт |  |
Теперь вы знаете как правильно использовать пылесос RoboRock S50 Xiaomi 2. Инструкция на русском языке в PDF-формате, файл сжат и оптимизирован для открытия на любом смартфоне и компьютере.
Обзор Xiaomi RoboRock S502-00 (S50)
Сухая и влажная уборка, мощный двигатель (2000 Па), и парочка щеток эффективно очищают пол от мусора.

Лазерный датчик (Laser Distance Sensor) сканирует периметр в 360° для ориентации в помещении. Алгоритм SLAM используется на самоходах NASA и в новых инновационных проектах компании Google Inc.
Используя программу Mi Home, вы можете планировать маршрут уборки комнаты, запрограммировать роботу нужное время, установить зоны уборки и многое другое. На борту 13 датчиков для эффективной уборки.
Полезные ссылки
- все модели роботов-пылесосов
- как подключить пылесос к Wi-Fi
Roborock S5 MAX Manual
Product introduction
Robot

 On/Off
- Press to start cleaning
- Press and hold to power on or off
Power indicator
- White: Battery level ≥ 20%
- Red: Battery level < 20%
- Flashing: Charging or starting up
- Flashing red: Error
 Dock/Spot Clean
- Press to return to the dock
- Press and hold to spot clean
Note:
Press any button to pause cleaning, returning to dock, or spot cleaning.
Parts list

Charging dock

Moisture-proof mat

Power cable

Mop cloth mount

Mop cloth
Dustbin

WiFi indicator light
- Off: WiFi disabled
- Slow flashing: Waiting for connection
- Fast flashing: Connecting
- Steady: WiFi connected
Machine and sensors

Mopping module

Charging dock

Installation
Using the robot
- Place the charging dock against the wall on a flat surface and plug it into the mains power.

Note:- The charging dock should have more than 0.5m (1.6ft) of clearance on each side, and more than 1.5m (5ft) in the front.
- If the power cable is vertical to the ground, it may be caught by the machine, causing the charging dock to be disconnected.
- The charging dock indicator is on when the charging dock is electrified, and off when the robot is charging.
- Secure the charging dock with the adhesive tape.
Wipe the floor of the area where the charging dock will be placed with a dry cloth, then stick the enclosed double-sided tape to the floor. Place the dock onto the double-sided tape to secure it in place.
Note:- Use of the double-sided tape to secure the charging dock is optional.
- When necessary, remove the double-sided adhesive tape slowly to reduce residue glue.
- Secure the moisture-proof mat.
After securing the charging dock, wipe the area where the moisture-proof mat will be placed with a dry cloth as shown. Stick the double-sided tape first to the moisture-proof mat then in position on the floor.
Note:
Always place the moisture-proof mat on a wooden floor - Power on and charge.
Press and hold the button to turn on the robot. When the power indicator lights up, place the robot onto the charging dock to begin charging. The robot uses a high-performance lithium-ion rechargeable battery. To maintain peak battery performance, always keep the robot charged.
The color of the power indicator indicates the battery level.- White: ≥ 20%
- Red: < 20%
Note:
The robot will not turn on when the battery is low. Place the robot directly onto the charging dock to begin charging.


 button to turn on the robot. When the power indicator lights up, place the robot onto the charging dock to begin charging. The robot uses a high-performance lithium-ion rechargeable battery. To maintain peak battery performance, always keep the robot charged.
Connect to the app
- Connect to the app.(recommended)
- Download the Roborock app or Xiaomi home app
- Search «Roborock» in the App Store or Google Play, Or scan the QR code below, then download and install the app.
- Download the Roborock app or Xiaomi home app
- Search «Xiaomi home» in the App Store or Google Play, Or scan the QR code below, then download and install the app.

- Reset WiFi
- Open the top cover of the robot to reveal the WiFi indicator light.
- Press and hold the button and the button until you hear the «Reset WiFi» voice alert. When the WiFi indicator light is flashing slowly, the robot has entered network configuration mode.
Note:
If you cannot connect your phone to the robot, reset the WiFi, and add your robot as a new device.
- Add device
Open the app and click «+» in the top right corner, then follow the instructions in-app. Once your robot has been added, it will be found in a list on the homepage.
Note:- Due to ongoing app development, the actual process may differ slightly from the above description. Always follow the instructions given in the app.
- Only 2.4GHz WiFi is supported.
WiFi indicator light - Off: WiFi disabled
- Slow flashing: Waiting for connection
- Fast flashing: Connecting
- Steady: WiFi connected
- Reset WiFi

 button until you hear the «Reset WiFi» voice alert. When the WiFi indicator light is flashing slowly, the robot has entered network configuration mode.
Using the robot
- Mopping
Note:
It is recommended that all floors are vacuumed at least three times before the first mopping session to reduce excessive dirt buildup on the mop.- Remove the water tank
Press down the water tank latch and slide the tank backwards to remove it. - Fill the water tank
Open the water tank, fill it with water, and close it tightly.
Note:
Do not use hot water, which may cause the tank to deform. To prevent corrosion or damage, do not use cleaning fluid or disinfectant in the water tank. - Install the water tank
Slide the water tank into the robot until you hear it lock with a click. - Install the mop cloth
If mopping immediately, dampen the mop cloth and squeeze it dry then attach it to the mop cloth bracket.
Note:
Use a barrier tape or no-mop zones to separate prevent mopping on carpeted floors. - Attach the mop cloth bracket
Slide the mop cloth bracket under the water tank following the alignment marks, until you hear a click.
Note:
Cleaning the mop cloth after 60-minutes of mopping is recommended to ensure water flow and cleaning quality.
- Remove the water tank
- Adjust water flow rate
Use the mobile app to adjust the water flow as required. - Start cleaning
When the battery is fully charged, the power indicator will remain lit. Press the button or use the app to start cleanup. - Remove the mop cloth bracket
To remove the mop cloth bracket, press the two clips inwards and pull the bracket backwards.
Note:- When the charging dock is placed on a wooden floor, always use it with the moisture-proof mat to prevent moisture damage.
- Removing and washing the mop cloth bracket, and emptying the water tank frequently is recommended to prevent odors or mildew.
- Remove the mop cloth bracket if not mopping.
- Separating the water tank from the mop cloth bracket
As shown in the figure, press the two side clips inwards and slide the mop cloth bracket backwards to separate it from the water tank.


 button or use the app to start cleanup.

On/Off
Press and hold the  button to turn on the robot. The power indicator will turn on and the robot will enter Standby mode. If the robot is in Sleep mode, press and hold the button to turn it off and end the current cleanup.
Note: The robot cannot be turned off when it is charging.
Start cleanup
Press the  button to start cleaning. Once started, the robot will plan its cleaning route based on its scan of the area. It cleans along the edges of a zone first and then moves in a Z-shaped cleaning route to cover the internal area efficiently and thoroughly.
Note:
- Cleaning cannot start if the battery level is too low. Allow the robot to charge before restarting cleanup.
- Tidy away any cables on the ground (including the power cable of the charging dock) before cleaning to avoid losing power or damaging either the robot or the connected device.
- If a cleanup finishes within 10 minutes, cleaning repeats by default
- If the battery runs low before cleanup is complete, the robot will carry out a top-up charge before resuming cleanup from where it left off.
Pause
When the robot is cleaning, press any button to pause it.
Then press the button to continue cleaning or the  button to return it to the charging dock and stop the cleaning cycle.
Note: Placing a paused robot on the charging dock manually will end the current cleanup.
Sleep
If the robot is paused for over 10-minutes, it will go to sleep, and its power indicator will flash slowly. Press any button to wake it back up.
Note:
- The robot will not go to sleep when it is on the charging dock.
- The robot will automatically shut down if left in sleep mode for more than hours.
Charging
Auto: After cleaning, the robot will automatically return to the charging dock to recharge.
Manual: In Pause mode, press the button to send the robot back to the charging dock.
The power indicator will flash slowly as the robot charges.
Note: If the cleaning cycle was started away from the charging dock and the robot could not return to the dock after cleaning, it will instead return to its starting point. Place the robot directly on the dock to recharge it.
Error
If an error occurs while the robot is cleaning, the power indi-cator will flash red quickly, and you will hear a voice alert. See «Troubleshooting» for resolution options.
Note:
- The robot will go to sleep automatically if left in an Error state for over 10-minutes.
- Placing the robot on the charging dock in an error state will stop the current cleanup.
Reset WiFi
If your phone cannot connect to the robot because you have changed your router configuration, forgotten your password, or any other reason, open the top cover to see the WiFi indi-cator light then press and hold the  button and the button until you hear the» Resetting WiFi» voice alert. When the WiFi indicator light flashes slowly, reset is complete.
Note: If the robot is left connecting to the network for over an hour, its WiFi will be disabled. Reset WiFi before attempting reconnection.
Spot Cleaning
In the Standby or Pause mode, press and hold the button to start spot cleaning. This mode is used to clean a 1.5m x 1.5m square area centered on the robot. After cleanup, the robot will return to the center of the square. 
Note: Pressing any button will cancel the current spot cleaning cycle.
Selective Room Cleaning
Select specific rooms for cleaning in the APP. In this mode, the robot will only clean the selected rooms.
Note:
- A full map must be created and Map Saving mode switched on before this function can be used.
- After cleaning starts, the robot may move beyond the defined areas. Make sure there are no obstacles preventing the robot’s access to the target rooms.
Scheduled Cleaning
Use the APP to set start times and suction levels for scheduled cleanups. The robot will return to the charging dock after each cleanup.
Zone Cleaning
Use the APP to draw a specific zone for the robot to clean.
Note:
While cleaning the designated zone, the robot may move outside zone borders. Make sure that there are no cables or obstacles placed close to the cleanup zone.
Pin n Go
Use the APP to set a destination for the robot to go to.
Cleaning mode
Use the APP to choose from Quiet, Balanced, Strong, or MAX modes. Balanced mode is the default.
Do Not Disturb (DND) mode
In DND mode, no cleanups will start, no voice alerts will play, and the power indicator will dim. DND mode set from 22:00 to 08:00 by default and can be disabled or modified in the APP.
No-go zones / Invisible Wall / Mopping No-Go Zone
The app can be used to draw Virtual No-Go Zones and Walls, as well as Virtual No-Mop Zones and Walls to keep the robot from entering the areas you define. Virtual No-Mop Zones and Walls are only activated when the mopping cloth bracket is installed.
Note:
- «Map Saving Mode» must be turned on in the app to use virtual no-go zones.
- Virtual no-go zones and walls should only be used to customize the cleaning area. They should not be used to isolate hazards.
- Moving the robot manually or making significant changes to the home environment may cause the loss of Virtual No-Go Zones and Walls.

More app functions
| Real-Time Map Updates | Carpet Boost | Robot Location |
| Change Cleaning Mode | Part Replacement Schedule | Do Not Disturb (DND) mode |
| View Cleaning History | Remote Control | Firmware Update |
| Change Robot Voice | View robot status |
Note: Functions and details of the app may vary slightly due to continuous app development and upgrades.
Refilling the water tank or cleaning the mopping cloth midway
To refill the water tank or clean the mop cloth during a cleanup, pause cleaning by pressing any button and remove the mop module. Refill the water tank and/or clean the mop cloth as required. Reinstall the mop module and press the  button to continue cleaning.
Charging dock
The charging dock should be plugged in and placed against a wall on level ground, with more than 0.5m (1.6ft) of clearance on each side, and more than 1.5m (5ft) in front. For the best experience when using the mobile app, place the charging dock in an area with strong WiFi coverage. 
Note: Do not place the charging dock in direct sunlight or block the locator beacon; otherwise, the robot may not be able to return to the charging dock.
Routine maintenance
Main brush
* Clean weekly
- Turn the robot over then unlatch and remove the main brush cover.
- Take out the main brush, remove and clean its bearings.
- Remove the main brush cap, rotating in the unlock direction.
- Use the supplied main brush cleaning tool to remove any entangled hair.
- Re-install the cap and bearings following the lock direction.
- Re-insert the main brush and replace the brush cover.

Note: Main brush replacement every 6-12 months is recommended.
Using the main brush cleaning tool
Use the main brush cleaning tool to remove any hair entangled around the main brush. 
Note: If there is a large amount of hair, or hair is tightly entangled, remove it carefully to avoid damage to the main brush.
Dustbin and filter
* Weekly cleaning is recommended
- Open the top cover of the robot, squeeze the dustbin latch, and remove the dustbin.
- Open the dustbin lid as indicated by the arrow and pour out the contents.


Clean the washable filter
* Clean every two weeks
- Open the dustbin lid as indicated by the arrow and pour out the contents.
- Fill the dustbin with clean water and close the cover. Gently shake the dustbin, then pour out the dirty water.
Note:
Only use fresh water without cleaning liquid. - Remove the filter and clean it with water.
Note:
To avoid damage, do not touch the surface of the filter with hands, brushes, or sharp objects. - Rinse repeatedly and tap the filter frame to remove as much dirt as possible.
- Leave the filter to dry before reinstalling it.
Note:
Allow the filter to dry thoroughly before use. 24-hours of drying is recommended.


Battery
The robot is equipped with a high-performance lithium-ion rechargeable battery pack. To maintain battery performance, keep the robot charged.
Note: If the robot is to be left unused for an extended period, turn it off before storage and charge it at least once every three months to avoid battery damage resulting from over-discharging.
Charging dock
* Monthly cleaning recommended
Use a soft dry cloth to clean the charging contacts of the charging dock.
Side brush
* Monthly cleaning recommended
- Turn the robot over and remove the screw holding the side brush.
- Remove and clean the side brush.
- Reinstall the side brush and tighten the screw.
Note:
Side brush replacement every 3-6 months is recommended.

Water tank
* Frequent cleaning is recommended
- Open the water tank.
- Fill the filter with water
- Shake it, and pour out the water
Mop cloth
* Clean after use
- Remove the mop cloth from the mop cloth bracket.
- Clean the mop cloth and dry it.
Note:- If the mop cloth gets excessively dirty, cleaning quality will be affected. Cleaning it before use is recommended.
- Replacing the mop cloth every 3-6 months is recommended to maintain cleaning quality.

Omnidirectional wheel
* Frequent cleaning is recommended
- Turn the robot over.
- Use a small screwdriver to separate the axle and the tire.
- Rinse the axle and tire with water to remove any hair and dirt.
- Dry and rebuild the wheel, then press it back in place.
Note:
The omnidirectional wheel bracket cannot be removed.

System Reset
If the robot does not respond when you press a button or the robot cannot be shut down, press the Reset button. The robot will then restart.
Note: After a system reset, cleaning schedules, WiFi and other settings will be restored to factory settings.
Restore factory settings
If the robot is not functioning after a system reset, turn it on, then press the Reset button. Then press and hold the button until you hear the «Start restoring initial version» voice alert. The robot will then be restored to factory settings.
Machine sensors
* Monthly cleaning recommended
Use a soft dry cloth to wipe and clean all sensors, including:
- Four cliff sensors at the bottom of the robot.
- The wall sensor on the right of the robot.
- The charging contact on the bottom of the robot.

Firmware update
Update the robot using the app. Place the robot on the charging dock and ensure that the battery level is higher than 20% before updating. The power indicator will flash white quickly during a firmware update.
Holiday Energy Saving Function
When the robot is docked, press and hold «Recharge» for seconds or until you hear an alert sound. This will activate Holiday mode. In this mode the robot will switch to Low Power mode to minimize power consumption. This includes a dimming of the LED indicator, and the stopping of all non-charging related functions including cleaning, remote control over WiFi, and more. To deactivate Holiday mode, press and hold «Recharge» for seconds until the LED indicator brightens.
Basic parameters
Robot
| Name | Parameters |
| Model | roborock S5 Max |
| Dimensions | 353× 350× 96.5mm |
| Battery | 14.4V/5200mAh lithium battery |
| Weight | Approx. 3.5 kg |
| Wireless connection | WiFi Smart Connect |
| Rated voltage | 14.4VDC |
| Rated power | 58W |
Charging dock
| Name | Parameters |
| Model | CDZ11RR or CDZ12RR |
| Dimensions | 151× 130× 98mm |
| Rated power | 28W |
| Rated input | 100-240VAC |
| Rated output | 20VDC 1.2A |
| Rated frequency | 50-60Hz |
Note: The serial number is on a sticker on the underside of the robot.
Troubleshooting
If an error occurs during cleanup, the power indicator will flash red quickly, and a voice alert will play. Refer to the table below for resolution options.
| Error | Solution |
| Error 1: Rotate the laser head to check that it turns freely. | The LDS unit is jammed. Remove any items blocking it then move the robot to a new location and restart. |
| Error 2: Clean and lightly tap the bumper. | The bumper is stuck. Tap the bumper repeatedly to dislodge any jammed items. If nothing falls out, move the robot to a new location and restart. |
| Error 3: Move the robot to a new location and restart. | A wheel is suspended. Move the robot to a new location and restart. |
| Error 4: Wipe the cliff sensors, move the robot away from raised edges, and restart. | The robot is suspended. Move it to a new location and restart. If the problem persists, clean the cliff sensors. This error may also be caused by a dirty cliff sensor. Try wiping all sensors clean. |
| Error 5: Remove the main brush and clean the brush and bearing. | The main brush may be tangled up. Remove and clean it. |
| Error 6: Remove and clean the side brush. | The side brush may be tangled up. Remove and clean it. |
| Error 7: Look for anything stuck in the main wheels then move the robot to a new location and restart. | The main wheels may be jammed. Remove and clean them. |
| Error 8: Clear away any obstacles around the robot. | The robot may be stuck. Clear any obstacles around it. |
| Error 9: Install the dustbin and filter. | Reinstall the dustbin and filter and check that they are installed properly. If the problem persists, try replacing the filter. |
| Error 10: The filter is either wet or blocked. | The filter is not completely dry. Dry the filter for at least 24 hours. The filter may also require cleaning. If the problem persists, replace the filter. |
| Error 11: High-intensity magnetic field detected. Move the robot away from the magnetic tape and restart. | The robot is too close to a magnetic tape and cannot start. Move it to a new location and restart. |
| Error 12: The battery is too low. Recharge before use. | Low battery. Recharge before use. |
| Error 13: Charging error. Clean the charging contact area. | Use a dry cloth to clean the charging contacts on the robot and on the charging dock. |
| Error 14: Battery error. | The battery temperature is either too high or too low. Wait until it returns to normal. |
| Error 16: Robot is tilted. Place it on flat ground and restart. | The robot is tilted. Move it to flat ground and restart. |
| Error 17: Side brush module error. Reset the system. | The side brush module is experiencing a fault. Reset the system. |
| Error 18: Vacuum fan error. Reset the system. | The vacuum fan is experiencing a fault. Reset the system. |
| Error 22: Please wipe the recharge sensor. | The recharge sensor is blocked by dust. Please wipe the dust off. |
| Error 23: Please clear the signal emission area of the dock charger. | The charging dock is jammed. Clear and retry. |
| Error 24: Virtual no-go zone or wall detected. Move the robot to a new location and restart. | Move the robot away from the virtual no-go zone or barrier and restart. |
| Error 26: Wipe the wall sensor. | The wall sensor is dirty. Wipe it clean. |
| Internal error. Reset the system. | Malfunction due to an internal error. Reset the system. |
Note: A system reset may not resolve all problems.
If the problem persists after using the recommendations in the table above, please email our after-sales service team:
US/Non-Europe Support: support@roborock.com
Europe Support: support@roborock-eu.com
FAQs
| Problem | Solution |
| Unable to power on | The battery level is low. Put the robot on the charging dock to charge it before use. The battery temperature is too low or too high. Only use the robot within the range of 0-40°C (32-104°F). |
| Unable to charge | If the charging dock is not receiving power, check that both ends of the power cable are properly connected. If contact is poor, clean the contact areas of the charging dock and the robot. Power is restored when the power indicator light turns on. |
| Slow charging | When used at high or low temperatures, the machine will automatically reduce charging speed to extend battery life. The charging contact areas may be dirty. Use a dry cloth to clean them. |
| Unable to recharge | There are too many obstacles near the charging dock. Move it to an open area. The robot is too far from the charging dock. Place it closer and retry. |
| Abnormal behavior | Restart the robot. |
| Noise during cleaning | The main brush, side brush, or main wheels may jammed. Turn off the robot and clean them. If the omnidirectional wheel gets jammed, use a screwdriver to remove it for cleaning. |
| Poor cleaning ability or dust falling out | The dustbin is full and needs emptying. The filter is blocked and needs cleaning. The main brush is jammed and needs cleaning. |
| Unable to connect to WiFi | WiFi is disabled. Reset the WiFi and try again. WiFi signal is poor. Make sure that the robot is in an area with good WiFi signal reception. Abnormal WiFi connection. Reset the WiFi and download the latest mobile app and retry. The current device is not supported. You can find supported models inside the app. Unable to connect to WiFi. There may be an error with your router settings. Contact Roborock customer service for help with troubleshooting. |
| Scheduled cleaning is not working | The battery level is too low. Scheduled cleaning can only begin when the battery level is above 20%. Please confirm whether the timed cleaning setting is set to «effective once»? |
| Is power always being drawn when the robot is on the charging dock? | The robot will draw power while it is docked to maintain battery performance, but power consumption is extremely low. |
| Does the robot need to be charged for at least 16 hours the first three times it is used? | No. The robot can be used any time after it has been fully charged once. |
| No or little water during mopping | Check whether there is water in the water tank and use the app mobile app to set water flow or see the manual for full mop setup instructions. |
| Cleaning does not resume after recharging | Make sure that the robot is not in DND mode. DND mode will prevent cleanup. When cleaning a space requiring a top-up charge, if the robot was placed manually on the charging dock before it recharged automatically, it will not be able to continue cleanup. |
| The robot cannot return to the charging dock after spot cleaning or when it has been moved manually. | After spot cleaning or a significant position change, the robot will re-generate the map. If the charging dock is too far away, it may not be able to return for recharging and must be placed on the charger manually. |
| The robot suddenly misses a certain spot | The wall sensor or cliff sensors may be dirty. Clean them with a soft dry cloth. |
| It takes a long time to fill the water tank | The filter may be blocked and need cleaning. |
Robot Vacuum Cleaner
Manufacturer: Beijing Roborock Technology Co.,Ltd.
Product Model: roborock S5 Max
Address of Manufacturer: Floor 6, Suite 6016, 6017, 6018, Building C, Kangjian Baosheng Plaza,
No.8 Heiquan Road, Haidian District, Bejing, P.R.CHINA
For more product information, visit our website: www.roborock.com
For after-sales support, email our after-sales service team:
US/Non-Europe Support: support@roborock.com
Europe Support: support@roborock-eu.com

Videos
Roborock S5 Max Review Video
Roborock S5 Max Mopping Test Video
Documents / Resources
References
Download manual
Here you can download full pdf version of manual, it may contain additional safety instructions, warranty information, FCC rules, etc.
Download Roborock S5 MAX Manual