- Manuals
- Brands
- Moneual Manuals
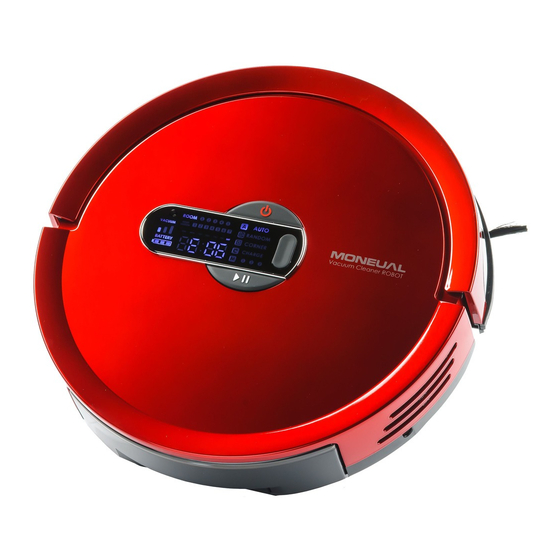
- Vacuum Cleaner
- RYDIS MR7700
- User manual
-
Contents
-
Table of Contents
-
Bookmarks
Quick Links
User Manual
RYDIS MR7700
Version 1.0
Copyright ⓒ 2012 MONEUAL Inc. All rights reserved. The MONEUAL, MONCASO, MiNEW, RYDIS, SONAMU
are trademarks, or registered trademarks of MONEUAL Inc. in the Republic of Korea and/or other counties.
Related Manuals for Moneual RYDIS MR7700
Summary of Contents for Moneual RYDIS MR7700
-
Page 1
User Manual RYDIS MR7700 Version 1.0 Copyright ⓒ 2012 MONEUAL Inc. All rights reserved. The MONEUAL, MONCASO, MiNEW, RYDIS, SONAMU are trademarks, or registered trademarks of MONEUAL Inc. in the Republic of Korea and/or other counties. -
Page 3
RYDIS MR7700 User Manual… -
Page 4: Table Of Contents
Cleaning the dust box Replacing the filter Cleaning the falling point-detecting sensor Cleaning wheels Cleaning the dust intake Battery usage and management Voice announcement list System error codes list Checkpoints before request for after-sales service Product specifications 4 RYDIS MR7700 User Manual…
-
Page 5: Product Features
The cleaner comes with a motion-control remote controller, the first of its kind, enabling the robot cleaner to freely move through physical motions made with the remote controller. This function provides users with convenience and fun during cleaning. RYDIS MR7700 User Manual 5…
-
Page 6
With this function, the cleaner can reduce the time of cleaning by memorizing the internal structure so it does not have to re-identify the home layout every time it starts cleaning. 6 RYDIS MR7700 User Manual… -
Page 7: Cautions For Safety
A child or an elderly person can become frightened or injured. Make sure that the charger is always plugged into a power source. Otherwise, you cannot use the function of having the robot go back to the charger for automatic charging during or after cleaning. RYDIS MR7700 User Manual 7…
-
Page 8
Do not use the product in a utility room, on a wet floor, on stairs, on a table or shelf, in an underground room, a warehouse, a commercial building or outdoors. If you have dropped the product or caused an impact to the product, contact the designated service center immediately. 8 RYDIS MR7700 User Manual… -
Page 9
For indicator power, use rated batteries and adapters. If not, the product can be damaged set on fire or it may not work. In case of insufficient indicator battery, replace with a new one. Without batteries, indicator functions may not work normally. RYDIS MR7700 User Manual 9… -
Page 10
Do not place hot or flammable objects such as cigarette, candles, heaters, matches, or gasoline near product. The product can become badly damaged or a fire may break out. Do not use the product near an explosive object or in an explosive place. 10 RYDIS MR7700 User Manual… -
Page 11: Product Composition
The life span of the dust box filter is around six months, though this time period can increase/decrease depending on usage environments. Make sure to use standard expendables. For inquires for appropriate standards, please contact our customer care center. RYDIS MR7700 User Manual 11…
-
Page 12: Cautions Before Using The Product
(e.g. desks, tables, etc.) where the robot cleaner has risk of falling off. The cleaner is not able to cross over a threshold higher than 1cm. The robot cleaner may not be able to move properly on a carpet with long wool. 12 RYDIS MR7700 User Manual…
-
Page 13: Name Of Each Part Of The Product
CORNER ⑥ Battery status lamp CHARGE ⑦ Reservation information lamp ⑧ Room selection lamp ⑨ Time lamp ⑩ Operation mode lamp Robot cleaner(Rear) ① Dust box ② Air outlet ③ Power switch ④ Adapter jack RYDIS MR7700 User Manual 13…
-
Page 14: Indicator
⑤ Dust intake ⑥ Dust cloth guard mounting holes Indicator(Top) ① Signal transmission sensor ② Mode switch button ③ Distance setup button ④ Indicator number setup button Indicator(Bottom/Rear) ① Battery cover ② Power button ③ Adaptor jack 14 RYDIS MR7700 User Manual…
-
Page 15: Charger
Charger(Front) ① Operation lamp ② Guide signal transmission sensor ③ Charging terminal Charger(Rear) ① Adapter compartment ② Adapter jack ③ Sensor Signal Distance Adjustment Switch. RYDIS MR7700 User Manual 15…
-
Page 16: Installing The Product
If the charger is installed in a site under direct sunlight, automatic charging may not occur or the product can become discolored. Adjust the signal detection distance from 5 m to 8 m according to the charger’s location and room size. 16 RYDIS MR7700 User Manual…
-
Page 17
Usage time may vary depending on the strength of suction power required for the clean. AUTO ROOM RESER RANDOM VACUUM VATION CORNER CHARGE Being charged Blink twice per second. Battery lamp Charging completed All three bars are full Low battery Blinks 4 times/per second RYDIS MR7700 User Manual 17… -
Page 18
For detailed installation methods, see page 37. The indicator can be used in connection with an additional adaptor (5V). (Battery power will not be consumed while connected to the adaptor.) ※ Adapter specification: 5V + 1A (for separate purchase) 18 RYDIS MR7700 User Manual… -
Page 19: Descriptions For Remote Controller Buttons
Adjusts the strength of suction power ⑧ INTENSIVE button Selects the focused cleaning mode (See page 25.) ⑨ CHARGE button Moves the robot cleaner to the charger ⑩ SHADOW button Selects the mode for cleaning under furniture (See page 27.) RYDIS MR7700 User Manual 19…
-
Page 20
2. While pressing the power button on the top face of the main body, turn on the power switch at the side of the main body simultaneously. The display of the main body will start blinking for synchronization. Power Button Power Switch 20 RYDIS MR7700 User Manual… -
Page 21
Synchronization will only take a few seconds to be completed. If the main body is 3 meters or more away from the remote controller, synchronization will fail. MANUAL 5. Pull out and then re-insert the battery of the remote controller. This will complete synchronization. RYDIS MR7700 User Manual 21… -
Page 22: Language Setting
04. Supported voices may differ depending on Language the regions and countries. German English Italian French Russian 05. Press the power button on the top face of the main body to complete language selection and confirm selected language. 22 RYDIS MR7700 User Manual…
-
Page 23: Basic Cleaning
If there is a carpet or other objects in front of the charger while cleaning with the dust cloth, the robot cleaner may fall to reach the charger. RYDIS MR7700 User Manual 23…
-
Page 24: Random Cleaning
When the cleaning is stopped and you press the [Start/Stop] button, the product will resume cleaning. MANUAL At this time, the previous cleaning operation will be ignored and the automatic cleaning will be newly activated. 04. The robot begins random cleaning. 24 RYDIS MR7700 User Manual…
-
Page 25: Using Advanced Cleaning Functions
MANUAL 01. Select the focused cleaning mode. Main body button Remote controller button MANUAL (None) 02. When cleaning is complete, the cleaner will stop at its current location. RYDIS MR7700 User Manual 25…
-
Page 26: Cleaning Corners
MANUAL MANUAL AUTO ROOM RESER RANDOM VACUUM VATION CORNER CHARGE 02. Press the [START/STOP] button. After cleaning is completed, the product will automatically move back to the charger. MANUAL MANUAL 26 RYDIS MR7700 User Manual…
-
Page 27: Shadow Cleaning
To reduce the moving time, place the robot cleaner in front of desired furniture before it starts working. MANUAL 02. Select the mode for cleaning under the bed. Main body button Remote controller button MANUAL (None) 03. After cleaning is completed, the product will return to the charger. RYDIS MR7700 User Manual 27…
-
Page 28: Selecting A Room For Cleaning
Main body button Remote controller button MANUAL Every time you press the button, the number/status is changed among 1-2-3-4-5-no selection. (None) MANUAL 02. Press the [START/STOP] button. After cleaning is completed, the product will return charger. 28 RYDIS MR7700 User Manual…
-
Page 29: Mop Cleaning
01. Put a mop made of superfine fibers onto the mop guard. 02. Install the mop guard to meet the mounting hole seen at the bottom of the main body. 03. Press the [Start/Stop] button. Main body button Remote controller button MANUAL (None) MANUAL RYDIS MR7700 User Manual 29…
-
Page 30: Cleaning Through Manual Control
03. Operate the robot cleaner as you like with the direction keys of the remote controller. Manual control is not available while charging. If you only need a manual move without vacuuming, this function is useful. 30 RYDIS MR7700 User Manual…
-
Page 31: Cleaning Through Manual Control(Control Of The Motion)
03. Press the button seen below to enter the remote controller operation mode for the motion control mode. MANUAL If no operations are detected for five (5) or longer seconds within motion control mode, the motion control mode will be released. MANUAL RYDIS MR7700 User Manual 31…
-
Page 32
Slightly flick the remote controller toward left/right. The inhalation motor will start/stop working. Adjusting the suction power — (equivalent to [VACUUM] button on the remote controller) Slightly pull the remote controller in direction of the arrow. 32 RYDIS MR7700 User Manual… -
Page 33
Moving the robot left or right (Equivalent to [LEFT/RIGHT] button on the remote controller) Roll your wrist with the remote controller to the left/right. (Turning counterclockwise) (Stop the rotation) (Turning clockwise) 05. To release the remote controller from the motion control mode, press the motion control conversion button. RYDIS MR7700 User Manual 33… -
Page 34: Setup Of Time And Reservation
05. Use the up and down direction keys to set the day of the week. 06. When all the settings are completed, press the [CONFIRM/MANUAL CLEAN] button. 34 RYDIS MR7700 User Manual…
-
Page 35: Setting Reservation
For any date requiring no reservation, you can set the time as [00:00]. 04. After all the settings for the day of the week are completed or to exit the setup mode, press the [RESERVE] button. RYDIS MR7700 User Manual 35…
-
Page 36: Setup And Execution Of Macros(To Save Moving Lines)
When the voice announcement for the completed setup is heard, the macro setup will be finished (At this time, the upper display may blink). If the input control is “Charging” during macro setting, the cleaner will move to the charger after the setting. 36 RYDIS MR7700 User Manual…
-
Page 37: Executing Macros
In this case, the starting point of each function can be different in each macro. Except for automatic cleaning, if the cleaner needs charging while performing other functions, macro execution will be terminated. RYDIS MR7700 User Manual 37…
-
Page 38: Using The Indicator
Repeat pressing until the setup is made for the door width. 1m(●) — 3m(●●) — 5m(●●●) For the average home, 1m setup is adequate. If the distance is set too excessively, the robot cleaner may not function correctly. 38 RYDIS MR7700 User Manual…
-
Page 39
Every time you press the button, the distance is shifted as Distance follows: 1m(●) – 3m(●●) – 5m(●●●). Set to fit to the door width. Set the room number. Indicator number When you use 2 or more indicators, room numbers should not be duplicated. RYDIS MR7700 User Manual 39… -
Page 40: Using Through Setup Of Cleaning Areas
If the distance is set as too short or too long, the robot cleaner may not properly understand the area. 03. Calculate the signal distance to arrange the indicator in the appropriate position. If the signal does not reach the wall, the robot cleaner may slip through the crack. 40 RYDIS MR7700 User Manual…
-
Page 41
It is recommended that you not install indicators in a place with the charger in it. The emitting signals of the charger (in the radius of 5 meters) may be overlapped with the signals of the indicators, causing all signals to be ignored. Charger Emitting signals of the charger RYDIS MR7700 User Manual 41… -
Page 42: Managing The Product
02. Lift the cover off the dust box. 03. Remove the dust filter. The dust filter can be water-cleaned. After cleaning the filter with water, let air dry indoors. In water-cleaning the filter, do not use any detergent. 42 RYDIS MR7700 User Manual…
-
Page 43
Make sure to replace the cover as shown in the picture below! Correct (○) Wrong ( X ) 07. Insert the dust box back into the robot cleaner. When you push gently in, the dust box should smoothly insert due to built-in magnets. RYDIS MR7700 User Manual 43… -
Page 44: Replacing The Filter
02. Use the cleaning brush or a cotton swab to clean the three sensors as shown in the picture below. Do not directly moisten or use benzene or alcohol to clean the sensors. Brush Cotton Swab 44 RYDIS MR7700 User Manual…
-
Page 45: Cleaning Wheels
Turn each wheel while cleaning to clean the entire wheel. Remove hairs and other foreign substances, which can disturb operation of the wheels. Cleaning the dust intake 01. Turn the robot cleaner over. 02. Lift the cover off the dust intake vent. RYDIS MR7700 User Manual 45…
-
Page 46
Check the groove shape and insert it into the fixing hole of the rubber brush. Then, fix the wing of the fixing pin to the fixing pin. 06. Insert the cover of the dust intake. Insert the protruding part first. The built-in magnets will ensure the cover stays in place. 46 RYDIS MR7700 User Manual… -
Page 47: Battery Usage And Management
For purchase of additional batteries, please contact our customer service center. Replacing the battery manually If you feel it is too difficult to manually replace the battery, please contact customer center. 01. Turn the robot cleaner over. RYDIS MR7700 User Manual 47…
-
Page 48
03. Remove the battery and pull out the battery pin. Press the lock at the same time to pull out the battery pin. 04. Fix the battery pin of the new battery in and then insert the battery. 48 RYDIS MR7700 User Manual… -
Page 49
If you use the product while it is filled with foreign substances and dust, it can cause increase in rotation of internal motors and shorten the life span of the battery. Charge the battery between each use of the product. In charging or long-term storage, keep the product away from direct sunlight and fire. RYDIS MR7700 User Manual 49… -
Page 50: Voice Announcement List
The main brush is tangled or jammed in a foreign substance. Check the side brush. The side brush is tangled or jammed in a foreign substance. Errors are generated. Errors have occurred (See the error code chart). 50 RYDIS MR7700 User Manual…
-
Page 51: System Error Codes List
[E.12] Lift the robot cleaner to another site. Measures Reason Warning keeps activating and disrupting cleaning. [E.13] Measures Lift the robot cleaner to another site. Reason Other errors [E.15] Measures Please contact our service center. RYDIS MR7700 User Manual 51…
-
Page 52: Checkpoints Before Request For After-Sales Service
(2) Check if a reservation setup has been made. Q. The robot does not respond to any If the main body is directly connected with the adapter for charging, button. no button input will work during manual charging. 52 RYDIS MR7700 User Manual…
-
Page 53: Product Specifications
Indicator Model RI-750 Dimension 89.7 x 86.8 x 100mm (LxHxW) Weight 0.22kg Battery D alkaline batteries (LR20); 2EA Battery operation time Approx. six (6) months (standby mode) Signal transmission 1, 3, 5m (Select) distance (IR) RYDIS MR7700 User Manual 53…
-
Page 54
Remote control Model RC-750 Dimension 132.7 x 23.4 x 46.9mm (LxHxW) Weight 0.06kg Power source AAA alkaline batteries (LR03) ; 2EA Battery life 6 months Signal transmission distance (IR) 54 RYDIS MR7700 User Manual… -
Page 55: Product Warranty
The warranty service to our consumers is based on the customer compensation regulation. By the request for the warranty service, MONEUAL will provide the service. The company will let the customer notified of whether to be compensated and the details within seven(7) business days after the requested day and offer the compensation within fourteen(14) business days after the notified day.
-
Page 56
MEMO… -
Page 57
MEMO… -
Page 58
MEMO… -
Page 60
Copyright ⓒ 2012 MONEUAL Inc. All rights reserved. The MONEUAL, MONCASO, MiNEW, RYDIS, SONAMU are trademarks, or registered trademarks of MONEUAL Inc. in the Republic of Korea and/or other counties.
Перейти к контенту
![]()
Русские электронные инструкции по эксплуатации
Постоянно обновляемый большой каталог документации по эксплуатации и использованию современных устройств и оборудования на русском языке. Бесплатное скачивание файлов.
Поиск:
Главная
♥ В закладки
Просмотр инструкции в pdf


Инструкция по эксплуатации робота-пылесоса MONEUAL MR7700 Red.
Скачать инструкцию к роботу-пылесосу MONEUAL MR7700 Red (2,34 МБ)

Инструкции по эксплуатации роботов-пылесосов MONEUAL
« Инструкция к роботу-пылесосу LG VRF4041LS
» Инструкция к роботу-пылесосу Philips SmartPro Compact FC8710-01
Вам также может быть интересно

Инструкция к роботу-пылесосу MONEUAL MR6500 Green

Инструкция к пылесосу Tefal Explorer Serie 20 RG6871WH

Инструкция к стиральной машине Атлант СМА 60 С 108

Инструкция к холодильнику Nordfrost ДХ 404 012

Инструкция к пылесосу Samsung SR20M7070WD

Инструкция к телевизору Samsung QE65QN85BAU

Инструкция к фену Dyson Supersonic HD01 Fuchsia + Brush Set

Инструкция к газовой плите Gorenje GI63398BX
Добавить комментарий
Имя *
Email *
Сайт
Комментарий


![]()


Сохранить моё имя, email и адрес сайта в этом браузере для последующих моих комментариев.
- Добавить инструкцию
- Заказать инструкцию
|
Detail Specifications: 1007/1007520-rydis_mr7700.pdf file (10 Apr 2023) |
Accompanying Data:
Moneual RYDIS MR7700 Vacuum Cleaner PDF Operation & User’s Manual (Updated: Monday 10th of April 2023 05:34:10 AM)
Rating: 4.4 (rated by 85 users)
Compatible devices: MR6550, MBOT 900, ME685 Series, MR6800M-M3 Series, MV-400, MBOT500, MBOT 500, ME485.
Recommended Documentation:
Text Version of Operation & User’s Manual
(Ocr-Read Summary of Contents, UPD: 10 April 2023)
-
60, Copyright ⓒ 2012 MONEUAL Inc. All rights reserved. The MONEUAL, MONCASO, MiNEW, RYDIS, SONAMU are trademarks, or registered trademarks of MONEUAL Inc. in the Republic of Korea and/or other counties.
… -
21, RYDIS MR7700 User Manual 21 ENGLISH 4. While pressing the OK button from the remote controller, re-insert the battery in. 5. Pull out and then re-insert the battery of the remote controller. 3. Pull out one battery from the remote controller. The OK button of the remote controller will turn on and then off in red and blue in turn. Synchronization will only take a few secon…
-
29, RYDIS MR7700 User Manual 29 ENGLISH With the dust cloth attached, the cleaner is able to mop clean the floor. In this mode, the robot cleaner does not go onto carpeted areas or, thresholds. Mop cleaning 01. Put a mop made of superfine fibers onto the mop guard. 02. Install the mop guard to meet the mounting hole seen at the bottom of the main body. 03. Press the …
-
54, 54 RYDIS MR7700 User Manual ENGLISH Model Dimension Weight Power source Battery life Signal transmission distance (IR) RC-750 132.7 x 23.4 x 46.9mm (LxHxW) 0.06kg AAA alkaline batteries (LR03) ; 2EA 6 months 10m Remote control
… -
4, Moneual RYDIS MR7700 4 RYDIS MR7700 User Manual ENGLISH Table of Contents Product features 5 Cautions for safety 7 Product composition 11 Cautions before using the product 12 Name of each part of the product 13 Robot cleaner 13 Indicator 14 Charger 15 Installing the product 16 Descriptions for remote controller buttons 19 Language Setting 22 Basic cleaning 23 …
-
15, Moneual RYDIS MR7700 RYDIS MR7700 User Manual 15 ENGLISH Charger(Front) Charger(Rear) ① Operation lamp ② Guide signal transmission sensor ③ Charging terminal ① Adapter compartment ② Adapter jack ③ Sensor Signal Distance Adjustment Switch.
… -
40, 40 RYDIS MR7700 User Manual ENGLISH 02. Press the [Distance] button and adjust the distance of signals to set cleaning areas. 03. Calculate the signal distance to arrange the indicator in the appropriate position. Repeat the pressing of the button until the distance of signals to set cleaning areas is set at the desired level. 1m(●) — 3m(●●) — 5m(●●●) If t…
-
38, Moneual RYDIS MR7700 38 RYDIS MR7700 User Manual ENGLISH Check the indicator battery status. The indicator is not included with the standard package but can be purchased separately if needed. Press any button to check if the lamp blinks; if so, it means the indicator is turned on. If the battery becomes depleted, press the button; all the lamps will blink at the same time. In this case, you need to replace the…
-
32, 32 RYDIS MR7700 User Manual ENGLISH Turning on/off cleaning mode — (equivalent to [OK/MANUAL] button on the remote controller) Adjusting the suction power — (equivalent to [VACUUM] button on the remote controller) Turning on/off the power — (equivalent to [POWER] button on the remote controller) Slightly flick the remote controller toward left/right. The inhalation…
-
5, RYDIS MR7700 User Manual 5 ENGLISH Product features This system divides cleaning areas into up to five areas for select cleaning of specified areas. Each indicator can help you set one room, and works as a guide for establishing cleaning areas so that the cleaner will not move out of specified areas. The cleaner comes with a motion-control remote controller, t…
-
39, RYDIS MR7700 User Manual 39 ENGLISH 04. Press the [Indicator number] button to set a room number. 05. Leave the door open. Every time you press the button, the lamps are turned on in the order of “1-2-3-4-5”. When two or more indicators are installed, room numbers should not be duplicated. If you do not want to clean the room with the indicator installed, clos…
Recommended Instructions:
P512-006, 125 CC, 961980019, TES-3600, TVIVFBIR120


-
Wet/Dry VacuumATTENTION! …
87M Series 9
-
Vac-35 PropaneModel:Model:Model:Model:Model:PV9908KLPPV9908KLPPV9908KLPPV9908KLPPV9908KLPPV9908KSPLPV9908KSPLPV9908KSPLPV9908KSPLPV9908KSPLPV9908KSPLRPV9908KSPLRPV9908KSPLRPV9908KSPLRPV9908KSPLROPERAOPERAOPERAOPERAOPERATIONTIONTIONTIONTIONSERVICESERVICESERVICESERVICESERVICEPPPPPARARARARARTSTSTSTSTSCARECARECARECARECARERevised 7/05 …
Parker PV9908KLP 23
-
1Register your new device on MyBosch now and get free benefits:bosch-home.com/ welcomeBCS81/BBS81/BSS81Unlimited[de]Gebrauchsanleitung 56[en]Instruction manual 59[fr]Mode d’emploi 63[it]Istruzioni per l’uso 67[nl]Gebruiksaanwijzing 71[da]Beskrivelse74[no]Beskrivelse av apparatet78[sv]Produktbeskrivning81[fi]Laitteen kuvaus85[es]Instrucciones de uso 88[pt]Instruções de serviço 92[ …
Unlimited BCS81 145
Popular Right Now:
Operating Impressions, Questions and Answers:
Посмотреть инструкция для Moneual Rydis MR7700 бесплатно. Руководство относится к категории пылесосы, 1 человек(а) дали ему среднюю оценку 8.8. Руководство доступно на следующих языках: -. У вас есть вопрос о Moneual Rydis MR7700 или вам нужна помощь? Задайте свой вопрос здесь
Не можете найти ответ на свой вопрос в руководстве? Вы можете найти ответ на свой вопрос ниже, в разделе часто задаваемых вопросов о Moneual Rydis MR7700.
Мой пылесос Moneual не всасывает как раньше. В чем может быть проблема?
Как часто следует проверять фильтр?
Что делать при появлении от пылесоса неприятного запаха?
С какой частотой необходимо пылесосить помещения?
Инструкция Moneual Rydis MR7700 доступно в русский?
Не нашли свой вопрос? Задайте свой вопрос здесь