-
Contents
-
Table of Contents
-
Bookmarks
Quick Links
10810
multiMAUS
Handbuch
�
Manual
��
Manuel
�
Manuale
�
Related Manuals for roco multiMAUS
Summary of Contents for roco multiMAUS
-
Page 1
10810 multiMAUS Handbuch � Manual �� Manuel � Manuale �… -
Page 2: Table Of Contents
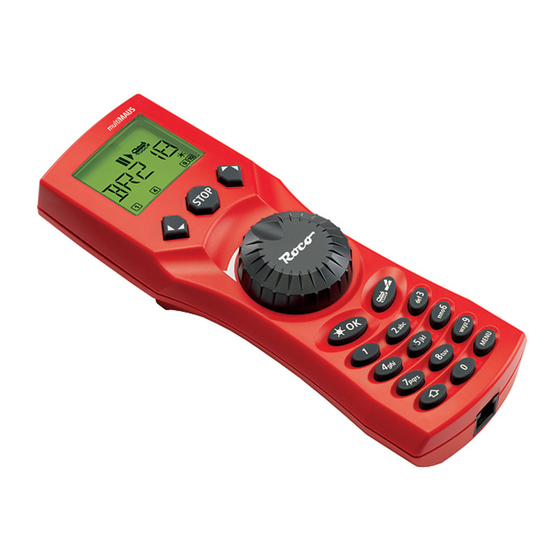
ABLE OF ONTENT The evolution of the ROCO Lokmaus – the multiMAUS …………..An overview of the multiMAUS ………………….. Section 1 • Basics – Get to know the multiMAUS Connecting the multiMAUS ………………….�� The display screen ……………………..The keys ……………………….
-
Page 3: The Evolution Of The Roco Lokmaus — The Multimaus
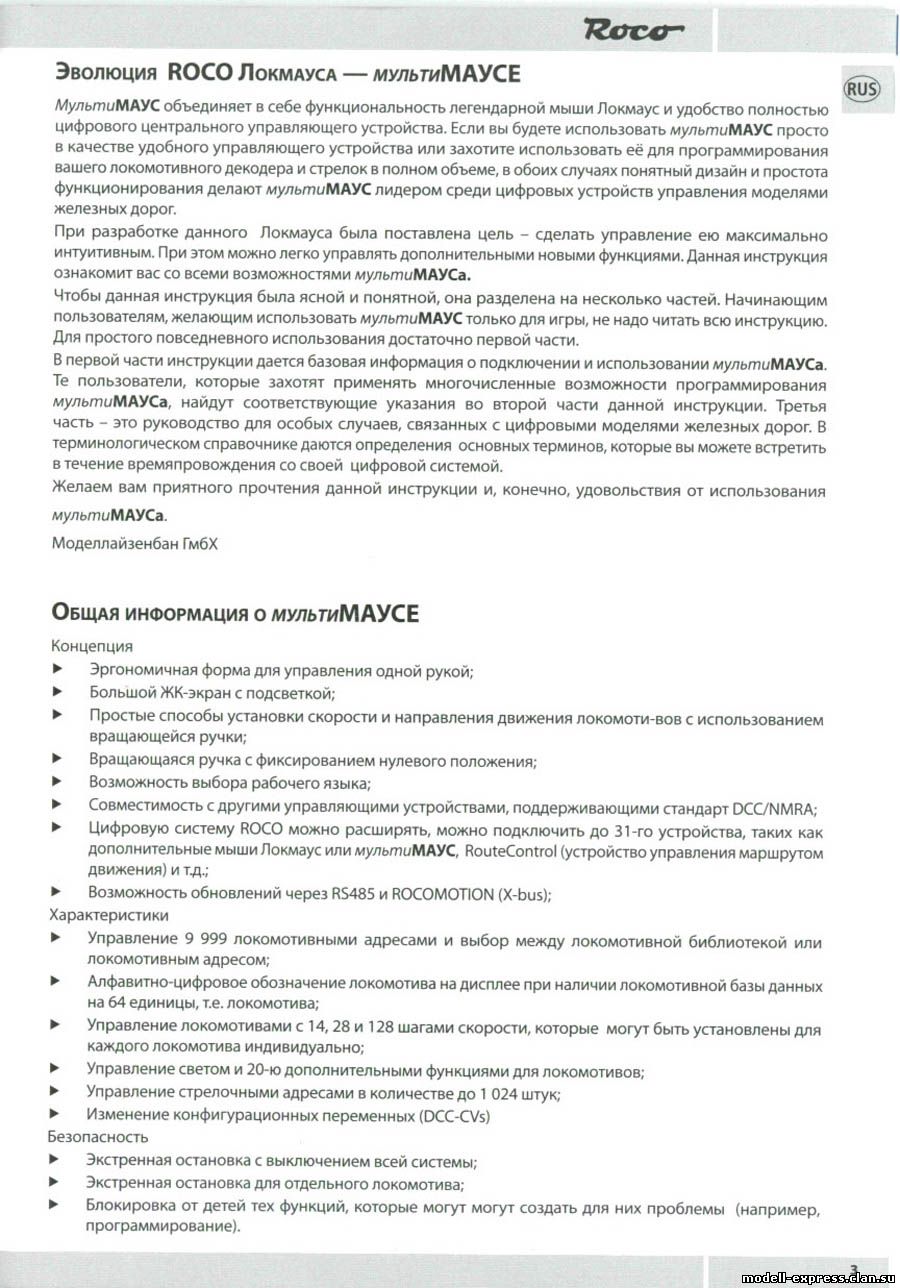
The multiMAUS brings together the functionality of the legendary Lokmaus with the comfort of a fully digital central control unit. Whether you use the multiMAUS as just a comfortable controller or wish to use it for comprehensive programming of your locomotive decoder and turnouts, the clear layout of the design and simple operation make the multiMAUS the leading digital model railroading controller.
-
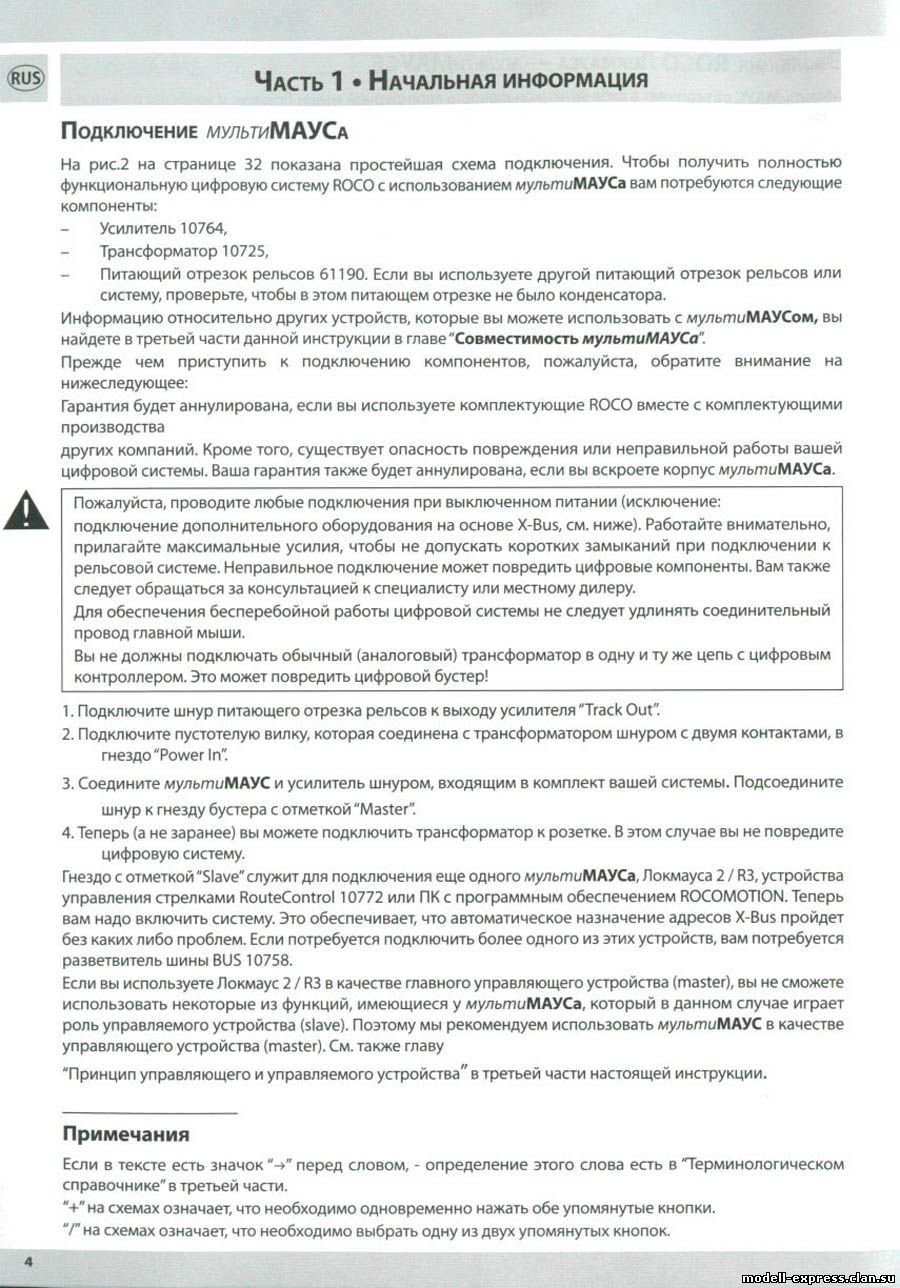
Page 4: Connecting The Multimaus
If you use a Lokmaus 2 / R3 as a master, you will be unable to use some of the functions performed by a multiMAUS set as a slave. We therefore recommend that you use a multiMAUS as the master. See also the chapter “M…
-
Page 5: The Display Screen
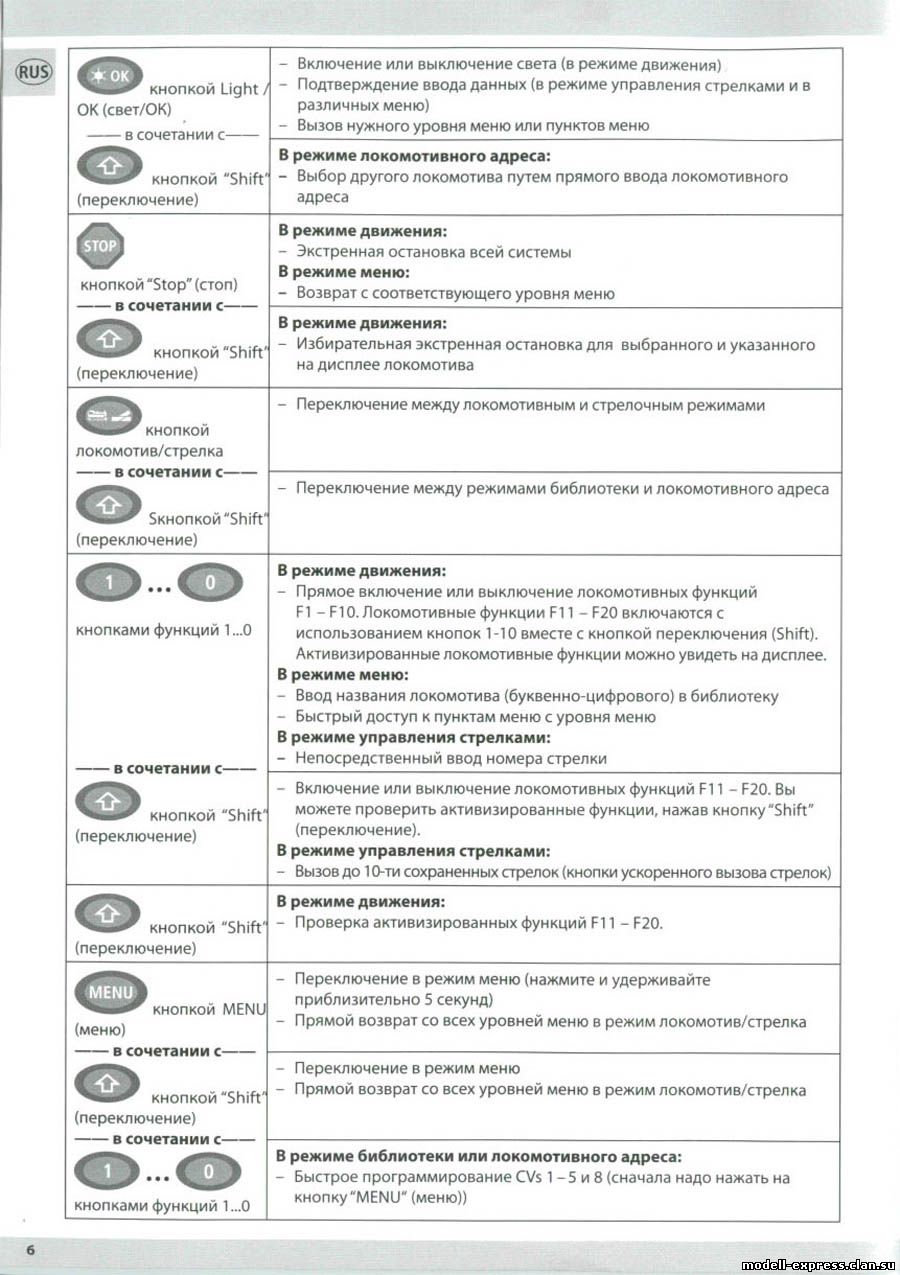
ISPLAY CREEN All the functions of the multiMAUS can be checked on the large LCD with backlight. The symbols are as follows: Drive symbols Wrench Turnout symbol – Arrows shows the direction of – the multiMAUS is in the (locomotive / turnout key) travel of the selected locomotive “Settings”…
-
Page 6
– Switch the light on or off (in drive mode) Light / OK key – Confirm inputs (in turnout mode and in the menus) – Call up desired menu level or menu items – in combination with — In locomotive address mode: –… -
Page 7: Operating The Multimaus
PERATING THE Despite its numerous options, operation of the multiMAUS is simple and intuitive. A concept which had already been successfully introduced for the Lokmaus models of the first and second generation. The fol- lowing shows you how to operate the multiMAUS based on practical examples.
-
Page 8
“1” key. Correct input errors by using the left “arrow key” to move back one or more spaces. Confirm by pressing “OK” The multiMAUS then switches to the loco- motive address. The “suggested value” is dis- played, in this case “3”. -
Page 9
6, page 42). The locomotive can now be controlled. 2.2. Locomotive address mode The multiMAUS also gives you the option of controlling your loco- motives using the decoder address only. The display screen shows the locomotive address with the letter “L” before it (in this case, locomotive address 36), the locomotive symbol and all the selected functions. -
Page 10: Driving And Functions
Backwards Standstill Forwards �� If another multiMAUS or Lokmaus is used to control a locomotive, the locomotive symbol flashes. See also the chapter “T “ on page 54. HE MASTER SLAVE PRINCIPLE The locomotive functions, e.g.
-
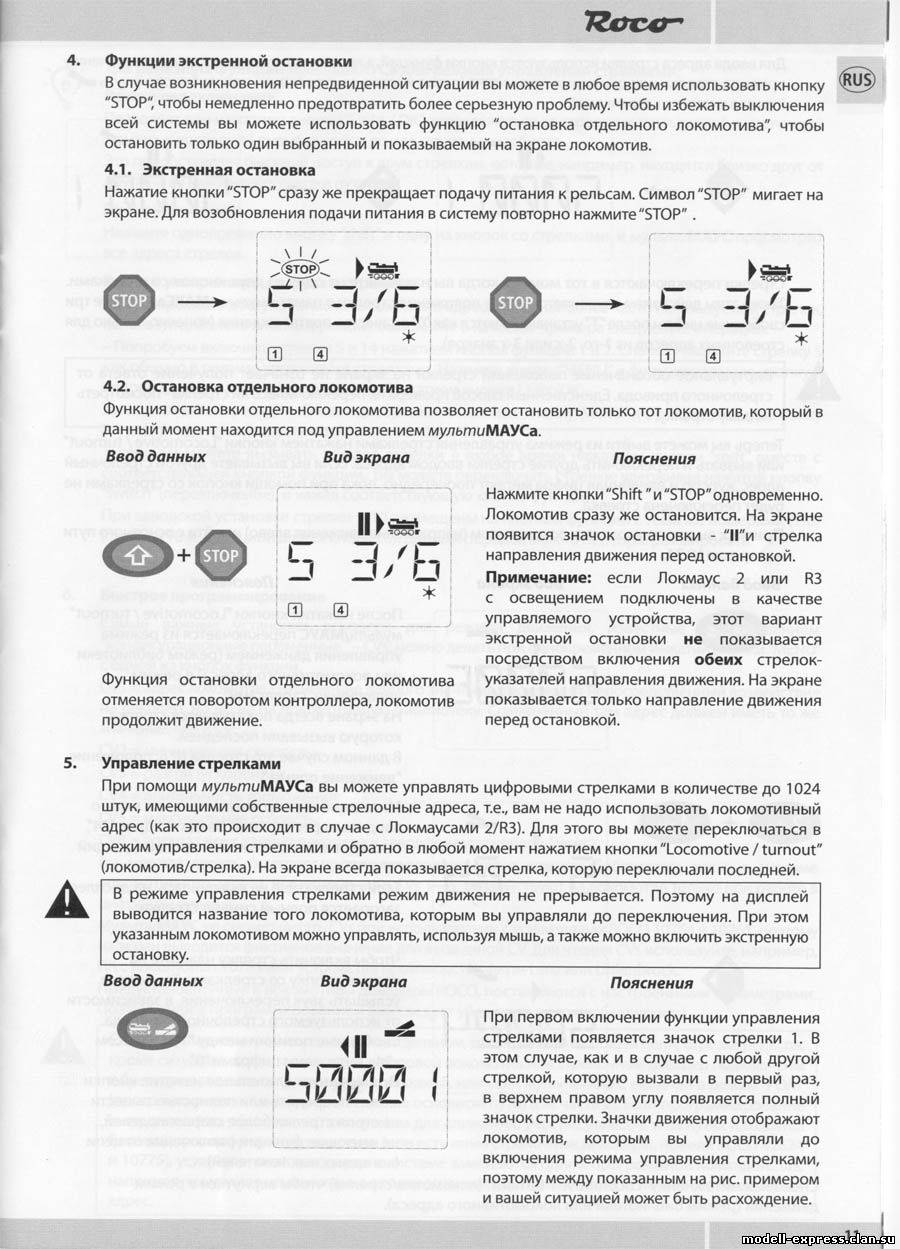
Page 11: The Emergency Stop Functions
The locomotive stop is released by turning the controller, the locomotive starts to move again. Turnout control You can use the multiMAUS to control up to 1,024 digital turnout drives with genuine turnout ad- dresses without having to use up a locomotive address (as is the case with the Lokmaus 2 / R3). To do so, you can switch to turnout mode and back at any time by pressing the “Locomotive / turnout”…
-
Page 12
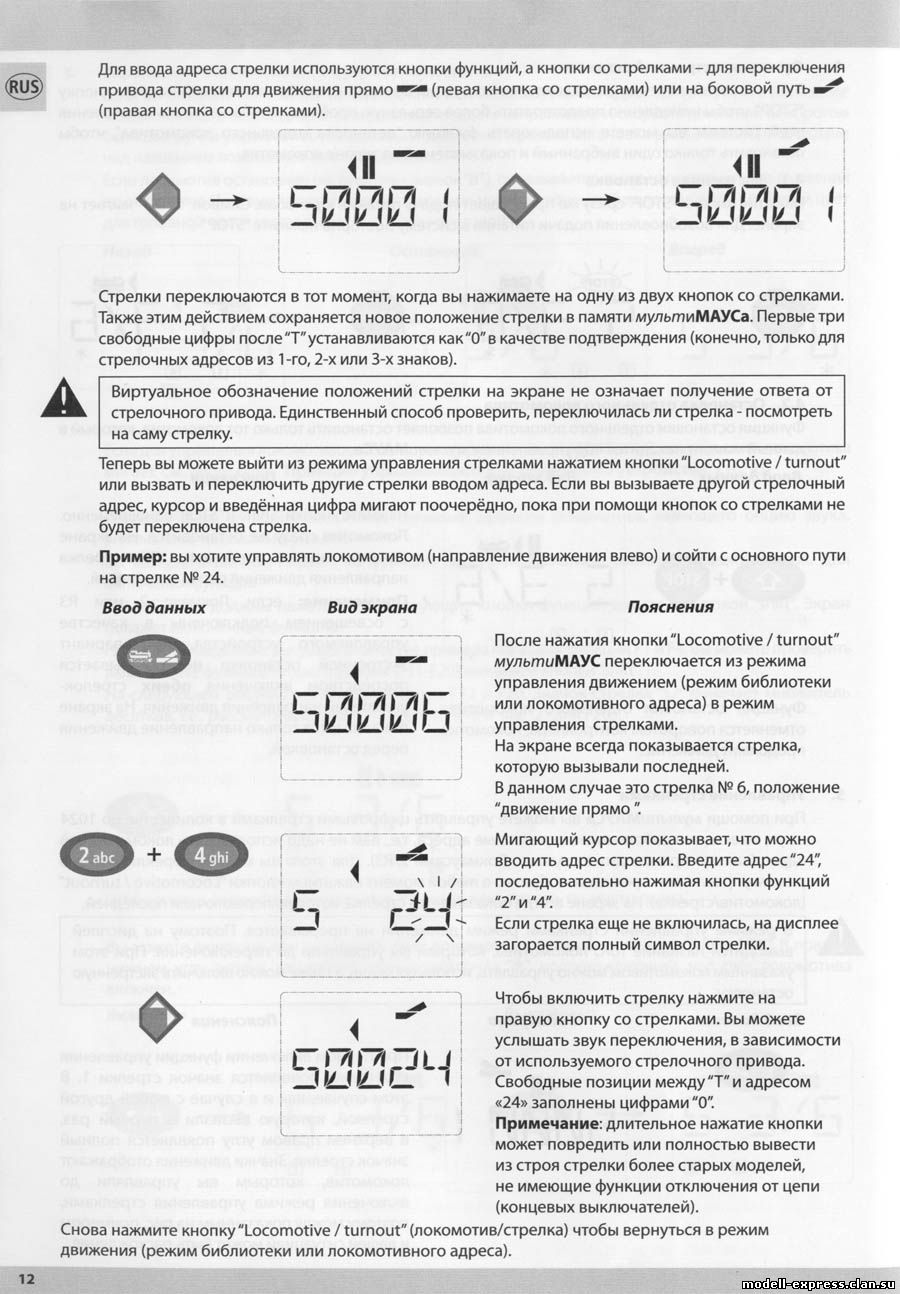
Input Display message Comment After the “Locomotive / turnout” key has been pressed, the multiMAUS switches from drive mode (library or locomotive address mode) to turnout mode. The turnout last called up always appear. In this case, turnout “6”, position “straight-on”. -
Page 13: Quick-Programming
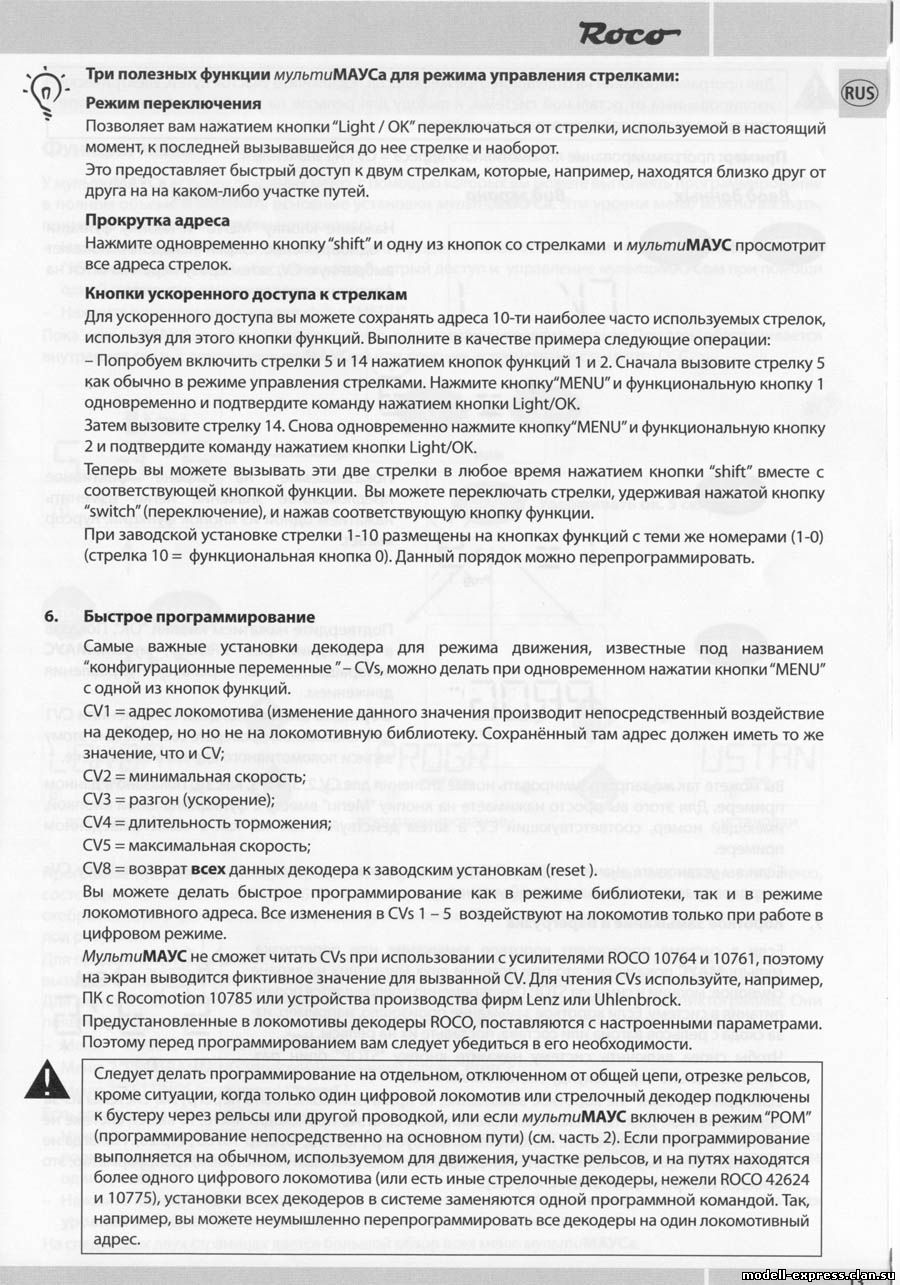
This provides you with quick access to two sets of turnouts which, for instance, are next to each other on a stretch of track. Address scrolling Press the “shift” key and one of the “arrow keys” at the same time and the multiMAUS will scroll through all the turnout addresses. ��…
-
Page 14: Short Circuit And Overload
Short circuit and overload If a short circuit or an overload occurs on the system, the multiMAUS indicates this using two flashing symbols on the display screen: a streak of lightning and the STOP symbol At the same time the voltage supply to the system is shut off.
-
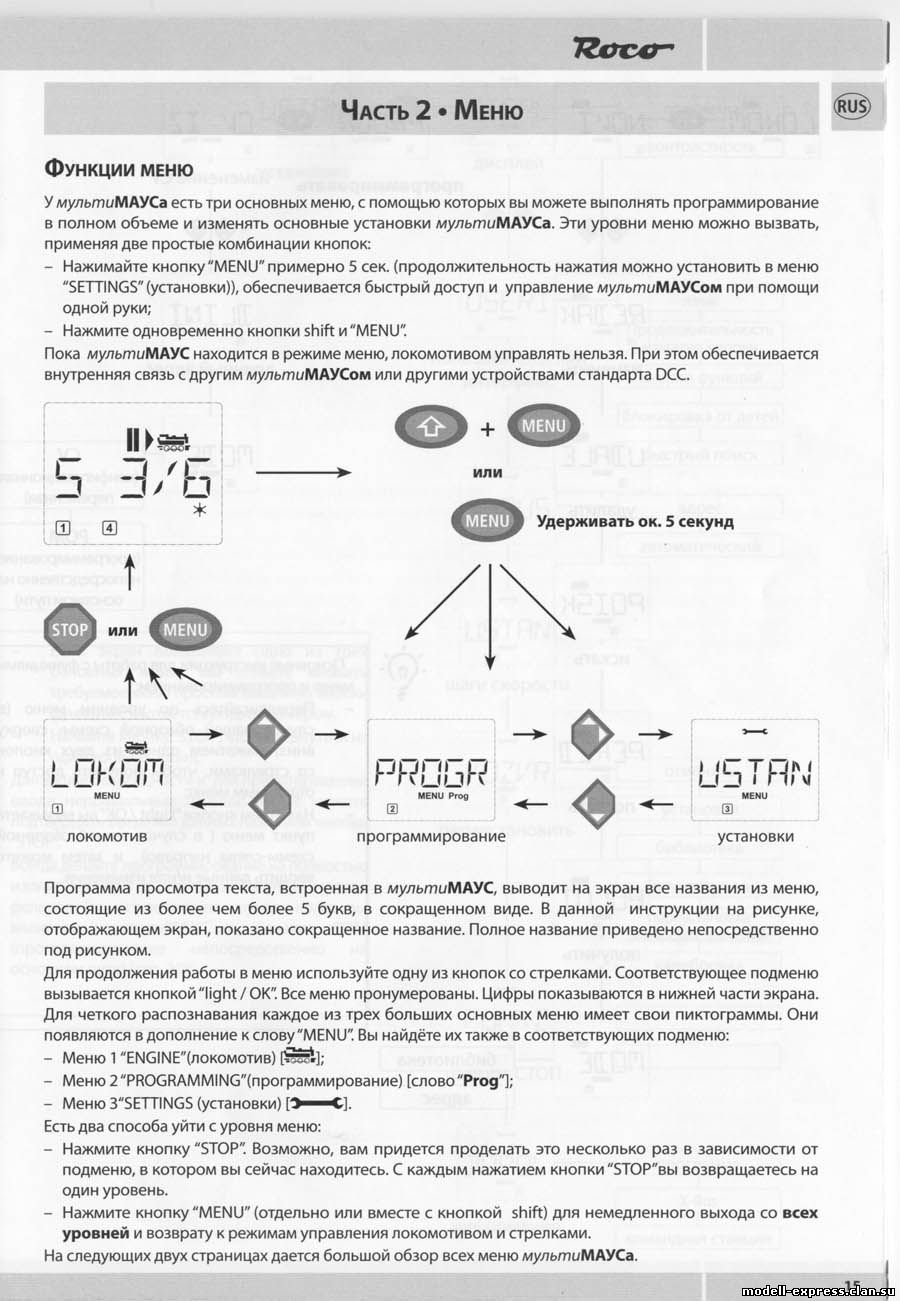
Page 15: The Menu Functions Of The Multimaus
Press the “MENU” key (alone or together with the shift key) to exit all levels immediately and return to locomotive and turnout mode. All of the menus of the multiMAUS can be found in the large overview on the next two pages.
-
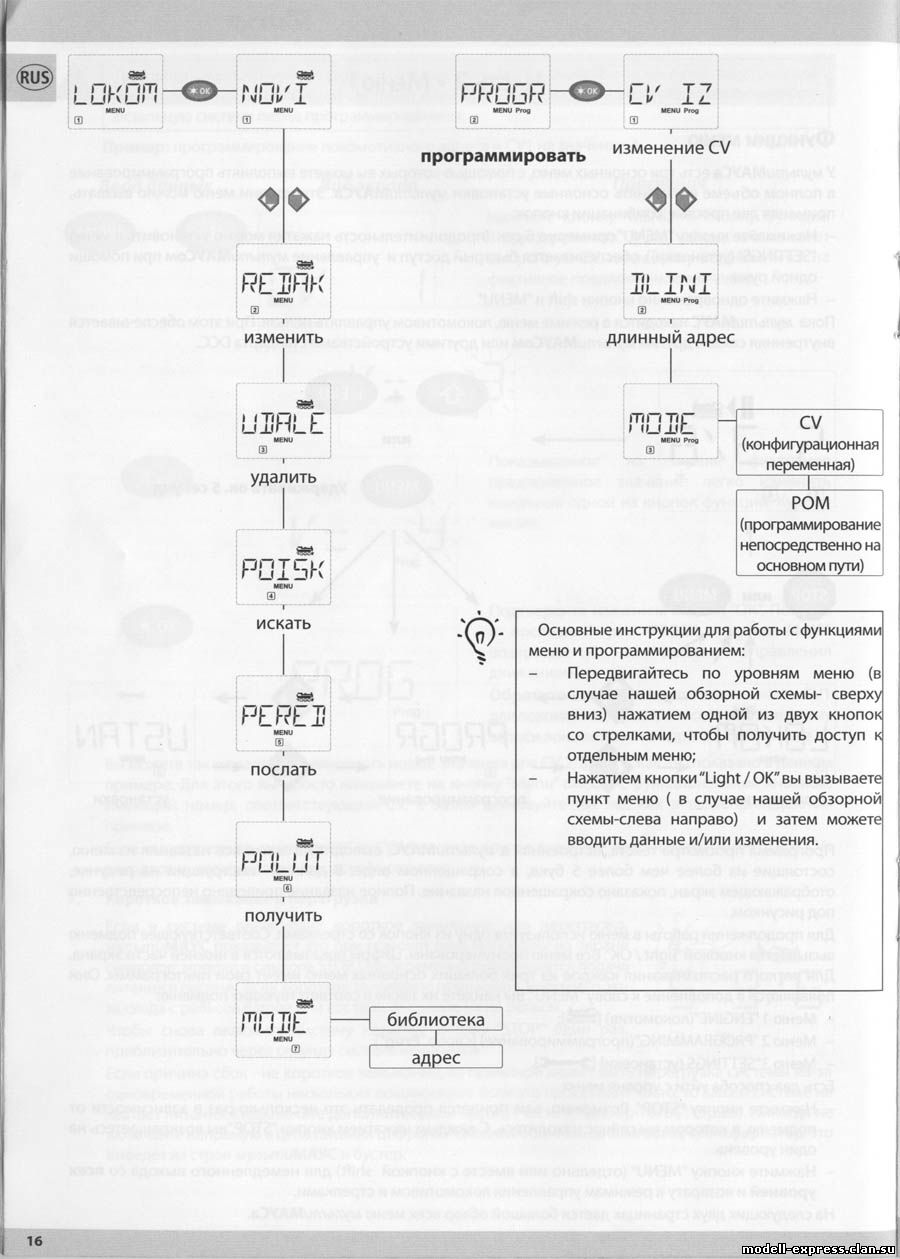
Page 16: Overview Of The Menu Structure
CV MODIFICATION PROGRAM �� EDIT LONG ADDRESS DELETE SEARCH Basic instructions for operating the menu functions and programming: – Move within the menu level (i.e. in this overview, from top to bottom) to access the individual menus by pressing one of the two arrow SEND keys.
-
Page 17
Settings “STOP” key. Library Always program on a programming track which is fully disconnected from the rest of Speedsteps the system (exception: you have switched Factory Reset the multiMAUS to POM mode (page 49)). Calibration STOP-MODE Software X-Bus Command Station… -
Page 18: The «Loco» Menu
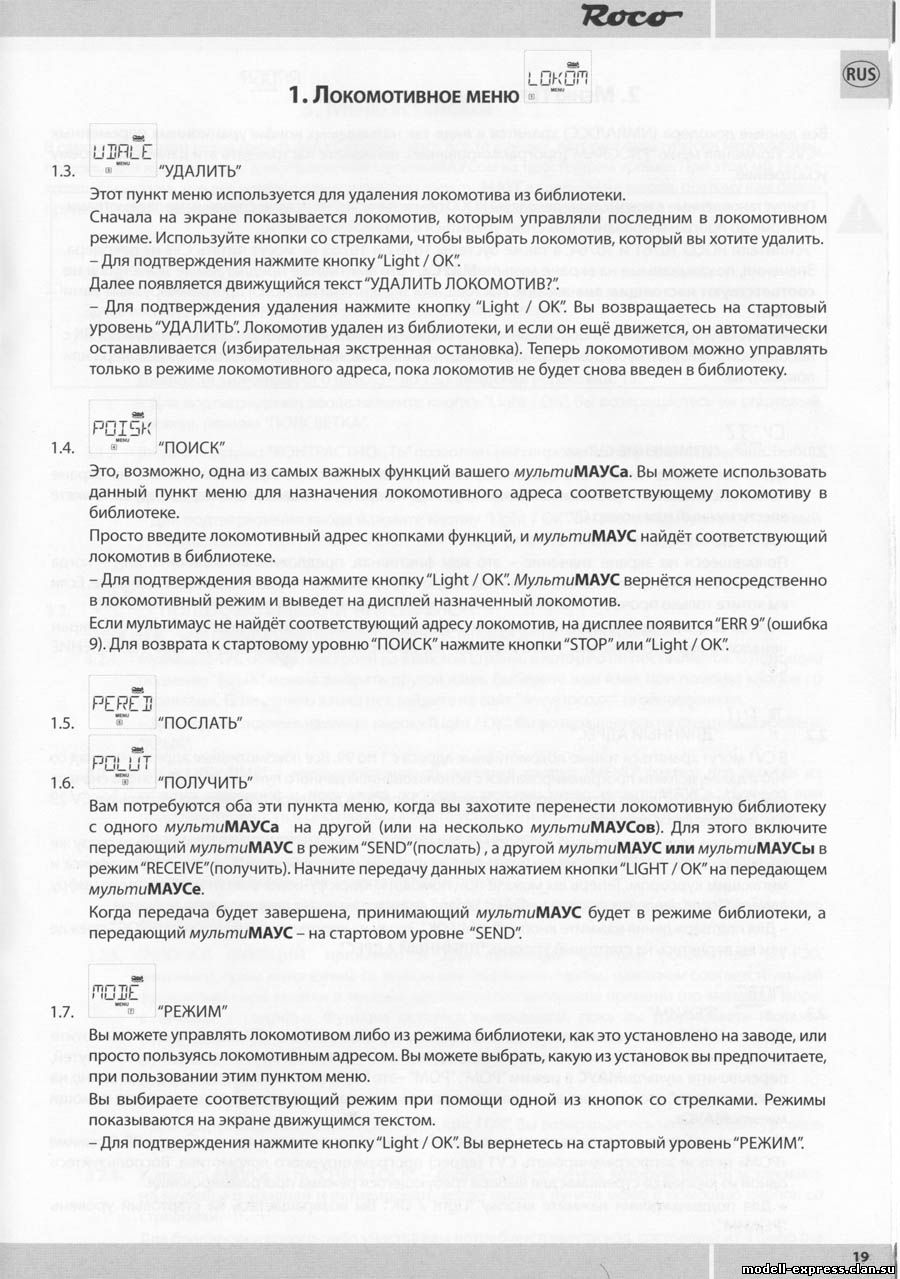
” M The multiMAUS uses the “LOCO” menu to manage all data which is required for the locomotive library and for identification of a locomotive. You can also use this menu to set the multiMAUS to library or address mode.
-
Page 19
1.4. “SEARCH“ This could be one of the most important functions of your multiMAUS. You can use this menu item to assign a locomotive address to the corresponding locomotive in the library. Simply enter a locomotive address using the “function keys” and the multiMAUS will find the cor- responding locomotive in the library. -
Page 20: The «Programming» Menu
ROCO decoders already installed in locomotives are usually delivered with the suitable settings. You should therefore check before performing programming whether it is really necessary. The ROCO amplifiers 10761 and 10764 and booster 10762 and 10765 cannot read the CVs from a de- ��…
-
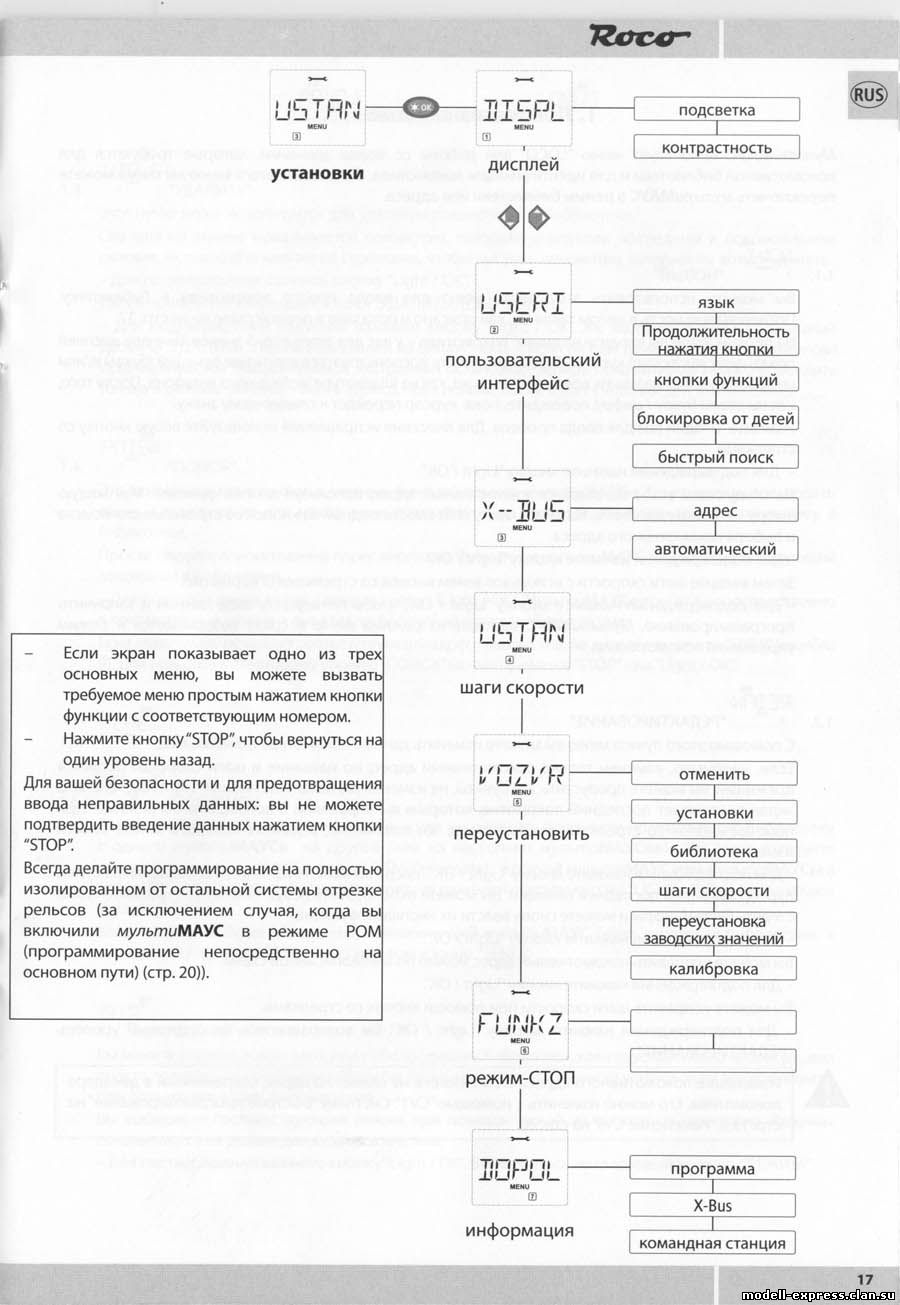
Page 21: The «Settings» Menu
The most extensive multiMAUS menu contains all the data which is practical, useful or sometimes necessary for basic operation of the multiMAUS. We would also like to point out at this point that the multiMAUS is provided with all the necessary settings in the factory so that you have to use this main menu either rarely or not at all.
-
Page 22
” M ETTINGS 3.2.4. The multiMAUS has „CHILD LOCK“ which can be set to multiple levels and can be activated after calling up the menu item using the „arrow keys“. To block an area, you will need to enter a code which is comprised of 4 numbers (no letters!). -
Page 23
” M ETTINGS 3.5. “RESET“ The multiMAUS is a particularly user-friendly digital controller and can be reset to the factory settings, not just completely but also partially. 3.5.1. “CANCEL” can be regarded as the emergency exit from this menu item. ��… -
Page 24: Compatibility Of The Multimaus — All Useable Devices
ROCO add-on devices. The ROCO Lokmaus Digital-is-Cool system – 1 10750 and central control unit 10751 – can be used with the multiMAUS without restriction to all its functions. All you need is the 10759 translation device which is connected directly (or via the 10758 distributor) to the “Slave”…
-
Page 25: The Master-And-Slave Principle
If a multiMAUS is plugged into the master connection on the amplifier, it automatically becomes the mas- ter. This multiMAUS is then the higher order instance – the central control unit – in the digital system. In order to be able to use all functions without restrictions, you should only connect one multiMAUS to this connection on the amplifier.
-
Page 26: The 10765 Booster
Switch off the system before installing a booster. Divide the system into supply sections. Disconnect the tracks electrically from each other in the respective places (on both sides!) wether using ROCO insulating rail connectors 42611 or 61192, insulated track or by sawing the rail profiles. Install a section of power track (e.g.
-
Page 27: Terminal Loops In Digital Operation
All values which affect the behaviour of the locomotive decoder – and ultimately the behaviour of the locomotive – are stored in what are referred to as CVs. CV is the abbreviation for configuration variables. The multiMAUS is compatible with the NMRA / DCC standard and can therefore read and write these vari- ables.
-
Page 28: Hints, Tips & Help
Modern decoders (from about 2000 onwards) can be controlled using at least 28 speed steps. They auto- matically set to the number of speed steps set in the locomotive controller (i.e. the multiMAUS) so that you do not need to make the setting in the decoder yourself. See the respective operating manual to determine whether your decoder is compatible with automatic speed step setting and which speed steps ��…
-
Page 29: Programming Help For Lokmaus 2 / R3 — Multimaus
(see page � Change speed steps The ROCO electrics handbook, article number 82071, which is available as a CD-ROM from your local dealer, includes many tips and much information on the subject of model railway electrics and digital technology. The ROCOMOTION system controller also has numerous options which can also be used in conjunc- tion with the multiMAUS.
-
Page 30: Error Messages
If this does not solve the problem, check the X-Bus address. ERR 14: The calibration values are invalid. The controller needs to be recalibrated. See page 52, 3.5.6. ERR 90 and above: Your multiMAUS is unfortunately in need of service by the ROCO service department.
-
Page 31
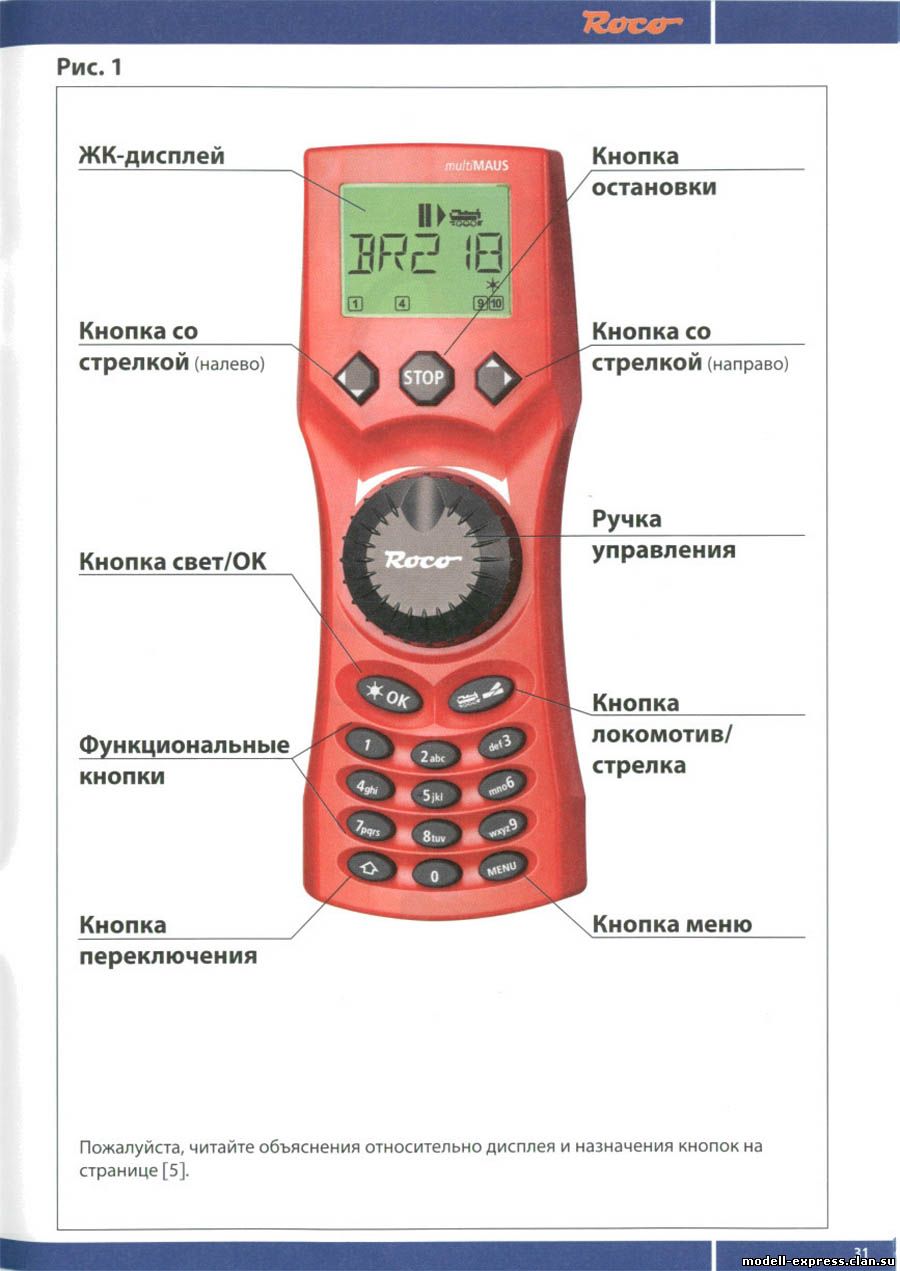
Fig. 1 LC-Display Stop-Taste LC display Stop Key Écran touche »Stop« LC display Tasto di arresto Pfeiltaste Pfeiltaste (links) (rechts) Arrow Key Arrow key (left) (right) touche »flèche« touche »flèche« (à gauche) (à droite) Tasto freccia Tasto freccia (sinistra) (destra) Fahrregler control knob Licht / OK-Taste… -
Page 32
Setting up the ROCO digital system (Europe version with 230 V) with the multiMAUS. Structure de la commande numérique ROCO (version européene à 230 V) avec la multiMAUS (=multiSOURIS). Struttura del sistema digitale ROCO (versione europea a 230 V) con il multiMAUS. -
Page 33
Fig. 3 Anschluss eines Boosters 10765 an den Verstärker 10764 und die Gleisanlage. Wiring diagram of the amplifier 10764, the booster 10765 and the tracks. Comment câbler l‘amplificateur complémentaire réf. 10765 avec l‘amplificateur principal réf. 10764 et la voie. Come collegare l‘amplificatore 10764, il booster 10765 e i binari. 62 62… -
Page 34
Fig. 4 Übergangsstrecke Digital — Gleichstrom mit dem Trennmodul 10768. Pass-over section with additional tracks from digital to DC-layout controlled by the Separator module 10768. Canton de transition de la section en commande numérique à celle en commande analogique avec le module 10768. -
Page 35
Fig. 5 ����� Eine digitale Kehrschleife mit dem Kehrschleifenmodul 10769. A digital turning loop controlled by the modul 10769. Branchement d‘une boucle de retournement en commande numérique contrôlée par le module réf. 10769. Una linea di raccordo digitale controllata per il modulo 10769. Hinweis / Note / À… -
Page 36
Kurzübersicht / Overview Fahren / Driving Lokauswahl Nothalt Licht STOP Light Loco selection Emerg. Stop Funktionen / Functions � … … F1 – F10 F11 – F20 Weichen / Turnouts … Menüebene / Menu level � MENU oder zurück =…
This manual is also suitable for:
10810
![]() Управление моделью железной дороги
Управление моделью железной дороги
![]() мульти МАУС
мульти МАУС
Краткое пособие
КЛАВИАТУРА ОБЪЯСНЕНИЕ

ПОЯСНЕНИЕ СИМВОЛОВ НА ДИСПЛЕЕ

Большое спасибо за выбор одного из наших
* Указанные функции относятся только к этому краткому справочному руководству.
Дополнительные функции мультиМАУСа и дополнительную информацию можно найти на нашем webсайт: www.z21.eu https://www.z21.eu/de/produkte/z21-multimaus
Подключение к Z21:

ВЫБОР ЛОКО
Для управления вашим локомотивом с помощью мультиМАУСа или для изменения настроек вы должны сначала выбрать локомотив. Есть два способа сделать это: библиотечный режим или адресный режим. При первом включении мультиМАУСа он запустится в режиме библиотеки.
1.1 Библиотечный режим
В режиме библиотеки мультиМАУСа ваши локомотивы сортируются по именам. Чтобы выбрать локомотив, которым вы хотите управлять, просто прокрутите библиотеку с помощью клавиш со стрелками.![]()
Когда вы включаете вашу систему, на дисплее мультиМАУС отображается название последнего использовавшегося локомотива. При первом включении на дисплее отобразится «LOCO1» или заводское название локомотива вашей стартовой установки.

1.2 Адресный режим
Кроме того, вы также можете управлять локомотивами, введя адрес декодера. Декодер находится в вашем цифровом локомотиве и получает управляющие сигналы от вашего мультиМАУСа. Все локомотивы имеют заводской предустановленный адрес 3.

СОЗДАЕМ ДАЛЬНЕЙШИЕ ЛОКОМОТИВЫ
Чтобы создать новый локомотив с именем «BR024» и адресом 24, выполните следующие действия в три простых шага:
- Создайте локомотив с новым именем в библиотеке локомотивов мультиМАУС.
- Назначьте новый, еще не назначенный адрес декодера в мультиМАУСе.
- Установите декодер локомотива на новый адрес декодера с помощью мультиМАУСа.
2.1 Создание нового локомотива в многоквартирном доме

— Нажмите 2 раза на клавишу ![]() для буквы «В» или, например, нажмите 4 раза клавишу
для буквы «В» или, например, нажмите 4 раза клавишу ![]() для цифры «2».
для цифры «2».
– После ввода текста подтвердите нажатием![]()
2.2 Изменение адреса декодера с помощью мультиМАУСа
Адрес декодера сохраняется как первая переменная конфигурации, CV1 для краткости, в цифровом декодере каждого локомотива. С помощью мультиМАУСа вы можете легко изменить эту настройку CV. Внимание: Для этого программирования на трассе может находиться только один локомотив.
Теперь ваш локомотив имеет адрес декодера 24 и реагирует на все команды, которые вы ему даете с помощью мультиМАУСа. Горячая линия
Если у вас возникли технические вопросы/проблемы, вы можете обратиться на горячую линию сервиса.
Наши специалисты будут рады помочь вам советами и рекомендациями:
- https://www.fleischmann.de/de/service/hotline/index.html
- https://www.roco.cc/de/service/hotline/index.html
- БЕСПЛАТНО: 00800 57626000 (Германия, Австрия, Швейцария)
- МЕЖДУНАРОДНЫЙ: +43 820 200668
Модельлейзенбан ГмбХ | Плейнбахштрассе 4 | 5101 Бергхайм, Австрия | www.fleischmann.de | www.roco.cc
Приятного времяпрепровождения с вашей цифровой системой!
![]() это инновация от
это инновация от![]()
A5_MultiMaus_Kurzanleitung_02.02.2022_ENG.indd 2
09.05.22 10:11
Искусство. нет. 8010835923 02/2022
Документы / Ресурсы
Рекомендации
![]()
© 2023
Manualzz provides technical documentation library and question & answer platform.Its a community-based project which helps to repair anything.
About us
DMCA / GDPR
Пожаловаться
FixFr.com
|
Инструкция по использованию мультимауса фирмы «Roco» в цифровом управлении.
Добавлять комментарии могут только зарегистрированные пользователи. [ Регистрация | Вход ] |
|


|
Detail Specifications: 1578/1578003-multimaus.pdf file (14 Mar 2023) |
Accompanying Data:
roco MultiMAUS Controller PDF Manual (Updated: Tuesday 14th of March 2023 02:40:27 AM)
Rating: 4.2 (rated by 19 users)
Compatible devices: ROCOMOTION 10785, ZTH Series, MZ-One, Solexa II, 10810, 31028, Link HC, 5600.
Recommended Documentation:
Text Version of Manual
(Ocr-Read Summary of Contents, UPD: 14 March 2023)
-
124, 124 124 Guida di Programmazione Lokmaus 2 / R3 – multiMAUS Nelle istruzioni relative agli articoli digitali ROCO nora riportate (quali ad es. l’azionamento degli scambi 42624) hanno riguardato solo il modo di programmazione standard con il Lokmaus 2 / R3. Di seguito è riportata una tabella che confronta la procedura di programmazione del Lokmaus 2 / R3 con…
-
86, 86 86 ▪ Conrmer par la touche »feux / OK« votre choix préalablement fait à l’aide des touches »èches«. La multiSOURIS retourne au départ du menu secondaire »RECHERCHE RAPIDE«. 3.3. »X-BUS« Le »X-BUS« est le protocole permettant la communication entre les différents composants de la com- mande numérique (la multiSOURIS »maître«, par exemple, avec l’amp…
-
88, 88 88 Chapitre 3 ▪ Renseignements complémentaires Compatibilité de la multiSOURIS 1. Les locosouris précédentes et leurs appareils complémentaires Tous les composants de la commande numérique ROCO basés sur le protocole interne »X-BUS« sont compatibles avec la multi SOURIS. Cela concerne surtout : ▪ multiZENTRALE pro ▪ les »loco-souris type 2«, »Powermouse«, »loco-s…
-
120, 120 120 Il Z21- Booster Un Booster è necessario quando l’impianto si disattiva spesso senza che si sia vericato un corto circuito, quindi nessuna locomotiva o vagone deraglia o nel cablaggio si sono introdotti degli errori. In questo caso è presente un sovraccarico causato da troppe utenze (locomotiva, carrozze illuminate, ecc.). Il Booster insieme ad un ulteriore t…
-
92, 92 92 sera remplacée par celle de la machine la plus récemment appelée. La liste est réinitialisée à zéro à chaque démarrage de votre commande numérique (coupure d’alimentation de votre commande ou déconnexion puis reconnexion de la multiSOURIS raccordée à la prise »Master« de l’amplicateur numérique principal). La fonction »sélection rapide« est à acti…
-
75, roco MultiMAUS 75 Pressez la touche »èche droite« et les aiguil- les s’enclenchent en position »déviée«. En fonction du type de moteur utilisé vous avez éventuellement une conrmation acoustique de l’opération. Les chiffres libres entre le »A« et l’adresse »24« se remplissent maintenant de »0«. À noter : Si vous pressez trop longtemps une touche »èches« il y a …
-
112, 112 112 1. Il Menu “Locomotiva“ Nel menu „Locomotiva“ il multiMAUS gestisce tutti i dati necessari per l’archivio delle locomotive e per l’identicazione di una locomotiva. Il multiMAUS può essere impostato anche per il funzionamento ad Archivio o Indirizzo. 1.1. “NUOVO“ In questa voce di menu è possibile inserire nell’archivio una nuova locomotiva. La sequenza è pri…
-
125, 125 Messagi di errore ERR 1: La programmazione non viene supportata. ERR 2: Durante la programmazione / lettura non è stata ricevuta dal decoder alcuna conferma. Vericare se il collegamento con il decoder è disturbato a causa dei binari sporchi o i contatti delle ruote. Eventualmente rimettere in binario la locomotiva. Vericare se da qualche parte nel sistem…
-
99, roco MultiMAUS 99 (tasto Luce / OK)– luce della locomotiva attivata Simbolo scambi (tasto locomotiva / scambi) ▪ il multiMAUS si trova in moda- lità Scambi Simbolo locomotiva (tasto locomotiva / scambi) ▪ funzionamento di marcia ▪ con “MENU“: menu Locomotiva Corto circuito ▪ il simbolo lampeggia in caso di corto circuito o un sovraccarico Stop (Tasto Stop) ▪ il simbolo lam…
-
89, 89 L’amplicateur numérique complémentaire (»Z21 Booster«) Vous en avez besoin dès que l’amplicateur numérique de votre réseau coupe de temps en temps ou même régulièrement l’alimentation du réseau sans qu’il y ait eu un court-circuit causé par un véhicule déraillé ou une erreur de câblage. Il y a – dans ce cas – une surcharge de l’alimenta…
-
81, roco MultiMAUS 81 1. Le menu principal »LOCO« Le menu »LOCO« vous permet de faire gérer par votre multiSOURIS toutes les données indispensables pour la bibliothèque »matériel moteur« et pour l’identication d’un engin moteur. Ce menu vous permet également de préenclencher la multiSOURIS aux modes »bibliothèque« ou »adresses machines«. 1.1. »NOUVELLE« Ce menu secondair…
-
47, roco MultiMAUS 47 Section 2 ▪ The Menus The menu functions of the multiMAUS The multiMAUS has three main menus with which you can both perform comprehensive programming and change the basic settings of the multiMAUS. This menu levels can be accessed using two simple key combinations: ▪ Press the “MENU” key on its own for approximately 5 seconds (the duration can be set …
Recommended Instructions:
E3700HRT, DVD-527, M916, GR 80 PFEX1995.1, EINS513307


-
(217) 352-9330 | [email protected] | artisantg.com-~ ARTISAN® ~I TECHNOLOGY GROUP Your definitive source for quality pre-owned equipment. Artisan Technology Group Full-service, independent repair center with experienced engineers and technicians on staff. We buy your excess, underutilized, and idle equipment along with credit for buybacks and trade-ins. Cust …
PENN P70 Series 26
-
1/8Luminarias de suspensión con LED Serie: LPLExplosion protected LED Pendant LightingSeries: LPLNOR000111511928CHBA000075Instrucciones de usoOperating instructionCROUSE-HINDSSERIES å åHWH åiGD PDW MD] � …
Crouse-hinds series 8
-
This manual confers no industrial property rights or any rights of any other kind, nor does it confer any patent licenses. Mitsubishi Electric Corporation cannot be held responsible for any problems involving industrial property rights which may occur as a result of using the contents noted in this manual.WarrantyExclusion of loss in opportunity and secondary loss from warranty liabilit …
FX3U-64CCL 3
-
SYCLOPE TERE’O® controller for swimming pools (Part 1) Installation, commissioning and operating instructions Reference : TER0000 — TER0010 – TER0020 – TER xxxx Rev : 5.1 …
TERE’O 40