У TP-Link есть модели роутеров-модемов, которые работают через телефонную линию ADSL. Как быть, если вам в руки попалась необычная модель TP-Link TD854W?Как её настроить в режиме роутера или моста?
Комплектация TP-Link TD854W и цена
Модель уже довольно устаревшая. В большинстве магазинов она уже не продаётся. Но её можно купить с рук. Цена на «Авито» до 1 тыс. рублей. Кроме этого, многие провайдеры, например, Ростелеком, предлагают своим клиентам этот ADSL-роутер, если у последних возможно настроить интернет только через телефонную линию.
Что идёт в коробке роутера кроме самого устройства:
- сплиттер для подключения роутера к телефонной линии;
- телефонный кабель;
- кабель Ethernet для соединения роутера и ПК;
- инструкция по быстрой настройке;
- диск с программой настройки и руководством по эксплуатации;
- адаптер электрического питания.
Внешний вид + фото
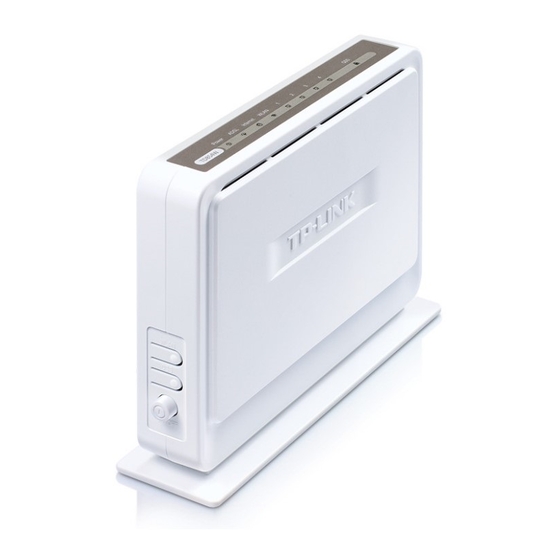
Внешность TP-Link TD854W отличается от внешнего вида большинства роутеров. У него нет внешних антенн, он прямоугольной формы. Его корпус расположен вертикально, а не горизонтально. Сверху находятся все индикаторы:
- Питание от электрической сети.
- Соединение с линией ADSL.
- Подключение к интернету.
- Работа модуля «Вай-Фай».
- 4 индикатора подключения к локальным портам.
- Функция WPS.
Слева сбоку находятся кнопки: для включения/отключения самого девайса, «Вай-Фая» и опции WPS (для аппаратного подключения устройств к сети без ввода пароля).
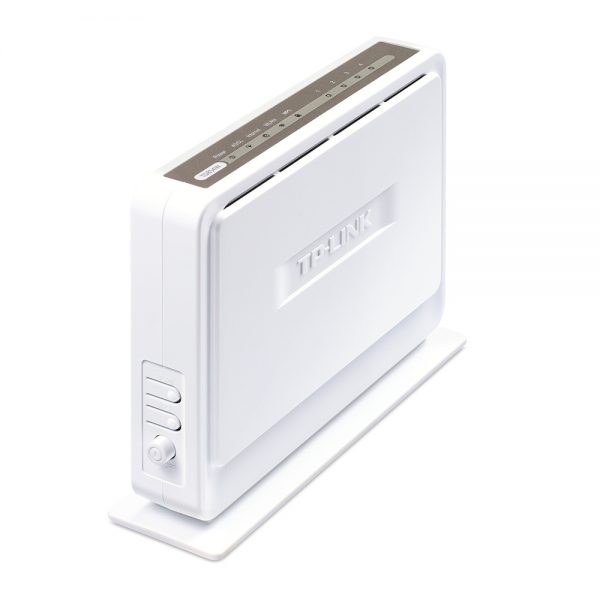
Все индикаторы расположены сверху на серой панели роутера
Сзади один разъём для подключения к телефонной линии провайдера (самый правый крайний). Слева 4 локальных гнезда жёлтого цвета для проводной связи с компьютером и других устройств. Ещё левее находится маленькая внутренняя кнопка для сброса настройка роутера. Крайний левый выход — для адаптера питания.
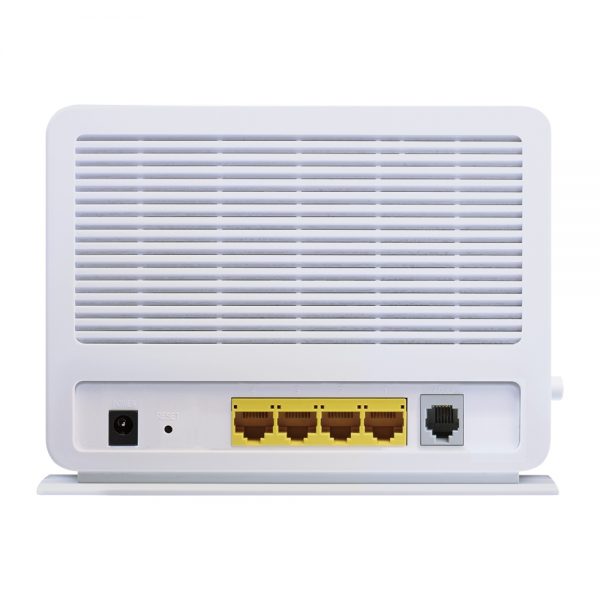
У роутера 4 локальных порта жёлтого цвета
Таблица: технические характеристики TP-Link TD854W
| Тип антенны | Встроенная |
| Коэффициент усиления антенны | 2 дБи |
| Стандарты беспроводных сетей | IEEE 8.2.11b/g/n |
| Диапазон частот (приём и передача) | 2,400–2,4835 ГГц |
| Безопасность | Межсетевые экраны NAT и SPI Фильтрация по MAC-адресу, IP-адресу, пакетам, приложениям, URL Защита от DoS-атак, SYN Flooding, Ping of Death |
| Перенаправление портов | Виртуальный сервер, DMZ, ACL (Список контроля доступа) |
| Протоколы | ATM/PPP ATM Forum UNI3.1/4.0 PPP через ATM (RFC 2364) PPP через Ethernet (RFC2516) IPoA (RFC1577/2225) PVC — до 8 PVCs |
Схема подключения
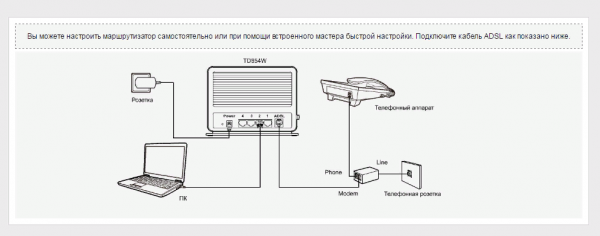
Рассмотрим поэтапно, как соединить роутер с линией провайдера и вашим компьютером:
- Кабель, который идёт от телефонной розетки, мы подключаем к сплиттеру в разъём Line. Сплиттер в дальнейшем будет разделять сигнал для телефона и для интернета.

Роутер нужно подключить к телефонной линии через сплиттер
- К гнезду Modem на другой стороне сплиттера подключаем телефонный кабель, который идёт в комплекте. Другой конец телефонного кабеля вставляем в разъём ADSL сзади на роутере.
- Шнур Ethernet вставляем в один из локальных разъёмов жёлтого цвета. Второй конец этого кабеля подключаем к сетевой карточке ПК.
- Адаптер питания подключаем к роутеру и вставляем его вилку в розетку. Включаем роутер и ждём, когда он прогрузится.
Подготовка компьютера к настройкам
Перед отладкой интернета нужно определённым образом настроить сетевую карту ПК:
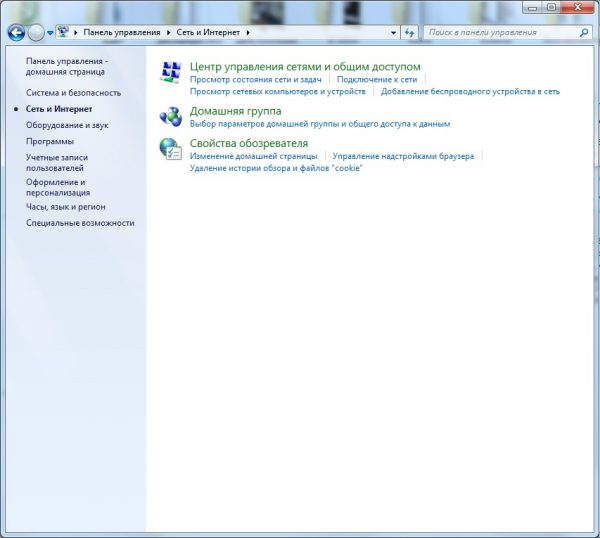
- Через «Пуск» открываем «Панель управления» (она может находиться в папке «Стандартные» или «Служебные»).
- Через раздел для сети и интернета запускаем блок «Центр управления сетями».

Откройте раздел «Центр управления сетями и общим доступом»
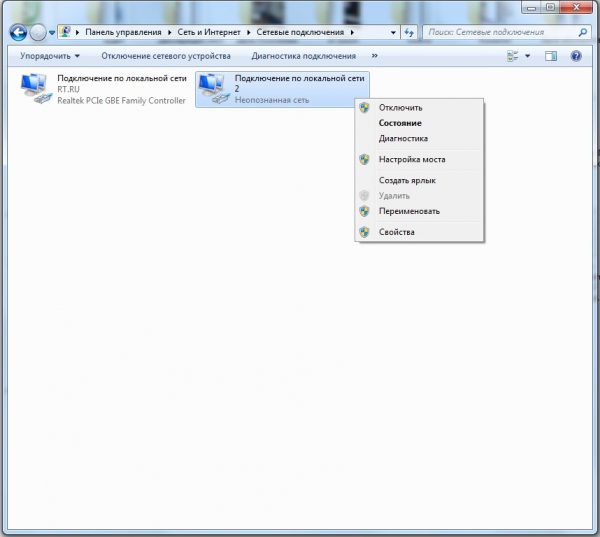
- Переходим к параметрам адаптера.
- Заходим в свойства локальной сети или сети Ethernet с помощью дополнительного меню, которое вызывается правой клавишей мышки.

Перейдите к свойствам сети
- Открываем свойства четвёртого протокола IPv4.
- Ставим автоматическую передачу данных для DNS и IP — сохраняем изменения.
Вход в настройки
Что нужно сделать, чтобы войти в меню с параметрами роутера:
- Выберите любой браузер на своём ПК, откройте его и в поле для адресов напишите числовой код — 192.168.0.1. Перейдите на локальную страницу с настройками с помощью «Энтер».
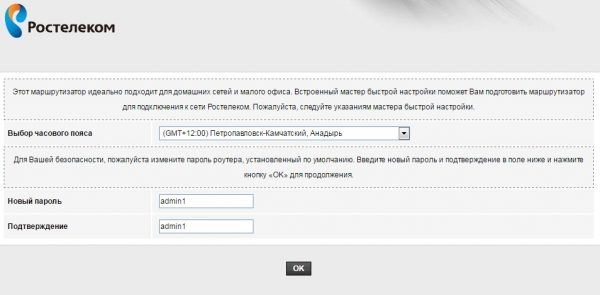
- Укажите в меню свой город и часовой пояс. Далее сразу напишите пароль для входа в панель с настройками. Щёлкните по ОК.

Укажите пароль для страницы с настройками роутера
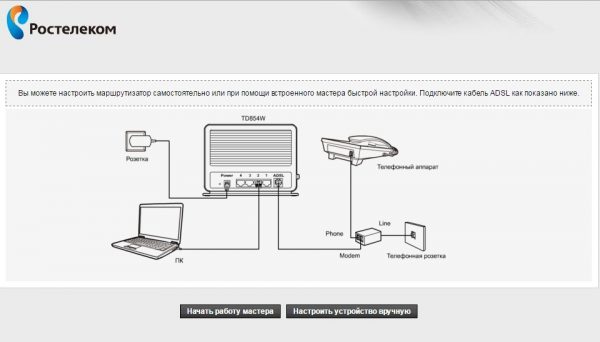
- Перейдите в следующем окошке к ручной настройке.

Перейдите к ручной настройке роутера
- Напишите данные для входа в панель: логин admin и пароль, который вы ранее установили.
Настройка подключения к интернету
Эта модель роутера часто поставляется клиентам Ростелекома. Рассмотрим настройку интернета на примере этого провайдера в фирменной прошивке. Будем использовать протокол интернета PPPoE. У вас может быть немного другой интерфейс, если у вас другой провайдер, а также другой протокол «инета». Узнать конкретно, какой протокол у вас, можно из договора с провайдером.
Итак, приступим к настройке:
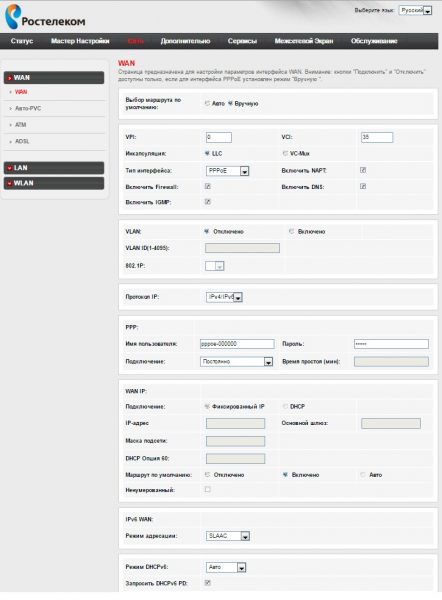
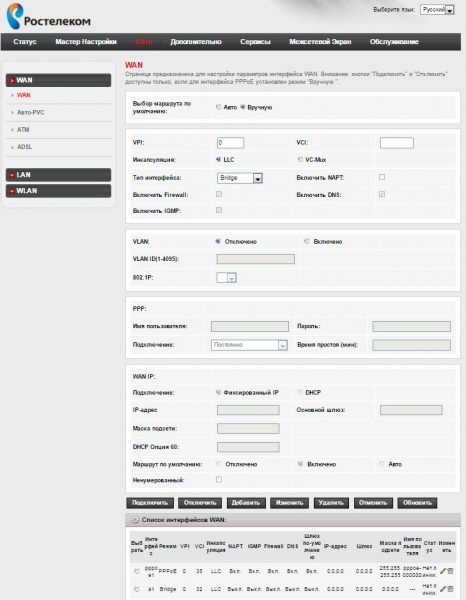
- Откройте блок с параметрами сети. В первой же вкладке WAN нужно заполнить строки VPI и VCI. Какие конкретно для вас действуют значения, можно узнать в договоре с провайдером. Если в договоре вы не можете ничего найти, обратитесь в службу поддержки компании.
- В типе интерфейса укажите PPPoE. Активируйте IGMP и «Фаервол».

Заполните форму WAN, чтобы создать подключение
- В блоке PPP пишем логин и пароль от интернета провайдера, прописанные в договоре. Ставим обязательно постоянное подключение.
- Ставим DHCP или фиксированный IP. Последний вариант подойдёт только для тех случаев, если вы предварительно купили услугу «Статический IP» у провайдера.
- Внизу жмём на «Добавить». Подключение сразу появится в таблице внизу.
Настройка Wi-Fi
Изменим некоторые параметры беспроводной сети:
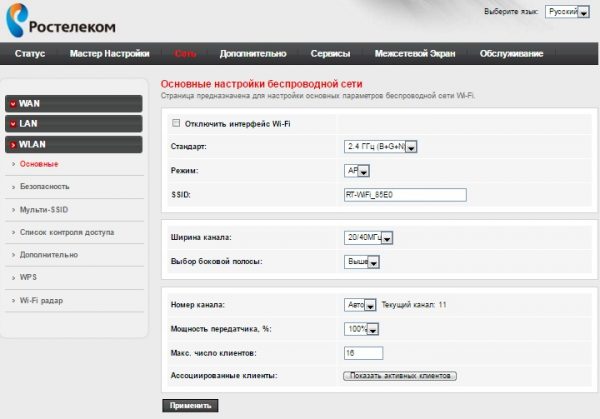
- В разделе «Сеть» вверху переходим в WLAN. Что делаем в основных параметрах: убираем галочки с «Отключить интерфейс». В стандарте ставим комбинированный параметр bgn.

Поменяйте, если нужно, название своего «Вай-Фая»
- Новое название «Вай-Фая» пишем в поле SSID. Ставим автоматический канал, а его ширину — 20/40 МГц. Применяем настройки.
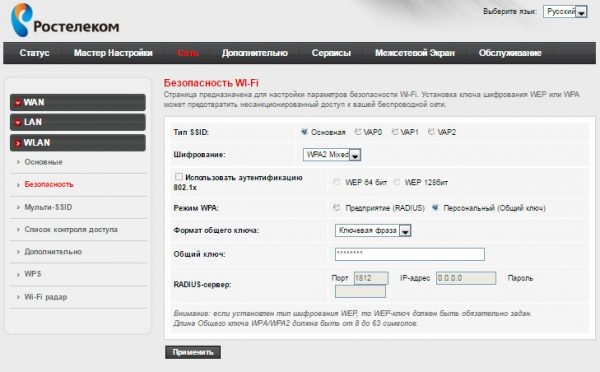
- В безопасности ставим WPA2 Mixed. В общем ключе прописываем сложный пароль — это будет ключ для входа в ваш «Вай-Фай». Обязательно его перепишите себе отдельно в блокнот или на листик.

Задайте сложный пароль на сеть
Подключение IPTV
Чтобы подключение ТВ шло через роутер, нужно создать отдельное для него подключение:
- Для этого идём в раздел WAN. Там ставим тип соединения «Мост» (Bridge).
- При необходимости включаем VLAN, если у вас подключение идёт через идентификатор. И вписываем нужное значение — оно указано в договоре.
- Заполняем также верхние поля VCI и VPI — значениями, указанными в том же договоре.
- Жмём на «Добавить» — под формой заполнения в таблице появится подключение для IPTV.

Введите VPI и VCI для телевидения вашего провайдера
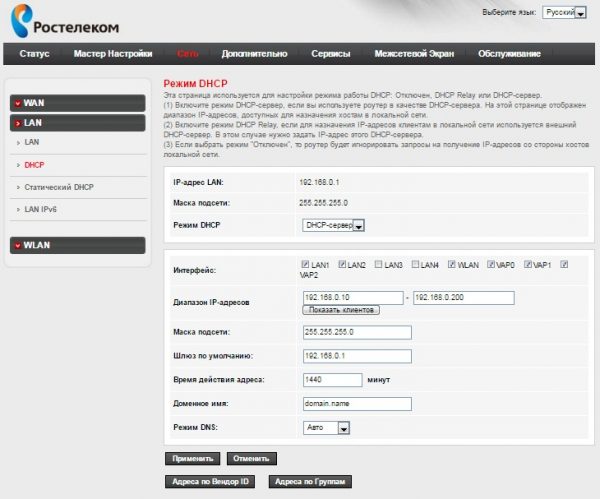
- Теперь открываем вкладку LAN. Убираем отметки с пунктов LAN 3 и 4. Сохраняем настройки.

Уберите отметки с третьего и четвёртого порта
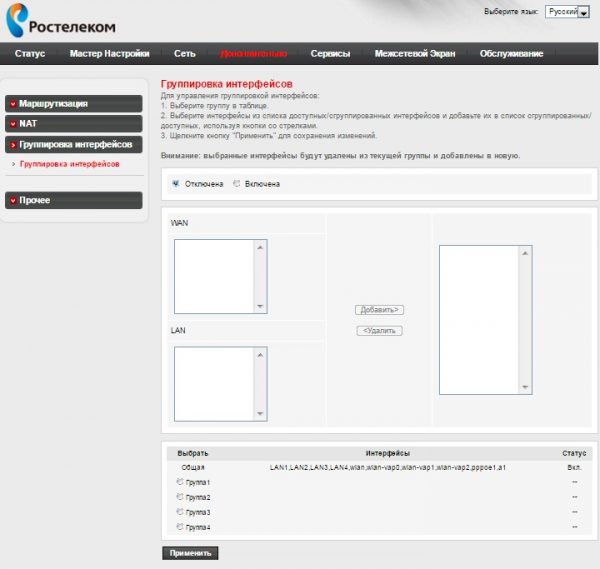
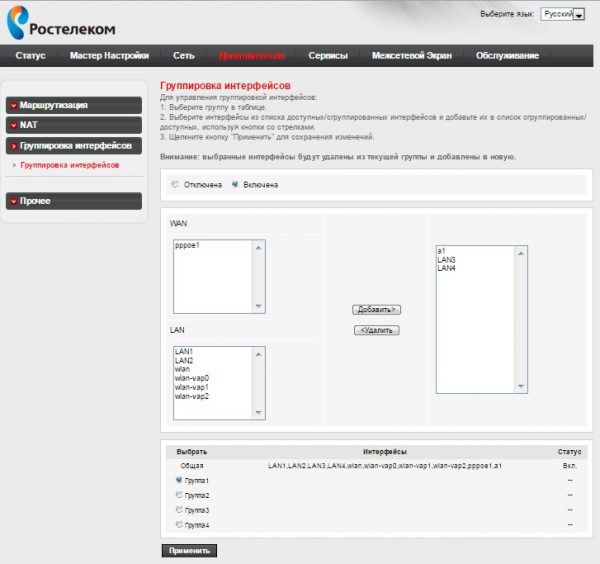
- Открываем раздел «Дополнительно» вверху и переходим на вкладку для группировки интерфейсов.
- Отмечаем пункт «Включена».

Включите группировку интерфейсов
- Ставим отметку рядом с «Группа 1» внизу. Перенесём из меню WAN интерфейс а1, а из меню LAN интерфейсы LAN3, LAN4. Применяем настройки. Подключаем приставку или ТВ к роутеру к локальному выходу и проверяем, работает ли ТВ.

Сгруппируйте подключения WAN и LAN
Настройка модема в режиме моста
Что делать, если вам понадобилось настроить TP-Link TD854W в режиме моста:
- Заходим в раздел «Сеть».
- Открываем вкладку WAN и переходим к созданию подключения. VPI И VCI пишем в соответствии со своим регионом и провайдером. Информация должна быть указана в договоре.
- В виде интерфейса ставим Bridge. Жмём на «Добавить» в конце страницы. Подключение появится в таблице ниже.
Возможные проблемы с роутером и их решение
Прежде всего, подключите ПК к роутеру с помощью кабеля Ethernet и убедитесь, что проводное соединение стабильно работает. Если даже с проводным подключением проблемы, стоит обновить прошивку оборудования. Скачать её можно на официальном сайте производителя либо провайдера (если стоит фирменная прошивка, как на Ростелекоме).
Если интернета вовсе нет, попробуйте перезагрузить роутер (выключить и снова включить). Если не помогает, обращайтесь в службу поддержки своего провайдера — возможно, неполадки на его стороне.
Если интернет есть, но скорость маленькая:
- Убедитесь, что вы находитесь в стабильной зоне приёма сигнала роутера (у точки доступа на устройстве есть хотя бы 2 деления).
- Отключите от сети ненужные устройства, если их сейчас много в локальной сети (много девайсов подключены к вашему «Вай-Фаю»).
- Закройте ненужные программы и вкладки в браузере, которые используют сейчас трафик.
- Поставьте в настройках раздела WAN в веб-интерфейсе определённый канал, например, 1, 6 или 11. Опытным путём выберите самый свободный и скоростной. Поставьте также ширину канала только 20 МГц.
TP-Link TD854W подключается к телефонной линии провайдера через сплиттер, который разделяет сигнал для телефона и интернета. Настройка проводится в веб-интерфейсе. Во вкладке WAN настраивается определённый тип протокола — чаще всего это PPPoE: вводятся логин и пароль от сети провайдера. Далее нужно задать пароль для «Вай-Фая» и можно подключать устройства к интернету.
- Распечатать
Оцените статью:
- 5
- 4
- 3
- 2
- 1
(6 голосов, среднее: 5 из 5)
Поделитесь с друзьями!
-
Contents
-
Table of Contents
-
Troubleshooting
-
Bookmarks
Quick Links
TD854W
150Mbps Wireless N ADSL2+ Modem Router
Rev: 1.0.0
1910010472
Related Manuals for TP-Link TD854W
Summary of Contents for TP-Link TD854W
-
Page 1
TD854W 150Mbps Wireless N ADSL2+ Modem Router Rev: 1.0.0 1910010472… -
Page 2: Fcc Statement
Specifications are subject to change without notice. is a registered trademark of TP-LINK TECHNOLOGIES CO., LTD. Other brands and product names are trademarks or registered trademarks of their respective holders. No part of the specifications may be reproduced in any form or by any means or used to make any derivative such as translation, transformation, or adaptation without permission from TP-LINK TECHNOLOGIES CO., LTD.
-
Page 3: Ce Mark Warning
FCC RF Radiation Exposure Statement This equipment complies with FCC RF radiation exposure limits set forth for an uncontrolled environment. This device and its antenna must not be co-located or operating in conjunction with any other antenna or transmitter. “To comply with FCC RF exposure compliance requirements, this grant is applicable to only Mobile Configurations.
-
Page 4: Declaration Of Conformity
TP-LINK TECHNOLOGIES CO., LTD DECLARATION OF CONFORMITY For the following equipment: Product Description: 150Mbps Wireless N ADSL2+ Modem Router Model No.: TD854W Trademark: TP-LINK We declare under our own responsibility that the above products satisfy all the technical regulations applicable to the product within the scope of Council Directives:…
-
Page 5: Table Of Contents
CONTENTS Package Contents………………….1 Chapter 1. Introduction……………….2 Product Overview ………………2 Main Features………………2 Conventions……………….3 Chapter 2. Hardware Installation …………….4 The Front Panel………………4 The Back Panel ………………5 The Side Panel ………………6 Installation Environment …………….6 Connecting the Modem Router…………..6 Chapter 3. Quick Installation Guide……………9 Configure PC ………………9 Login………………..12 Chapter 4.
-
Page 6
4.4.2 UPnP ………………….62 4.4.3 SNMP ………………….63 4.4.4 DNS………………….64 4.4.5 DDNS ………………….64 Firewall ………………..66 4.5.1 MAC Filter ………………..66 4.5.2 IP/Port Filter ………………..67 4.5.3 URL Filter ………………..69 4.5.4 ACL………………….70 Maintenance ………………73 4.6.1 Update………………….. 73 4.6.2 Password……………….. -
Page 7: Package Contents
Package Contents The following contents should be found in your package: One TD854W 150Mbps Wireless N ADSL2+ Modem Router One Power Adapter for TD854W 150Mbps Wireless N ADSL2+ Modem Router Quick Installation Guide One RJ45 cable …
-
Page 8: Chapter 1. Introduction
The device is designed to provide a simple and cost-effective ADSL Internet connection for a private Ethernet or IEEE 802.11n/ IEEE 802.11g/ IEEE 802.11b wireless network. The TD854W connects to an Ethernet LAN or computers via standard Ethernet ports. The ADSL connection is made using ordinary telephone line with standard connectors. Multiple workstations can be networked and connected to the Internet using a single Wide Area Network (WAN) interface and single global IP address.
-
Page 9: Conventions
Diagnostic tools 1.3 Conventions The Router or device mentioned in this User Guide stands for TD854W without any explanations. Parameters provided in the pictures are just references for setting up the product, which may differ from the actual situation.
-
Page 10: Chapter 2. Hardware Installation
Error! AutoText entry not defined. Error! AutoText entry not defined. User Guide Chapter 2. Hardware Installation 2.1 The Front Panel Figure 2-1 The LEDs locate on the front panel. They indicate the device’s working status. For details, please refer to Error! Reference source not found.. LED Explanation Name Status…
-
Page 11: The Back Panel
Error! AutoText entry not defined. Error! AutoText entry not defined. User Guide Note: 1. If the ADSL LED is off, please check your Internet connection first. Refer to 2.4 Connecting the Modem Router for more information about how to make Internet connection correctly. If you have already made a right connection, please contact your ISP to make sure if your Internet service is available now.
-
Page 12: The Side Panel
Error! AutoText entry not defined. Error! AutoText entry not defined. User Guide 2.3 The Side Panel Figure 2-3 WLAN: Press this button to enable or disable the Wireless LAN interface. QSS: This button is used for QSS setting. For detailed information, please refer to 4.2.3.6 QSS.
-
Page 13
Method one: Plug one end of the twisted-pair ADSL cable into the ADSL LINE port on the rear panel of TD854W, and insert the other end into the wall socket. Method two:You can use a separate splitter. External splitter can divide the data and voice, and then you can access the Internet and make calls at the same time. -
Page 14
Error! AutoText entry not defined. Error! AutoText entry not defined. User Guide Figure 2-4… -
Page 15: Chapter 3. Quick Installation Guide
Chapter 3. Quick Installation Guide 3.1 Configure PC After you directly connect your PC to the TD854W or connect your adapter to a Hub/Switch which has connected to the Router, you need to configure your PC’s IP address. Follow the steps below to configure it.
-
Page 16
Error! AutoText entry not defined. Error! AutoText entry not defined. User Guide Figure 3-2 Step 3: Select General tab, highlight Internet Protocol (TCP/IP), and then click the Properties button. -
Page 17
Error! AutoText entry not defined. Error! AutoText entry not defined. User Guide Figure 3-3 Step 4: Configure the IP address as Figure 3-4 shows. After that, click OK. Figure 3-4 Note: You can configure the PC to get an IP address automatically, select “Obtain an IP address automatically”… -
Page 18: Login
Error! AutoText entry not defined. Error! AutoText entry not defined. User Guide Figure 3-5 If the result displayed is similar to the screen shown below, it means that your PC has not connected to the Router. Figure 3-6 You can check it follow the steps below: Is the connection between your PC and the Router correct? The LEDs of LAN port which you link to the device and the LEDs on your PC’s adapter should be lit.
-
Page 19
Error! AutoText entry not defined. Error! AutoText entry not defined. User Guide Figure 3-7 Step 1: Select the Wizard tab and you will see the next screen. Figure 3-8 Step 2: Configure the Router with the information provided by your ISP, including VPI/VCI, Connection Mode and the following parameters. -
Page 20
Error! AutoText entry not defined. Error! AutoText entry not defined. User Guide Figure 3-9 Step 3: Choose to enable your wireless network or not. If it’s enabled, you need to create a name for your wireless network. It’s recommended that the name be unique and easy to remember. -
Page 21
Error! AutoText entry not defined. Error! AutoText entry not defined. User Guide If the WLAN is enabled, the wireless function will be available even without the external antenna because of an additional printed antenna. To adopt the wireless security protection measures, please refer to Section 4.2.3.3. -
Page 22: Chapter 4. Software Configuration
Error! AutoText entry not defined. Error! AutoText entry not defined. User Guide Chapter 4. Software Configuration This User Guide recommends using the “Quick Installation Guide” for first-time installation. For advanced users, if you want to know more about this device and make use of its functions adequately, maybe you will get help from this chapter to configure the advanced settings through the Web-based Utility.
-
Page 23
Error! AutoText entry not defined. Error! AutoText entry not defined. User Guide Figure 4-1 Click the Refresh button to refresh immediately. 4.1.1.2 ADSL Choose “Status→Device Info→ADSL” menu, and you will be able to view the ADSL configuration. -
Page 24: Statistics
Error! AutoText entry not defined. Error! AutoText entry not defined. User Guide Figure 4-2 Click the Retrain button to retrain the information again. Click the Refresh button to refresh immediately. 4.1.2 Statistics Choose “Status→Statistics” menu, and you will be able to view the network traffic.
-
Page 25: Wizard
Error! AutoText entry not defined. Error! AutoText entry not defined. User Guide Figure 4-3 Click the Refresh button to refresh immediately. 4.1.3 Wizard Please refer to » 3.2: Login». 4.2 Setup Choose “Setup”, you can see the next submenus: WAN, LAN and WLAN. Click any of them, and you will be able to configure the corresponding function.
-
Page 26
Error! AutoText entry not defined. Error! AutoText entry not defined. User Guide Figure 4-4 Current ATM VC Table: ATM settings are used to connect to your ISP. Your ISP provides VPI (Virtual Path Identifier), VCI (Virtual Channel Identifier) settings to you. In this Device, there is one VC configured by default. -
Page 27
Error! AutoText entry not defined. Error! AutoText entry not defined. User Guide Encapsulation: Specifies the type of Multiplexing, either LLC or VC-Mux. Please note that VC-Mux is not available for IPoA channel mode. Channel Mode: There are six channel modes, 1483 Bridged, 1483 MER, PPPoE, PPPoA, 1483 Routed and IPoA. -
Page 28
Error! AutoText entry not defined. Error! AutoText entry not defined. User Guide Undo: Click this button to abandon your operation. Refresh: Click this button to refresh the ATM VC table. Note: After configuration, you need to click the Save button on the left panel to make your configuration take effect. -
Page 29: Lan
Error! AutoText entry not defined. Error! AutoText entry not defined. User Guide Figure 4-6 After configuration, click Apply Changes button to save your changes. Note: After saving your configuration, you need to click the Save button on the left panel to make your configuration take effect.
-
Page 30
Error! AutoText entry not defined. Error! AutoText entry not defined. User Guide Figure 4-7 Interface Name: Displays the name of the LAN interface for the device. IP Address: The Router’s local IP Address. You can access to the Web-based Utility via … -
Page 31
Error! AutoText entry not defined. Error! AutoText entry not defined. User Guide New MAC Address: This field allows you to add a new MAC address to the Current Allowed MAC Address Table. To add a new MAC address, enter the MAC address and then click Add button. -
Page 32
Error! AutoText entry not defined. Error! AutoText entry not defined. User Guide DHCP Mode: Options available are None, DHCP Relay and DHCP Server. None: In this mode, the Modem Router will do nothing when the host requests an IP address by DHCP protocol. -
Page 33
Error! AutoText entry not defined. Error! AutoText entry not defined. User Guide Figure 4-11 IP Pool Range: Specify the start and end IP address for the DHCP server’s IP assignment. The default start and end IP Address are 192.168.1.100 and 192.168.1.200 separately. -
Page 34
Error! AutoText entry not defined. Error! AutoText entry not defined. User Guide Figure 4-12 Device name: Give a name for the class of your device, such as PC, Phone, TV, etc. Start address: Specify the start address. End address: Specify the end address. … -
Page 35: Wlan
Error! AutoText entry not defined. Error! AutoText entry not defined. User Guide Figure 4-13 IP Address: Enter the IP address desired to be assign to the client. Mac Address: Enter the MAC address of the client. After configuration, click Apply Changes button to save your changes. …
-
Page 36
Error! AutoText entry not defined. Error! AutoText entry not defined. User Guide Figure 4-14 Disable Wireless LAN Interface: Choose to disable the Wireless function of the ADSL Router. Band: Options available are 2.4 GHz (B), 2.4 GHz (G), 2.4 GHz (B+G), 2.4 GHz (N), 2.4 GHz (G+N), and 2.4 GHz (B+G+N). -
Page 37
Error! AutoText entry not defined. Error! AutoText entry not defined. User Guide Note: After saving your configuration, you need to click the Save button on the left panel to make your configuration take effect. 4.2.3.2 MSSID Choose “Setup→WLAN→MSSID” menu, and you will see the Wireless Multiple BSSID Setup screen (shown in Figure 4-15). -
Page 38
Error! AutoText entry not defined. Error! AutoText entry not defined. User Guide SSID: Wireless network name shared among all points in a wireless network. The SSID must be identical for all devices in the wireless network. It is case-sensitive and must not exceed 32 characters (use any of the characters on the keyboard). -
Page 39
Error! AutoText entry not defined. Error! AutoText entry not defined. User Guide WEP (Wired Equivalent Privacy) is a data privacy mechanism based on a 64-bit and 128-bit shared key algorithm, as described in the IEEE 802.11g standard. To configure WEP settings, select “WEP”… -
Page 40
Error! AutoText entry not defined. Error! AutoText entry not defined. User Guide Figure 4-18 Key Length: Select the desired length. Options available are 64-bit and 128-bit. Key Format: Select the desired format. Options available are ASCII (5 characters) and … -
Page 41
Error! AutoText entry not defined. Error! AutoText entry not defined. User Guide Figure 4-19 SSID TYPE: Select the desired wireless network to configure the security. There can be root SSID or virtual Access Point. Encryption: Select the encryption you want to use: WPA (TKIP), WPA (AES), WPA2 (AES), WPA2 (TKIP) and WPA2 Mixed is an encryption method stronger than TKIP). -
Page 42
Error! AutoText entry not defined. Error! AutoText entry not defined. User Guide 4.2.3.4 Access control Choose “Setup→WLAN→Access Control” menu, and you will see the Wireless Access Control screen (shown in Figure 4-20). Wireless access control function is used to allow or deny the wireless client’s access to the wireless network by MAC address. -
Page 43
Error! AutoText entry not defined. Error! AutoText entry not defined. User Guide Figure 4-21 Fragment Threshold: This value specifies the maximum size for a packet before data is fragmented into multiple packets. If you experience a high packet error rate, you may slightly increase the Fragmentation Threshold. -
Page 44
Error! AutoText entry not defined. Error! AutoText entry not defined. User Guide Broadcast SSID: When wireless clients survey the local area for wireless networks to associate with, they will detect the SSID broadcast by the Router. To broadcast the Router’s SSID, select “Enable”. -
Page 45
Error! AutoText entry not defined. Error! AutoText entry not defined. User Guide Push Button Configuration: Click Start PBC button when using PBC method for QSS configuration. If the wireless adapter supports QSS and the Push Button Configuration (PBC) method, you can add it to the network by PBC with the following two methods. -
Page 46
Error! AutoText entry not defined. Error! AutoText entry not defined. User Guide The QSS Configuration Screen of Wireless Adapter Method Two: Step 1: Press the QSS button on the front panel of the Router or click Start PBC button in Figure 4-22. -
Page 47
Error! AutoText entry not defined. Error! AutoText entry not defined. User Guide The QSS Configuration Screen of Wireless Adapter Step 3: Wait for a while until the next screen appears. Click Finish to complete the QSS configuration. The QSS Configuration Screen of Wireless Adapter PIN code If the wireless adapter supports QSS and the PIN method, you can add it to the network by PIN with the following two methods. -
Page 48
Error! AutoText entry not defined. Error! AutoText entry not defined. User Guide Method One: Enter the PIN into my Router Step 1: For the configuration of the wireless adapter, please choose “Enter a PIN into my access point or a registrar” in the configuration utility of the QSS, and get the PIN code on the screen as below, then click Next. -
Page 49
Error! AutoText entry not defined. Error! AutoText entry not defined. User Guide Method Two: Enter the PIN from my Router Step 1: Get the Current PIN code of the Router from Self-PIN Number in Figure 4-23 (each Router has its unique PIN code. Here takes the PIN code 00745659 of this Router for example). -
Page 50: Advanced
Error! AutoText entry not defined. Error! AutoText entry not defined. User Guide Comment [znh1]: 无法设置 4.2.3.7 WDS Figure 4-24 Enable WDS: Select to enable WDS. With this function enabled, the Router can bridge two or more WLANs. Add WDS AP: …
-
Page 51
Error! AutoText entry not defined. Error! AutoText entry not defined. User Guide Figure 4-25 Enable: Check the box to enable this function. Destination: Enter the IP network address of the final destination. It can be a subnet IP or a host address. -
Page 52: Nat
Error! AutoText entry not defined. Error! AutoText entry not defined. User Guide Figure 4-26 RIP: Select to enable the RIP function or not. Click the Apply button to save your configuration. Interface: Select the interface on which you want to enable RIP. …
-
Page 53
Error! AutoText entry not defined. Error! AutoText entry not defined. User Guide Figure 4-27 Enable DMZ: Check the box to enable DMZ function. DMZ Host IP Address: Enter the specified IP Address for DMZ host on the LAN side. Click Apply Changes to save your configuration. -
Page 54
Error! AutoText entry not defined. Error! AutoText entry not defined. User Guide Figure 4-28 Usual Service Name: The Router provides some common services. Select the one you need. User-defined Service Name: If the service can not be found in the Usual Service Name drop-down list, just enter the name manually in this field instead. -
Page 55
Error! AutoText entry not defined. Error! AutoText entry not defined. User Guide For example: If you want to setup a FTP Server on LAN host 192.168.1.33, you can configure a virtual server rule as follows: Step 1: Select “FTP” from Usual Service Name drop-down list . Protocol, WAN Port, and LAN Open Port will be automatically filled, and you don’t need to change them. -
Page 56
Error! AutoText entry not defined. Error! AutoText entry not defined. User Guide Port trigger is used to restrict certain types of data packets from your local network to Internet. Some applications require multiple connections, like Internet games, video conferencing, Internet calling and so on. -
Page 57
Error! AutoText entry not defined. Error! AutoText entry not defined. User Guide NAT Type: It can be outgoing or incoming. Click the Apply Changes button to save your configuration. And then the trigger rule will be added to the Current Portrigger Table. … -
Page 58: Qos
Error! AutoText entry not defined. Error! AutoText entry not defined. User Guide “Global End IP”. Local Start IP / Local End IP: Enter the local IP Address you plan to map to. Local Start IP is the starting local IP address and Local End IP is the ending local IP address. If the rule is for all local IPs, then the Start IP is 0.0.0.0 and the End IP is 255.255.255.255.
-
Page 59
Error! AutoText entry not defined. Error! AutoText entry not defined. User Guide Figure 4-32 IP QoS: Enable or disable the IP QoS function on the device. QoS Policy: Policy of QoS. The traffic will be classified on the base of this policy. It can be based on stream, 802.1p or DSCP. -
Page 60
Error! AutoText entry not defined. Error! AutoText entry not defined. User Guide Note: If changes are made, after clicking Apply Changes button, a Save button will appear on the left panel. You need to click the Save button to make your changes take effect. 4.3.3.1 Stream If the QoS policy is “stream based”, you should configure the QoS rule. -
Page 61
Error! AutoText entry not defined. Error! AutoText entry not defined. User Guide Set Priority: The priority of the rule. It can be p0(highest), p1, p2, p3(lowest). The traffic matches the rule will be assigned the priority you have configured. … -
Page 62
Error! AutoText entry not defined. Error! AutoText entry not defined. User Guide 4.3.3.2 802.1p If the QoS policy is “802.1p based”, you should configure the 802.1p setting. Figure 4-34 802.1p tag: The number of 802.1p tag. Send priority: The priority to transmit. The traffic matches the 802.1p filed will be assigned this priority. -
Page 63: Cwmp
Error! AutoText entry not defined. Error! AutoText entry not defined. User Guide Figure 4-35 DSCP tag: The value of the DSCP filed. Transmit prior: The priority to transmit. The traffic matches the DSCP filed will be assigned this priority. …
-
Page 64
Error! AutoText entry not defined. Error! AutoText entry not defined. User Guide information, diagnoses the devices and configures the devices automatically via ACS (Auto-Configuration Server). Figure 4-36 ACS parameters Enable: Enable or disable the CWMP. URL: Enter the website of ACS which is provided by your ISP. … -
Page 65: Port Mapping
Error! AutoText entry not defined. Error! AutoText entry not defined. User Guide Port: The port of the device ConnectionRequestURL. 4.3.5 Port mapping Choose “Advanced→Port Mapping”, you can configure the mapping group in the screen (shown in Figure 4-37). The device provides multiple interface groups, up to five interface groups are supported including one default group.
-
Page 66
Error! AutoText entry not defined. Error! AutoText entry not defined. User Guide Figure 4-37 You can enable or disable the port mapping function of the device by the select radio button. If “Enable” radio is selected, you can configure the mapping group as follow steps. Select a group (Group 1, Group 2, Group3 or Group 4)… -
Page 67: Others
Error! AutoText entry not defined. Error! AutoText entry not defined. User Guide Click the Save button on the left panel to make the changes take effect. 4.3.6 Others Choose “Advanced→Others”, you can configure the client limit settings in the screen (shown in Figure 4-38).
-
Page 68: Upnp
Error! AutoText entry not defined. Error! AutoText entry not defined. User Guide Figure 4-39 Note: If changes are made, after clicking Apply Changes button, a Save button will appear on the left panel. You need to click the Save button to make your changes take effect. 4.4.2 UPnP Choose “Service→UPnP”…
-
Page 69: Snmp
Error! AutoText entry not defined. Error! AutoText entry not defined. User Guide Note: If changes are made, after clicking Apply Changes button, a Save button will appear on the left panel. You need to click the Save button to make your changes take effect. 4.4.3 SNMP Choose “Service→SNMP”, you can see the SNMP screen (shown in Figure 4-41).
-
Page 70: Dns
Error! AutoText entry not defined. Error! AutoText entry not defined. User Guide Community name (read-write): Name of the read-write community. This read-write community allows read and write operation to all objects defines as read-writable in the MIB. 4.4.4 DNS Choose “Service→DNS”, you can see the DNS screen (shown in Figure 4-42).
-
Page 71
Error! AutoText entry not defined. Error! AutoText entry not defined. User Guide Figure 4-43 DDNS provider: There are two DDNS provider to be selected in order to register your device, DynDNS.org and TZO. Hostname: Domain name to be registered with the DDNS server. … -
Page 72: Firewall
Error! AutoText entry not defined. Error! AutoText entry not defined. User Guide 4.5 Firewall Choose “Firewall”, you can see the next submenus: Click any of them, and you will be able to configure the corresponding function. 4.5.1 MAC Filter Choose “Firewall→MAC Filter” menu, and you will see the next screen (shown in Figure 4-44). In order to management your local network better, you can use the MAC address filter function to control the internet access.
-
Page 73: Ip/Port Filter
Error! AutoText entry not defined. Error! AutoText entry not defined. User Guide Action: The action of the filter entry, it can be “Deny” or “Allow”. If the action is “Deny”, the connection matches the filter rule will be denied, if the action is “Allow”, the connection matches the filter rule will be allowed.
-
Page 74
Error! AutoText entry not defined. Error! AutoText entry not defined. User Guide Figure 4-45 SPI Firewall: Choose to enable or disable the SPI firewall. Rule Action: The filter mode of this entry, it can be “Permit” and “Deny”. If the mode is “Permit”, the IP connection matches the rule will be permitted;… -
Page 75: Url Filter
Error! AutoText entry not defined. Error! AutoText entry not defined. User Guide Note: If changes are made, after clicking Apply Changes button, a Save button will appear on the left panel. You need to click the Save button to make your changes take effect. 4.5.3 URL Filter Choose “Firewall→URL Filter”…
-
Page 76: Acl
Error! AutoText entry not defined. Error! AutoText entry not defined. User Guide Step 2: Enter “yahoo.com” in the Keyword field. Step 3: Finally click the AddKeyword to save the entry. Note: If changes are made, after clicking Apply Changes button, a Save button will appear on the left panel.
-
Page 77
Error! AutoText entry not defined. Error! AutoText entry not defined. User Guide Figure 4-48 LAN ACL Switch: You can enable or disable the ACL function on LAN side. If it is disabled, all hosts on LAN side can access the services which your router provides. If it is enabled, only the hosts on the “Current ACL Table”… -
Page 78
Error! AutoText entry not defined. Error! AutoText entry not defined. User Guide Figure 4-49 WAN Setting: The setting of WAN side, it can be “Interface” or “IP Address”. If it is “Interface”, you should specify a WAN interface for this ACL entry. If the WAN setting is “IP Address”, you should specify the IP address of the host on WAN side. -
Page 79: Maintenance
Error! AutoText entry not defined. Error! AutoText entry not defined. User Guide Current ACL Table: It shows the current ACL setting. 4.6 Maintenance Choose “Maintenance”, you can see the next submenus: Click any of them, and you will be able to configure the corresponding function. 4.6.1 Update 4.6.1.1 Firmware Update Choose “Maintenance→Update→Firmware Update”, you can upgrade the firmware of the…
-
Page 80
Error! AutoText entry not defined. Error! AutoText entry not defined. User Guide To upgrade the router’s firmware, follow these instructions below: Step 1: Type the exact path of the update file into the “Select File” field. Or click the Browse button to locate the update file. -
Page 81
Error! AutoText entry not defined. Error! AutoText entry not defined. User Guide Figure 4-52 Step 2: Save the file as the appointed file (shown in Figure 4-53). Figure 4-53 To restore the Router’s settings: Step 1: Click the Browse button to locate the file for the device, or enter the exact path in “Load Settings from File”… -
Page 82: Password
Error! AutoText entry not defined. Error! AutoText entry not defined. User Guide Step 2: Click the Upload button to complete. 4.6.2 Password Choose “Maintenance→Password”, you can configure the user account of the router in the screen (shown in Figure 4-54). Here you can add user account to access the web server, and modify the password of the specified user.
-
Page 83: Time
Error! AutoText entry not defined. Error! AutoText entry not defined. User Guide 4.6.4 Time Choose “Maintenance→Time”, you can configure the system time in the screen (shown in Figure 4-56). Simple Network Timing Protocol (SNTP) is a protocol used to synchronize the system time to the public SNTP server.
-
Page 84: Log
Error! AutoText entry not defined. Error! AutoText entry not defined. User Guide Figure 4-58 State: Indicate the current state of NTP function. Choose to enable the NTP or not. Server/Server2: Enter the IP address or the host name of the NTP server. …
-
Page 85: Diagnostic
Error! AutoText entry not defined. Error! AutoText entry not defined. User Guide Figure 4-59 Note: If changes are made, after clicking Apply Changes button, a Save button will appear on the left panel. You need to click the Save button to make your changes take effect. 4.6.6 Diagnostic The router provides several useful diagnostic tools.
-
Page 86
Error! AutoText entry not defined. Error! AutoText entry not defined. User Guide 4.6.6.2 Tracert Choose “Maintenance→Diagnostic→Tracert”, you can tracert a host you want (shown in Figure 4-61). The router provides a tracert command to measure the route path and transit times of packets across an Internet Protocol (IP) network. -
Page 87
Error! AutoText entry not defined. Error! AutoText entry not defined. User Guide Figure 4-62 Flow type: The ATM OAM flow type. The selection can be F5 Segment, F5 End-to-End, F4 Segment or F4 End-to-End. VPI: The VPI number you want to do the loopback diagnostics. … -
Page 88
Error! AutoText entry not defined. Error! AutoText entry not defined. User Guide Figure 4-63 Click the Start button to start the diagnostic, and then wait several minutes later you will see the test result. 4.6.6.5 Diag-Test Choose “Maintenance→Diagnostic→Diag-Test”, you can select an interface to run diagnostic in Figure 4-64. -
Page 89
Error! AutoText entry not defined. Error! AutoText entry not defined. User Guide Figure 4-64 Click the Run Diagnostic Test button to start the test, and then wait several times later you can see the diagnostic result. -
Page 90: Appendix A: Specifications
Error! AutoText entry not defined. Error! AutoText entry not defined. User Guide Appendix A: Specifications General ANSI T1.413, ITU G.992.1, ITU G.992.2, ITU G.992.3, ITU G.992.5, Standards and Protocols IEEE 802.11b, IEEE 802.11g, IEEE 802.11n, IEEE 802.3, IEEE 802.3u, TCP/IP, PPPoA, PPPoE, SNTP, HTTP, DHCP, ICMP, NAT Safety &…
-
Page 91: Appendix B: Troubleshooting
Error! AutoText entry not defined. Error! AutoText entry not defined. User Guide Appendix B: Troubleshooting 1. How do I restore my Router’s configuration to its factory default settings? With the Router powered on, press and hold the RESET button on the rear panel for 8 to 10 seconds before releasing it.
-
Page 92
Error! AutoText entry not defined. Error! AutoText entry not defined. User Guide Click Network Connections Right-click Local Area Connection Click Properties Double-click Internet Protocol (TCP/IP) -
Page 93
Error! AutoText entry not defined. Error! AutoText entry not defined. User Guide Select Obtain an IP address automatically Select Obtain DNS server address automatically Click OK Click OK… -
Page 94
Error! AutoText entry not defined. Error! AutoText entry not defined. User Guide For Windows Vista OS Go to Start > Settings >Control Panel, and then you will see the following page. Click View network status and tasks Click View status Click Properties… -
Page 95
Error! AutoText entry not defined. Error! AutoText entry not defined. User Guide Double-click Internet Protocol Version 4 (TCP/IPv4) Select Obtain an IP address automatically Select Obtain DNS server address automatically Click OK… -
Page 96
Error! AutoText entry not defined. Error! AutoText entry not defined. User Guide For Windows 7 OS Go to Start > Settings > Control Panel, and then you will see the following page. Click View network status and tasks Click Change adapter settings Right-click Local Area Connection… -
Page 97
Error! AutoText entry not defined. Error! AutoText entry not defined. User Guide Double-click Internet Protocol Version 4 (TCP/IPv4) Select Obtain an IP address automatically Select Obtain DNS server address automatically Click OK… -
Page 98
Error! AutoText entry not defined. Error! AutoText entry not defined. User Guide 2) Configure your IE browser Open your IE browser, click Tools tab and you will see the following screen. Click Internet Options Select Never dial a connection Click OK 4. -
Page 99
Error! AutoText entry not defined. Error! AutoText entry not defined. User Guide to contact our Technical Support if the problem persists. Note: For more details about Troubleshooting and Technical Support contact information, please log on to our Technical Support Website: http://www.tp-link.com/support/Support.asp… -
Page 100: Appendix C: Technical Support
For all other technical support, please contact us by using the following details: Global Australia & New Zealand Tel: +86 755 26504400 Tel: AU 1300 87 5465 E-mail: support@tp-link.com NZ 0800 87 5465 Service time: 24hrs, 7 days a week E-mail: support@tp-link.com.au Service time: 24hrs, 7 days a week…
Производитель TP-Link
Категория Network Router
Документы, которые мы получаем от производителя устройства TP-Link TD854W мы можем разделить на несколько групп. Это в частности:
— технические чертежи TP-Link
— инструкции обслуживания TD854W
— паспорта изделия TP-Link
— информационные брошюры
— энергетические этикетки TP-Link TD854W
Все из них важны, однако самую важную информацию с точки зрения пользователя мы найдем в инструкции обслуживания TP-Link TD854W.
Группа документов, определяемая как инструкции обслуживания, делится также на более подробные типы, такие как: Инструкции монтажа TP-Link TD854W, инструкции обслуживания, короткие инструкции или инструкции пользователя TP-Link TD854W. В зависимости от потребностей, Вам необходимо поискать требуемый документ. На нашем сайте Вы можете просмотреть самую популярную инструкцию использования изделия TP-Link TD854W.
Полная инструкция обслуживания устройства TP-Link TD854W, как должна выглядеть?
Инструкция обслуживания, определяемая также как пособие пользователя, или просто «руководство» — это технический документ, цель которого заключается в использовании TP-Link TD854W пользователями. Инструкции пишет, как правило технический писатель, языком, доступным для всех пользователей TP-Link TD854W.
Полная инструкция обслуживания TP-Link, должна заключать несколько основных элементов. Часть из них менее важная, как например: обложка / титульный лист или авторские страницы. Однако остальная часть, должна дать нам важную с точки зрения пользователя информацию.
1. Вступление и рекомендации, как пользоваться инструкцией TP-Link TD854W — В начале каждой инструкции, необходимо найти указания, как пользоваться данным пособием. Здесь должна находится информация, касающаяся местонахождения содержания TP-Link TD854W, FAQ и самых распространенных проблем — то есть мест, которые чаще всего ищут пользователи в каждой инструкции обслуживания
2. Содержание — индекс всех советов, касающихся TP-Link TD854W, которое найдем в данном документе
3. Советы по использованию основных функций устройства TP-Link TD854W — которые должны облегчить нам первые шаги во время использования TP-Link TD854W
4. Troubleshooting — систематизированный ряд действия, который поможет нам диагностировать а в дальнейшем очередность решения важнейших проблем TP-Link TD854W
5. FAQ — чаще всего задаваемые вопросы
6. Контактные данные Информация о том, где искать контактные данные производителя / сервисного центра TP-Link TD854W в данной стране, если самостоятельно не получится решить проблему.
Предназначение устройства
TD854W является универсальным устройством для обеспечения высокоскоростного доступа в Интернет по проводной и беспроводной сети. Устройство представляет собой беспроводной маршрутизатор серии N со встроенным модемом ADSL2+ и скоростью передачи данных до 150 Мбит/с. С помощью мастера быстрой настройки, межсетевого экрана SPI и NAT и прочих расширенных функций пользователи смогут легко настроить безопасную беспроводную сеть и наслаждаться просмотром веб-страниц, VoIP, а также потоковым просмотром аудио и видео.
Универсальное решение
TD854W представляет собой устройство формата 3 в 1 и совмещает в себе функции высокоскоростного DSL-модема, 4-портового маршрутизатора 10/100 Мбит/с и беспроводной точки доступа серии N. При наличии линии DSL TD854W способен установить высокоскоростное подключение к Интернету по стандарту ADSL2+. После настройки проводные/беспроводные функции могут быть использованы для обмена данными между устройствами, просмотра веб-страниц, IP-телефонии, а также потоковой трансляции HD-видео.
Высокоскоростной доступ в Интернет и Wi-Fi
TD854W поддерживает последние стандарты ADSL, обеспечивающие высокую производительность сети (скорость входящего потока до 24 Мбит/с, скорость исходящего потока до 3,5 Мбит/с).
Благодаря поддержке стандарта беспроводной связи IEEE 802.11n маршрутизатор TD854W способен установить беспроводное соединение и обеспечить лучшую производительность сети Wi-Fi, скорость передачи, стабильность и покрытие. Скорость стандарта N в 9 раз превышает показатели стандарта G, благодаря чему пользователи смогут делиться фотографиями, музыкой, файлами, а также проигрывать HD-видео.
Продвинутые настройки безопасности сети и удобное управление
TD854W использует межсетевой экран SPI и NAT, который проверяет содержание входящих пакетов перед тем, как они пропускаются устройством, предотвращая потенциальные атаки через Интернет. Для большего удобства устройство поддерживает контроль доступа на основе MAC-адресов, IP-адресов, доменных имён и приложений, таких как MSN или Yahoo Messenger, благодаря чему родители смогут устанавливать ограничение доступа для детей или персонала. Помимо настройки с помощью веб-интерфейса TD854W также обеспечивает функции TR-069 или SNMP, которые предоставляют возможность обновления программного обеспечения и настроек устройства, когда они становятся доступными у Интернет-провайдера. Данные функции позволят пользователям улучшить безопасность их сети и сделать правление сетью более гибким.
Настройка защиты с помощью WPS
Для настройки безопасного беспроводного соединения пользователям понадобится нажать кнопку WPS на TD854W и затем нажать кнопку WPS или ввести PIN-код на их беспроводном клиенте, и устройство автоматически установит беспроводное соединение с WPA-шифрованием, таким образом, пользователям не потребуется запоминать пароль!
Простая настройка
На компакт диске с устройством доступен многоязычный мастер быстрой настройки, с помощью которого даже начинающие пользователи смогут легко настроить устройство, подключение к Интернету, беспроводную сеть и настройки безопасности. Для настройки необходимо вставить компакт-диск, идущий в комплекте, и сетевое подключение будет настроена в считанные минуты.
sale-points:
150Mbps Wireless N ADSL2+
Modem Router
Description:
The TD854W Wireless N ADSL2+ Modem Router is a All-in-One device that combines the function of a high speed DSL
modem, a NAT router, a 4-port switch and a wireless access point. It is designed to give you a one-stop solution to acquiring
and sharing high speed Internet access over a wired/wireless network. Supporting the latest ADSL standards, the TD854W
provides higher performance and longer reach from the central office of your ISP. Compatible with IEEE 802.11n standard,
you can enjoy more kinds of bandwidth consuming applications like video streaming wirelessly. Along with the features of
Dual Firewalls (NAT and SPI), QoS engine and TR-069, making TD854W the perfect choice to access to the Internet.
All-in-One: ADSL2+ modem, NAT router, 4-port
switch and wireless N access point
Exceptionally high wireless speed up to 150Mbps
makes it ideal for on-line gaming, Internet call or
video streaming
Easy Setup Assistant provides quick & hassle free
installation
TD854W
www.tp-link.com
Specifications are subject to change without notice. TP-LINK is a registered trademark of TP-LINK Technologies Co., Ltd. Other brands and product names are
trademarks or registered trademarks of their respective holders. No part of the specifications may be reproduced in any form or by any means or used to make
any derivative such as translation, transformation, or adaptation without permission from TP-LINK Technologies Co., Ltd.