- Manuals
- Brands
- Sony Manuals
- Camcorder
- HXR-NX5E
Manuals and User Guides for Sony HXR-NX5E. We have 3 Sony HXR-NX5E manuals available for free PDF download: Operating Manual, Service Manual

Sony HXR-NX5E Operating Manual (128 pages)
Digital HD Video Camera Recorder
Brand: Sony
|
Category: Camcorder
|
Size: 11.16 MB
Table of Contents
-
Read this First
2
-
Table of Contents
6
-
Getting Started
9
-
Step 1: Checking Supplied Items
9
-
Step 2: Attaching the Supplied Microphone and the Lens Hood with Lens Cover
10
-
Step 3: Charging the Battery Pack
12
-
Step 4: Turning the Power on and Holding Your Camcorder Properly
14
-
Step 5: Adjusting the LCD Panel and Viewfinder
15
-
Step 6: Setting the Date and Time
17
-
Changing the Language Setting
18
-
-
Step 7: Inserting a Memory Card/Attaching a Flash Memory Unit
19
-
-
Recording/Playback
21
-
Recording
21
-
Changing the Setting of the Record Button/Handle Record Button
23
-
Selecting High Definition Image Quality (HD) or Standard Definition Image Quality (SD)
24
-
Selecting the Recording Format
25
-
-
Changing the Settings of Your Camcorder Recordings
26
-
Adjusting the Zoom
26
-
Adjusting the Focus Manually
27
-
Adjusting the Image Brightness
28
-
Adjusting to Natural Color (White Balance)
30
-
Customizing the Picture Quality (Picture Profile)
32
-
Audio Setup
39
-
Acquiring Location Information (HXR-NX5E/NX5P)
41
-
Recording with the SMOOTH SLOW REC Function
42
-
Setting Time Data
43
-
-
Assigning the Functions to the ASSIGN Buttons
45
-
Playback
47
-
Viewing Still Images
49
-
-
Changing/Checking the Settings in Your Camcorder
51
-
Changing the Screen
51
-
Displaying Recording Data (Data Code)
51
-
Displaying the Settings in Your Camcorder (Status Check)
52
-
-
Connecting a Monitor or a TV
54
-
-
Editing
57
-
Operating the MODE Menu
57
-
Protecting Recorded Images (Protect)
58
-
Using the Playlist of Movies
59
-
Creating the Playlist
59
-
Playing the Playlist
59
-
-
Capturing Still Images from a Movie
60
-
Dividing a Movie
61
-
Deleting Movies and Still Images
62
-
Dubbing Movies/Copying Still Images
63
-
Dubbing Movies
63
-
Copying Still Images
64
-
-
Formatting the Recording Media
65
-
Preventing Data on Recording Media from Being Recovered
65
-
Repairing the Image Database File
66
-
-
Using the Menu
67
-
Operating the Menu
67
-
Menu Items
69
-
(CAMERA SET) Menu
71
-
Settings to Adjust Your Camcorder to the Recording Conditions
71
-
(REC/OUT SET) Menu
77
-
Recording Settings, Input and Output Settings (REC SET/VIDEO OUT)
77
-
-
(AUDIO SET) Menu
78
-
Settings for the Audio Recording (AUDIO FORMAT/XLR SET, Etc.)
78
-
-
(DISPLAY SET) Menu
81
-
Display Settings of the Display and the Viewfinder
81
-
DISPLAY OUTPUT, Etc.)
81
-
Zoom Display
82
-
Shutter Display
83
-
-
-
(TC/UB SET) Menu
85
-
(TC PRESET/UB PRESET, Etc.)
85
-
-
(OTHERS) Menu
86
-
Settings While Recording or Other Basic Settings (AREA SET/BEEP, Etc
86
-
-
-
Connecting with a Computer
88
-
Saving Images with a Computer
88
-
-
Troubleshooting
90
-
Warning Indicators and Messages
99
-
-
Additional Information
101
-
Recording Time of Movies
101
-
Using Your Camcorder Abroad
103
-
File/Folder Structure on the Memory Card and the Flash Memory Unit
104
-
Maintenance and Precautions
105
-
About the AVCHD Format
105
-
About GPS (HXR-NX5E/NX5P)
105
-
About the Memory Card
106
-
About the «Infolithium» Battery Pack
107
-
About Charging the Battery Pack
108
-
About X.V.color
109
-
About Handling of Your Camcorder
109
-
-
Specifications
112
-
-
Quick Reference
116
-
Identifying Parts and Controls
116
-
Wireless Remote Commander
121
-
Screen Indicators
122
-
Index
124
-
Advertisement
Sony HXR-NX5E Service Manual (121 pages)
Digital HD Video Camera Recorder
Brand: Sony
|
Category: Camcorder
|
Size: 22.8 MB
Sony HXR-NX5E Service Manual (19 pages)
Digital HD Video Camera Recorder
Brand: Sony
|
Category: Camcorder
|
Size: 8.44 MB
Advertisement
Advertisement
Related Products
-
Sony HXR-NX5M
-
Sony HXR-NX5P
-
Sony NXCAM HXR-NX5N
-
Sony HXR-NX5U
-
Sony HXR-NX5C
-
Sony HXR-NX5J
-
Sony HXR-NX5R
-
Sony NXCAM HXR-NX3
-
Sony nxcam HXR-NX3D1E
-
Sony HXR-NX70E
Sony Categories
![]()
Laptop
![]()
Camcorder
![]()
TV
![]()
CD Player
![]()
Digital Camera
More Sony Manuals

PDF инструкция · 128 страниц(ы) английский
инструкцияSony HXR-NX5E

4-157-878-13(1)
© 2009 Sony Corporation
Digital HD Video
Camera Recorder
Operating Guide
Before operating the unit, please read this manual thoroughly,
and retain it for future reference.
HXR-NX5E/NX5P/NX5M
Посмотреть инструкция для Sony HXR-NX5E бесплатно. Руководство относится к категории видеокамеры, 2 человек(а) дали ему среднюю оценку 9.3. Руководство доступно на следующих языках: английский. У вас есть вопрос о Sony HXR-NX5E или вам нужна помощь? Задайте свой вопрос здесь
- Read this first
- Table of Contents
- Getting Started
- Recording/Playback
- Editing
- Using the Menu
- Connecting with a Computer
- Troubleshooting
- Additional Information
- Quick Reference
Главная
| Sony | |
| HXR-NX5E | HXR-NX5E | |
| видеокамера | |
| 4905524660661, 4905524660623 | |
| английский | |
| Руководство пользователя (PDF) |
Датчик изображения
| Всего мегапикселей | 1.037 MP |
| Тип сенсора | CMOS |
| Размер оптического сенсора | 1/3 « |
Объектив
| Оптическое увеличение | 20 x |
| Цифровой зум | 1.5 x |
| Фокусное расстояние | 4.1 — 82 mm |
| Эквивалент расстояния для линз 35мм камеры | 36.1 — 722 mm |
| Размер фильтра | 72 mm |
| Стабилизатор изображения | Да |
| Сменные объективы | Да |
Устройства хранения данных
| Тип носителя видеокамеры | Карта памяти |
| Флэш-память | — GB |
| Совместимые карты памяти | MS PRO Duo, MS Pro-HG Duo, SDHC |
| Максимальный объем флеш-карты | 32 GB |
| Слоты памяти | 1 |
| Емкость встроенной памяти | — GB |
| Поддерживаемые типы дисков | Нет |
| Тип пленки камеры | Нет |
Фокус
| Фокусировка | Автофокус/Ручной |
| Нормальное фокусное расстояние | 0.8 — ∞ m |
| Диапазон макро фокусировки | 0.01 — ∞/0.8 — ∞ m |
Экспозиция
| Режимы световой экспозиции | Auto, Manual |
Баланс белого
| Баланс белого | Auto, Manual |
| Баланс белого на улице | Да |
| Баланс белого в помещении | Да |
| Установка баланса белого одним нажатием | Да |
Затвор
| Скорость действия затвора | 1/25 s |
Экран
| Диагональ экрана | 3.2 « |
| Дисплей | ЖК |
| Разрешение дисплея (числовое) | 921600 пикселей |
| Сенсорный экран | Нет |
| Встроенный экран | Да |
Видоискатель
| Видоискатель | 122688 пикселей |
| Размер экрана видоискателя | 0.45 « |
| Тип видоискателя | — |
Дизайн
| Цвет товара | Черный |
| Поддерживается монтаж на штатив | Да |
| Светодиодные индикаторы | Да |
Камера
| Минимальное освещение | 1.5 lx |
| Тип камеры | Портативный |
| 3D | — |
Видео
| Максимальное разрешение видео | 1920 x 1080 пикселей |
| Разрешение видео | 720 x 576,1280 x 720,1440 x 1080 пикселей |
| Поддерживаемый видеоформат | H.264, MPEG2, MPEG4 |
| Режимы захвата видео | LP |
| Тип HD | Full HD |
Фотоснимок
| Максимальное разрешение изображения | — пикселей |
Аудио
| Аудиосистема | Dolby Digital 2.0 |
| PCM цифровой звук | 16-разрядный/48 кГц |
| Встроенный микрофон | Да |
| Встроенные колонки | — |
Порты и интерфейсы
| Выход S-Video | Нет |
| Количество портов USB 2.0 | 1 |
| Компонентный видео выход (YPbPr/YCbCr) | 1 |
| Композитный видео выход | 1 |
| HDMI | Да |
| Гнездо входа постоянного тока (DC) | Да |
| Линейный вход микрофона | Да |
| XLR вход | Да |
| Тип USB коннектора | Mini-USB B |
| PictBridge | — |
| Линейные выходы наушников | — |
| Количество портов USB 3.2 Gen 1 (3.1 Gen 1) Type-A | — |
Батарея
| Технология батареи | Литиевая |
| Время работы батареи в режиме записи видео | 2.8 h |
| Время работы батареи (макс) | 6.4 h |
| Напряжение батареи | 7.2 V |
| Тип батареек | NP-F570, CR2025 |
| Емкость батареи | — mAh |
Вес и размеры
| Ширина | 173 mm |
| Глубина | 342 mm |
| Высота | 187 mm |
| Вес | 2200 g |
Прочие свойства
| Минимальный объём жесткого диска | 100 MB |
| Минимальный процессор | Intel Core 2 Duo 2.20GHz |
| Минимальный объём ОЗУ | 512 MB |
| Совместимые операционные системы | Windows XP/Vista/7 |
Условия эксплуатации
| Диапазон температур при эксплуатации | 0 — 40 °C |
Содержимое упаковки
| Батарейки в комплекте | Да |
| Сетевой адаптер в комплекте | Да |
| Пульт дистанционного управления | Да |
Вспышка
| Встроенная вспышка | — |
| Встроенная подсветка | — |
показать больше
Не можете найти ответ на свой вопрос в руководстве? Вы можете найти ответ на свой вопрос ниже, в разделе часто задаваемых вопросов о Sony HXR-NX5E.
Что означает аббревиатура MП?
Какой размер экрана Sony HXR-NX5E?
Какая высота Sony HXR-NX5E?
Какая ширина Sony HXR-NX5E?
Какая толщина Sony HXR-NX5E?
Какой тип USB-подключения Sony HXR-NX5E имеет?
Какой объем памяти Sony HXR-NX5E имеет?
Инструкция Sony HXR-NX5E доступно в русский?
Не нашли свой вопрос? Задайте свой вопрос здесь
Скачать
4-157-878-12(1)
© 2009 Sony Corporation
Digital HD Video
Camera Recorder
Operating Guide
Before operating the unit, please read this manual thoroughly,
and retain it for future reference.
HXR-NX5E/NX5P/NX5M
![]()
4-157-878-12(1)
Digital HD Video
Camera Recorder
HXR-NX5E/NX5P/NX5M
Operating Guide
Before operating the unit, please read this manual thoroughly, and retain it for future reference.
© 2009 Sony Corporation
Read this first
Before operating this unit, please read this manual thoroughly, and retain it for future reference.
To handle the recorded images on your computer
Refer to “Help” on the supplied CD-ROM “Content Management Utility.”
Notes on use
Types of memory cards you can use in your camcorder
•You can use the following memory cards for this camcorder; “Memory Stick PRO Duo” (Mark2) media, “Memory Stick PRO-HG Duo” media, SD memory cards, SDHC memory cards, SDXC memory cards (Speed Class 4 or faster is required for each SD card). However, operation with all memory cards is not assured.
•“Memory Stick PRO Duo” media of up to 32 GB and SD cards of up to 64 GB have been verified to operate with your camcorder.
•In this manual, “Memory Stick PRO Duo” (Mark2) media and “Memory Stick PROHG Duo” media are called “Memory Stick PRO Duo” media. SD memory card, SDHC memory card and SDXC memory card are called SD card.
•See page 101 for the recordable time of memory cards.
b Notes
•A MultiMedia Card cannot be used with this camcorder.
•Movies recorded on SDXC memory cards cannot be imported to or played back on computers or A/V devices not supporting the exFAT* file system by connecting the camcorder to these devices with the USB cable. Confirm in advance that the connecting equipment is supporting the exFAT system. If you connect an equipment not supporting the exFAT system and the format screen appears, do not perform the format. All the data recorded will be lost.
*The exFAT is a file system that is used for SDXC memory cards.
Size of memory card you can use with your camcorder
•“Memory Stick PRO Duo” media, half the size of “Memory Stick,” or standard size SD cards can be used for this camcorder.
•Do not attach a label or the like on memory card or memory card adaptor. Doing so may cause a malfunction.
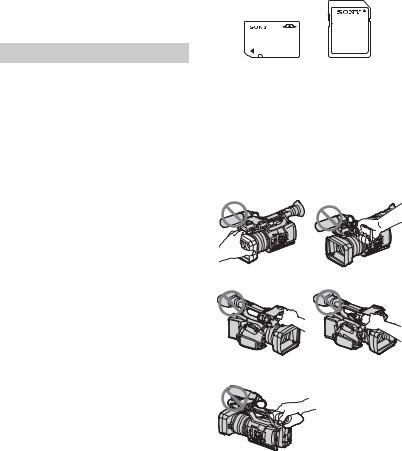
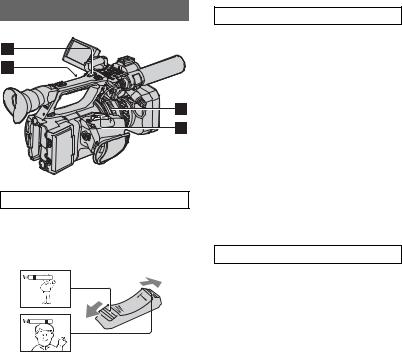
Using the camcorder
•Do not hold the camcorder by the following part.
|
Internal |
Microphone or |
|
microphone |
Microphone holder |
Viewfinder
2
b Notes
•The camcorder is not dustproof, dripproof or waterproof.
See “About handling of your camcorder” (p. 109).
•Connect cables to your camcorder with their terminals placed the correct way. Squeezing the terminals into your camcorder’s jacks may damage them or results in a malfunction of your camcorder.
•HXR-NX5E/NX5P: Even if the camcorder is turned off, the GPS function is working as long as the GPS switch is set to ON. Make sure that the GPS switch is set to OFF during take off and landing of an airplane.
About menu items, LCD panel, viewfinder, and lens
•A menu item that is grayed out is not available under the current recording or playback conditions.
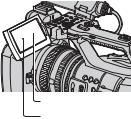
•The LCD screen and the viewfinder are manufactured using extremely highprecision technology, so over 99.99% of the pixels are operational for effective use. However, there may be some tiny black points and/or bright points (white, red, blue, or green in color) that appear constantly on the LCD screen and/or the viewfinder. These points are normal results of the manufacturing process and do not affect the recording in any way.
Black point
White, red, blue or green point
Do not expose your camcorder’s viewfinder, lens, or LCD screen to the sun or strong light source for extended periods.
•Intense light sources, especially the sun will converge on the viewfinder or lens and damage the internal parts of your camcorder. Avoid sunlight or other strong light sources when storing your camcorder. Protect this device by always closing the lens cover or by placing it in its bag when not in use.
About temperature of your camcorder and battery pack
•Your camcorder has a protective function that disables recording or playback if the temperature of your camcorder or battery pack is beyond the safely operable range. In this case, a message appears on the LCD screen or in the viewfinder (p. 99).
On recording
•In order to stabilize memory card operation, it is recommended that you format the memory card when you use it with your camcorder for the first time. All data recorded on the memory card will be erased by formatting, and can not be recovered. Save important data on the memory card on other media such as a computer, before formatting the memory card.
•Before starting to record, test the recording function to make sure the picture and sound are recorded without any problems.
•Compensation for the loss of the content of recordings or the loss of recording opportunities cannot be provided, even if recording or playback is not possible due to a malfunction of the camcorder, storage media, etc., or even if images or sounds are distorted due to the limits of the capabilities of the camcorder.
•TV color systems differ depending on the countries/regions. To view your
Continued , 3
Read this first (Continued)
recordings on a TV, you need a PAL system-based TV.
•Television programs, films, video tapes, and other materials may be copyrighted. Unauthorized recording of such materials may be contrary to the copyright laws.
•Because of the way that the image device (CMOS sensor) reads out image signals, the following phenomena may occur.
–The subjects passing by the frame rapidly might appear crooked depending on the recording conditions. (This phenomenon may be notable in displays having high motion resolution.)
–Horizontal lines appear on the screen during recording under fluorescent lights. The phenomena can be reduced by adjusting the shutter speed (p. 29).
–Images on the screen look horizontally divided when a subject is lighted with a flash. The phenomena can be reduced by using a slower shutter speed.
On playing back movies
•Your camcorder is compatible with MPEG-4 AVC/H.264 High Profile for high definition image quality (HD) recording. Therefore, you cannot play back images recorded with high definition image quality (HD) on your camcorder with the following devices;
–Other AVCHD format compatible devices which are not compatible with High Profile
–Devices which are not compatible with the AVCHD format
•Movies made using this camcorder may not play back normally on devices other than this camcorder. Also, movies recorded on other devices may not play back properly on this camcorder.
•Standard (SD) image quality movies recorded on SD memory cards cannot be played on AV equipment of other manufacturers.
Discs recorded with high definition image quality (HD)
This camcorder captures high definition footage in the AVCHD format. DVD media
containing AVCHD footage should not be used with DVD based players or recorders, as the DVD player/recorder may fail to eject the media and may erase its contents without warning.
Save all your recorded image data
To prevent your image data from being lost, save all your recorded images on external media periodically. It is recommended that you save the image data on a computer using the supplied application software.
Format the recording media using [MEDIA FORMAT] if images are not recorded or played back properly
If you continue recording and deleting images on recording media for a long time, the files on that recording media may be fragmented. As a result, you may not be able to record and save images properly. If this happens, save images on a separate recordable media, such as a disc or computer, then format the recording media (p. 65).
Note on disposal/transfer
Even if you delete all data or format the recording media on your camcorder or computer, you may not delete data from the recording media completely. When you transfer the recording media or your camcorder, it is recommended that you delete the data completely using commercially available data deletion software to prevent the recovery of your data. Also, when you dispose of the recording media, it is recommended that you destroy the actual body of the recording media.
About the operation of the camcorder
You can operate the camcorder using the SEL/PUSH EXEC dial/B/b buttons (p. 17), V/v/B/b/EXEC buttons (p. 67), and the touch panel. However, you cannot use the touch panel to make some settings such as the MENU items.
4
About this manual
•Memory cards and a flash memory unit are both referred to as recording media in this manual.
•The images of the LCD screen and the viewfinder used in this manual for illustration purposes are captured using a digital still camera, and therefore may appear different.
•The on-screen displays in each local language are used for illustrating the operating procedures. Change the screen language before using your camcorder if necessary (p. 18).
•Design and specifications of recording media and other accessories are subject to change without notice.
•Illustrations of camcorders in this manual show the HXR-NX5E unless otherwise specified.
•Illustrations of battery packs in this manual show the NP-F770 unless otherwise specified.
5

Table of Contents |
|
|
Read this first ………………………………………………………………………………. |
2 |
|
Getting Started |
|
|
Step 1: Checking supplied items …………………………………………………….. |
9 |
|
Step 2: Attaching the supplied microphone and the lens hood with lens |
|
|
cover ……………………………………………………………………………… |
10 |
|
Step 3: Charging the battery pack ………………………………………………… |
12 |
|
Step 4: Turning the power on and holding your camcorder properly ….. |
14 |
|
Step 5: Adjusting the LCD panel and viewfinder ……………………………… |
15 |
|
Step 6: Setting the date and time ………………………………………………….. |
17 |
|
Changing the language setting………………………………………………….. |
18 |
|
Step 7: Inserting a memory card/Attaching a flash memory unit ……….. |
19 |
|
Recording/Playback |
|
|
Recording ………………………………………………………………………………….. |
21 |
|
Changing the setting of the record button/handle record button ……. |
23 |
|
Selecting high definition image quality (HD) or standard definition |
|
|
image quality (SD)……………………………………………………………………. |
24 |
|
Selecting the recording format…………………………………………………… |
25 |
|
Changing the settings of your camcorder recordings ………………………. |
26 |
|
Adjusting the zoom…………………………………………………………………… |
26 |
|
Adjusting the focus manually …………………………………………………….. |
27 |
|
Adjusting the image brightness …………………………………………………. |
28 |
|
Adjusting to natural color (White balance) …………………………………… |
30 |
|
Customizing the picture quality (Picture profile) …………………………… |
32 |
|
Audio setup …………………………………………………………………………….. |
39 |
|
Acquiring location information (HXR-NX5E/NX5P)………………………… |
41 |
|
Recording with the SMOOTH SLOW REC function……………………….. |
42 |
|
Setting time data ……………………………………………………………………… |
43 |
|
Assigning the functions to the ASSIGN buttons ………………………………. |
45 |
|
Playback …………………………………………………………………………………… |
47 |
|
Viewing still images ………………………………………………………………….. |
49 |
|
Changing/checking the settings in your camcorder …………………………. |
51 |
|
Changing the screen………………………………………………………………… |
51 |
|
Displaying recording data (Data code)……………………………………….. |
51 |
|
Displaying the settings in your camcorder (Status check) …………….. |
52 |
|
Connecting a monitor or a TV ………………………………………………………. |
54 |
6
|
Editing |
|
|
Operating the MODE menu ………………………………………………………….. |
57 |
|
Protecting recorded images (Protect) …………………………………………….. |
58 |
|
Using the Playlist of movies …………………………………………………………. |
59 |
|
Creating the Playlist …………………………………………………………………. |
59 |
|
Playing the Playlist …………………………………………………………………… |
59 |
|
Capturing still images from a movie ………………………………………………. |
60 |
|
Dividing a movie …………………………………………………………………………. |
61 |
|
Deleting movies and still images …………………………………………………… |
62 |
|
Dubbing movies/copying still images …………………………………………….. |
63 |
|
Dubbing movies………………………………………………………………………. |
63 |
|
Copying still images…………………………………………………………………. |
64 |
|
Formatting the recording media ……………………………………………………. |
65 |
|
Preventing data on recording media from being recovered ………………. |
65 |
|
Repairing the image database file …………………………………………………. |
66 |
|
Using the Menu |
|
|
Operating the menu …………………………………………………….. |
67 |
|
Menu items ………………………………………………………………………………… |
69 |
|
(CAMERA SET) menu ………………………………………………………….. |
71 |
Settings to adjust your camcorder to the recording conditions (GAIN SET/ BACK LIGHT/STEADYSHOT, etc.)
|
(REC/OUT SET) menu ………………………………………………………….. |
77 |
Recording settings, input and output settings (REC SET/VIDEO OUT)
|
(AUDIO SET) menu ………………………………………………………………. |
78 |
Settings for the audio recording (AUDIO FORMAT/XLR SET, etc.)
|
(DISPLAY SET) menu …………………………………………………………… |
81 |
Display settings of the display and the viewfinder (MARKER/VF BACKLIGHT/ DISPLAY OUTPUT, etc.)
|
(TC/UB SET) menu ……………………………………………………………….. |
85 |
|
(TC PRESET/UB PRESET, etc.) |
|
|
(OTHERS) menu ……………………………………………………………………. |
86 |
|
Settings while recording or other basic settings (AREA SET/BEEP, etc.) |
Connecting with a Computer
|
Saving images with a computer ……………………………………………………. |
88 |
Continued , 7

|
Table of Contents (Continued) |
|
|
Troubleshooting |
|
|
Troubleshooting …………………………………………………………………………. |
90 |
|
Warning indicators and messages ………………………………………………… |
99 |
|
Additional Information |
|
|
Recording time of movies ………………………………………………………….. |
101 |
|
Using your camcorder abroad …………………………………………………….. |
103 |
|
File/folder structure on the memory card and the flash memory unit … |
104 |
|
Maintenance and precautions …………………………………………………….. |
105 |
|
About the AVCHD format ………………………………………………………… |
105 |
|
About GPS (HXR-NX5E/NX5P) …………………………………………………. |
105 |
|
About the memory card…………………………………………………………… |
106 |
|
About the “InfoLITHIUM” battery pack………………………………………. |
107 |
|
About charging the battery pack ……………………………………………… |
108 |
|
About x.v.Color………………………………………………………………………. |
109 |
|
About handling of your camcorder …………………………………………… |
109 |
|
Specifications …………………………………………………………………………… |
112 |
|
Quick Reference |
|
|
Identifying parts and controls ……………………………………………………… |
116 |
|
Screen indicators ……………………………………………………………………… |
122 |
|
Index ………………………………………………………………………………………. |
124 |
8
Getting Started
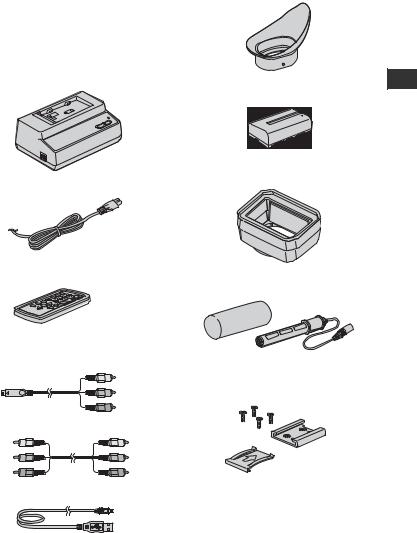
Step 1: Checking supplied items
Make sure that you have following items supplied with your camcorder.
The number in the parentheses indicates the number of that item supplied.
•Memory cards are not included. See pages 2 and 106 for types of memory cards that you can use on your camcorder.
AC Adaptor/Charger (AC-VL1) (1) (p. 12)
Power cord (mains lead) (1) (p. 12)
Wireless Remote Commander (RMT-845)
(1) (p. 121)
A button-type lithium battery is already installed.
Component video cable (1) (p. 54)
A/V connecting cable (1) (p. 54)
USB cable (1) (p. 88)
Large eyecup (1) (p. 16)
Rechargeable battery pack (NP-F570) (1) (p. 12, 107)
Lens hood with lens cover (1) (p. 10)
This lens hood is pre-mounted.
Wind Screen (1), Microphone (ECM-XM1)
(1) (p. 10)
Accessory shoe kit (Accessory shoe (1), Accessory shoe plate (1), screws (4)) (p. 116)
Connecting cord (DK-415) (1) (p. 13)
CD-ROM “Content Management Utility” (1)
CD-ROM “Manuals for Digital HD Video Camera Recorder” (1)
Operating Guide (2)
Started Getting
9
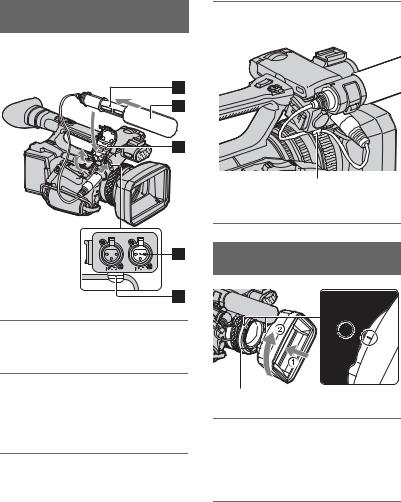
Step 2: Attaching the supplied microphone and the lens hood with lens cover
Attaching the supplied microphone
When you use the supplied microphone (ECM-XM1) for recording sound, do the following steps.
4 Put the microphone cable into the cable holder E.
Hook the cable in the outer cable holder.
Attaching the lens hood with lens cover
1 Attach the wind screen B to the supplied microphone A.
2 Place the microphone A in the microphone holder C with the model name facing upward, close the cover, and shut the clamp.
3 Connect the plug of the
microphone to the INPUT1 jack
D.
PUSH (lens hood release) button
Align the marks on the lens hood to those on the camcorder, and turn the lens hood in the direction of the arrow 2 until it is locked.
10
![]()
To remove the lens hood with lens cover
Turn the lens hood in the opposite direction to the arrow 2 in the illustration while pressing the PUSH (lens hood release) button.
z Tips
•If you attach or remove a 72mm (2 7/8 in.) PL filter or MC protector, remove the lens hood with lens cover.
To open or close the shutter of the lens hood with lens cover
Move the lens cover lever to OPEN to open the lens cover, and move the lever to CLOSE to close the lens cover.
Started Getting
11
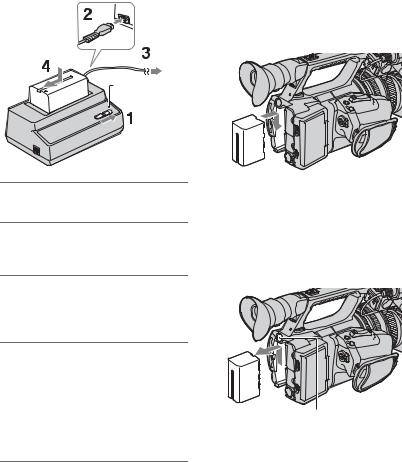
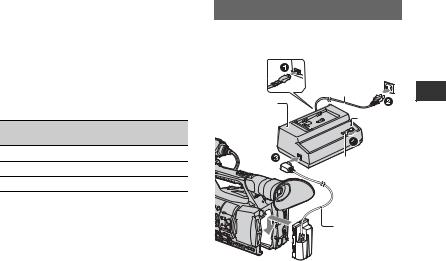
Step 3: Charging the battery pack
You can charge the “InfoLITHIUM” battery pack (L series) with the supplied AC Adaptor/Charger.
b Notes
•You cannot use batteries other than the “InfoLITHIUM” battery pack (L series) (p. 107).
After charging the battery
The charge lamp turns off (normal charge). If you continue charging more 1 hour after the charge lamp turns off, you can use the battery a little longer (full charge). Remove the battery pack from the AC Adaptor/Charger when the charge is completed.
Charge lamp
1 Set the mode switch to CHARGE.
2 Connect the power cord (mains lead) to the AC Adaptor/Charger.
3 Connect the power cord (mains lead) to the wall outlet (wall socket).
4 Place the battery pack in the slot of the AC Adaptor/Charger, press it down, and slide it in the direction of the arrow as illustrated.
The charge lamp turns on and charging starts.
To attach the battery pack
Press the battery pack against the back of your camcorder and slide it down.
z Tips
•You can check the remaining battery life with the status check function (p. 52).
To remove the battery pack
Slide the POWER switch to OFF. Push the BATT RELEASE (battery release) button and remove the battery pack.
BATT RELEASE (battery release) button
12
To store the battery pack
If the battery pack is not in use for a while, run down the battery and store it. See page 108 for details on storage of the battery pack.
Charging time
Approximate time (min.) required when you charge a fully discharged battery pack.
|
Battery pack |
Normal charge |
Fully charge |
|
|
time |
time |
||
|
NP-F570 |
140 |
200 |
|
|
NP-F770 |
250 |
310 |
|
|
NP-F970 |
365 |
425 |
b Notes
•The supplied battery pack is NP-F570.
•You cannot use the NP-F330 battery pack with your camcorder.
On the battery pack
•Before changing the battery pack, slide the POWER switch to OFF.
•The Battery Info (p. 52) will not be correctly displayed under the following conditions.
–The battery pack is not attached correctly.
–The battery pack is damaged.
–The battery pack is worn-out.
Using an outside power source
You can use the AC Adaptor/Charger to obtain AC power.
|
To the wall outlet |
|||
|
(wall socket) |
|||
|
Power cord |
|||
|
AC Adaptor/ |
Getting |
||
|
Charger |
Charge |
||
|
lamp |
Started |
||
|
Mode |
|||
|
switch |
|||
|
Connecting |
|||
|
cord |
|||
|
DK-415 |
1Connect the power cord (mains lead) to the AC Adaptor/Charger.
2Connect the power cord (mains lead) to the wall outlet (wall socket).
3Connect the connecting cord (DK-415) to the AC Adaptor/Charger.
4Set the mode switch of the AC Adaptor/ Charger to VCR/CAMERA.
5Press the connecting part of the connecting cord (DK-415) against the back of your camcorder in the battery slot and slide it down.
On the AC Adaptor/Charger
•Use the nearby wall outlet when using the AC Adaptor/Charger. Disconnect the AC Adaptor/ Charger from the wall outlet (wall socket) immediately if any malfunction occurs while using your camcorder.
•Do not use the AC Adaptor/Charger placed in a narrow space, such as between a wall and furniture.
•Do not short-circuit the DC plug of the AC Adaptor/Charger or battery terminal with any metallic objects. This may cause a malfunction.
Continued , 13
Step 3: Charging the battery pack (Continued)
•Even if your camcorder is turned off, AC power (house current) is still supplied to it while connected to the wall outlet (wall socket) via the AC Adaptor/Charger.
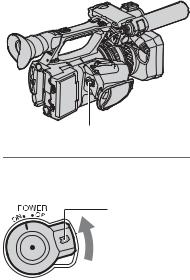
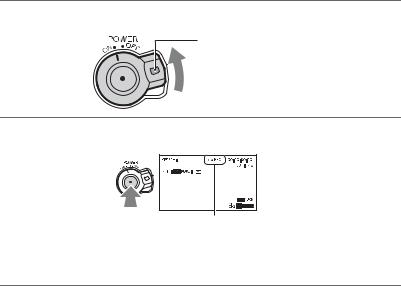
Step 4: Turning the power on and holding your camcorder properly
To record or play back, set the POWER switch to ON.
When you use your camcorder for the first time, the [CLOCK SET] screen appears (p. 17).
POWER switch
1 Slide the POWER switch to ON while you press the green button.
Press and hold the green button.
b Notes
•The current date and time appear on the LCD screen for a few seconds when you turn on your camcorder after you set the date and time with [CLOCK SET], p. 17.
14

2 Hold the camcorder properly.
3 Ensure a good grip, then fasten the grip belt.
To turn off the power
Slide the POWER switch to OFF.
b Notes
•If warning messages appear on the screen, follow the instructions.
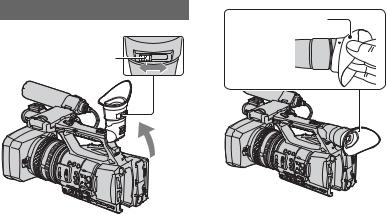
Step 5: Adjusting the LCD panel and viewfinder
LCD panel
Open the LCD panel 180 degrees (1), then rotate it to the best angle to record or play back (2).
|
1Open 180 degrees. |
Getting |
|
|
290 degrees |
||
|
(max.) |
Started |
|
|
2180 degrees |
||
|
(max.) |
DISPLAY button
z Tips
•Images are displayed as mirror images on the LCD screen, but are recorded as normal images.
To turn off the LCD backlight to make the battery last longer
Press and hold the DISPLAY button for a few seconds until 

 appears.
This setting is practical when you use your camcorder in bright conditions or when you want to save battery power. The recorded picture will not be affected by the setting. To turn on the LCD backlight, press and hold the DISPLAY button for a few seconds until 

 disappears.
Also, you can turn on the LCD backlight by turning on/off the camcorder.
z Tips
•You can adjust the brightness of the LCD screen from [LCD BRIGHT] (p. 83).
Continued , 15
Step 5: Adjusting the LCD panel and viewfinder (Continued)
Viewfinder
Viewfinder lens adjustment lever
Move it until the picture becomes clear.
b Notes
•You may see primary colors shimmering in the viewfinder when you move your line of sight. This is not a malfunction. The shimmering colors will not be recorded on the recording media.
z Tips
•You can adjust the brightness of the viewfinder backlight from [VF BACKLIGHT] (p. 83).
•To display images both on the LCD display and in the viewfinder, set [VF POWERMODE] to [ON] (p. 84).
•To display images in black and white in the viewfinder, set [VF COLOR] to [OFF] (p. 84).
When the picture in the viewfinder is hard to see
If you cannot see the picture in the viewfinder clearly under bright circumstances, use the supplied large eyecup. To attach the large eyecup, stretch it slightly and align it with the eyecup groove in the viewfinder. You can attach the large eyecup facing either the right or left side.
b Notes
• Do not remove the pre-attached eyecup.
Large eyecup (supplied) 
Attach with the protruding part at the top.
16
Step 6: Setting the date and time
Set the date and time when using your camcorder for the first time. If you do not set the date and time, [CLOCK SET] screen appears every time you turn on your camcorder.
z Tips
•If you do not use your camcorder for about 3 months, the built-in rechargeable battery gets discharged and the date and time settings may be cleared from the memory. In that case, charge the rechargeable battery and then set the date and time again (p. 111).
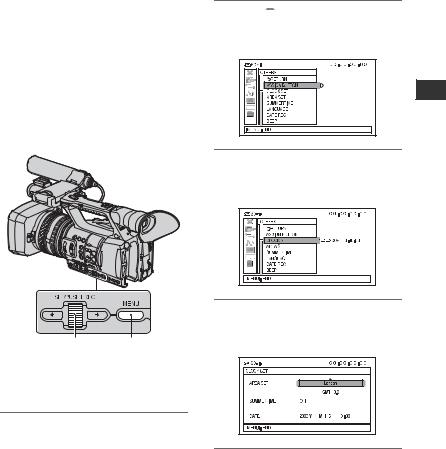
2 Select  (OTHERS) by turning the SEL/PUSH EXEC dial, then press the dial.
3 Select [CLOCK SET] by turning the SEL/PUSH EXEC dial, then press the dial.
Started Getting
|
SEL/PUSH |
MENU |
|
EXEC dial |
button |
Skip to step 4 when you set the clock for the first time.
1 Press the MENU button.
4 Select your area by turning the SEL/PUSH EXEC dial, then press the dial.
5 Set [SUMMERTIME], [Y] (year), [M] (month), [D] (day), hour and minute, by turning the SEL/PUSH EXEC dial, then press the dial.
Continued , 17

Step 6: Setting the date and time (Continued)
The clock starts.
•Set [SUMMERTIME] to [ON] to move the time forward 1 hour.
•You can set any year up to the year 2037.
z Tips
•The date and time are automatically recorded on the selected recording media, and can be displayed during playback (DATA CODE button, p. 51).
Changing the language setting
You can change the on-screen displays to show messages in a specified language. Press the MENU button and select
 (OTHERS) with the SEL/PUSH EXEC dial. Select the screen language in [LANGUAGE] (p. 86).
18
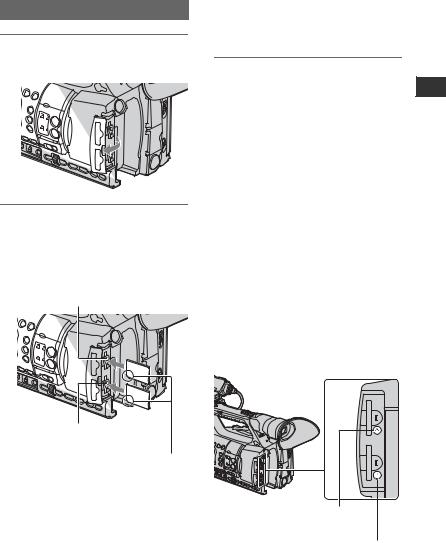
Step 7: Inserting a memory card/Attaching a flash memory unit
Memory card
1 Open the cover in the direction of the arrow.
•When you insert a new memory card in standby mode, the [Create a new Image Database File.] screen appears. Follow the screen indication, and touch [YES].
2 Orient the memory card’s notched corner as shown in the illustration, and insert into the memory card slot until it clicks.
Memory card slot A and its access lamp
Memory card slot B and its access lamp
Insert with the notched corner first, and facing down.
To eject the memory card
Lightly push the memory card once.
b Notes
•When the access lamp is lit or flashing in red, your camcorder is reading/writing data. Do not shake or knock your camcorder, turn the power off, eject the memory card, or remove the battery pack. Otherwise, image data may be damaged.
•If [Failed to create a new Image Database File. It may be possible that there is not enough free space.] appears in step 2, format the memory card (p. 65).
•When inserting or ejecting the memory card, be careful to prevent the memory card from popping out and dropping.
Selecting the memory card slot to be used for recording
Press the A or B button of the memory card slot where the memory card you want to record on is inserted. The lamp of the selected slot lights up in green.
Started Getting
b Notes
•If you insert a memory card into the slot in the wrong direction, the memory card, the memory card slot, or image data may be damaged.
Memory card slot A button
Memory card slot B button
Continued , 19

Step 7: Inserting a memory card/Attaching a flash memory unit (Continued)
b Notes
•You can only select a slot that already has a memory card inserted.
•While movies are being recorded on the memory card, you cannot switch the slot even if you press the memory card slot A/B buttons.
z Tips
•When only one slot has a memory card inserted, the slot that has the memory card is selected automatically.
•If the memory card is fully recorded during recording, the camcorder continues recording automatically on the memory card inserted in the other slot (Relay recording, p. 22).
Flash memory unit
You can attach a flash memory unit HXRFMU128 (sold separately) to your camcorder for recording movies.
1 While sliding the RELEASE lever in the direction of the arrow, remove the flash memory unit jack cover.
2 Align the mark on the camcorder and that on the flash memory unit, and slide the flash memory unit in the direction of the arrow.
3 When [EXT media has been attached. It is necessary to reboot. Execute?] appears on the screen, touch [YES].
b Notes
•If you touch [NO] in step 3, turn on your camcorder again. You will be able to record in the flash memory unit.
To remove the flash memory unit
Turn off your camcorder, and while sliding the RELEASE lever in the direction of arrow, remove the flash memory unit.
When you do not use an flash memory unit, leave the flash memory unit jack cover attached.
20
![]()
Recording/Playback
Recording
Recording lamp
Handle record button
Recording lamp
 Lens hood
 POWER switch
Record button
Your camcorder records movies on memory cards or a flash memory unit. Do the following steps to record movies.
•This camcorder can record movies in either high definition image quality (HD) or standard definition image quality (SD). The factory setting is high definition image quality (HD) ([ /
/ SET], p. 24).
b Notes
•When the access lamp is lit or flashing in red, your camcorder is writing data on recording media. Do not shake or knock your camcorder, or remove the battery pack or the AC Adaptor/Charger.
•See page 101 on the recording time of movies.
•Your camcorder can record movies for about 13 hours continuously.
•If a movie file exceeds 2 GB during recording, the camcorder divides the file and create a new file automatically.
•The menu settings, the PICTURE PROFILE settings, and the settings made by the AUTO/MANUAL switch are stored in your camcorder when you turn the POWER switch to OFF. The access lamp lights up while the settings are being stored. If you remove the battery pack or the AC Adaptor/Charger before turning off the power, the settings may return to the default settings.
1 Open the shutter of the lens hood.
Recording/Playback
Continued , 21
Recording (Continued)
2 Slide the POWER switch to ON while pressing the green button.
Press and hold the green button.
3 Press the record button or the handle record button.
[STBY] t [REC]
The recording lamp lights up during recording.
To stop the movie recording, press the record button or the handle record button again.
z Tips
•When recording in high definition image quality (HD), the aspect ratio is fixed to 16:9. When recording in standard definition image quality (SD), you can switch the aspect ratio to 4:3 ([ WIDE REC], p. 77).
•You can change the screen display during recording (p. 51).
•Indicators displayed on the screen during recording are shown on page 122.
•The recording lamp can be set to stay off ([REC LAMP[F]], [REC LAMP[R]], p. 86).
•For low angle recording, the handle record button is convenient. Release the HOLD lever to enable the handle record button. It might be helpful if you set the LCD panel face up or close it after turning it face down, or lift the viewfinder up during the low angle recording.
•You can capture still images from the movies you recorded (p. 60).
To continue recording on the memory cards, one after another (Relay recording)
Insert memory cards each in both slots A and B, so the camcorder switches memory card A (or B) just before space on the other one runs out, and continues recording on the next memory card automatically.
22
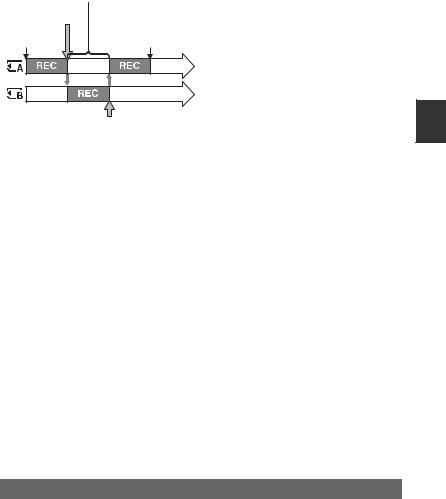
Insert a recordable memory card.
REC: Recording
Small space
b Notes
•Do not eject the memory card that is currently being used for recording. Replace only the memory card whose slot lamp is off.
•Even if you press the memory card slot button, A or B, while recording movies, you cannot switch the slot currently being used.
•When the remaining recording time of the memory card being used is less than 1 minute and the other slot has recordable memory card inserted, [

 ] or [

 ] appears on the camcorder screen. The indicator turns off when the memory card is switched.
•If you start recording on a memory card with the remaining recording time of less than 1 minute, the camcorder may not be able to relay-record. To relay-record without fail, make sure that the memory card has more than 1 minute when you start recording.
•Seamless playback of relay-recorded movies with this camcorder is not possible.
•You can re-combine relay-recorded movies using the supplied application software (Windows only).
To record movies using both the memory card and the flash memory unit (Simultaneous recording)
You can record movies on both of these recording media simultaneously.
You can change the recording media using the record button and the handle record button with [REC BUTTON SET] (p. 23).
b Notes
• You cannot record on the memory cards in slots A and B simultaneously.
z Tips
•Relay recording works during simultaneous recording on different media.
•If one of the recording media used becomes unable to continue recording during simultaneous recording, the other recording media continues recording without pause.
Changing the setting of the record button/handle record button
You can start and stop recording on different recording media at different timing by operating the record button and the handle record button.
In the default setting, movies are recorded on both the memory card and the flash memory unit at the same time when either record button is pressed.
Recording/Playback
Continued , 23
Recording (Continued)
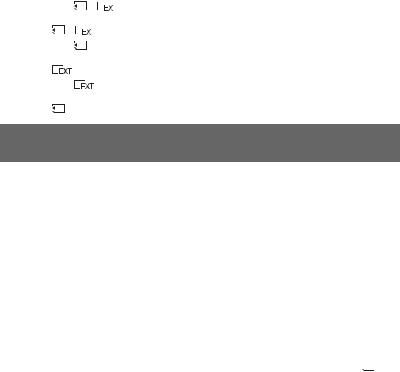
•REC BUTTON:[ ][
][
 ]
]
•HANDLE REC BUTTON:[ ][
][
 ]
]
To change the setting
Press MENU t select  (REC/OUT SET) t [REC SET] t [REC BUTTON SET] with the SEL/PUSH EXEC dial.
|
[REC BUTTON SET] setting |
Button and recording media |
||
|
REC BUTTON:[ |
][ |
] Recording on both the memory card and the flash memory unit |
|
|
HANDLE REC |
starts and stops at the same time when either record button is |
||
|
BUTTON:[ |
][ |
] |
pressed. |
|
REC BUTTON:[ |
] |
Recording on the memory card starts and stops when the record |
|
|
HANDLE REC |
button is pressed, and on the flash memory unit when the handle |
||
|
BUTTON:[ |
] |
record button is pressed. |
|
|
REC BUTTON:[ |
] |
Recording on the flash memory unit starts and stops when the |
|
|
HANDLE REC |
record button is pressed, and on the memory card when the handle |
||
|
BUTTON:[ |
] |
record button is pressed. |
|
Selecting high definition image quality (HD) or standard definition image quality (SD)
You can set the recording image quality, high definition image quality (HD) or standard definition image quality (SD), separately for the memory card and the flash memory unit.
To change the setting
Press MENU t select  (REC/OUT SET) t [REC SET] t [
 /
/ SET] with the SEL/PUSH EXEC dial.
To record in high definition image quality (HD)
Select [ :
:

 :
: ] in [
 /
/ SET].
SET].
Images are recorded in high definition image quality (HD) on the memory card and the flash memory unit.
To record in standard definition image quality (SD)
To record in standard definition image quality (SD) on the memory card, select [ :
:

 :
: ] in [
 /
/ SET].
SET].
To record in standard definition image quality (SD) on the flash memory unit, select [ :
:

 :
: ].
].
b Notes
•You cannot record in standard definition image quality (SD) on both the memory card and the flash memory unit simultaneously.
24

Selecting the recording format
You can select the recording format (bit-rate, image size, frame rate, scanning system). In the default setting, [


 ] is selected.
To change the setting
Press MENU t select  (REC/OUT SET) t [REC SET] t [REC FORMAT] with the SEL/PUSH EXEC dial.
|
Setting value |
Description |
• Bit-rate
FX: max. 24 Mbps
FH: approx. 17 Mbps (average) HQ: approx. 9 Mbps (average) LP: approx. 5 Mbps (average)
• Image size
FX: 1920×1080/1280×720
FH: 1920×1080/1280×720 HQ: HD recording 1440×1080
SD recording 720×576 LP: 1440×1080
• Frame rate either 25 or 50
• Scanning system i: interlace
p: progressive
pSCAN: Records images of progressive scanning system as interlace signal (50i).
Setting value
If you select [


 ], for example, movies are recorded with following format.
•HD: High definition image quality. SD is standard definition image quality.
•1080: Effective scanning lines
•50: Frame rate
•i: Scanning system
•FX: Recording mode
b Notes
•The recording mode is fixed to FX or FH with the progressive scanning system.
•When the recording format is changed to or from the 720/50p, you will be prompted to reboot the camcorder. Select [YES]. Otherwise, you cannot switch the recording format.
z Tips
• When [ :
:

 :
: ] in [
 /
/ SET] is selected,
  items are grayed out.
Recording/Playback
25
Changing the settings of your camcorder recordings
Adjusting the zoom
Using the power zoom lever
Move the power zoom lever Dslightly for a slower zoom. Move it further for a faster zoom.
Wide view: (Wide angle)
Close view: (Telephoto)
z Tips
•The minimum distance required between your camcorder and the subject for focus is about
1 cm (about 13/32 in.) for wide angle and about 80 cm (about 2 5/8 feet) for telephoto.
•The focus may not be adjusted at certain zoom positions if the subject is within 80 cm (about 2 5/8 feet) from your camcorder.
•When you set [FOCUS MACRO] to [OFF], you cannot focus on a subject within 80 cm (about 2 5/8 feet) regardless of the zoom position (p. 74).
•Be sure to keep your finger on the power zoom lever D. If you move your finger off the power zoom lever D, the operation sound of the power zoom lever Dmay also be recorded.
•You can increase the zoom speed of the power zoom lever Dor the handle zoom A([SPEED ZOOM], p. 74).
Using the handle zoom
1Set the handle zoom switch B to VAR or FIX.
z Tips
•When you set the handle zoom switch Bto VAR, you can zoom in or out at variable speed.
•When you set the handle zoom switch Bto FIX, you can zoom in or out at fixed speed set in [HANDLE ZOOM] (p. 74).
2Press the handle zoom lever Ato zoom in or out.
b Notes
•You cannot use the handle zoom lever Awhen the handle zoom switch Bis set to OFF.
•You cannot change the zoom speed of the power zoom lever Dwith the handle zoom switch B.
Using the zoom ring
You can zoom at the desired speed by turning the zoom ring C. Fine adjustment is also possible.
b Notes
•Turn the zoom ring Cat a moderate speed. If you turn it too fast, the zoom speed may lag behind the zoom ring rotation speed, or the operation sound of the zoom may also be recorded.
26
Adjusting the focus manually
You can adjust the focus manually for different recording conditions.
Use this function in the following cases.
–To record a subject behind a window covered with raindrops.
–To record horizontal stripes.
–To record a subject with little contrast between the subject and its background.
–When you want to focus on a subject in the background.
– To record a stationary subject using a tripod.
1 During recording or standby, set the FOCUS switch B to MAN.
9 appears.
2 Rotate the focus ring Aand adjust the focus.
9 changes to  when the focus cannot be adjusted any farther. 9 changes to
  when the focus cannot be adjusted any closer.
z Tips
For focusing manually
•It is easier to focus on the subject when you use the zoom function. Move the power zoom lever towards T (telephoto) to adjust the focus, and then, towards W (wide angle) to adjust the zoom for recording.
•When you want to record a close-up image of a subject, move the power zoom lever towards W (wide angle) to fully magnify the image, then adjust the focus.
To restore automatic adjustment
Set the FOCUS switch Bto AUTO. 9 disappears and the automatic focus adjustment is restored.
Using automatic focus temporarily (Push auto focus)
Record the subject while pressing and holding the PUSH AUTO button C.
If you release the button, the setting returns to manual focusing.
Use this function to shift the focus on one subject to another. The scenes will shift smoothly.
z Tips
•The focal distance information (for when it is dark and hard to adjust the focus) appears for about 3 seconds in the following cases. (It will not be displayed correctly if you are using a conversion lens (sold separately)).
–When you set the FOCUS switch Bto MAN and 9 appears on the screen
–When you rotate the focus ring while 9 is displayed on the screen.
Recording/Playback
Continued , 27
Changing the settings of your camcorder recordings (Continued)
Using the expanded focus (Expanded focus)
[EXPANDED FOCUS] is assigned to the ASSIGN 7 button (p. 45).
Press the ASSIGN 7 button. [EXPANDED FOCUS] appears and the center of the screen is magnified by about 2.0 times. It will be easier to confirm the focus setting during manual focusing. The screen returns to the original size when you press the button again.
b Notes
•Even though the image appears expanded on the screen, the recorded image is not expanded.
z Tips
•You can select a type of an expanded image displayed during the expanded focus ([EXPANDED FOCUS TYPE], p. 82).
Focusing on a distant subject (Focus infinity)
Slide the FOCUS switch B to INFINITY and hold it there.
 appears on the screen.
To return to manual focus mode, release the FOCUS switch B. This function enables you to set focus on a distant subject even when the focus is automatically set on a close subject.
b Notes
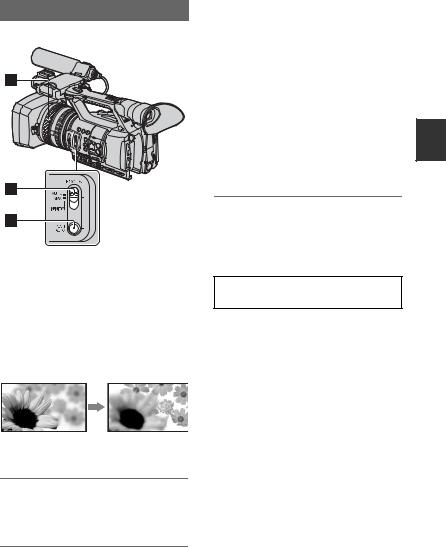
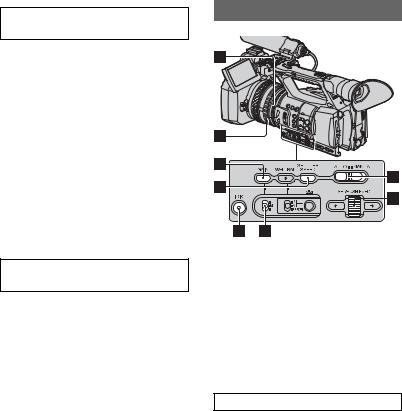
Adjusting the image brightness
You can adjust the image brightness by adjusting the iris, gain or shutter speed, or by reducing the light volume with the ND filter B.
b Notes
•You cannot use the back light function and the spotlight function when iris, gain and shutter speed are adjusted manually.
•[AE SHIFT] is not effective temporarily while you adjust the iris, gain and shutter speed all manually.
Adjusting the iris
•This function is only available during the manual focus. It is not available during the automatic focus.
You can manually adjust the iris to control the volume of the light entering the lens. By adjusting the iris, you can change or close ( ) the aperture of the lens, which is expressed as an F value between F1.6 and F11. The volume of the light increases the more that you open the aperture (decreasing F value). The volume of the light decreases the more that you close the aperture (increasing F value). The current F value appears on the screen.
1During recording or standby, set the AUTO/MANUAL switch Hto MANUAL.
28

2When the iris is automatically adjusted, press the IRIS button E.
 next to the iris value disappears, or the iris value appears on the screen.
3Adjust the iris with the iris ring A. When you assign [PUSH AUTO IRIS] to one of the ASSIGN buttons, you can automatically adjust the iris while pressing and holding that ASSIGN button. See page 45 for details on the ASSIGN button.
z Tips
•The F value becomes close to F3.4 as the zoom position changes from W to T even when you open the aperture by setting the F value lower than F3.4, such as F1.6.
•The range of focus, an important effect of the aperture, is called the depth of field. The depth of field gets shallower as the aperture is opened, and deeper as the aperture is closed. Use the aperture creatively to obtain the desired effect in your photography.
•This is handy for making the background blurred or sharp.
To adjust the iris automatically
Press the IRIS button E, or set the AUTO/ MANUAL switch Hto AUTO.
The iris value disappears, or  appears next to the iris value.
b Notes
•When you set the AUTO/MANUAL switch H to AUTO, other manually adjusted items (gain, shutter speed, white balance) also become automatic.
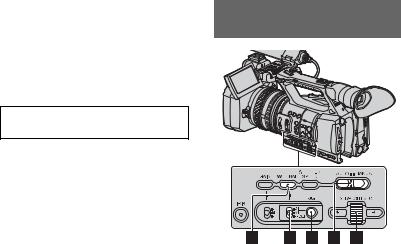
Adjusting the gain
You can adjust the gain manually when you do not want to use the AGC (automatic gain control).
1During recording or standby, set the AUTO/MANUAL switch Hto MANUAL.
2When the gain is automatically adjusted, press the GAIN button C.
 next to the gain value disappears, or the gain value appears on the screen.
3Set the gain switch F to H, M or L. The gain value set for the selected gain switch position appears on the screen. You can set the gain value for each gain
switch position from [GAIN SET] of the 

 (CAMERA SET) menu (p. 71).
To adjust the gain automatically
Press the GAIN button C, or set the AUTO/MANUAL switch H to AUTO. The gain value disappears, or  appears next to the gain value.
b Notes
•When you set AUTO/MANUAL switch Hto AUTO, other manually adjusted items (iris, shutter speed, white balance) also become automatic.
z Tips
•When you record high definition image quality (HD) movies with the gain set to [-6dB] and play them back with the data code, the gain value is displayed as [—].
Adjusting the shutter speed
You can manually adjust and fix the shutter speed. You can make a moving subject look still or emphasize the movement of a moving subject by adjusting the shutter speed.
1During recording or standby, set the AUTO/MANUAL switch Hto MANUAL.
2Press the SHUTTER SPEED button D until the shutter speed value is highlighted.
3Change the shutter speed displayed on
the screen by turning the SEL/PUSH EXEC dial G.
You can adjust the shutter speed in a range of 1/3 second through 1/10000 second.
The denominator of the set shutter speed appears on the screen. For example,
Recording/Playback
Continued , 29
Changing the settings of your camcorder recordings (Continued)
[100] appears on the screen when you set the shutter speed to 1/100 second. The larger the value on the screen, the faster the shutter speed.
4Press the SEL/PUSH EXEC dial Gto lock the shutter speed.
To readjust the shutter speed, do steps 2 to 4.
z Tips
•It is difficult to focus automatically at a lower shutter speed. Manual focusing with your camcorder attached to a tripod is recommended.
•When recording under fluorescent lamps, sodium lamps, or mercury lamps, the picture may flicker or change colors, or may have horizontal bands of noise. You may be able to improve the situation by adjusting the shutter speed.
To adjust the shutter speed automatically
Press the SHUTTER SPEED button D twice, or set the AUTO/MANUAL switch Hto AUTO.
The shutter speed value disappears, or  appears next to the shutter speed value.
b Notes
•When you set the AUTO/MANUAL switch H to AUTO, other manually adjusted items (iris, gain, white balance) also become automatic.
Adjusting the volume of light (ND filter)
You can record the subject clearly by using the ND filter Bwhen the recording environment is too bright.
The ND filters 1, 2 and 3 reduce the volume of light to about 1/4, 1/16 and 1/64, respectively.
If 
 flashes during the iris automatic adjustment, set the ND filter to 1. If
 flashes during the iris automatic adjustment, set the ND filter to 2. If
 flashes during the iris automatic adjustment, set the ND filter to 3.
The ND filter indicator will stop flashing and remain on the screen.
If 

 flashes, set the ND filter to OFF. The ND filter icon will disappear from the screen.
b Notes
•If you change the ND filters Bduring recording, the movie and sound may be distorted.
•When adjusting the iris manually, the ND filter icon does not flash even if the light volume should be adjusted with the ND filter.
•If the camcorder cannot detect the ND filter
position (OFF/1/2/3),  flashes on the screen. Make sure that the ND filter is set correctly.
z Tips
•While recording a bright subject, diffraction may occur if you close the aperture further down, resulting in a fuzzy focus (this is a
common phenomenon with video cameras). The ND filter Bsuppresses this phenomenon and gives better recording results.
Adjusting to natural color (White balance)
You can adjust and fix the white balance according to the lighting conditions of recording environment.
You can store white balance values in
30
![]()
memory A ( A) and memory B (
 B), respectively. Unless a white balance is readjusted, values will remain even after the power has been turned off.
When you select PRESET, [OUTDOOR], [INDOOR] or [MANU WB TEMP] is selected, according to which one you previously set with [WB PRESET] in the


 (CAMERA SET) menu.
1 During recording or standby, set the AUTO/MANUAL switch D to
MANUAL.
2 Press the WHT BAL button A.
3 Set the white balance memory switch B to any one of
PRESET/A/B.
Select A or B for recording with the white balance setting stored in memory A or B.
|
Indicator |
Shooting conditions |
|
|
A |
• White balance values |
|
|
(Memory A) |
adjusted for light |
|
|
B |
sources can be stored |
|
|
(Memory B) |
in memory A and |
|
|
memory B. Follow the |
||
|
steps in “To save the |
||
|
adjusted white balance |
||
|
value in memory A or |
||
|
B” (p. 31). |
||
|
• Recording neon signs |
||
|
Outdoor |
or fireworks |
|
|
• Recording sunset/ |
||
|
([OUTDOOR]) |
||
|
sunrise, just after |
||
|
sunset or just before |
||
|
sunrise |
•Under daylight color fluorescent lamps
|
Indicator |
Shooting conditions |
n• Under the lighting
|
Indoor |
conditions that change |
|
|
([INDOOR]) |
in many ways, such as |
|
|
a party hall |
||
|
• Under strong light, |
||
|
such as in a |
||
|
photography studio |
||
|
• Under sodium lamps |
||
|
or mercury lamps |
||
|
Color |
• Color temperature can |
|
|
temperature |
be set between 2300K |
|
|
([MANU WB |
and 15000K (the |
|
|
default setting is |
||
|
TEMP]) |
||
|
6500K). |
||
z Tips
•You can change the outdoor white balance
setting by setting offset. Press  (one push) button Cwhile
  (outdoor) is selected and turn the SEL/PUSH EXEC dial Eto select an offset value from -7 (bluish) to 0 (normal, the default setting) to +7 (reddish). You can also set the white balance offset value from the menu ([WB OUTDOOR LEVEL], p. 72).
•You can change the color temperature. Set [WB
PRESET] to [MANU WB TEMP], and the white balance memory switch Bto PRESET,
then press the  (one push) button C. Turn the SEL/PUSH EXEC dial Euntil the desired temperature appears on the screen, then press the dial to set the temperature. You can also set the color temperature from the menu ([WB TEMP SET], p. 72).
To save the adjusted white balance value in memory A or B
1Set the white balance memory switch to
A ( A) or B (
 B) in step 3 of “Adjusting to natural color (White balance).”
2Capture a white subject, such as white paper, full-screen in the same lighting condition as the one in which the subject is.
3 Press the  (one push) button C.
Recording/Playback
Continued , 31

Changing the settings of your camcorder recordings (Continued)
 A or
A or  B starts flashing rapidly. It will stay on when the white balance adjustment is completed and the adjusted value is stored in
  A or
A or  B.
B.
b Notes
•When a white balance adjustment value has not
been obtained successfully,  A or
A or  B turns from rapid flashing to slow flashing. Adjust the subject appropriately and set the shutter speed to auto or around 1/50, then try adjusting the white balance again.
•It may take a long time to adjust the white balance, depending on the recording conditions. If you want to perform a different operation
before completing the adjustment, set the white balance memory switch Bto another position to temporarily suspend white balance adjustment.
To adjust the white balance automatically
Press the WHT BAL button A or set the AUTO/MANUAL switch Dto AUTO.
b Notes
•When you set the AUTO/MANUAL switch D to AUTO, other manual adjusted items (iris, gain, and shutter speed) also become automatic.
Customizing the picture quality (Picture profile)
You can customize the picture quality by adjusting picture profile items such as [GAMMA] and [DETAIL].
Connect your camcorder to a TV or monitor, and adjust the picture quality while observing the picture on the TV or monitor screen.
Picture quality settings for different recording conditions have been stored in [PP1] through [PP6] as default settings.
b Notes
•When you set [x.v.Color] in the 

 (CAMERA SET) menu to [ON], the picture profile will be disabled.
32

|
Picture profile |
Recording condition |
||
|
number |
|||
|
PP1 |
Default settings the same |
||
|
as when Picture Profile is |
|||
|
[OFF] |
|||
|
PP2 |
Default settings the same |
||
|
as when Picture Profile is |
|||
|
[OFF] |
|||
|
PP3 |
Example settings of |
||
|
pictures recorded by a |
|||
|
professional shoulder |
|||
|
camcorder with ITU-709 |
|||
|
gamma |
|||
|
PP4 |
Example settings of |
||
|
pictures recorded by a |
|||
|
professional handy |
|||
|
camcorder with PD |
|||
|
gamma |
|||
|
PP5 |
Example settings of |
||
|
pictures recorded on |
|||
|
cinema color negative film |
|||
|
PP6 |
Example settings of |
||
|
pictures screened with |
|||
|
cinema color print film |
|||
1 During standby, press the PICTURE PROFILE button B.
2 Select a picture profile number with the SEL/PUSH EXEC dial A.
You can record with the settings of the selected picture profile.
3 Select [OK] with the SEL/PUSH EXEC dial A.
To cancel the picture profile recording
Select [OFF] in step 2 with the SEL/PUSH EXEC dial A.
To change the picture profile
You can change the settings stored in [PP1] through [PP6].
1Press the PICTURE PROFILE button
B.
2Select the PICTURE PROFILE number with the SEL/PUSH EXEC dial A.
3Select [SETTING] with the SEL/PUSH EXEC dial A.
4Select an item to be adjusted with the SEL/PUSH EXEC dial A.
5Adjust the picture quality with the SEL/ PUSH EXEC dial A.
6Repeat steps 4 and 5 to adjust other items.
7Select [ RETURN] with the SEL/ PUSH EXEC dial A.
8Select [OK] with the SEL/PUSH EXEC dial A.
A picture profile indicator appears.
Recording/Playback
Continued , 33

Changing the settings of your camcorder recordings (Continued)
BLACK LEVEL
To set the black level.
|
Item |
Description and settings |
|
[MASTER BLACK] |
Sets the master black level. |
|
-15 to +15 |
|
|
[BLACK R] |
Sets the black level of Rch. |
|
[MASTER BLACK] + [BLACK R] is the black level of Rch. |
|
|
-15 to +15 |
|
|
[BLACK G] |
Sets the black level of Gch. |
|
[MASTER BLACK] + [BLACK G] is the black level of Gch. |
|
|
-15 to +15 |
|
|
[BLACK B] |
Sets the black level of Bch. |
|
[MASTER BLACK] + [BLACK B] is the black level of Bch. |
|
|
-15 to +15 |
|
GAMMA
To select a gamma curve.
|
Item |
Description and settings |
|
[STANDARD] |
Standard gamma curve |
|
[CINEMATONE1] |
Gamma curve 1 for producing tone of film camera images |
|
[CINEMATONE2] |
Gamma curve 2 for producing tone of film camera images |
|
[ITU709] |
Gamma curve that corresponds to ITU-709. Gain in low intensity area: |
|
4.5 |
|
|
[G5.0] |
Gamma curve with 5.0 of a low intensity area gain |
|
[PD] |
Gamma curve for producing tone similar to DSR-PD series |
|
[x.v.] |
Gamma curve similar to x.v.Color |
BLACK GAMMA
To correct gamma in low intensity area.
|
Item |
Description and settings |
|
[RANGE] |
Selects a correcting range. |
|
HIGH / MIDDLE / LOW |
|
|
[LEVEL] |
Sets the correcting level. |
|
-7 (maximum black compression) to +7 (maximum black stretch) |
|
34

KNEE
To set knee point and slope for video signal compression to prevent over-exposure by limiting signals in high intensity areas of the subject to the dynamic range of your camcorder.
|
Item |
Description and settings |
||
|
[MODE] |
Selects a mode either automatic or manual. |
||
|
[AUTO] |
: to set the knee point and slope automatically. |
||
|
[MANUAL] |
: to set the knee point and slope manually. |
||
|
[AUTO SET] |
Sets the maximum point and sensitivity in the automatic mode. |
||
|
[MAX POINT] |
: Sets the maximum point. |
||
|
90% to 100% |
|||
|
[SENSITIVITY] |
: Sets the sensitivity. |
||
|
HIGH/MIDDLE/LOW |
|||
|
[MANUAL SET] |
Sets the knee point and slope manually. |
||
|
[POINT] |
: Sets the knee point. |
||
|
75% to 105% |
|||
|
[SLOPE] |
: Sets the knee slope. |
||
|
-5(gentle) to +5(steep) |
|||
COLOR MODE
To set type and level of colors.
|
Item |
Description and settings |
|
|
[TYPE] |
Selects a type of colors. |
|
|
[STANDARD] |
: Standard colors |
|
|
[CINEMATONE1] : Film camera image-like colors good with |
||
|
[GAMMA] set to [CINEMATONE1] |
||
|
[CINEMATONE2] : Film camera image-like colors good with |
||
|
[GAMMA] set to [CINEMATONE2] |
||
|
[ITU709 MATRIX]: Colors corresponding to ITU-709 |
||
|
[LEVEL] |
Sets a color level when you set [TYPE] to the settings other than |
|
|
[STANDARD]. |
||
|
1 (close to color settings of [STANDARD]) to 8 (color settings of the |
||
|
selected type) |
||
COLOR LEVEL
To set the color level.
|
Item |
Description and settings |
|
-7 (light) to +7 (dark), -8: black and white |
|
COLOR PHASE
To set the color phase.
|
Item |
Description and settings |
|
-7 (greenish) to +7 (reddish) |
|
Recording/Playback
Continued , 35

Changing the settings of your camcorder recordings (Continued)
COLOR DEPTH
To set the color depth for each color phase.
This function is more effective for chromatic colors and less effective for achromatic colors. The color looks deeper as you increase the setting value to more positive side, and lighter as you decrease the value to more negative side. This function is effective even if you set [COLOR LEVEL] to [-8] (black and white).
|
Item |
Description and settings |
|
|
[R] |
-7 (light red) to +7 (deep red) |
|
|
[G] |
-7 (light green) to +7 (deep green) |
|
|
[B] |
-7 |
(light blue) to +7 (deep blue) |
|
[C] |
-7 |
(light cyan) to +7 (deep cyan) |
|
[M] |
-7 |
(light magenta) to +7 (deep magenta) |
|
[Y] |
-7 |
(light yellow) to +7 (deep yellow) |
WB SHIFT
To set items for the white balance shift.
|
Item |
Description and settings |
||
|
[FILTER TYPE] |
Selects a color filter type for the white balance shift. |
||
|
[LB-CC] |
: Film type (color conversion and correction) |
||
|
[R-B] |
: Video type (correction of R and B levels) |
||
|
[LB[COLOR TEMP]] |
Sets a color temperature offset value. |
||
|
-9 |
(bluish) to +9 (reddish) |
||
|
[CC[MG/GR]] |
Sets a color correct offset value. |
||
|
-9 |
(greenish) to +9 (magentish) |
||
|
[R GAIN] |
Sets an R level. |
||
|
-9 |
(low R level) to +9 (high R level) |
||
|
[B GAIN] |
Sets a B level. |
||
|
-9 |
(low B level) to +9 (high B level) |
||
36

DETAIL
To set items for the detail.
|
Item |
Description and settings |
|
|
[LEVEL] |
Sets the detail level. |
|
|
-7 to +7 |
||
|
[MANUAL SET] |
[ON/OFF] |
: Turns on and off the manual detail adjustment. |
|
[ON] |
: Enables the manual detail adjustment (automatic |
|
|
optimization will not be performed). |
||
|
[OFF] |
: Disables the manual detail adjustment. |
|
|
[V/H BALANCE] : Sets the vertical (V) and horizontal (H) balance of |
||
|
DETAIL. |
||
|
-2 (off to the vertical (V) side) to +2 (off to the |
||
|
horizontal (H) side) |
||
|
[B/W BALANCE]: Selects the balance of the lower DETAIL (B) and |
||
|
the upper DETAIL (W). |
||
|
TYPE 1 (off to the lower DETAIL (B) side) to |
||
|
TYPE 5 (off to the upper DETAIL (W) side) |
||
|
[BLACK LIMIT] : Sets the limit level of the lower DETAIL (B). |
||
|
0 (Low limit level: likely to be limited) to 7 (High |
||
|
limit level: not likely to be limited) |
||
|
[WHITE LIMIT] |
: Sets the limit level of the upper DETAIL (W). |
|
|
0 (Low limit level: likely to be limited) to 7 (High |
||
|
limit level: not likely to be limited) |
||
|
[CRISPENING] |
: Sets the crispening level. |
|
|
0 (shallow crispening level) to 7 (deep crispening |
||
|
level) |
||
|
[HI-LIGHT DETAIL]: |
||
|
Sets the DETAIL level in the high intensity areas. |
||
|
-2 to +2 |
||
Recording/Playback
Continued , 37

Changing the settings of your camcorder recordings (Continued)
SKINTONE DETAIL
To adjust the detail of skintone areas to reduce wrinkles.
|
Item |
Description and settings |
|
|
[ON/OFF] |
Suppresses details in skin-tone areas to reduce wrinkles. Select [ON] |
|
|
when you want to use this function. You can also select other areas. |
||
|
[LEVEL] |
Sets the adjustment level. |
|
|
1 (less adjust the detail) to 8 (more adjust the detail) |
||
|
[COLOR SEL] |
Sets color items for the detail adjustment. |
|
|
[PHASE] |
: Sets the color phase. |
|
|
0 (purple) t 32 (red) t 64 (yellow) t |
||
|
96 (green) t 127 (blue) |
||
|
[RANGE] |
: Sets the color range. |
|
|
0 (selects no color), 1 (narrow: selects a single |
||
|
color) to 31 (wide: selects multiple colors in |
||
|
similar color phases and saturation) |
||
|
The detail will not be adjusted when you set |
||
|
[RANGE] to 0. |
||
|
[SATURATION] |
: Sets the color saturation. |
|
|
0 (selects a light color) to 31 (selects a deep color) |
||
|
[REVERSE] |
: Reverses the selected color range. |
|
|
If you execute this function when a color has been |
||
|
selected, colors that have not been selected will be |
||
|
selected instead. |
||
|
[Y LEVEL] |
: Sets the color brightness. |
|
|
0 (selects a dark color) to 31 (selects a bright |
||
|
color) |
||
|
[Y RANGE] |
: Sets the color brightness range. |
|
|
1 (narrows the brightness range) to 32 (expands |
||
|
the brightness range) |
||
COPY
To copy the settings of the picture profile to another picture profile number.
RESET
To reset the picture profile to the default setting.
38

To copy the picture profile setting to another picture profile number
See page 32 for the location of the buttons.
1Press the PICTURE PROFILE button
B.
2Select the picture profile number that
you want to copy from with the SEL/ PUSH EXEC dial A.
3Select [SETTING] t [COPY] with SEL/PUSH EXEC dial A.
4Select the number of the picture profile
that you want to copy to with the SEL/ PUSH EXEC dial A.
5Select [YES] with the SEL/PUSH EXEC dial A.
6Select [ RETURN] t [OK] with the SEL/PUSH EXEC dial A.
To reset the picture profile settings
You can reset the picture profile settings by each picture profile number. You cannot reset all picture profile settings at once. See page 32 for the location of the buttons.
1Press the PICTURE PROFILE button
B.
2Select the number of the picture profile
that you want to reset with the SEL/ PUSH EXEC dial A.
3Select [SETTING] t [RESET] t
[YES] t [ RETURN] t [OK] with the SEL/PUSH EXEC dial A.
Audio setup
Recording/Playback
Channel setting
1Select input sources with the CH1 (INT MIC/INPUT1) switch Cand the CH2
(INT MIC/INPUT1/INPUT2) switch
D.
See the table below for the recording channels.
Continued , 39
 Loading…
Смотреть руководство для Sony HXR-NX5E ниже. Все руководства на ManualsCat.com могут просматриваться абсолютно бесплатно. Нажав кнопку «Выбор языка» вы можете изменить язык руководства, которое хотите просмотреть.

MANUALSCAT | RU
Вопросы и ответы
У вас есть вопрос о Sony HXR-NX5E, но вы не можете найти ответ в пользовательском руководстве? Возможно, пользователи ManualsCat.com смогут помочь вам и ответят на ваш вопрос. Заполните форму ниже — и ваш вопрос будет отображаться под руководством для Sony HXR-NX5E. Пожалуйста, убедитесь, что вы опишите свои трудности с Sony HXR-NX5E как можно более детально. Чем более детальным является ваш вопрос, тем более высоки шансы, что другой пользователь быстро ответит на него. Вам будет автоматически отправлено электронное письмо, чтобы проинформировать вас, когда кто-то из пользователей ответит на ваш вопрос.
Задать вопрос о Sony HXR-NX5E
- Бренд:
- Sony
- Продукт:
- видеокамеры
- Модель/название:
- HXR-NX5E
- Тип файла:
- Доступные языки:
- английский