 abstract: В статье описаны продвинутые функций OpenSSH, которые позволяют сильно упростить жизнь системным администраторам и программистам, которые не боятся шелла. В отличие от большинства руководств, которые кроме ключей и -L/D/R опций ничего не описывают, я попытался собрать все интересные фичи и удобства, которые с собой несёт ssh.
Предупреждение: пост очень объёмный, но для удобства использования я решил не резать его на части.
Оглавление:
- управление ключами
- копирование файлов через ssh
- Проброс потоков ввода/вывода
- Монтирование удалённой FS через ssh
- Удалённое исполнение кода
- Алиасы и опции для подключений в .ssh/config
- Опции по-умолчанию
- Проброс X-сервера
- ssh в качестве socks-proxy
- Проброс портов — прямой и обратный
- Реверс-сокс-прокси
- туннелирование L2/L3 трафика
- Проброс агента авторизации
- Туннелирование ssh через ssh сквозь недоверенный сервер (с большой вероятностью вы этого не знаете)
Управление ключами
Теория в нескольких словах: ssh может авторизоваться не по паролю, а по ключу. Ключ состоит из открытой и закрытой части. Открытая кладётся в домашний каталог пользователя, «которым» заходят на сервер, закрытая — в домашний каталог пользователя, который идёт на удалённый сервер. Половинки сравниваются (я утрирую) и если всё ок — пускают. Важно: авторизуется не только клиент на сервере, но и сервер по отношению к клиенту (то есть у сервера есть свой собственный ключ). Главной особенностью ключа по сравнению с паролем является то, что его нельзя «украсть», взломав сервер — ключ не передаётся с клиента на сервер, а во время авторизации клиент доказывает серверу, что владеет ключом (та самая криптографическая магия).
Генерация ключа
Свой ключ можно сгенерировать с помощью команды ssh-keygen. Если не задать параметры, то он сохранит всё так, как надо.
Ключ можно закрыть паролем. Этот пароль (в обычных графических интерфейсах) спрашивается один раз и сохраняется некоторое время. Если пароль указать пустым, он спрашиваться при использовании не будет. Восстановить забытый пароль невозможно.
Сменить пароль на ключ можно с помощью команды ssh-keygen -p.
Структура ключа
(если на вопрос про расположение ответили по-умолчанию).
~/.ssh/id_rsa.pub — открытый ключ. Его копируют на сервера, куда нужно получить доступ.
~/.ssh/id_rsa — закрытый ключ. Его нельзя никому показывать. Если вы в письмо/чат скопипастите его вместо pub, то нужно генерировать новый ключ. (Я не шучу, примерно 10% людей, которых просишь дать ssh-ключ постят id_rsa, причём из этих десяти процентов мужского пола 100%).
Копирование ключа на сервер
В каталоге пользователя, под которым вы хотите зайти, если создать файл ~/.ssh/authorized_keys и положить туда открытый ключ, то можно будет заходить без пароля. Обратите внимание, права на файл не должны давать возможность писать в этот файл посторонним пользователям, иначе ssh его не примет. В ключе последнее поле — user@machine. Оно не имеет никакого отношения к авторизации и служит только для удобства определения где чей ключ. Заметим, это поле может быть поменяно (или даже удалено) без нарушения структуры ключа.
Если вы знаете пароль пользователя, то процесс можно упростить. Команда ssh-copy-id user@server позволяет скопировать ключ не редактируя файлы вручную.
Замечание: Старые руководства по ssh упоминают про authorized_keys2. Причина: была первая версия ssh, потом стала вторая (текущая), для неё сделали свой набор конфигов, всех это очень утомило, и вторая версия уже давным давно переключилась на версии без всяких «2». То есть всегда authorized_keys и не думать о разных версиях.
Если у вас ssh на нестандартном порту, то ssh-copy-id требует особого ухищрения при работе: ssh-copy-id '-p 443 user@server' (внимание на кавычки).
Ключ сервера
Первый раз, когда вы заходите на сервер, ssh вас спрашивает, доверяете ли вы ключу. Если отвечаете нет, соединение закрывается. Если да — ключ сохраняется в файл ~/.ssh/known_hosts. Узнать, где какой ключ нельзя (ибо несекьюрно).
Если ключ сервера поменялся (например, сервер переустановили), ssh вопит от подделке ключа. Обратите внимание, если сервер не трогали, а ssh вопит, значит вы не на тот сервер ломитесь (например, в сети появился ещё один компьютер с тем же IP, особо этим страдают всякие локальные сети с 192.168.1.1, которых в мире несколько миллионов). Сценарий «злобной man in the middle атаки» маловероятен, чаще просто ошибка с IP, хотя если «всё хорошо», а ключ поменялся — это повод поднять уровень паранойи на пару уровней (а если у вас авторизация по ключу, а сервер вдруг запросил пароль — то паранойю можно включать на 100% и пароль не вводить).
Удалить известный ключ сервера можно командой ssh-keygen -R server. При этом нужно удалить ещё и ключ IP (они хранятся раздельно): ssh-keygen -R 127.0.0.1.
Ключ сервера хранится в /etc/ssh/ssh_host_rsa_key и /etc/ssh/ssh_host_rsa_key.pub. Их можно:
а) скопировать со старого сервера на новый.
б) сгенерировать с помощью ssh-keygen. Пароля при этом задавать не надо (т.е. пустой). Ключ с паролем ssh-сервер использовать не сможет.
Заметим, если вы сервера клонируете (например, в виртуалках), то ssh-ключи сервера нужно обязательно перегенерировать.
Старые ключи из know_hosts при этом лучше убрать, иначе ssh будет ругаться на duplicate key.
Копирование файлов
Передача файлов на сервер иногда может утомлять. Помимо возни с sftp и прочими странными вещами, ssh предоставляет нам команду scp, которая осуществляет копирование файла через ssh-сессию.
scp path/myfile user@8.8.8.8:/full/path/to/new/location/
Обратно тоже можно:
scp user@8.8.8.8:/full/path/to/file /path/to/put/here
Fish warning: Не смотря на то, что mc умеет делать соединение по ssh, копировать большие файлы будет очень мучительно, т.к. fish (модуль mc для работы с ssh как с виртуальной fs) работает очень медленно. 100-200кб — предел, дальше начинается испытание терпения. (Я вспомнил свою очень раннюю молодость, когда не зная про scp, я копировал ~5Гб через fish в mc, заняло это чуть больше 12 часов на FastEthernet).
Возможность копировать здорово. Но хочется так, чтобы «сохранить как» — и сразу на сервер. И чтобы в графическом режиме копировать не из специальной программы, а из любой, привычной.
Так тоже можно:
sshfs
Теория: модуль fuse позволяет «экспортировать» запросы к файловой системе из ядра обратно в userspace к соответствующей программе. Это позволяет легко реализовывать «псевдофайловые системы». Например, мы можем предоставить доступ к удалённой файловой системе через ssh так, что все локальные приложения (за малым исключением) не будут ничего подозревать.
Собственно, исключение: O_DIRECT не поддерживается, увы (это проблема не sshfs, это проблема fuse вообще).
Использование: установить пакет sshfs (сам притащит за собой fuse).
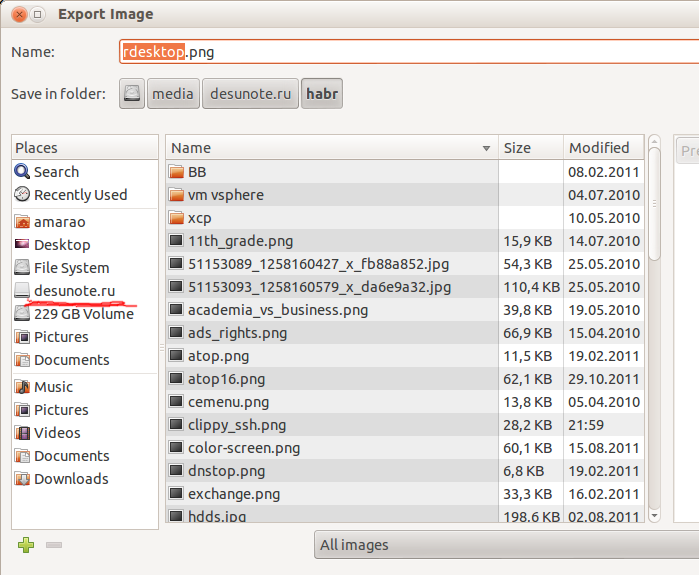
Собственно, пример моего скрипта, который монтирует desunote.ru (размещающийся у меня на домашнем комьютере — с него в этой статье показываются картинки) на мой ноут:
#!/bin/bash
sshfs desunote.ru:/var/www/desunote.ru/ /media/desunote.ru -o reconnect
Делаем файл +x, вызываем, идём в любое приложение, говорим сохранить и видим:
Параметры sshfs, которые могут оказаться важными: -o reconnect (говорит пытаться пересоединиться вместо ошибок).
Если вы много работаете с данными от рута, то можно (нужно) сделать idmap:
-o idmap=user. Работает она следующим образом: если мы коннектимся как пользователь pupkin@server, а локально работаем как пользователь vasiliy, то мы говорим «считать, что файлы pupkin, это файлы vasiliy». ну или «root», если мы коннектимся как root.
В моём случае idmap не нужен, так как имена пользователей (локальное и удалённое) совпадают.
Заметим, комфортно работать получается только если у нас есть ssh-ключик (см. начало статьи), если нет — авторизация по паролю выбешивает на 2-3 подключение.
Отключить обратно можно командой fusermount -u /path, однако, если соединение залипло (например, нет сети), то можно/нужно делать это из-под рута: sudo umount -f /path.
Удалённое исполнение кода
ssh может выполнить команду на удалённом сервере и тут же закрыть соединение. Простейший пример:
ssh user@server ls /etc/
Выведет нам содержимое /etc/ на server, при этом у нас будет локальная командная строка.
Некоторые приложения хотят иметь управляющий терминал. Их следует запускать с опцией -t:
ssh user@server -t remove_command
Кстати, мы можем сделать что-то такого вида:
ssh user@server cat /some/file|awk '{print $2}' |local_app
Это нас приводит следующей фиче:
Проброс stdin/out
Допустим, мы хотим сделать запрос к программе удалённо, а потом её вывод поместить в локальный файл
ssh user@8.8.8.8 command >my_file
Допустим, мы хотим локальный вывод положить удалённо
mycommand |scp — user@8.8.8.8:/path/remote_file
Усложним пример — мы можем прокидывать файлы с сервера на сервер: Делаем цепочку, чтобы положить stdin на 10.1.1.2, который нам не доступен снаружи:
mycommand | ssh user@8.8.8.8 «scp — user@10.1.1.2:/path/to/file»
Есть и вот такой головоломный приём использования pipe’а (любезно подсказали в комментариях в жж):
tar -c * | ssh user@server "cd && tar -x"
Tar запаковывает файлы по маске локально, пишет их в stdout, откуда их читает ssh, передаёт в stdin на удалённом сервере, где их cd игнорирует (не читает stdin), а tar — читает и распаковывает. Так сказать, scp для бедных.
Алиасы
Скажу честно, до последнего времени не знал и не использовал. Оказались очень удобными.
В более-менее крупной компании часто оказывается, что имена серверов выглядят так: spb-MX-i3.extrt.int.company.net. И пользователь там не равен локальному. То есть логиниться надо так: ssh ivanov_i@spb-MX-i3.extrt.int.company.net. Каждый раз печатать — туннельных синдромов не напасёшься. В малых компаниях проблема обратная — никто не думает о DNS, и обращение на сервер выглядит так: ssh root@192.168.1.4. Короче, но всё равно напрягает. Ещё большая драма, если у нас есть нестандартный порт, и, например, первая версия ssh (привет цискам). Тогда всё выглядит так: ssh -1 -p 334 vv_pupkin@spb-MX-i4.extrt.int.company.net. Удавиться. Про драму с scp даже рассказывать не хочется.
Можно прописать общесистемные alias’ы на IP (/etc/hosts), но это кривоватый выход (и пользователя и опции всё равно печатать). Есть путь короче.
Файл ~/.ssh/config позволяет задать параметры подключения, в том числе специальные для серверов, что самое важное, для каждого сервера своё. Вот пример конфига:
Host ric
        Hostname ооо-рога-и-копыта.рф
        User Администратор
        ForwardX11 yes
        Compression yes
Host home
        Hostname myhome.dyndns.org
        User vasya
        PasswordAuthentication no
Все доступные для использования опции можно увидеть в man ssh_config (не путать с sshd_config).
Опции по умолчанию
По подсказке UUSER: вы можете указать настройки соединения по умолчанию с помощью конструкции Host *, т.е., например:
Host *
User root
Compression yes
То же самое можно сделать и в /etc/ssh/ssh_config (не путать с /etc/ssh/sshd_config), но это требует прав рута и распространяется на всех пользователей.
Проброс X-сервера
Собственно, немножко я проспойлерил эту часть в примере конфига выше. ForwardX11 — это как раз оно.
Теория: Графические приложения в юникс обычно используют X-сервер (wayland в пути, но всё ещё не готов). Это означает, что приложение запускается и подключается к X-серверу для рисования. Иными словами, если у вас есть голый сервер без гуя и есть локальный x-сервер (в котором вы работаете), то вы можете дать возможность приложениям с сервера рисовать у вас на рабочем столе. Обычно подключение к удалённом X-серверу — не самая безопасная и тривиальная вещь. SSH позволяет упростить этот процесс и сделать его совсем безопасным. А возможность жать трафик позволяет ещё и обойтись меньшим трафиком (т.е. уменьшить утилизацию канала, то есть уменьшить ping (точнее, latency), то есть уменьшить лаги).
Ключики: -X — проброс X-сервера. -Y проброс авторизации.
Достаточно просто запомнить комбинацию ssh -XYC user@SERVER.
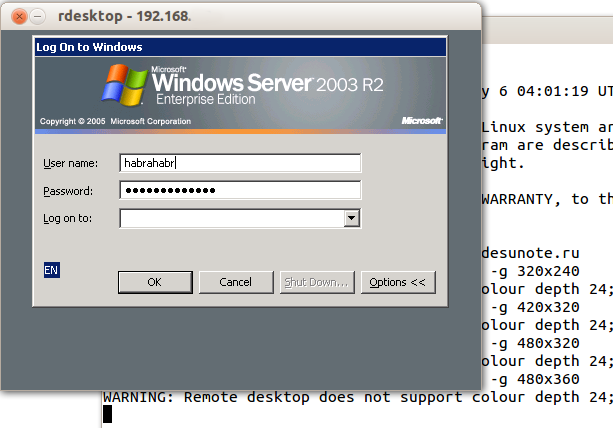
В примере выше (названия компании вымышленные) я подключаюсь к серверу ооо-рога-и-копыта.рф не просто так, а с целью получить доступ к windows-серверу. Безопасность microsoft при работе в сети мы все хорошо знаем, так что выставлять наружу голый RDP неуютно. Вместо этого мы подключаемся к серверу по ssh, а дальше запускаем там команду rdesktop:
ssh ric

rdesktop -k en-us 192.168.1.1 -g 1900x1200
и чудо, окошко логина в windows на нашем рабочем столе. Заметим, тщательно зашифрованное и неотличимое от обычного ssh-трафика.
Socks-proxy
Когда я оказываюсь в очередной гостинице (кафе, конференции), то местный wifi чаще всего оказывается ужасным — закрытые порты, неизвестно какой уровень безопасности. Да и доверия к чужим точкам доступа не особо много (это не паранойя, я вполне наблюдал как уводят пароли и куки с помощью банального ноутбука, раздающего 3G всем желающим с названием близлежащей кафешки (и пишущего интересное в процессе)).
Особые проблемы доставляют закрытые порты. То джаббер прикроют, то IMAP, то ещё что-нибудь.
Обычный VPN (pptp, l2tp, openvpn) в таких ситуациях не работает — его просто не пропускают. Экспериментально известно, что 443ий порт чаще всего оставляют, причём в режиме CONNECT, то есть пропускают «как есть» (обычный http могут ещё прозрачно на сквид завернуть).
Решением служит socks-proxy режим работы ssh. Его принцип: ssh-клиент подключается к серверу и слушает локально. Получив запрос, он отправляет его (через открытое соединение) на сервер, сервер устанавливает соединение согласно запросу и все данные передаёт обратно ssh-клиенту. А тот отвечает обратившемуся. Для работы нужно сказать приложениям «использовать socks-proxy». И указать IP-адрес прокси. В случае с ssh это чаще всего localhost (так вы не отдадите свой канал чужим людям).
Подключение в режиме sock-proxy выглядит так:
ssh -D 8080 user@server
В силу того, что чужие wifi чаще всего не только фиговые, но и лагливые, то бывает неплохо включить опцию -C (сжимать трафик). Получается почти что opera turbo (только картинки не жмёт). В реальном сёрфинге по http жмёт примерно в 2-3 раза (читай — если вам выпало несчастье в 64кбит, то вы будете мегабайтные страницы открывать не по две минуты, а секунд за 40. Фигово, но всё ж лучше). Но главное: никаких украденных кук и подслушанных сессий.
Я не зря сказал про закрытые порты. 22ой порт закрывают ровно так же, как «не нужный» порт джаббера. Решение — повесить сервер на 443-й порт. Снимать с 22 не стоит, иногда бывают системы с DPI (deep packet inspection), которые ваш «псевдо-ssl» не пустят.
Вот так выглядит мой конфиг:
/etc/ssh/sshd_config:
(фрагмент)
Port 22
Port 443
А вот кусок ~/.ssh/config с ноутбука, который описывает vpn
Host vpn
    Hostname desunote.ru
    User vasya
    Compression yes
    DynamicForward 127.1:8080
    Port 443
(обратите внимание на «ленивую» форму записи localhost — 127.1, это вполне себе законный метод написать 127.0.0.1)
Проброс портов
Мы переходим к крайне сложной для понимания части функционала SSH, позволяющей осуществлять головоломные операции по туннелированию TCP «из сервера» и «на сервер».
Для понимания ситуации все примеры ниже будут ссылаться на вот эту схему:

Комментарии: Две серые сети. Первая сеть напоминает типичную офисную сеть (NAT), вторая — «гейтвей», то есть сервер с белым интерфейсом и серым, смотрящим в свою собственную приватную сеть. В дальнейших рассуждениях мы полагаем, что «наш» ноутбук — А, а «сервер» — Б.
Задача
: у нас локально запущено приложение, нам нужно дать возможность другому пользователю (за пределами нашей сети) посмотреть на него.
Решение: проброс локального порта (127.0.0.1:80) на публично доступный адрес. Допустим, наш «публично доступный» Б занял 80ый порт чем-то полезным, так что пробрасывать мы будем на нестандартный порт (8080).
Итоговая конфигурация: запросы на 8.8.8.8:8080 будут попадать на localhost ноутбука А.
ssh -R 127.1:80:8.8.8.8:8080 user@8.8.8.8
Опция -R позволяет перенаправлять с удалённого (Remote) сервера порт на свой (локальный).
Важно: если мы хотим использовать адрес 8.8.8.8, то нам нужно разрешить GatewayPorts в настройках сервера Б.
Задача
. На сервере «Б» слушает некий демон (допустим, sql-сервер). Наше приложение не совместимо с сервером (другая битность, ОС, злой админ, запрещающий и накладывающий лимиты и т.д.). Мы хотим локально получить доступ к удалённому localhost’у.
Итоговая конфигурация: запросы на localhost:3333 на ‘A’ должны обслуживаться демоном на localhost:3128 ‘Б’.
ssh -L 127.1:3333:127.1:3128 user@8.8.8.8
Опция -L позволяет локальные обращения (Local) направлять на удалённый сервер.
Задача
: На сервере «Б» на сером интерфейсе слушает некий сервис и мы хотим дать возможность коллеге (192.168.0.3) посмотреть на это приложение.
Итоговая конфигурация: запросы на наш серый IP-адрес (192.168.0.2) попадают на серый интерфейс сервера Б.
ssh -L 192.168.0.2:8080:10.1.1.1:80 user@8.8.8.8
Вложенные туннели
Разумеется, туннели можно перенаправлять.
Усложним задачу: теперь нам хочется показать коллеге приложение, запущенное на localhost на сервере с адресом 10.1.1.2 (на 80ом порту).
Решение сложно:
ssh -L 192.168.0.2:8080:127.1:9999 user@8.8.8.8 ssh -L 127.1:9999:127.1:80 user2@10.1.1.2
Что происходит? Мы говорим ssh перенаправлять локальные запросы с нашего адреса на localhost сервера Б и сразу после подключения запустить ssh (то есть клиента ssh) на сервере Б с опцией слушать на localhost и передавать запросы на сервер 10.1.1.2 (куда клиент и должен подключиться). Порт 9999 выбран произвольно, главное, чтобы совпадал в первом вызове и во втором.
Реверс-сокс-прокси
Если предыдущий пример вам показался простым и очевидным, то попробуйте догадаться, что сделает этот пример:
ssh -D 8080 -R 127.1:8080:127.1:8080 user@8.8.8.8 ssh -R 127.1:8080:127.1:8080 user@10.1.1.2
Если вы офицер безопасности, задача которого запретить использование интернета на сервере 10.1.1.2, то можете начинать выдёргивать волосы на попе, ибо эта команда организует доступ в интернет для сервера 10.1.1.2 посредством сокс-прокси, запущенного на компьютере «А». Трафик полностью зашифрован и неотличим от любого другого трафика SSH. А исходящий трафик с компьютера с точки зрения сети «192.168.0/24» не отличим от обычного трафика компьютера А.
Туннелирование
Если к этому моменту попа отдела безопасности не сияет лысиной, а ssh всё ещё не внесён в список врагов безопасности номер один, вот вам окончательный убийца всего и вся: туннелирование IP или даже ethernet. В самых радикальных случаях это позволяет туннелировать dhcp, заниматься удалённым arp-спуфингом, делать wake up on lan и прочие безобразия второго уровня.
Подробнее описано тут: www.khanh.net/blog/archives/51-using-openSSH-as-a-layer-2-ethernet-bridge-VPN.html
(сам я увы, таким не пользовался).
Легко понять, что в таких условиях невозможно никаким DPI (deep packet inspection) отловить подобные туннели — либо ssh разрешён (читай — делай что хочешь), либо ssh запрещён (и можно смело из такой компании идиотов увольняться не ощущая ни малейшего сожаления).
Проброс авторизации
Если вы думаете, что на этом всё, то…… впрочем, в отличие от автора, у которого «снизу» ещё не написано, читатель заранее видит, что там снизу много букв и интриги не получается.
OpenSSH позволяет использовать сервера в качестве плацдарма для подключения к другим серверам, даже если эти сервера недоверенные и могут злоупотреблять чем хотят.
Для начала о простом пробросе авторизации.
Повторю картинку:
Допустим, мы хотим подключиться к серверу 10.1.1.2, который готов принять наш ключ. Но копировать его на 8.8.8.8 мы не хотим, ибо там проходной двор и половина людей имеет sudo и может шариться по чужим каталогам. Компромиссным вариантом было бы иметь «другой» ssh-ключ, который бы авторизовывал user@8.8.8.8 на 10.1.1.2, но если мы не хотим пускать кого попало с 8.8.8.8 на 10.1.1.2, то это не вариант (тем паче, что ключ могут не только поюзать, но и скопировать себе «на чёрный день»).
ssh предлагает возможность форварда ssh-агента (это такой сервис, который запрашивает пароль к ключу). Опция ssh -A пробрасывает авторизацию на удалённый сервер.
Вызов выглядит так:
ssh -A user@8.8.8.8 ssh user2@10.1.1.2
Удалённый ssh-клиент (на 8.8.8.8) может доказать 10.1.1.2, что мы это мы только если мы к этому серверу подключены и дали ssh-клиенту доступ к своему агенту авторизации (но не ключу!).
В большинстве случаев это прокатывает.
Однако, если сервер совсем дурной, то root сервера может использовать сокет для имперсонализации, когда мы подключены.
Есть ещё более могучий метод — он превращает ssh в простой pipe (в смысле, «трубу») через которую насквозь мы осуществляем работу с удалённым сервером.
Главным достоинством этого метода является полная независимость от доверенности промежуточного сервера. Он может использовать поддельный ssh-сервер, логгировать все байты и все действия, перехватывать любые данные и подделывать их как хочет — взаимодействие идёт между «итоговым» сервером и клиентом. Если данные оконечного сервера подделаны, то подпись не сойдётся. Если данные не подделаны, то сессия устанавливается в защищённом режиме, так что перехватывать нечего.
Эту клёвую настройку я не знал, и раскопал её redrampage.
Настройка завязана на две возможности ssh: опцию -W (превращающую ssh в «трубу») и опцию конфига ProxyCommand (опции командной строки, вроде бы нет), которая говорит «запустить программу и присосаться к её stdin/out». Опции эти появились недавно, так что пользователи centos в пролёте.
Выглядит это так (циферки для картинки выше):
.ssh/config:
Host raep
     HostName 10.1.1.2
     User user2
     ProxyCommand ssh -W %h:%p user@8.8.8.8
Ну а подключение тривиально: ssh raep.
Повторю важную мысль: сервер 8.8.8.8 не может перехватить или подделать трафик, воспользоваться агентом авторизации пользователя или иным образом изменить трафик. Запретить — да, может. Но если разрешил — пропустит через себя без расшифровки или модификации. Для работы конфигурации нужно иметь свой открытый ключ в authorized_keys как для user@8.8.8.8, так и в user2@10.1.1.2
Разумеется, подключение можно оснащать всеми прочими фенечками — прокидыванием портов, копированием файлов, сокс-прокси, L2-туннелями, туннелированием X-сервера и т.д.
Финал
Разумеется, в посте про туннели должен быть туннель, а в любой успешной статье — секретный ингредиент всеобщей популярности. Держите:

Уровень сложности
Простой
Время на прочтение
5 мин
Количество просмотров 26K

Программистов, сисадминов, devops’ов, тестировщиков часто объединяет использование некоторых общих технологий. Например, возможность иметь удалённый доступ к серверу пригодилось бы любому из указанной выше анекдотичной компании. Поэтому в этой статье мы рассмотрим основы работы с протоколом SSH на базовом уровня (без генерации ключей, подписей, мам, пап и кредитов). «Продвинутое» использование посмотрим уже отдельно, в следующий раз. Материал подготовил Макс, автор YouTube-канала PyLounge. Поехали!
Введение
SSH (Secure SHell — защищенная оболочка) — сетевой протокол прикладного уровня, предназначенный для безопасного удаленного доступа к различным системам (Linux, Windows, Mac).
Данный протокол шифрует всю передаваемую информацию по сети. По умолчанию, используется 22-й порт. В основном он нужен для удаленного управления данными пользователя на сервере, запуска служебных команд, работы в консольном режиме с базами данных.
Эта служба была создана в качестве замены не зашифрованному Telnet и использует криптографические техники, чтобы обеспечить, что всё сообщение между сервером и пользователем было зашифровано.
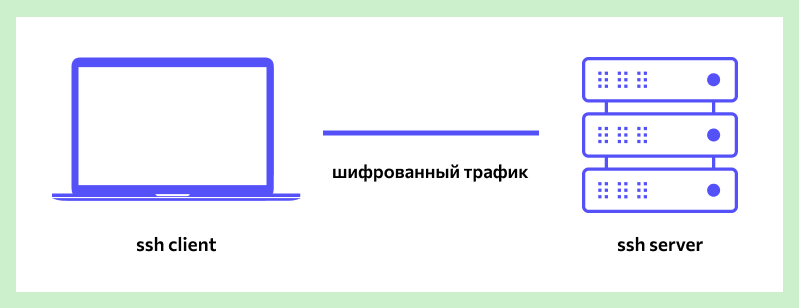
Чтобы установить SSH-соединение, необходимы два компонента: SSH-сервер и SSH-клиент. Сервер прослушивает определенный порт (по умолчанию это порт 22) и при успешной аутентификации дает доступ пользователю. Все команды, которые используются на SSH-клиенте, отправляются через защищенный канал связи на SSH-сервер, на котором они выполняются и откуда отправляют результат работы обратно клиенту.
SSH-сервер
Устанавливается на управляемой операционной системе и принимает входящие подключения от клиентских машин, проверяя соединение одним из способов:
-
по IP-адресу клиента, что не слишком безопасно из-за риска подмены;
-
по публичному ключу клиента и имени пользователя. Нужно создать приватный (закрытый) и публичный (открытый) ключ. Зашифровав информацию одним ключом, можно расшифровать ее только другим;
-
по паролю клиента, который передается в зашифрованном виде. Это один из наиболее распространенных вариантов. Вводить его нужно при каждом подключении.
Платные и бесплатные SSH-серверы есть для всех распространенных ОС:
-
BSD — OpenSSH;
-
Linux — dropbear, lsh-server, openssh-server;
-
Windows — freeSSHd, copssh, WinSSHD, OpenSSH и т. д.
SSH-клиент
Используется для входа на удаленный сервер и выполнения команд. Через клиент выполняется управление удаленным компьютером.
SSH-клиенты разработаны для всех ОС. Имеют платные и бесплатные версии:
-
Linux/BSD — openssh-client, putty, ssh, Vinagre;
-
Windows — PuTTY, SecureCRT, ShellGuard;
-
Android — connectBot.
Встроенный SSH-клиент Windows, основанный на OpenSSH, предустановлен в ОС, начиная с Windows 10 1809.
Установка OpenSSH на Ubuntu
Установка с помощью менеджера пакетов apt-get:
sudo apt-get install openssh-serverПроверка SELinux
Security Enhanced Linux, или SELinux – это усовершенствованный механизм контроля доступа, встроенный в большинство современных дистрибутивов Linux. Первоначально он был разработан Агентством национальной безопасности США для защиты компьютерных систем от вторжения злоумышленников и взлома. SELinux также может помешать работе с ssh. Поэтому необходимо убедиться, что он отключен, либо отключить его.
Устанавливаем доп. инструменты для работы с сетью и настройками безопасности:
sudo apt-get install policycoreutils
sudo apt-get install net-tools
Проверяем статус SELinux. Состояние должно быть disable.
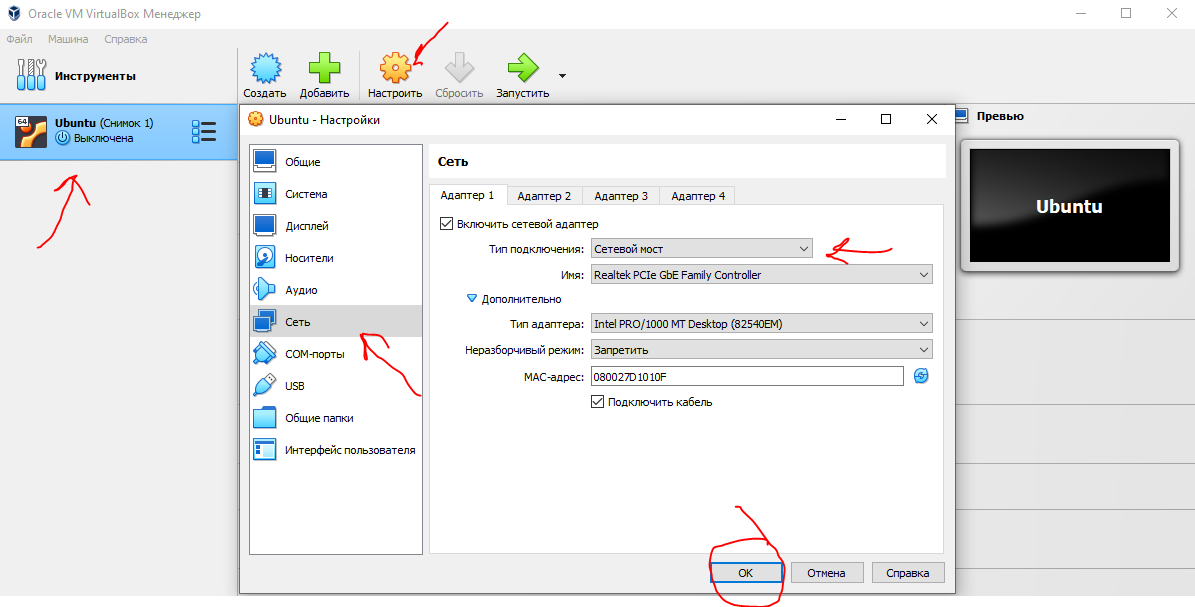
sestatusПодключение к виртуальной машине с типом подключения NAT
Если виртуальная машина использует тип сетевого подключения NAT, то первоначально необходимо настроить проброс портов. Пробросим порт хоста 2222 (или любой свободный) на гостевой порт виртуальной машины номер 22 (порт ssh по умолчанию).
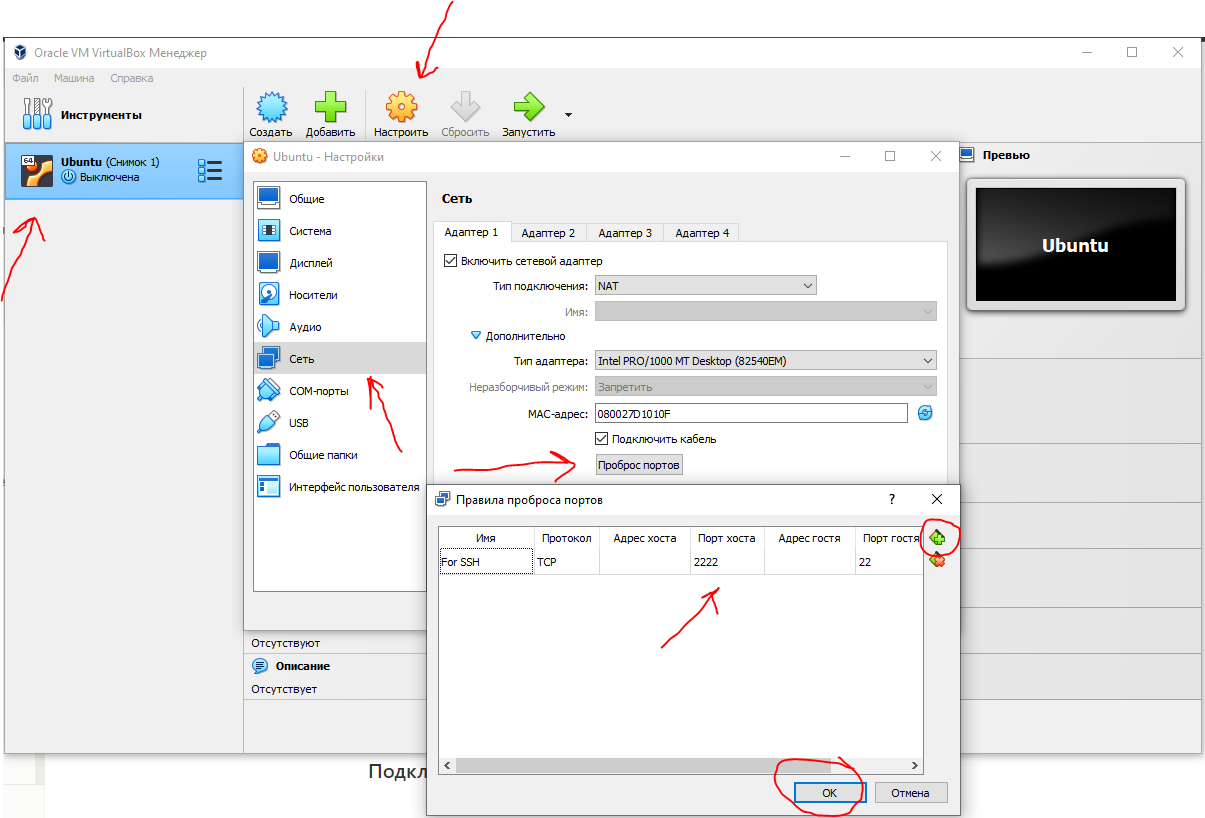
После этого мы можем подключиться из Windows к нашей виртуальной машине.
Подключение по ssh через PuTTY
Т.к. в качестве сетевого подключения у виртуальной машины используется NAT, при подключении мы будем указывать петлевой адрес localhost (127.0.0.1) c портом, на который был назначен проброс.
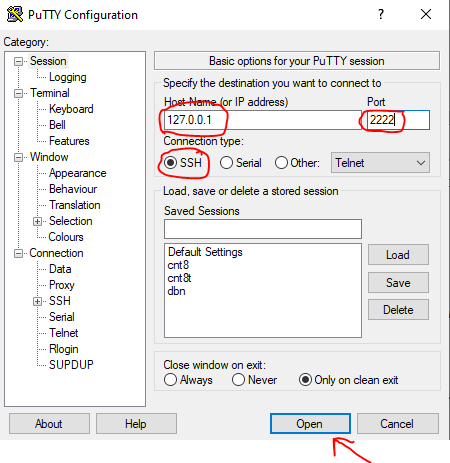
После этого вводим имя пользователя (пользователь должен существовать в linux!!!) и пароль от этого пользователя.
Подключение по ssh через Командную строку Windows (cmd)
Запускаем командную строку сочетанием клавиш Win + R . В открывшемся окне указываем cmd. Нажимаем OK.

В общем видео подключение по ssh имеет вид:
ssh имя_пользователя@ip_адрес_компьютера_к_которому_подключаемся -p портЕсли для подключения используется стандартный порт ssh — 22, то порт можно не указывать.
В открывшемся окне вводим команду:
ssh student@127.0.0.1 -p 2222Вводим пароль пользователя. Всё. Вы великолепны!
Подключение к виртуальной машине с типом подключение Сетевой мост
С типом подключения Сетевой мост необходимо выдать статический ip для Linux системы. Дальнейшее подключение будет уже по этому, выданному ip, а не через localhost.
Установка статического ip
Начиная с выпуска Ubuntu 17.10 NetPlan теперь это инструмент настройки сети по умолчанию для управления настройками сети, заменяющий файл конфигурации /etc/network/interfaces, который использовался в предыдущих версиях.
Файлы конфигурации для Netplan находятся в каталоге /etc/netplan и написаны на языке YAML. В этом каталоге вы найдете файлы конфигурации YAML.
Откроем конфигурационный файл:
sudo nano /etc/netplan/*.yamlОтредактируем конфигурационный файл:
network:
  version: 2
  renderer: NetworkManager
  ethernets:
      enp0s3:
          dhcp4: false
          addresses: [10.40.0.224/24]
          gateway4: 10.40.0.1
          nameservers:
              addresses: [10.2.0.8, 10.2.0.3]
Здесь:
-
ethernets — указывает на проводное Ethernet подключение;
-
enp0s3 — имя сетевого интерфейса (можно узнать командой ifconfig);
-
dhcp4 — автоматическая выдача ipv4-адреса с помощью службы dhcp (для ipv6 указывать dhcp6);
-
addresses — ip-адрес и маска сети, которые назначаются компьютеру;
-
gateway4 — шлюз по умолчанию;
-
nameservers — список dns-серверов.
Посмотреть настройки можно с хостовой машины на Windows с помощью команды ipconfig /all.
Чтобы применить изменения и перезагрузить сеть, вводим команду:
sudo netplan applyПодключение по ssh
Запускаем командную строку сочетанием клавиш Win + R . В открывшемся окне указываем cmd. Нажимаем OK.
В открывшемся окне вводим команду:
ssh student@10.40.0.224Вводим пароль пользователя. Всё. Вы великолепны (2)!
Заключение
Несмотря на высокую защиту протокола, использование стандартного порта значительно повышает риск взлома сервера. Например, это можно сделать при помощи brute-force (атака полным перебором). Порт 22 — открытый, поэтому злоумышленнику нужно только подобрать логин и пароль к серверу. Это сложно, но возможно. Чтобы максимально ограничить доступ к серверу для злоумышленников (настроить брандмауэр, iptables), можно сменить SSH-порты.
Ресурсы, которые использовал
-
Как включить SSH в Ubuntu 20.04 (Routerus):https://routerus.com/how-to-enable-ssh-on-ubuntu-20-04/
-
Коротко об SSH / Хабр: https://habr.com/ru/sandbox/166705/
-
Что такое SSH (блог REG.RU): https://help.reg.ru/support/hosting/dostupy-i-podklyucheniye-panel-upravleniya-ftp-ssh/chto-takoye-ssh
ssh — Man Page
OpenSSH remote login client
Examples (TL;DR)
-
Connect to a remote server:
ssh username@remote_host -
Connect to a remote server with a specific identity (private key):
ssh -i path/to/key_file username@remote_host -
Connect to a remote server using a specific port:
ssh username@remote_host -p 2222 -
Run a command on a remote server with a [t]ty allocation allowing interaction with the remote command:
ssh username@remote_host -t command command_arguments -
SSH tunneling: Dynamic port forwarding (SOCKS proxy on
localhost:1080):ssh -D 1080 username@remote_host -
SSH tunneling: Forward a specific port (
localhost:9999toexample.org:80) along with disabling pseudo-[T]ty allocation and executio[N] of remote commands:ssh -L 9999:example.org:80 -N -T username@remote_host -
SSH jumping: Connect through a jumphost to a remote server (Multiple jump hops may be specified separated by comma characters):
ssh -J username@jump_host username@remote_host -
Agent forwarding: Forward the authentication information to the remote machine (see
man ssh_configfor available options):ssh -A username@remote_host
tldr.sh
Synopsis
| ssh | [-46AaCfGgKkMNnqsTtVvXxYy] [-B bind_interface] [-b bind_address] [-c cipher_spec] [-D [bind_address:]port] [-E log_file] [-e escape_char] [-F configfile] [-I pkcs11] [-i identity_file] [-J destination] [-L address] [-l login_name] [-m mac_spec] [-O ctl_cmd] [-o option] [-p port] [-Q query_option] [-R address] [-S ctl_path] [-W host:port] [-w local_tun[:remote_tun]] destination [command [argument …]] |
Description
ssh (SSH client) is a program for logging into a remote machine and for executing commands on a remote machine. It is intended to provide secure encrypted communications between two untrusted hosts over an insecure network. X11 connections, arbitrary TCP ports and UNIX-domain sockets can also be forwarded over the secure channel.
ssh connects and logs into the specified destination, which may be specified as either [user@]hostname or a URI of the form ssh://[user@]hostname[:port]. The user must prove their identity to the remote machine using one of several methods (see below).
If a command is specified, it will be executed on the remote host instead of a login shell. A complete command line may be specified as command, or it may have additional arguments. If supplied, the arguments will be appended to the command, separated by spaces, before it is sent to the server to be executed.
The options are as follows:
- -4
-
Forces ssh to use IPv4 addresses only.
- -6
-
Forces ssh to use IPv6 addresses only.
- -A
-
Enables forwarding of connections from an authentication agent such as ssh-agent(1). This can also be specified on a per-host basis in a configuration file.
Agent forwarding should be enabled with caution. Users with the ability to bypass file permissions on the remote host (for the agent’s UNIX-domain socket) can access the local agent through the forwarded connection. An attacker cannot obtain key material from the agent, however they can perform operations on the keys that enable them to authenticate using the identities loaded into the agent. A safer alternative may be to use a jump host (see -J).
- -a
-
Disables forwarding of the authentication agent connection.
- -B bind_interface
-
Bind to the address of bind_interface before attempting to connect to the destination host. This is only useful on systems with more than one address.
- -b bind_address
-
Use bind_address on the local machine as the source address of the connection. Only useful on systems with more than one address.
- -C
-
Requests compression of all data (including stdin, stdout, stderr, and data for forwarded X11, TCP and UNIX-domain connections). The compression algorithm is the same used by gzip(1). Compression is desirable on modem lines and other slow connections, but will only slow down things on fast networks. The default value can be set on a host-by-host basis in the configuration files; see the
Compressionoption. - -c cipher_spec
-
Selects the cipher specification for encrypting the session. cipher_spec is a comma-separated list of ciphers listed in order of preference. See the
Cipherskeyword in ssh_config(5) for more information. - -D [bind_address:]port
-
Specifies a local “dynamic” application-level port forwarding. This works by allocating a socket to listen to port on the local side, optionally bound to the specified bind_address. Whenever a connection is made to this port, the connection is forwarded over the secure channel, and the application protocol is then used to determine where to connect to from the remote machine. Currently the SOCKS4 and SOCKS5 protocols are supported, and ssh will act as a SOCKS server. Only root can forward privileged ports. Dynamic port forwardings can also be specified in the configuration file.
IPv6 addresses can be specified by enclosing the address in square brackets. Only the superuser can forward privileged ports. By default, the local port is bound in accordance with the
GatewayPortssetting. However, an explicit bind_address may be used to bind the connection to a specific address. The bind_address of “localhost” indicates that the listening port be bound for local use only, while an empty address or ‘*’ indicates that the port should be available from all interfaces. - -E log_file
-
Append debug logs to log_file instead of standard error.
- -e escape_char
-
Sets the escape character for sessions with a pty (default: ‘
~’). The escape character is only recognized at the beginning of a line. The escape character followed by a dot (‘.’) closes the connection; followed by control-Z suspends the connection; and followed by itself sends the escape character once. Setting the character to “none” disables any escapes and makes the session fully transparent. - -F configfile
-
Specifies an alternative per-user configuration file. If a configuration file is given on the command line, the system-wide configuration file (
/etc/ssh/ssh_config) will be ignored. The default for the per-user configuration file is~/.ssh/config. If set to “none”, no configuration files will be read. - -f
-
Requests ssh to go to background just before command execution. This is useful if ssh is going to ask for passwords or passphrases, but the user wants it in the background. This implies -n. The recommended way to start X11 programs at a remote site is with something like
ssh -f host xterm.If the
ExitOnForwardFailureconfiguration option is set to “yes”, then a client started with -f will wait for all remote port forwards to be successfully established before placing itself in the background. Refer to the description ofForkAfterAuthenticationin ssh_config(5) for details. - -G
-
Causes ssh to print its configuration after evaluating
HostandMatchblocks and exit. - -g
-
Allows remote hosts to connect to local forwarded ports. If used on a multiplexed connection, then this option must be specified on the master process.
- -I pkcs11
-
Specify the PKCS#11 shared library ssh should use to communicate with a PKCS#11 token providing keys for user authentication.
- -i identity_file
-
Selects a file from which the identity (private key) for public key authentication is read. You can also specify a public key file to use the corresponding private key that is loaded in ssh-agent(1) when the private key file is not present locally. The default is
~/.ssh/id_rsa,~/.ssh/id_ecdsa,~/.ssh/id_ecdsa_sk,~/.ssh/id_ed25519,~/.ssh/id_ed25519_skand~/.ssh/id_dsa. Identity files may also be specified on a per-host basis in the configuration file. It is possible to have multiple -i options (and multiple identities specified in configuration files). If no certificates have been explicitly specified by theCertificateFiledirective, ssh will also try to load certificate information from the filename obtained by appending-cert.pubto identity filenames. - -J destination
-
Connect to the target host by first making a ssh connection to the jump host described by destination and then establishing a TCP forwarding to the ultimate destination from there. Multiple jump hops may be specified separated by comma characters. This is a shortcut to specify a
ProxyJumpconfiguration directive. Note that configuration directives supplied on the command-line generally apply to the destination host and not any specified jump hosts. Use~/.ssh/configto specify configuration for jump hosts. - -K
-
Enables GSSAPI-based authentication and forwarding (delegation) of GSSAPI credentials to the server.
- -k
-
Disables forwarding (delegation) of GSSAPI credentials to the server.
- -L [bind_address:]port:host:hostport
- -L [bind_address:]port:remote_socket
- -L local_socket:host:hostport
- -L local_socket:remote_socket
-
Specifies that connections to the given TCP port or Unix socket on the local (client) host are to be forwarded to the given host and port, or Unix socket, on the remote side. This works by allocating a socket to listen to either a TCP port on the local side, optionally bound to the specified bind_address, or to a Unix socket. Whenever a connection is made to the local port or socket, the connection is forwarded over the secure channel, and a connection is made to either host port hostport, or the Unix socket remote_socket, from the remote machine.
Port forwardings can also be specified in the configuration file. Only the superuser can forward privileged ports. IPv6 addresses can be specified by enclosing the address in square brackets.
By default, the local port is bound in accordance with the
GatewayPortssetting. However, an explicit bind_address may be used to bind the connection to a specific address. The bind_address of “localhost” indicates that the listening port be bound for local use only, while an empty address or ‘*’ indicates that the port should be available from all interfaces. - -l login_name
-
Specifies the user to log in as on the remote machine. This also may be specified on a per-host basis in the configuration file.
- -M
-
Places the ssh client into “master” mode for connection sharing. Multiple -M options places ssh into “master” mode but with confirmation required using ssh-askpass(1) before each operation that changes the multiplexing state (e.g. opening a new session). Refer to the description of
ControlMasterin ssh_config(5) for details. - -m mac_spec
-
A comma-separated list of MAC (message authentication code) algorithms, specified in order of preference. See the
MACskeyword for more information. - -N
-
Do not execute a remote command. This is useful for just forwarding ports. Refer to the description of
SessionTypein ssh_config(5) for details. - -n
-
Redirects stdin from
/dev/null(actually, prevents reading from stdin). This must be used when ssh is run in the background. A common trick is to use this to run X11 programs on a remote machine. For example,ssh -n shadows.cs.hut.fi emacs &will start an emacs on shadows.cs.hut.fi, and the X11 connection will be automatically forwarded over an encrypted channel. The ssh program will be put in the background. (This does not work if ssh needs to ask for a password or passphrase; see also the -f option.) Refer to the description ofStdinNullin ssh_config(5) for details. - -O ctl_cmd
-
Control an active connection multiplexing master process. When the -O option is specified, the ctl_cmd argument is interpreted and passed to the master process. Valid commands are: “check” (check that the master process is running), “forward” (request forwardings without command execution), “cancel” (cancel forwardings), “exit” (request the master to exit), and “stop” (request the master to stop accepting further multiplexing requests).
- -o option
-
Can be used to give options in the format used in the configuration file. This is useful for specifying options for which there is no separate command-line flag. For full details of the options listed below, and their possible values, see ssh_config(5).
-
AddKeysToAgent
-
AddressFamily
-
BatchMode
-
BindAddress
-
BindInterface
-
CanonicalDomains
-
CanonicalizeFallbackLocal
-
CanonicalizeHostname
-
CanonicalizeMaxDots
-
CanonicalizePermittedCNAMEs
-
CASignatureAlgorithms
-
CertificateFile
-
CheckHostIP
-
Ciphers
-
ClearAllForwardings
-
Compression
-
ConnectionAttempts
-
ConnectTimeout
-
ControlMaster
-
ControlPath
-
ControlPersist
-
DynamicForward
-
EnableSSHKeysign
-
EscapeChar
-
ExitOnForwardFailure
-
FingerprintHash
-
ForkAfterAuthentication
-
ForwardAgent
-
ForwardX11
-
ForwardX11Timeout
-
ForwardX11Trusted
-
GatewayPorts
-
GlobalKnownHostsFile
-
GSSAPIAuthentication
-
GSSAPIKeyExchange
-
GSSAPIClientIdentity
-
GSSAPIDelegateCredentials
-
GSSAPIKexAlgorithms
-
GSSAPIRenewalForcesRekey
-
GSSAPIServerIdentity
-
GSSAPITrustDns
-
HashKnownHosts
-
Host
-
HostbasedAcceptedAlgorithms
-
HostbasedAuthentication
-
HostKeyAlgorithms
-
HostKeyAlias
-
Hostname
-
IdentitiesOnly
-
IdentityAgent
-
IdentityFile
-
IgnoreUnknown
-
Include
-
IPQoS
-
KbdInteractiveAuthentication
-
KbdInteractiveDevices
-
KexAlgorithms
-
KnownHostsCommand
-
LocalCommand
-
LocalForward
-
LogLevel
-
LogVerbose
-
MACs
-
Match
-
NoHostAuthenticationForLocalhost
-
NumberOfPasswordPrompts
-
PasswordAuthentication
-
PermitLocalCommand
-
PermitRemoteOpen
-
PKCS11Provider
-
Port
-
PreferredAuthentications
-
ProxyCommand
-
ProxyJump
-
ProxyUseFdpass
-
PubkeyAcceptedAlgorithms
-
PubkeyAuthentication
-
RekeyLimit
-
RemoteCommand
-
RemoteForward
-
RequestTTY
-
RevokedHostKeys
-
SecurityKeyProvider
-
RequiredRSASize
-
SendEnv
-
ServerAliveInterval
-
ServerAliveCountMax
-
SessionType
-
SetEnv
-
StdinNull
-
StreamLocalBindMask
-
StreamLocalBindUnlink
-
StrictHostKeyChecking
-
SyslogFacility
-
TCPKeepAlive
-
Tunnel
-
TunnelDevice
-
UpdateHostKeys
-
User
-
UserKnownHostsFile
-
VerifyHostKeyDNS
-
VisualHostKey
-
XAuthLocation
-
- -p port
-
Port to connect to on the remote host. This can be specified on a per-host basis in the configuration file.
- -Q query_option
-
Queries for the algorithms supported by one of the following features: cipher (supported symmetric ciphers), cipher-auth (supported symmetric ciphers that support authenticated encryption), help (supported query terms for use with the -Q flag), mac (supported message integrity codes), kex (key exchange algorithms), kex-gss (GSSAPI key exchange algorithms), key (key types), key-cert (certificate key types), key-plain (non-certificate key types), key-sig (all key types and signature algorithms), protocol-version (supported SSH protocol versions), and sig (supported signature algorithms). Alternatively, any keyword from ssh_config(5) or sshd_config(5) that takes an algorithm list may be used as an alias for the corresponding query_option.
- -q
-
Quiet mode. Causes most warning and diagnostic messages to be suppressed.
- -R [bind_address:]port:host:hostport
- -R [bind_address:]port:local_socket
- -R remote_socket:host:hostport
- -R remote_socket:local_socket
- -R [bind_address:]port
-
Specifies that connections to the given TCP port or Unix socket on the remote (server) host are to be forwarded to the local side.
This works by allocating a socket to listen to either a TCP port or to a Unix socket on the remote side. Whenever a connection is made to this port or Unix socket, the connection is forwarded over the secure channel, and a connection is made from the local machine to either an explicit destination specified by host port hostport, or local_socket, or, if no explicit destination was specified, ssh will act as a SOCKS 4/5 proxy and forward connections to the destinations requested by the remote SOCKS client.
Port forwardings can also be specified in the configuration file. Privileged ports can be forwarded only when logging in as root on the remote machine. IPv6 addresses can be specified by enclosing the address in square brackets.
By default, TCP listening sockets on the server will be bound to the loopback interface only. This may be overridden by specifying a bind_address. An empty bind_address, or the address ‘
*’, indicates that the remote socket should listen on all interfaces. Specifying a remote bind_address will only succeed if the server’sGatewayPortsoption is enabled (see sshd_config(5)).If the port argument is ‘
0’, the listen port will be dynamically allocated on the server and reported to the client at run time. When used together with-O forward, the allocated port will be printed to the standard output. - -S ctl_path
-
Specifies the location of a control socket for connection sharing, or the string “none” to disable connection sharing. Refer to the description of
ControlPathandControlMasterin ssh_config(5) for details. - -s
-
May be used to request invocation of a subsystem on the remote system. Subsystems facilitate the use of SSH as a secure transport for other applications (e.g. sftp(1)). The subsystem is specified as the remote command. Refer to the description of
SessionTypein ssh_config(5) for details. - -T
-
Disable pseudo-terminal allocation.
- -t
-
Force pseudo-terminal allocation. This can be used to execute arbitrary screen-based programs on a remote machine, which can be very useful, e.g. when implementing menu services. Multiple -t options force tty allocation, even if ssh has no local tty.
- -V
-
Display the version number and exit.
- -v
-
Verbose mode. Causes ssh to print debugging messages about its progress. This is helpful in debugging connection, authentication, and configuration problems. Multiple -v options increase the verbosity. The maximum is 3.
- -W host:port
-
Requests that standard input and output on the client be forwarded to host on port over the secure channel. Implies -N, -T,
ExitOnForwardFailureandClearAllForwardings, though these can be overridden in the configuration file or using -o command line options. - -w local_tun[:remote_tun]
-
Requests tunnel device forwarding with the specified tun(4) devices between the client (local_tun) and the server (remote_tun).
The devices may be specified by numerical ID or the keyword “any”, which uses the next available tunnel device. If remote_tun is not specified, it defaults to “any”. See also the
TunnelandTunnelDevicedirectives in ssh_config(5).If the
Tunneldirective is unset, it will be set to the default tunnel mode, which is “point-to-point”. If a differentTunnelforwarding mode it desired, then it should be specified before -w. - -X
-
Enables X11 forwarding. This can also be specified on a per-host basis in a configuration file.
X11 forwarding should be enabled with caution. Users with the ability to bypass file permissions on the remote host (for the user’s X authorization database) can access the local X11 display through the forwarded connection. An attacker may then be able to perform activities such as keystroke monitoring.
For this reason, X11 forwarding is subjected to X11 SECURITY extension restrictions by default. Refer to the ssh -Y option and the
ForwardX11Trusteddirective in ssh_config(5) for more information. - -x
-
Disables X11 forwarding.
- -Y
-
Enables trusted X11 forwarding. Trusted X11 forwardings are not subjected to the X11 SECURITY extension controls.
- -y
-
Send log information using the syslog(3) system module. By default this information is sent to stderr.
ssh may additionally obtain configuration data from a per-user configuration file and a system-wide configuration file. The file format and configuration options are described in ssh_config(5).
Authentication
The OpenSSH SSH client supports SSH protocol 2.
The methods available for authentication are: GSSAPI-based authentication, host-based authentication, public key authentication, keyboard-interactive authentication, and password authentication. Authentication methods are tried in the order specified above, though PreferredAuthentications can be used to change the default order.
Host-based authentication works as follows: If the machine the user logs in from is listed in /etc/hosts.equiv or /etc/ssh/shosts.equiv on the remote machine, the user is non-root and the user names are the same on both sides, or if the files ~/.rhosts or ~/.shosts exist in the user’s home directory on the remote machine and contain a line containing the name of the client machine and the name of the user on that machine, the user is considered for login. Additionally, the server must be able to verify the client’s host key (see the description of /etc/ssh/ssh_known_hosts and ~/.ssh/known_hosts, below) for login to be permitted. This authentication method closes security holes due to IP spoofing, DNS spoofing, and routing spoofing. [Note to the administrator: /etc/hosts.equiv, ~/.rhosts, and the rlogin/rsh protocol in general, are inherently insecure and should be disabled if security is desired.]
Public key authentication works as follows: The scheme is based on public-key cryptography, using cryptosystems where encryption and decryption are done using separate keys, and it is unfeasible to derive the decryption key from the encryption key. The idea is that each user creates a public/private key pair for authentication purposes. The server knows the public key, and only the user knows the private key. ssh implements public key authentication protocol automatically, using one of the DSA, ECDSA, Ed25519 or RSA algorithms. The HISTORY section of ssl(8) contains a brief discussion of the DSA and RSA algorithms.
The file ~/.ssh/authorized_keys lists the public keys that are permitted for logging in. When the user logs in, the ssh program tells the server which key pair it would like to use for authentication. The client proves that it has access to the private key and the server checks that the corresponding public key is authorized to accept the account.
The server may inform the client of errors that prevented public key authentication from succeeding after authentication completes using a different method. These may be viewed by increasing the LogLevel to DEBUG or higher (e.g. by using the -v flag).
The user creates their key pair by running ssh-keygen(1). This stores the private key in ~/.ssh/id_dsa (DSA), ~/.ssh/id_ecdsa (ECDSA), ~/.ssh/id_ecdsa_sk (authenticator-hosted ECDSA), ~/.ssh/id_ed25519 (Ed25519), ~/.ssh/id_ed25519_sk (authenticator-hosted Ed25519), or ~/.ssh/id_rsa (RSA) and stores the public key in ~/.ssh/id_dsa.pub (DSA), ~/.ssh/id_ecdsa.pub (ECDSA), ~/.ssh/id_ecdsa_sk.pub (authenticator-hosted ECDSA), ~/.ssh/id_ed25519.pub (Ed25519), ~/.ssh/id_ed25519_sk.pub (authenticator-hosted Ed25519), or ~/.ssh/id_rsa.pub (RSA) in the user’s home directory. The user should then copy the public key to ~/.ssh/authorized_keys in their home directory on the remote machine. The authorized_keys file corresponds to the conventional ~/.rhosts file, and has one key per line, though the lines can be very long. After this, the user can log in without giving the password.
A variation on public key authentication is available in the form of certificate authentication: instead of a set of public/private keys, signed certificates are used. This has the advantage that a single trusted certification authority can be used in place of many public/private keys. See the CERTIFICATES section of ssh-keygen(1) for more information.
The most convenient way to use public key or certificate authentication may be with an authentication agent. See ssh-agent(1) and (optionally) the AddKeysToAgent directive in ssh_config(5) for more information.
Keyboard-interactive authentication works as follows: The server sends an arbitrary «challenge» text and prompts for a response, possibly multiple times. Examples of keyboard-interactive authentication include BSD Authentication (see login.conf(5)) and PAM (some non-OpenBSD systems).
Finally, if other authentication methods fail, ssh prompts the user for a password. The password is sent to the remote host for checking; however, since all communications are encrypted, the password cannot be seen by someone listening on the network.
ssh automatically maintains and checks a database containing identification for all hosts it has ever been used with. Host keys are stored in ~/.ssh/known_hosts in the user’s home directory. Additionally, the file /etc/ssh/ssh_known_hosts is automatically checked for known hosts. Any new hosts are automatically added to the user’s file. If a host’s identification ever changes, ssh warns about this and disables password authentication to prevent server spoofing or man-in-the-middle attacks, which could otherwise be used to circumvent the encryption. The StrictHostKeyChecking option can be used to control logins to machines whose host key is not known or has changed.
When the user’s identity has been accepted by the server, the server either executes the given command in a non-interactive session or, if no command has been specified, logs into the machine and gives the user a normal shell as an interactive session. All communication with the remote command or shell will be automatically encrypted.
If an interactive session is requested, ssh by default will only request a pseudo-terminal (pty) for interactive sessions when the client has one. The flags -T and -t can be used to override this behaviour.
If a pseudo-terminal has been allocated, the user may use the escape characters noted below.
If no pseudo-terminal has been allocated, the session is transparent and can be used to reliably transfer binary data. On most systems, setting the escape character to “none” will also make the session transparent even if a tty is used.
The session terminates when the command or shell on the remote machine exits and all X11 and TCP connections have been closed.
Escape Characters
When a pseudo-terminal has been requested, ssh supports a number of functions through the use of an escape character.
A single tilde character can be sent as ~~ or by following the tilde by a character other than those described below. The escape character must always follow a newline to be interpreted as special. The escape character can be changed in configuration files using the EscapeChar configuration directive or on the command line by the -e option.
The supported escapes (assuming the default ‘~’) are:
- ~.
-
Disconnect.
- ~^Z
-
Background ssh.
- ~#
-
List forwarded connections.
- ~&
-
Background ssh at logout when waiting for forwarded connection / X11 sessions to terminate.
- ~?
-
Display a list of escape characters.
- ~B
-
Send a BREAK to the remote system (only useful if the peer supports it).
- ~C
-
Open command line. Currently this allows the addition of port forwardings using the -L, -R and -D options (see above). It also allows the cancellation of existing port-forwardings with
-KL[bind_address:]port for local,-KR[bind_address:]port for remote and-KD[bind_address:]port for dynamic port-forwardings.!command allows the user to execute a local command if thePermitLocalCommandoption is enabled in ssh_config(5). Basic help is available, using the-hoption. - ~R
-
Request rekeying of the connection (only useful if the peer supports it).
- ~V
-
Decrease the verbosity (
LogLevel) when errors are being written to stderr. - ~v
-
Increase the verbosity (
LogLevel) when errors are being written to stderr.
TCP Forwarding
Forwarding of arbitrary TCP connections over a secure channel can be specified either on the command line or in a configuration file. One possible application of TCP forwarding is a secure connection to a mail server; another is going through firewalls.
In the example below, we look at encrypting communication for an IRC client, even though the IRC server it connects to does not directly support encrypted communication. This works as follows: the user connects to the remote host using ssh, specifying the ports to be used to forward the connection. After that it is possible to start the program locally, and ssh will encrypt and forward the connection to the remote server.
The following example tunnels an IRC session from the client to an IRC server at “server.example.com”, joining channel “#users”, nickname “pinky”, using the standard IRC port, 6667:
$ ssh -f -L 6667:localhost:6667 server.example.com sleep 10
$ irc -c '#users' pinky IRC/127.0.0.1
The -f option backgrounds ssh and the remote command “sleep 10” is specified to allow an amount of time (10 seconds, in the example) to start the program which is going to use the tunnel. If no connections are made within the time specified, ssh will exit.
X11 Forwarding
If the ForwardX11 variable is set to “yes” (or see the description of the -X, -x, and -Y options above) and the user is using X11 (the DISPLAY environment variable is set), the connection to the X11 display is automatically forwarded to the remote side in such a way that any X11 programs started from the shell (or command) will go through the encrypted channel, and the connection to the real X server will be made from the local machine. The user should not manually set DISPLAY. Forwarding of X11 connections can be configured on the command line or in configuration files.
The DISPLAY value set by ssh will point to the server machine, but with a display number greater than zero. This is normal, and happens because ssh creates a “proxy” X server on the server machine for forwarding the connections over the encrypted channel.
ssh will also automatically set up Xauthority data on the server machine. For this purpose, it will generate a random authorization cookie, store it in Xauthority on the server, and verify that any forwarded connections carry this cookie and replace it by the real cookie when the connection is opened. The real authentication cookie is never sent to the server machine (and no cookies are sent in the plain).
If the ForwardAgent variable is set to “yes” (or see the description of the -A and -a options above) and the user is using an authentication agent, the connection to the agent is automatically forwarded to the remote side.
Verifying Host Keys
When connecting to a server for the first time, a fingerprint of the server’s public key is presented to the user (unless the option StrictHostKeyChecking has been disabled). Fingerprints can be determined using ssh-keygen(1):
$ ssh-keygen -l -f /etc/ssh/ssh_host_rsa_key
If the fingerprint is already known, it can be matched and the key can be accepted or rejected. If only legacy (MD5) fingerprints for the server are available, the ssh-keygen(1) -E option may be used to downgrade the fingerprint algorithm to match.
Because of the difficulty of comparing host keys just by looking at fingerprint strings, there is also support to compare host keys visually, using random art. By setting the VisualHostKey option to “yes”, a small ASCII graphic gets displayed on every login to a server, no matter if the session itself is interactive or not. By learning the pattern a known server produces, a user can easily find out that the host key has changed when a completely different pattern is displayed. Because these patterns are not unambiguous however, a pattern that looks similar to the pattern remembered only gives a good probability that the host key is the same, not guaranteed proof.
To get a listing of the fingerprints along with their random art for all known hosts, the following command line can be used:
$ ssh-keygen -lv -f ~/.ssh/known_hosts
If the fingerprint is unknown, an alternative method of verification is available: SSH fingerprints verified by DNS. An additional resource record (RR), SSHFP, is added to a zonefile and the connecting client is able to match the fingerprint with that of the key presented.
In this example, we are connecting a client to a server, “host.example.com”. The SSHFP resource records should first be added to the zonefile for host.example.com:
$ ssh-keygen -r host.example.com.
The output lines will have to be added to the zonefile. To check that the zone is answering fingerprint queries:
$ dig -t SSHFP host.example.com
Finally the client connects:
$ ssh -o "VerifyHostKeyDNS ask" host.example.com
[...]
Matching host key fingerprint found in DNS.
Are you sure you want to continue connecting (yes/no)?
See the VerifyHostKeyDNS option in ssh_config(5) for more information.
SSH-Based Virtual Private Networks
ssh contains support for Virtual Private Network (VPN) tunnelling using the tun(4) network pseudo-device, allowing two networks to be joined securely. The sshd_config(5) configuration option PermitTunnel controls whether the server supports this, and at what level (layer 2 or 3 traffic).
The following example would connect client network 10.0.50.0/24 with remote network 10.0.99.0/24 using a point-to-point connection from 10.1.1.1 to 10.1.1.2, provided that the SSH server running on the gateway to the remote network, at 192.168.1.15, allows it.
On the client:
# ssh -f -w 0:1 192.168.1.15 true
# ifconfig tun0 10.1.1.1 10.1.1.2 netmask 255.255.255.252
# route add 10.0.99.0/24 10.1.1.2
On the server:
# ifconfig tun1 10.1.1.2 10.1.1.1 netmask 255.255.255.252
# route add 10.0.50.0/24 10.1.1.1
Client access may be more finely tuned via the /root/.ssh/authorized_keys file (see below) and the PermitRootLogin server option. The following entry would permit connections on tun(4) device 1 from user “jane” and on tun device 2 from user “john”, if PermitRootLogin is set to “forced-commands-only”:
tunnel="1",command="sh /etc/netstart tun1" ssh-rsa ... jane
tunnel="2",command="sh /etc/netstart tun2" ssh-rsa ... john
Since an SSH-based setup entails a fair amount of overhead, it may be more suited to temporary setups, such as for wireless VPNs. More permanent VPNs are better provided by tools such as ipsecctl(8) and isakmpd(8).
Environment
ssh will normally set the following environment variables:
- DISPLAY
-
The
DISPLAYvariable indicates the location of the X11 server. It is automatically set by ssh to point to a value of the form “hostname:n”, where “hostname” indicates the host where the shell runs, and ‘n’ is an integer ≥ 1. ssh uses this special value to forward X11 connections over the secure channel. The user should normally not setDISPLAYexplicitly, as that will render the X11 connection insecure (and will require the user to manually copy any required authorization cookies). - HOME
-
Set to the path of the user’s home directory.
- LOGNAME
-
Synonym for
USER; set for compatibility with systems that use this variable. -
Set to the path of the user’s mailbox.
- PATH
-
Set to the default
PATH, as specified when compiling ssh. - SSH_ASKPASS
-
If ssh needs a passphrase, it will read the passphrase from the current terminal if it was run from a terminal. If ssh does not have a terminal associated with it but
DISPLAYandSSH_ASKPASSare set, it will execute the program specified bySSH_ASKPASSand open an X11 window to read the passphrase. This is particularly useful when calling ssh from a.xsessionor related script. (Note that on some machines it may be necessary to redirect the input from/dev/nullto make this work.) - SSH_ASKPASS_REQUIRE
-
Allows further control over the use of an askpass program. If this variable is set to “never” then ssh will never attempt to use one. If it is set to “prefer”, then ssh will prefer to use the askpass program instead of the TTY when requesting passwords. Finally, if the variable is set to “force”, then the askpass program will be used for all passphrase input regardless of whether
DISPLAYis set. - SSH_AUTH_SOCK
-
Identifies the path of a UNIX-domain socket used to communicate with the agent.
- SSH_CONNECTION
-
Identifies the client and server ends of the connection. The variable contains four space-separated values: client IP address, client port number, server IP address, and server port number.
- SSH_ORIGINAL_COMMAND
-
This variable contains the original command line if a forced command is executed. It can be used to extract the original arguments.
- SSH_TTY
-
This is set to the name of the tty (path to the device) associated with the current shell or command. If the current session has no tty, this variable is not set.
- SSH_TUNNEL
-
Optionally set by sshd(8) to contain the interface names assigned if tunnel forwarding was requested by the client.
- SSH_USER_AUTH
-
Optionally set by sshd(8), this variable may contain a pathname to a file that lists the authentication methods successfully used when the session was established, including any public keys that were used.
- TZ
-
This variable is set to indicate the present time zone if it was set when the daemon was started (i.e. the daemon passes the value on to new connections).
- USER
-
Set to the name of the user logging in.
Additionally, ssh reads ~/.ssh/environment, and adds lines of the format “VARNAME=value” to the environment if the file exists and users are allowed to change their environment. For more information, see the PermitUserEnvironment option in sshd_config(5).
Files
- ~/.rhosts
-
This file is used for host-based authentication (see above). On some machines this file may need to be world-readable if the user’s home directory is on an NFS partition, because sshd(8) reads it as root. Additionally, this file must be owned by the user, and must not have write permissions for anyone else. The recommended permission for most machines is read/write for the user, and not accessible by others.
- ~/.shosts
-
This file is used in exactly the same way as
.rhosts, but allows host-based authentication without permitting login with rlogin/rsh. - ~/.ssh/
-
This directory is the default location for all user-specific configuration and authentication information. There is no general requirement to keep the entire contents of this directory secret, but the recommended permissions are read/write/execute for the user, and not accessible by others.
- ~/.ssh/authorized_keys
-
Lists the public keys (DSA, ECDSA, Ed25519, RSA) that can be used for logging in as this user. The format of this file is described in the sshd(8) manual page. This file is not highly sensitive, but the recommended permissions are read/write for the user, and not accessible by others.
- ~/.ssh/config
-
This is the per-user configuration file. The file format and configuration options are described in ssh_config(5). Because of the potential for abuse, this file must have strict permissions: read/write for the user, and not writable by others.
- ~/.ssh/environment
-
Contains additional definitions for environment variables; see Environment, above.
- ~/.ssh/id_dsa
- ~/.ssh/id_ecdsa
- ~/.ssh/id_ecdsa_sk
- ~/.ssh/id_ed25519
- ~/.ssh/id_ed25519_sk
- ~/.ssh/id_rsa
-
Contains the private key for authentication. These files contain sensitive data and should be readable by the user but not accessible by others (read/write/execute). ssh will simply ignore a private key file if it is accessible by others. It is possible to specify a passphrase when generating the key which will be used to encrypt the sensitive part of this file using AES-128.
- ~/.ssh/id_dsa.pub
- ~/.ssh/id_ecdsa.pub
- ~/.ssh/id_ecdsa_sk.pub
- ~/.ssh/id_ed25519.pub
- ~/.ssh/id_ed25519_sk.pub
- ~/.ssh/id_rsa.pub
-
Contains the public key for authentication. These files are not sensitive and can (but need not) be readable by anyone.
- ~/.ssh/known_hosts
-
Contains a list of host keys for all hosts the user has logged into that are not already in the systemwide list of known host keys. See sshd(8) for further details of the format of this file.
- ~/.ssh/rc
-
Commands in this file are executed by ssh when the user logs in, just before the user’s shell (or command) is started. See the sshd(8) manual page for more information.
- /etc/hosts.equiv
-
This file is for host-based authentication (see above). It should only be writable by root.
- /etc/ssh/shosts.equiv
-
This file is used in exactly the same way as
hosts.equiv, but allows host-based authentication without permitting login with rlogin/rsh. - /etc/ssh/ssh_config
-
Systemwide configuration file. The file format and configuration options are described in ssh_config(5).
- /etc/ssh/ssh_host_key
- /etc/ssh/ssh_host_dsa_key
- /etc/ssh/ssh_host_ecdsa_key
- /etc/ssh/ssh_host_ed25519_key
- /etc/ssh/ssh_host_rsa_key
-
These files contain the private parts of the host keys and are used for host-based authentication.
- /etc/ssh/ssh_known_hosts
-
Systemwide list of known host keys. This file should be prepared by the system administrator to contain the public host keys of all machines in the organization. It should be world-readable. See sshd(8) for further details of the format of this file.
- /etc/ssh/sshrc
-
Commands in this file are executed by ssh when the user logs in, just before the user’s shell (or command) is started. See the sshd(8) manual page for more information.
Exit Status
ssh exits with the exit status of the remote command or with 255 if an error occurred.
IPv6
IPv6 address can be used everywhere where IPv4 address. In all entries must be the IPv6 address enclosed in square brackets. Note: The square brackets are metacharacters for the shell and must be escaped in shell.
See Also
scp(1), sftp(1), ssh-add(1), ssh-agent(1), ssh-keygen(1), ssh-keyscan(1), tun(4), ssh_config(5), ssh-keysign(8), sshd(8)
Standards
S. Lehtinen and C. Lonvick, The Secure Shell (SSH) Protocol Assigned Numbers, RFC 4250, January 2006.
T. Ylonen and C. Lonvick, The Secure Shell (SSH) Protocol Architecture, RFC 4251, January 2006.
T. Ylonen and C. Lonvick, The Secure Shell (SSH) Authentication Protocol, RFC 4252, January 2006.
T. Ylonen and C. Lonvick, The Secure Shell (SSH) Transport Layer Protocol, RFC 4253, January 2006.
T. Ylonen and C. Lonvick, The Secure Shell (SSH) Connection Protocol, RFC 4254, January 2006.
J. Schlyter and W. Griffin, Using DNS to Securely Publish Secure Shell (SSH) Key Fingerprints, RFC 4255, January 2006.
F. Cusack and M. Forssen, Generic Message Exchange Authentication for the Secure Shell Protocol (SSH), RFC 4256, January 2006.
J. Galbraith and P. Remaker, The Secure Shell (SSH) Session Channel Break Extension, RFC 4335, January 2006.
M. Bellare, T. Kohno, and C. Namprempre, The Secure Shell (SSH) Transport Layer Encryption Modes, RFC 4344, January 2006.
B. Harris, Improved Arcfour Modes for the Secure Shell (SSH) Transport Layer Protocol, RFC 4345, January 2006.
M. Friedl, N. Provos, and W. Simpson, Diffie-Hellman Group Exchange for the Secure Shell (SSH) Transport Layer Protocol, RFC 4419, March 2006.
J. Galbraith and R. Thayer, The Secure Shell (SSH) Public Key File Format, RFC 4716, November 2006.
D. Stebila and J. Green, Elliptic Curve Algorithm Integration in the Secure Shell Transport Layer, RFC 5656, December 2009.
A. Perrig and D. Song, Hash Visualization: a New Technique to improve Real-World Security, 1999, International Workshop on Cryptographic Techniques and E-Commerce (CrypTEC ’99).
Authors
OpenSSH is a derivative of the original and free ssh 1.2.12 release by Tatu Ylonen. Aaron Campbell, Bob Beck, Markus Friedl, Niels Provos, Theo de Raadt and Dug Song removed many bugs, re-added newer features and created OpenSSH. Markus Friedl contributed the support for SSH protocol versions 1.5 and 2.0.
Referenced By
6tunnel(1), age(1), ampctld(1), autossh(1), bssh(1), btrbk.conf(5), byobu-launcher-install(1), byobu-launcher-uninstall(1), ckeygen(1), clogin(1), cloginrc(5), clush(1), cockpit-desktop(1), conch(1), connect-proxy(1), cpdup(1), cvs.sh(5), cwm(1), darcs(1), debrsign(1), dirvish(8), dirvish.conf(5), distcc(1), distccd(1), doveadm-sync(1), environment.d(5), fetchmail(1), git-shell(1), gsisftp(1), gsissh_config(5), gsisshd(8), gsisshd_config(5), gsissh-keygen(1), gsissh-keysign(8), isoinfo(1), k5login(5), kwalletaskpass(1), login_duo(8), mgarepo(8), mpssh(1), mussh(1), muttrc(5), nbdkit-ssh-plugin(1), neomuttrc(5), netcat(1), nmcli-examples(7), ocproxy(1), openvpn(8), openvpn-examples(5), pam_ssh(8), parallel(1), parallel_examples(7), pdcp(1), pdsh(1), pft-pub(1), pnuke(1), polkit(8), proc(5), proxytunnel(1), prsync(1), pscp.pssh(1), pslurp(1), pssh(1), pty(7), qodem-x11(1), rancid.conf(5), rdiff-backup(1), rdiff-backup-old(1), rdist(1), readom(1), rigctld(1), rotctld(1), router.db(5), rsnapshot(1), rssh(1), rssh.conf(5), safekeep(1), scp(1), scponly(8), sd_bus_default(3), sftp(1), sftp-server(8), ssh-add(1), ssh-agent(1), ssh_config(5), ssh-copy-id(1), sshd(8), sshd_config(5), sshexport(1), sshfp(1), ssh-keygen(1), ssh-keyscan(1), ssh-keysign(8), ssh-pkcs11-helper(8), ssh-sk-helper(8), sshuttle(1), sss_ssh_authorizedkeys(1), sss_ssh_knownhostsproxy(1), star(1), sudoers(5), systemd-stdio-bridge(1), tar(1), termy-server(1), termy-ssh(1), tkconch(1), tmux(1), torsocks(8), udisks-tcp-bridge(1), user@.service(5), virt-p2v(1), waypipe(1), wodim(1), x11-ssh-askpass.1x(1), x11vnc(1), xlock(1), xpra(1), zfs(8), zssh(1).
March 31, 2022

Представим, что вы арендовали облачный сервер на cloud.timeweb.com для того, чтобы разместить на нем сайт. После покупки вы получите чистую систему, которую предстоит настраивать — устанавливать веб-сервер, загружать файлы и так далее. Для этого не нужно ехать в дата-центр с флешкой, в таких случаях используется протокол SSH.
SSH (от английского secure shell — защищённая оболочка) — это протокол для удалённого доступа к любым устройствам с операционной системой Linux: компьютерам, серверам, телефонам и так далее. Иными словами, это некий набор правил, позволяющий устанавливать соединение с устройством, которое физически расположено в любой точке мира.
Слово secure в названии протокола значит, что обмен данными между устройствами шифруется, а значит вы можете работать с чувствительной информацией — паролями, кодами доступа и так далее.
Информация передаётся в зашифрованном виде, таким образом повышается безопасность обмена данными, с которыми вы работаете. Соединение и аутентификация осуществляются одним из двух способов:
- Вход по паролю. Между клиентом и сервером создаётся общий секретный ключ, с его помощью шифруется трафик.
- Вход с помощью пары ключей. Перед первым соединением пользователь генерирует два ключа: открытый и закрытый. Они хранятся на удалённом и локальном устройствах соответственно.
В статье рассмотрим возможности протокола, синтаксис SSH-команд и настройки демона SSH.
Вход в систему с помощью ключей
Использовать пароль входа на сервер по протоколу SSH — небезопасно и неудобно. Во-первых, пароль можно подобрать перебором. Во-вторых, может произойти случайная утечка, ведь устройств может быть несколько, а значит и пароли разные, все не запомнить. А в-третьих, это утомительно — каждый раз вводить кодовое слово перед началом сеанса.
Самый надёжный способ — входить в систему с помощью пары ключей RSA.
Сначала нужно создать ключи на локальном компьютере:
ssh-keygen -t rsa
В процессе создания вам нужно будет выбрать расположение файлов ключей и кодовое слово. Если хотите подключаться без пароля, оставляйте поле Passphrase пустым. Passphrase — это кодовое слово, которым дополнительно защищается ключ. Так, если ваш приватный ключ будет скомпрометирован, злоумышленники не смогут им воспользоваться без кодового слова.
Затем нужно отправить на сервер публичный ключ; на его публичность указывает суффикс .pub и права на чтение для всех пользователей:
ssh-copy-id -p 222 -i ~/.ssh/id_rsa.pub remote@example.comКоманда создаст сеанс SSH. После введения пароля публичный ключ будет скопирован в файл авторизованных ключей, и вам больше не понадобится вводить пароль.
Вы можете ещё больше увеличить безопасность, полностью отключив доступ по паролю. Для этого отредактируйте файл /etc/ssh/sshd_config, выставив следующие директивы:
PasswordAuthentication no— запрещаем вход с паролем.PubkeyAuthentication yes— разрешаем аутентификацию по ключам SSH.ChallengeResponseAuthentication no— отключаем PAM-аутентификацию
После обновления файла перезагружаем демон SSH:
sudo systemctl reload sshНастройка SSH
Чтобы выполнить подключение, на удалённом устройстве должен быть запущен сервер sshd, в Ubuntu он запускается с помощью диспетчера systemd:
sudo systemctl start sshКонфигурация сервера sshd находится в файле /etc/ssh/sshd_config. Рассмотрим основные параметры настройки SSH, которые вы можете использовать.
Порт. По умолчанию sshd отслеживает изменения на 22 порту. Часто злоумышленники пытаются получить доступ к вашему устройству перебором паролей от суперпользователей — root, admin и так далее. Можно усложнить эту задачу и изменить стандартный порт на любой другой с помощью директивы Port.
Однако это не гарантирует полную безопасность, так как существуют скрипты, сканирующие порты устройства. Они определят порт, который «слушает» демон sshd, и всё равно попытаются заполучить доступ. Для большей безопасности рекомендуем закрыть SSH для root-пользователя.
Доступ суперпользователя. Поскольку в основном SSH используется для администрирования удаленных серверов Linux, по умолчанию во всех современных системах удалённый доступ суперпользователя root разрешён. Но это очень небезопасно, так как злоумышленники могут попытаться подобрать пароль и, если смогут попасть в систему, получат полный контроль над устройством. Для того, чтобы избежать таких сценариев, используйте директиву PermitRootLogin со значением no.
Протокол. SSH может работать по двум версиям протокола — 1 и 2. Вторая поддерживает больше методов шифрования и способов аутентификации. Если вы хотите использовать только одну из версий, используйте директиву Protocol: Protocol 2.
Доступ только нескольким пользователям. Ещё больше увеличивает безопасность разрешение удалённого доступа только для определённых пользователей и групп — директивы AllowUsers и AllowGroups соответственно. Так, мы можем запретить доступ к серверу всем, кроме администраторов:
AllowUsers adm1, adm2или
AllowGroups admin, infrastructureВы также можете запретить доступ конкретным пользователям с помощью DenyUsers и DenyGroups.
Сохранение ошибок. Уровень логгирования можно задать с помощью директивы LogLevel. Она отвечает за уровень наполнения системного журнала, то есть насколько подробно sshd будет будет сохранять сообщения, которые регистрирует. По умолчанию используется INFO, но в отладочных целях можно поставить VERBOSE или вовсе отключить журналирование QUIET.
Доступ по паролю. За возможность попасть на удалённое устройство с помощью пароля отвечает директива PasswordAuthentication со значениями yes (по умолчанию) или no.
После того, как вы внесли изменения и сохранили файл, нужно перезапустить сервер sshd, чтобы новая конфигурация вступила в силу. Перед этим убедитесь, что вы сохранили на сервер файл ключей или оставили доступ по паролю — иначе существует риск остаться без доступа к серверу.
sudo systemctl reload sshSSH-клиенты
На Windows-системах вы также можете использовать SSH для подключения к удалённому серверу с помощью специальных приложений. Они удобны тем, что позволяют запомнить данные для подключения или указать разные цветовые схемы для разных сеансов (полезно, когда вы администрируете несколько серверов). Среди наиболее популярных:
- PuTTY
- WinSCP
- Termius
- FileZilla — для передачи данных по SFTP
- MobaXterm
Если вы работаете в unix-системах, можно использовать простой терминал или командную строку.
Синтаксис
Для удалённого подключения нужно использовать команду SSH с указанием IP-адреса или доменного имени сервера:
ssh example.comВ примере выше предполагается, что имена пользователей в локальной и удалённой системах совпадают. Чаще всего это не так, поэтому приходится отдельно указывать, какое имя использовать при подключении:
ssh remote@example.comЗавершить сеанс можно с помощью команды exit.
Если при настройке удалённого сервера вы указали порт отличный от 22, то на локальном устройстве вам нужно указать его при подключении, сделать это можно с помощью флага -p:
ssh -p 222 remote@example.comСценарии использования
Ниже рассмотрим частые и наиболее интересные сценарии использования протокола SSH.
Передача файлов и каталогов
Если на вашем сервере настроен демон sshd, вы также можете пользоваться другими утилитами, которые работают на основе протокола SSH. Одна из таких утилит — scp, которая использует протокол RCP для передачи файлов.
Для того, чтобы передать файл filename.txt на устройство с адресом example.com и расположить его в каталоге ~/trash/txt, используйте следующую команду:
scp filename.txt remote@example.com:~/trash/txtЕсли поменять местами локальный путь и сервер, то вы сможете забрать себе на локальное устройство файлы с удалённого сервера.
Когда нужно передать весь каталог, добавьте флаг -r. При путь к каталогу, в который вы собираетесь копировать данные, должен завершаться косой чертой.
Представим, что нам нужно скопировать каталог images с сервера себе на компьютер в папку documents:
scp -r remote@example.com:~/images ~/documents/Вы также можете передавать файлы между двумя удалёнными машинами, указывая вместо локальных файлов путь подключения к серверу.
SSH-туннели
Туннели через SSH позволяют устанавливать безопасный удалённый доступ и передавать файлы по защищённой сети. Чаще всего всего они применяются в случае, когда нужно получить доступ в частную сеть или создать зашифрованный канал.
Для того, чтобы пробросить порт с удалённого сервера, используйте флаг -L. Для примера рассмотрим случай, когда нам нужно разрешить работу с удалённой базой данных, которая доступна только на локальной машине, порт 3306.
Для этого выполним следующую команду:
ssh -N 53306:127.0.0.1:3306 remote@example.comВ этой команде флаг -N означает, что на удалённой машине не нужно выполнять команду, 53306 — локальный порт, 127.0.0.1:3306 — адрес, на котором работает сервис MySQL на удалённом сервере.
Подробнее об SSH-туннелях читайте в нашей статье.
SFTP
SFTP (Secure File Transfer Protocol) — протокол передачи файлов, который работает поверх безопасного канала и является частью OpenSSH, поэтому если у вас корректно работает демон SSH, вы можете использовать SFTP без дополнительной настройки. Главное отличие SFTP от стандартного протокола FTP — шифрование абсолютно любой информации.
Создать сеанс SFTP можно с теми же доступами — логином и паролем или ключом — что и SSH. Кроме этого можно указать порт, если вы меняли его со стандартного 22 на какой-либо другой. Сделайте это с помощью команды:
sftp -oPort=222 remote@example.comПосле успешной аутентификации вы окажетесь на удалённом сервере и сможете работать с файлами.
Заключение
В статье мы разобрали, что такое протокол удалённого управления компьютером и как работает SSH. Знание основ работы этого протокола — незаменимый навык в работе системного администратора и программиста. SSH позволяет подключиться к устройству в любой точке мира и при этом иметь те же самые права и возможности, что и при физической работе с компьютером.
Если вы размещаете в интернете сайт, при этом используете для этого выделенный сервер, то неправильная конфигурация SSH — угроза проникновения злоумышленников в систему, что может привести к непоправимым последствиям.
Любой сервер, который вы арендуете на cloud.timeweb.com, будет доступен по SSH по умолчанию. А если вам необходимо дополнительно его настроить, наши специалисты всегда на связи.
Copyleft Andrey Lavrentyev
����������.
������ ����������� ���� �������� �� ������ ������������� ssh ������ 1.2.x ��������� SSH1.5.
�� ��� ������ ����� ���� ������������ � ��� ������ � ssh ������ 2.x, ���
������������� ��������� SSH2.
����������� ���� �������� ����� ����� �� ������ ���� ��������� �������.
�������� �� ������ UnixGems — ��������� Unix, � �������� ������������
������������ Unix, � ���������� ����� �� ������� ������� �������� � ���������
��� �����������.
����������: ���� �������� ���� �� ���� ������������, � ��������
��������� �������� � �������������� ssh ������ 2.x, � ������ ����� ���
������� ��� �����������. ���� � SSH2.x ����� ������� � �������� ��������
� �� ����� ������ � ��������� ��� �������������.
- ������� � ������ SSH.
- � ���������� ������� ��������� ������.
-
�������� ������
����� ������������ � ��������� ��������� ����� -
����������� �������,
���������� � �����. -
���� �� ���������
�������. -
�������� ������
����������� � ������. -
������
������� X11 �� ��������� �������. -
������
������� X11 ����� ������ xdm. -
���������� �������
����������� � ������. -
������ ������ ��
��������� �������. -
����������� ������
����� ���������. -
��������� �����������
��������. - ��������� ssh-agent � CDE.
- SSH � ���������.
- ��������� ��������.
- ������� SSH ��� Windows.
-
������ �� ������
�������� ��������� ����������.
������� � ������ SSH.
SSH � ������������ ������ �������� �������������:
- �������� ������������� �� ������ ����� �����, ������ — hosts
- �������� ������������� �� ������ ������������
�������:- /etc/hosts.equiv � .rhosts/.shosts —
���� ������� � ����������-������� �� rsh/rlogin. - XAUTHORITY — ���� ��������� ������ SSH, � X-Window ��
����� � ������������ ��� ����� XDM. - RSA — ������������, ���� SSH ������ � ���������� RSA.
- �������� ������������� ����������� «public key».
- �������� ������ ����� �� ��������� ������� ������������ � SSH,
��-��������� — IDEA. - ������������� ��������� ����� — passphrase.
- /etc/hosts.equiv � .rhosts/.shosts —
- ���������� ������ SSH � ������� �������� �������� ������������,
TIS, Kerberos, SSL, C2 � ��� �����, ��������� ��. ������������ SSH.
������� ��� SSH �������� ��������� ���������� ������<->������,
����������� ��� ������������ �������� ���������� �� ��� ��� ������. 
� ������ ������������� SSH, ������ ���������� ���������� ��������
���:
         Client (workplace)  <---------------->  Server (remote machine)

          ssh/slogin/scp     <---------------->    sshd
Client ��������� � �������� �������� ����� ������������, �� ��� �����������
������ ���� ��������� «public key» � «private key», � �� �������
��������� ������, ���� �� ����� ����� ���������� ����, ������ ���� �������
����� SSHD, ����� ������� ��������� ������ �������� �������� — Server.
���� ������������ � �������� workplace — �������� ����� �����
������������ ������ ������ — Client, ��������������, �� ������ �� ���
���������� ��������� ssh-keygen. � �������� �������� ����� ����� ����
������������� ������������ ���������, ������� � �� � ��.
����� ������������ ����� ���������� ���������:
         Client (workplace)  <---------------->  Server (remote machine)

          ssh/slogin/scp     <---------------->    sshd

  $HOME/.ssh/                         |          $HOME/[.ssh/]
            /[authorized_keys]        |               /.Xauthority
            /identity                 |               /.rhosts[.shosts]
            /identity.pub             |                     /[authorized_keys]
            /known_hosts              |                     /[identity]
            /random_seed              |                     /[identity.pub]
                                      |                     /[known_hosts]
                                      |                     /[random_seed]
�� ������ ����� ��� ��������, [] — ������� ��� � ������,
���������� ��������������, �� ��������� �����������, � ����������� ��
���������������� ��������, �� ��������, Server ����� ���� � ����
������� Client, � ��� ������, ���� ������������ ����� �����������
���������� [� ������� �� ����������] ������� � ����.
� ���������� ������� ��������� ������.
���������� ������� ���������� ����� ���������� «public key» ���
�������� � «private key» ��� ���������� ������. ��� ������ «public key» ��������� �� ��� ����, ��� ������������ ���� ����� ����� ��� ������
�� ������������ ����-�������� ������ ��� ���� ����������, ��� ���������
������ �� ������������ ������ ����������.
��� ��������, ��� ��� ��������� �������� ������ «public key» ���
����������� ����� $HOME/.ssh/identity.pub �� �����������
����� ��� ������� �������� ���������� �������������� ���������� �������
����� �� �������� ��� ������ � ���� $HOME/.ssh/authorized_keys
�� ��������� �������.
���� ���-���� ����� �������� ������������������� ������ � ����� ������
��� ��������������� ����� ������ ��� �����������, �� ��� ���������� �������
�������� ������ � ������ ������� ����� $HOME/.ssh/identity
� �������������� ����������� ��� ��� ������������� ������ ������ ����.
������ ��� ������� ������ ������ «private key», ��� ��� ���������
� ������� ��������� keygen ���������� ������ passphrase —
���������-����� ��� �������� ����������� �����, ����� �� ����� ������������
�� �������� �������. ��� ������ ������������� �� ���������� ������� �����
���� ���� ���-���� ����������� � ���� �������� ���������� � ������.
�������� ������ ����� ������������
� ��������� ��������� �����.
����, ������ ��� ��� ���������� ������� — ��� ������������ ������� ssh-keygen
��� �������� ����������� ������ �����������. ���������� ������ ���������
��� �������, ����� �������������� � ���� ������� ��-��������� ������ �������������
��� �����������.
�����, ����� �������� ssh-keygen ������� ���������� � ���������
�����-������[passphrase],
������� ������ ������������� ��������� �������������:
- ��������� ������������������ ��������� ����
-
������� � �����, ���� ����� ����� ����������� ���������; ��� �� ������
�����������, �� � �������������� � ����� ���������� ����������� -
�������� ��������� ����� �� ������� ��������� ������������(��������������
� �� ��������� ������ ���� ��������) -
�������� ��������� ����� � ������ �� ����� ��� �������� ����� ���� � ����
��������� ������-�����. ��� �������� ���������� ������������� ����
������������ ����� ��������������� ���� ������-�����, ��� �������� ����� ��� ���� � ��� ������ ���� — «private key».
����� �������� ������ �������� �������, ���������� ����� � �� �����������:
/* �� �������� ��� �������� passphrase �� ������������� */
unix1% ssh-keygen
 Initializing random number generator...
 Generating p:  .............................................++ (distance 830)
 Generating q:  .......................................++ (distance 636)>
 Computing the keys...
 Testing the keys...
 Key generation complete.
 Enter file in which to save the key ($HOME/.ssh/identity):
 Enter passphrase: pust' vsegda 2000
 Enter the same passphrase again: pust' vsegda 2000
 Your identification has been saved in /home/lavr/.ssh/identity.
 Your public key is:
 1024 37 [lots of numbers] lavr@unix1
 Your public key has been saved in /home/lavr/.ssh/identity.pub
unix1%
���� �� ������ ��������� accounts (������ � ������ �������), �� ������
������� ��������� ��������� � ������ ������ ��� ������� �� ���, ��������:
- ��� ������
- ��� ������ �������
- ��� Internet service provider (ISP) �������
- ��� �����������
- ��� ������-������������������ ������ ��� ����������
��� ������������� ��������� ����������� ���������� ������ ����� ����� �������������,
�������� ������������� ������� �� ����� � ������ � ����������� �������������������
������ �� ��������������� ����������
������� ��� ��� �������������, �� ������ ������ �������� ���� ������-�����
�������� ������� ssh-keygen � ������ -p , ��������:
/* �� �������� ��� �������� passphrase �� ������������� */
unix1% ssh-keygen -p
 Enter file in which the key is ($HOME/.ssh/identity):
 Enter old passphrase: pust' vsegda 2000
 Key has comment 'lavr@sunhe'
 Enter new passphrase: budet new 3000
 Enter the same passphrase again: budet new 3000
 Your identification has been saved with the new passphrase.
unix1%
����������� �������, ���������� � �����.
��� ���� ����� ��������� ��� ���������� ������ ������ � ������� ��������
�������� ������ ���������� ������� ���� $HOME/.ssh/authorized_keys
� ������� ��������� ������ «public key» ��� ������ ������� ��������
������.
������ ������������ ����� ����� �������������� ������ �� _���������_
������� ��������� ��������� ����(���� ����� ����� ��� ��� ������������
����� ����������� �������� ���������� � �������������� NFS) � ������ ������
���������� ������ ����������� ���� $HOME/.ssh/identity.pub �
«public key» � ���� $HOME/.ssh/authorized_keys.
unix1% cd ~/.ssh
unix1% cp identity.pub authorized_keys
������ �� ������ ����������� ���� authorized_keys �� ������ ���������
������� ����� ��������� ������ � ��� � ��������� �������. �������� ���
���� �� ������ �� ftp ��� ����� rcp/scp.
��� ��������� ������� � ����� ��� �������� � ������ �������� �� ������
�������� �������������� ��� ���� authorized_keys ��������� ���������
��������. �������, ��� ������ ���� — ��� ���� ������ �����, � ����� ��
��� ����������� ���� ����� ������ «public key» �� ������ � �����������
pub.
������ ������� �� ������� ������� � ����� ����� ������, �� ��������
� ���, � �������� ������� ������������ ����� ������ � ����������� ������.
���� ����� ���� ����������� �����������, ��������� ������� ����������
��� � �������, ���������� ��������� ����� � ������ � ����������� � ������
��������� � SSH:
� ~/.ssh
� ~/.ssh/authorized_keys
����� �� ������ ������ ���� ������ � ��� — ���������. ��������� ������
���������� ������ ��� ������ ����:
unix1% cd
unix1% ls -ld . .ssh .ssh/authorized_keys
 drwxr-xr-x  36 lavr  dug  4096 Jul 25 02:24 .
 drwxr-xr-x   2 lavr  dug   512 Apr 10 02:30 .ssh
 -rw-r--r--   1 lavr  dug  1674 Apr 10 02:29 .ssh/authorized_keys
unix1%
����� ��������� ������� ��������� ��������� ������ �� ������ ���������
����� �� ������ ���� �� ����������� ���������:
unix1% cd
unix1% chmod go-w . .ssh .ssh/authorized_keys
unix1%
���������, �������� ��� ��������� �� ���� ������� �� �������� ������ ������
�� ���� ����� accounts.
����������:
������ ����������� ���� �������� ����� �����, ��������� ��� ������ ����
��� ������������, � ������� ��������� �������� ����� �� ������ �������������.
������ ������, ������ ���� — ���� identity, ������ ������
����� ����� 0600, ��������� �� ���� ���������� � ������ �� ������
��������� � ��������� � ������������, ��, �� � ������� ���� � «public key» — identity.pub==0644.
� �� ��������� ����� ����� �� ���������� $HOME/.ssh==0700
, � �� ���������� �������[������ �������� ��� � ���� .ssh==755]:
unix1:/home/lavr> ls -la .ssh
total 42
 drwxr-xr-x   2 lavr  dug    512 26 ��� 06:50 .
 drwxr-xr-x  61 lavr  dug   5632  6 ��� 22:45 ..
 -rw-------   1 lavr  dug    672 26 ��� 06:39 authorized_keys
 -rw-------   1 lavr  dug    539 26 ��� 06:39 identity
 -rw-r--r--   1 lavr  dug    343 26 ��� 06:39 identity.pub
 -rw-------   1 lavr  dug  31654 29 ��� 11:49 known_hosts
 -rw-------   1 lavr  dug    512  6 ��� 22:45 random_seed
unix1:/home/lavr>
����� ������ �������� � ����������� �������� ����� ���� $HOME/.ssh/authorized_keys �������� ������ � �������������� ���������, ��� ������
unix1 — Client, � ��������� ������ unix2 [������ ��� — mammoth] � cv — Servers:
         Client (workplace)  <---------------->  Server (remote machine)
          ssh/slogin/scp     <---------------->    sshd

 unix1:~lavr/.ssh/                     unix2:~lavr/.ssh/
                 /[authorized_keys]  |                  �������
                 /identity           |
                 /identity.pub       |
                 /known_hosts        |
                 /random_seed        |
                                     |
                                     |
������ ��� �� ����� ������� — ���������, ���������� �� ��������� ������
��������� SSH, �� ���� �������� �� �� ��� ������ — sshd.
��� ����� ��� ���������� ��������������� �������� telnet � ��������� �����
— 22, ������ ���� ���� ������������ SSH ��-���������:
unix1:/home/lavr> telnet unix2 22
Trying 159.93.17.122...
Connected to unix2.jinr.dubna.su.
Escape character is '^]'.
SSH-1.5-1.2.27
^^^^^^^^^^^^^^- � ��� �� ����� ���������, � ������� �������� �� ������ sungraph
unix1:/home/lavr> telnet sungraph 22
Trying 159.93.20.105...
telnet: Unable to connect to remote host: Connection refused
unix1:/home/lavr> telnet sungraph
Trying 159.93.20.105...
Connected to sungraph.jinr.dubna.su.
Escape character is '^]'.


SunOS UNIX (sungraph)

login: Connection closed by foreign host.
unix1:/home/lavr>
����� ��� �� ��������� ������ sungraph ����������� ����� sshd
� ��� ������ ��� �� �� ����� ��������� ��������������� SSH.
����� �������� ��� ���� SSH �������������� � ���������� rsh/rlogin �� � ������ ������� ����� �� ��������� ������ ��� SSH, slogin
����� ���������� �� ����������� ����� /etc/hosts.equiv � .rhosts,
�������, ���� ������ ����� �������� � ��� ����������� �� ��������� ������ �
sshd — �������, �� ������� ������������ ������ �����������, ����� �����
������������.
���� ��� �� ���� �� ��������� ������ unix2 ���������� .ssh � � ����� ������ ���� ��������������� SSH ��� ����������� ����� �
��������� ������ �� unix2, ������, ��������� �� ��������� ������ unix2:
mammoth:/usr/home/lavr> ls -la .ssh
ls: .ssh: No such file or directory
mammoth:/usr/home/lavr>
���������� ����� � unix1 �� unix2:
unix1:/home/lavr> slogin -v unix2
SSH Version 1.2.26 [i386-unknown-freebsd2.2.8], protocol version 1.5.
Compiled with RSAREF.
unix1.jinr.dubna.su: Reading configuration data /usr/local/etc/ssh_config
unix1.jinr.dubna.su: ssh_connect: getuid 310 geteuid 0 anon 0
unix1.jinr.dubna.su: Connecting to unix2 [159.93.17.122] port 22.
unix1.jinr.dubna.su: Allocated local port 787.
unix1.jinr.dubna.su: Connection established.
unix1.jinr.dubna.su: Remote protocol version 1.5, remote software version 1.2.27
unix1.jinr.dubna.su: Waiting for server public key.
unix1.jinr.dubna.su: Received server public key (768 bits) and host key (1024 bits).
unix1.jinr.dubna.su: Host 'unix2' is known and matches the host key.
unix1.jinr.dubna.su: Initializing random; seed file /home/lavr/.ssh/random_seed
unix1.jinr.dubna.su: Encryption type: idea
unix1.jinr.dubna.su: Sent encrypted session key.
unix1.jinr.dubna.su: Installing crc compensation attack detector.
unix1.jinr.dubna.su: Received encrypted confirmation.
unix1.jinr.dubna.su: Trying rhosts or /etc/hosts.equiv with RSA host authentication.
unix1.jinr.dubna.su: Remote: Rhosts/hosts.equiv authentication refused: client user 'lavr', server user 'lavr', client host 'unix1.jinr.dubna.su'.
unix1.jinr.dubna.su: Server refused our rhosts authentication or host key.
unix1.jinr.dubna.su: Connection to authentication agent opened.
unix1.jinr.dubna.su: Trying RSA authentication via agent with 'lavr@unix1.jinr.dubna.su'
unix1.jinr.dubna.su: Server refused our key.
unix1.jinr.dubna.su: RSA authentication using agent refused.
unix1.jinr.dubna.su: Trying RSA authentication with key 'lavr@unix1.jinr.dubna.su'
unix1.jinr.dubna.su: Server refused our key.
unix1.jinr.dubna.su: Doing password authentication.
lavr@unix2's password:
^^^^^^^^^^^^^^^^^^^^^^--- ������ ������ � ������� �� unix2.

unix1.jinr.dubna.su: Requesting pty.
unix1.jinr.dubna.su: Failed to get local xauth data.
unix1.jinr.dubna.su: Requesting X11 forwarding with authentication spoofing.
unix1.jinr.dubna.su: Requesting authentication agent forwarding.
unix1.jinr.dubna.su: Requesting shell.
unix1.jinr.dubna.su: Entering interactive session.
Last login: Fri Apr  7 15:33:57 2000 from unix1.jinr.dubna
Copyright (c) 1980, 1983, 1986, 1988, 1990, 1991, 1993, 1994
        The Regents of the University of California.   All rights reserved.

FreeBSD 2.2.8-STABLE (MMTH) #0: Sun Jan  9 22:37:00 MSK 2000

Welcome to FreeBSD!

Handbook is in /usr/share/doc/handbook and the FAQ in /usr/share/doc/FAQ.
lynx /usr/share/doc/handbook & lynx /usr/share/doc/FAQ.

No new messages.
mammoth:/usr/home/lavr>
����� ����� �������� ������ ���� � ������������. ������� �������� ���
��������� ������ �� ��� ���� ��������� � ���� ������ ��� ��������������
SSH ������� ��������� �������� ������ � ���� ����� �������������
���������� � ��������� �������, �� �������� ���� ������ ���� �����������. �
���������� ����������� �� 22-��� �����.
������ ������� ����������� ��������� «public key» ������������
lavr � ���������� ������ unix2 — unix1:~lavr/.ssh/identity.pub ��� ������������� ������ �� ������ unix2.
��� ����� ���������� �� ��������� ������ unix2 ������� ���� ~lavr/.ssh/authorized_keys � ��������� � ���� «��������� ����»
������� ��� ��������� � ����� unix1:~lavr/.ssh/identity.pub.
���������� ����������, ����������� ������� authorized_keys:
������ ����������� ����� unix1:~lavr/.ssh/identity.pub
---------------------------- identity.pub ------------------------------------
1024 33 123455613571294786678234678124109412884011689992618043976213690319207626
04778809267037467162812346789078213478908712346796123474787443160033234663145614
49429937525705396999378436889184517007432662261198826716033688101069276271769654
25643258747621735477817990558818651836009050064859034674736459969312463503021 la
vr@unix1.jinr.dubna.su
---------------------------- end of identity.pub -----------------------------

��������� ���� ��������� ���� - ��� ���� ������ ������� ���������� �����������
� ���� authorized_keys �� ������ unix2, ������ ���������� ��� ���������:

      unix1:~lavr/.ssh/identity.pub -> unix2:~lavr/.ssh/authorized_keys

unix2:/home/lavr/.ssh> chmod 0600 authorized_keys
unix2:/usr/home/lavr/.ssh> ls -la authorized_keys
-rw-------  1 lavr  dug  343  7 ��� 15:18 authorized_keys
unix2:/usr/home/lavr/.ssh>


         Client (workplace)  <---------------->  Server (remote machine)
          ssh/slogin/scp     <---------------->    sshd

 unix1:~lavr/.ssh/                     unix2:~lavr/.ssh/
                 /[authorized_keys]  |                 /authorized_keys �
                 /identity           | ��������� ������ lavr@unix1
                 /identity.pub       |
                 /known_hosts        |
                 /random_seed        |
                                     |
                                     |
��������� �������� SSH ��� ������������� authorized_keys:
unix1:/home/lavr> slogin -v unix2
SSH Version 1.2.26 [i386-unknown-freebsd2.2.8], protocol version 1.5.
Compiled with RSAREF.
unix1.jinr.dubna.su: Reading configuration data /usr/local/etc/ssh_config
unix1.jinr.dubna.su: ssh_connect: getuid 310 geteuid 0 anon 0
unix1.jinr.dubna.su: Connecting to unix2 [159.93.17.122] port 22.
unix1.jinr.dubna.su: Allocated local port 786.
unix1.jinr.dubna.su: Connection established.
unix1.jinr.dubna.su: Remote protocol version 1.5, remote software version 1.2.27
unix1.jinr.dubna.su: Waiting for server public key.
unix1.jinr.dubna.su: Received server public key (768 bits) and host key (1024 bits).
unix1.jinr.dubna.su: Host 'unix2' is known and matches the host key.
unix1.jinr.dubna.su: Initializing random; seed file /home/lavr/.ssh/random_seed
unix1.jinr.dubna.su: Encryption type: idea
unix1.jinr.dubna.su: Sent encrypted session key.
unix1.jinr.dubna.su: Installing crc compensation attack detector.
unix1.jinr.dubna.su: Received encrypted confirmation.
unix1.jinr.dubna.su: Trying rhosts or /etc/hosts.equiv with RSA host authentication.
unix1.jinr.dubna.su: Remote: Rhosts/hosts.equiv authentication refused: client user 'lavr', server user 'lavr', client host 'unix1.jinr.dubna.su'.
unix1.jinr.dubna.su: Server refused our rhosts authentication or host key.
unix1.jinr.dubna.su: Connection to authentication agent opened.
unix1.jinr.dubna.su: Trying RSA authentication via agent with 'lavr@unix1.jinr.dubna.su'
unix1.jinr.dubna.su: Received RSA challenge from server.
unix1.jinr.dubna.su: Sending response to RSA challenge.
unix1.jinr.dubna.su: Remote: RSA authentication accepted.
unix1.jinr.dubna.su: RSA authentication accepted by server.
unix1.jinr.dubna.su: Requesting pty.
unix1.jinr.dubna.su: Failed to get local xauth data.
unix1.jinr.dubna.su: Requesting X11 forwarding with authentication spoofing.
unix1.jinr.dubna.su: Requesting authentication agent forwarding.
unix1.jinr.dubna.su: Requesting shell.
unix1.jinr.dubna.su: Entering interactive session.
Last login: Fri Apr  7 15:37:05 2000 from unix1.jinr.dubna
Copyright (c) 1980, 1983, 1986, 1988, 1990, 1991, 1993, 1994
        The Regents of the University of California.   All rights reserved.

FreeBSD 2.2.8-STABLE (MMTH) #0: Sun Jan  9 22:37:00 MSK 2000

Welcome to FreeBSD!

Handbook is in /usr/share/doc/handbook and the FAQ in /usr/share/doc/FAQ.
lynx /usr/share/doc/handbook & lynx /usr/share/doc/FAQ.

No new messages.
mammoth:/usr/home/lavr>
��� � ����������� �������� — ������ ������� �� ��������� ��������� ��
��������� ������� ������������ lavr@unix1. ��� ����� ���� ��������� ��� ������
������������� ������� �� ���������, ������ �������� �� ��������� �����
� ���� authorized_keys ��� ������, ���� �� ���������� ������� ���, ����
��������� ��������. � �������� ������� ��������� ������������ lavr@unix1
� unixgems@cv, �� ��� ��� ����� -v, �� ���� ��� ��������:
unix1:/home/lavr> slogin cv -l unixgems
No mail.
No new messages.
[cv]~ > ls -la .ssh
total 6
drwxr-xr-x  2 unixgems      512 Mar 17 15:42 .
drwxr-xr-x 10 unixgems     1024 Apr  7 17:00 ..
-rw-------  1 unixgems     1004 Mar 17 15:45 authorized_keys
-rw-------  1 unixgems      512 Mar 26 16:36 random_seed
[cv]~ >
��������� ���������� ����� cv:~unixgems/.ssh/authorized_keys:
[cv]~/.ssh > cat authorized_keys
1024 33 678678123496923479123479165242109412884011689992618043976213690319207626
04778809267037467162833562928533292936139256720809420334787443160033234663145614
49429937525705396999378436889184517007432662261198826716033688101069276271769654
25643258747621735477817990558818651836009050064859034674736459969312463503021
lavr@unix1.jinr.dubna.su
1024 37 137290359433182513579617890789123467129671297912312761273466645672942194
55970778052199218487445994523144629525988441011878648710134855446588870011860160
77772308703155696414837775201650380942285951978078879612311758535089405534081292
94415364237239835774809190340205754563617283970410932262411362690843796366679
grom@ultra.jinr.dubna.su
1024 37 130519989598501766767291364712467912674967231401723846127349672134678318
22302017753994633382264332578230406493484282790872111790029413922641217785693235
71826624741446328242429959045190528987359008994056451409547886075549563303970423
73079581597300609261185396227802478893345430979943132249249559815951890929333
serg@sunhe.jinr.ru
[cv]~/.ssh > id
uid=8333(unixgems) gid=100(dug) groups=100(dug)
[cv]~/.ssh >
�� ����������� ����� authorized_keys �� ����� ��� ������������
unixgems@cv ��������� �������� ��� ����� account ����� ����������������:
- lavr@unix1.jinr.dubna.su
- grom@ultra.jinr.dubna.su
- serg@sunhe.jinr.ru
�� �������� — ��������� ���� ������������ �� ����
���� ����� ������.
���� �� ��������� �������.
��� �������������� ����� �� ��������� ������� ����� ������������ ����
slogin,
���� ssh �������, ��� ���������� ���� � �� ��. ���������� �������
������ ���� ������� �������� — ��� ��������� �������. �� ���������, ���
������ ��� ������-����� ��� ����� � ���������� �� ����� ������������
��������.
unix1% slogin spp
 Enter passphrase for RSA key 'lavr@spp.jinr.dubna.su': pust' vsegda 2000
 Last login: Wed Oct 16 20:37:00 1996 from idefix
 [more output from the remote machine]
spp%
�� ������ �������� ����������� ��� ����� passphrase �������� ��
����� ����� ������������ � ������. �� ��� ����� �� ������ ��������� ������
passphrase, �� ���� �������, ����� ������ ��������� �� � ������.
(��. ������������� ssh-add)
����������: ������ ������ �� ������������ �����������
passphrase
����� ���� ������� � ������ � ���������� ��������� ���������� � ��������������
��������� � ������ �����, �� � ����� $HOME ����������� ������������ �����
NFS, ���� � ��� ��������� �������� ������� SSH, ���� � ����������
����������� X-Window.
���� ���� ��������������� ��� �� ����� ��������, ��������� � ���������,
�����������, �� ������ ������������ ����� «-l username» ��� ��������
����� �� ��������� �������. ��� ��������:
unix1% slogin -l lavr nusun
 Last login: Sun Oct 13 14:55:17 1997 from nusun.jinr.ru
 [more output from the remote machine]
nusun%
��� �������� ��������� � ����� ������������ ��� ��������� �������.
���� � ��� �������� �����-���� �������� ��� ����� �� ��������� �������
����������� ����� -v ��� ��������� ���������� ���������� � ��� ����
�������� �������� ����� ���� ��� �� ���������� � ��� ������.
��������:
unix1% slogin -v cv
SSH Version 1.2.22 [i386-unknown-freebsd2.2.5], protocol version 1.5.
Standard version.  Does not use RSAREF.
unix1.jinr.dubna.su: Reading configuration data /usr/local/etc/ssh_config
unix1.jinr.dubna.su: ssh_connect: getuid 310 geteuid 0 anon 0
unix1.jinr.dubna.su: Connecting to cv [159.93.17.13] port 22.
unix1.jinr.dubna.su: Allocated local port 777.
unix1.jinr.dubna.su: Connection established.
unix1.jinr.dubna.su: Remote protocol version 1.5, remote software version 1.2.22
unix1.jinr.dubna.su: Waiting for server public key.
unix1.jinr.dubna.su: Received server public key (768 bits) and host key (1024 bi
ts).
unix1.jinr.dubna.su: Host 'cv' is known and matches the host key.
unix1.jinr.dubna.su: Initializing random; seed file /home/lavr/.ssh/random_seed
unix1.jinr.dubna.su: Encryption type: idea
unix1.jinr.dubna.su: Sent encrypted session key.
unix1.jinr.dubna.su: Received encrypted confirmation.
unix1.jinr.dubna.su: Trying rhosts or /etc/hosts.equiv with RSA host authenticat
ion.
unix1.jinr.dubna.su: Remote: Accepted by .shosts.
unix1.jinr.dubna.su: Received RSA challenge for host key from server.
unix1.jinr.dubna.su: Sending response to host key RSA challenge.
unix1.jinr.dubna.su: Remote: Rhosts with RSA host authentication accepted.
unix1.jinr.dubna.su: Rhosts or /etc/hosts.equiv with RSA host authentication acc
epted by server.
unix1.jinr.dubna.su: Requesting pty.
unix1.jinr.dubna.su: Failed to get local xauth data.
unix1.jinr.dubna.su: Requesting X11 forwarding with authentication spoofing.
unix1.jinr.dubna.su: Requesting authentication agent forwarding.
unix1.jinr.dubna.su: Requesting shell.
unix1.jinr.dubna.su: Entering interactive session.
Last login: Tue Jun 30 08:21:28 1998 from cv.jinr.dubna.su

        Welcome to ConvexOS

    CONVEX computer Corporation

 /cern (CERN Soft) dirs tree
         and
 /local dirs tree
 mounted from BCV due to h/w problem.

 Samba services disabled temporary(?).

        Sorry.

No mail.
Message 107:
From: popovla
Date: Fri Jun 19 11:41:38 1998
Subject: LCTA 2-d floor servers
(8 lines) Display this message? (y)es, (n)o, (q)uit, (h)elp [y]: n
--Flushed--
cv:/home/b17c/lavr>
��������� slogin ���� ����� ���� ��� ���� �� ssh, ���� ��
��������� ����� �� ��������� ������, ����� ���������� ���:
unix1:/home/lavr> ssh -l lavr unix2
Last login: Fri Apr  7 17:17:55 2000 from unix1.jinr.dubna
Copyright (c) 1980, 1983, 1986, 1988, 1990, 1991, 1993, 1994
        The Regents of the University of California.   All rights reserved.

FreeBSD 2.2.8-STABLE (MMTH) #0: Sun Jan  9 22:37:00 MSK 2000

Welcome to FreeBSD!

Handbook is in /usr/share/doc/handbook and the FAQ in /usr/share/doc/FAQ.
lynx /usr/share/doc/handbook & lynx /usr/share/doc/FAQ.

No new messages.
mammoth:/usr/home/lavr>
�������� ������ ����������� � ������.
���� ��� ���������� ����� ��������� ���������� � ��������� ��������,
�� �������� ����� ������� ��������� ��� ����� ����� ssh-agent. �����
����� ������������ ���������� ������ ������������ ��� ���� ������ ��� ��������
����� ����������.
��� ������� ssh-agent � �������� ��������� ���������� �������
��� ������� ������� ����� �� ��������, ������ ��� ���� ��� shell����
������� ������� ������� �����. ������������� �� ������ �� ����� �������
��� ����� ����� ������� �� ������.
unix1% ssh-agent $SHELL
unix1%
������ ��� ������ �������� �������� ����� � ������ ����� ��� ���� ��������
��� ������ ������.
���������� ������ ������� �����
X11 �� ��������� �������.
���� � ��� ������� ��������� ������ � ������������� � ����������� ������
X-Window
system, �� ������ �������� ����������� ������� ����� �� � ������� �
������ ��� ������� ����� ssh-agent. ������ X-Window system
����������� ���������� ������� startx � �������������� ��������
�� ��������� — .xinitrc ��� ��� ��� ���������� ���������� �����
xinitrc.
�������� ��� ����� ��������� ���:
unix1% ssh-agent startx &
���� ���� ������� ������� ����� ����������� ������, ��� � ���� �������,
�� �������� ������ ��������� X-Window� ������� ������, ��� �������
�������� ��������������������� ������������ ��� ������ �� ������� � �������
�� ���������� X-Window, ���������� �� ���.
��������� ��������������� ���� ������� ���� ���� ������� ������� X-Window
��� ����� ���������
X11 forwarding:
- ������ X11 ������ ����� ssh-agent
- ������� ������ � � �������������� ssh-agent
������ ������ ������� � ��� ��� ������������ ���������� � ��������������
������� ���������� ������� ����� �������������� � �������������� ssh-agent.
����� ����� ��������� ����� ������������� ��������� �� ������ ������� �
��������, �������� �������� alias �� ������� startx �� �������
��������:
unix1% ls -la /usr/local[/etc]/.[a-z]*
 -rw-r--r--  1 root  wheel     6 Jun  6  1997 /usr/local/etc/.bash_logout
 -rw-r--r--  1 root  wheel  2361 Dec 29  1997 /usr/local/etc/.bash_profile
 -rw-r--r--  1 root  wheel  1543 Dec 29  1997 /usr/local/etc/.bashrc
 -rwxr-xr-x  1 root  wheel  1267 May 18 13:46 /usr/local/etc/.cshrc
 -rwxr-xr-x  1 root  wheel  1534 Jan 23 14:59 /usr/local/etc/.login
unix1%
�� ���� �������� ������������ � �������� ���������� � �������� SHELL: sh,bash,csh,tcsh,
� ��� � ������� ����� ��������� ��������������� ������� ����������� �������,
������� ������ ��������� � ���������� /etc/skel ��� � ����������� �� �������
� ���� ���������� �� �������� � ����� �������-������� �������� ������������
� ����������� ��������� ���������������, � ������� � ����������� alias
�� startx.
�������:
���������������� ����� ��������� �����:
unix1% cat .cshrc
source /usr/local/etc/.cshrc
unix1% cat .login
source /usr/local/etc/.login
unix1% cat .bashrc
. /usr/local/etc/.bashrc
unix1% cat .bash_profile
. /usr/local/etc/.bash_profile
unix1%
������� �� /usr/local/etc/.bashrc � /usr/local/etc/.cshrc[.login] ��������������
(������ ������ .login ������� �������)
unix1% grep startx /usr/local/etc/.[a-z]*
/usr/local/etc/.bashrc:alias startx='ssh-agent startx'
/usr/local/etc/.cshrc:alias startx  'ssh-agent startx'
unix1%
��������������� ��������� ������������ � � ��������� xinitrc � �������
����������� �������� �� ���������� ������������.
unix1% grep ssh /usr/X11/lib/X11/xinit/xinitrc
#-ssh-auth
 until ssh-askpass | ssh-add -p; do true; done
unix1%
��������� ���� ������ ������ ����������� �� ������������� X-clients
� ������ �������� ���������.
----------------------- cut from xinitrc -----------------------------------
...
until ssh-askpass | ssh-add -p; do true; done

xterm -geometry 80x40+8+9 -name login -ls -sb &
xconsole -geometry 480x130+0-0 -daemon -notify -verbose -fn fixed &
exec fvwm
----------------------- end of cut from xinitrc ----------------------------
������[� �����] ����� ������� � ��� ��� ������������ ����� ������������
������ ���� ������� ��������� ����� — ����� �����, � �������������� ����
.xinitrc.
�������� ���� ���� �������� ���������� ����� ��������� ������� ���������
� ��������������, ���� ������������ ���� ������ ����, ���� ���������� �����
���������� ���������� ������� �����������������, �� ������������ ���������
������������ ����� �������. � ������ ������������ ������ ���� ���������
��������������� �������, ������ �� ������� ���������� �� ������ �� �����������������,
�� � �� ���� � �����.
������ ������ ���������� ���� ���������� �� ������� ��� ������ �����
���� ��������������� ��� ��������, � ������������ ���� ����, � ������ ������
�������������� ������ X-Window ����� ssh-agent, � � ������ ������� ������������
����� ���������� ���� — ��������� ������������� ��� �������� �������, ���
� � �������������� ssh-agent.
������ ��������������� ��������� ������ startx �������� � startX
unix1% mv startx startX
� startx ���������� ��������� �������:
#!/bin/sh
if [ -d $HOME/.ssh ]
 then ssh-agent startX
 else startX
fi
��������������� ���������� ������ � � ��������� xinitrc �� ������ x-clients
� �������� ���������
------------------ cut from xinitrc ---------------------------------------
if [ -d $HOME/.ssh ]
 then until ssh-askpass | ssh-add -p; do true; done
fi
------------------ cut here -----------------------------------------------
����������: ��� �������������� ����� �������������� ��������
�������������� � ����������� ���������� ������ X-Window ����� ssh-agent. ���
����� �� ���������� ������� ���������:
unix1% cd
unix1% cp /usr/X11[R...]/lib/X11/xinit/xinitrc .xinitrc
����� �������� ������ «until ssh-askpass | ssh-add -p; do true; done» �
���� .xinitrc, � ������ �����, ������� ���� � � ����������� �� �������������
SHELL �������� alias �� ����� startx, ������� ����.
������ ���������, ��� �������������� �������� ������� X-Window �� ���������
������! [R…] — �������� ��� ���� ������� �� ���� ��� � ����� ������ X-Window
�����������.
���������� ������ X-Window ����� ������
xdm.
���� �� ����� ������� ��� ������� ������� X-Window ����������� ����� �����
XDM, ��� ���������� �������� ����� ������� ��������� ������� ������� �����
�������� ��� ssh-agent. ���������� ������, ����������� ������ � ����������
— startx. ���������� ������������� �������� ����� .xinitrc, ������� � ����
������� ����� ���������� �� ���������� ����� .xsession.
� �������� ������� �������� .xsession ����, ssh-agent �������� ������
��� ������� � �������� ���������� ������������ ������������� .ssh.
#!/bin/sh
if [ -d $HOME/.ssh ]
   then EXEC="exec ssh-agent"
   else EXEC="exec"
fi
if [ -x $HOME/.xinitrc ]
   then $EXEC $HOME/.xinitrc
   else $EXEC xterm -geometry 80x24+0-60 -ls
fi
�� �������� ��������� ������ ����� �������� � �������� �� ������������:
unix1% chmod a+x ~/.xinitrc ~/.xsession
����������: ���� ��� ������������� �� ����������� �� ����������
������� ��� ���������� ��������� ���� ����� .xinitrc � .xsession, ������
���� � ����� ������� X-Window ����������� ���� — ������������� �������� �����
����������������� � ���������� ��������������. �� ��� ������ ����� �������
���������� � �������������� � �������� ��� ������� � ��� �������� �����
����, �� ������ ������������ �������.
������: ��� ���������� �� ����� ���� ��������� � X-terminal‘� �������
�������� ����� ������ � ������������ ����� ������� � ����.
���������� ������� ����������� � ������.
�� ���� ��� ���� ���������� ����� ������������ ��� ������������� passphrase,
�� ������ ������������ ssh-add ��� ���������� ����������� ������ � ������.
��� ���������� ������� ������ � ������ ��������� ������� �� ����� ����
�������������� �����. � passphrase ����� ���������� ��� ���������� ����
������ � �� ����� ������������ ��� ����� � ����������.
unix1% ssh-add
 Need passphrase for /home/lavr/.ssh/identity (lavr@unix1.jinr.dubna.su).
 Enter passphrase: pust' vsegda 2000
 Identity added: /home/lavr/.ssh/identity (lavr@unix1.jinr.dubna.su)
����� ������� �������� ��� ����� �� identity ��� ����� �������� ��� ������
����, ���� ��� �� ���������� �������� �� ���������, ������ �� ���������
����� ��� ��� ����� ��������� ��� «private key».
����� -d ��������� ������� ����� �� ������, �� �������� ��� � SSH ���
������� «ssh-delete».
unix1% ssh-add -d ~/.ssh/isp
�������� ������ ���� ������� ������ � ������ — ����� -l.
unix1% ssh-add -l
 1024 33 [lots of numbers] lavr@unix1.jinr.dubna.su
�� � ������� �� ������ ������������ ���� -D ��� �������� ���� ������ ��
������.
unix1% ssh-add -D
����� ���������� ���� �� �������� ����� � ������ �� ��������� ������� �
�� ������ ������ ���������� ���������� �� ��� ��� ���� ����� �� ����� �������.
������ ������ �� ��������� �������.
������� ssh ����� ��������� ������� ��� ������������� ������� ��������
��� ������ �� ��������� ������� ��� ������������� �������������� �����
�� ���. ��������� �������� ������� — �����, ����� ���� ��������� � �����������
�� ��������� �������. ���� �������� �������� ������:
unix1% ssh cv who
 ckoch    tty03   Jun 30 14:09
 lavr     ttyp0   Jun 30 11:21   (cv.jinr.dubna.su)
 shchepun ttyp1   Jun 30 14:21   (axpls7.lns.infn.)
 grom     ttyp2   Jun 29 15:27   (unix0.jinr.dubna)
 veron    ttyp3   Jun 30 13:32   (159.93.22.23)
 ruben    ttyp4   Jun 30 13:29   (159.93.17.40)
 grom     ttyp5   Jun 30 12:32   (unix0.jinr.dubna)
 luna     ttyp6   Jun 30 11:38   (dct160.jinr.dubn)
 annask   ttypa   Jun 30 13:40   (xct174:0.0)
 vvm      ttypb   Jun 29 16:18   (cv.jinr.dubna.su)
 smanosh  ttypd   Jun 30 14:03   (bcv.jinr.dubna.s)
unix1%
���� �� ��������� � X-Window System, �� ������ ��������� xterm ���
��������� �������������� ������ �� ��������� ������:
unix1% ssh -n cv xterm & [1] 15866
unix1%
������������� ����� -n ��������� ������ �� ������������ ����� (��������������� � /dev/nul)
� ��������� ssh � ������� ������. ������ �� ����� ������������ ������ �����
������� ���� ��������� ������� �������� ����������� ��� ������ passphrase
��� passowrd.
����������� ������ ����� ���������.
�� ������ ���������� ����� ����� ��������� � ��������� ��������� ���
����� ����� ���������� ��������� ��������� ������� scp � ��� ��� �� �������
������ ���� ������ ����������� �� ��������� �������. ��� �������� �����
�� ��������� ������ ���������� ���� ����� ������ ����� ������� ��� ���������
������ � �������� �� ����� ����������, host:filename.
���� �� �������� ��� ��������� ����� ��� ���������� ��� �����������,
����� ����� �������������� ��� ��������� �����������. ����� ������� ������
������� ����� ���������� ����������� ����� � ��������� � ������� ����������
����������� �����:
unix1% scp -p spp:dead.letter .
unix1%
����� -p �������������, ��� ��������� �� �� ����� ��� �������� �����,
����� �� ����� �����������, ������� � ������ ������ ����������� �� �������������
����������� �����. ������ ��� ��� ������� ������������ ������������� �
������� �� ������ ����� � �����.
unix1% scp -r cv:source src
unix1%
� ������ ������� ����� -r �������� ��� ���������� ���������� �����������
���������� source ������������� �� ������ «cv» � ���������� src �� «unix1».
����� ����� �������� ��� ��� �������� ������:
-C — ����������� � �����������, ������� ��� ��� ������ ������������
������ ����� ��� ����������� ��� ������ ������.
-v — ��� � � ��������� �������� ssh[slogin] ������ ���
������ ���������� ����������.
���������� �������� ��� ������������� ����� �� ��������� � ���������
�������� ����������� �� �������:
- �� ��������� �� ���� ����������� ������� ����������
- �� ��������� �� ���� ����������� �������� ���������� ������������
unix1% scp bcv:ftptmp/ftp.out spp:temp/ftp.out.bcv
unix1%
����������: ���������� ��������, ��� ��� ����������� � ���������
������ ��
            ���������, ����������� ���������� ��������������� ����� ���� �����
            �������� ��� ������� ���������.
��������� ����������� ��������.
�������� �� ��������� ����� ��������������� � ���������� ������ �������������
� ����� $HOME/.ssh/config � ���������� ��� ������������ ���������� ����� —
/etc/ssh_config.
������ ������ � ������������ ���������� � ������� ����� HOST. ��� �������
����� �������� ����� ������������ ������� ������������:
- * ? ������������ ������ �������
- * * ������������� ������ ��� ������������������ ������ ���������� ��������
������ ������������ ��������� �������� ����� (��������� � ��������):
Compression yes/no (yes)
������������� ���������� � �����������
CompressionLevel 1-9 (6)
������� ������: 1 — ����� �������,
9 — ����� ��������� (�����������
������������ ����������), �����
����� ������������ �� ��������� �����������
FallBackToRsh yes/no (yes)
���� �� ������� ���������� ���������
���������� � �������������� SSH,
�������� ������� �� �������������
Rsh, � �������� �� ������� �����������
����������� ������ ����� �����������
KeepAlive yes/no (yes)
��������� ������������� ���������
TCP keepalive. ����� ������������,
��������� ���������� ������� �����
� ���� � ������������� ���������
���������� ��� ������ ��� ������
����������.
User account (local account)
�������� ��� �� ��������� �������.
������ �������� ��� ��������������
������ ������������� ����� -l.
���� ������ ����� ~/.ssh/config.
Host nusun.jinr.ru
User lavr Compression no
Host sunhe.jinr.ru
User lavr CompressionLevel 6
FallBackToRsh no
KeepAlive yes
Host *
Compression yes CompressionLevel 9
FallBackToRsh yes
KeepAlive no
�� ���������, ��� host-��������� ���������� ������� ���������� �� �������
��������� — ����� ���������� (��-���������), ��, ����� ��������� ��� ssh
������� � ����� ����� ����������������� �����, � ���� ������� ����������
� ������������� �������� ��� �������������� host‘�� � ��������.
�� �������� ������� �����, ��� ��� ���� hosts ������������� ��������
�� ������� ������ — ������� 9, � ��������� �� rsh � ��� keepalive. � ���
�� ����� � nusun �������� ��� account=lavr, � sunhe � ����� ������� �����������
� ����������� �� rsh ��� ��� �������� sshd � ��������� �����.
��� �������� ������� ������ ����� � ������������ ������� ����������� �� ssh/sshd.
��������� ssh-agent � CDE.
���� �� ��������� ����� ���� ������� � �������� ������� �� CDE
����� ssh-agent, ���� �������� ��������� �������:
- ������ ������:
- ���������� ����� root-����������, �������� �������: su root
- ������ �������� �������: cd /usr/dt/bin
- �������� �������: mv Xsession XsessionA
- �������� ���� 0005.ssh-addkey
- ��������� ����� ��������� ����� ����� ����� �� ���������� 0755
����������� �����-������, ��������� ����:
1. ����� ���� Xsession, ssh-agent �������� � ��� ������, ����
������������� ������������ ����� �������� ssh-keygen, �� ����������
���� $HOME/.ssh/identity.------------------------------ Xsession --------------------------------------- #!/bin/ksh # # This script starts ssh-agent if there is a defined $HOME/.ssh/identity # file. # if [ -f $HOME/.ssh/identity -a -x /usr/local/bin/ssh-agent ] ; then /usr/local/bin/ssh-agent /usr/dt/bin/XsessionA else /usr/dt/bin/XsessionA fi --------------------------- end of Xsession -----------------------------------
����, ����� ��������� ssh-agent ��� ���� ������, ������ ����������
identity ��� ���������� �� ������������ ����� passphrase, ���
����� ������-�����, ssh-add ���������� ��������� � ������ -p:� ����������� �� ���� ��� � ��� ���������� CDE, �������� ����
0005.LOCAL.ssh ���� � ���������� /etc/dt/config/Xsession.d/, ���� �
/usr/dt/config/Xsession.d/2. ��������� ���� 0005.LOCAL.ssh:
---------------------------- 0005.ssh-addkey ---------------------------------- #!/bin/ksh # if [ x$SSH_AUTHENTICATION_FD != x -o x$SSH_AUTHENTICATION_SOCKET != x -a -x /usr/local/bin/ssh-add ] then /usr/local/bin/ssh-add fi ------------------------- end of 0005.ssh-addkey ------------------------------ - ������ ������:
��� �� �������, ��������� ��������������.
- 1. ����������� /usr/dt/config/Xconfig, ��������� ������:
Dtlogin*session: /usr/dt/bin/start.Xsession
- 2. ������� ���� /usr/dt/bin/start.Xsession:
---------------------------- start.Xsession ----------------------------------- #!/bin/ksh if [ -f $HOME/.ssh/identity -a -x /usr/local/bin/ssh-agent ] ; then exec /usr/local/bin/ssh-agent /usr/dt/bin/Xsession "$@" else exec /usr/dt/bin/Xsession fi ------------------------- end of start.Xsession ------------------------------- - 3. ������� ���� /usr/dt/config/Xsession.d: ------------------------------ Xsession.d ------------------------------------- #!/bin/ksh # The following is needed if ssh-add can't find ssh-askpass: PATH=$PATH:/usr/local/bin if [ "$SSH_AGENT_PID" -a -x /usr/local/bin/ssh-add ] ; then /usr/local/bin/ssh-add < /dev/null fi --------------------------- end of Xsession.d ---------------------------------
- 4. �������������� ���� /usr/dt/config/C/Xresources:
�������� ������:

     Dtlogin*altDtStart1:          /usr/dt/bin/Xsession
��

     Dtlogin*altDtStart1:          /usr/dt/bin/start.Xsession
������ DtLogo.pm ��������� � /usr/dt/appconfig/icons/C/
� � ���� �������� /usr/dt/config/C/Xresources ������ ��������
������:Dtlogin*logo*bitmapFile: /usr/dt/appconfig/icons/C/DtLogo.pm
������ ������� ������ DtLogo.pm
- 1. ����������� /usr/dt/config/Xconfig, ��������� ������:
SSH � ���������.
� ������� SSH ����� �������� ��������� ����������� ��� ����� TCP ������,
� ������� �� UDP. �������� ����� ��������� ����� ������� ������������ ���������
��� POP/SMTP/FTP ��� PPP. ����� ������ ����� �������� ����� �������������,
����� ��������� ���������� ����� ����� � SSH-FAQ ��� � ������������.
����� ���� ���� ��������:
ssh -L 25:smtp.target.domain:25 target &
��������� ��� SMTP
1. myhost$ ssh -L 1234:ftphost.example.com:21 ssh-server
2.

myhost$ ftp localhost 1234

220 ftphost FTP server (Foonix 08/15) ready.

Name: (myhost:yourname):

331 Password required for yourname

Password:

230 User yourname logged in
��� ������ ���������� FTP � ������ myhost �� ������ ftphost
���� ����� �������� ��� ��� ��� ������ �� ��������� ������ myhost,
���������� ����� ��� �������� ����, ������ ��� redirect ����� 1., � ������ ��������������� ��� ������� ftp-client.
����������: ��� ����� ������ ���������� ������� SSH-FAQ.
������ ���� ��� ������� ������� ���������� ��� ������ �� ftp:
- SafeTP — ������-������ ��� �������� ������ ������.
- sftp — ������ �� ���� �������������� SSH, ������ ��� OS Unix’es
��������� ��������.
� ������ ������� ���������� ��������� SSH-FAQ, ���� ��� �� ������� �
������� ����� �������, ���������� �������� ����� � mail-������� ssh,
� ���� ������ �������� ������������� �� ������������ ���� bugs.
��� �� ����� �������������� �������:
- ��� ������� ������������, ��������� � ��� ��� � ��� ������ ��� ��������
������� � ssh �� ������ ������� ������ - ��������� ��������� �� �� ����� �� ����� ������� �����.
- ��������� ������� SSH ������ �� ��������� �������.
- ���������, �� �������� �� ���� HOME-DIR ������������ �� NFS
��� ������ ����� � ��� � ��� ����� �� ��� �� ��������� �����, � ����� �� ���
�� ����������� ��� ��������� ������� �����. - ������ ����� sshd ������� � ������, ��������� �� Solaris — ��������
`kill -HUP sshd-process-id` - ������ ���������� �������� ����������� ��-�� ������������� ���������
��� ���������� SSH c X-Window, ����� � ������� ������� ��������
��� GUI: OPENWIN � X-Window[X11R[N]. ������ ����������
�������� .Xauthority, ����� ������ ��� �������� �/��� ����� �������� ��� �
������� ��������.
������� SSH ��� Windows.
����������: ���� ����� � ������ �����, ������ ��������� — ������ �����.
� ��������� � ���� �� ������� ������� ��� ������������� � OS Unix, � ���
Windows ��� �� ����� �� ����� PC.
���� ����� ����� �������� ������ �����:
- ������ �� ������� SSH ��� ��������� OS
������ �� ������ �������� ���������
����������
- ��� ������� ������ �� �����
- ����� ��������� �������� ����� ����� ����������
- F-Secure — ������������ ���������� ��� MS Windows
- ��������� �������� SSH.
- ��������� ������ SSH.
Copyleft Andrey Lavrentyev
SSH — (Secure Shell) — это протокол удаленного управления компьютером с операционной системой Linux. В основном ssh используется для удаленного управления серверами через терминал. Если вы администратор нескольких серверов или даже продвинутый веб-мастер, то наверное, вы часто сталкиваетесь с необходимостью работать с тем или иным компьютером по ssh. В Linux для этого используется сервер ssh на машине, к которой нужно подключится и клиент, на той из которой подключаются.
В этой инструкции мы рассмотрим как пользоваться ssh, а также ее возможности, о которых вы даже не знали. Скорее всего, вы уже знаете как подключиться к серверу по ssh, но у этой утилиты есть еще много возможностей, таких как передача файлов ssh, подключение без пароля или выполнение скрипта на удаленном сервере. Все это мы и рассмотрим далее в статье. Но начнем с самых основ.
Базовый синтаксис
Синтаксис команды выглядит следующим образом:
$ ssh [опции] имя пользователя@сервер [команда]
Важно заметить что ssh может работать по двум версиям протокола. Версии 1 и 2. Понятное дело, что версия 2 лучше и поддерживает больше типов шифрования и аутентификации. Больше в этой статье об отличиях протоколов мы говорить не будем и я буду подразумевать что вы используете версию 2.
Теперь давайте рассмотрим самые основные опции команды ssh:
- f — перевести ssh в фоновый режим;
- g — разрешить удаленным машинам обращаться к локальным портам;
- l — имя пользователя в системе;
- n — перенаправить стандартный вывод в /dev/null;
- p — порт ssh на удаленной машине;
- q — не показывать сообщения об ошибках;
- v — режим отладки;
- x — отключить перенаправление X11;
- X — включить перенаправление Х11;
- C — включить сжатие.
Это далеко не все опции утилиты, остальные выходят за рамки данной статьи. Многие настройки работы ssh можно изменять через конфигурационный файл ~/.ssh/config но здесь мы это тоже подробно рассматривать не будем.
Настройка сервера SSH
Настройки сервера SSH находятся в файле /etc/ssh/sshd_config. Многие из них мы тоже трогать не будем. Рассмотрим только самые интересные. Сначала откройте файл /etc/ssh/sshd.conf
Порт ssh
По умолчанию ssh работает на порту 22. Но такое поведение небезопасно, поскольку злоумышленник знает этот порт и может попробовать выполнить Bruteforce атаку для перебора пароля. Порт задается строчкой:
Port 22
Поменяйте значение порта на нужное.
Протокол SSH
По умолчанию сервер ssh может работать по двум версиям протокола, для совместимости. Чтобы использовать только протокол версии два раскомментируйте строчку:
Protocol 2
И приведите ее к такому виду:
Protocol 2
Рут доступ
По умолчанию Root доступ по ssh разрешен, но такое поведение очень небезопасно, поэтому раскомментируйте строчку:
PermitRootLogin no
Доступ только определенного пользователя к SSH
Мы можем разрешить доступ к ssh только для определенного пользователя или группы. Для этого добавьте строчки:
AllowUsers User1, User2, User3

AllowGroups Group1, Group2, Group3
Здесь User1 и Group1 — пользователь и группа к которым нужно разрешить доступ.
Выполнение X11 приложений
Не все знают но есть возможность использовать ssh для запуска полноценных X11 приложений. Об этом мы поговорим ниже, но чтобы все заработало необходимо разрешить эту возможность на стороне сервера, добавьте такую строчку:
X11Forwarding yes
Основные опции рассмотрели, перед тем как переходить дальше, не забудьте перезагрузить ssh сервер чтобы сохранить изменения:
service sshd restart
Использование SSH
Основная цель этой статьи — показать интересные и полезные способы использования ssh, о которых, возможно, вы не знали. Переходим к самому вкусному — возможности ssh.
Подключение к серверу
Чтобы просто подключиться к серверу по SSH используйте такую команду:
ssh user@host
Выполнить команду
Мы привыкли подключаться к удаленному серверу, а уже потом выполнять нужные команды, но на самом деле утилита ssh позволяет сразу выполнить нужную команду без открытия терминала удаленной машины. Например:
ssh user@host ls
Выполнит команду ls на удаленном сервере и вернет ее вывод в текущий терминал.
Выполнить локальный скрипт
Выполним интерпретатор bash на удаленном сервере и передадим ему наш локальный скрипт с помощью перенаправления ввода Bash:
ssh user@host 'bash -s' < script.sh
Бекап на удаленный сервер и восстановление
Мы можем сохранять бекэп диска сразу на удаленном сервере с помощью ssh. Перенаправим вывод dd с помощью оператора перенаправления |, затем сохраним его на той стороне в файл:
sudo dd if=/dev/sda | ssh user@host 'dd of=sda.img'
Теперь чтобы восстановить состояние диска из сделанной копии выполните:
ssh user@host 'dd if=sda.img' | dd of=/dev/sda
Здесь и выше /dev/sda имя файла вашего жесткого диска.
Аутентификация без пароля
Использование ssh пароля для входа на сервер не только неудобно но и небезопасно, потому что этот пароль в любой момент может быть подобран. Самый надежный и часто используемый способ аутентификации — с помощью пары ключей RSA. Секретный ключ хранится на компьютере, а публичный используется на сервере для удостоверения пользователя.
Настроить такое поведение очень легко. Сначала создайте ключ командой:
ssh-keygen -t rsa
Во время создания ключа нужно будет ответить на несколько вопросов, расположение оставляйте по умолчанию, если хотите подключаться без пароля — поле Passphare тоже оставьте пустым.
Затем отправляем ключ на сервер:
ssh-copy-id -i ~/.ssh/id_rsa.pub user@host
Вот и все. Теперь при попытке подключится к этому серверу пароль запрашиваться не будет, а стазу произойдет подключение. Смотрите подробнее создание открытого ключа для ssh.
Взять пароль из локального файла
Напомню, что хранить пароли в обычных текстовых файлах небезопасно, но если хотите, то да — возможно. Для этого используется оператор перенаправления ввода Bash:
ssh user@host < local_file.txt
Изменить приветствие SSH
При входе по ssh может выводиться приветствие, изменить его очень легко. За это отвечает файл /etc/issue. Просто откройте этот файл и введите нужный текст:
vi /etc/issue
Welcome!
Смотрим неудачные попытки входа SSH
Хотите посмотреть были ли попытки неудачного доступа по ssh к вашему серверу и с каких IP адресов? Запросто, все запросы логируются в файл /var/log/secure, отфильтруем только нужные данные командой:
cat /var/log/secure | grep "Failed password for"
Передача файлов по SSH
Кроме выполнения команд, можно копировать файлы по ssh. Для этого используется утилита scp. Просто укажите файл, который нужно передать, удаленный сервер и папку на сервере, вот:
$ scp /адрес/локального/файла пользователь@хост:адрес/папки
Например:
scp ~/test.txt user@host:documents
Кроме утилиты scp, передача файлов ssh может быть выполнена более хитрым способом. Прочитаем файл и с помощью cat, передадим, а там сохраним поток в файл:
cat localfile | ssh user@host "cat > remotefile"
Или так:
ssh user@host "cat > remotefile" < localfile
Пойдем еще дальше, вы можете сжимать файлы перед передачей с помощью tar, а потом их сразу же на лету распаковывать:
tar czf - /home/user/file | ssh user@host tar -xvzf -C /home/remoteuser/
Такое копирование файлов ssh позволяет отправлять сразу целые папки.
Запуск графических приложений по ssh
Если вам нужно запустить то или иное графическое приложение на удаленной машине необязательно для этого использовать VNC, вы можете обойтись возможностями ssh. Программа будет выполняться на стороне сервера, а вам будет лишь транслироваться окно, чтобы вы могли сделать все что нужно. Причем все данные шифруются. Чтобы эта функция работала, нужно включить ее поддержку на стороне сервера.
Затем просто выполняем команду запуска графического приложения на удаленном сервере вот таким образом:
ssh -XC user@remotehost "eclipse"
Как вы уже видели опция X разрешает перенаправление X11 на стороне клиента, а С — сжатие данных.
Завершение сессии SSH
Если вы использовали SSH с нестабильным интернетом, когда соединение время от времени рвется, то вам уже, наверное, надоело закрывать терминал, потому что иначе, на первый взгляд, сеанс никак не прекратить. Когда соединение с удаленным сервером разорвано вы не можете ввести никакую команду и сочетания клавиш Ctrl+C, Ctrl+Z, Ctrl+D не работают. И не будут работать поскольку клиент пытается отправить эти команды на сервер. Но есть решение — Escape последовательности. Чтобы активировать их поддержку добавьте строку:
EscapeChar ~
В файл /etc/ssh/ssh_config. Теперь, чтобы разорвать SSH соединение достаточно нажать Enter и набрать:
~.
Другие управляющие символы можно узнать нажав:
~?
Туннели SSH
С помощью SSH туннелей вы можете пробросить порт с удалённого сервера на локальную машину. Это очень полезно, в первую очередь, для разработчиков. Для того чтобы пробросить порт с удалённой машины локальной используйте опцию -L и такой синтаксис:
$ ssh -L локальный_порт:удаленный_адрес:удаленный_порт пользователь@сервер
Например, сделаем удалённую базу данных доступной локально на порту 5555. Для этого выполните подставив свои значения:
$ ssh -N -L 5555:127.0.0.1:3306 root@losst-1
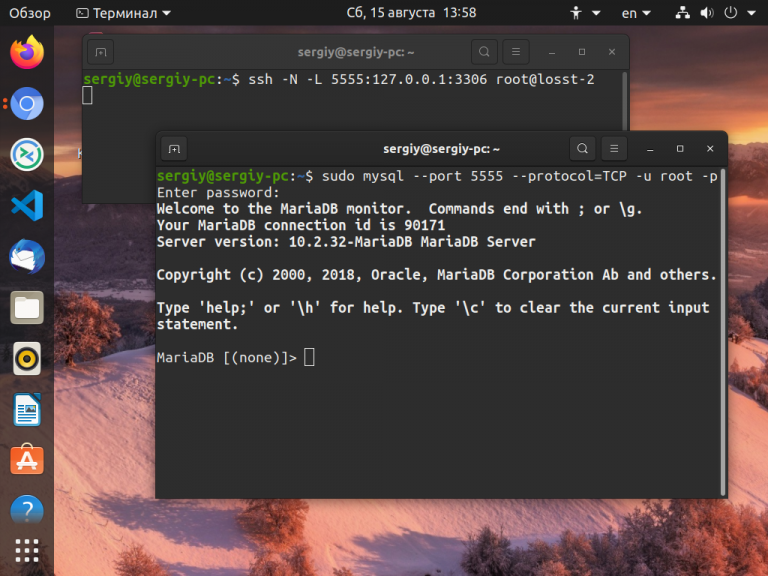
Опция -N сообщает, что команду на удалённой машине выполнять не нужно. Локальный порт — 5555, поскольку сервер баз данных слушает на локальном интерфейсе удалённой машины, то и здесь надо указывать адрес 127.0.0.1. А порт MySQL по умолчанию 3306. Если же вы хотите чтобы локальный сервис был доступен на удалённой машине, то следует использовать опцию -R:
$ ssh -N -R 5555:127.0.0.1:3306 root@losst-1
Теперь локальная база данных на порту 3306 будет доступна на удалённом сервере при обращении к порту 5555.
Выводы
Теперь вы знаете как пользоваться SSH. Как видите, технология SSH позволяет сделать намного больше чем можно предположить с первого взгляда, и это еще далеко не все. Какие интересные возможности SSH используете вы при повседневной работе? Поделитесь в комментариях!
Обнаружили ошибку в тексте? Сообщите мне об этом. Выделите текст с ошибкой и нажмите Ctrl+Enter.

Статья распространяется под лицензией Creative Commons ShareAlike 4.0 при копировании материала ссылка на источник обязательна .