Android-разработчица такси Maxim и ментор курса «Android-разработчик» Арина Мурашева подробно рассказывает, как установить и использовать Android Studio и как собирать и отлаживать приложения.
Для чего используется Android Studio?
Android Studio — это IDE (интегрированная среда разработки) для работы с платформой Android. Она позволяет разрабатывать приложения для смартфонов, планшетов, часов, телевизоров и других устройств на этой ОС.
Я использую Android Studio, потому что это официальная среда разработки, которую поддерживает Google. Она основана на IntelliJ IDEA от компании JetBrains, чьи продукты я люблю и использую еще со студенческих времен. В Android Studio те же горячие клавиши и интерфейс, что и в других продуктах JetBrains, поэтому для меня эта среда самая привычная и удобная.
Установка Android Studio
Установка Java SDK
Установите Java SDK независимо от того, планируете вы разрабатывать на Java или Kotlin. Для этого перейдите на официальный сайт Oracle в раздел Downloads и скачайте нужную версию Java SDK. Для разных проектов могут понадобиться разные версии, но если вы не знаете, какая нужна, — скачивайте последнюю.
Установка и настройка Android Studio
В отличие от многих инструментов разработки, за Android Studio не нужно платить. Чтобы скачать Android Studio, перейдите на официальный сайт для разработчиков Android и нажмите Download, согласитесь с условиями использования и нажмите Download Android Studio.
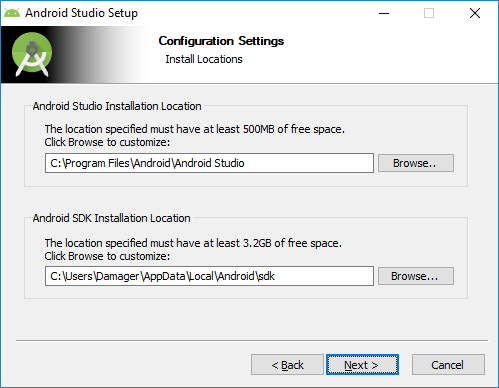
После завершения скачивания запустите установочный файл и начните процесс установки. Сначала выберите путь установки Android Studio и Android SDK. Оставьте пути по умолчанию или выберите свои.
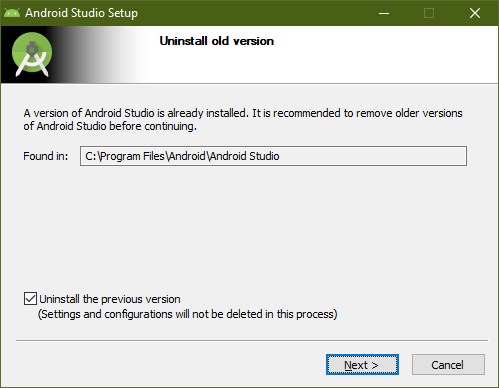
Если у вас уже установлена старая версия Android Studio, то первое окно установщика будет выглядеть как на скриншоте ниже. При этом процесс установки будет немного отличаться, однако в этой статье рассматривается только первичная установка Android Studio.
Повторная установка Android Studio
После этого несколько раз нажмите Next, оставляя все параметры по умолчанию, пока не начнется установка. После завершения установки Android Studio должна запуститься автоматически. Если нет, то ярлык программы вы сможете найти в меню «Пуск» или на рабочем столе.
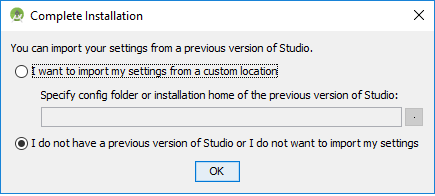
При первом запуске Android Studio нужно будет ее настроить. Сначала студия спросит, нужно ли импортировать настройки с прошлой версии. Так как это первая установка студии, то сохраненных настроек у вас нет. Оставьте второй вариант и нажмите OK.
После этого завершите настройку и скачайте необходимые компоненты с помощью Setup Wizard, который открывается после нажатия OK в предыдущем окне.
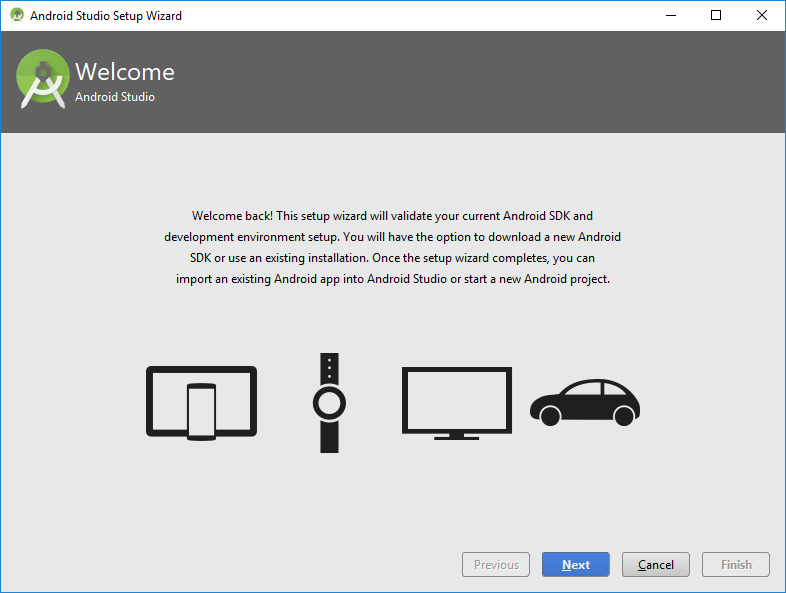
Нажмите Next и перейдите к выбору типа установки компонентов Android Studio.
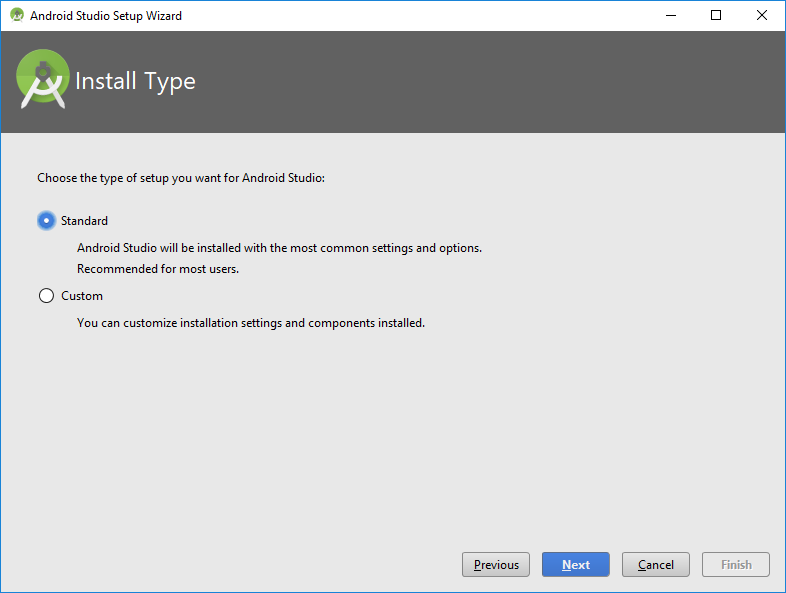
Если вам не нужна кастомная настройка компонентов, выберите Standard и нажмите Next.
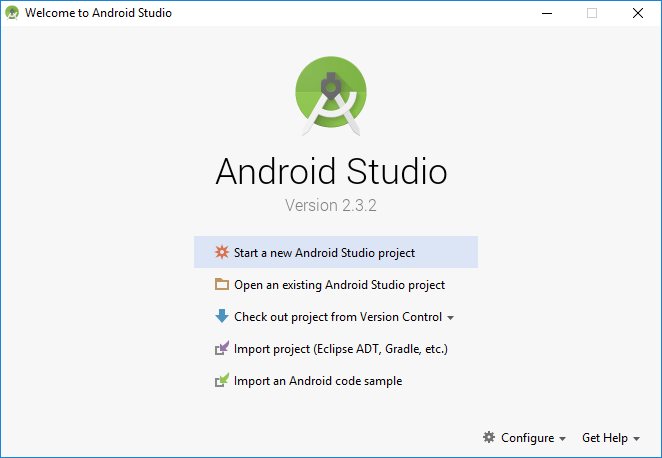
После этого установщик сообщит, что необходимо загрузить несколько компонентов для завершения установки. Нажмите Finish и подождите, пока все компоненты загрузятся и распакуются. После завершения этого процесса снова станет доступна кнопка Finish. Нажмите на нее, после чего появится экран приветствия Android Studio.
Как использовать Android Studio
Работа в Android Studio похожа на работу в большинстве современных IDE. Однако, как и везде, здесь есть свои нюансы. Далее мы разберем основы работы в Android Studio.
Для начала необходимо создать проект в Android Studio. На приветственном экране нажмите Create New Project, после этого вы увидите экран с шаблонами устройств и Activity (это класс, в котором реализуют логику экрана приложения). Для начала можно выбрать Phone and Tablet (телефоны и планшеты) и No Activity либо Empty Activity. Разница в том, что в первом случае вам нужно будет реализовать первую Activity с нуля, а во втором студия самостоятельно создаст готовый редактируемый шаблон.
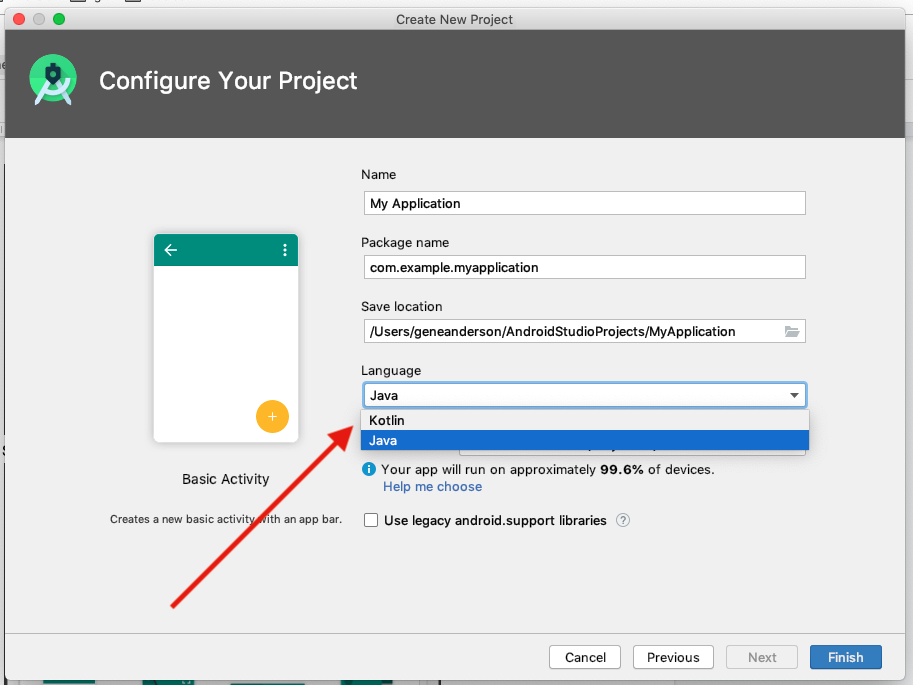
После выбора нажмите Next и увидите окно настроек будущего проекта. Название проекта (Name) в Android Studio может быть любым и даже содержать пробелы. А вот имя пакета (Package Name) должно быть уникальным, если вы собираетесь опубликовать приложение в Google Play.
Что еще можно выбрать: расположение проекта (Save Location), язык (Language), который вы собираетесь использовать (Java или Kotlin), и минимальную поддерживаемую SDK (Minimum SDK). Минимальная поддерживаемая SDK — это самая ранняя версия операционной системы Android, в которой приложение может работать. Если вы меняете расположение файлов проекта, то не забудьте создать папку, которая будет содержать ваш проект. Обратите внимание, что в названии не должно быть пробелов.
Язык здесь можно выбрать любой, потому что в проекте доступны и Java, и Kotlin. А вот минимальную поддерживаемую Android SDK выбирайте внимательно.
Студия подсказывает, какое количество устройств на сегодняшний день поддерживают ту или иную SDK. Старайтесь выбрать минимальное значение, чтобы как можно больше устройств могли успешно работать с вашим приложением в Android Studio. Но учтите, что чем ниже минимальная SDK, тем больше трудностей будет возникать при разработке.
Структура проекта Android
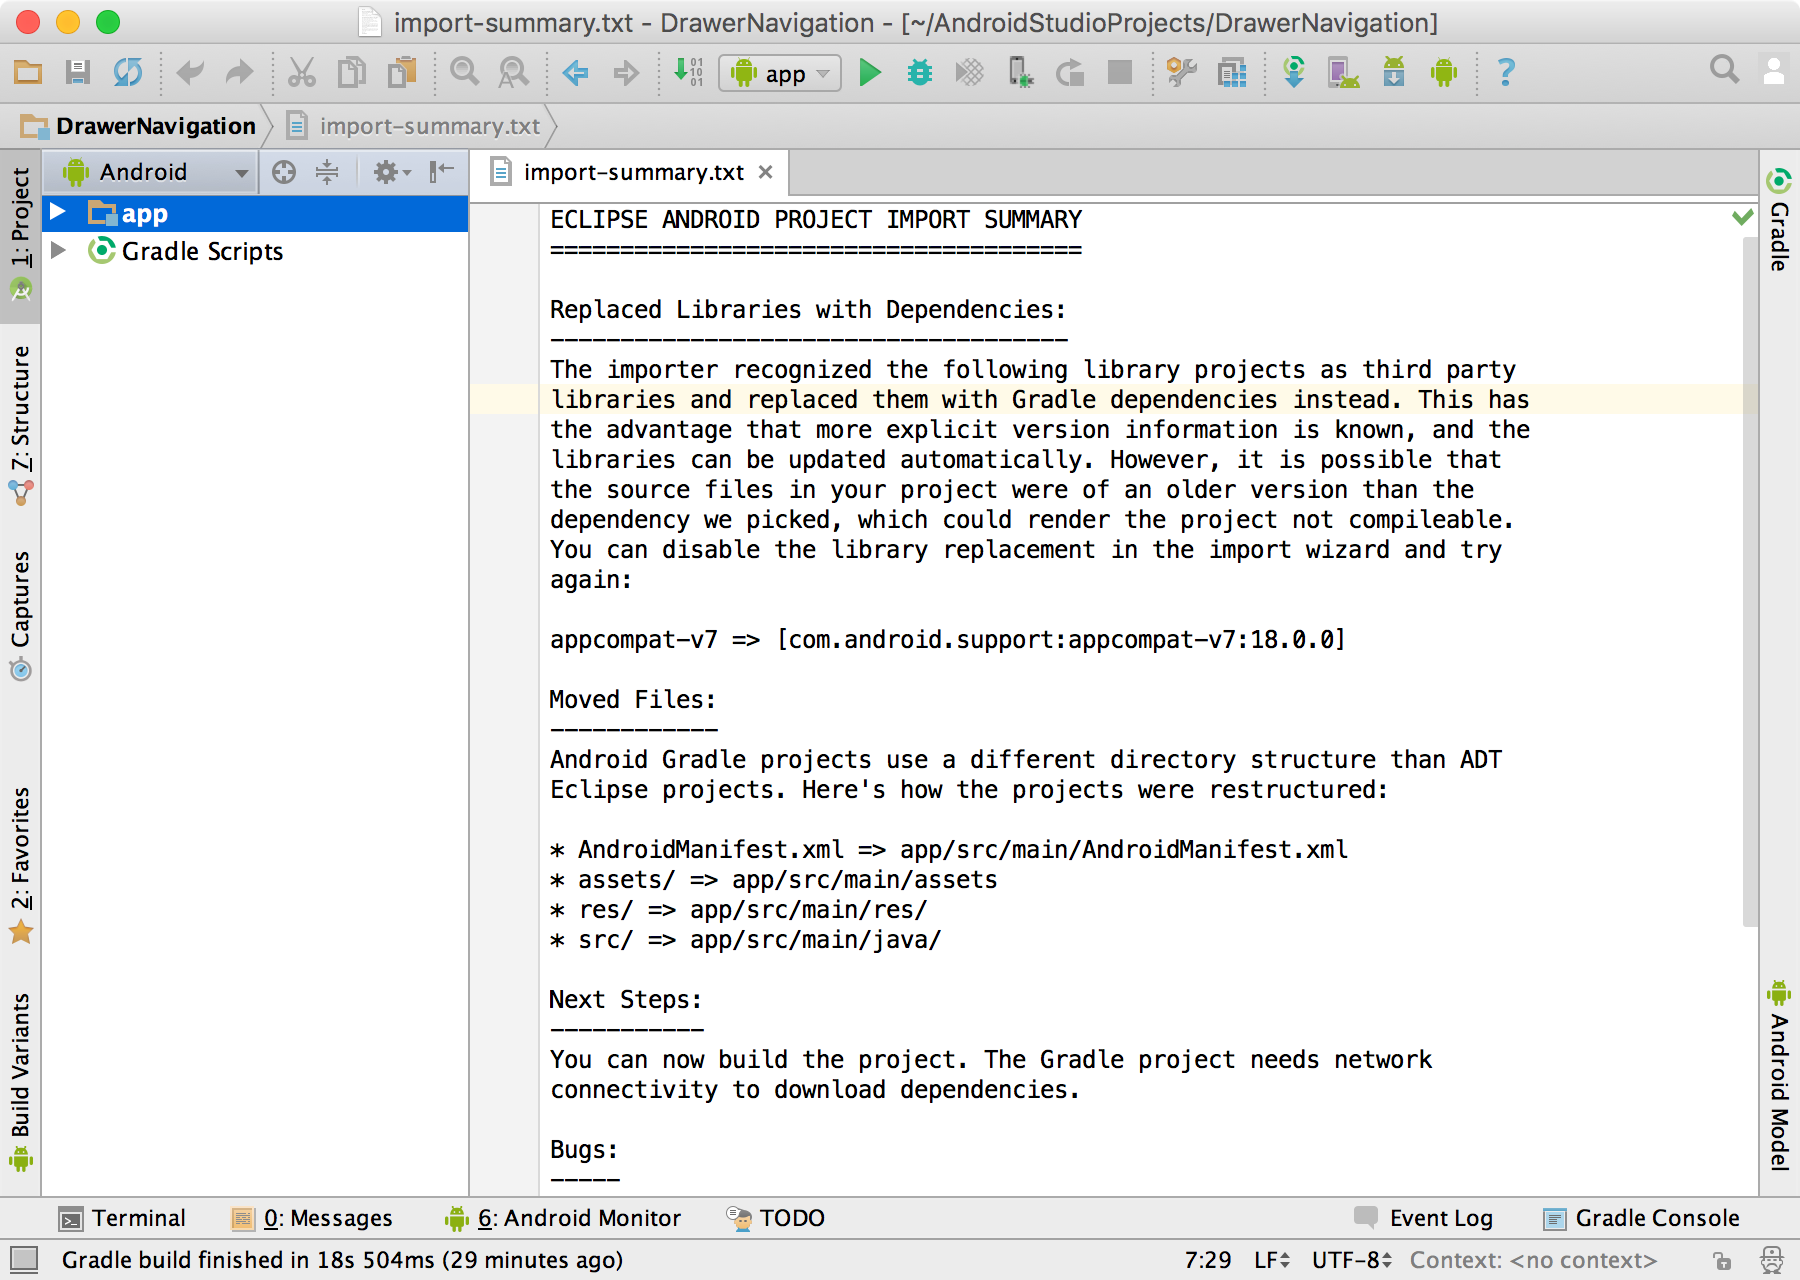
Если в предыдущем шаге вы выбрали шаблон Empty Activity, то при создании проекта студия сгенерирует и структуру файлов проекта. Так выглядит пустой, только что созданный проект в Android Studio.
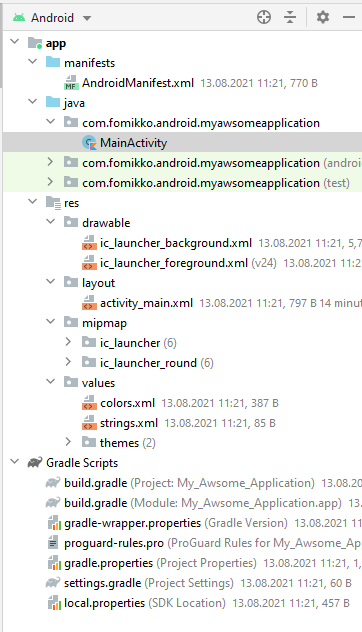
Он содержит 2 корневые папки: app и Gradle Scripts. Папка app включает 3 подпапки: manifests (содержит файлы конфигураций приложения), java (содержит исходный код приложения) и res (содержит файлы ресурсов — картинок, стилей, размерностей и т.д.).
AndroidManifest.xml в папке manifests содержит информацию о пакетах и компонентах приложения. Этот файл важен для работы приложения Android, так как именно в нем прописаны разрешения приложения на использование компонентов системы Android. Также в нем определяется, как будут запускаться компоненты приложения.
В папке java исходные файлы проекта могут содержаться в различных подпапках. Обычно в Android-приложении в папке java также есть определенная структура файлов. В этой статье мы рассматривать ее не будем, так как тема выходит за пределы общей структуры проекта.
В папка res есть несколько подпапок даже при создании тестового базового проекта, и она сильно разрастается при разработке настоящих приложений. Будьте готовы, что файлы в этой папке могут занимать много места на вашем жестком диске.
Рассмотрим подпапки, которые появляются при создании базового проекта:
- Папка drawable содержит файлы с изображениями.
- В папке layout нужно располагать xml-файлы, используемые для создания интерфейса приложения.
- Папка mipmap хранит значки приложения.
- Папка values хранит xml-файлы со значениями строк, цветов, тем, стилей.
Папка Gradle Scripts содержит скрипты для автоматизации сборки проекта.
Папка .idea не видна на скриншоте, но если изменить конфигурацию Android на Project, то она появится. Эта папка нужна для настройки метаданных проекта в Android Studio.
Редактор xml
Для редактирования xml-файлов в Android Studio встроен удобный инструмент. Он позволяет не только редактировать код xml-файлов, но и видеть изменения в режиме реального времени с помощью визуального представления. В этом же визуальном представлении можно редактировать xml-файлы.
Чтобы посмотреть работу этого редактора, откройте файл activity_main.xml, сгенерированный Android Studio. Кстати, если ваш проект уже разросся и искать файлы неудобно, то нажмите клавишу Shift быстро два раза, и откроется окно поиска по файлам проекта. Начните вводить туда название нужного файла, а затем выберите его из списка. Как видно на анимации, необязательно вводить слова полностью — достаточно первых букв.
По умолчанию открывается только редактор кода.
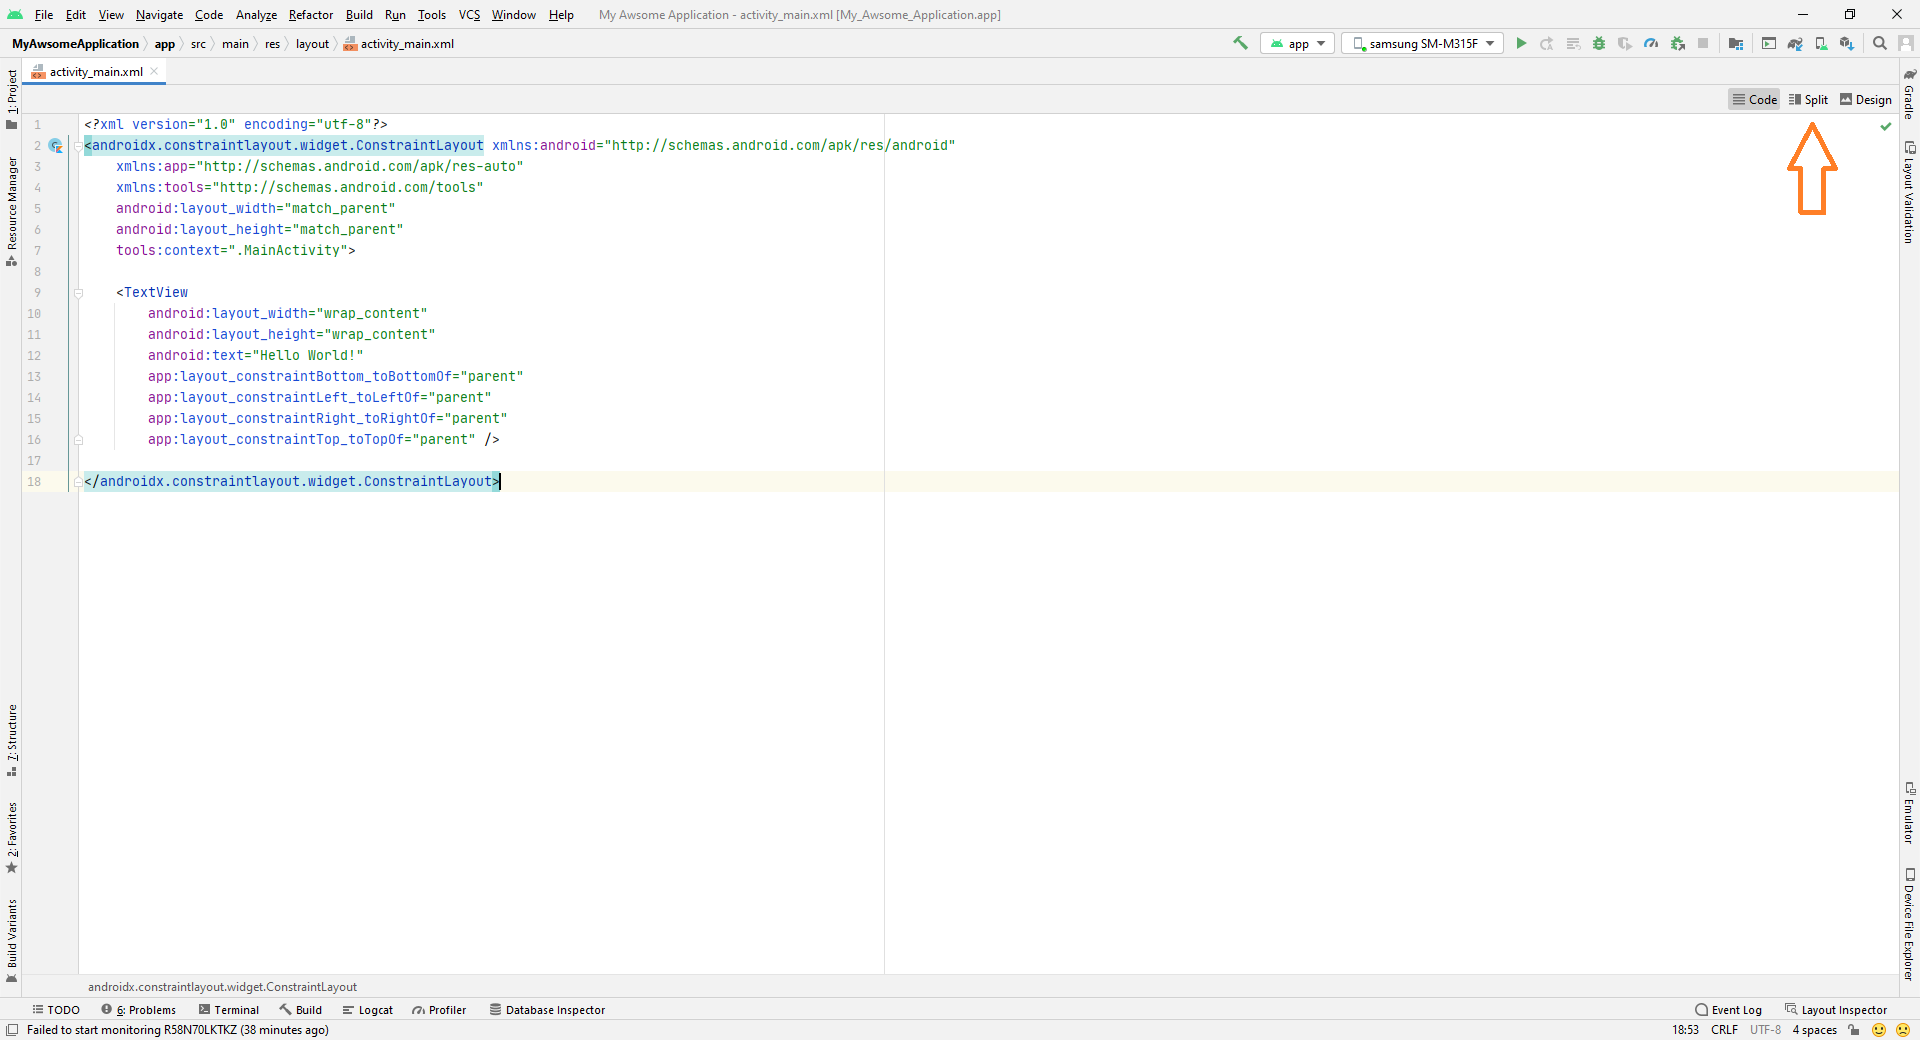
Чтобы открыть визуальный редактор, нажмите кнопку Split в верхнем правом углу, чтобы отобразить оба представления рядом. Или кнопку Design, чтобы открыть только визуальное представление.
Gradle
Android Studio выполняет сборку приложения с использованием системы Gradle. Он значительно упрощает сборку проекта из большого количества файлов в apk-файл, который можно установить на Android-устройстве.
Хочу поделиться лайфхаком, который выручал меня не раз. Если проект перестал собираться по непонятной причине, скорее всего, это связано с gradle. В таком случае в меню выберите Build, а затем опцию Clear Project.
Сборка и отладка приложения
После того как вы добавили первую функциональность в свое приложение, начните отлаживать его (запускать и проверять работоспособность всех функций). Лучше делать это на устройстве Android.
Для этого подключите устройство Android к компьютеру через USB. При этом убедитесь, что на телефоне включена отладка по USB в параметрах разработчика.
Чтобы включить параметры разработчика, в настройках своего телефона найдите пункт «Номер сборки» (обычно находится в «Сведениях об устройстве») и нажмите на него быстро семь раз. Далее перейдите в параметры разработчика и включите отладку по USB.
После этого подключите телефон через USB к компьютеру и увидите название своего устройства в верхней панели Android Studio — у меня это Samsung. Обратите внимание, на телефоне могут появиться уведомления, где нужно разрешить отладку с данного компьютера.

Затем нажмите на кнопку Run (зеленый треугольник), и приложение запустится на вашем телефоне.
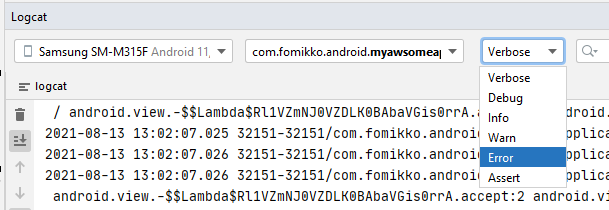
Если приложение «упало» (завершило работу, когда не должно было) или возникли какие-то другие ошибки — данные вы увидите на вкладке Logcat (внизу).

В панели настроек Logcat можно выбрать устройство, на котором производится отладка, отлаживаемый процесс и поставить фильтр на сообщения, которые хотите видеть в Logcat. Обычно сообщения об ошибках и так заметны — они выделяются красным, — но если хотите видеть только их, то поставьте фильтр Error.
Отладка приложения на виртуальных устройствах
Устройств на Android так много, что невозможно протестировать код на каждом из них. Здесь на помощь приходят виртуальные устройства, доступные для скачивания из Android Studio.
Чтобы создать виртуальное устройство, откройте AVD Manager (Android Virtual Device Manager) и начните создание желаемого устройства.
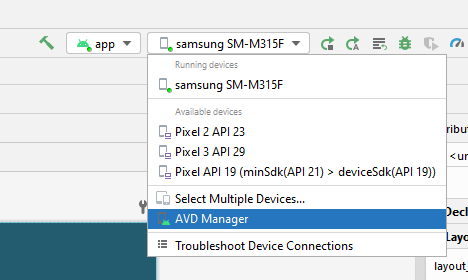
Для создания нового устройства нажмите кнопку Create Virtual Device. Затем выберите устройство (модель телефона).

После нажмите Next и переходите к выбору системы Android, которая будет установлена на устройство. Если ранее вы не устанавливали ни одной эмулированной системы, то ее нужно будет скачать. У меня уже скачан Android Q.
После скачивания нажмите Next, затем Finish, и создание виртуального устройства завершено.
Чтобы запустить приложение на созданном устройстве, выберите его в списке устройств и нажмите кнопку Run.
Главное — практика
По-настоящему освоить Android Studio получится только самостоятельно в процессе практики. Дополнительно рекомендую изучить горячие клавиши в Android Studio (как двойное нажатие Shift для поиска по файлам).
Before diving into the vast field of Android Development, there is a need to understand the tool required for it. The name of the tool is Android Studio, used for developing Android Applications. Android Studio is developed by Google and Jetbrains. It’s the most widely used software for developing Android Applications. So in this article, there is a deep discussion about Android Studio. Like how to install it, tips and tricks that increase productivity while developing an Android application. So stay tuned till the end.

So in this article, we have covered the following things:
- What is Android Studio?
- How to Install Android Studio?
- File Structure of a Project in Android Studio
- Writing first Android Studio Application
- Understanding the Designing Part
- Understanding the Coding Part
- Run Android App
- Essential Android Studio Keyboard Shortcuts
- Some Android Studio Tips and Tricks
- Complete Android Studio Tutorial
1. What is Android Studio?
Before starting and learning any programming language, the one thing required to learn to program is IDE (Integrated Development Environment). It provides a convenient way to write code. If there are any errors or bugs after compiling, they can be debugged. So, Android Studio is an official IDE for developing Android applications. It provides features that enrich productivity while writing code. It provides features like:
- A flexible Gradle build system, easy to manage all the dependencies in a single place.
- It allows you to run and test applications if one doesn’t have an Android smartphone. Because of its feature-rich emulator, it can run one or more emulators at a time to test client-server applications. And it also allows you to run and test physical Android Smartphones.
- It provides a unified environment so that applications can be developed for all types of Android devices.
- Intelligent code completion feature.
- Predefined code templates.
- Git integration makes developers maintain repositories, and also helps to build common app features and import sample code.
- C++ and Native Development Kit(NDK) support.
2. How to Install Android Studio?
To install Android Studio, visit the Android Studio Download page. Make sure to install the latest stable version of the Android Studio. Before installing the Android Studio, check the system requirements on the same page, so that the system meets its minimum requirement to run Android Studio smoothly. Visit Android Install and Set up Android Studio in Windows. To find out how to install the Android Studio on Windows OS-based systems. Or one may visit the official page Install Android Studio to find out how to install Android Studio on Windows, Mac, and Linux.
3. File Structure of a Project in Android Studio
Android studio project folder structure: There are two view types of the project file structure in Android Studio. One is Android View(Summarised), another is Project View(Detailed View). Most beginners use the Android View(Summarised). Have a look at the following image to see the differences between these views. One can read the detailed info about the Android project folder structure here: Android Project folder Structure

Android Studio Application File structure:

This folder is responsible for holding the Application’s Manifest file, looking at the main application’s Business logic (Java/Kotlin), drawable files (images, vector graphics), Application’s UI layout files, mipmap (app’s icon files), colors(application’s branding color), strings(all the texts, used for localizing the application), styles(predefined or user-defined styles of application), app-level gradle file(managing the dependencies). To find out more about the app file structure read: Android Application File Structure
Application Manifest File: The manifest file is an important part of our app because it defines the structure and metadata of our application, its components, and its requirements. This file includes nodes for each of the Activities, Services, Content Providers, and Broadcast Receiver that make the application and, using Intent Filters and Permissions, determine how they co-ordinate with each other and other applications. To get more insights about the Android Manifest read: The Application Manifest File. The typical very basic manifest file looks like this:

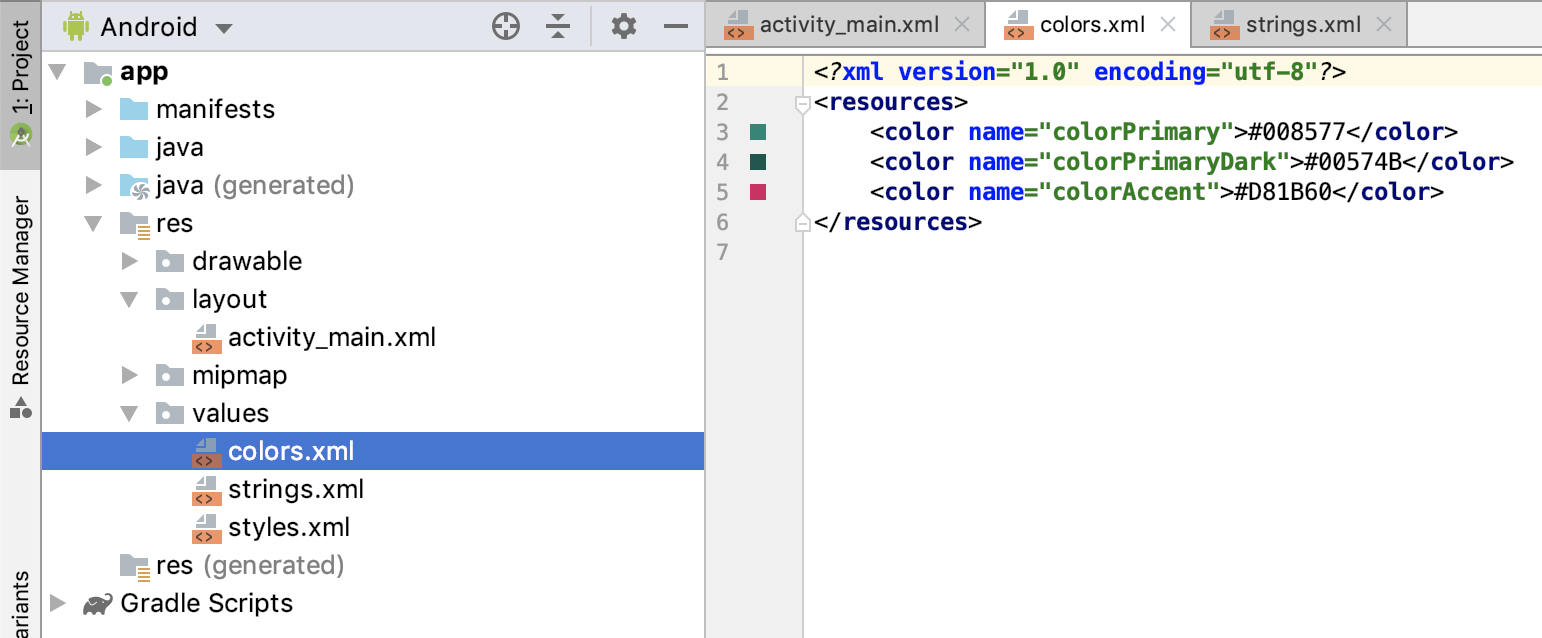
res/values folder: The values folder used to store the values for the resources that are used in many Android projects includes features of color, styles, dimensions, padding values, margin values, etc. There are 4 main files under the res/values folder. Those are: colors.xml, dimens.xml, strings.xml, styles.xml. Read on the res/values folder to find out the details of the res/values folder. Have a look at the following image where it’s found:

build.gradle file: Gradle is a build system (open source) that is used to automate building, testing, deployment, etc. Every Android project needs a Gradle for generating an apk from the .java and .xml files in the project. It is located in the root project directory and its main function is to define the build configurations that will be applied to all the modules in the project. Read: build.gradle and get to know more about the various build.gradle. Have a look at the following image to get the location of build.gradle files.

Assets Folder: Assets provide a way to add arbitrary files like text, XML, HTML, fonts, music, and video in the application. If one tries to add these files as “resources“, Android will treat them into its resource system and you will be unable to get the raw data. Read Assets Folder in Android Studio for a detailed view of the assets folder. Have a look at the following image to get the location of the assets folder in Android Studio.

Resource Raw Folder: The raw folder in Android is used to keep mp3, mp4, sfb files, etc. The raw folder is created inside the res folder: main/res/raw. So we will simply create it inside the res folder. Read: Resource Raw Folder in Android Studio to know details about the raw folder. Have a look at the following image to get the location of the folder where it needs to be created:

Logcat window: Logcat Window is the place where various messages can be printed when an application runs. Suppose, you are running your application and the program crashes, unfortunately. Then, Logcat Window is going to help you to debug the output by collecting and viewing all the messages that your emulator throws. Read: Logcat window in Android Studio to know more about the Logcat in Android Studio. Have a look at the following image to locate the Logcat window:

debug.keystore file: is one of the most important files which is present in almost every application when we download that app from the Google Play Store. This file is basically considered as the certificate of any application which is being verified by Google each and every time. Each app that you are using on your phone needs to be signed. Read: Where is debug.keystore in Android Studio? to know where it is located and to generate the certificate for the Android app.
4. Writing first Android Studio Application
As in features of Android Studio, it’s mentioned that Android Studio provides various numbers of templates by default. It allows you to select them before creating a project. To create a new project click on “Create New Project“.

After clicking, another new window pops up to select several predefined templates. Pick what suits the current project needs. If there is no desired template, choose “Empty Activity” and click on the “Next” button.
To find out more on this, refer to Android Studio Main Window

After clicking on the Next button, another window pops up asking to enter the name of the project, package name, location to save the project, programming language to select(as two programming languages are supporting Kotlin & Java), and the minimum SDK API level (The minimum API level that is supported by the app). After entering the information, click on the “Finish” button.

Congratulations, the first Android Studio project is ready. Initially, it shows the tip of the day, which gives tips to improve work efficiency. Before going to explore the Android Studio, get familiar with the initial screen which is shown below.

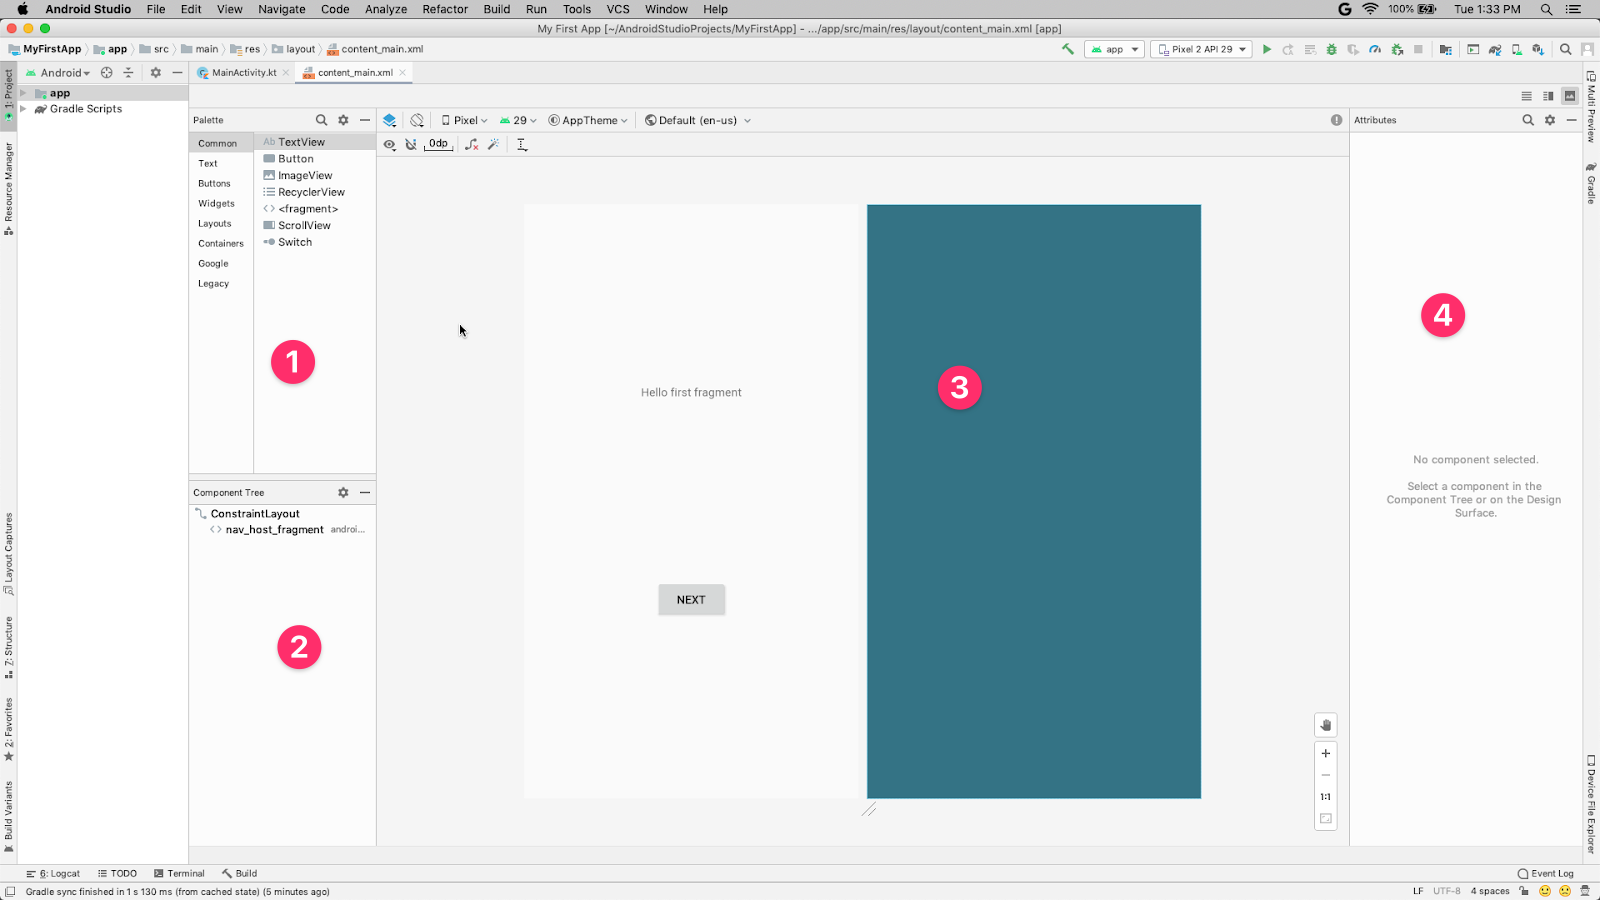
For a better understanding of the Android Studio environment, it has been divided into 4 parts:
1. Menu Part: In this section, it provides options to create a new project, open an existing android studio project, a button to run the application, dropdown for selecting the desired device to run and test an application on.
2. Coding Area: This section provides for writing code for files like .xml, .java, .kt. It allows you to open multiple files at a time in different tabs, but it allows you to edit one file at a time.
3. Project Structure: This area allows us to explore every file of the project. There are various views of the structure. Android is a summarised view of the project structure hierarchy and Project is a detailed view of the project hierarchy. Have a look at the following image.

4. Current Execution Part: One of the most important parts of the Android Studio environment. It provides a detailed view of the current execution of the process or activity. It shows what errors, build outputs, logcat results, etc.
5. Understanding the Designing Part
All the UI layouts of the application can be found under the res/layout directory. These are of the .xml extension, responsible for building the UIs for application. Android Studio provides two types of ways of designing UI for applications. One is Text, where one needs to design the UI by hardcoding and one is the Design section that provides a convenient drag and drop mechanism for building UI. Have a look at the following image which shows how the code is being written, it goes on to show the result in the right pane.

The following image shows the drag and drop environment for widgets to pick and add in the UI of the application. One can switch to the Design layout by clicking on the bottom left button, shown as the following.

6. Understanding the Coding Part
As we have understood the design part similarly, another main part is the coding part. In the image below you can see a file named MainActivity.kt. Yes, this is the file where you write the backend part. The logic part. For example, you want to add two numbers. So, after entering two numbers in the EditText, when the user clicks on the Button, it will give the output as the sum of two numbers. So to calculate the sum, you have to write the logic in its part.

Note: If you select Language as Java during project creation, then the file name will be MainActivity.java.

7. Run Android App
To run an application there are two ways to do it. One is using an emulator, another is using a physical device by connecting it through a USB cable. Refer to How to install Android Virtual Device(AVD) how to set up an android virtual device or refer to How to Run the Android App on a Real Device? setting up a real physical android device and running applications on it. Have a look at the following image of what the Android Virtual Device looks like on the first run of the application.

8. Essential Android Studio Keyboard Shortcuts
Keyboard shortcuts make work a lot easier and increase productivity. One may refer to 10 Important Android Studio Shortcuts You Need the Most getting to know the essential keyboard shortcuts for Android Studio.
9. Android Studio Tips and Tricks
There are some tips and tricks that can be used to master Android development using Android Studio. These tips and tricks are:
- Setting up the theme of Android Studio
- Changing color of Logcat
- Fast Searching
- Split Screen
- Distraction-free mode
- Code completion
- Multi cursor feature and many more
You may refer to the following articles to find out more about Android Studio Tips and Tricks
- Top 20 Tips and Tricks of Android Studio
- 10 Android Studio Tips and Tricks For Android Developers
10. For the complete Android Studio Tutorial, you may refer to this article: Android Studio Tutorial
Рассказываю об основном инструменте для разработки Android-приложений, созданном самой компанией Google. Краткий гайд по основам работы с Android Studio.
Что такое Android Studio?
Это IDE, созданная компанией Google для разработки приложений под операционную систему Android. IDE – это набор инструментов для программиста, помогающих ему «написать» логику поведения программы, добавить в нее визуальные элементы, сделать их интерактивными и превратить задумку в полноценный продукт, который можно выставить на продажу в Google Play.
Android Studio создана специально для взаимодействия с такими языками программирования, как Java и Kotlin. Поэтому начинающий разработчик, решивший познакомиться с инструментами Android Studio, должен уже обладать навыками в одном из двух перечисленных выше языков и знать основы разработки приложений для ОС Google.
И хотя AS не напишет за вас хит, способный выбиться в топ-10 загружаемых программ, эта утилита может заметно сократить головную боль и автоматизировать колоссальное количество работы, ложащейся на плечи разработчиков. Например, поиск ошибок и даже их исправление. И да, иногда AS будет писать код за вас, и вам это понравится.
Комьюнити теперь в Телеграм
Подпишитесь и будьте в курсе последних IT-новостей
Подписаться
Устанавливаем и настраиваем Android Studio
Начать стоит с загрузки клиента AS и его установки на компьютер. Для этого Google подготовила целую кипу установщиков всех сортов. Они доступны на официальном сайте утилиты. Зайдите туда и нажмите кнопку «Download Android Studio». Сайт предложит подходящий дистрибутив, который можно установить классическим двойным кликом.
Запускаем скачанный файл и следуем инструкциям на экране. Ставим галочки на всех пунктах, чтобы вместе с IDE загрузились вспомогательные компоненты (без них не получится создать программу, способную работать на настоящем смартфоне).
В остальном процедура заключается в многократном нажатии на кнопку «Далее».
Для Linux и macOS есть опция установки Android Studio с помощью командной строки, используя менеджеры пакетов apt, dnf и brew.
Также стоит иметь в виду, что для работы с Android Studio на ПК должен быть установлен Java.
Создаем свой первый проект
После установки включаем Android Studio и видим перед собой окно с надписью New Project. IDE предлагает нам создать новую программу. Если такое окно не появилось, то открываем New Project вручную, кликнув сначала по кнопке File в верхнем левом углу, а потом на New Project.
Для создания проекта нужно указать его название, а также домен своей компании (если таковой имеется, конечно). Здесь же можно указать другой путь для хранения проекта, но это необязательно.
После нажатия на Next перед вами появится целый список шаблонов для будущей программы. Можно выбрать целое приложение, можно отдельное окно или функцию (доступ к геолокации, форму для входа в учетную запись, боковое меню и т.п.).
Если надо создать приложение с нуля без конкретики, то стоит выбрать Basic Activity. В нем будет одна кнопка, панель управления и текстовое поле, где можно разместить любой контент на свое усмотрение.
Независимо от выбранного шаблона, впоследствии вы сможете добавлять любые виды контента и окон, как только они понадобятся.
Структура интерфейса Android Studio
Основное окно делится на 4 основных блока:
-
Palette – это все окна, которые уже есть в вашем приложении. По мере разработки их количество будет увеличиваться.
-
Component Tree – здесь будут все компоненты, даже если они не относятся к конкретному окну.
-
Design Editor – главное окно с выбранным окном приложения или редактором кода.
-
Attributes Panel, или «Инспектор». Набор настроек, относящихся к элементу, с которым вы работаете в текущий момент.
В верхнем правом углу вы можете обнаружить кнопку деления экрана на части. Чтобы, к примеру, в Design Editor одновременно отображался и внешний вид программы, и код, «скрытый» под ним.
Что за куча файлов вокруг?
Разработка комплексных приложений не укладывается в рамки одного скрипта и одного файла разметки, как это принято, например, в базовой веб-разработке. Хотя логика тут схожая.
Вас встретит документ под названием ИмяПриложения.java Это что-то в духе основы для программы. Как index.html при разработке веб-сайта, но не для всей разметки, а для подключения других компонентов и управления ими.
Разметка находится в файле имя_приложения.xml. Это уже ближе к HTML-файлу в том смысле, что здесь вы «расписываете» компилятору, как будет выглядеть ваша программа и где будут находиться кнопки, аватарки, текстовые поля и прочие элементы.
На базовом уровне визуальная часть будет описана в XML-документе, а «логическая» – в java-скрипте. Количество файлов неограничено, каждый элемент интерфейса можно описать в отдельном документе. Такая практика упрощает дальнейшую разработку и делает код более читаемым.
С чего начать разработку своего приложения?
Все документы хранятся в файловом менеджере в левой части интерфейса Android Studio. Там можно найти основной XML-документ, отвечающий за разметку контента в вашем детище.
В нем можно обнаружить такие поля, как <TextView /> или <Button />. Из названий понятно, что одно поле содержит в себе текстовую информацию, а другое является кнопкой, которая может выполнять действия.
Внутри компонентов содержатся свойства, например:android:layout_width="wrap_content", обозначающее ширину окна приложения, или android:text="Какой-то набор букв", создающее в окне отдельный элемент с текстом. Менять эти параметры можно как вручную, так и при помощи встроенных графических инструментов, расположенных в панели «Инспектор». Эти изменения все равно в итоге отобразятся в XML-документе.
И это первое, с чем стоит начать знакомиться, тыкая в различные свойства, добавляя новые компоненты и наблюдая, что из этого получается.
Типы файлов. Зачем их так много?
Есть еще несколько директорий, с которыми стоит ознакомиться чуть ли не после первого включения Android Studio:
-
res – это сокращение от resources. Тут будут лежать дополнительные файлы, необходимые вашей программе, например картинки, используемые вместо стандартных иконок интерфейса, или просто изображения, задействованные в работе ПО.
-
layout – тут лежат все XML-документы с разметкой для разных компонентов приложения.
-
values – а тут находятся значения свойств. Например, здесь можно хранить переменные с названиями цветов вместо их кодов, чтобы потом было проще добавлять их в разные куски интерфейса программы, потому что
buttonColorнесет куда больше смысла, чем#f34e980.
А еще нужно изучить файл manifest. Он содержит критически важную информацию о вашем детище: какие компоненты будут в него включены, имя программы, которое увидят пользователи и т.п.
Сборщик приложения – Gradle
Как вы могли догадаться, приложение не поступает в Google Play в таком разрозненном виде. Обилие файлов Android Studio нужно упаковать во что-то удобоваримое и запускаемое на смартфонах.
Для этого в AS разработчики Google предусмотрели утилиту Gradle. Она работает как сборщик разных частей приложения и собирает их в единый пакет, который потом можно скачать из интернета и установить на Android-устройство.
Вам нужно знать о Gradle то, что у него есть конфигурационный файл build.gradle. В нем нужно указать зависимости проекта (если вы используете сторонние программные библиотеки для добавления продвинутых функций в вашу программу, недоступных в AS по умолчанию).
Запустить Gradle можно следующим образом:
-
Кликаем по меню Build в верхней части окна.
-
Выбираем свой проект и ждем.
Деббагинг на реальном устройстве
Представим, что ваше приложение готово. Вы дописали код и довольны внедренной в утилиту функциональностью. Теперь надо провести тестирование и выявить недочеты в коде. Это можно сделать двумя способами: запустив программу в эмуляторе Андроида прямо в Android Studio или на «живом» устройстве, если такой есть под рукой.
Чтобы запустить написанный вами код на реальном устройстве:
-
Подключаем гаджет к компьютеру с помощью USB-кабеля (в режиме дебаггинга).
-
Потом нажимаем на кнопку Run в верхней панели управления интерфейсом.
-
После этого выбираем пункт Run App.
Graddle быстро создаст сборку программы и запустит ее в тестовом режиме. В этом режиме вся информация о работе программы записывается в журнал событий, отображающийся во вкладке logcat. Если что-то пойдет не так, прочитать о случившемся можно будет именно там. А еще полезная информация о работе с программой (нагрузка на процессор, энергопотребление) отображается во вкладке Monitor.
Дебаггинг с AVD-менеджером
AVD, Android Virtual Devices – это система эмуляции Android-устройств с различными характеристиками. Она нужна на тот случай, если у вас нет подходящего телефона или планшета. Также не стоит забывать о сумасшедшей фрагментации мира Андроидов, а ведь это сотни различных чипов, разрешений и дизайнов. Нельзя скупить тысячи устройств и на всех протестировать ПО. Но AVD-менеджер эту задачу упрощает.
Чтобы включить AVD-менеджер:
-
Открываем меню Tools в верхней части окна Android Studio.
-
В выпавшем списке опций выбираем Android.
-
А потом AVD Manager.
-
Выбираем тип оборудования, размер экрана и другие параметры виртуального гаджета.
Виртуальный гаджет появится в списке устройств для дебаггинга среди настоящих телефонов и планшетов, ранее использовавшихся для отладки программ.
Работа с SDK-менеджером
Хотя Android Studio включает в себя уйму инструментов, в нем отсутствует весомый кусок часто используемых компонентов. Их надо загрузить отдельно, через SDK-менеджер.
Он расположен в том же меню, что и AVD-менеджер – во вкладке Tools на панели инструментов Android Studio.
SDK Manager позволяет загрузить утилиты, необходимые при создании программ для очков Google Glass или для добавления специфичных возможностей в приложение для телефона, которые недоступны в AS в базовой комплектации.
Упаковка приложения в подписанный APK-пакет
В Google Play не пускают кого попало. Надо доказать, что вы реальный разработчик и имеете права на свое детище. Для реализации проверки Google выдает специальные ключи. Они уникальны и строго привязаны к конкретному приложению. Уникальный ключ запрашивается при попытке создать подписанный APK-файл, оптимизированный под загрузку в магазин приложений.
Чтобы сделать такой пакет:
-
Открываем вкладку Build, расположенную в панели инструментов.
-
Выбираем опцию Generate Signed APK.
Gradle соберет для вас подходящий APK, готовый к публикации в Google Play.
А что дальше?
Дальше придется углубляться в изучение как инструментов, так и языков, используемых в среде Android-разработчиков. Я затронул только азы, необходимые для создания и публикации элементарного приложения, но разработка включает в себя куда больше аспектов, и вам предстоит много узнать самостоятельно на личном опыте или после прохождения курсов по программированию.
Сегодня программирование является наиболее прибыльной сферой деятельности, в которую теоретически может войти любой желающий.
Множество людей, которым не повезло устроиться на работу по основной профессии, изучают IT и занимают достойное место в обществе, зарабатывая тысячи долларов в месяц. Но чтобы состояться в этой отрасли, необходимо изначально удачно выбрать язык программирования и сферу работы.
Их очень много: бэкенд, фронтенд, создание мобильных приложений, программирование «железа» и т. д.
Перспективной является разработка приложений на смартфоны и гаджеты – статистика показывает, что все больше людей пользуются переносными устройствами в качестве основных.
Смартфон сегодня даже потеснил традиционный ПК, так как позволяет развлекаться и потреблять контент даже в более удобных формах. Поэтому отличным решением будет выбор разработки под популярную систему ОС Android, у которой уже сейчас миллиарды пользователей по всему миру.
Корпорация Google, ныне входящая в состав холдинга Alphabet, заранее подумала о том, чтобы предоставить разработчикам все условия для удобного создания приложений на свою платформу Android. Для этого еще в 2013 году была представлена среда разработки Android Studio.
Это мощный инструмент разработки (IDE), в котором собраны все необходимые возможности для быстрого создания приложений на смартфоны с операционной системой «Андроид». Если вы хотите заниматься программированием для смартфона, установка и использование данной среды будет необходимостью.
Как установить Android Studio? Все очень просто – данное средство разработки распространяется бесплатно самой компанией Google, и скачать его можно со страницы https://developer.android.com/studio.
Загрузив пакет установки, надо просто нажать на него два раза левой кнопкой мыши и запустить установку. Далее процесс стандартный – необходимо выбрать место установки рабочих файлов, дождаться окончания процесса, и можно запускать среду разработки, используя появившийся ярлык на рабочем столе.
Рабочая среда в Android Studio
Компания постаралась сделать так, чтобы ее инструмент разработки просто не имел достойных конкурентов. В Android Studio все организовано максимально удобно, аккуратно, любой проект виден во всех своих мельчайших деталях. Здесь собраны все необходимые возможности для разработки:
- гибкая настройка системы дает возможность подстроить работу под себя;
- встроенный эмулятор приложений позволяет запускать создаваемые программы и тестировать прямо на ПК;
- унифицированное рабочее пространство дает возможность легко подгонять проект под любые смартфоны и задавать перечень версий Android, которые должны поддерживаться
приложением; - можно вносить изменения в проект уже с запущенным эмулятором, не перезапуская его заново, что очень удобно и облегчает работу;
- в программу встроена масса полезных функций, таких как поддержка Google Cloud Platform, интеграция с GitHub и другое.
Работа над проектом контролируется прямо в интерфейсе программы, и она здесь реализована максимально удобно. Разрабатываемый проект отображается в левом верхнем углу во всей своей подробной структуре: отдельно выделены базовые файлы, раздел программирования кода java, переменные, меню, разметка страниц приложения, скрипты.
Создаем первые проекты
После того, как вы скачали установочный файл Android Studio, который занимает около 1 Гб, установили его стандартным путем, остается только начать работать. Для новичка все кажется сложным, но первые простые проекты для старта можно смело делать. Рассмотрим наиболее типичный пример – создадим приложение Hello World!
Чтобы начать, запустите программу и создайте свой первый проект, нажав в появившемся окне на строчку «New Project». Далее необходимо задать такие параметры проекта, как название, имя компании-разработчика (пишем что угодно), локализация проекта – путь размещения рабочих файлов.

В следующем окне разработчику предлагается выбрать, для каких версий Android создается его программа, на какие устройства: смартфоны и планшеты, смарт-часы, ТВ и прочее. В следующем окне выбирается шаблон пользовательского интерфейса, который максимально подходит для будущей программы. Для «HelloWorld!» подойдет базовый вариант Empty Activity. Далее после ввода основной информации о проекте касательно его имени и тайтла остается лишь нажать на кнопку «Finish» и начать работать.


Чтобы создать надпись «HelloWorld!» на экране приложения, используем инструмент TextView. Также давайте добавим Button с надписью «Click Me». Если открыть текстовый редактор кода, то приложение должно выглядеть так:
<?xml version="1.0" encoding="utf-8"?>
<LinearLayout
    xmlns:android="http://schemas.android.com/apk/res/android"
    xmlns:app="http://schemas.android.com/apk/res-auto"
    xmlns:tools="http://schemas.android.com/tools"
    android:layout_width="match_parent"
    android:layout_height="match_parent"
    android:orientation="vertical"
    tools:context=".MainActivity">
    <TextView
        android:id="@+id/textView"
        android:text="HelloWorld!"
        android:layout_width="match_parent"
        android:layout_height="wrap_content"
        android:layout_margin="24dp"
        android:gravity="center"
        android:textSize="25sp"/>
    <Button
        android:id="@+id/button"
        android:layout_width="match_parent"
        android:layout_height="wrap_content"
        android:layout_margin="24dp"
        android:text="Click Me"/>
</LinearLayout>
Каждая строчка задает параметры элемента на экране: надпись, размеры, величину букв и т. п. Можно поиграться с параметрами, добиваясь желаемого эффекта.
Далее откроем класс MainActivity и добавим для обработки нажатие и после-нажатие изменяем текст. Пример кода:
override fun onCreate(savedInstanceState: Bundle?) {
    super.onCreate(savedInstanceState)
    setContentView(R.layout.activity_main)
    val textView = findViewById<TextView>(R.id.textView)
    val button = findViewById<Button>(R.id.button)
    button.setOnClickListener {
        textView.text = "You clicked button"
    }
}
Приложение готово! Надо его лишь запустить и протестировать. Для этого необходимо предварительно настроить работу эмулятора Android Studio и нажать на кнопку Run в главном окне интерфейса. В зависимости от мощности компьютера разработчика, с определенной скоростью запустится эмулятор, и в нем отобразится ваше творение – приложение, в котором по центру экрана красуется надпись «HelloWorld» и кнопка. После нажатия кнопки надпись меняется на «You clicked button»
На чем сфокусироваться новичку
Начиная программировать в Android Studio, не стоит сразу браться за сложные проекты.
Необходимо потратить время на примитивные приложения и проекты типа рассмотренного выше и понять базовые вещи: особенности интерфейса среды разработки, структуру проектов и управление ею, обращение с основными элементами интерфейса, редактирование шаблонных элементов.
Все моменты программы осваиваются быстро и относительно просто, но не стоит забывать, что Android Studio – это все же создание приложения, и оно требует от человека знания языка программирования, и лучше всего, чтобы это был Kotlin или Java.
В качестве заключения отметим, что Android Studio – мощная среда разработки, которую стоит использовать каждому человеку, желающему начать писать программы под Android.
Contents:
- The development process
- Using Android Studio
- Exploring a project
- Understanding the Android manifest
- Understanding the build process
- Running the app on an emulator or a device
- Using the log
- Related practical
- Learn more
This chapter describes how to develop applications using Android Studio, which is an integrated development environment (IDE) for Android.
The development process
An Android app project begins with an idea and a definition of the requirements necessary to realize that idea. You may want to sketch user interfaces (UIs) for the various app functions. To show what a UI would look like and how it would work, use drawings, mockups, and prototypes.
When you are ready to start coding, you use Android Studio to go through the following steps:

- Create the project in Android Studio and choose an appropriate template.
- Define a layout for each screen that has UI elements. You can place UI elements on the screen using the layout editor, or you can write code directly in the Extensible Markup Language (XML).
- Write code using the Java programming language. Create source code for all of the app’s components.
- Build and run the app on real and virtual devices. Use the default build configuration or create custom builds for different versions of your app.©
- Test and debug the app’s logic and UI.
- Publish the app by assembling the final APK (package file) and distributing it through channels such as Google Play.
Using Android Studio
Android Studio provides a unified development environment for creating apps for all Android-powered devices. Android Studio includes code templates with sample code for common app features, extensive testing tools and frameworks, and a flexible build system.
Starting an Android Studio project
After you have successfully installed the Android Studio IDE, double-click the Android Studio application icon to start it. Click Start a new Android Studio project in the Welcome window, and name the project the same name that you want to use for the app.

When choosing a unique Company domain, keep in mind that apps published to Google Play must have a unique package name. Because domains are unique, prepending the app’s name with your name, or your company’s domain name, should provide an adequately unique package name. If you don’t plan to publish the app, you can accept the default example domain. Be aware that changing the package name later is extra work.
Choosing target devices and the minimum SDK
When choosing Target Android Devices, Phone and Tablet are selected by default, as shown in the figure below. The choice shown in the figure for the Minimum SDK—API 15: Android 4.0.3 (IceCreamSandwich)—makes your app compatible with 97% of Android-powered devices active on the Google Play Store.

Different devices run different versions of the Android system, such as Android 4.0.3 or Android 4.4. Each successive version often adds new APIs not available in the previous version. To indicate which set of APIs are available, each version specifies an API level. For instance, Android 1.0 is API level 1 and Android 4.0.3 is API level 15.
The Minimum SDK declares the minimum Android version for your app. Each successive version of Android provides compatibility for apps that were built using the APIs from previous versions. That means your app should always be compatible with future versions of Android, if you use the documented Android APIs.
Choosing an Activity template
An Activity is a single, focused thing that the user can do. It is a crucial component of any Android app. An Activity typically has a layout associated with it that defines how UI elements appear on a screen.
Android Studio pre-populates your project with minimal code for an Activity and layout based on a template. Available Activity templates range from a virtually blank template (Add No Activity) to an Activity that includes navigation and an options menu.

You can customize the Activity after you select your template. For example, the Empty Activity choice provides a single Activity with a single layout resource for the screen. The Configure Activity screen appears after you click Next. On the Configure Activity screen you can accept the commonly used name for the Activity (such as MainActivity), or you can change the name.
Tip: This course covers the Activity class in more detail in another practical. You can also read Introduction to Activities for a comprehensive introduction.

The Configure Activity screen differs depending on which template you chose. In most cases you can select the following options, if they are not already selected:
- Generate Layout file: Leave this checkbox selected to create the layout resource connected to this
Activity, which is usually namedactivity_main. The layout defines the UI for theActivity. - Backwards Compatibility (AppCompat): Leave this checkbox selected to include the
AppCompatlibrary. Use theAppCompatlibrary to make sure that the app is compatible with previous versions of Android, even if the app uses features found only in newer Android versions.
Android Studio creates a folder for your projects, and builds the project with Gradle.
Tip: See the Configure your build developer page for detailed information.
Exploring a project
An Android Studio project contains all of the source code and all resources for an app. The resources include layouts, strings, colors, dimensions, and images. The Android Studio main window is made up of several logical areas, or panes, as shown in the figure below.

In the figure above:
- Toolbar: Provides a wide range of actions, including running the Android app and launching Android tools.
- Navigation bar: Navigate through the project and open files for editing.
- Project pane: Displays project files in a hierarchy. The selected hierarchy in the figure above is Android.
- Editor: The contents of a selected file in the project. For example, after you select a layout (as shown in the figure above), the editor pane shows the layout editor with tools to edit the layout. After you select a Java code file, the editor pane shows the Java code with tools for editing the code.
- Tabs along the left, right, and bottom of the window: You can click tabs to open other panes, such as Logcat to open the Logcat pane with log messages, or TODO to manage tasks.
The status bar at the bottom of the Android Studio window displays the status of the project and Android Studio itself, as well as any warnings or messages. You can watch the build progress in the status bar.
Tip: You can organize the main window to give yourself more screen space by hiding or moving panes. You can also use keyboard shortcuts to access most features. See Keyboard Shortcuts for a complete list.
Using the Project pane
You can view the project organization in several ways in the Project pane. If it is not already selected, click the Project tab. (The Project tab is in the vertical tab column on the left side of the Android Studio window.)
The Project pane appears. To view the project in the standard Android project hierarchy, select Android from the Down arrow at the top of the Project pane.

Note: This chapter and other chapters refer to the Project pane, when set to Android, as the Project > Android pane.
Gradle files
When you first create an app project, the Project > Android pane appears with the Gradle Scripts folder expanded as shown below. If the Gradle Scripts folder is not expanded, click the triangle to expand it. This folder contains all the files needed by the build system.

The build.gradle(Module:app) file specifies additional libraries and the module’s build configuration. The Activity template that you select creates this file. The file includes the minSdkVersion attribute that declares the minimum version for the app, and the targetSdkVersion attribute that declares the highest (newest) version for which the app has been optimized.
This file also includes a list of dependencies, which are libraries required by the code—such as the AppCompat library for supporting a wide range of Android versions.
App code
To view and edit the Java code, expand the app folder, the java folder, and the com.example.android.helloworld folder. Double-click the MainActivity java file to open it in the code editor.

The java folder includes Java class files. Each Activity, Service, or other component (such as a Fragment) is defined as a Java class, usually in its own file. Tests and other Java class files are also located here.
The java folder contains three subfolders:
com.example.hello.helloworld(or the domain name you have specified): All the files for a package are in a folder named after the package. For your Hello World app, there is one package, and it contains onlyMainActivity.java. The firstActivity(screen) that the user sees, which also initializes app-wide resources, is customarily calledMainActivity. (The file extension is omitted in the Project > Android pane.)com.example.hello.helloworld(androidTest): This folder is for your instrumented tests, and starts out with a skeleton test file.com.example.hello.helloworld(test): This folder is for your unit tests and starts out with an automatically created skeleton unit test file.
Layout files
To view and edit a layout file, expand the res folder and the layout folder to see the layout file. In the figure below, the layout file is called activity_main.xml.
Double-click the file to open it in the layout editor. Layout files are written in XML.

Resource files
The res folder holds resources, such as layouts, strings, and images. An Activity is usually associated with a layout of UI views that are defined as an XML file. This XML file is usually named after its Activity. The res folder includes these subfolders:
drawable: Store all your app’s images in this folder.layout: EveryActivityhas at least one XML layout file that describes the UI. For Hello World, this folder containsactivity_main.xml.mipmap: The launcher icons are stored in this folder. There is a subfolder for each supported screen density. Android uses the screen density (the number of pixels per inch) to determine the required image resolution. Android groups all actual screen densities into generalized densities, such as medium (mdpi), high (hdpi), or extra-extra-extra-high (xxxhdpi).
Theic_launcher.pngfolder contains the default launcher icons for all the densities supported by your app.values: Instead of hardcoding values like strings, dimensions, and colors in your XML and Java files, it is best practice to define them in their respectivevaluesfiles. This practice makes it easier to change the values and keep the values consistent across your app.
The values subfolder includes these subfolders:
colors.xml: Shows the default colors for your chosen theme. You can add your own colors or change the colors based on your app’s requirements.dimens.xml: Store the sizes of views and objects for different resolutions.strings.xml: Create resources for all your strings. Doing this makes it easy to translate the strings to other languages.styles.xml: All the styles for your app and theme go here. Styles help give your app a consistent look for all UI elements.
Using the editor pane
If you select a file, the editor pane appears. A tab appears for the file so that you can open multiple files and switch between them. For example, if you double-click the activity_main.xml layout file in the Project > Android pane, the layout editor appears as shown below.

If you double-click the MainActivity file in the Project > Android pane, the editor changes to the code editor as shown below, with a tab for MainActivity.java:

At the top of the MainActivity.java file is a package statement that defines the app package. This package statement is followed by an import block condensed with ..., as shown in the figure above. Click the dots to expand the block to view it. The import statements import libraries needed for the app. For example, the following statement imports the AppCompatActivity library:
import android.support.v7.app.AppCompatActivity;
Each Activity in an app is implemented as a Java class. The following class declaration extends the AppCompatActivity class to implement features in a way that is backward-compatible with previous versions of Android:
public class MainActivity extends AppCompatActivity {
    // ... Rest of the code for the class.
}
Understanding the Android manifest
Before the Android system can start an app component such as an Activity, the system must know that the Activity exists. It does so by reading the app’s AndroidManifest.xml file, which describes all of the components of your Android app. Each Activity must be listed in this XML file, along with all components for the app.
To view and edit the AndroidManifest.xml file, expand the manifests folder in the Project > Android pane, and double-click AndroidManifest.xml. Its contents appear in the editing pane:
<?xml version="1.0" encoding="utf-8"?>
<manifest xmlns:android="http://schemas.android.com/apk/res/android"
    package="com.example.android.helloworld">

    <application
        android:allowBackup="true"
        android:icon="@mipmap/ic_launcher"
        android:label="@string/app_name"
        android:roundIcon="@mipmap/ic_launcher_round"
        android:supportsRtl="true"
        android:theme="@style/AppTheme">
        <activity android:name=".MainActivity">
            <intent-filter>
               <action android:name="android.intent.action.MAIN" />

               <category android:name="android.intent.category.LAUNCHER" />
            </intent-filter>
        </activity>
    </application>

</manifest>
Android namespace and application tag
The Android Manifest is coded in XML and always uses the Android namespace:
xmlns:android="http://schemas.android.com/apk/res/android"
   package="com.example.android.helloworld">
The package expression shows the unique package name of the new app. Do not change the package expression after the app is published.
The <application> tag, with its closing </application> tag, defines the manifest settings for the entire app.
Automatic backup
The android:allowBackup attribute enables automatic app data backup:
android:allowBackup="true"
Setting the android:allowBackup attribute to true enables the app to be backed up automatically and restored as needed. Users invest time and effort to configure apps. Switching to a new device can cancel out all that careful configuration. The system performs this automatic backup for nearly all app data by default, and does so without the developer having to write any additional app code.
For apps whose target SDK version is Android 6.0 (API level 23) and higher, devices running Android 6.0 and higher automatically create backups of app data to the cloud because the android:allowBackup attribute defaults to true if omitted. For apps < API level 22 you have to explicitly add the android:allowBackup attribute and set it to true.
Tip: To learn more about the automatic backup for apps, see Configuring Auto Backup for Apps.
The app icon
The android:icon attribute sets the icon for the app:
android:allowBackup="true"
android:icon="@mipmap/ic_launcher"
The android:icon attribute assigns to the app an icon in the mipmap folder (inside the res folder in the Project > Android pane). The icon appears on the home screen or in the Search Apps screen for launching the app. The icon is also used as the default icon for app components.

App label and string resources
The android:label attribute shows the string "Hello World" highlighted. If you click the string, it changes to show the string resource @string/app_name:
android:label="@string/app_name"
Tip: To see the context menu, ctrl-click or right-click app_name in the editor pane. Select Go To > Declaration to see where the string resource is declared: in the strings.xml file. When you select Go To > Declaration or open the file by double-clicking strings.xml inside the values folder in the Project > Android pane, the file’s contents appear in the editor pane.
After opening the strings.xml file, you can see that the string name app_name is set to Hello World. You can change the app name by changing the Hello World string to something else. String resources are described in a separate lesson.
App theme
The android:theme attribute sets the app’s theme, which defines the appearance of UI elements such as text:
android:theme="@style/AppTheme">
The theme attribute is set to the standard theme AppTheme. Themes are described in a separate lesson.
Declaring the Android version
Different devices may run different versions of the Android system, such as Android 4.0 or Android 4.4. Each successive version can add new APIs not available in the previous version. To indicate which set of APIs are available, each version specifies an API level. For instance, Android 1.0 is API level 1 and Android 4.4 is API level 19.
The API level allows a developer to declare the minimum version with which the app is compatible, using the <uses-sdk> manifest tag and its minSdkVersion attribute. For example, the Calendar Provider APIs were added in Android 4.0 (API level 14). If your app can’t function without these APIs, declare API level 14 as the app’s minimum supported version like this:
<manifest xmlns:android="http://schemas.android.com/apk/res/android"
    package="com.example.android.helloworld">
    <uses-sdk android:minSdkVersion="14" android:targetSdkVersion="19" />
    // ... Rest of manifest information
</manifest>
The minSdkVersion attribute declares the minimum version for the app, and the targetSdkVersion attribute declares the highest (newest) version which has been optimized within the app. Each successive version of Android provides compatibility for apps that were built using the APIs from previous versions, so the app should always be compatible with future versions of Android while using the documented Android APIs.
The targetSdkVersion attribute does not prevent an app from being installed on Android versions that are higher (newer) than the specified value. Even so, the target attribute is important, because it indicates to the system whether the app should inherit behavior changes in newer versions.
If you don’t update the targetSdkVersion to the latest version, the system assumes that your app requires backward-compatible behaviors when it runs on the latest version. For example, among the behavior changes in Android 4.4, alarms created with the AlarmManager APIs are now inexact by default so that the system can batch app alarms and preserve system power. If your target API level is lower than "19", the system retains the previous API’s behavior for your app.
Understanding the build process
The Android application package (APK) is the package file format for distributing and installing Android mobile apps. The build process involves tools and processes that automatically convert each project into an APK.
Android Studio uses Gradle as the foundation of the build system, with more Android-specific capabilities provided by the Android Plugin for Gradle. This build system runs as an integrated tool from the Android Studio menu.
Understanding build.gradle files
When you create a project, Android Studio automatically generates the necessary build files in the Gradle Scripts folder in the Project > Android pane. Android Studio build files are named build.gradle as shown below:
build.gradle (Project: apptitle)
This file is the top-level build file for the entire project, located in the root project folder, which defines build configurations that apply to all modules in your project. This file, generated by Android Studio, should not be edited to include app dependencies.
If a dependency is something other than a local library or file tree, Gradle looks for the files in whichever online repositories are specified in the repositories block of this file. By default, new Android Studio projects declare JCenter and Google (which includes the Google Maven repository) as the repository locations:
allprojects {
    repositories {
        google()
        jcenter()
    }
}
build.gradle (Module: app)
Android Studio creates separate build.gradle (Module: app) files for each module. You can edit the build settings to provide custom packaging options for each module, such as additional build types and product flavors, and to override settings in the manifest or top-level build.gradle file. This file is most often the file to edit when changing app-level configurations, such as declaring dependencies in the dependencies section. The following shows the contents of a project’s build.gradle (Module: app) file:
apply plugin: 'com.android.application'

android {
    compileSdkVersion 26
    defaultConfig {
        applicationId "com.example.android.helloworld"
        minSdkVersion 15
        targetSdkVersion 26
        versionCode 1
        versionName "1.0"
        testInstrumentationRunner
                         "android.support.test.runner.AndroidJUnitRunner"
    }
    buildTypes {
        release {
            minifyEnabled false
            proguardFiles getDefaultProguardFile('proguard-android.txt'),
                                                     'proguard-rules.pro'
        }
    }
}

dependencies {
    implementation fileTree(dir: 'libs', include: ['*.jar'])
    implementation 'com.android.support:appcompat-v7:26.1.0'
    implementation 'com.android.support.constraint:constraint-layout:1.0.2'
    testImplementation 'junit:junit:4.12'
    androidTestImplementation 'com.android.support.test:runner:1.0.1'
    androidTestImplementation
                    'com.android.support.test.espresso:espresso-core:3.0.1'
}
The build.gradle files use Gradle syntax. Gradle is a Domain Specific Language (DSL) for describing and manipulating the build logic using Groovy, which is a dynamic language for the Java Virtual Machine (JVM). You don’t need to learn Groovy to make changes, because the Android Plugin for Gradle introduces most of the DSL elements you need.
Tip: To learn more about the Android plugin DSL, read the DSL reference documentation.
Plugin and Android blocks
In the build.gradle (Module: app) file above, the first statement applies the Android-specific Gradle plug-in build tasks:
apply plugin: 'com.android.application'

android {
   compileSdkVersion 26
   // ... Rest of android block.
}
The android { } block specifies the target SDK version for compiling the app code ( compileSdkVersion 26) and several blocks of information.
The defaultConfig block
Core settings and entries for the app are specified in the defaultConfig { } block within the android { } block:
defaultConfig {
    applicationId "com.example.android.helloworld"
    minSdkVersion 15
    targetSdkVersion 26
    versionCode 1
    versionName "1.0"
    testInstrumentationRunner
                "android.support.test.runner.AndroidJUnitRunner"
}
The minSdkVersion and targetSdkVersion settings override any AndroidManifest.xml settings for the minimum SDK version and the target SDK version. See «Declaring the Android version» previously in this chapter for background information on these settings.
The testInstrumentationRunner statement adds the instrumentation support for testing the UI using Espresso and UIAutomator. These tools are described in a separate lesson.
Build types
Build types for the app are specified in a buildTypes { } block, which controls how the app is built and packaged.
buildTypes {
    release {
        minifyEnabled false
        proguardFiles getDefaultProguardFile('proguard-android.txt'),
                                                       'proguard-rules.pro'
    }
}
The build type specified is release for the app’s release. Another common build type is debug. Configuring build types is described in a separate lesson.
Dependencies
Dependencies for the app are defined in the dependencies { } block, which is the part of the build.gradle file that is most likely to change as you start developing code that depends on other libraries. The block is part of the standard Gradle API and belongs outside the android { } block.
dependencies {
    implementation fileTree(dir: 'libs', include: ['*.jar'])
    implementation 'com.android.support:appcompat-v7:26.1.0'
    implementation 'com.android.support.constraint:constraint-layout:1.0.2'
    testImplementation 'junit:junit:4.12'
    androidTestImplementation 'com.android.support.test:runner:1.0.1'
    androidTestImplementation
                    'com.android.support.test.espresso:espresso-core:3.0.1'
}
In the snippet above, the statement implementation fileTree(dir: 'libs', include: ['*.jar']) adds a dependency of all «.jar» files inside the libs folder.
Syncing your project
When you make changes to the build configuration files in a project, Android Studio requires that you sync the project files. During the sync, Android Studio imports the build configuration changes and runs checks to make sure the configuration won’t create build errors.
To sync the project files, click Sync Now in the notification bar that appears when making a change (as shown in the figure below), or click the Sync Project with Gradle Files button
 in the menu bar.

If Android Studio notices any errors with the configuration — for example, if the source code uses API features that are only available in an API level higher than the compileSdkVersion—the Messages window appears to describe the issue.
Running the app on an emulator or a device
With virtual device emulators, you can test an app on different devices such as tablets or smartphones—with different API levels for different Android versions—to make sure it looks good and works for most users. You don’t have to depend on having a physical device available for app development.
The Android Virtual Device (AVD) manager creates a virtual device or emulator that simulates the configuration for a particular type of Android-powered device. Use the AVD Manager to define the hardware characteristics of a device and its API level, and to save it as a virtual device configuration. When you start the Android emulator, it reads a specified configuration and creates an emulated device on your computer that behaves exactly like a physical version of that device.
Creating a virtual device
To run an emulator on your computer, use the AVD Manager to create a configuration that describes the virtual device. Select Tools > Android > AVD Manager, or click the AVD Manager icon
 in the toolbar.
The Your Virtual Devices screen appears showing all of the virtual devices created previously. Click the +Create Virtual Device button to create a new virtual device.
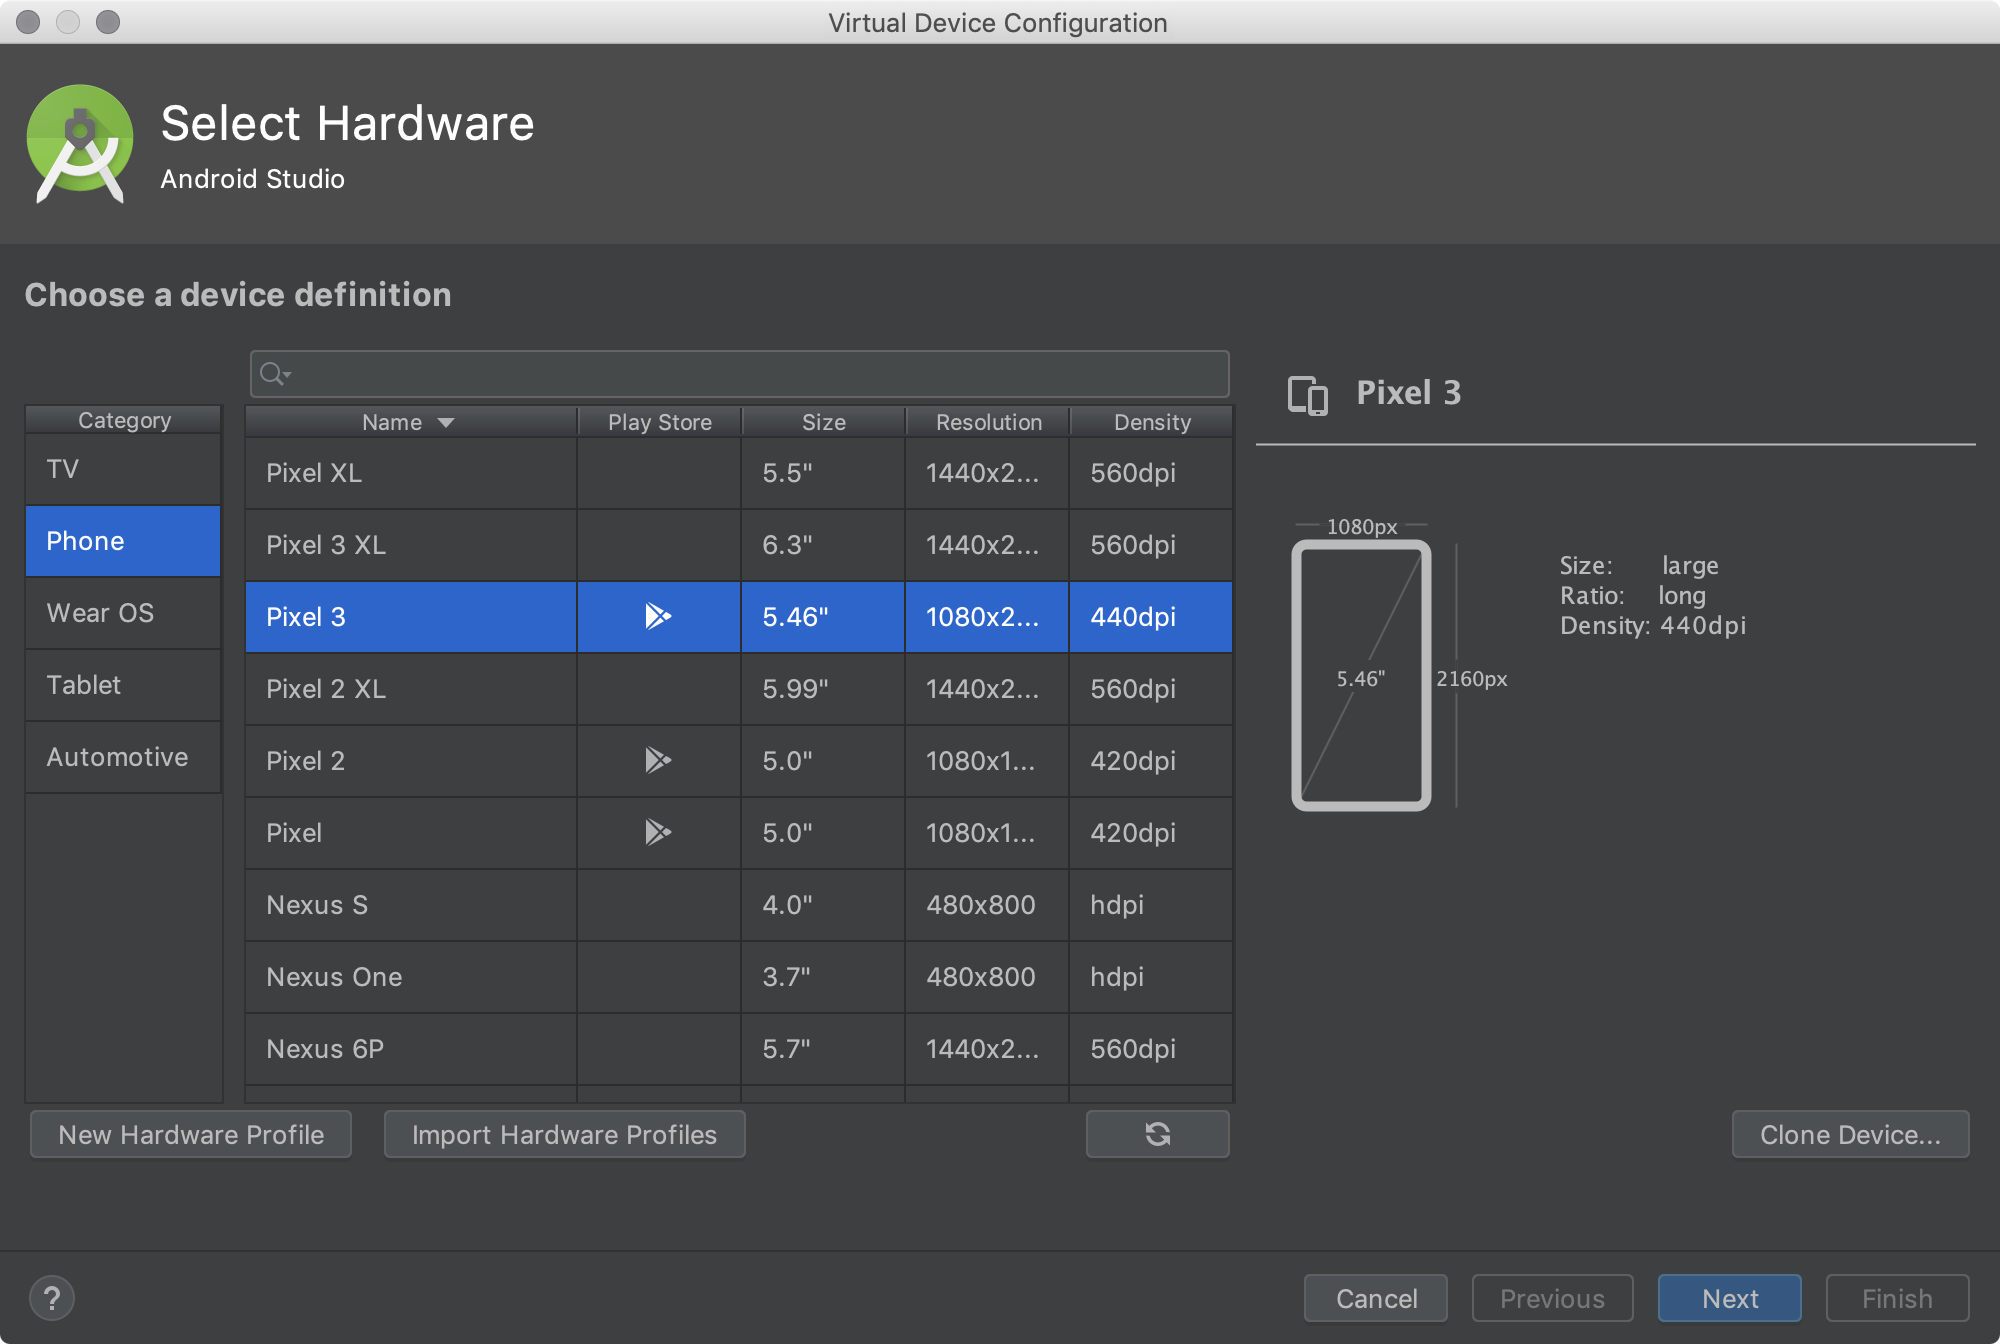
 manager")
You can select a device from a list of predefined hardware devices. For each device, the table provides a column for its diagonal display size (Size), screen resolution in pixels (Resolution), and pixel density (Density). For example, the pixel density of the Nexus 5 device is xxhdpi, which means the app uses the icons in the xxhdpi folder of the mipmap folder. Likewise, the app uses layouts and drawables from folders defined for that density.

After you click Next, the System Image screen appears for choosing the version of the Android system for the device. The Recommended tab shows the recommended systems for the device. More versions are available under the x86 Images and Other Images tabs. If a Download link is visible next to a system image version, it is not installed yet. Click the link to start the download, and click Finish when it’s done.
Running the app on the virtual device
To run the app on the virtual device you created in the previous section, follow these steps:
-
In Android Studio, select Run > Run app or click the
 Run icon in the toolbar.
 -
In the Select Deployment Target window, under Available Emulators, select the virtual device you created, and click OK.
 Run icon in the toolbar.
The emulator starts and boots just like a physical device. Depending on the speed of your computer, the startup process might take a while. The app builds, and once the emulator is ready, Android Studio uploads the app to the emulator and runs it.
You should see the app created from the Empty Activity template («Hello World») as shown in the following figure, which also shows Android Studio’s Run pane that displays the actions performed to run the app on the emulator.
Tip: When testing on a virtual device, it is a good practice to start it up once, at the very beginning of your session. Do not close it until you are done testing your app, so that your app doesn’t have to go through the device startup process again. To close the virtual device, select Quit from the menu or press Control-Q in Windows or Command-Q in macOS.

The figure above shows the emulator and the run log:
- The Emulator running the app.
- The Run pane, which shows the actions taken to install and run the app.
- The Run tab, which you click to open or close the Run pane.
Running the app on a physical device
Always test your apps on a physical device. While emulators are useful, they can’t show all possible device states, such as what happens if an incoming call occurs while the app is running. To run the app on a physical device, you need the following:
- An Android-powered device such as a phone or tablet.
- A data cable to connect your Android-powered device to your computer via the USB port.
- If you are using a Linux or Windows system, you may need to perform additional steps to run on a hardware device. Check the Using Hardware Devices documentation. You may also need to install the appropriate USB driver for your device. See OEM USB Drivers.
To let Android Studio communicate with your Android-powered device, you must turn on USB Debugging on the device. You enable USB Debugging in the device’s Developer options settings. (Note that enabling USB Debugging is not the same as rooting your device.)
On Android 4.2 and higher, the Developer options screen is hidden by default. To show developer options and enable USB Debugging:
- On your device, open Settings > About phone and tap Build number seven times.
- Return to the previous screen (Settings). Developer options appears at the bottom of the list. Tap Developer options.
- Select USB Debugging.
- Connect the device and run the app from Android Studio.
Using the log
The log is a powerful debugging tool you can use to look at values, execution paths, and exceptions. After you add logging statements to an app, your log messages appear along with general log messages in the Logcat pane.
Viewing log messages
To see the Logcat pane, click the Logcat tab at the bottom of the Android Studio window as shown in the figure below.

In the figure above:
- The Logcat tab for opening and closing the Logcat pane, which displays information about your app as it is running. If you add
Logstatements to your app,Logmessages appear here. - The
Loglevel menu set to Verbose (the default), which shows allLogmessages. Other settings include Debug, Error, Info, and Warn.
Adding logging statements to your app
Logging statements add whatever messages you specify to the log. Adding logging statements at certain points in the code allows the developer to look at values, execution paths, and exceptions. For example, the following logging statement adds "MainActivity" and "Hello World" to the log:
Log.d("MainActivity", "Hello World");
The following are the elements of this statement:
Log: TheLogclass for sending log messages to the Logcat pane.d: The DebugLoglevel setting to filter log message display in the Logcat pane. Other log levels areefor Error,wfor Warn, andifor Info. You assign a log level so that you can filter the log messages using the drop-down menu in the center of the Logcat pane."MainActivity": The first argument is a tag which can be used to filter messages in the Logcat pane. This tag is commonly the name of theActivityfrom which the message originates. However, you can name the tag anything that is useful to you for debugging."Hello world": The second argument is the actual message.
By convention, log tags are defined as constants for the Activity:
private static final String LOG_TAG = MainActivity.class.getSimpleName();
Use the constant in the logging statements:
Log.d(LOG_TAG, "Hello World");
After you add the Log.d statement shown above, follow these steps to see the log message:
- If the Logcat pane is not already open, click the Logcat tab at the bottom of Android Studio to open it.
- Change the
Loglevel in the Logcat pane to Debug. (You can also leave theLoglevel as Verbose, because there are so few log messages.) - Run your app on a virtual device.
The following message should appear in the Logcat pane:
11-24 14:06:59.001 4696-4696/? D/MainActivity: Hello World
The related practical is 1.1 Android Studio and Hello World.
Learn more
Android Studio documentation:
- Android Studio download page
- Meet Android Studio
- Reading and writing logs
- Android Virtual Device (AVD) manager
- App Manifest
- Configure Your Build
Logclass- Configure Build Variants
- Create and Manage Virtual Devices
- Sign Your App
- Shrink Your Code and Resources
Android API Guide, «Develop» section:
- Introduction to Android
- Platform Architecture
- UI Overview
- Platform versions
- Supporting Different Platform Versions
- Supporting Multiple Screens
Other:
- Wikipedia: Summary of Android version history
- Groovy syntax
- How do I install Java?
- Installing the JDK Software and Setting JAVA_HOME
- Gradle site
- Gradle Wikipedia page