Mastering phpMyAdmin 3.4 for Effective MySQL Management
A percentage of the book’s sales is donated to help phpMyAdmin.
phpMyAdmin Starter
A percentage of the book’s sales is donated to help phpMyAdmin.
Mastering phpMyAdmin 2.11 for Effective MySQL Management

A percentage of the book’s sales is donated to help phpMyAdmin.
Dominar phpMyAdmin para una administración efectiva de MySQL

Este libro es una guía completa que le ayuda a sacar partido del potencial de phpMyAdmin. Ya sea un programador experimentado, un administrador de sistemas, un diseñador Web o nuevo a las tecnologías de MySQL y phpMyAdmin, este libro le mostrará como aumentar su productividad y control cuando trabaje con MySQL. Por ello se ha traducido, de modo que esta guía completa sea más accesible al lector español.
Управление базами данных — один из самых важных моментов в разработке веб-сайтов приложений и других программных продуктов. Для многих программ нужно вручную создавать базы данных перед тем, как они смогут быть установлены и настроены. Если вы используете хостинг, то там есть веб-интерфейс для решения таких задач, но на VPS все придется делать вручную, через терминал или использовать phpmyadmin.
Это очень популярный инструмент для управления базой данных mysql. Здесь вы можете сделать практически все, начиная от создания базы данных и настройки прав доступа до создания пользователей и резервного копирования. В этой статье мы рассмотрим как пользоваться Phpmyadmin для решения своих задач.
Мы не будем подробно останавливаться на установке программы, поскольку она достаточно сложна и сильно зависит от используемого вами дистрибутива. Мы уже раньше говорили про установку phpmyadmin в Ubuntu, а чуть позже про установку phpmyadmin в CentOS, просто обратитесь к тем статьям, чтобы найти более подробную информацию о том как выполняется установка и настройка phpmyadmin.
Как пользоваться Phpmyadmin
Первое что вам предстоит после установки phpmyadmin — это открыть веб-интерфейс и авторизоваться в нем. Обычно веб-интерфейс доступен по адресу:
http://адрес_сайта/phpmyadmin
Это если вы ничего не меняли. Просто откройте этот адрес в браузере.
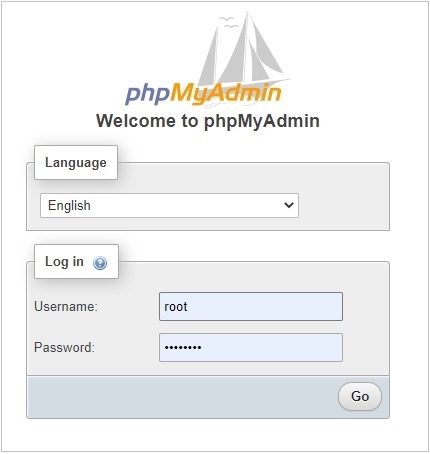
1. Авторизация
Когда вы откроете указанный выше адрес, перед вами откроется поле ввода логина и пароля. Я буду использовать суперпользователя, поскольку я собираюсь создавать базы данных, создавать новых пользователей и управлять их правами. Если вам нужно только выполнить SQL запрос как базе данных пользователя, то можно использовать его. В mysql для каждого пользователя можно прикрепить базу данных, к которой у него будет доступ что очень удобно.
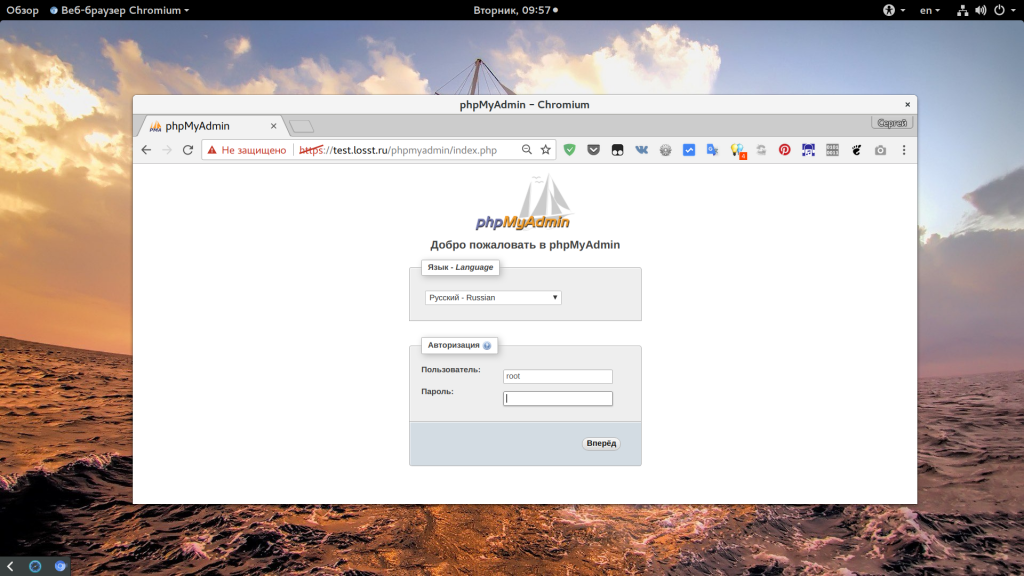
Теперь вы знаете как войти в phpmyadmin.
2. Первоначальная настройка
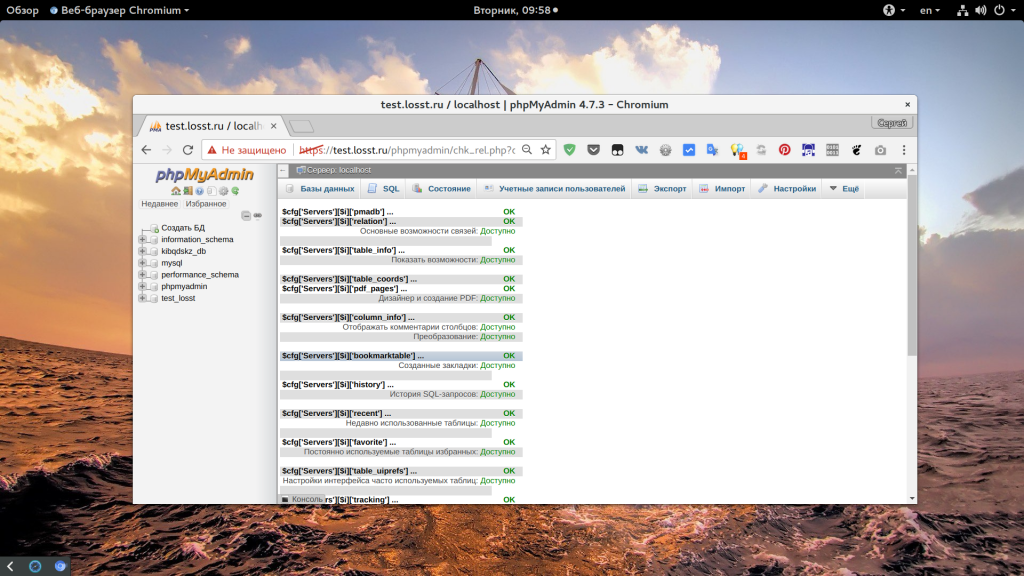
Обратите внимание на самый низ окна, здесь программа сообщает о наличии новой версии и о том, что не все возможности активированы. Программа предлагает создать базу данных phpmyadmin и сохранить туда все ее настройки. Согласитесь на это предложение:
Здесь может быть выполнена настройка phpmyadmin, но я не советую вам тут что-то менять.
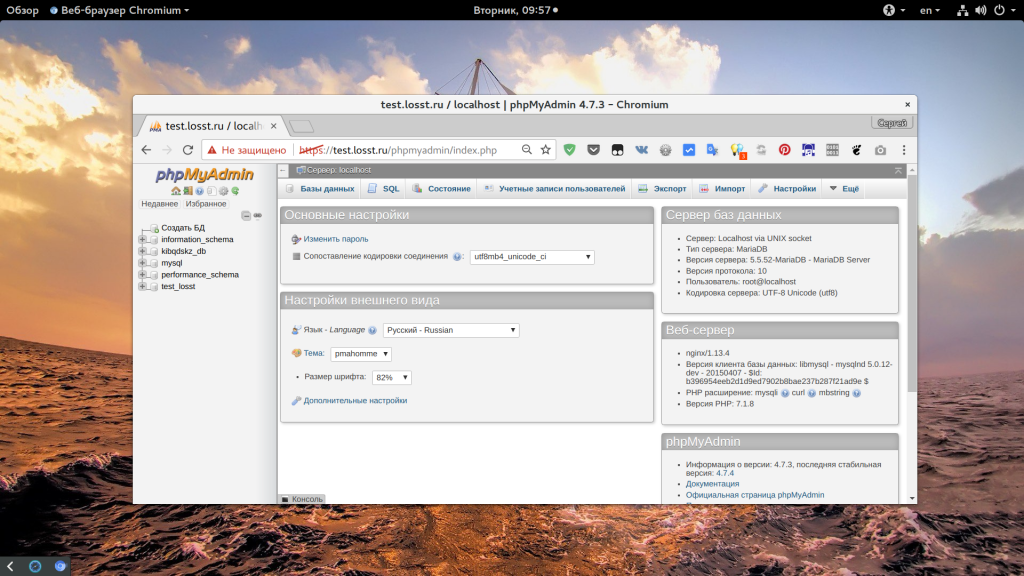
3. Интерфейс
Теперь пора более детально остановиться на интерфейсе программы. Перед вами открылось главное окно, оно выглядит вот так:
Условно его можно разделить на несколько частей:
- Боковая панель — находится слева, тут отображается вертикальный список доступных для вас в данный момент баз данных, а также их таблиц. Вы можете развернуть каждую из них чтобы посмотреть таблицы. Также тут есть быстрые кнопки — обновить, домой и так далее;
- Главное меню — это полоска, которая находится под именем сервера. Именно с помощью нее мы будем перемещаться по различным возможностям программы, таким как базы данных, пользователи, экспорт и импорт и так далее;
- Рабочая область — тут отображается рабочая информация, сейчас, в главном окне тут находится информация о сервере, в других же случаях может находится содержимое базы данных или поле ввода текста.
Как видите, все довольно просто, несмотря на то, что на первый взгляд, интерфейс может показаться сложным.
4. Создание базы данных
Теперь нас интересует первая вкладка меню. Базы данных. Здесь вы увидите список доступных вам баз данных, а также поле для создания новой базы над ними. Введите в это поле имя для новой базы, а затем выберите кодировку utf8-general-ci:
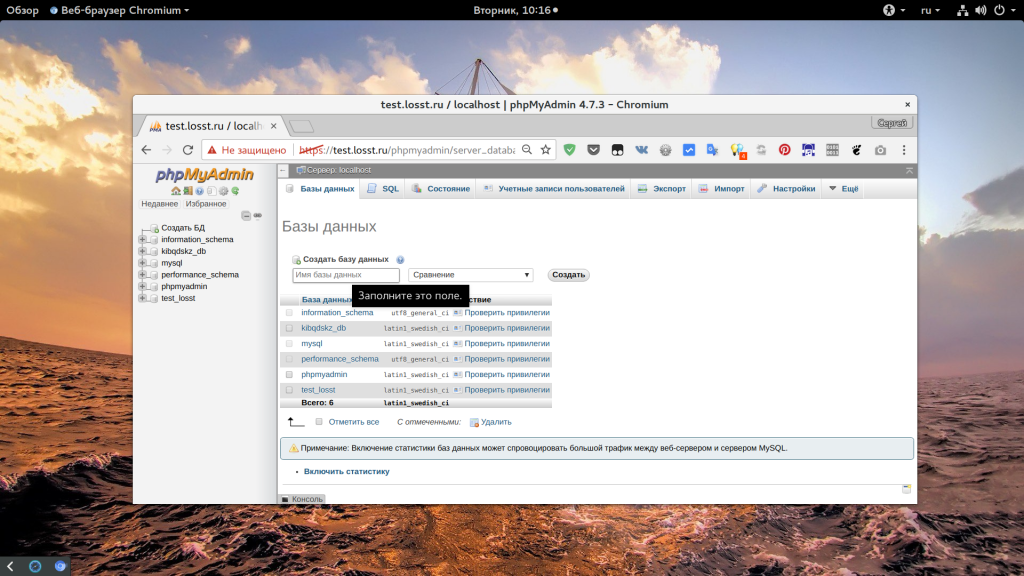
После этого нажмите кнопку «Создать». Будет создана новая база данных, и вы сразу перейдете в нее. Теперь вы управляете только ею и главное меню немного изменилось.
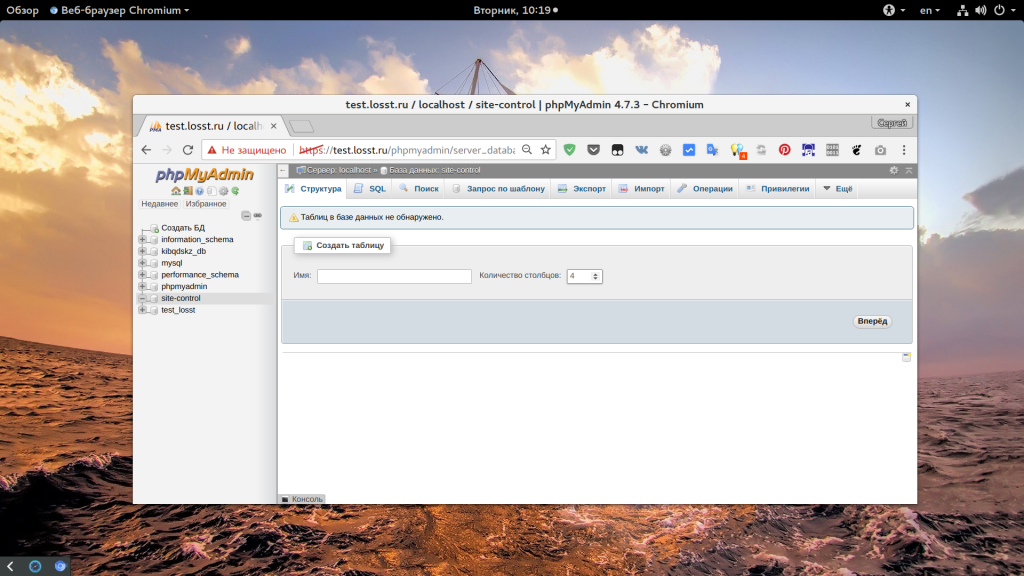
5. Создание таблиц
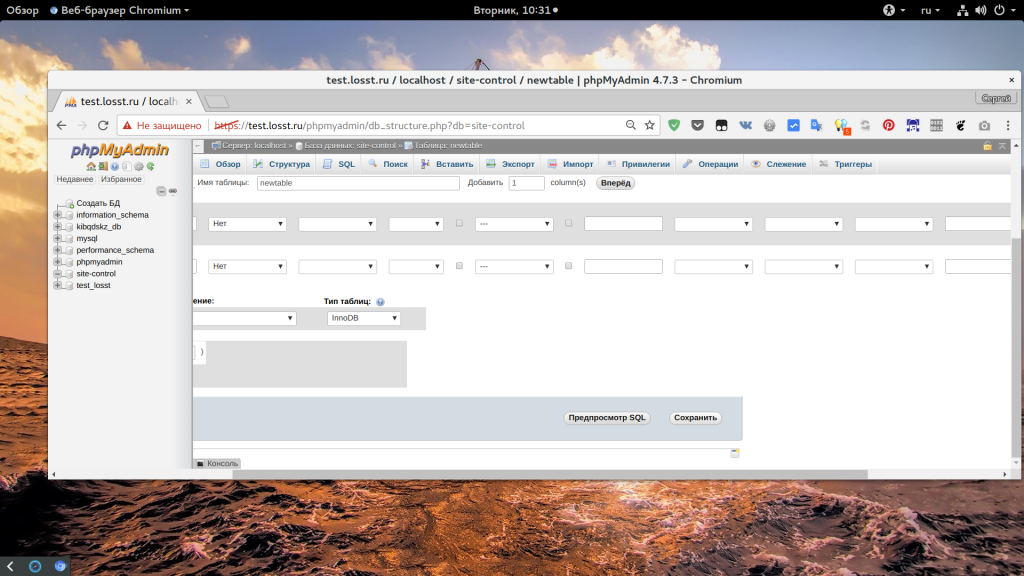
Обычно, различные движки создают себе сами таблицы, но на случай, если вы захотите создать базу данных phpmyadmin для собственного приложения, мы рассмотрим как делать таблицы. Как только вы попали на вкладку «Структура», вам будет выведен список доступных таблиц, а также возможность добавить новую. Введите имя таблицы в поле, а также выберите количество столбцов.
На следующем шаге нам предстоит выбрать типы данных для столбцов и их имена:
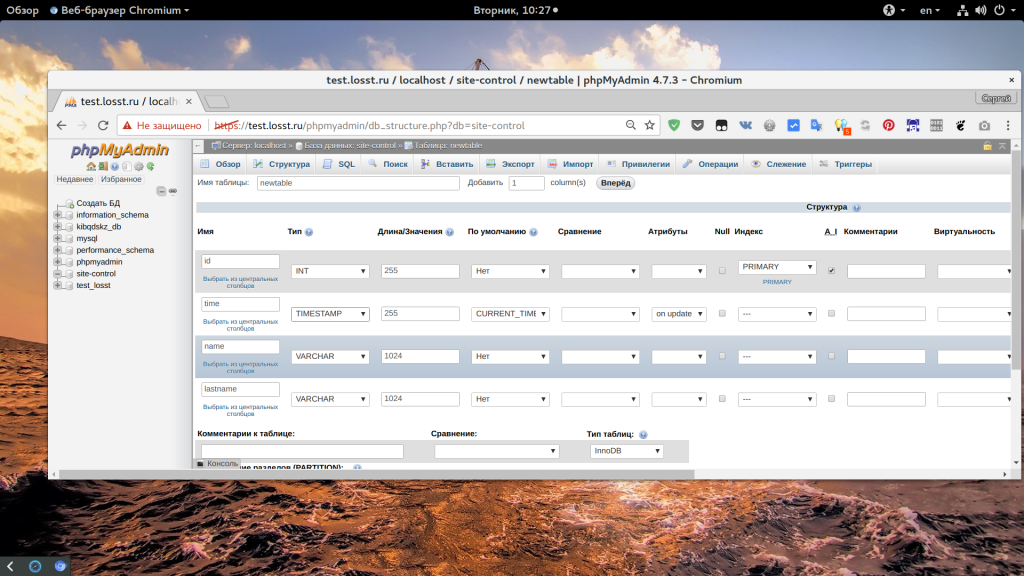
Я создам четыре поля:
- id — формат INT, длина 255, AUTOINDEX, автоматически увеличивается для каждой новой записи, PRIMARY — используется как первичный ключ для ускорения поиска по этому полю;
- time — формат TIMESTAMP — временная метка в формате Unix, CURRENT_TIMESTAMP — автоматически устанавливается текущее время когда создается запись в этом поле;
- name и lastname — обычные строки VARCHAR длиной 1024 символа;
Внизу окна можно еще выбрать тип движка таблиц. Самый популярный — InnoDB, он самый производительный, но требователен к ресурсам. Можно еще выбрать AriaDB, но тогда производительность упадет. Когда завершите, нажмите кнопку «Сохранить» в самом низу:
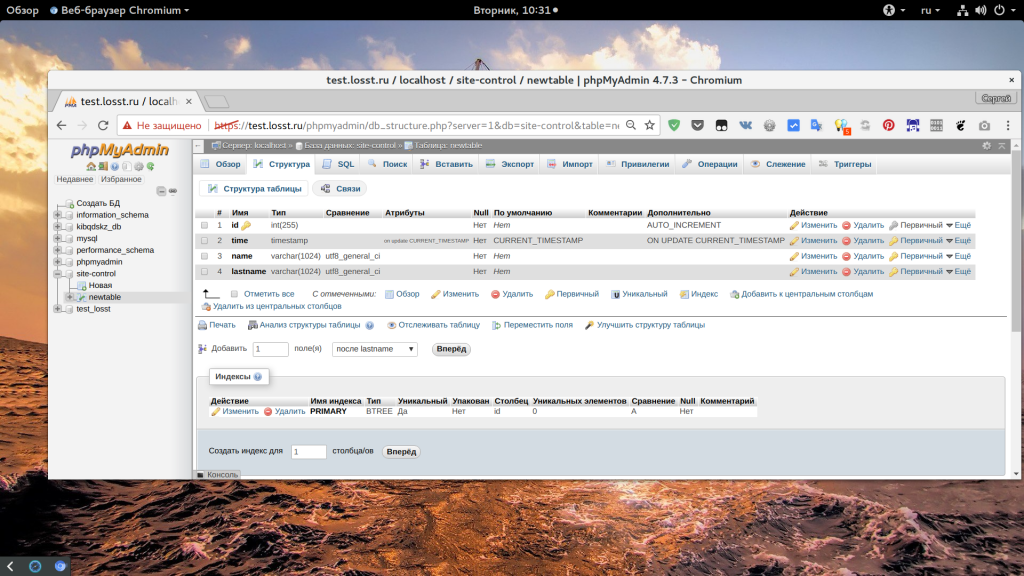
Далее вы попадете на страницу этой таблицы и меню снова изменится. Тут вы можете настроить связи между таблицами, изменить ее структуру, добавить новые поля, выполнить поиск и вставить новые записи.
6. Вставка записей
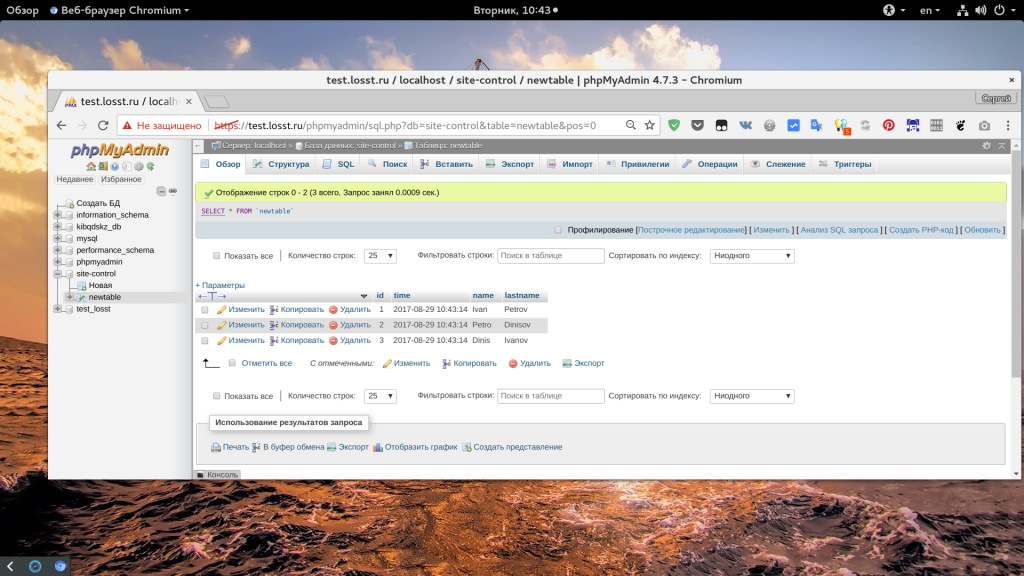
Phpmyadmin позволяет делать практически все с таблицами баз данных, самое простое, что мы можем сейчас сделать — это вставить новую запись. Для этого перейдите на вкладку «Вставить»:
Здесь вы можете вставить несколько записей за один раз. Заполнять нужно только те поля, для которых не были заданы значения по умолчанию — name и lastname.
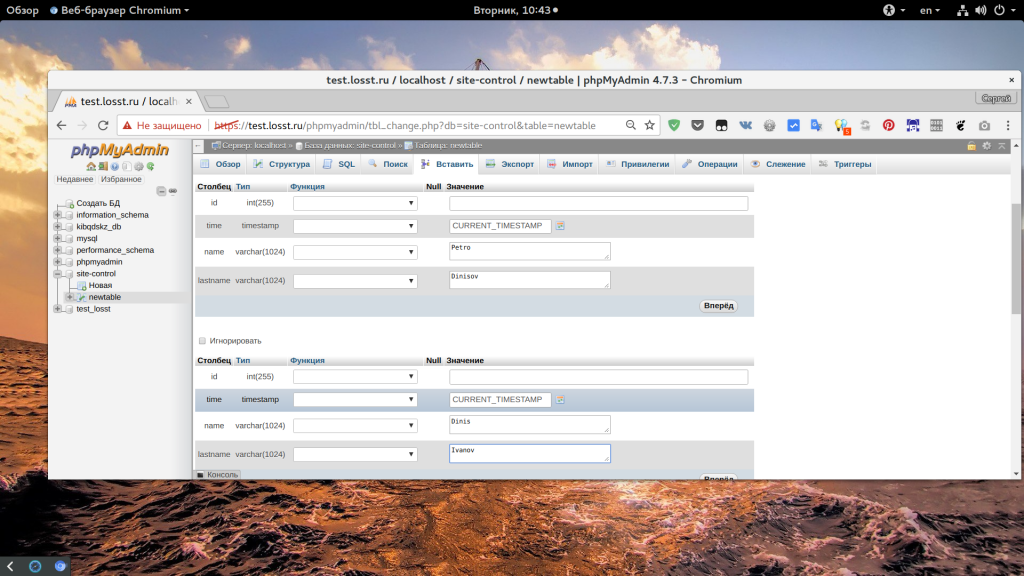
Когда завершите, пролистайте в самый низ и нажмите «Вперед». Здесь же можно установить количество полей, которые вы хотите добавить.
Далее перед вами откроется либо редактор SQL с только что выполненным запросом, либо обзор полей таблицы:
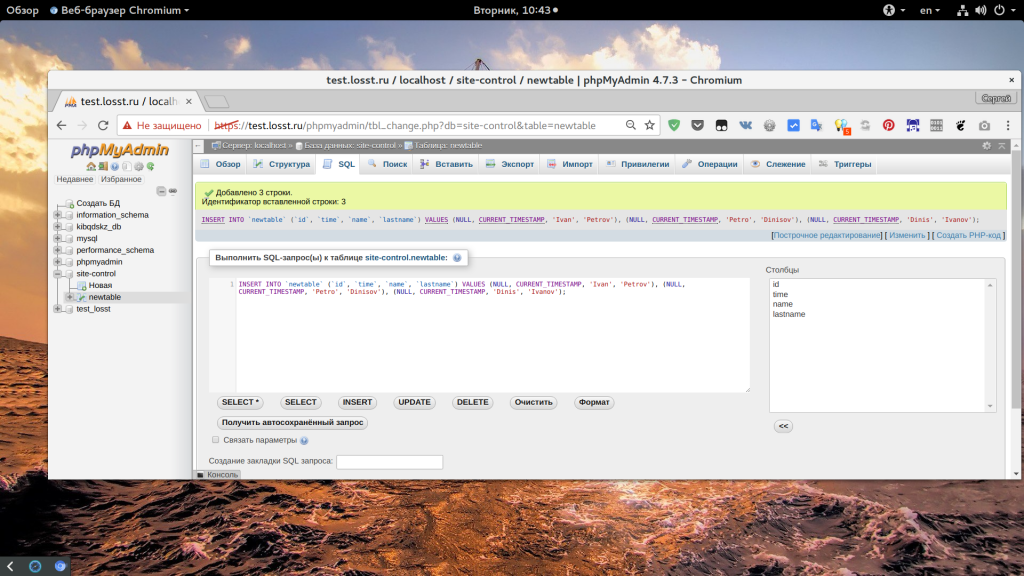
7. Выполнение SQL запроса
Если вы не знаете как пользоваться phpmyadmin для выполнение того или иного действия, но знаете как его выполнить через SQL, то это не проблема в phpmyadmin можно выполнить любой SQL запрос. Для этого в меню таблицы или базы данных перейдите на вкладку SQL:
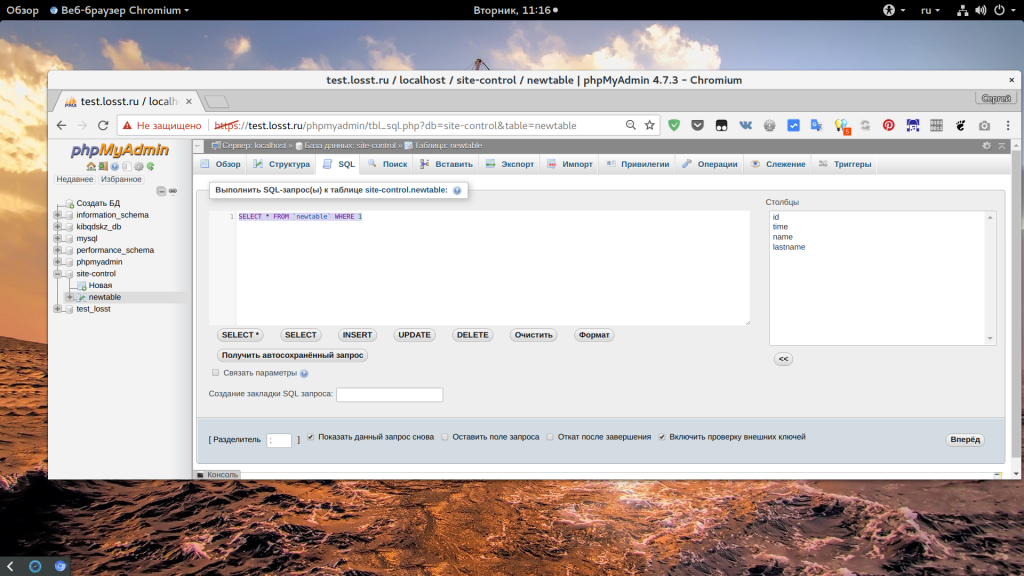
Сразу же тут вы найдете различные шаблоны для запросов.
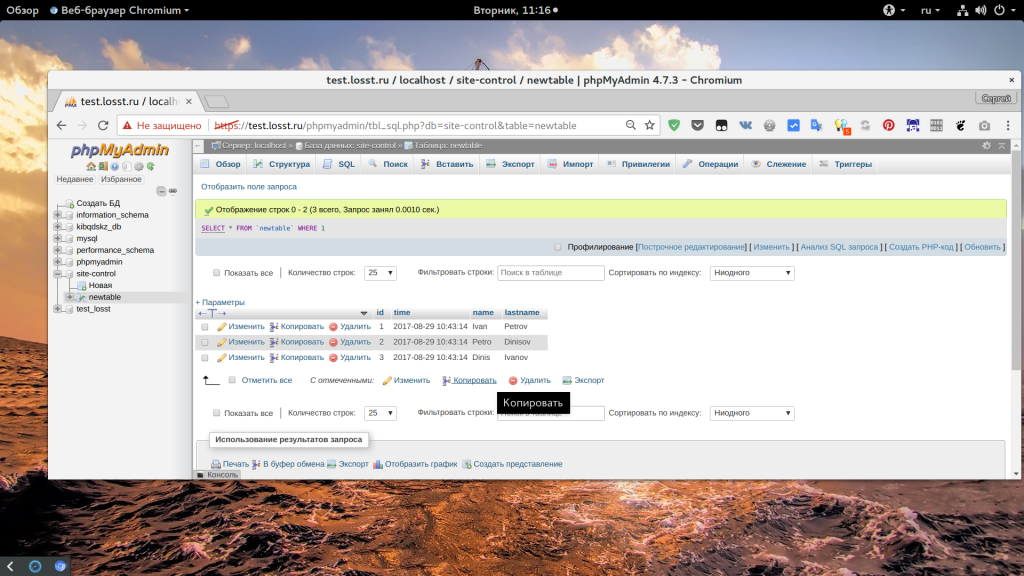
Или можете ввести нужный запрос сами, вручную. Для выполнения запроса нажмите «Вперед». Перед вами откроется результат запроса, если были получены какие-либо поля, то они будут выведены, если же нет, то просто будет выведено сообщение о том что все прошло успешно.
8. Создание пользователя
С основными операциями над базой данных мы разобрались, как вы могли убедится, работа с phpmyadmin очень проста, теперь давайте рассмотрим как настроить привилегии. Сначала нам нужно создать пользователя для базы данных. Для этого перейдите на домашний экран, а затем выберите «Учетные записи пользователей»:
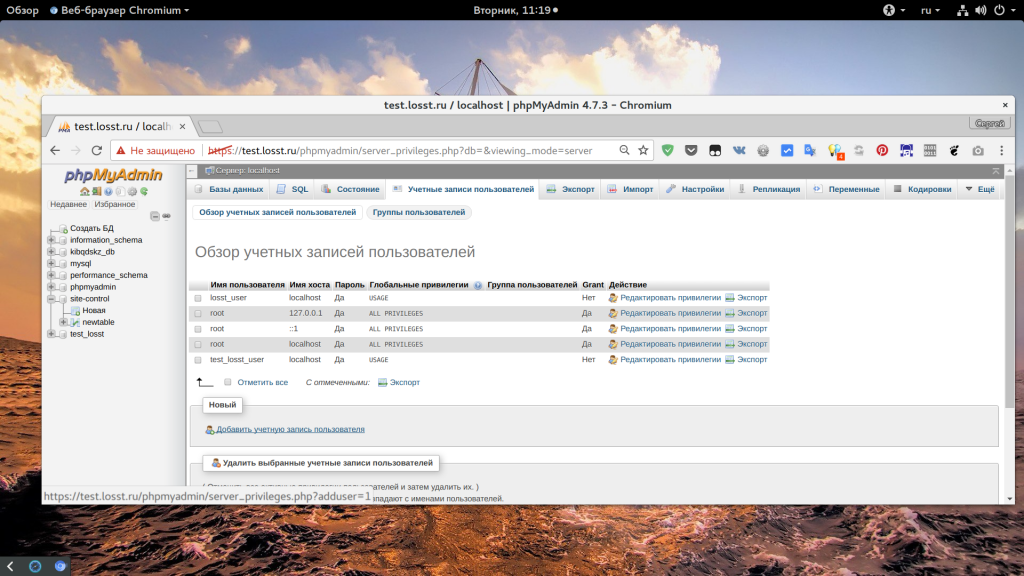
Здесь отображен список всех пользователей, если вы авторизовались не от имени root, то, возможно, вам придется выйти и авторизоваться заново. Под списком есть ссылка «Добавить учетную запись пользователя»:
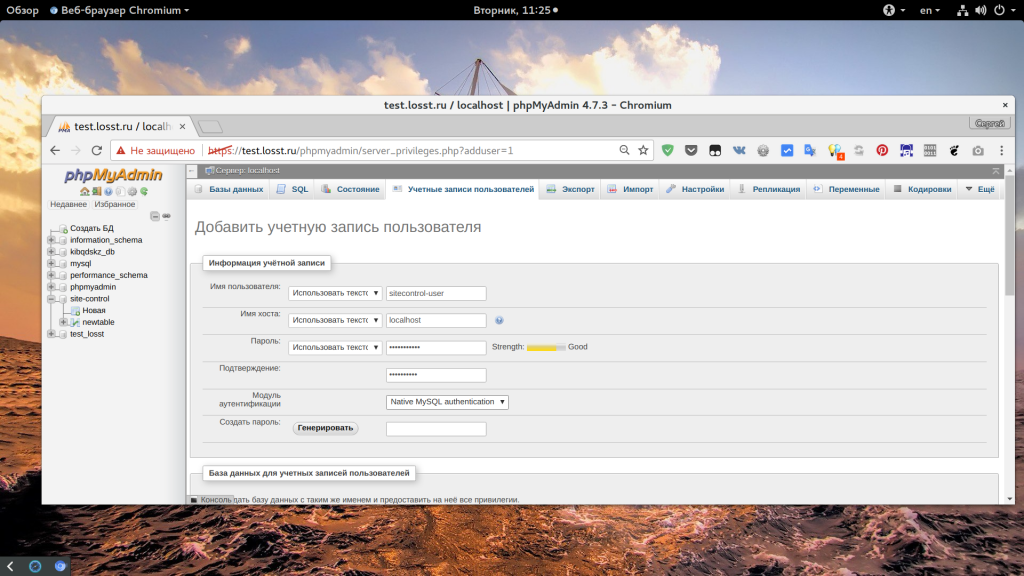
Тут вам нужно заполнить несколько полей. Во-первых, это имя пользователя. Оно может состоять из символов английского алфавита, цифр или дефиса, другие символы использовать можно, но лучше не нужно во избежание проблем. Следующее поле — это хост, с которого сможет авторизоваться этот пользователь, по умолчанию установлено значение %, это любой хост. Но нам нужно чтобы пользователь мог войти только локально, поэтому пишем localhost. Следующие два поля — пароль:

Чуть ниже вы можете создать базу данных с таким же именем, как у пользователя, или же настроить для него глобальные привилегии. Когда завершите, нажмите «Вперед».
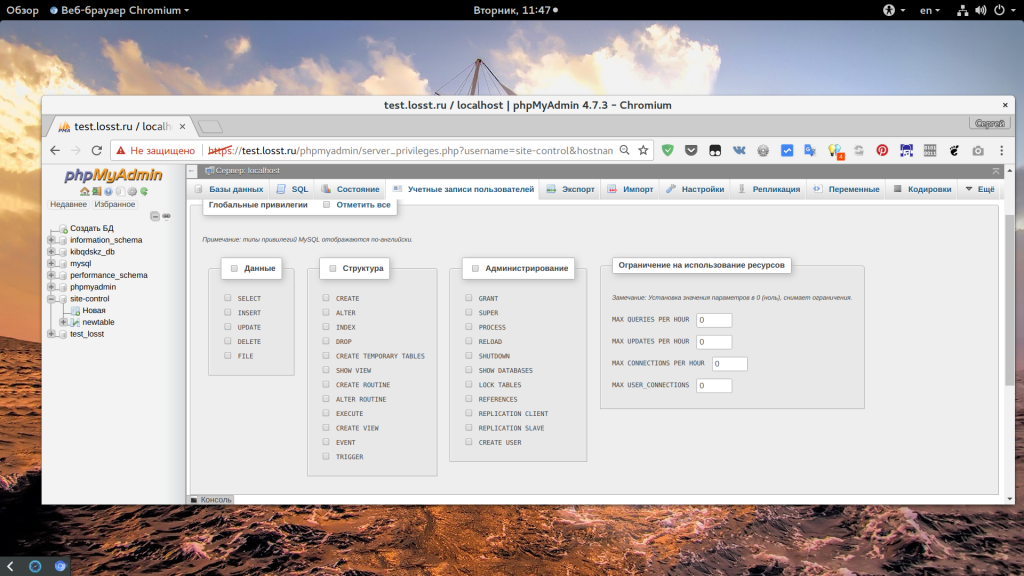
9. Привилегии пользователя
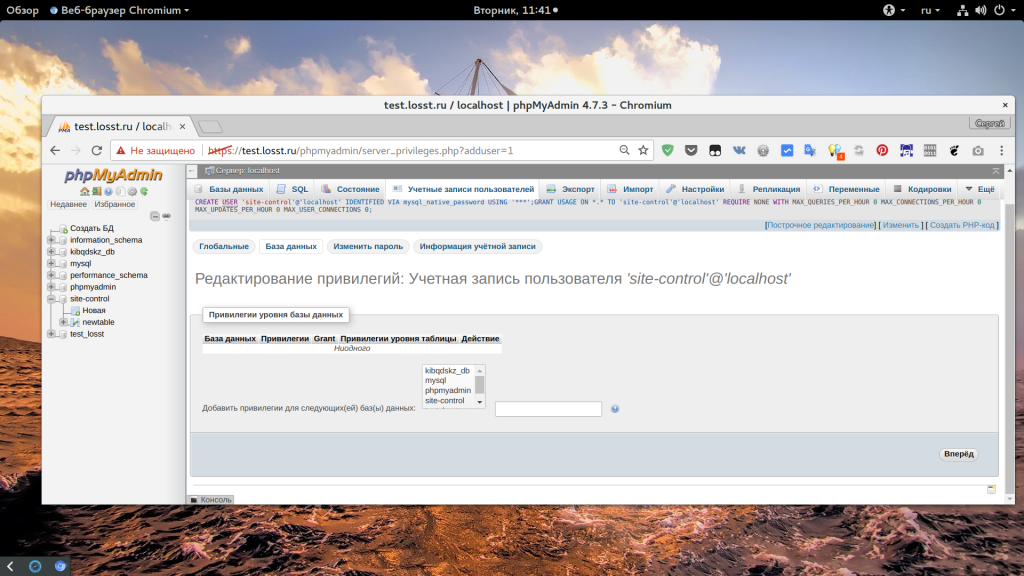
Еще нам нужно дать пользователю возможность работать только с одной базой данных. Поэтому после создания пользователя откройте его в списке и перейдите на вкладку «База данных»:
Здесь вам нужно выбрать базу данных, к которой у пользователя будет доступ, например, site-control:
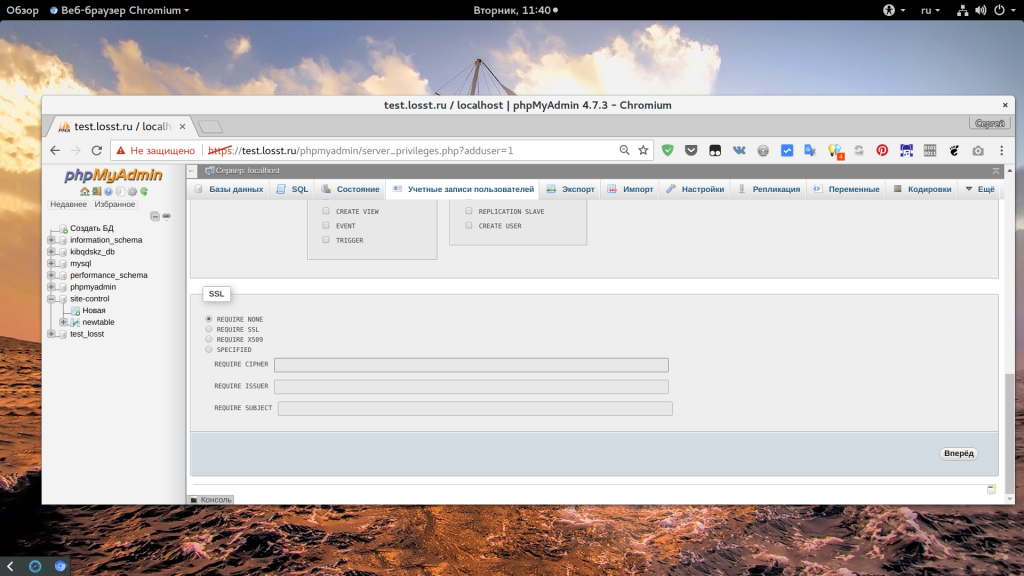
Дальше нажмите «Вперед». На следующем экране вам нужно отметить права, которые будут у пользователя на эту базу, можно просто нажать «Отметить все»:

На вкладке «Глобальные» вы все еще можете изменить глобальные привилегии пользователя.
10. Экспорт и импорт
Резервное копирование базы данных имеет очень важное значение. И эту функцию вы можете выполнять с помощью Phpmyadmin. Для этого перейдите на вкладку «Экспорт»:
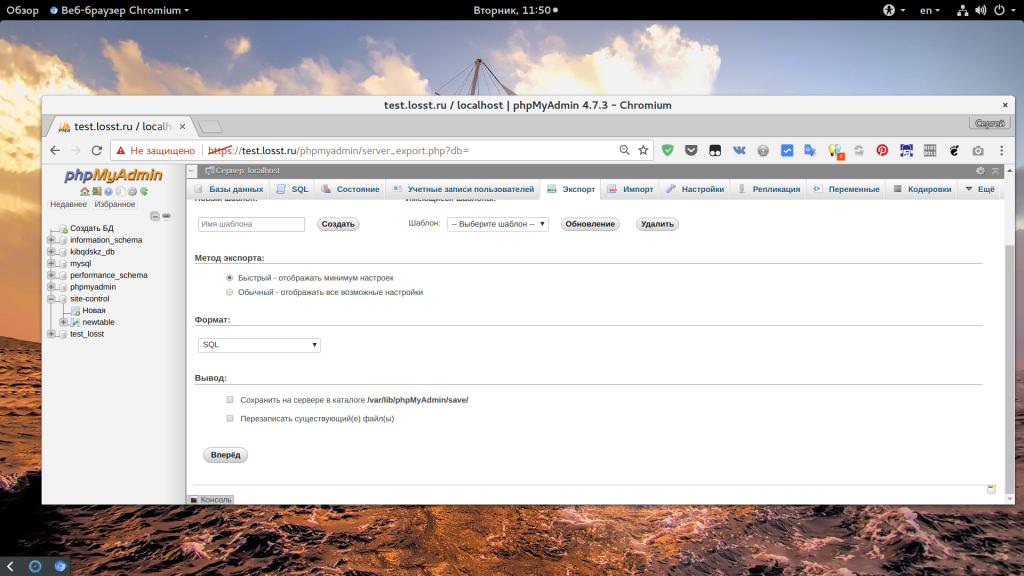
В быстром режиме можно выполнить резервное копирование всех баз в формате SQL. Просто нажмите «Вперед»:
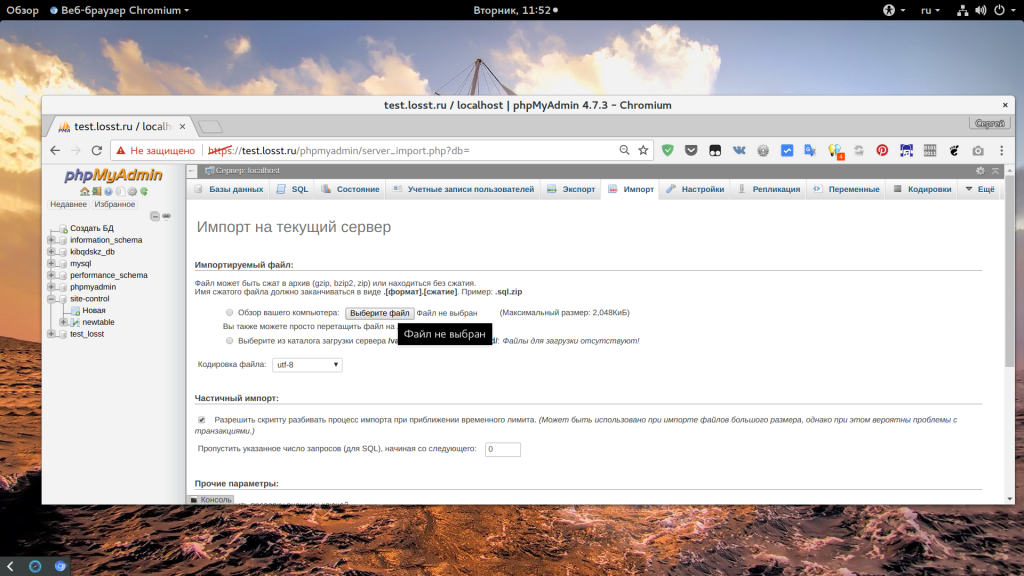
Для импорта перейдите на вкладку «Импорт» и выберите файл *.sql из которого вы хотите импортировать команды.
Выводы
В этой небольшой статье мы рассмотрели как пользоваться phpmyadmin для решения основных задач при работе с базой данных. Как видите, вам необязательно учить SQL и сидеть в терминале чтобы создать базу данных и таблицы для своего проекта. Хотя это было бы весьма желательно. Надеюсь, эта инструкция phpmyadmin для чайников была для вас полезной. Если у вас остались вопросы, спрашивайте в комментариях!
https://youtu.be/R9JLxGLr5E0
Обнаружили ошибку в тексте? Сообщите мне об этом. Выделите текст с ошибкой и нажмите Ctrl+Enter.

Статья распространяется под лицензией Creative Commons ShareAlike 4.0 при копировании материала ссылка на источник обязательна .
Автор: Марк Делисл
Перевод: Иван Шумилов
Данная обучающая статья от ведущего разработчика phpMyAdmin предназначена для веб-мастеров, которые только начинают знакомиться с основами SQL. В качестве инструментария используются сервер баз данных MySQL и интерфейс их администрирования — phpMyAdmin. Последний и будет использоваться в данной статье в качестве инструмента для изучения SQL.
Что такое SQL?
SQL (англ. Structured Query Language — язык структурированных запросов) — универсальный язык, применяемый для создания, модификации и управления данными в реляционных базах данных. Этот язык был разработан IBM (экспериментальная СУБД «System R») в 1974-1979 годах. Первый стандарт языка SQL был принят Американским национальным институтом стандартизации (ANSI) в 1987 (так называемый SQL level 1) и несколько уточнён в 1989 году (SQL level 2), 1992 и 1999 году. После этого, индустрия начала широко использовать SQL как язык реляционных баз данных, и на сегодняшний день практически каждая база данных основана на SQL.
Архитектура данных, к которой обращается SQL называется реляционной. В реляционных базах данных все данные представлены в виде простых таблиц, разбитых на строки и столбцы, на пересечении которых расположены данные. Запросы к таким таблицам возвращают таблицы, которые сами могут становиться предметом дальнейших запросов. Каждая база данных может включать несколько таблиц, которые, как правило, связаны друг с другом, откуда и произошло название реляционные.
В данной статье мы будем использовать MySQL, популярную открытую реализацию SQL, которая предоставляется абсолютным большинством хостинг-провайдеров.
Инструментарий для данной статьи
Для выполнения упражнений, приведенных в данной статье, потребуется доступ к MySQL-серверу. В качестве интерфейса для MySQL используется phpMyAdmin — PHP приложение, запущенное на Web-сервере. Для полного ознакомления с возможностями phpMyAdmin рекомендуется прочитать книгу «Mastering phpMyAdmin for effective MySQL Management».
Эта статья познакомит Вас с основами синтаксиса SQL, время от времени, предлагая Вам ввести выражения; покажет, как phpMyAdmin генерирует MySQL-запросы на основе ваших действий через интерфейс.
Создание таблиц в phpMyAdmin
В качестве примера, мы будем использовать географическую информационную систему. Допустим, мы решили, что нам необходима информация о городах и странах — таким образом, нам понадобятся две таблицы, которые будут частью базы данных `geodb`. Для создания таблиц можно использовать вкладку «Structure» на странице просмотра базы данных, или использовать блок SQL-запросов для ввода соответствующего выражения.
Чтобы создать таблицу, воспользуемся выражением CREATE TABLE, в котором мы зададим имя нашей новой таблицы. Выражение начинается с CREATE TABLE, после которой следует имя таблицы. Затем в скобках указывается список столбцов, и информация о ключах. Каждому столбцу дается имя, указывается тип данных, указывается атрибут NULL или NOT NULL (здесь, NOT NULL означает, что колонка не может иметь значение NULL), и значение по умолчанию, если оно уместно.
CREATE TABLE cities ( id int(11) NOT NULL auto_increment, city_name varchar(50) NOT NULL default », latitude varchar(15) NOT NULL default », longitude varchar(15) NOT NULL default », population int(11) NOT NULL default ‘0’, country_code char(2) NOT NULL default », PRIMARY KEY (id) ) TYPE=MyISAM AUTO_INCREMENT=1 ;
Столбец id — это первичный ключ (primary key), колонка, которая уникально идентифицирует каждый город. Тип данных этого столбца — INT (целое число нормального размера), MySQL назначает уникальные значения для этого столбца, благодаря атрибуту auto_increment. Обратите внимание на то, что мы не можем использовать название городов в качестве первичного ключа, т.к. некоторые имена городов не уникальны в мире. Для отображения численности населения мы также используем целое число.
Другие столбцы используют в качестве типов данных строки фиксированной длины (CHAR) либо строки переменной длины (VARCHAR). Когда мы точно знаем длину строки, лучше использовать CHAR, задавая длину столбца как CHAR(2). В противном случае, мы используем в качестве типа данных строки переменной длины, указывая только максимальную длину строки, например: VARCHAR(15).
После списка столбцов, мы можем указать дополнительные параметры таблицы, например, её тип, первое значение для столбца автоинкремента. SQL-выражение заканчивается точкой с запятой. Создав таблицу для городов, мы делаем ту же операцию, но на этот раз для таблицы стран.
CREATE TABLE countries ( country_code char(2) NOT NULL default », country_name varchar(100) NOT NULL default » ) TYPE=MyISAM;
Заметьте, что столбец `country_code` присутствует в обеих таблицах. Это отражает принцип связи: country_code в `cities` связан с одноименным столбцом в таблице `countries`. Таким образом, мы экономим на месте, указывая название страны в базе данных только однажды.
В другой статье (Migrating to InnoDB) техника связывания рассматривается более подробно. После того как таблицы созданы, следует ввести в них какие-нибудь данные.
Изменение табличных данных с помощью phpMyAdmin.
В данном разделе мы изучим базовый синтаксис выражений INSERT, UPDATE, DELETE, и SELECT.
Добавление данных с помощью INSERT
Для начала изучим выражение INSERT, на примере кода, который генерирует phpMyAdmin при выполнении операции INSERT. Для этого открываем вкладку Insert на странице просмотра таблицы `countries`, и вводим данные о стране:
После того как мы кликаем на Go, данные записываются в таблицу и phpMyAdmin показывает нам использованное выражение INSERT:
INSERT INTO `countries` (`country_code` , `country_name` ) VALUES (‘ca’, ‘Canada’);
После части INSERT INTO, следует имя таблицы. В MySQL, мы можем заключать имена таблиц и имена столбцов в обратные галочки «`», если в именах используются спецсимволы, зарезервированные слова. Затем мы открываем первую скобку, перечисляем столбцы в которые будет осуществлена вставка, разделяя их друг от друга запятыми. После перечисления списка названий столбцов скобка закрывается и указывается зарезервированное слово VALUES, после которого в скобках перечисляются значения которые нужно вставить в таблицу, причем перечисляются в том же порядке, что и названия столбцов. Если значения имеют символьный тип данных, необходимо заключать их в кавычки.
Давайте занесем в таблицу `cities` данные города:
INSERT INTO `cities` ( `id` , `city_name` , `latitude` , `longitude` , `population`, `country_code` ) VALUES (», ‘Sherbrooke’, ’45 23 59.00′, ‘-71 46 11.00’, 125000, ‘ca’);
Здесь, мы указываем пустое значение для id, потому что атрибут автоинкремента данного столбца обеспечивает автоматическое выставление уникального значения. Также следует обратить внимание, что значение `population` — числовое, поэтому не заключено в кавычки.
Давайте закончим этот раздел вставкой некоторых данных для нескольких других стран и городов, которые понадобятся нам позже.
INSERT INTO `countries` ( `country_code` , `country_name` ) VALUES (‘zh’, ‘China’); INSERT INTO `cities` ( `id` , `city_name` , `latitude` , `longitude` , `population` , `country_code` ) VALUES (», ‘Shanghai’, ’31 13 58.00′, ‘121 26 59.99’, 11000000, ‘zh’);
Обновление данных с помощью UPDATE
Сначала кликните на `Browse` для таблицы `cities` в результате будет выведена пока единственная запись. Кликая по иконке в виде карандаша на бумаге (или ссылке Edit), мы переходим на панель редактирования данной строки. Изменим значение столбца `population` на 130000. После щелчка на `Save`, phpMyAdmin отображает следующее выражение:
UPDATE `cities` SET `population` = ‘130000’ WHERE `id` = ‘1’ LIMIT 1 ;
Ключевое слово в данном выражении — `UPDATE`, за которым следует название таблицы. Слово `SET` предваряет список модификаций (в нашем случае — только для столбца `population`) который записывается в формате «столбец = новое значение».
Мы видим, что в выражении присутствует условие: WHERE `id` = ‘1’, в котором используется первичный ключ, чтобы ограничить изменение значения столбца `population` только данной строкой, т.е. только для данного города.
Часть limit 1 добавляется phpMyAdmin-ом и является гарантией, что если первичный ключ не задан, изменения не будут применены более чем к одной записи. За один запрос `UPDATE` могут быть изменены значения сразу нескольких столбцов:
UPDATE `cities` SET `city_name` = ‘Sherbrooke, Quebec’, `population` = ‘130001’ WHERE `id` = ‘1’ LIMIT 1 ;
Удаление данных с помощью DELETE
В режиме `Browse` (просмотр) таблицы `cities`, кликните по красной иконке корзины (или ссылке Delete) — будет сгенерирован запрос, запрашивающий подтверждение выполнения следующего выражения: DELETE FROM `cities` WHERE `id` = ‘1’ LIMIT 1 ;
Синтаксис здесь очень прост, и включает только название таблицы, и условие при котором будет выполнена операция удаления. Исключение условия WHERE из запросов UPDATE или DELETE вполне допустимо в SQL, но в таком случае действие выражения будет применено к каждой записи таблицы!
Выборка данных с помощью SELECT
Извлечение информации из таблиц — вероятно наиболее часто используемый вид запроса. Например, запросы SELECT позволяют получить ответы на подобные вопросы: «какие города имеют численность населения большую, чем данное число?». Фактически, мы уже предварительно использовали SELECT, когда кликали на ссылку Browse для таблицы `cities`. Это сгенерировало простейшую форму выражения запроса SELECT:
SELECT * FROM `cities` LIMIT 0,30;
Звездочка здесь означает «все столбцы». Мы добавили FROM и имя таблицы, в которой будет выполнен запрос на выборку. LIMIT 0,30 означает что выборка начинается с записи номер 0 (самой первой), и содержит максимум 30 записей.
Вкладка Search позволяет увидеть большее количество опций для запроса SELECT. Выберем вкладку Search для таблицы cities, и выберем только те столбцы, которые нам нужны. Затем справа от списка столбцов мы выберем порядок сортировки полученной выборки по столбцу `population` по убыванию:
В результате phpMyAdmin сгенерирует следующий запрос:
SELECT `city_name` , `population`
FROM `cities`
WHERE 1
ORDER BY `population` DESC LIMIT 0,30;
Мы видим, что звездочка была заменена списком столбцов, разделенных запятыми. Условие WHERE 1, добавленное phpMyAdmin-ом, всегда истинно и выбирает все записи. Чуть позже мы увидим, что можно заменить его другим условием. Кроме того, появляется условие ORDER BY , после которого следует название столбца по которому мы хотим сортировать результат выборки, и ключевое слово DESC для сортировки по убыванию (мы могли также использовать ASC для сортировки по возрастанию).
Условия в SQL-запросах
Самым простым способом добавить условие — клик по SQL-query: Edit, на странице результатов, в результате которого будет открыто всплывающее окно «Query». Добавим условие для столбца `country`:
SELECT `city_name` , `population`
FROM `cities`
WHERE country_code = ‘zh’
ORDER BY `population` DESC;
Это условие выберет все города, находящиеся в Китае. При обозначении условий может быть использовано богатое множество операторов и функций. Вот — два примера:
Найти канадские города с численностью населения более 100000:
WHERE population > 100000 AND country_code = ‘ca’;
Найти города, чьи названия начинаются с символа «A»:
WHERE city_name like ‘A%’
Функции группировки
Итоговая информация может быть сгенерирована в результате группировки по определенному столбцу. Давайте узнаем среднюю численность городского населения в стране:
SELECT country_code, AVG(population)
FROM cities
GROUP BY country_code
Другие возможные функции группировки — MIN(), MAX(), SUM() и COUNT(), которые вычисляют соответственно минимальное значение, максимальное значение, сумму значений, и число записей. Например, с помощью следующего запроса мы можем получить число городов в стране:
SELECT country_code, count(city_name) FROM cities
GROUP BY country_code;
Объединения
Обычно, реляционная база данных включает множество таблиц, связанных общими ключами. Часто возникает необходимость в запросах сразу для нескольких таблиц. Связать, или объединить, таблицы можно с помощью различных методов; мы сосредоточимся на самом простом методе, заключающемся в сравнении ключей.
В рассмотренном ниже запросе, условие FROM содержит список названий таблиц, разделенных запятыми. В списке столбцов, мы используем названия таблиц и точку в качестве префикса перед каждым названием столбца (в этом нет необходимости в случае, если все столбцы из одной таблицы).
SELECT cities.city_name, cities.population, countries.country_name
FROM cities, countries
WHERE cities.country_code = countries.country_code LIMIT 0,30
Заключение
Те элементарные выражения, что были рассмотрены нами здесь не раскрывают полностью возможности SQL. Однако, эта статья поверхностно осветила основы SQL, и показала как использовать phpMyAdmin в качестве инструмента для углубления знаний в SQL.
Об авторе. Марк Делисл начал свое участие в развитии phpMyAdmin в декабре 1998 (именно он разработал первую многоязычную версию). С мая 2001, принимал активное участие в проекте как разработчик и проектный администратор.
Работает с 1980 в колледже Cegep de Sherbrook (Квебек, Канада), разработчиком программного обеспечения и системным администратором. Он также преподавал организацию сети, безопасность, серверы Linux, и прикладное программирование PHP/MySQL.
Издательство Packt Publishing выпустило первую книгу по phpMyAdmin: Mastering phpMyAdmin for effective MySQL Management, автором которой является Марк Делисл
phpMyAdmin — Overview
phpMyAdmin is one the most popular, free and open source administration tool which can manage MySQL and MariaDB. It is licensed under GNU GPLv2. It has a web based interface and can be used on any platform easily. It is available in 79 languages. It is PHP based and is provided by almost all the Web hosting solution providers who supports WAMP/LAMP development stack.
phpMyAdmin can be used to do useful functions like managing databases, tables, relations, indexes, user permissions etc using its web based user interface. It also support a query interface, where user can type SQL commands and run.
phpMyAdmin is neatly documented and lots of learning material is available in form of books, blogs and articles for it. phpMyAdmin supports for LTR and RTL languages.
phpMyAdmin development is community driven and is hosted on GitHub. It is also a member of Software Freedom Conservancy which is not-for-profit organization and helps promote, improve, develop and defends free and open source projects.
Prerequisites
Following are the vital components which are required to work with phpMyAdmin.
-
Web Server − Apache, Nginx, IIS.
-
PHP − PHP 7.1.3+ is required to work with phpMyAdmin 5.1.1. mysqli and openssl extensions should be enabled.
-
Database − MySQL 5.5 or MariaDB 5.5 onwards
-
Web Browser − As phpMyAdmin is a web based application, web browser is required to access it like Google Chrome, Edge, Firefox etc.
phpMyAdmin — Environment Setup
As phpMyAdmin is PHP based, following four vital components need to be installed on your computer system before installing phpMyAdmin.
-
Web Server − PHP works with virtually all Web Server software, including Microsoft’s Internet Information Server (IIS) but most often used is Apache Server. Download Apache for free here − https://httpd.apache.org/download.cgi. Apache 2.4 is used in this tutorial.
-
Database − phpMyAdmin manages MySQL or MariaDB databases. In this tutorial, we can using MySQL database. Download MySQL for free here − https://www.mysql.com/downloads/. MySQL 8.0 is used in this tutorial.
-
PHP Parser − In order to process PHP script instructions, a parser must be installed to generate HTML output that can be sent to the Web Browser. This tutorial will guide you how to install PHP parser on your computer. Php 7.4 is used in this tutorial.
-
Web Browser − phpMyAdmin is a web based software, so web browser is needed with javascript and cookies enabled. We are using Google Chrome in this tutorial.
PHP Parser Installation
Before you proceed, it is important to make sure that you have proper environment setup on your machine to develop your web programs using PHP. Store the following php file in Apache’s htdocs folder.
phpinfo.php
Example
<?php
   phpinfo();
?>
Output
Type the following address into your browser’s address box.
http://127.0.0.1/phpinfo.php
If this displays a page showing your PHP installation related information, then it means you have PHP and Webserver installed properly. Otherwise, you have to follow the given procedure to install PHP on your computer.
This section will guide you to install and configure PHP over the following four platforms −
-
PHP Installation on Linux or Unix with Apache
-
PHP Installation on Mac OS X with Apache
-
PHP Installation on Windows NT/2000/XP with IIS
-
PHP Installation on Windows NT/2000/XP with Apache
Apache Configuration
If you are using Apache as a Web Server, then this section will guide you to edit Apache Configuration Files.
Check here − PHP Configuration in Apache Server
PHP.INI File Configuration
The PHP configuration file, php.ini, is the final and immediate way to affect PHP’s functionality.
Check here − PHP.INI File Configuration
Windows IIS Configuration
To configure IIS on your Windows machine, you can refer your IIS Reference Manual shipped along with IIS.
Install MySQL Database
The most important thing you will need, of course is an actual running database with a table that you can query and modify.
-
MySQL DB − MySQL is an open source database. You can download it from MySQL Official Site. We recommend downloading the full Windows installation.
In addition, download and install MySQL Administrator as well as MySQL Query Browser. These are GUI based tools that will make your development much easier.
Finally, download and unzip MySQL Connector/J (the MySQL JDBC driver) in a convenient directory. For the purpose of this tutorial we will assume that you have installed the driver at C:Program FilesMySQLmysql-connector-java-5.1.8.
Accordingly, set CLASSPATH variable to C:Program FilesMySQLmysql-connector-java-5.1.8mysql-connector-java-5.1.8-bin.jar. Your driver version may vary based on your installation.
Set Database Credential
When we install MySQL database, its administrator ID is set to root and it gives provision to set a password of your choice.
Using root ID and password you can either create another user ID and password, or you can use root ID and password for your JDBC application.
There are various database operations like database creation and deletion, which would need administrator ID and password.
We would use MySQL Database with root as ID and root@123 as password.
If you do not have sufficient privilege to create new users, then you can ask your Database Administrator (DBA) to create a user ID and password for you.
For a complete understanding on MySQL database, study the MySQL Tutorial.
phpMyAdmin installation
Download and unzip phpMyAdmin-5.1.1-all-languages.zip phpMyAdmin web application in a convenient directory. Then copy the folder to htdocs directory of Apache Web Server. We’ve renamed the phpMyAdmin-5.1.1-all-languages to phpMyAdmin and placed it inside the htdocs directory.
Before restarting Apache Server, we need to make changes to Apache Configuration and PHP Configuration to allow phpMyAdmin to work with MySQL and OpenSSL. Please do the following changes.
Apache Configuration Update
Locate /conf/httpd.conf file in Apache Web Server directory and update DirectoryIndex > index.html to index.php.
#
# DirectoryIndex: sets the file that Apache will serve if a directory
# is requested.
#
<IfModule dir_module>
   DirectoryIndex index.php
</IfModule>
PHP Configuration Updates
Locate php.ini in PHP Installation directory and uncomment extensions for mysqli and openssl.
extension=mysqli
extension=openssl
Now enable the extension_dir to load extensions for mysqli and openssl.
; Directory in which the loadable extensions (modules) reside.
; http://php.net/extension-dir
;extension_dir = "./"
; On windows:
extension_dir = "ext"
That’s it, now start the Apache Server and open localhost/phpmyadmin phpmyadmin in web browser to open the phpMyAdmin interface.
phpMyAdmin — Features
Following is some of the key features of phpMyAdmin.
-
User friendly Web Interface − phpMyAdmin UI is quite intuitive and easy to use.
-
Most of Database Operations are supported − phpMyAdmin supports most of the MySQL/MariaDB features as listed below −
-
Browse databases, tables, view, fields and indexes.
-
Create/Copy/Drop/Rename databases, tables, view, fields and indexes.
-
Server maintenance, database/tables configuration proposal.
-
Execute, Edit and bookmark SQL statements, batch queries.
-
Manage user accounts and privilleges.
-
Manage stored procedures and triggers.
-
-
Import Data − Data can be imported from from CSV and SQL files.
-
Export Data − Data can be exported to various formats like CSV, SQL, XML, PDF, ISO/IEC 26300 — OpenDocument Text and Spreadsheet, Word, LATEX and others
-
Multiserver support − phpMyAdmin can be used to administrater multiple servers together.
-
Graphics Support − phpMyAdmin can show graphics of database layout in various formats.
-
Query-by-example − phpMyAdmin Query-by-example (QBE) can be used to create complex queries.
-
Search − phpMyAdmin allows to searching globally in a database or a subset of database.
-
Transformation − phpMyAdmin can help in transforming stored data into any format using a set of built-in functions, for example displaying BLOB-data as image or download-link.
phpMyAdmin — Pros & Cons
Pros
Following are some of the key advantages that phpMyAdmin provides −
-
Web Based − Being web based, phpMyAdmin UI is accessible using Web Browser and this interface is available on all the platforms where a web browser can work.
-
Graphical Interface phpMyAdmin provides graphical interface to run SQL commands and do SQL operations and makes it quite easy to use as compared to console based sql editors.
-
Script Interface phpMyAdmin provides script interface to run PHP scripts to connect to databases and do customized operations.
-
Multi-Server phpMyAdmin allows to operate multiple servers at a time.
-
Backup formats phpMyAdmin allows to take database backups in various formats like XML, CSV, SQL, PDF, OpenDocument Text, Excel, Word, and Spreadsheet, etc.
-
Complex Query Made Easy phpMyAdmin’s easy to use interface allows to create and run complex queries, create and edit functions, triggers etc easily.
Cons
There are certain disadvantages as well in using phpMyAdmin.
-
Difficult Installation − phpMyAdmin installation is not straight forward. User needs to install Apache Web Server, PHP and MySQL and then configure each softwares seperately. As an alternate solution is to use XAMPP, which bundles them as a package and have phpMyAdmin module as well. In case of fresh installation, XAMPP is the best choice to install WAMP/LAMP stack to use phpMyAdmin.
-
No schema visualization − schema visualization capability is not present in phpMyAdmin.
-
No auto-compilation − Auto-compilation functionality is not available as well.
-
No scheduled backup − Automatic backup scheduling is not feasible.
-
No Encryption − phpMyAdmin exports database in common text files thus needs high storage and poor security.
phpMyAdmin vs MySQL WorkBench
MySQL WorkBench is part of MySQL database and it provides a full featured administrative interface to execute SQL queries and MySQL management where as phpMyAdmin is a web based tool to administer the MySQL database. Following are the some of the key differences in both interfaces.
-
Supported Versions − phpMyAdmin supports MySQL 5.5 onwards whereas MySQL Workbench can support any version of MySQL database.
-
Graphical Interface phpMyAdmin provides an easy to understand graphical interface to run SQL commands and do SQL operations and makes it quite easy to use as compared to MySQL workbench which is quite complex for beginners.
-
Script Interface phpMyAdmin provides script interface to run PHP scripts to connect to databases and do customized operations. MySQL workbench has no such option.
-
Web Based phpMyAdmin is web based and may be slow and depends upon web browser heavily where as MySQL workbench is a specilized software to work with databases.
-
Code Highlight phpMyAdmin does not have smart code highlight capabilities or auto-complete functionalities whereas MySQL workbench provides code highlighting and auto-complete features.
-
Pricing phpMyAdmin is completely free to use. It is open source and is provided by almost all hosting service providers whereas MySQL Workbench has a community based version which is free and open source. There are other commercial versions for enterprises which are subscription based. These commercial versions have enterprise level features and support.
phpMyAdmin — Databases
Start the Apache Server and open /localhost/phpmyadmin phpmyadmin in web browser to open the phpMyAdmin interface.
As we have configured a database MySQL during Environment Setup, we’ve root user with password as root@123. Once phpMyAdmin opens up, you need to enter same credential to login to database.
Dashboard
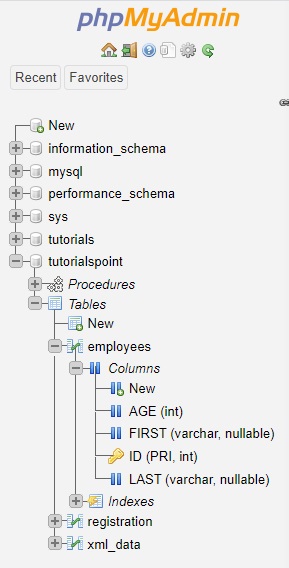
Once logged in, you can see the following sections on the phpMyAdmin page loaded. The left section shows the databases available, it shows system as well user created databases.
On the right side, dashboard shows a tabbed interface to do all the database administration operations as shown below.
Databases
Click on Database Tab, to see the list of databases with more details. We can create database, iterate databases and do other operations here.
Click on any listed database to see the list of tables with more details. Tabs changes as per the context. Now tabs will shows as per the database.
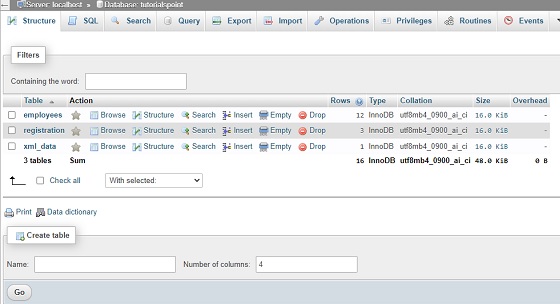
Tables
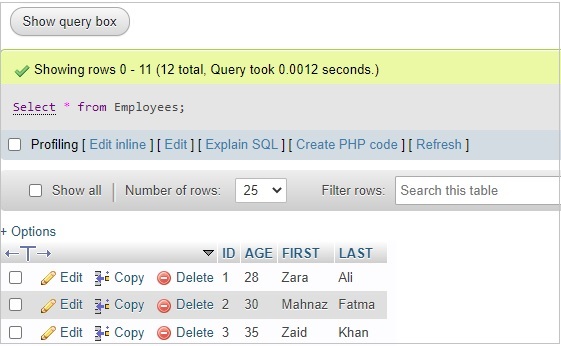
Now in the schema browser, click on any table, right side section will load the table details as shown with updated tabbed interface to do various operations on that table as shown below −

Double clicking on any cell, makes it editable, where you can edit and save data. Pressing esc key, will not save data. Once you move out of editing cell, it will show the update query and status of operation as shown below −
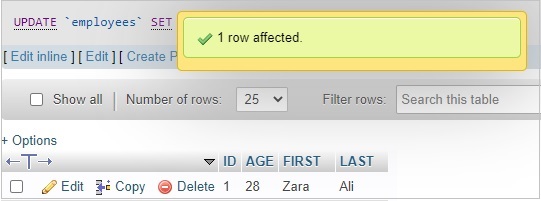
You can verify the update statement as well as show below −
UPDATE `employees` SET `AGE` = '28' WHERE `employees`.`ID` = 1;
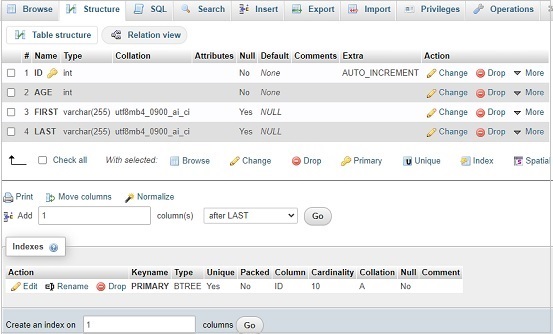
Now click on Structure tab, it will show the table structural details as shown below −
phpMyAdmin — SQL
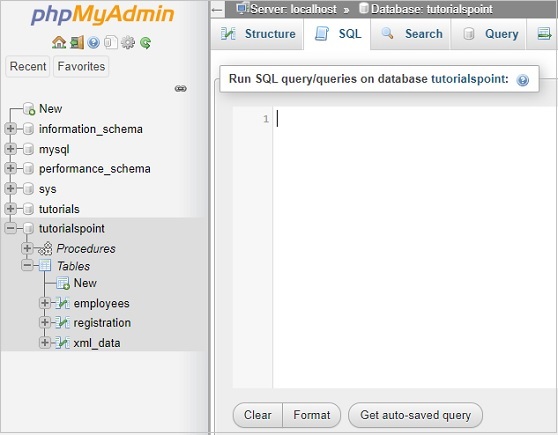
phpMyAdmin provides a SQL console under SQL Tab. Its context varies as per the selection. If no database is selected, then SQL console opens in localhost context otherwise in relevant database context. In given example, we’ve selected a database TutorialsPoint. Now switching to SQL shows the following screen.
Now let’s run a simple query to see SQL Tab in action. SQL interface will keep suggesting keywords while user types. You can press Ctrl+Space to open the relevant suggestion as well.
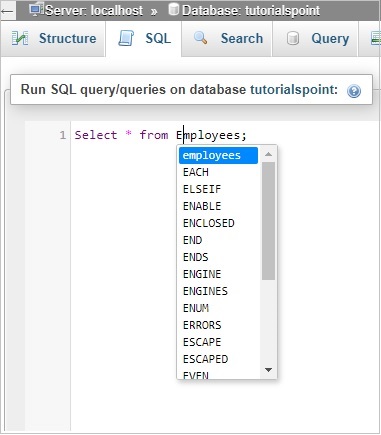
Now click on Go Button and phpMyAdmin will run the query and show the result as shown below −
phpMyAdmin — Status
phpMyAdmin provides a six types of statuses under Status Tab.
-
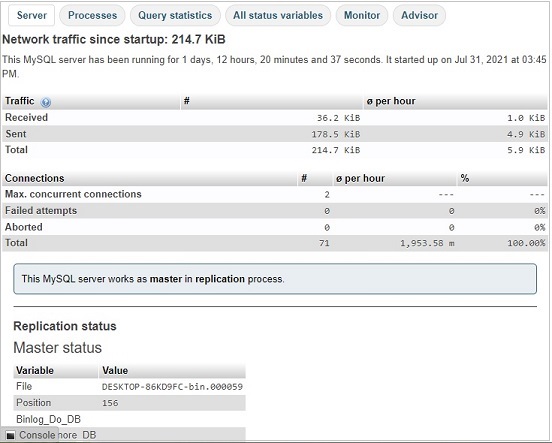
Server − Server Status tab describes the MySQL/MariaDB server status in terms of traffic and connections that server is handling. It also shares the replication status.
-
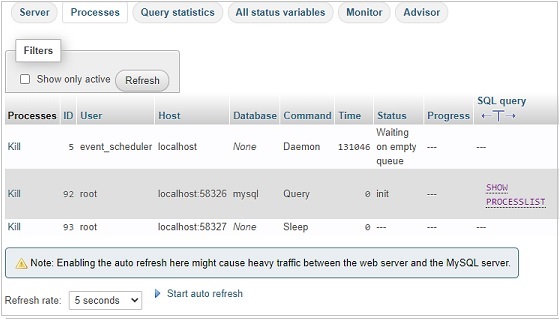
Processes − Processes like root, event scheduler are shared on this dashboard. We can kill them as well.
-
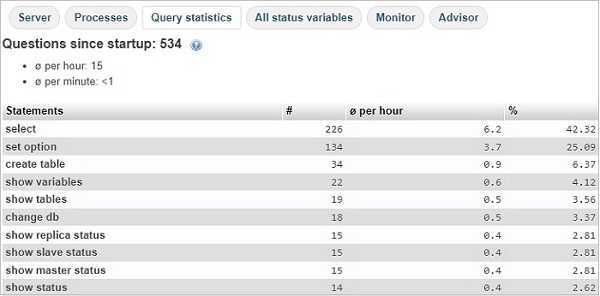
Queries − Query Statistics tell about the types and count of queries that has been run using phpMyAdmin interface. It includes the queries run plus the queries run by phpMyAdmin in background.
-
All Status Variables − All kind of status variables are listed here with their value and description. User can filter on these variables as well.
-
Monitor − Monitor dashboard helps in visual way to check and control traffic, cpu usages, connections, processes, questions, system memory and system swaps.
-
Advisor − Advisor helps in analyzing the problems and provides advices for performance bottlenecks. It also provides insights on generally faced problems.
phpMyAdmin — User Accounts
phpMyAdmin provides an intuitive user interface for user management. We can view users, edit their previleges etc.
Let’s create a user using phpMyAdmin say testuser. Click on the Add User Account link under New Section.
Create user with a strong password.
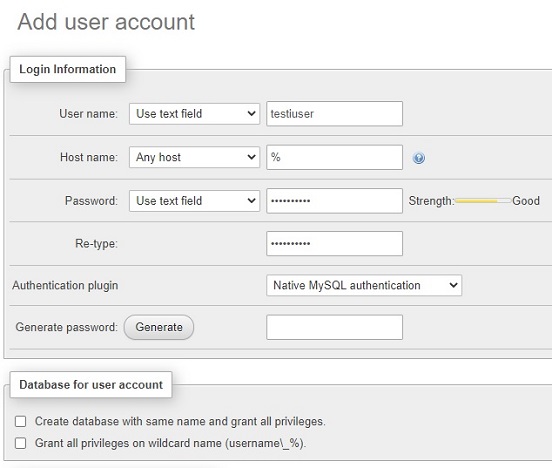
Grant Privileges.

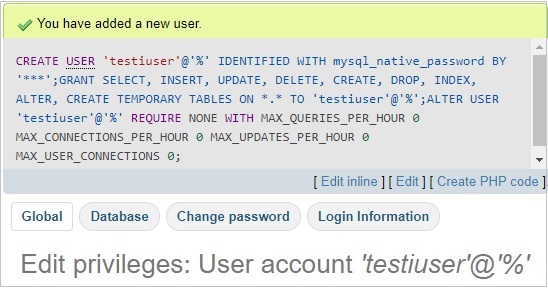
Now click on go button and phpMyAdmin will create the user and shows the SQL used to create the user.
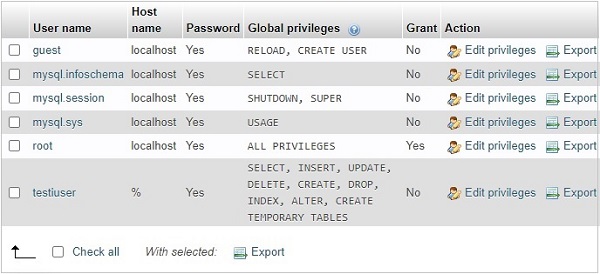
Now click on User accounts and verify the user with required privileges.
phpMyAdmin — Exports
phpMyAdmin provides an intuitive user interface to export database(s).
Click on Go button and phpMyAdmin will generate SQL required to create databases/tables and other relevant entities.
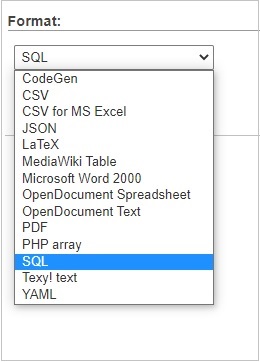
Instead of SQL, user can choose other popular options as well like csv, json, yaml etc.
Now select the custom option and phpMyAdmin will show lots of options like
-
Databases − A list of databases to be selected. User can select multiple databases.
-
Output − Options to save output to a file with customization options like name, charset, compression. It also provides options to skip large tables, rename exported databases/tables/columns and so on.
-
Format Specific Options − Options to display/hide comments, enclose export in a transaction, export views as tables, export metadata and database selection for compatabilities and so.
-
Object Creation Options − Options to add drop database/tables etc if exists, auto increment id, add create view, add create trigger statements, using backquotes to enclose table and column names etc.
-
Data Creation Options − Options to truncate table before insert delayed statements and insert ignore statements. Options to choose format while preparing sql for insert data, set the maximum length of created query, dump timestamp columns in UTC etc.
phpMyAdmin — Imports
phpMyAdmin provides an intuitive user interface to import database(s).
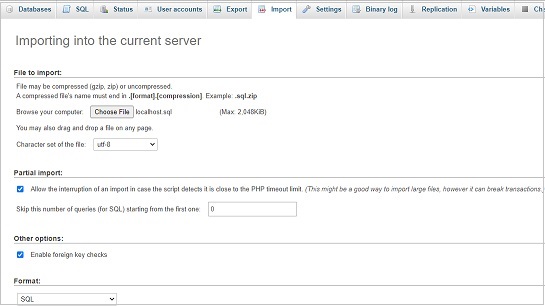
Choose a file to import. phpMyAdmin allows to import zip file as well as uncompressed file. Max size limit is 2GB. Click on Go button and phpMyAdmin will import the databases and show the success/failure/error messages accordingly.

Now select the custom option and phpMyAdmin will show lots of options like

-
Partial Import − This option is very handy while importing large databases. It allows to prevent PHP timeout and allows to skip queries as well.
-
Other Options − Options to check foreign integrity checks.
-
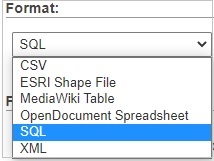
Format − phpMyAdmin allows six differents format to be used in import process.
-
Format Specific Options − Options to choose database specific formats. For zero values, auto increment can be disabled.
phpMyAdmin — Settings
phpMyAdmin provides an intuitive user interface to manage and set settings for its interface.

Following is the description of various sections of Settings tab.
-
Manage Your Settings − Main Dashboard shows the Import/Export and Reset Options. User can set up a setup script to do this process automatically as well. Script provide more fine grain control as well. Saved settings can be exported in JSON/PHP format or to browser storage and in similar fashion, it can be imported.
-
Two Factor Authentication − Two factor authentication is very important for security purpose. It enables to authenticate user with additional authentication mechanism like HOTP and TOTP applications such as FreeOTP, Google Authenticator or Authy or using hardware security tokens supporting FIDO U2F, along with password authentication.
-
Features − Features covers the configuration setting related to databases, text fields, page titles, warning messages, console and general settings like natural order, version checks etc.
-
SQL Queries − Options related to SQL queries like show SQL queries, confirmation on drop queries and configurations on sql query box like to show explain SQL, create PHP Code, refresh options and so.
-
Navigation Panel − Options covering navigation panel, navigation tree and to configure display settings for servers, databases and tables display.
-
Main Panel − Options to customize startup screen, database structure, table structure, browse mode, edit mode, tabs and relational schema display.
-
Export/Import − Options to customize export and import settings.
phpMyAdmin — Binary Logs
phpMyAdmin Binary Logs tabs helps in checking the log history. It shows a glimpse of whatever we’ve done using phpMyAdmin.
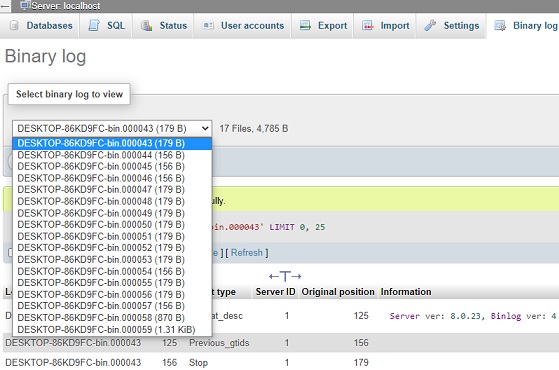
Let’s select any binary logs file and click on Go button, It will display the logs history of that log file.

Here, you can check which activities has been carried out by phpMyAdmin behind the scene.
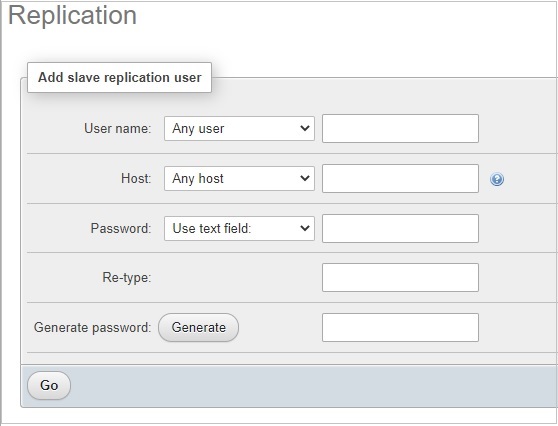
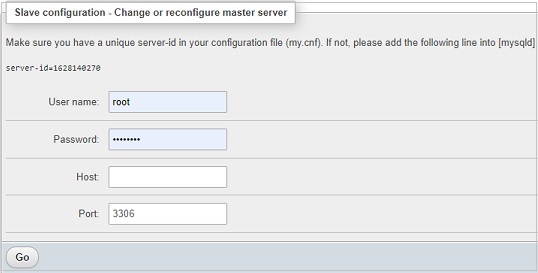
phpMyAdmin — Replication
phpMyAdmin Replication tab handles the database replication. Marking one database as master database and other as slave databases is made easy using this feature.
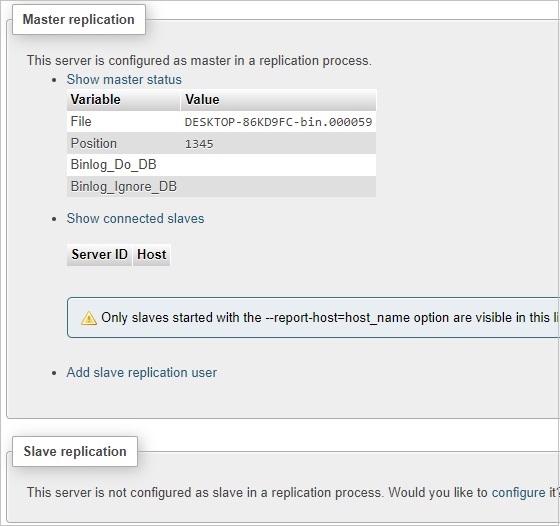
-
Master Replication − This section shows the master status and connected slaves status. We can add slave replication user as well using this section.
-
Slave Replication − This section allows to add a slave using username, password, host and port details.
phpMyAdmin — Variables
phpMyAdmin Variables tab handles nearly 600 variables of MySQL where we can edit set them on/off and update their values.
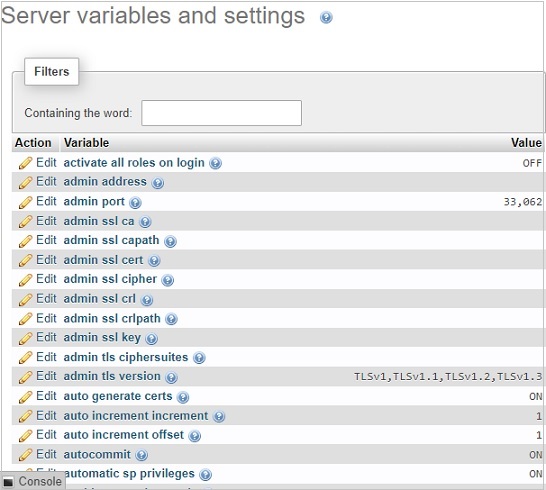
Click on edit button, and you can edit the variable value.
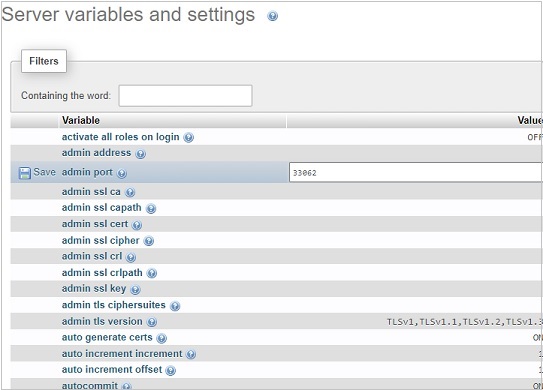
After updating the value, click on save button or press esc key to cancel.
An important point to note is that these variables can be edited only one user logged in as root user.
phpMyAdmin — Charsets
phpMyAdmin Charsets tab displays all the charsets and collations which are supported by MySQL server.
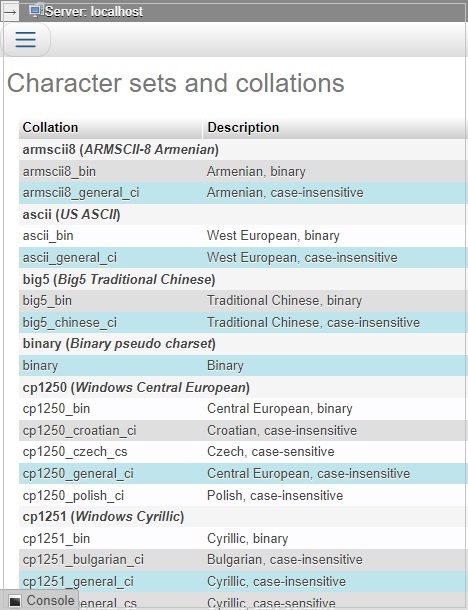
You cannot edit anything here. It is a readonly information.
phpMyAdmin — Storage Engines
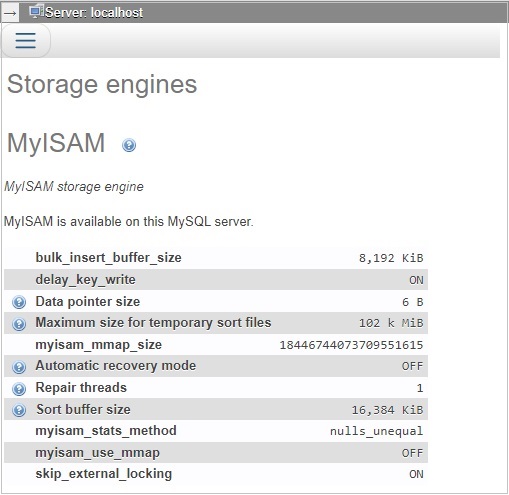
phpMyAdmin Storage Engines tab displays all the engines which are supported by MySQL server.
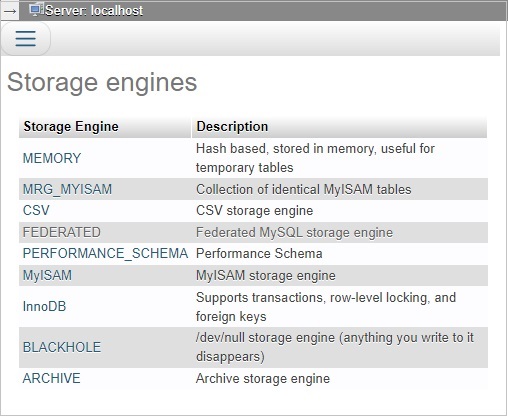
You cannot edit anything here. It is a readonly information. When we click on any engine name, it displays the details further. For example, when user clicks on the default engine myISAM, it displays as following −
phpMyAdmin — Plugins
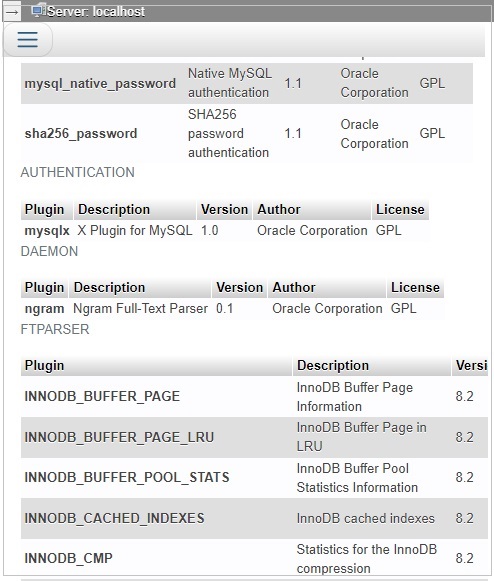
phpMyAdmin Plugins tab displays all the plugins which are presently installed in MySQL server. It contains information like their version and description.
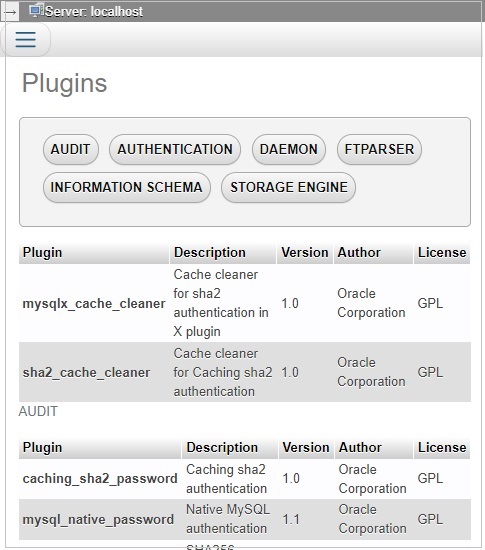
Plugins are broadly categorized in six categories −
-
AUDIT
-
AUTHENTICATION
-
DAEMON
-
FTPPARSER
-
INFORMATION SCHEMA
-
STORAGE ENGINE
If you click on any of the category, it will scroll to the related list of plugins.
После установки phpMyAdmin рассмотрим приложение более подробно
Веб-приложение phpMyAdmin – универсальный и достаточно мощный инструмент для управления базами данных (БД) для разработчиков, администраторов, а также для обычных пользователей — владельцев сайтов. Предоставляемый phpMyAdmin веб-интерфейс позволяет получать доступ к управлению БД из любого браузера в любой операционной системе (ОС). Поэтому когда возникает необходимость в выборе клиента MySQL, то phpMyAdmin – это пожалуй самое оптимальное решение, в особенности для веб-разработчиков и обычных пользователей.
Содержание
- Для каких задач следует использовать phpMyAdmin?
- Структура пользовательского интерфейса phpMyAdmin
- Создание, удаление и редактирование БД и таблиц
- Управление пользователями и привилегиями
- Инструменты импорта/экспорта, выполнение SQL-запросов
- Заключение
В первую очередь phpMyAdmin очень облегчает выполнение «обывательских» задач, которые по классическому подходу, посредством ввода SQL-запросов в командной консоли MySQL (для которой предварительно ещё нужно выполнить авторизацию) занимают неоправданно много времени. Визуальный стиль управления и редактирования БД, предоставляемый phpMyAdmin — куда более понятный быстрый и наглядный способ.
Чаще всего необходимо быстро отредактировать поля таблицы БД. В этом случае написание SQL-запросов навевает тоску. Или необходимо быстро создать, удалить или очистить БД — phpMyAdmin позволит это сделать в считанные секунды, буквально за несколько кликов.
Кроме инструментов редактирования phpMyAdmin предоставляет также возможности для мониторинга быстродействия, производительности MySQL-сервера, а также анализа его работы.
Импорт и экспорт также не являются для phpMyAdmin проблемой, однако с некоторыми ограничениями, касающимися размеров файлов для импорта/экспорта, что связано с настройками PHP и веб-сервера. Всё-таки phpMyAdmin – это веб-приложение.
А вот для чего phpMyAdmin не подойдёт, так это для обработки сложных, ресурсоёмких запросов, а также для работы с большими по объёму БД. Точнее, в таких условиях он работает не стабильно и следует использовать уже классические инструменты.
Структура пользовательского интерфейса phpMyAdmin
Пользовательский интерфейс (GUI) phpMyAdmin скомпонован по классической схеме, состоящей из всего трёх компонентов: панели БД, панели категорий задач, а также рабочей области. Панель БД расположена слева, панель задач вверху и включает в себя вкладки, группирующие различные категории задач, такие как:
- работа с БД;
- работа с SQL-запросами;
- состояние и мониторинг MySQL-сервера;
- учётные записи пользователей и привилегии;
- экспорт/импорт;
- системные настройки;
- некоторые сервисные и контекстные функции.
Вся остальная часть страницы отведена для непосредственно рабочей области и просмотра/редактирования БД, таблиц, привилегий и т. д.
Принцип работы с phpMyAdmin заключается в том, чтобы сначала выбрать БД из списка в левой панели и затем выбрать вкладку с категорией задач, в соответствии с тем, что нужно делать с БД. Теперь рабочая область будет готова для работы с БД и таблицами этой БД.
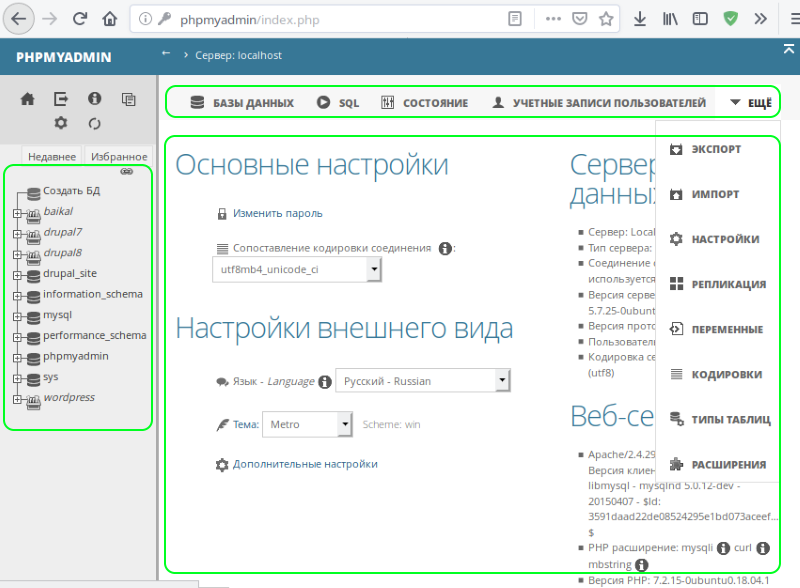
Рис. 1: Компоновка элементов графического интерфейса
Создание, удаление и редактирование БД и таблиц
Создать новую БД можно, когда ни одна другая БД не выбрана в левой панели, находясь на домашней странице или странице по-умолчанию index.php. В верхней панели задач будет доступна вкладка «Базы данных», при переходе на которую будет загружена страница со списком всех имеющихся БД, а также органами управления для создания новой БД.
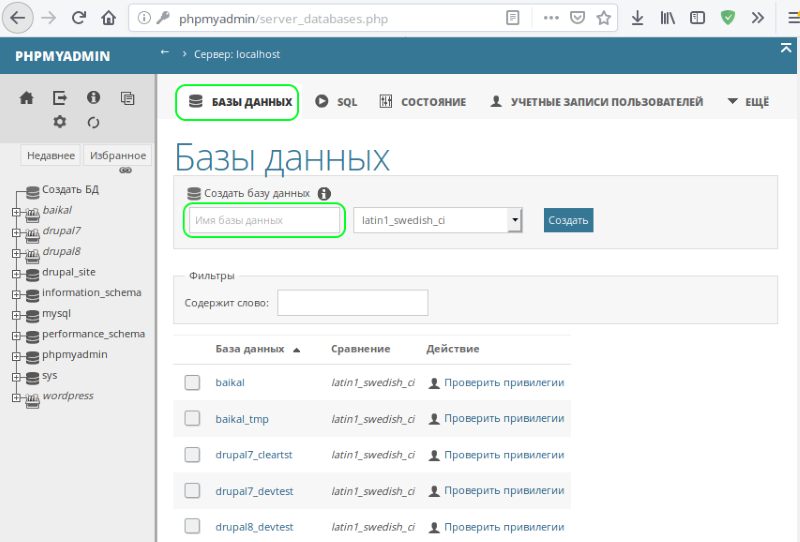
Рис.2: Просмотр списка БД. Создание новой БД
На этой же странице для удаления БД (внизу списка БД) имеется ссылка «Удалить». Предварительно нужно отметить чекбоксами требуемые (можно несколько) для удаления БД.

Рис. 3: Удаление БД
Для работы непосредственно с БД и таблицами, необходимо, как уже было отмечено, выбрать нужную БД в списке левой панели. При этом справа, в рабочей области phpMyAdmin отобразит страницу со списком всех таблиц выбранной БД. Помимо системной информации, для каждой таблицы доступны следующие функции:
- обзор — просмотр и редактирование содержимого полей таблицы;
- структура — просмотр и редактирование структуры таблицы;
- поиск;
- очистить — очистка таблицы от всего содержимого;
- удалить — полное удаление таблицы из БД.

Рис. 4: Просмотр и редактирование структуры таблиц и редактирование полей
На этой же странице можно создавать новые таблицы для текущей (выбранной БД).
Функция «Обзор» загружает страницу со списком полей соответствующей БД. Здесь можно видеть содержимое, редактировать поля таблицы, а также удалять записи таблицы как в визуальном редакторе. Всплывающие подсказки очень помогают довольно быстро разобраться с тонкостями работы GUI.
Для добавления новых таблиц в БД также существует пункт «Новая» в раскрывающемся списке БД, выбранной в панели слева:
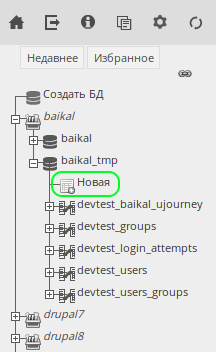
Рис.5: Добавление новой таблицы
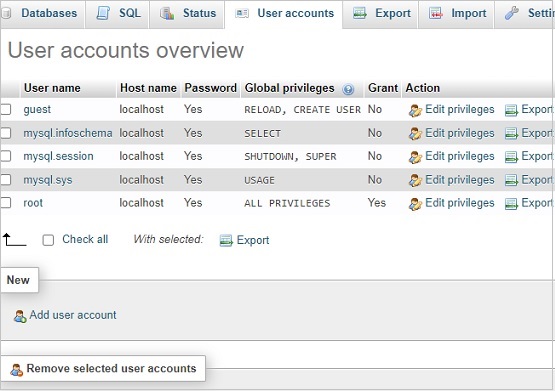
Управление пользователями и привилегиями
Управлять пользователями и группами в phpMyAdmin позволяет соответствующая вкладка «Учетные записи пользователей». Эта вкладка доступна, когда не выбрана никакая БД. Здесь выводится список всех зарегистрированных пользователей, их ключевые атрибуты. А также действия, позволяющие перейти на страницу редактирования привилегий. Удаление пользователей производится в соответствующем разделе (внизу страницы) и для этого удаляемые учётные записи должны быть предварительно отмечены.
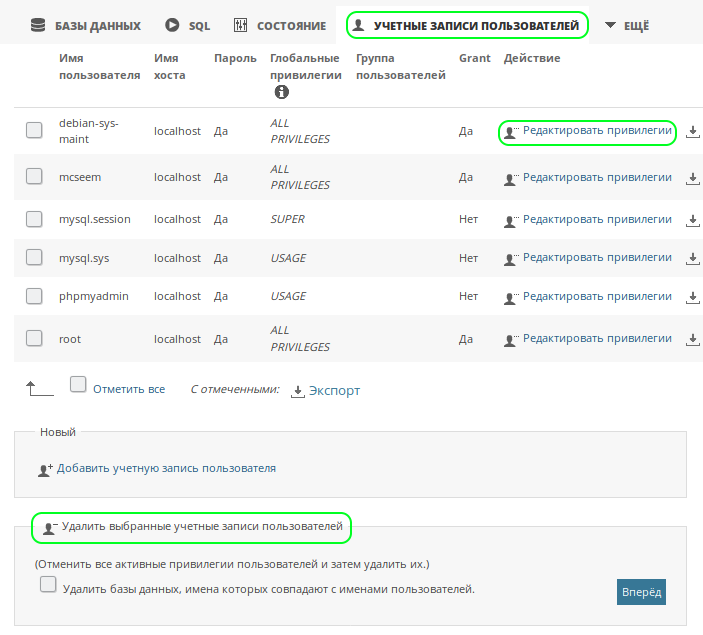
Рис. 6: Управление пользователями и группами
Страница редактирования привилегий включает в себя соответствующие опции и настройки как глобально, так и для отдельных БД. Здесь же можно изменять информацию об учётной записи и задавать пароли к ним.
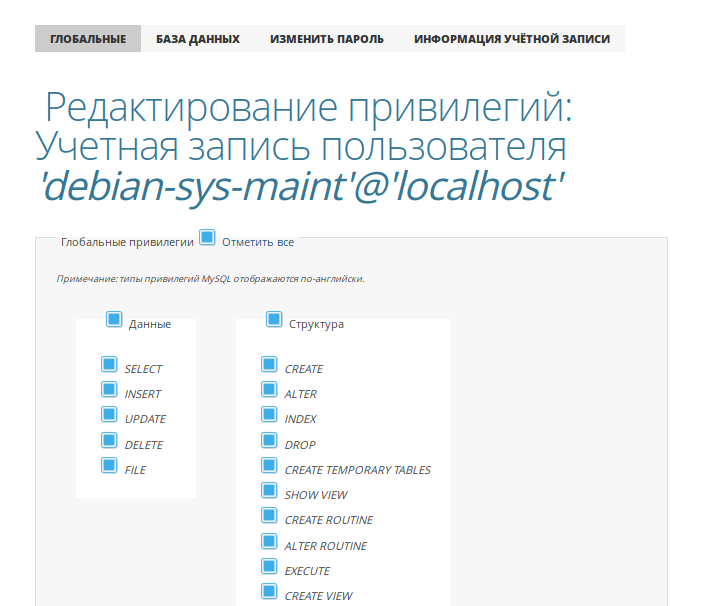
Рис. 7: Редактирование привилегий пользователей
Инструменты импорта/экспорта, выполнение SQL-запросов
При использовании инструментов экспорта и импорта. Которые доступны в соответствующих вкладках панели задач phpMyAdmin. Необходимо учитывать, что эти функции можно выполнять как для отдельной БД (которая в данный момент выбрана), так и для всех БД по-умолчанию — когда ни одна БД не выбрана в списке в левой панели.
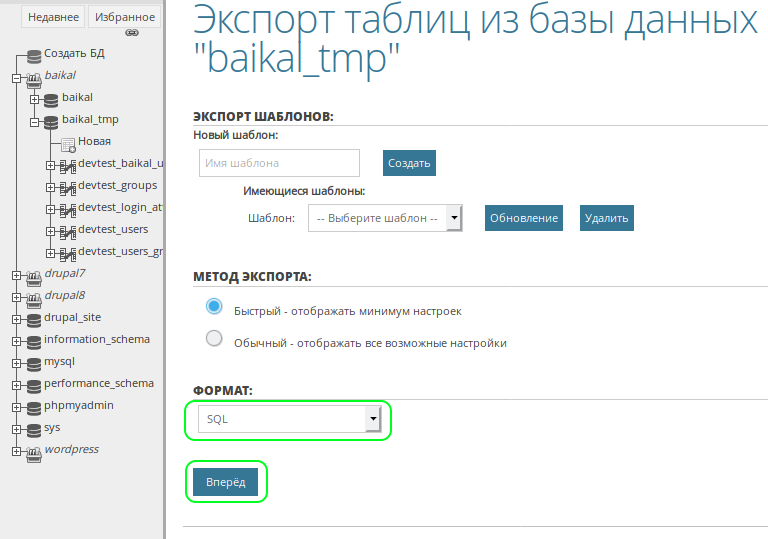
Рис. 8: Экспорт выбранной БД
Когда визуальных инструментов phpMyAdmin не хватает для выполнения каких-то специфичных или сложный действий с БД/таблицами. То есть возможность воспользоваться составлением запросов вручную на вкладке «SQL».

Рис. 9: Создание и выполнение SQL запросов
Заключение
В заключение следует отметить, что phpMyAdmin не самое простое приложение для управления БД. Огромный функционал является плюсом и в то же время делает GUI довольно громоздким. Например, не сразу понятно, когда рабочая область настроена для работы с конкретной БД (если она выбрана), а когда глобально. Из полезных особенностей стоит выделить сопровождение всех действий всплывающими сообщениями об успешности или ошибках. В которых приводится текст SQL-запроса, соответствующий этим действиям. Таким образом можно на практике осваивать язык SQL. Также очень полезна
Если вы нашли ошибку, пожалуйста, выделите фрагмент текста и нажмите Ctrl+Enter.
phpMyAdmin allows us to interact with a MySQL database without having to do it through the command line. Thanks to a convenient interface, phpMyAdmin enables us to manage our MySQL database in a very simple way.
In this article, phpMyAdmin: the definite guide, we will see all the operations that can be useful in managing the database. We’ll see how to create a new database, add or modify tables and search for specific fields in it.
We will also discover how to import and export databases from one server to another and how to create a backup copy of the database directly from phpMyAdmin. First, let’s see how to access phpMyAdmin and what its home page looks like.
Login to phpMyAdmin
First, we need to access phpMyAdmin, if you have a hosting service you can access the application directly from cPanel. If you are developing the site locally, you can make use of the fact that platforms like XAMPP or MAMP allow you to use phpMyAdmin for database management.
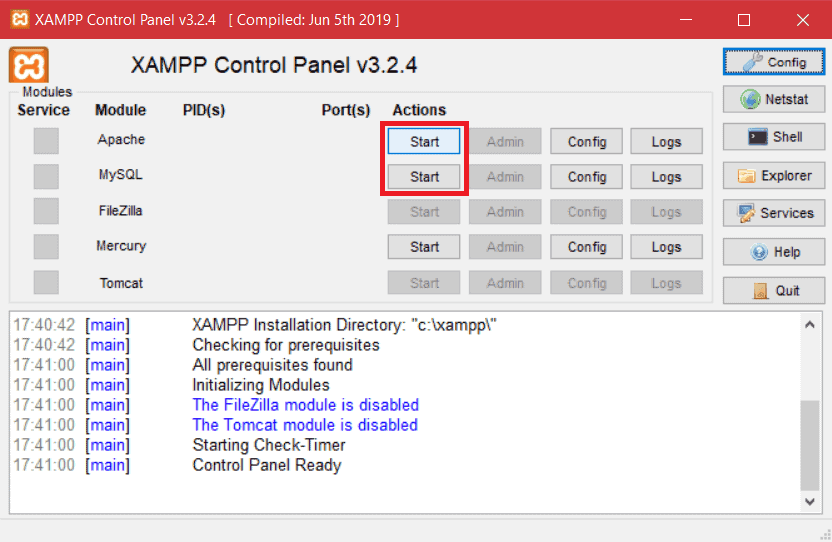
How to access phpMyAdmin if you use XAMPP
With XAMPP all you have to do is connect to this address http://localhost/phpMyAdmin/ after activating the necessary modules for the webserver (Apache and MySQL).
How to access phpMyAdmin from cPanel
For all our plans including shared hosting and WordPress press, phpMyAdmin is available, ready to use.
In order to access it from the control panel, after loging in to cPanel with your login details, scroll down to the Database section and click on phpMyAdmin.

In both cases, you’ll find the main page of the application, so let’s go see what it looks like.
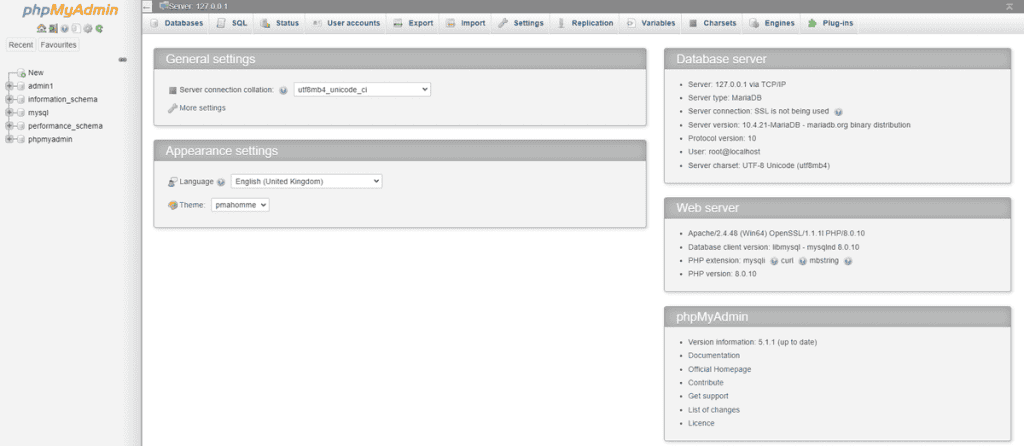
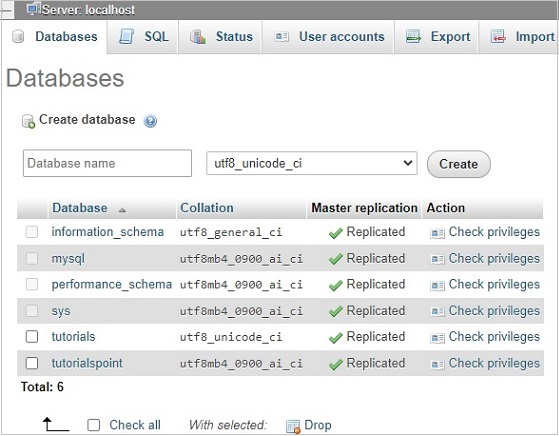
In the left section, you can see a list of all the databases on the server. You can see it highlighted in the screenshot below as an example.
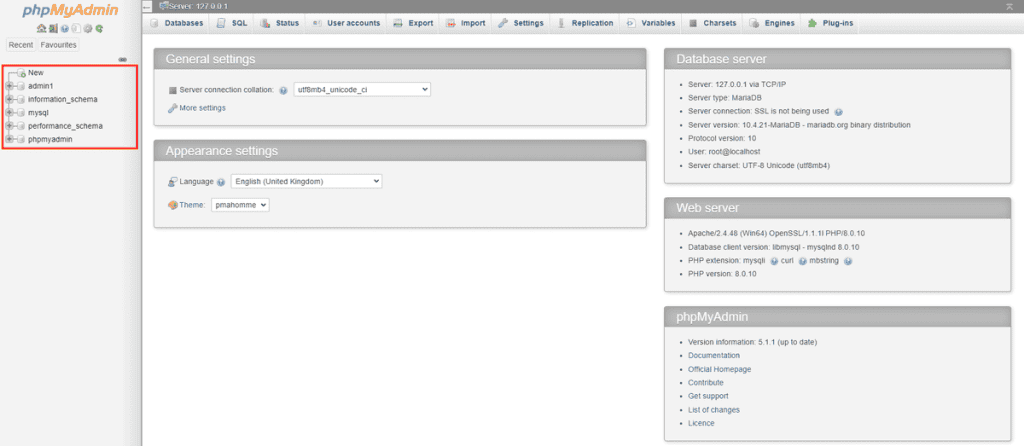
By clicking on the name of one of the databases you can access the structure and see the tables it contains.
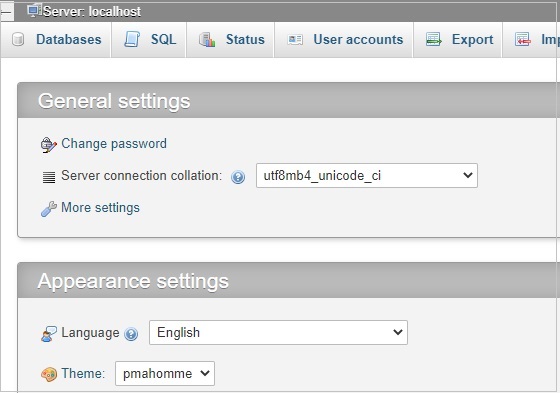
In the middle section, we have the settings that allow us to change language, theme and manage the size of the font used in the interface. On the right side, we can see among the information about the server, the encoding of the fonts used, the current PHP version and the version of phpMyAdmin we are using.
Let’s see how to use phpMyAdmin starting from the basic options and then we’ll see how to create a database.
Create a database with phpMyAdmin
As we said phpMyAdmin allows you to manage databases, one of its functions is the possibility to create new databases, let’s see how to do it.
On the main screen of the application, we can see several tabs, the one that interests us is the first one: Database.
This tab allows us to create a new database: all we need to do is fill in the database name field and choose the character encoding to be used, then click the Create button.
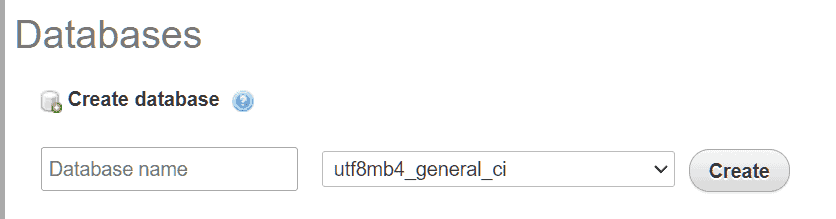
The database created will appear in the list on the left along with other existing databases if there are already others.
At this point the created database is empty and there are no tables inside it yet. If, in fact, after selecting the database we click on the Structure tab we can see a warning similar to this one:
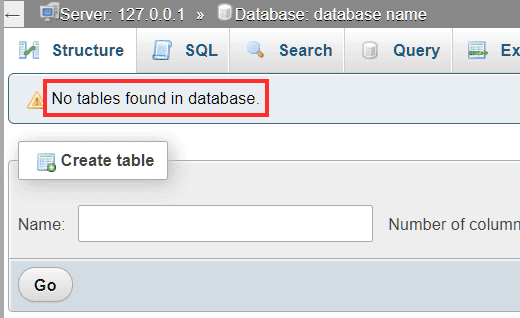
Create Tables
To create a new table we simply need to open the Structure tab of the database we are interested in. Then we will have to fill in two fields: the name of the table and decide the number of columns we want to insert. After that, we click on Go and the table will be added to the database.

We will have to insert the fields that will make up the table. For each field we will have to insert:
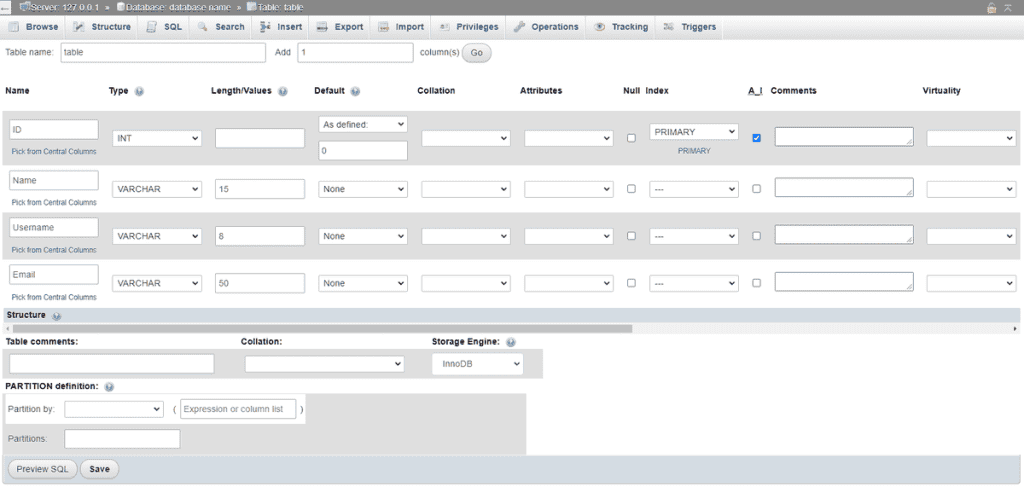
Name: the name to give to each column in the table
Type: the type of data that can be inserted in that column, for example, INT for integers or DATE to insert a date.
Length/Values: This field is not mandatory, but allows us to set a maximum length such as a character limit.
Default: allows us to choose how to fill the entries in that column when no value is entered. By choosing the As defined option we can enter a string or a value to be used in the field that appears below.
Character encoding: we can set a specific encoding for each column of the table.
A_I: means Auto increment, we can check the box when we want to assign a value that will increase automatically. You can use it for example to generate a unique numeric ID.
After filling in all the fields, just click on Save to generate the table.
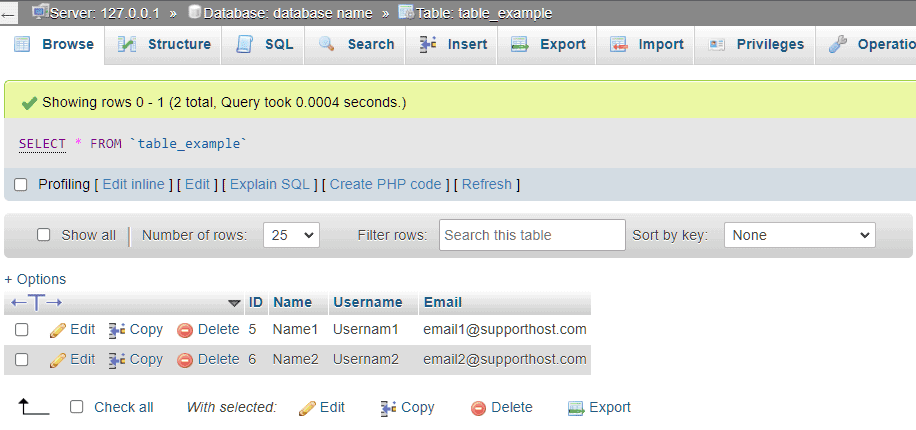
After creating our table we can view it by clicking on its name from the list on the left where we have all the databases. If we have just created the table there will be no data in it yet. In this case in the Browse tab of our table we will see a warning message like this one:
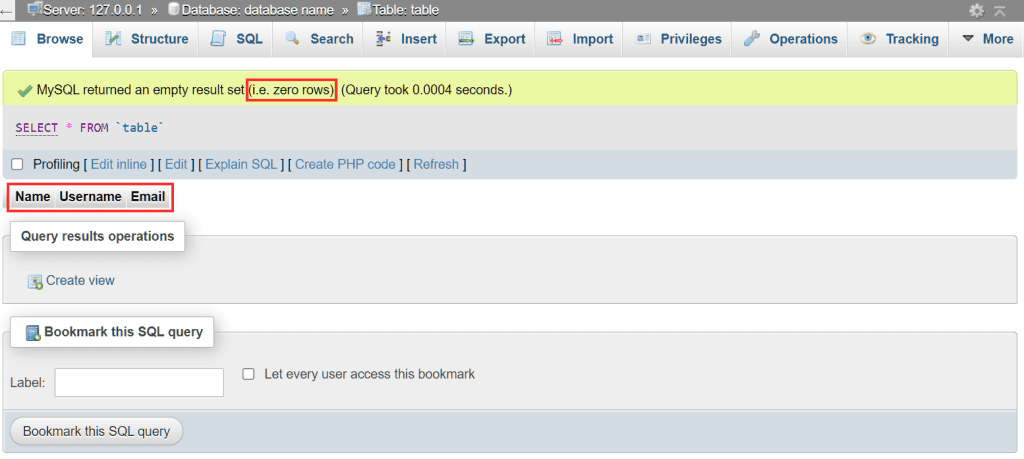
We will, in fact, see our table, but without any values inside.
Insert data into the table
At this point, we can create the records of the table we have just made. After selecting the table from the menu on the left, click on the Insert tab.
We will then see the fields of the table we have created and an empty field next to each of them under the heading Value, in this field we need to enter the content for each column. This will create the rows of our table.
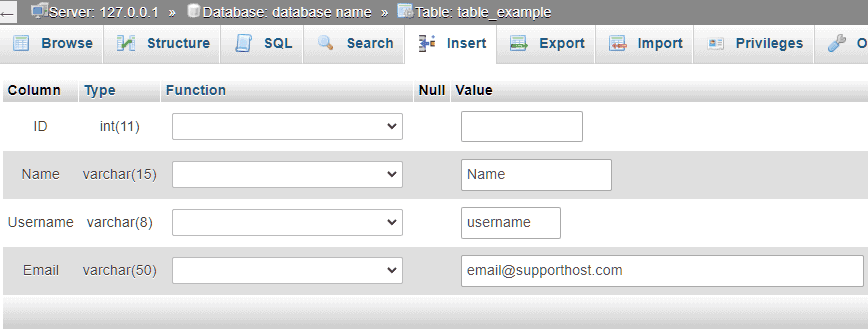
In our case, we are going to leave the ID column empty since we have set the auto-increment and the values will be inserted automatically, as you can see in this example.
We do not necessarily have to insert one record at a time, but we can also insert multiple rows at once. By default, we will be shown two rows, but we can increase the number by changing the value in the box you see as shown in this screenshot:

Edit table
When we first saw how to create the table, we had to set the number of columns we wanted to use. In any case, we can modify our table with phpMyAdmin even later by adding or removing some columns.
Before you modify the tables and risk losing the data they hold, it is always better to create a backup of the entire database. In our case, you can also restore the database from an automatic backup.
Let’s click on the table we are interested in modifying and open the Structure tab. At the bottom, we can see a row like this one that allows us to add one or more fields and allows us to choose which field to insert them after. Let’s take the example of wanting to insert a Password column after the Username column, select the option from the drop-down menu and click on Go.
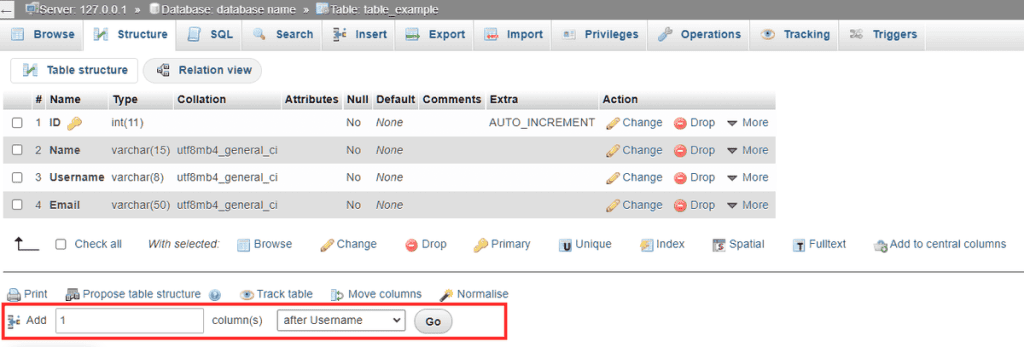
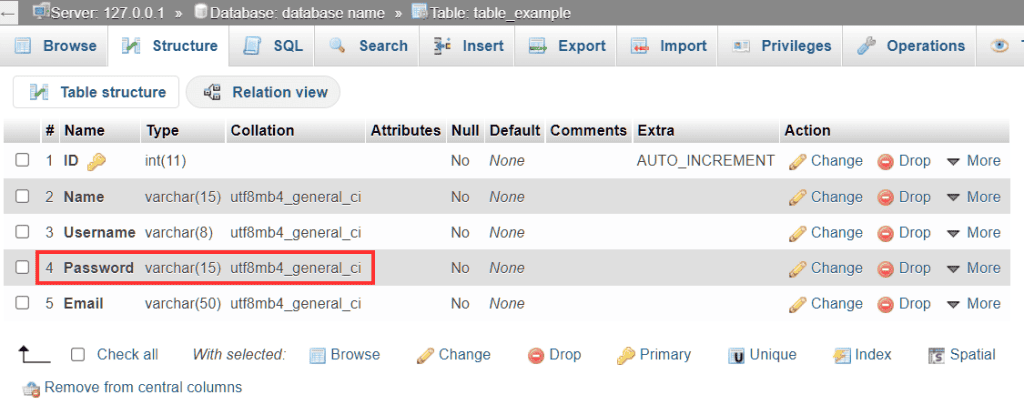
To add the new column we’ll need to specify the name, type and other parameters as we have seen before.

Let’s click on Save and our new column will be added to the table.
From the Structure tab we can also edit the columns we have already created. To do this we just need to check the box next to the column and then click edit, as you can see in this screenshot:
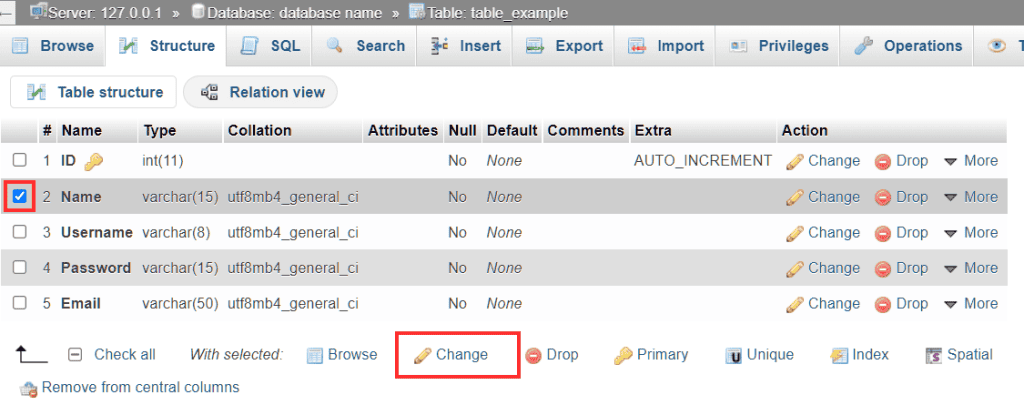
This function allows us to edit multiple columns at the same time.
Manage the database with phpMyAdmin
As we have seen while creating a new database when we select a database the tabs available at the top of phpMyAdmin change to let us show the database structure, make queries and perform other operations like renaming the database or copying it. Let’s see what you can do from each of these tabs.
From the Structure tab, we can create new tables, as we saw in one of the previous paragraphs. From here we can also edit existing tables by acting on the action buttons you see below.

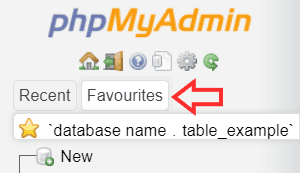
The star-shaped symbol: allows us to add the table to the favorites. To access the favorites we just need to hover with the mouse over Favourites in the side menu as seen below:
Show: This allows us to open a specific table and view its contents.
Structure: This gives us access to the structure tab of the table. From here we can edit a single table and add or delete columns, as seen in the section related to table modifications.
Search: This allows us to carry out a search in that specific table. We will go into the search function and its various options in the next section.
Insert: go to the Insert tab of the table where it is possible to add a new record or more records at once.
Empty: deletes the data contained in the table (the rows), maintaining its structure.
Delete: completely deletes the table (both data and structure).
Using the search function
If we select a database we can switch to the Search tab to do a search on the entire database or in specific tables.
To search the entire database, just enter one or more terms to be searched, click on Select All in the In Tables section and then click on the Run button at the bottom.
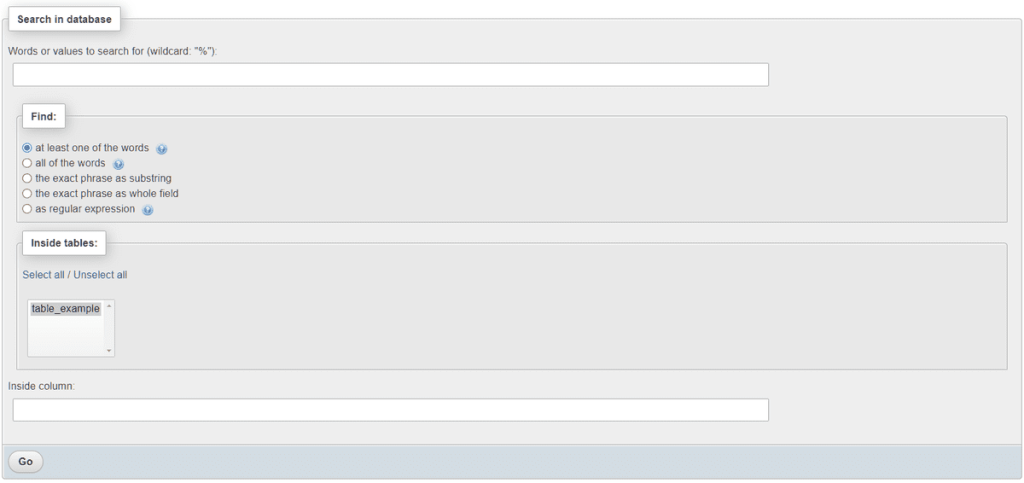
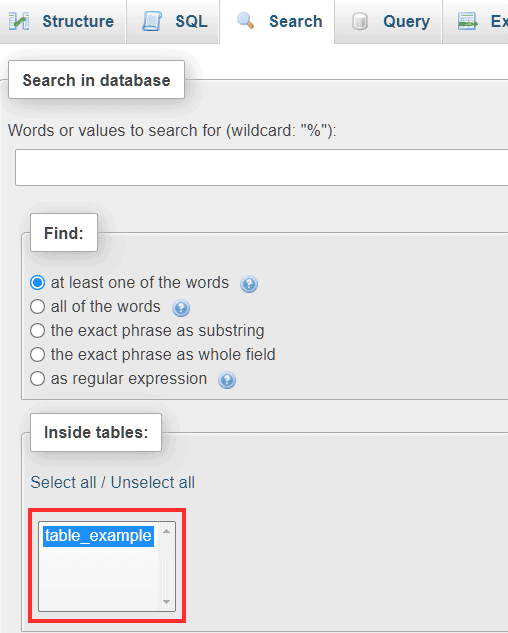
If we want to restrict the search to specific tables, then we just have to select them from the list, as you can see in this screenshot.
The default option (at least one of the words) performs the search and returns the results if at least one of the words we typed is present in the database. We can also search using the whole phrase, in this case, the whole phrase will be searched as such:
- the exact phrase as a substring: it will show us the results even if there is no correspondence on the whole field.
- the exact phrase as a complete field: it will search the exact matches in the field.
Here’s a practical example. In this case, we want to search the database for the phrase “A WordPress“.
If we run the search by setting the exact phrase as a substring option we will have two results as you see in this screenshot.
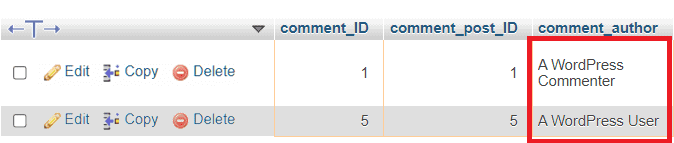
Repeating the search with the exact phrase option as a complete field has no results.

This happens because our complete fields were composed of a third word after the string we searched for.
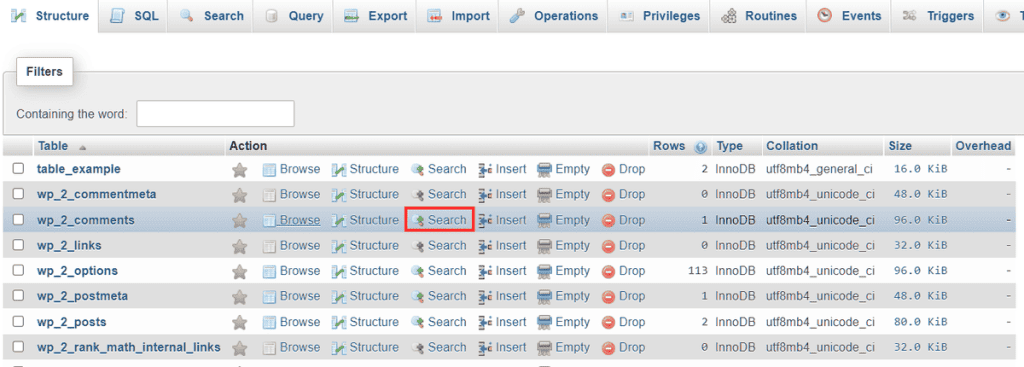
Search in a table
If we want to search within a single table, we can select the database we are interested in and open the Structure tab. From here we just click on the Search button next to the desired table as in this example:
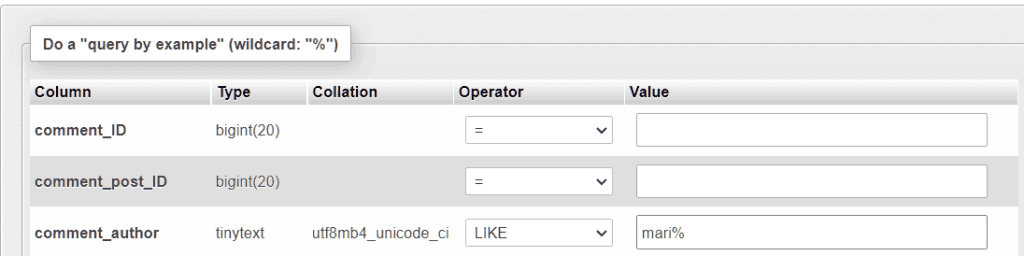
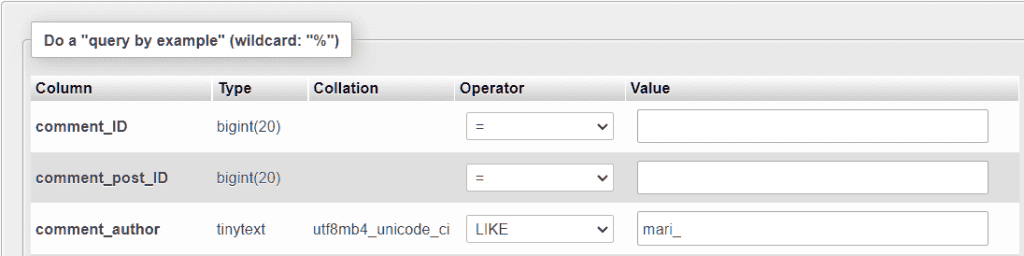
Searching in tables allows us to restrict the search to specific fields.
In the search, we can use the operator = if we want the match between the searched terms and the entered values to be exact. By using LIKE as an operator we will also select partial matches.
To better understand the difference, let’s take an example in our case with the authors of the comments. In case we want to find comments of users named Mario or Maria we can use wildcards and the operator like.
Using % as a wildcard will include all user names that begin with ‘Mari’ and continue with any number of characters, so Mario, Maria, but also Marianna.
By using _ as a wildcard we can, instead, search for usernames that begin with ‘Mari’ and that contain only one other character. A search of this type would yield ‘Mario’ and ‘Maria’ in the results, but not ‘Marianna’.
Database operations with phpMyAdmin
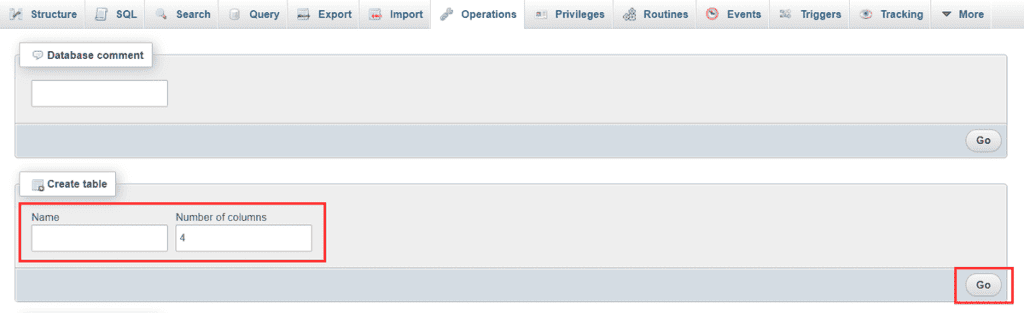
After selecting a database from the left side menu click on the Operations tab. The first thing we can do is create a new table to add to our database.
Create a new table
phpMyAdmin allows us to create tables both from the Structure tab and from the Operations tab.
In any case, the procedure is the same as we saw before: we enter the name we want to give to the table, set the number of fields it must have and click on Go.
Rename the database
From the Operations tab, we can rename our database. All we need to do is enter the new name to be given to the database and click on Go.

The warning message that appears asks us to confirm the operation and tells us that a new database will be created with the new name we have indicated and the contents of the existing database will be copied into the new one.
Create a copy of the database with phpMyAdmin
In addition to the export function that we will see later and which allows us to create a copy of the database to be saved locally and then allow us to import it on a new server, there is another method that allows us to create a copy of our database. In this case, we are going to see how to create a copy of the database to keep as a backup so we can restore it in case of problems.
We can always do this through the Operations tab. All we have to do is enter the name we want to give to the copy of the database we are creating and click on Go.
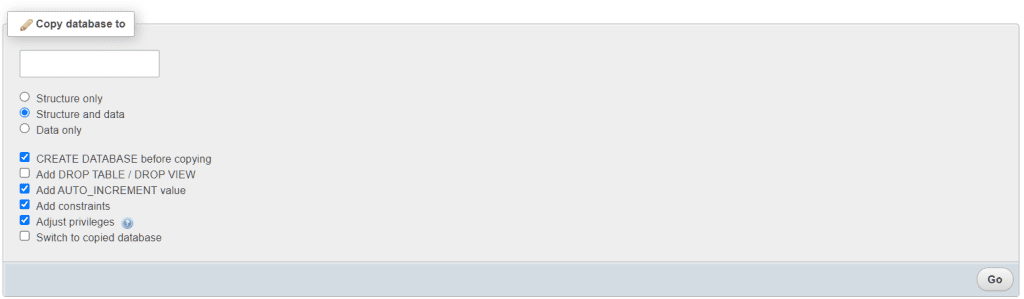
The options you see allow us to copy only the structure, without the data. However, if we want to create a copy of the database that can be restored in case of errors, we leave the default option Structure and data.
Change character encoding
The last section of the Operations tab allows us to change the character encoding of the database. All we need to do is select the encoding from the drop-down menu and click on Go.

In this way, the encoding will be applied to the new tables. If, on the other hand, we want the change to be applied to existing tables as well, we will have to use the option at the bottom to change all tables collations.
Table operations with phpMyAdmin
Just as we have just seen for the entire database, we can also access the Operations tab after selecting a single table. Let’s see which is possible to accomplish from here.
Move a table
From this section you can move the table to another database:

To do this, select the database from the drop-down menu and choose the destination database. We can also change the name of the table by changing the value in the field next to it.
Rename a table
The selected table can also be renamed by changing the name directly from the table options section.
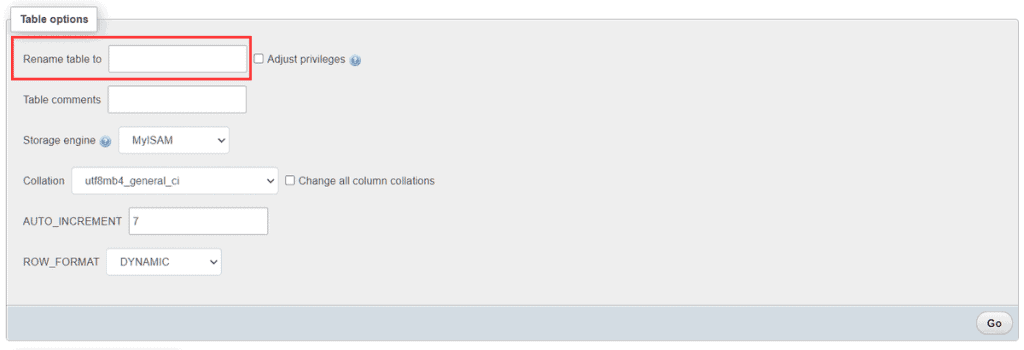
From here we can also add a comment to the table or change the character encoding.
Copy a table
With phpMyAdmin we can create a copy of the table in the same database or in a different one. To change the database, all we need to do is click on the drop-down menu.
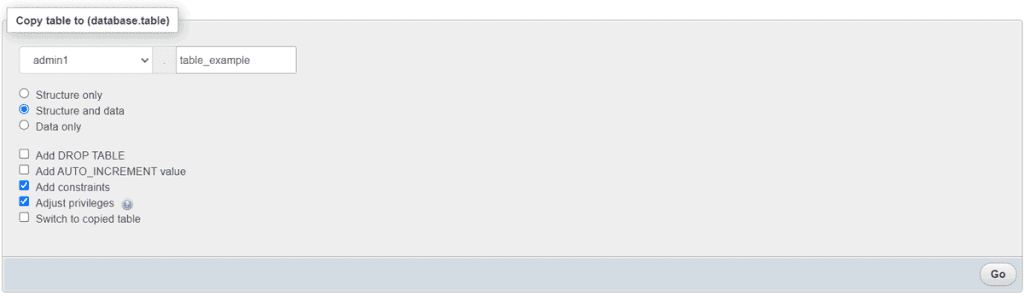
We can make a copy of the whole table (structure and data) or only copy the structure.
Table administration
Note that the operations accessible from this section can also be performed from the Structure tab of phpMyAdmin directly on several tables. In that case, we just need to select the tables and then click on the dropdown menu as shown in this screenshot:
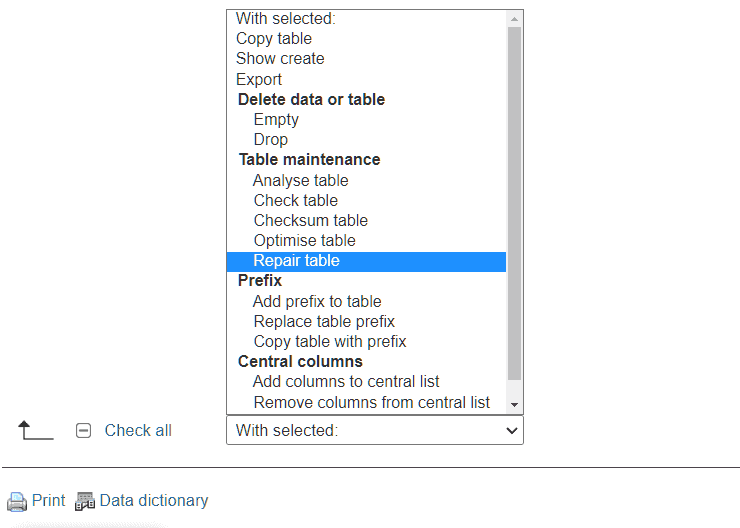
Repair or optimization can also be performed on the entire database, in this case, we simply need to select all tables.
From the Operations section you can:
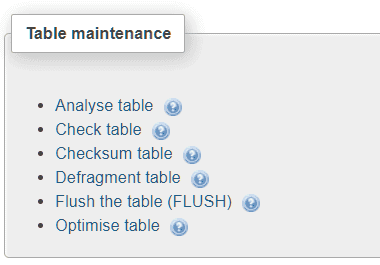
analyze the table: to obtain information on the status
check the table: to search for the presence of errors
repair the table: to repair the table if it is corrupted
optimize the table: allows you to recover the space occupied and reduces the time needed to access the table. It is convenient to perform this action when adding, modifying or deleting a large number of records in the table.
reload the table (flush): clears the cache and reloads the table.
Eliminate or empty the table
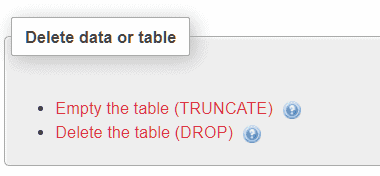
In the last section of the Operations tab, it is possible to
empty the table (truncate): this operation deletes the data contained in the table but maintains the structure.
delete the table (drop): this deletes the entire table, both the data inside and the entire structure.
Interrogate the database with phpMyAdmin
As you may have noticed while creating tables or inserting data into them, after clicking Run phpMyAdmin you are always redirected to the SQL tab.
Here you are shown the current process, all operations that are performed on the database through the interface and are actually translatable into SQL commands. In this example, you can see the insertion of data in the fields of a table.

From the SQL tab, you can run one or more queries on the table or database. Here is an example with a query that shows us a column in a specific table.
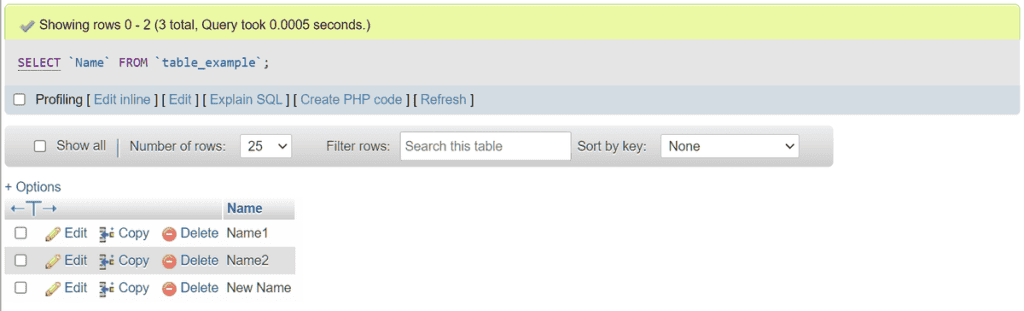
The essential commands you can use for queries are:
SELECT: This allows you to retrieve data from a table, showing only one column for example, or inserting specific conditions using clauses such as WHERE.
INSERT: This allows you to insert data in the table, as we saw in the example I showed you before.
UPDATE: This is used to update the values inside a table already created and populated.
DELETE: This allows you to delete records from a specific table.
By using the tab Query by example we can generate queries in an easier way. In fact, the screen allows us to choose the table columns we are interested in and specify the criteria.
In this example, we want to show all records of the comments table whose author corresponds to Mario.
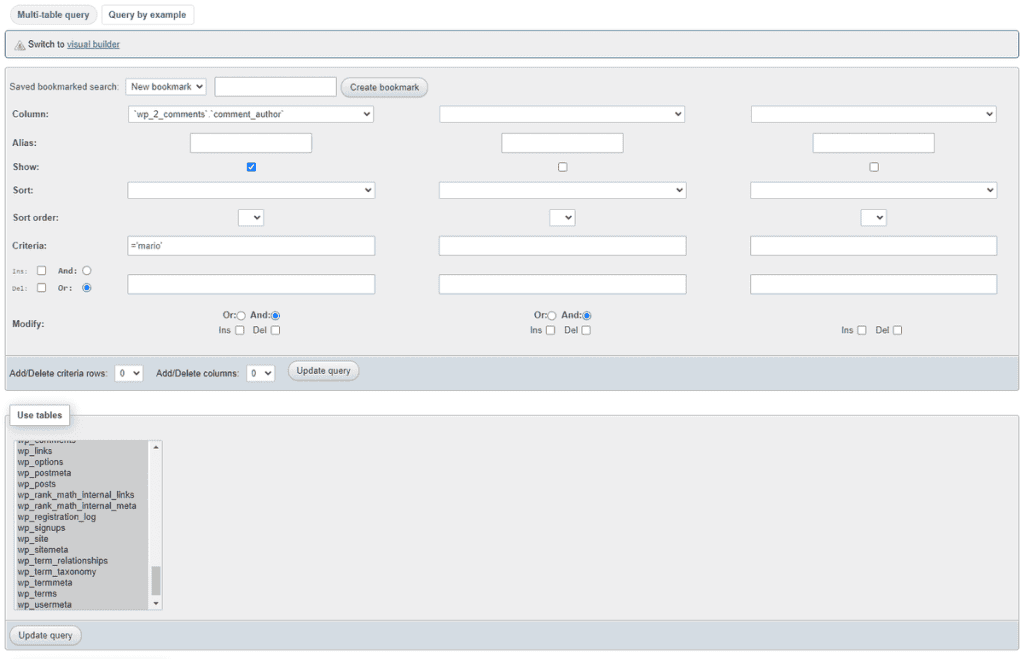
As you can see in the bottom pane, SQL-query, the query we have created through the grid will be shown in written form.
Import and export a database with phpMyAdmin
We can create a database from scratch or import an existing database. This feature of phpMyAdmin comes in handy when we want to transfer the site or for example when after installing WordPress locally we want to bring the site online.
In these cases, it is essential to export the database and import it on the online site, or on the destination server in the case of transfer, let’s see how to do it.
In the specific case of WordPress the import and export of the database can also be done using WP-CLI. In this regard, if you want to learn more about database management check out our guide to using phpMyAdmin for WordPress.
Export a database
The Export function of phpMyAdmin can also be used to create a backup copy of our database.
Let’s select from the list on the left of the database we want to export and then click on the Export tab.
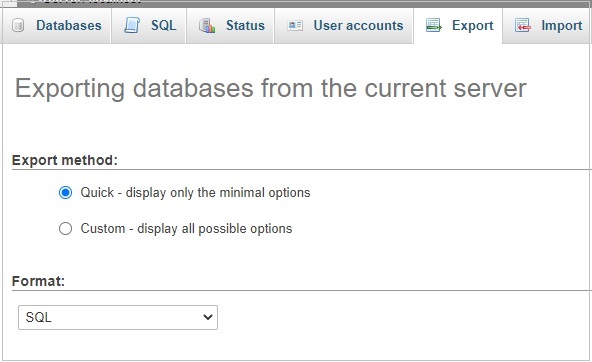
With the quick export method, we simply choose the format (we usually leave SQL) and click Go to export our database.
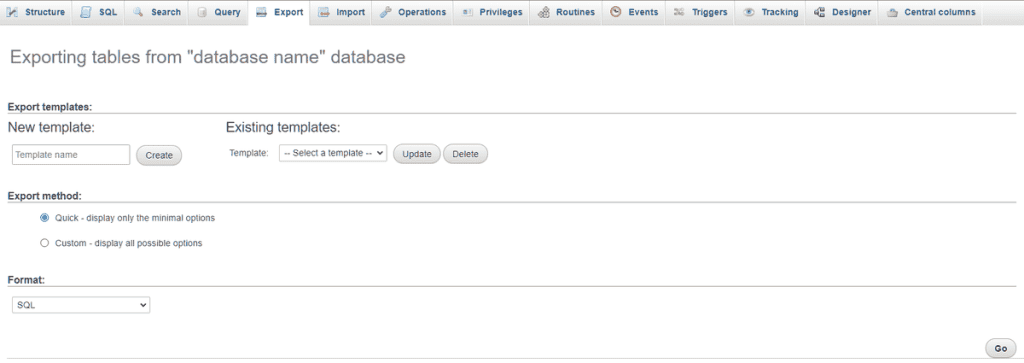
If we select Custom as the export method, we can access other options as well. For example, we can choose which tables to export, selecting only those that interest us. Or we can export only the structure and not the data.
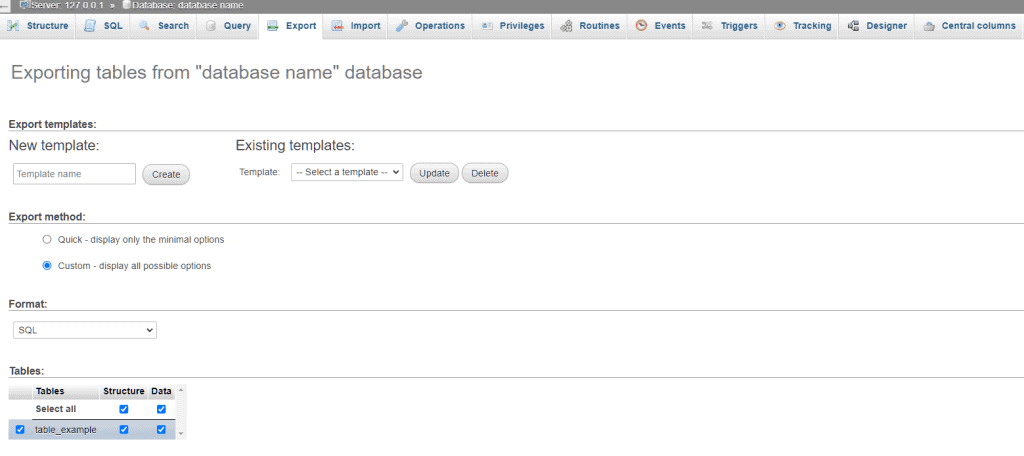
In the example I am going to show you, we will export only the structure of the database we created following the previous steps.
Import a database
To import a database we must first create a database. You can follow the steps described at the beginning of this guide.
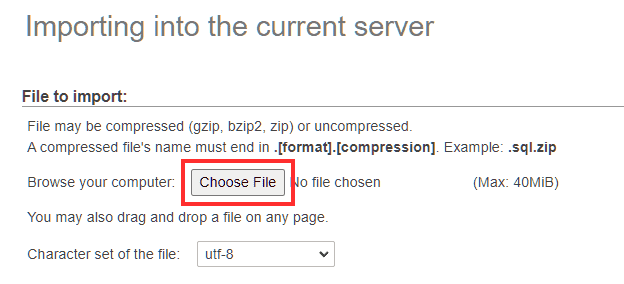
Let’s select the newly created database (which is still empty) and click on the Import tab. Through this section, we can import a database that we have previously saved on the computer.
Let’s click on Choose File, load the file and then click on Go found at the bottom.
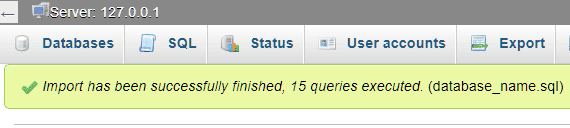
At the end of the process, if the import was successful we will see an alert message like this one here:
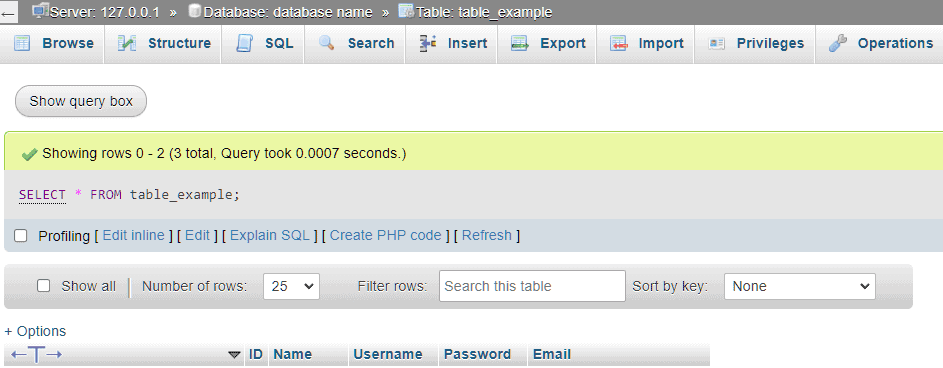
Now we can make sure that the database has been imported correctly, in our case we have exported only the structure and we are waiting to have the table with the fields created before, but without values in it. Our table will be just like this:
Conclusion
In this article, phpMyAdmin: the definite guide, we have seen how to use phpMyAdmin to create a new database, generate tables and populate them with data. We then focused on database management discovering how to search within a database or a specific table and rename databases and tables.
We also saw how to use queries, optimize tables, how to create a backup copy of our databases, and how to use the import and export functions. Let me know in the comments if there’s anything you’d like to learn more about or any steps you’re unclear about.