- Manuals
- Brands
- Zte Manuals
- Cell Phone
- Blade A5
- User manual
-
Contents
-
Table of Contents
-
Bookmarks
Quick Links
ZTE Blade A5 2020
User Manual
Related Manuals for Zte Blade A5
Summary of Contents for Zte Blade A5
-
Page 1
ZTE Blade A5 2020 User Manual… -
Page 2
ZTE Corporation. Notice ZTE Corporation reserves the right to make modifications on print errors or update specifications in this guide without prior notice. This manual has been designed with the utmost care to ensure the accuracy of its content. -
Page 3
Images and screenshots used in this guide may differ from the actual product. Content in this guide may differ from the actual product or software. Trademarks ZTE and the ZTE logos are trademarks of ZTE Corporation. Android™ is a trademark of Google LLC. ® The Bluetooth word mark and logos are registered trademarks owned by the Bluetooth SIG, Inc. -
Page 4
Instructional Icons Additional information, NOTE supplementary instruction or tips for the operation of the product. Safety information that, if ignored, CAUTION may cause minor damage to the equipment or service interruption. WARNING Safety information that, if ignored, may cause serious damage to the equipment or danger to personal safety. -
Page 5: Table Of Contents
Contents Getting Started …………9 Overview …………….9 Knowing the Keys …………11 Installing the nano-SIM Cards and the microSDXC™ Card (Optional) ………….. 12 Charging the Phone …………14 Powering On/Off …………15 Setting Up for the First Time ……….
-
Page 6
Connecting to Networks ……..30 Connecting to Mobile Network ……..30 ® Connecting to Wi-Fi …………. 33 Connecting to Devices ………. 33 ® Bluetooth …………..33 Connecting to a Computer via USB ……35 … -
Page 7
Using Other Camera Modes ………. 53 Photos …………..55 Opening Photos …………. 55 Sharing Your Photos or Videos ……..55 Deleting Unwanted Photos or Videos ……55 Restoring a Photo or Video ……….56 … -
Page 8
General Safety ………….. 74 Radio Frequency (RF) Energy ……..76 Distractions …………..79 Product Handling …………79 Electrical Safety …………. 86 Radio Frequency Interference ……..87 Explosive Environments ……….89 Specification ……错误!未定义书签。 … -
Page 9: Getting Started
Getting Started Overview Proximity & Earpiece Light sensor Indicator light Front camera nano-SIM/ Volume key microSDXC card tray Power key Touch screen Charging/ Microphone micro-USB jack…
-
Page 10
* Supports CTIA headsets only. -
Page 11: Knowing The Keys
Knowing the Keys Function Press and hold to turn on or off airplane Power key mode, switch audio profiles, restart or power off. Press to turn off or on the screen display. Volume key Press or hold to turn the volume up or down. …
-
Page 12: Installing The Nano-Sim Cards And The Microsdxc™ Card (Optional)
Installing the nano-SIM Cards and the microSDXC™ Card (Optional) The nano-SIM cards can be installed or removed while the phone is turned on. WARNING! To avoid damage to the phone, do not use any other kind of SIM cards, or any non-standard nano-SIM card cut from a SIM card.
-
Page 13
2. Pull out the card tray and place a nano-SIM card in slot 1 and a microSDXC card (optional) or a nano-SIM card in slot 2, as shown. Carefully slide the tray back into place. Slot 2 Slot 1 NOTE: When two nano-SIM cards are installed, both cards can connect to the 4G, 3G or 2G network, and either card can be used for mobile data. -
Page 14: Charging The Phone
You should fully charge the battery as soon as possible. WARNING! Use only ZTE-approved chargers and USB cables. The use of unapproved accessories could damage your phone or cause the battery to explode.
-
Page 15: Powering On/Off
NOTE: If the battery is extremely low, you may be unable to power on the phone even when it is being charged. In this case, try again after charging the phone for at least 20 minutes. Contact the customer service if you still cannot power on the phone after prolonged charging.
-
Page 16: Knowing The Home Screen
Touch the language field to select the language you want to use and then touch START. If you have installed two nano-SIM cards, select the card for mobile data, calls, or messages. Then follow the prompts to set up Wi-Fi, Date & time, and Google Services, and activate protection features.
-
Page 17: Personalizing
Personalizing Choosing Your Wallpaper You can set the wallpaper for the home screen and the lock screen. 1. Touch and hold on an empty area of the home screen and touch WALLPAPERS. 2. Touch My photos to select a picture and use it as the wallpaper.
-
Page 18: Removing Items From Your Home Screen
Removing Items From Your Home Screen 1. Touch and hold the item you want to delete. 2. Drag it to Remove to delete it. NOTE: If the item is an app icon, you may also drag it to Uninstall and touch OK to uninstall the app. Some preinstalled apps cannot be uninstalled.
-
Page 19
Set Do Not Disturb Mode 1. From the home screen touch > Apps & notifications > Notifications > Do Not Disturb. 2. Touch and set the following options as you need: Sound & vibration: When Do Not Disturb mode is on, sound and vibration will be muted, except for the items (Alarms, Media or Touch sounds) you allow. -
Page 20
Duration: Until you turn off means that Do Not Disturb mode is always on until you turn off it manually. Touch to set the duration time for Do Not Disturb mode. If you choose Ask every time, you need to choose Until you turn off or the duration time for Do Not Disturb mode when you turn on Do Not Disturb mode. -
Page 21: Knowing The Basics
Knowing the Basics Monitoring the Phone Status The status bar at the top of the home screen provides phone and service status icons on the right side. Below are some of the icons you may see. 3G connected No signal 4G connected Signal strength Mobile data in…
-
Page 22: Managing Notifications
Managing Notifications Notification Icons The status bar at the top of the home screen provides notification icons on the left. Below are some of the icons you may see. New SMS/MMS Call in progress Song playing Call on hold USB tethering on Missed call microSDXC card Open Wi-Fi…
-
Page 23: Using Quick Settings
To close the notification panel, swipe your finger up on the screen or touch the Back key. Using Quick Settings The Quick Settings make it convenient to view or change the most common settings for your phone. Swipe down from the status bar and drag the notification panel downwards to open the Quick Settings panel.
-
Page 24: Opening And Switching Apps
Touch and hold a tile and drag it to the Drag here to remove section to hide it. In the Hold and drag to add tiles section, drag a tile up to show it in the Quick Settings panel. Opening and Switching Apps Open an App 1.
-
Page 25: Using Split-Screen Mode
NOTES: You can swipe a card up to remove it from the screen, which will free up running memory on the phone. Double-tap the Recent apps key to switch to the most recent app. Using Split-Screen Mode You can work with two apps at the same time in split-screen mode.
-
Page 26: Security
Security Protecting Your Phone With Screen Locks 1. From the home screen touch > Security & location > Screen lock. 2. Touch None, Swipe, Pattern, PIN or Password. Touch None to disable the screen lock. Touch Swipe to enable screen lock and allow …
-
Page 27
Turn On Screen Pinning 1. From the home screen touch > Security & location > Advanced > Screen pinning. 2. Touch the Off switch. 3. To add security for unpinning, switch on Lock device when unpinning and set up a screen lock as prompted, or switch on Ask for unlock pattern/PIN/password before unpinning if you’ve set a screen lock already. -
Page 28: Using Face Recognition
Using Face Recognition You can use face recognition to unlock the screen or open locked apps in Private Space. NOTE: The security strength of face recognition is lower than that of password or pattern. Create a Face 1. From the home screen touch >…
-
Page 29
Use Face Recognition to Unlock the Screen After creating your face, you can unlock the screen with face recognition. 1. Press the Power key to turn on the screen display if the screen is off. 2. Put your face in front of the screen. If the face recognition fails, touch to try again. -
Page 30: Connecting To Networks
Bright display: If this option is enabled, the phone will increase screen brightness automatically in a dim light to help verify your face. Delete face data: Touch this option and select DELETE to delete recorded face data. Connecting to Networks Connecting to Mobile Network Manage the nano-SIM Cards When two nano-SIM cards are installed, you can turn on or…
-
Page 31
off one of the cards, or choose the default card for calls, data, and messages. To turn on or off a card: 1. From the home screen touch > Network & Internet > SIM cards. 2. Touch the on/off switch next to a card. NOTE: You can touch a card name to edit the card name, change its colour, and view the carrier and number of the card. -
Page 32
1. From the home screen touch > Network & Internet > Mobile network. 2. Touch a card tab at the top if two nano-SIM cards are installed. 3. Touch Advanced > Access Point Names > (on the top of the screen). 4. -
Page 33: Connecting To Wi-Fi
® Connecting to Wi-Fi Wi-Fi is a wireless networking technology that can provide Internet access at distances of up to 100 meters, depending on the Wi-Fi router and your surroundings. To turn Wi-Fi on and connect to a Wi-Fi network: 1.
-
Page 34
distance of about 10 meters (32.8 feet). The Bluetooth devices must be paired before communication is performed. 1. From the home screen touch > Connected devices > Pair new device. Your phone automatically scans for and displays the IDs of all available Bluetooth devices in range. -
Page 35: Connecting To A Computer Via Usb
Connecting to a Computer via USB You can connect your phone to a computer with a USB cable and transfer music, pictures, and other files in both directions. Your phone stores these files in the phone storage or on a removable microSDXC card.
-
Page 36: Sharing Your Mobile Data Connection
NOTE: You can also install the driver on PC by running the executable file in the new CD-ROM drive. Disconnect Your Phone From the Computer To disconnect the phone from the computer, simply unplug the USB cable when you’re finished. Sharing Your Mobile Data Connection You can use tethering to share your phone’s Internet…
-
Page 37: Phone Calls
connection with a computer that connects to your phone via USB cable or by Bluetooth. 1. From the home screen touch > Network & Internet > Hotspot & tethering. 2. Switch on USB tethering or Bluetooth tethering. For USB tethering, connect your phone to the …
-
Page 38
2. Touch to open the dialer and enter the phone number or the contact name with the dialpad. Touch to delete incorrect digits. NOTE: As you enter the phone number or the contact name, your phone searches for matching information in your contacts. If you see the number and contact you want to call, touch it to place the call immediately. -
Page 39: Answering Or Rejecting Calls
1. From the home screen, touch > 2. Touch next to an entry in the call history list to call back. 3. Select the nano-SIM card you want to use for the call. Place a Call from a Text Message If a text message contains a phone number that you want to call, you can make the call while viewing the text message.
-
Page 40
answer the call. — or — If the screen is unlocked, touch ANSWER. NOTE: To silence the ringer before answering the call, press either end of the Volume key. Reject a Call When you receive a phone call, swipe down on the screen to reject the call. -
Page 41
Touch to make another call separately from the first call, which is put on hold. Touch to put the call on hold. Touch to go to Contacts. Touch to mute or unmute your microphone. Touch to switch to the keypad when you need to enter a code (for example, the PIN for your voicemail or bank account) during the call. -
Page 42: Contacts
responses, set call settings, set blocked numbers, set voicemail, and other settings. 1. From the home screen, touch 2. Touch next to Search contacts box. 3. Touch Settings. Contacts You can add contacts on your phone and synchronize them with the contacts in your accounts that support contact syncing. You can view and add contact information directly from Phone and message applications.
-
Page 43: Creating A Contact
Creating a Contact 1. From the home screen, touch 2. Touch to add a contact. 3. Enter the contact name, phone numbers, email addresses, and other information. 4. Touch SAVE. Searching for a Contact 1. From the home screen, touch 2.
-
Page 44
Import Contacts From the nano-SIM Cards 1. Open Contacts. 2. Touch > Settings > Import > Import from [card name]. 3. Check the contacts you need and then touch 4. If prompted, touch the account you want to import the contacts to. -
Page 45: Setting A Ringtone For A Contact
Export Contacts to the nano-SIM Cards 1. Open Contacts. 2. Touch > Settings > Export > Export to [card name]. 3. Check the contacts you need and then touch Export Contacts to the Phone Storage or the microSDXC Card 1. Open Contacts. 2.
-
Page 46: Joining Duplicate Contacts
2. Touch a contact you want to set a ringtone for and then touch 3. Touch More fields > Default ringtone. 4. Select a ringtone you like and touch OK. NOTE: Touch Add ringtone at the bottom of the ringtone list to select an audio file on the phone or an installed microSDXC card.
-
Page 47: Separating Contact Information
2. Touch a contact, and then touch > Link. 3. Touch the contact whose information you want to join with the first entry. The information from the second contact is added to the first contact, and the second contact is no longer displayed in the contacts list.
-
Page 48: Setting Call Blocking
Setting Call Blocking The call blocking feature allows you to block calls and messages from certain numbers. 1. Open Contacts. 2. Touch > Settings > Blocked numbers. 3. Touch ADD A NUMBER to add specific numbers you want to block. NOTE: To unblock a number, touch next to the number and…
-
Page 49: Messages
Messages You can use Messages to exchange text messages (SMS) and multimedia messages (MMS). Sending a Message 1. From the home screen, touch 2. On the Messages screen, touch Start chat at the bottom. 3. Add recipients by one of the following ways. Touch the To field and manually enter the recipient’s …
-
Page 50: Message Settings
attach a file to the message. 7. Touch NOTES: You can also include email addresses as recipients for a multimedia message. Do not add any attachment if you want to send a text message. Otherwise, you may be charged for a multimedia message.
-
Page 51: Camera
Camera Taking Pictures From the home screen, touch Aim the camera at the subject and make any necessary adjustment. Swipe from the left side of the phone to the centre to select other camera modes. Swipe from the right side of the phone to the centre for the camera settings. Number Function…
-
Page 52
Number Function Switch between the front and back cameras. Turn on/off beauty mode and customise settings. Turn on/off bokeh mode and customise aperture. Turn on or off HDR or set it at auto. Change the flash setting. View pictures and videos you have taken. Capture a picture. -
Page 53: Recording Videos
leave the camera to autofocus on the centre of the image. Lightly touch Recording Videos 1. From the home screen, touch > 2. Aim the camera at the subject. 3. Touch to start recording a video. 4. Touch to stop recording. NOTES: …
-
Page 54
effects. Swipe from the left side of the phone to the centre to use them. Manual: Adjust more camera options for your photo such as ISO, white balance, exposure, and metering. Burst: Take burst photo shots. Panorama: Capture a panoramic photo. … -
Page 55: Photos
Photos Opening Photos From the home screen, touch . You’ll see all the photos and videos on your phone and—if you have turned on “Back up & sync”—anything else synced to your Google Photos library. NOTE: You can touch > Help & feedback to get detailed help information about Google Photos.
-
Page 56: Restoring A Photo Or Video
4. Touch > Move to trash or you can touch > Delete > Delete from device. NOTE: Items in the trash will be removed after 60 days, while Delete from device will permanently delete the items immediately. Restoring a Photo or Video 1.
-
Page 57: Play Music
Play Music Playing Your Music Play Music supports a wide variety of audio formats, so it can play music you purchase from online stores, music you copy from your CD collection, and so on. 1. Swipe up from the home screen and touch >…
-
Page 58: Managing Playlists
Managing Playlists Create playlists to organize your music files into sets of songs, so that you can play the songs you like in the order you prefer. In the music library, touch next to a song > Add to playlist to add the song to a playlist or create a new playlist (touch NEW PLAYLIST).
-
Page 59: Settings
Settings From the home screen touch . The Settings app contains most of the tools for customizing and configuring your phone. Network & Internet Wi-Fi Open Settings and touch Network & Internet > Wi-Fi. You can turn Wi-Fi on or off and configure your Wi-Fi connections. Connecting to Wi-Fi.
-
Page 60
can use the default APN. And if you want to add a new APN, please contact the service provider to get the necessary information. Data Usage Open Settings and touch Network & Internet > Data usage to check and manage mobile data use. You can view and restrict Wi-Fi data usage as well. -
Page 61
PCs or other devices. See Sharing Your Mobile Data Connection. SIM Cards Open Settings and touch Network & Internet > SIM cards to manage dual-SIM options. When two nano-SIM cards are installed, you can turn on or off one of the cards, choose the default card for data, calls, and messages. -
Page 62: Connected Devices
Open Settings and touch Network & Internet > Advanced > VPN to set up and connect to virtual private networks. Private DNS To get information from a website, your phone first asks where the website is. Private DNS is a way to help secure these questions and answers.
-
Page 63: Apps & Notifications
You can also touch Connected devices > Connection preferences > Printing to use the default printing service or other printer plug-ins installed from the Google Play Store or your printer manufacturer. Apps & Notifications App Info Open Settings and touch Apps & notifications to see recently opened apps or all apps installed on your phone and manage them.
-
Page 64
whether to open the links in the app and clear the app’s defaults. App Permissions Open Settings and touch Apps & notifications > Advanced > App permissions to check what apps have been allowed to access certain permissions. You can also change the app permissions. -
Page 65: Features
Features Open Settings and touch Features. The following features are available. Record screen: Set the video quality and the touch interaction options for screen recording. Z-POP: While Z-POP is on, a floating bubble appears on the edge of the screen. You can drag the bubble to reveal navigation operations.
-
Page 66: Display
Display Open Settings and touch Display to configure the display options, including brightness level, eye comfort mode, colours and contrast, wallpaper, screen sleep time, screen rotation, font size, etc. Scheduled Power On/Off Open Settings and touch Scheduled power on/off > Power on / Power off to set the day and time when the phone automatically powers on or off.
-
Page 67: Security & Location
you can select Phone or SD card as the default location for new data, such as captured photos and recorded audio. Device storage: Touch Internal shared storage to get a detailed breakdown of space usage by type. Touch FREE UP SPACE to delete the files you do not need.
-
Page 68
Find My Device: Use Find My Device helps you locate this device remotely. It also helps you keep your data safe if the device is lost. The lost device must be signed in to a Google account. Security update: Check for security update of your system. -
Page 69
to use more the Smart Lock features. Location: Manage location services, which help your phone and apps determine your location. To use location-related applications, such as finding your location on Google Maps, you must have location services enabled on your phone. In the Location menu, touch Advanced >… -
Page 70: Accounts
cannot access the mobile phone network. Contact your operator for a PIN Unlock Key (PUK) to restore the nano-SIM card. Encryption & credentials: Check the encryption status of your phone and set the credential storage options. Trust agents: View or deactivate trust agents. …
-
Page 71: Google
using Colour inversion or Display size for users with sight problems. Google Open Settings and touch Google to manage settings for Google apps and services. System About Phone Open Settings and touch System > About phone to view phone number, status, legal information, and other information.
-
Page 72
Date & Time Open Settings and touch System > Date & time to set date, time, time zone, and the time format. You can also use network-provided data. Backup Open Settings and touch System > Backup to manage data backup options. To easily restore or switch phones at any time, you can enable automatic backup to Google Drive of important data. -
Page 73
has his/her own storage space, wallpaper, screen lock and so on. Users can also adjust phone settings like Wi-Fi that affect everyone and update apps for all other users. By default, a Guest account is available for anyone who needs to use your phone temporarily. You can touch Add user to create more user accounts. -
Page 74: For Your Safety
For Your Safety General Safety Don’t make or receive phone calls while driving. Never text while driving. Keep your phone at least 5 mm away from your body while making calls. Small parts may cause choking. Your phone can produce a loud sound. To prevent possible hearing damage, do not listen at high volume levels for long periods.
-
Page 75
Turn off when asked to in hospitals and medical facilities. Turn off when told to on aircraft and at airports. Turn off when near explosive materials or liquids. Don’t use at gas stations. Your phone may produce a bright or flashing light. Don’t dispose of your phone in fire. -
Page 76: Radio Frequency (Rf) Energy
For pluggable equipment, the socket-outlet shall be installed near the equipment and shall be easily accessible. Don’t rely on your phone as a primary device for emergency communications. Radio Frequency (RF) Energy General Statement on RF Energy Your phone contains a transmitter and a receiver. When it is ON, it receives and transmits RF energy.
-
Page 77
Absorption Rate, or SAR. The SAR limit for mobile devices is 2 W/kg and the highest SAR value for this device when tested at the head was 0.427W/kg*, and when tested at the body was 1.457 W/kg* with 5 mm distance. As mobile devices offer a range of functions, they can be used in other positions, such as on the body as described in this guide**. -
Page 78
phone must be used with a minimum of 5 mm separation from the body. Failure to observe these instructions could result in your RF exposure exceeding the relevant guideline limits. Limiting Exposure to Radio Frequency (RF) Fields For individuals concerned about limiting their exposure to RF fields, the World Health Organisation (WHO) provides the following advice: Precautionary measures: Present scientific information does… -
Page 79: Distractions
as noted. Please find the section EU DOC in the end of this guide. Distractions Driving Full attention must be given to driving at all times in order to reduce the risk of an accident. Using a phone while driving (even with a hands-free kit) can cause distraction and lead to an accident.
-
Page 80
measures designed to protect users and their environment. Always treat your phone and its accessories with care and keep them in a clean place. Keep the screen and camera lens clean. An unclean screen or camera lens may slow down the phone’s reaction to your operations or interfere with the image quality. -
Page 81
Do not carry your phone in your back pocket as it could break when you sit down. Battery Safety Using ZTE-unapproved or incompatible battery, charger or power adapter may damage your device, shorten its lifespan or cause a fire, explosion or other hazards. -
Page 82
If the battery damages or shows signs of swelling or leakage, please stop use immediately and contact ZTE or ZTE-authorized service provider for replacement. -
Page 83
Small Children Do not leave your phone and its accessories within the reach of small children or allow them to play with it. They could hurt themselves or others, or could accidentally damage the phone. Your phone contains small parts with sharp edges that may cause an injury or may become detached and create a choking hazard. -
Page 84
your ear, with the bottom towards your mouth. Airbags Do not place a phone in the area over an airbag or in the airbag deployment area, as an airbag inflates with great force and serious injury could result. Store the phone in a safe and secure area before driving your vehicle. -
Page 85
Press the buttons lightly. Use the special features which are designed to minimize the times of pressing buttons, such as Message Templates and Predictive Text. Take frequent breaks to stretch and relax. Emergency Calls This phone, like any other wireless phone, operates using radio signals, which cannot guarantee connection in all conditions. -
Page 86: Electrical Safety
Electrical Safety Accessories Use only approved accessories. Do not connect with incompatible products or accessories. Take care not to touch or allow metal objects, such as coins or key rings, to contact or short-circuit the charging jack. Never puncture the surface of the phone with sharp objects. Connection to Vehicles Seek professional advice when connecting a phone interface to the vehicle electrical system.
-
Page 87: Radio Frequency Interference
Radio Frequency Interference General Statement on Interference Care must be taken when using the phone in close proximity to personal medical devices, such as pacemakers and hearing aids. Please consult your doctor and the device manufacturers to determine if the operation of your phone may interfere with the operation of your medical devices.
-
Page 88
The level of interference depends on the type of hearing device and the distance from the interference source. Increasing the separation between them may reduce the interference. You may also consult your hearing aid manufacturer to discuss alternatives. Medical Equipment Turn off your wireless device when you are requested to do so in hospitals, clinics or healthcare facilities. -
Page 89: Explosive Environments
hands-free kit with an external antenna is included in the installation. Explosive Environments Gas Stations and Explosive Atmospheres In locations with potentially explosive atmospheres, obey all posted signs to turn off wireless devices such as your phone or other radio equipment. Areas with potentially explosive atmospheres include fuelling areas, below decks on boats, fuel or chemical transfer or storage facilities, and areas where the air contains chemicals…
-
Page 90: Ce Caution
CE Caution Battery Caution Risk of explosion if battery is replaced by an incorrect type. Dispose of used batteries according to the instructions. USB Port This product shall only be connected to a USB interface of version USB 2.0. Proper Use As described in this guide, your device can be used only in right location.
-
Page 91: Disposal Of Your Old Appliance
3. The correct disposal of your old appliance will help prevent potential negative consequences for the environment and human health. For this product’s recycling information based on WEEE directive, please send an e-mail to weee@zte.com.cn…
-
Page 92: Eu Declaration Of Conformity
EU DECLARATION OF CONFORMITY Hereby, ZTE Corporation declares that the radio equipment type ZTE Blade A5 2020 is in compliance with Directive 2014/53/EU. The full text of the EU declaration of conformity is available at the following Internet address: http://certification.ztedevices.com…
-
Page 93: Erp Conformity
The external power supply of this product conforms to the Energy-related Product Directive (ErP) 2009/125/EC of the European Parliament and the Council. Manufacturer’s ZTE Corporation name, commercial 9144030027939873X7 registration ZTE Plaza, Keji Road South, Hi-Tech number and Industrial Park, Nanshan District, address Shenzhen, China Model identifier STC-A51D-A Input voltage…
-
Page 94
FCC Caution § 15.19 Labeling requirements. This device complies with part 15 of the FCC Rules. Operation is subject to the following two conditions: (1) This device may not cause harmful interference, and (2) this device must accept any interference received, including interference that may cause undesired operation. -
Page 95
interference to radio or television reception, which can be determined by turning the equipment off and on, the user is encouraged to try to correct the interference by one or more of the following measures: -Reorient or relocate the receiving antenna. -Increase the separation between the equipment and receiver. -
Page 96
FCC RF Exposure Information (SAR) This phone is designed and manufactured not to exceed the emission limits for exposure to radio frequency (RF) energy set by the Federal Communications Commission of the United States. During SAR testing, this device was set to transmit at its highest certified power level in all tested frequency bands, and placed in positions that simulate RF exposure in usage against the head with no separation, and near the body with the separation of 10 mm.
Перейти к контенту
![]()
Русские электронные инструкции по эксплуатации
Постоянно обновляемый большой каталог документации по эксплуатации и использованию современных устройств и оборудования на русском языке. Бесплатное скачивание файлов.
Поиск:
Главная
Просмотр инструкции в pdf


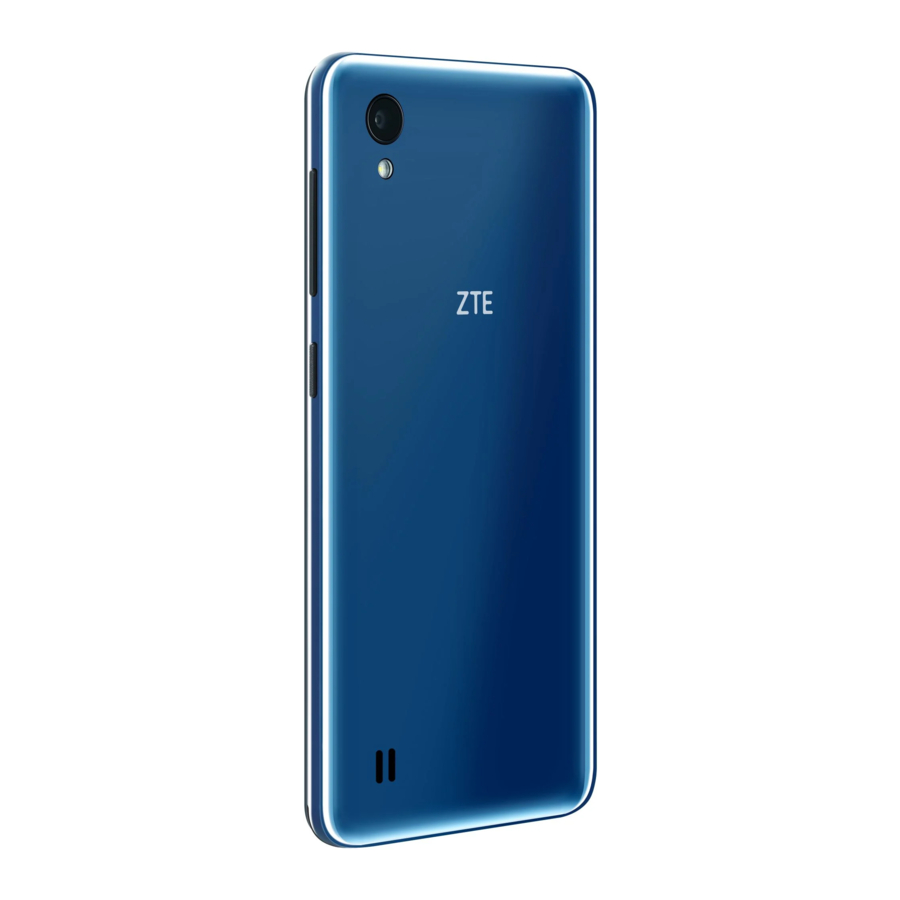
Инструкция по эксплуатации смартфона ZTE Blade A5 2020 Black.
Скачать инструкцию к смартфону ZTE Blade A5 2020 Black (1,36 МБ)

Инструкции по эксплуатации смартфонов ZTE
« Инструкция к смартфону Highscreen Max 3 Red
» Инструкция к смартфону realme C3 3+64GB NFC Volcano Grey (RMX2020)
Вам также может быть интересно
%20Blue.jpg)
Инструкция к смартфону ZTE Blade A7 2020 (3+64GB) Blue

Инструкция к смартфону ZTE Blade A3 Blue

Инструкция к смартфону ZTE Blade A5 Black

Инструкция к смартфону ZTE Blade A31 Plus Cadet Blue
%20Deep%20Blue.jpg)
Инструкция к смартфону ZTE Blade V2020 Smart (4+64GB) Deep Blue

Инструкция к смартфону ZTE Blade A3 2020 Red

Инструкция к смартфону ZTE Blade L5 Plus Gold

Инструкция к смартфону ZTE Axon 10 Pro Blue
Комментариев: 1
-

Деонид
08.01.2022 в 00:22
Мне нужно скачать инструкцию к смартфона ZTE Blade A5 2020
Ответить

Добавить комментарий
Имя *
Email *
Сайт
Комментарий


![]()


Сохранить моё имя, email и адрес сайта в этом браузере для последующих моих комментариев.
- Добавить инструкцию
- Заказать инструкцию
Для ознакомления с инструкцией необходимо нажать на ссылку «ЗАГРУЗИТЬ», чтобы скачать pdf файл. Если есть кнопка «ПРОСМОТР», то можно просто посмотреть документ онлайн.
Для удобства, Вы можете сохранить данную страницу с файлом руководства по эксплуатации в свой список «избранное» прямо на сайте (доступно для зарегистрированных пользователей).
Смотрите инструкцию для похожих моделей:

Вы можете задать вопрос посетителям сайта по модели ZTE Blade A5. Если Вы являетесь её пользователем, то пожалуйста оставьте, по возможности развёрнутый отзыв:
Главная > Телефония > Смартфон ZTE Blade A5
ZTE Blade A5 отзывы, характеристики и servise-manual
| Устройство: | Формат: | Размер: | Язык: | Скачать: |
| Смартфон A5 (работает под управлением Android 4.4) | 1.45 MB | русский |  |
ZTE Blade A5 характеристики
| Сети: | UMTS 900, 2100 GSM 900, 1800, 1900 |
| Интернет: | HSDPA 7.2 Мбит/с, HSUPA 5.76 Мбит/с, EDGE |
| Wi-Fi: | b/g/n, 2.4 ГГц |
| Экран: | TFT, 4″, 480×800, сенсорный, ёмкостный, мультитач |
| ОС: | Android 4.4 KitKat |
| Железо: | 1.2 ГГц, Spreadtrum SC7731, 4 ядра Cortex A7, Mali-400 MP2 |
| Память: | RAM 512 МБ, ROM 4 ГБ, Micro-SD до 32 ГБ |
| Аккумулятор: | Li-Ion, 1400 мАч |
| Масса: | 121 грамм |
| Размеры: | 124 x 64 x 11 мм |
| Фото: | 3.1 МП, вспышка, автофокуса нет фронтальная: 1.9 МП |
| Радио: | есть |
| Bluetooth: | v2.1, A2DP |
| Навигация: | GPS, A-GPS |
| Sim-карты: | 2, Micro-SIM + Mini-SIM |
| Фонарик | есть |
Смартфон ZTE Blade A5 обзор (самый полный)
Смартфон ZTE Blade A5 отзывы покупателей
Преимущества:
- дешевый вариант;
- есть две камеры;
- датчик приближения;
- две сим карты;
- удобно лежит в руке;
- приятный дизайн.
Недостатки:
- хлипкий разъем USB;
- слабая батарея;
- не прочный корпус, скрипит и люфтит;
- очень слабый микрофон;
- оба динамика слабые;
- часто тормозит тач скрин;
- плохая связь;
- фотографии с низким расширением;
- не корректно показывает проценты заряда аккумулятора;
- аппарат часто сам выключается.
Отзывы владельцев составлены на базе 29 отзывов пользователей в Яндекс Маркет.
Руководство пользователя. Как скачать руководство по эксплуатации?
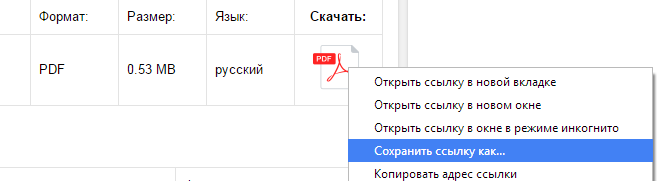
Сервис-мануал легко скачивается, в начале страницы перед Вами будет таблица:

Нажимайте правой кнопкой на изображении PDF, после чего ищите в списке «Сохранить как», далее сохраняете на Вашем ПК мобильный телефон ЗТЕ Блейд А5 инструкция на русском языке, например:
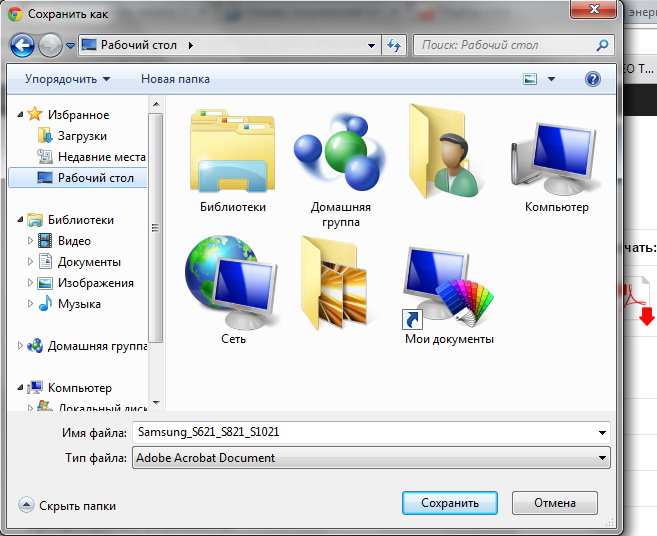
И последний шаг, выбираете папку, в которой желаете сохранить смартфон ZTE A5 инструкция по применению, например на рабочем столе:
Надеемся, у Вас получилось найти мануал для мобильника ZTE, скачать и успешно ею воспользоваться. Желаем Вам приятного пользования Вашим устройством от компании ZTE.
Посмотреть инструкция для ZTE Blade A5 2019 бесплатно. Руководство относится к категории телефоны, 1 человек(а) дали ему среднюю оценку 7.5. Руководство доступно на следующих языках: английский. У вас есть вопрос о ZTE Blade A5 2019 или вам нужна помощь? Задайте свой вопрос здесь
Не можете найти ответ на свой вопрос в руководстве? Вы можете найти ответ на свой вопрос ниже, в разделе часто задаваемых вопросов о ZTE Blade A5 2019.
Какая операционная система в ZTE Blade A5 2019 используется?
Какой вес ZTE Blade A5 2019?
Какой размер экрана ZTE Blade A5 2019?
Какая высота ZTE Blade A5 2019?
Какое разрешение экрана дисплея ZTE Blade A5 2019?
Какая ширина ZTE Blade A5 2019?
Какая толщина ZTE Blade A5 2019?
Какой тип USB-подключения ZTE Blade A5 2019 имеет?
Какой объем памяти ZTE Blade A5 2019 имеет?
Инструкция ZTE Blade A5 2019 доступно в русский?
Не нашли свой вопрос? Задайте свой вопрос здесь