-
Драйверы
10
-
Инструкции по эксплуатации
5
Языки:

Lexmark MX421 инструкция по эксплуатации
(263 страницы)
- Языки:Русский
-
Тип:
PDF -
Размер:
14.88 MB
Просмотр

Lexmark MX421 инструкция по эксплуатации
(262 страницы)
- Языки:Английский, Итальянский, Немецкий, Французский
-
Тип:
PDF -
Размер:
14.32 MB
Просмотр

Lexmark MX421 инструкция по эксплуатации
(256 страниц)
- Языки:Английский, Испанский, Итальянский, Французский
-
Тип:
PDF -
Размер:
14.34 MB
Просмотр

Lexmark MX421 инструкция по эксплуатации
(124 страницы)
- Языки:Английский
-
Тип:
PDF -
Размер:
2.51 MB
Просмотр

Lexmark MX421 инструкция по эксплуатации
(29 страниц)
- Языки:Английский
-
Тип:
PDF -
Размер:
432.52 KB
Просмотр
На NoDevice можно скачать инструкцию по эксплуатации для Lexmark MX421. Руководство пользователя необходимо для ознакомления с правилами установки и эксплуатации Lexmark MX421. Инструкции по использованию помогут правильно настроить Lexmark MX421, исправить ошибки и выявить неполадки.
- Manuals
- Brands
- Lexmark Manuals
- All in One Printer
- MX421
Manuals and User Guides for Lexmark MX421. We have 4 Lexmark MX421 manuals available for free PDF download: Service Manual, User Manual, Quick Reference

Lexmark MX421 Service Manual (408 pages)
Brand: Lexmark
|
Category: All in One Printer
|
Size: 61.59 MB
Table of Contents
-
Product Information
2
-
Edition Notice
2
-
October
2
-
Table of Contents
3
-
-
Notices, Conventions, and Safety Information
11
-
Laser Notice
11
-
Conventions
14
-
Safety Information
15
-
General Caution Statements
20
-
-
Change History
21
-
General Information
23
-
Printer Model Configurations
23
-
Finding the Serial Number
24
-
Supported Paper Sizes, Types, and Weights
24
-
Supported Paper Sizes
24
-
Supported Paper Types
26
-
Supported Paper Weights
27
-
-
Tools Required for Service
27
-
-
Diagnostics and Troubleshooting
29
-
Troubleshooting Overview
29
-
Performing the Initial Troubleshooting Check
29
-
Using Safe Mode
29
-
-
Fixing Print Quality Issues
30
-
Initial Print Quality Check
31
-
Gray Background or Toner Fog Check
31
-
Blank Pages Check
34
-
Print Is too Dark Check
40
-
Print Is too Light Check
42
-
Paper Curl Check
45
-
Folded or Wrinkled Paper Check
46
-
Solid Black Pages Check
47
-
Repeating Defects Check
50
-
Skewed Print Check
51
-
Streaked Vertical Lines Appear on Prints Check
53
-
Horizontal Light Bands Check
54
-
Vertical Light Bands Check
55
-
Vertical Dark Bands Check
56
-
Vertical Dark Streaks with Print Missing Check
58
-
White Streaks and Voided Areas Check
60
-
Fine Lines Are Not Printed Correctly (Specifically Chinese Characters) Check
63
-
Clipped Pages or Images Check
64
-
Compressed Images Appear on Prints Check
66
-
Incorrect Margins on Prints Check
67
-
Toner Rubs off Check
68
-
Toner Specks Appear on Prints Check
69
-
-
Paper Jams
71
-
Avoiding Jams
71
-
Identifying Jam Locations
72
-
Paper Jam in Door a
73
-
Paper Jam in the Rear Door
77
-
Paper Jam in the Standard bin
78
-
Paper Jam in the Duplex Unit
79
-
Paper Jam in Trays
80
-
Paper Jam in the Multipurpose Feeder
80
-
Paper Jam in the Automatic Document Feeder
81
-
200 Paper Jams
82
-
202-221 Paper Jams
93
-
230 Paper Jams
97
-
240-241 Paper Jams
101
-
242-244 Paper Jams
103
-
280 Paper Jams
109
-
281 Paper Jams
113
-
284 Paper Jams
116
-
29Y Paper Jams
119
-
-
User Attendance Messages (0-99.99)
121
-
User Attendance Messages
121
-
Unsupported or Unresponsive Toner Cartridge Service Check
122
-
Unsupported or Unresponsive Imaging Unit Service Check
124
-
Mismatched Supplies Error Service Check
125
-
Maintenance Kit Low Service Check
125
-
-
Printer Hardware Errors
126
-
111 Errors
126
-
Errors
127
-
126 Errors
133
-
128 Errors
135
-
133 Errors
138
-
140 Errors
139
-
155 Errors
140
-
16Y Errors
142
-
171 Errors
146
-
6Yy Errors
147
-
Procedure before Starting the 9Yy Service Checks
149
-
900 Errors
151
-
-
Adf/Scanner Hardware Errors
156
-
84Y Errors
156
-
-
Other Symptoms
158
-
Fax Symptoms
158
-
-
-
Service Menus
169
-
Understanding the Printer Control Panel
169
-
Using the Printer Control Panel
169
-
Understanding the Status of the Power Button and Indicator Light
170
-
Using the Home Screen
171
-
-
Diagnostics Menu
172
-
Entering the Diagnostics Menu
172
-
Reports
172
-
Advanced Print Quality Samples
172
-
Format Fax Storage
173
-
Event Log
173
-
Input Tray Quick Print
174
-
Output bin Quick Feed
174
-
Printer Setup
174
-
Printer Diagnostics and Adjustments
176
-
Scanner Diagnostics
177
-
Additional Input Tray Diagnostics
179
-
-
Configuration Menu
180
-
Service Engineer Menu
183
-
Entering Invalid Engine Mode
183
-
Entering the Service Engineer (SE) Menu
184
-
General SE
184
-
Network SE
184
-
-
-
Parts Removal
185
-
Removal Precautions
185
-
Data Security Notice
185
-
Handling ESD-Sensitive Parts
186
-
Controller Board/Control Panel Replacement
187
-
Restoring the Printer Configuration after Replacing the Controller Board
187
-
Restoring Solutions, Licenses, and Configuration Settings
190
-
Updating the Printer Firmware
191
-
Backing up Esf Solutions and Settings
192
-
Disconnecting Ribbon Cables
193
-
Ribbon Cable Connectors
193
-
Zero Insertion Force (ZIF) Connectors
193
-
Horizontal Top Contact Connector
194
-
Horizontal Bottom Contact Connector
197
-
Vertical Mount Contact Connector
200
-
Horizontal Sliding Contact Connector
203
-
Low Insertion Force (LIF) Connector
206
-
-
Printhead Assembly Adjustment
207
-
-
Removal Procedures
209
-
Left Side Removals
209
-
Left Cover Removal
209
-
Main Drive Gearbox Removal
211
-
MPF Gearbox Removal
212
-
Fuser Actuator Removal
215
-
Reverse Solenoid Removal
216
-
MPF Solenoid Removal
219
-
Cartridge Gearbox Removal
220
-
Pick Roller Clutch Removal
221
-
-
Right Side Removals
223
-
Right Cover Removal
223
-
Interconnect Cable Removal
225
-
Sensor (Tray Present) Removal
227
-
Cooling Fan Removal
227
-
Controller Board Removal
230
-
Toner Cartridge Smart Chip Contact Removal
233
-
Cartridge Barrel Shutter Sensor Kit Removal
236
-
-
Front Removals
239
-
Nameplate Removal
239
-
Top Access Cover Removal
240
-
Bezel (MX321) Removal
241
-
Numeric Keypad Cover (MX321) Removal
241
-
Numeric Keypad Cover (MX421, MX521, and MX522) Removal
242
-
Speaker (MX321) Removal
242
-
Speaker (MX421, MX521, and MX522) Removal
243
-
Control Panel Assembly (MX321) Removal
245
-
Control Panel Assembly (MX421, MX521, and MX522) Removal
246
-
Control Panel (MX321) Cover and Board Removal
247
-
Control Panel (MX421, MX521, and MX522) Cover and Board Removal
248
-
Scanner Front Cover Removal
249
-
Transfer Roller Removal
250
-
Jam Access Cover Removal
250
-
Sensor (Front Door) Removal
251
-
MPF Pick Roller and Separator Pad Removal
253
-
MPF with Front Access Cover Removal
256
-
Sensor (MPF Paper Present) Removal
257
-
Front Input Guide Removal
258
-
Front USB Port Removal
258
-
-
Bottom Removals
260
-
Power Supply Removal
260
-
Duplex Assembly Removal
262
-
Sensors (Duplex and Input) Removal
264
-
Sensor (Toner Density) Removal
265
-
Sensor (Trailing Edge) Removal
267
-
Pick Roller Assembly Removal
268
-
-
Rear Side Removals
272
-
Scanner Rear Covers Removal
272
-
Rear Door and Cover Removal
273
-
Sensor (bin Full) Removal
273
-
Redrive Assembly Removal
274
-
Fuser Removal
275
-
Redrive Gear Assembly Removal
275
-
-
Top Side Removals
276
-
Top Cover Removal
276
-
Printhead Removal
279
-
-
Adf/Scanner Removals
282
-
ADF Restraint Pad Removal
282
-
ADF Tray Removal
283
-
Scanner Assembly Removal
283
-
ADF Assembly Removal
285
-
ADF Hinge Removal
286
-
ADF Access Door Removal
288
-
ADF Roller Removal
289
-
Flatbed Scanner Removal
291
-
ADF Flat Cable Removal
293
-
ADF Cable Removal
296
-
-
Optional 250/550-Sheet Tray Removals
300
-
Separator Roller Assembly Removal
300
-
-
-
Component Locations
303
-
Printer Configurations
303
-
Attaching Cables
304
-
Printer Roller Locations
307
-
Printer Sensor Locations
309
-
Controller Board Connectors
310
-
-
Maintenance
315
-
Inspection Guide
315
-
Scheduled Maintenance
315
-
Maintenance Kits
315
-
Resetting the Maintenance Counter
316
-
-
Lubrication Specification
316
-
Cleaning the Printer
317
-
Cleaning the Scanner
317
-
Cleaning the Printhead Lenses
320
-
-
-
Parts Catalog
322
-
Legend
322
-
Assembly 1: Covers
323
-
Assembly 2: Control Panel (MX421, MX521, and MX522)
325
-
Assembly 3: Control Panel (MX321)
327
-
Assembly 4: Electronics 1
329
-
Assembly 5: Electronics 2
333
-
Assembly 6: Electronics 3
335
-
Assembly 7: Electronics 4
337
-
Assembly 8: Paper Transport 1
339
-
Assembly 9: Paper Transport 2
341
-
Assembly 10: MPF and Standard Tray
343
-
Assembly 11: Optional Trays
345
-
Assembly 12: Imaging (MX321, MX421, and MX521) 1
347
-
Assembly 13: Imaging (MX321, MX421, and MX521) 2
351
-
Assembly 14: Imaging (MX522)
355
-
Assembly 15: Fax Card and Hard Disk
357
-
Assembly 16: Maintenance Kits (MX522, MX521, and MB2546)
359
-
Assembly 17: Miscellaneous
361
-
-
Printer Specifications
363
-
Power Consumption
363
-
Product Power Consumption
363
-
Sleep Mode
363
-
Hibernate Mode
364
-
Off Mode
364
-
Total Energy Usage
364
-
-
Selecting a Location for the Printer
364
-
Noise Emission Levels
365
-
Temperature Information
366
-
-
Options and Features
367
-
Available Internal Options
367
-
Input/Output Configurations and Capacities
367
-
-
Theory of Operation
369
-
POR Sequence
369
-
Printer Control
369
-
Print Cycle Operation
369
-
Print Engine Layout
369
-
Print Cycle
370
-
-
Printer Operation
376
-
Printer Sections
376
-
Printer Paper Path
377
-
Printer Paper Path Sensors
379
-
Main Drive
380
-
Tray Drive
381
-
-
ADF and Scanner Operation
382
-
Flatbed Scanner Drive
382
-
ADF Paper Path
383
-
ADF Paper Path Sensors
384
-
-
-
Acronyms
387
-
Index
389
-
Part Number Index
395
-
Part Name Index
401
Advertisement
Lexmark MX421 User Manual (267 pages)
Brand: Lexmark
|
Category: All in One Printer
|
Size: 15.15 MB
Table of Contents
-
Table of Contents
2
-
Safety Information
7
-
Conventions
7
-
Product Statements
7
-
Learning about the Printer
10
-
Finding Information about the Printer
10
-
Selecting a Location for the Printer
11
-
Printer Configurations
13
-
Attaching Cables
14
-
Using the Control Panel
15
-
Understanding the Status of the Power Button and Indicator Light
15
-
Using the Home Screen
16
-
Printing the Network Setup Page
16
-
Setting up and Using the Home Screen Applications
17
-
Customizing the Home Screen
17
-
Supported Applications
17
-
Setting up Card Copy
17
-
Creating a Shortcut
18
-
Using Display Customization
18
-
Configuring Eco-Settings
19
-
Using Customer Support
19
-
Using QR Code Generator
19
-
Setting up Scan Center
20
-
Setting up Device Quotas
20
-
Creating a Cloud Connector Profile
20
-
Managing Bookmarks
21
-
Managing Contacts
22
-
Setting up and Using the Accessibility Features
24
-
Activating Voice Guidance
24
-
Navigating the Screen Using Gestures
24
-
Enabling Magnification Mode
25
-
Adjusting the Voice Guidance Speech Rate
25
-
Using the Keyboard on the Display
25
-
Enabling Spoken Passwords or Personal Identification Numbers
25
-
Loading Paper and Specialty Media
26
-
Setting the Paper Size and Type
26
-
Configuring Universal Paper Settings
26
-
Loading Trays
26
-
Loading the Multipurpose Feeder
28
-
Linking Trays
29
-
Paper Support
30
-
Supported Paper Sizes
30
-
Supported Paper Types
32
-
Supported Paper Weights
33
-
Printing
34
-
Printing from a Computer
34
-
Printing from a Mobile Device
34
-
Printing from a Flash Drive
36
-
Supported Flash Drives and File Types
37
-
Configuring Confidential Jobs
38
-
Printing Confidential and Other Held Jobs
38
-
Printing from a Cloud Connector Profile
39
-
Printing a Font Sample List
39
-
Printing a Directory List
39
-
Canceling a Print Job
39
-
Copying
41
-
Using the Automatic Document Feeder and Scanner Glass
41
-
Making Copies
41
-
Copying Photos
41
-
Copying on Letterhead
42
-
Copying on both Sides of the Paper
42
-
Reducing or Enlarging Copies
42
-
Collating Copies
42
-
Placing Separator Sheets between Copies
42
-
Copying Multiple Pages Onto a Single Sheet
43
-
Creating a Copy Shortcut
43
-
E-Mailing
44
-
Using the Automatic Document Feeder and Scanner Glass
44
-
Configuring the E-Mail Server Settings
44
-
Sending an E-Mail
45
-
Creating an E-Mail Shortcut
45
-
Faxing
46
-
Setting up the Printer to Fax
46
-
Using the Automatic Document Feeder and Scanner Glass
54
-
Sending a Fax
54
-
Scheduling a Fax
55
-
Creating a Fax Destination Shortcut
55
-
Changing the Fax Resolution
55
-
Adjusting the Fax Darkness
56
-
Printing a Fax Log
56
-
Blocking Junk Faxes
56
-
Holding Faxes
56
-
Forwarding a Fax
56
-
Scanning
57
-
Using the Automatic Document Feeder and Scanner Glass
57
-
Scanning to a Computer
57
-
Creating an FTP Shortcut
58
-
Scanning to an FTP Server
58
-
Scanning to a Flash Drive
59
-
Sending Scanned Documents to a Computer
60
-
Scanning to a Cloud Connector Profile
60
-
Understanding the Printer Menus
61
-
Menu Map
61
-
Device
62
-
Print
75
-
Paper
83
-
Copy
86
-
Fax
89
-
E-Mail
102
-
Ftp
108
-
USB Drive
113
-
Network/Ports
118
-
Security
131
-
Reports
138
-
Help
140
-
Troubleshooting
140
-
Printing the Menu Settings Page
140
-
Securing the Printer
141
-
Locating the Security Slot
141
-
Erasing Printer Memory
141
-
Erasing Printer Hard Disk Memory
141
-
Encrypting the Printer Hard Disk
142
-
Restoring Factory Default Settings
142
-
Statement of Volatility
142
-
Maintaining the Printer
144
-
Adjusting the Speaker Volume
144
-
Networking
144
-
Cleaning Printer Parts
147
-
Ordering Parts and Supplies
151
-
Replacing Parts and Supplies
155
-
Moving the Printer
167
-
Saving Energy and Paper
168
-
Recycling
169
-
Clearing Jams
170
-
Avoiding Jams
170
-
Identifying Jam Locations
171
-
Paper Jam in Door a
172
-
Paper Jam in the Rear Door
176
-
Paper Jam in the Standard bin
177
-
Paper Jam in the Duplex Unit
177
-
Paper Jam in Trays
178
-
Paper Jam in the Multipurpose Feeder
179
-
Paper Jam in the Automatic Document Feeder
180
-
Troubleshooting
182
-
Network Connection Problems
182
-
Hardware Options Problems
184
-
Issues with Supplies
186
-
Paper Feed Problems
187
-
Printing Problems
190
-
Faxing Problems
219
-
Scanning Problems
222
-
Contacting Customer Support
226
-
Upgrading and Migrating
227
-
Hardware
227
-
Software
241
-
Firmware
242
-
Notices
244
-
Index
261
Lexmark MX421 User Manual (262 pages)
Brand: Lexmark
|
Category: All in One Printer
|
Size: 15.02 MB
Table of Contents
-
Table of Contents
2
-
Safety Information
7
-
Conventions
7
-
Product Statements
7
-
Learning about the Printer
10
-
Finding Information about the Printer
10
-
Selecting a Location for the Printer
11
-
Printer Configurations
13
-
Attaching Cables
14
-
Using the Control Panel
15
-
Understanding the Status of the Power Button and Indicator Light
15
-
Setting up and Using the Home Screen Applications
16
-
Using the Home Screen
16
-
Customizing the Home Screen
17
-
Setting up Card Copy
17
-
Creating a Shortcut
17
-
Using Display Customization
18
-
Configuring Eco-Settings
18
-
Using Customer Support
19
-
Using QR Code Generator
19
-
Setting up Scan Center
19
-
Setting up Device Quotas
19
-
Creating a Cloud Connector Profile
20
-
Managing Bookmarks
20
-
Managing Contacts
21
-
Setting up and Using the Accessibility Features
24
-
Enabling Magnification Mode
24
-
Activating Voice Guidance
24
-
Navigating the Screen Using Gestures
24
-
Adjusting the Voice Guidance Speech Rate
25
-
Using the Keyboard on the Display
25
-
Enabling Spoken Passwords or Personal Identification Numbers
25
-
Loading Paper and Specialty Media
26
-
Setting the Size and Type of the Specialty Media
26
-
Configuring Universal Paper Settings
26
-
Loading Trays
26
-
Loading the Multipurpose Feeder
28
-
Linking Trays
29
-
Paper Support
30
-
Supported Paper Sizes
30
-
Supported Paper Types
32
-
Supported Paper Weights
33
-
Printing
34
-
Printing from a Computer
34
-
Printing from a Mobile Device
34
-
Printing from a Flash Drive
35
-
Supported Flash Drives and File Types
36
-
Configuring Confidential Jobs
37
-
Printing Confidential and Other Held Jobs
37
-
Printing from a Cloud Connector Profile
38
-
Printing a Font Sample List
38
-
Printing a Directory List
38
-
Canceling a Print Job
39
-
Copying
40
-
Using the Automatic Document Feeder and Scanner Glass
40
-
Making Copies
40
-
Copying Photos
40
-
Copying on Letterhead
41
-
Copying on both Sides of the Paper (Two-Sided)
41
-
Reducing or Enlarging Copies
41
-
Collating Copies
41
-
Placing Separator Sheets between Copies
41
-
Copying Multiple Pages Onto a Single Sheet
42
-
Creating a Copy Shortcut
42
-
E-Mailing
43
-
Using the Automatic Document Feeder and Scanner Glass
43
-
Setting up the E-Mail Function
43
-
Configuring E-Mail Settings
43
-
Sending an E-Mail
44
-
Creating an E-Mail Shortcut
44
-
Faxing
45
-
Setting up the Printer to Fax
45
-
Using the Automatic Document Feeder and Scanner Glass
51
-
Sending a Fax
51
-
Scheduling a Fax
52
-
Creating a Fax Destination Shortcut
52
-
Changing the Fax Resolution
53
-
Adjusting the Fax Darkness
53
-
Viewing a Fax Log
53
-
Blocking Junk Faxes
53
-
Holding Faxes
53
-
Forwarding a Fax
53
-
Scanning
55
-
Using the Automatic Document Feeder and Scanner Glass
55
-
Scanning to an FTP Server
55
-
Creating an FTP Shortcut
55
-
Scanning to a Flash Drive
56
-
Sending Scanned Documents to a Computer
57
-
Scanning to a Cloud Connector Profile
57
-
Understanding the Printer Menus
58
-
Menu Map
58
-
Device
59
-
Print
70
-
Paper
79
-
Copy
81
-
Fax
85
-
E-Mail
98
-
Ftp
105
-
USB Drive
110
-
Network/Ports
116
-
Security
129
-
Reports
137
-
Help
138
-
Troubleshooting
138
-
Printing the Menu Settings Page
138
-
Securing the Printer
139
-
Locating the Security Slot
139
-
Erasing Printer Memory
139
-
Erasing Printer Hard Disk Memory
139
-
Encrypting the Printer Hard Disk
140
-
Restoring Factory Default Settings
140
-
Statement of Volatility
140
-
Maintaining the Printer
142
-
Adjusting the Speaker Volume
142
-
Networking
143
-
Cleaning Printer Parts
145
-
Ordering Parts and Supplies
148
-
Replacing Parts and Supplies
152
-
Moving the Printer
164
-
Saving Energy and Paper
165
-
Recycling
166
-
Clearing Jams
168
-
Avoiding Jams
168
-
Identifying Jam Locations
169
-
Paper Jam in Door a
170
-
Paper Jam in the Rear Door
174
-
Paper Jam in the Standard bin
175
-
Paper Jam in the Duplex Unit
175
-
Paper Jam in Trays
176
-
Paper Jam in the Multipurpose Feeder
177
-
Paper Jam in the Automatic Document Feeder
178
-
Troubleshooting
180
-
Network Connection Problems
180
-
Hardware Options Problems
182
-
Issues with Supplies
184
-
Paper Feed Problems
185
-
Printing Problems
188
-
Faxing Problems
216
-
Scanning Problems
219
-
Contacting Customer Support
223
-
Upgrading and Migrating
224
-
Hardware
224
-
Software
238
-
Firmware
238
-
Notices
240
-
Index
256
Advertisement
Lexmark MX421 Quick Reference (26 pages)
Brand: Lexmark
|
Category: Printer
|
Size: 7.72 MB
Table of Contents
-
Sending an Email
4
-
Using the Control Panel
4
-
Using a Shortcut Number
4
-
Scanning to a Computer
5
-
Setting up the Printer to Fax
5
-
Sending a Fax
6
-
Printing from a Computer
6
-
Printing from a Mobile Device
6
-
Printing Confidential and Other Held Jobs
6
-
Maintaining the Printer
7
-
Cleaning the Scanner
8
-
Loading the 550-Sheet Tray
9
-
Loading the 2100-Sheet Tray
11
-
Loading the Multipurpose Feeder
13
-
Setting the Size and Type of the Specialty Media
13
-
Installing the Printer Software
13
-
Installing the Fax Driver
13
-
Updating Firmware
14
-
Configuring Wi-Fi Direct
14
-
Connecting the Printer to a Wi-Fi Network
15
-
Clearing Jams
15
-
Avoiding Jams
15
-
Connecting a Computer to the Printer
15
-
Identifying Jam Locations
16
-
Paper Jam in Trays
16
-
Paper Jam in Door a
17
-
Paper Jam in Door C
18
-
Paper Jam in the Standard bin
18
-
Paper Jam in the Multipurpose Feeder
19
-
Paper Jam in the Automatic Document Feeder
19
-
Paper Jam in the 4-Bin Mailbox
20
-
Paper Jam in the Staple, Hole Punch Finisher
21
-
Staple Jam in the Staple Finisher
22
-
Staple Jam in the Staple, Hole Punch Finisher
23
Advertisement
Related Products
-
Lexmark MX410de
-
Lexmark MX421ade
-
Lexmark MX417
-
Lexmark MX431
-
Lexmark MX431adn
-
Lexmark MX431adw
-
Lexmark MX431dn
-
Lexmark MX432
-
Lexmark MX912
-
Lexmark MX511dte
Lexmark Categories
![]()
Printer
![]()
All in One Printer
Printer Accessories
Software
Print Server
More Lexmark Manuals
|
Код: 129357 Извините, товара сейчас нет в наличии
Бесплатная доставка
Извините, товара сейчас нет в наличии Сравнить Новости интернет-магазина «Лаукар»:28.03.2023 22.02.2023 13.02.2023 Дополнительная информация в категории МФУ:Принтеры и МФУ — особенности и термины Таблица Авторизованных сервисных центров по брендам. Описание Инструкция Отзывы (0) В интернет-магазине бытовой техники «Лаукар» Вы можете скачать инструкцию к товару МФУ Lexmark MX421ade совершенно бесплатно. Все инструкции, представленные на сайте интернет-магазина бытовой техники «Лаукар», предоставляются производителем товара. Для того чтобы скачать инструкцию, Вам необходимо нажать на ссылку «скачать инструкцию», расположенную ниже, а в случае, если ссылки нет, Скачать инструкцию Смотреть инструкцию
Фирма-производитель оставляет за собой право на внесение изменений в конструкцию, дизайн и комплектацию товара: МФУ Lexmark MX421ade. Пожалуйста, сверяйте информацию о товаре с информацией на |


инструкцияLexmark MX421ade

MB2442, MB2546, MX421, MX521,
MX522, XM1242, XM1246 MFPs
User’s Guide
September 2018 www.lexmark.com
Machine type(s):
7017
Models:
476, 478, 496, 636, 676, 678, 679, 686
Посмотреть инструкция для Lexmark MX421ade бесплатно. Руководство относится к категории принтеры, 1 человек(а) дали ему среднюю оценку 7. Руководство доступно на следующих языках: английский. У вас есть вопрос о Lexmark MX421ade или вам нужна помощь? Задайте свой вопрос здесь
- Contents
- Safety information
- Learning about the printer
- Setting up and using the home screen applications
- Setting up and using the accessibility features
- Loading paper and specialty media
- Paper support
- Printing
- Copying
- E-mailing
- Faxing
- Scanning
- Understanding the printer menus
- Securing the printer
- Maintaining the printer
- Clearing jams
- Troubleshooting
- Upgrading and migrating
- Notices
- Index

Главная
| Lexmark | |
| MX421ade | 36S0700 | |
| принтер | |
| 0734646636087 | |
| английский | |
| Руководство пользователя (PDF) |
Печать
| Технология печати | Лазерная |
| Печать | Черно-белая печать |
| Скорость печати (ч/б, обычное кач., A4/US Letter) | 40 ppm |
| Максимальное разрешение | 1200 x 1200 DPI |
| Скорость двусторонней печати (цвет, обычное качество, A4/US Letter) | 20 ppm |
| Поля печати (верхняя, нижняя, правая, левая) | 4 mm |
| Время выхода первой страницы (ч/б, норм. качество) | 6.25 s |
| Двусторонняя печать | Да |
Копирование
| Копирование | Черно-белое копирование |
| Максимальное разрешение копирования | — DPI |
| Скорость копирования (обычное кач., ч/б, A4) | 40 cpm |
| Масштабирование копии | 25 — 400 % |
| Время выхода первой копии (черный, норм. качество) | 6.25 s |
| Скорость двустороннего копирования (ч/б, Letter) | 20 ppm |
Сканирование
| Сканирование | цветное сканирование |
| Разрешение оптического сканирования | 1200 x 600 DPI |
| Разрешение оптического сканирования (ч/б) | 1200 x 600 ppi |
| Разрешение оптического сканирования (цвет.) | 600 x 600 ppi |
| Максимальная область сканирования | 215.9 x 355.6 mm |
| Тип сканера | Планшетный сканер с автоматической подачей документов |
| Сканировать в | E-mail, FTP, Image, USB |
| Скорость сканирования (цвет.) | 22 ppm |
| Скорость сканирования (ч/б) | 45 ppm |
| Скорость дуплекс сканирования (цвет.) | 10.5 ppm |
| Дуплексная скорость сканирования (ч/б) | 20 ppm |
| Поддерживаемые форматы изображения | JPEG, JPG, TIFF |
| Подерживаемые форматы документов | PDF, XPS |
| Технология сканирования | CIS |
Факс
| Факс | Черно-белый |
| Разрешение факса (ч/б) | 400 x 400 DPI |
| Скорость передачи факса | 3 с/стор |
| Скорость модема | 33.6 кбит/с |
Свойства
| Максимальный рабочий цикл | 10000 стр/мес |
| Цифровой передатчик | — |
| Рекомендуемый рабочий цикл | 1000 — 10000 стр/мес |
| Языки описания страницы | Microsoft XPS, PCL 5e, PCL 6, PDF 1.7, PPDS, PostScript 3 |
| Шрифты принтера | Bitmap, PCL, PostScript, PPDS, Scalable |
| PostScript шрифты | 91 |
| PCL шрифты | 84 |
| Растровые шрифты | OCR-A, OCR-B |
| Количество шрифтов PPDS | 5 |
| Количество растровых шрифтов | 7 |
| Количество масштабируемых шрифтов | 39 |
Дизайн
| Позиционирование на рынке | Бизнес |
| Цвет товара | Black, Grey |
| Встроенный экран | Да |
| Цветной дисплей | Да |
| Диагональ экрана | 4.3 « |
| Сенсорный экран | Да |
| Тип управления | Сенсорный |
Прочие свойства
| Опция отделки | Нет |
| Поддерживаемые шрифты | Да |
| Паспорт безопасности | Да |
| CD с программным обеспечением | Да |
| Компакт-диск с документацией | Да |
Сеть
| Протоколы управления | DHCP, APIPA (AutoIP), BOOTP, RARP, mDNS, IGMP, WINS, DDNS, SNMPv3, SNMPv1, SNMPv2c, Telnet, NTP, ICMP, HTTP, DNS, ARP, HTTPs (SSL /TLS), Finger |
| Метод аутентификации | 802.1x |
| Wi-Fi | Нет |
| Подключение Ethernet | Да |
| Скорость передачи данных Ethernet LAN | 10,100,1000 Мбит/с |
| Алгоритмы шифрования данных | 802.1x RADIUS, LEAP, MD5, MSCHAPv2, PEAP, SSL/TLS, TTLS |
| Сетевые способы печати | LPR/LPD, Direct IP (Port 9100), Pull Printing, Microsoft Web Services WSD, Secure IP (Port 96xx), FTP, TFTP, Enhanced IP (Port 9400), ThinPrint .print integration, IPP 1.0, 1.1, 2.0 |
| Поддерживаемые сетевые протоколы (IPv4) | TCP/IP IPv4, AppleTalk, TCP, UDP |
| Поддерживаемые сетевые протоколы (IPv6) | TCP/IP IPv6, AppleTalk, TCP, UDP |
| Технологии мобильной печати | Apple AirPrint |
| Свивка кабеля | 10/100/1000Base-T(X) |
Входная и выходная емкость
| Общий объем подачи бумаги | 350 листов |
| Тип подачи бумаги | Лоток для бумаги |
| Маскимальная вместимость на входе | 900 листов |
| Емкость автоподатчика бумаги | 50 листов |
| Вместимость универсального лотка | 100 листов |
| Общее количество лотков подачи бумаги | 2 |
| Максимальное количество лотков подачи бумаги | 3 |
| Общий объем вывода бумаги | 150 листов |
| Максимальная вместимость выходного лотка | 150 листов |
| Вместимость автоматического устройства подачи документов | 50 листов |
| Многоцелевой лоток | Да |
| Автоподатчик (ADF) | Да |
Типы и характеристики бумаги
| Максимальный размер бумаги ISO A-формата | A4 |
| Типы материалов для печати | Card stock, Envelopes, Labels, Plain paper |
| ISO A-форматы (А0…А9) | A4, A5, A6 |
| JIS B-форматы (B0…B9) | B5 |
| Размеры конвертов | 7 3/4, 9,10, DL |
| Размеры бумаги не соответствующие стандарту ISO | Executive (184 x 267mm), Folio (media size), Legal (media size), Letter (media size), Oficio (media size), Statement (140 x 216mm), Universal |
| Вес лотка подачи материалов для печати | 60 — 120 g/m² |
Порты и интерфейсы
| Прямая печать | Да |
| Стандартные интерфейсы | Ethernet, USB 2.0 |
| Количество портов USB 2.0 | 2 |
| USB коннектор | USB Type-A / USB Type-B |
| USB порт | Да |
Производительность
| Встроенный кардридер | — |
| Количество ядер процессора | 2 |
| Тактовая частота процессора | 1000 MHz |
| Уровень звукового давления (копирование) | 55 dB |
| Уровень давления звука (печать) | 55 dB |
| Уровень звукового давления (сканирование) | 55 dB |
| Уровень звукового давления (дуплексная печать) | 54 dB |
| Встроенный процессор | Да |
Энергопитание
| Средняя потребляемая мощность (в рабочем режиме) | — W |
| Обычное потребление Энергии в соответствии с Energy Star | 1.6 кВт·ч/неделя |
| Потребляемая мощность при печати | 570 W |
| Потребляемая мощность при копировании | 590 W |
| Потребляемая мощность при сканировании | 17.5 W |
| Потребляемая мощность (режим готовности) | 11.5 W |
| Потребление энергии в спящем режиме | 2.1 W |
Системные требования
| Поддерживаемые операционные системы Windows | Да |
| Поддерживаемые операционные системы Mac | Да |
| Поддерживаемые операционные системы Linux | Да |
Устойчивость
| Сертификаты устойчивого развития | ENERGY STAR |
Сертификаты
| Сертификация | ICES-003 Class B, BSMI Class B, VCCI Class B, US FDA, UL 60950-1, FCC Class B, cUL CAN/CSA-C22.2 60950-1, NOM, CB EN/IEC 60950-1, CB EN/IEC 60825-1, CE DoC (EN 62301 Class B, EN 62311, CE EN/IEC 60950-1, CE EN/IEC 60825-1, EN 61000-3, EN 55022 Class B, EuP, EN 55024, UL), EFTA (CE), KCC, CCC, CECP, CEL, C-tick DoC, UL-AR, KC mark, UL GS mark, EC 1275, MET-I, ISO 532B, ECMA-370, TED, GOST-R, SII, TER |
Вес и размеры
| Ширина | 399 mm |
| Глубина | 429.5 mm |
| Высота | 467 mm |
| Вес | 19400 g |
Данные об упаковке
| Ширина упаковки | 484 mm |
| Глубина упаковки | 524 mm |
| Высота упаковки | 564 mm |
| Масса брутто | 22250 g |
Содержимое упаковки
| Картридж (и) включены | Да |
| Модуль формирования изображения в комплекте | Да |
| Шнур питания в комплекте | Да |
| Гарантийная карточка | Да |
| Поставляемые кабели | Phone |
Условия эксплуатации
| Диапазон относительной влажности при эксплуатации | 8 — 80 % |
| Диапазон температур при эксплуатации | 10 — 32 °C |
| Рабочая высота | 0 — 5000 m |
показать больше
Не можете найти ответ на свой вопрос в руководстве? Вы можете найти ответ на свой вопрос ниже, в разделе часто задаваемых вопросов о Lexmark MX421ade.
Не нашли свой вопрос? Задайте свой вопрос здесь
![]()
MB2442, MB2546, MX421, MX521,
MX522, XM1242, XM1246 MFPs
User’s Guide
|
September 2018 |
www.lexmark.com |
Machine type(s):
7017
Models:
476, 478, 496, 636, 676, 678, 679, 686

|
Contents |
|
|
Safety information…………………………………………………………………………….. |
7 |
|
Conventions……………………………………………………………………………………………………………………………………….. |
7 |
|
Product statements……………………………………………………………………………………………………………………………. |
7 |
|
Learning about the printer………………………………………………………………. |
10 |
|
Finding information about the printer…………………………………………………………………………………………….. |
10 |
|
Selecting a location for the printer………………………………………………………………………………………………….. |
11 |
|
Printer configurations………………………………………………………………………………………………………………………. |
13 |
|
Attaching cables………………………………………………………………………………………………………………………………. |
14 |
|
Using the control panel…………………………………………………………………………………………………………………… |
15 |
|
Understanding the status of the power button and indicator light………………………………………………. |
15 |
|
Setting up and using the home screen applications………………………… |
16 |
|
Using the home screen……………………………………………………………………………………………………………………. |
16 |
|
Customizing the home screen………………………………………………………………………………………………………… |
17 |
|
Setting up Card Copy………………………………………………………………………………………………………………………. |
17 |
|
Creating a shortcut…………………………………………………………………………………………………………………………… |
17 |
|
Using Display Customization…………………………………………………………………………………………………………… |
18 |
|
Configuring Eco Settings………………………………………………………………………………………………………………… |
18 |
|
Using Customer Support…………………………………………………………………………………………………………………. |
19 |
|
Using QR Code Generator………………………………………………………………………………………………………………. |
19 |
|
Setting up Scan Center……………………………………………………………………………………………………………………. |
19 |
|
Setting up Device Quotas……………………………………………………………………………………………………………….. |
19 |
|
Creating a Cloud Connector profile………………………………………………………………………………………………. |
20 |
|
Managing bookmarks…………………………………………………………………………………………………………………….. |
20 |
|
Managing contacts…………………………………………………………………………………………………………………………… |
21 |
|
Setting up and using the accessibility features………………………………. |
24 |
|
Enabling Magnification mode…………………………………………………………………………………………………………. |
24 |
|
Activating Voice Guidance……………………………………………………………………………………………………………… |
24 |
|
Navigating the screen using gestures…………………………………………………………………………………………… |
24 |
|
Adjusting the Voice Guidance speech rate…………………………………………………………………………………… |
25 |
|
Using the keyboard on the display………………………………………………………………………………………………… |
25 |
|
Enabling spoken passwords or personal identification numbers……………………………………………….. |
25 |
|
Loading paper and specialty media………………………………………………… |
26 |
|
Setting the size and type of the specialty media………………………………………………………………………….. |
26 |
|
Configuring Universal paper settings……………………………………………………………………………………………. |
26 |
|
Loading trays…………………………………………………………………………………………………………………………………… |
26 |
|
Loading the multipurpose feeder………………………………………………………………………………………………….. |
28 |
|
Linking trays…………………………………………………………………………………………………………………………………….. |
29 |
|
Paper support…………………………………………………………………………………. |
30 |
|
Supported paper sizes……………………………………………………………………………………………………………………. |
30 |
|
Supported paper types…………………………………………………………………………………………………………………… |
32 |
|
Supported paper weights……………………………………………………………………………………………………………….. |
33 |
|
Printing…………………………………………………………………………………………… |
34 |
|
Printing from a computer………………………………………………………………………………………………………………… |
34 |
|
Printing from a mobile device………………………………………………………………………………………………………… |
34 |
|
Printing from a flash drive………………………………………………………………………………………………………………. |
35 |
|
Supported flash drives and file types……………………………………………………………………………………………. |
36 |
|
Configuring confidential jobs…………………………………………………………………………………………………………. |
37 |
|
Printing confidential and other held jobs………………………………………………………………………………………. |
37 |
|
Printing from a Cloud Connector profile……………………………………………………………………………………….. |
38 |
|
Printing a font sample list……………………………………………………………………………………………………………….. |
38 |
|
Printing a directory list…………………………………………………………………………………………………………………….. |
38 |
|
Canceling a print job………………………………………………………………………………………………………………………. |
39 |
|
Copying………………………………………………………………………………………….. |
40 |
|
Using the automatic document feeder and scanner glass………………………………………………………….. |
40 |
|
Making copies…………………………………………………………………………………………………………………………………. |
40 |
|
Copying photos………………………………………………………………………………………………………………………………. |
40 |
|
Copying on letterhead…………………………………………………………………………………………………………………….. |
41 |
|
Copying on both sides of the paper (two sided)……………………………………………………………………………. |
41 |
|
Reducing or enlarging copies…………………………………………………………………………………………………………. |
41 |
|
Collating copies……………………………………………………………………………………………………………………………….. |
41 |
|
Placing separator sheets between copies…………………………………………………………………………………….. |
41 |
|
Copying multiple pages onto a single sheet………………………………………………………………………………… |
42 |
|
Creating a copy shortcut………………………………………………………………………………………………………………… |
42 |
|
E-mailing………………………………………………………………………………………… |
43 |
|
Using the automatic document feeder and scanner glass………………………………………………………….. |
43 |
|
Setting up the e mail function………………………………………………………………………………………………………… |
43 |
|
Configuring e mail settings…………………………………………………………………………………………………………….. |
43 |
|
Sending an e-mail……………………………………………………………………………………………………………………………. |
44 |
|
Creating an e-mail shortcut…………………………………………………………………………………………………………….. |
44 |
|
Faxing…………………………………………………………………………………………….. |
45 |
|
Setting up the printer to fax……………………………………………………………………………………………………………. |
45 |
|
Using the automatic document feeder and scanner glass…………………………………………………………… |
51 |
|
Sending a fax……………………………………………………………………………………………………………………………………. |
51 |
|
Scheduling a fax……………………………………………………………………………………………………………………………… |
52 |
|
Creating a fax destination shortcut……………………………………………………………………………………………….. |
52 |
|
Changing the fax resolution…………………………………………………………………………………………………………… |
53 |
|
Adjusting the fax darkness…………………………………………………………………………………………………………….. |
53 |
|
Viewing a fax log…………………………………………………………………………………………………………………………….. |
53 |
|
Blocking junk faxes…………………………………………………………………………………………………………………………. |
53 |
|
Holding faxes…………………………………………………………………………………………………………………………………… |
53 |
|
Forwarding a fax……………………………………………………………………………………………………………………………… |
53 |
|
Scanning………………………………………………………………………………………… |
55 |
|
Using the automatic document feeder and scanner glass………………………………………………………….. |
55 |
|
Scanning to an FTP server……………………………………………………………………………………………………………… |
55 |
|
Creating an FTP shortcut……………………………………………………………………………………………………………….. |
55 |
|
Scanning to a flash drive………………………………………………………………………………………………………………… |
56 |
|
Sending scanned documents to a computer………………………………………………………………………………… |
57 |
|
Scanning to a Cloud Connector profile…………………………………………………………………………………………. |
57 |
|
Understanding the printer menus…………………………………………………… |
58 |
|
Menu map……………………………………………………………………………………………………………………………………….. |
58 |
|
Device……………………………………………………………………………………………………………………………………………… |
59 |
|
Print………………………………………………………………………………………………………………………………………………….. |
70 |
|
Paper………………………………………………………………………………………………………………………………………………… |
79 |
|
Copy………………………………………………………………………………………………………………………………………………….. |
81 |
|
Fax……………………………………………………………………………………………………………………………………………………. |
85 |
|
E-mail……………………………………………………………………………………………………………………………………………….. |
98 |

|
Contents |
5 |
|
FTP………………………………………………………………………………………………………………………………………………….. |
105 |
|
USB Drive………………………………………………………………………………………………………………………………………… |
110 |
|
Network/Ports…………………………………………………………………………………………………………………………………. |
116 |
|
Security…………………………………………………………………………………………………………………………………………… |
129 |
|
Reports……………………………………………………………………………………………………………………………………………. |
137 |
|
Help………………………………………………………………………………………………………………………………………………… |
138 |
|
Troubleshooting…………………………………………………………………………………………………………………………….. |
138 |
|
Printing the Menu Settings Page………………………………………………………………………………………………….. |
138 |
|
Securing the printer………………………………………………………………………. |
139 |
|
Locating the security slot………………………………………………………………………………………………………………. |
139 |
|
Erasing printer memory…………………………………………………………………………………………………………………. |
139 |
|
Erasing printer hard disk memory………………………………………………………………………………………………… |
139 |
|
Encrypting the printer hard disk……………………………………………………………………………………………………. |
140 |
|
Restoring factory default settings…………………………………………………………………………………………………. |
140 |
|
Statement of Volatility……………………………………………………………………………………………………………………. |
140 |
|
Maintaining the printer………………………………………………………………….. |
142 |
|
Adjusting the speaker volume………………………………………………………………………………………………………. |
142 |
|
Networking…………………………………………………………………………………………………………………………………….. |
143 |
|
Cleaning printer parts……………………………………………………………………………………………………………………. |
145 |
|
Ordering parts and supplies…………………………………………………………………………………………………………. |
148 |
|
Replacing parts and supplies………………………………………………………………………………………………………… |
152 |
|
Moving the printer…………………………………………………………………………………………………………………………. |
164 |
|
Saving energy and paper……………………………………………………………………………………………………………… |
165 |
|
Recycling………………………………………………………………………………………………………………………………………… |
166 |
|
Clearing jams………………………………………………………………………………… |
168 |
|
Avoiding jams………………………………………………………………………………………………………………………………… |
168 |
|
Identifying jam locations……………………………………………………………………………………………………………….. |
169 |
|
Paper jam in door A……………………………………………………………………………………………………………………….. |
170 |
|
Paper jam in the rear door…………………………………………………………………………………………………………….. |
174 |
|
Paper jam in the standard bin……………………………………………………………………………………………………….. |
175 |
|
Paper jam in the duplex unit…………………………………………………………………………………………………………. |
175 |
|
Paper jam in trays…………………………………………………………………………………………………………………………… |
176 |
|
Paper jam in the multipurpose feeder………………………………………………………………………………………….. |
177 |
|
Paper jam in the automatic document feeder……………………………………………………………………………… |
178 |
|
Troubleshooting……………………………………………………………………………. |
180 |
|
Network connection problems……………………………………………………………………………………………………… |
180 |
|
Hardware options problems…………………………………………………………………………………………………………. |
182 |
|
Issues with supplies………………………………………………………………………………………………………………………. |
184 |
|
Paper feed problems…………………………………………………………………………………………………………………….. |
185 |
|
Printing problems…………………………………………………………………………………………………………………………… |
188 |
|
Faxing problems……………………………………………………………………………………………………………………………. |
216 |
|
Scanning problems……………………………………………………………………………………………………………………….. |
219 |
|
Contacting customer support………………………………………………………………………………………………………. |
223 |
|
Upgrading and migrating……………………………………………………………… |
224 |
|
Hardware………………………………………………………………………………………………………………………………………. |
224 |
|
Software………………………………………………………………………………………………………………………………………… |
238 |
|
Firmware………………………………………………………………………………………………………………………………………… |
238 |
|
Notices…………………………………………………………………………………………. |
240 |
|
Index……………………………………………………………………………………………. |
256 |
Safety information |
7 |
Safety information
Conventions
Note: A note identifies information that could help you.
Warning: A warning identifies something that could damage the product hardware or software.
CAUTION: A caution indicates a potentially hazardous situation that could injure you.
Different types of caution statements include:
 CAUTION—POTENTIAL INJURY: Indicates a risk of injury.
 CAUTION—SHOCK HAZARD: Indicates a risk of electrical shock.
 CAUTION—HOT SURFACE: Indicates a risk of burn if touched.
 CAUTION—TIPPING HAZARD: Indicates a crush hazard.
 CAUTION—PINCH HAZARD: Indicates a risk of being caught between moving parts.
Product statements
CAUTION—POTENTIAL INJURY: To avoid the risk of fire or electrical shock, connect the power cord to an appropriately rated and properly grounded electrical outlet that is near the product and easily accessible.
CAUTION—POTENTIAL INJURY: To avoid the risk of fire or electrical shock, use only the power cord provided with this product or the manufacturer’s authorized replacement.
CAUTION—POTENTIAL INJURY: Do not use this product with extension cords, multioutlet power strips, multioutlet extenders, or UPS devices. The power capacity of these types of accessories can be easily overloaded by a laser printer and may result in a risk of fire, property damage, or poor printer performance.
CAUTION—POTENTIAL INJURY: Only a Lexmark Inline Surge Protector that is properly connected between the printer and the power cord provided with the printer may be used with this product. The use of non-Lexmark surge protection devices may result in a risk of fire, property damage, or poor printer performance.
CAUTION—POTENTIAL INJURY: To reduce the risk of fire, use only a 26 AWG or larger telecommunications (RJ-11) cord when connecting this product to the public switched telephone network. For users in Australia, the cord must be approved by the Australian Communications and Media Authority.
CAUTION—SHOCK HAZARD: To avoid the risk of electrical shock, do not place or use this product near water or wet locations.
CAUTION—SHOCK HAZARD: To avoid the risk of electrical shock, do not set up this product or make any electrical or cabling connections, such as the power cord, fax feature, or telephone, during a lightning storm.

CAUTION—POTENTIAL INJURY: Do not cut, twist, bind, crush, or place heavy objects on the power cord. Do not subject the power cord to abrasion or stress. Do not pinch the power cord between objects such as furniture and walls. If any of these things happen, a risk of fire or electrical shock results. Inspect the power cord regularly for signs of such problems. Remove the power cord from the electrical outlet before inspecting it.
CAUTION—SHOCK HAZARD: To avoid the risk of electrical shock, make sure that all external connections (such as Ethernet and telephone system connections) are properly installed in their marked plug-in ports.
CAUTION—SHOCK HAZARD: To avoid the risk of electrical shock, if you are accessing the controller board or installing optional hardware or memory devices sometime after setting up the printer, then turn the printer off, and unplug the power cord from the electrical outlet before continuing. If you have any other devices attached to the printer, then turn them off as well, and unplug any cables going into the printer.
CAUTION—SHOCK HAZARD: To avoid the risk of electrical shock, do not use the fax feature during a lightning storm.
CAUTION—SHOCK HAZARD: To avoid the risk of electrical shock when cleaning the exterior of the printer, unplug the power cord from the electrical outlet and disconnect all cables from the printer before proceeding.
CAUTION—POTENTIAL INJURY: If the printer weight is greater than 18 kg (40 lb), then it requires two or more trained personnel to lift it safely.
CAUTION—POTENTIAL INJURY: When moving the printer, follow these guidelines to avoid personal injury or printer damage:
•Make sure that all doors and trays are closed.
•Turn off the printer, and then unplug the power cord from the electrical outlet.
•Disconnect all cords and cables from the printer.
•If the printer has separate floor-standing optional trays or output options attached to it, then disconnect them before moving the printer.
•If the printer has a caster base, then carefully roll it to the new location. Use caution when passing over thresholds and breaks in flooring.
•If the printer does not have a caster base but is configured with optional trays or output options, then remove the output options and lift the printer off the trays. Do not try to lift the printer and any options at the same time.
•Always use the handholds on the printer to lift it.
•Any cart used to move the printer must have a surface able to support the full footprint of the printer.
•Any cart used to move the hardware options must have a surface able to support the dimensions of the options.
•Keep the printer in an upright position.
•Avoid severe jarring movements.
•Make sure that your fingers are not under the printer when you set it down.
•Make sure that there is adequate clearance around the printer.
CAUTION—TIPPING HAZARD: Installing one or more options on your printer or MFP may require a caster base, furniture, or other feature to prevent instability causing possible injury. For more information on supported configurations, see www.lexmark.com/multifunctionprinters.

CAUTION—TIPPING HAZARD: To reduce the risk of equipment instability, load each tray separately. Keep all other trays closed until needed.
CAUTION—HOT SURFACE: The inside of the printer might be hot. To reduce the risk of injury from a hot component, allow the surface to cool before touching it.
CAUTION—PINCH HAZARD: To avoid the risk of a pinch injury, use caution in areas marked with this label. Pinch injuries may occur around moving parts, such as gears, doors, trays, and covers.
CAUTION—POTENTIAL INJURY: This product uses a laser. Use of controls or adjustments or performance of procedures other than those specified in the User’s Guide may result in hazardous radiation exposure.
CAUTION—POTENTIAL INJURY: The lithium battery in this product is not intended to be replaced. There is a danger of explosion if a lithium battery is incorrectly replaced. Do not recharge, disassemble, or incinerate a lithium battery. Discard used lithium batteries according to the manufacturer’s instructions and local regulations.
This product is designed, tested, and approved to meet strict global safety standards with the use of specific manufacturer’s components. The safety features of some parts may not always be obvious. The manufacturer is not responsible for the use of other replacement parts.
Refer service or repairs, other than those described in the user documentation, to a service representative.
This product uses a printing process that heats the print media, and the heat may cause the media to release emissions. You must understand the section in your operating instructions that discusses the guidelines for selecting print media to avoid the possibility of harmful emissions.
This product may produce small amounts of ozone during normal operation, and may be equipped with a filter designed to limit ozone concentrations to levels well below the recommended exposure limits. To avoid high ozone concentration levels during extensive usage, install this product in a well-ventilated area and replace the ozone and exhaust filters if instructed to do so in the product maintenance instructions. If there are no references to filters in the product maintenance instructions, then there are no filters requiring replacement for this product.
SAVE THESE INSTRUCTIONS.

Learning about the printer |
10 |
Learning about the printer 
Finding information about the printer
|
What are you looking for? |
Find it here |
|||
|
Initial setup instructions: |
See the setup documentation that came with the |
|||
|
• |
Connecting the printer |
printer or go to http://support.lexmark.com. |
||
|
• Installing the printer software |
||||
|
More setup and instructions for using the printer: |
Information Center—Go to |
|||
|
• Selecting and storing paper and specialty media |
http://infoserve.lexmark.com. |
|||
|
• |
Loading paper |
Help Menu Pages—Access the guides on the |
||
|
• |
Configuring printer settings |
printer firmware or go to |
||
|
http://support.lexmark.com. |
||||
|
• |
Viewing and printing documents and photos |
|||
|
Touch Screen Guide—Go to |
||||
|
• Setting up and using the printer software |
||||
|
http://support.lexmark.com. |
||||
|
• Configuring the printer on a network |
Product videos—Go to |
|||
|
• Caring for and maintaining the printer |
http://infoserve.lexmark.com/idv/. |
|||
|
• |
Troubleshooting and solving problems |
|||
|
Information on setting up and configuring the accessibility |
Lexmark Accessibility Guide—Go to |
|||
|
features of your printer |
http://support.lexmark.com. |
|||
|
Help using the printer software |
Help for Microsoft® Windows® or Macintosh |
|||
|
operating systems—Open a printer software |
||||
|
program or application, and then click Help. |
||||
|
Click ? to view context sensitive information. |
||||
|
Notes: |
||||
|
• |
Help is automatically installed with the printer |
|||
|
software. |
||||
|
• |
Depending on the operating system, the |
|||
|
printer software is located in the printer |
||||
|
program folder or on the desktop. |
||||
![]()
|
Learning about the printer |
11 |
|||
|
What are you looking for? |
Find it here |
|||
|
The latest supplemental information, updates, and customer |
Go to http://support.lexmark.com. |
|||
|
support: |
Note: Select your country or region, and then |
|||
|
• |
Documentation |
|||
|
select your product to view the appropriate |
||||
|
• |
Driver downloads |
support site. |
||
|
• |
Live chat support |
Support contact information for your country or |
||
|
• |
E mail support |
region can be found on the website or on the |
||
|
printed warranty that came with the printer. |
||||
|
• |
Voice support |
|||
|
Have the following information ready when you |
||||
|
contact customer support: |
||||
|
• |
Place and date of purchase |
|||
|
• |
Machine type and serial number |
|||
|
• |
Safety information |
Warranty information varies by country or region: |
|
|
• |
Regulatory information |
• In the U.S.—See the Statement of Limited |
|
|
• |
Warranty information |
Warranty included with the printer, or go to |
|
|
• |
Environmental information |
http://support.lexmark.com. |
|
|
• In other countries and regions—See the |
|||
|
printed warranty that came with the printer. |
|||
|
Product Information Guide—See the |
|||
|
documentation that came with the printer or go to |
|||
|
http://support.lexmark.com. |
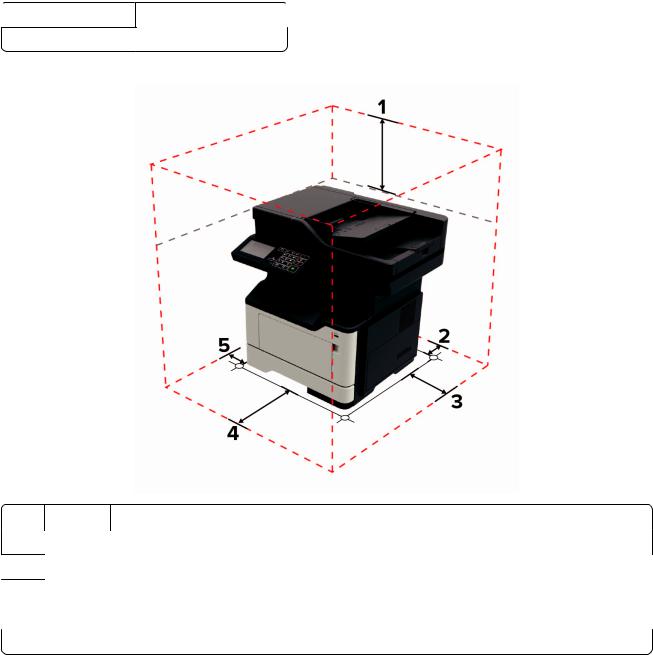
Selecting a location for the printer
•Leave enough room to open trays, covers, and doors and to install hardware options.
•Set up the printer near an electrical outlet.
CAUTION—POTENTIAL INJURY: To avoid the risk of fire or electrical shock, connect the power cord to an appropriately rated and properly grounded electrical outlet that is near the product and easily accessible.
CAUTION—SHOCK HAZARD: To avoid the risk of electrical shock, do not place or use this product near water or wet locations.
|
Learning about the printer |
12 |
•Make sure that airflow in the room meets the latest revision of the ASHRAE 62 standard or the CEN Technical Committee 156 standard.
•Provide a flat, sturdy, and stable surface.
•Keep the printer:
–Clean, dry, and free of dust
–Away from stray staples and paper clips
–Away from the direct airflow of air conditioners, heaters, or ventilators
–Free from direct sunlight and humidity extremes
•Observe the recommended temperatures and avoid fluctuations.
 Ambient temperature 10 to 32.2°C (50 to 90°F)
Storage temperature 0 to 40°C (32 to 104°F)
• Allow the following recommended amount of space around the printer for proper ventilation:
|
1 |
Top |
737 mm (29 in.) |
|
2 |
Rear |
203 mm (8 in.) |
3Right side 305 mm (12 in.)
|
4 |
Front |
510 mm (20 in.) |
|
Note: The minimum space needed in front of the printer is 76 mm (3 in.). |
||
|
5 |
Left side |
203 mm (8 in.) |
|
Learning about the printer |
13 |
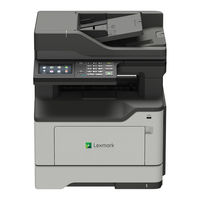
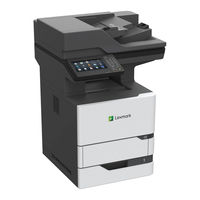
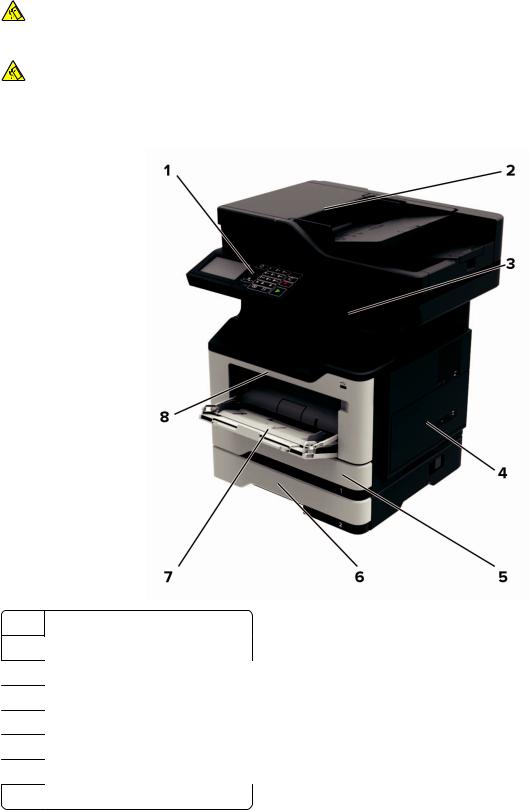
Printer configurations
CAUTION—TIPPING HAZARD: Installing one or more options on your printer or MFP may require a caster base, furniture, or other feature to prevent instability causing possible injury. For more information on supported configurations, see www.lexmark.com/multifunctionprinters.
CAUTION—TIPPING HAZARD: To reduce the risk of equipment instability, load each tray separately. Keep all other trays closed until needed.
You can configure your printer by adding optional 250 or 550 sheet trays. For more information, see “Installing optional trays” on page 237.
1 Control panel
2Automatic document feeder (ADF)
3Standard bin
4Controller board access cover
5Standard 250 sheet tray
6Optional 250 or 550 sheet tray
7Multipurpose feeder
8 Door A
|
Learning about the printer |
14 |
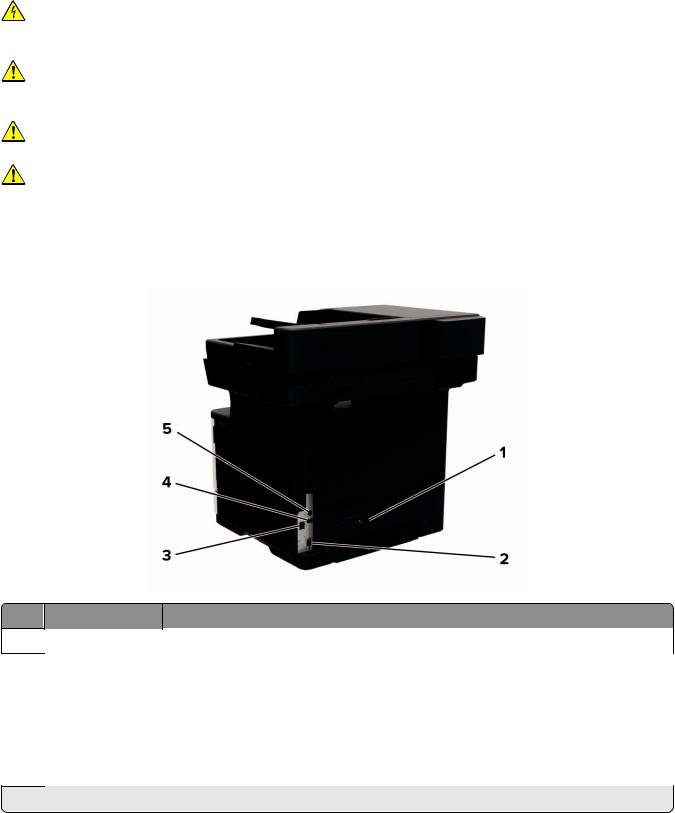
Attaching cables
CAUTION—SHOCK HAZARD: To avoid the risk of electrical shock, do not set up this product or make any electrical or cabling connections, such as the power cord, fax feature, or telephone, during a lightning storm.
CAUTION—POTENTIAL INJURY: To avoid the risk of fire or electrical shock, connect the power cord to an appropriately rated and properly grounded electrical outlet that is near the product and easily accessible.
CAUTION—POTENTIAL INJURY: To avoid the risk of fire or electrical shock, use only the power cord provided with this product or the manufacturer’s authorized replacement.
CAUTION—POTENTIAL INJURY: To reduce the risk of fire, use only a 26 AWG or larger telecommunications (RJ-11) cord when connecting this product to the public switched telephone network. For users in Australia, the cord must be approved by the Australian Communications and Media Authority.
Warning—Potential Damage: To avoid loss of data or printer malfunction, do not touch the USB cable, any wireless network adapter, or the printer in the areas shown while actively printing.
1Power cord socket Connect the printer to an electrical outlet.
|
2 |
Ethernet port |
Connect the printer to an Ethernet network. |
|
3 |
LINE port |
Connect the printer to an active telephone line through a standard wall jack (RJ 11), DSL |
|
filter, or VoIP adapter, or any other adapter that allows you to access the telephone line |
||
|
to send and receive faxes. |
||
|
4 |
USB port* |
Attach a keyboard or any compatible option. |
|
5 |
USB printer port |
Connect the printer to a computer. |
* This port is available only in some printer models.
|
Learning about the printer |
15 |
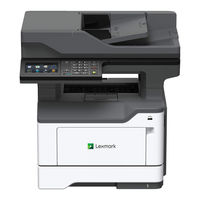
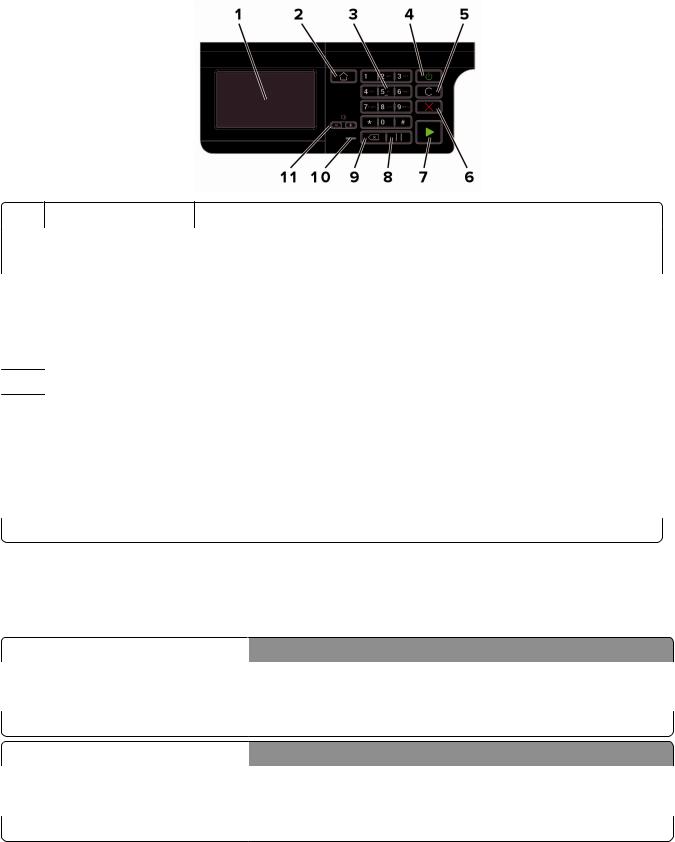
Using the control panel
|
Use the |
To |
|
|
1 |
Display |
• View the printer messages and supply status. |
|
• Set up and operate the printer. |
||
|
2 |
Home button |
Go to the home screen. |
|
3 |
Numeric keypad |
Enter numbers or symbols in an input field. |
|
4 |
Power button |
Turn on or turn off the printer. |
|
Note: To turn off the printer, press and hold the power button for five seconds. |
5Clear all or Reset button Reset the default settings of a function such as copying, faxing, or scanning.
|
6 |
Stop or Cancel button |
Stop the current printer task. |
|
7 |
Start button |
Start a printer task, depending on which mode is selected. |
|
8 |
Pause button |
Place a dial pause in a fax number. |
|
9 |
Backspace button |
Move the cursor backward and delete a character in an input field. |
|
10 |
Indicator light |
Check the printer status. |
|
11 |
Volume buttons |
Adjust the speaker volume. |
Understanding the status of the power button and indicator light
|
Indicator light |
Printer status |
|
|
Off |
The printer is off or in Hibernate mode. |
|
|
Blue |
The printer is ready or processing data. |
|
|
Red |
The printer requires user intervention. |
|
|
Power button light |
Printer status |
|
|
Off |
The printer is off, ready, or processing data. |
|
|
Solid amber |
The printer is in Sleep mode. |
|
|
Blinking amber |
The printer is in Hibernate mode. |
|
Setting up and using the home screen applications |
16 |
Setting up and using the home screen applications
Note: These applications are supported only in some printer models.
Using the home screen
Note: Your home screen may vary depending on your home screen customization settings, administrative setup, and active embedded solutions.
|
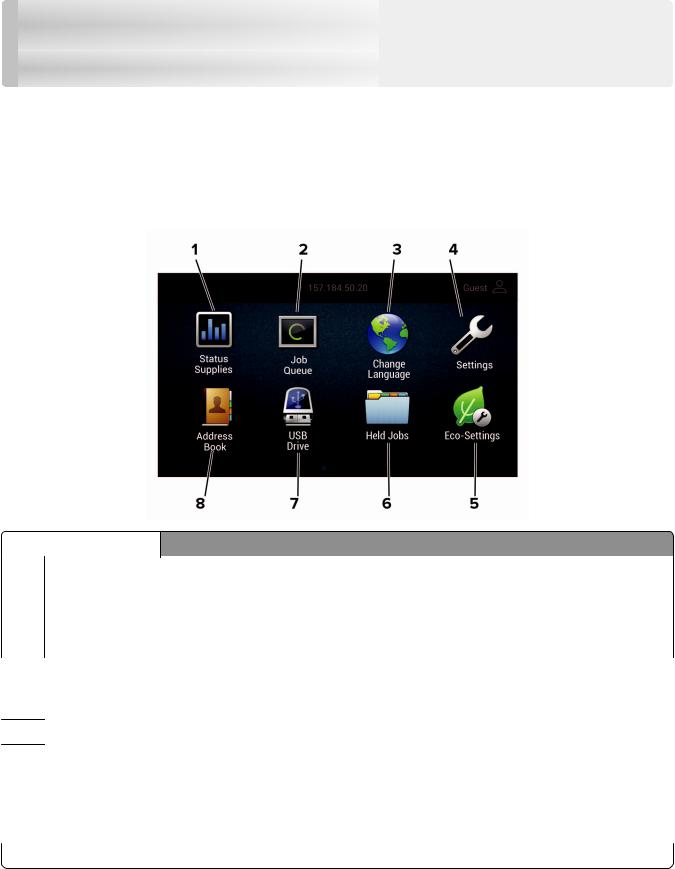
Touch |
To |
|
|
1 |
Status/Supplies |
• Show a warning or error message whenever the printer requires intervention to |
|
continue processing. |
||
|
• View more information on the printer warning or message, and on how to clear it. |
||
|
Note: You can also access this setting by touching the top section of the home |
||
|
screen. |
||
|
2 |
Job Queue |
Show all the current print jobs. |
|
Note: You can also access this setting by touching the top section of the home |
||
|
screen. |
3Change Language Change the language on the display.
|
4 |
Settings |
Access the printer menus. |
|
5 |
Eco Settings |
Manage energy consumption, noise, toner, and paper usage settings. |
|
6 |
Held Jobs |
Show the print jobs that are held in the printer memory. |
|
7 |
USB Drive |
Print photos and documents from a flash drive. |
|
8 |
Address Book |
Manage a contact list that other applications on the printer can access. |
|
Setting up and using the home screen applications |
17 |
Customizing the home screen
1Open a web browser, and then type the printer IP address in the address field.
Notes:
•View the printer IP address on the printer home screen. The IP address appears as four sets of numbers separated by periods, such as 123.123.123.123.
•If you are using a proxy server, then temporarily disable it to load the web page correctly.
2 Click Settings > Device > Visible Home Screen Icons.
3 Select the icons that you want to appear on the home screen.
4 Apply the changes.
Setting up Card Copy
1Open a web browser, and then type the printer IP address in the address field.
Notes:
•View the printer IP address on the printer home screen. The IP address appears as four sets of numbers separated by periods, such as 123.123.123.123.
•If you are using a proxy server, then temporarily disable it to load the web page correctly.
2Click Apps > Card Copy > Configure.
Notes:
•Make sure that Display Icon is enabled.
•Make sure that E mail Settings and Network Share Settings are configured.
•When scanning a card, make sure that the scan resolution does not exceed 200 dpi for color and 400 dpi for black and white.
•When scanning multiple cards, make sure that the scan resolution does not exceed 150 dpi for color and 300 dpi for black and white.
3 Apply the changes.
Note: You need a printer hard disk to scan multiple cards.
Creating a shortcut
1 From the home screen, touch Shortcut Center.
Note: The icon and name may have been changed. For more information, contact your administrator.
2 Select a printer function, and then touch Create Shortcut.
Note: The Secure E mail function is not supported.
3 Configure the settings, and then touch Save.
|
Setting up and using the home screen applications |
18 |
4Type a unique shortcut name.
Note: To avoid clipped names on the home screen, type only up to 25 characters.
5Touch OK.
The application automatically generates a unique shortcut number. To launch the shortcut, press # and then the shortcut number.
Using Display Customization
Before using the application, make sure to do the following:
•From the Embedded Web Server, click Apps > Display Customization > Configure.
•Enable and configure the screen saver, slideshow, and wallpaper settings.
Managing screen saver and slide show images
1From the Screen Saver and Slideshow Images section, add, edit, or delete an image.
Notes:
•You can add up to 10 images.
•When enabled, the status icons appear on the screen saver only when there are errors, warnings, or cloud based notifications.
2 Apply the changes.
Changing the wallpaper image
1 From the home screen, touch Change Wallpaper.
2 Select an image to use.
3 Apply the changes.
Running a slide show from a flash drive
1 Insert a flash drive into the USB port.
2From the home screen, touch Slideshow. Images appear in alphabetical order.
Note: You can remove the flash drive after the slide show starts, but the images are not stored in the printer. If the slide show stops, then insert the flash drive again to view the images.
Configuring Eco Settings
1 From the home screen, touch Eco Settings.
2 Configure Eco Mode or Schedule Power Modes.
3 Apply the changes.
|
Setting up and using the home screen applications |
19 |
Using Customer Support
1 From the home screen, touch Customer Support.
2Print or e mail the information.
Note: For information on configuring the application settings, see the Customer Support Administrator’s Guide.
Using QR Code Generator
You may need administrative rights to access the application.
1Open a Web browser, and then type the printer IP address in the address field.
Notes:
•View the printer IP address on the printer home screen. The IP address appears as four sets of numbers separated by periods, such as 123.123.123.123.
•If you are using a proxy server, then temporarily disable it to load the Web page correctly.
2 Click Apps > QR Code Generator > Configure.
3Do either of the following:
•Select a default QR code value.
•Type a QR code value.
4 Apply the changes.
Setting up Scan Center
1 From the home screen, touch Scan Center.
2Select and create a destination, and then configure the settings.
Notes:
•When creating a network destination, make sure to validate and adjust the settings until no errors occur.
•Only destinations created from the Embedded Web Server are saved. For more information, see the documentation that came with the solution.
3 Apply the changes.
Setting up Device Quotas
You may need administrative rights to access the application.
1Open a Web browser, and then type the printer IP address in the address field.
Notes:
•View the printer IP address on the printer home screen. The IP address appears as four sets of numbers separated by periods, such as 123.123.123.123.

|
Setting up and using the home screen applications |
20 |
|
|
• If you are using a proxy server, then temporarily disable it to load the Web page correctly. |
||
|
2 |
Click Apps > Device Quotas > Configure. |
|
|
3 |
From the User Accounts section, add or edit a user, and then set the user quota. |
4Apply the changes.
Note: For information on how to configure the application and its security settings, see the Device Quotas Administrator’s Guide.
Creating a Cloud Connector profile
We recommend logging in to the printer before you create a profile. To enable a login method, see the
Embedded Web Server Security Admin Guide.
|
1 |
From the home screen, touch Cloud Connector. |
|
|
2 |
Select a cloud service provider. |
|
|
3 |
Touch Create a Profile or |
. |
|
4 |
Type a unique profile name. |
|
|
5 |
If necessary, enter a PIN. |
|
|
Note: When using the printer as guest, protect the profile with a PIN. |
||
|
6 |
Touch Create, and then take note of the authorization code. |
|
|
Note: The authorization code is valid only for 24 hours. |
||
|
7 |
Open a web browser, and then go to https://lexmark.cloud-connect.co. |
|
|
8 |
Click Next, and then accept the Terms of Use. |
|
|
9 |
Enter the authorization code, and then click Connect. |
10Log in to your cloud service provider account.
11Grant permissions.
Note: To complete the authorization process, open the profile within 72 hours.
Managing bookmarks
Creating bookmarks
Use bookmarks to print frequently accessed documents that are stored in servers or on the web.
1Open a web browser, and then type the printer IP address in the address field.
Notes:
•View the printer IP address on the printer home screen. The IP address appears as four sets of numbers separated by periods, such as 123.123.123.123.
|
Setting up and using the home screen applications |
21 |
• If you are using a proxy server, then temporarily disable it to load the web page correctly.
2 Click Bookmark Setup > Add Bookmark, and then type a unique name for the bookmark.
3Select an Address protocol type, and then do one of the following:
•For HTTP and HTTPS, type the URL that you want to bookmark.
•For HTTPS, make sure to use the host name instead of the IP address. For example, type myWebsite.com/sample.pdf instead of typing 123.123.123.123/sample.pdf. Make sure that
the host name also matches the Common Name (CN) value in the server certificate. For more information on obtaining the CN value in the server certificate, see the help information for your web browser.
•For FTP, type the FTP address. For example, myServer/myDirectory. Enter the FTP port. Port 21 is the default port for sending commands.
•For SMB, type the network folder address. For example, myServer/myShare/myFile.pdf. Type the network domain name.
•If necessary, select the Authentication type for FTP and SMB.
To limit access to the bookmark, enter a PIN.
Note: The application supports the following file types: PDF, JPEG, TIFF, and HTML-based web pages. Other file types such as DOCX and XLXS are supported in some printer models.
4 Click Save.
Note: To manage bookmarks, click Bookmark Setup.
Creating folders
1Open a web browser, and then type the printer IP address in the address field.
Notes:
•View the printer IP address on the printer home screen. The IP address appears as four sets of numbers separated by periods, such as 123.123.123.123.
•If you are using a proxy server, then temporarily disable it to load the web page correctly.
2 Click Bookmark Setup > Add Folder, and then type a unique name for the folder.
Note: To limit access to the folder, enter a PIN.
3 Click Save.
Notes:
•You can create folders or bookmarks inside a folder. To create a bookmark, see “Creating bookmarks” on page 20.
•To manage folders, click Bookmark Setup.
Managing contacts
Adding contacts
1 Open a web browser, and then type the printer IP address in the address field.
|
Setting up and using the home screen applications |
22 |
Notes:
•View the printer IP address on the printer home screen. The IP address appears as four sets of numbers separated by periods, such as 123.123.123.123.
•If you are using a proxy server, then temporarily disable it to load the web page correctly.
2 Click Address Book.
3 From the Contacts section, add a contact.
Note: You can assign the contact to one or more groups.
4 If necessary, specify a login method to allow application access.
5 Apply the changes.
Adding groups
1Open a web browser, and then type the printer IP address in the address field.
Notes:
•View the printer IP address on the printer home screen. The IP address appears as four sets of numbers separated by periods, such as 123.123.123.123.
•If you are using a proxy server, then temporarily disable it to load the web page correctly.
2 Click Address Book.
3 From the Contact Groups section, add a group name.
Note: You can assign one or more contacts to the group.
4 Apply the changes.
Editing contacts or groups
1Open a web browser, and then type the printer IP address in the address field.
Notes:
•View the printer IP address on the printer home screen. The IP address appears as four sets of numbers separated by periods, such as 123.123.123.123.
•If you are using a proxy server, then temporarily disable it to load the web page correctly.
2 Click Address Book.
3Do either of the following:
•From the Contacts section, click a contact name, and then edit the information.
•From the Contact Groups section, click a group name, and then edit the information.
4 Apply the changes.
Deleting contacts or groups
1 Open a web browser, and then type the printer IP address in the address field.
|
Setting up and using the home screen applications |
23 |
Notes:
•View the printer IP address on the printer home screen. The IP address appears as four sets of numbers separated by periods, such as 123.123.123.123.
•If you are using a proxy server, then temporarily disable it to load the web page correctly.
2 Click Address Book.
3Do either of the following:
•From the Contacts section, select a contact that you want to delete.
•From the Contact Groups section, select a group name that you want to delete.

Setting up and using the accessibility features |
24 |
Setting up and using the accessibility features
Note: For more information on the accessibility features of your printer model, see the Accessibility Guide at http://support.lexmark.com.
Enabling Magnification mode
1 From the control panel, press and hold the 5 key until you hear a voice message.
2 Select Magnification mode.
3 Select OK.
For more information on navigating a magnified screen, see “Navigating the screen using gestures” on page 24.
Activating Voice Guidance
From the control panel
1 Press and hold the 5 key until you hear a voice message.
2 Select OK.
From the keyboard
1 Press and hold the 5 key until you hear a voice message.
2 Press Tab to navigate the focus cursor to the OK button, and then press Enter.
Notes:
•Voice Guidance is also activated when you insert headphones into the headphone jack.
•To adjust the volume, use the volume buttons at the bottom part of the control panel.
Navigating the screen using gestures
Notes:
•The gestures are applicable only when Voice Guidance is activated.
•Enable Magnification to use the zoom and pan gestures.
•Use a physical keyboard to type characters and adjust certain settings.
|
Gesture |
Function |
|
|
Double tap |
Select an option or item on the screen. |
|
|
Triple tap |
Zoom in or zoom out text and images. |
|
|
Swipe right or swipe down |
Move to the next item on the screen. |
|
|
Swipe left or swipe up |
Move to the previous item on the screen. |
|

|
Setting up and using the accessibility features |
25 |
|
|
Gesture |
Function |
|
|
Pan |
Access parts of the zoomed image that are beyond the limits of the screen. |
|
|
Note: This gesture requires the use of two fingers to drag across a zoomed |
||
|
image. |
||
|
Swipe up then left |
Exit an application and return to the home screen. |
|
|
Swipe down then left |
• Cancel a job. |
•Go back to the previous setting.
•Exit the screen that appears without changing any setting or value.
|
Swipe up then down |
Repeat a spoken prompt. |
Adjusting the Voice Guidance speech rate
1 From the home screen, select Settings > Device > Accessibility > Speech Rate.
2 Select the speech rate.
Using the keyboard on the display
Do one or more of the following:
•Drag a finger over the key to announce the character.
•Lift the finger to enter or type the character in the field.
•Select Backspace to delete characters.
•To hear the content in the input field, select Tab, and then select Shift + Tab.
Enabling spoken passwords or personal identification numbers
1 From the home screen, select Settings > Device > Accessibility > Speak Passwords/PINs.
2 Enable the setting.
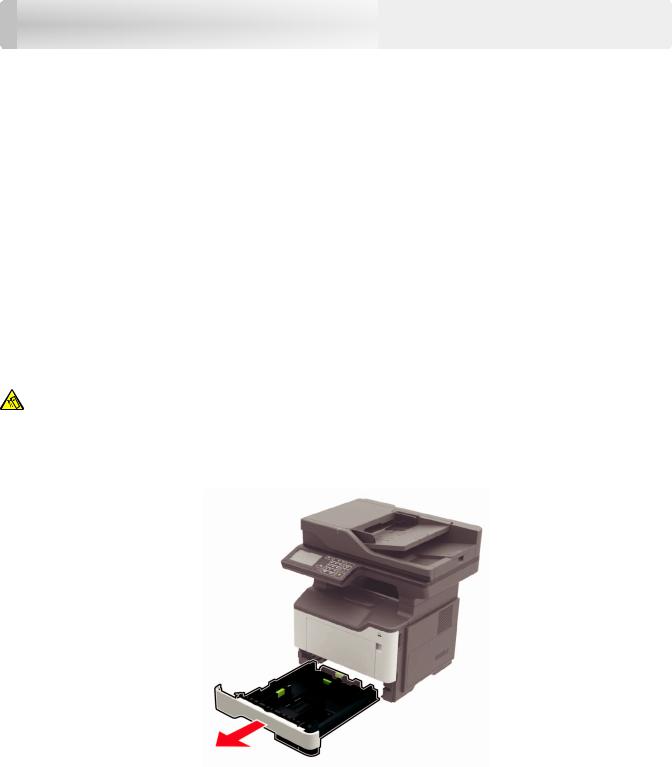
Loading paper and specialty media |
26 |
Loading paper and specialty media
Setting the size and type of the specialty media
The trays automatically detect the size of plain paper. For specialty media like labels, card stock, or envelopes, do the following:
1From the home screen, navigate to:
Settings > Paper > Tray Configuration > Paper Size/Type > select a paper source
2 Set the size and type of the specialty media.
Configuring Universal paper settings
1 From the home screen, touch Settings > Paper > Media Configuration > Universal Setup.
2 Configure the settings.
Loading trays
CAUTION—TIPPING HAZARD: To reduce the risk of equipment instability, load each tray separately. Keep all other trays closed until needed.
1Remove the tray.
Note: To avoid paper jams, do not remove trays while the printer is busy.
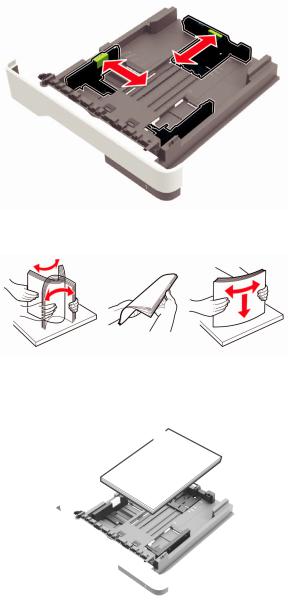
|
Loading paper and specialty media |
27 |
2 Adjust the paper guides to match the size of the paper that you are loading.
3 Flex, fan, and align the paper edges before loading.
4Load the paper stack with the printable side facedown, and then make sure that the side guides fit snugly against the paper.
Notes:
•Load letterhead facedown with the top edge of the sheet toward the front of the tray for one sided printing.
•Load letterhead faceup with the bottom edge of the sheet toward the front of the tray for two sided printing.
•Do not slide paper into the tray.
•To avoid paper jams, make sure that the stack height is below the maximum paper fill indicator.
5Insert the tray.
If necessary, set the paper size and paper type from the control panel to match the paper loaded.
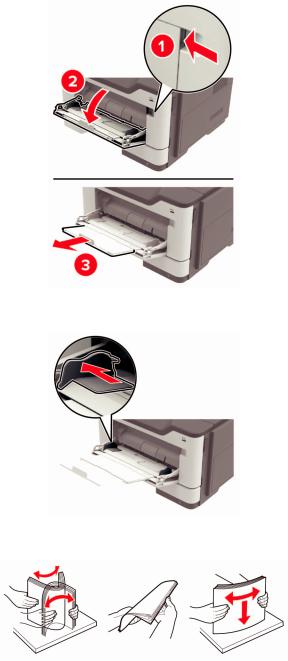
|
Loading paper and specialty media |
28 |
Loading the multipurpose feeder
1 Open the multipurpose feeder.
2 Adjust the guide to match the size of the paper that you are loading.
3 Flex, fan, and align the paper edges before loading.
4Load paper with the printable side faceup.
Notes:
•Load letterhead faceup with the top edge of the sheet toward the front of the tray for one sided printing.
•Load letterhead facedown with the bottom edge of the sheet toward the front of the tray for two sided printing.
|
Loading paper and specialty media |
29 |
•Load envelopes with the flap facedown on the left side.
•Load European envelopes with the flap facedown and entering the printer first.
Warning—Potential Damage: Do not use envelopes with stamps, clasps, snaps, windows, coated linings, or self stick adhesives.
5 From the control panel, set the paper size and paper type to match the paper loaded.
Linking trays
1Open a web browser, and then type the printer IP address in the address field.
Notes:
•View the printer IP address on the printer home screen. The IP address appears as four sets of numbers separated by periods, such as 123.123.123.123.
•If you are using a proxy server, then temporarily disable it to load the web page correctly.
2 Click Settings > Paper > Tray Configuration.
3 Set the same paper size and paper type for the trays that you are linking.
4 Save the settings.
5 Click Settings > Device > Maintenance > Configuration Menu > Tray Configuration.
6 Set Tray Linking to Automatic.
7 Save the settings.
To unlink trays, make sure that no trays have the same paper size and paper type settings.
Warning—Potential Damage: The temperature of the fuser varies according to the specified paper type. To avoid printing issues, match the paper type setting in the printer with the paper loaded in the tray.
Paper support
Supported paper sizes
|
Paper size |
Tray |
Multipurpose |
Two sided |
ADF |
Scanner |
Scanner |
|
feeder |
printing |
glass |
glass |
|||
|
(MB2422, |
(MB2546, |
|||||
|
MX421, |
MX521, |
|||||
|
XM1242) |
MX522, |
|||||
|
XM1246) |
||||||
|
A4 |
||||||
|
210 x 297 mm |
||||||
|
(8.3 x 11.7 in.) |
||||||
|
A5 |
X |
|||||
|
210 x 148 mm |
||||||
|
(5.8 x 8.3 in.) |
||||||
|
A5 LEF1 |
X |
|||||
|
148 x 210 mm |
||||||
|
(5.8 x 8.3 in.) |
||||||
|
A6* |
X |
|||||
|
105 x 148 mm |
||||||
|
(4.1 x 5.8 in.) |
||||||
|
JIS B5 |
X |
|||||
|
182 x 257 mm |
||||||
|
(7.2 x 10.1 in.) |
||||||
|
Oficio (Mexico) |
||||||
|
216 x 340 mm |
||||||
|
(8.5 x 13.4 in.) |
||||||
|
Hagaki |
X |
X |
X |
|||
|
100 x 148 mm |
||||||
|
(3.9 x 5.8 in.) |
||||||
|
Business card |
X |
X |
X |
X |
||
|
50.8 x 88.9 mm |
||||||
|
(2 x 3.5 in.) |
||||||
|
Statement |
X |
|||||
|
140 x 216 mm |
||||||
|
(5.5 x 8.5 in.) |
1 This paper size is not supported in the optional tray.
2 This paper source supports paper size only up to 216 x 297 mm (8.5 x 11.7 in.).
![]()
|
Paper support |
31 |
|||||
|
Paper size |
Tray |
Multipurpose |
Two sided |
ADF |
Scanner |
Scanner |
|
feeder |
printing |
glass |
glass |
|||
|
(MB2422, |
(MB2546, |
|||||
|
MX421, |
MX521, |
|||||
|
XM1242) |
MX522, |
|||||
|
XM1246) |
||||||
|
Executive |
X |
|||||
|
184 x 267 mm |
||||||
|
(7.3 x 10.5 in.) |
||||||
|
Letter |
||||||
|
216 x 279 mm |
||||||
|
(8.5 x 11 in.) |
||||||
|
Legal |
X |
|||||
|
216 x 356 mm |
||||||
|
(8.5 x 14 in.) |
||||||
|
Folio |
X |
|||||
|
216 x 330 mm |
||||||
|
(8.5 x 13 in.) |
||||||
|
Universal |
X |
2 |
||||
|
76.2 x 127 mm to |
||||||
|
216 x 356 mm |
||||||
|
(3 x 5 in. to 8.5 x 14 in.) |
||||||
|
7 3/4 Envelope |
X |
X |
X |
|||
|
(Monarch) |
||||||
|
98 x 191 mm |
||||||
|
(3.9 x 7.5 in.) |
||||||
|
9 Envelope |
X |
X |
X |
|||
|
98 x 225 mm |
||||||
|
(3.9 x 8.9 in.) |
||||||
|
10 Envelope |
X |
X |
X |
|||
|
105 x 241 mm |
||||||
|
(4.1 x 9.5 in.) |
||||||
|
DL Envelope |
X |
X |
X |
|||
|
110 x 220 mm |
||||||
|
(4.3 x 8.7 in.) |
||||||
|
C5 Envelope |
X |
X |
X |
|||
|
162 x 229 mm |
||||||
|
(6.4 x 9 in.) |
1 This paper size is not supported in the optional tray.
2 This paper source supports paper size only up to 216 x 297 mm (8.5 x 11.7 in.).

|
Paper support |
32 |
|||||
|
Paper size |
Tray |
Multipurpose |
Two sided |
ADF |
Scanner |
Scanner |
|
feeder |
printing |
glass |
glass |
|||
|
(MB2422, |
(MB2546, |
|||||
|
MX421, |
MX521, |
|||||
|
XM1242) |
MX522, |
|||||
|
XM1246) |
||||||
|
B5 Envelope |
X |
X |
X |
|||
|
176 x 250 mm |
||||||
|
(6.9 x 9.8 in.) |
||||||
|
Other Envelope |
X |
X |
X |
|||
|
76.2 x 127 mm to |
||||||
|
216 x 356 mm |
||||||
|
( 3 x 5 in. to 8.5 x 14 in.) |
1 This paper size is not supported in the optional tray.
2 This paper source supports paper size only up to 216 x 297 mm (8.5 x 11.7 in.).
Supported paper types
|
Paper type |
Tray |
Multipurpose |
Two sided |
ADF |
Scanner glass |
|
feeder |
printing |
||||
|
Plain paper |
|||||
|
Card stock |
X |
X |
X |
||
|
Transparency |
X |
X |
|||
|
Recycled |
|||||
|
Paper labels1 |
X |
X |
|||
|
Bond2 |
|||||
|
Letterhead |
|||||
|
Preprinted |
|||||
|
Colored Paper |
|||||
|
Light Paper |
|||||
|
Heavy Paper2 |
1 One sided paper labels designed for laser printers are supported for occasional use. It is recommended to print 20 or fewer pages of paper labels per month. Vinyl, pharmacy, and two sided labels are not supported.
2 Bond and Heavy Paper are supported in two sided printing up to 90 g/m2 (24 lb) paper weight.

|
Paper type |
Tray |
Multipurpose |
Two sided |
ADF |
Scanner glass |
|
feeder |
printing |
||||
|
Rough/Cotton |
|||||
|
Envelope |
X |
X |
X |
||
|
Rough envelope |
X |
X |
X |
1 One sided paper labels designed for laser printers are supported for occasional use. It is recommended to print 20 or fewer pages of paper labels per month. Vinyl, pharmacy, and two sided labels are not supported.
2 Bond and Heavy Paper are supported in two sided printing up to 90 g/m2 (24 lb) paper weight.
Supported paper weights
|
Tray |
Multipurpose feeder |
Two sided printing |
ADF |
|
|
Paper weight |
60–120 g/m2 |
60–216 g/m2 |
60–90 g/m2 |
52–120 g/m2 |
|
(16–32 lb) |
(16–58 lb) |
(16–24 lb) |
(14–32 lb) |
|

Printing
Printing from a computer
Note: For labels, card stock, and envelopes, set the paper size and type in the printer before printing the document.
1 From the document that you are trying to print, open the Print dialog.
2 If necessary, adjust the settings.
3 Print the document.
Printing from a mobile device
Printing from a mobile device using Lexmark Mobile Print
LexmarkTM Mobile Print allows you to send documents and images directly to a supported Lexmark printer.
1 Open the document, and then send or share the document to Lexmark Mobile Print.
Note: Some third party applications may not support the send or share feature. For more information, see the documentation that came with the application.
2 Select a printer.
3 Print the document.
Printing from a mobile device using Google Cloud Print
Google Cloud PrintTM is a mobile printing service that allows enabled applications on mobile devices to print to any Google Cloud Print ready printer.
1 From the home screen of your mobile device, launch an enabled application.
2 Tap Print, and then select a printer.
3 Print the document.
Printing from a mobile device using Mopria Print Service
Mopria® Print Service is a mobile printing solution for mobile devices running on AndroidTM version 4.4 or later. It allows you to print directly to any Mopria certified printer.
Note: Before printing, make sure that the Mopria Print Service is enabled.
1 From the home screen of your mobile device, launch a compatible application.
2 Tap Print, and then select the printer.
3 Send the print job.

Printing from a mobile device using AirPrint
AirPrint is a mobile printing solution that allows you to print directly from Apple devices to an AirPrint certified printer.
Note: This application is supported only in some Apple devices.
1 From the home screen of your mobile device, launch a compatible application.
2 Select an item to print, and then tap the share icon.
3 Tap Print, and then select the printer.
4 Send the print job.
Printing from a flash drive
This feature is available only in some printer models.
1 Insert the flash drive.
Notes:
•If you insert the flash drive when an error message appears, then the printer ignores the flash drive.
•If you insert the flash drive while the printer is processing other print jobs, then Busy appears on the display.
2Select the document that you want to print. If necessary, configure other print settings.
3Print the document.
To print another document, select USB Drive.
Warning—Potential Damage: To avoid loss of data or printer malfunction, do not touch the flash drive or the printer in the area shown while actively printing, reading, or writing from the memory device.

Supported flash drives and file types
Flash drives
•Lexar JumpDrive S70 (16GB and 32GB)
•SanDisk Cruzer (16GB and 32GB)
•PNY Attache (16GB and 32GB)
Notes:
–The printer supports high speed USB flash drives with full speed standard.
–USB flash drives must support the File Allocation Table (FAT) system.
File types
Documents
•PDF (version 1.7 or earlier)
•XPS
•Microsoft file formats (.doc, .docx, .xls, .xlsx, .ppt, .pptx) Images
•.dcx
•.gif
•.JPEG or .jpg
•.bmp
•.pcx
•.TIFF or .tif
•.png

Configuring confidential jobs
1From the control panel, navigate to:
Settings > Security > Confidential Print Setup
2 Configure the settings.
|
Use |
To |
|
|
Max Invalid PIN |
Set the number of times an invalid PIN can be entered. |
|
|
Note: When the limit is reached, the print jobs for that user name are deleted. |
||
|
Confidential Job |
Set the expiration time for confidential print jobs. |
|
|
Expiration |
Note: Confidential held jobs are stored in the printer until they are released or |
|
|
deleted manually. |
||
|
Repeat Job Expiration |
Set the expiration time for a repeat print job. |
|
|
Note: Repeat held jobs are stored in the printer memory for reprinting. |
||
|
Verify Job Expiration |
Set the expiration time that the printer prints a copy before printing the remaining |
|
|
copies. |
||
|
Note: Verify jobs print one copy to check if it is satisfactory before printing the |
||
|
remaining copies. |
||
|
Reserve Job Expiration |
Set the expiration time that the printer stores print jobs. |
|
|
Note: Reserve held jobs are automatically deleted after printing. |
||
|
Require All Jobs to be |
Set the printer to hold all print jobs. |
|
|
Held |
||
|
Keep duplicate |
Set the printer to print all documents with the same file name. |
|
|
documents |
||
Printing confidential and other held jobs
For Windows users
1 With a document open, click File > Print.
2 Click Properties, Preferences, Options, or Setup.
3 Click Print and Hold.
4 Select Use Print and Hold, and then assign a user name.
5Select the print job type (Confidential, Repeat, Reserve, or Verify). If the print job is confidential, then enter a four digit PIN.
6 Click OK or Print.

7From the printer home screen, release the print job.
•For confidential print jobs, navigate to:
Held jobs > select your user name > Confidential > enter the PIN > select the print job > configure the settings > Print
•For other print jobs, navigate to:
Held jobs > select your user name > select the print job > configure the settings > Print
For Macintosh users
1With a document open, choose File > Print.
If necessary, click the disclosure triangle to see more options.
2 From the print options or Copies & Pages menu, choose Job Routing.
3Select the print job type (Confidential, Repeat, Reserve, or Verify).
If the print job is confidential, then assign a user name and a four digit PIN.
4 Click OK or Print.
5From the printer home screen, release the print job.
•For confidential print jobs, navigate to:
Held jobs > select your user name > Confidential > enter the PIN > select the print job > configure the settings > Print
•For other print jobs, navigate to:
Held jobs > select your user name > select the print job > configure the settings > Print
Printing from a Cloud Connector profile
1 From the home screen, touch Cloud Connector.
2 Select a cloud service provider, and then select a profile.
Note: For more information on creating a Cloud Connector profile, see “Creating a Cloud Connector profile” on page 20.
3 Select a file.
Note: You cannot select an unsupported file.
4 If necessary, change the settings.
5 Touch Print.
Printing a font sample list
1 From the home screen, touch Settings > Reports > Print > Print Fonts.
2 Touch PCL Fonts or PostScript Fonts.
Printing a directory list
From the home screen, touch Settings > Reports > Print > Print Directory.
Canceling a print job
From the printer control panel
1 From the home screen, touch Job Queue.
Note: You can also access this setting by touching the top section of the home screen.
2 Select the job to cancel.
From the computer
1Depending on the operating system, do either of the following:
•Open the printers folder, and then select your printer.
•From the System Preferences in the Apple menu, navigate to your printer.
2 Select the job to cancel.

Copying
Using the automatic document feeder and scanner glass
|
Automatic document feeder (ADF) |
Scanner glass |
•Use the ADF for multiple page or two-sided documents.
•Load an original document faceup. For multiple page documents, make sure to align the leading edge before loading.
•Make sure to adjust the ADF guides to match the width
|
of the paper that you are loading. |
• Use the scanner glass for single page documents, |
|
book pages, small items (such as postcards or |
|
|
photos), transparencies, photo paper, or thin media |
|
|
(such as magazine clippings). |
|
|
• Place the document facedown in the corner with the |
|
|
arrow. |
Making copies
1 Load an original document into the ADF tray or on the scanner glass.
Note: To avoid a cropped image, make sure that the original document and output have the same paper size.
2From the home screen, touch Copy, and then specify the number of copies. If necessary, adjust the copy settings.
3 Copy the document.
Note: To make a quick copy, from the control panel, press  .
.
Copying photos
1 Place a photo on the scanner glass.
2From the control panel, navigate to:
Copy > Settings > Content > Content Type > Photo
3 From the Content Source menu, select the setting that best matches the original photo.
4 Copy the document.
Copying on letterhead
1 Load an original document into the ADF tray or on the scanner glass.
2 From the home screen, touch Copy > Copy From > select the size of the original document.
3Touch Copy To, and then select the paper source that contains the letterhead. If you loaded the letterhead into the multipurpose feeder, then navigate to:
Copy To > Multipurpose Feeder > select a paper size > Letterhead
4 Copy the document.
Copying on both sides of the paper (two sided)
1 Load an original document into the ADF tray or on the scanner glass.
2 From the home screen, touch Copy > Settings > Paper Setup.
3 Adjust the settings.
4 Copy the document.
Reducing or enlarging copies
1 Load an original document into the ADF tray or on the scanner glass.
2From the control panel, navigate to:
Copy > Settings > Scale > specify a scale value
Note: Changing the size of the original document or output after setting Scale restores the scale value to Auto.
3 Copy the document.
Collating copies
1 Load an original document into the ADF tray or on the scanner glass.
2From the control panel, navigate to:
Copy > Settings > Collate > On [1,2,1,2,1,2]
3 Copy the document.
Placing separator sheets between copies
1 Load an original document into the ADF tray or on the scanner glass.
2From the control panel, navigate to:
Copy > Settings > Separator Sheets > adjust the settings
3 Copy the document.
Copying multiple pages onto a single sheet
1 Load an original document into the ADF tray or on the scanner glass.
2From the control panel, navigate to:
Copy > Settings > Pages per Side > adjust the settings
3 Copy the document.
Creating a copy shortcut
Note: You may need administrative rights to create a shortcut.
1Open a web browser, and then type the printer IP address in the address field.
Notes:
•View the printer IP address on the home screen. The IP address appears as four sets of numbers separated by periods, such as 123.123.123.123.
•If you are using a proxy server, then temporarily disable it to load the web page correctly.
2 Click Shortcuts > Add Shortcut.
3 From the Shortcut Type menu, select Copy, and then configure the settings.
4 Apply the changes.

E-mailing
Using the automatic document feeder and scanner glass
|
Automatic document feeder (ADF) |
Scanner glass |
•Use the ADF for multiple page or two-sided documents.
•Load an original document faceup. For multiple page documents, make sure to align the leading edge before loading.
•Make sure to adjust the ADF guides to match the width
|
of the paper that you are loading. |
• Use the scanner glass for single page documents, |
|
book pages, small items (such as postcards or |
|
|
photos), transparencies, photo paper, or thin media |
|
|
(such as magazine clippings). |
|
|
• Place the document facedown in the corner with the |
|
|
arrow. |
Setting up the e mail function
1Open a web browser, and then type the printer IP address in the address field.
Notes:
•View the printer IP address on the home screen. The IP address appears as four sets of numbers separated by periods, such as 123.123.123.123.
•If you are using a proxy server, then temporarily disable it to load the web page correctly.
2 Click Settings > E mail > E mail Setup.
3 Configure the settings.
4 Apply the changes.
Configuring e mail settings
1Open a Web browser, and then type the printer IP address in the address field.
Notes:
•View the printer IP address on the printer home screen. The IP address appears as four sets of numbers separated by periods, such as 123.123.123.123.
|
E-mailing |
44 |
|
|
• If you are using a proxy server, then temporarily disable it to load the Web page correctly. |
||
|
2 |
Click Settings > E-mail. |
|
|
3 |
Enter the needed information. |
|
|
4 |
Apply the changes. |
|
Sending an e-mail |
||
|
Using the control panel |
||
|
1 |
Load an original document into the ADF tray or on the scanner glass. |
|
|
2 |
From the home screen, touch E-mail, and then enter the needed information. |
|
|
Note: You can also enter the recipient using the address book or shortcut number. |
||
|
3 |
If necessary, configure the output file type settings. |
|
|
4 |
Send the e-mail. |
Using the shortcut number
1 From the control panel, press #, and then enter the shortcut number using the keypad.
2 Send the e mail.
Creating an e-mail shortcut
Note: You may need administrative rights to create a shortcut.
1Open a web browser, and then type the printer IP address in the address field.
Notes:
•View the printer IP address on the home screen. The IP address appears as four sets of numbers separated by periods, such as 123.123.123.123.
•If you are using a proxy server, then temporarily disable it to load the web page correctly.
2 Click Shortcuts > Add Shortcut.
3 From the Shortcut Type menu, select E mail, and then configure the settings.
4 Apply the changes.

Faxing
Setting up the printer to fax
Notes:
•The following connection methods are applicable only in some countries or regions.
•During the initial printer setup, clear the fax function check box and any other function you plan to set up later, and then select Continue.
•If the fax function is enabled and not fully set up, then the indicator light may blink red.
Warning—Potential Damage: To avoid loss of data or printer malfunction, do not touch cables or the printer in the area shown while actively sending or receiving a fax.
Setting up the fax function
1 From the home screen, touch Settings > Device > Preferences > Run Initial Setup.
2 Turn off the printer, wait for about 10 seconds, and then turn it back on.
3 From the Before You Begin screen, select Change the Settings and Continue with the Wizard.
4 From the Fax/Email Server Setup screen, enter the needed information.
5 Finish the setup.

Setting up fax using a standard telephone line
CAUTION—SHOCK HAZARD: To avoid the risk of electrical shock, do not set up this product or make any electrical or cabling connections, such as the power cord, fax feature, or telephone, during a lightning storm.
CAUTION—SHOCK HAZARD: To avoid the risk of electrical shock, do not use the fax feature during a lightning storm.
CAUTION—POTENTIAL INJURY: To reduce the risk of fire, use only a 26 AWG or larger telecommunications (RJ-11) cord when connecting this product to the public switched telephone network. For users in Australia, the cord must be approved by the Australian Communications and Media Authority.
Setup 1: Printer is connected to a dedicated fax line
1 Connect one end of the telephone cable to the line port of the printer.
2 Connect the other end of the cable to an active analog wall jack.
Notes:
•You can set the printer to receive faxes automatically (Auto Answer On) or manually (Auto Answer Off).
•If you want to receive faxes automatically, then set the printer to pick up on a specified number of rings.

Setup 2: Printer is sharing the line with an answering machine
Note: If you subscribe to a distinctive ring service, then make sure that you set the correct ring pattern for the printer. Otherwise, the printer does not receive faxes even if you have set it to receive faxes automatically.
Connected to different wall jacks
1 Connect one end of the telephone cable to the line port of the printer.
2 Connect the other end of the cable to an active analog wall jack.
Notes:
•If you have only one telephone number on your line, then set the printer to receive faxes automatically.
•Set the printer to pick up calls two rings after the answering machine. For example, if the answering machine picks up calls after four rings, then set the printer Rings to Answer setting to six.

Setting up fax in countries or regions with different telephone wall jacks and plugs
CAUTION—SHOCK HAZARD: To avoid the risk of electrical shock, do not set up this product or make any electrical or cabling connections, such as the power cord, fax feature, or telephone, during a lightning storm.
CAUTION—SHOCK HAZARD: To avoid the risk of electrical shock, do not use the fax feature during a lightning storm.
CAUTION—POTENTIAL INJURY: To reduce the risk of fire, use only a 26 AWG or larger telecommunications (RJ-11) cord when connecting this product to the public switched telephone network. For users in Australia, the cord must be approved by the Australian Communications and Media Authority.
The standard wall jack adopted by most countries or regions is RJ11. If the wall jack or equipment in your facility is not compatible with this type of connection, then use a telephone adapter. An adapter for your country or region may not come with your printer, and you may need to purchase it separately.
There may be an adapter plug installed in the telephone port of the printer. Do not remove the adapter plug from the telephone port of the printer if you are connecting to a serial or cascaded telephone system.
|
Part name |
Part number |
|
Lexmark adapter plug |
40X8519 |

Connecting the printer to a non RJ11 wall jack
1 Connect one end of the telephone cable to the line port of the printer.
2 Connect the other end of the cable to the RJ11 adapter, and then connect the adapter to the wall jack.
3If you want to connect another device with a non RJ11 connector to the same wall jack, then connect it directly to the telephone adapter.

Connecting the printer to a wall jack in Germany
The German wall jack has two kinds of ports. The N ports are for fax machines, modems, and answering machines. The F port is for telephones. Connect the printer to any of the N ports.
1 Connect one end of the telephone cable to the line port of the printer.
2 Connect the other end of the cable to the RJ11 adapter, and then connect the adapter to an N port.
3If you want to connect a telephone and answering machine to the same wall jack, then connect the devices as shown.
Connecting to a distinctive ring service
A distinctive ring service lets you have multiple telephone numbers on one telephone line. Each telephone number is assigned a different ring pattern.
1From the home screen, touch Settings > Fax > Analog Fax Setup > Fax Receive Settings > Admin Controls > Answer On.
2 Select the ring pattern.
3 Apply the changes.
 Loading…