Как дебажить фронтенд и бекенд: пошаговая инструкция
Время на прочтение
6 мин
Количество просмотров 46K
Привет, Хабр! Представляю вам перевод статьи «How to debug javascript in Chrome quick and easy «.
В этом посте мы научимся дебажить JavaScript на фронт- и бекенде с помощью Chrome DevTools и VS Code.
Цели:
- Научиться отлаживать фронтенд и Angular
- Проанализировать процесс отладки Node.js
Ловим баги на фронтенде (JavaScript, Angular)
Очень много сервисов сейчас позволяют дебажить код над фронтенде. Chrome DevTools и Firefox Developer Tools среди них самые популярные, но и в других браузерах тоже есть свои тулзы. Мы будем использовать Chrome DevTools для примеров.
Дебажим JavaScript
Откровенно говоря, отладка кода может занимать много времени. Особенно, если использовать такие простые команды как console.log() или window.alert().
Нужно писать, а потом удалять дополнительный код, а иногда эти команды все равно попадают в коммит (даже если вы думали, что все их забрали). А если при этом использовать линты (статические отладчики), то команды console или alert будут подсвечиваться в коде.
И на этом моменте в игру вступает Chrome DevTools, позволяя нам дебажить код без утомительных команд. Среди фишек этой тулзы, редактирование CSS и HTML, тестирование сети и проверка скорости сайта — наши любимые.
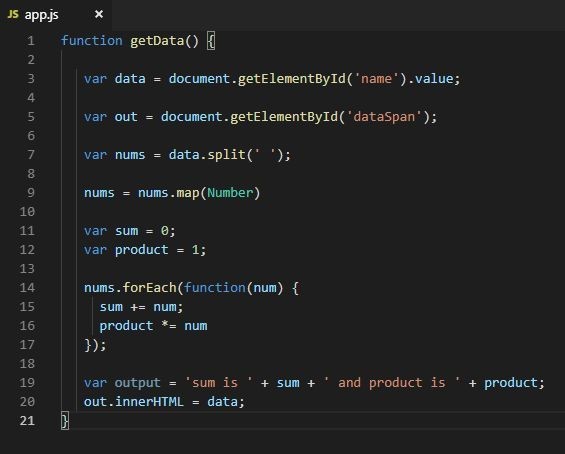
Чтобы на практике познакомиться с этой тулзой, давайте создадим простенькую страничку на JavaScript с getData() методом. Этот метод будет просто собирать данные с поля ввода, создавать DOM элемент с dataSpan ID и добавлять значение с поля ввода в этот элемент.
Вот как наша страничка будет выглядеть:
В HTML:

В JavaScript:
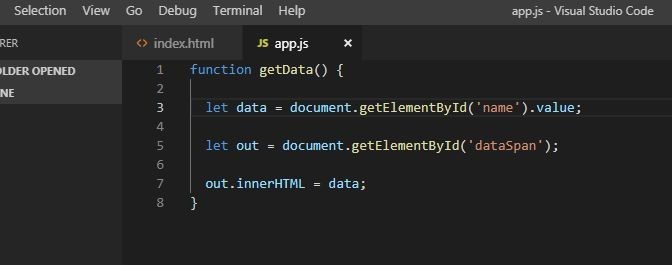
Сохраним ее как app.js.
Вот как наша страничка будет выглядеть в браузере:

Чтобы проверить как метод работает до того, как сохранять данные в dataSpan, можно использовать старомодные console.log(data) или window.alert(data). Вот что мы увидим запустив файл в VS Code:

Это самый примитивный подход.
Вместо этого, мы используем брейкпоинты (точки останова) вChrome DevTools чтобы убедиться, что все работает как надо.
Брейкпоинт — это строка кода, на которой мы хотим приостановить прогонку кода, чтобы изучить как он работает (или не работает).
Возвращаясь к примеру, давайте запустим страницу в Google Chrome и сделаем следующее:
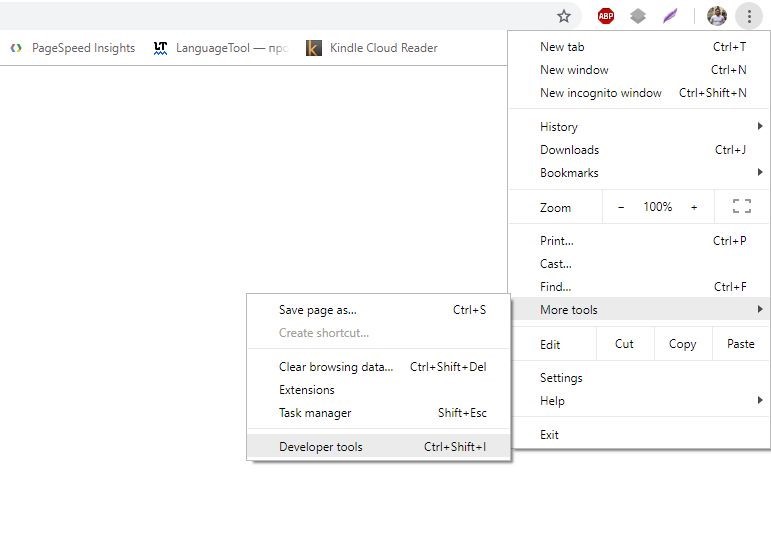
- Чтобы открыть Chrome Developer Tools, в правом верхнем углу браузера, кликнем чтобы открыть меню настроек.
- В этом меню, выберем Дополнительные инструменты (в английском меню — More tools), а потом Инструменты разработчика (Developer tools).
Кроме этого, можно использовать комбинацию клавиш Ctrl+Shift+I (мы пользуемся ею, но это уже вам решать =).
Открыв панель инструментов разработчика, давайте приостановим код на брейкпоинте:
- Выберите вкладку Sources.
- В Sources, в панели Page, выберите app.js (который мы создали чуть раньше).
- В редакторе кода, кликните на номер строки
let data =document.getElementById('name').value;
Таким образом мы поставили брейкпоинт (для удобства, программа выделяет место с брейкпоинтом синим флажком). Также обратите внимание, что вырбанная переменная автоматически добавляется в секцию Breakpoints > Local (на панели JavaScript Debugging).
Управление интервалами выполнения кода
Поставив брейкпоинт, ми приостанавливаем исполнение функции на нем. Поэтому нам нужно будет продолжить построчное выполнение кода, чтобы изучить изменения нашей переменной.
В верхнем левом углу панели JavaScript Debugging находятся основные команды прогонки брейкпоинтов:
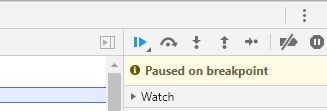
Первая кнопка, Resume script execution () продолжит выполнение кода до конца или до следующего брейкпоинта.
Давайте введем hello world в поле ввода. В строку добавится data = “hello world”. Теперь давайте кликнем на кнопку Step over next function call ().
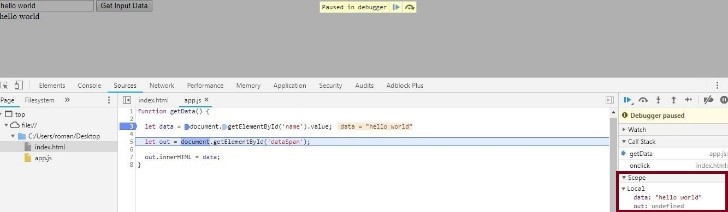
Выбранная строка с брейкпоинтом будет выполнена и дебаггер выберет следующую. Откройте вкладку Scope чтобы посмотреть значение переменной data. Оно изменилось на “hello world”, которое мы ввели ранее и просто показывает значение нашей переменной на конкретной строке кода. Кликните Step over next function call еще раз чтобы выполнить выбранный метод и перейти на следующую строку.
Если обновить страницу, значение переменной out также обновится в DOM элементе. Чтобы посмотреть значение переменной, можно кликнуть на Expand () слева от нее. Если же еще раз кликнуть Step over next function call, то текст “hello world” еще раз добавится в dataSpan.
Более сложная отладка
Предположим, что мы выполняем функцию посложнее, которую точно не помешает отладить. К примеру, мы хотим, чтобы пользователи вводили числа через пробел. Функция затем будет обрабатывать и выводить эти числа, их сумму, и результат умножения.
Для этого мы обновим код app.js как на скриншоте выше. Обновляем страницу и приступаем непосредственно к дебаггингу.
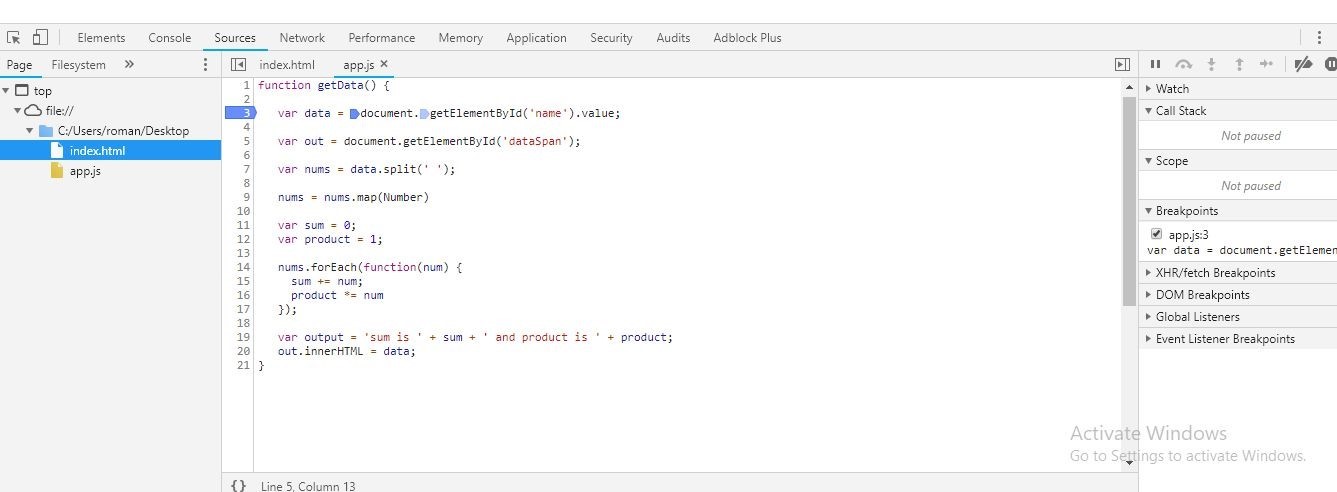
- Кликните 3 (номер строки of let data = document.getElementById(‘name’).value;) чтобы поставить брейкпоинт.
- Введите 23 24 е в строке ввода в браузере.
- Кликните Step over next function call.
На скриншоте видно, что и у суммы, и у произведения чисел значение NaN (not a number). Это показывает, что нужно исправить код немедленно.
Как еще можно поставить брейкпоинты
В большинстве случаев, ваш код намного длиннее и, вполне возможно, конкатенирован в одну строку. К примеру, предположим, что у вас 1000 строк кода. В этом случае, ставить брейкпоинты, кликая на номера строк каждый раз, не кажется такой уж отличной идеей, не правда ли?
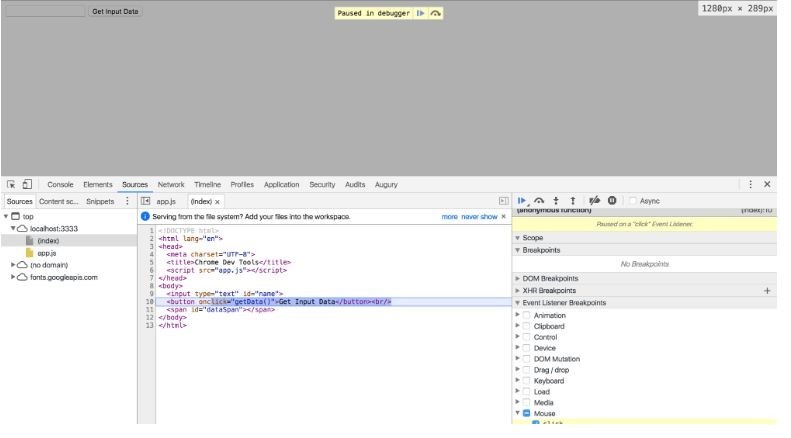
Для этого в DevTools есть классный инструмент для установки брейкпоинтов на разные типы интеракции с браузером. На панели JavaScript Debugging, кликните Event Listener Breakpoints чтобы посмотреть доступные категории.

Как вы видите, можно поставить брейкпоинт на событие Mouse > click (клик мышкой) в любом месте нашего кода. Это означает, что, если кликнуть Get Input Data, выполнение кода остановится на событии onclick. И не нужно вручную ничего добавлять.
Клик на Step over next function call будет последовательно вести нас через код, используемый чтобы обработать клики.
Используя Event Listener Breakpoints, можно поставить брейкпоинты на кучу разных типов событий, таких как Keyboard, Touch, и XHR.
Ключевое слово “debugger”
Если ввести debugger в любом месте кода, Chrome DevTools приостановит выполнение кода на этой строке и подсветит ее также, как и брейкпоинты. Можно использовать этот инструмент чтобы дебажить JavaScript в Chrome или других браузерах. Только не забудьте удалить его, когда закончите отладку.

Код на скриншоте выше остановится на строке, которая содержит ключевое слово debugger и автоматически запустит Chrome DevTools. По сути, это то же самое, что и поставить брейкпоинт на эту строку. Также выполнением кода можно управлять с помощью кнопок Step into next function call и Step over next function call.
Выжимка
В начале мы рассмотрели команды console.log() и window.alert() и поняли, что они не слишком удобны. Нужно было их часто использовать по всему коду, что могло сделать код «тяжелее» и медленнее, если бы мы забыли их удалить перед коммитом.
Когда количество строк растет, Chrome Developer Tools намного более эффективен для отлова багов и оценки работы в целом.
Дебажим Angular
Легче всего отладить код Angular — использовать Visual Studio Code (VS Code). Чтобы начать дебаггинг, вам нужно будет установить расширение Debugger для Chrome:
- Запустите проект на VS Code и откройте вкладку Extensions. Или нажмите Ctrl+Shift+X на клаве.
- В строке поиска введите Chrome.
- Выберите Debugger for Chrome и кликните Install.
- После того как установите расширение, появится кнопка Reload. Кликните ее, чтобы завершить инсталляцию и активировать Debugger.
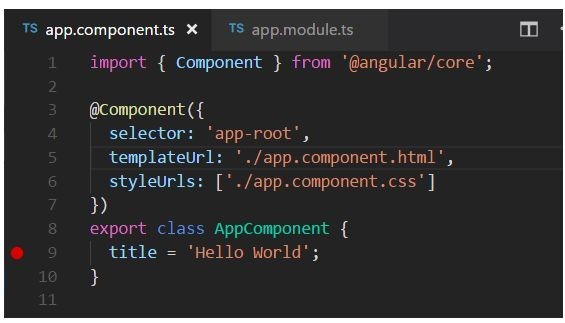
Как поставить брейкпоинт?
Точно так же, как и в DevTools, кликните на номер строки в app.component.ts. Строка с брейкпоинтом подсветится красным кружком (слева от номера строки).
Настраиваем дебаггер
Для начала, нам нужно будет настроить дебаггер:
1. С File Explorer перейдите на Debug вкладку.
Также можно использовать для этого Ctrl+Shift+D.
2. Кликните на иконку Settings чтобы создать launch.json.
Это файл с настройками, который мы будем использовать.
3. С выпадающего меню Select Environment выберите Chrome.
Это создаст новую папку .vscode и файл launch.json для вашего проекта.
4. Запустите этот файл.
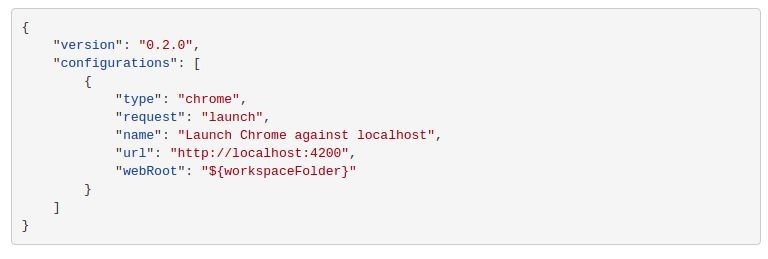
5. Чтобы использовать этот файл для наших целей, в методе url замените localhost порт с 8080 на 4200.
6. Сохраните изменения.
Вот как должен выглядеть файл:
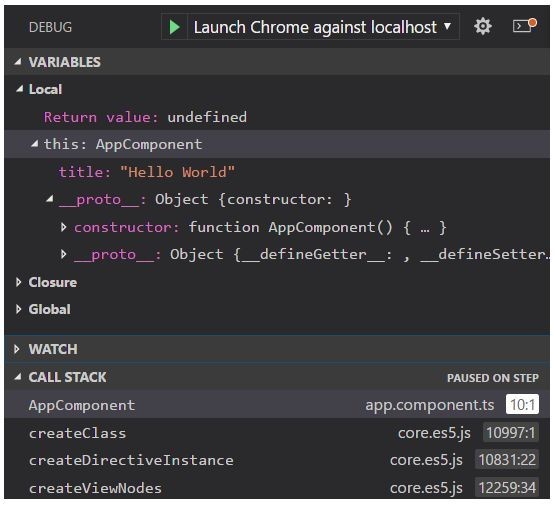
7. Нажмите F5 или кликните кнопку Start Debugging чтобы запустить Debugger.
8. Запустите Chrome.
9. Чтобы приостановить выполнение кода на брейкпоинте, обновите страницу.

Чтобы последовательно просмотреть выполнение кода и как меняются переменные, используйте клавишу F10.
README
В расширении Debugger для Chrome есть множество дополнительных конфигураций, работа з source maps и устранений всяческих неполадок. Чтобы просмотреть их прямо в VS Code, кликните на расширение и выберите вкладку Details.

Отладка бекенда (Node.js)
Здесь вы узнаете как дебажить код на Node.js. Вот самые распространённые подходы:
• Используя Chrome DevTools
На даный момент, это наш любимый подход.
• Используя IDE-шки типаVisual Studio Code, Visual Studio, WebStorm, и т.д.
Для примеров мы будем использовать VS Code и Chrome DevTools.
Chrome и Node.js используют тот же JavaScript-движок, Google V8, и это значит, что для бекенда мы будем использовать те же инструменты, что и для фронта.
Для этого:
1. Запустите свой проект в VS Code.
2. Перейдите на вкладку Console.
3. Введите команду npm start —inspect и нажмите Enter.
4. Проигнорируйте предлагаемый “chrome-devtools://…” URL (существует метод получше).

5. Запустите Chrome и введите “about:inspect”.
Это перенаправит вас на вкладку Devices на DevTools.
6. Кликните линк Open dedicated DevTools for Node.

Процесс отладки такой же, как и для фронтенда, то есть с использованием брейкпоинтов. На самом деле, очень удобно то, что не нужно переключаться на IDE. Таким образом, можно дебажить и фронт- и бекенд на одном интерфейсе.
Спасибо за чтение и надеемся, что вам понравился этот пост. Подписывайтесь на обновления — у нас в рукавах еще полно полезностей 
One of the key features of Visual Studio Code is its great debugging support. VS Code’s built-in debugger helps accelerate your edit, compile, and debug loop.
Debugger extensions
VS Code has built-in debugging support for the Node.js runtime and can debug JavaScript, TypeScript, or any other language that gets transpiled to JavaScript.
For debugging other languages and runtimes (including PHP, Ruby, Go, C#, Python, C++, PowerShell and many others), look for Debuggers extensions in the VS Code Marketplace or select Install Additional Debuggers in the top-level Run menu.
Below are several popular extensions which include debugging support:
Tip: The extensions shown above are dynamically queried. Select an extension tile above to read the description and reviews to decide which extension is best for you.
Start debugging
The following documentation is based on the built-in Node.js debugger, but most of the concepts and features are applicable to other debuggers as well.
It is helpful to first create a sample Node.js application before reading about debugging. You can follow the Node.js walkthrough to install Node.js and create a simple «Hello World» JavaScript application (app.js). Once you have a simple application set up, this page will take you through VS Code debugging features.
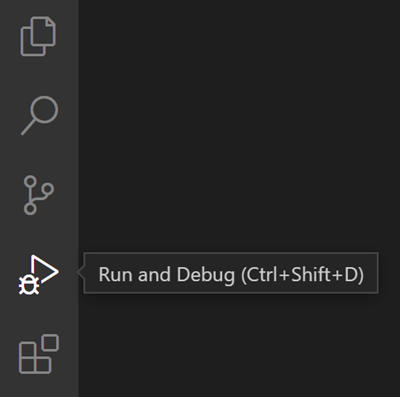
Run and Debug view
To bring up the Run and Debug view, select the Run and Debug icon in the Activity Bar on the side of VS Code. You can also use the keyboard shortcut ⇧⌘D (Windows, Linux Ctrl+Shift+D).
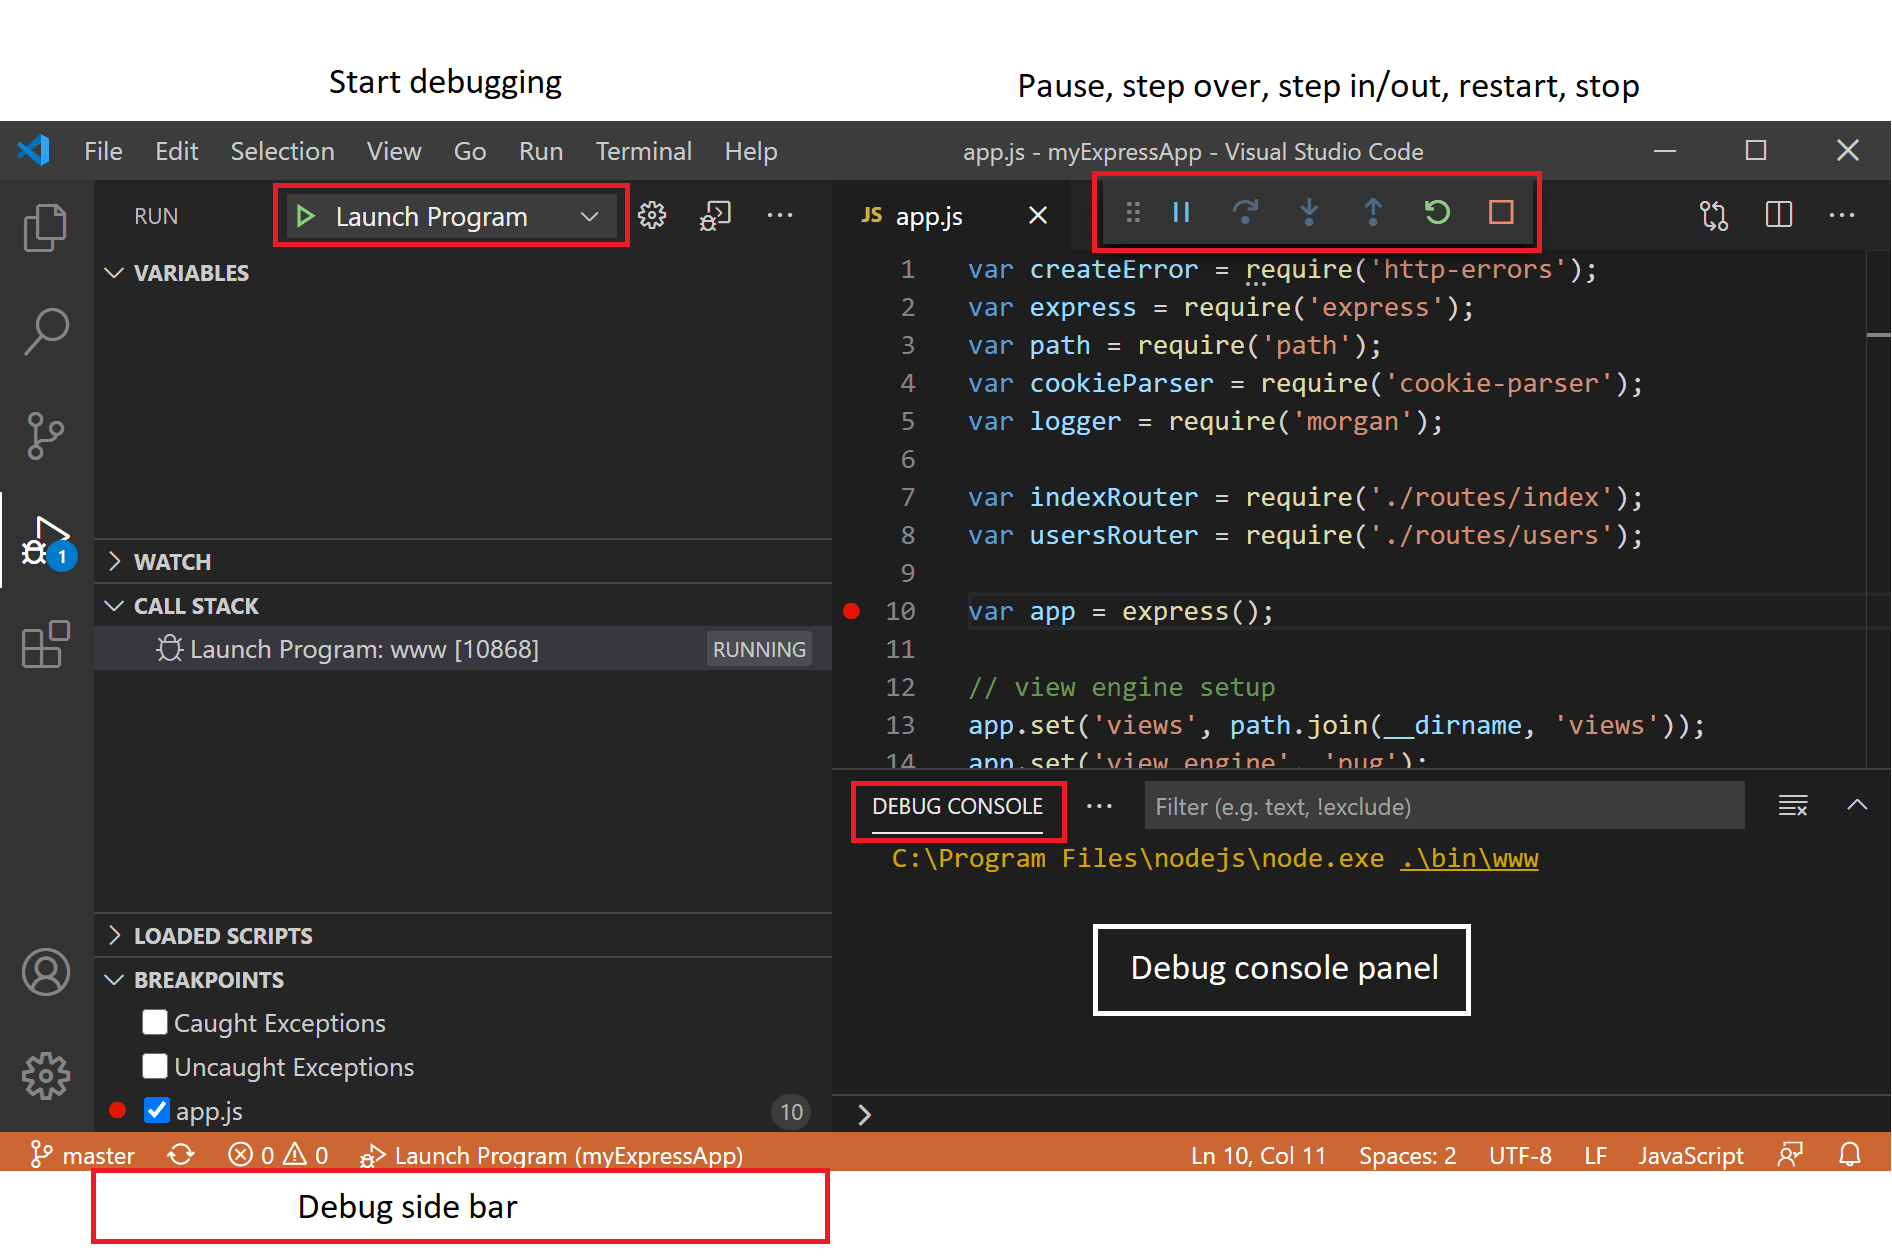
The Run and Debug view displays all information related to running and debugging and has a top bar with debugging commands and configuration settings.
If running and debugging is not yet configured (no launch.json has been created), VS Code shows the Run start view.
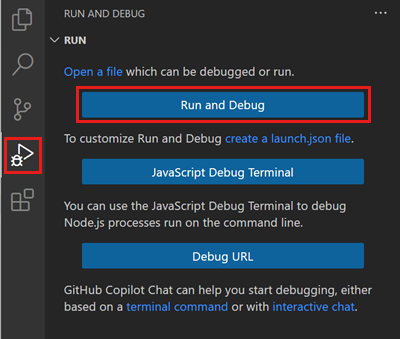
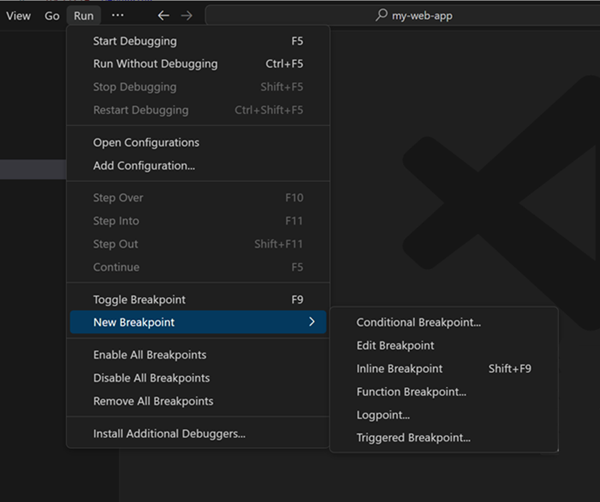
The top-level Run menu has the most common run and debug commands:
Launch configurations
To run or debug a simple app in VS Code, select Run and Debug on the Debug start view or press F5 and VS Code will try to run your currently active file.
However, for most debugging scenarios, creating a launch configuration file is beneficial because it allows you to configure and save debugging setup details. VS Code keeps debugging configuration information in a launch.json file located in a .vscode folder in your workspace (project root folder) or in your user settings or workspace settings.
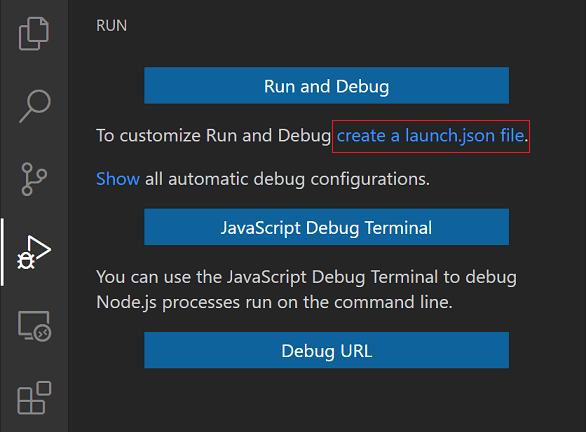
To create a launch.json file, click the create a launch.json file link in the Run start view.
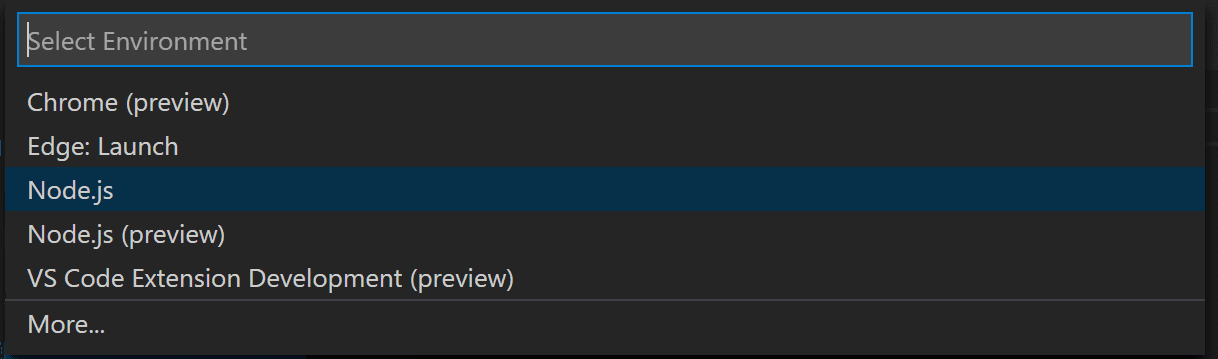
VS Code will try to automatically detect your debug environment, but if this fails, you will have to choose it manually:
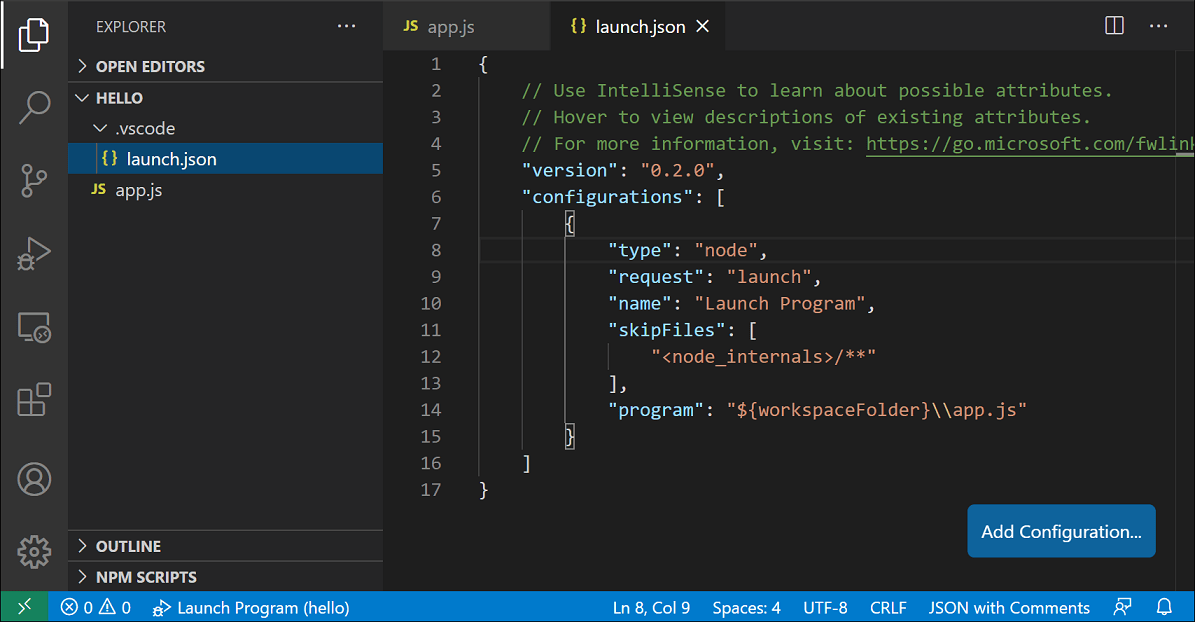
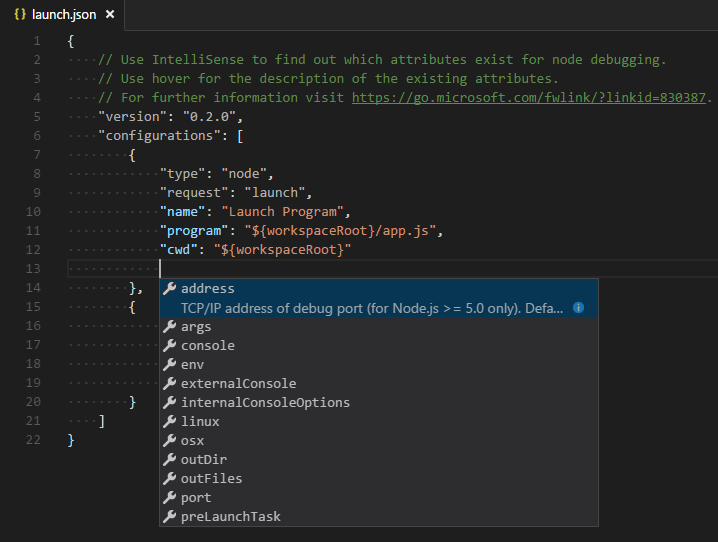
Here is the launch configuration generated for Node.js debugging:
{
  "version": "0.2.0",
  "configurations": [
    {
      "type": "node",
      "request": "launch",
      "name": "Launch Program",
      "skipFiles": ["<node_internals>/**"],
      "program": "${workspaceFolder}\app.js"
    }
  ]
}
If you go back to the File Explorer view (⇧⌘E (Windows, Linux Ctrl+Shift+E)), you’ll see that VS Code has created a .vscode folder and added the launch.json file to your workspace.
Note: You can debug a simple application even if you don’t have a folder open in VS Code, but it is not possible to manage launch configurations and set up advanced debugging. The VS Code Status Bar is purple if you do not have a folder open.
Note that the attributes available in launch configurations vary from debugger to debugger. You can use IntelliSense suggestions (⌃Space (Windows, Linux Ctrl+Space)) to find out which attributes exist for a specific debugger. Hover help is also available for all attributes.
Do not assume that an attribute that is available for one debugger automatically works for other debuggers too. If you see green squiggles in your launch configuration, hover over them to learn what the problem is and try to fix them before launching a debug session.
Review all automatically generated values and make sure that they make sense for your project and debugging environment.
Launch versus attach configurations
In VS Code, there are two core debugging modes, Launch and Attach, which handle two different workflows and segments of developers. Depending on your workflow, it can be confusing to know what type of configuration is appropriate for your project.
If you come from a browser Developer Tools background, you might not be used to «launching from your tool,» since your browser instance is already open. When you open DevTools, you are simply attaching DevTools to your open browser tab. On the other hand, if you come from a server or desktop background, it’s quite normal to have your editor launch your process for you, and your editor automatically attaches its debugger to the newly launched process.
The best way to explain the difference between launch and attach is to think of a launch configuration as a recipe for how to start your app in debug mode before VS Code attaches to it, while an attach configuration is a recipe for how to connect VS Code’s debugger to an app or process that’s already running.
VS Code debuggers typically support launching a program in debug mode or attaching to an already running program in debug mode. Depending on the request (attach or launch), different attributes are required, and VS Code’s launch.json validation and suggestions should help with that.
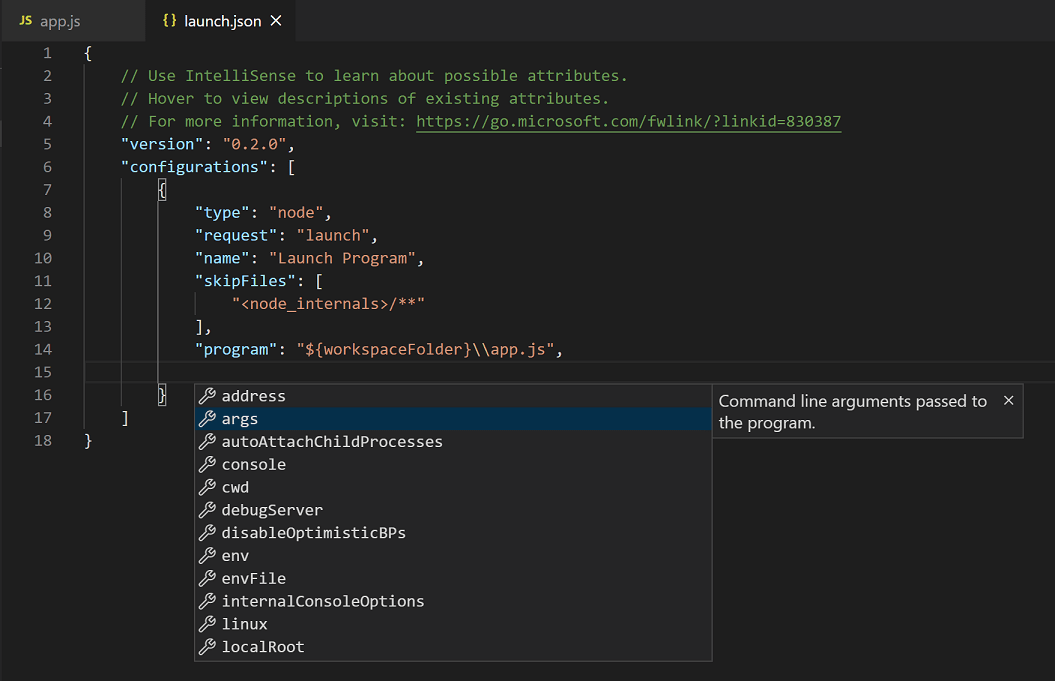
Add a new configuration
To add a new configuration to an existing launch.json, use one of the following techniques:
- Use IntelliSense if your cursor is located inside the configurations array.
- Press the Add Configuration button to invoke snippet IntelliSense at the start of the array.
- Choose Add Configuration option in the Run menu.
VS Code also supports compound launch configurations for starting multiple configurations at the same time; for more details, please read this section.
In order to start a debug session, first select the configuration named Launch Program using the Configuration dropdown in the Run and Debug view. Once you have your launch configuration set, start your debug session with F5.
Alternatively, you can run your configuration through the Command Palette (⇧⌘P (Windows, Linux Ctrl+Shift+P)) by filtering on Debug: Select and Start Debugging or typing 'debug ' and selecting the configuration you want to debug.
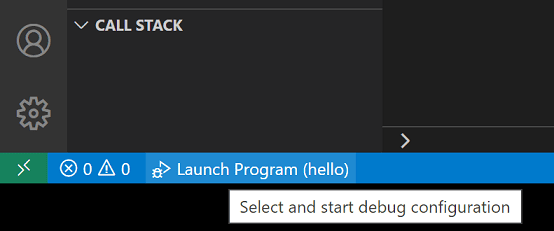
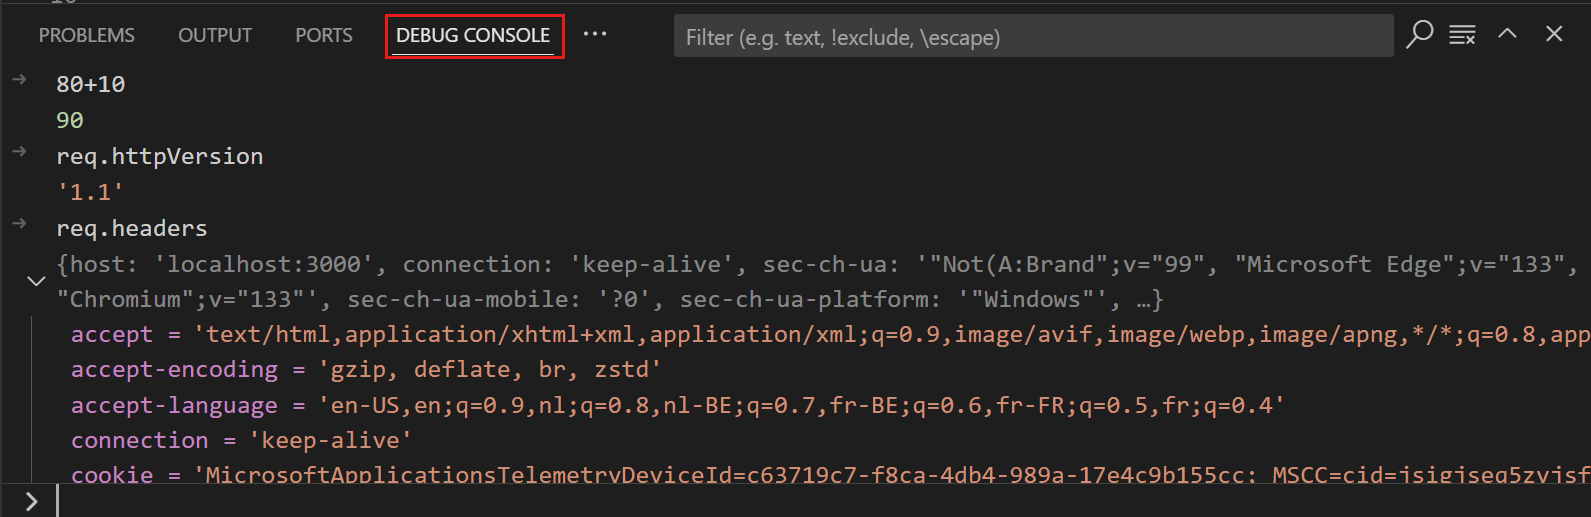
As soon as a debugging session starts, the DEBUG CONSOLE panel is displayed and shows debugging output, and the Status Bar changes color (orange for default color themes):
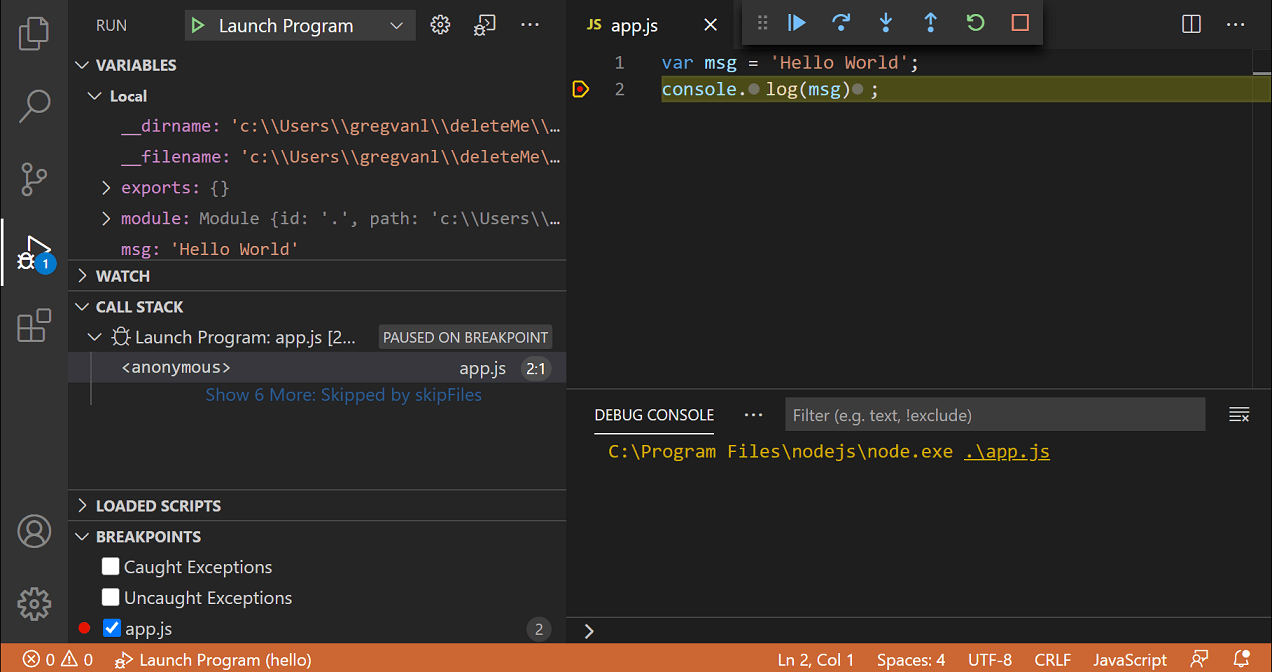
In addition, the debug status appears in the Status Bar showing the active debug configuration. By selecting the debug status, a user can change the active launch configuration and start debugging without needing to open the Run and Debug view.
Debug actions
Once a debug session starts, the Debug toolbar will appear on the top of the editor.

| Action | Explanation |
|---|---|
| Continue / Pause F5 |
Continue: Resume normal program/script execution (up to the next breakpoint). Pause: Inspect code executing at the current line and debug line-by-line. |
| Step Over F10 |
Execute the next method as a single command without inspecting or following its component steps. |
| Step Into F11 |
Enter the next method to follow its execution line-by-line. |
| Step Out ⇧F11 (Windows, Linux Shift+F11) |
When inside a method or subroutine, return to the earlier execution context by completing remaining lines of the current method as though it were a single command. |
| Restart ⇧⌘F5 (Windows, Linux Ctrl+Shift+F5) |
Terminate the current program execution and start debugging again using the current run configuration. |
| Stop ⇧F5 (Windows, Linux Shift+F5) |
Terminate the current program execution. |
Tip: Use the setting
debug.toolBarLocationto control the location of the debug toolbar. It can be the defaultfloating,dockedto the Run and Debug view, orhidden. Afloatingdebug toolbar can be dragged horizontally and also down to the editor area.
Run mode
In addition to debugging a program, VS Code supports running the program. The Debug: Run (Start Without Debugging) action is triggered with ⌃F5 (Windows, Linux Ctrl+F5) and uses the currently selected launch configuration. Many of the launch configuration attributes are supported in ‘Run’ mode. VS Code maintains a debug session while the program is running, and pressing the Stop button terminates the program.
Tip: The Run action is always available, but not all debugger extensions support ‘Run’. In this case, ‘Run’ will be the same as ‘Debug’.
Breakpoints
Breakpoints can be toggled by clicking on the editor margin or using F9 on the current line. Finer breakpoint control (enable/disable/reapply) can be done in the Run and Debug view’s BREAKPOINTS section.
- Breakpoints in the editor margin are normally shown as red filled circles.
- Disabled breakpoints have a filled gray circle.
- When a debugging session starts, breakpoints that cannot be registered with the debugger change to a gray hollow circle. The same might happen if the source is edited while a debug session without live-edit support is running.
If the debugger supports breaking on different kinds of errors or exceptions, those will also be available in the BREAKPOINTS view.
The Reapply All Breakpoints command sets all breakpoints again to their original location. This is helpful if your debug environment is «lazy» and «misplaces» breakpoints in source code that has not yet been executed.

Optionally, breakpoints can be shown in the editor’s overview ruler by enabling the setting debug.showBreakpointsInOverviewRuler:

Logpoints
A Logpoint is a variant of a breakpoint that does not «break» into the debugger but instead logs a message to the console. Logpoints are especially useful for injecting logging while debugging production servers that cannot be paused or stopped.
A Logpoint is represented by a «diamond» shaped icon. Log messages are plain text but can include expressions to be evaluated within curly braces (‘{}’).
Just like regular breakpoints, Logpoints can be enabled or disabled and can also be controlled by a condition and/or hit count.
Note: Logpoints are supported by VS Code’s built-in Node.js debugger, but can be implemented by other debug extensions. The Python and Java extensions, for example, support Logpoints.
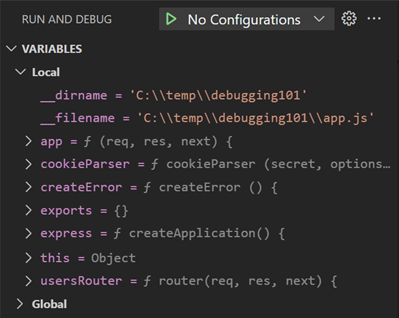
Data inspection
Variables can be inspected in the VARIABLES section of the Run and Debug view or by hovering over their source in the editor. Variable values and expression evaluation are relative to the selected stack frame in the CALL STACK section.
Variable values can be modified with the Set Value action from the variable’s context menu. Additionally, you can use the Copy Value action to copy the variable’s value, or Copy as Expression action to copy an expression to access the variable.
Variables and expressions can also be evaluated and watched in the Run and Debug view’s WATCH section.

Variable names and values can be filtered by typing while the focus is on the VARIABLES section.

Launch.json attributes
There are many launch.json attributes to help support different debuggers and debugging scenarios. As mentioned above, you can use IntelliSense (⌃Space (Windows, Linux Ctrl+Space)) to see the list of available attributes once you have specified a value for the type attribute.
The following attributes are mandatory for every launch configuration:
type— the type of debugger to use for this launch configuration. Every installed debug extension introduces a type:nodefor the built-in Node debugger, for example, orphpandgofor the PHP and Go extensions.request— the request type of this launch configuration. Currently,launchandattachare supported.name— the reader-friendly name to appear in the Debug launch configuration dropdown.
Here are some optional attributes available to all launch configurations:
presentation— using theorder,group, andhiddenattributes in thepresentationobject, you can sort, group, and hide configurations and compounds in the Debug configuration dropdown and in the Debug quick pick.preLaunchTask— to launch a task before the start of a debug session, set this attribute to the label of a task specified in tasks.json (in the workspace’s.vscodefolder). Or, this can be set to${defaultBuildTask}to use your default build task.postDebugTask— to launch a task at the very end of a debug session, set this attribute to the name of a task specified in tasks.json (in the workspace’s.vscodefolder).internalConsoleOptions— this attribute controls the visibility of the Debug Console panel during a debugging session.debugServer— for debug extension authors only: this attribute allows you to connect to a specified port instead of launching the debug adapter.serverReadyAction— if you want to open a URL in a web browser whenever the program under debugging outputs a specific message to the debug console or integrated terminal. For details see section Automatically open a URI when debugging a server program below.
Many debuggers support some of the following attributes:
program— executable or file to run when launching the debuggerargs— arguments passed to the program to debugenv— environment variables (the valuenullcan be used to «undefine» a variable)envFile— path to dotenv file with environment variablescwd— current working directory for finding dependencies and other filesport— port when attaching to a running processstopOnEntry— break immediately when the program launchesconsole— what kind of console to use, for example,internalConsole,integratedTerminal, orexternalTerminal
Variable substitution
VS Code makes commonly used paths and other values available as variables and supports variable substitution inside strings in launch.json. This means that you do not have to use absolute paths in debug configurations. For example, ${workspaceFolder} gives the root path of a workspace folder, ${file} the file open in the active editor, and ${env:Name} the environment variable ‘Name’. You can see a full list of predefined variables in the Variables Reference or by invoking IntelliSense inside the launch.json string attributes.
{
  "type": "node",
  "request": "launch",
  "name": "Launch Program",
  "program": "${workspaceFolder}/app.js",
  "cwd": "${workspaceFolder}",
  "args": ["${env:USERNAME}"]
}
Platform-specific properties
Launch.json supports defining values (for example, arguments to be passed to the program) that depend on the operating system where the debugger is running. To do so, put a platform-specific literal into the launch.json file and specify the corresponding properties inside that literal.
Below is an example that passes "args" to the program differently on Windows:
{
  "version": "0.2.0",
  "configurations": [
    {
      "type": "node",
      "request": "launch",
      "name": "Launch Program",
      "program": "${workspaceFolder}/node_modules/gulp/bin/gulpfile.js",
      "args": ["myFolder/path/app.js"],
      "windows": {
        "args": ["myFolder\path\app.js"]
      }
    }
  ]
}
Valid operating properties are "windows" for Windows, "linux" for Linux, and "osx" for macOS. Properties defined in an operating system specific scope override properties defined in the global scope.
Please note that the type property cannot be placed inside a platform-specific section, because type indirectly determines the platform in remote debugging scenarios, and that would result in a cyclic dependency.
In the example below, debugging the program always stops on entry except on macOS:
{
  "version": "0.2.0",
  "configurations": [
    {
      "type": "node",
      "request": "launch",
      "name": "Launch Program",
      "program": "${workspaceFolder}/node_modules/gulp/bin/gulpfile.js",
      "stopOnEntry": true,
      "osx": {
        "stopOnEntry": false
      }
    }
  ]
}
Global launch configuration
VS Code supports adding a "launch" object inside your User settings. This "launch" configuration will then be shared across your workspaces. For example:
"launch": {
    "version": "0.2.0",
    "configurations": [{
        "type": "node",
        "request": "launch",
        "name": "Launch Program",
        "program": "${file}"
    }]
}
Advanced breakpoint topics
Conditional breakpoints
A powerful VS Code debugging feature is the ability to set conditions based on expressions, hit counts, or a combination of both.
- Expression condition: The breakpoint will be hit whenever the expression evaluates to
true. - Hit count: The ‘hit count’ controls how many times a breakpoint needs to be hit before it will ‘break’ execution. Whether a ‘hit count’ is respected and the exact syntax of the expression vary among debugger extensions.
You can add a condition and/or hit count when creating a source breakpoint (with the Add Conditional Breakpoint action) or when modifying an existing one (with the Edit Condition action). In both cases, an inline text box with a dropdown menu opens where you can enter expressions:
Condition and hit count editing support is also supported for function and exception breakpoints.
You can initiate condition editing from the context menu or the new inline Edit Condition action.
An example of condition editing in the BREAKPOINTS view:

If a debugger does not support conditional breakpoints, the Add Conditional Breakpoint and Edit Condition actions will be missing.
Inline breakpoints
Inline breakpoints will only be hit when the execution reaches the column associated with the inline breakpoint. This is particularly useful when debugging minified code which contains multiple statements in a single line.
An inline breakpoint can be set using ⇧F9 (Windows, Linux Shift+F9) or through the context menu during a debug session. Inline breakpoints are shown inline in the editor.
Inline breakpoints can also have conditions. Editing multiple breakpoints on a line is possible through the context menu in the editor’s left margin.
Function breakpoints
Instead of placing breakpoints directly in source code, a debugger can support creating breakpoints by specifying a function name. This is useful in situations where source is not available but a function name is known.
A function breakpoint is created by pressing the + button in the BREAKPOINTS section header and entering the function name. Function breakpoints are shown with a red triangle in the BREAKPOINTS section.
Data breakpoints
If a debugger supports data breakpoints, they can be set from the context menu in the VARIABLES view. The Break on Value Change/Read/Access commands will add a data breakpoint that is hit when the value of the underlying variable changes/is read/is accessed. Data breakpoints are shown with a red hexagon in the BREAKPOINTS section.
Debug Console REPL
Expressions can be evaluated with the Debug Console REPL (Read-Eval-Print Loop) feature. To open the Debug Console, use the Debug Console action at the top of the Debug pane or use the View: Debug Console command (⇧⌘Y (Windows, Linux Ctrl+Shift+Y)). Expressions are evaluated after you press Enter and the Debug Console REPL shows suggestions as you type. If you need to enter multiple lines, use Shift+Enter between the lines and then send all lines for evaluation with Enter.
Debug Console input uses the mode of the active editor, which means that the Debug Console input supports syntax coloring, indentation, auto closing of quotes, and other language features.
Note: You must be in a running debug session to use the Debug Console REPL.
Redirect input/output to/from the debug target
Redirecting input/output is debugger/runtime specific, so VS Code does not have a built-in solution that works for all debuggers.
Here are two approaches you might want to consider:
-
Launch the program to debug («debug target») manually in a terminal or command prompt and redirect input/output as needed. Make sure to pass the appropriate command line options to the debug target so that a debugger can attach to it. Create and run an «attach» debug configuration that attaches to the debug target.
-
If the debugger extension you are using can run the debug target in VS Code’s Integrated Terminal (or an external terminal), you can try to pass the shell redirect syntax (for example, «<» or «>») as arguments.
Here’s an example launch.json configuration:
{
  "name": "launch program that reads a file from stdin",
  "type": "node",
  "request": "launch",
  "program": "program.js",
  "console": "integratedTerminal",
  "args": ["<", "in.txt"]
}
This approach requires that the «<» syntax is passed through the debugger extension and ends up unmodified in the Integrated Terminal.
Multi-target debugging
For complex scenarios involving more than one process (for example, a client and a server), VS Code supports multi-target debugging.
Using multi-target debugging is simple: after you’ve started a first debug session, you can just launch another session. As soon as a second session is up and running, the VS Code UI switches to multi-target mode:
Compound launch configurations
An alternative way to start multiple debug sessions is by using a compound launch configuration. A compound launch configuration lists the names of two or more launch configurations that should be launched in parallel. Optionally a preLaunchTask can be specified that is run before the individual debug sessions are started. The boolean flag stopAll controls whether manually terminating one session will stop all of the compound sessions.
{
  "version": "0.2.0",
  "configurations": [
    {
      "type": "node",
      "request": "launch",
      "name": "Server",
      "program": "${workspaceFolder}/server.js"
    },
    {
      "type": "node",
      "request": "launch",
      "name": "Client",
      "program": "${workspaceFolder}/client.js"
    }
  ],
  "compounds": [
    {
      "name": "Server/Client",
      "configurations": ["Server", "Client"],
      "preLaunchTask": "${defaultBuildTask}",
      "stopAll": true
    }
  ]
}
Compound launch configurations are displayed in the launch configuration dropdown menu.
Remote debugging
VS Code does not itself support remote debugging: this is a feature of the debug extension you are using, and you should consult the extension’s page in the Marketplace for support and details.
There is, however, one exception: the Node.js debugger included in VS Code supports remote debugging. See the Node.js Debugging topic to learn how to configure this.
Automatically open a URI when debugging a server program
Developing a web program typically requires opening a specific URL in a web browser in order to hit the server code in the debugger. VS Code has a built-in feature «serverReadyAction» to automate this task.
Here is an example of a simple Node.js Express application:
var express = require('express');
var app = express();

app.get('/', function(req, res) {
  res.send('Hello World!');
});

app.listen(3000, function() {
  console.log('Example app listening on port 3000!');
});
This application first installs a «Hello World» handler for the «/» URL and then starts to listen for HTTP connections on port 3000. The port is announced in the Debug Console, and typically, the developer would now type http://localhost:3000 into their browser application.
The serverReadyAction feature makes it possible to add a structured property serverReadyAction to any launch config and select an «action» to be performed:
{
  "type": "node",
  "request": "launch",
  "name": "Launch Program",
  "program": "${workspaceFolder}/app.js",

  "serverReadyAction": {
    "pattern": "listening on port ([0-9]+)",
    "uriFormat": "http://localhost:%s",
    "action": "openExternally"
  }
}
Here the pattern property describes the regular expression for matching the program’s output string that announces the port. The pattern for the port number is put into parenthesis so that it is available as a regular expression capture group. In this example, we are extracting only the port number, but it is also possible to extract a full URI.
The uriFormat property describes how the port number is turned into a URI. The first %s is substituted by the first capture group of the matching pattern.
The resulting URI is then opened outside of VS Code («externally») with the standard application configured for the URI’s scheme.
Trigger Debugging via Edge or Chrome
Alternatively, the action can be set to debugWithEdge or debugWithChrome. In this mode, a webRoot property can be added that is passed to the Chrome or Edge debug session.
To simplify things a bit, most properties are optional and we use the following fallback values:
- pattern:
"listening on.* (https?://\S+|[0-9]+)"which matches the commonly used messages «listening on port 3000» or «Now listening on: https://localhost:5001». - uriFormat:
"http://localhost:%s" - webRoot:
"${workspaceFolder}"
Triggering an Arbitrary Launch Config
In some cases, you may need to configure additional options for the browser debug session—or use a different debugger entirely. You can do this by setting action to startDebugging with a name property set to the name of the launch configuration to start when the pattern is matched.
The named launch configuration must be in the same file or folder as the one with the serverReadyAction.
Here the serverReadyAction feature in action:

Next steps
To learn about VS Code’s Node.js debugging support, take a look at:
- Node.js — Describes the Node.js debugger, which is included in VS Code.
- TypeScript — The Node.js debugger also supports TypeScript debugging.
To see tutorials on the basics of Node.js debugging, check out these videos:
- Intro Video — Debugging — Showcases the basics of debugging.
- Getting started with Node.js debugging — Shows how to attach a debugger to a running Node.js process.
To learn about debugging support for other programming languages via VS Code extensions:
- C++
- Python
- Java
To learn about VS Code’s task running support, go to:
- Tasks — Describes how to run tasks with Gulp, Grunt, and Jake and how to show errors and warnings.
To write your own debugger extension, visit:
- Debugger Extension — Uses a mock sample to illustrate the steps required to create a VS Code debug extension.
Common questions
What are the supported debugging scenarios?
Debugging of Node.js-based applications is supported on Linux, macOS, and Windows out of the box with VS Code. Many other scenarios are supported by VS Code extensions available in the Marketplace.
I do not see any launch configurations in the Run and Debug view dropdown. What is wrong?
The most common problem is that you did not set up launch.json or there is a syntax error in that file. Alternatively, you might need to open a folder, since no-folder debugging does not support launch configurations.
5/3/2023
IntelliJ IDEA provides a debugger for Java code. Depending on the installed/enabled plugins, you can also debug code written in other languages.
During a debugging session, you launch your program with the debugger attached to it. The purpose of the debugger is to interfere with the program execution and provide you with the information on what’s happening under the hood. This facilitates the process of detecting and fixing bugs in your program.
Before debugging
-
Make sure the Generate debugging info option is turned on (the default setting) in .
This setting is not absolutely required for debugging, however we recommend leaving it enabled. Disabling it allows you to save disk space at the cost of some debugger functionality.
-
Configure common debugging properties and behavior in .
If you are new to debugging, the out-of-the-box configuration will work for you. The topics about each debugger functionality provide references and explain the related settings where applicable. If you are an advanced user and looking for some particular property, see the Debugger reference section.
-
Define a run/debug configuration if you are going to use a custom one. This is required if you need some arguments to be passed to the program or some special activity to be performed before launch. For more information on how to set up run/debug configurations, refer to the Run/debug configurations section. Most of the time, you don’t need this to debug a simple program that doesn’t expect arguments or have any special requirements.
General debugging procedure
There is no one-size-fits-all procedure for debugging applications. Depending on actual requirements you may have to use different actions in different order. This topic provides general guidelines, which represent typical debugging steps. The details on how and when to use particular features are provided in the respective topics.
-
Define where the program needs to be stopped. This is done using breakpoints. Breakpoints are special markers, which represent places and/or conditions when the debugger needs to step in and freeze the program state. A program, which has been frozen by the debugger is referred to as suspended.
The alternative to using breakpoints is manually suspending the program at an arbitrary moment, however this method imposes some limitations on the debugger functionality and doesn’t allow for much precision as to when to suspend the program.
-
Run your program in debug mode.
Just like with regular running of the program, you can run multiple debugging sessions at the same time.
-
After the program has been suspended, use the debugger to get the information about the state of the program and how it changes during running.
The debugger provides you with the information about variable values, the current state of the threads, breakdown of objects that are currently in the heap, and so on. It also allows you to test your program in various conditions by throwing exceptions (for example, to check how they are handled) or running arbitrary code right in the middle of the program execution.
While these tools let you examine the program state at a particular instant, the stepping feature gives you the control over step-by-step execution of the program. By combining the tools you can deduce where the bug is coming from and test your program for robustness.
-
When you have determined what needs to be fixed, you can do it without terminating the session. For this purpose, IntelliJ IDEA provides a functionality allowing you to adjust and reload pieces of your code on the fly. This approach is covered in the Reload modified classes topic.
Debugger refreshers
If you are already familiar with IntelliJ IDEA debugger and want to get an overview of various useful features and approaches, take a look at Debugger Refresher video series.
Debugger Essentials covers basic topics like line breakpoints, stepping, controlling the debug session, watches, expression evaluation, and breakpoint conditions.
Debugger Advanced covers breakpoint types and settings, advanced stepping, remote debug, renderers, and more.
Debugger Professional covers advanced topics like using HotSwap, debug labels, asynchronous stack traces, and debugging decompiled code.
Last modified: 05 March 2023
A Guide to DEBUG
( The Microsoft® DEBUG.EXE Program )
Copyright©2004,2007,2009,2017 by Daniel B. Sedory
This page may be freely copied for PERSONAL use ONLY !
( It may NOT be used for ANY other purpose unless you have
first contacted and received permission from the author ! )
- A History of DEBUG
- Beginnings
- Changes in DEBUG
- Under Windows™ 9x/Me
- Under Windows™ NT/2000/XP and later
- Summary
- But PCE even runs under Windows 10!
- The best DEBUG ‘Clone’ (also for 32-bit code!)
- The Limitations of DEBUG
- Important Initialization Values for DEBUG
- Using DEBUG with .EXE Files
- Special Memory Locations in MS-DEBUG
- DEBUG’s own Dynamic Stack Area
- Have you found a ‘bug‘ in DEBUG?
- Important Notes for using DEBUG
- All the Commands — Listed Alphabetically
- Quick Links to Command Help
- How to Use the COMMANDS
- Meaning of Command Parameters
- Detailed Help on each Command (begins here)
- An Example Program for you to Enter, Run and Edit under DEBUG.
- A Note
about Win 9x’s ‘IHC‘ string in Diskette Boot Sectors - Appendix
- The 8086 CPU Registers
- The FLAGS Register
- The Segment:Offset Addressing method used by DEBUG
PAGE TWO:
A History of MS-DEBUG
Beginnings
In
1980, Tim Paterson began working on a 16-bit OS for the 8086 S-100 Bus card
he had designed for SCP (Seattle Computer Products) the
previous year. To help in getting QDOS
(later called 86-DOS) to work correctly, Tim created a debugger in a ROM chip;
the code for that ROM version was released into the Public Domain. Later, Tim
adapted the code to run as a .COM program under QDOS, and also added the ability
to disassemble 8086 machine code. In the meantime, Microsoft® had
been busy purchasing the rights to sell Tim’s QDOS to IBM®
for their ‘secret’ PC project. Tim was then hired by Microsoft
as the primary author of their first OS. When he completed his work on IBM’s
Personal Computer™ DOS 1.00 in 1981, his DEBUG.COM utility
was included with it. All the functionality that Tim put into DEBUG is still
there and little has been added to it (the major exception being the Assemble
command; added under DOS 2.0).
[ Thanks go to Tim Paterson himself for reviewing
this perspective on DEBUG’s beginnings. ]
Changes in MS-DEBUG
With the release of DOS
2.0, DEBUG
gained the ability to assemble instructions directly into machine code (the
A command). This is one of the most important commands for many of its
users. Though lacking much of the functionality of a stand-alone Assembler,
e.g., all Jumps must be to hexadecimal addresses (no labels can be used), many
useful .COM programs have been assembled with this command. Under DOS 3.0,
the P (Proceed) command was added, so DEBUG could quickly execute
subroutines; at the same time, it became possible to attempt stepping
through Interrupts with the T (Trace) command. When DOS made EMS
(Expanded Memory) functions available under DOS 4.0,
the four commands xa,
xd, xm
and xs were also added
to DEBUG. It appears they were rarely, if ever used though, even by programmers.
For most of us, the only noticeable change in DEBUG was the addition
of the help command (type a ‘?‘
while inside DEBUG) under DOS 5.0;
when all DOS commands finally got the /?
command-line switch.
DEBUG’s code went
through a number of changes (and ‘bug fixes’ too) over the years!
Some of these internal changes were related to DOS system calls and screen
output, then there was the change in file type from a .COM to an .EXE program
under DOS 5.0.
But in spite of all those changes and others which followed, DEBUG has never
had an official revision since 2.40 (those digits have
been embedded inside all versions of DEBUG since DOS 3.0).
We can only guess about the real reasons that Microsoft® never updated
DEBUG to handle instructions beyond those of the Intel® 8086/8087/8088 processors.
Microsoft® did create their own Assembler (MASM), ‘C’ compiler and
Debugger (CodeView ); which you could use too, if you were
willing to pay extra, so that could have been one of their reasons. Rather
than using MASM and CodeView, many opted for the less expensive Borland®
assembler (TASM) and Turbo™ Debugger when they appeared, or some
other commercial product. However, users and students alike can still learn
a great deal about Assembly language by using DEBUG.
DEBUG under Windows®
9x/Me
The internal structure
of these Windows® versions of DEBUG appear much different than any previous
DOS forms; at least at first glance. Though it seems a great deal has changed,
you’ll still find the phrase «Vers 2.40» but in a different location.
Windows® itself went through a lot of changes during this period, such as
being able to handle a new file system, FAT32, and larger drives. But without
access to its source code, we can’t be sure if there were any major differences
in DEBUG. The changes might be due to something as simple as just reorganizing
the error messages in the source code and/or using a new Assembler/Linker.
DEBUG had always been an
effective tool in the hands of any Batch programmer, but some time after
the introduction of Windows™ 95 and especially with Windows™
98, that effectiveness was diminished when its I/O
commands became unreliable! Whether due to a ‘bug’ in DEBUG itself or
in Windows®, the fact is that I/O
commands under Windows™ 9x/Me cannot be relied upon for direct access
to a hard drive! If you run our ATA drive
ID script under Win9x/Me, the data you get back is as interesting as
it is disturbing: It appears that every other byte is still correct!
So, one has to wonder what the cause of this problem might be.
DEBUG under Windows®
NT/2000/XP/2003
The DEBUG program included
with Windows® NT/2000/XP/2003 appears to operate the
same as it did under DOS 5.0, but with two major exceptions:
1)
DEBUG is no longer allowed to load from or write
to any logical HDD sectors; only named files can still
be read from or written to under an NT-type OS. It can, however, still access
diskette sectors in the A: or B: drives
with the L and W commands, but only if those diskettes
contain a file system the host OS (2000, XP, 2003) can recognize!
(See the L
command in the Tutorial section for more
information.)
[
Note: DEBUG has never been able
to directly access areas of an HDD outside of its drive volumes; such
as an Extended partition table or even the MBR sector! However, DEBUG can be
used to access such data by programming it to run INT13 commands or using
a script file
under DOS (e.g., our old CopyMBR
script). Note again, that no Windows version after Win98/ME will allow INT13 access! ]
2)
The I and
O commands are essentially useless, since the program’s interface
with the rest of the system is only being emulated under these
versions of Windows® rather than having any direct access to the hardware.
This was already true to varying degrees under previous versions of Windows®.
This may surprise you: We
purposely mentioned the DOS 5.0 version of DEBUG here, since the DEBUG.EXE
file included with Windows® XP (and every other version
of the NT OS series) is exactly the same program file created
for MS-DOS 5.0 (md5sum = c17afa0aad78c621f818dd6729572c48).
DEBUG was only one of a small handful of DOS 5.0 programs that didn’t
require any changes to run under an NT operating system. It’s almost
ironic that another of those few programs is EDLIN, a line editor disliked by
most DOS users. Though EDLIN was also created by Tim Paterson, he did so in
just two weeks and was shocked when he heard IBM had actually included
it in their PC-DOS 1.00 release! No doubt he wished it had been replaced by
something better way back in 1981. It wasn’t until the release of DOS 5.0,
that EDLIN was effectively replaced by Microsoft’s EDIT.COM
program (v 1.0, 1991. Note: This
first version of EDIT required QBASIC to also be present); EDLIN was, however, still
retained, to be ‘backwards compatible’ with various 3rd-party Batch files. Though NOTEPAD
or more advanced editors are available under Windows™, you can still use
the 1995 standalone version of EDIT (v
2.0.026) at Command Line prompts in Windows™ XP; its menus will
even respond to mouse clicks.
Summary
Though created at the beginning
of the 16-bit processor era (before the 80286 existed), more recent versions
of DEBUG (such as those found inside a Windows™ Me or 98SE Emergency Boot
Diskette’s EBD.CAB file) are still useful to PC techs for direct access to certain
memory locations on present-day systems (an Intel® Pentium™
IV, for example). DEBUG
can also be quite useful for educational purposes. And even for debugging
the Assembly code that is required during the boot process: The software that
checks the Partition Table on hard disks and loads OS Boot Sectors into Memory.
Unfortunately, many Boot Managers and recent MBR sectors now use instructions
requiring a 386 (or even 486) class CPU to function, making it difficult
to use DEBUG for such a purpose. Because of the backward compatibility
of most Intel® processors, and the fact that it was included with
Microsoft® Windows™ XP and 2003, DEBUG has had a much longer life span
than ever expected. Though the ITANIUM™
CPU was not x86-compatible, the AMD64 was. In 2005, Intel®
made the so-called «x64-based» CPUs that were once again x86-compatible.
So, DEBUG still continues to find some use on 64-bit computers, even my
Intel®
Core™ 2 Quad (4 processors in one)
machine.
Final Chapter?
Yes, DEBUG and some other early DOS utilities were removed from the Command Line of the 64-bit
version of Windows 7, and will never again appear in any new Microsoft OS. However, it’s been possible for a few years now to run IBM PC DOS 1.x0, 2.x0
and 3.30 (possibly others) along with their versions of DEBUG in a small window under Windows XP (32-bit), Windows 7
(64-bit), 8 and even the latest update of Windows 10 (Anniversary)! Read here about the PCE (PC Emulator) program by Hampa Hug. Of course, if you wish to run the last version of MS-DEBUG from
MS-DOS 6.22 or the 32-bit Debug clone we recommend below, you may need to install BOCHS, QEMU or some other emulator, or VPC, VirtualBox,
VMWare Player or some other type of virtual machine software. But what’s cool about PCE is that you’ll be running the OS under the actual ROM BIOS
code used in a physical IBM PC. It should be noted that BOCHS itself can also be run as a powerful
visual debugger! (SEE our Bochs Debug page for more on that.)
A Better (and also for 32-bit code!) DEBUG Clone!
For some years now, we’ve been using a ‘clone’ of MS-DEBUG which started as the DEBUG
program for FreeDOS, but has since had even more improvements made. You can download and use this program for free; currently we recommend
a page made for it on a site created by Vernon C. Brooks, who had been a Senior programmer for IBM’s PC DOS 7.0, the remainder of his site
deals with the history of IBM PC DOS, and is very informative (PC DOS Retro):
Enhanced DEBUG (current version, since MAY 2016, is 1.32b).
I finally found it still available from there: Download DEBUGX 1.32b.
Unfortunately, just as with MS-DOS DEBUG itself, DEBUGX is also 16-bit, so it will not function under any 64-bit Windows OS;
attempting to do so will result in this error message:

C:DEBUG> DEBUGX
-?
assemble        A [address]
compare         C range address
dump            D[B|W|D] [range]
dump interrupt  DI interrupt [count]
dump LDT        DL selector [count]
dump MCB chain  DM
dump ext memory DX [physical_address]
enter           E address [list]
fill            F range list
go              G [=address] [breakpoints]
hex add/sub     H value1 value2
input           I[W|D] port
load file       L [address]
load sectors    L address drive sector count
move            M range address
set x86 mode    M [x] (x=0..6)
set FPU mode    MC [2|N] (2=287,N=no FPU)
name            N [[drive:][path]filename [arglist]]
output          O[W|D] port value
proceed         P [=address] [count]
proceed return  PR
quit            Q
register        R [register [value]]
MMX register    RM
FPU register    RN[R]
toggle 386 regs RX
search          S range list
trace           T [=address] [count]
trace mode      TM [0|1]
unassemble      U [range]
write file      W [address]
write sectors   W address drive sector count

prompts: '-' = real/v86-mode; '#' = protected-mode
-
The Limitations of MS-DEBUG
DEBUG was originally designed
to work with .COM programs having a maximum size of only 65,280 bytes
[ (64 x 1024) — 256 ] or less; how much less, depended
upon the maximum number of bytes the program had to place on the Stack
at the same time. The subtraction of 256 bytes is necessary since DEBUG
often uses the area from offset 00 through FF hex
for some internal data such as the name of the file that was loaded.
Remember, true .COM programs by definition are supposed to fit inside
a single Segment of memory (only 64 KiB).
Even when running MS-DEBUG
under the latest Windows® OS, since it’s still an old 16-bit DOS application,
you can only open files whose names have been saved in the 8.3 DOS convention;
i.e., up to 11 characters total, using no more than 8 DOS characters
for the name and 3 for the extension.
As early as DOS 1.10,
DEBUG was able to load files larger than 64 KiB. Basically, how large a file
that DEBUG can safely use without error depends on the amount of available memory
and the way the OS handles memory management. We’ll say more about this below.
|
A. When DEBUG starts 1)
2) The Segment registers, CS, DS, ES and SS are all set to 3) The Instruction Pointer ( IP) 4) The registers, AX, BX, CX, DX, BP, S I B. When DEBUG starts with 1)
3) The Instruction Pointer ( IP) 4) Most of the registers follow the same pattern as above, |
Remember: The Segment assigned to DEBUG,
depends on the amount of memory in use, not the total memory available. So,
the same DOS machine, whether it has 16 or even 4096 MiB of memory, will generally
load DEBUG into the same Segment; unless a «terminate and stay resident»
program is using that memory, or memory was not properly deallocated prior to
running DEBUG.
Using DEBUG with
.EXE Files
Any version of DEBUG from
DOS 2.0 or
higher, makes use of the operating system’s EXEC function which means that it’s
possible for you to perform a limited amount of debugging on an .EXE
program. However, DEBUG can never be used to save either an .EXE or a
.HEX file to disk, since both of these file types contain extra data that DEBUG
was never programmed to create after EXEC removed such data! It is quite possible
though, to change the extension of an .EXE file, for example to .BIN, so DEBUG
can be used to edit such a file, then change it back to an .EXE extension
afterwards. Normally we’d recommend using a Hex editor instead, but would like to
point out that DEBUG could be used with Batch files and scripts to carry out such
edits automatically; taking the place of a Patch program.
One of the simplest .EXE
programs you can run under DEBUG is the so-called DOS «Stub» found
inside many Windows® executables. You can follow along as we examine one
of these here!
Special Memory Locations in MS-DEBUG
There will always be some
code and data placed within the first 256
bytes of the Segment for DEBUG’s own use. And although DEBUG often functions
as expected if you zero-out this area, there may be some cases where you wouldn’t
want to alter its contents. The code bytes are simple and always found in the
same locations: The first
two bytes of this area («CD 20») are machine code for the DOS
interrupt: INT 20.
The bytes at offsets 50h and 51h («CD 21») form
an INT 21, and
the byte «CB» at offset 52h is a RETF instruction.
|
When booting from an A:>debug
-d 0 8f
1787:0000 CD 20 C0 9F 00 9A EE FE-1D F0 4F 03 EB 11 8A 03 . ........O.....
1787:0010 EB 11 17 03 EB 11 38 0E-01 01 01 00 02 FF FF FF ......8.........
1787:0020 FF FF FF FF FF FF FF FF-FF FF FF FF 5F 0F 4E 01 ............_.N.
1787:0030 AB 16 14 00 18 00 87 17-FF FF FF FF 00 00 00 00 ................
1787:0040 06 16 00 00 00 00 00 00-00 00 00 00 00 00 00 00 ................
1787:0050 CD 21 CB 00 00 00 00 00-00 00 00 00 00 20 20 20 .!...........
1787:0060 20 20 20 20 20 20 20 20-00 00 00 00 00 20 20 20 .....
1787:0070 20 20 20 20 20 20 20 20-00 00 00 00 00 00 00 00 ........
1787:0080 00 0D 75 73 0D 0D 00 00-00 00 00 00 00 00 00 00 ..us............
When running One of these -n edit.com
-l
-d 0 8f
1798:0000 CD 20 C0 9F 00 9A F0 FE-1D F0 4F 03 EB 11 8A 03 . ........O.....
1798:0010 EB 11 17 03 EB 11 DA 11-01 01 01 00 02 FF FF FF ................
1798:0020 FF FF FF FF FF FF FF FF-FF FF FF FF 75 0F E8 49 ............u..I
1798:0030 EB 11 14 00 18 00 98 17-FF FF FF FF 00 00 00 00 ................
1798:0040 06 16 00 00 00 00 00 00-00 00 00 00 00 00 00 00 ................
1798:0050 CD 21 CB 00 00 00 00 00-00 00 00 00 00 45 44 49 .!...........EDI
1798:0060 54 20 20 20 20 43 4F 4D-00 00 00 00 00 20 20 20 T COM.....
1798:0070 20 20 20 20 20 20 20 20-00 00 00 00 00 00 00 00 ........
1798:0080 09 20 45 44 49 54 2E 43-4F 4D 0D 00 00 00 00 00 . EDIT.COM......
At first, we |
When running DEBUG in a
Windows® DOS-box (under CMD.exe), dumping its first 256 bytes will
almost always show the same fragmented string (shown below in
white text). The characters are the remains
of the Ntvdm program (which starts as soon as any 16-bit command is run)
quickly reading one line at a time from the file AUTOEXEC.NT
(located in the C:WINDOWSsystem32 folder),
into the same area of memory where command line parameters are stored. The longest
line in that file, including its trailing 0Dh (carriage return) byte,
is successively overwritten by shorter lines in the file until the process results
in what’s copied to offsets 82h through CEh of DEBUG’s Segment:
C:>debug
-d 0 cf
0B20:0000  CD 20 FF 9F 00 9A EE FE-1D F0 4F 03 84 05 8A 03   . ........O.....
0B20:0010  84 05 17 03 84 05 25 04-01 01 01 00 02 FF FF FF   ......%.........
0B20:0020  FF FF FF FF FF FF FF FF-FF FF FF FF 28 05 4E 01   ............(.N.
0B20:0030  44 0A 14 00 18 00 20 0B-FF FF FF FF 00 00 00 00   D..... .........
0B20:0040  05 00 00 00 00 00 00 00-00 00 00 00 00 00 00 00   ................
0B20:0050  CD 21 CB 00 00 00 00 00-00 00 00 00 00 20 20 20   .!...........
0B20:0060  20 20 20 20 20 20 20 20-00 00 00 00 00 20 20 20           .....
0B20:0070  20 20 20 20 20 20 20 20-00 00 00 00 00 00 00 00           ........
0B20:0080  00 0D 20 20 20 53 45 54-20 42 4C 41 53 54 45 52   ..   SET BLASTER
0B20:0090  3D 41 30 0D 64 64 72 65-73 73 2E 20 20 46 6F 72   =A0.ddress.  For
0B20:00A0  20 65 78 61 6D 70 6C 65-3A 0D 20 6F 6E 20 4E 54    example:. on NT
0B20:00B0  56 44 4D 2C 20 73 70 65-63 69 66 79 20 61 6E 20   VDM, specify an
0B20:00C0  69 6E 76 61 6C 69 64 0D-20 6F 6E 6C 79 2E 0D 00   invalid. only...
None of the The byte at |
Note: If you rename
or delete AUTOEXEC.NT, you will
not be allowed to run DEBUG (nor any other 16-bit program; all
of which must run under Ntvdm). You can, however, save a copy of
AUTOEXEC.NT, then edit it
to see how your changes affect what’s copied into DEBUG. You may reduce
its size to just a single byte. But in order to see anything
other than zero bytes in offsets 82h and following, at least one space
byte (20h) must be placed between a non-space byte at the beginning of a line
and whatever you’d like to have displayed. If the file contains only the 3 bytes:
«T«, space and «S«,
then offsets 82h and 83h would be an «S»
followed by 0Dh.
DEBUG’s «Dynamic Stack» Area
This section
is presently a «Work in Progress«, but if you happen to see
this before it’s finished, can you guess what it’s about?
Have you found a «Bug» in DEBUG?
Although almost all the code used by programmers performs exactly as
expected; once they’ve eliminated their own errors in logic that is, occasionally it will produce surprising results because
they didn’t dig deep enough into the fine print of the user manuals for a PC’s processor. Professional programmers will always
test their code in as many ways as reasonably possible, but studying the processor’s programming notes; especially
sections pertinent to any of their tasks, should be high on their list! NOTE: If you want to be a much better
hacker, the example presented here might cause you to delve into Intel’s detailed
notes on how their CPUs handle various instructions.
Have you ever encountered two distinct lines of Assembly
instructions that DEBUG always steps through without ever stopping at the second line? The following is just one of MANY
repeatable examples we could list here. Open any instance of DEBUG (DOS or Windows; any version), and copy and paste the
following E (Enter) command at its (-) prompt:
e 100 8C C8 8E D0 B0 74 90 90
After entering «u
100 107» it should disassemble to:
 xxxx:0100 8CC8    MOV   AX,CS  <- Keep Stack in CS Segment.
 xxxx:0102 8ED0    MOV   SS,AX  <- The key instruction!
 xxxx:0104 B074    MOV   AL,73  <- Could be almost anything.
 xxxx:0106 90      NOP
 xxxx:0107 90      NOP
Now enter an «r» at the prompt and try to single step (t) through the code.
As soon as you enter the t command at offset 0102h, you’ll wind up at offset 0106h; every time! Is this some «bug» that was never dealt with? The instruction at offsets 0104h ff. could be almost anything; any 1-, 2-, 3- or even 4-byte machine code will do; we purposely picked one that would alter a register’s contents (AL in this case) so you could see this instruction had indeed been executed by the CPU; without the user ever having a choice to do so.
This effect will always be observed no matter what version of DEBUG you run it under;
MS-DOS 7.1, 5.0 or all the way back to the first version of DEBUG under IBM PC DOS 1.0 (no
guarantee it would act the same if you ran it on an original PC though; we only have an 80486 and later for testing).
However, if you expand your research to include other debugging tools, you’ll soon realize the chances of every version of two or more tools having the
same «bug» are… well, way too coincidental. So, why does this code affect a debugger’s interrupt abilities?
If you haven’t already reached for your Intel® Instruction Set Reference… What’s that? You don’t have one! Well, you’d better search for the keywords: Intel, IA32, Software, Instruction and at least download a PDF digital copy of the Instruction Set Reference!
(Usually found as two separate files titled: Volume 2A: Instruction Set Reference, A-M and Volume 2B: Instruction Set Reference, N-Z). In my January 2006 copy under «MOV—Move«, I found:
« Loading the SS register with a MOV instruction inhibits all interrupts until after the execution of
the next instruction. This operation allows a stack pointer to be loaded into the ESP register with the next instruction (MOV ESP, stack-pointer value) before an interrupt occurs1.» (IA-32 Intel® Architecture
Software Developer’s Manual, Volume 2A: Instruction Set Reference, A-M, 253666-018, Jan 2006, «MOV—Move,» page 3-584). And footnote 1. clearly states: «If a code instruction breakpoint (for debug) is placed on an instruction located immediately after a MOV
SS instruction, the breakpoint may not be triggered.» (page 3-585). For those who are new to how a debugger works, the «instruction breakpoint» which this refers to is not a breakpoint set by users, but rather the, let’s call it, automatic breakpoint a debugger sets by itself on every single instruction users step into. So, according to these notes, what you may have thought was a «bug» in DEBUG, is in fact a processor doing what it was designed to do!
Does this mean we believe MS-DEBUG is completely «bug free»? No. In the future we’ll post some examples here of real ‘bugs’ in DEBUG.
Before using any of the
debugging (Trace, Procedure) or Register commands, you
should familiarize yourself with the abbreviations for the CPU Registers
that are referenced in DEBUG (See the Appendix, The
8086 CPU Registers for all the details.)
You should also know about the
SEGMENT:OFFSET Addressing method used by DEBUG (and other programming utilities).
A note about where and how DEBUG is used in a computer’s Memory:
Using DEBUG in a Windows® DOS-box (or CMD prompt) for the first time
could easily confuse you! If you open two instances of DEBUG (one per DOS-window) and examine all
the memory they can access, you might notice completely different data in many of the same memory locations! The reason is that each
application under a Windows™ OS is (theoretically) given its own 4-Gigabyte «Virtual computer» sandbox to
play in, and a copy of the critical data within the machine’s first Megabyte of Memory is made for each running instance of
DEBUG. Only under 16-bit DOS, does DEBUG actually have access to the real Memory locations in which the operating system
itself is running; making it much easier to crash the whole system if an error is made. Under Windows®, the theory is that such
errors should crash only the open CMD window or application that caused a problem, but not the whole computer! At least that’s how Windows®
is supposed to operate. From experience, it seems that Windows™ 2000/XP do a much better job at keeping control of their systems under the
same circumstances that often ended in Blue Screens on the displays of earlier versions!
NOTE: If you decide to use one of the PCE emulation programs, DEBUG will exist entirely within
the memory space set up by the emulator for whatever OS you happen to be running it under. We will attempt to locate and point out any inconsistencies
when using PCE with these early versions of DEBUG, but would appreciate feedback from our readers as well.
Quick Links to all the
Commands
(Alphabetically Listed)
We recommend reading
through the entire Tutorial on DEBUG before using these quick command links.
For a reminder of all the commands available
while inside of DEBUG, simply enter a question mark (?)
at the DEBUG prompt; when using DOS 5.0 or later.
Click on a command
here for all its details:
-?
assemble    A [address]
compare     C range address
dump        D [range]
enter       E address [list]
fill        F range list
go          G [=address] [addresses]
hex         H value1 value2
input       I port
load        L [address] [drive] [firstsector] [number]
move        M range address
name        N [pathname] [arglist]
output      O port byte
proceed     P [=address] [number]
quit        Q
register    R [register]
search      S range list
trace       T [=address] [number]
unassemble  U [range]
write       W [address] [drive] [firstsector] [number]
Updated: December 9, 2007 (09.12.2007); February 12, 2009 (12.02.2009); August 24, 2009 (24.08.2009);
April 20, 2015 (20.04.2015); February 18, 2017 (18.02.2017).
Last Update: August 2, 2020. (02.08.2020)
![]()
The Starman’s Realm Assembly Page