- Руководства по ремонту
- Руководство по ремонту Дэу Эсперо 1999-2001 г.в.
Руководство по ремонту Daewoo Espero / Део Эсперо
Общая информация об автомобиле.
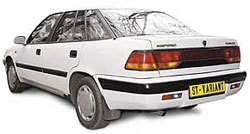
Daewoo Espero появился в 1992 году. В основу этого автомобиля были положены агрегаты от старого доброго Опеля Асконы. Несмотря на то, что первым экземплярам этой модели уже более десяти лет, Дэу Эсперо до сих пор смотрится неплохо. Под стать внешнему виду и интерьер, который изготовлен на недорогих материалов, но выглядит достаточно солидно и современно. Места внутри много и для водителя с пассажиром, и для «обитателей» заднего ряда сидений.
В ходу Daewoo Espero чем-то напоминает американские модели — он обладает хорошей плавностью хода, позволяя не снижать скорость на ямах и выбоинах наших дорог. В поворотах досаждают излишние крены, хотя по траектории автомобиль движется неплохо. Двигатели, устанавливаемые на Daewoo Espero, проверены временем и как следствие надежны. А вот ходовая не слишком крепка и требует довольно частых вложений, правда запчасти стоят недорого. В общем, это довольно комфортабельный автомобиль, обладающий очень важным достоинством — невысокой ценой.
Корейская модель среднего класса Daewoo Espero — это довольно прочный и качественный автомобиль с неплохой динамикой и комфортом, разработанный на платформе Opel Ascona 80х годов. Его собирали на предприятии «Красный Аксай» в Ростове-на-Дону, благодаря чему его вполне можно считать и отечественным автомобилем. Стильный переднеприводный седан с кузовом работы итальянского ателье Bertone появился в 1994 году. Гамма двигателей, особенно предназначенных для отечественного рынка, невелика: лишь 1,5-литровый 16-клапанный 90-сильный от меньшей модели Nexia да 2,0-литровый 8-клапанный 105-сильный.
С последним максимальная скорость достигает 185 км/ч, а разгон до 100 км/ч занимает 10,0 с. Еще один 1,8-литровый 95-сильный двигатель на российский рынок не поставляется. Все «отечественные» модификации комплектуют только 5-ступенчатой механической коробкой передач, на «корейских» версиях встречается и 4-диапазонный «автомат». Также в комплектацию входят: кондиционер, магнитола, центральная блокировка, электростеклоподъемники на всех дверях.
↓ Комментарии ↓
1. Инструкция по эксплуатации
1.0 Инструкция по эксплуатации
1.1 Предисловие
1.2 Вниманию владельца
1.3 Перед тем, как отправиться в путь
1.4 Пуск двигателя и управление автомобилем
1.5 Панель приборов и органы управления
1.6 Оборудование автомобиля
1.7 Вентиляция, отопление и кондиционирование воздуха
1.8 Практические советы
1.9 Техническое обслуживание
2. Общие сведения
2.0 Общие сведения
2.1 Техника безопасности при выполнении технического обслуживания
2.2 Общие требования к проведению ремонта автомобиля
2.3. Общее описание
2.4 Подъем автомобиля
2.5 Регламентные работы и смазочные материалы
2.6 Инструкции пользователя по проведению осмотров и техническому обслуживанию автомобиля
3. Двигатель
3.0 Двигатель
3.1 Общие сведения
3.2 Поиск и устранение неисправностей в работе двигателя
3.3 Конструкция двигателя
4. Система охлаждения
4.0 Система охлаждения
4.1 Общие сведения
4.2 Диагностика неисправностей
4.3 Обслуживание системы охлаждения
4.4 Поиск и устранение неисправностей системы охлаждения
4.5 Обслуживание на автомобиле
5. Топливная система
5.0 Топливная система
5.1 Общие сведения
5.2 Система впрыска топлива
5.3 Обслуживание топливной системы
5.4 Обслуживание на автомобиле
6. Электрическое оборудование двигателя
6.0 Электрическое оборудование двигателя
6.1 Электрическое оборудование двигателя
6.2 Система пуска двигателя
6.3 Система зарядки
6.4 Система зажигания
7. Сцепление
7.0 Сцепление
7.1 Общие сведения
7.2 Проверка сцепления
7.3 Трос сцепления
7.4 Педаль сцепления
7.5 Ведомый и нажимной диск сцепления
7.6 Возможные неисправности сцепления и методы их устранения
8. Общие сведения
8.0 Общие сведения
8.1 Техническое обслуживание
8.2 Ремонт узлов коробки передач
8.3 Замена элементов коробки передах
8.4 Возможные неисправности
8.5 Признаки и возможные причины неисправностей коробки передач
9. Автоматическая коробка передач
9.0 Автоматическая коробка передач
9.1 Общие сведения
9.2 Принцип работы автоматической коробки передач
9.3 Рекомендации по ремонту автоматической коробки передач
9.4 Технические данные
10. Передняя подвеска
10.0 Передняя подвеска
10.1 Общие сведения
10.2 Углы установки передних колес
10.3 Предварительные проверки
10.4 Техническое обслуживание и ремонт автомобиля
10.5 Технические данные
11. Задняя подвеска
11.0 Задняя подвеска
11.1 Общие сведения
11.2 Проверка и регулировка
11.3 Обслуживание автомобиля
12. Тормозная система
12.0 Тормозная система
12.1 Тормозная система
12.2 Главный тормозной цилиндр
12.3 Суппорт дисковых тормозов
12.4 Барабанные тормоза
12.5 Вакуумный усилитель тормозов
12.6 Технические данные
13. Рулевое управление
13.0 Рулевое управление
13.1 Общие сведения
13.2 Реечная рулевая передача
13.3 Насос усилителя рулевого управления
13.4 Рулевое колесо и рулевая колонка
13.5 Диагностика неисправностей рулевой передачи
13.6 Технические данные
14. Колеса и шины
14.0 Колеса и шины
14.1 Общие сведения
14.2 Техническое обслуживание и регулировка
14.3 Диагностика шин
14.4 Технические данные
15. Система кондиционирования воздуха система
15.0 Система кондиционирования воздуха система
15.1 Общие сведения
15.2 Установка блока управления системой кондиционирования воздуха
15.3 Блок компрессора V5 системы кондиционирования воздуха
15.4 Описание работы компрессора V5
15.5 Определение неисправностей в системе кондиционирования компрессора V5
16. Схемы электрооборудования
16.0 Схемы электрооборудования
16.1 Как читать монтажную схему
16.2 Цоколевка соединителей жгутов проводов
16.3 Схема 1
16.4 Схема 2
16.5 Схема 3
16.6 Схема 4
16.7 Схема 5
16.8 Схема 6
16.9 Схема 7
Руководство по эксплуатации, тех. обслуживанию и ремонту Daewoo Espero
 3877 просмотров")
Выпуск 1991 — 2000гг.
Бензиновые двигатели 2.0л ( 73,5л.с.) SOHC
Настоящее руководство является пособием по эксплуатации, техническому обслуживанию и ремонту автомобилей Daewoo Espero и предназначено для индивидуальных владельцев и работников ремонтных мастерских и станций технического обслуживания.
Руководство поможет грамотно эксплуатировать автомобиль и определять его неисправности, в нем рассматриваются методы их устранения. Принцип ремонта автомобиля, на котором основано руководство — замена неисправных деталей и узлов новыми.
Язык: Русский
Формат: PDF
Размер: 57,6 Мб
Скачать документацию Daewoo Espero
-
Page 2
When it comes to service, remember that your local DAEWOO Outlet knows your vehicle best and is interested in your complete satisfaction. We would like to take this opportunity to thank you for choosing a DAEWOO product and assure you of our continuing interest in your motoring pleasure and satisfaction. -
Page 3: Important Notice
IMPORTANT NOTICE All information, illustrations and specifica- We would like to point out that non-Daewoo Please read this manual and follow its genuine parts and accessories have not tion in this manual are based on the latest instructions carefully. been examined and approved by Daewoo,…
-
Page 4
BE FOR E DR IV IN G YOU RCA R 2. START IN G AND 0 PER AT IN G 3 . INS T RUM E NT SAN D CON T R 0 LS ……………………. 3~ 1 4. OTHER CONTROLS AND FEATURES 5. -
Page 6: Before Driving Off
RUNNING-IN PERIOD BEFORE DRIVING OFF Following a few simple precautions for the • Ensure that the windows, exterior rear- • Adjust your seating position. first few hundred miles can add to the fu- view mirrors and lights are clean, un- •…
-
Page 7
You should also record the key number in a safe place, not in the vehicle. If you need additional keys, duplicates can be obtained from your Daewoo Outlet up to a maximum of 3. See page 2-5 under Immobiliser System… -
Page 8: Door Locks
DOOR LOCKS CENTRAL DOOR LOCKING SYSTEM The front doors can be locked or unlocked If you wish to lock the driver’s door without from outside by using the key. using the key, set the button in the lock By pressing down or pulling up the inte- position before closing the door.
-
Page 9
CHILD SAFETY DOOR LOCKS FUEL TANK FILLER CAP BOOT LID When the metal latch beneath the lock on 1. Pull the door lock button of the driver’s 1. Press the boot lid release button in the either of the rear doors is pushed door upwards. -
Page 10
ELECTRIC WINDOW SWITCHES The windows be operated switches located in the driver’s door arm- Care must be taken when operating rest when the ignition switch is in the «on» is a the electric windows. There risk of position. injury, particularly for children, and danger that articles could become Safety lock switch… -
Page 11
Adjust the exterior rear-view mirrors with Convex rear-view mirror* The interior mirror can be adjusted up, The exterior mirror on the passenger’s the adjusting lever so that you can see down or sideways to obtain the best view. not only each side of the road behind you side is convex if it says «OBJECTS IN The interior mirror has day and night but also each side of your vehicle. -
Page 12
TILTABLE STEERING WHEEL FRONT SEAT SLIDE ADJUSTMENT FRONT SEAT RECLINING ADJUSTMENT The steering wheel can be adjusted to To move the seat forwards or backwards, different positions. pull up the control lever located under the To adjust the seat back, rotate the knob front of the seat, and hold it. -
Page 13
REAR SEAT ARMREST DRIVER’S SEAT HEIGHT HEAD RESTRAINTS ADJUSTMENT The head restraints are designed to help The pull-down rear seat armrest is located reduce the risk of neck injuries. in the centre of the rear seat. The desired seat height can be achieved by turning the crank handle located below the driver’s seat. -
Page 14
SEAT-BELT PRECAUTIONS THREE-POINT SEAT-BELTS To protect you and your passengers in the Each Daewoo vehicle is equipped with CAUTION event of an accident, it is recommended three-point seat-belts with automatic The seat-belt will provide maximum that the seat-belts be worn by all occu-… -
Page 15
USING THE BELT LAP BELT SEAT-BELT HEIGHT ADJUSTER* A lap belt is installed in the centre of the Pull the belt evenly out of the retractor On seat-belts with a height-adjustable up- and guide it across the body, making cer- rear seat. -
Page 16
SEAT-BELT WARNING CHIME DRIVER’S AIR BAG The air bag is stored in the centre pad of The seat-belt warning chime will sound for CAUTION the steering wheel. about 4 to 8 seconds when the ignition To help reduce the risk of personal switch is in the «II»… -
Page 17
Daewoo Outlet or Daewoo Autho- tal collision. The seat-belts must rised Service Operation. Injuries therefore always be worn. The air may result if the air bag is triggered bag system serves to supplement inadvertently. -
Page 19
Operation in Foreign Countries Unleaded fuel with a Research Octane the larger nozzle used with leaded fuel at If you are going to drive your Daewoo in Number 95 must be used in your service stations cannot be inserted into another country, be sure to : Daewoo vehicle. -
Page 20
IGNITION SWITCH WARNING 1. Never remove the key while driv- This position turns on the ignition sys- The engine can be turned off without ing. If the key is removed, tem and the electrical accessories. locking the steering wheel. steering wheel will lock. This may cause the driver to lose control of the vehicle and could result in seri- ous vehicle damage or personal… -
Page 21
BEFORE STARTING THE ENGINE STARTING THE ENGINE Make sure that the area around the 1. Apply the hand brake. Automatic transmission*: vehicle is clear. Move the selector lever to «P»(Park) The maintenance items in this manual or «N»(Neutral), although «P» is pre- ferred. -
Page 22
<..’.’ <?- first, especially in cold weather. <‘:::::::’_;il~~~. / The valid key for a vehicle equipped with a Daewoo Immobiliser System is a me- NOTE chanical ignition key with an integrated «:: transponder, which is electronically coded. If the engine has become flooded dur-… -
Page 23
The automatic transmission in your Daewoo vehicle is an electronically con- trolled four speed transmission. The 4th gear is an overdrive function. The position of the selector lever is indicated •• +~~<> on the right-hand side of the selector lever under the selector position indicator in the D ••… -
Page 24
SWITCH* Drive range L Selector lever positions P, Rand N L= The drive position for low gear, e.g. on p=Park, with the front wheels locked. To Power mode: winding mountain roads: the transmission be selected only with the vehicle For powerful acceleration or driving up does not shift into third and fourth gear, stationary and the hand brake on. -
Page 25
If the accelerator pedal is depressed gently and evenly the transmission will shift into This driving aid switches off automatically You must consult a Daewoo Outlet or the fuel-saving higher gears at an early above approx. 50 mph. Daewoo Authorised Service Operation as stage. -
Page 26
Rocking the car Stopping the car Kick-down If it becomes necessary to rock the car to The selector lever can be left in the cho- When the accelerator pedal is depressed free it from sand, mud, snow or a hole, sen drive range with the engine running. -
Page 27
ASS is functioning brakes firmly when going in each direction. normally. WARNING If an abnormality occurs in the system, the Visit your Daewoo Outlet the pedal The anti.lock braking system, although anti-lock braking system is cancelled. height does not return to normal,… -
Page 28
Do not race the engine. Use the air conditioning (if equipped) (3) lower only when necessary. Slow down when driving on rough See your Daewoo Outlet if adjustment of roads. the hand brake is required. Always keep your tyres inflated to the recommended… -
Page 29
(CARBON MONOXIDE) Engine exhaust gases, though colourless and odourless, contain carbon monoxide, which is dangerous or even lethal if in- haled. • If at any time you suspect that exhaust fumes are entering the passenger com- partment, have the source located and corrected as soon as possible. -
Page 31
INSTRUMENTS AND CONTROLS 2 34 5 91011 l[ill) 29 28 27 26124 122 21 15 20 16 15… -
Page 32
16. Ignition 1. Central air vents 17. Accelerator pedal 2. Light switch + Turn signal switch 18. Air Bag 3. Wiper speed control switch 19. Brake pedal 4. Rear window demister 20. Clutch pedal Rear window and exterior mirror demister with timer* 21. -
Page 33
INSTRUMENTS 111213 19 2021 22… -
Page 34
13. Front fog lamp indicator light 1. Tachometer 14. Power mode indicator’ 2. Turn signal/Hazard warning flasher indicator light 15. Winter mode indicator’ 3. Trip odometer 16. Reset button for trip odometer 4. Odometer 17. Low fuel level warning light 5. -
Page 35
SPEEDOMETER TACHOMETER The speedometer indicates the vehicle The odometer registers the accumulated The tachometer indicates engine speed speed in miles per hour (mph) and kilo- distance in miles. metres per hour (km/h). 5 » unit: mile The trip odometer indicates individual ZONE X1CQ)rpm… -
Page 36: Warning Light
FUEL GAUGE LOW WASHER FLUID LEVEL TEMPERATURE GAUGE WARNING LIGHT This gauge indicates the level of fuel in the The temperature gauge indicates the tem- fuel tank. perature of the engine coolant. This light comes on when the washer fluid level is low. Replen- ish washer fluid if this light comes on.
-
Page 37: Brake System Warning
Consult a Daewoo cate that the brake fluid level in the res- at the nearest Daewoo Outlet. Outlet or Daewoo Authorised Service ervoir is low. Operation to remedy the fault.
-
Page 38: Indicator Light
• If the belt is OK, there is a problem somewhere in the charging system. The problem should be located and cor- rected as soon as possible. Drive immediately to the nearest Daewoo Outlet.
-
Page 39: Abs Warning Light
Reset the system by restarting the engine. If the light comes on again while driving, a malfunction of the ASS system is indica- ted. Check at your nearest Daewoo Outlet. Remember, that this means that the ASS is cancelled. Consult your Daewoo Outlet…
-
Page 40
If this indicator illuminates while driving without the switch being pressed, a fault occurred automatic transmission system. Therefore consult a Daewoo Outlet or Daewoo Authorised Service Operation. 3-11… -
Page 41: Air Bag Warning Light
This light comes on when the fog Have the air bag system checked without lamp is on. delay by a Daewoo Outlet or Daewoo Authorised Service Operation. Should this occur, see page 1-13 and 1-14 for details on the air bag.
-
Page 42
LIGHT SWITCH TURN SIGNAL SWITCH To turn the lights on or off, twist the knob Move this lever up or down to the stop position to engage indicator turn signals. on the end of the combination switch le- The asymmetrical low beam increases ver. -
Page 43
PASSING LIGHT SWITCH HIGH BEAM SWITCH To operate the windscreen wipers, move To illuminate the high beam at any time, To illuminate the high beam headlights the lever upwards with the ignition on. pull the lever towards the steering wheel. push the lever towards the instrument The lever will return to the off position panel. -
Page 44
WIPER SPEED CONTROL SWITCH HEADLAMP LEVELING SWITCH The frequency of intermittent front wipers can be varied from 4 seconds to 24 sec- onds by turning the knurled knob when the wiper is in the «INT» position. low speed pull Adjuster is located next to the hand brake on the centre console. -
Page 45: Exterior Mirror
REAR WINDOW AND FRONT FOG LAMP SWITCH REAR WINDOW DEMISTER EXTERIOR MIRROR WITH TIMER Fog lamps provide auxiliary illumination and improve vision in fog or snow. DEMISTER WITH TIMER* Pressing this button will switch on the rear To turn on the front fog lamp, push this window demister for approx.
-
Page 46
HAZARD WARNING INSTRUMENT IllUMINATION REAR FOG lAMP SWITCH FLASHER SWITCH CONTROL SWITCH To turn on the rear fog lamps, push this button when the light switch is turned on. Press this button to turn on the hazard The brightness of the instrument panel Pushing it again will turn off the lamps. -
Page 47: Digital Clock
INTERIOR LIGHT WITH DIGITAL CLOCK DIGITAL CLOCK SWITCH [ 12:00 Digital Clock Adjusting Button 1. H -Hour Adjusting Button (Ignition in «II» position) Press the H button to adjust the hour digits. Hold the button to adjust more rapidly. ——-J-2 2.
-
Page 48: Cigarette Lighter
SUNVISORS ASHTRAY CIGARETTE LIGHTER The sunvisors are padded and can be Open the ashtray cover. The cigarette lighter is next to the front swung up and down and to the side for ashtray. Open the front ashtray cover. protection of driver and passenger To operate the cigarette lighter turn the against glare.
-
Page 49
LUGGAGE COMPARTMENT REAR READING LIGHT GLOVE BOX ILLUMINATION «0 » Press the part of light to illuminate To open the lid, press the knob and pull the light and press again to switch off the The light will come on when the boot lid is the glove box lid forward. -
Page 51
SKI SLEEVE BONNET 3. Open the boot and load your skis from A ski sleeve is located behind the rear 1. To open the bonnet, pull the release the boot into the interior. knob to unlatch the bonnet. armrest. 4. Use the strap on the ski sleeve to se- You can transport skis or other long thin cure it tightly to the armrest. -
Page 52
ELECTRIC SUN ROOF* I~—— The electric sun roof can be operated with WARNING WARNING ignition «ON» or «OFF» • Be extremely careful not to have any • Care must be taken when operating part of your body in the sun roof the electric sun roof. -
Page 54: Ventilation And Heating
CENTRAL AIR VENTS VENTILATION AND HEATING SIDE VENTILATION VENTS Air mixture system: by mixing cold and Unheated fresh air can be directed into Cooled and warm air can be directed into hot air the temperature can be regulated the vehicle via both centre vents. The the vehicle via the side ventilation vents without delay and thereby held practically vents are opened by means of the regu-…
-
Page 55: Temperature Control
TEMPERATURE CONTROL AIR CONDITIONING SWITCH AIR CONDITIONING SYSTEM* This switch turns on and off the air condi- The ventilation, heating and refrigeration tioning. sections make up a functional unit de- signed to provide maximum comfort at all times of year, under any weather conditions and at any outside temperature.
-
Page 56
FAN CONTROL SWITCH AIR DIRECTION CONTROL RECIRCULATION SWITCH This switch allows you to select the out- Press this switch when driving in dusty let ai r flow. conditions or to avoid traffic fumes, and when quick cooling or heating is required. The indicator light will illuminate and the interior air will be recirculated inside the vehicle. -
Page 57: Maximum Cooling
NORMAL COOLING BI-LEVEL MAXIMUM COOLING To be used during transitional periods e.g. Normal cooling during interurban During hot weather and when the vehicle low outside temperature and little sun- motorway driving. has been exposed to the sun for lengthy shine. periods, open the window briefly so that Warmer air will flow into the floor area and warm air can escape rapidly.
-
Page 58
VENTILATION MAXIMUM HEATING NORMAL HEATING Outside air is directed through the centre In order to guarantee even, pleasant heat- and side ventilation vents. ing, the heated air is directed towards the foot area. Air-conditioning switch: OFF Recirculation switch: ON Air delivery mode switch: Air-conditioning switch: OFF Temperature switch: extreme right side Recirculation switch: OFF… -
Page 59: Cooling System
OPERATING TIPS FOR DEMISTING COOLING SYSTEM The refrigeration unit(compressor) will be switched on from time to time for quicker • If the car has been parked in direct drying of the inside window. sunlight, open the windows before op- Side ventilation vents: upper vents can also erating.
-
Page 61
RADIO AND CASSETIE* (AKF-9637) The radio and cassette tape player is lo- cated in the centre of the instrument panel. 9 10 Your vehicle is equipped with an audio system which has an Electronically Tuned Radio (ETR) and an auto-reverse cassette tape player. -
Page 62
1. On-offNolume control knob 4. Balance control knob tion button in order to release the pre- set scan function. (push button) Turning the knob to the left or right con- When you use this auto memory func- • Power on-off trols the left and right speaker volume. -
Page 63
Seek function: 12. Preset station/manual memory but- 9. 10. Program button When pressing the tuning up or down Press 9 and 10 buttons simultaneously button for more than 0.5 seconds, the to play the opposite side of tape that You can choose the pre-set station by is currently playing. -
Page 64
ANTI-THEFT SYSTEM How to enter the security code If 3 incorrect codes are entered, «Err» will be flashed in the L.C.D, and the The identification card, stamped with the 1. When the audio system is reconnec- audio system cannot be operated. security code number, is provided with the ted to the battery, the security warning The audio system should be discon-… -
Page 65: Care And Maintenance
ELECTRIC AERIAL CARE AND MAINTENANCE GLXi 4 Door only: 1. We recommend that tapes below Never leave cassettes inserted in the The antenna will automatically extend C-90 (the playing time: 90 minutes) operating position with the tape player when the radio mode is switched on, and be used.
-
Page 67: Vehicle Tools
SPARE WHEEL, JACK AND WHEEL CHANGING VEHICLE TOOLS In order to reduce the chance of possible • With a wedge block or any available injuries when changing a wheel, note the block of wood or a rock, block the The spare wheel, jack and vehicle tools are following procedure and observe all refer- wheel diagonally opposite the wheel accommodated…
-
Page 68
PROCEDURES • Remove the wheel bolts by turning them anticlockwise and then remove Pry the wheel cover off with the wheel • the wheel. nut wrench. • Mount the spare wheel in position and • Loosen the wheel bolt one turn each tighten the wheel bolts hand-tight by with the wheel nut wrench, but do not turning clockwise. -
Page 69: Starting The Engine
STARTING THE ENGINE WITH JUMP LEADS A car with a discharged battery may be Connect the first jump lead from the PERFORM OPERATIONS IN THE started by transferring electrical power positive terminal of the battery provid- CORRECT ORDER! from a battery in another car. ing the jump start (identified by «+»…
-
Page 70: Rocking The Vehicle
ROCKING THE VEHICLE TOWING THE VEHICLE To prevent the entry of exhaust fumes If it is necessary to rock the vehicle to free Switch on the hazard warning flashers of it from snow, sand or mud, move the se- from the towing vehicle into the passen- both vehicles.
-
Page 71
To help avoid personal injury due to is fitted to your vehicle. This weight can be measured using a swaying caused by such things as Your Daewoo Outlet will help supply and bathroom scale. crosswinds, large trucks passing or install… -
Page 72
Trailer Brakes Safety Chains On vehicles with automatic transmission towing the brake type caravan/trailer, If the trailer brakes are used, you should Always attach safety chains between your when driving gradients of 10% or more do follow all instructions provided by the vehicle and the trailer. -
Page 74
ENGINE COMPARTMENT 1.5 DOHC ENGINE (GLXi) ——-_.»‘- 1. Brake fluid reservoir 6. Battery 2. Coolant surge reservoir 7. Distributor 3. Power steering fluid reservoir 8. Engine oil level dipstick 4. Windscreen washer fluid reservoir 9. Engine oil filler cap 5. Ignition coil 10. -
Page 75
1.8. 2.0L MPI ENGINE (CDi, CDXi) 1. Brake fluid reservoir 7. Distributor 2. Power steering oil reservoir 8. Automatic transmission oil level dipstick* 3. Windscreen washer fluid reservoir 9. Engine oil level dipstick 4. Coolant surge reservoir 10. Spark plug 5. -
Page 76
DRIVER’S CHECK LIST A NOTE ON SAFETY The following checks are recommended 6. Check the position of the rearview To avoid the possibility of injury from the • before driving to maintain safe and de- mirrors. cooling fan, carry out all engine checks pendable vehicle operation. -
Page 77
ENGINE OIL Engine oil and filter change. trips are less than 10 miles (16 km). Engine oil changes are to be carried When most trips include extended idling VjII11fOJ===== depending on time intervals and mileage in- and/or frequent low-speed operation tervals, since oil looses its lubrication prop- such as in stop-and-go… -
Page 78
AIR CLEANER COOLANT LEVEL Coolant surge tank If the vehicle is operated in very dusty or The cooling system is filled with a glycol sandy areas, replace the air cleaner base coolant. element more frequently than the usual In the correct concentration the coolant recommended intervals. -
Page 79: Manual Transmission
AUTO TRANSMISSION MANUAL TRANSMISSION FLUID LEVEL*- FLUID LEVEL Normal operating temperature is only reached after motorway driving over a dis- To ensure proper functioning, efficiency Check the fluid level a couple of minutes tance of at least 8 to 12 miles (15 to and durability of the automatic transmis- after shutting off the engine.
-
Page 80
«ADD» and Have the system checked at your near- diately with plenty of water. If irritation «FULL», est Daewoo Outlet. occurs consult doctor. Brake fluid will With the engine at operating temperature, damage paintwork. If splashed or spilt the fluid level should be at the «FULL»… -
Page 81: Drive Belt
DRIVE BELT Proper condition and correct tension are The windscreen washer fluid reservoir is BELT SIZE essential for the correct function of the al- located in the engine compartment conditioning belt unit: mm ternator. illustrated. WIDTH LENGTH If the pointer of the auto tensioner is within operation range (A), the belt tension is 1.5 DOHC…
-
Page 82: Windscreen Wipers
WINDSCREEN WIPERS BATTERY MAINTENANCE Properly functioning windscreen wipers To replace the wiper blade, press the re- Your vehicle is fitted with a maintenance taining clip and pull the wiper blade off the free (MF) battery without seal plugs. are essential for safe driving and clear •…
-
Page 83
For best battery service, do the following. Battery terminals should be disconnected af- WARNING 1. Keep the battery securely mounted. ter stopping the engine. Used batteries contain amongst other 2. Keep the battery top clean and dry. Check the battery terminals for corrosion things sulphulic acid and lead. -
Page 84: Wheels And Tyres
Tyre passengers In the event of abnormal wear, consult Fr 29 185/65 R14 your Daewoo Outlet and have the chassis Rr26 and steering checked. Should, after extended mileage, the front tyres show greater wear than the rear tyres, it is recommended to have both front wheels exchanged with the rear wheels.
-
Page 85
Fitting new tyres Snow chains CAUTION It is recommended that radial tyres be fit- • The use of chains may adversely ted in complete sets. They should be fit- affect vehicle handling. ted in pairs with tyres of the same make •… -
Page 86: Catalytic Converter
Service Operation at the intervals speci- Authorised Service Operation Do not drive for a lengthy period with the fied by Daewoo. You can then be certain quickly as possible in the event of engine control indicator light illuminated, that all components of the vehicle’s elec-…
-
Page 87: Electrical System
ELECTRICAL SYSTEM FUSE BOX COVER IGNITION SYSTEM FUSE The fuse box is located to the right of the For fuse replacement, withdraw the cover Electronic ignition systems have a greater steering column under a cover. and extract blown fuse. electrical current than conventional sys- tems.
-
Page 88
LOCATION AND CAPACITY OF FUSES Turn signal lamps, Windscreen ABS (Key-On) Radiator Fuel pump Brake lamps, • TCM* wipers Air-con, Temperature Electric side mirror* Compressor cut-off switch Rear window Radiator Electric windows Cassette Cooling fan relay Injector Illumination lamp Electrical exterior (high speed) mirror demister •… -
Page 89
The main relay box is located on the front wheel housing next to the battery in the engine An auxiliary relay box is located in the compartment. lefthand footwell. 13-2 13-3 13-1 Low beam High beam Rear spoiler Fuel pump Fog lamp (left) (left) -
Page 90: Bulb Replacement
BULB REPLACEMENT Bulbs Wattages x Number Do not touch halogen bulbs with bare Remarks hands. Greasy fingers will cause stains, Head lamp (low beam) 55Wx2 halogen bulb eventually resulting in a dull light. Head lamp (high beam) halogen bulb 65Wx2 Side light &…
-
Page 91
SIDE LIGHT HEAD LAMP HIGH AND LOW BEAM 1. Open the bonnet and engage the 4. Release the bulb retaining spring and 1. Open bonnet and engage the support. support. remove the bulb. 2. Rotate the plastic cap anticlockwise 2. Rotate the plastic cap anticlockwise and remove. -
Page 92: Interior Lamp
INTERIOR LAMP REAR COMBINATION LAMP 1. Open the boot lid and remove the 1. Prise the lamp out of the recess, using a screwdriver. protective cover. 2. When removing the bulb holder, press and pull the bulb holder upwards. 3. Press the bulb, turn the bulb clockwise and remove.
-
Page 93: Reading Lamp
READING LAMP LICENCE PLATE LAMP REVERSING LAMP 1. Prise the lamp out of the recess, using 1. Rotate and disengage the socket by 1. Unscrew the two bolts and remove the a screwdriver. hand. reversing lamp. 2. Remove the licence plate lamp. 2.
-
Page 94: Boot Lamp
REAR APPLIQUE LAMP BOOT LAMP Press the bulb, turn the bulb clockwise +, — 1. Unscrew the two screws installed in the The wi ring harness polarity and remove it from bulb holder. upper side of lamp housing. marked on the boot lamp as below. Replace the bulb with the new one.
-
Page 95
Miles (kilometres) or time in months, whichever comes first —- MAINTENANCE —- INTERVAL x 1,000 miles —- x 1,000 kms MAINTENANCE ITEM —- Months ENGINE CONTROL SYSTEM Drive belt (ALT. P/STG’) DOHC SOHC & (1) (3) Engine oil engine oil filter &… -
Page 96
Miles (kilometres) or time in months, whichever comes first MAINTENANCE INTERVAL x 1,000 miles x 1,000 kms MAINTENANCE …•.•..ITEM ..Months ENGINE CONTROL SYSTEM Distributor cap & rotor Charcoal canister & vapour lines PCV system DOHC Camshaft belt SOHC CHASSIS AND BODY Exhaust pipes &… -
Page 97
..Miles (kilometres) or time in months, whichever comes first MAINTENANCE ‘- ‘- INTERVAL x 1,000 miles ..x 1,000 kms MAINTENANCE ITEM Months ….. CHASSIS AND BODY Manual transmission fluid Clutch & brake pedal free play Automatic transmission fluid* Chassis and u/body bolts &… -
Page 99: Cleaning Agents
.CLEANING AGENTS CARE AND CLEANING OF GLASS SURFACES THE INTERIOR Glass surfaces should be cleaned on a Follow the manufacturer’s advice whenever cleaning agents or other chemicals regular basis. The use of a glass cleaner With the use of modern trim materials, it is or a liquid household glass cleaner will used, inside or outside the vehicle.
-
Page 100
Daewoo vehicles are designed to operate replaced so that corrosion protection is under normal environmental conditions restored. (Also see «Finish damage» which and to withstand the natural elements. -
Page 101
If de- sired, your Daewoo Outlet can do this On no account must any of these items service for you. be placed in the household refuse bins or the fluids poured down the drains. -
Page 103
OFFICIAL VEHICLE ENGINE NUMBER CHASSIS NUMBER IDENTIFICATION DATA The engine number is stamped on the front The chassis number is stamped on the right-hand side of the cylinder block. vehicle floor between the right hand front The vehicle identification number (chas- door and front seat. -
Page 104: Lubrication Chart
LUBRICATION CHART Service Interval Classification Lubricant Capacity SG grade or above Change every 10,000 miles or 1 year. CCMC G4/G5 1.5 DOHC 3.75 L SAE 5W/30 Engine oil (Oil filter element should be replaced at the same 1.8 MPI 4.25 L •…
-
Page 105
ENGINE OIL API classifications of engine oil Engine A= Single-grade oil The viscosity should be selected according to outside The American Petroleum Institute classifies B= Multi-grade oil temperature. Do not switch to a different viscosity in the engine oils according to their performance c= Improved-lubricity oil event of brief temperature fluctuations. -
Page 106: Specifications
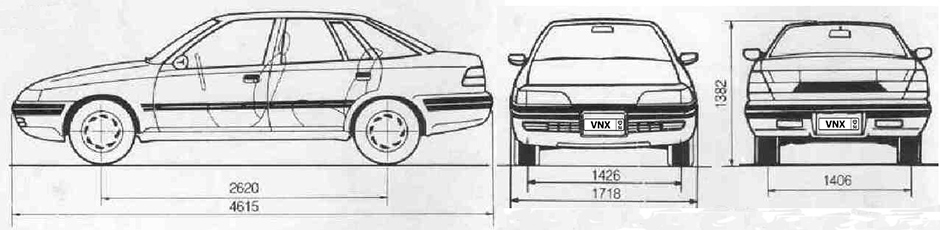
SPECIFICATIONS 1.8 MPI 2.0 MPI Model 1.5 DOHC Manual Automatic Manual Automatic Automatic Manual Items transmission transmission transmission transmission transmission transmission 1. Vehicle dimensions (mm) 4,615 Overall length <- 4,615 <- <- <- Overall width 1,718 <- 1,718 <- <- <- 1,388 Overall height…
-
Page 107
Model 1.5 DOHC 1.8 MPI 2.0 MPI Manual Automatic Manual Automatic Manual Automatic Items transmission transmission transmission transmission transmission transmission 5. Engine Total displacement (cc) 1,498 1,796 <- <- 1,998 <- Bore x Stroke (mm) 76.5 x 81.5 <- 84.8 x 79.5 <- 86 x 86 <-… -
Page 108
Model 1.5 DOHC 1.8 MPI 2.0 MPI Manual Automatic Manual Automatic Manual Automatic Items transmission transmission transmission transmission transmission transmission 12. Brake Front wheel Disc (256 mm) +— +— +— Disc +— Rear wheel Drum (216 mm) Drum +— +— +— +— Booster (inch) -
Page 109: Fuel Consumption
FUEL CONSUMPTION FUEL CONSUMPTION IN MILES PER GALLON DESCRIPTION MODEL 75 mph 56 mph Urban 5 speed 47.9 44.8 25.9 1.5 DOHC manual transmission 4 speed automatic 39.2 23.2 47.9 transmission 5 speed 40.4 23.9 49.6 1.8 SOHC manual transmission 4 speed automatic 38.7 44.8…
-
Page 111
Boot ABS (Anti-lock brake system) 2-10 8-22 Demister 3-10 Warning light Bulb replacement 8-18 Rear window demister 3-16 Air bag 1-12 Demisting Warning light 3-12 Brake 2-10 3-18 Digital clock Air cleaner 2-10 Door locks Air conditioning Fluid 8-8,10-3 Central door lock AlC switch Hand 2-11… -
Page 112
8-5, 10-3,4 Engine oil Oil and filter change Hand brake 2-11 7-23 Jack Oil level Hazard warning Jump lead Oil pressure warning light Switch 3-17 Exterior mirror adjusting 3-18 Indicator Exterior rear-view mirror Head lamp 3-13,14 Passing 3-14 With integrated transponder Leveling switch 3-15 Door lock… -
Page 113
Temperature control…… Octane number Seat Temperature gauge Odometer Front seat slide Tiltable steering wheel Front seat reclining Tyre 1-10 Seat-belt Tyre inflation pressure 8-12 Passing light switch 3-14 1-12 Care of belts Tyre condition 8-12 6-10 Power antenna Height adjust 1-11 Fitting new tyre 8-13… -
Page 114
Washer fluid level Wheel changing Procedures Wheels and tyres 8-12 Window Door window Electric window switch Window demister 5-2, 7 Windscreen washer fluid 8-10 Windscreen washer switch 3-15 Windscreen wiper 8-10 Windscreen wiper switch 3-14 Winter tyres 8-13 Wiper speed control switch 3-15 Winter mode Switch…
Daewoo Espero с бензиновыми двигателями: C20LE 2.0 л SOHC (1998 см³) 100 л.с./74 кВт; Руководство по эксплуатации, техническому обслуживанию и ремонту. Полные технические характеристики, секреты эксплуатации, детальное описание операций, более 300 иллюстраций, цветные электросхемы. Пошаговый ремонт в фотографиях автомобиль среднего класса «Д» Дэу Эсперо с цельнометаллическими несущими кузовами четырёхдверный седан модели первого поколения выпуска с 1991 по 2000 год
ЕСЛИ ВЫ ВИДИТЕ ОШИБКУ 406 Not Acceptable и не видите документ, то скорей всего у Вас IP РФ и его надо сменить, на любой другой страны, с помощью VPN ( Scribd и SlideShare блокируют посетителей с Российским IP).
Видео Дэу Эсперо замена генератора и радиатора печки (Daewoo Espero)
Дэу Эсперо общая информация (Daewoo Espero 1991-2000)
Настоящее руководство является пособием по эксплуатации, техническому обслуживанию и ремонту автомобилей Daewoo Espero и предназначено для индивидуальных владельцев и работников ремонтных мастерских и станций технического обслуживания. Руководство поможет грамотно эксплуатировать автомобиль и определять его неисправности, в нем рассматриваются методы их устранения.
Принцип ремонта автомобиля, на котором основано руководство, замена неисправных деталей и узлов новыми. С помощью приведенных методик поиска и устранения неисправностей в работе двигателя можно обнаружить наиболее вероятные причины неисправностей в работе двигателя. Эти операции охватывают компоненты топливной системы, системы зажигания и механические системы, которые могут стать причиной данной конкретной неисправности, а затем приведены в логической последовательности способы устранения этих неисправностей. Важным признаком, сигнализирующим о неисправности двигателя во время движения, служит постоянно горящая или кратко временно зажигающаяся контрольная лампа «Двигатель скоро потребует обслуживания». При этом необходимо проверить код неисправности, хранящийся в компьютерной системе управления двигателем либо в электронной системе диагностики.
В руководстве приводится описание признаков каждой неисправности и на основании обнаруженных неисправностей необходимо выбрать правильный признак. Признак неисправности приводится вместе с описанием неисправностей. В некоторых случаях используемые термины могут оказаться незнакомыми и потому, что многие из них являются взаимозаменяемыми, необходимо проанализировать наиболее частое употребление каждого термина и затем определить его значение Если значение термина не будет понятно и конкретный признак не ясен, то процедурой поиска и устранения неисправностей невозможно будет воспользоваться. Важно помнить о следующих двух фактах.
1. Процедуры поиска и устранения неисправностей приведены для диагностики неисправностей двигателя, который некоторое время работал нормально, а затем старение и износ создали новую ситуацию.
2. Невозможно охватить все возможные причины неисправностей, особенно те, которые влияют на содержание выбросов вредных веществ. Если выполнение действий по устранению неисправностей не приводит к исчезновению неисправности, значит либо был выбран неправильный признак, либо необходимо провести более детальный анализ. Практически все из приведенных признаков неисправностей могут быть вызваны изношенными или неисправными деталями, такими как свечи зажигания, провода системы зажигания, крышка и ротор распределителя системы зажигания, а также топливный и воздушный фильтры.
Система смазки двигателя — под давлением, через полнопоточный масляный фильтр, с помощью шестереночного насоса). Масло засасывается через сетчатый фильтр в маслоприемный патрубок и под давлением подается насосом на полнопоточный масляный фильтр. Масляный фильтр — полнопоточный с бумажным фильтрующим элементом. Для обеспечения подачи масла в двигатель в случае засорения фильтра имеется перепускной клапан. От фильтра масло подается в главную магистраль. которая смазывает коренные подшипники коленчатого вала через пересекающиеся масляные каналы. Масло, поступающее через небольшие отверстия в шатунах, смазывает стенки цилиндров и охлаждает нижнюю часть поршня.
Главная магистраль имеет вертикальные каналы, по которым масло подается вверх через головку цилиндров в корпус подшипников распределительного вала. Масло подается в распределительный вал через отверстие в шейке третьего подшипника. Через канал, просверленный вдоль оси распределительного вала, масло подается на остальные шейки. Шейка третьего подшипника имеет пересекающиеся каналы, расположенные в корпусе подшипников, которые направляют масло в канал. просверленный вдоль левой стороны головки цилиндров. В этом канале расположен предохранительный клапан, регулирующий максимальное давление в системе смазки. Через этот канал масло подается на механизмы регулировки зазоров впускных клапанов, а через пересекающие его каналы — на механизм регулировки зазоров выпускных клапанов.
Смазка кулачков распределительного вала осуществляется через отверстия, просверленные в каждом кулачке. Эти отверстия пересекают канал, проходящий вдоль распределительного вала. Избыток масла из клапанного механизма стекает обратно в картер через отверстия на концах головки цилиндров, а также через отверстия, расположенные рядом с опорными тарелками пружин впускных клапанов первого, второго и третьего цилиндра.
| № | Спецификация / Specs | Данные |
| Габариты (мм/mm) и масса (кг/kg) / Dimensions and Weight | ||
| 1 | Длина / Length | 4615 |
| 2 | Ширина (без/с зеркалами) / Width | 1718 |
| 3 | Высота (загружен/пустой) / Height | 1382 |
| 4 | Колёсная база / Wheelbase | 2620 |
| 5 | Дорожный просвет (клиренс) / Ground clearance | 175 |
| 6 | Снаряжённая масса / Total (curb) weight | 1090 |
| Полная масса / Gross (max.) weight | 1565 | |
|
Двигатель / Engine |
||
| 7 | Тип / Engine Type, Code | Бензиновый, жидкостного охлаждения, четырехтактный, C20LE |
| 8 | Количество цилиндров / Cylinder arrangement: Total number of cylinders, of valves | 4-цилиндровый, рядный, 8V, SOHC с верхним расположением одного распределительного вала |
| 9 | Диаметр цилиндра / Bore | 86.0 мм |
| 10 | Ход поршня / Stroke | 86.0 мм |
| 11 | Объём / Engine displacement | 1998 см³ |
| 12 | Система питания / Fuel supply, Aspiration | Распределенный впрыск топлива |
| Атмосферный | ||
| 13 | Степень сжатия / Compression ratio | 8.8:1 |
| 14 | Максимальная мощность / Max. output power kW (HP) at rpm | 74 кВт (100 л.с.) при 5400 об/мин |
| 15 | Максимальный крутящий момент / Max. torque N·m at rpm | 162 Нм при 3200 об/мин |
|
Трансмиссия / Transmission |
||
| 16 | Сцепление / Clutch type | 216 мм Однодисковое, сухое, с диафрагменной нажимной пружиной и гасителем крутильных колебаний, постоянно замкнутого типа |
| 17 | КПП / Transmission type | DWМC F-16 МКПП 5 пятиступенчатая механическая, двухвальная, с синхронизаторами на всех передачах переднего хода |
О Книге
- Название: Daewoo Espero Руководство по эксплуатации, техническому обслуживанию и ремонту. Таблицы, иллюстрации + электросхемы
- Бензиновые двигатели: C20LE 2.0 л SOHC (1998 см³) 100 л.с./74 кВт
- Выпуск с 1991 по 2000 год
- Серия: «Моя иномарка»
- Год издания: 2004
- Автор: Коллектив авторов
- Издательство: «Ассоциация независимых издателей»
- Формат: PDF
- Страниц в книге: 236
- Размер: 59.41 МБ
- Язык: Русский
- Количество электросхем: 13

- Manuals
- Brands
- Daewoo Manuals
- Automobile
- Espero
- Owner’s manual
-
Contents
-
Table of Contents
-
Bookmarks
Quick Links
Related Manuals for Daewoo Espero
Summary of Contents for Daewoo Espero
-
Page 2
When it comes to service, remember that your local DAEWOO Outlet knows your vehicle best and is interested in your complete satisfaction. We would like to take this opportunity to thank you for choosing a DAEWOO product and assure you of our continuing interest in your motoring pleasure and satisfaction. -
Page 3: Important Notice
IMPORTANT NOTICE All information, illustrations and specifica- We would like to point out that non-Daewoo Please read this manual and follow its genuine parts and accessories have not tion in this manual are based on the latest instructions carefully. been examined and approved by Daewoo,…
-
Page 4
BE FOR E DR IV IN G YOU RCA R 2. START IN G AND 0 PER AT IN G 3 . INS T RUM E NT SAN D CON T R 0 LS ……………………. 3~ 1 4. OTHER CONTROLS AND FEATURES 5. -
Page 6: Before Driving Off
RUNNING-IN PERIOD BEFORE DRIVING OFF Following a few simple precautions for the • Ensure that the windows, exterior rear- • Adjust your seating position. first few hundred miles can add to the fu- view mirrors and lights are clean, un- •…
-
Page 7
You should also record the key number in a safe place, not in the vehicle. If you need additional keys, duplicates can be obtained from your Daewoo Outlet up to a maximum of 3. See page 2-5 under Immobiliser System… -
Page 8: Door Locks
DOOR LOCKS CENTRAL DOOR LOCKING SYSTEM The front doors can be locked or unlocked If you wish to lock the driver’s door without from outside by using the key. using the key, set the button in the lock By pressing down or pulling up the inte- position before closing the door.
-
Page 9
CHILD SAFETY DOOR LOCKS FUEL TANK FILLER CAP BOOT LID When the metal latch beneath the lock on 1. Pull the door lock button of the driver’s 1. Press the boot lid release button in the either of the rear doors is pushed door upwards. -
Page 10
ELECTRIC WINDOW SWITCHES The windows be operated switches located in the driver’s door arm- Care must be taken when operating rest when the ignition switch is in the «on» is a the electric windows. There risk of position. injury, particularly for children, and danger that articles could become Safety lock switch… -
Page 11
Adjust the exterior rear-view mirrors with Convex rear-view mirror* The interior mirror can be adjusted up, The exterior mirror on the passenger’s the adjusting lever so that you can see down or sideways to obtain the best view. not only each side of the road behind you side is convex if it says «OBJECTS IN The interior mirror has day and night but also each side of your vehicle. -
Page 12
TILTABLE STEERING WHEEL FRONT SEAT SLIDE ADJUSTMENT FRONT SEAT RECLINING ADJUSTMENT The steering wheel can be adjusted to To move the seat forwards or backwards, different positions. pull up the control lever located under the To adjust the seat back, rotate the knob front of the seat, and hold it. -
Page 13
REAR SEAT ARMREST DRIVER’S SEAT HEIGHT HEAD RESTRAINTS ADJUSTMENT The head restraints are designed to help The pull-down rear seat armrest is located reduce the risk of neck injuries. in the centre of the rear seat. The desired seat height can be achieved by turning the crank handle located below the driver’s seat. -
Page 14
SEAT-BELT PRECAUTIONS THREE-POINT SEAT-BELTS To protect you and your passengers in the Each Daewoo vehicle is equipped with CAUTION event of an accident, it is recommended three-point seat-belts with automatic The seat-belt will provide maximum that the seat-belts be worn by all occu-… -
Page 15
USING THE BELT LAP BELT SEAT-BELT HEIGHT ADJUSTER* A lap belt is installed in the centre of the Pull the belt evenly out of the retractor On seat-belts with a height-adjustable up- and guide it across the body, making cer- rear seat. -
Page 16
SEAT-BELT WARNING CHIME DRIVER’S AIR BAG The air bag is stored in the centre pad of The seat-belt warning chime will sound for CAUTION the steering wheel. about 4 to 8 seconds when the ignition To help reduce the risk of personal switch is in the «II»… -
Page 17
Daewoo Outlet or Daewoo Autho- tal collision. The seat-belts must rised Service Operation. Injuries therefore always be worn. The air may result if the air bag is triggered bag system serves to supplement inadvertently. -
Page 19
Operation in Foreign Countries Unleaded fuel with a Research Octane the larger nozzle used with leaded fuel at If you are going to drive your Daewoo in Number 95 must be used in your service stations cannot be inserted into another country, be sure to : Daewoo vehicle. -
Page 20
IGNITION SWITCH WARNING 1. Never remove the key while driv- This position turns on the ignition sys- The engine can be turned off without ing. If the key is removed, tem and the electrical accessories. locking the steering wheel. steering wheel will lock. This may cause the driver to lose control of the vehicle and could result in seri- ous vehicle damage or personal… -
Page 21
BEFORE STARTING THE ENGINE STARTING THE ENGINE Make sure that the area around the 1. Apply the hand brake. Automatic transmission*: vehicle is clear. Move the selector lever to «P»(Park) The maintenance items in this manual or «N»(Neutral), although «P» is pre- ferred. -
Page 22
<..’.’ <?- first, especially in cold weather. <‘:::::::’_;il~~~. / The valid key for a vehicle equipped with a Daewoo Immobiliser System is a me- NOTE chanical ignition key with an integrated «:: transponder, which is electronically coded. If the engine has become flooded dur-… -
Page 23
The automatic transmission in your Daewoo vehicle is an electronically con- trolled four speed transmission. The 4th gear is an overdrive function. The position of the selector lever is indicated •• +~~<> on the right-hand side of the selector lever under the selector position indicator in the D ••… -
Page 24
SWITCH* Drive range L Selector lever positions P, Rand N L= The drive position for low gear, e.g. on p=Park, with the front wheels locked. To Power mode: winding mountain roads: the transmission be selected only with the vehicle For powerful acceleration or driving up does not shift into third and fourth gear, stationary and the hand brake on. -
Page 25
If the accelerator pedal is depressed gently and evenly the transmission will shift into This driving aid switches off automatically You must consult a Daewoo Outlet or the fuel-saving higher gears at an early above approx. 50 mph. Daewoo Authorised Service Operation as stage. -
Page 26
Rocking the car Stopping the car Kick-down If it becomes necessary to rock the car to The selector lever can be left in the cho- When the accelerator pedal is depressed free it from sand, mud, snow or a hole, sen drive range with the engine running. -
Page 27
ASS is functioning brakes firmly when going in each direction. normally. WARNING If an abnormality occurs in the system, the Visit your Daewoo Outlet the pedal The anti.lock braking system, although anti-lock braking system is cancelled. height does not return to normal,… -
Page 28
Do not race the engine. Use the air conditioning (if equipped) (3) lower only when necessary. Slow down when driving on rough See your Daewoo Outlet if adjustment of roads. the hand brake is required. Always keep your tyres inflated to the recommended… -
Page 29
(CARBON MONOXIDE) Engine exhaust gases, though colourless and odourless, contain carbon monoxide, which is dangerous or even lethal if in- haled. • If at any time you suspect that exhaust fumes are entering the passenger com- partment, have the source located and corrected as soon as possible. -
Page 31
INSTRUMENTS AND CONTROLS 2 34 5 91011 l[ill) 29 28 27 26124 122 21 15 20 16 15… -
Page 32
16. Ignition 1. Central air vents 17. Accelerator pedal 2. Light switch + Turn signal switch 18. Air Bag 3. Wiper speed control switch 19. Brake pedal 4. Rear window demister 20. Clutch pedal Rear window and exterior mirror demister with timer* 21. -
Page 33
INSTRUMENTS 111213 19 2021 22… -
Page 34
13. Front fog lamp indicator light 1. Tachometer 14. Power mode indicator’ 2. Turn signal/Hazard warning flasher indicator light 15. Winter mode indicator’ 3. Trip odometer 16. Reset button for trip odometer 4. Odometer 17. Low fuel level warning light 5. -
Page 35
SPEEDOMETER TACHOMETER The speedometer indicates the vehicle The odometer registers the accumulated The tachometer indicates engine speed speed in miles per hour (mph) and kilo- distance in miles. metres per hour (km/h). 5 » unit: mile The trip odometer indicates individual ZONE X1CQ)rpm… -
Page 36: Warning Light
FUEL GAUGE LOW WASHER FLUID LEVEL TEMPERATURE GAUGE WARNING LIGHT This gauge indicates the level of fuel in the The temperature gauge indicates the tem- fuel tank. perature of the engine coolant. This light comes on when the washer fluid level is low. Replen- ish washer fluid if this light comes on.
-
Page 37: Brake System Warning
Consult a Daewoo cate that the brake fluid level in the res- at the nearest Daewoo Outlet. Outlet or Daewoo Authorised Service ervoir is low. Operation to remedy the fault.
-
Page 38: Indicator Light
• If the belt is OK, there is a problem somewhere in the charging system. The problem should be located and cor- rected as soon as possible. Drive immediately to the nearest Daewoo Outlet.
-
Page 39: Abs Warning Light
Reset the system by restarting the engine. If the light comes on again while driving, a malfunction of the ASS system is indica- ted. Check at your nearest Daewoo Outlet. Remember, that this means that the ASS is cancelled. Consult your Daewoo Outlet…
-
Page 40
If this indicator illuminates while driving without the switch being pressed, a fault occurred automatic transmission system. Therefore consult a Daewoo Outlet or Daewoo Authorised Service Operation. 3-11… -
Page 41: Air Bag Warning Light
This light comes on when the fog Have the air bag system checked without lamp is on. delay by a Daewoo Outlet or Daewoo Authorised Service Operation. Should this occur, see page 1-13 and 1-14 for details on the air bag.
-
Page 42
LIGHT SWITCH TURN SIGNAL SWITCH To turn the lights on or off, twist the knob Move this lever up or down to the stop position to engage indicator turn signals. on the end of the combination switch le- The asymmetrical low beam increases ver. -
Page 43
PASSING LIGHT SWITCH HIGH BEAM SWITCH To operate the windscreen wipers, move To illuminate the high beam at any time, To illuminate the high beam headlights the lever upwards with the ignition on. pull the lever towards the steering wheel. push the lever towards the instrument The lever will return to the off position panel. -
Page 44
WIPER SPEED CONTROL SWITCH HEADLAMP LEVELING SWITCH The frequency of intermittent front wipers can be varied from 4 seconds to 24 sec- onds by turning the knurled knob when the wiper is in the «INT» position. low speed pull Adjuster is located next to the hand brake on the centre console. -
Page 45: Exterior Mirror
REAR WINDOW AND FRONT FOG LAMP SWITCH REAR WINDOW DEMISTER EXTERIOR MIRROR WITH TIMER Fog lamps provide auxiliary illumination and improve vision in fog or snow. DEMISTER WITH TIMER* Pressing this button will switch on the rear To turn on the front fog lamp, push this window demister for approx.
-
Page 46
HAZARD WARNING INSTRUMENT IllUMINATION REAR FOG lAMP SWITCH FLASHER SWITCH CONTROL SWITCH To turn on the rear fog lamps, push this button when the light switch is turned on. Press this button to turn on the hazard The brightness of the instrument panel Pushing it again will turn off the lamps. -
Page 47: Digital Clock
INTERIOR LIGHT WITH DIGITAL CLOCK DIGITAL CLOCK SWITCH [ 12:00 Digital Clock Adjusting Button 1. H -Hour Adjusting Button (Ignition in «II» position) Press the H button to adjust the hour digits. Hold the button to adjust more rapidly. ——-J-2 2.
-
Page 48: Cigarette Lighter
SUNVISORS ASHTRAY CIGARETTE LIGHTER The sunvisors are padded and can be Open the ashtray cover. The cigarette lighter is next to the front swung up and down and to the side for ashtray. Open the front ashtray cover. protection of driver and passenger To operate the cigarette lighter turn the against glare.
-
Page 49
LUGGAGE COMPARTMENT REAR READING LIGHT GLOVE BOX ILLUMINATION «0 » Press the part of light to illuminate To open the lid, press the knob and pull the light and press again to switch off the The light will come on when the boot lid is the glove box lid forward. -
Page 51
SKI SLEEVE BONNET 3. Open the boot and load your skis from A ski sleeve is located behind the rear 1. To open the bonnet, pull the release the boot into the interior. knob to unlatch the bonnet. armrest. 4. Use the strap on the ski sleeve to se- You can transport skis or other long thin cure it tightly to the armrest. -
Page 52
ELECTRIC SUN ROOF* I~—— The electric sun roof can be operated with WARNING WARNING ignition «ON» or «OFF» • Be extremely careful not to have any • Care must be taken when operating part of your body in the sun roof the electric sun roof. -
Page 54: Ventilation And Heating
CENTRAL AIR VENTS VENTILATION AND HEATING SIDE VENTILATION VENTS Air mixture system: by mixing cold and Unheated fresh air can be directed into Cooled and warm air can be directed into hot air the temperature can be regulated the vehicle via both centre vents. The the vehicle via the side ventilation vents without delay and thereby held practically vents are opened by means of the regu-…
-
Page 55: Temperature Control
TEMPERATURE CONTROL AIR CONDITIONING SWITCH AIR CONDITIONING SYSTEM* This switch turns on and off the air condi- The ventilation, heating and refrigeration tioning. sections make up a functional unit de- signed to provide maximum comfort at all times of year, under any weather conditions and at any outside temperature.
-
Page 56
FAN CONTROL SWITCH AIR DIRECTION CONTROL RECIRCULATION SWITCH This switch allows you to select the out- Press this switch when driving in dusty let ai r flow. conditions or to avoid traffic fumes, and when quick cooling or heating is required. The indicator light will illuminate and the interior air will be recirculated inside the vehicle. -
Page 57: Maximum Cooling
NORMAL COOLING BI-LEVEL MAXIMUM COOLING To be used during transitional periods e.g. Normal cooling during interurban During hot weather and when the vehicle low outside temperature and little sun- motorway driving. has been exposed to the sun for lengthy shine. periods, open the window briefly so that Warmer air will flow into the floor area and warm air can escape rapidly.
-
Page 58
VENTILATION MAXIMUM HEATING NORMAL HEATING Outside air is directed through the centre In order to guarantee even, pleasant heat- and side ventilation vents. ing, the heated air is directed towards the foot area. Air-conditioning switch: OFF Recirculation switch: ON Air delivery mode switch: Air-conditioning switch: OFF Temperature switch: extreme right side Recirculation switch: OFF… -
Page 59: Cooling System
OPERATING TIPS FOR DEMISTING COOLING SYSTEM The refrigeration unit(compressor) will be switched on from time to time for quicker • If the car has been parked in direct drying of the inside window. sunlight, open the windows before op- Side ventilation vents: upper vents can also erating.
-
Page 61
RADIO AND CASSETIE* (AKF-9637) The radio and cassette tape player is lo- cated in the centre of the instrument panel. 9 10 Your vehicle is equipped with an audio system which has an Electronically Tuned Radio (ETR) and an auto-reverse cassette tape player. -
Page 62
1. On-offNolume control knob 4. Balance control knob tion button in order to release the pre- set scan function. (push button) Turning the knob to the left or right con- When you use this auto memory func- • Power on-off trols the left and right speaker volume. -
Page 63
Seek function: 12. Preset station/manual memory but- 9. 10. Program button When pressing the tuning up or down Press 9 and 10 buttons simultaneously button for more than 0.5 seconds, the to play the opposite side of tape that You can choose the pre-set station by is currently playing. -
Page 64
ANTI-THEFT SYSTEM How to enter the security code If 3 incorrect codes are entered, «Err» will be flashed in the L.C.D, and the The identification card, stamped with the 1. When the audio system is reconnec- audio system cannot be operated. security code number, is provided with the ted to the battery, the security warning The audio system should be discon-… -
Page 65: Care And Maintenance
ELECTRIC AERIAL CARE AND MAINTENANCE GLXi 4 Door only: 1. We recommend that tapes below Never leave cassettes inserted in the The antenna will automatically extend C-90 (the playing time: 90 minutes) operating position with the tape player when the radio mode is switched on, and be used.
-
Page 67: Vehicle Tools
SPARE WHEEL, JACK AND WHEEL CHANGING VEHICLE TOOLS In order to reduce the chance of possible • With a wedge block or any available injuries when changing a wheel, note the block of wood or a rock, block the The spare wheel, jack and vehicle tools are following procedure and observe all refer- wheel diagonally opposite the wheel accommodated…
-
Page 68
PROCEDURES • Remove the wheel bolts by turning them anticlockwise and then remove Pry the wheel cover off with the wheel • the wheel. nut wrench. • Mount the spare wheel in position and • Loosen the wheel bolt one turn each tighten the wheel bolts hand-tight by with the wheel nut wrench, but do not turning clockwise. -
Page 69: Starting The Engine
STARTING THE ENGINE WITH JUMP LEADS A car with a discharged battery may be Connect the first jump lead from the PERFORM OPERATIONS IN THE started by transferring electrical power positive terminal of the battery provid- CORRECT ORDER! from a battery in another car. ing the jump start (identified by «+»…
-
Page 70: Rocking The Vehicle
ROCKING THE VEHICLE TOWING THE VEHICLE To prevent the entry of exhaust fumes If it is necessary to rock the vehicle to free Switch on the hazard warning flashers of it from snow, sand or mud, move the se- from the towing vehicle into the passen- both vehicles.
-
Page 71
To help avoid personal injury due to is fitted to your vehicle. This weight can be measured using a swaying caused by such things as Your Daewoo Outlet will help supply and bathroom scale. crosswinds, large trucks passing or install… -
Page 72
Trailer Brakes Safety Chains On vehicles with automatic transmission towing the brake type caravan/trailer, If the trailer brakes are used, you should Always attach safety chains between your when driving gradients of 10% or more do follow all instructions provided by the vehicle and the trailer. -
Page 74
ENGINE COMPARTMENT 1.5 DOHC ENGINE (GLXi) ——-_.»‘- 1. Brake fluid reservoir 6. Battery 2. Coolant surge reservoir 7. Distributor 3. Power steering fluid reservoir 8. Engine oil level dipstick 4. Windscreen washer fluid reservoir 9. Engine oil filler cap 5. Ignition coil 10. -
Page 75
1.8. 2.0L MPI ENGINE (CDi, CDXi) 1. Brake fluid reservoir 7. Distributor 2. Power steering oil reservoir 8. Automatic transmission oil level dipstick* 3. Windscreen washer fluid reservoir 9. Engine oil level dipstick 4. Coolant surge reservoir 10. Spark plug 5. -
Page 76
DRIVER’S CHECK LIST A NOTE ON SAFETY The following checks are recommended 6. Check the position of the rearview To avoid the possibility of injury from the • before driving to maintain safe and de- mirrors. cooling fan, carry out all engine checks pendable vehicle operation. -
Page 77
ENGINE OIL Engine oil and filter change. trips are less than 10 miles (16 km). Engine oil changes are to be carried When most trips include extended idling VjII11fOJ===== depending on time intervals and mileage in- and/or frequent low-speed operation tervals, since oil looses its lubrication prop- such as in stop-and-go… -
Page 78
AIR CLEANER COOLANT LEVEL Coolant surge tank If the vehicle is operated in very dusty or The cooling system is filled with a glycol sandy areas, replace the air cleaner base coolant. element more frequently than the usual In the correct concentration the coolant recommended intervals. -
Page 79: Manual Transmission
AUTO TRANSMISSION MANUAL TRANSMISSION FLUID LEVEL*- FLUID LEVEL Normal operating temperature is only reached after motorway driving over a dis- To ensure proper functioning, efficiency Check the fluid level a couple of minutes tance of at least 8 to 12 miles (15 to and durability of the automatic transmis- after shutting off the engine.
-
Page 80
«ADD» and Have the system checked at your near- diately with plenty of water. If irritation «FULL», est Daewoo Outlet. occurs consult doctor. Brake fluid will With the engine at operating temperature, damage paintwork. If splashed or spilt the fluid level should be at the «FULL»… -
Page 81: Drive Belt
DRIVE BELT Proper condition and correct tension are The windscreen washer fluid reservoir is BELT SIZE essential for the correct function of the al- located in the engine compartment conditioning belt unit: mm ternator. illustrated. WIDTH LENGTH If the pointer of the auto tensioner is within operation range (A), the belt tension is 1.5 DOHC…
-
Page 82: Windscreen Wipers
WINDSCREEN WIPERS BATTERY MAINTENANCE Properly functioning windscreen wipers To replace the wiper blade, press the re- Your vehicle is fitted with a maintenance taining clip and pull the wiper blade off the free (MF) battery without seal plugs. are essential for safe driving and clear •…
-
Page 83
For best battery service, do the following. Battery terminals should be disconnected af- WARNING 1. Keep the battery securely mounted. ter stopping the engine. Used batteries contain amongst other 2. Keep the battery top clean and dry. Check the battery terminals for corrosion things sulphulic acid and lead. -
Page 84: Wheels And Tyres
Tyre passengers In the event of abnormal wear, consult Fr 29 185/65 R14 your Daewoo Outlet and have the chassis Rr26 and steering checked. Should, after extended mileage, the front tyres show greater wear than the rear tyres, it is recommended to have both front wheels exchanged with the rear wheels.
-
Page 85
Fitting new tyres Snow chains CAUTION It is recommended that radial tyres be fit- • The use of chains may adversely ted in complete sets. They should be fit- affect vehicle handling. ted in pairs with tyres of the same make •… -
Page 86: Catalytic Converter
Service Operation at the intervals speci- Authorised Service Operation Do not drive for a lengthy period with the fied by Daewoo. You can then be certain quickly as possible in the event of engine control indicator light illuminated, that all components of the vehicle’s elec-…
-
Page 87: Electrical System
ELECTRICAL SYSTEM FUSE BOX COVER IGNITION SYSTEM FUSE The fuse box is located to the right of the For fuse replacement, withdraw the cover Electronic ignition systems have a greater steering column under a cover. and extract blown fuse. electrical current than conventional sys- tems.
-
Page 88
LOCATION AND CAPACITY OF FUSES Turn signal lamps, Windscreen ABS (Key-On) Radiator Fuel pump Brake lamps, • TCM* wipers Air-con, Temperature Electric side mirror* Compressor cut-off switch Rear window Radiator Electric windows Cassette Cooling fan relay Injector Illumination lamp Electrical exterior (high speed) mirror demister •… -
Page 89
The main relay box is located on the front wheel housing next to the battery in the engine An auxiliary relay box is located in the compartment. lefthand footwell. 13-2 13-3 13-1 Low beam High beam Rear spoiler Fuel pump Fog lamp (left) (left) -
Page 90: Bulb Replacement
BULB REPLACEMENT Bulbs Wattages x Number Do not touch halogen bulbs with bare Remarks hands. Greasy fingers will cause stains, Head lamp (low beam) 55Wx2 halogen bulb eventually resulting in a dull light. Head lamp (high beam) halogen bulb 65Wx2 Side light &…
-
Page 91
SIDE LIGHT HEAD LAMP HIGH AND LOW BEAM 1. Open the bonnet and engage the 4. Release the bulb retaining spring and 1. Open bonnet and engage the support. support. remove the bulb. 2. Rotate the plastic cap anticlockwise 2. Rotate the plastic cap anticlockwise and remove. -
Page 92: Interior Lamp
INTERIOR LAMP REAR COMBINATION LAMP 1. Open the boot lid and remove the 1. Prise the lamp out of the recess, using a screwdriver. protective cover. 2. When removing the bulb holder, press and pull the bulb holder upwards. 3. Press the bulb, turn the bulb clockwise and remove.
-
Page 93: Reading Lamp
READING LAMP LICENCE PLATE LAMP REVERSING LAMP 1. Prise the lamp out of the recess, using 1. Rotate and disengage the socket by 1. Unscrew the two bolts and remove the a screwdriver. hand. reversing lamp. 2. Remove the licence plate lamp. 2.
-
Page 94: Boot Lamp
REAR APPLIQUE LAMP BOOT LAMP Press the bulb, turn the bulb clockwise +, — 1. Unscrew the two screws installed in the The wi ring harness polarity and remove it from bulb holder. upper side of lamp housing. marked on the boot lamp as below. Replace the bulb with the new one.
-
Page 95
Miles (kilometres) or time in months, whichever comes first —- MAINTENANCE —- INTERVAL x 1,000 miles —- x 1,000 kms MAINTENANCE ITEM —- Months ENGINE CONTROL SYSTEM Drive belt (ALT. P/STG’) DOHC SOHC & (1) (3) Engine oil engine oil filter &… -
Page 96
Miles (kilometres) or time in months, whichever comes first MAINTENANCE INTERVAL x 1,000 miles x 1,000 kms MAINTENANCE …•.•..ITEM ..Months ENGINE CONTROL SYSTEM Distributor cap & rotor Charcoal canister & vapour lines PCV system DOHC Camshaft belt SOHC CHASSIS AND BODY Exhaust pipes &… -
Page 97
..Miles (kilometres) or time in months, whichever comes first MAINTENANCE ‘- ‘- INTERVAL x 1,000 miles ..x 1,000 kms MAINTENANCE ITEM Months ….. CHASSIS AND BODY Manual transmission fluid Clutch & brake pedal free play Automatic transmission fluid* Chassis and u/body bolts &… -
Page 99: Cleaning Agents
.CLEANING AGENTS CARE AND CLEANING OF GLASS SURFACES THE INTERIOR Glass surfaces should be cleaned on a Follow the manufacturer’s advice whenever cleaning agents or other chemicals regular basis. The use of a glass cleaner With the use of modern trim materials, it is or a liquid household glass cleaner will used, inside or outside the vehicle.
-
Page 100
Daewoo vehicles are designed to operate replaced so that corrosion protection is under normal environmental conditions restored. (Also see «Finish damage» which and to withstand the natural elements. -
Page 101
If de- sired, your Daewoo Outlet can do this On no account must any of these items service for you. be placed in the household refuse bins or the fluids poured down the drains. -
Page 103
OFFICIAL VEHICLE ENGINE NUMBER CHASSIS NUMBER IDENTIFICATION DATA The engine number is stamped on the front The chassis number is stamped on the right-hand side of the cylinder block. vehicle floor between the right hand front The vehicle identification number (chas- door and front seat. -
Page 104: Lubrication Chart
LUBRICATION CHART Service Interval Classification Lubricant Capacity SG grade or above Change every 10,000 miles or 1 year. CCMC G4/G5 1.5 DOHC 3.75 L SAE 5W/30 Engine oil (Oil filter element should be replaced at the same 1.8 MPI 4.25 L •…
-
Page 105
ENGINE OIL API classifications of engine oil Engine A= Single-grade oil The viscosity should be selected according to outside The American Petroleum Institute classifies B= Multi-grade oil temperature. Do not switch to a different viscosity in the engine oils according to their performance c= Improved-lubricity oil event of brief temperature fluctuations. -
Page 106: Specifications
SPECIFICATIONS 1.8 MPI 2.0 MPI Model 1.5 DOHC Manual Automatic Manual Automatic Automatic Manual Items transmission transmission transmission transmission transmission transmission 1. Vehicle dimensions (mm) 4,615 Overall length <- 4,615 <- <- <- Overall width 1,718 <- 1,718 <- <- <- 1,388 Overall height…
-
Page 107
Model 1.5 DOHC 1.8 MPI 2.0 MPI Manual Automatic Manual Automatic Manual Automatic Items transmission transmission transmission transmission transmission transmission 5. Engine Total displacement (cc) 1,498 1,796 <- <- 1,998 <- Bore x Stroke (mm) 76.5 x 81.5 <- 84.8 x 79.5 <- 86 x 86 <-… -
Page 108
Model 1.5 DOHC 1.8 MPI 2.0 MPI Manual Automatic Manual Automatic Manual Automatic Items transmission transmission transmission transmission transmission transmission 12. Brake Front wheel Disc (256 mm) +— +— +— Disc +— Rear wheel Drum (216 mm) Drum +— +— +— +— Booster (inch) -
Page 109: Fuel Consumption
FUEL CONSUMPTION FUEL CONSUMPTION IN MILES PER GALLON DESCRIPTION MODEL 75 mph 56 mph Urban 5 speed 47.9 44.8 25.9 1.5 DOHC manual transmission 4 speed automatic 39.2 23.2 47.9 transmission 5 speed 40.4 23.9 49.6 1.8 SOHC manual transmission 4 speed automatic 38.7 44.8…
-
Page 111
Boot ABS (Anti-lock brake system) 2-10 8-22 Demister 3-10 Warning light Bulb replacement 8-18 Rear window demister 3-16 Air bag 1-12 Demisting Warning light 3-12 Brake 2-10 3-18 Digital clock Air cleaner 2-10 Door locks Air conditioning Fluid 8-8,10-3 Central door lock AlC switch Hand 2-11… -
Page 112
8-5, 10-3,4 Engine oil Oil and filter change Hand brake 2-11 7-23 Jack Oil level Hazard warning Jump lead Oil pressure warning light Switch 3-17 Exterior mirror adjusting 3-18 Indicator Exterior rear-view mirror Head lamp 3-13,14 Passing 3-14 With integrated transponder Leveling switch 3-15 Door lock… -
Page 113
Temperature control…… Octane number Seat Temperature gauge Odometer Front seat slide Tiltable steering wheel Front seat reclining Tyre 1-10 Seat-belt Tyre inflation pressure 8-12 Passing light switch 3-14 1-12 Care of belts Tyre condition 8-12 6-10 Power antenna Height adjust 1-11 Fitting new tyre 8-13… -
Page 114
Washer fluid level Wheel changing Procedures Wheels and tyres 8-12 Window Door window Electric window switch Window demister 5-2, 7 Windscreen washer fluid 8-10 Windscreen washer switch 3-15 Windscreen wiper 8-10 Windscreen wiper switch 3-14 Winter tyres 8-13 Wiper speed control switch 3-15 Winter mode Switch…