 Автор: «FORD MOTOR CORPORATION»
Формат: PDF
Страниц: 322
Тип иллюстраций: черно-белые
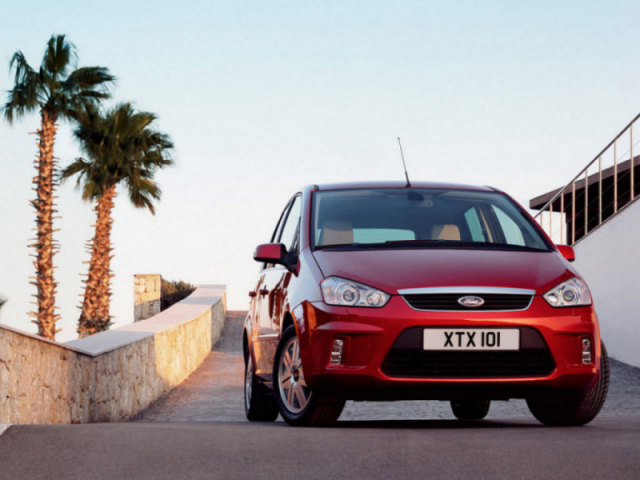
На машинах установлены бензиновые двигатели рабочим объемом 1,6 (100 и 115 л.с.), 1,8 (125 л.с.), 2,0 л. (145 л.с.), либо дизели объемом 1,6 (110 л.с.), 1,8 (115 л.с.) и 2,0 л. (136 л.с.).
Официальное руководство по эксплуатации автоомбиля Ford C-MAX от производителя «FORD MOTOR CORPORATION». Оно поможет владельцу машины разобраться в особенностях устройства. Также в издании есть полезные советы и замечания, важные при процедурах проведения текущего техобслуживания самостоятельно

Руководство по эксплуатации и техническому обслуживанию автомобилей Ford C-MAX и Ford Grand C-MAX с 2014 года выпуска.
- Автор: —
- Издательство: Motorist
- Год издания: —
- Страниц: 385
- Формат: —
- Размер: —

Руководство по эксплуатации, ремонту и техническому обслуживанию Ford C-MAX с 2003 года выпуска с бензиновыми и дизельными двигателями.
- Автор: —
- Издательство: Арго-Авто
- Год издания: —
- Страниц: 496
- Формат: —
- Размер: —

Подборка руководств по эксплуатации Ford C-MAX.
- Автор: —
- Издательство: Ford Motor Company
- Год издания: 2010/2011/2012/2013/2014
- Страниц: 322/334/350/380/388
- Формат: PDF
- Размер: 105,0 Mb
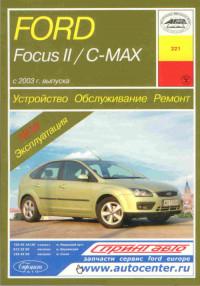
Руководство по эксплуатации, техническому обслуживанию и ремонту Ford Focus II и Ford C-MAX с 2003 года выпуска.
- Автор: И.А. Карпов
- Издательство: Арус
- Год издания: 2007
- Страниц: 388
- Формат: PDF
- Размер: 120,0 Mb
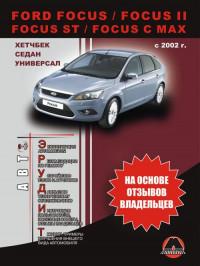
Руководство по эксплуатации, техническому обслуживанию и ремонту автомобилей Ford Focus и Ford Focus C-MAX с 2002 года выпуска.
- Автор: —
- Издательство: Монолит
- Год издания: —
- Страниц: 294
- Формат: —
- Размер: —


|
FordC-MAX |
Feel the difference |
||
|
Owner’shandbook |
|||

The information contained in this publication was correct at the time of going to print. In the interest of development the right is reserved to change specifications, design or equipment at any time without notice and without incurring any obligations. This publication, or part thereof, may not be reproduced nor translated without our approval. Errors and omissions excepted.
© Ford Motor Company 2007
All rights reserved.
Part number: 8M5J-19A321-BDA (CG3478en) 10/2007 20071114175745

Table of contents
|
Introduction |
|
|
About this handbook…………………… |
7 |
|
Symbols glossary………………………… |
7 |
|
Parts and accessories…………………. |
7 |
|
Quick start |
|
|
Quick start………………………………….. |
10 |
|
Child safety |
|
|
Child seats…………………………………. |
20 |
|
Child seat positioning…………………. |
21 |
|
Booster cushions………………………. |
23 |
|
ISOFIX anchor points…………………. |
24 |
|
Child safety locks………………………. |
26 |
|
Occupant protection |
|
|
Principle of operation…………………. |
27 |
|
Fastening the seat belts…………….. |
31 |
|
Seat belt height adjustment………. |
33 |
|
Using seat belts during |
|
|
pregnancy……………………………… |
33 |
|
Disabling the passenger |
|
|
airbag…………………………………….. |
33 |
|
Keys and remote |
|
|
controls |
|
|
General information on radio |
|
|
frequencies……………………………. |
35 |
|
Programming the remote |
|
|
control……………………………………. |
35 |
|
Changing the remote control |
|
|
battery……………………………………. |
36 |
|
Locks |
|
|
Locking and unlocking………………. |
40 |
|
Keyless entry…………………………….. |
44 |
|
Global opening and closing……….. |
50 |
|
Engine immobiliser |
|
|
Principle of operation………………… |
52 |
|
Coded keys………………………………. |
52 |
|
Arming the engine immobiliser….. |
52 |
|
Disarming the engine |
|
|
immobiliser…………………………….. |
52 |
|
Alarm |
|
|
Arming the alarm……………………….. |
53 |
|
Disarming the alarm…………………… |
54 |
|
Steering wheel |
|
|
Adjusting the steering wheel……… |
55 |
|
Horn………………………………………….. |
55 |
|
Audio control…………………………….. |
55 |
|
Voice control……………………………… |
57 |
|
Pedals |
|
|
Adjusting the pedals………………….. |
58 |
|
Wipers and washers |
|
|
Windscreen wipers……………………. |
59 |
|
Windscreen washers…………………. |
61 |
|
Rear window wiper and |
|
|
washers………………………………….. |
61 |
|
Adjusting the windscreen washer |
|
|
jets…………………………………………. |
62 |
|
Headlamp washers…………………… |
62 |
|
Checking the wiper blades……….. |
63 |
|
Changing the wiper blades……….. |
63 |
|
Lighting |
|
|
Lighting control………………………….. |
64 |
1

Table of contents
|
Autolamps…………………………………. |
65 |
|
Front fog lamps…………………………. |
65 |
|
Rear fog lamps………………………….. |
65 |
|
Headlamp levelling…………………….. |
66 |
|
Adaptive front lighting system |
|
|
(AFS)………………………………………. |
68 |
|
Hazard warning flashers……………. |
70 |
|
Direction indicators…………………….. |
71 |
|
Interior lamps…………………………….. |
72 |
|
Changing a bulb………………………… |
74 |
|
Windows and mirrors |
|
|
Electric windows……………………….. |
84 |
|
Exterior mirrors………………………….. |
85 |
|
Electric exterior mirrors……………… |
86 |
|
Interior mirror…………………………….. |
87 |
|
Instruments |
|
|
Gauges……………………………………… |
88 |
|
Warning lamps and indicators…… |
90 |
|
Audible warnings and |
|
|
indicators……………………………….. |
94 |
|
Information displays |
|
|
General information…………………… |
96 |
|
Personalised settings………………… |
99 |
|
Information messages…………….. |
103 |
|
Climate control |
|
|
Principle of operation……………….. |
107 |
|
Air vents…………………………………… |
107 |
|
Manual climate control…………….. |
108 |
|
Automatic climate control…………. |
111 |
|
Heated windows and mirrors…… |
114 |
|
Auxiliary heater…………………………. |
114 |
|
Electric sunroof…………………………. |
116 |
|
Seats |
|
|
Sitting in the correct position……. |
120 |
|
Manual seats……………………………. |
120 |
|
Head restraints…………………………. |
121 |
|
Electric seats……………………………. |
122 |
|
Rear seats……………………………….. |
124 |
|
Heated seats…………………………… |
132 |
|
Convenience features |
|
|
Sun visors………………………………… |
133 |
|
Sun blinds………………………………… |
133 |
|
Instrument lighting dimmer………. |
134 |
|
Cigar lighter……………………………… |
134 |
|
Auxiliary power sockets…………… |
134 |
|
Centre console………………………… |
135 |
|
Cool box…………………………………… |
137 |
|
Storage compartments……………. |
137 |
|
Seat back trays………………………… |
138 |
|
Glasses holder…………………………. |
139 |
|
Toll reader………………………………… |
139 |
|
Childminder mirror……………………. |
140 |
|
Auxiliary input (AUX IN) socket….. |
140 |
|
Starting the engine |
|
|
General information………………….. |
141 |
|
Ignition switch…………………………… |
141 |
|
Steering wheel lock………………….. |
142 |
|
Starting a petrol engine……………. |
142 |
|
Starting a diesel engine……………. |
144 |
|
Keyless starting……………………….. |
145 |
|
Switching off the engine…………… |
148 |
|
Engine heater…………………………… |
148 |
2

Table of contents
|
Fuel and refuelling |
|
|
Safety precautions…………………… |
149 |
|
Fuel quality — Petrol…………………… |
149 |
|
Fuel quality — Flexible Fuel………… |
149 |
|
Fuel quality — Diesel………………….. |
150 |
|
Catalytic converter…………………… |
150 |
|
Fuel filler flap……………………………… |
151 |
|
Refuelling………………………………….. |
151 |
|
Fuel consumption…………………….. |
151 |
|
Technical specifications……………. |
152 |
|
Transmission |
|
|
Manual transmission………………… |
154 |
|
Automatic transmission……………. |
154 |
|
Brakes |
|
|
Principle of operation……………….. |
158 |
|
Hints on driving with ABS…………. |
158 |
|
Parking brake…………………………… |
159 |
|
Stability control |
|
|
Principle of operation……………….. |
160 |
|
Using stability control………………… |
161 |
|
Parking aid |
|
|
Principle of operation……………….. |
162 |
|
Using the parking aid……………….. |
162 |
|
Cruise control |
|
|
Principle of operation……………….. |
164 |
|
Using cruise control…………………. |
164 |
|
Automatic speed limiter |
|
|
(ASL) |
|
|
Principle of operation……………….. |
166 |
|
Load carrying |
|
|
General information………………….. |
167 |
|
Luggage covers……………………….. |
167 |
|
Rear under floor storage………….. |
168 |
|
Towing |
|
|
Towing a trailer…………………………. |
169 |
|
Detachable tow ball…………………. |
169 |
|
Driving hints |
|
|
Running-in………………………………… |
173 |
|
Emergency |
|
|
equipment |
|
|
First aid kit………………………………… |
174 |
|
Warning triangle……………………….. |
174 |
|
Status after a |
|
|
collision |
|
|
Fuel cut-off switch……………………. |
175 |
|
Inspecting safety system |
|
|
components…………………………. |
175 |
|
Fuses |
|
|
Fuse box locations…………………… |
176 |
|
Changing a fuse……………………….. |
177 |
|
Fuse labels……………………………….. |
177 |
|
Fuse specification chart……………. |
179 |
|
Vehicle recovery |
|
|
Towing points…………………………… |
185 |
|
Towing the vehicle on four |
|
|
wheels………………………………….. |
186 |
3

Table of contents
|
Maintenance |
|
|
General information…………………. |
188 |
|
Opening and closing the |
|
|
bonnet………………………………….. |
189 |
|
Engine compartment overview — |
|
|
1.6L Duratec-16V (Sigma)/1.6L |
|
|
Duratec-16V Ti-VCT (Sigma)….. |
190 |
|
Engine compartment overview — |
|
|
1.8L Duratec-HE (MI4)/2.0L |
|
|
Duratec-HE (MI4)………………….. |
192 |
|
Engine compartment overview — |
|
|
1.6L Duratorq-TDCi (DV) |
|
|
Diesel……………………………………. |
194 |
|
Engine compartment overview — |
|
|
1.8L Duratorq-TDCi (Lynx) |
|
|
Diesel……………………………………. |
196 |
|
Engine compartment overview — |
|
|
2.0L Duratorq-TDCi (Puma) |
|
|
Diesel……………………………………. |
198 |
|
Engine oil dipstick — 1.6L |
|
|
Duratec-16V (Sigma)/1.6L |
|
|
Duratec-16V Ti-VCT (Sigma)….. |
199 |
|
Engine oil dipstick — 1.8L |
|
|
Duratec-HE (MI4)/2.0L |
|
|
Duratec-HE (MI4)………………….. |
199 |
|
Engine oil dipstick — 1.6L |
|
|
Duratorq-TDCi (DV) Diesel…… |
200 |
|
Engine oil dipstick — 1.8L |
|
|
Duratorq-TDCi (Lynx) Diesel…. |
200 |
|
Engine oil dipstick — 2.0L |
|
|
Duratorq-TDCi (DW) Diesel….. |
200 |
|
Engine oil check………………………. |
200 |
|
Engine coolant check………………. |
201 |
|
Brake and clutch fluid check…… |
202 |
|
Power steering fluid check……… |
202 |
|
Washer fluid check………………….. |
203 |
|
Technical specifications…………… |
204 |
|
Vehicle care |
|
|
Cleaning the exterior……………….. |
207 |
|
Cleaning the interior………………… |
208 |
|
Repairing minor paint damage…. |
208 |
|
Vehicle battery |
|
|
Battery care…………………………….. |
209 |
|
Using booster cables………………. |
209 |
|
Changing the vehicle battery…… |
210 |
|
Wheels and tyres |
|
|
General information………………….. |
211 |
|
Changing a road wheel…………….. |
211 |
|
Tyre repair kit……………………………. |
217 |
|
Tyre care…………………………………. |
223 |
|
Using winter tyres……………………. |
223 |
|
Using snow chains………………….. |
223 |
|
Technical specifications…………… |
224 |
|
Vehicle identification |
|
|
Vehicle identification plate……….. |
226 |
|
Vehicle identification number |
|
|
(VIN)……………………………………… |
226 |
|
Engine number — 1.6L Duratec-16V |
|
|
(Sigma)/1.6L Duratec-16V Ti-VCT |
|
|
(Sigma)………………………………… |
226 |
|
Engine number — 1.8L Duratec-HE |
|
|
(MI4)/2.0L Duratec-HE |
|
|
(MI4)…………………………………….. |
226 |
|
Engine number — 1.6L |
|
|
Duratorq-TDCi (DV) Diesel/2.0L |
|
|
Duratorq-TDCi (Puma) |
|
|
Diesel……………………………………. |
227 |
|
Engine number — 1.8L |
|
|
Duratorq-TDCi (Lynx) Diesel….. |
227 |
4

Table of contents
|
Technical specific- |
|
|
ations |
|
|
Technical specifications…………… |
228 |
|
Telephone |
|
|
General information…………………. |
231 |
|
Telephone setup……………………… |
231 |
|
Bluetooth setup………………………. |
233 |
|
Telephone controls…………………. |
234 |
|
Using the telephone — Vehicles |
|
|
Without: Navigation System….. |
235 |
|
Using the telephone — Travel Pilot |
|
|
EX………………………………………… |
238 |
|
Voice control |
|
|
Principle of operation……………….. |
241 |
|
Using voice control………………….. |
242 |
|
Audio unit commands…………….. |
242 |
|
Telephone commands……………. |
247 |
|
Navigation system |
|
|
commands…………………………… |
252 |
|
Climate control commands…….. |
252 |
|
Appendices |
|
|
Type approvals………………………… |
255 |
|
Type approvals………………………… |
255 |
|
Electromagnetic compatibility….. |
262 |
5

6
Introduction
ABOUT THIS HANDBOOK
Thank you for choosing Ford. We recommend that you take some time to get to know your vehicle by reading this handbook. The more that you know about it, the greater the safety and pleasure you will get from driving it.
Note: This handbook describes product features and options available throughout the range, sometimes even before they are generally available. It may describe options not fitted to your vehicle.
Note: Always use and operate your vehicle in line with all applicable laws and regulations.
Note: Pass on this handbook when selling your vehicle. It is an integral part of the vehicle.
SYMBOLS GLOSSARY
Symbols in this handbook
WARNING
You risk death or serious injury to yourself and others if you do not follow the instructions highlighted
by the warning symbol.
CAUTION
You risk damaging your vehicle if you do not follow the
instructions highlighted by the caution symbol.
Symbols on your vehicle
When you see these symbols, read and follow the relevant instructions in this handbook before touching or attempting adjustment of any kind.
PARTS AND
ACCESSORIES
Now you can be sure that your Ford parts are Ford parts
Your Ford has been built to the highest standards using high quality Ford Original Parts. As a result, you can enjoy driving it for many years.
Should the unexpected occur and a major part needs replacing, we recommend that you accept nothing less than Ford Original Parts.
The use of Ford Original Parts ensures that your vehicle is repaired to its pre-accident condition and maintains its maximum residual value.
Ford Original Parts match Ford’s stringent safety requirements and high standards of fit, finish and reliability. Quite simply, they represent the best overall repair value, including parts and labour costs.
7
Introduction
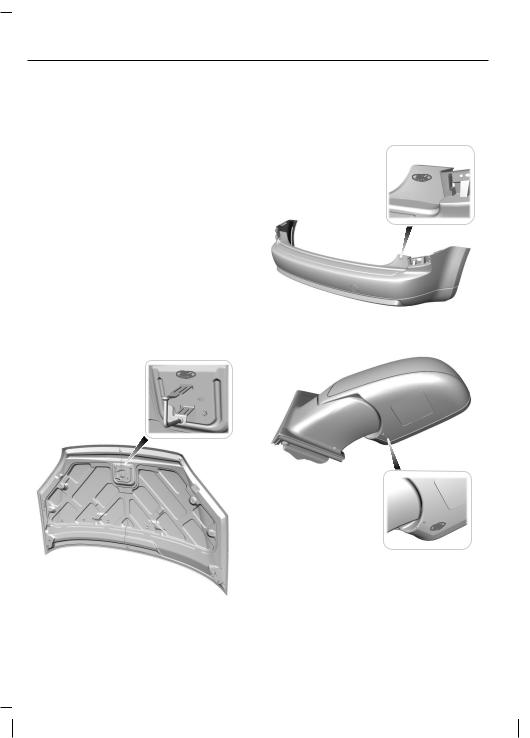
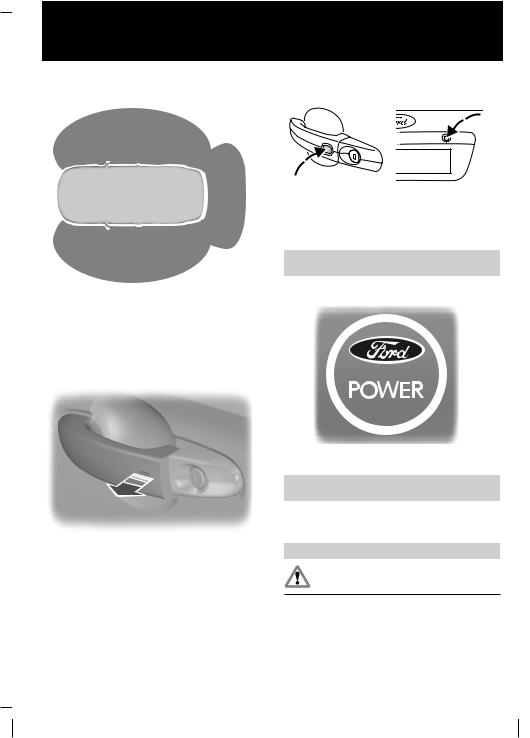
Now it is easier to tell if you have really been given Ford Original Parts. The Ford logo is clearly visible on the following parts if they are Ford Original Parts. If your vehicle has to be repaired, look for the clearly visible Ford branding and make sure that only Ford Original Parts have been used.
Look for the Ford logo on the following parts
Sheet metal
•Bonnet
•Wings
•Doors
•Luggage compartment lid or tailgate
E89932
Bumper and radiator grille
•Radiator grille
•Front and rear bumper
E89933
Exterior mirror
E89934
Glass
•Rear window
•Side glass
•Windscreen
8
![]()
Introduction
E89936
E89935
Lighting
•Rear lamps
•Headlamp
9
Quick start
QUICK START
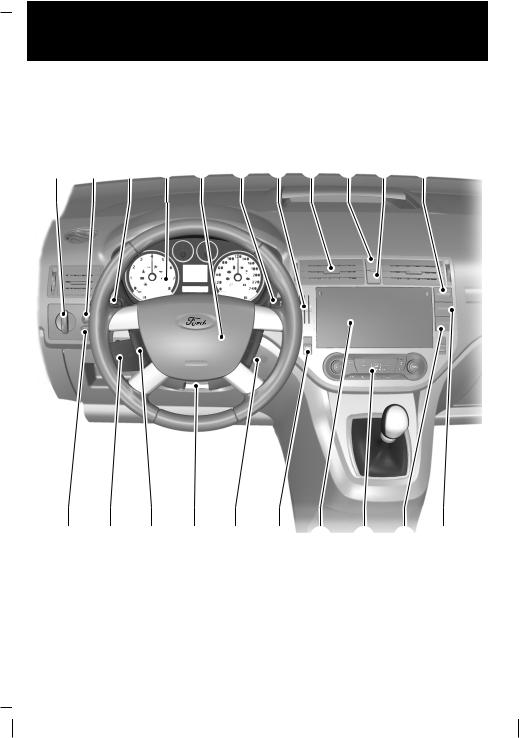
Instrument panel overview
Left-hand drive
A B C D E F G H I J K
U T S R Q P O N M L
E78209
ALighting control. See Lighting control (page 64). Front fog lamps. See Front fog lamps (page 65). Rear fog lamp. See Rear fog lamps (page 65).
BHeadlamp levelling control. See Headlamp levelling (page 66).
10

Quick start
CMulti-function lever: Information display controls. Direction indicators. See Direction indicators (page 71). Main beam. See Lighting control (page 64).
DInstrument cluster. See Gauges (page 88). See Warning lamps and indicators (page 90).
EHorn. See Horn (page 55).
F Wiper lever. See Wipers and washers (page 59).
GCard holder.
HAir vents. See Air vents (page 107).
IHazard warning flasher switch. See Hazard warning flashers (page 70).
JAirbag deactivation indicator. See Disabling the passenger airbag (page 33). Parking aid switch. See Using the parking aid (page 162).
JStart button. See Keyless starting (page 145).
KHeated windscreen switch. See Heated windows and mirrors (page 114).
LHeated rear window switch. See Heated windows and mirrors (page 114).
MStability control (ESP) switch. See Using stability control (page 161).
N Climate controls. See Climate control (page 107).
OAudio or navigation unit. See separate handbook.
P Heated front seat switch. See Heated seats (page 132).
QIgnition switch. See Ignition switch (page 141).
RSteering wheel adjustment. See Adjusting the steering wheel (page 55).
S Cruise control switches. See Using cruise control (page 164).
T Audio controls. See Audio control (page 55).
UInstrument lighting dimmer. See Instrument lighting dimmer (page 134).
11
Quick start
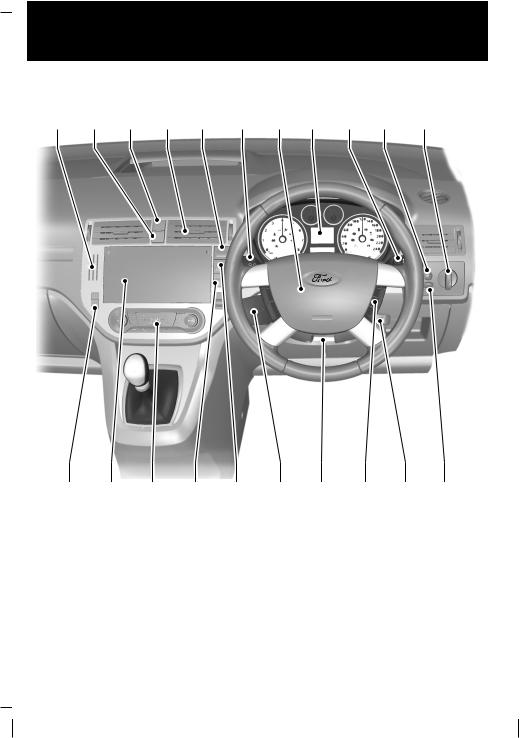
Right-hand drive
A B C D E F G H I J K
U T S R Q P O N M L
E78210
ACard holder.
BAirbag deactivation indicator. See Disabling the passenger airbag (page 33). Parking aid switch. See Using the parking aid (page 162).
BStart button. See Keyless starting (page 145).
CHazard warning flasher switch. See Hazard warning flashers (page 70).
12

Quick start
DAir vents. See Air vents (page 107).
EHeated windscreen switch. See Heated windows and mirrors (page 114).
FMulti-function lever: Information display controls. See Information displays (page 96). Direction indicators. See Direction indicators (page 71). Main beam. See Lighting control (page 64).
GHorn. See Horn (page 55).
HInstrument cluster. See Gauges (page 88). See Warning lamps and indicators (page 90).
IWiper lever. See Wipers and washers (page 59).
JHeadlamp levelling control. See Headlamp levelling (page 66).
KLighting control. See Lighting control (page 64). Front fog lamps. See Front fog lamps (page 65). Rear fog lamp. See Rear fog lamps (page 65).
LInstrument lighting dimmer. See Instrument lighting dimmer (page 134).
MIgnition switch. See Ignition switch (page 141).
NCruise control switches. See Using cruise control (page 164).
OSteering wheel adjustment. See Adjusting the steering wheel (page 55).
PAudio controls. See Audio control (page 55).
QHeated rear window switch. See Heated windows and mirrors (page 114).
RStability control (ESP) switch. See Using stability control (page 161).
S Climate controls. See Climate control (page 107).
TAudio/navigation unit. See separate handbook.
UHeated front seat switch. See Heated seats (page 132).
13
Quick start
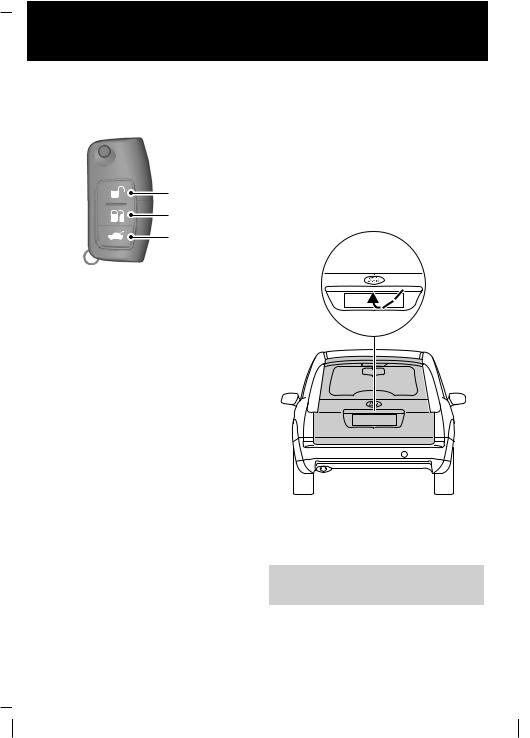
Locking and unlocking
Unlocking the vehicle
A
B
C
E71963
AUnlock
BLock
CTailgate unlock
Press the unlock button once to unlock the vehicle. See
Programming the remote control (page 35).
Press and hold the unlock button for three seconds to unlock the vehicle and open the windows and sunroof (global opening)*.
Press the lock button once to activate central locking and arm the alarm.
Press the lock button twice within three seconds to activate double locking and arm the interior sensors.
Press and hold the lock button for three seconds to lock the vehicle and close the windows and sunroof (global closing)*.
Press the tailgate unlock button twice within three seconds to unlock the luggage compartment.
* only in combination with four electric windows (in combination with two electric windows, only the sunroof can be opened and closed in this way).
Opening the tailgate
E78262
To open the luggage compartment, press the switch. The driver’s door must be unlocked.
See Locking and unlocking
(page 40).
14
Quick start
Keyless entry
E78276
Passive locking and unlocking requires a valid passive key to be located within one of the three external detection ranges.
Unlocking the vehicle
E78278
Pull a door handle to unlock all the doors and the luggage compartment lid and disarm the alarm.
Locking the vehicle
E78282
Locking buttons are located on each of the front doors and the luggage compartment lid.
See Keyless entry (page 44).
Keyless starting
E85766
Press the start button.
See Keyless starting (page 145).
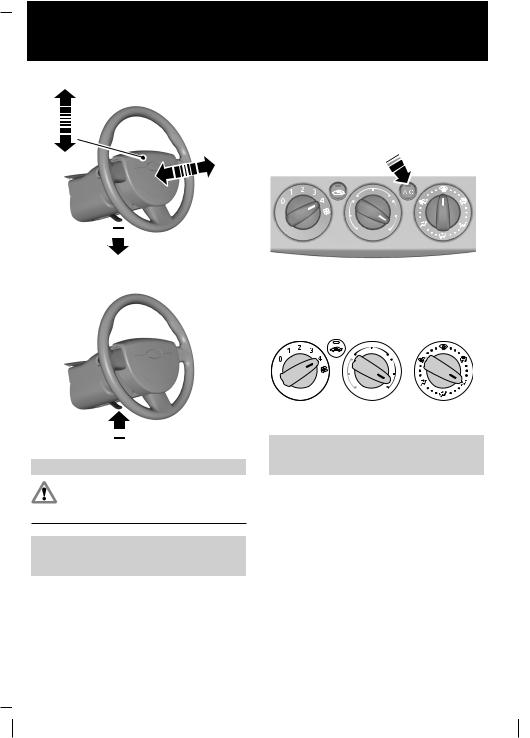
Adjusting the steering wheel
WARNING
Never adjust the steering wheel when the vehicle is moving.
15
Quick start
|
Manual climate control |
|
|
2 |
Windscreen |
|
defrosting/demisting |
2
 1
1
E95178
E71382
Rapid heating of vehicle interior
E77935
 3
3
|
E95179 |
See Manual climate control |
|
|
WARNING |
(page 108). |
|
Make sure that you fully engage the locking lever when returning
it to its original position.
See Adjusting the steering wheel (page 55).
16
Quick start
Automatic climate control
A B
E D C
E78730
AWindscreen defrosting/demisting
BToggle mono mode on and off
C Air conditioning OFF
DRecirculated air
EAir conditioning ON
See Automatic climate control
(page 111).
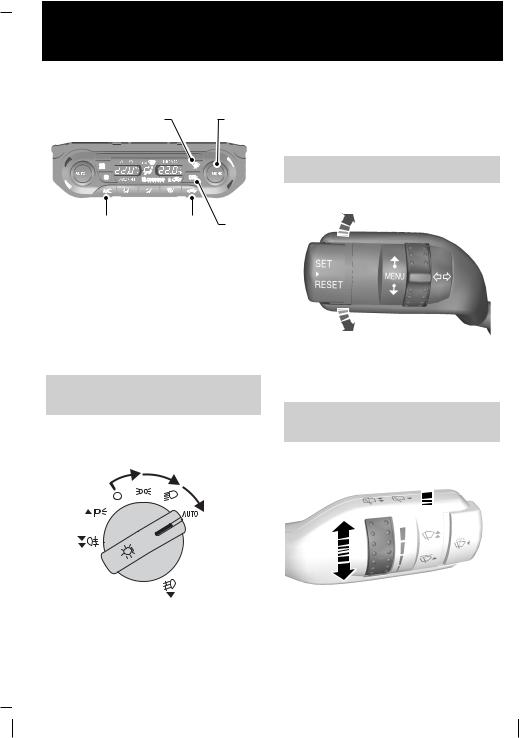
Autolamps
E72162
When the lighting control is set to position AUTO the dipped beam headlamps will switch on and off automatically depending on the ambient light.
See Lighting control (page 64).
Direction indicators
E71098
If the lever is tapped up or down, the direction indicators will flash three times.
See Direction indicators (page 71).
Autowipers
 B
B
E71014
Move the lever up one position.
17
Quick start
The rain sensor will continuously measure the amount of water on the front screen and adjust the speed of the front wipers automatically.
Adjust the sensitivity of the rain sensor using the rotary control.
See Windscreen wipers (page 59).
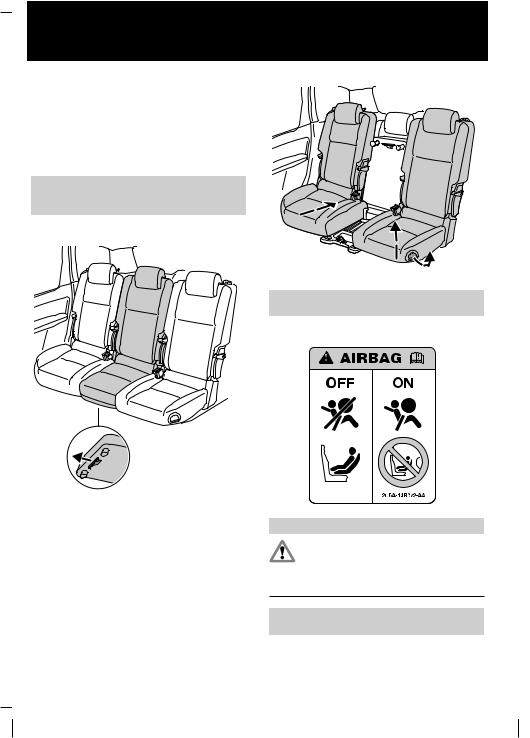
Rear seats
E78064
See Rear seats (page 124).
Airbag
E78062
E69213
WARNING
To avoid the risk of death or serious injury, never use a rearward facing child restraint in the
front, unless the air bag is off.
See Child safety (page 20).
18
![]()
Quick start
See Disabling the passenger airbag (page 33).
Manual transmission
Reverse gear − 6-speed transmission
2
 1
1
E75052
See Manual transmission (page 154).
Automatic transmission
Note: When the engine is started, the brake pedal and the selector lever button must be depressed before the selector lever can be moved from the park position
P.
See Transmission (page 154).
19
Child safety
CHILD SEATS
E68916
WARNINGS
Secure children that are less than 150 centimetres tall or less
than 12 years of age in a suitable, approved child restraint, in the rear seat.
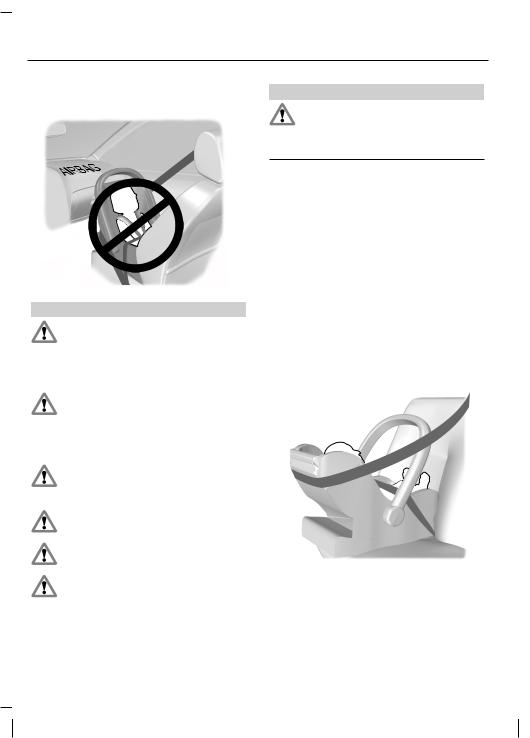
Original text according to ECE R94.01: Extreme Hazard! Do not use a rearward facing child restraint
on a seat protected by an air bag in front of it!
Read and follow the manufacturer’s instructions
when you are fitting a child restraint.
Do not modify child restraints in any way.
Do not hold a child on your lap when the vehicle is moving.
Do not leave unattended children in your vehicle.
WARNINGS
If your vehicle has been involved in an accident, have the child
restraints checked by properly trained technicians.
Note: Mandatory use of child restraints varies from country to country.
A choice of ECE approved child restraints which have been specifically tested and approved for your vehicle are available from your Dealer.
Child restraints for different mass groups
Use the correct child restraint as follows:
Baby safety seat
E68918
Secure children that weigh less than 13 kilogrammes in a rearward facing baby safety seat in the rear seat.
20
Child safety
|
Child safety seat |
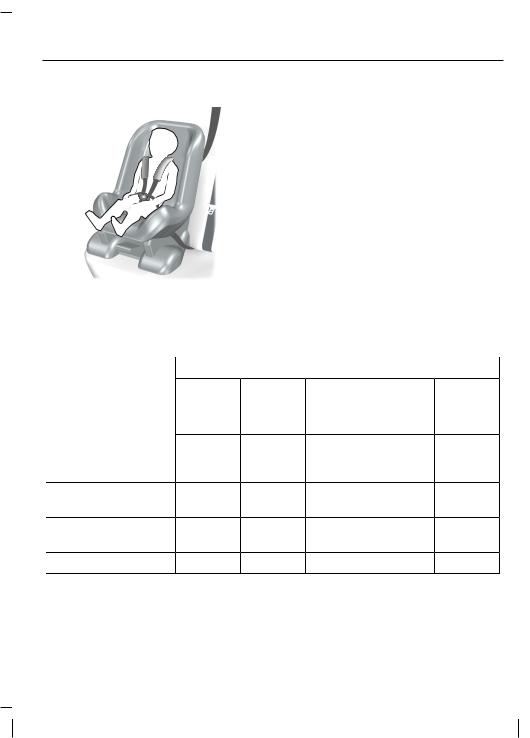
Secure children that weigh between |
|
13 and 18 kilogrammes in a child |
|
|
safety seat in the rear seat. |
E68920
CHILD SEAT POSITIONING
Child seat positions
|
Seating positions |
Mass group categories |
||||
|
0 |
0+ |
I |
II |
III |
|
|
Up to 10 |
Up to 13 |
9-18 kg |
15-25 kg |
22-36 |
|
|
kg |
kg |
kg |
|||
|
Baby |
Baby |
Child |
Booster |
Booster |
|
|
safety |
safety |
safety |
seat or |
seat or |
|
|
seat |
seat |
seat |
cushion |
cushion |
|
|
Front passenger |
X |
X |
U1 |
U1 |
U1 |
|
airbag ON |
|||||
|
Front passenger |
U |
U |
U |
U |
U |
|
airbag OFF |
|||||
|
Rear seats |
U |
U |
U |
U |
U |
U Suitable for universal category child restraints approved for use in this mass group.
X Not suitable for children in this mass group.
21

Child safety
U1 Suitable for universal category child restraints approved for use in this mass group. However, we recommend that you secure children in a government approved child restraint, in the rear seat.
22
Child safety
BOOSTER CUSHIONS
WARNINGS
Do not install a booster seat or a booster cushion with only the
lap strap of the seat belt.
Do not install a booster seat or a booster cushion with a seat
belt that is slack or twisted.
Do not put the seat belt under your child’s arm or behind its
back.
Do not use pillows, books or towels to boost your child’s
height.
Make sure that your children sit in an upright position.
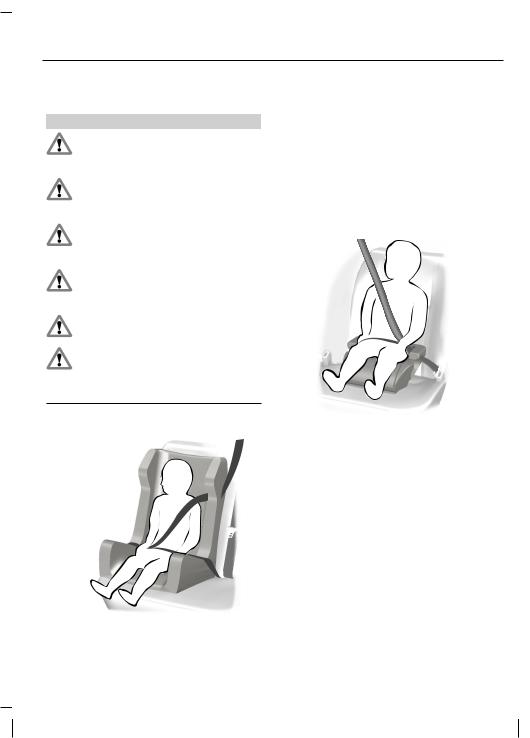
Secure children that weigh more than 15 kilogrammes but are
less than 150 centimetres tall in a booster seat or a booster cushion.
Booster seat
E70710
We recommend that you use a booster seat that combines a cushion with a backrest instead of a booster cushion only. The raised seating position will allow you to position the shoulder strap of the adult seat belt over the centre of your child’s shoulder and the lap strap tightly across its hips.
Booster cushion
E68924
23
Child safety
ISOFIX ANCHOR POINTS Attaching child safety seats with top tethers
E75531
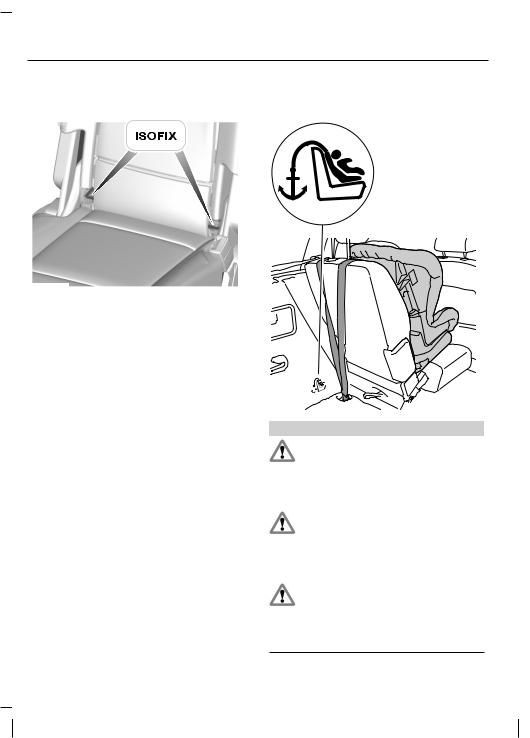
Your vehicle has been equipped with ISOFIX attachments. Your Ford Dealer will be pleased to make them accessible.
The ISOFIX system consists of two rigid latching arms on the child seat, which attach to anchor points at the base of the vehicle seat back. When made available by your Ford Dealer, the two lower anchor points may be found in the rear seating rows and are labelled with a circular pictogram and the word ISOFIX.
The funnel guides enable the latching arms of an ISOFIX child seat to be easily and securely attached.
ISOFIX child seats not approved by Ford have not been validated by Ford, and neither the safety nor the suitability of such seats can be certified, whether installed using the ISOFIX system or the normal seat belts.
E78299
WARNINGS
Attach the tether strap only to the appropriate tether anchor as shown. The tether strap may not
work properly if attached somewhere other than the correct tether anchor.
Ford does not recommend the use of an ISOFIX system without
the use of an anti-rotation device, such as a top tether anchor or support leg, correctly installed.
There is a risk of death or serious injury when the manufacturers instructions are not followed properly or when the child
restraint is modified in any way.
24

Child safety
A third anchor point has been provided for child seats that are equipped with a top tether, available for use in the forward facing configuration.
The top tether anchors in your vehicle are located on the floor of the luggage compartment.
The tether strap should be routed beneath the raised rear head restraint, to the anchor point on the floor of the luggage compartment. The anchor point is identified by a pictogram.
After installing the child safety seat, tighten the tether strap according to the manufacturer’s instructions.
25
Child safety
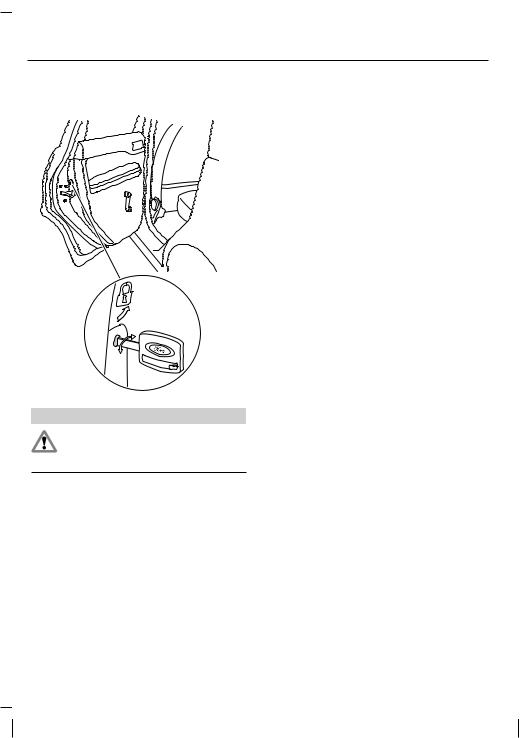
CHILD SAFETY LOCKS
E78298
WARNING
When the child safety lock is activated, the door can only be
opened from outside.
Turn the key in the rear door in the direction of the arrow to activate the lock. To deactivate the lock turn the key in opposite direction to the arrow.
26
Occupant protection
PRINCIPLE OF OPERATION
Airbags
E78293
WARNING
Do not modify the front of the vehicle in any way as this can
adversely affect airbag deployment.
Note: A loud bang will be heard when an airbag deploys and it is normal to see a cloud of harmless powdery residue.
The airbag system comprises the following:
•single-stage inflatable nylon bags (airbags) with gas generators
•side airbags
•curtain airbags
•seat belt pretensioners
•a seat belt reminder
•crash sensors.
•a warning lamp in the instrument panel.
•an airbag deactivation switch
•an airbag deactivation indicator in the instrument panel
•an electronic control and diagnostic unit.
E72330
27
Occupant protection
WARNINGS
Repairs to either of the front seat covers, the sensors
attached to the seats as well as to the roof lining should only be carried out by properly trained technicians. Injuries may result if the side airbags are triggered inadvertently.
Do not block, obstruct or cover the airbag because it may
prevent proper deployment. Do not poke any sharp objects into the areas where airbags are fitted. This could damage the airbags.
Do not use any accessory seat covers that are not specifically designed for seats with side airbags. These seat covers must be fitted by
properly trained technicians.
E66553
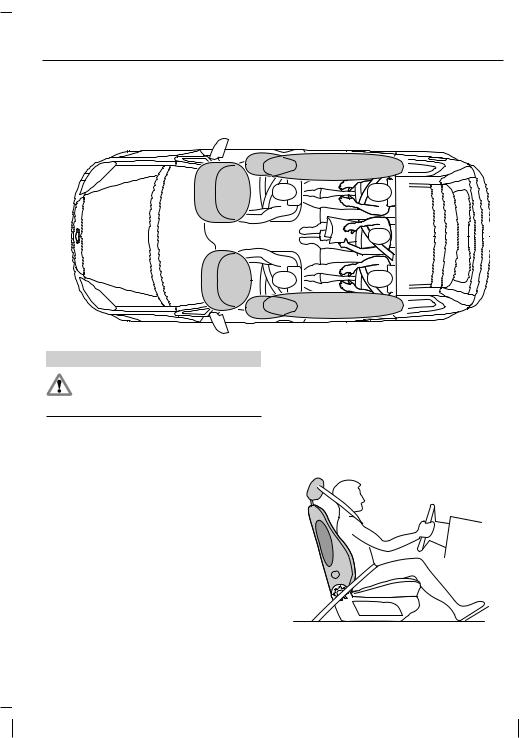
WARNING
Always wear the seat belt and keep sufficient distance
between the driver and the steering wheel. Only when the seat belt is used properly, can it hold the body in a position which allows the airbag to achieve its optimum effect. There is a risk of injury when the airbag deploys.
The seat and back must be set correctly for the airbags to be optimally effective. See Sitting in the correct position (page 120).
This is the ideal seating position for the driver and front passenger and helps reduce the risk of injury from sitting too close to an inflating airbag.
E72325
28
![]()
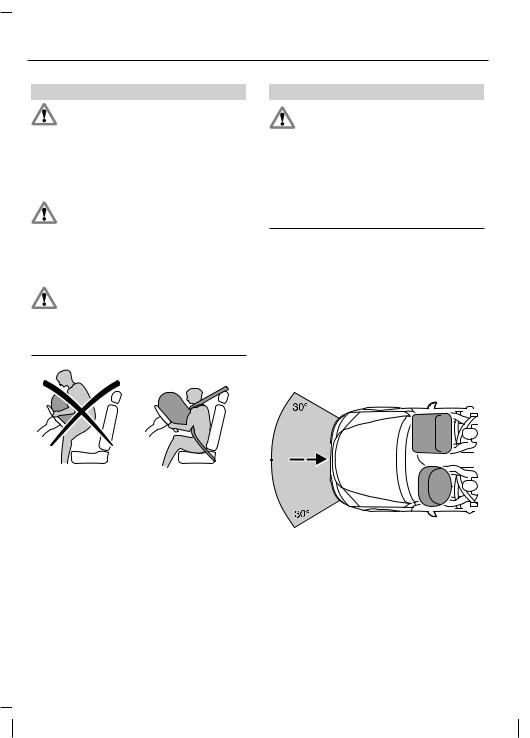
Occupant protection
The front airbags activate during significant collisions which are either frontal or up to 30 degrees from the left or the right. The airbags inflate within a few thousandths of a second. They will deflate on contact with the front occupants thus cushioning forward body movement.
E72326
During minor collisions as well as overturns and rear or side collisions, the front airbag system will not be activated.
E78294
WARNINGS
Repairs to the steering wheel, steering column and airbag
system should be carried out by properly trained technicians.
Always keep the areas in front of the airbags free. Never affix
anything to or over these areas.
These areas should only be wiped with a damp cloth, never with a wet cloth.
Side air bags
E72328
A label on the seatback indicates that side airbags are fitted. The side airbags are fitted on the side of the seatbacks of the front seats. In case of a severe lateral collision, the airbag on the side affected by the collision will be inflated.
The airbag will inflate between the door panel and occupant. Once the occupant’s body contacts the airbag, the propellant escapes, thereby cushioning the impact.
29

Occupant protection
The side airbags are not activated upon minor lateral collisions nor upon front or rear impacts.
Curtain air bags
WARNINGS
The seat belts should fit tightly around the body.
Seat belt pretensioner
E72329
Moulded badges in the A- and B-piller trims indicate that curtain air bags are fitted. The curtain airbags are fitted over the front and rear side windows inside the roof lining. In case of a severe lateral collision, the air bag on the side affected by the collision will be inflated.
The curtain air bags are not activated upon minor lateral collisions nor upon front or rear impacts.
Seat belts
WARNINGS
 Use seat belts at all times.
Never use a seat belt for more than one person.
 Avoid wearing thick clothing.
E72333
WARNING
The belt pretensioners must not be removed. If the
pretensioners are deployed during an accident, they must be replaced. Have the pretensioners serviced and disposed of by specially trained personnel only.
The restraint system, with belt pretensioners in the front seats, helps to reduce the risk of serious injury in a major frontal impact. During a serious crash the seat belts are pretensioned to help reduce slack in the belt. The safety belt pretensioner is a device which removes excess webbing from the safety belt system. When the safety belt pretensioner deploys, webbing from the lap and shoulder belt is tightened.
30

Occupant protection
The belt pretensioner is not triggered in any side, rear or minor frontal collisions.
FASTENING THE SEAT BELTS
E74124
WARNING
Insert the tongue into the buckle until a distinct click is heard,
otherwise the seat belt will not be locked correctly.
Pull the belt out steadily. It may lock if pulled sharply or if the vehicle is on a slope.
To release the belt, press the red button on the buckle and let the belt rewind completely and smoothly.
E78079
When in use, the rear seat belts should be placed in the belt guides on the outboard seatbacks.
E74127
WARNING
In order to ensure that the centre belt works properly, the
rear seatback must be correctly engaged.
Make sure that each seat belt uses the correct buckle.
31

Occupant protection
1
E74125
The retractor for the rear centre seat belt is located in the roof. To fasten the seat belt, pull it out steadily and engage the smaller, black tongue in the smaller black buckle to the right of the centre seat.
2
E74126
Then pull the larger tongue across the lap and engage it in the larger buckle to the left of the centre seat.
To release the belt, first press the red button on the left buckle and let the belt rewind. If in constant use, the belt can be left buckled in the right-hand buckle. When not in use, or when folding or moving the rear seats, the belt should be released from the right-hand buckle by pressing the button on the side of the buckle and letting the belt rewind smoothly to the retractor in the roof.
E78080
32

Occupant protection
Fold the smaller seat belt tongue back and insert the larger belt tongue into the retaining slot as shown.
SEAT BELT HEIGHT ADJUSTMENT
E78081
Press the locking control on the height adjuster and move the pivot so that the belt rests across the centre of the shoulder.
Lifting the slider slightly while pressing the locking control makes it easier to release the locking mechanism.
USING SEAT BELTS DURING PREGNANCY
WARNING
Position the seat belt correctly for your safety and that of your unborn child. Do not use only the lap
strap or the shoulder strap.
Position the lap strap comfortably across your hips and low beneath your pregnant abdomen. Position the shoulder strap between your breasts, above and to the side of your pregnant abdomen.
DISABLING THE PASSENGER AIRBAG
WARNING
Make sure that the passenger airbag is disabled when using a rearward facing child restraint on the
front passenger seat.
E71313
E68587
33

Occupant protection
Fitting the passenger airbag deactivation switch
WARNING
If you need to fit a child restraint on a seat protected by an
operational airbag in front of it, have a passenger airbag deactivation switch fitted. Ask your dealer for further information.
Note: The key switch is located in the glove compartment with an airbag deactivation lamp in the instrument panel.
If the airbag warning lamp illuminates or flashes when you are driving, this indicates a malfunction. See
Warning lamps and indicators
(page 90). Remove the child restraint and have the system checked immediately.
Disabling the passenger airbag
Enabling the passenger airbag
WARNING
Make sure that the passenger airbag is enabled when you are not using a child restraint on the front
passenger seat.
Turn the switch to position B.
AB
E71312
A Disabled
BEnabled
Turn the switch to position A.
When you switch the ignition on, check that the passenger airbag deactivation warning lamp illuminates.
34

Keys and remote controls
GENERAL INFORMATION ON RADIO FREQUENCIES
CAUTION
The radio frequency used by your remote control can also be
used by other short distance radio transmissions (e.g. amateur radios, medical equipment, wireless headphones, remote controls and alarm systems). If the frequencies are jammed, you will not be able to use your remote control. You can lock and unlock the doors with the key.
Note: You could unlock the doors if you press the buttons on the remote control unintentionally.
The operating range between your remote control and your vehicle varies depending on the environment.
PROGRAMMING THE REMOTE CONTROL
A maximum of eight remote controls can be programmed (including the ones delivered with the vehicle). The remote controls must remain inside the vehicle during the programming procedure. Fasten the front seat belts and close all doors to ensure that conflicting chimes do not sound during programming.
E78253
•To programme new remote controls turn the ignition key to position II four times within six seconds.
•Turn the ignition to position 0. A tone sounds to indicate that it is now possible to programme the remote controls for ten seconds.
E78254
35

Keys and remote controls
•Press any button on a new remote control. A tone will sound as confirmation. Repeat this last step for all your remote controls, including your original. Do not remove the key from the ignition when pressing the button on this remote control.
•Switch the ignition back on (position II) or wait for ten seconds without programming another remote control to end the key programming. Only the remote controls which you have just programmed are now able to lock and unlock the vehicle.
Reprogramming the unlocking function
You can change the unlocking function so that pressing the unlock button once deactivates the central locking or double locking, disarms the anti-theft alarm system and unlocks only the driver’s door. Pressing the unlock button twice within three seconds also unlocks the passengers’ doors.
In order to re-programme the function, press and hold the unlock and lock buttons simultaneously for at least four seconds with the ignition switched off. The direction indicators will flash twice to indicate that the unlocking function has been successfully re-programmed.
Pressing and holding both buttons simultaneously for at least four seconds again will change the function back.
CHANGING THE REMOTE CONTROL BATTERY
If the range of the transmitter in the remote control decreases gradually, the battery (type 3V CR 2032) should be replaced.
Remote control type 1
First, press the button to release the key blade.
Passive key
Remove the spare key.
E78255
36

Keys and remote controls
|
Opening the container |
Remote control type 1 and |
|
Remote control type 1 |
passive key |
E78256
•Insert a screw driver as far as possible into the slot at the side of the remote control and push it towards the key blade to release the container from the key blade.
E78257
•Insert the screw driver into the opening at the side of the container and rotate it to start opening the container.
E78258
A Remote control
B Passive key
•Insert the screw driver into the opening at the front of the container and rotate it to open the container completely. Be careful not to lose the key ring.
37

Keys and remote controls
|
Remote control type 2 |
Replacing the battery |
|||
E74386
•Carefully separate the transmitter unit from the key using a screwdriver at the recess on the back.
•Open the transmitter unit by separating the retaining clips on the sides with the screwdriver.
E78259
A Type 1
BType 2
CPassive key
•Insert the screw driver into the opening marked with an arrow and carefully prise out the battery. Take care not to touch the battery contacts or the printed circuit board.
•Insert a new battery. The plus contact of the battery (marked with a +) must face upwards.
38
![]()
Keys and remote controls
Reassembling the container
Snap the two halves of the housing together.
Remote control type 1
Assemble the key blade until it snaps onto the container.
Remote control type 2
Snap the transmitter unit back onto the key.
Passive key
Insert the spare key blade into the passive key until it clicks into place.
39

Locks
LOCKING AND
UNLOCKING
Doors
Locking and unlocking from the outside
Left-hand drive
E78260
Right-hand drive
E78261
Note: Only vehicles without remote control are equipped with a lock cylinder in the passenger’s door.
All doors can be locked and unlocked from the outside with the key at the driver’s door.
On vehicles without remote control, they can also be locked and unlocked at the front passenger’s door.
Locking and unlocking from the inside
A
B
E72194
Note: On vehicles without remote control, all doors can also be locked using the locking button on the front passenger’s door.
When inside the vehicle, all doors can be locked with the locking button A on the driver’s door and unlocked using the door handle B. To lock the front passenger’s door and the rear doors individually, depress the locking button and close the door when leaving the vehicle.
40

Locks
|
Tailgate |
Closing the tailgate |
Opening the tailgate
E78263
A recessed grip is incorporated inside the tailgate to facilitate closing.
Central and double locking
Left-hand drive
E78262
Note: If there is a cut in the power supply e.g. the battery is disconnected, it is not possible to open the tailgate. To open the tailgate, the vehicle must first be unlocked with the key or remote control.
To open the luggage compartment, press the switch. The driver’s door
must be unlocked.
E78264
41

Locks
|
Right-hand drive |
On vehicles without remote control, |
|
it can also be activated from outside |
|
|
with the key at the passenger’s door |
|
|
or using the locking button on that |
|
|
door. |
E78265
WARNING
Double locking should not be activated when persons are
inside the vehicle.
Note: Only vehicles without remote control are equipped with a lock cylinder in the passenger’s door.
The central locking system can be activated from the driver’s door. It operates only when the front doors are closed. It is activated from the outside with the key or remote control, or from inside by depressing the locking button on the driver’s door handle.
E72198
Double locking is an additional theft protection feature which prevents the vehicle’s doors being opened from inside the vehicle. Double locking is possible only if the front doors are closed.
Unlocking the vehicle
E78266
42

Locks
|
With the key: Turn the key in the |
Unlocking the tailgate |
|
driver’s or front passenger’s door to |
|
|
position 1. |
E78267
WARNING
If a failure occurs in the vehicle’s electrical system the driver’s
door can still be individually unlocked with the key.
With the remote control: Press the unlock button once.
One long flash of the direction indicators confirms that all the doors, the tailgate and the fuel filler flap have been unlocked and that the anti-theft alarm system has been disarmed.
Automatic relocking
To prevent the vehicle being left unlocked inadvertently, central locking and the anti-theft alarm system will be reactivated automatically 45 seconds after the unlock button is pressed if the following occurs during this period:
•No door is opened.
•The luggage compartment is not opened.
•The ignition is not switched on.
E78268
To unlock only the tailgate when the vehicle is locked, press the unlock button twice within three seconds.
Locking the vehicle
E78269
To activate central locking and arm the anti-theft alarm system:
With the key: Turn the key in the driver’s or front passenger’s door to position 2.
43

Locks
E78270
With the remote control: Press the lock button once.
On vehicles without double locking, the direction indicators will flash twice as confirmation.
Double locking the vehicle Left-hand drive
E78271
Right-hand drive
E78272
With the key: Turn the key in the driver’s door to position 2 twice within three seconds.
E78270
With the remote control: Press the lock button twice within three seconds.
The direction indicators will flash twice as confirmation.
KEYLESS ENTRY
General information
The key free system allows the driver to operate the vehicle without the use of a key or remote control.
The advantages of the key free system are:
•the vehicle can be locked and unlocked without having to insert a key into the door lock or press any buttons on a remote control.
•the engine can be started without the need to insert a key into the ignition. See Starting the engine (page 141).
44

Locks
E78276
Note: If the door handles are pulled repeatedly during a short period of time without the presence of a valid passive key, the system might become inoperable for a certain time.
To unlock or lock the vehicle, the passive key must be located within one of the three external detection ranges. These are located approximately one and a half metres from the driver’s and front passenger’s door handles and the tailgate.
Passive key
E78277
WARNING
Do not store the passive key with metal objects or electronic
devices such as mobile phones as this could cause interference with the key free system.
The vehicle is operated by means of a passive key See Type approvals (page 255). . The passive key can also be used as a remote control. See
Locking and unlocking (page 40).
Spare key
A spare key is provided for the following situations:
•If the passive key frequencies are jammed.
•If the passive key battery is flat.
•If the key free function has been deactivated using the information display.
•When the vehicle is being towed.
•To reactivate a deactivated passive key.
The spare key can be used in the following ways:
•To open the bonnet. See
Opening and closing the bonnet (page 189).
•To lock and unlock the vehicle.
•To start the engine. See
Starting the engine (page 141).
45

Locks
2
1
E78284
Slide the release slider in the direction of the arrow and pull out the key blade with your thumb.
E78285
Push the button on the side of the ignition switch and pull out the container.
E78286
Insert the spare key blade into the container until it clicks. Make sure the blade is inserted the right way up.
E78287
To release the spare key blade from the container, press the upper part of the button.
Insert the spare key blade back into the passive key until it clicks.
Insert the container back into the ignition switch.
Disabled passive keys
Note: All your passive keys will be enabled, regardless of whether they are located inside the vehicle or not.
If one or more passive keys are left inside the vehicle interior when it is locked, the passive keys inside the vehicle will be disabled. In order to use these passive keys again, they have to be enabled.
To enable all your passive keys:
Using an enabled passive key, depress the clutch pedal (manual transmission) or brake pedal (automatic transmission), push the ignition switch in and turn it to position II.
46

Locks
E78288
If you only have a disabled passive key:
Insert the spare key into the ignition switch.
Push the ignition switch in and turn it to position II.
As soon as the ignition is turned to position II, all your passive keys will be enabled.
Unlocking the vehicle
Note: If the vehicle is not unlocked for longer than five days, the key free system will enter an energy-saving mode. This is to prevent the battery from discharging. When the vehicle is unlocked while in this mode, the reaction time of the system may be a little longer than normal. Unlocking the vehicle once will deactivate the energy-saving mode.
E78278
Pull any door handle to unlock all the doors and the tailgate and disarm the alarm.
E78279
Note: A valid passive key must be located within the detection range of that door.
One long flash of the direction indicators confirms that all the doors, the tailgate and the fuel filler flap have been unlocked and that the alarm has been disarmed.
47

Locks
E78280
If the passive key is located within the tailgate detection range, only the tailgate can be opened. The other doors will remain locked.
Unlocking only the driver’s door
If the front passenger’s door or one of the rear doors is the first door which is opened, all the doors and the tailgate will be unlocked.
Tailgate
E78281
If the unlocking function is reprogrammed so that only the driver’s door is unlocked ( See
Programming the remote control (page 35). ), note the following:
If the driver’s door is the first door which is opened, the other doors and the tailgate will remain locked. All the other doors can be unlocked from inside the vehicle by pressing the unlock button next to the driver’s door handle. Doors can be unlocked individually by pulling the interior door handles on those doors.
E78283
Note: The tailgate cannot be closed and will pop back up if the passive key is located inside the luggage compartment. PASSIVE KEY IN LUGG. COMP. will appear in the information display.
Note: If a second valid passive key is located within the tailgate detection range, the luggage compartment can be closed.
To open the luggage compartment, press the tailgate release switch.
48
 Loading…
Ford Focus II / C-Max с бензиновыми двигателями: Duratec 1.4 л Sigma (1388 см³) 80 л.с./59 кВт, HWDA/HXDA Duratec Ti-VCT 1.6 л Sigma (1596 см³) 100-115 л.с./74-85 кВт, CSDA/CSDB/QQDA/QQDB Duratec-HE 1.8 л MI4 (1798 см³) 120-125 л.с./88-92 кВт, AODA/AODB Duratec-HE 2.0 л MI4 (1998 см³) 145 л.с./107 кВт, HYDA Duratec-ST 2.5 л VI5 (2522 см³) 225 л.с./166 кВт и турбодизельными G8DA/G8DB Duratorq (DV6) 1.6 л (1560 см³) 110 л.с./80 кВт, KKDA Duratorq (Kent) TDCI 1.8 л (1753 см³) 115 л.с./85 кВт, G6DA/G6DB/G6DC Duratorq (DW10) TDCI 2.0 л (1998 см³) 133-136 л.с./98-100 кВт; Руководство по эксплуатации, техническому обслуживанию и ремонту, полные технические характеристики, электросхемы, контрольные размеры кузова, описание устройства, поиск неисправностей и диагностика. Форд Фокус второго поколения с кузовами седан и хэтчбек, универсал и Си-Макс модели выпуска с 2003 года
ЕСЛИ ВЫ ВИДИТЕ ОШИБКУ 406 Not Acceptable и не видите документ, то скорей всего у Вас IP РФ и его надо сменить, на любой другой страны, с помощью VPN ( Scribd и SlideShare блокируют посетителей с Российским IP).
Видео Ford Focus II / C-Max замена цепи ГРМ, регулировка клапанов и салонного фильтра (Форд Си-Макс/ Фокус 2 с 03)
Ford Focus II / C-Max общая информация (Форд Си-Макс / Фокус 2 2003-2011)
Выпуск автомобилей Ford Focus второго поколения начался в ноябре 2004 года. В мае 2003 года был представлен автомобиль повышенной вместимости Ford Focus С-МАХ. послуживший прототипом для Ford Focus II и выпускаемый по 2007 год. В 2007 году начался выпуск обновленной модели, получившей название Ford С-МАХ и новые элементы отделки кузова и салона. Ford Focus II представлен в четырех вариантах кузова: Седан, Универсал, 3-дверный Хэтчбек и 5-дверный Хэтчбек. Также предлагается спортивный вариант (Focus ST), а с 2007 года — вариант кабриолет-купе (Focus Coupe-Cabriolet).
Модельный ряд представлен как бензиновыми (объем 1.4, 1.6, 1.8, 2.0 и 2.5 л), так и дизельными двигателями (объем 1.6, 1.8 и 2.0 л). Бензиновый двигатель 2.5 л предназначен для установки только на модели Focus ST. Двигатель установлен в двигательном отсеке поперечно. Для передачи крутящего момента от двигателя к приводным валам используется 5- или 6-ступенчатая РКПП, либо 4-ступенчатая АТ.
Передняя подвеска — независимая, со стойками МакФерсона, нижними рычагами и стабилизатор поперечной устойчивости. Задняя подвеска — независимая пружинная многорычажная (типа Control Blade), со стабилизатором поперечной устойчивости. Передние тормозные механизмы — дисковые; задние — либо барабанные (на моделях Focus II без ESP), либо дисковые (на всех моделях С-МАХ и на моделях Focus II с ESP). Тормоза оснащены вакуумным усилителем.
На моделях Focus II за дополнительную плату возможна установка системы ABS с электронной системой распределения тормозных усилий (EBD). Также возможна установка системы помощи при экстренном торможении (EBA) и системы динамической стабилизации (ESP). На моделях Focus C-MAX системы ABS, EBD и ЕВА в ходят в штатную комплектацию. Рулевое управление — реечное, с гидроусилителем (на моделях 1.4 и 1.6 л) или электрогидравлическим усилителем (модели 1.8 и 2.0 л) и регулировкой вылета и угла наклона рулевой колонки. Ford Focus II в минимальной комплектации оснащен фронтальной подушкой безопасности водителя.
В качестве дополнительной комплектации возможна установка фронтальной подушки безопасности переднего пассажира, боковых подушек безопасности водителя и переднего пассажира и надувных занавесей. Начиная с комплектации Ghia, а также на моделях С-МАХ штатно устанавливаются фронтальные и боковые подушки безопасности водителя и переднего пассажира. Все ремни безопасности — трех анкерные; передние ремни безопасности оборудованы аварийными натяжителями (устраняют слабину ленты ремня при столкновении) и ограничителями усилия натяжения (снижают вероятность травмирования грудной клетки). В число пассивных элементов системы обеспечения безопасности входят складываемые при фронтальном ударе рулевая колонка и педаль тормоза. Задние сиденья на моделях Focus — раздельные, в пропорции 60:40. На моделях С-МАХ все три задние сиденья раздельные. Система кондиционирования воздуха штатно устанавливается на модели Focus II начиная с комплектации «Ambiente», а на модели С-МАХ — начиная с комплектации «Trend».
Модели Ford Focus с 2004 г. выпуска и Ford Focus С-МАХ с 2003 г. выпуска с бензиновыми (1.4, 1.6, 1.8, 2.0 и 2.5 л) и дизельными (1.6, 1.8 и 2.0 л) двигателями, оборудованные 5- или 6-ступенчатой РКПП, либо 4-ступенчатой или вариаторной АТ. Устройство, обслуживание, ремонт и эксплуатация автомобилей Ford Focus II и С-Мах. Руководство составлено на основе опыта работы станции техобслуживания и содержит технические характеристики, описания ремонта отдельных узлов, раздел, посвященный поиску и устранению неисправностей и рекомендации по техническому обслуживанию автомобилей Ford Focus II и С-Мах. Отдельная глава предназначена для ознакомления владельца автомобиля с органами управления и приемами безопасной эксплуатации. Для владельцев автомобилей и работников авторемонтных мастерских. В связи с тем что фирма-производитель постоянно вносит изменения в конструкцию двигателей, издательство не несет ответственности за возможные расхождения параметров Вашего двигателя с данными, представленными в Руководстве.
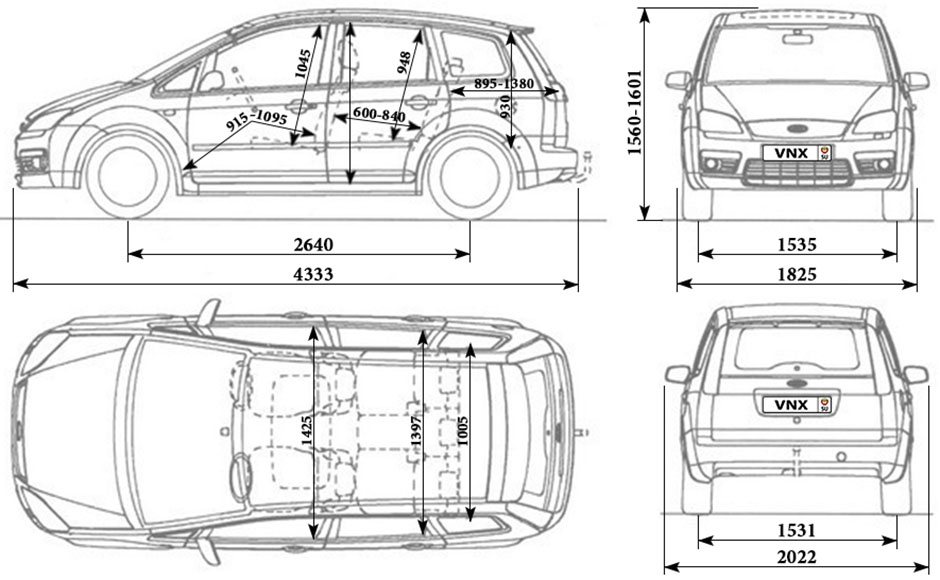
| № | Спецификация / Specs | Данные |
| Габариты (мм/mm) и масса (кг/kg) / Dimensions and Weight | ||
| 1 | Длина / Length | 4333 |
| 2 | Ширина (без/с зеркалами) / Width | 1825/2022 |
| 3 | Высота (загружен/пустой) / Height | 1560/1601 |
| 4 | Колёсная база / Wheelbase | 2640 |
| 5 | Дорожный просвет (клиренс) / Ground clearance | 150 |
| 6 | Снаряжённая масса / Total (curb) weight | 1387 |
| Полная масса / Gross (max.) weight | 1910 | |
|
Двигатель / Engine |
||
| 7 | Тип / Engine Type, Code | Бензиновый, жидкостного охлаждения, четырехтактный, Duratec-HE, QQDA |
| 8 | Количество цилиндров / Cylinder arrangement: Total number of cylinders, of valves | 4-цилиндровый, рядный, 16V, DOHC с верхним расположением двух распределительных валов |
| 9 | Диаметр цилиндра / Bore | 83.0 мм |
| 10 | Ход поршня / Stroke | 83.1 мм |
| 11 | Объём / Engine displacement | 1798 см³ |
| 12 | Система питания / Fuel supply, Aspiration | Распределенный впрыск топлива EEC V / SEFI |
| Атмосферный | ||
| 13 | Степень сжатия / Compression ratio | 10.8:1 |
| 14 | Максимальная мощность / Max. output power kW (HP) at rpm | 92 кВт (125 л.с.) при 6000 об/мин |
| 15 | Максимальный крутящий момент / Max. torque N·m at rpm | 165 Нм при 4000 об/мин |
|
Трансмиссия / Transmission |
||
| 16 | Сцепление / Clutch type | Однодисковое, сухое, с диафрагменной нажимной пружиной и гасителем крутильных колебаний, постоянно замкнутого типа |
| 17 | КПП / Transmission type | IB5 МКПП 5 пятиступенчатая механическая, двухвальная, с синхронизаторами на всех передачах переднего хода |
О Книге
- Название: Ford Focus II / C-Max Руководство по эксплуатации, техническому обслуживанию и ремонту
- Бензиновые двигатели: Duratec 1.4 л Sigma (1388 см³) 80 л.с./59 кВт, HWDA/HXDA Duratec Ti-VCT 1.6 л Sigma (1596 см³) 100-115 л.с./74-85 кВт, CSDA/CSDB/QQDA/QQDB Duratec-HE 1.8 л MI4 (1798 см³) 120-125 л.с./88-92 кВт, AODA/AODB Duratec-HE 2.0 л MI4 (1998 см³) 145 л.с./107 кВт, HYDA Duratec-ST 2.5 л VI5 (2522 см³) 225 л.с./166 кВт и турбодизельными G8DA/G8DB Duratorq (DV6) 1.6 л (1560 см³) 110 л.с./80 кВт, KKDA Duratorq (Kent) TDCI 1.8 л (1753 см³) 115 л.с./85 кВт, G6DA/G6DB/G6DC Duratorq (DW10) TDCI 2.0 л (1998 см³) 133-136 л.с./98-100 кВт
- Выпуск с 2003 года
- Серия: «Автолюбитель»
- Год издания: 2007
- Автор: Коллектив авторов
- Издательство: «Ассоциация независимых издателей»
- Формат: PDF
- Страниц в книге: 388
- Размер: 99.61 МБ
- Язык: Русский
- Количество электросхем: 42

VRTM
11 ноября 2009
Обзор литературы по ремонту и эксплуатации С-Макса

Las9w
 17 августа 2011

Superalex
4 декабря 2012
Встретил руководство по ремонту Фокуса-2. Примерное оглавление:
Файлы формата doc и pdf
Помятуя схожесть С-Мах м Фокуса может кому-нибудь пригодится…
ссылка > fordclub.fo.ru


Superalex
чтото не так: все мельком глянутые док-файлы относятся к Фьюжику
Господа одноклубники, извиняюсь. Действительно, выложенные файлы относятся к Fusion. К сожалению…
illusi0n
13 августа 2013
Нашел руководство по c-max 2010 г, на tfile такого не нашел.
rghost.ru/48083544

Качество не очень, но все же mirknig.com/2010/01/30/avtomobili-ford-focus-ii-ford-c-max-rukovodstvo.html
Ну в общем почитал я эл. «ксерокопии» руководств по ремонту и твердо решил купить оригинал. Под машину с таким не залезешь)) Но тут встал вопрос: «Какую книгу лучше взять?» У меня два варианта, это издательство «Ротор»: книга «FORD C-MAX с 2003 бензин / турбодизель Пособие по ремонту и эксплуатации» или издательство «Арус»: книга «FORD FOCUS C-MAX / FORD FOCUS 2 с 2003 бензин / дизель Пособие по ремонту и эксплуатации». В принципе цена одинакова, но схоже ли содержание? Может кто держал эти книги в руках и посоветует, какая лучше?

DamageDealer
16 октября 2013
Ребят, очень ищу следующую книгу! Очень буду признателен. дайте ссылку где можно ее скачать
Ford Focus II:Выпуск с 2004 г.; Ford Focus C-Maх:Выпуск с 2003 г.; Двигатели:Б:1.4/ 1.6/ 1.8/ 2.0/ 2.5; Д:1.6/ 1.8/ 2.0, оборудованные 5- или 6-ступенчатой РКПП, либо 4-ступенчатой или вариаторной АТ:Устройство, обслуживание, ремонт и эксплуатация:Учебное пособие:Руководство №221:New
Автор: И. А. Карпов
ISBN: 5-89744-121-9 978-5-89744-121-1
Издательство: Роко
Год издания: 2007

дядюшка_мокус
16 октября 2013
Дмитрий42
17 августа 2014
1
http://narod.yandex.ru/disk/46855386001.76c117f…ip.html
книга по ремонту форд фокус.с-макс
если не будет работать ссылка пишите в почту скину кому надо.
FOCUSniik
18 марта 2015
Ребят нужна тех документацию приличная со всеми эл схемами и прочим, даже и на английском для двигателя 1.6TDCI
Ford C-MAX 2009г
Где такую скачать?
FOCUSniik
Есть переводная книжка FORD C-MAX. Руководство по эксплуатации, ремонту и ТО. Про Ваш двигатель порядка 35 стр. + общее по всем остальным двигателям. А в вышеперечисленных книгах необходимой информации нет?
Друзья! Недавно стал обладателем C-Max 1 в рестайле 2007г, обшарил наверное весь рунет в поиске книги по ремонту и эксплуатации, может конечно и плохо искал или не так, сильно прошу за это не пинать. НО! Может есть у кого электронный вариант книги на рестайловую версию? Видел обложку только в картинках, но книги так и не нашел(((
TimmShadrin
Я покупал бумажный вариант.
zonnic
7 ноября 2019mobile
TimmShadrin
Посмотри может быть подойдёт http://ffclub.ru/file/203/ (разницы с фокусом практически нет, отличия рестайлинг и дорестайлиг практически только в проводке )
P.S. и то также отличия минимальны
Можно посмотреть здесь , очень хорошая ссылка.
Литература по дизельным двигателям форд (сообщение #16052542)
TimmShadrin
10 ноября 2019
|
zonnic: |
|
Посмотри может быть подойдёт (разницы с фокусом практически нет, отличия рестайлинг и дорестайлиг практически только в проводке ) P.S. и то также отличия минимальны Можно посмотреть здесь , очень хорошая ссылка. |

Спасибо) Посмотрю
TimmShadrin
10 ноября 2019
|
Superalex: |
|
Я покупал бумажный вариант. |
В электронном варианте хочется, книгу покупать рассматриваю в крайнем случае.
1 человек сейчас в теме
-
nekesha
- Администратор
- Сообщения: 1668
- Зарегистрирован: 17 дек 2014, 03:43
- Благодарил (а): 2 раза
- Поблагодарили: 6 раз
Ford Focus C-Max с 2004г
Руководство по эксплуатации, техобслуживанию и ремонту Ford Focus C-Max
 3188 просмотров")
Выпуск: с 2004 года
Язык: Русский
Формат: PDF
Размер: 205 Мб
Скачать документацию Ford Focus C-Max
для распаковки архива используйте пароль — avtoproblem-net.ru

This webpage contains Ford C Max 2007 Owners Manual PDF used by Ford garages, auto repair shops, Ford dealerships and home mechanics.
With this Ford C-Max Workshop manual, you can perform every job that could be done by Ford garages and mechanics from:
- changing spark plugs,
- brake fluids,
- oil changes,
- engine rebuilds,
- electrical faults
- and much more
The Ford C Max 2007 Owners Manual PDF includes:
- detailed illustrations,
- drawings,
- diagrams,
- step by step guides,
- explanations of Ford C-Max:
- service
- repair
- maintenance
PDF Document Details
: Ford C Max 2007 Owners Manual PDF