- Manuals
- Brands
- Ford Manuals
- Automobile
- TRANSIT CUSTOM
- Owner’s manual
-
Contents
-
Table of Contents
-
Troubleshooting
-
Bookmarks
Quick Links
FORD TRANSIT CUSTOM Owner’s Manual
Related Manuals for Ford TRANSIT CUSTOM
Summary of Contents for Ford TRANSIT CUSTOM
-
Page 1
FORD TRANSIT CUSTOM Owner’s Manual… -
Page 2
No part of this publication may be reproduced, transmitted, stored in a retrieval system or translated into any language in any form by any means without our written permission. Errors and omissions excepted. © Ford Motor Company 2012 All rights reserved. Part Number: CG3577en 09/2012 20120918161016… -
Page 3: Table Of Contents
Table of Contents Introduction Security About This Manual………..5 Passive Anti-Theft System……31 Symbols Glossary……….5 Anti-Theft Alarm……….31 Replacement Parts Recommendation………7 Steering Wheel Special Notices……….7 Adjusting the Steering Wheel….32 Mobile Communications Audio Control………..32 Equipment…………8 Voice Control…………33 Cruise Control……….33 At a Glance Information Display Control…….34 At a Glance…………9 Wipers and Washers Child Safety…
-
Page 4
Table of Contents Glasses Holder……….77 Instrument Cluster Gauges……………48 Starting and Stopping the Warning Lamps and Indicators….49 Engine Audible Warnings and Indicators…..52 General Information……..78 Ignition Switch……….78 Information Displays Steering Wheel Lock……..78 General Information……..53 Starting a Diesel Engine…….79 Clock…………..55 Diesel Particulate Filter……..79 Trip Computer……….55 Switching Off the Engine……80 Personalised Settings……..56… -
Page 5
Table of Contents First Aid Kit…………115 Stability Control Warning Triangle……….115 Principle of Operation……..93 Jump-Starting the Vehicle……115 Parking Aids Fuses Principle of Operation……..94 Fuse Box Locations……..117 Parking Aid…………94 Fuse Specification Chart……118 Rear View Camera………96 Changing a Fuse……….127 Cruise Control Maintenance Principle of Operation……..99 General Information……..128 Using Cruise Control……..99 Opening and Closing the Bonnet…128… -
Page 6
Table of Contents Cleaning the Alloy Wheels……146 SYNC Troubleshooting……209 Wheels and Tyres Appendices General Information……..147 Electromagnetic compatibility….215 Temporary Mobility Kit……..147 End User Licence Agreement….216 Tyre Care…………150 Using Winter Tyres……..151 Using Snow Chains……..151 Changing a Road Wheel……151 Technical Specifications……157 Capacities and Specific- ations Vehicle Identification Plate…….159 Vehicle Identification Number….160… -
Page 7: Introduction
Introduction ABOUT THIS MANUAL Thank you for choosing Ford. We recommend that you take some time to get to know your vehicle by reading this manual. The more that you know about it, the greater the safety and pleasure you will get from driving it.
-
Page 8
Introduction Battery acid Explosive gas Brake fluid — non petroleum Fan warning based Fasten seat belt Brake system Front airbag Cabin air filter Front fog lamps Check fuel cap Fuel pump reset Child safety door lock or unlock Fuse compartment Child seat lower anchor Hazard warning flashers Child seat tether anchor… -
Page 9: Replacement Parts Recommendation
Windscreen wash and wipe benefit from a Ford Warranty. Damage caused to your vehicle as a result of the failure of non-Ford parts may not be covered by the Ford Warranty. For REPLACEMENT PARTS additional information, refer to the terms and conditions of the Ford Warranty.
-
Page 10: Mobile Communications Equipment
Introduction MOBILE COMMUNICATIONS EQUIPMENT Using mobile communications equipment is becoming increasingly important in the conduct of business and personal affairs. However, you must not compromise your own or others’ safety when using such equipment. Mobile communications can enhance personal safety and security when appropriately used, particularly in emergency situations.
-
Page 11: At A Glance
At a Glance Front Exterior Overview See Maintenance (page 128). See Changing the Wiper Blades (page 135). See Driving Aids (page 101). See Locking and Unlocking (page 27). See Changing a Road Wheel (page 151). Tyre pressures. See Technical Specifications (page 157). See Changing a Bulb (page 136).
-
Page 12
At a Glance Vehicle Interior Overview See Transmission (page 90). See Locking and Unlocking (page 27). See Power Windows (page 45). See Fastening the Seat Belts (page 21). See Head Restraints (page 65). See Seats (page 65). See Parking Brake (page 91). -
Page 13
At a Glance Instrument Panel Overview Left-Hand Drive… -
Page 14
At a Glance Right-Hand Drive Air vents. See Air Vents (page 61). Parking aid switch. See Parking Aid (page 94). Start-stop switch. See Start-Stop (page 82). Direction indicators. See Direction Indicators (page 43). Main beam. See Lighting Control (page 38). Left-hand drive vehicles — Instrument cluster display control. -
Page 15
At a Glance Right-hand drive vehicles — Instrument cluster display control. See Information Displays (page 53). Wiper lever. See Wipers and Washers (page 35). Heated rear window switch. Heated windscreen switch. See Heated Windows and Mirrors (page 64). Information and entertainment display. Audio unit. -
Page 16: Child Safety
Child Safety INSTALLING CHILD SEATS WARNINGS If your vehicle has been involved in a collision, have the child seats checked by an authorised dealer. Only child seats certified to ECE-R44.03 (or later) have been tested and approved for use in your vehicle. A choice of these are available from an authorised dealer.
-
Page 17: Child Safety
Child Safety Child Safety Seat WARNINGS You must reinstall the head restraint following the removal of the child seat. See Head Restraints (page 65). Secure children that weigh more than 33 lb (15 kg) but are less than 60 in (150 cm) tall in a booster seat or a booster cushion.
-
Page 18
Child Safety Booster Cushion (Group 3) The ISOFIX system has two rigid attachment arms on the child seat that attach to anchor points on the second row seats, where the cushion and backrest meet. Tether anchor points are fitted to the underside or rear of the second row seats for child seats with a top tether. -
Page 19: Child Seat Positioning
Child Safety Double Cab Van WARNINGS Extreme Hazard! Do not use a rearward facing child seat on a seat protected by an air bag in front of it! When using a child seat with a support leg, the support leg must rest securely on the floor.
-
Page 20
Child Safety Mass group categories Seating positions Up to 22 Up to 29 20 — 40 lbs 33 — 55 lbs 46 — 79 lbs lbs (10 kg) lbs (13 kg) (9 — 18 kg) (15 — 25 kg) (22 — 36 kg) Front passenger’s seat UF¹… -
Page 21
Child Safety ISOFIX Child Seats Mass group categories Up to 22 lbs (10 Up to 29 lbs (13 20 — 40 lbs (9 — Seating positions 18 kg) Child safety Baby safety seat seat Rear ISOFIX second row C, D, E A, B, B1, C, D ISOFIX size class — second row Rear ISOFIX third row… -
Page 22: Child Safety Locks
Child Safety CHILD SAFETY LOCKS WARNING You cannot open the doors from inside if you have put the child safety locks on. The childproof locks are located on the rear edge of each rear door and must be set separately for each door. Left-Hand Side Turn anticlockwise to lock and clockwise to unlock.
-
Page 23: Seat Belts
Seat Belts FASTENING THE SEAT BELTS WARNINGS Insert the tongue into the buckle until you hear a distinct click. You have not fastened the seat belt correctly if you do not hear a distinct click. Make sure that your seat belt is securely stored away and is not outside your vehicle when closing the door.
-
Page 24: Seat Belt Height Adjustment
Seat Belts Pregnant women should always wear their SEAT BELT MINDER seat belt. The lap belt portion of a combination lap and shoulder seat belt WARNING should be positioned low across the hips The system will only provide below the belly and worn as tight as protection when you use the seat comfort will allow.
-
Page 25: Supplementary Restraints System
Supplementary Restraints System PRINCIPLE OF OPERATION DRIVER AIRBAG WARNINGS Extreme Hazard! Do not use a rearward facing child restraint on a seat protected by an airbag in front of it! Do not modify the front of your vehicle in any way. This could adversely affect deployment of the airbags.
-
Page 26: Supplementary Restraints System
Supplementary Restraints System The airbag will deploy during significant frontal collisions or collisions that are up to 30 degrees from the left or the right. The airbag will inflate within a few thousandths of a second and deflate on contact with the occupant, thus cushioning forward body movement.
-
Page 27: Side Airbags
Supplementary Restraints System Turn the switch to position B. SIDE CURTAIN AIRBAGS SIDE AIRBAGS WARNING Use seat covers designed for seats with side airbags. Have these fitted by an authorised dealer. The airbags are located over the front side windows. There are moulded badges in the headlining above the windows to indicate this.
-
Page 28: Keys And Remote Controls
Keys and Remote Controls GENERAL INFORMATION ON REPLACING A LOST KEY OR RADIO FREQUENCIES REMOTE CONTROL Note: Changes or modifications not Replacement keys or remote controls can expressly approved by the party responsible be purchased from an authorised dealer. for compliance could void the user s Authorised dealers can program remote authority to operate the equipment.
-
Page 29: Locks
Locks Unlocking LOCKING AND UNLOCKING Unlocking with the Key Note: Check your vehicle is locked before leaving it unattended. Turn the top of the key toward the rear of your vehicle. Note: Do not leave your keys in your vehicle. Unlocking with the Remote Control Locking Press the button.
-
Page 30
Locks Locking and Unlocking the Doors Opening the Double Rear Doors From Inside Lock Unlock You can see the door lock status in the instrument cluster. For item location: See At a Glance (page 9). The lamp will illuminate when you lock your vehicle. Opening the Sliding Door Slam Locking Slam locking allows you to lock a door with… -
Page 31: Automatic Locking
Locks Automatic Locking You will unlock the front doors, rear doors and luggage compartment doors when Your vehicle has the capability for the you: doors to lock automatically when you • Turn the key in either of the front door exceed 5 mph (8 km/h).
-
Page 32: Manual Liftgate
Locks Press the button located in the top of the MANUAL LIFTGATE liftgate pull cup handle to unlatch the liftgate, then pull on the outside handle. WARNINGS It is extremely dangerous to ride in Opening with the Remote Control the cargo area, inside or outside of Press the button twice within your vehicle.
-
Page 33: Security
Security PASSIVE ANTI-THEFT ANTI-THEFT ALARM SYSTEM The system will warn you of an unauthorised entry to your vehicle. It will Principle of Operation be triggered if any door, the luggage compartment or the bonnet is opened The system prevents someone from without using the key or the remote starting the engine with an incorrectly control.
-
Page 34: Steering Wheel
Steering Wheel ADJUSTING THE STEERING WHEEL WARNING Do not adjust the steering wheel when your vehicle is moving. Note: Make sure that you are sitting in the correct position. See Sitting in the Correct Position (page 65). 3. Lock the steering column. AUDIO CONTROL Select the required source on the audio unit.
-
Page 35: Voice Control
Steering Wheel Type 2 VOICE CONTROL Volume up Pull the control to select or deselect voice control. See SYNC (page 187). Seek up or next Volume down CRUISE CONTROL Seek down or previous Seek, Next or Previous Press the seek button to: •…
-
Page 36: Information Display Control
Steering Wheel INFORMATION DISPLAY CONTROL See Information Displays (page 53).
-
Page 37: Wipers And Washers
Wipers and Washers Intermittent Wipe WINDSCREEN WIPERS Note: Fully defrost the windscreen before switching on the windscreen wipers. Note: Make sure the windscreen wipers are switched off before entering a car wash. Note: Clean the windscreen and wiper blades if they begin to leave streaks or smears.
-
Page 38: Windscreen Washers
Wipers and Washers Note: Wet road conditions can cause Keep the outside of the windscreen clean. unexpected wiping or smearing. Sensor performance will be affected if the area around the interior mirror is dirty. The To reduce smearing we recommend the rain sensor is very sensitive and the wipers following: may operate if dirt, mist or flies hit the…
-
Page 39: Rear Window Wiper And Washers
Wipers and Washers Rear Window Washer REAR WINDOW WIPER AND WASHERS Rear Window Wiper The washer will spray for as long as you push the lever away from you. When you release the lever, the wiper will operate for a short time. Intermittent wipe Low speed wipe Press the button at the end of the lever to…
-
Page 40: Lighting
Lighting GENERAL INFORMATION LIGHTING CONTROL Condensation in Lamp Assemblies Lighting Control Positions Exterior lamps have vents to accommodate normal changes in air pressure. Condensation can be a natural by-product of this design. When moist air enters the lamp assembly through the vents, there is a possibility that condensation can occur when the temperature is cold.
-
Page 41: Autolamps
Lighting Headlamp Flasher One Side Pull the lever toward you slightly and release it to flash the headlamps. Right-hand side AUTOLAMPS Left-hand side Note: It may be necessary to switch your headlamps on manually in severe weather Main Beams conditions. Note: If you have autolamps on, you can only switch the main beam on once autolamps has switched the headlamps on.
-
Page 42: Instrument Lighting Dimmer
Lighting The headlamps will switch on and off HEADLAMP EXIT DELAY automatically in low light situations or during inclement weather. After you switch the ignition off, you can switch the headlamps on by pulling the The headlamps will remain on for a period direction indicator lever toward you.
-
Page 43: Rear Fog Lamps
Lighting WARNINGS Do not use the rear fog lamps when it is raining or snowing and visibility is more than 164 feet (50 metres). Press the control to switch the fog lamps on or off. You can switch the fog lamps on when either the front fog lamps or dipped beam headlamps are on.
-
Page 44: Cornering Lamps
Lighting CORNERING LAMPS Headlamp beam Cornering lamp beam The cornering lamps illuminate the inside of a corner when you are turning.
-
Page 45: Direction Indicators
Lighting DIRECTION INDICATORS INTERIOR LAMPS Courtesy Lamp Door contact Push the lever up or down to use the direction indicators. If you set the switch to position B, the Note: Tap the lever up or down to make the courtesy lamp will illuminate when you direction indicators flash three times to unlock or open a door or the liftgate.
-
Page 46
Lighting Reading Lamps If you switch the ignition off, the reading lamps will go off automatically after some time to prevent your vehicle battery from discharging. To switch them back on, switch the ignition on for a short time. -
Page 47: Windows And Mirrors
Windows and Mirrors Driver’s Side One-Touch Up POWER WINDOWS Lift the switch fully and release it. Press or WARNINGS lift it again to stop the window. Do not leave children unattended in Bounce-Back your vehicle and do not let them play with the power windows.
-
Page 48: Exterior Mirrors
Windows and Mirrors 5. Release the switch. Tilt the controller to adjust the mirror. 6. Lift and hold the switch until the Electric Folding Mirrors window is fully closed. Folding and Unfolding Open the window and then try to close it automatically.
-
Page 49: Sun Shades
Windows and Mirrors Note: Do not clean the housing or glass of Pull the blind up and attach it to the hooks any mirror with harsh abrasives, fuel or other petroleum or ammonia-based cleaning products. You can adjust the interior mirror to your preference.
-
Page 50: Instrument Cluster
Instrument Cluster GAUGES Information display. See Information Displays (page 53). Speedometer Engine coolant temperature gauge Tripmeter reset button Fuel gauge Tachometer Trip Computer Information Display See Trip Computer (page 55). Odometer Vehicle Settings and Personalisation Located in the bottom of the information display.
-
Page 51: Warning Lamps And Indicators
Instrument Cluster Brake Pad Wear Warning Lamp At normal operating temperature, the needle will remain in the centre section. It will illuminate when the brake Note: Do not restart the engine until the pads have worn down to a cause of overheating has been resolved. predetermined limit.
-
Page 52: Instrument Cluster
Instrument Cluster Door Ajar Warning Lamp Front Airbag Warning Lamp Illuminates when you switch the If it fails to illuminate when you ignition on and remains on if any start your vehicle, continues to door or the bonnet is not closed flash or remains on, it indicates properly.
-
Page 53
Instrument Cluster Hill Start Assist Indicator If it stays on after starting or illuminates when driving, this While driving, it illuminates indicates a malfunction. Stop during activation of the system. your vehicle as soon as it is safe to do so After switching on the ignition, if and switch the engine off. -
Page 54: Audible Warnings And Indicators
Instrument Cluster Water In Fuel Indicator Vehicles with a Diesel Engine It will illuminate if there is excess water in the fuel filter. Drain off the water immediately. See Draining the Fuel Filter Water Trap (page 132). If it illuminates after draining the water, this indicates a fuel filter service is required.
-
Page 55: Information Displays
You can access the menu using the information display control. Note: Some options may appear slightly different or not at all if the items are optional. Trip Trip Odometer Distance to E Inst Fuel Econ Average Fuel Ford EcoMode Gear shifting Anticipation Speed…
-
Page 56: Information Displays
Information Displays Trip Ford EcoMode Average Speed Outside Temp. All Values See Trip Computer (page 55). See Eco Mode (page 105). Settings Driver Assist Traction Ctrl On or Off Driver alert On or Off Hill Start Assist On or Off…
-
Page 57: Clock
Information Displays Settings Reduced Ask on Exit Locks Autolock Autounlock Global Unlock Custom Lock System Reset Press and hold OK to reset the system to factory default Trip Odometer System Check Registers the distance travelled of All active warnings will display first if individual journeys.
-
Page 58: Personalised Settings
Information Displays Press the OK button to acknowledge and PERSONALISED SETTINGS remove some messages from the information display. Other messages will Measure Units be removed automatically after a short To swap between imperial and metric time. units, scroll to this display and press the Certain messages need to be confirmed OK button.
-
Page 59
Information Displays Alarm Message Message Action Indicator Alarm activated Amber Displays when the alarm has been triggered Check Vehicle due to unauthorised entry. See Anti-Theft Alarm (page 31). Alarm fault Have your vehicle checked by an authorised Service required dealer as soon as possible. Battery and Charging System Message Message… -
Page 60
Information Displays Message Message Action Indicator Rear load compartment Vehicle is moving. Stop your vehicle as soon as door ajar safely possible and close. Emergency rear door ajar Vehicle is moving. Stop your vehicle as soon as safely possible and close. Driver door ajar Vehicle not moving. -
Page 61
Information Displays Lighting Message Message Action Indicator Brake lamp Bulb fault Displays when the brake lamp bulb has burned out. See Lighting (page 38). . Dipped beam Bulb fault Displays when the dipped beam headlamp bulb has burned out. See Lighting (page 38). Headlamp fault Amber Displays when an electrical system problem… -
Page 62
Information Displays Parking Brake Message Message Action Indicator Park brake applied Displays when the parking brake is set, the engine is running and your vehicle speed is above 3 mph (5 km/h). If the warning stays on after the parking brake is released, have your vehicle checked by an authorised dealer as soon as possible. -
Page 63: Climate Control
Climate Control Warming the Interior PRINCIPLE OF OPERATION Direct the air toward your feet. In cold or Outside Air humid weather conditions, direct some of the air toward the windscreen and the door Keep the air intakes in front of the windows.
-
Page 64: Manual Climate Control
Climate Control MANUAL CLIMATE CONTROL Fan speed control: Controls the volume of air circulated in your vehicle. Adjust to select the desired fan speed or switch off. If you switch the fan off, the windscreen may fog up. Recirculated air: Press the button to switch between outside air and recirculated air.
-
Page 65: Hints On Controlling The Interior Climate
Climate Control Recommended Settings for Select to distribute air through Heating the windscreen air vents. You can also use this setting to defog • Adjust the fan speed to the second and clear the windscreen of a thin covering speed setting. of ice.
-
Page 66: Heated Windows And Mirrors
Climate Control Side Window Defogging in Cold Press the button to clear the window of Weather thin ice and fog. It switches off automatically after a short time. • Adjust the air distribution control to the instrument panel and footwell air vents Heated Rear Window positions.
-
Page 67: Seats
Seats • Adjust the head restraint so that the SITTING IN THE CORRECT top of it is level with the top of your POSITION head and as far forward as possible. Make sure that you remain WARNINGS comfortable. Do not recline the seatback too far •…
-
Page 68: Front Seats
Seats Adjusting the Head Restraint WARNING Raise the rear head restraint when the rear seat is occupied by a passenger or a child restraint. Adjust the head restraint so that the top of it is level with the top of your head. Removing the Head Restraint Press the locking buttons and remove the MANUAL SEATS…
-
Page 69
Seats Adjusting the Height of the WARNINGS Driver’s Seat The driver’s seat has removable stop bolts on the track to enable access to the vehicle battery. See Changing the 12V Battery (page 133). Moving the Seat Backward and Forward Seat Cushion Adjustment Adjusting the Lumbar Support… -
Page 70: Power Seats
Seats Recline Adjustment Adjusting the Armrest POWER SEATS WARNINGS Do not adjust the driver’s seat or seatback when your vehicle is moving. Do not place cargo or any objects behind the seatback before returning it to the original position. The driver’s seat has removable stop bolts on the track to enable access to the vehicle battery.
-
Page 71: Rear Seats
Seats Power Lumbar REAR SEATS WARNINGS Do not use the bench seats as a bed when your vehicle is moving. Make sure that the seats and the seatbacks are secure and fully latched in their catches. When folding the seatbacks up, make sure that the belts are visible to an occupant and not caught behind the seat.
-
Page 72
Seats Recline Adjustment WARNINGS Do not sit in a rear row seat if any seat in the row in front has not been returned to the fully upright position. Do not place loads on the seatbacks when they are in the fold flat position. -
Page 73
Seats 2. Push the seatback to the upright position after releasing the handle and pull strap. Removing the Seats Folding the Seats Forward WARNING The seats weigh up to 126 lb (57 kilograms). Do not attempt to lift or carry them on your own. Note: Store the seat in a dry and secure place. -
Page 74: Accessing The Third Row Seats
Seats Note: Make sure you align the front legs 2. Fold and remove the third row seats and floor catches correctly when locking the you want to move. seats to the floor. Drop the front seat legs 3. Install the front legs of the third row gently from a vertical position into the floor seats to the rear floor catches of the catches.
-
Page 75: Heated Seats
Seats HEATED SEATS WARNING People who are unable to feel pain to their skin because of advanced age, chronic illness, diabetes, spinal cord injury, medication, alcohol use, exhaustion or other physical conditions, must exercise care when using the heated seat. The heated seat may cause burns even at low temperatures, especially if used for long periods of time.
-
Page 76: Auxiliary Power Points
Auxiliary Power Points Locations WARNINGS If used when the engine is not running, the battery will lose charge. There may be insufficient power to restart the engine. Do not plug optional electrical accessories into the cigar lighter socket. Incorrect use of the lighter can cause damage not covered by your warranty, and can result in fire or serious injury.
-
Page 77: Cigar Lighter
150 watt limit is exceeded. It of 30 minutes. can also switch to a fault mode when it is Note: Use only Ford accessory connectors overloaded, overheated, or shorted. Unplug or connectors specified for use with SAE your device and switch the ignition off then standard sockets.
-
Page 78: Storage Compartments
Storage Compartments CUP HOLDERS ASHTRAY WARNINGS Do not place hot drinks in the cup holders when your vehicle is moving. Make sure that cups placed in the holders do not obstruct your vision while driving. OVERHEAD CONSOLE Overhead Storage Compartment WARNING Do not place heavy objects in the compartment.
-
Page 79: Glasses Holder
Storage Compartments GLASSES HOLDER…
-
Page 80: Starting And Stopping The Engine
Starting and Stopping the Engine GENERAL INFORMATION IGNITION SWITCH If you disconnect the battery, your vehicle may exhibit some unusual driving characteristics for approximately 5 miles (8 kilometres) after you reconnect it. This is because the engine management system must realign itself with the engine. You can disregard any unusual driving characteristics during this period.
-
Page 81: Starting A Diesel Engine
Starting and Stopping the Engine To unlock the steering wheel: DIESEL PARTICULATE FILTER Insert the key in the ignition switch. The filter forms part of the emissions 2. Turn the key to position I. reduction system on your vehicle. It filters Note: You may need to rotate the steering harmful diesel particulates (soot) from the wheel slightly to assist unlocking if there is…
-
Page 82: Switching Off The Engine
Starting and Stopping the Engine You must carry out occasional trips with Note: The heater is most effective when the following conditions to assist the outdoor temperatures are below 0°F regeneration process: (-18°C). • Drive your vehicle in more favourable The heater acts as a starting aid by conditions, which you will find at higher warming the engine coolant.
-
Page 83: Starting And Stopping The Engine
Starting and Stopping the Engine • Make sure the system is unplugged and properly stowed before driving your vehicle. Make sure the protective cover seals the prongs of the block heater cord plug when not in use. • Make sure the heater system is checked for proper operation before winter.
-
Page 84: Unique Driving Characteristics
Unique Driving Characteristics Note: The system only operates when the START-STOP engine is warm and the outside temperature is less than 104°F (40°C). ECO System Note: If you stall the engine and then Note: For vehicles with start-stop the depress the clutch pedal within five battery requirement is different.
-
Page 85: Unique Driving Characteristics
Unique Driving Characteristics 3. Release the clutch pedal. 4. Release the accelerator pedal. The system may not shut down the engine under certain conditions, for example: • Low battery charge. • The outside temperature is too low or too high. •…
-
Page 86: Fuel And Refuelling
Fuel and Refuelling • Automotive fuels can be harmful or SAFETY PRECAUTIONS fatal if swallowed. Fuel such as petrol is highly toxic and if swallowed can WARNINGS cause death or permanent injury. If fuel Do not overfill the fuel tank. The is swallowed, call a doctor pressure in an overfilled tank may immediately, even if no symptoms are…
-
Page 87: Fuel Quality
Fuel and Refuelling If you have run out of fuel: FUEL QUALITY • You may need to cycle the ignition from off to on several times after refuelling WARNINGS to allow the fuel system to pump the Do not mix diesel with oil, petrol or fuel from the tank to the engine.
-
Page 88: Catalytic Converter
Fuel and Refuelling Driving with a Catalytic Converter WARNINGS Avoid running out of fuel. Do not crank the engine for long periods. Do not run the engine when a spark plug lead is disconnected. Do not push-start or tow-start your vehicle.
-
Page 89: Fuel And Refuelling
Fuel and Refuelling WARNINGS Do not remove the nozzle from its fully inserted position during the entire refuelling process. Note: Your vehicle does not have a fuel filler cap. Note: Your vehicle must be unlocked, with the door open before opening and closing the fuel filler flap.
-
Page 90: Fuel Consumption
Fuel and Refuelling They are intended as a comparison between makes and models of vehicles. They are not intended to represent the real world fuel consumption you may get from your vehicle. Real world fuel consumption is governed by many factors including: driving style, high speed driving, stop-start driving, air conditioning usage, the accessories fitted, payload, towing, etc.
-
Page 91: Technical Specifications
Fuel and Refuelling 3. After at least three to five tank fill ups, Keep a record for at least one month and fill the fuel tank and record the current record the type of driving (city or odometer reading. motorway). This provides an accurate estimate of your vehicle’s fuel economy 4.
-
Page 92: Transmission
Transmission When the system is active, your vehicle will MANUAL TRANSMISSION remain stationary on the slope for two to three seconds after you release the brake Selecting Reverse Gear pedal. This allows you time to move your Do not engage reverse gear when your foot from the brake to the accelerator vehicle is moving.
-
Page 93: Brakes
Brakes Anti-lock Brake System GENERAL INFORMATION This system helps you maintain steering WARNING control and vehicle stability during emergency stops by keeping the brakes The system does not relieve you of from locking. your responsibility to drive with due care and attention. HINTS ON DRIVING WITH Note: Occasional brake noise is normal.
-
Page 94: Traction Control
Traction Control PRINCIPLE OF OPERATION The traction control system helps avoid drive wheel spin and loss of traction. If your vehicle begins to slide, the system applies the brakes to individual wheels and, when needed, reduces engine power at the same time. If the wheels spin when accelerating on slippery or loose surfaces, the system reduces engine power in order to increase traction.
-
Page 95: Stability Control
Stability Control Stability Control Warning Lamp PRINCIPLE OF OPERATION While driving, it flashes when the system Electronic Stability Program is operating. See Warning Lamps and Indicators (page 49). WARNING The system does not relieve you of your responsibility to drive with due care and attention.
-
Page 96: Parking Aids
Parking Aids Note: The outer sensors may detect the PRINCIPLE OF OPERATION side walls of a garage. If the distance between the outer sensor and the side wall WARNINGS remains constant for three seconds, the The system does not relieve you of tone will switch off.
-
Page 97: Parking Aids
Parking Aids Note: If your vehicle sustains damage to The system sounds an audible warning the bumper or fascia, leaving it misaligned when obstacles are near either bumper in or bent, the sensing zone may be altered the following manner: causing inaccurate measurement of •…
-
Page 98: Rear View Camera
Parking Aids Press the button to switch the system off. Liftgate It will remain off for the entire ignition cycle. For item location See At a Glance (page 9). REAR VIEW CAMERA WARNINGS The operation of the camera may vary depending on the ambient temperature, vehicle and road conditions.
-
Page 99
Parking Aids WARNINGS Marks are for general guidance only, and are calculated for vehicles in minimum load conditions on an even road surface. The lines show a projected vehicle path (based on the current steering wheel angle) and the distance from the exterior mirrors and rear bumper. -
Page 100: Switching The Rear View Camera Off
Parking Aids Green — 24 — 35 inches (0.6 — 0.9 metre) Black — centre line of the projected vehicle path Note: The green line is extended from 35 inches (0.9 metre) up to a distance of 126 inches (3.2 metres). Note: When reversing with a trailer, the lines on the screen are not shown.
-
Page 101: Cruise Control
Cruise Control Press and release ON. PRINCIPLE OF OPERATION Setting a Speed WARNING Press and release SET+. The system does not relieve you of your responsibility to drive with due The indicator will display in the care and attention. instrument cluster. Cruise control allows you to control your Changing the Set Speed speed using the switches on the steering…
-
Page 102
Cruise Control Switching Off Cruise Control Note: The set speed is erased when you switch off cruise control. Press and release OFF or switch off the ignition. -
Page 103: Driving Aids
Driving Aids Vehicle Speed Limiter — Adjustable SPEED LIMITER WARNING Engine Speed Limiter When you are going downhill, your Engine speed is limited to protect the speed may increase above the set engine. speed. The system will not apply the brakes but a warning will be given.
-
Page 104: Driver Alert
Driving Aids Setting the Speed Limit WARNINGS Take regular rest breaks as required Press switch A or switch C to select your and do not wait for the system to desired speed limit. The speed is displayed warn you if you feel tired. in the information display and stored as the set speed.
-
Page 105: Using Driver Alert
Driving Aids The system is designed to alert you if it detects that you are becoming drowsy or if your driving deteriorates. Using Driver Alert Switching the System On and Off Note: The system will remain on or off depending on how it was last set. Alertness level is fine, no rest required.
-
Page 106: Lane Keeping System
Driving Aids Note: The system may assist you when LANE KEEPING SYSTEM driving on fast main roads and motorways. Lane Keeping Alert Note: The system may not operate during hard braking or acceleration and when you Principle of Operation are intentionally steering your vehicle. WARNINGS Note: The system will operate with a minimum of one tracked lane marking.
-
Page 107: Eco Mode
Driving Aids Press the button twice to turn the system The lane markings are colour coded as on. Press the button once to turn the follows: system off. • Green: The system is ready to warn you of any unintentional lane departure. Setting the Steering Wheel Vibration •…
-
Page 108: Driving Aids
Driving Aids The value of these characteristics is Efficient speed represented by petals shown in the display, Reduce your cruising speed on open roads with five petals being the most efficient. to improve economy. Higher speeds use The more efficiently you drive, the better more fuel.
-
Page 109: General Information
Load Carrying GENERAL INFORMATION ROOF RACKS AND LOAD CARRIERS WARNINGS Use load securing straps to an WARNINGS approved standard, e.g. DIN. You should evenly distribute the load when loading the roof rail crossbars, Make sure that you secure all loose as well as maintain a low centre of items properly.
-
Page 110: Load Carrying
Load Carrying Securing Cargo All Vehicles except Kombi…
-
Page 111
Load Carrying Kombi Vehicles… -
Page 112: Towing
Towing Steep Gradients TOWING A TRAILER WARNING WARNINGS The anti-lock braking system does Do not exceed 62 mph (100 km/h). not control the overrun brake on the trailer. The rear tyre pressures must be increased by 3 psi (0.2 bar) above Use a low gear when descending a steep specification.
-
Page 113: Towing The Vehicle On Four Wheels
Towing Front Towing Eye Rear Towing Hook Note: If your vehicle has a tow bar, use this Remove the cover and install the towing to tow other vehicles instead of the towing eye. hook. TOWING THE VEHICLE ON FOUR WHEELS WARNINGS You must switch the ignition on when your vehicle is being towed.
-
Page 114: Driving Hints
Driving Hints You must only drive your vehicle for a short RUNNING-IN distance if the engine overheats. The distance you can travel depends on Tyres ambient temperature, vehicle load and terrain. The engine will continue to operate WARNING with limited power for a short time. New tyres need to be run-in for If the engine temperature continues to rise, approximately 300 miles (500…
-
Page 115: Floor Mats
Driving Hints In an emergency, you can drive your vehicle WARNINGS through water to a maximum depth of 8 Pedals that cannot move freely can inches (200 millimetres) and at a cause loss of vehicle control and maximum speed of 6 mph (10 km/h). You increase the risk of serious personal must take extra care when driving through injury.
-
Page 116: Driving Hints
Driving Hints WARNINGS To remove the floor mat, reverse the installation procedure.
-
Page 117: Roadside Emergencies
Roadside Emergencies To Connect the Booster Cables HAZARD WARNING FLASHERS Note: Depending on applicable laws and regulations in the country for which your vehicle was originally built, your brake lamps may flash during heavy braking. Following this your hazard warning flashers may also flash once your vehicle comes to a stop.
-
Page 118: Roadside Emergencies
Roadside Emergencies 3. Lift up the battery positive connection WARNING point cover. For item location, refer to Do not switch the headlamps on the appropriate under bonnet overview. when disconnecting the cables. The See Maintenance (page 128). peak voltage could blow the bulbs. 4.
-
Page 119: Fuses
Fuses This is located behind the removable trim FUSE BOX LOCATIONS panel. Engine Compartment Fuse Box Pre-fuse Box This is located under the driver’s seat. Body Control Module Fuse Box For item location: See Under Bonnet Overview (page 129). Passenger Compartment Fuse Box This is located behind the removable trim panel.
-
Page 120: Fuse Specification Chart
Fuses FUSE SPECIFICATION CHART Engine Compartment Fuse Box Fuse Fuse rating Circuits protected Not used Not used Not used Not used…
-
Page 121
Fuses Fuse Fuse rating Circuits protected Diesel particulate filter vaporiser, glow plug monitor Anti-lock braking system, electronic stability program, ignition 7.5 A Powertrain control module ignition Not used 30 A Front wiper left-hand 30 A Front wiper right-hand 10 A Air conditioning clutch 20 A Diesel particulate filter vaporiser, glow plug… -
Page 122
Fuses Fuse Fuse rating Circuits protected Not used 60 A Engine coolant fan (single fan) Not used 60 A Dual front wiper motors Not used Not used 15 A Powertrain control system 7.5 A Powertrain control system 7.5 A Powertrain control system 7.5 A Air conditioning clutch 15 A… -
Page 123
Fuses Relay Circuits switched Low speed cooling fan Not used Powertrain control module High speed cooling fan Passenger’s Compartment Fuse Box Fuse Fuse rating Circuits protected 10 A Airbag module Anti-lock braking system 10 A Heated mirrors Not used 20 A Fuel fired heater Tachograph Not used… -
Page 124
Fuses Fuse Fuse rating Circuits protected Not used Power seat movement — 30 A driver’s Power seat movement — 30 A passenger’s Not used Not used Powertrain control module battery positive Powertrain control module 40 A power relay Power supply for 40 A passenger’s junction box Not used… -
Page 125
Fuses Fuse Fuse rating Circuits protected 20 A Cornering lamp Not used Not used Not used 20 A Rear wiper Power mirrors 20 A Horn 7.5 A Audio SYNC module Front blower, Wiper, horn relay Remote keyless entry, battery, power window log, 7.5 A rear heating ventilation air conditioning… -
Page 126
Fuses Fuse Fuse rating Circuits protected 60 A Ignition relay 2 Heated windscreen left- 40 A hand Heated windscreen right- 40 A hand Relay Circuits switched Fuel fired heater Power points Not used Ignition 2 Not used Ignition 1 Horn Not used Heater blower Rear heater blower… -
Page 127
Fuses Pre-fuse Box Fuse Fuse rating Circuits protected 470 A Starter, alternator, feed engine junction box Power supply for passenger’s compartment fuse box and 100 A body control module fuse box. 40 A Not used 200 A Passenger’s fuse box non start related feed 1 100 A Passenger’s fuse box non start related feed 3 80 A… -
Page 128
Fuses Body Control Module Fuse Box Fuse Fuse rating Circuits protected 15 A Central locking 1 15 A Central locking 2 15 A Ignition switch supply Parking aid module Rain sensing module 15 A Washer pump supply 7.5 A Mirror supply… -
Page 129: Changing A Fuse
Fuses Fuse Fuse rating Circuits protected 15 A Fog lamp supply 10 A Main beam right supply 10 A Main beam left supply 25 A Exterior lamp right 20 A Battery backup sounder supply, security horn 15 A On board diagnostics 2 supply, battery saver supply Direction indicator supply, rear fog lamp supply, daytime 25 A running lamp supply…
-
Page 130: Maintenance
Have your vehicle serviced regularly to help • Tyre pressures (when cold). See maintain its roadworthiness and resale Technical Specifications (page 150). value. There is a large network of Ford • Tyre condition. See Wheels and Tyres authorised repairers that are there to help (page 147).
-
Page 131: Under Bonnet Overview — 2.2L Duratorq-Tdci (114Kw/155Ps) — Puma/2.2L Duratorq-Tdci (74Kw/100Ps) — Puma/2.2L Duratorq-Tdci (92Kw/125Ps) — Puma
Maintenance Open the bonnet and support it with the bonnet strut. Closing the Bonnet Note: You must secure the bonnet prop correctly after use. Note: Make sure that you have closed the bonnet correctly. Lower the bonnet and allow it to drop from under its own weight for the last 8 — 11 inches (20 –…
-
Page 132: (114Kw/155Ps) — Puma/2.2L
Maintenance Washer fluid reservoir. See Washer Fluid Check (page 132). Brake and clutch fluid reservoir (right-hand drive). See Brake and Clutch Fluid Check (page 132). Brake and clutch fluid reservoir (left-hand drive). See Brake and Clutch Fluid Check (page 132). Engine junction box.
-
Page 133: Engine Coolant Check
Undiluted coolant is flammable and 2. Remove the engine oil filler cap. may ignite if spilt on a hot exhaust. 3. Add engine oil that meets Ford specifications. See Technical Note: In an emergency, you can add just Specifications (page 143).
-
Page 134: Brake And Clutch Fluid Check
Do not add fluid further than the MAX mark. WARNINGS Use of any fluid other than the Add fluid that meets the Ford specification. recommended brake fluid may See Technical Specifications (page 143). reduce brake efficiency and not meet Ford’s performance standards.
-
Page 135: Changing The 12V Battery
Remove the cover on both sides. approximately two seconds. 2. Remove the seat runner bolts on both Note: Only add fuel that meets the Ford sides. Slide the seat fully forward, specification. See Fuel and Refuelling making sure the arm rest is folded up.
-
Page 136: Checking The Wiper Blades
Maintenance 3. Remove the cover trim by pulling up 5. Remove the battery clamp bolts. the tabs with your fingers. 6. Remove the battery clamp and cover. WARNING Make sure the seat runner bolts are securely fastened before installing the covers. Install in the reverse order.
-
Page 137: Changing The Wiper Blades
Maintenance CHANGING THE WIPER BLADES Windscreen Wiper Blades Note: The windscreen wiper blades are different in length. See Technical Specifications (page 143). If you install wiper blades of the wrong length, the rain sensor may not work correctly. Changing the Windscreen Wiper Blades Lift the wiper arms.
-
Page 138: Removing A Headlamp
Maintenance 6. Remove the wiper blade. Install in the reverse order. Note: Make sure that the wiper blade locks 5. Disconnect the electrical connector. into place. Note: When fitting the headlamp, make sure that you reconnect the electrical REMOVING A HEADLAMP connector correctly.
-
Page 139
Maintenance Headlamp 4. Release the clip and remove the bulb. Note: Remove the covers to gain access to Direction Indicator the bulbs. Remove the headlamp. See Removing a Headlamp (page 136). Cornering lamp 2. Turn the bulb holder anticlockwise and remove it. -
Page 140
Maintenance Front Fog Lamps Headlamp Dipped Beam Remove the headlamp. See Removing a Headlamp (page 136). Note: You cannot separate the bulb from 2. Remove the cover. the bulb holder. 3. Disconnect the electrical connector. Disconnect the electrical connector. 4. Release the clip and remove the bulb. 2. -
Page 141
Maintenance Rear Lamps Rear and brake lamp Direction indicator Reversing lamp Fog lamp Remove the nut. 2. Remove the rear lamp and unclip the bulb holder. 3. Gently press the bulb into the bulb holder, turn it anticlockwise and remove it. -
Page 142
Maintenance Central High Mounted Brake Lamp Interior Lamp Entrance Lamps Carefully remove the lamp. 2. Remove the bulb. Licence Plate Lamp Carefully remove the lamp assembly. 2. Remove the bulbs. Vehicles with Interior Sensors Remove the lens. 2. Remove the bulb. Carefully remove the lens. -
Page 143
Maintenance 2. Remove the bulb. Carefully remove the lamp. 2. Turn the bulb holder anticlockwise and Reading Lamps remove it. Vehicles without Interior Sensors 3. Remove the bulb. Carefully remove the lamp. Sun Visor Mirror Lamp 2. Turn the bulb holder anticlockwise and remove it. -
Page 144: Bulb Specification Chart
Maintenance BULB SPECIFICATION CHART Lamp Specification Power (watt) Front direction indicator PY21W Headlamp main beam — high series Headlamp main beam — low series Headlamp dipped beam Front fog lamp Side repeater WY5W Approach lamp Rear direction indicator PY21W Brake and rear lamp P21/5W 21/5 Rear fog lamp…
-
Page 145: Technical Specifications
ISO 4925 Class 6 Brake Fluid Your engine has been designed to be used with Castrol and Ford Engine Oil, which gives a fuel economy benefit while maintaining the durability of your engine. Adding oil: If you are unable to find an oil that meets the specification defined by WSS-M2C913-D, you must use SAE 5W-30 that meets the specification defined by ACEA A5/B5.
-
Page 146
Maintenance Variant Item Capacity in gallons (litres) Increased capacity Fuel tank 20.9 (95) Engine lubrication system — including the 1.4 (6.2) oil filter Engine lubrication system — excluding the 1.3 (6) oil filter Engine Oil Adding Capacities Capacity in Engine gallons (litres) 2.2L Duratorq-TDCi 0.3 (1.5) -
Page 147: Vehicle Care
Vehicle Care Cleaning the Chrome Trim CLEANING THE EXTERIOR WARNINGS WARNINGS Do not use abrasives or chemical If you use a car wash with a waxing solvents. Use soapy water. cycle, make sure that you remove the wax from the windscreen. Do not apply cleaning product to hot surfaces and do not leave cleaning Prior to using a car wash facility…
-
Page 148: Repairing Minor Paint Damage
Remove particles such as bird droppings, We recommend that you use Ford service tree sap, insect deposits, tar spots, road wheel cleaner. Make sure that you read salt and industrial fallout before repairing and follow the manufacturer’s instructions.
-
Page 149: Wheels And Tyres Appendices
Wheels and Tyres General Information GENERAL INFORMATION WARNINGS A decal with tyre pressure data is located Depending on the type and extent of in the driver’s door opening. tyre damage, some tyres can only be Check and set the tyre pressure at the partially sealed or not sealed at all.
-
Page 150
Wheels and Tyres WARNINGS WARNINGS Never leave the kit unattended while Watch the sidewall of the tyre. If any in use. cracks, bumps or similar damage appears, switch off the compressor Do not keep the compressor and let the air out by means of the pressure operating for more than 10 minutes. -
Page 151
Wheels and Tyres 5. Remove the valve cap from the damaged tyre. 6. Remove the protective cap A from the sealant bottle hose and screw the hose firmly onto the valve of the damaged tyre. Make sure that the compressor switch F is in position 0. -
Page 152: Tyre Care
Wheels and Tyres Note: When pumping in the sealant through Once you have inflated the tyre to its the tyre valve, the pressure may rise up to correct tyre pressure, move the 87 psi (6 bar) but will drop again after about compressor switch F to position 0, 30 seconds.
-
Page 153: Using Winter Tyres
Wheels and Tyres To make sure the front and rear tyres of WARNINGS your vehicle wear evenly and last longer, Only fit snow chains to specified we recommend that you swap the tyres tyres. See Technical from front to rear and vice versa at regular Specifications (page 157).
-
Page 154
Wheels and Tyres If the spare wheel is exactly the same type and size as the other fitted road wheels, you can replace the existing road wheel with the spare wheel and continue to drive in the normal manner. If the spare wheel is different to the other road wheels, it will carry a yellow label with the appropriate speed limit. -
Page 155
Wheels and Tyres Vehicle Jack WARNINGS The vehicle jack supplied with your vehicle should only be used when changing a wheel in emergency situations. Before using the vehicle jack, check that it is not damaged or deformed and that the thread is lubricated and free from foreign matter. -
Page 156
Wheels and Tyres • Insert the hook of the handle into the ring on the jack. Insert the wheel brace into the other end of the handle and rotate clockwise. Front Jacking Points WARNINGS Use only the specified jacking points. If you use other positions, you may damage the body, steering, suspension, engine, braking system or the… -
Page 157
Wheels and Tyres All Front-wheel Drive Vehicles WARNINGS Set up a warning triangle. Make sure that your vehicle is on firm, level ground with the wheels pointing straight ahead. Switch the ignition off and apply the parking brake. If your vehicle has a manual transmission, move the transmission selector lever to first or reverse gear. -
Page 158
Wheels and Tyres 4. Jack up your vehicle until the tyre is 4. Partially tighten the wheel nuts in the clear of the ground. sequence shown. 5. Remove the wheel nuts and the wheel. 5. Lower your vehicle and remove the jack. -
Page 159: Technical Specifications
Wheels and Tyres TECHNICAL SPECIFICATIONS Wheel Nut Torque Wheel type Ib-ft (Nm) 147.5 (200) Tyre Pressures (Cold Tyres) Full Load Half Load Front Rear Front Rear Variant Tyre size lbf/in² lbf/in² lbf/in² lbf/in² (bar) (bar) (bar) (bar) 300S 215/65 R 15 C 49.3 (3.4) 47.9 (3.3) 49.3 (3.4)
-
Page 160
Wheels and Tyres Standard Economy Front Rear Front Rear Variant Tyre size lbf/in² lbf/in² lbf/in² lbf/in² (bar) (bar) (bar) (bar) 290L 215/65 R 16 C 55.1 (3.8) 52.2 (3.6) 68.0 (4.7) 68.0 (4.7) 300S 215/65 R 15 C 49.3 (3.4) 47.9 (3.3) 54.0 (3.7) 54.0 (3.7) -
Page 161: Capacities And Specifications
Capacities and Specifications Note: Your vehicle identification plate VEHICLE IDENTIFICATION design may vary to that shown. PLATE Note: The information shown on your vehicle identification plate is dependant upon market requirements. Model Variant Engine designation Emission level Vehicle identification number Gross vehicle weight Gross train weight Maximum front axle weight…
-
Page 162: Vehicle Identification Number
Capacities and Specifications The vehicle identification number is VEHICLE IDENTIFICATION located on the left hand side of the NUMBER instrument panel. You will also find it stamped into the right-hand front wheel arch. TECHNICAL SPECIFICATIONS Vehicle Dimensions Short Wheelbase Dimension description Dimension in inches (mm) Maximum length 195.8 (4972)
-
Page 163: Capacities And Specifications
Capacities and Specifications Long Wheelbase Dimension description Dimension in inches (mm) Maximum length 210.2 (5339) Overall width including exterior mirrors 89.5 (2272) Overall height 77.9 — 93.9 (1979 — 2385) Wheelbase 129.9 (3300) Front track 68.7 (1745) Rear track 67.6 (1718)
-
Page 164
Capacities and Specifications Towing Equipment Dimensions Item Dimension description Dimension in inches (mm) Wheel centre — end of tow ball 46.3 (1176) Centre of tow ball — side member 16.6 (421) Inner side of side member 33.2 (842) Centre of tow ball — centre 1.attachment point 18.7 (476) Centre of tow ball — centre 2.attachment point 21.7 (551) -
Page 165: Audio System
WMA disc playback: MP3 and may not function correctly when used in WMA track mode (system default) and Ford CD players. MP3 and WMA folder mode. Note: CDs with homemade paper • MP3 and WMA track mode ignores any…
-
Page 166: Audio Unit — Vehicles With: Am/Fm/Cd
Audio System • MP3 and WMA folder mode represents In track mode, the system displays and a folder structure consisting of one plays the structure as if it were only one level of folders. The CD player numbers level deep (all .mp3 and WMA files are all MP3 and WMA tracks on the disc played, regardless of being in a specific (noted by the .mp3 or .
-
Page 167
Audio System CD slot: Where you insert a CD. Eject: Press the button to eject a CD. Passenger airbag information: Informs you when the airbag is either on or off. INFO: Press the button to access radio, CD, USB and IPod information. TA: Press the button to turn traffic announcements on or off and cancels announcements during an active announcement. -
Page 168
Audio System On, Off and Volume: Press the button to switch the audio system on or off. Turn the dial to adjust the volume. Seek down: Press the button to go to the next station down the radio frequency band or the previous track on a CD. MENU: Press the button to access different audio system features. -
Page 169
Audio System 4. Press OK to continue listening to a Turning Traffic Announcements On and station. Before you can receive traffic Station Preset Buttons announcements, you must press either the This feature allows you to store your TA or TRAFFIC button. A TA display will favourite stations, they can be recalled by appear to show the feature is switched on. -
Page 170
Audio System Alternative Frequencies Ending Traffic Announcements The audio unit will return to normal The majority of programs that broadcast operation at the end of each traffic on the FM waveband have a program announcement. To end the announcement identification code, it can be recognised by prematurely, press TA or TRAFFIC during audio units. -
Page 171: Audio Unit — Vehicles With: Am/Fm/Cd/Digital Audio Broadcast (Dab) Radio/Sync
Audio System Regional Mode 3. Scroll to RDS REGIONAL and turn on or off with the OK button. Regional mode controls the behaviour of 4. Press the MENU button to return. alternative frequencies switching between regionally related networks of a parent broadcaster.
-
Page 172
Audio System CD slot: Where you insert a CD. Eject: Press the button to eject a CD. Passenger airbag information: Informs you when the airbag is either on or off. INFO: Press the button to access radio, CD, USB and IPod information. TA: Press the button to turn traffic announcements on or off and cancels announcements during an active announcement. -
Page 173
Audio System Seek up: Press the button to go to the next station up the radio frequency band or the next track on a CD. Function button 4: Press the button to select different functions of the audio system depending on which mode (i.e. radio or CD) you are in. Function button 3: Press the button to select different functions of the audio system depending on which mode (i.e. -
Page 174
Audio System Station Tuning Control Note: When you drive to another part of the country, stations that broadcast on Seek Tuning alternative frequencies, and are stored on preset buttons, may be updated with the Select a waveband and briefly press one correct frequency and station name for that of the seek buttons. -
Page 175
Audio System Note: If traffic announcement is on and you 5. Press the MENU button to return. select a preset or manual tune to a non News Broadcasts traffic announcement station no traffic announcement will be heard. Your audio unit may interrupt normal Note: When you are listening to a non reception to broadcast news bulletins from traffic announcement station and turn… -
Page 176: Audio Unit — Vehicles With: Digital Audio Broadcast (Dab) Radio/Navigation System/Sync
Audio System It will restore radio reception when it finds Regional mode off: This allows a larger one or if one is not found, the unit will coverage area if neighbouring regional return to the original stored frequency. networks are carrying the same programming, but can cause random When selected, AF will be shown in the alternative frequency switches if they are…
-
Page 177
Audio System CD slot: Where you insert a CD. Eject: Press the button to eject a CD. Passenger airbag information: Informs you when the airbag is either on or off. INFO: Press the button to access radio, CD, USB and IPod information. MAP: Press the button to access map features. -
Page 178
Audio System TA: Press the button to turn traffic announcements on or off and cancels announcements during an active announcement. Function button 4: Press the button to select different functions of the audio system depending on which mode (i.e. radio or CD) you are in. Function button 3: Press the button to select different functions of the audio system depending on which mode (i.e. -
Page 179
Audio System Station Tuning Control Station Preset Buttons This feature allows you to store your DAB Service Linking favourite stations, they can be recalled by Note: This feature does not automatically selecting the appropriate waveband and turn on every time you switch the ignition pressing one of the preset buttons. -
Page 180
Audio System Turning Traffic Announcements On and Ending Traffic Announcements The audio unit will return to normal Before you can receive traffic operation at the end of each traffic announcements, you must press either the announcement. To end the announcement TA or TRAFFIC button. -
Page 181: Regional Mode
Audio System 3. Scroll to the required digital signal When selected, the unit continually processing function. evaluates signal strength and, if a better signal becomes available, the unit will 4. Use the up and down arrow buttons to switch to that alternative. It mutes while select the required setting.
-
Page 182: Digital Audio Broadcasting
Audio System 2. Select AUDIO or AUDIO SETTINGS. Station Tuning Control 3. Scroll to RDS REGIONAL and turn on Note: When you reach the first or last or off with the OK button. station within an ensemble, further tuning will skip to the next ensemble. There may 4.
-
Page 183: Auxiliary Input Socket
Audio System Select a station. If you leave the coverage area of a frequency, this feature allows the system 2. Press function button 3. to switch automatically to a corresponding 3. Press a seek button to begin the scan. frequency, e.g. from Digital to FM. 4.
-
Page 184: Audio Troubleshooting
Audio System The auxiliary input jack allows you to 3. Switch the radio on. Select either a connect and play music from your portable tuned FM station or a CD. music player through your vehicle speakers. 4. Adjust the volume as desired. You can use any portable music player 5.
-
Page 185: Navigation
It loss of vehicle control, accident and is always your responsibility to injury. Ford strongly recommends control your vehicle, supervise any system that drivers use extreme caution when and obey the correct speed limit.
-
Page 186
Navigation • Fastest: Uses the fastest moving roads Note: This feature can be useful in avoiding possible. delays or hold ups on journeys. • Shortest: Uses the shortest distance Motorway possible. When switched on the system will look for • Eco (EcoRoute): Uses the most fuel motorways on your route and efficient route. -
Page 187
Navigation When You Select You Can Route preferences · Avoid motorways, toll roads, ferries and car trains when planning your route. · Have the system always select the shortest distance, fastest time or most economical route. Destination input · This feature allows you to enter your destination details (for example enter city names, enter street names or pick a place from a map). -
Page 188
Navigation When You Select You Can Assistance options · This feature allows you to customise display information for your journey (for example signs, lanes and speed limits). Personal data · This feature allows you to edit and delete personal data (for example your home address). -
Page 189: General Information
For further support see an authorised • use emergency assistance dealer. For more information visit the • access phonebook contacts and music regional Ford website. using voice commands • stream music from your connected mobile phone • select pre-defined text messages…
-
Page 190
SYNC Safety Information Privacy Information When a mobile phone is connected to WARNING SYNC, the system creates a profile that is Driving while distracted can result in linked to that mobile phone. The system loss of vehicle control, collision and creates the profile to offer you more mobile injury. -
Page 191: Using Voice Recognition
SYNC Before giving a voice command, wait for USING VOICE RECOGNITION the system announcement to finish followed by a single beep. Any command This system helps you control many spoken prior to this does not register with features using voice commands. This the system.
-
Page 192
SYNC When You Say The System Provides less audible interaction and more «Interaction Mode Advanced» tone prompts. Provides more detailed interaction and «Interaction Mode Standard» guidance. The system defaults to the standard interaction mode. Press the voice button to change the Confirmation prompts are short questions confirmation prompt setting. -
Page 193: Using Sync With Your Phone
To check your mobile phone’s the information and entertainment display. compatibility, refer to your mobile phone’s Press the MENU button. manual or visit the regional Ford website. 2. Select SYNC-Settings. Pairing a Mobile Phone For the 3. Select Voice Settings.
-
Page 194
SYNC 4. When prompted on your mobile Make sure the Bluetooth feature on phone’s display, enter the six-digit PIN your mobile phone is switched on provided by the system in the audio before starting the search. Refer to your display. The display indicates when the mobile phone’s manual if necessary. -
Page 195
SYNC «Phone» «Connections» «Phonebook <name> on other» «Dial» You do not need to say «phone» prior to these commands. These commands are not available until your mobile phone information has completely downloaded using Bluetooth. See Dial table. See Menu table. Phonebook Commands When you ask the system to access a phonebook name, number, etc., the… -
Page 196: Receiving A Call
SYNC «Menu» «(Phone) connections» «(Phone) settings (message) notification off» «(Phone) settings (message) notification on» «(Phone) settings (set) phone ringer» «(Phone) settings (set) ringer 1» «(Phone) settings (set) ringer 2» «(Phone) settings (set) ringer 3» «(Phone) settings (set) ringer off» «Phone name» «Text message inbox»…
-
Page 197
SYNC When You Select You Can Mic. off Turn your vehicle’s microphone off. To turn the microphone on, select the option again. Privacy Switch a call from an active hands-free environment to your mobile phone for a more private conversation. When selected, the audio display will indicate the call is private. -
Page 198
SYNC Accessing Features Through the Press the PHONE button to enter the Mobile Phone Menu mobile phone menu. 2. Select one of the options available. You can access your call history, phonebook, sent text messages as well as access mobile phone and system settings. You can also access advanced features such as emergency assistance. -
Page 199: Text Messaging
SYNC Text Messaging • Press the voice button and say «Read text message». Note: This is a mobile phone dependent • Select the more option and use the feature. arrow buttons to scroll through further The system allows you to receive, send, options.
-
Page 200
SYNC • Delete allows you to delete current Note: You can send text messages either text messages from the system (not by choosing a contact from the phonebook your mobile phone). The audio display and selecting the text option from the audio indicates when all your text messages display or by replying to a received message have been deleted. -
Page 201
SYNC When You Select You Can If your mobile phone supports in-band ringing, your mobile phone’s ringtone sounds when you choose the mobile phone ringtone option. Text msg notify Have the option of hearing an audible tone to notify you when a text message arrives. -
Page 202
SYNC When You Select You Can Pair extra mobile phones to the system. 1. Select the option to add to start the pairing process. 2. When a message to begin pairing appears in the audio display, search for SYNC on your mobile phone. Refer to your mobile phone’s manual if necessary. -
Page 203
SYNC System Settings 2. Select the SYNC settings option, then press the OK button. Press the MENU button. When You Select You Can Bluetooth on Check or uncheck this option to turn the Bluetooth inter- face of the system on or off. Select this option then press the OK button to change the option’s status. -
Page 204: Sync Applications And Services
Ford website. call which could delay the response time, Setting Emergency Assistance On potentially increasing the risk of serious injury or death.
-
Page 205: In The Event Of A Collision
Note: This feature will only work in a European country or region where SYNC emergency assistance can call the local emergency services. Visit the regional Ford website for details.
-
Page 206
Herzegovina, Macedonia, Netherlands, information immediately. Ukraine, Moldova and Russia. Note: While information is being provided Visit the regional Ford website for latest to the emergency operator, the system will details. play a message letting you know it is sending important information. It will then… -
Page 207: Using Sync With Your Media Player
SYNC 2. Press the AUX button until an USING SYNC WITH YOUR initialising message appears in the top MEDIA PLAYER left corner of the display. 3. Depending on how many media files You can access and play music from your are on your connected device, an media player through your vehicle’s indexing message may appear in the…
-
Page 208
SYNC «USB» «Play artist <name>» «Search artist <name>» «Play genre <name>» «Search genre <name>» «Play next folder» «Search song <name>» «Play next track» «Search track <name>» «Shuffle off» «Play playlist <name>» «Shuffle on» «Play previous folder» «Play previous track» «Similar music» «What’s playing?»… -
Page 209
SYNC «Bluetooth Audio» «Connections» «Pause» «Play» «Play next track» «Play previous track» Press AUX to select USB playback and Media Menu Features then Options to enter the Media menu. The media menu allows you to select how 2. Scroll to cycle through: to play your music (by artist, genre, shuffle, repeat, etc.) and to find similar music or reset the index of your USB devices. -
Page 210: Accessing Your Usb Song Library
SYNC Accessing Your USB Song Library 2. Press AUX to select USB playback and then Browse. This menu allows you to select and play If there are no media files to access, the your media files by artist, album, genre, display indicates there is no media.
-
Page 211: Sync Troubleshooting
See Using SYNC With tables below. Your Phone (page 191). To check your mobile phone’s compatibility, visit the regional Ford website. Mobile Phone Issues Issue Possible Cause Possible Solution A lot of back-…
-
Page 212
SYNC Mobile Phone Issues Issue Possible Cause Possible Solution The system Limitations on your Try pushing your phonebook contacts to says «Phone- mobile phone’s capab- SYNC by selecting the option to add. book down- ility. If the missing contacts are stored on your loaded»… -
Page 213
SYNC USB and Media Issues Issue Possible Cause Possible Solution I am having Possible device malfunc- Try turning the device off, resetting it or trouble tion. removing the battery, then trying again. connecting my Make sure you are using the manufacturer’s device. -
Page 214
SYNC Voice Command Issues Issue Possible Cause Possible Solution SYNC does not You may be using the Review the mobile phone voice commands understand wrong voice commands. and the media voice commands at the what I am You may be speaking too beginning of their respective sections. -
Page 215
SYNC Voice Command Issues Issue Possible Cause Possible Solution You can also use the mobile phone and media suggestion lists to get a list of possible suggestions when the system cannot fully understand you. See Using Voice Recognition (page 189). The SYNC voice Foreign names are SYNC applies the phonetic pronunciation… -
Page 216
SYNC Voice Command Issues Issue Possible Cause Possible Solution SYNC offers several new voice control features for a wide range of languages. Dialling a contact name directly from the phonebook without pre-recording (for example, “call John Smith”) or selecting a track, artist, album, genre or playlist directly from your media player (for example,»… -
Page 217: Electromagnetic Compatibility
Appendices ELECTROMAGNETIC WARNINGS Do not mount any transceiver, COMPATIBILITY microphones, speakers, or any other item in the deployment path of the WARNINGS airbag system. Your vehicle has been tested and Do not fasten antenna cables to certified to legislation relating to original vehicle wiring, fuel pipes and electromagnetic compatibility brake pipes.
-
Page 218: End User Licence Agreement
• You have acquired a device («DEVICE») • with the engine running that includes software licenced by FORD MOTOR COMPANY from an • during a road test at various speeds. affiliate of Microsoft Corporation Check that electromagnetic fields («MS») . Those installed software…
-
Page 219
«online» or electronic FORD MOTOR COMPANY or its third documentation («FORD SOFTWARE») party software and service providers. are protected by international intellectual property laws and treaties. -
Page 220
(e.g., in the user • Consent to Use of Data: You agree documentation and in the software). that MS, Microsoft Corporation, FORD Even if you receive multiple EULAs, you MOTOR COMPANY, third party are licenced to use only one (1) copy software and systems suppliers, their of the SOFTWARE. -
Page 221
SOFTWARE («Supplemental endorsement of the third party site by Components»). MS, Microsoft Corporation, their affiliates and/or their designated If FORD MOTOR COMPANY or third party agent. software and services suppliers provide or make available to you Supplemental • Obligation to Drive Responsibly:… -
Page 222
Appendices UPGRADES AND RECOVERY MEDIA: INTELLECTUAL PROPERTY RIGHTS: If the SOFTWARE is provided by FORD All title and intellectual property rights in MOTOR COMPANY separate from the and to the SOFTWARE (including but not DEVICE on media such as a ROM chip, CD… -
Page 223
TRADEMARKS: This EULA does not grant End User Notice you any rights in connection with any Microsoft® Windows® Mobile for trademarks or service marks of FORD Automotive Important Safety MOTOR COMPANY, MS, Microsoft Information Corporation, third party software or service providers, their affiliates or suppliers. -
Page 224
Appendices Use of Speech Recognition Functions: WARNING Speech recognition software is inherently Operating certain parts of this a statistical process which is subject to system while driving can distract errors. It is your responsibility to monitor your attention away from the road, any speech recognition functions included and possibly cause an accident or other in the system and address any errors. -
Page 225
Appendices 1. Safe and Lawful Use Potential Map Inaccuracy: Maps used by this system may be inaccurate because You acknowledge that devoting attention of changes in roads, traffic controls or to the TeleNav Software may pose a risk driving conditions. Always use good of injury or death to you and others in judgment and common sense when situations that otherwise require your… -
Page 226
Appendices 3. Software Licence 3.1 Licence Limitations Subject to your compliance with the terms You agree not to do any of the following: of this Agreement, TeleNav hereby grants (a) reverse engineer, decompile, to you a personal, non-exclusive, disassemble, translate, modify, alter or non-transferable licence (except as otherwise change the TeleNav Software expressly permitted below in connection… -
Page 227
Appendices 4. Disclaimers 5. Limitation of Liability To the fullest extent permissible pursuant TO THE EXTENT PERMITTED UNDER to applicable law, in no event will TeleNav, APPLICABLE LAW, UNDER NO its licensors and suppliers, or agents or CIRCUMSTANCES SHALL TELENAV OR employees of any of the foregoing, be ITS LICENSORS AND SUPPLIERS BE liable for any decision made or action… -
Page 228
Appendices 6. Arbitration and Governing Law 7. Assignment You agree that any dispute, claim or You may not resell, assign, or transfer this controversy arising out of or relating to this Agreement or any of your rights or Agreement or the TeleNav Software shall obligations, except in totality, in connection be settled by independent arbitration with your permanent transfer of the… -
Page 229
Appendices 9. Other Vendors Terms and Conditions By using the TeleNav Software, you The TeleNav Software utilizes map and consent to receive from TeleNav all other data licenced to TeleNav by third communications, including notices, party vendors for the benefit of you and agreements, legally required disclosures other end users. -
Page 230
Appendices NT holds a nonexclusive licence from the Additional Licence Limitations: Except United States Postal Service ® to publish where you have been specifically licenced and sell ZIP+4 ® information. to do so by NT in a separate written agreement, and without limiting the ©… -
Page 231
Appendices Disclaimer of Warranty: NT AND ITS Export Control: You agree not to export LICENSORS (INCLUDING THEIR from anywhere any part of the Data or any LICENSORS AND SUPPLIERS) DISCLAIM direct product thereof except in ANY WARRANTIES, EXPRESS OR IMPLIED, compliance with, and with all licences and OF QUALITY, PERFORMANCE, approvals required under, applicable… -
Page 232
Appendices Government End Users: If the Data is Gracenote® Copyright being acquired by or on behalf of the CD and music-related data from United States government or any other Gracenote, Inc., copyright© 2000-2007 entity seeking or applying rights similar to Gracenote. -
Page 233
Appendices You agree that you will use the content THE GRACENOTE SOFTWARE, EACH ITEM from Gracenote («Gracenote Content») , OF GRACENOTE DATA AND THE Gracenote Data, the Gracenote Software, GRACENOTE CONTENT ARE LICENCED and Gracenote Servers for your own TO YOU «AS IS». NEITHER GRACENOTE personal, non-commercial use only. -
Page 234
Appendices FCC ID: KMHSYNCG2 IC: 1422A-SYNCG2 This device complies with Part 15 of the FCC Rules and with RSS-210 of Industry Canada. Operation is subject to the following two conditions: (1) This device may not cause harmful interference, and (2) this device must accept any interference received, including interference that may cause undesired operation. -
Page 235
Index Audio unit — Vehicles With: AM/FM/CD/Digital Audio Broadcast (DAB) Radio/SYNC……..169 Alternative Frequencies……..173 See: Climate Control……….61 Automatic Volume Control……173 About This Manual………..5 Autostore Control……….172 Protecting the Environment…….5 News Broadcasts……….173 Regional Mode………….174 See: Brakes…………..91 Sound Button…………171 ABS driving hints Station Preset Buttons……..172 See: Hints on Driving With Anti-Lock Station Tuning Control……..172 Brakes…………..91… -
Page 236
Index Cigar Lighter………….75 Cleaning the Alloy Wheels……146 Cleaning the Exterior……..145 Bonnet Lock Body Paintwork Preservation……145 See: Opening and Closing the Bonnet..128 Cleaning the Chrome Trim……145 Bottle Holder…………76 Cleaning the Headlamps………145 Brake and Clutch Fluid Check….132 Cleaning the Rear Window……145 Brakes…………..91 Cleaning the Interior……..145 General Information……….91 Instrument Cluster Screens, LCD Screens… -
Page 237
Index Fuel Consumption………88 See: Daytime Running Lamps……40 Calculating Fuel Economy…….88 Filling the Tank…………88 Fuel Consumption See: Technical Specifications……89 Eco Mode…………105 Fuel Quality…………85 Resetting Eco Mode……….106 Long-Term Storage……….85 Fuse Box Locations……..117 Type 1…………..106 Type 2 and 3…………106 Body Control Module Fuse Box……117 Electromagnetic compatibility….215 Engine Compartment Fuse Box…..117 End User Licence Agreement….216… -
Page 238
Index Hill Start Assist……….90 Switching the System On and Off….90 Using Hill Start Assist……..90 Jump-Starting the Vehicle……115 Hints on Controlling the Interior To Connect the Booster Cables…..115 Climate…………63 To Start the Engine……….116 Cooling the Interior Quickly……63 General Hints…………63 Heating the Interior Quickly……63 Maximum Cooling Performance in Keys and Remote Controls……26 Instrument Panel or Instrument Panel… -
Page 239
Index Maintenance……….128 Parking Aid…………94 Parking Aids………….94 General Information……….128 Technical Specifications……..143 Principle of Operation……..94 Manual Climate Control……62 Parking Brake…………91 Manual Liftgate……….30 Passenger Airbag……….23 Opening and Closing the Liftgate….30 Switching the Passenger Airbag Off…..24 Manual Seats……….66 Switching the Passenger Airbag On….24 Passive Anti-Theft System……31 Adjusting the Armrest……..68 Adjusting the Height of the Driver’s Arming the Engine Immobiliser……31… -
Page 240
Index Rear View Camera………96 Special Notices……….7 Speed Control Switching the Rear View Camera Off..98 Switching the Rear View Camera On…96 See: Cruise Control……….99 Speed Limiter……….101 Using the Display……….96 Vehicles with Parking Aid………98 Engine Speed Limiter………101 Rear View Camera Vehicle Speed Limiter — Adjustable….101 See: Rear View Camera……..96 Vehicle Speed Limiter — Fixed……101 Rear Window Wiper and Washers…37… -
Page 241
Index Temporary Mobility Kit……..147 Using SYNC With Your Media Player…………205 Checking the Tyre Pressure……150 General Information………..147 Accessing Your USB Song Library….208 Inflating the Tyre……….148 Bluetooth Devices and System Using the Kit…………147 Settings…………209 Towing a Trailer……….110 Connecting Your Media Player to the USB Steep Gradients………..110 Port…………..205 Towing Points……….110… -
Page 242
Index Warning Lamps and Indicators….49 Anti-Lock Braking System Warning Lamp…………..49 Brake Pad Wear Warning Lamp…..49 Brake System Warning Lamp……49 Cruise Control Indicator……..49 Direction Indicator……….49 Door Ajar Warning Lamp……..50 Engine Warning Lamps……..50 Front Airbag Warning Lamp……50 Front Fog Lamp Indicator………50 Frost Warning Lamp………..50 Glow Plug Indicator……….50 Headlamp Indicator……….50 Hill Start Assist Indicator……..51… -
Page 244
CG3577en…
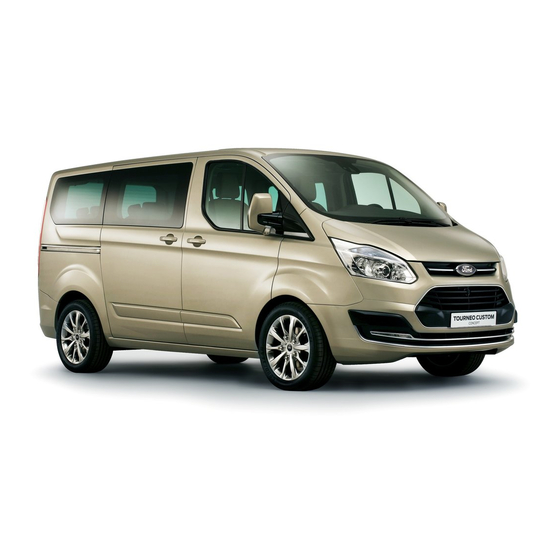
- Manuals
- Brands
- Ford Manuals
- Automobile
- TRANSIT CUSTOM
- Owner’s manual
-
Contents
-
Table of Contents
-
Troubleshooting
-
Bookmarks
Quick Links
FORD TRANSIT CUSTOM Owner’s Manual
Related Manuals for Ford TRANSIT CUSTOM
Summary of Contents for Ford TRANSIT CUSTOM
-
Page 1
FORD TRANSIT CUSTOM Owner’s Manual… -
Page 2
No part of this publication may be reproduced, transmitted, stored in a retrieval system or translated into any language in any form by any means without our written permission. Errors and omissions excepted. © Ford Motor Company 2012 All rights reserved. Part Number: CG3577en 11/2012 20121221113602… -
Page 3: Table Of Contents
Direction Indicators……..46 General Information on Radio Interior Lamps……….47 Frequencies……….28 Remote Control……….28 Windows and Mirrors Replacing a Lost Key or Remote Power Windows……….48 Control…………28 Exterior Mirrors……….49 Locks Interior Mirror………..50 Sun Shades…………50 Locking and Unlocking………29 Transit Custom (TTF) Vehicles Built From: 14-01-2013…
-
Page 4
General Information……..101 Auxiliary Power Points………84 Hints on Driving With Anti-Lock Cigar Lighter………….85 Brakes…………101 Parking Brake……….101 Storage Compartments Cup Holders………….86 Traction Control Overhead Console………86 Principle of Operation………103 Ashtray……………86 Using Traction Control…….103 Seat Back Trays……….86 Transit Custom (TTF) Vehicles Built From: 14-01-2013… -
Page 5
Checking the Wiper Blades……146 Running-In…………122 Changing the Wiper Blades……146 Economical Driving……..122 Removing a Headlamp…….147 Reduced Engine Performance….122 Changing a Bulb………..148 Cold Weather Precautions……123 Bulb Specification Chart……154 Driving Through Water……..123 Technical Specifications……155 Floor Mats…………123 Transit Custom (TTF) Vehicles Built From: 14-01-2013… -
Page 6
AM/FM/CD/Digital Audio Broadcast (DAB) Radio/SYNC……..181 Audio unit — Vehicles With: Digital Audio Broadcast (DAB) Radio/Navigation System/SYNC………..186 Audio unit — Vehicles With: Digital Audio Broadcast (DAB) Radio……192 Digital Audio………..196 Auxiliary Input Socket………197 Audio Troubleshooting…….198 Navigation Navigation…………199 Transit Custom (TTF) Vehicles Built From: 14-01-2013… -
Page 7: Introduction
This manual may qualify the location of a component as left-hand side or right-hand side. The side is determined when facing Anti-lock braking system forward in the seat. Avoid smoking, flames or sparks Battery Transit Custom (TTF) Vehicles Built From: 14-01-2013…
-
Page 8
Cruise control Heated windscreen Do not open when hot Interior luggage compartment Engine air filter release Jack Engine coolant Lighting control Engine coolant temperature Low tyre pressure warning Engine oil Maintain correct fluid level Transit Custom (TTF) Vehicles Built From: 14-01-2013… -
Page 9: Replacement Parts Recommendation
A great way to know for sure you are getting this level of protection is to use genuine Ford replacement collision parts. Transit Custom (TTF) Vehicles Built From: 14-01-2013…
-
Page 10: Special Notices
Environmental conditions (e.g. temperature). These data are exclusively technical and help identification and correction of errors as well as optimisation of vehicle functions. Motion profiles indicating travelled routes cannot be created with these data. Transit Custom (TTF) Vehicles Built From: 14-01-2013…
-
Page 11
— possibly, with the assistance of an expert. Additional functions contractually agreed upon with the client (e.g. vehicle location in emergency cases) allow the transmission of particular vehicle data from the vehicle. Transit Custom (TTF) Vehicles Built From: 14-01-2013… -
Page 12: At A Glance
See Driving Aids (page 111). See Automatic Main Beam Control (page 42). See Locking and Unlocking (page 29). See Changing a Road Wheel (page 163). Tyre pressures. See Technical Specifications (page 169). See Changing a Bulb (page 148). See Towing Points (page 120). Transit Custom (TTF) Vehicles Built From: 14-01-2013…
-
Page 13
See Transmission (page 100). See Locking and Unlocking (page 29). See Power Windows (page 48). See Fastening the Seat Belts (page 23). See Head Restraints (page 74). See Seats (page 74). See Parking Brake (page 101). Transit Custom (TTF) Vehicles Built From: 14-01-2013… -
Page 14: Instrument Panel Overview
At a Glance Instrument Panel Overview Left-Hand Drive Transit Custom (TTF) Vehicles Built From: 14-01-2013…
-
Page 15
Right-hand drive vehicles — Information and entertainment display control. See Information Displays (page 56). See Audio System (page 175). See Navigation (page 199). Instrument cluster. See Gauges (page 51). See Warning Lamps and Indicators (page 52). Transit Custom (TTF) Vehicles Built From: 14-01-2013… -
Page 16
Lighting control. See Lighting Control (page 40). Front fog lamps. See Front Fog Lamps (page 44). Rear fog lamps. See Rear Fog Lamps (page 45). Headlamp levelling control. See Headlamp Levelling (page 45). Instrument lighting dimmer. See Instrument Lighting Dimmer (page 42). Transit Custom (TTF) Vehicles Built From: 14-01-2013… -
Page 17: Child Safety
Extreme Hazard! Never use a Use the correct child seat as follows: rearward facing child restraint on a seat protected by an active airbag in front of it. Death or serious injury to the child can occur. Transit Custom (TTF) Vehicles Built From: 14-01-2013…
-
Page 18: Booster Seats
Secure children that weigh between 29 lb (13 kg) and 40 lb (18 kg) in a child safety seat (Group 1) on the rear seat. Transit Custom (TTF) Vehicles Built From: 14-01-2013…
-
Page 19: Isofix Anchor Points
Note: When you are purchasing an ISOFIX seat, make sure that you know the correct mass group and ISOFIX size class for the intended seating locations. See Child Seat Positioning (page 19). Transit Custom (TTF) Vehicles Built From: 14-01-2013…
-
Page 20: Child Safety
Make sure that the child seat manufacturer lists your vehicle as suitable for use with this type of child seat. Follow the child seat manufacturer’s instructions for installing a child seat with a support leg. Transit Custom (TTF) Vehicles Built From: 14-01-2013…
-
Page 21: Child Seat Positioning
See Seats (page 74). Transit Custom (TTF) Vehicles Built From: 14-01-2013…
-
Page 22
UF¹ Suitable for universal category forward facing child seats approved for use in this mass group. However, we recommend that you secure children in a government approved child seat, on the rear seat. Transit Custom (TTF) Vehicles Built From: 14-01-2013… -
Page 23
IU Suitable for universal category ISOFIX child seats approved for use in this mass group. As defined by ECE-R16. Note: When you are purchasing an ISOFIX child seat, make sure that you know the correct mass group and ISOFIX size class for the intended seating locations. Transit Custom (TTF) Vehicles Built From: 14-01-2013… -
Page 24: Child Safety Locks
Left-Hand Side Turn anticlockwise to lock and clockwise to unlock. Right-Hand Side Turn clockwise to lock and anticlockwise to unlock. Transit Custom (TTF) Vehicles Built From: 14-01-2013…
-
Page 25: Seat Belts
Using Seat Belts During Pregnancy WARNING Position the seat belt correctly for your safety and that of your unborn child. Do not use only the lap strap or the shoulder strap. Transit Custom (TTF) Vehicles Built From: 14-01-2013…
-
Page 26: Seat Belt Height Adjustment
Support the seat belt loop while pressing the adjuster button. 2. Slide the adjuster to the desired position then release the button. 3. Pull down on the seat belt loop to make sure it is secure in position. Transit Custom (TTF) Vehicles Built From: 14-01-2013…
-
Page 27: Supplementary Restraints System
This is normal. Note: The front passenger airbag protects both positions of a double seat. Note: Only wipe airbag covers with a damp cloth. Transit Custom (TTF) Vehicles Built From: 14-01-2013…
-
Page 28
When you switch the ignition on, check that the airbag deactivation warning lamp illuminates. Switching the Passenger Airbag WARNING You must switch the airbag on when you are not using a child seat on the front seat. Transit Custom (TTF) Vehicles Built From: 14-01-2013… -
Page 29: Side Airbags
The airbag will deploy during significant lateral collisions. It will also deploy during significant frontal angled collisions. The airbag will not deploy in minor lateral and frontal collisions, rear collisions, or overturns. Transit Custom (TTF) Vehicles Built From: 14-01-2013…
-
Page 30: Keys And Remote Controls
REMOTE CONTROL You can program a maximum of eight remote controls to your vehicle. This includes any that were supplied with your vehicle. See an authorised dealer. Transit Custom (TTF) Vehicles Built From: 14-01-2013…
-
Page 31: Locks
Double Locking with the Key Turn the key to the lock position twice within three seconds. Double Locking with the Remote Control Press the button twice within three seconds. Transit Custom (TTF) Vehicles Built From: 14-01-2013…
-
Page 32: Opening The Double Rear Doors
The door will be locked when you close it. Note: Do not leave your keys in your vehicle. Note: The horn may sound if you try to lock the doors when a door is still open. Transit Custom (TTF) Vehicles Built From: 14-01-2013…
-
Page 33: Automatic Locking
For Bus vehicles, the cargo • Press the unlock button on the remote area comprises of the rear doors or liftgate. control once. • Press the interior unlock button once. Transit Custom (TTF) Vehicles Built From: 14-01-2013…
-
Page 34: Manual Liftgate
Note: Be careful when opening or closing the liftgate in a garage or other enclosed area to avoid damaging the liftgate. Transit Custom (TTF) Vehicles Built From: 14-01-2013…
-
Page 35: Security
When you switch the ignition on the engine immobiliser will disarm automatically if a correctly coded key is used. If you are unable to start the engine with a correctly coded key, have your vehicle checked by an authorised dealer. Transit Custom (TTF) Vehicles Built From: 14-01-2013…
-
Page 36: Steering Wheel
Type 1 Unlock the steering column. 2. Adjust the steering wheel to the desired position. Use the arrows on the steering wheel to navigate through the menus. Press OK to make a selection. Transit Custom (TTF) Vehicles Built From: 14-01-2013…
-
Page 37: Voice Control
Press and hold the seek button to: • tune the radio to the next station up or down the frequency band • seek through a track. See Cruise Control (page 110). Transit Custom (TTF) Vehicles Built From: 14-01-2013…
-
Page 38: Information Display Control
Steering Wheel INFORMATION DISPLAY CONTROL See Information Displays (page 56). Transit Custom (TTF) Vehicles Built From: 14-01-2013…
-
Page 39: Wipers And Washers
If that does not resolve the issue, install new wiper blades. Note: If you switch autolamps on in conjunction with autowipers, the dipped beam headlamps will illuminate automatically when the rain sensor activates the windscreen wipers continuously. Transit Custom (TTF) Vehicles Built From: 14-01-2013…
-
Page 40: Windscreen Washers
Sensor performance will be affected if the Intermittent wipe area around the interior mirror is dirty. The rain sensor is very sensitive and the wipers Low speed wipe may operate if dirt, mist or flies hit the windscreen. Transit Custom (TTF) Vehicles Built From: 14-01-2013…
-
Page 41: Rear Window Washer
Rear Window Washer The washer will spray for as long as you push the lever away from you. When you release the lever, the wiper will operate for a short time. Transit Custom (TTF) Vehicles Built From: 14-01-2013…
-
Page 42: Lighting
If you see any unacceptable condensation, Switch the ignition off. have your vehicle checked by an authorised Both Sides dealer. Set the lighting control to position B. Transit Custom (TTF) Vehicles Built From: 14-01-2013…
-
Page 43: Autolamps
Push the lever forward to switch the main beams on. Push the lever forward again or pull the lever toward you to switch the main beams off. Transit Custom (TTF) Vehicles Built From: 14-01-2013…
-
Page 44: Instrument Lighting Dimmer
A manual override may be necessary if the system fails to switch the main beam on or off. A manual override may be required when approaching other road users such as cyclists. Transit Custom (TTF) Vehicles Built From: 14-01-2013…
-
Page 45
Turn the switch to the autolamps position. The Automatic Main Beam Control indicator will illuminate to confirm when your system is ready to assist. Transit Custom (TTF) Vehicles Built From: 14-01-2013… -
Page 46: Front Fog Lamps
Note: This is a temporary override and the system will return to automatic operation after a short period. To permanently deactivate the system use the information display menu or turn the lighting control switch from autolamps to headlamps. Transit Custom (TTF) Vehicles Built From: 14-01-2013…
-
Page 47: Rear Fog Lamps
(35 and 100 metres) when your You can switch the fog lamps on when vehicle is partially or fully laden. either the front fog lamps or dipped beam headlamps are on. Transit Custom (TTF) Vehicles Built From: 14-01-2013…
-
Page 48: Cornering Lamps
Lighting CORNERING LAMPS Headlamp beam Cornering lamp beam The cornering lamps illuminate the inside DIRECTION INDICATORS of a corner when you are turning. Transit Custom (TTF) Vehicles Built From: 14-01-2013…
-
Page 49: Interior Lamps
It will switch off automatically after a short period of time to prevent your vehicle battery from losing charge. To switch it back on, switch the ignition on for a short period of time. Transit Custom (TTF) Vehicles Built From: 14-01-2013…
-
Page 50: Windows And Mirrors
3. Lift the switch again for one more second. Press the switch fully and release it. Press 4. Press and hold the switch until the again or lift it to stop the window. window is fully open. Transit Custom (TTF) Vehicles Built From: 14-01-2013…
-
Page 51: Exterior Mirrors
This is to avoid permanent damage. Fold-Away Exterior Mirrors Push the mirror toward the door window glass. Make sure that you fully engage the mirror in its support when you unfold it. Transit Custom (TTF) Vehicles Built From: 14-01-2013…
-
Page 52: Interior Mirror
The mirror will dim automatically to reduce glare when bright lights are detected from behind your vehicle. It will automatically return to normal reflection when you select reverse gear to make sure you have a clear view when reversing. Transit Custom (TTF) Vehicles Built From: 14-01-2013…
-
Page 53: Instrument Cluster
See General Information (page 56). distance your vehicle has travelled. Engine Coolant Temperature Outside Air Temperature Gauge Shows the outside air temperature. WARNING Never remove the coolant reservoir cap while the engine is running or hot. Transit Custom (TTF) Vehicles Built From: 14-01-2013…
-
Page 54: Warning Lamps And Indicators
See Using malfunction. You will continue Cruise Control (page 110). to have normal braking (without Anti-lock braking system). Have your vehicle checked by an authorised dealer as soon as possible. Transit Custom (TTF) Vehicles Built From: 14-01-2013…
-
Page 55: Instrument Cluster
39ºF (4ºC) and 32ºF (0ºC). It will glow red Have this checked immediately. when the temperature is below 32ºF (0ºC). Glow Plug Indicator If it illuminates, wait until it extinguishes before starting. Transit Custom (TTF) Vehicles Built From: 14-01-2013…
-
Page 56
See Information Messages off. (page 63). Transit Custom (TTF) Vehicles Built From: 14-01-2013… -
Page 57: Audible Warnings And Indicators
Sounds when you have left the parking brake on and drive your vehicle. If the warning chime remains on after you have released the parking brake, have the system checked by an authorised dealer immediately. Transit Custom (TTF) Vehicles Built From: 14-01-2013…
-
Page 58: Information Displays
You can access the menu using the information display control. Note: Some options may appear slightly different or not at all if the items are optional. Trip computer Trip odometer Dist to empty Instant fuel Average fuel Transit Custom (TTF) Vehicles Built From: 14-01-2013…
-
Page 59: Information Displays
Choose your applicable setting Temp unit Choose your applicable setting Chimes Information On or Off Warning On or Off Convenience Aux heater On or Off Park heater Time 1 Time 2 Once Heat now Transit Custom (TTF) Vehicles Built From: 14-01-2013…
-
Page 60
Navigation Route Active guidance Route sections list Block next section Unblock rte sctn Destination input Country City/postcode Street District Start guidance Traffic TMC for route All TMC Block next section Route sections list Transit Custom (TTF) Vehicles Built From: 14-01-2013… -
Page 61
Fast Short Always ask Driver: Leisurely Normal Fast Eco settings Trailer Roof box Dynamic On or Off Motorway On or Off Tunnel On or Off Ferry/motorail On or Off Toll On or Off Transit Custom (TTF) Vehicles Built From: 14-01-2013… -
Page 62
Dial a number Redial Phonebook Call history Incoming calls Outgoing calls Missed calls Speed Dial Text messaging BT Devices Phone settings Set as master Phonebook pref. Set ringtone Phone status Text msg notify Emerg. Assist. Transit Custom (TTF) Vehicles Built From: 14-01-2013… -
Page 63
Dynamic Motorway Tunnel Ferry/motorail Toll Seasonal roads Toll sticker Map display Map content Arrows on map: Nav time display: Map heading up Best contrast Assistance options Signs/lane Speed limits Nav icons in lists Transit Custom (TTF) Vehicles Built From: 14-01-2013… -
Page 64
Adaptive volume Sound Nav audio mixing DSP settings DSP equaliser News Alt. frequency RDS regional DAB service link Clock settings Auto time (GPS) Set time Set date Set time zone Summer time 24-hour mode Transit Custom (TTF) Vehicles Built From: 14-01-2013… -
Page 65: Clock
Instantaneous Fuel Consumption Indicates the current fuel consumption. Average Fuel Consumption Indicates the average fuel consumption since the function was last reset. Average Speed Indicates the average speed calculated since the function was last reset. Transit Custom (TTF) Vehicles Built From: 14-01-2013…
-
Page 66
Displays when the alarm has been triggered Check Vehicle due to unauthorised entry. See Anti-Theft Alarm (page 33). Alarm fault Have your vehicle checked by an authorised Service required dealer as soon as possible. Transit Custom (TTF) Vehicles Built From: 14-01-2013… -
Page 67
Passenger door ajar Vehicle is moving. Stop your vehicle as soon as safely possible and close. Passenger side rear door Vehicle is moving. Stop your vehicle as soon as ajar safely possible and close. Transit Custom (TTF) Vehicles Built From: 14-01-2013… -
Page 68
Stop your vehicle as soon as safely possible and allow the engine to cool. If the problem persists, have your vehicle checked by an authorized dealer as soon as possible. See Engine Coolant Check (page 142). Transit Custom (TTF) Vehicles Built From: 14-01-2013… -
Page 69
See Brake and Clutch Fluid Check (page 143). Washer fluid level low Displays when the washer fluid is low and needs to be refilled. See Washer Fluid Check (page 143). Transit Custom (TTF) Vehicles Built From: 14-01-2013… -
Page 70
Cranking time exceeded Displays when your vehicle fails to start. Traction Control Message Message Action Indicator Traction control off Displays when you switch the traction control system off. See Using Traction Control (page 103). Transit Custom (TTF) Vehicles Built From: 14-01-2013… -
Page 71: Climate Control
General Information on Controlling the Interior Climate Fully close all the windows. Transit Custom (TTF) Vehicles Built From: 14-01-2013…
-
Page 72: Manual Climate Control
Select to distribute air through the instrument panel air vents. the footwell air vents. Select to distribute air through Select to distribute air through the instrument panel and the windscreen and footwell air footwell air vents. vents. Transit Custom (TTF) Vehicles Built From: 14-01-2013…
-
Page 73: Hints On Controlling The Interior Climate
• Adjust the fan speed to the lowest speed setting. speed setting. • Adjust the temperature control to the highest setting. • Adjust the air distribution control to the footwell air vents position. Transit Custom (TTF) Vehicles Built From: 14-01-2013…
-
Page 74: Heated Windows And Mirrors
Both mirrors are heated to remove ice, mist will be required. See Start-Stop (page 92). and fog. They will switch off automatically after a short period of time. Heated Windscreen Transit Custom (TTF) Vehicles Built From: 14-01-2013…
-
Page 75: Auxiliary Heater
You can switch the heater off using the information display. Note: A cross appears in the box when the heater is on. Transit Custom (TTF) Vehicles Built From: 14-01-2013…
-
Page 76: Seats
We recommend that you follow these guidelines: • Sit in an upright position with the base of your spine as far back as possible. • Do not recline the seatback more than 30 degrees. Transit Custom (TTF) Vehicles Built From: 14-01-2013…
-
Page 77: Front Seats
An unlatched seat may become dangerous if you stop suddenly or have a collision. Rock the seat backward and forward after releasing the lever to make sure that it is fully latched. Transit Custom (TTF) Vehicles Built From: 14-01-2013…
-
Page 78
The driver’s seat has removable stop bolts on the track to enable access to the vehicle battery. See Changing the 12V Battery (page 144). Moving the Seat Backward and Forward Seat Cushion Adjustment Adjusting the Lumbar Support Transit Custom (TTF) Vehicles Built From: 14-01-2013… -
Page 79: Power Seats
The driver’s seat has removable stop bolts on the track to enable access to the vehicle battery. See Changing the 12V Battery (page 144). Transit Custom (TTF) Vehicles Built From: 14-01-2013…
-
Page 80
Seats Transit Custom (TTF) Vehicles Built From: 14-01-2013… -
Page 81: Rear Seats
Make sure that the floor catches are free from obstructions when locking the seat legs into them. With the seat occupied, pull the lever or strap to recline the seatback. Transit Custom (TTF) Vehicles Built From: 14-01-2013…
-
Page 82: Removing The Seats
2. Pull the release handle up and hold it there. 3. Gently pull the seat backward until the front of the seat frame clears the catches on the floor. 4. Remove the seat. Install the seat in the reverse order. Transit Custom (TTF) Vehicles Built From: 14-01-2013…
-
Page 83: Installing The Seats
Accessing the Third Row Seats Fold the seatback down. The rear seats have latch indicators at the bottom of each seat leg, located at the front and rear. Check the latch indicators after installing the rear seats. Transit Custom (TTF) Vehicles Built From: 14-01-2013…
-
Page 84: Heated Seats
This may damage engine is running. Doing so can cause the heating element which may cause the the battery to lose charge. heated seat to overheat. An overheated seat may cause serious personal injury. Transit Custom (TTF) Vehicles Built From: 14-01-2013…
-
Page 85
The heated seat will remain on until you switch it off. If the heated seat is on when you switch the ignition off, it will be on when you switch the ignition back on. Transit Custom (TTF) Vehicles Built From: 14-01-2013… -
Page 86: Auxiliary Power Points
Keep the engine running or running. cycle the ignition to keep the power point • Do not leave devices plugged in overnight or when your vehicle is parked for extended periods. Transit Custom (TTF) Vehicles Built From: 14-01-2013…
-
Page 87: Cigar Lighter
Cathode ray tube type televisions • Motor loads, such as vacuum cleaners, electric saws and other electric power tools, compressor-driven refrigerators, etc. Press the element in to use the cigar lighter. It will pop out automatically. Transit Custom (TTF) Vehicles Built From: 14-01-2013…
-
Page 88: Storage Compartments
Do not place hot drinks in the cup sudden stop, which may increase the risk holders when your vehicle is moving. of serious injury. BOTTLE HOLDER WARNING Do not place glass objects in the bottle holder. Transit Custom (TTF) Vehicles Built From: 14-01-2013…
-
Page 89: Glasses Holder
Storage Compartments GLASSES HOLDER Transit Custom (TTF) Vehicles Built From: 14-01-2013…
-
Page 90: Starting And Stopping The Engine
To lock the steering wheel: operation. Only use the accelerator pedal Remove the key from the ignition when you have difficulty starting the switch. engine. 2. Rotate the steering wheel slightly to engage the lock. Transit Custom (TTF) Vehicles Built From: 14-01-2013…
-
Page 91: Starting A Diesel Engine
You drive only short distances. 2. Turn the key to position III until the • You frequently switch the ignition on engine has started. and off. • Your journeys contain a high level of acceleration and deceleration. Transit Custom (TTF) Vehicles Built From: 14-01-2013…
-
Page 92: Switching Off The Engine
Failure to follow engine block heater instructions could result in property damage or serious personal injury. Do not use your heater with ungrounded electrical systems or two-pronged adapters. There is a risk of electrical shock. Transit Custom (TTF) Vehicles Built From: 14-01-2013…
-
Page 93: Using The Engine Block Heater
The system does not have a thermostat. It achieves maximum temperature after approximately three hours of operation. Using the heater longer than three hours does not improve system performance and unnecessarily uses electricity. Transit Custom (TTF) Vehicles Built From: 14-01-2013…
-
Page 94: Unique Driving Characteristics
To Stop the Engine The system may not function if you Stop your vehicle. leave extra loads connected with the 2. Move the transmission selector lever ignition off. to neutral. Transit Custom (TTF) Vehicles Built From: 14-01-2013…
-
Page 95: To Restart The Engine
The system may request an engine restart under certain conditions, for example: • Low battery charge. • The heated windscreen or heated rear window is switched on. • Your vehicle has started moving (for example, rolling downhill). Transit Custom (TTF) Vehicles Built From: 14-01-2013…
-
Page 96: Fuel And Refuelling
If fuel is splashed on the skin, promptly vehicle. wash skin thoroughly with soap and • Always turn off the vehicle before water. Consult a doctor immediately if refuelling. you experience an adverse reaction. Transit Custom (TTF) Vehicles Built From: 14-01-2013…
-
Page 97: Fuel Quality
Avoid running out of fuel because this your vehicle. situation may have an adverse effect on When filling your vehicle’s fuel tank from powertrain components. a portable fuel container, use the funnel included with your vehicle. Transit Custom (TTF) Vehicles Built From: 14-01-2013…
-
Page 98: Catalytic Converter
Fuel spillage could be Driving with a Catalytic Converter hazardous to other road users. WARNINGS Do not remove the nozzle from its fully inserted position during the Avoid running out of fuel. entire refuelling process. Transit Custom (TTF) Vehicles Built From: 14-01-2013…
-
Page 99: Fuel And Refuelling
A may affect the flow of fuel and shut off the fuel nozzle before the fuel tank Pull the flap to open it. Open the flap is full. fully until it engages. 4. Operate the nozzle within the area shown. Transit Custom (TTF) Vehicles Built From: 14-01-2013…
-
Page 100: Fuel Consumption
Indicated capacity is the difference in the amount of fuel in a full tank and a tank when the fuel gauge indicates empty. Empty reserve is the amount of fuel in the tank after the fuel gauge indicates empty. Transit Custom (TTF) Vehicles Built From: 14-01-2013…
-
Page 101: Technical Specifications
176 — 185 (35.3) (47.1) 6.7 (42.2) Start-Stop 2.2L Duratorq-TDCi (92kW/125PS) and 8.8 (32.1) — 8 6.4 (44.1) — 6 7.3 (38.7) — 176 — 191 (114kW/155PS) without (35.3) (47.1) 6.7 (42.2) Start-Stop Transit Custom (TTF) Vehicles Built From: 14-01-2013…
-
Page 102: Transmission
If required, you can switch when your vehicle is on a slope without the this feature off using the information need to use the parking brake. display. See General Information (page 56). Transit Custom (TTF) Vehicles Built From: 14-01-2013…
-
Page 103: Brakes
2. Pull the parking brake lever up to its in critical situations. fullest extent. To release the parking brake: Press the brake pedal firmly. 2. Pull the lever up slightly. Transit Custom (TTF) Vehicles Built From: 14-01-2013…
-
Page 104
Brakes 3. Press the release button and push the lever down. Transit Custom (TTF) Vehicles Built From: 14-01-2013… -
Page 105: Traction Control
You can switch the system off and on using the information display. See General Information (page 56). Transit Custom (TTF) Vehicles Built From: 14-01-2013…
-
Page 106: Stability Control
This improves your ability to pull away on slippery roads or loose surfaces and improves comfort by limiting wheel spin in hairpin bends. Transit Custom (TTF) Vehicles Built From: 14-01-2013…
-
Page 107: Parking Aids
If the sensors as the sensors or if your vehicle is fully laden. are covered, the system s accuracy can be affected. Do not clean the sensors with sharp objects. Transit Custom (TTF) Vehicles Built From: 14-01-2013…
-
Page 108: Parking Aids
3 mph (5 km/h) and a moving object is approaching the rear of your vehicle at a speed of less than 3 mph (5 km/h). Transit Custom (TTF) Vehicles Built From: 14-01-2013…
-
Page 109: Rear View Camera
• If the camera’s view is obstructed, for example by mud. Using the Display WARNINGS Obstacles above the camera position will not be shown. Inspect the area behind your vehicle if necessary. Transit Custom (TTF) Vehicles Built From: 14-01-2013…
-
Page 110
(based on the current steering wheel angle) and the distance from the exterior mirrors and rear bumper. Red — up to 12 inches (0.3 metre) Amber — 12 — 24 inches (0.3 — 0.6 metre) Transit Custom (TTF) Vehicles Built From: 14-01-2013… -
Page 111: Switching The Rear View Camera Off
These are colour coded as follows: • Green — 24 — 71 inches (0.6 to 1.8 metres). • Amber — 12 — 24 inches (0.3 to 0.6 metre). • Red — 12 inches (0.3 metre) or less. Transit Custom (TTF) Vehicles Built From: 14-01-2013…
-
Page 112: Cruise Control
Resuming the Set Speed Pull RES toward you and release. Switching Cruise Control Off Note: You will erase the set speed if you switch the system off. Press and release OFF or switch the ignition off. Transit Custom (TTF) Vehicles Built From: 14-01-2013…
-
Page 113: Driving Aids
To turn it on, press the switch again. For item location: See At a Glance (page 10). Transit Custom (TTF) Vehicles Built From: 14-01-2013…
-
Page 114: Driver Alert
40 mph (65 km/h). required. The system automatically monitors your If the sensor becomes blocked the driving behaviour. system may not function. Transit Custom (TTF) Vehicles Built From: 14-01-2013…
-
Page 115: Using Driver Alert
See General Information (page 56). • stopping your vehicle and then opening and closing the driver’s door. The alertness level is shown by six steps as a coloured bar. Transit Custom (TTF) Vehicles Built From: 14-01-2013…
-
Page 116: Lane Keeping System
If your vehicle has a suspension kit not approved by us, the system may not function correctly. Note: Keep the windscreen free from obstructions such as bird droppings, insects and snow or ice. Transit Custom (TTF) Vehicles Built From: 14-01-2013…
-
Page 117: Eco Mode
A column of lane markings are displayed either side of the vehicle graphic. This system assists you in driving more efficiently by constantly monitoring characteristics of gear changing, anticipation of traffic conditions and speeds while driving. Transit Custom (TTF) Vehicles Built From: 14-01-2013…
-
Page 118: Type 2 And
See General Information (page 56). Type 1 Anticipation Efficient speed Anticipation Adjust your vehicle speed and the distance to other vehicles to avoid the need for heavy braking or acceleration to improve fuel economy. Transit Custom (TTF) Vehicles Built From: 14-01-2013…
-
Page 119: General Information
Make sure that the load is securely fastened. Check the security of the load before driving and at each fuel stop. LOAD RETAINING FIXTURES Note: The number of load retaining fixtures may vary depending on your vehicle model. Transit Custom (TTF) Vehicles Built From: 14-01-2013…
-
Page 120: Securing Cargo
Load Carrying Securing Cargo All Vehicles except Kombi Transit Custom (TTF) Vehicles Built From: 14-01-2013…
-
Page 121: Load Carrying
Load Carrying Kombi Vehicles Transit Custom (TTF) Vehicles Built From: 14-01-2013…
-
Page 122: Towing
Make sure that it is fully tightened. Failure to do so could result in Steep Gradients the towing hook becoming loose. WARNING The anti-lock braking system does not control the overrun brake on the trailer. Transit Custom (TTF) Vehicles Built From: 14-01-2013…
-
Page 123: Towing The Vehicle On Four Wheels
When towing your vehicle you must You must carry the towing hook in your select neutral. vehicle at all times. Drive off slowly and smoothly without jerking the vehicle that is being towed. Transit Custom (TTF) Vehicles Built From: 14-01-2013…
-
Page 124: Driving Hints
Technical Specifications (page 169). terrain. The engine will continue to operate with limited power for a short time. Gear Shifting Use the highest drivable gear appropriate for the road conditions. Transit Custom (TTF) Vehicles Built From: 14-01-2013…
-
Page 125: Cold Weather Precautions
6 mph (10 km/h). You Pedals that cannot move freely can must take extra care when driving through cause loss of vehicle control and flowing water. increase the risk of serious personal injury. Transit Custom (TTF) Vehicles Built From: 14-01-2013…
-
Page 126: Driving Hints
To install floor mats, position the floor mat so that the eyelet is over the retention post and press down to lock in. To remove the floor mat, reverse the installation procedure. Transit Custom (TTF) Vehicles Built From: 14-01-2013…
-
Page 127: Roadside Emergencies
In the event of a moderate to severe crash, your vehicle is equipped with a fuel pump shut-off feature that stops the flow of fuel to the engine. Not every impact will cause a shut-off. Transit Custom (TTF) Vehicles Built From: 14-01-2013…
-
Page 128: To Connect The Booster Cables
3. Run both vehicles for a minimum of Position the vehicles so that they do three minutes before disconnecting the not touch one another. cables. 2. Switch the ignition off and any electrical equipment. Transit Custom (TTF) Vehicles Built From: 14-01-2013…
-
Page 129: Roadside Emergencies
Roadside Emergencies WARNING Do not switch the headlamps on when disconnecting the cables. The peak voltage could blow the bulbs. Disconnect the cables in the reverse order. Transit Custom (TTF) Vehicles Built From: 14-01-2013…
-
Page 130: Fuses
This is located under the driver’s seat. Body Control Module Fuse Box For item location: See Under Bonnet Overview (page 140). Passenger Compartment Fuse Box This is located behind the removable trim panel. Transit Custom (TTF) Vehicles Built From: 14-01-2013…
-
Page 131: Fuse Specification Chart
Fuses FUSE SPECIFICATION CHART Engine Compartment Fuse Box Fuse Fuse rating Circuits protected Not used Not used Not used Not used Transit Custom (TTF) Vehicles Built From: 14-01-2013…
-
Page 132
Glow plugs 60 A Ignition relay three Not used Not used Anti-lock braking system, electronic stability program 25 A valves 7.5 A Diesel fuel pump Not used Not used Not used Not used Transit Custom (TTF) Vehicles Built From: 14-01-2013… -
Page 133
Relay Circuits switched Ignition 3 Starter Rear wiper Front wipers Not used Not used Not used Not used Not used Air conditioning clutch Vaporiser glow plug Fuel pump All-wheel drive pump Not used Transit Custom (TTF) Vehicles Built From: 14-01-2013… -
Page 134
Passenger’s Compartment Fuse Box Fuse Fuse rating Circuits protected 10 A Airbag module Anti-lock braking system 10 A Heated mirrors Not used 20 A Fuel fired heater Tachograph Not used 40 A 230V power outlet Transit Custom (TTF) Vehicles Built From: 14-01-2013… -
Page 135
Front and rear air condi- 7.5 A tioning control Headlamp levelling Not used Not used 20 A Heated seats Not used Rear view camera, lane 10 A keeping system, electric mirror Transit Custom (TTF) Vehicles Built From: 14-01-2013… -
Page 136
30 A Trailer B+ supply 60 A Power points Not used 30 A Power windows 20 A Cigar lighter 20 A Power point rear 20 A Power point front 60 A Ignition relay 1 Transit Custom (TTF) Vehicles Built From: 14-01-2013… -
Page 137
Fuel fired heater Power points Not used Ignition 2 Not used Ignition 1 Horn Not used Heater blower Rear heater blower Heated rear windows , heated mirrors Heated windscreen right-hand Heated windscreen left-hand Transit Custom (TTF) Vehicles Built From: 14-01-2013… -
Page 138
Passenger’s fuse box non start related feed 2 60 A Body control module fuse box 60 A Body control module fuse box 60 A Customer connection 1 (optional) 60 A Customer connection 2 60 A Customer connection 3 (optional) Transit Custom (TTF) Vehicles Built From: 14-01-2013… -
Page 139
Fuse rating Circuits protected 15 A Central locking 1 15 A Central locking 2 15 A Ignition switch supply Parking aid module Rain sensing module 15 A Washer pump supply 7.5 A Mirror supply Transit Custom (TTF) Vehicles Built From: 14-01-2013… -
Page 140: Changing A Fuse
Always replace a fuse with one that has the specified amperage rating. Using a fuse with a higher amperage rating can cause severe wire damage and could start a fire. Transit Custom (TTF) Vehicles Built From: 14-01-2013…
-
Page 141: Maintenance
Have your vehicle serviced regularly to help • Tyre pressures (when cold). See maintain its roadworthiness and resale Technical Specifications (page 162). value. There is a large network of Ford • Tyre condition. See Wheels and Tyres authorised repairers that are there to help (page 159).
-
Page 142: Under Bonnet Overview — 2.2L Duratorq-Tdci (114Kw/155Ps) — Puma/2.2L Duratorq-Tdci (74Kw/100Ps) — Puma/2.2L Duratorq-Tdci (92Kw/125Ps) — Puma
Lower the bonnet and allow it to drop from under its own weight for the last 8 — 11 inches (20 – 30 centimetres). UNDER BONNET OVERVIEW — 2.2L DURATORQ-TDCI (114KW/155PS) — PUMA/2.2L DURATORQ-TDCI (74KW/100PS) — PUMA/2.2L DURATORQ-TDCI (92KW/125PS) — PUMA Transit Custom (TTF) Vehicles Built From: 14-01-2013…
-
Page 143: (114Kw/155Ps) — Puma/2.2L
Note: Make sure that the oil level is between the minimum and the maximum Minimum marks. Maximum Note: Do not use oil additives or other engine treatments. Under certain conditions, they could damage the engine. Transit Custom (TTF) Vehicles Built From: 14-01-2013…
-
Page 144: Engine Coolant Check
Note: Make sure that the level is between the MIN and the MAX marks. Note: Coolant expands when it is hot. The level may therefore extend beyond the MAX mark. Transit Custom (TTF) Vehicles Built From: 14-01-2013…
-
Page 145: Brake And Clutch Fluid Check
Make sure that the level is between the MIN and the MAX marks. If the level is at the MIN mark, add fluid immediately. Adding Fluid Remove the filler cap. Transit Custom (TTF) Vehicles Built From: 14-01-2013…
-
Page 146: Changing The 12V Battery
Note: With the engine running, the water in fuel indicator lamp will go out after approximately two seconds. Note: Only add fuel that meets the Ford specification. See Fuel and Refuelling (page 94). Note: To carry out this procedure you will need to access the underside of your vehicle, e.g.
-
Page 147
5. Remove the battery clamp bolts. the tabs with your fingers. 6. Remove the battery clamp and cover. 4. Unhook the cover flap and tuck it under Remove the battery terminal cover. the seat valance. Transit Custom (TTF) Vehicles Built From: 14-01-2013… -
Page 148: Checking The Wiper Blades
Make sure the seat runner bolts are securely fastened before installing the covers. Press the locking button. Install in the reverse order. 2. Remove the wiper blade. 3. Install in the reverse order. Transit Custom (TTF) Vehicles Built From: 14-01-2013…
-
Page 149: Removing A Headlamp
Note: Make sure that the wiper blade locks into place. 3. Disengage the wiper blade from the wiper arm. REMOVING A HEADLAMP WARNING Switch the lamps and the ignition off. Failure to do so could result in serious personal injury. Transit Custom (TTF) Vehicles Built From: 14-01-2013…
-
Page 150: Changing A Bulb
Fit replacements in the reverse order unless otherwise stated. 4. Disconnect the electrical connector. Note: When fitting the headlamp, make sure that you reconnect the electrical connector correctly. Transit Custom (TTF) Vehicles Built From: 14-01-2013…
-
Page 151
3. Disconnect the electrical connector. 4. Release the clip and remove the bulb. Note: Do not touch the glass of the bulb. Headlamp Main Beam Remove the headlamp. See Removing a Headlamp (page 147). Transit Custom (TTF) Vehicles Built From: 14-01-2013… -
Page 152
5. Remove the bulb holder by pulling it straight out. Remove the bulb. 2. Remove the cover. 3. Disconnect the electrical connector. 4. Release the clip and remove the bulb. Note: Do not touch the glass of the bulb. Transit Custom (TTF) Vehicles Built From: 14-01-2013… -
Page 153: Rear Lamps
Fog lamp Remove the nut. 2. Remove the screws. 3. Remove the lamp and unclip the bulb holder. 4. Gently press the bulb into the bulb holder, turn it anticlockwise and remove it. Transit Custom (TTF) Vehicles Built From: 14-01-2013…
-
Page 154: Central High Mounted Brake Lamp
Carefully remove the lamp. 2. Using a screwdriver, gently prise the 2. Remove the bulb. clips to release the lamp. Interior Lamp Entrance Lamps 3. Carefully remove the lamp. 4. Remove the bulb. Transit Custom (TTF) Vehicles Built From: 14-01-2013…
-
Page 155
Carefully remove the lamp. 2. Turn the bulb holder anticlockwise and remove it. 3. Remove the bulb. Sun Visor Mirror Lamp Carefully remove the lamp. 2. Turn the bulb holder anticlockwise and remove it. Transit Custom (TTF) Vehicles Built From: 14-01-2013… -
Page 156: Bulb Specification Chart
P21W Reversing lamp W16W Licence plate lamp Luggage compartment lamp Note: On some vehicles the lamps are LED (light emitting diode). These are not serviceable items, see an authorised dealer if they fail. Transit Custom (TTF) Vehicles Built From: 14-01-2013…
-
Page 157: Technical Specifications
ISO 4925 Class 6 Brake Fluid Your engine has been designed to be used with Castrol and Ford Engine Oil, which gives a fuel economy benefit while maintaining the durability of your engine. Adding oil: If you are unable to find an oil that meets the specification defined by WSS-M2C913-D, you must use SAE 5W-30 that meets the specification defined by ACEA A5/B5.
-
Page 158
Engine lubrication system — including the 1.4 (6.2) oil filter Engine lubrication system — excluding the 1.3 (6) oil filter Engine Oil Adding Capacities Capacity in Engine gallons (litres) 2.2L Duratorq-TDCi 0.3 (1.5) Transit Custom (TTF) Vehicles Built From: 14-01-2013… -
Page 159: Vehicle Care
Seat Belts Use a clean, lint free cloth or a damp WARNINGS chamois leather to clean the inside of the rear window. Do not use abrasives, or chemical solvents to clean them. Transit Custom (TTF) Vehicles Built From: 14-01-2013…
-
Page 160: Repairing Minor Paint Damage
Using other non-recommended cleaning Always read and follow the manufacturer’s products can result in severe and instructions before using the products. permanent cosmetic damage. Transit Custom (TTF) Vehicles Built From: 14-01-2013…
-
Page 161: Wheels And Tyres
The compressor is located in the passenger and 158°F (70°C). side door. The sealant is located in the right hand side stepwell. Using the Kit WARNINGS Compressed air can act as an explosive or propellant. Transit Custom (TTF) Vehicles Built From: 14-01-2013…
-
Page 162: Inflating The Tyre
Check the sidewall of the tyre prior to inflation. If there are any cracks, bumps or similar damage, do not attempt to inflate the tyre. Do not stand directly beside the tyre while the compressor is operating. Transit Custom (TTF) Vehicles Built From: 14-01-2013…
-
Page 163: Wheels And Tyres
E out of the kit. Immediately drive approximately six 4. Screw the hose C onto the sealant miles (10 kilometres) so that the bottle. sealant can seal the damaged area. Transit Custom (TTF) Vehicles Built From: 14-01-2013…
-
Page 164: Tyre Care
B. 6. If the tyre pressure is below 44 psi (3 bar), repeat steps 13 to 16 and steps 1 to 5 (Checking the Tyre Pressure). Transit Custom (TTF) Vehicles Built From: 14-01-2013…
-
Page 165: Using Winter Tyres
Do not exceed 50 km/h (30 mph). You can obtain a replacement locking wheel nut key and replacement locking wheel nuts from an authorised dealer using Do not use snow chains on snow-free the reference number certificate. roads. Transit Custom (TTF) Vehicles Built From: 14-01-2013…
-
Page 166: Vehicles With A Spare Wheel
Only fit snow chains to specified tyres. See Technical Specifications (page 169). The ground clearance of your vehicle may be reduced. Take care when parking next to a kerb. Note: Your vehicle may exhibit some unusual driving characteristics. Transit Custom (TTF) Vehicles Built From: 14-01-2013…
-
Page 167: Vehicle Jack
• Unfold the jack handle. Unscrew the retaining nut to release the spare wheel bracket. Transit Custom (TTF) Vehicles Built From: 14-01-2013…
-
Page 168: Front Jacking Points
Rear Jacking Points WARNING Use only the specified jacking points. If you use other positions, you may damage the body, steering, suspension, engine, braking system or the fuel lines. Transit Custom (TTF) Vehicles Built From: 14-01-2013…
-
Page 169: Removing A Road Wheel
Park your vehicle in such a position and carefully remove the wheel trim. that neither the traffic nor you are 2. Install the locking wheel nut key. hindered or endangered. 3. Slacken the wheel nuts. Transit Custom (TTF) Vehicles Built From: 14-01-2013…
-
Page 170: Installing A Road Wheel
WARNING Do not raise the spare wheel carrier without the wheel attached. Damage can occur to the winch mechanism if lowered without a wheel attached. Make sure that the spare wheel is secure. Transit Custom (TTF) Vehicles Built From: 14-01-2013…
-
Page 171: Technical Specifications
50.8 (3.5) 52.2 (3.6) 68.0 (4.7) 68.0 (4.7) 290S 235/50 R 18 45.0 (3.1) 45.0 (3.1) 49.3 (3.4) 49.3 (3.4) 290L 215/65 R 15 C 50.8 (3.5) 47.9 (3.3) 54.0 (3.7) 54.0 (3.7) Transit Custom (TTF) Vehicles Built From: 14-01-2013…
-
Page 172
330L SVO 215/65 R 16 C 56.6 (3.9) 58.0 (4) 68.0 (4.7) 68.0 (4.7) Snow Chain Wheel Standard Variant Tyre size Front Rear lbf/in² (bar) lbf/in² (bar) 185/75 R 16 C 66.7 (4.6) Transit Custom (TTF) Vehicles Built From: 14-01-2013… -
Page 173: Capacities And Specifications
Maximum front axle weight Maximum rear axle weight You can find your vehicle identification number and maximum weights on a plate, which is located at the bottom of the lock side of the passenger door aperture. Transit Custom (TTF) Vehicles Built From: 14-01-2013…
-
Page 174: Vehicle Identification Number
Dimension in inches (mm) Maximum length 195.8 (4972) Overall width including exterior mirrors 89.5 (2272) Overall height 77.9 — 93.9 (1979 — 2385) Wheelbase 115.5 (2933) Front track 68.7 (1745) Rear track 67.6 (1718) Transit Custom (TTF) Vehicles Built From: 14-01-2013…
-
Page 175: Capacities And Specifications
Dimension in inches (mm) Maximum length 210.2 (5339) Overall width including exterior mirrors 89.5 (2272) Overall height 77.9 — 93.9 (1979 — 2385) Wheelbase 129.9 (3300) Front track 68.7 (1745) Rear track 67.6 (1718) Transit Custom (TTF) Vehicles Built From: 14-01-2013…
-
Page 176
Centre of tow ball — side member 16.6 (421) Inner side of side member 33.2 (842) Centre of tow ball — centre 1.attachment point 18.7 (476) Centre of tow ball — centre 2.attachment point 21.7 (551) Transit Custom (TTF) Vehicles Built From: 14-01-2013… -
Page 177: Audio System
Do not clean in a circular motion. Do not expose discs to direct sunlight or heat sources for extended periods of time. Transit Custom (TTF) Vehicles Built From: 14-01-2013…
-
Page 178: Audio Unit — Vehicles With: Am/Fm/Cd
Make sure you are aware of all applicable local laws that may affect the use of electronic devices while driving. Transit Custom (TTF) Vehicles Built From: 14-01-2013…
-
Page 179
Cursor arrows: Press a button to scroll through on-screen choices. OK: Press the button to confirm on-screen selections. Seek up: Press the button to go to the next station up the radio frequency band or the next track on a CD. Transit Custom (TTF) Vehicles Built From: 14-01-2013… -
Page 180
OK. Press the MENU button. 2. Select RADIO mode and then SCAN. 3. Use the seek buttons to scan up or down the selected waveband. Transit Custom (TTF) Vehicles Built From: 14-01-2013… -
Page 181
The display will show the level selected. Traffic Information Control Many stations that broadcast on the FM waveband have a TP code to signify that they carry traffic program information. Transit Custom (TTF) Vehicles Built From: 14-01-2013… -
Page 182
3. Scroll to NEWS and turn on or off with country. At various times of the day this the OK button. 4. Press the MENU button to return. Transit Custom (TTF) Vehicles Built From: 14-01-2013… -
Page 183: Audio Unit — Vehicles With: Am/Fm/Cd/Digital Audio Broadcast (Dab) Radio/Sync
3. Scroll to RDS REGIONAL and turn on or off with the OK button. 4. Press the MENU button to return. Transit Custom (TTF) Vehicles Built From: 14-01-2013…
-
Page 184
Cursor arrows: Press a button to scroll through on-screen choices. OK: Press the button to confirm on-screen selections. Clock: Press the button to select clock setup. Transit Custom (TTF) Vehicles Built From: 14-01-2013… -
Page 185
3. Use the left and right arrow buttons to to the required waveband and press OK. make the necessary adjustment. The display indicates the level selected. 4. Press the OK button to confirm the new settings. Transit Custom (TTF) Vehicles Built From: 14-01-2013… -
Page 186
You can repeat this on each waveband and unit will remain on that station unless TA for each preset button. or TRAFFIC is turned off, then on again. Transit Custom (TTF) Vehicles Built From: 14-01-2013… -
Page 187
3. Use the left or right arrow button to the selected waveband for a genuine adjust the setting. alternative frequency. 4. Press the OK button to confirm your selection. Transit Custom (TTF) Vehicles Built From: 14-01-2013… -
Page 188: Audio Unit — Vehicles With: Digital Audio Broadcast (Dab) Radio/Navigation System/Sync
Make sure you are aware of all applicable local laws that may affect the use of electronic devices while driving. Transit Custom (TTF) Vehicles Built From: 14-01-2013…
-
Page 189
Numeric keypad Press the button to recall a previously stored station. To store a favourite station press and hold until the sound returns. Cursor arrows: Press a button to scroll through on-screen choices. OK: Press the button to confirm on-screen selections. Transit Custom (TTF) Vehicles Built From: 14-01-2013… -
Page 190
(for example bass, middle and new settings. treble). Press the sound button. Waveband Button 2. Use the up and down arrow buttons to Press the RADIO button to select from the select the required setting. wavebands available. Transit Custom (TTF) Vehicles Built From: 14-01-2013… -
Page 191
Select a waveband. TA or TRAFFIC button. A TA display will appear to show the feature is switched on. 2. Tune to the station required. Transit Custom (TTF) Vehicles Built From: 14-01-2013… -
Page 192
5. Press the OK button to confirm your Note: If you press TA or TRAFFIC at any selection. other time it will switch all announcements 6. Press the MENU button to return. off. Transit Custom (TTF) Vehicles Built From: 14-01-2013… -
Page 193
It will restore radio reception when it finds one or if one is not found, the unit will return to the original stored frequency. Transit Custom (TTF) Vehicles Built From: 14-01-2013… -
Page 194: Audio Unit — Vehicles With: Digital Audio Broadcast (Dab) Radio
Make sure you are aware of all applicable local laws that may affect the use of electronic devices while driving. Transit Custom (TTF) Vehicles Built From: 14-01-2013…
-
Page 195
Scroll to the required waveband and press 2. Use the up and down arrow buttons to select the required level. 3. Press the OK button to confirm the new settings. Transit Custom (TTF) Vehicles Built From: 14-01-2013… -
Page 196
The display will show the area. level selected. Traffic Information Control Many stations that broadcast on the FM waveband have a TP code to signify that they carry traffic program information. Transit Custom (TTF) Vehicles Built From: 14-01-2013… -
Page 197
Under certain conditions, however, networks are carrying the same alternative frequencies tuning may programming, but can cause random temporarily disrupt normal reception. alternative frequency switches if they are not. Press the MENU button. Transit Custom (TTF) Vehicles Built From: 14-01-2013… -
Page 198: Digital Audio
4. Press OK to confirm your selection. the available wavebands. Scan Tuning 3. Select DAB1 or DAB2. This feature allows you to listen to the first few seconds of each station while searching through a waveband. Transit Custom (TTF) Vehicles Built From: 14-01-2013…
-
Page 199: Auxiliary Input Socket
FM station, the audio will player to be safely stored while your mute when attempting to switch. vehicle is moving. Note: When linked to a corresponding FM station, an FM symbol displays below the station name. Transit Custom (TTF) Vehicles Built From: 14-01-2013…
-
Page 200: Audio Troubleshooting
CD DRIVE MALFUNCTION General error message for CD fault conditions such as possible mechanism fault. CD DRIVE HIGH TEMP Ambient temperature too hot – unit will not work until it has cooled down. Transit Custom (TTF) Vehicles Built From: 14-01-2013…
-
Page 201: Navigation
Safety Information If detailed viewing of route instructions is necessary, pull off the road when it is safe to do so and park your vehicle. Transit Custom (TTF) Vehicles Built From: 14-01-2013…
-
Page 202: Route Options Menu
Select settings for the system to take into updated to take into account real time account when planning your route. Press traffic incidents or congestion. MENU and select the navigation option. Transit Custom (TTF) Vehicles Built From: 14-01-2013…
-
Page 203
Store position Store and name your current position. Route options Store and name your current position. Special functions Select GPS and system information or a demonstration of the system functionality. Transit Custom (TTF) Vehicles Built From: 14-01-2013… -
Page 204
You need to specify the Select the auto option to turn on junction make and model of your vehicle to zoom. determine if there is an update available. Transit Custom (TTF) Vehicles Built From: 14-01-2013… -
Page 205: Type Approvals
SD Logo is a trademark. The navigation software is based in part on the work of the FreeType team © 2006 The navigation software is based in part on the work of the independent JPEG Group. Transit Custom (TTF) Vehicles Built From: 14-01-2013…
-
Page 206: Sync
For more information visit the • access phonebook contacts and music regional Ford website. using voice commands • stream music from your connected mobile phone • select pre-defined text messages Transit Custom (TTF) Vehicles Built From: 14-01-2013…
-
Page 207: Using Voice Recognition
If you connect a spoken commands. media player, the system creates and Transit Custom (TTF) Vehicles Built From: 14-01-2013…
-
Page 208: Initiating A Voice Session
When You Say The System Provides less audible interaction and more «Interaction Mode Advanced» tone prompts. Provides more detailed interaction and «Interaction Mode Standard» guidance. The system defaults to the standard interaction mode. Transit Custom (TTF) Vehicles Built From: 14-01-2013…
-
Page 209
«Phone Candidate Lists On» phone suggestions. 2. Select SYNC-Settings. Changing the Voice Settings 3. Select Voice Settings. You can change the voice settings using the information and entertainment display. Press the MENU button. Transit Custom (TTF) Vehicles Built From: 14-01-2013… -
Page 210: Using Sync With Your Phone
The display indicates when the 2. Press the PHONE button. When the pairing is successful. audio display indicates that no phones are paired, select the option to add. Transit Custom (TTF) Vehicles Built From: 14-01-2013…
-
Page 211: Mobile Phone Voice Commands
Phonebook Commands When you ask the system to access a phonebook name, number, etc., the requested information appears in the audio display. Press the voice button and say «call» to call the contact. Transit Custom (TTF) Vehicles Built From: 14-01-2013…
-
Page 212
«(Phone) settings (set) ringer 3» «(Phone) settings (set) ringer off» «Phone name» «Text message inbox» Words in parenthesis are optional and do not have to be spoken for the system to understand the command. Transit Custom (TTF) Vehicles Built From: 14-01-2013… -
Page 213: Making A Call
1. Select the option for more. 2. Access the desired contact through the system or use voice commands to place the second call. Once actively in the second call, select the option for more. Transit Custom (TTF) Vehicles Built From: 14-01-2013…
-
Page 214
2. Scroll through your phonebook contacts. 3. Press the OK button again when the desired selection appears in the audio display. 4. Press the OK button or dial button to call the selection. Transit Custom (TTF) Vehicles Built From: 14-01-2013… -
Page 215: Text Messaging
Note: Only one recipient is allowed per text message. When a new message arrives, an audible tone sounds and the audio display indicates you have a new message. Transit Custom (TTF) Vehicles Built From: 14-01-2013…
-
Page 216
Press the PHONE button. 2. Scroll until the phone settings option appears, then press the OK button. 3. Scroll to select from the following options: Transit Custom (TTF) Vehicles Built From: 14-01-2013… -
Page 217
Downloading times are mobile phone dependent and quantity dependent. When automatic download is switched on, any changes, additions or deletions saved in the system since your last download are deleted. Transit Custom (TTF) Vehicles Built From: 14-01-2013… -
Page 218
Master Set a previously paired mobile phone as your primary mobile phone. Select the master option to confirm the primary mobile phone. Transit Custom (TTF) Vehicles Built From: 14-01-2013… -
Page 219
Select this option and confirm when Master reset? appears in the audio display. The display indicates when complete and the system takes you back to the SYNC- Settings menu. Transit Custom (TTF) Vehicles Built From: 14-01-2013… -
Page 220: Sync Applications And Services
If you do not hear emergency phone must have Bluetooth and be assistance within five seconds of the crash, compatible with the system. the system or mobile phone may be damaged or non-functional. Transit Custom (TTF) Vehicles Built From: 14-01-2013…
-
Page 221
Visit the regional Ford option and press OK. website for details. 3. Select the option you require and press Display Options If you turn this feature on, a confirmation message will be shown in the display. Transit Custom (TTF) Vehicles Built From: 14-01-2013… -
Page 222: In The Event Of A Crash
The language the system uses to call cannot be placed. Visit the regional interact with the occupants of your Ford website for details. vehicle may differ from the language used to deliver information to the emergency operator. Transit Custom (TTF) Vehicles Built From: 14-01-2013…
-
Page 223: Using Sync With Your Media Player
The system reads the metadata Connecting Your Media Player to tags (if populated) of the track being the USB Port played. Note: If your media player has a power switch, make sure that the device is turned Transit Custom (TTF) Vehicles Built From: 14-01-2013…
-
Page 224: Media Voice Commands
<name> is a dynamic listing, meaning that it could be the name of any desired group, artist, song, etc. Voice commands which are not available until indexing is complete. Voice commands which are only available in folder mode. Transit Custom (TTF) Vehicles Built From: 14-01-2013…
-
Page 225: Media Menu Features
The media menu allows you to select how 2. Scroll to cycle through: to play your music (by artist, genre, shuffle, repeat, etc.) and to find similar music or reset the index of your USB devices. Transit Custom (TTF) Vehicles Built From: 14-01-2013…
-
Page 226: Accessing Your Usb Song Library
Press OK to select. The first track title appears in the display. Playlists Access your playlists (from formats such as . ASX, .M3U, . WPL or . MTP). 1. Press OK to select. Transit Custom (TTF) Vehicles Built From: 14-01-2013…
-
Page 227: Sync Troubleshooting
You can access these menus using the should questions arise, please refer to the audio display. See Using SYNC With tables below. Your Phone (page 208). To check your mobile phone’s compatibility, visit the regional Ford website. Transit Custom (TTF) Vehicles Built From: 14-01-2013…
-
Page 228
SYNC. deleting SYNC from your device, then trying again. Always check the security and auto accept prompt settings relative to the SYNC Bluetooth connection on your mobile phone. Update your mobile phone’s firmware. Transit Custom (TTF) Vehicles Built From: 14-01-2013… -
Page 229
Make sure you are using the manufacturer’s device. cable. Make sure the USB cable is correctly inserted into the device and your vehicle’s USB port. Transit Custom (TTF) Vehicles Built From: 14-01-2013… -
Page 230
USB and through Bluetooth Audio, select SYNC. Bluetooth Audio To listen to the iPhone or iPod Touch at the same through USB, select Dock Connector. time, I some- times do not hear any sound. Transit Custom (TTF) Vehicles Built From: 14-01-2013… -
Page 231
ICE as the system does not recognise contacts may be saved them. in capital letters. If the contacts are saved in capital letters, you have to spell them. JAKE requires you to say «Call J-A-K-E». Transit Custom (TTF) Vehicles Built From: 14-01-2013… -
Page 232
SYNC uses text-to- SYNC uses a synthetically-generated voice are electronic- speech voice prompt rather than pre-recorded human voice. ally generated technology. and the pronun- ciation of some words may not be accurate for my language. Transit Custom (TTF) Vehicles Built From: 14-01-2013… -
Page 233
(for (phone, USB, example, “call John Smith”) or selecting a Bluetooth track, artist, album, genre or playlist directly audio, voice from your media player (for example, play control and artist Madonna). voice prompts). Transit Custom (TTF) Vehicles Built From: 14-01-2013… -
Page 234: Appendices
There are no special provisions or conditions for installations or use. Transit Custom (TTF) Vehicles Built From: 14-01-2013…
-
Page 235: End User Licence Agreement
Microsoft Corporation generated inside your vehicle cabin by the («MS») . Those installed software transmitter installed do not exceed products of MS origin, as well as applicable human exposure requirements. associated media, printed materials, Transit Custom (TTF) Vehicles Built From: 14-01-2013…
-
Page 236
The MS SOFTWARE, FORD and only to the extent that such activity SOFTWARE and THIRD PARTY is expressly permitted by applicable SOFTWARE hereinafter collectively law notwithstanding this limitation. and individually will be referred to as «SOFTWARE». Transit Custom (TTF) Vehicles Built From: 14-01-2013… -
Page 237
WMDRM technology included in your DEVICE to protect their intellectual property, included copyrighted content. Portions of the SOFTWARE on your DEVICE use WMDRM software to access WMDRM-protected content. If the WMDRM software fails to protect the Transit Custom (TTF) Vehicles Built From: 14-01-2013… -
Page 238
Component(s) shall be the licensor of the ROM disk(s) or via web download or other Supplemental Component(s). means, and is labelled «For Upgrade Purposes Only» or «For Recovery Purposes Only» you may install one (1) copy of such Transit Custom (TTF) Vehicles Built From: 14-01-2013… -
Page 239
AMOUNT IN EXCESS OF U.S. TWO subject to U.S. and European Union export HUNDRED FIFTY DOLLARS (U.S. jurisdiction. You agree to comply with all $250.00). applicable international and national laws that apply to the SOFTWARE, including Transit Custom (TTF) Vehicles Built From: 14-01-2013… -
Page 240
Keep the volume at a level where you can still hear outside traffic and emergency signals while driving. Driving while unable to hear these sounds could cause an accident. Transit Custom (TTF) Vehicles Built From: 14-01-2013… -
Page 241
(b) use your own personal judgment while directions. driving. If you feel that a route suggested by the TeleNav Software instructs you to perform an unsafe or illegal manoeuver, Transit Custom (TTF) Vehicles Built From: 14-01-2013… -
Page 242
TeleNav Software licence), without the right to sublicence, to use the TeleNav Software (in object code form only) in order to access and use the TeleNav Software. This licence shall terminate upon Transit Custom (TTF) Vehicles Built From: 14-01-2013… -
Page 243
Agreement or the TeleNav Software shall be settled by independent arbitration involving a neutral arbitrator and administered by the American Arbitration Association in the County of Santa Clara, California. The arbitrator shall apply the Transit Custom (TTF) Vehicles Built From: 14-01-2013… -
Page 244
Agreement. shall a waiver of any breach or default of this Agreement constitute a waiver of any subsequent breach or default or a waiver of the provision itself. Transit Custom (TTF) Vehicles Built From: 14-01-2013… -
Page 245
Data. If you wish to reject the terms of this agreement, and have not Transit Custom (TTF) Vehicles Built From: 14-01-2013… -
Page 246
CAUSE OF THE CLAIM, DEMAND OR ACTION ALLEGING ANY LOSS, INJURY OR DAMAGES, DIRECT OR INDIRECT, WHICH MAY RESULT FROM THE USE OR POSSESSION OF THIS DATA; OR FOR ANY LOSS OF PROFIT, REVENUE, CONTRACTS Transit Custom (TTF) Vehicles Built From: 14-01-2013… -
Page 247
NAVTEQ and supersedes in their entirety any and all written or oral agreements previously CONTRACTOR existing between us with respect to such (MANUFACTURER/SUPPLIER) subject matter. ADDRESS: 425 West Randolph Street, Chicago, IL 60606. Transit Custom (TTF) Vehicles Built From: 14-01-2013… -
Page 248
Gracenote Servers. Gracenote, Emeryville, California 94608 respectively, reserve all rights in Gracenote («Gracenote»). Data, the Gracenote Software, and the Gracenote Servers and Gracenote Content, including all ownership rights. Under no circumstances will either Gracenote Transit Custom (TTF) Vehicles Built From: 14-01-2013… -
Page 249
OBLIGATED TO PROVIDE YOU WITH ANY ENHANCED OR ADDITIONAL DATA TYPES THAT GRACENOTE MAY CHOOSE TO PROVIDE IN THE FUTURE AND IS FREE TO DISCONTINUE ITS ONLINE SERVICES AT ANY TIME. GRACENOTE DISCLAIM ALL Transit Custom (TTF) Vehicles Built From: 14-01-2013… -
Page 250
The term «IC» before the radio certification number only signifies that Industry Canada technical specifications were met. The antenna used for this transmitter must not be co-located or operating in conjunction with any other antenna or transmitter. Transit Custom (TTF) Vehicles Built From: 14-01-2013… -
Page 251
News Broadcasts……….191 Headlamps On…………55 Regional Mode…………191 Parking Brake On……….55 Sound Button…………188 Audio Control………..34 Station Preset Buttons……..189 Type 1…………….34 Station Tuning Control……..189 Type 2……………35 Traffic Information Control……189 Audio System……….175 Waveband Button……….188 General Information………..175 Audio Troubleshooting…….198 Transit Custom (TTF) Vehicles Built From: 14-01-2013… -
Page 252
Car Wash Cleaning the Interior……..157 See: Cleaning the Exterior……..157 Instrument Cluster Screens, LCD Screens Catalytic Converter……..96 and Radio Screens……..158 Driving with a Catalytic Converter….96 Rear Windows…………158 Seat Belts……………157 Climate Control……….69 Principle of Operation……..69 Transit Custom (TTF) Vehicles Built From: 14-01-2013… -
Page 253
Resetting Eco Mode……….116 See: Front Fog Lamps……..44 Fog Lamps — Rear Type 1…………….116 Type 2 and 3…………116 See: Rear Fog Lamps……….45 Front Fog Lamps……….44 Front Seats…………75 Underseat Storage Compartment….75 Fuel and Refuelling……..94 Technical Specifications……..99 Transit Custom (TTF) Vehicles Built From: 14-01-2013… -
Page 254
Attaching a Child Seat with Top Headlamp Levelling……..45 Tethers…………..18 Head Restraints……….74 Booster Seats…………16 Adjusting the Head Restraint……75 Child Seats for Different Mass Groups..15 Removing the Head Restraint……75 ISOFIX Anchor Points………..17 Heated Seats………..82 Instrument Cluster……….51 Instrument Lighting Dimmer…..42 ………………42 Transit Custom (TTF) Vehicles Built From: 14-01-2013… -
Page 255
Moving the Seat Backward and Forward……………76 Recline Adjustment……….77 Seat Cushion Adjustment………76 Manual Transmission………100 Selecting Reverse Gear……..100 Message Centre See: Information Displays………56 Mirrors See: Heated Windows and Mirrors….72 See: Windows and Mirrors……..48 Mobile Communications Equipment..8 Transit Custom (TTF) Vehicles Built From: 14-01-2013… -
Page 256
Switching Chimes Off………63 Control………….28 Power Door Locks Roadside Emergencies…….125 See: Locking and Unlocking……29 Roof Racks and Load Carriers….117 Power Seats…………77 Running-In…………122 Power Lumbar…………79 Brakes and Clutch……….122 Power Steering Fluid Check……143 Engine…………..122 Adding Fluid…………143 Tyres……………..122 Transit Custom (TTF) Vehicles Built From: 14-01-2013… -
Page 257: Sync Troubleshooting
Tyre Inflation When Punctured Steering Wheel……….34 See: Temporary Mobility Kit……159 Storage Compartments……86 Tyre Repair Kit Sun Shades…………50 See: Temporary Mobility Kit……159 Tyres Rear Side Windows……….50 Supplementary Restraints System..25 See: Wheels and Tyres……..159 Principle of Operation………25 Transit Custom (TTF) Vehicles Built From: 14-01-2013…
-
Page 258: Using Sync With Your Phone
Start-Stop Indicator……….55 Helpful Hints…………205 Water In Fuel Indicator……..55 Warning Triangle………..125 Initiating a Voice Session…….206 Washer Fluid Check……..143 System Interaction and Feedback…..206 Using Winter Tyres……..163 Washers See: Wipers and Washers……..37 Washing See: Cleaning the Exterior……..157 Transit Custom (TTF) Vehicles Built From: 14-01-2013…
-
Page 259
See: Changing a Road Wheel……163 Wheels and Tyres………159 General Information……….159 Technical Specifications……..169 Windows and Mirrors……..48 Windscreen Washers……..38 Windscreen Wipers……..37 Intermittent Wipe……….37 Speed dependent wipers (if equipped)…………37 Winter Tyres See: Using Winter Tyres……..163 Wipers and Washers……..37 Transit Custom (TTF) Vehicles Built From: 14-01-2013… -
Page 260
Transit Custom (TTF) Vehicles Built From: 14-01-2013… -
Page 262
CG3577en…
Используемые в ролике про установку фаркопа мануалы по Форд Транзит:
Мануал Форд Транзит Кастом (Ford Transit Custom)
Монтаж оборудования на Форд Транзит 2014+
Мануал Форд Транзит на русском (короткая версия)
Мануал Форд Транзит на русском (полная версия)
Найти их и скачать абсолютно бесплатно можно на моей страничке: onehat.ru/posts/10-pro-fa…instrukcii-i-manualy.html
Надеюсь эта информация будет вам полезна!
Цена вопроса: 0 ₽
Пробег: 3 773 км
![]()
FORD TRANSIT CUSTOM
Руководство пользователя

Информация, содержащаяся в этой публикации, являлась верной на момент сдачи в печать. В интересах непрерывного развития компания оставляет за собой право в любой момент вносить изменения в технические характеристики, конструкцию или комплектацию своей продукции без предварительного уведомления и без каких-либо обязательств. Ни одна из частей данной публикациинеможетбытьвоспроизведена,переданаилисохраненавинформационно-поисковых системах, а также переведена на тот или иной язык в любой форме и любыми средствами без письменного согласия компании. Ошибки и пропуски информации исключены.
© Ford Motor Company 2012
Все права защищены.
Номер по каталогу: CG3577ru 09/2012 20120918194420

Содержание
|
Введение |
|
|
О данном руководстве………………………….. |
7 |
|
Словарь символов………………………………….. |
7 |
|
Рекомендация о замене деталей………. |
9 |
|
Особые примечания…………………………….. |
10 |
|
Оборудование мобильной связи……… |
10 |
|
Быстрый обзор |
|
|
Быстрый обзор………………………………………… |
11 |
|
Безопасность детей |
|
|
Установка детского сиденья……………… |
16 |
|
Установка детского сиденья……………… |
19 |
|
Замки с функцией блокировки от |
|
|
отпирания детьми…………………………….. |
22 |
|
Ремни безопасности |
|
|
Пристегивание ремней |
|
|
безопасности……………………………………… |
23 |
|
Регулировкавысотыкрепленияремня |
|
|
безопасности…………………………………….. |
24 |
|
Система напоминания о |
|
|
непристегнутом ремне |
|
|
безопасности…………………………………….. |
24 |
|
Дополнительная система |
|
|
пасивной безопасности |
|
|
Принципы работы………………………………… |
25 |
|
Подушка безопасности |
|
|
водителя……………………………………………… |
25 |
|
Подушка безопасности |
|
|
пассажира…………………………………………… |
26 |
|
Боковые подушки безопасности……… |
27 |
|
Боковыезанавесысистемынадувных |
|
|
подушек безопасности…………………… |
28 |
|
Ключи и пульты дистанци- |
|
|
онного управления |
|
|
Общая информация о |
|
|
радиочастотах…………………………………… |
29 |
|
Дистанционное управление……………… |
29 |
|
Замена утерянного ключа или пульта |
|
|
дистанционного управления………… |
29 |
|
Замки |
|
|
Блокировка и разблокировка |
|
|
замков………………………………………………….. |
30 |
|
Задняя поднимающаяся дверь с |
|
|
ручным управлением……………………….. |
33 |
|
Безопасность |
|
|
Пассивная противоугонная |
|
|
система………………………………………………… |
35 |
|
Противоугонная сигнализация……….. |
35 |
|
Рулевое колесо |
|
|
Регулировка положения рулевого |
|
|
колеса…………………………………………………… |
37 |
|
Управление аудиосистемой………………. |
37 |
|
Голосовое управление……………………….. |
38 |
|
Управление скоростью………………………. |
38 |
|
Органы управления |
|
|
информационным дисплеем………… |
39 |
|
Стеклоочистителиистекло- |
|
|
омыватели |
|
|
Очистители ветрового стекла…………. |
40 |
|
Автоматические |
|
|
стеклоочистители……………………………. |
40 |
|
Омыватели ветрового стекла…………… |
42 |
|
Очиститель и омыватели заднего |
|
|
стекла…………………………………………………… |
42 |
|
Осветительное |
|
|
оборудование |
|
|
Общая информация…………………………… |
44 |
|
Органы управления осветительным |
|
|
оборудованием…………………………………. |
44 |
|
Автоматическое управление |
|
|
включением внешнего |
|
|
освещения………………………………………….. |
45 |
|
Регулятор яркости подсветки панели |
|
|
приборов…………………………………………….. |
46 |
|
Задержка выключения фар……………… |
46 |
1

Содержание
|
Световое оборудование дневного |
|
|
времени……………………………………………….. |
47 |
|
Передние противотуманные |
|
|
фары…………………………………………………….. |
47 |
|
Задние противотуманные |
|
|
фонари………………………………………………… |
47 |
|
Коррекция наклона световых пучков |
|
|
фар………………………………………………………. |
48 |
|
Виражные фары…………………………………… |
49 |
|
Указатели поворота……………………………. |
50 |
|
Плафоны освещения ниши для |
|
|
ног…………………………………………………………. |
50 |
|
Плафоны внутреннего |
|
|
освещения…………………………………………. |
50 |
|
Окна и зеркала |
|
|
Электрические |
|
|
стеклоподъемники…………………………… |
52 |
|
Наружные зеркала заднего вида……. |
53 |
|
Внутреннее зеркало заднего |
|
|
вида………………………………………………………. |
54 |
|
Солнцезащитные шторки…………………. |
55 |
|
Щиток приборов |
|
|
Указатели……………………………………………….. |
56 |
|
Сигнализаторы и индикаторы………….. |
57 |
|
Звуковые предупреждения и |
|
|
индикаторы…………………………………………. |
61 |
|
Информационные |
|
|
дисплеи |
|
|
Общая информация…………………………… |
62 |
|
Часы…………………………………………………………. |
64 |
|
Маршрутный компьютер……………………. |
65 |
|
Персональные настройки………………….. |
65 |
|
Информационные сообщения………… |
65 |
|
Органы управления |
|
|
микроклиматом |
|
|
Принципы работы…………………………………. |
72 |
|
Вентиляционные дефлекторы…………. |
72 |
|
Ручной режим управления |
|
|
микроклиматом…………………………………. |
73 |
|
Советы по контролю внутреннего |
|
|
климата………………………………………………… |
75 |
|
Окна и зеркала с обогревом……………… |
76 |
|
Сиденья |
|
|
Сидение в правильном |
|
|
положении………………………………………….. |
78 |
|
Подголовники……………………………………….. |
78 |
|
Передние сиденья……………………………….. |
79 |
|
Сиденья с ручной регулировкой……… |
79 |
|
Сиденья с электрической |
|
|
регулировкой……………………………………… |
81 |
|
Задние сиденья……………………………………. |
82 |
|
Сиденья с обогревом………………………….. |
86 |
|
Дополнительные электри- |
|
|
ческие розетки |
|
|
Дополнительные электрические |
|
|
розетки………………………………………………… |
88 |
|
Прикуриватель……………………………………… |
90 |
|
Отделения для хранения |
|
|
предметов |
|
|
Подставки для стаканов…………………….. |
91 |
|
Верхняя консоль……………………………………. |
91 |
|
Пепельница…………………………………………….. |
91 |
|
Откидные столики в спинках |
|
|
сидений………………………………………………… |
91 |
|
Держатель для бутылок……………………. |
92 |
|
Подстаканник………………………………………… |
92 |
|
Запуск и остановка |
|
|
двигателя |
|
|
Общая информация…………………………… |
93 |
|
Выключатель зажигания…………………… |
93 |
|
Блокировка рулевого колеса……………. |
94 |
|
Пуск дизельного двигателя……………… |
94 |
|
Фильтр твердых частиц…………………….. |
94 |
|
Выключение двигателя……………………… |
96 |
2

Содержание
Нагреватель блока цилиндров………..96 Камера заднего вида…………………………..117
|
Уникальныехарактеристики |
Управление скоростью |
|||
|
модификаций |
Принципы работы………………………………. |
120 |
||
|
автомобилей |
98 |
Использование системы |
120 |
|
|
Пуск-остановка…………………………………….. |
круиз-контроля……………………………….. |
|||
|
Топливо и заправка |
Системы помощи |
|||
|
Меры предосторожности………………… |
100 |
водителю |
||
|
Качество топлива………………………………… |
101 |
Ограничитель скорости……………………. |
122 |
|
|
Полная выработка топлива……………… |
101 |
Предупреждение водителя……………… |
123 |
|
|
Каталитический нейтрализатор……. |
103 |
Система удержания полосы |
126 |
|
|
Заправка топливом |
103 |
движения…………………………………………… |
||
|
Экономичный режим ЕСО |
128 |
|||
|
Расход топлива |
105 |
|||
|
Технические характеристики…………… |
107 |
Перевозка груза |
||
|
Коробка передач |
Общая информация…………………………. |
130 |
||
|
Механическая коробка передач |
108 |
Люки доступа к заднему грузовому |
||
|
отсеку |
130 |
|||
|
Система помощи при трогании на |
||||
|
Верхние багажники крыши и |
||||
|
подъеме |
108 |
|||
|
кронштейны для различных |
130 |
|||
|
Тормоза |
грузов…………………………………………………. |
|||
|
Приспособления для фиксации |
||||
|
Общая информация………………………….. |
110 |
груза…………………………………………………….. |
131 |
|
|
Советы по управлению автомобилем |
Буксировка |
|||
|
с антиблокировочной системой |
110 |
|||
|
тормозов…………………………………………….. |
Буксировка прицепа |
134 |
||
|
Стояночный тормоз |
111 |
|||
|
Система стабилизации прицепа |
134 |
|||
|
Контроль тягового усилия |
Точки крепления буксировочного |
135 |
||
|
оборудования…………………………………… |
||||
|
Принципы работы………………………………… |
112 |
Буксировка автомобиля с опорой на |
||
|
Использование контроля тягового |
112 |
четыре колеса………………………………….. |
136 |
|
|
усилия………………………………………………….. |
Советы по вождению |
|||
|
Система динамической |
||||
|
Обкатка………………………………………………….. |
137 |
|||
|
стабилизации |
113 |
Ухудшенные характеристики |
137 |
|
|
Принципы работы………………………………… |
двигателя…………………………………………… |
|||
|
Системы помощи при |
Меры предосторожности при |
|||
|
движении в холодную погоду……… |
138 |
|||
|
парковке |
Преодоление водной преграды…….. |
138 |
||
|
Принципы работы………………………………… |
114 |
Напольные коврики……………………………. |
138 |
|
|
Система помощи при парковке……….. |
114 |
3

Содержание
|
Аварийные принад- |
|
|
лежности |
|
|
Аварийная световая |
|
|
сигнализация…………………………………… |
140 |
|
Аптечка………………………………………………….. |
140 |
|
Знак аварийной остановки……………… |
140 |
|
Запуск автомобиля от внешнего |
|
|
источника электропитания………….. |
140 |
|
Плавкие предохранители |
|
|
Расположение блоков плавких |
|
|
предохранителей……………………………. |
143 |
|
Таблица характеристик плавких |
|
|
предохранителей……………………………. |
144 |
|
Замена плавкого |
|
|
предохранителя………………………………. |
156 |
|
Обслуживание |
|
|
Общая информация………………………….. |
157 |
|
Открывание и закрывание |
|
|
капота…………………………………………………. |
158 |
|
Общий вид моторного отсека — 2.2L |
|
|
Duratorq-TDCi (114кВт/155л.с.) — |
|
|
Puma/2.2L Duratorq-TDCi |
|
|
(74кВт/100л.с.) — Puma/2.2L |
|
|
Duratorq-TDCi (92кВт/125л.с.) — |
|
|
Puma……………………………………………………. |
159 |
Щуп для проверки моторного масла
—2.2L Duratorq-TDCi (114кВт/155л.с.)
—Puma/2.2L Duratorq-TDCi
|
(74кВт/100л.с.) — Puma/2.2L |
|
|
Duratorq-TDCi (92кВт/125л.с.) — |
|
|
Puma…………………………………………………… |
160 |
|
Проверка моторного масла…………….. |
160 |
|
Проверка охлаждающей жидкости |
|
|
двигателя…………………………………………… |
161 |
|
Проверка уровня тормозной |
|
|
жидкости и рабочей жидкости |
|
|
гидропривода сцепления…………….. |
162 |
|
Проверка рабочей жидкости |
|
|
усилителя рулевого |
|
|
управления……………………………………….. |
163 |
|
Проверка омывающей жидкости…… |
163 |
|
Слив конденсата из топливного |
|
|
фильтра…………………………………………….. |
163 |
|
Замена аккумуляторной батареи 12 В |
|
|
………………………………………………………………. |
164 |
|
Проверка щеток |
|
|
стеклоочистителей………………………… |
165 |
|
Замена щеток |
|
|
стеклоочистителей………………………… |
166 |
|
Снятие фары………………………………………… |
167 |
|
Замена ламп………………………………………… |
168 |
|
Таблица технических характеристик |
|
|
ламп…………………………………………………….. |
173 |
|
Технические характеристики…………… |
174 |
|
Уход за автомобилем |
|
|
Очистка автомобиля снаружи………… |
176 |
|
Очистка салона……………………………………. |
177 |
|
Устранение мелких повреждений |
|
|
лакокрасочного покрытия…………….. |
177 |
|
Очистка легкосплавных дисков…….. |
178 |
|
Колеса и шины |
|
|
Общая информация………………………….. |
179 |
|
Комплект для ремонта шин…………….. |
179 |
|
Обслуживание шин……………………………. |
183 |
|
Использование зимних шин……………. |
184 |
|
Использование цепей |
|
|
противоскольжения………………………. |
184 |
|
Замена колеса……………………………………… |
185 |
|
Технические характеристики………….. |
190 |
|
Заправочные объемы и |
|
|
технические характе- |
|
|
ристики |
|
|
Табличка с идентификационным |
|
|
номером автомобиля…………………….. |
193 |
|
Идентификационный номер |
|
|
автомобиля………………………………………. |
194 |
|
Технические характеристики………….. |
194 |
|
Аудиосистема |
|
|
Общая информация…………………………. |
198 |
|
Аудиоблок — В комплектацию |
|
|
автомобиля входит: AM/FM/CD…. |
200 |
4

Содержание
|
Аудиоблок — В комплектацию |
|
|
автомобиля входит: |
|
|
AM/FM/CD/Радиоприемник |
|
|
цифрового аудиовещания |
|
|
(DAB)/SYNC…………………………………….. |
206 |
|
Аудиоблок — В комплектацию |
|
|
автомобилявходит:Радиоприемник |
|
|
цифрового аудиовещания |
|
|
(DAB)/Навигационная |
|
|
система/SYNC…………………………………… |
213 |
|
Цифровое радиовещание……………….. |
221 |
|
Дополнительный разъем…………………. |
223 |
|
Устранение неполадок в работе |
|
|
аудиосистемы………………………………….. |
224 |
|
Навигационная система |
|
|
Навигационная система…………………… |
225 |
|
SYNC™ |
|
|
Общая информация………………………….. |
231 |
|
Использование функции |
|
|
распознавания речи……………………… |
233 |
|
Использование SYNC™ на вашем |
|
|
телефон……………………………………………. |
236 |
|
Приложения и службы SYNC™……… |
250 |
|
Использование SYNC™ на |
|
|
медиаплеере вашего |
|
|
автомобиля………………………………………. |
253 |
|
SYNC™, поиск и устранение |
|
|
неисправностей……………………………… |
259 |
|
Приложения |
|
|
Электромагнитная |
|
|
совместимость………………………………… |
268 |
|
Лицензионное соглашение с |
|
|
конечным пользователем…………… |
269 |
5

6

Введение
О ДАННОМ РУКОВОДСТВЕ
Благодарим вас за то, что вы остановили свой выбор на автомобиле Ford. Рекомендуем уделить время и лучше ознакомиться с возможностями вашего автомобиля с помощью данного руководства. Чем лучше вы знаете автомобиль, тем безопаснее и приятнее будет вождение.
ПРЕДУПРЕЖДЕНИЕ
Управляяавтомобилем,пользуясь его системами и органами управления,проявляйтевнимание
и осторожность.
Примечание: В руководстве описаны особенности и дополнительное оборудование всего модельного ряда автомобилей, часть из которого еще не установлено на все модели. В нем также могут упоминаться устройства, которые не установлены в вашем автомобиле.
Примечание: Некоторые иллюстрации изданногоруководствамогутотноситься к другим моделям, отличаясь от того, что установлено на вашем автомобиле.
Однако значимая информация, показаннаянаиллюстрациях, неизменно верна.
Примечание: Строго соблюдайте все действующие правила и законы при пользовании автомобилем.
Примечание: В случае продажи автомобиля данное руководство необходимопередатьновомувладельцу. Оно является неотъемлемой принадлежностью автомобиля.
В данном руководстве некоторые элементы конструкции могут иметь определение «левый» и «правый». Сторона определяется из положения сидя на сиденье «лицом вперед».
A С правой стороны
BС левой стороны
Защита окружающей среды
Вы должны участвовать в охране окружающей среды. Правильное использованиеавтомобиляиудаление отходов, чистящих и смазочных материалов — важные шаги на пути к этой цели.
СЛОВАРЬ СИМВОЛОВ
Ниже приведены несколько символов, которые вы можете увидеть на вашем автомобиле.
Предупреждение об опасности
См. руководство по эскплуатации
Антиблокировочная система тормозов
Не допускайте курения, искр и открытого пламени
Аккмулятор
7

Введение
Кислота для аккумуляторной батареи
Тормозная жидкость не на нефтяной основе
Система тормозов
Фильтр салона
Проверьтетопливнуюкрышку
Включение/выключение функцииблокировкидвериот открывания детьми
Нижний анкер детского сиденья
Анкер привязных ремней детского сиденья
Система круиз-контроля
Не открывайте в горячем состоянии
Воздушный фильтр двигателя
Охлаждающая жидкость двигателя
Температура охлаждающей жидкости двигателя
Моторное масло
Взрывоопасный газ
Предупреждение о работающем вентиляторе
Пристегните ремень безопасности
Передняя надувная подушка безопасности
Контрольная лампа передних противотуманных фар
Сброс топливного насоса
Плавкий предохранитель
Мигающее предупреждение об опасности
Обогревательзаднегостекла
Лобовое стекло с обогревом
Внутренняяручкаоткрывания багажного отделения
Домкрат
Управление освещением
Предупреждение о низком давлении воздуха в шинах
Поддерживайте правильный уровень жидкости
8
![]()
Введение
Предупредительная
сигнализация
датчики системы помощи при парковке
Стояночный тормоз
Рабочая жидкость гидроусилителя рулевого управления
Окна с электроприводом стекол (передние/задние)
Блокировка окон с электроприводом стекол
Скоро потребуется сервисное обслуживание двигателя
Боковые подушки безопасности
Система поддержания устойчивости
Стеклоомыватель и стеклоочиститель ветрового стекла
РЕКОМЕНДАЦИЯ О ЗАМЕНЕ ДЕТАЛЕЙ
Ваш автомобиль изготовлен в соответствии с самыми высокими стандартами с использованием деталей высокого качества. При прохождении планового технического обслуживания или ремонта мы рекомендуемтребоватьиспользование только оригинальных запасных частей
Ford и Motorcraft. Оригинальные запасные части Ford и Motorcraft легко распознать по изображению торговых марок Ford, FoMoCo или Motorcraft как на самих запасных частях, так и на их упаковке.
Плановое техническое обслуживание и ремонты механической части
Одним из самых оптимальных вариантов поддержания вашего автомобиля в исправном состоянии — техническое обслуживание в соответствии с нашими рекомендациями с использованием запасных частей, соответствующих техническим требованиям, указанным в руководстве по эксплуатации. Оригинальные запасные части Ford и Motorcraft соответствуют или превосходят эти технические требования.
9

Введение
Послеаварийные ремонты
Мы надеемся, вам удастся избежать аварий, однако они все же случаются. ОригинальныезапасныечастиFord для послеаварийных ремонтов соответствуют самым строгим требованиям по размерам, лакокрасочному покрытию, прочности, коррозионной стойкости и сопротивлению вдавливанию. При создании наших автомобилей мы закладываем такой уровень качества этих деталей, который обеспечивает предусмотренный уровень защиты автомобиля как единой системы. Оптимальный способ обеспечения такогоуровнязащиты—использование оригинальных запасных частей Ford для послеаварийных ремонтов.
Гарантия на запасные части
ГарантияFord распространяетсятолько на оригинальные запасные части Ford и Motorcraft. Гарантия Ford может не распространяться на повреждения вашего автомобиля вследствие неисправности неоригинальной запасной части. Дополнительная информация приведена в условиях гарантии Ford.
ОСОБЫЕ ПРИМЕЧАНИЯ
При переоборудовании или модификации вашего автомобиля, связанной с отступлениями от технических спецификаций производителя, см. Руководство по кузовным работам и установке оборудования (BEMM) на веб-сайте www.etis.ford.com/fordservice.
ОБОРУДОВАНИЕ МОБИЛЬНОЙ СВЯЗИ
Использование устройств мобильной связистановитсявсеболееважнымпри ведении бизнеса и личных дел. Однако при использовании такого оборудования не следует идти на компромисс в отношении обеспечения собственной безопасности или безопасности других. При правильном использованиимобильнаясвязьможет повысить личную безопасность и защиту, особенно в чрезвычайных ситуациях. Безопасность должна быть первостепенной при использовании оборудования мобильной связи, чтобы не свести к нулю данные выгоды. Оборудование мобильной связи включает в себя, помимо прочего, мобильные телефоны, пейджеры, портативные устройства для работы с электронной почтой, устройства для отправки текстовых сообщений и портативные приемопередающие радиоустановки.
ПРЕДУПРЕЖДЕНИЕ
Вождение с отвлеченным сознаниемможетповлечьпотерю контроля над автомобилем,
аварию и телесные повреждения. Мы настоятельнорекомендуемсоблюдать крайнюю осторожность при использовании любых устройств или функций, которые могут отвлечь ваше внимание от дороги. Ваша первоочередная ответственность — безопасная эксплуатация вашего автомобиля. Мы рекомендуем воздержатьсяотиспользованиялюбых портативных устройств во время вождения, а также рекомендуем соблюдать все применимое законодательство.
10
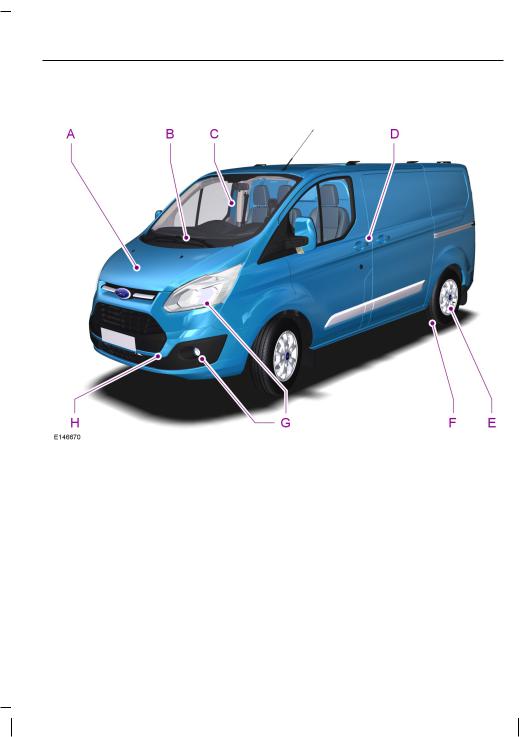
Быстрый обзор
Обзор передней наружной части автомобиля
AСм. Обслуживание (стр. 157).
B См. Замена щеток стеклоочистителей (стр. 166).
ССм. Системы помощи водителю (стр. 122).
D См. Блокировка и разблокировка замков (стр. 30).
EСм. Замена колеса (стр. 185).
F Давление в шинах. См. Технические характеристики (стр. 190).
GСм. Замена ламп (стр. 168).
HСм. Точки крепления буксировочного оборудования (стр. 135).
11

Быстрый обзор
Обзор салона автомобиля
AСм. Коробка передач (стр. 108).
B См. Блокировка и разблокировка замков (стр. 30).
ССм. Электрические стеклоподъемники (стр. 52).
DСм. Пристегивание ремней безопасности (стр. 23).
EСм. Подголовники (стр. 78).
FСм. Сиденья (стр. 78).
GСм. Стояночный тормоз (стр. 111).
12
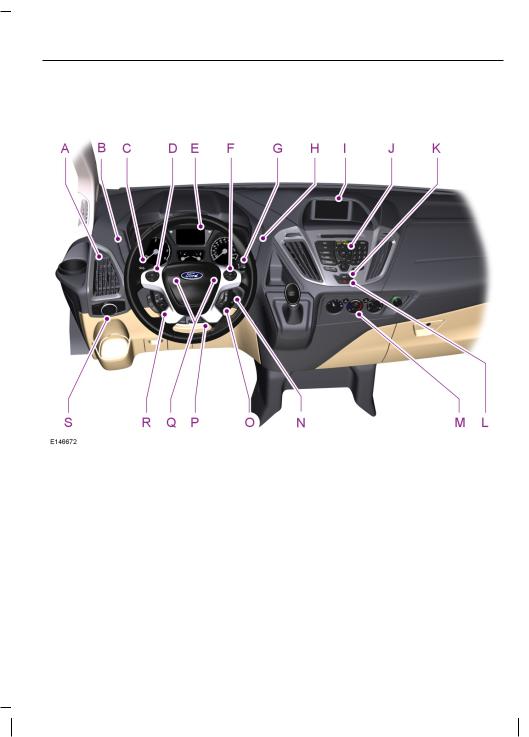
Быстрый обзор
Обзор панели приборов
Автомобиль с левосторонним управлением
13
 User Manual")
Быстрый обзор
Автомобиль с правосторонним управлением
AСопла системы вентиляции См. Вентиляционные дефлекторы (стр. 72).
BПереключатель системы помощи при парковке. См. Система помощи при парковке (стр. 114). Выключатель запуска/останова двигателя. См.
Пуск-остановка (стр. 98).
СУказатели поворота См. Указатели поворота (стр. 50). Дальний свет.
См. Органы управления осветительным оборудованием (стр. 44).
DАвтомобили с левосторонним управлением — Органы управления дисплеем щитка приборов. См. Информационные дисплеи (стр. 62).
DАвтомобили с правосторонним управлением — Органы управления информационно-развлекательным дисплеем. См. Аудиосистема (стр. 198).
EПанель приборов См. Указатели (стр. 56). См. Сигнализаторы и индикаторы (стр. 57).
14

Быстрый обзор
FАвтомобили с левосторонним управлением — Органы управления информационно-развлекательным дисплеем. См. Аудиосистема (стр. 198).
FАвтомобили с правосторонним управлением — Органы управления дисплеем щитка приборов. См. Информационные дисплеи (стр. 62).
GПодрулевой переключатель очистителей и омывателей стекол См.
Стеклоочистители и стеклоомыватели (стр. 40).
HВыключатель электробогрева заднего стекла Переключатель обогреваемого ветрового стекла. См. Окнаизеркаласобогревом(стр. 76).
I Информационно-развлекательный дисплей
JАудиоблок См. Аудиосистема (стр. 198).
KИндикатор блокировки дверей. См. Блокировка и разблокировка замков (стр. 30).
LКнопка аварийной световой сигнализации См. Аварийная световая сигнализация (стр. 140).
MОрганы управления микроклиматом. См. Органы управления микроклиматом (стр. 72).
NЗамок (выключатель) зажигания См. Выключатель зажигания (стр. 93).
ООрганы управления аудиосистемой. См. Управление аудиосистемой (стр. 37). Голосовое управление. См. Голосовое управление (стр. 38).
PРычаг механизма регулировки рулевого колеса. См. Регулировка положения рулевого колеса (стр. 37).
QЗвуковой сигнал
RПереключатели круиз-контроля. См. Управление скоростью (стр. 120).
SВыключатель осветительных приборов См. Органы управления осветительнымоборудованием(стр. 44). Передниепротивотуманные фары. См. Передние противотуманные фары (стр. 47). Задние противотуманныефонари. См. Задниепротивотуманныефонари(стр. 47). Коррекция наклона света фар См. Коррекция наклона световых пучков фар (стр. 48). Регулятор яркости подсветки панели приборов.
См. Регулятор яркости подсветки панели приборов (стр. 46).
15

Безопасность детей
УСТАНОВКА ДЕТСКОГО СИДЕНЬЯ
ПРЕДУПРЕЖДЕНИЯ
Чрезвычайно опасно! Не пользуйтесь детским сиденьем, установленным спинкой вперед,
если напротив сиденья установлена надувная подушка безопасности!
Для безопасной перевозки на заднем сиденье детей ростом ниже 150 cm используйте детские
сиденья одобренного типа.
Ознакомьтесь с инструкциями производителя и соблюдайте их при установке детского сиденья.
Не вносите никаких изменений в детские сиденья.
Не держите ребенка на коленях во время движения автомобиля.
ПРЕДУПРЕЖДЕНИЯ
Не оставляйте детей в автомобиле без присмотра.
Если автомобиль попал в аварию, проверьте детские сиденья у авторизованного дилера.
Только сиденья, сертифицированные в соответствии со стандартом ЕСЕ-R44,03 (или более подними стандартами), были проверены и одобрены для использования в этом автомобиле. Разнообразные сиденья представлены на выбор у авторизованных дилеров.
Примечание: Требования по использованию детских сидений могут быть различными в зависимости от страны.
Детские сиденья для разных весовых категорий
Используйте правильно подобранное детское сиденье в соответствии с данными указаниями:
Детское сиденье для младенцев
16

Безопасность детей
Безопасная перевозка детей весом менее 13 kg должна осуществляться в детском сиденье для младенцев, обращенном спинкой вперед (группа 0+) и устанавливаемом на заднем сиденье.
Детское сиденье
Безопасная перевозка детей весом между 13 kg и 18 kg должна осуществляться в детском сиденье (Группа 1) на заднем сиденье автомобиля.
Детские автокресла-подушки
ПРЕДУПРЕЖДЕНИЯ
Не устанавливайте детское кресло-подушкутолькоспоясным ремнемилиремнембезопасности.
Не устанавливайте детское кресло-подушку с провисающим или перекрученным ремнем
безопасности.
Не располагайте ремень безопасности под рукой ребенка или за его спиной.
Нельзя использовать книги, подушки или полотенца для того, чтобы посадить ребенка повыше.
ПРЕДУПРЕЖДЕНИЯ
Убедитесь, что ребенок сидит прямо.
Если детское сиденье установлено на заднем сиденье, оно должно быть плотно
закреплено на сиденье автомобиля. Ононедолжнокасатьсяподголовника. Если необходимо, снимите подголовник. См. Подголовники (стр. 78).
Вы можете вновь установить подголовник после снятия детского кресла. См.
Подголовники (стр. 78).
Безопасная перевозка детей с весом более 15 kg, но ростом ниже 150 cm должна осуществляться на дополнительных сиденьях или подушках.
Детскоекресло-подушка(группа2)
17

Безопасность детей
Рекомендуется использовать дополнительное кресло со спинкой вместо дополнительной подушки. Поднятоеположениесиденьяпозволит расположить плечевую лямку ремня безопасностипоцентруплечаребенка, а поясной ремень — плотно вокруг бедер.
Детская подушка (группа 3)
Скобы крепления ISOFIX
ПРЕДУПРЕЖДЕНИЕ
Систему ISOFIX следует использовать вместе с устройствомдляпредотвращения
вращения. Мы рекомендуем использовать верхний шнур или опорную стойку.
Автомобиль оснащен скобами крепления ISOFIX, которые подходят для всемирно одобренных детских сидений ISOFIX.
В системе ISOFIX предусмотрены два жестких рычага крепления на детском сиденье, которые крепятся к соответствующимскобамкрепленияна сиденьях второго ряда в месте соединения подушек и спинок. Скобы крепления строп предусмотрены на нижней или задней стороне сидений второго ряда и предназначены для детских сидений с верхней стропой крепления.
Примечание: При покупке сиденья ISOFIX обязательно ознакомьтесь с надлежащей весовой категорией и классом размеров ISOFIX для предполагаемого расположения сиденья. См. Установка детского сиденья (стр. 19).
18
![]()
Безопасность детей
Установка детского сиденья с верхними стропами крепления
Фургон с кабиной с двумя рядами сидений.
ПРЕДУПРЕЖДЕНИЕ
Верхняялямкадолжнакрепиться только к предусмотренной точке крепления привязной лямки.
УСТАНОВКА ДЕТСКОГО СИДЕНЬЯ
ПРЕДУПРЕЖДЕНИЯ
Получите консультацию у авторизованного дилера по вопросу последних уточнений относительно рекомендуемых детских
сидений.
Чрезвычайно опасно! Не пользуйтесь детским сиденьем, установленным спинкой вперед,
если напротив сиденья установлена надувная подушка безопасности!
При использовании детского сиденья с поддержкой для ног убедитесь в надежности
крепления поддержки для ног на полу.
При использовании детского сиденья с ремнем безопасности проследите, чтобы ремень не
провисал и не перекручивался.
Требуется, чтобыдетскоесиденье вплотную примыкало к сиденью автомобиля. При использовании
детского сиденья со спинкой, обращенной по ходу движения автомобиля, необходимо снять подголовник. См. Подголовники (стр. 78).
Вы можете вновь установить подголовник после снятия детского кресла. См.
Подголовники (стр. 78).
Примечание: При использовании детского сиденья на переднем сиденье пассажира последнее необходимо перевести в крайнее заднее положение. Если поясную часть ремня безопасности не удается затянуть без слабины, установите спинку сиденья в полностью вертикальное положение и увеличьте высоту сиденья. См. Сиденья (стр. 78).
19

Безопасность детей
Размещение на сиде-  ньях
ньях
Сиденье переднего пассажираснадувной подушкой безопасности в режиме
АКТИВИРОВАНА
Сиденье переднего пассажираснадувной подушкой безопасности в режиме
ОТКЛЮЧЕНА
 Задние сиденья
Весовые категории (вес и возраст ребенка)
|
0 |
0+ |
1 |
2 |
3 |
|
До 10 кг |
До 13 кг |
9–18 кг |
15–25 кг |
22–36 кг |
|
(22 |
(29 |
(20–40 |
(33–55 |
(46–79 |
|
фунта) |
фунтов) |
фунтов) |
фунтов) |
фунтов) |
X X UF? UF? UF?
|
U? |
U? |
U? |
U? |
U? |
|
U |
U |
U |
U |
U |
X Не подходит для детей данной весовой категории.
U Подходит для универсальных детских сидений для детей данной весовой категории.
U? Подходит для универсальных детских сидений для детей данной весовой категории. Однако мы рекомендуем использовать одобренное детское сиденье и крепить его на заднем сиденье.
UF? Подходит для универсальных детских сидений, в которых ребенок располагается лицом вперед, соответствующих для детей данной весовой категории. Однако мы рекомендуем использовать одобренное детское сиденье и крепить его на заднем сиденье.
20

Безопасность детей
Детские кресла ISOFIX
Размещение на сиденьях
Задние крепления ISOFIX на втором ряду сидений
Класс размера крепления ISOFIX — второй ряд сидений*
Задние крепления ISOFIX на сиденьях третьего ряда
Класс размера крепления ISOFIX — третий ряд сидений*
Весовые категории (вес и возраст ребенка)
|
0 |
0+ |
I |
|
До 10 кг (22 |
До 13 кг (29 |
9–18 кг (20–40 |
|
фунта) |
фунтов) |
фунтов) |
|
Детская кроватка |
Детскоекресло |
|
|
IU |
IU |
IU |
|
E |
C, D, E |
A, B, B1, C, D |
|
IU |
IU |
IU |
|
E |
D, E |
A, B, B1, D |
IU Подходит для универсальной категории детских сидений с креплением ISOFIX, одобренных для использования в данной весовой категории.
* Согласно ECE-R16.
Примечание: При покупке детского сиденья с креплением ISOFIX вы должны знать требуемуювесовуюкатегориюиклассразмеракрепленияISOFIX дляпредполагаемых мест установки сиденья.
21
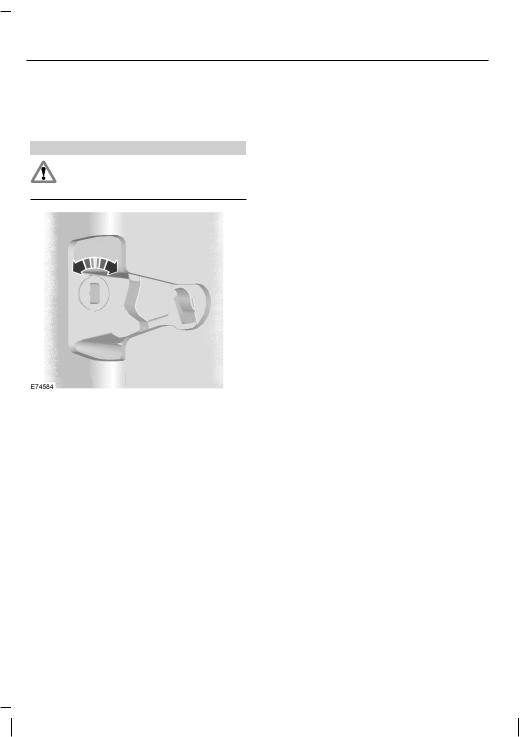
Безопасность детей
ЗАМКИ С ФУНКЦИЕЙ БЛОКИРОВКИ ОТ ОТПИРАНИЯ ДЕТЬМИ
ПРЕДУПРЕЖДЕНИЕ
Вы не можете открыть двери изнутри, когда используется функция «защиты детей».
Замки системы блокировки дверей от открывания детьми предусмотрены на задней кромке каждой задней двери и должныустанавливатьсяотдельнодля каждой двери.
Левая сторона
Поверните против часовой стрелки, чтобы закрыть, и по часовой стрелке, чтобы открыть.
Правая сторона
Поверните по часовой стрелке, чтобы закрыть, и против часовой стрелки, чтобы открыть.
22

Ремни безопасности
ПРИСТЕГИВАНИЕ РЕМНЕЙ БЕЗОПАСНОСТИ
ПРЕДУПРЕЖДЕНИЯ
Вставляйте язычок в замок до характерного щелчка. Вы пристегнулиременьбезопасности
неправильно, если не услышали щелчка.
Убедитесь, что ремень безопасности полностью убран и не остался снаружи автомобиля
после закрытия двери.
Плавно вытяните ремень из гнезда. Если вы резко потянете за ленту ремня, или автомобиль стоит на наклонной плоскости, ремень может заклинить.
Для отсоединения ремня нажмите красную кнопку на его замке. Удерживая за язычок, дайте ремню плавно и полностью втянуться.
Особенности использования ремня безопасности для беременных женщин
ПРЕДУПРЕЖДЕНИЕ
Расположите ремень так, чтобы обеспечить свою безопасность и безопасность своего ребенка.
Нельзяпользоватьсятолькоплечевым или только поясным ремнем.
23

Ремни безопасности
Беременнымженщинамследуетвсегда держать ремень безопасности застегнутым. Поясную часть комбинированной системы поясных и наплечных ремней безопасности необходиморасполагатьпоперекбедер и внизу живота, натянув максимально туго, но так, чтобы это не причиняло неудобств. Наплечный ремень должен проходить через середину плеча и центр груди.
РЕГУЛИРОВКА ВЫСОТЫ КРЕПЛЕНИЯ РЕМНЯ БЕЗОПАСНОСТИ
ПРЕДУПРЕЖДЕНИЕ
Установите регулятор высоты ремня безопасности так, чтобы ремень проходил посредине
вашего плеча. Неправильная регулировкаремнябезопасностиможет снизить эффективность ремня безопасности и увеличивает риск получения травм при аварии.
1.Поддерживайте петлю ремня безопасности, когда нажимаете на кнопку регулятора.
2.Отведите регулятор в требуемое положение, а затем отпустите кнопку.
3.Потяните вниз петлю ремня безопасности, чтобыубедитьсявее надежной фиксации.
СИСТЕМАНАПОМИНАНИЯО НЕПРИСТЕГНУТОМ РЕМНЕ БЕЗОПАСНОСТИ
ПРЕДУПРЕЖДЕНИЕ
Данная система обеспечивает безопасность только при правильно пристегнутом ремне
безопасности.
Предупреждающая лампа загорается и звуковой сигнал раздается при следующих условиях:
•Непристегнутременьбезопасности водителя.
•автомобиль превышает относительно низкую скорость движения.
Предупреждение включается также в том случае, когда в движущемся автомобиле не пристегнут водительский ремень безопасности.
Если ремень безопасности остается непристегнутым,звуковоеивизуальное предупреждения автоматически отключатсяпримерночерезпятьминут.
Выключение устройства напоминания о необходимости пристегнуть ремень безопасности
Обратитеськавторизованномудилеру.
24
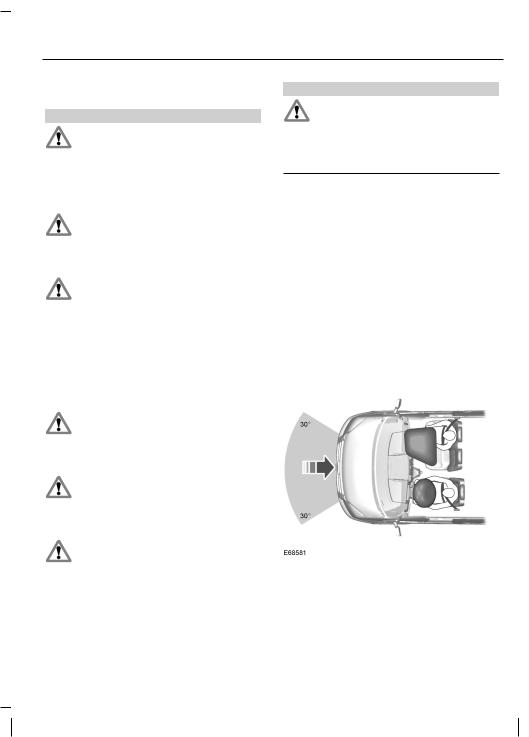
Дополнительная система пасивной безопасности
ПРИНЦИПЫ РАБОТЫ
ПРЕДУПРЕЖДЕНИЯ
Очень опасно! Если напротив сиденья установлена фронтальная подушка
безопасности, не используйте на этом сиденье детские удерживающие устройства, в которых ребенок сидит лицом против хода движения!
Не вносите никакие изменения в конструкциюпередкаавтомобиля. Это может ухудшить
эффективностьсрабатыванияподушек безопасности.
Пристегивайтесь ремнем безопасности и поддерживайте безопасное расстояние между
вами и рулевым колесом. Только правильно пристегнутый ремень безопасности может удержать ваше туловище в том положении, в котором достигается оптимальный эффект срабатывания подушки безопасности.
См. Сидение в правильном положении (стр. 78).
Ремонт рулевого колеса, рулевой колонки, сидений, подушек и ремней безопасности должен
проводитьсятолькоуавторизованного дилера.
Не закрывайте область перед подушкой безопасности какими-либо предметами. Не
прикрепляйте никаких предметов к накладке подушки безопасности.
Не прокалывайте сиденья острыми предметами. Это может привести к повреждению и
ухудшить эффективность срабатывания подушек безопасности.
ПРЕДУПРЕЖДЕНИЯ
Используйте чехлы, предназначенные для сидений, оборудованных боковыми
надувными подушками безопасности. Надеватьихследуетуавторизованного дилера.
Примечание: При раскрытии подушки безопасности вы услышите громкий хлопок и увидите облако безвредного порошка. Это нормальное явление, на которое можно не обращать внимания.
Примечание: Действие передней пассажирской подушки безопасности распространяется на оба посадочных места сдвоенного сиденья.
Примечание: Протирайте крышки модулей подушки безопасности только влажной тряпкой.
ПОДУШКА БЕЗОПАСНОСТИ ВОДИТЕЛЯ
25

Дополнительная система пасивной безопасности
Подушка безопасности срабатывает при сильном лобовом ударе или столкновении, произошедшим под угломдо30 градусовслеваилисправа. Онанадуваетсязанесколькотысячных долей секунды и сдувается при контактеспассажирамииливодителем, амортизируя, такимобразом, движение телавперед. Прислабыхфронтальных, задних и боковых столкновениях, или переворотах подушка безопасности может не сработать.
ПОДУШКА БЕЗОПАСНОСТИ ПАССАЖИРА
Подушка безопасности срабатывает при сильном лобовом ударе или столкновении, произошедшим под угломдо30 градусовслеваилисправа. Онанадуваетсязанесколькотысячных долей секунды и сдувается при контактеспассажирамииливодителем, амортизируя, такимобразом, движение телавперед. Прислабыхфронтальных, задних и боковых столкновениях, или переворотах подушка безопасности может не сработать.
Выключениенадувнойподушки безопасности пассажира
ПРЕДУПРЕЖДЕНИЕ
При использовании на месте пассажира детского сиденья, установленного спинкой вперед,
необходимо отключить надувную подушку безопасности.
Клавишный выключатель с сигнализаторомотключениянадувной подушки безопасности расположены на панели приборов.
26
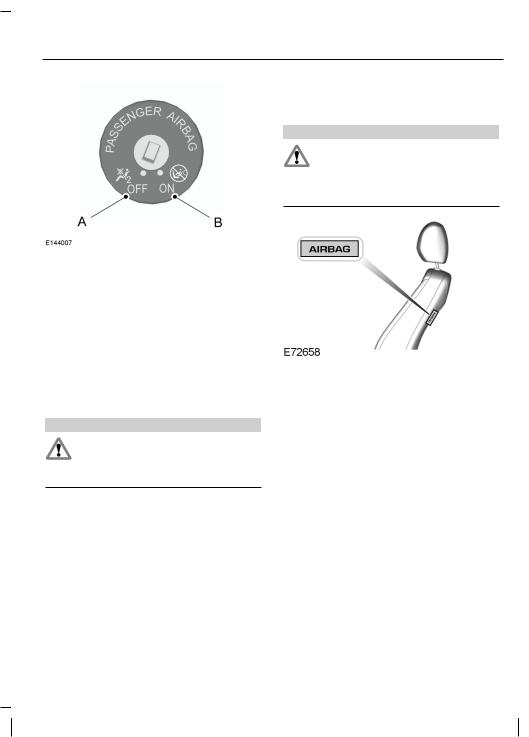
Дополнительная система пасивной безопасности
AВыключение
BВключение
Повернитепереключательвположение А.
При включении зажигания убедитесь, что предупреждающая лампа отключения подушки безопасности загорелась.
Включение надувной подушки безопасности пассажира
ПРЕДУПРЕЖДЕНИЕ
Надувную подушку безопасности необходимо включить, когда на местепассажиранеиспользуется
детское сиденье.
Повернитепереключательвположение В.
БОКОВЫЕ ПОДУШКИ БЕЗОПАСНОСТИ
ПРЕДУПРЕЖДЕНИЕ
Используйте чехлы, предназначенные для сидений, оборудованных боковыми
подушками безопасности. Надевать их следует у авторизованного дилера.
Подушки безопасности установлены в спинках передних сидений. Об этом свидетельствует табличка на торце спинки сиденья.
Подушка безопасности срабатывает присерьезныхбоковыхстолкновениях. Он также приводится в действие при значительных фронтальных столкновениях под углом. Подушка безопасности не сработает при незначительныхбоковых,фронтальных и задних столкновениях или при переворотах.
27
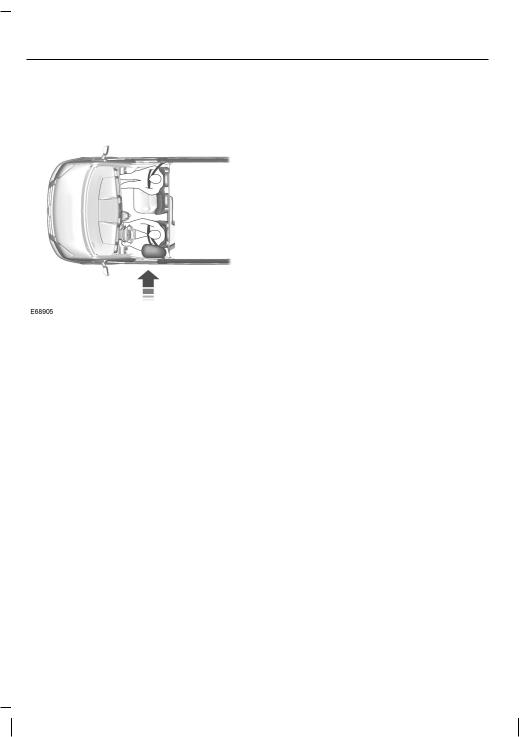
Дополнительная система пасивной безопасности
БОКОВЫЕ ЗАНАВЕСЫ СИСТЕМЫ НАДУВНЫХ ПОДУШЕК БЕЗОПАСНОСТИ
Надувные подушки безопасности располагаются над передними боковыми окнами. Об этом свидетельствуют штампованные таблички на обшивке потолка салона.
Подушка безопасности срабатывает присерьезныхбоковыхстолкновениях. Он также приводится в действие при значительных фронтальных столкновениях под углом. Боковой занавессистемыподушекбезопасности не срабатывает при незначительных боковых, фронтальных и задних столкновениях или при переворотах.
28
![]()
Ключи и пульты дистанционного управления
ОБЩАЯ ИНФОРМАЦИЯ О РАДИОЧАСТОТАХ
Примечание: Внесение изменений или модификаций без разрешения соответствующихрегулирующихорганов может привести к лишению пользователя права на эксплуатацию данного оборудования.
Дальность работы передатчика, как правило, составляет порядка 33 футов (10 метров). Уменьшение дальности работы может быть вызвано:
•погодными условиями
•находящимися поблизости радиомачтами
•зданиями и сооружениями вокруг автомобиля
•другими машинами, стоящими рядом с вашим автомобилем.
Радиочастота, используемая для дистанционной разблокировки и блокировки замков, может также использоваться для работы других маломощных радиоустройств (например, любительских радиоприемников и передатчиков, медицинского оборудования, беспроводных наушников, пультов дистанционного управления, систем сигнализацииидругихприборов). Если частота недоступна из-за помех, вы не сможете воспользоваться пультом дистанционного управления блокировкой замков. Для открывания изапираниядверейпонадобитсяключ.
Примечание: Убедитесь, что автомобильзаперт, преждечемоставить его без присмотра.
Примечание: В пределах рабочей дальности пульт дистанционного управления будет работать и при случайном нажатии кнопки.
ДИСТАНЦИОННОЕ
УПРАВЛЕНИЕ
На своем автомобиле вы можете запрограммировать не более восьми пультов дистанционного управления. В это число входит и пульт, который вы получили вместе с машиной. Обратитеськавторизованномудилеру.
ЗАМЕНА УТЕРЯННОГО КЛЮЧА ИЛИ ПУЛЬТА ДИСТАНЦИОННОГО УПРАВЛЕНИЯ
У авторизованных дилеров вы можете приобрести сменные или дополнительные ключи, а также устройства дистанционного управления. Ваш дилер может запрограммировать пульт дистанционного управления для вашего автомобиля. См.
Дистанционноеуправление(стр.29).
Дляперепрограммированияпассивной противоугонной системы обратитесь к авторизованному дилеру.
29

Замки
БЛОКИРОВКА И РАЗБЛОКИРОВКА ЗАМКОВ
Примечание: Проверьте, заперт ли автомобиль, прежде чем оставлять его без присмотра.
Примечание: Не оставляйте ключи в автомобиле.
Запирание
Блокирование с помощью ключа
Поверните верхнюю секцию ключа в направлении передней части автомобиля.
Блокировка с помощью пульта дистанционного управления
Нажмите кнопку.
Примечание: Дверь водителя можно запереть ключом. Воспользуйтесь им, когда не работает пульт дистанционного управления.
Двойное запирание
ПРЕДУПРЕЖДЕНИЕ
Не используйте режим двойной блокировки, когда в салоне автомобиля находятся люди или
животные. После двойной блокировки разблокировать замки дверей со стороны салона невозможно.
Двойная блокировка — это мера противоугонной защиты, не позволяющая открыть двери изнутри.
Примечание: Если вы выполните двойную блокировку автомобиля, находясь внутри него, включите зажигание, чтобы вернуть автомобиль к одинарной блокировке.
Двойное блокирование с помощью ключа
В течение трех секунд дважды поверните ключ в положение блокирования.
Двойная блокировка при помощи пультадистанционногоуправления
Нажмите кнопку два раза в течение трех секунд.
Отпирание
Разблокировка с помощью ключа
Поверните верхнюю секцию ключа в направлениизаднейчастиавтомобиля.
Разблокировка с помощью пульта дистанционного управления
Нажмите кнопку.
Примечание: Дверь водителя можно отпереть ключом. Воспользуйтесь им, когда не работает пульт дистанционного управления.
Примечание: Пульт дистанционного управления отключится, если оставить машину запертой в течение нескольких недель. Автомобиль следует разблокировать и запустить двигатель с помощью ключа. Разблокирование и однократныйзапускдвигателявключают пульт дистанционного управления.
Перепрограммирование функции разблокировки
Функцию разблокировки можно перепрограммировать таким образом, чтобы отпиралась только дверь водителя. См. Дистанционное управление (стр. 29).
30

Замки
|
Подтверждение блокировки и |
Открытие сдвижной двери |
|
разблокировки |
После разблокировки замков дверей указателиповоротамигнутоднократно.
После двойной блокировки замков дверей указатели поворота мигнут трижды.
После разблокировки замков дверей указателиповоротамигнутоднократно.
Примечание:Еслиавтомобильоснащен системойдвойнойблокировки,указатели поворота однократно мигнут после активации системы централизованного запирания, а затем еще два раза после двойной блокировки.
Блокировка и разблокировка замков дверей снаружи автомобиля
Открытие двустворчатой задней грузовой двери
AЗаблокировать
BРазблокировать
Вы можете увидеть, заблокирована дверь или нет, на щитке приборов. Расположение индикатора: См.
Быстрый обзор (стр. 11). Лампочка загорается, когда вы блокируете автомобиль.
31

Замки
Запирание при захлопывании двери
С помощью захлопывания можно запереть открытую дверь ключом или пультом дистанционного управления. Когда дверь закрывается, включается блокировка.
Примечание: Не оставляйте ключи в автомобиле.
Примечание: Если вы попытаетесь заблокировать замки дверей, когдаодна из дверей остается открытой, возможно, раздастся короткий звуковой сигнал.
Автоматическая блокировка
Ваш автомобиль имеет возможность автоматически блокировать двери, когда его скорость превышает 8 км/ч (5 миль/ч). Вы может включить эту функциюспомощьюинформационного дисплея. См. Информационные дисплеи (стр. 62). Если вы включили этуфункцию, точтобыоткрытьзаднюю или боковую грузовые двери, используйте внутреннюю кнопку разблокировки двери или выключите зажигание и воспользуйтесь ключом или дистанционным пультом.
Автоматическая повторная блокировка
Если вы не открываете ни одну из дверей в течение 45 секунд после разблокировки замков дверей с помощьюдистанционногоуправления, замки дверей автоматически заблокируются снова. Двери заблокируются и сигнализация вернется к предыдущему состоянию.
Разблокировка в один этап
Когда вы используете эту функцию, вы можете разблокировать задние двери или заднюю поднимающуюся дверь, если нажмете один раз кнопку разблокировки багажного отделения.
Примечание: При разблокировке замков дверей указатели поворота мигают один раз.
Замки всех дверей разблокируются, когда вы:
•Потянете за одну из ручек со стороны салона (если не была использована двойная блокировка замков).
•Повернете ключ в одном из замков дверей.
•Нажмите кнопку на пульте дистанционного управления один раз.
Разблокировка в два этапа
Примечание: При разблокировке замков дверей указатели поворота мигают один раз.
32

Замки
Замки передних дверей разблокируются, когда вы:
•Потянете за одну из ручек со стороны салона (если не была использована двойная блокировка замков).
•Повернете ключ в одном из замков дверей.
•Нажмите кнопку на пульте дистанционного управления один раз.
Вы разблокируете одновременно передние двери, задние двери и двери багажного отделения, если вы:
•В течение трех секунд дважды повернете ключ в положение блокирования.
•Нажмете и будете удерживать кнопку на пульте дистанционного управления не менее трех секунд.
На фургонах вы можете разблокировать задние двери или заднюю поднимающуюся дверь, а также сдвижную дверь, если нажмете один раз кнопку разблокировки багажного отделения.
Зональная повторная блокировка
Замки в вариантах фургон, автобус и комби разделены на две зоны — кабина и грузовой отсек
•Выйдите из автомобиля и нажмите кнопку блокировки.
•Нажмитекнопкуразблокировкиили кнопку разблокировки багажного отделения один раз, чтобы открыть соответственную зону.
Если после этого вы откроете дверь в разблокированной зоне, замки остальных дверей в этой зоне автоматически заблокируются.
Настраиваемая разблокировка
Настраиваемая разблокировка — это функция, разработанная, чтобы уменьшитьвремяпростоямашины.Она позволяет вам выбирать, какие двери будут разблокированы, когда вы нажимаете кнопку разблокировки и кнопку разблокировки багажного отделения на пульте дистанционного управления один или два раза. Если вы активировали эту функцию, вы не сможете снова отключить ее. За дополнительной информацией обращайтесь к авторизованному дилеру.
ЗАДНЯЯПОДНИМАЮЩАЯСЯ ДВЕРЬ С РУЧНЫМ УПРАВЛЕНИЕМ
ПРЕДУПРЕЖДЕНИЯ
Перемещатьсявгрузовомотсеке, снаружи или внутри автомобиля, чрезвычайно опасно. При
столкновении риск получения серьезной травмы или смерти более высок для людей, находящихся в этих зонах. Не позволяйте людям находиться в какой-либо зоне автомобиля, неоснащеннойсиденьями и ремнями безопасности. Убедитесь, что все пассажиры автомобиля находятся на сиденьях и используют ремни безопасности надлежащим образом.
33

Замки
ПРЕДУПРЕЖДЕНИЯ
Чтобы предотвратить попадание выхлопных газов в салон, убедитесь, что задняя
поднимающаясядверьзакрыта. Кроме того, это предотвратит выпадение груза или пассажиров. Если необходимо держать заднюю поднимающуюся дверь открытой, обеспечьте хорошую вентиляцию автомобиля, чтобы наружный воздух не попал внутрь автомобиля.
Примечание: Для предотвращения повреждения задней поднимающейся двери соблюдайте осторожность при ее открывании в гараже или других закрытых помещениях.
Примечание:Неподвешивайтеникакие предметы (например, стойки для велосипеда т. д.) на спойлере, стекле или задней поднимающейся двери. Это может привести к поломке задней поднимающейся двери или ее компонентов.
Примечание: Во время движения не оставляйте заднюю поднимающуюся дверь открытой. Это может привести к поломке задней поднимающейся двери или ее компонентов.
Открытие и закрытие задней поднимающейся двери
Открытие задней поднимающейся двери
Нажмитекнопку,расположеннуювверху ручки задней поднимающейся двери, чтобы разблокировать дверь, и затем потяните за внешнюю ручку.
Открытие с помощью пульта дистанционного управления
Нажмите кнопку два раза в течение трех секунд.
Закрытие задней поднимающейся двери
34

Безопасность
ПАССИВНАЯ
ПРОТИВОУГОННАЯ
СИСТЕМА
Принцип работы
Система предотвращает запуск двигателя при помощи ключа с неверным кодом.
Кодированные ключи
При потере ключа можно приобрести запасной ключ у авторизованного дилера. По возможности сообщите дилеру номер ключа, указанный на ярлыке, которым были снабжены оригинальные ключи. Кроме того, у авторизованного дилера можно приобрести дополнительные ключи.
Примечание: Если вы потеряете ключ, остальные ключи будет необходимо стереть из памяти и перепрограммировать. Кодирование сменных ключей должно выполняться вместесперекодированиемоставшихся ключей. За дополнительной информацией обращайтесь к авторизованному дилеру.
Примечание: Не допускайте экранировки ключей металлическими предметами. Это может воспрепятствовать распознаванию закодированного ключа приемником.
Приведение иммобилайзера двигателя в режим охраны
После выключения зажигания иммобилайзер двигателя спустя непродолжительное время автоматически перейдет в режим охраны.
Снятие иммобилайзера двигателя с режима охраны
После включения зажигания иммобилайзер двигателя автоматически выйдет из режима охраны при использовании ключа с правильным кодом.
Если двигатель не запускается при помощи ключа с правильным кодом, проверьте ваш автомобиль у авторизованного дилера.
ПРОТИВОУГОННАЯ
СИГНАЛИЗАЦИЯ
Система предупредит вас о несанкционированном проникновении ввашавтомобиль.Этопроизойдетесли любая дверь, багажное отделение или капотбудутоткрытыбезиспользования ключа или устройства дистанционного управления.
Когда включена сигнализация, то при попытке несанкционированного проникновениявспыхиваютстояночные фонариифонариуказателейповорота и включается звуковой сигнал сигнализации.
Возьмите все устройства дистанционного управления к авторизованному дилеру, если есть какая-либо потенциальная проблема с сигнализацией вашего автомобиля.
Включение сигнализации
Сигнализацияготоваквключению,если взажиганиинетключа. Длявключения сигнализации заприте замки автомобиля.
Выключение сигнализации
Отключениесигнализациипроисходит в следующих случаях:
35

Безопасность
•Отпирание дверей или багажного отделения при помощи пульта дистанционного управления.
•Включение зажигания или запуск двигателя.
•Отпирание двери водителя при помощи ключа с последующим включениемзажиганиявтечение12 секунд.
36

Рулевое колесо
РЕГУЛИРОВКАПОЛОЖЕНИЯ РУЛЕВОГО КОЛЕСА
ПРЕДУПРЕЖДЕНИЕ
Не регулируйте рулевое колесо при движении автомобиля.
Примечание: Убедитесь в том, что вы сидите в правильном положении. См.
Сидение в правильном положении
(стр. 78).
3. Заблокируйте рулевую колонку.
УПРАВЛЕНИЕ
АУДИОСИСТЕМОЙ
Выберите в аудиосистеме нужный источник.
Управление позволяет использовать следующие функции:
Тип 1
1.Разблокируйте рулевую колонку.
2.Отрегулируйте рулевое колесо до необходимого положения.
37

Рулевое колесо
Для навигации по меню используйте кнопкисострелкаминарулевомколесе. Нажмите OK для выбора.
Тип 2
AУвеличение громкости
BПоиск в направлении увеличения частоты вещания (искать далее)
СУменьшение громкости
DПоиск в направлении уменьшениячастотывещания (искать предыдущее)
Поиск, далее или назад
Нажмите кнопку «Seek», чтобы:
•Настроить радиоприемник на следующую или предыдущую предварительную установку
•воспроизвести следующую или предыдущую дорожку.
Нажмитеиудерживайтекнопкупоиска, чтобы:
•начать автоматический поиск соседней радиостанции
•выполнить поиск в дорожке.
ГОЛОСОВОЕ УПРАВЛЕНИЕ
Оттянитерычагдлявыбораилиотмены режима голосового управления. См.
SYNC™ (стр. 231).
УПРАВЛЕНИЕ СКОРОСТЬЮ
См. Управлениескоростью (стр. 120).
38
![]()
Рулевое колесо
ОРГАНЫ УПРАВЛЕНИЯ ИНФОРМАЦИОННЫМ ДИСПЛЕЕМ
См. Информационные дисплеи (стр. 62).
39

Стеклоочистители и стеклоомыватели
ОЧИСТИТЕЛИ ВЕТРОВОГО СТЕКЛА
Примечание: Перед включением очистителейветровогостеклаполностью удалите лед и иней с ветрового стекла.
Примечание: Перед въездом на мойку убедитесь, что очистители ветрового стекла выключены.
Примечание: Если щетки стеклоочистителя начинают оставлять полосы или разводы, очистите ветровое стекло и щетки стеклоочистителя. Если неисправность не устраняется, установите новые щетки стеклоочистителя.
Примечание: Не используйте стеклоочистители при сухом ветровом стекле. Этоможетпривестикпоявлению царапин на ветровом стекле, повреждению щеток стеклоочистителя или перегоранию электродвигателя стеклоочистителя. Перед тем, как очистить сухое ветровое стекло, всегда используйте омыватель ветрового стекла.
AОдинарная очистка
BПрерывистая работа стеклоочистителей
С Нормальный режим очистки
DРабота с высокой частотой
Прерывистый режим работы стеклоочистителей
AКороткий интервал очистки
BПрерывистая работа стеклоочистителей
СБольшой интервал очистки
Для регулирования прерывистого интервала очистки используйте поворотный регулятор.
Стеклоочистители,работающие в зависимости от скорости движения автомобиля
При увеличении скорости движения автомобиля интервал очистки уменьшается.
АВТОМАТИЧЕСКИЕ
СТЕКЛООЧИСТИТЕЛИ
Примечание: Перед включением очистителейветровогостеклаполностью удалите лед и иней с ветрового стекла.
40

Стеклоочистители и стеклоомыватели
Примечание: Перед въездом на мойку убедитесь, что очистители ветрового стекла выключены.
Примечание: Если щетки стеклоочистителя начинают оставлять полосы или разводы, очистите ветровое стекло и щетки стеклоочистителя. Если неисправность не устраняется, установите новые щетки стеклоочистителя.
Примечание: Если вы включаете систему автоматического управления включениемвнешнегоосвещениявместе с системой автоматического включения стеклоочистителей, фары ближнего света включатся автоматически, когда датчик дождя активирует стеклоочистители для работы в непрерывном режиме.
Примечание: При движении по влажному дорожному покрытию стеклоочистителимогутначатьработать неожиданно или перемещаться с рывками.
Для уменьшения прерывистости движения рекомендуется выполнить следующие действия:
•уменьшите чувствительность автоматически работающих стеклоочистителей;
•переключите скорость очистки на нормальную или высокую;
•отключите автоматический режим работы стеклоочистителей.
AВысокая чувствительность
BOn (Вкл.)
СНизкая чувствительность
Стеклоочистители будут работать при обнаружениивлагинаветровомстекле. Датчик дождя продолжит измерять количество влаги на ветровом стекле и автоматически изменять скорость работы стеклоочистителей.
Спомощьювращающегосярегулятора выберите необходимый уровень чувствительности датчика дождя. При установке низкой чувствительности стеклоочистители будут срабатывать, если датчик определит, что на ветровом стекле находится большое количество влаги. При установке высокой чувствительности стеклоочистители будут срабатывать, если датчик определит, что на ветровомстекленаходитсянебольшое количество влаги.
Следите за чистотой внешней стороны ветрового стекла. Работа датчика будет нарушена, если область стекла вокругвнутреннегозеркалазагрязнена. Датчик дождя очень чувствительный, поэтому стеклоочистители могут сработать при попадании на ветровое стекло грязи, влаги или насекомых.
41

Стеклоочистители и стеклоомыватели
ОМЫВАТЕЛИ ВЕТРОВОГО СТЕКЛА
Примечание: Невключайтеомыватели при пустом бачке омывателя. Это может привести к перегреву насоса омывателя.
Примечание: Не включайте стеклоомывателидольше, чем10 секунд за раз.
Омыватели будут разбрызгивать жидкостьвсевремя,покавынажимаете рычаготсебя.Послеотпусканиярычага стеклоочистители будут работать еще непродолжительный период времени.
ОЧИСТИТЕЛЬИОМЫВАТЕЛИ ЗАДНЕГО СТЕКЛА
Стеклоочистительзаднегоокна
AПрерывистая работа стеклоочистителей
BРабота с низкой частотой
Нажмите на кнопку в конце рычага для переключениямеждурежимами»Откл», «Прерывистый» и «Низкая скорость».
При переводе рычага переключения передач в положение R задний стеклоочиститель переключается на прерывистый режим работы, если передние стеклоочистители активированы.
42

Стеклоочистители и стеклоомыватели
Омыватель заднего окна
Омывательбудетразбрызгиватьсявсе время, пока вы нажимаете рычаг от себя. После отпускания рычага стеклоочистители будут работать еще непродолжительный период времени.
43

Осветительное оборудование
ОБЩАЯ ИНФОРМАЦИЯ
Конденсат в блоке фонарей
Для установления нормального давления воздуха во внешних лампах имеются дефлекторы.
Конденсат может быть естественным следствием такой конструкции. Когда в лампу в сборе через дефлекторы поступаетвлажныйвоздух, существует вероятность образования конденсата при холодной температуре. При образовании нормального конденсата на внутренней поверхности стекла формируетсямелкодисперсныйтуман. Во время нормальной работы мелкодисперсный туман в результате выходит через дефлекторы.
В сухую погоду время исчезновения тумана может составить до 48 часов.
Примеры допустимого конденсата:
ОРГАНЫ УПРАВЛЕНИЯ ОСВЕТИТЕЛЬНЫМ ОБОРУДОВАНИЕМ
Положения переключателя управления освещением
•Наличие мелкодисперсного тумана (нет потеков, следов течи или больших капель).
•Мелкодисперсныйтуманпокрывает менее 50 % стекла.
Примеры недопустимого конденсата:
•Лужица воды внутри лампы.
AВентилятор выключен
BГабаритные фонари, лампы подсветки панели приборов, лампы освещения номерного знака и задние габаритные фонари
СФары
•Потеки, следы течи или большие каплинавнутреннейсторонестекла. Габаритные фонари
Если обнаружен недопустимый конденсат, проверьте автомобиль у авторизованного дилера.
Примечание: Включение габаритных фонарейвтечениедлительноговремени может привести к разряду аккумуляторной батареи.
Выключите зажигание.
С обеих сторон
Переведите рычаг управления системой освещения в положение B.
44

Осветительное оборудование
|
С одной стороны |
Сигнализация светом фар |
AС правой стороны
BС левой стороны
Дальний свет
Для включения сигнализации светом фар потяните рычаг слегка на себя и отпустите.
АВТОМАТИЧЕСКОЕ УПРАВЛЕНИЕВКЛЮЧЕНИЕМ ВНЕШНЕГО ОСВЕЩЕНИЯ
Для включения дальнего света переведите рычаг вперед.
Для выключения дальнего света переведите рычаг вперед еще раз или потяните его на себя.
Примечание: При сложных погодных условиях может потребоваться ручное включение фар автомобиля.
Примечание: Если работает система автоматического управления включениемвнешнегоосвещения, после того как она включила фары, вы можете включить только дальний свет.
Примечание: Если работает система автоматического управления включениемвнешнегоосвещения, после того как она включила фары, вы можете включить только дальний свет.
45

Осветительное оборудование
В условиях плохой освещенности или ненастной погоды фары будут включаться и выключаться автоматически.
Фарыостаютсявключеннымнекоторое время после выключения зажигания. Выможетеустановить время задержки спомощьюинформационногодисплея.
См. Информационные дисплеи (стр. 62).
Примечание: Если режим автоматического управления включением внешнего освещения включается вместе с режимом автоматического управления включениемстеклоочистителей,тофары ближнего света включаются автоматически при переводе стеклоочистителей в непрерывный режим работы по сигналу с датчика дождя.
РЕГУЛЯТОР ЯРКОСТИ ПОДСВЕТКИ ПАНЕЛИ ПРИБОРОВ
Примечание: Если аккумуляторная батарея отсоединена или разряжена, освещение компонентов будет автоматически переключено на максимальный уровень.
Нажмите несколько раз или нажмите и удерживайте до достижения желаемого уровня.
ЗАДЕРЖКА ВЫКЛЮЧЕНИЯ ФАР
После того, как зажигание будет выключено, вы можете включить передние фары путем нажатия на рычагуказателянаправлениявпереди вас. Раздастся короткий звуковой сигнал. Передние фары выключатся автоматически после трех минут, если открыты двери или после 30 секунд после того, как будет закрыта последняядверь.Выможетеотключить этуфункциюпутемповторногонажатия науказательнаправлениявпередивас или путем выключения зажигания.
46

Осветительное оборудование
СВЕТОВОЕ ОБОРУДОВАНИЕ ДНЕВНОГО ВРЕМЕНИ
ПРЕДУПРЕЖДЕНИЕ
Обязательно включайте фары при движении в условиях плохой освещенности или холодной
погоды. Система не включает задние габаритныеогниинеможетобеспечить достаточное освещение в таких условиях. Невыполнение этого требования в таких условиях может привести к столкновению.
Включение системы:
•Включите зажигание.
•При высоком уровне наружного освещения выключите переключатель управления внешним освещением или переведите его в положение автоматического включения освещения.
ПЕРЕДНИЕ ПРОТИВОТУМАННЫЕФАРЫ
ПРЕДУПРЕЖДЕНИЕ
Используйте передние противотуманные фары, только если видимость значительно
ограничена из-за тумана, снега или дождя.
Примечание: Если работает система автоматического управления включениемвнешнегоосвещения, после того как она включила фары, вы можете включить только передние противотуманные фары.
Длявыключенияпротивотуманныхфар нажмите переключатель.
Противотуманные фары можно включить при любом положении переключателя управления освещением, кроме положения «выключено».
ЗАДНИЕ
ПРОТИВОТУМАННЫЕ
ФОНАРИ
47

Осветительное оборудование
ПРЕДУПРЕЖДЕНИЯ
Используйте задние противотуманные фары только есливидимостьограниченадо50
метров (164 фута).
Не используйте задние противотуманные фары, если видимость ограничена из-за
дождя или снега и превышает 50 метров (164 фута).
Длявыключенияпротивотуманныхфар нажмите переключатель.
Противотуманные фары можно включить, когда включены передние противотуманные фары или фары ближнего света.
КОРРЕКЦИЯ НАКЛОНА СВЕТОВЫХ ПУЧКОВ ФАР
1.Нажмитедляосвобождениякнопки.
2.Поверните кнопку до требуемой настройки.
3.Нажмите кнопку до закрытого положения.
Вы можете отрегулировать наклон световых пучков фар в соответствии с загрузкой автомобиля.
Если ваш автомобиль не загружен, установите регулятор коррекции наклонасветафарна«ноль».Есливаш автомобиль частично или полностью загружен, установите регулятор таким образом, чтобы дальность пучка света фарсоставляла115–330 футов(35–100
м).
48
 Loading…