-
Bookmarks
Quick Links
8
For your information
Main Owner’s Manual
Please note that this manual applies to all models and all equipment, includ-
ing options. Therefore, you may find some explanations for equipment not
installed on your vehicle.
All specifications provided in this manual are current at the time of printing.
However, because of the Toyota policy of continual product improvement, we
reserve the right to make changes at any time without notice.
Depending on specifications, the vehicle shown in the illustrations may differ
from your vehicle in terms of equipment.
Noise from under vehicle after turning off the engine
Approximately five hours after the engine is turned off, you may hear sound
coming from under the vehicle for several minutes. This is the sound of a fuel
evaporation leakage check and, it does not indicate a malfunction.
Accessories, spare parts and modification of your Toyota
A wide variety of non-genuine spare parts and accessories for Toyota vehi-
cles are currently available on the market. You should know that Toyota does
not warrant these products and is not responsible for their performance,
repair, or replacement, or for any damage they may cause to, or adverse
effect they may have on, your Toyota vehicle.
This vehicle should not be modified with non-genuine Toyota products. Modi-
fication with non-genuine Toyota products could affect its performance, safety
or durability, and may even violate governmental regulations. In addition,
damage or performance problems resulting from the modification may not be
covered under warranty.
RAV4_OM_OM42809U_(U)
Summary of Contents for Toyota 2013 RAV4
Ознакомьтесь с правилами эксплуатации вашего автомобиля Toyota, изучив электронную версию руководства.
На данной странице представлены следующие типы руководств:
- Общее руководство для владельца
- Руководство по мультимедиа и навигации
- Руководство по вождению в условиях бездорожья
Toyota RAV4 Инструкция для владельца с бензиновыми двигателями рабочим объемом 3ZR-FE 2.0 л (1987 см³) 146-151 л.с./107-111 кВт, 2AR-FE 2.5 л (2494 см³) 180 л.с./132 кВт и дизельными 1AD-FТV D-4D 2.0 л (1998 см³) 124 л.с./91 кВт, 2AD-FТV/2AD-FHV 2.2 л (2231 см³) 150 л.с./110 кВт. Основное руководство по эксплуатации Тойота РАВ-4 модели XA40 четвёртого поколения выпуска с 2013 года
ЕСЛИ ВЫ ВИДИТЕ ОШИБКУ 406 Not Acceptable и не видите документ, то скорей всего у Вас IP РФ и его надо сменить, на любой другой страны, с помощью VPN ( Scribd и SlideShare блокируют посетителей с Российским IP).
Видео Toyota RAV4 замена фильтра салона и передних тормозных колодок (Тойота РАВ4 с 13)
Toyota RAV4 XA40 Mark IV общая информация (Тойота РАВ-4 с 2013)

Самостоятельное техническое обслуживание — Фильтр кондиционера
Чтобы сохранить эффективность системы кондиционирования воздуха, следует регулярно заменять фильтр кондиционера.
Способ извлечения
1) Автомобили без интеллектуальной системы входа и запуска:
⇒ Переведите переключатель двигателя в положение «LOCK».
Автомобили с интеллектуальной системой входа и запуска:
⇒ Выключите переключатель двигателя.
2) Откройте перчаточный ящик.
⇒ Снимите демпфер.
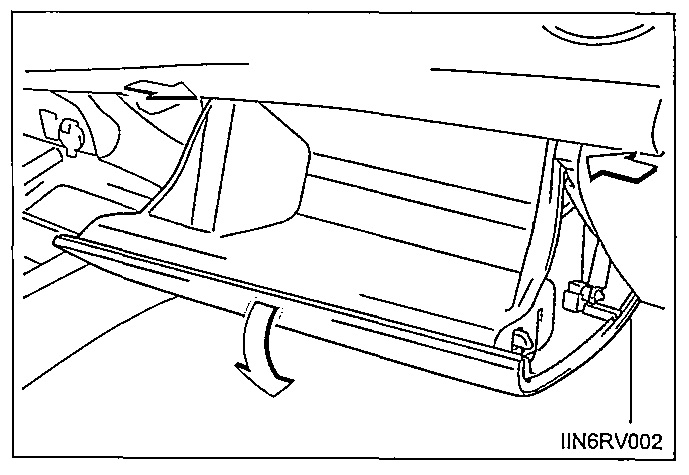
3) Нажмите на перчаточный ящик с обеих сторон для отсоединения зубцов.
4) Снимите крышку фильтра.
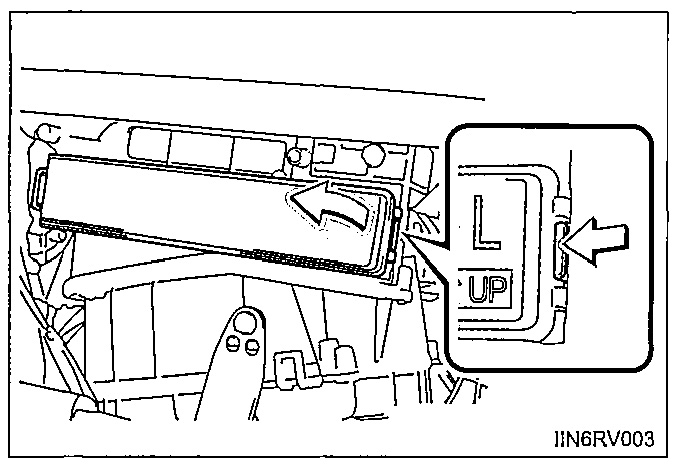
⇒ Автомобили с левым рулем
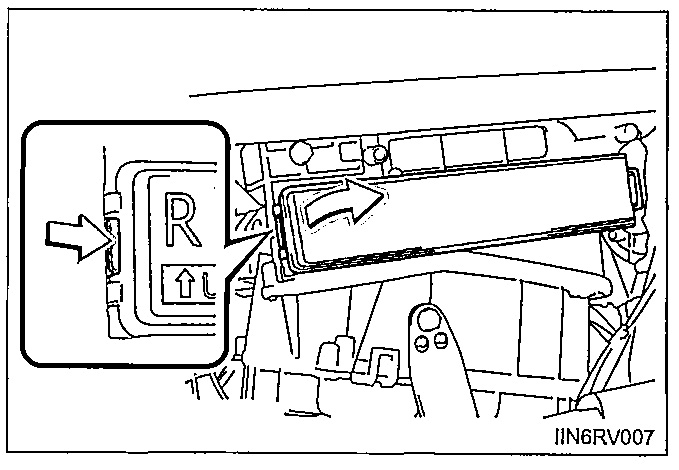
⇒ Автомобили с правым рулем
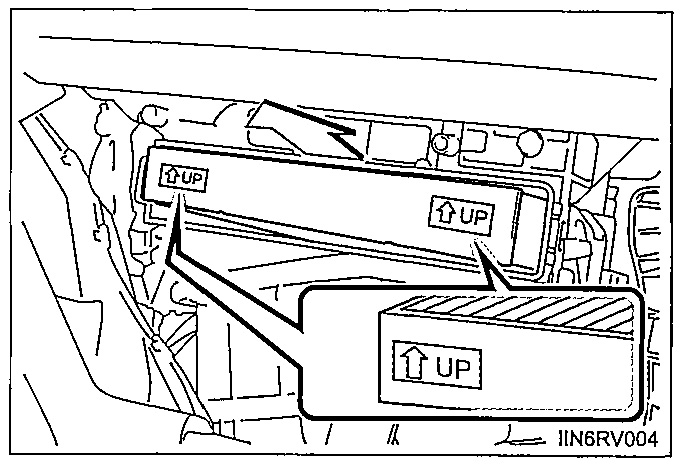
5) Снимите фильтр кондиционера и замените его новым.
Метки «UP» на фильтре должны быть обращены вверх.
■ Интервал проверки
Выполняйте осмотр и замену фильтра кондиционера в соответствии с графиком технического обслуживания. При эксплуатации автомобиля в регионах с повышенной запыленностью или на дорогах с интенсивным движением может потребоваться более ранняя замена. (За информацией по плановому обслуживанию обратитесь к Сервисной книжке Toyota или к Руководству по гарантиям Toyota.)
■ Если поступление воздуха из вентиляционных дефлекторов заметно уменьшается фильтр мог засориться. Проверьте фильтр и при необходимости замените.
ВНИМАНИЕ!
■ При использовании системы кондиционирования воздуха убедитесь в наличии фильтра.
Использование системы кондиционирования воздуха без фильтра может привести к повреждению системы.
Следует иметь в виду, что данное руководство предназначено для всех моделей и всего оборудования, в том числе и приобретаемого дополнительно. Поэтому в него может быть включено описание оборудования, которое на Вашем автомобиле не установлено. Все технические характеристики приведены на момент издания настоящего руководства. Следуя политике, направленной на постоянное совершенствование продукции, Toyota оставляет за собой право вносить изменения в любое время без предварительного уведомления. В зависимости от технических характеристик автомобиль, показанный на иллюстрациях, может отличаться от Вашего автомобиля по комплектации.
Аксессуары, запасные части и модификация автомобиля Toyota
В настоящее время в продаже имеются как оригинальные запчасти и аксессуары Toyota, так и разнообразные не оригинальные запасные части и аксессуары для автомобилей Toyota. Если выяснится, что какая-либо из оригинальных деталей или аксессуаров Toyota требует замены, корпорация Toyota рекомендует использовать для замены оригинальные запасные части и аксессуары Toyota. Возможно также использование других запасных частей и аксессуаров надлежащего качества. Однако корпорация Toyota не принимает на себя ответственности и не предоставляет никаких гарантий на запасные части и аксессуары, которые не являются оригинальными изделиями Toyota, а также на работы по замене или установке подобных изделий. Кроме того, ущерб или неполадки в работе, связанные с использованием не оригинальных запасных частей или аксессуаров Toyota, не покрываются гарантией.
Установка в автомобиле системы РЧ-передатчика может повлиять на работу таких электронных систем, как:
• Система распределенного впрыска топлива/система последовательного распределенного рыска топлива
• Система круиз-контроля
• Антиблокировочная тормозная система
• Система подушек безопасности SRS
• Система преднатяжения ремней безопасности
Обязательно проконсультируйтесь с авторизованным дилером или в ремонтной мастерской Toyota либо в организации, имеющей соответствующее оснащение и квалификацию, относительно мер предосторожности или специальных инструкций по установке РЧ-передатчика. Дополнительную информацию о диапазонах частот, уровнях мощности, положениях антенны и условиях установки РЧ-передатчиков можно запросить у авторизованного дилера Toyota или в другой организации, имеющей соответствующее оснащение и квалификацию.
Общие меры предосторожности при движении
Вождение под воздействием алкоголя и лекарственных препаратов: запрещается управлять автомобилем, находясь под воздействием алкоголя или лекарственных препаратов, которые ухудшают способность управления автомобилем. Алкоголь и некоторые лекарства замедляют реакцию, ухудшают мыслительные способности и снижают координацию, что может привести к аварии, в результате, к смертельному исходу или серьезным травмам. Безопасное вождение: управляйте автомобилем с повышенной осторожностью. Будьте готовы к возможным ошибкам со стороны других водителей или пешеходов, чтобы успеть вовремя предотвратить аварию. Внимательность водителя: всегда направляйте все свое внимание на дорогу. Все действия, отвлекающие водителя, например регулировка органов управления, разговоры по мобильному телефону или чтение, могут привести к аварии и, в результате, к смертельному исходу или тяжелым травмам как для Вас, так для пассажиров и пешеходов.
Выбор режима движения
В соответствии с условиями движения можно выбирать следующие режимы.
• Режим экологичного движения Используйте режим экологичного движения для экономии топлива во время движения с частыми ускорениями. Нажмите кнопку «ЕСО MODE», чтобы выбрать режим экологичного движения. Загорается «MODE» индикатор «ЕСО». Вновь нажмите кнопку для отмены режима экологичного движения.
• Спортивный режим
Используйте спортивный режим для мощного ускорения и движения в гористой местности. Для переключения в спортивный режим нажмите кнопку «SPORT». Загорается индикатор «SPORT». Для отключения спортивного режима нажмите эту кнопку еще раз. Для переключения в режим S переместите рычаг управления трансмиссией в положение S. После этого можно переключать передачи с помощью рычага управления трансмиссией, что позволяет двигаться на выбранной передаче. Диапазон переключения можно выбрать при помощи рычага управления трансмиссией.
• Переключение на более высокую передачу
• Переключение на более низкую передачу
Выбранный диапазон переключения передач от 1 до 6 отображается на при борах. Исходный диапазон переключения передач в режиме S автоматически устанавливается равным 5 или 4 в зависимости от нахождения автомобиля. Однако если при управления трансмиссией в положении рычага скорости D была использована функция AI-SHIFT, то может быть выбран исходный диапазон 3. (стр. 256)
• Диапазоны переключения передач и их функции
• Автоматический выбор диапазона переключения между 1 и 6 ступенями в зависимости от скорости автомобиля и условий движения. Но выбор передачи ограничен выбранным диапазоном.
• Можно выбрать один из 6 уровней торможения двигателем.
• Более низкий диапазон переключения передач обеспечивает более эффективное торможение двигателем по сравнению с более высоким диапазоном; при этом также возрастают обороты двигателя.
• Режим «S»
• Если установлен диапазон переключения 4 или ниже, то переводам рычага переключения передач в положение «+» можно установить диапазон переключения 6.
• Для предотвращения работы двигателя на слишком высоких оборотах возможно автоматическое переключение на повышенную передачу.
• При высокой температуре жидкости для защиты автоматической трансмиссии может быть автоматически выбран более высокий диапазон.
• Предупреждающий звуковой сигнал ограничения переключения на пониженную передачу В целях повышения безопасности движения и улучшения характеристик управляемости иногда переключение на более низкую передачу может быть запрещено. В некоторых обстоятельствах переключение на более низкую передачу невозможно даже при изменении положения рычага управления трансмиссией. (Предупреждающий звуковой сигнал подается два раза.)
• Работа системы кондиционирования воздуха в режиме экологичного движения Экологичный режим вождения управляет операциями обогрева/охлаждения и скоростью вентилятора* системы кондиционирования воздуха с целью повышения эффективности расхода топлива (стр. 381, 392). Для повышения эффективности кондиционирования воздуха отрегулируйте скорость вентилятора* или отключите режим экологичного движения.
*: Только автомобили с автоматической системой кондиционирования воздуха.
• Отключение режима движения
• Режим экологичного движения не будет отменен, пока не будет нажата кнопка «ЕСО MODE», даже если двигатель выключен после движения в режиме экологичного движения.
• Спортивный режим выключается при выключении переключателя двигателя после движения в спортивном режиме.
• При движении с включенной системой круиз-контроля (при наличии) Даже при выполнении следующих действий с целью включения торможения двигателем оно не будет активировано, пока не будет отменен круиз-контроль.
• При движении в режиме «S» — переключение на 5 или 4 передачу. (стр. 253)
• При переключении режима движения в спортивный режим во время движения с переключателем, установленным в положение «D». (стр. 269)
• Если рычаг управления трансмиссией не удается вывести из положения «Р»
• Если индикатор «S» не включается или индикатор «D» горит даже после перевода рычага управления трансмиссией в положение «S»
Это может указывать на неисправность в автоматической трансмиссии. Немедленно произведите осмотр автомобиля у любого авторизованного дилера или в ремонтной мастерской Toyota либо в другой организации, имеющей соответствующую квалификацию и оснащение. (В этой ситуации трансмиссия будет работать так же, как при нахождении рычага управления трансмиссией в положении «D».)
• При отображении предупреждающего сообщения о температуре жидкости автоматической трансмиссии
Если во время движения отображается предупреждающее сообщение о температуре масла для автоматических коробок передач, перейдите к вождению с положением рычага в положении «D» и сбросьте скорость, отпустив педаль газа. Остановите автомобиль в безопасном месте, переведите рычаг управления трансмиссией в положение «Р» и позвольте двигателю поработать на холостом ходу до исчезновения предупреждающего сообщения. После исчезновения предупреждающего сообщения автомобиль вновь может двигаться. Если предупреждающее сообщение не исчезает через некоторое время, произведите осмотр автомобиля у любого авторизованного дилера или в ремонтной мастерской Toyota либо в другой организации, имеющей соответствующую квалификацию и оснащение.
AI-SHIFT
Функция AI-SHIFT автоматически включает подходящую передачу в соответствии с манерой вождения водителя и условиями движения. Функция AI-SHIFT автоматически работает, когда рычаг управления трансмиссией находится в положении «D». (При переключении рычага управления трансмиссией в положение «S» эта функция отключается.)
ПРЕДОСТЕРЕЖЕНИЕ!
• При движении по скользкой дороге Не используйте резкий разгон или резкое переключение передач. Резкое изменение оборотов двигателя при торможении двигателем может вызвать занос автомобиля и привести к аварии.
| № | Спецификация / Specs | Данные |
| Габариты (мм/mm) и масса (кг/kg) / Dimensions and Weight | ||
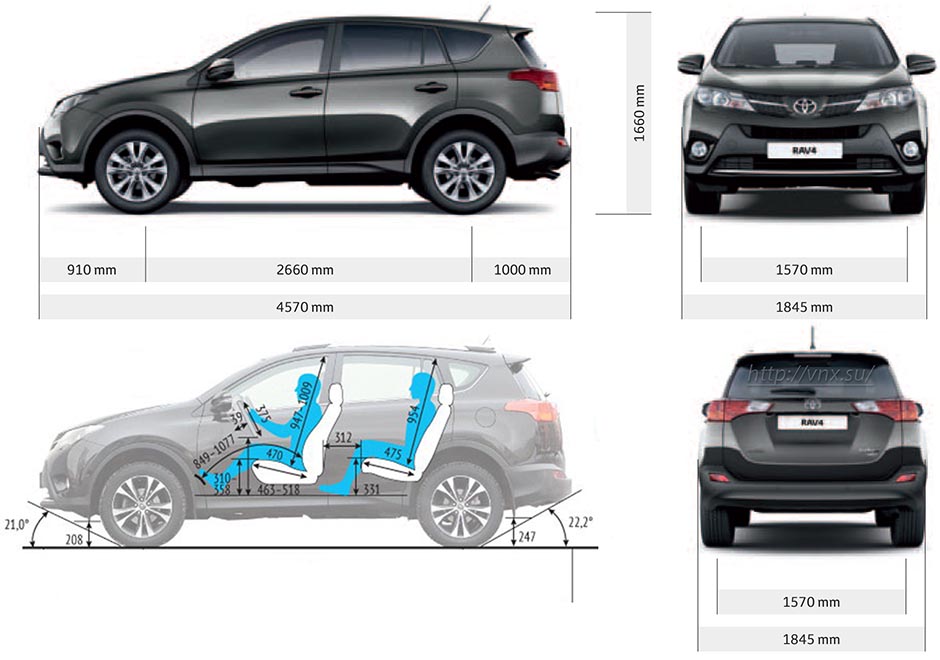
| 1 | Длина / Length | 4570 |
| 2 | Ширина (без/с зеркалами) / Width | 1845 |
| 3 | Высота (загружен/пустой) / Height | 1660/1715 — с рейлингами |
| 4 | Колёсная база / Wheelbase | 2660 |
| 5 | Дорожный просвет (клиренс) / Ground clearance | 197 |
| 6 | Снаряжённая масса / Total (curb) weight | 1490–1570 |
| Полная масса / Gross (max.) weight | 2000 | |
|
Двигатель / Engine |
||
| 7 | Тип / Engine Type, Code | Бензиновый, жидкостного охлаждения, четырехтактный, 3ZR-FE цепной привод с системой Dual VVT-i |
| 8 | Количество цилиндров / Cylinder arrangement: Total number of cylinders, of valves | 4-цилиндровый, рядный, 16V, DOHC с верхним расположением двух распределительных валов |
| 9 | Диаметр цилиндра / Bore | 80.5 мм |
| 10 | Ход поршня / Stroke | 97.6 мм |
| 11 | Объём / Engine displacement | 1987 см³ |
| 12 | Система питания / Fuel supply, Aspiration | Распределенный впрыск топлива EFI |
| Атмосферный | ||
| 13 | Степень сжатия / Compression ratio | 10.0:1 |
| 14 | Максимальная мощность / Max. output power kW (HP) at rpm | 107 кВт (146 л.с.) при 6200 об/мин |
| 15 | Максимальный крутящий момент / Max. torque N·m at rpm | 187 Нм при 3600 об/мин |
|
Трансмиссия / Transmission |
||
| 16 | Сцепление / Clutch type | Однодисковое, сухое, с диафрагменной нажимной пружиной и гасителем крутильных колебаний, постоянно замкнутого типа |
| 17 | КПП / Transmission type | МКПП 6 шестиступенчатая механическая, двухвальная, с синхронизаторами на всех передачах переднего хода |
О Книге
- Название: Toyota RAV4 2013 Руководство для Владельца
- Бензиновые двигатели: 3ZR-FE 2.0 л (1987 см³) 146-151 л.с./107-111 кВт, 2AR-FE 2.5 л (2494 см³) 180 л.с./132 кВт и дизельными 1AD-FТV D-4D 2.0 л (1998 см³) 124 л.с./91 кВт, 2AD-FТV/2AD-FHV 2.2 л (2231 см³) 150 л.с./110 кВт
- Выпуск с 2013 года
- Серия: «Owner Guide»
- Год издания: 2013
- Автор: Overseas Service Division
- Издательство: «Toyota Motors Corporation»
- Формат: PDF
- Страниц в книге: 768
- Размер: 23.82 МБ
- Язык: Русский
- Количество электросхем: 0
Toyota RAV 4 с 2013 года. Руководство по ремонту, эксплуатации и обслуживанию. Цветные электросхемы
cкачать в формате PDF
![]()
Автомануал по ремонту Toyota Rav4 в электронном виде. Руководство будет всегда под рукой во время обслуживания и ремонта автомобиля, для этого его достаточно бесплатно скачать на планшет или телефон в формате pdf.
Перед использованием автомануала проверьте соответствие года выпуска и двигателя автомобиля.
Язык: Русский
Формат: pdf
Размер файла: 174,3 Mb
электронная книга в формате pdf
Помните, что в комплектацию Вашего автомобиля могут входить не все описанные в руководстве функции. В руководстве по ремонту возможны расхождения с описанием Вашего конкретного автомобиля, а также вы можете встретить описание таких вариантов исполнения и такого оборудования, которые отсутствуют на вашем автомобиле.
Чтобы скачать книгу по ремонту Toyota Rav4, вам необходимо перейти по ссылке Скачать , подтвердить ознакомление с условиями использования и загрузить файл на ваше устройство. Мы не ограничиваем скорость загрузки. Если у вас возникнут трудности — воспользуйтесь формой обратной связи. Мы постараемся решить проблему и ответить вам как можно быстрее.
![]()
Что вы найдете в книге по ремонту Toyota Rav4?
Подробную информацию об устройстве автомобиля.
Алгоритм определения неисправностей, систему ежедневных и периодических проверок, справочную информацию по самодиагностике Toyota Rav4.
Инструкцию по своевременному обслуживанию автомобиля.
Пошаговое руководство по самостоятельному ремонту Toyota Rav4.
Описание книги
Книга по ремонту Toyota Rav4
Эксплуатация любого автомобиля Toyota Rav4 невозможна без знаний его устройства, особенностей обслуживания и ремонта. Не имеет значения, кем будут производиться необходимые работы, — каждый водитель просто обязан знать элементарные процедуры ухода и устранения неполадок.
Книга по ремонту Toyota Rav4 содержит в себе все необходимые сведения, которые помогут владельцу разобраться в устройстве автомобиля, научат грамотному уходу за автомобилем, своевременному техническому обслуживанию и правильному ремонту.
Руководство по ремонту Toyota Rav4 разделено на главы:
Устройство автомобиля (описываются общие сведения и паспортные данные автомобиля);
Инструкция по эксплуатации (подготовка к выезду, рекомендации по безопасности движения);
Неисправности в пути (советы, которые помогут Вам в случае неожиданной поломки в дороге);
Техническое обслуживание (подробные рекомендации по проведению всех процедур обслуживания);
Инструкции по ремонту (двигатель, трансмиссия, ходовая часть, рулевое управление, тормозная система, а также включены сборочно-разборочные работы, необходимые в процессе ремонта Toyota Rav4);
Электрооборудование (подробный мануал по диагностике и устранению неисправностей, отдельно описаны основные блоки и даны подробные электрические схемы Toyota Rav4).
Любая из процедур ремонта Toyota Rav4 приведена по принципу от простого к сложному: от простейших операций по обслуживанию, регулировке, замене деталей, до глобального ремонта со сборочно-разборочными работами.
Все материалы книги основаны на конкретном опыте, полученном в процессе полной разборки и сборки Toyota Rav4 высококвалифицированными автомеханиками.
Книга «Toyota RAV 4 с 2013 года. Руководство по ремонту, эксплуатации и обслуживанию. Цветные электросхемы» необходима, чтобы диагностика и ремонт Toyota Rav4 могли быть сделаны профессионально и быстро даже владельцем автомобиля, который ещё имеет мало практического опыта.
Бесплатно скачать руководство по ремонту Toyota Rav4 Вы можете в формате pdf. Его достаточно закачать в свой телефон либо планшет и в любой ситуации на дороге Вы сможете им воспользоваться.
Источник
Toyota RAV 4: руководство по эксплуатации

Toyota RAV 4: руководство по эксплуатации автомобиля.
Toyota RAV 4: руководство по эксплуатации
Инструкция Toyota RAV 4: содержание
Для вашего сведения 8
Чтение данного Руководства по эксплуатации Тойота РАВ 4 12
Способы поиска 13
Иллюстрированный указатель 14 1-1.
Инструкция Тойота РАВ 4 Для безопасности и защиты
Для безопасной эксплуатации
Перед началом движения 34
В целях безопасности движения 36
Ремни безопасности 38
Подушки безопасности SRS… 46
Инструкция по эксплуатации системы ручного включения-выключения подушек безопасности Тойота РАВ 4 59
Сведения по безопасности детей 61
Системы безопасности для детей Инструкция по эксплуатации Toyota RAV4
 62
62
Установка системы безопасности для детей 73
Меры предосторожности в отношении выхлопных газов 86
1-2. Охранная система
Система иммобилайзера
двигателя 87
Система двойного
запирания 96
Охранная система 97
Руководство Тойота РАВ 4 Комбинация приборов
Комбинация приборов
Контрольные лампы и индикаторы 104
Приборы и указатели 111
Многофункциональный дисплей 115
Информация о расходе топлива 122
3- 1. Информация о ключах
Ключи 126
3- 2. Открывание, закрывание и запирание дверей
Боковые двери 149
Дверь багажного
отделения 155
Тойота РАВ 4 инструкция по эксплуатации интеллектуальной системы входа и запуска 178
3- 3. Регулировка сидений
Передние сиденья 200
Задние сиденья 202
Память положений водителя …205
Подголовники 207
3- 4. Регулировка рулевого колеса и зеркал
Рулевое колесо 210
Внутреннее зеркало заднего вида 212
Наружные зеркала
заднего вида 214
3- 5. Открывание и закрывание окон и люка Окна с электроприводом стеклоподъемников Люк
^ Вождение
4- 1. Перед началом движения
Управление автомобилем…. 228
Груз и багаж 240
Буксировка прицепа 242
Тойота РАВ 4 Инструкция по эксплуатации Вождение
4- 2. Вождение
Переключатель двигателя (зажигания) (автомобили без интеллектуальной системы входа и запуска) 255
Переключатель двигателя (зажигания) (автомобили с интеллектуальной системой входа и запуска) 259
Автоматическая трансмиссия
(с режимом S) 266
Автоматическая трансмиссия
(с режимом M) 274
Бесступенчатая трансмиссия Multidrive Инструкция по эксплуатации Toyota RAV4
284
Ручная трансмиссия 293
Рычаг указателей поворота 297
Стояночный тормоз 298
Система DPF (Diesel Particulate Filter, фильтр очистки дизельного топлива от микрочастиц)/
DPNR (фильтр очистки дизельного топлива от сажи и окислов азота) 299
Тойота РАВ 4 Руководство по эксплуатации световых приборов и стеклоочистителей
Переключатель света фар ….301
Автоматический дальний свет фар 307
Переключатель противотуманных фар/ задних противотуманных
фонарей 311
Стеклоочистители и омыватель ветрового стекла 313
Стеклоочиститель и омыватель заднего стекла 318
4- 4. Заправка
Открывание крышки заливной горловины топливного бака 320
4- 5. Использование других систем помощи при вождении Toyota Safety Sense 323
PCS (Pre-Crash Safety system, система предаварийной безопасности) 333
LDA (система предупреждения о выходе за пределы полосы с рулевым управлением) 350
RSA (Road Sign Assist, система информирования о дорожных знаках) 360
Динамический радарный круиз-контроль 365
Круиз-контроль 378
Ограничитель скорости 383
Система помощи при парковке Toyota 386
Переключатель включения полного привода (модели с полным приводом) 396
Система Stop & Start 397
Система помощи при спуске с холма 413
BSM (Blind Spot Monitor, монитор слепых зон) 415
• Функция монитора слепых зон 421
• Функция предупреждения водителя о наличии других автомобилей 425
Мануал РАВ 4 по системам помощи при вождении 428
4-6. Советы водителю
Советы по вождению зимой 435
Меры предосторожности при использовании внедорожного автомобиля 440
Тойота РАВ 4 Руководство по эксплуатации аудиосистемы
5- 1. Основные операции
Типы аудиосистем 446
Использование переключателей управления аудиосистемой
на рулевом колесе 448
AUX-nopT/USB-порт 451
5- 2. Использование аудиосистемы
Оптимальное использование
аудиосистемы 453
5- 3. Использование радиоприемника
Управление радиоприемником 455
5- 4. Воспроизведение аудио-CD и дисков MP3/WMA
Управление CD-плеером 458
5- 5. Использование внешнего устройства
Прослушивание iPod 467
Прослушивание
аудио с USB-памяти 474
Использование порта AUX….480
Bluetooth®
Аудиоустройство/
телефон Bluetooth® 481
Использование переключателей на рулевом колесе 486
Регистрация устройства Bluetooth® 487
5-7. Меню “SETUP”
Использование меню “SETUP”
(меню “Bluetooth*”) 488
Использование меню “SETUP” (меню “PHONE” или “TEL”) Инструкция по эксплуатации Toyota RAV4 495
5-8. Аудиоустройство Bluetooth® Использование портативного плеера, оснащенного Bluetooth® 502
5-9. Телефон Bluetooth®
Вызов по телефону 504
При приеме телефонного вызова 506
Разговор по телефону 507
5-10. Bluetooth®
Тойота РАВ 4 руководство по эксплуатации оборудования салона
Тойота РАВ 4: инструкция по использованию системы кондиционирования воздуха и функций устранения запотевания стекол
Система кондиционирования воздуха с ручным управлением 516
Система кондиционирования воздуха с автоматическим
управлением 524
Дополнительный отопитель 535
Обогрев рулевого колеса/ обогрев сидений 537
6- 2. Использование освещения салона
Перечень средств освещения
салона 540
• Фонари освещения салона 541
• Фонари персонального освещения 541
6- 3. Использование функций хранения вещей
Перечень функций хранения вещей 543
• Перчаточный ящик 544
• Вещевой отсек консоли ….544
• Держатели стаканов 545
• Держатели бутылок 546
• Дополнительный отсек 547
Оснащение багажного
отделения 548
6- 4. Использование прочего оборудования салона
Прочее оборудование салона 560
• Солнцезащитные козырьки 560
• Косметические зеркала ….560
• Переносная пепельница 561
• Электрические розетки 562
• Подлокотник 563
• Крючки для одежды 563
• Дополнительные ручки 564
ЭРА-ГЛОНАСС/ЭВАК 565
Тойота РАВ 4: руководство по уходу за автомобилем и техническому обслуживанию
Наружная чистка и защита автомобиля 572
Чистка и защита салона автомобиля 577
7- 2. Техническое обслуживание Требования к техническому обслуживанию 580
Плановое техническое обслуживание 584
7- 3. Самостоятельное техническое обслуживание Мануал РАВ 4
Меры предосторожности при самостоятельном техническом обслуживании 595
Капот 599
Установка напольного домкрата 601
Моторный отсек 602
Шины 622
Давление в шинах 639
Колесные диски 641
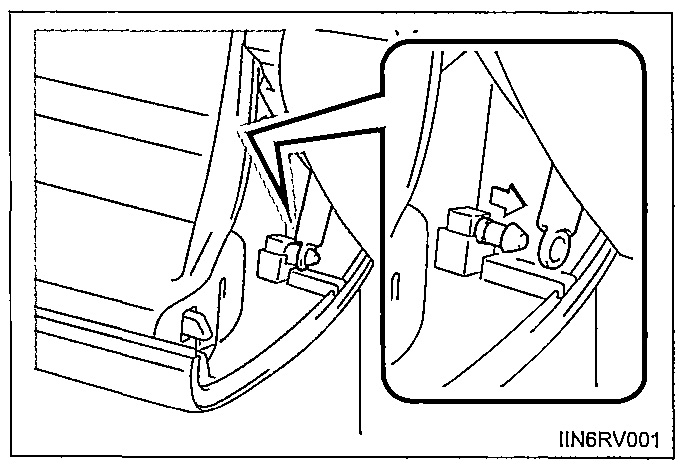
Фильтр кондиционера 644
ключа 646
Проверка и замена плавких
предохранителей 650
Лампы 654
Тойота РАВ 4 руководство по действию в экстренных ситуациях
- 8- 1. Важная информация
- Аварийные сигналы 666
- Если требуется экстренно остановить автомобиль 667
- 8- 2. Действия в экстренных ситуациях в буксировке 669
- При наличии каких-либо сомнений 675
- Система отключения топливного насоса Мануал РАВ 4 (только бензиновый двигатель) 676
- Если горит контрольная лампа или звучит предупреждающий сигнал 677
- Если отображается предупреждающее сообщение 688
- Если спущена шина (автомобили с запасным колесом) 712
- Если спущена шина (автомобили без запасного колеса) 728
- Если двигатель не запускается 746
- Если электронный ключ не работает надлежащим образом (автомобили с интеллектуальной системой входа и запуска) 748
- Если разряжен аккумулятор 752
- Если двигатель перегрелся 761
- Если закончилось топливо и двигатель заглох 764
- Если автомобиль увяз 765
Технические характеристики автомобиля Тойота РАВ 4 770
Здесь можно скачать руководство Тойота РАВ 4 или читать его онлайн.
Источник
Руководства по эксплуатации, обслуживанию и ремонту Toyota RAV4
Сборник руководств на английском языке по техническому обслуживанию и ремонту автомобиля Toyota RAV4 1996-1999 годов выпуска.
- Автор: —
- Издательство: Toyota Motor Corporation
- Год издания: —
- Страниц: —
- Формат: PDF
- Размер: 87,5 Mb
Repair Manual Toyota RAV4 2001-2005.
Сборник руководств на английском языке по техническому обслуживанию и ремонту автомобиля Toyota RAV4 2001-2005 годов выпуска.
- Автор: —
- Издательство: Toyota Motor Corporation
- Год издания: —
- Страниц: —
- Формат: PDF
- Размер: 500,6 Mb
Repair Manual Toyota RAV4 2006-2012.
Сборник руководств на английском языке по техническому обслуживанию и ремонту автомобиля Toyota RAV4 2006-2012 годов выпуска.
- Автор: —
- Издательство: Toyota Motor Corporation
- Год издания: —
- Страниц: —
- Формат: PDF
- Размер: 1,5 Gb
Repair Manual Toyota RAV4 2013-2014.
Сборник руководств на английском языке по техническому обслуживанию и ремонту автомобиля Toyota RAV4 2013-2014 годов выпуска.
- Автор: —
- Издательство: Toyota Motor Corporation
- Год издания: —
- Страниц: —
- Формат: PDF, HTML
- Размер: 239,7 Mb
Service Information Library Toyota RAV4 30 series.
Мультимедийное руководство на английском языке по техническому обслуживанию и ремонту автомобиля Toyota RAV4 30-й серии.
- Автор: —
- Издательство: Toyota Motor Corporation
- Год издания: —
- Страниц: —
- Формат: ISO
- Размер: 120,5 Mb
Инструкции пользователя Toyota RAV4 2006-2013 г.
Сборник руководств на русском и английском языках по эксплуатации дополнительных систем автомобиля Toyota RAV4 2006-2013 годов выпуска.
- Автор: —
- Издательство: Toyota Motor Company
- Год издания: —
- Страниц: —
- Формат: PDF
- Размер: 99,0 Mb
Ремонт и ТО Toyota RAV4 1994-2006 г.

Руководство по техническому обслуживанию и ремонту автомобиля Toyota RAV4 1994-2006 годов выпуска с бензиновыми и дизельными двигателями.
- Автор: Б. Хендерсон, Э. Легг
- Издательство: Алфамер
- Год издания: —
- Страниц: 404
- Формат: —
- Размер: —
Руководство для владельца Toyota RAV4 2012 г.
Руководство по эксплуатации и техническому обслуживанию автомобиля Toyota RAV4 2012 года выпуска.
- Автор: —
- Издательство: Toyota Motor Company
- Год издания: 2011
- Страниц: 658
- Формат: JPG
- Размер: 210,1 Mb
Руководство для владельца Toyota RAV4.
Руководство по эксплуатации и техническому обслуживанию автомобиля Toyota RAV4 2000-2005 годов выпуска.
- Автор: —
- Издательство: MoToR
- Год издания: —
- Страниц: 280
- Формат: —
- Размер: —
Руководство по ремонту и ТО Toyota RAV4 1994-2000 г.

Руководство по эксплуатации, техническому обслуживанию и ремонту + каталог расходных запчастей автомобиля Toyota RAV4 1994-2000 годов выпуска.
- Автор: —
- Издательство: Легион-Автодата
- Год издания: —
- Страниц: 368
- Формат: —
- Размер: —
Руководство по ремонту и ТО Toyota RAV4 2006-2009 г.
Мультимедийное руководство по техническому обслуживанию и ремонту автомобиля Toyota RAV4 2006-2009 годов выпуска.
- Автор: —
- Издательство: —
- Год издания: —
- Страниц: —
- Формат: —
- Размер: 62,0 Mb
Руководство по ремонту и ТО Toyota RAV4 2006-2013 г.
Руководство по эксплуатации, техническому обслуживанию и ремонту + каталог расходных запчастей автомобиля Toyota RAV4 2006-2013 годов выпуска с бензиновыми двигателями объемом 2,0/2,4 л.
- Автор: —
- Издательство: Легион-Автодата
- Год издания: —
- Страниц: 534
- Формат: —
- Размер: —
Руководство по ремонту и ТО Toyota RAV4 2013-2019 г.
Руководство по эксплуатации, техническому обслуживанию и ремонту + каталог расходных запчастей автомобиля Toyota RAV4 2013-2019 годов выпуска с бензиновыми двигателями объемом 2,0/2,5 л.
- Автор: —
- Издательство: Легион-Автодата
- Год издания: —
- Страниц: 724
- Формат: —
- Размер: —
Руководство по ремонту и ТО Toyota RAV4 с 2005 г.
Руководство по эксплуатации, техническому обслуживанию и ремонту автомобилей Toyota RAV4 с 2005 и Toyota Vanguard 2007-2013 годов выпуска с правым расположением руля и бензиновыми двигателями объемом 2,4/3,5 л.
- Автор: —
- Издательство: Легион-Автодата
- Год издания: —
- Страниц: 464
- Формат: —
- Размер: —
Руководство по ремонту и эксплуатации Toyota RAV4 с 2006 г.
Руководство по эксплуатации и ремонту автомобиля Toyota RAV4 с 2006 года выпуска с бензиновыми и дизельными двигателями.
- Автор: —
- Издательство: Монолит
- Год издания: —
- Страниц: 698
- Формат: —
- Размер: —
Руководство по ремонту и эксплуатации Toyota RAV4 с 2008 г.
Руководство по эксплуатации и ремонту автомобиля Toyota RAV4 с 2008 года выпуска с бензиновыми и дизельными двигателями.
- Автор: —
- Издательство: Монолит
- Год издания: —
- Страниц: 360
- Формат: —
- Размер: —
Руководство по ремонту и эксплуатации Toyota RAV4 с 2013 г.
Руководство по эксплуатации и ремонту автомобиля Toyota RAV4 с 2013 года выпуска с бензиновыми и дизельными двигателями.
- Автор: —
- Издательство: Монолит
- Год издания: —
- Страниц: 626
- Формат: —
- Размер: —
Руководство по ремонту и эксплуатации Toyota RAV4 с 2013 г.
Руководство по эксплуатации и ремонту автомобиля Toyota RAV4 с 2013 года выпуска с бензиновыми и дизельными двигателями.
- Автор: —
- Издательство: Монолит
- Год издания: 2014
- Страниц: 595
- Формат: PDF
- Размер: 253,5 Mb
Руководство по ремонту и эксплуатации Toyota RAV4 с 2018 г.

Руководство по эксплуатации и ремонту автомобиля Toyota RAV4 с 2018 года выпуска с бензиновыми двигателями объемом 2,0/2,5 л.
- Автор: —
- Издательство: Монолит
- Год издания: —
- Страниц: 444
- Формат: —
- Размер: —
Руководство по эксплуатации Toyota RAV4 выпуска с 2006 г.
Руководство по эксплуатации и техническому обслуживанию автомобиля Toyota RAV4 с 2006 года выпуска.
- Автор: —
- Издательство: MoToR
- Год издания: —
- Страниц: 452
- Формат: —
- Размер: —
Устройство, ТО и ремонт Toyota RAV4 1994-2000 г.

Руководство по техническому обслуживанию и ремонту автомобиля Toyota RAV4 1994-2000 годов выпуска.
- Автор: —
- Издательство: —
- Год издания: —
- Страниц: 293
- Формат: PDF
- Размер: 31,9 Mb
Устройство, ТО и ремонт Toyota RAV4 2000-2005 г.
Руководство по техническому обслуживанию и ремонту автомобиля Toyota RAV4 2000-2005 годов выпуска с бензиновым двигателем объемом 2,0 л.
- Автор: —
- Издательство: Легион-Автодата
- Год издания: 2006
- Страниц: 317
- Формат: —
- Размер: —
Устройство, ТО и ремонт Toyota RAV4 2000-2005 г.
Руководство по эксплуатации, техническому обслуживанию и ремонту + каталог расходных запчастей автомобиля Toyota RAV4 2000-2005 годов выпуска с бензиновыми двигателями объемом 1,8/2,0 л.
- Автор: —
- Издательство: Легион-Автодата
- Год издания: —
- Страниц: 404
- Формат: —
- Размер: —
Эксплуатация, обслуживание, ремонт Toyota RAV4 с 2006 г.
Руководство по эксплуатации, техническому обслуживанию и ремонту автомобиля Toyota RAV4 с 2006 года выпуска.
- Автор: —
- Издательство: Монолит
- Год издания: —
- Страниц: 338
- Формат: —
- Размер: —
Источник
Всех приветствую. Выкладываю свою подброрку литературы по ремонту и эксплуатации RAV4 все поколения, в том числе двигатели и трансмиссии.
В данной подборке вы найдете следующие книжки в формате PDF.
Toyota Rav4 1994-2000 Третий рим
Toyota Rav4 1994-2000 Легион
Toyota Rav4 1994-2005 Гуси-Лебеди

Toyota Rav4 1994-2006 Алфамер

Toyota Rav4 2000-2005 Легион
Toyota Rav4 2000-2005 Легион Правый руль
Toyota Rav4 2006 Монолит
Toyota RAV4 2006 Монолит v2 Long
Toyota Rav4 2006 Третий рим

Toyota Rav4 2006-2013 Легион Правый руль
Toyota Rav4 2008 Монолит
Toyota Rav4 2013 Легион
Toyota Rav4 2013 Монолит

Toyota Rav4 2018 Монолит
Toyota двигатели 1AZ-FE 2AZ-FE Легион редакции (2006) (2010)
Toyota двигатели 3S-FE, 3S-FSE

Коды ошибок Тойота и методы устранения
Так же «Toyota двигатели 1AZ-FE 2AZ-FE 2AD-FHV 2AD-FTV», «Трансмиссия U140F-U341E-rus-manual»
Ну и ссылочка на все это добро.
drive.google.com/drive/fo…XS3NePS8jQJBk?usp=sharing
Всем удачи.

- Manuals
- Brands
- Toyota Manuals
- Automobile
- 2013 RAV4
- Owner’s manual
-
Contents
-
Table of Contents
-
Troubleshooting
-
Bookmarks
Quick Links
Related Manuals for Toyota RAV4 2013
Summary of Contents for Toyota RAV4 2013
-
Page 3
Pictorial index Search by illustration For safety Make sure to read through them and security Instrument How to read the gauges and meters, the variety of cluster warning lights and indicators, etc. Operation of Opening and closing the doors and windows, each component adjustment before driving, etc. -
Page 4: Table Of Contents
TABLE OF CONTENTS For your information …….8 Instrument cluster Reading this manual…..12 How to search ……13 Pictorial index …….14 Instrument cluster Warning lights For safety and security and indicators….82 Gauges and meters….. 87 Multi-information display ..88 1-1. For safe use Before driving…….24 Operation of For safety drive ….26…
-
Page 5
4-5. Using the driving support 4-1. Before driving systems Driving the vehicle …..158 Cruise control ….240 Cargo and luggage ….171 Toyota parking Trailer towing …..173 assist-sensor ….244 4-2. Driving procedures All-wheel drive lock Engine (ignition) switch switch (AWD models)..250 (vehicles without a smart Driving assist systems.. -
Page 6
TABLE OF CONTENTS 5-3. Using the interior lights Interior features Interior lights list ….301 • Interior lights ….302 5-1. Using the air conditioning • Personal lights ….302 system and defogger 5-4. Using the storage features Manual air conditioning List of storage features.. -
Page 7
Maintenance and care When trouble arises 6-1. Maintenance and care 7-1. Essential information Cleaning and protecting Emergency flashers ..410 the vehicle exterior ..330 If your vehicle has to Cleaning and protecting be stopped in an emergency …… 411 the vehicle interior …335 6-2. -
Page 8
TABLE OF CONTENTS Vehicle specifications Index 8-1. Specifications What to do if… (Troubleshooting) ….504 Maintenance data (fuel, oil level, etc.)…480 Alphabetical index…… 510 Fuel information ….496 8-2. Customization Customizable features ..498 8-3. Items to initialize Items to initialize ….502… -
Page 10: For Your Information
Accessories, spare parts and modification of your Toyota A wide variety of non-genuine spare parts and accessories for Toyota vehi- cles are currently available in the market. Using these spare parts and acces-…
-
Page 11
SRS airbag system ● Seat belt pretensioner system Be sure to check with your Toyota dealer for precautionary measures or spe- cial instructions regarding installation of a mobile two-way radio system. Vehicle data recordings Your Toyota is equipped with several sophisticated computers that will record certain data, such as: •… -
Page 12
EDR. ● Disclosure of the EDR data Toyota will not disclose the data recorded in an EDR to a third party except when: • An agreement from the vehicle’s owner (or the lessee for a leased vehi- cle) is obtained •… -
Page 13
Be sure to have the systems of the SRS airbag and seat belt pretensioner removed and disposed of by a qualified service shop or by your Toyota dealer before you scrap your vehicle. -
Page 14: Reading This Manual
Reading this manual CAUTION: Explains something that, if not obeyed, could cause death or serious injury to people. NOTICE: Explains something that, if not obeyed, could cause damage to or a malfunction in the vehicle or its equipment. 1 2 3 Indicates operating or working procedures.
-
Page 15: How To Search
How to search ■ Searching by name • Alphabetical index ..P. 510 ■ Searching installation position • Pictorial index….P. 14 ■ Searching by symptom or sound • What to do if… (Troubleshooting) ..P. 504 ■ Searching by title •…
-
Page 16: Pictorial Index
Pictorial index Pictorial index ■ Exterior Side doors ……..P. 117 Locking/unlocking .
-
Page 17
Pictorial index Windshield wipers ……. . . P. 228 Precautions against winter season ….. P. 269 Precautions against car wash . -
Page 18
Pictorial index ■ Instrument panel Engine switch ……. . P. 184, 188 Starting the engine/changing the modes . -
Page 19
Pictorial index Shift lever (Manual transmission) ….P. 214 Changing the shift position ……P. 214 Precautions against towing . -
Page 20
Pictorial index ■ Switches Outside rear view mirror switches ….P. 145 Headlight leveling dial ……P. 224 VSC OFF switch. -
Page 21
Pictorial index Audio remote control switches ….. . P. 299 Telephone switches……. . P. 299 “DISP”… -
Page 22
….P. 263 BSM (Blind Spot Monitor) main switch Toyota parking-assist sensor switch ….P. 244 Emergency flasher switch . -
Page 23
Pictorial index ■ Interior SRS airbags ……..P. 36 Floor mats . -
Page 24
Pictorial index Inside rear view mirror ……P. 142 Sun visors ……..P. 319 Vanity mirrors . -
Page 25
For safety and security 1-1. For safe use Before driving…….24 For safety drive ….26 Seat belts……28 SRS airbags……36 Safety information for children……47 Child restraint systems ..48 Installing child restraints ..58 Exhaust gas precautions ..71 1-2. Theft deterrent system Engine immobilizer system …….72 Double locking system..74 Alarm ……..75… -
Page 26: 1-1. For Safe Use
1-1. For safe use Before driving Floor mat Use only floor mats designed specifically for vehicles of the same model and model year as your vehicle. Fix them securely in place onto the carpet. Insert the retaining hooks (clips) into the floor mat eyelets. Turn the upper knob of each retaining hook (clip) to secure the floor mats in place.
-
Page 27
When installing the driver’s floor mat ● Do not use floor mats designed for other models or different model year vehicles, even if they are Toyota Genuine floor mats. ● Only use floor mats designed for the driver’s seat. ●… -
Page 28: For Safety Drive
1-1. For safe use For safety drive For safe driving, adjust the seat and mirror to an appropriate position before driving. Correct driving posture Adjust the angle of the seat- back so that you are sitting straight up and so that you do not have to lean forward to steer.
-
Page 29
1-1. For safe use Adjusting the mirrors Make sure that you can see backward clearly by adjusting the inside and outside rear view mirrors properly. (→P. 142, 145) CAUTION Observe the following precautions. Failure to do so may result in death or serious injury. ●… -
Page 30: Seat Belts
1-1. For safe use Seat belts Make sure that all occupants are wearing their seat belts before driving the vehicle. Correct use of the seat belts ● Extend the shoulder belt so that it comes fully over the shoulder, but does not come into contact with the neck or slide off the shoulder.
-
Page 31
1-1. For safe use Fastening the seat belt (for the rear center seat) Press the plate to release, and then pull the seat belt. Push the plate into the buckle in Plate “B” Plate “A” the order of plate “A” and plate “B”… -
Page 32
1-1. For safe use Releasing and stowing the seat belt (for the rear center seat) To release the hooked buckle “B”, push the buckle release button. Release button To release the hooked plate “A”, insert the mechanical key (→P. 98) or plate “B” or the wireless key into the hole on the buckle. -
Page 33
1-1. For safe use Adjusting the seat belt shoulder anchor height (front seats) Push the seat belt shoulder anchor down while pressing the release button. Push the seat belt shoulder anchor up. Move the height adjuster up and down as needed until you hear a click. -
Page 34
If the vehicle is involved in multiple collisions, the pretensioner will activate for the first collision, but will not activate for the second or subsequent collisions. ■ Seat belt regulations If seat belt regulations exist in the country where you reside, please contact your Toyota dealer for seat belt replacement or installation. -
Page 35
Each seat belt should be used by one person only. Do not use a seat belt for more than one person at once, including children. ● Toyota recommends that children be seated in the rear seat and always use a seat belt and/or an appropriate child restraint system. ●… -
Page 36
Seat belt pretensioners If the pretensioner has activated, the SRS warning light will come on. In that case, the seat belt cannot be used again and must be replaced at your Toyota dealer. ■ Adjustable shoulder anchor Always make sure the shoulder belt is positioned across the center of your shoulder. -
Page 37
● Do not attempt to install, remove, modify, disassemble or dispose of the seat belts. Have any necessary repairs carried out by your Toyota dealer. Inappropriate handling of the pretensioner may prevent it from operating properly resulting in death or serious injury. -
Page 38: Srs Airbags
1-1. For safe use SRS airbags The SRS airbags inflate when the vehicle is subjected to certain types of severe impacts that may cause significant injury to the occupants. They work together with the seat belts to help reduce the risk of death or serious injury. ◆…
-
Page 39
1-1. For safe use SRS airbag system components Side impact sensors (rear) Front impact sensors Curtain shield airbags Seat belt pretensioners and force limiters Side airbags Airbag sensor assembly Driver airbag Driver knee airbag SRS warning light Driver’s seat belt buckle Front passenger’s seat belt switch… -
Page 40
1-1. For safe use The main SRS airbag system components are shown above. The SRS airbag system is controlled by the airbag sensor assembly. As the airbags deploy, a chemical reaction in the inflators quickly fills the airbags with non-toxic gas to help restrain the motion of the occu- pants. -
Page 41
An infant or child who is too small to use a seat belt should be properly secured using a child restraint sys- tem. Toyota strongly recommends that all infants and children be placed in the rear seats of the vehicle and properly restrained. The rear seats are safer for infants and children than the front passenger seat. -
Page 42
1-1. For safe use CAUTION ■ SRS airbag precautions ● Do not lean against the door, the roof side rail or the front, side and rear pil- lars. ● Do not allow anyone to kneel on the passenger seat toward the door or put their head or hands outside the vehicle. -
Page 43
1-1. For safe use CAUTION ■ SRS airbag precautions ● Do not attach anything to areas such as a door, windshield glass, side door glass, front or rear pillar, roof side rail and assist grip. ● Vehicles without a smart entry & start system: Do not attach any heavy, sharp or hard objects such as keys and accessories to the key. -
Page 44
Modification and disposal of SRS airbag system components Do not dispose of your vehicle or perform any of the following modifications without consulting your Toyota dealer. The SRS airbags may malfunction or deploy (inflate) accidentally, causing death or serious injury. -
Page 45
1-1. For safe use ■ If the SRS airbags deploy (inflate) ● Bruising and slight abrasions may result from contact with a deploying (inflating) SRS airbag. ● A loud noise and white powder will be emitted. ● Parts of the airbag module (steering wheel hub, airbag cover and inflator) as well as the front seats, parts of the front and rear pillars, and roof side rails may be hot for several minutes. -
Page 46
1-1. For safe use ■ Conditions under which the SRS airbags may deploy (inflate), other than a collision The SRS front airbags and SRS curtain shield airbags may also deploy if a serious impact occurs to the underside of your vehicle. Some examples are shown in the illustration. -
Page 47
1-1. For safe use ■ Types of collisions that may not deploy the SRS airbags (SRS side and curtain shield airbags) The SRS side and curtain shield airbags may not activate if the vehicle is subjected to a collision from the side at certain angles, or a collision to the side of the vehicle body other than the passenger compartment. -
Page 48
1-1. For safe use ■ When to contact your Toyota dealer In the following cases, the vehicle will require inspection and/or repair. Con- tact your Toyota dealer as soon as possible. ● Any of the SRS airbags have been inflated. ●… -
Page 49: Safety Information For Children
1-1. For safe use Safety information for children Observe the following precautions when children are in the vehi- cle. Use a child restraint system appropriate for the child, until the child becomes large enough to properly wear the vehicle’s seat belt.
-
Page 50: Child Restraint Systems
General installation instructions are provided in this manual. (→P. 58) ● If child restraint system regulations exist in the country where you reside, please contact your Toyota dealer for the child restraint sys- tem installation. ● Toyota recommends that you use a child restraint system which…
-
Page 51
1-1. For safe use Types of child restraints Child restraint systems are classified into the following 5 groups according to the regulation ECE No.44: Group 0: Up to 10 kg (22 lb.) (0 — 9 months) Group 0 : Up to 13 kg (28 lb.) (0 — 2 years) Group I: 9 to 18 kg (20 to 39 lb.) (9 months — 4 years) Group II:… -
Page 52
L2: Suitable for “Maxi Cosi Cabriofix plus Easybase2” (0 to 13 kg [0 to 28 lb.]) approved for the use in this mass group. L3: Suitable for “TOYOTA KIDFIX” (15 to 36 kg [34 to 79 lb.]) approved for the use in this mass group. Please fix by using both… -
Page 53
1-1. For safe use L4: Suitable for “Roemer KidFix” (15 to 36 kg [34 to 79 lb.]) approved for the use in this mass group. Please fix by using both ISOFIX and seat belt. Not suitable seat position for children in this mass group. : Adjust the front seatback to the 4th lock position from the most upright position. -
Page 54
1-1. For safe use Child restraint system suitability for various seating positions (with ISOFIX rigid anchor) Information provided in the table shows your child restraint system suitability for various seating positions. Vehicle ISOFIX positions Mass groups Size class Fixture Rear outboard seat ISO/L1 Carrycot ISO/L2… -
Page 55
IL3: Toyota recommend to use “Maxi Cosi Cabriofix plus Easyfix” approved for the use in this mass group. IL4: Toyota recommend to use “HTS iZi Kid X3” approved for the use in this mass group. IL5: Toyota recommend to use “Maxi Cosi Pearl plus Familyfix”… -
Page 56
1-1. For safe use ISOFIX position not suitable for ISOFIX child restraint systems in this mass group and/or this size class. : Adjust the seatback to the 8th lock position from the fully reclined posi- tion. : Remove the head restraint if it interferes with your child restraint sys- tem. -
Page 57
1-1. For safe use ■ When installing a child restraint system on the front passenger seat When you have to use a child restraint system on the front passenger seat, adjust the following: ● The seat cushion to the fully rearward position If the seat belt shoulder anchor is ahead of the child seat belt guide, move the… -
Page 58
● Toyota strongly urges the use of a proper child restraint system that con- forms to the size of the child, installed on the rear seat. According to acci- dent statistics, the child is safer when properly restrained in the rear seat than in the front seat. -
Page 59
1-1. For safe use CAUTION ■ Child restraint precautions ● Do not allow the child to lean his/her head or any part of his/her body against the door or the area of the seat, front and rear pillars or roof side rails from which the SRS side airbags or SRS curtain shield airbags deploy even if the child is seated in the child restraint system. -
Page 60: Installing Child Restraints
1-1. For safe use Installing child restraints Follow the child restraint system manufacturer’s instructions. Firmly secure child restraints to the seats using a seat belt or ISOFIX rigid anchors. Attach the top strap when installing a child restraint. Seat belts equipped with a child restraint locking mechanism…
-
Page 61
1-1. For safe use Installing child restraints using a seat belt (child restraint lock function belt) Rear-facing Baby seat (infant seat)/child seat (convertible ■ seat) Adjust the seatback to the 8th lock position from the fully reclined position. (→P. 135) Fully reclined position 8th lock position If your child restraint system interferes with a head restraint and… -
Page 62
1-1. For safe use Fully extend the shoulder belt and allow it to retract to put it in lock mode. In lock mode, the belt cannot be extended. While pushing child restraint system down into the rear seat, allow the shoulder belt to retract until the child restraint system is securely in place. -
Page 63
1-1. For safe use Forward-facing Child seat (convertible seat) ■ Adjust the seatback to the 8th lock position from the fully reclined position. (→P. 135) Fully reclined position 8th lock position Remove the head restraint. Place the child restraint sys- tem on the seat facing the front of the vehicle. -
Page 64
1-1. For safe use Fully extend the shoulder belt and allow it to retract to put it in lock mode. In lock mode, the belt cannot be extended. While pushing child restraint system down into the rear seat, allow the shoulder belt to retract until the child restraint system is securely in place. -
Page 65
1-1. For safe use ■ Junior seat (booster seat) Adjust the seatback to the 8th lock position from the fully reclined position. (→P. 135) Fully reclined position 8th lock position If your child restraint system interferes with a head restraint and cannot be installed properly, install the child restraint system after removing the head restraint. -
Page 66
1-1. For safe use Sit the child in the child restraint system. Fit the seat belt to the child restraint sys- tem according to the manu- facturer’s instructions insert the plate into the buckle. Make sure that the belt is not twisted. Check that the shoulder belt is correctly positioned over the child’s shoulder and that the lap… -
Page 67
1-1. For safe use Installation with ISOFIX rigid anchors (ISOFIX child restraint sys- tem) Adjust the seatback to the 8th lock position from the fully reclined position. (→P. 135) Fully reclined position 8th lock position If your child restraint system interferes with a head restraint and cannot be installed properly, install the child restraint system after removing the head restraint. -
Page 68
1-1. For safe use Child restraint systems with a top strap Remove the head restraint. Secure the child restraint sys- tem using the seat belt. Widen the slits of the cover Front of vehicle slightly and confirm the position of the anchor fitting. Attach the child restraint anchor attaching clip to the exposed child restraint anchor fitting. -
Page 69
You need a locking clip to install the child restraint system. Follow the instruc- tions provided by the manufacturer of the system. If your child restraint sys- tem does not provide a locking clip, you can purchase the following item from your Toyota dealer: Locking clip for child restraint system (Part No. 73119-22010) CAUTION ■… -
Page 70
1-1. For safe use CAUTION ■ When installing a child restraint system ● Never use a rear-facing child restraint system on the front passenger seat. The force of the rapid inflation of the front passenger airbag can cause death or serious injury to children in the event of an accident. -
Page 71
When installing a child restraint system ● If child restraint system regulations exist in the country where you reside, please contact your Toyota dealer for the child restraint system installation. ● When installing a child restraint system in the rear center seat, adjust both seatbacks at the same angle. -
Page 72
1-1. For safe use CAUTION ■ To correctly attach a child restraint system to the anchors When using the lower anchors, be sure that there are no foreign objects around the anchors and that the seat belt is not caught behind the child restraint system. -
Page 73: Exhaust Gas Precautions
Keep the back door closed. ● If you smell exhaust gases in the vehicle even when the back door is closed, open the windows and have the vehicle inspected at your Toyota dealer as soon as possible. ■ When parking ●…
-
Page 74: 1-2. Theft Deterrent System
1-2. Theft deterrent system Engine immobilizer system The vehicle’s keys have built-in transponder chips that prevent the engine from starting if a key has not been previously regis- tered in the vehicle’s on-board computer. Never leave the keys inside the vehicle when you leave the vehi- cle.
-
Page 75
1-2. Theft deterrent system NOTICE ■ To ensure the system operates correctly Do not modify or remove the system. If modified or removed, the proper operation of the system cannot be guaranteed. -
Page 76: Double Locking System
1-2. Theft deterrent system ∗ Double locking system Unauthorized access to the vehicle is prevented by disabling the door unlocking function from both the interior and exterior of the vehicle. Vehicles employing this system have labels on the window glass of both front doors.
-
Page 77: Alarm
1-2. Theft deterrent system ∗ Alarm The alarm The alarm uses light and sound to give an alert when an intrusion is detected. The alarm is triggered in the following situations when the alarm is set: ● A locked door is unlocked or opened in any way other than using the entry function, wireless remote control or mechanical key.
-
Page 78
1-2. Theft deterrent system ■ System maintenance The vehicle has a maintenance-free type alarm system. ■ Items to check before locking the vehicle To prevent unexpected triggering of the alarm and vehicle theft, make sure of the following: ● Nobody is in the vehicle. ●… -
Page 79
1-2. Theft deterrent system Intrusion sensor The intrusion sensor detects intruders or movement in the vehicle. When an intruder or movement is detected, the alarm will be trig- gered. This system is designed to deter and prevent vehicle theft but does not guarantee absolute security against all intrusions. -
Page 80
1-2. Theft deterrent system ■ Canceling and automatic re-enabling of the intrusion sensor ● The alarm will still be set even when the intrusion sensor is canceled. ● After the intrusion sensor is canceled, pressing the engine switch or unlock- ing the doors using the entry function or wireless remote control will re- enable the intrusion sensor. -
Page 81
● Do not spray air fresheners or other products directly into the sensor holes. ● Installing accessories other than genuine Toyota parts or leaving objects between the driver’s seat and front passenger’s seat may reduce the detection performance. -
Page 82
1-2. Theft deterrent system… -
Page 83: Instrument Cluster
Instrument cluster Instrument cluster Warning lights and indicators ….82 Gauges and meters …..87 Multi-information display ..88…
-
Page 84: Instrument Cluster Warning Lights And Indicators
2. Instrument cluster Warning lights and indicators The warning lights and indicators on the instrument cluster and center panel inform the driver of the status of the vehicle’s vari- ous systems. For the purpose of explanation, the following illustration dis- plays all warning lights and indicators illuminated.
-
Page 85
(→P. 423) light (→P. 425) (red) Automatic headlight ABS warning light leveling system warning (→P. 423) light (→P. 424) (if equipped) 2, 3 Electric power steering Toyota parking system warning light assist-sensor indicator (→P. 424) (→P. 424, 425) (if equipped) -
Page 86
There may be a malfunction in a system if the lights do not come on, or turn off. Have the vehicle inspected by your Toyota dealer. : The light flashes to indicate a malfunction. : The light comes on to indicate that Toyota parking assist-sensor is dirty or covered with ice. -
Page 87
All-wheel drive lock (→P. 253) indicator (→P. 250) (if equipped) VSC OFF indicator “AUTO LSD” indicator (→P. 253) (→P. 253) (if equipped) Toyota parking Low engine coolant assist-sensor indicator temperature indicator (→P. 244) (blue) (if equipped) BSM outside rear Engine preheating view mirror indicator indicator (→P. -
Page 88
They will turn off after the engine is started, or after a few seconds. There may be a malfunction in a system if the lights do not come on, or turn off. Have the vehicle inspected by your Toyota dealer. : The light flashes to indicate that the system is operating. -
Page 89: Gauges And Meters
2. Instrument cluster Gauges and meters Tachometer Displays the engine speed in revolutions per minute Speedometer Displays the vehicle speed Fuel gauge Displays the quantity of fuel remaining in the tank Shift position and shift range (vehicles with an automatic transmis- sion or a CVT) Displays the selected shift position or selected shift range (→P.
-
Page 90: Multi-Information Display
2. Instrument cluster Multi-information display Display contents The multi-information display presents the driver with a variety of driv- ing-related data including the current outside air temperature. ● Outside temperature display (→P. 90) ● Engine coolant temperature gauge Displays the engine coolant tem- perature.
-
Page 91
2. Instrument cluster Odometer and trip meters ■ Switching the display Items displayed switched by pressing the odom- eter/trip meter display change button. ■ Odometer Displays the total distance the vehicle has been driven. ■ Trip meters “A” and “B” Displays the distance the vehicle has been driven since the meter was last reset. -
Page 92
2. Instrument cluster Trip information ■ Switching the display Items displayed switched pressing “DISP” button. ■ Outside temperature Displays the outside air temperature The temperature range that can be displayed is from -40°C (-40°F) to 50°C (122°F) ■ Current fuel consumption Displays the current rate of fuel consumption ■… -
Page 93
2. Instrument cluster ■ Driving range Displays the estimated approximate distance that can be driven with the quantity of fuel remaining • This distance is computed based on your aver- age fuel consumption. As a result, the actual distance that can be driven may differ from that displayed. -
Page 94
2. Instrument cluster Setting up the displays While the vehicle is stopped, press the “DISP” button until “SETTINGS” screen appears. Press and hold the “DISP” but- ton until the screen changes. Press and hold the “DISP” but- ton after selecting the desired setting item by pressing the “DISP”… -
Page 95
2. Instrument cluster Press and hold the “DISP” but- ton after selecting the desired setting by pressing the “DISP” button. The display goes back to step Press and hold the “DISP” but- ton after selecting the “BACK” by pressing the “DISP” button. The display goes back to step (The display goes back to step automatically in few seconds with-… -
Page 96
When the outside temperature has changed suddenly (at the entrance/exit of a garage, tunnel, etc.) ■ When “—°C” is displayed The system may be malfunctioning. Take your vehicle to your Toyota dealer. ■ Setting display automatic cancelation In the following situations, setting display in which the settings can be changed through the “DISP”… -
Page 97
2. Instrument cluster CAUTION ■ Cautions during setting up the display As the engine needs to be operating during setting up the display, ensure that the vehicle is parked in a place with adequate ventilation. In a closed area such as a garage, exhaust gases including harmful carbon monoxide (CO) may collect and enter the vehicle. -
Page 98
2. Instrument cluster… -
Page 99: Operation Of Each Component
Operation of each component 3-1. Key information Keys……..98 3-2. Opening, closing and locking the doors Smart entry & start system ……101 Wireless remote control ..114 Side doors……117 Back door……121 3-3. Adjusting the seats Front seats……133 Rear seats ……135 Head restraints ….138 3-4.
-
Page 100: 3-1. Key Information
3-1. Key information Keys The keys The following keys are provided with the vehicle. Vehicles without a smart entry & start system Master keys Operating the wireless remote con- trol function (→P. 114) Key number plate Vehicles with a smart entry & start system Electronic keys •…
-
Page 101: System
■ If you lose your keys New genuine keys can be made by your Toyota dealer using the other key and the key number stamped on your key number plate. Keep the plate in a safe place such as your wallet, not in the vehicle.
-
Page 102
When an electronic key is lost (vehicles with a smart entry & start sys- tem) If the electronic key remains lost, the risk of vehicle theft increases signifi- cantly. Visit your Toyota dealer immediately with all remaining electronic keys that was provided with your vehicle. -
Page 103
3-2. Opening, closing and locking the doors ∗ Smart entry & start system Function summary The following operations can be performed simply by carrying the electronic key on your person, for example in your pocket. (The driver should always carry the electronic key.) Locks and unlocks the side doors (→P. -
Page 104
3-2. Opening, closing and locking the doors Unlocking and locking the doors Front doors Grip the door handle to unlock the doors. Make sure to touch the sensor on the back of the handle. The doors cannot be unlocked for 3 seconds after the doors are locked. -
Page 105
3-2. Opening, closing and locking the doors Back door Press the unlock button to unlock all the doors. The doors cannot be unlocked for 3 seconds after the doors are locked. Press the lock button to lock all the doors. -
Page 106
3-2. Opening, closing and locking the doors Antenna location and effective range ■ Antenna location Antennas outside the cabin Antennas inside the cabin Antenna outside the luggage compartment… -
Page 107
3-2. Opening, closing and locking the doors ■ Effective range (areas within which the electronic key is detected) When locking or unlocking the doors The system can be operated when the electronic key is within about 0.7 m (2.3 ft.) of either of the outside front door handles and back door opener switch. -
Page 108
3-2. Opening, closing and locking the doors ■ Alarms and warning indicators A combination of exterior and interior alarms as well as warning messages shown on the multi-information display are used to prevent theft of the vehicle and accidents resulting from erroneous operation. Take appropriate mea- sures in response to any warning message on the multi-information display. -
Page 109
3-2. Opening, closing and locking the doors ■ Battery-saving function The battery-saving function will be activated in order to prevent the electronic key battery and the vehicle battery from being discharged while the vehicle is not in operation for a long time. ●… -
Page 110
3-2. Opening, closing and locking the doors ■ Conditions affecting operation The smart entry & start system uses weak radio waves. In the following situa- tions, the communication between the electronic key and the vehicle may be affected, preventing the smart entry & start system, wireless remote control and engine immobilizer system from operating properly. -
Page 111
3-2. Opening, closing and locking the doors ■ Note for the entry function ● Even when the electronic key is within the effective range (detection areas), the system may not operate properly in the following cases: • The electronic key is too close to the window or outside door handle, near the ground, or in a high place when the doors are locked or unlocked. -
Page 112
3-2. Opening, closing and locking the doors ■ Note for locking the doors ● Touching the door lock sensor while wearing gloves may delay or prevent lock operation. Remove the gloves and touch the lock sensor again. ● If the door handle becomes wet while the electronic key is within the effec- tive range, the door may lock and unlock repeatedly. -
Page 113
3-2. Opening, closing and locking the doors ■ When the vehicle is not driven for extended periods ● To prevent theft of the vehicle, do not leave the electronic key within 2 m (6 ft.) of the vehicle. ● The smart entry & start system can be deactivated in advance. (→P. 498) ■… -
Page 114
3-2. Opening, closing and locking the doors ■ Electronic key battery depletion ● The standard battery life is 1 to 2 years. ● If the battery becomes low, an alarm will sound in the cabin when the engine stops. (→P. 439) ●… -
Page 115
(→P. 104) The radio waves may affect the operation of such devices. If necessary, the entry function can be disabled. Ask your Toyota dealer for details, such as the frequency of radio waves and timing of emitting the radio waves. -
Page 116: Wireless Remote Control
3-2. Opening, closing and locking the doors Wireless remote control Function summary The wireless remote control can be used to lock and unlock the vehi- cle. It also opens and closes the back door. Vehicles without a smart entry & start system Locks all the doors Unlocks all the doors Vehicles with a smart entry &…
-
Page 117
3-2. Opening, closing and locking the doors ■ Operation signals Doors: A buzzer (if equipped) sounds and the emergency flashers flash to indicate that the doors have been locked/unlocked. (Locked: once; Unlocked: twice) Back door (if equipped): A buzzer sounds and the emergency flashers flash twice to indicate that the back door is opening/closing. -
Page 118
→P. 376 ■ Confirmation of the registered key number The number of keys already registered to the vehicle can be confirmed. Ask your Toyota dealer for details. ■ Customization Settings (e.g. wireless remote control system) can be changed. (Customizable features: →P. 498) -
Page 119: Side Doors
3-2. Opening, closing and locking the doors Side doors Unlocking and locking the doors The vehicle can be locked and unlocked using the key, entry function, wireless remote control or door lock switch. ◆ Entry function (if equipped) →P. 101 ◆…
-
Page 120
3-2. Opening, closing and locking the doors ◆ Door lock switch Locks all the doors Unlocks all the doors ◆ Inside lock buttons Locks the door Unlocks the door The driver’s door can be opened by pulling the inside handle even if the lock button is in the lock position. -
Page 121
3-2. Opening, closing and locking the doors Locking the front doors from the outside without a key Move the inside lock button to the lock position. Close the door while pulling the door handle. Vehicles without a smart entry & start system The door cannot be locked if the key is in the engine switch. -
Page 122
3-2. Opening, closing and locking the doors ■ When all the doors are locked with the entry function (vehicles with a smart entry & start system), wireless remote control or key The doors cannot be unlocked with the door lock switch. The door lock switch can be reset by unlocking all the doors with the entry function (vehicles with a smart entry &… -
Page 123: Back Door
3-2. Opening, closing and locking the doors Back door The back door can be locked/unlocked and opened/closed by the following procedures. Locking and unlocking the back door ■ Door lock switch →P. 118 ■ Entry function (if equipped) →P. 103 ■…
-
Page 124
3-2. Opening, closing and locking the doors Opening the back door from outside the vehicle ■ Back door opener Vehicles without a power back door Raise the back door while pressing up the back door opener switch. Vehicles with a power back door When back… -
Page 125
3-2. Opening, closing and locking the doors When closing the back door Lower the back door using the back door handle. Vehicles without a power back door Make sure to push the back door down from the outside to close it. Vehicles with a power back door The back door closing assist will… -
Page 126
3-2. Opening, closing and locking the doors ■ Luggage compartment light The luggage compartment light turns on when the back door is opened with the luggage compartment light switch on. ■ If the back door opener is inoperative The back door can be unlocked from the inside. Remove the cover on the back door trim. -
Page 127
3-2. Opening, closing and locking the doors ■ Jam protection function (vehicles with a power back door) If anything obstructs the power back door while it is closing/opening, the back door will automatically operate in the opposite direction or stop. ■… -
Page 128
3-2. Opening, closing and locking the doors CAUTION Observe the following precautions. Failure to do so may result in death or serious injury. ■ Before driving ● Make sure that the back door is fully closed. If the back door is not fully closed, it may open unexpectedly while driving and hit near-by objects or luggage in the luggage compartment may be thrown out, causing an acci- dent. -
Page 129
3-2. Opening, closing and locking the doors CAUTION ■ Operating the back door Observe the following precautions. Failure to do so may cause parts of the body to be caught, resulting in death or serious injury. ● Remove any heavy loads, such as snow and ice, from the back door before opening it. -
Page 130
When installing an accessory part to the back door, using a genu- ine Toyota part is recommended. ■ Back door closer (vehicles with a power back door) ●… -
Page 131
When installing an accessory part to the back door, ask your Toyota dealer for details. -
Page 132
3-2. Opening, closing and locking the doors CAUTION ■ Jam protection function (vehicles with a power back door) Observe the following precautions. Failure to do so may cause death or serious injury. ● Never use any part of your body to intentionally activate the jam protection function. -
Page 133
Do not touch the damper stay rod with gloves or other fabric items. ● Do not attach any accessories other Damper stays than genuine Toyota parts to the back door. ● Do not place your hand on the damper stay or apply lateral forces to it. ■… -
Page 134
3-2. Opening, closing and locking the doors NOTICE ■ To prevent back door closer malfunction (vehicles with a power back door) Do not apply excessive force to the back door while the back door closer is operating. ■ To prevent damage to the power back door (if equipped) ●… -
Page 135: 3-3. Adjusting The Seats
3-3. Adjusting the seats Front seats Adjustment procedure Manual seat Seat position adjustment lever Vertical height adjustment lever (driver’s side only) Seatback angle adjustment lever Power seat (driver’s side only) Seat position adjustment switch Vertical height adjustment switch Seatback angle adjustment switch Lumbar support adjustment…
-
Page 136
3-3. Adjusting the seats CAUTION ■ When adjusting the seat position ● Take care when adjusting the seat position to ensure that other passen- gers are not injured by the moving seat. ● Do not put your hands under the seat or near the moving parts to avoid injury. -
Page 137: Rear Seats
3-3. Adjusting the seats Rear seats Adjustment procedure Pull up the lever. Then lean back to the desired angle and release the lever. When a person sits in the rear center position, align all seatbacks at the same angle.
-
Page 138
3-3. Adjusting the seats Folding down the rear seatbacks ■ Before folding down the rear seatbacks Stow the rear center seat belt. (→P. 30) Stow the rear seat belt buck- les. Lower the head restraint to the lowest position. (→P. 138) ■… -
Page 139
3-3. Adjusting the seats CAUTION ■ When folding the rear seatbacks down Observe the following precautions. Failure to do so may result in death or serious injury. ● Do not fold the seatbacks down while driving. ● Stop the vehicle on level ground, set the parking brake and shift the shift lever to P (automatic transmission or CVT) or N (manual transmission). -
Page 140: Head Restraints
3-3. Adjusting the seats Head restraints Head restraints are provided for all seats. Front seats Pull the head restraints up. Down Push the head restraint down while pressing the lock release button. Lock release button Rear seats Pull the head restraints up. Down Push the head restraint down while pressing the lock release button.
-
Page 141
3-3. Adjusting the seats ■ Removing the head restraints Front seats Pull the head restraint up while pressing the lock release button. Lock release button Rear seats Pull the head restraint up while pressing the lock release button. Lock release button ■… -
Page 142
3-3. Adjusting the seats Rear seats Align the head restraint with the installa- tion holes and push it down while press- ing the lock release button. Lock release button ■ Adjusting the height of the head restraints Make sure that the head restraints are adjusted so that the center of the head restraint is closest to the top of your ears. -
Page 143: Adjusting The Steering Wheel
3-4. Adjusting the steering wheel and mirrors Steering wheel Adjustment procedure The steering wheel can be adjusted to a comfortable position. Hold the steering wheel and press the lever down. Adjust to the ideal position by moving the steering wheel hori- zontally and vertically.
-
Page 144: Inside Rear View Mirror
3-4. Adjusting the steering wheel and mirrors Inside rear view mirror The rear view mirror’s position can be adjusted to enable suffi- cient confirmation of the rear view. Adjusting the height of rear view mirror The height of the rear view mirror can be adjusted to suit your driving posture.
-
Page 145
3-4. Adjusting the steering wheel and mirrors Auto anti-glare inside rear view mirror Responding to the level of brightness of the headlights of vehicles behind, the reflected light is automatically reduced. Changing automatic anti-glare function mode On/off When the automatic anti-glare function is in ON mode, the indica- tor illuminates. -
Page 146
3-4. Adjusting the steering wheel and mirrors ■ To prevent sensor error (vehicles with an auto anti-glare inside rear view mirror) To ensure that the sensors operate prop- erly, do not touch or cover them. CAUTION Do not adjust the position of the mirror while driving. Doing so may lead to mishandling of the vehicle and cause an accident, resulting in death or serious injury. -
Page 147: Outside Rear View Mirrors
3-4. Adjusting the steering wheel and mirrors Outside rear view mirrors Adjustment procedure To select a mirror to adjust, press the switch. Left Right To adjust the mirror, press the switch. Right Down Left…
-
Page 148
3-4. Adjusting the steering wheel and mirrors Folding the mirrors Power type Press the switch to fold the mir- rors. Press it again to extend them to the original position. Manual type Push the mirror back in the direc- tion of the vehicle’s rear. -
Page 149
3-4. Adjusting the steering wheel and mirrors ■ Mirror angle can be adjusted when Vehicles without a smart entry & start system The engine switch is in the “ACC” or “ON” position. Vehicles with a smart entry & start system The engine switch is in ACCESSORY or IGNITION ON mode. -
Page 150
3-4. Adjusting the steering wheel and mirrors CAUTION ■ Important points while driving Observe the following precautions while driving. Failure to do so may result in loss of control of the vehicle and cause an accident, resulting in death or serious injury. ●… -
Page 151: Power Windows
3-5. Opening, closing the windows and moon roof Power windows Opening and closing procedures The power windows can be opened and closed using the switches. Operating the switch moves the windows as follows: Closing One-touch closing (driver’s win- dow only) Opening One-touch opening…
-
Page 152
If you release the switch while the window is moving, start again from the beginning. If the window continues to close but then re-open slightly even after perform- ing the above procedure correctly, have the vehicle inspected by your Toyota dealer. -
Page 153
3-5. Opening, closing the windows and moon roof CAUTION Observe the following precautions. Failure to do so may result in death or serious injury. ■ Closing the windows ● Check to make sure that all passengers do not have any part of their body in a position where it could be caught when a window is being operated. -
Page 154: Moon Roof
3-5. Opening, closing the windows and moon roof ∗ Moon roof Use the overhead switches to open and close the moon roof and tilt it up and down. Opening and closing Opens the moon roof The moon roof stops slightly before the fully open position to reduce wind noise.
-
Page 155
3-5. Opening, closing the windows and moon roof ■ The moon roof can be operated when The engine switch is in IGNITION ON mode. ■ Operating the moon roof after turning the engine off The moon roof can be operated for approximately 45 seconds after the engine switch is turned to ACCESSORY mode or turned off. -
Page 156
3-5. Opening, closing the windows and moon roof ■ Moon roof open reminder function A buzzer sounds and a message is shown on the multi-information display when the engine switch is turned off and the driver’s door is opened with the moon roof open. -
Page 157
3-5. Opening, closing the windows and moon roof CAUTION Observe the following precautions. Failure to do so may cause death or serious injury. ■ Opening the moon roof ● Do not allow any passengers to put their hands or heads outside the vehi- cle while it is moving. -
Page 158
3-5. Opening, closing the windows and moon roof… -
Page 159: Driving
Automatic transmission 4-5. Using the driving support (with S mode) ….195 systems Automatic transmission Cruise control…..240 (with M mode)….201 Toyota parking CVT (Continuously assist-sensor ….244 Variable Transaxle) ..208 All-wheel drive lock Manual transmission..214 switch (AWD models) ..250 Turn signal lever ….218 Driving assist systems ..251…
-
Page 160: 4-1. Before Driving
4-1. Before driving Driving the vehicle The following procedures should be observed to ensure safe driving: Starting the engine →P. 184, 188 Driving Automatic transmission or CVT With the brake pedal depressed, shift the shift lever to D. (→P. 195, 201, 208) Release the parking brake.
-
Page 161
4-1. Before driving Manual transmission While depressing the clutch pedal, depress the brake pedal. If necessary, set the parking brake. (→P. 220) If the vehicle is to be stopped for an extended period of time, shift the shift lever to N. (→P. 214) Parking the vehicle Automatic transmission or CVT With the shift lever in D, depress the brake pedal. -
Page 162
4-1. Before driving Starting off on a steep uphill Automatic transmission or CVT Make sure that the parking brake is set and shift the shift lever to D. Gently depress the accelerator pedal. Release the parking brake. Manual transmission With the parking brake firmly set and the clutch pedal fully depressed, shift the shift lever to 1. -
Page 163
Your vehicle has a drum-in-disc type parking brake system. This type of brake system needs bedding-down of the brake shoes periodically or whenever the parking brake shoes and/or drum are replaced. Have your Toyota dealer per- form the bedding down operation. -
Page 164
(→P. 92) Eco Driving Indicator Zone Display Eco Driving Indicator Zone Display availability can be customized at your Toyota dealer. The default setting is off. Zone of Eco driving Eco driving ratio based on acceleration If the acceleration exceeds Zone of Eco driving, the right side of Eco Driv- ing Indicator Zone Display blinks. -
Page 165
4-1. Before driving CAUTION Observe the following precautions. Failure to do so may result in death or serious injury. ■ When starting the vehicle On vehicles with an automatic transmission or a CVT, always keep your foot on the brake pedal while stopped with the engine running. This prevents the vehicle from creeping. -
Page 166
4-1. Before driving CAUTION Observe the following precautions. Failure to do so may result in death or serious injury. ■ When driving the vehicle ● During normal driving, do not turn off the engine. Turning the engine off while driving will not cause loss of steering or braking control, but the power assist to these systems will be lost. -
Page 167
4-1. Before driving CAUTION Observe the following precautions. Failure to do so may result in death or serious injury. ■ When driving on slippery road surfaces ● Sudden braking, acceleration and steering may cause tire slippage and reduce your ability to control the vehicle. ●… -
Page 168
■ If you hear a squealing or scraping noise (brake pad wear indicators) Have the brake pads checked and replaced by your Toyota dealer as soon as possible. The rotor damage may result if the pads are not replaced when needed. -
Page 169
4-1. Before driving CAUTION ■ When the vehicle is parked ● Do not leave glasses, cigarette lighters, spray cans, or soft drink cans in the vehicle when it is in the sun. Doing so may result in the following: • Gas may leak from a cigarette lighter or spray can, and may lead to a fire. -
Page 170
4-1. Before driving CAUTION ■ When taking a nap in the vehicle Always turn the engine off. Otherwise, if you accidentally move the shift lever or depress the accelerator pedal, this could cause an accident or fire due to engine overheating. Additionally, if the vehicle is parked in a poorly ventilated area, exhaust gases may collect and enter the vehicle, leading to death or a serious health hazard. -
Page 171
4-1. Before driving NOTICE ■ When driving the vehicle ● Do not depress the accelerator and brake pedals at the same time during driving, as this may restrain driving torque. Automatic transmission or CVT ● Do not use the accelerator pedal or depress the accelerator and brake pedals at the same time to hold the vehicle on a hill. -
Page 172
Short in electrical components ● Engine damage caused by water immersion In the event that you drive on a flooded road and the vehicle is flooded, be sure to have your Toyota dealer check the following: ● Brake function ●… -
Page 173: Cargo And Luggage
4-1. Before driving Cargo and luggage Take notice of the following information about storage precau- tions, cargo capacity and load. CAUTION ■ Things that must not be carried in the luggage compartment The following things may cause a fire if loaded in the luggage compartment: ●…
-
Page 174
4-1. Before driving CAUTION ■ Load and distribution ● Do not overload your vehicle. ● Do not apply loads unevenly. Improper loading may cause deterioration of steering or braking control which may cause death or serious injury. ■ When loading cargo on the roof luggage carrier (if equipped) Observe the following precautions: ●… -
Page 175: Trailer Towing
For your safety and the safety of others, do not overload the vehicle or trailer. Toyota warranties do not apply to damage or malfunction caused by towing a trailer for commercial purposes. For towing purposes, Toyota recommends using a sway control device when the total trailer weight is greater than the vehicle weight.
-
Page 176
4-1. Before driving ◆ Gross vehicle weight The gross vehicle weight must not exceed the following: 3ZR-FE engine Vehicles with a CVT: 2050 kg (4519 lb.) Vehicles with a manual transmission: 2000 kg (4409 lb.) 3ZR-FAE engine 2100 kg (4409 lb.) 2AR-FE engine Vehicles with an automatic transmission: 2130 kg (4695 lb.) Vehicles with a manual transmission: 2100 kg (4629 lb.) -
Page 177
4-1. Before driving ◆ Gross axle weight The load on either the front or rear axle resulting from distribution of the gross vehicle weight on both axles must not exceed 1150 kg (2531 lb.). ◆ Trailer tongue load The trailer cargo load should be distributed so that the tongue load is 9 to 11% of the total trailer weight, not exceed the following: 3ZR-FE engine : 80 kg (176 lb.) -
Page 178
4-1. Before driving Towing a trailer Contact your Toyota dealer for further information about additional requirements such as a towing kits etc. Hitch Trailer hitch assemblies have different weight capacities established by the hitch manufacturer. Even though the vehicle may be rated for towing a higher weight, the operator must never exceed the maximum weight rating specified for the trailer hitch. -
Page 179
■ Break-in schedule Toyota recommends that you do not use a new vehicle or a vehicle with any new power train components (engine, transmission, differential, wheel bear- ings, etc.) to tow a trailer for the first 800 km (500 miles) of driving. -
Page 180
4-1. Before driving CAUTION ■ To avoid accident or injury ● The total trailer weight (trailer weight plus the weight of cargo) must not exceed the following: 3ZR-FE engine : 800 kg (1763 lb.) 3ZR-FAE engine : 2000 kg (4409 lb.) 2AR-FE engine: 1500 kg (3306 lb.) 2AD-FTV engine (for Australia): 1000 kg (2205 lb.) 2AD-FTV engine (except for Australia) -
Page 181
4-1. Before driving CAUTION ● The gross combined weight (sum of your vehicle weight plus its load and the total trailer weight) must not exceed the following: 3ZR-FE engine Vehicles with a CVT: 2850 kg (6283 lb.) Vehicles with a manual transmission: 2800 kg (6172 lb.) 3ZR-FAE engine 4100 kg (9039 lb.) 2AR-FE engine… -
Page 182
■ When installing a trailer hitch ● Use only the position recommended by your Toyota dealer. Do not install the trailer hitch on the bumper; this may cause body damage. ● Do not use axle-mounted hitches, as they can cause damage to the axle housing, wheel bearings, wheels or tires. -
Page 183
4-1. Before driving Trailer towing tips Your vehicle will handle differently when towing a trailer. In order to avoid accident, death or serious injury, keep the following in mind when towing: ● Before starting out, check the trailer lights and the vehicle-trailer connections. -
Page 184
4-1. Before driving ● Take care when passing other vehicles. Passing requires consider- able distance. After passing a vehicle, do not forget the length of your trailer, and be sure you have plenty of room before changing lanes. ● Vehicles with an automatic transmission (with S mode): To maintain engine braking efficiency and charging system perfor- mance, when using engine braking, do not use the transmission in D. -
Page 185
4-1. Before driving ● Always place wheel blocks under both the vehicle and the trailer wheels when parking. Apply the parking brake firmly, and put the transmission in P (automatic transmission or CVT) or in the 1st gear or R gear (manual transmission). Avoid parking on a slope, but if unavoidable, do so only after performing the following: Apply the brakes and keep them applied. -
Page 186: Engine (Ignition) Switch (Vehicles Without A
4-2. Driving procedures Engine (ignition) switch (vehicles without a smart entry & start system) Starting the engine Automatic transmission or CVT (gasoline engine) Check that the parking brake is set. Check that the shift lever is set in P. Firmly depress the brake pedal. Turn the engine switch to the “START”…
-
Page 187
4-2. Driving procedures Changing the engine switch positions “LOCK” The steering wheel is locked and the key can be removed. (Vehicles with an automatic transmission or a CVT: The key can be removed only when the shift lever is in P.) “ACC”… -
Page 188
“LOCK” position. ■ If the engine does not start The engine immobilizer system may not have been deactivated. (→P. 72) Contact your Toyota dealer. ■ When the steering lock cannot be released When starting the engine, the engine switch may seem stuck in the “LOCK”… -
Page 189
Do not crank the engine for more than 30 seconds at a time. This may overheat the starter and wiring system. ● Do not race a cold engine. ● If the engine becomes difficult to start or stalls frequently, have your vehi- cle checked by your Toyota dealer immediately. -
Page 190: Engine (Ignition) Switch (Vehicles With A Smart Entry & Start System)
4-2. Driving procedures Engine (ignition) switch (vehicles with a smart entry & start system) Performing the following operations when carrying the elec- tronic key on your person starts the engine or changes engine switch modes. Starting the engine Check that the parking brake is set. Vehicles with an automatic transmission or a CVT: Check that the shift lever is set in P.
-
Page 191
4-2. Driving procedures Press the engine switch. The engine will crank until it starts or for up to 30 seconds, whichever is less. Continue depressing the brake pedal until the engine is completely started. Diesel engine only: the indi- cator turns on. The engine will start after the indicator light goes out. -
Page 192
4-2. Driving procedures Changing engine switch modes Modes can be changed by pressing the engine switch with the brake pedal released. (The mode changes each time the switch is pressed.) Off* The emergency flashers can be used. The multi-information display will not be displayed. -
Page 193
4-2. Driving procedures When stopping the engine with the shift lever in a position other than P (vehicles with an automatic transmission or a CVT only) If the engine is stopped with the shift lever in a position other than P, the engine switch will not be turned off but instead be turned to ACCESSORY mode. -
Page 194
4-2. Driving procedures ■ If the engine does not start ● The engine immobilizer system may not have been deactivated. (→P. 72) Contact your Toyota dealer. ● The steering lock may not have been canceled. ■ Steering lock After turning the engine switch off and opening and closing the doors, the steering wheel will be locked due to the steering lock function. -
Page 195
4-2. Driving procedures ■ Operation of the engine switch When operating the engine switch, one short, firm press is enough. If the switch is pressed improperly, the engine may not start or the engine switch mode may not change. It is not necessary to press and hold the switch. ■… -
Page 196
■ Symptoms indicating a malfunction with the engine switch If the engine switch seems to be operating somewhat differently than usual, such as the switch sticking slightly, there may be a malfunction. Contact your Toyota dealer immediately. -
Page 197: Automatic Transmission (With S Mode)
4-2. Driving procedures ∗ Automatic transmission (with S mode) Shifting the shift lever Vehicles without a smart entry & start system While the engine switch is in the “ON” position, move the shift lever with the brake pedal depressed. When shifting the shift lever between P and D, make sure that the vehicle is completely stopped.
-
Page 198
4-2. Driving procedures Shift position purpose Shift position Objective or function Parking the vehicle/starting the engine Reversing Neutral Normal driving S mode driving (→P. 198) : Shifting the shift lever to D allows the system to select a gear suitable for the driving conditions. -
Page 199
4-2. Driving procedures Selecting the driving mode The following modes can be selected to suit driving conditions. ■ Eco drive mode Use Eco drive mode to help achieve low fuel consumption during trips that involve frequent accelerating. Press the “ECO MODE” button to select Eco drive mode. -
Page 200
4-2. Driving procedures Selecting shift ranges in the S position To enter S mode, shift the shift lever to S. Shift ranges can be selected by operating the shift lever, allowing you to drive in the shift range of your choosing. The shift range can be selected by the shift lever. Upshifting Downshifting The selected shift range, from 1 to… -
Page 201
4-2. Driving procedures ■ S mode ● When the shift range is 4 or lower, holding the shift lever toward “+” sets the shift range to 6. ● To prevent the engine from over-revving, upshifting may automatically occur. ● To protect the automatic transmission, a higher shift range may automati- cally selected when the fluid temperature is high. -
Page 202
S This may indicate a malfunction in the automatic transmission system. Have the vehicle inspected by your Toyota dealer immediately. (In this situation, the transmission will operate in the same manner as when the shift lever is in D.) -
Page 203: Automatic Transmission (With M Mode)
4-2. Driving procedures ∗ Automatic transmission (with M mode) Shifting the shift lever Vehicles without a smart entry & start system While the engine switch is in the “ON” position, move the shift lever with the brake pedal depressed. When shifting the shift lever between P and D, make sure that the vehicle is completely stopped.
-
Page 204
4-2. Driving procedures Shift position purpose Shift position Objective or function Parking the vehicle/starting the engine Reversing Neutral Normal driving M mode driving (→P. 204) : Shifting the shift lever to D allows the system to select a gear suitable for the driving conditions. -
Page 205
4-2. Driving procedures Selecting the driving mode The following modes can be selected to suit driving conditions. ■ Eco drive mode Use Eco drive mode to help achieve low fuel consumption during trips that involve frequent accelerating. Press the “ECO MODE” button to select Eco drive mode. -
Page 206
4-2. Driving procedures Selecting gear in the M position To enter M mode, shift the shift lever to M. Gears can be selected by operating the shift lever, allowing you to drive in the gear of your choosing. Upshifting Downshifting The selected gear, from 1 to 6, will be displayed in the meter. -
Page 207
4-2. Driving procedures Gear Shift Indicator (if equipped) The Gear Shift Indicator display is a guide to help the driver achieve improved fuel economy and reduced exhaust emissions within limits of engine performance. When not in operation Shift-up indicator ■ Gear Shift Indicator function ●… -
Page 208
M This may indicate a malfunction in the automatic transmission system. Have the vehicle inspected by your Toyota dealer immediately. (In this situation, the transmission will operate in the same manner as when… -
Page 209
When the warning message goes out, the vehicle can be driven again. If the warning message does not go out after waiting a while, have your vehicle inspected by your Toyota dealer. ■ AI-SHIFT The AI-SHIFT automatically selects the suitable gear according to driver per- formance and driving conditions. -
Page 210: Cvt (Continuously Variable Transaxle)
4-2. Driving procedures ∗ CVT (Continuously Variable Transaxle) Shifting the shift lever Vehicles without a smart entry & start system While the engine switch is in the “ON” position, move the shift lever with the brake pedal depressed. When shifting the shift lever between P and D, make sure that the vehicle is completely stopped.
-
Page 211
4-2. Driving procedures Shift position purpose Shift position Objective or function Parking the vehicle/starting the engine Reversing Neutral Normal driving 7-speed sport sequential shiftmatic mode driving (→P. 211) : To improve fuel efficiency and reduce noises, set the shift lever in the D position for normal driving. -
Page 212
4-2. Driving procedures Selecting the driving mode The following modes can be selected to suit driving conditions. ■ Eco drive mode Use Eco drive mode to help achieve low fuel consumption during trips that involve frequent accelerating. Press the “ECO MODE” button to select Eco drive mode. -
Page 213
4-2. Driving procedures Changing gear steps in the M position To enter 7-speed sport sequential shiftmatic mode, shift the shift lever to M. Gear steps can then be selected by operating the shift lever, allowing you to drive in the gear step of your choosing. Upshifting Downshifting The gear changes once every time… -
Page 214
M This may indicate a malfunction in the automatic transmission system. Have the vehicle inspected by your Toyota dealer immediately. (In this situation, the transmission will operate in the same manner as when… -
Page 215
■ If the shift position indicator flashes or a warning buzzer* sounds This may indicate a malfunction in the automatic transmission system. Have the vehicle inspected by your Toyota dealer immediately. : Except downshifting restrictions warning buzzer (→P. 199) ■… -
Page 216: Manual Transmission
4-2. Driving procedures ∗ Manual transmission Shifting the shift lever Fully depress the clutch pedal before operating the shift lever, and then release it slowly. Shifting the shift lever to R Shift the shift lever to R while lift- ing up the ring section. ∗…
-
Page 217
4-2. Driving procedures Sport mode (if equipped) Use sport mode for powerful acceleration and driving in mountainous regions. Press the “SPORT” button to select sport mode. The “SPORT” indicator comes on. Press the button again to cancel sport mode. Gear Shift Indicator (if equipped) The Gear Shift Indicator display is a guide to help the driver achieve improved fuel economy and reduced exhaust emissions within limits of engine performance. -
Page 218
4-2. Driving procedures ■ Gear Shift Indicator display (if equipped) The Gear Shift Indicator may not be displayed when your foot is placed on the clutch pedal. ■ Deactivation of the driving mode (if equipped) Sport mode will be canceled if the engine is turned off after driving in sport mode. -
Page 219
4-2. Driving procedures CAUTION ■ Gear Shift Indicator display (if equipped) For safety, the driver should not look only at the display. Refer to the display when it is safe to do so while considering actual traffic and road conditions. Failure to do so may lead to an accident. -
Page 220: Turn Signal Lever
4-2. Driving procedures Turn signal lever Operating instructions Left turn Lane change to the left (move the lever partway and release The left hand signals will flash 3 times. Lane change to the right (move the lever partway and release The right hand signals will flash 3 times.
-
Page 221
4-2. Driving procedures ■ Turn signals can be operated when Vehicles without a smart entry & start system The engine switch is in the “ON” position. Vehicles with a smart entry & start system The engine switch is in IGNITION ON mode. ■… -
Page 222: Parking Brake
4-2. Driving procedures Parking brake Sets the parking brake Fully set the parking brake while depressing the brake pedal. Releases the parking brake Slightly raise the lever and lower it completely while pressing the but- ton. ■ Usage in winter time →P.
-
Page 223: Horn
4-2. Driving procedures Horn To sound the horn, press on or close to the mark. ■ After adjusting the steering wheel Make sure that the steering wheel is securely locked. The horn may not sound if the steering wheel is not securely locked. (→P.
-
Page 224: Headlight Switch
4-3. Operating the lights and wipers Headlight switch The headlights can be operated manually or automatically. Operating instructions Turning the end of the lever turns on the lights as follows: Type A The front position, tail, license plate and instru- ment panel lights turn on.
-
Page 225
4-3. Operating the lights and wipers Type B The front position, tail, license plate and instru- ment panel lights turn on. The headlights and all lights listed above turn on. daytime running lights turn on. -
Page 226
4-3. Operating the lights and wipers Turning on the high beam headlights With the headlights on, push the lever away from you to turn on the high beams. Pull the lever toward you to the center position to turn the high beams off. -
Page 227
4-3. Operating the lights and wipers ■ Daytime running light system To make your vehicle more visible to other drivers, the front position light turn on automatically (at an increased intensity) whenever the engine is started and the parking brake is released. Daytime running lights are not designed for use at night. -
Page 228
4-3. Operating the lights and wipers ■ Light reminder buzzer Vehicles without a smart entry & start system A buzzer sounds when the engine switch is turned to the “LOCK” position, the key is removed and the driver’s door is opened while the lights are turned on. Vehicles with a smart entry &… -
Page 229: Fog Light Switch
4-3. Operating the lights and wipers ∗ Fog light switch The fog lights secure excellent visibility in difficult driving con- ditions, such as in rain and fog. Turns the fog lights off Turns the fog lights on ■ Fog lights can be used when The headlights or the front position lights are turned on.
-
Page 230: Windshield Wipers And Washer
4-3. Operating the lights and wipers Windshield wipers and washer Operating the wiper lever The wiper operation is selected by moving the lever as follows. Intermittent windshield wipers with interval adjuster When intermittent windshield wiper operation is selected, wiper inter- vals can be also adjusted.
-
Page 231
4-3. Operating the lights and wipers Increases the intermittent wind- shield wiper frequency Decreases intermittent windshield wiper frequency Washer/wiper dual operation The wipers will automatically oper- ate a couple of times after the washer squirts. If the headlights are on, the head- light cleaners will operate once. -
Page 232
4-3. Operating the lights and wipers Rain-sensing windshield wipers When “AUTO” is selected, the wipers will operate automatically when the sensor detects falling rain. The system automatically adjusts wiper timing in accordance with rain volume and vehicle speed. When “AUTO” is selected, the sensor sensitivity can be adjusted as follows by turning the switch ring: Rain-sensing wiper operation Low speed wiper operation… -
Page 233
4-3. Operating the lights and wipers Increases the sensitivity Decreases the sensitivity Washer/wiper dual operation The wipers will automatically oper- ate a couple of times after the washer squirts. If the headlights are on, the head- light cleaners will operate once. And then, the headlight cleaners will operate every five times you pull the lever. -
Page 234
4-3. Operating the lights and wipers ■ The windshield wipers and washer can be operated when Vehicles without a smart entry & start system The engine switch is in the “ON” position. Vehicles with a smart entry & start system The engine switch is in IGNITION ON mode. -
Page 235
Do not operate the switch continually as the washer fluid pump may over- heat. ■ When a nozzle becomes blocked In this case, contact your Toyota dealer. Do not try to clear it with a pin or other object. The nozzle will be damaged. ■ To prevent battery discharge… -
Page 236: Rear Window Wiper And Washer
4-3. Operating the lights and wipers Rear window wiper and washer Turning the end of the lever turns on the rear window wiper, and push- ing the lever away from you turns on the rear window wiper and washer. Intermittent window wiper oper- ation Normal window wiper operation Washer/wiper dual operation…
-
Page 237
4-3. Operating the lights and wipers ■ The rear window wiper and washer can be operated when Vehicles without a smart entry & start system The engine switch is in the “ON” position. Vehicles with a smart entry & start system The engine switch is in IGNITION ON mode. -
Page 238: Refueling Opening The Fuel Tank
■ Use of ethanol blended gasoline in a gasoline engine Toyota allows the use of ethanol blended gasoline where the ethanol content is up to 10%. Make sure that the ethanol blended gasoline to be used has a Research Octane Number that follows the above.
-
Page 239
4-4. Refueling CAUTION ■ When refueling the vehicle Observe the following precautions while refueling the vehicle. Failure to do so may result in death or serious injury. ● After exiting the vehicle and before opening the fuel door, touch an unpainted metal surface to discharge any static electricity. -
Page 240
4-4. Refueling Opening the fuel tank cap Pull up the opener to open the fuel filler door. Turn the fuel tank cap slowly to open. Hang the fuel tank cap on the back of the fuel filler door. -
Page 241
CAUTION ■ When replacing the fuel tank cap Do not use anything but a genuine Toyota fuel tank cap designed for your vehicle. Doing so may cause a fire or other incident which may result in death or serious injury. -
Page 242: Using The Driving Support
4-5. Using the driving support systems Cruise control Summary of functions Use the cruise control to maintain a set speed without depressing the accelerator pedal. Indicators Cruise control switch Setting the vehicle speed Press the “ON-OFF” button to activate the cruise control. Cruise control indicator will come Press the button again to deacti- vate the cruise control.
-
Page 243
4-5. Using the driving support systems Adjusting the set speed To change the set speed, operate the lever until the desired set speed is obtained. Increases the speed Decreases the speed Fine adjustment: Momentarily move the lever in the desired direc- tion. -
Page 244
If the cruise control speed cannot be set or if the cruise control cancels imme- diately after being activated, there may be a malfunction in the cruise control system. Have the vehicle inspected by your Toyota dealer. -
Page 245
4-5. Using the driving support systems CAUTION ■ To avoid operating the cruise control by mistake Switch the cruise control off using the “ON-OFF” button when not in use. ■ Situations unsuitable for cruise control Do not use cruise control in any of the following situations. Doing so may result in loss of control and could cause an accident resulting in death or serious injury. -
Page 246: Toyota Parking Assist-Sensor
Always check the surrounding area when using this system. ■ Types of sensors Rear corner sensors Rear center sensors ■ Toyota parking assist-sensor switch Turns Toyota parking assist- sensor on/off When on, the indicator light comes on to inform the driver that the system is operational.
-
Page 247
The indicator and buzzer When a sensor detects an obstacle, the direction of and the approxi- mate distance to the obstacle are indicated and the buzzer sounds. ■ Toyota parking assist-sensor indicator Vehicle indicator Rear corner indicators Rear center indicator ■… -
Page 248
■ Toyota parking assist-sensor can be operated when Vehicles without a smart entry & start system The engine switch is in the “ON” position and the shift lever is in R. -
Page 249
• The area directly under the bumpers is not detected. • If obstacles draw too close to the sensor. • A non-genuine Toyota suspension (lowered suspension etc.) is installed. • People may not be detected if they are wearing certain types of clothing. -
Page 250
The indicator for the malfunctioning sensor flashes and the vehicle indicator turns off while the buzzer sounds for approximately 7 seconds. If the corner and center indicators flash after that, the sensor may be mal- functioning. Have the vehicle inspected by your Toyota dealer. -
Page 251
When using Toyota parking assist-sensor In the following situations, the system may not function correctly due to a sensor malfunction etc. Have the vehicle checked by your Toyota dealer. ● A beep does not sound when you turn the main switch on. -
Page 252: All-Wheel Drive Lock Switch (Awd Models)
4-5. Using the driving support systems All-wheel drive lock switch (AWD models) All-wheel drive lock mode can be used when a large amount of drive power needs to be applied to all the wheels, such as when the vehicle gets stuck in mud and you need to free it. Press the switch.
-
Page 253: Driving Assist Systems
4-5. Using the driving support systems Driving assist systems To help enhance driving safety and performance, the following systems operate automatically in response to various driving situations. Be aware, however, that these systems are supple- mentary and should not be relied upon too heavily when operat- ing the vehicle.
-
Page 254
4-5. Using the driving support systems ◆ AUTO LSD function (2WD models) The AUTO LSD function is activated when the system is in TRC off mode. It operates when one of the drive wheels is spinning, such as when the wheel is spinning freely on ice or mud. The system applies the brakes to the spinning wheel and transfers some of the torque to the other wheel to secure drive power. -
Page 255
4-5. Using the driving support systems When the TRC/VSC systems are operating The slip indicator light will flash while the TRC/VSC systems are operating. Disabling the TRC system If the vehicle gets stuck in mud, dirt or snow, the TRC system may reduce power from the engine to the wheels. -
Page 256
When the “AUTO LSD” indicator light flashes even if the VSC OFF switch has not been pressed (2WD models) TRC, AUTO LSD, hill-start assist control and downhill assist control cannot be operated. Contact your Toyota dealer. ■ When the message is displayed on the multi-information display show-… -
Page 257
4-5. Using the driving support systems ■ Automatic reactivation of TRC and VSC systems After turning the TRC and VSC systems off, the systems will be automatically reactivated in the following situations: ● When the engine switch is turned to the “LOCK” position (vehicles without smart entry &… -
Page 258
4-5. Using the driving support systems CAUTION ■ The ABS does not operate effectively when ● The limits of tire gripping performance have been exceeded (such as excessively worn tires on a snow covered road). ● The vehicle hydroplanes while driving at high speed on wet or slick roads. ■… -
Page 259
The ABS, TRC and VSC systems will not function correctly if different tires are installed on the vehicle. Contact your Toyota dealer for further information when replacing tires or wheels. ■ Handling of tires and the suspension Using tires with any kind of problem or modifying the suspension will affect the driving assist systems, and may cause a system to malfunction. -
Page 260: Hill-Start Assist Control
4-5. Using the driving support systems Hill-start assist control Assists with starting off and temporarily maintains braking power even if the foot is removed from the brake pedal when starting off on an incline or a slippery slope. To engage hill-start assist control, further depress the brake pedal when the vehicle is stopped com- pletely.
-
Page 261
• The brake pedal is depressed again. • The brake pedal has been depressed for more than approximately 3 min- utes. ■ If the slip indicator comes on It may indicate a malfunction in the system. Contact your Toyota dealer. CAUTION ■ Hill-start assist control ●… -
Page 262: Dac (Downhill Assist Control System)
4-5. Using the driving support systems ∗ DAC (Downhill Assist Control system) The DAC helps to prevent excessive speed on steep downhill slopes. The system will operate when the vehicle is traveling under 25 km/h (15 mph). ■ System operation Press the “DAC”…
-
Page 263
& start system) or IGNITION ON mode (vehicles with a smart entry & start system). ● The downhill assist control system indicator does not come on when the “DAC” switch is pressed. ● The slip indicator comes on. In the above cases, have your vehicle checked by your Toyota dealer. -
Page 264
4-5. Using the driving support systems CAUTION ■ When using downhill assist control Do not rely overmuch on the downhill assist control. This function does not extend the vehicle’s performance limitations. Always thoroughly check the road conditions, and drive safely. ■… -
Page 265: (Blind Spot Monitor)
4-5. Using the driving support systems ∗ BSM (Blind Spot Monitor) The Blind Spot Monitor is a system that assists the driver in making the decision to change lanes. The system uses radar sensors to detect vehicles that are travel- ing in an adjacent lane in the area that is not reflected in the out- side rear view mirror (the blind spot), and advises the driver of the vehicle’s existence via the outside rear view mirror indicator.
-
Page 266
4-5. Using the driving support systems The Blind Spot Monitor detection areas The blind spot that vehicles can be detected in are outlined below. The range of the detection area extends to: Approximately 3.5 m (11.5 ft.) from the side of the vehicle The first 0.5 m (1.6 ft.) from the side of the vehicle is not in the detection area… -
Page 267
4-5. Using the driving support systems ■ The Blind Spot Monitor system is operational when The BSM main switch is set to on and vehicle speed is greater than approxi- mately 40 km/h (25 mph). ■ The Blind Spot Monitor will detect a vehicle when ●… -
Page 268
4-5. Using the driving support systems ■ Conditions under which the Blind Spot Monitor system may not function correctly ● The Blind Spot Monitor system may not detect vehicles correctly in the fol- lowing conditions: • During bad weather such as heavy rain, fog, snow etc. •… -
Page 269
4-5. Using the driving support systems ■ The outside rear view mirror indicators visibility When under strong sunlight, the outside rear view mirror indicator may be dif- ficult to see. ■ When there is a malfunction in the system If a system malfunction is detected due to any of the following reasons, warn- ing messages will be displayed: (→P. -
Page 270
If the sensor moves even slightly off position, the system may mal- function and vehicles that enter the detection area may not be detected. If the sensor or surrounding area is subject to a strong impact, always have the area inspected by your Toyota dealer. ● Do not disassemble the sensor. -
Page 271: Driving Tips
4-6. Driving tips Winter driving tips Carry out the necessary preparations and inspections before driving the vehicle in winter. Always drive the vehicle in a man- ner appropriate to the prevailing weather conditions. Preparation for winter ● Use fluids that are appropriate to the prevailing outside tempera- tures.
-
Page 272
4-6. Driving tips Before driving the vehicle Perform the following according to the driving conditions: ● Do not try to forcibly open a window or move a wiper that is frozen. Pour warm water over the frozen area to melt the ice. Wipe away the water immediately to prevent it from freezing. -
Page 273
4-6. Driving tips Selecting tire chains Use the correct tire chain size when mounting the tire chains. Chain size is regulated for each tire size. Side chain: 3 mm (0.12 in.) in diameter 10 mm (0.39 in.) in width 30 mm (1.18 in.) in length Cross chain: 4 mm (0.16 in.) in diameter 14 mm (0.55 in.) in width… -
Page 274
4-6. Driving tips ■ Tire chain installation Observe the following precautions when installing and removing chains: ● Install and remove tire chains in a safe location. ● Install tire chains on the front tires only. Do not install tire chains on the rear tires. -
Page 275
Repairing or replacing snow tires (vehicles with the tire pressure warn- ing system) Request repairs or replacement of snow tires from Toyota dealers or legiti- mate tire retailers. This is because the removal and attachment of snow tires affects the opera- tion of the tire pressure warning valves and transmitters. -
Page 276: Utility Vehicle Precautions
4-6. Driving tips Utility vehicle precautions This vehicle belongs to the utility vehicle class, which has higher ground clearance and narrower tread in relation to the height of its center of gravity to make it capable of performing in a wide variety of off-road applications. Utility vehicle feature ●…
-
Page 277
4-6. Driving tips CAUTION ■ Utility vehicle precautions Always observe the following precautions to minimize the risk of death, seri- ous injury or damage to your vehicle: ● In a rollover crash, an unbelted person is significantly more likely to die than a person wearing a seat belt. -
Page 278
4-6. Driving tips Off-road driving When driving your vehicle off-road, please observe the following pre- cautions to ensure your driving enjoyment and to help prevent the clo- sure of areas to off-road vehicles. ● Drive your vehicle only in areas where off-road vehicles are permit- ted to travel. -
Page 279
4-6. Driving tips CAUTION ■ Off-road driving precautions Always observe the following precautions to minimize the risk of death, seri- ous injury or damage to your vehicle: ● Drive carefully when off the road. Do not take unnecessary risks by driving in dangerous places. -
Page 280
4-6. Driving tips NOTICE ■ When you drive through water If driving through water, such as when crossing shallow streams, first check the depth of the water and the bottom of the stream for firmness. Drive slowly and avoid deep water. ■… -
Page 281: Interior Features
Interior features 5-1. Using the air conditioning 5-3. Using the interior lights system and defogger Interior lights list….301 Manual air conditioning • Interior lights….302 system ……280 • Personal lights….302 Automatic air conditioning 5-4. Using the storage features system ……287 List of storage features ..304 Rear window and outside •…
-
Page 282: Manual Air Conditioning
5-1. Using the air conditioning system and defogger ∗ Manual air conditioning system Air outlet selector dial Cooling and dehumidification function on/off button Fan speed control dial Outside/recirculated air mode Temperature control dial button ∗ : If equipped…
-
Page 283
5-1. Using the air conditioning system and defogger Adjusting the settings To adjust the fan speed, turn the fan speed control dial clockwise (increase) or counterclockwise (decrease). Turning the dial to “0” turns off the fan. To adjust the temperature setting, turn the temperature control dial clockwise (warm) or counterclockwise (cool). -
Page 284
5-1. Using the air conditioning system and defogger Defogging the windshield Set the air outlet selector dial to position. If the recirculated air mode is used, it will automatically switch to the outside air mode. Perform the following operations accordingly: ●… -
Page 285
5-1. Using the air conditioning system and defogger Upper body and feet Feet Feet and windshield Switching between outside air and recirculated air modes Press The mode switches between outside air mode (indicator off) and recircu- lated air mode (indicator on) each time is pressed. -
Page 286
5-1. Using the air conditioning system and defogger Adjusting the position of and opening and closing the air outlets ■ Front center outlets Direct air flow to the left or right, up or down. Turn the knobs to open or close the vents. -
Page 287
5-1. Using the air conditioning system and defogger ■ Operation of the air conditioning system in Eco drive mode In Eco drive mode, the air conditioning system is controlled to prioritize fuel efficiency by regulating the engine speed and compressor operation to restrict the heating/cooling capacity. -
Page 288
5-1. Using the air conditioning system and defogger CAUTION ■ To prevent the windshield from fogging up Do not set the air outlet selection dial to during cool air operation in extremely humid weather. The difference between the temperature of the outside air and that of the windshield can cause the outer surface of the windshield to fog up, blocking your vision. -
Page 289: Automatic Air Conditioning System
5-1. Using the air conditioning system and defogger ∗ Automatic air conditioning system Air outlets and fan speed are automatically adjusted according to the temperature setting. Passenger’s side temperature Automatic mode button control dial Driver’s side temperature con- Simultaneous mode button trol dial Windshield defogger button Off button…
-
Page 290
5-1. Using the air conditioning system and defogger Using the automatic air conditioning system Press The dehumidification function begins to operate. Air outlets and fan speed are automatically adjusted according to the temperature setting and humidity. Turn clockwise to increases the temperature and turn counterclockwise to decreases the temperature on the driver’s side. -
Page 291
5-1. Using the air conditioning system and defogger Adjusting the settings manually To adjust the fan speed, press “∧” on to increase the fan speed and “∨” to decrease the fan speed. Press to turn the fan off. To adjust the temperature setting, turn clockwise to increases the temperature and turn counterclockwise to… -
Page 292
5-1. Using the air conditioning system and defogger Defogging the windshield Press dehumidification function operates and fan speed increases. Set the outside/recirculated air mode button to outside air mode if the recirculated air mode is used. (It may switch automatically.) To defog the windshield and the side windows early, turn the air flow and temperature up. -
Page 293
5-1. Using the air conditioning system and defogger Feet Feet and windshield Switching between outside air and recirculated air modes Press The mode switches between outside air mode (the indicator is off) and recirculated air mode (the indicator is on) each time is pressed. -
Page 294
5-1. Using the air conditioning system and defogger Adjusting the position of and opening and closing the air outlets ■ Front center outlets Direct air flow to the left or right, up or down. Turn the knobs to open or close the vents. -
Page 295
5-1. Using the air conditioning system and defogger ■ Operation of the air conditioning system in Eco drive mode In Eco drive mode, the air conditioning system is controlled as follows to pri- oritize fuel efficiency: ● Engine speed and compressor operation controlled to restrict heating/cool- ing capacity ●… -
Page 296
5-1. Using the air conditioning system and defogger ■ Pollen removal mode ● In order to prevent the windshield from fogging up when the outside air is cold, the following may occur: • Outside air mode does not switch to recirculated air mode. •… -
Page 297
5-1. Using the air conditioning system and defogger CAUTION ■ To prevent the windshield from fogging up Do not use during cool air operation in extremely humid weather. The difference between the temperature of the outside air and that of the wind- shield can cause the outer surface of the windshield to fog up, blocking your vision. -
Page 298: Rear Window And Outside Rear View Mirror Defoggers
5-1. Using the air conditioning system and defogger Rear window and outside rear view mirror defoggers These features are used to defog the rear window, and to remove raindrops, dew and frost from the outside rear view mir- rors. Vehicles with a manual air conditioning system On/off The defoggers will automatically turn off after approximately 15 min-…
-
Page 299
5-1. Using the air conditioning system and defogger ■ Operating conditions Vehicles without a smart entry & start system The engine switch is in the “ON” position. Vehicles with a smart entry & start system The engine switch is in IGNITION ON mode. ■… -
Page 300: 5-2. Using The Audio System
5-2. Using the audio system ∗ Using the AUX port/USB port This port can be used to connect a portable audio device and lis- ten to it using the vehicle’s speakers. For more information, please refer to the audio system owner’s manual or navigation system owner’s manual.
-
Page 301: Using The Steering Wheel Audio Switches
5-2. Using the audio system Using the steering wheel audio switches Some audio features (audio volume control, radio, CD player etc.) can be controlled using the switches on the steering wheel. Operation may differ depending on the type of audio system or navigation system.
-
Page 302: Using The Microphone
5-2. Using the audio system ∗ Using the microphone The microphone can be used for the hands-free phone system. For more information, please refer to the navigation system owner’s manual. ∗ : If equipped…
-
Page 303: Using The Interior Lights
5-3. Using the interior lights Interior lights list Interior lights (→P. 302) Engine switch light equipped) Interior/personal lights (→P. 302)
-
Page 304: Interior Lights
5-3. Using the interior lights Interior lights ■ Front Door position The personal lights and interior light come on when a door is opened. They go off when the doors are closed. ■ Rear Door position The interior lights come on when a door is opened.
-
Page 305
5-3. Using the interior lights ■ Illuminated entry system Vehicles without a smart entry & start system The lights automatically turn on/off according to the engine switch position, whether the doors are locked/unlocked, and whether the doors are open/ closed. Vehicles with a smart entry &… -
Page 306: 5-4. Using The Storage Features
5-4. Using the storage features List of storage features Bottle holders (→P. 308) Glove box (→P. 305) Console box (→P. 306) Cup holders (→P. 307) Storage boxes (→P. 310)
-
Page 307: Glove Box
5-4. Using the storage features CAUTION ■ Items that should not be left in the storage spaces Do not leave glasses, lighters or spray cans in the storage spaces, as this may cause the following when cabin temperature becomes high: ●…
-
Page 308: Console Box
5-4. Using the storage features Console box Lift the lid while pulling up the lever to release the lock. ■ When using the console box lid as an armrest (vehicles with slide func- tion) Slide the console box lid forward as needed.
-
Page 309: Cup Holders
5-4. Using the storage features Cup holders ■ Front ■ Rear Pull the armrest down. CAUTION ■ Items unsuitable for the cup holders Do not place anything other than cups or aluminum cans in the cup holders. Other items may be thrown out of the holders in the event of an accident or sudden braking, causing injury.
-
Page 310: Bottle Holders
5-4. Using the storage features Bottle holders ■ Front ■ Rear CAUTION ■ Items unsuitable for the bottle holder Do not place anything other than a bottle in the bottle holders. Other items may be thrown out of the holders in the event of an accident or sudden braking and cause injury.
-
Page 311: Luggage Compartment Features
5-4. Using the storage features Luggage compartment features Cargo hooks Raise the hooks to use. The cargo hooks are provided for securing loose items. CAUTION ■ When the cargo hooks are not in use To avoid injury, always return the cargo hooks to their stowed positions. Grocery bag hooks NOTICE ■…
-
Page 312
5-4. Using the storage features Storage boxes ■ Front Open the deck board by pulling up the strap. ■ Rear Type A Open the deck board by pull- ing up the strap. Fold up the deck board. The lid can be removed. -
Page 313
5-4. Using the storage features Type B Open the deck board by pulling up the strap. CAUTION ■ Caution while driving Do not drive with any of the deck boards opened. Items may fall out and cause injury. -
Page 314
5-4. Using the storage features Luggage cover (if equipped) ■ Installing the luggage cover With the “TOP” marks up, insert the right end of the lug- gage cover into the recess, then compress the left end of the luggage cover and insert it into the recess. -
Page 315
5-4. Using the storage features ■ Removing the luggage cover Release the cover from the left and right anchors and allow it to retract. Compress the end of the lug- gage cover and lift the lug- gage cover up. ■ Stowing the luggage cover Open the rear deck board and remove the deck side… -
Page 316
5-4. Using the storage features Insert the right end of the lug- gage cover into the recess, then compress the left end of the luggage cover and insert it into the recess. CAUTION ■ When installing/stowing the luggage cover Make sure that the luggage cover is securely installed/stowed. Failure to do so may result in serious injury in the event of sudden braking or a collision. -
Page 317
5-4. Using the storage features Rear cargo net (if equipped) Position of the rear cargo net can be changed. Position A (except for full-size spare tire) Insert the right end of the rear cargo net into the recess, then compress the left end of the rear cargo net and insert it into the recess. -
Page 318
5-4. Using the storage features Position B Insert the right end of the rear cargo net into the recess, then compress the left end of the rear cargo net and insert it into the recess. -
Page 319
5-4. Using the storage features ■ Stowing the rear cargo net Open the rear deck board and remove the deck side covers. Insert the right end of the rear cargo into recess, then compress the left end of the rear cargo net and insert it into the recess. -
Page 320
5-4. Using the storage features CAUTION ■ When installing/stowing the rear cargo net Make sure that the rear cargo net is securely installed/stowed. Failure to do so may result in serious injury in the event of sudden braking or a collision. ■… -
Page 321: Other Interior Features
5-5. Other interior features Sun visors and vanity mirrors Sun visors Forward position: Flip down. Side position: Flip down, unhook, and swing to the side. Vanity mirrors Slide the cover to open. The light turns on when the cover is opened. NOTICE ■…
-
Page 322: Clock
5-5. Other interior features Clock The clock can be adjusted by pressing the buttons. Adjusts the hours. Adjusts the minutes. ■ The clock is displayed when Vehicles without a smart entry & start system The engine switch is in the “ACC” or “ON” position. Vehicles with a smart entry &…
-
Page 323: Portable Ashtray
5-5. Other interior features ∗ Portable ashtray The ashtray can be installed in the cup holder. (→P. 307) CAUTION ■ When not in use Keep the ashtray closed. In the event of sudden braking, an accident may occur due to an occupant being struck by the open ashtray or ash flying out. ■…
-
Page 324: Power Outlets
5-5. Other interior features Power outlets The power outlet can be used for 12 V accessories that run on less than 10 A. Open the lid. ■ The power outlets can be used when Vehicles without a smart entry & start system The engine switch is in the “ACC”…
-
Page 325: Seat Heaters
5-5. Other interior features ∗ Seat heaters Turns on the front left seat heater (high) Turns on the front left seat heater (low) Turns on the front right seat heater (high) Turns on the front right seat heater (low) The indicator light comes on. ■…
-
Page 326
5-5. Other interior features CAUTION ■ Burns ● Use caution when seating the following persons in a seat with the seat heater on to avoid the possibility of burns: • Babies, small children, the elderly, the sick and the physically chal- lenged •… -
Page 327: Armrest
5-5. Other interior features Armrest ■ Front (vehicles with slide function) Slide the console box lid for- ward or backward as needed. Pull the lid forward by holding the front of the lid. ■ Rear Fold down the armrest for use. NOTICE ■…
-
Page 328: Coat Hooks
5-5. Other interior features Coat hooks The coat hooks are provided with the rear assist grips. CAUTION ■ Items that cannot be hung on the coat hook Do not hang coat hangers or other hard or sharp objects on the hook. If the SRS curtain shield airbags deploy, these items may become projectiles, causing death or serious injury.
-
Page 329: Assist Grips
5-5. Other interior features Assist grips An assist grip installed on the ceil- ing can be used to support your body while sitting on the seat. CAUTION ■ Assist grip Do not use the assist grip when getting in or out of the vehicle or rising from your seat.
-
Page 330
5-5. Other interior features… -
Page 331: Maintenance And Care
Maintenance and care 6-1. Maintenance and care Cleaning and protecting the vehicle exterior ..330 Cleaning and protecting the vehicle interior …335 6-2. Maintenance Maintenance requirements….338 6-3. Do-it-yourself maintenance Do-it-yourself service precautions ……341 Hood ……..345 Positioning a floor jack..347 Engine compartment..349 Tires……..366 Tire inflation pressure ..369 Wheels…….372…
-
Page 332: Maintenance And Care Cleaning And Protecting
6-1. Maintenance and care Cleaning and protecting the vehicle exterior Perform the following to protect the vehicle and maintain it in prime condition: ● Working from top to bottom, liberally apply water to the vehicle body, wheel wells and underside of the vehicle to remove any dirt and dust.
-
Page 333
6-1. Maintenance and care ■ Automatic car washes ● Before washing the vehicle: • Fold the mirrors • Remove the antenna • Turn off the power back door (if equipped) Start washing from the front of the vehicle. Make sure to re-install the antenna and extend the mirrors before driving. -
Page 334
6-1. Maintenance and care ■ Aluminum wheels (if equipped) ● Remove any dirt immediately by using a neutral detergent. Do not use hard brushes or abrasive cleaners. Do not use strong or harsh chemical clean- ers. Use the same mild detergent and wax as used on the paint. ●… -
Page 335
■ Precautions regarding the Blind Spot Monitor (if equipped) If the paint of the rear bumper is chipped or scratched, the system may mal- function. If this occurs, consult your Toyota dealer. -
Page 336
6-1. Maintenance and care NOTICE ■ To prevent paint deterioration and corrosion on the body and compo- nents (aluminum wheels etc.) ● Wash the vehicle immediately in the following cases: • After driving near the sea coast • After driving on salted roads •… -
Page 337: Cleaning And Protecting The Vehicle Interior
6-1. Maintenance and care Cleaning and protecting the vehicle interior The following procedures will help protect your vehicle’s interior and keep it in top condition: Protecting the vehicle interior Remove dirt and dust using a vacuum cleaner. Wipe dirty surfaces with a cloth dampened with lukewarm water.
-
Page 338
6-1. Maintenance and care ■ Caring for leather areas Toyota recommends cleaning the interior of the vehicle at least twice a year to maintain the quality of the vehicle’s interior. ■ Shampooing the carpets There are several commercial foaming-type cleaners available. Use a sponge or brush to apply the foam. -
Page 339
6-1. Maintenance and care NOTICE ■ Cleaning detergents ● Do not use the following types of detergent, as they may discolor the vehi- cle interior or cause streaks or damage to painted surfaces: • Non-seat portions: Organic substances such as benzene or gasoline, alkaline or acidic solutions, dye, and bleach •… -
Page 340: Maintenance Maintenance Requirements
These are best performed by qualified technicians. Even if you are an experienced do-it-yourself mechanic, we recommend that repairs and maintenance be conducted by your Toyota dealer who will keep a record of maintenance on your vehicle. This record could be helpful should you ever…
-
Page 341
6-2. Maintenance ■ Where to go for service? It makes good sense to take your vehicle to your local Toyota dealer for ser- vice. Toyota technicians are well-trained specialists receiving the latest service information through technical bulletins, service tips, and in-dealership training programs. -
Page 342
6-2. Maintenance CAUTION ■ If your vehicle is not properly maintained Improper maintenance could result in serious damage to the vehicle and possible death or serious injury. ■ Handling of the battery Battery posts, terminals and related accessories contain lead and lead com- pounds which are known to cause brain damage. -
Page 343: Precautions
• Baking soda • Grease Battery condition (→P. 359) • Conventional wrench (for terminal clamp bolts) • Distilled water • “Toyota Super Long Life Coolant” or a similar high quality ethylene glycol-based non-silicate, non- amine, non-nitrite and non-borate coolant with…
-
Page 344
6-3. Do-it-yourself maintenance Items Parts and tools • Fuse with same amperage rating Fuses (→P. 380) as original • Bulb with same number and watt- age rating as original Light bulbs (→P. 394) • Phillips-head screwdriver • Flathead screwdriver • Wrench Radiator, condenser and … -
Page 345
6-3. Do-it-yourself maintenance CAUTION The engine compartment contains many mechanisms and fluids that may move suddenly, become hot, or become electrically energized. To avoid death or serious injury, observe the following precautions. ■ When working on the engine compartment ● Keep hands, clothing and tools away from the moving fan and engine drive belt. -
Page 346
6-3. Do-it-yourself maintenance NOTICE ■ If you remove the air cleaner filter Driving with the air cleaner filter removed may cause excessive engine wear due to dirt in the air. ■ If the fluid level is low or high It is normal for the brake fluid level to go down slightly as the brake pads wear or when the fluid level in the accumulator is high. -
Page 347: Hood
6-3. Do-it-yourself maintenance Hood Release the lock from the inside of the vehicle to open the hood. Pull the hood lock release lever. The hood will pop up slightly. Push the auxiliary catch lever to the left and lift the hood. Hold the hood open by inserting the supporting rod into the slot.
-
Page 348
6-3. Do-it-yourself maintenance CAUTION ■ Pre-driving check Check that the hood is fully closed and locked. If the hood is not locked properly, it may open while the vehicle is in motion and cause an accident, which may result in death or serious injury. ■… -
Page 349: Positioning A Floor Jack
6-3. Do-it-yourself maintenance Positioning a floor jack When raising your vehicle with a floor jack, position the jack cor- rectly. Improper placement may damage your vehicle or cause injury. ◆ Front ◆ Rear…
-
Page 350
6-3. Do-it-yourself maintenance CAUTION ■ When raising your vehicle Make sure to observe the following precautions to reduce the possibility of death or serious injury: ● Lift up the vehicle using a floor jack such as the one shown in the illustra- tion. -
Page 351: Engine Compartment
6-3. Do-it-yourself maintenance Engine compartment 3ZR-FE and 3ZR-FAE engines Fuse boxes (→P. 380) Radiator (→P. 358) Engine coolant reservoir Condenser (→P. 358) (→P. 357) Electric cooling fans Engine oil filler cap Engine oil level dipstick (→P. 354) (→P. 352) Battery (→P.
-
Page 352
6-3. Do-it-yourself maintenance 2AR-FE engine Fuse boxes (→P. 380) Radiator (→P. 358) Engine coolant reservoir Condenser (→P. 358) (→P. 357) Electric cooling fans Engine oil filler cap Engine oil level dipstick (→P. 354) (→P. 352) Battery (→P. 359) Washer fluid tank (→P. 363) -
Page 353
6-3. Do-it-yourself maintenance 2AD-FTV engine Fuse boxes (→P. 380) Radiator (→P. 358) Engine coolant reservoir Intercooler (→P. 358) (→P. 357) Condenser (→P. 358) Engine oil filler cap Electric cooling fans (→P. 354) Engine oil level dipstick Fuel filter (→P. 365) (→P. -
Page 354
6-3. Do-it-yourself maintenance Engine oil With the engine at operating temperature and turned off, check the oil level on the dipstick. ■ Checking the engine oil Park the vehicle on level ground. After warming up the engine and turning it off, wait more than 5 minutes for the oil to drain back into the bottom of the engine. -
Page 355
6-3. Do-it-yourself maintenance Flat dipstick: Reinsert the dipstick fully. Non-flat dipstick: Reinsert the non-flat dipstick fully with its protruding areas ( illustration) pointing towards the engine. Holding a rag under the end, pull the dipstick out and check the oil level. Normal Excessive Flat dipstick… -
Page 356
6-3. Do-it-yourself maintenance ■ Adding engine oil If the oil level is below or near the low level mark, add engine oil of the same type as that already in the engine. 3ZR-FE and 3ZR-FAE engines 2AR-FE engine 2AD-FTV engine Make sure to check the oil type and prepare the items needed before adding oil. -
Page 357
6-3. Do-it-yourself maintenance ■ Engine oil consumption A certain amount of engine oil will be consumed while driving. In the following situations, oil consumption may increase, and engine oil may need to be refilled in between oil maintenance intervals. ● When the engine is new, for example directly after purchasing the vehicle or after replacing the engine ●… -
Page 358
Dispose of used oil and filters only in a safe and acceptable manner. Do not dispose of used oil and filters in household trash, in sewers or onto the ground. Call your Toyota dealer, service station or auto parts store for information concerning recycling or disposal. ●… -
Page 359
If the coolant level drops within a short time of replenishing Visually check the radiator, hoses, engine coolant reservoir cap, drain cock and water pump. If you cannot find a leak, have your Toyota dealer test the cap and check for leaks in the cooling system. -
Page 360
Check the radiator, condenser and intercooler (diesel engine only) and clear away any foreign objects. If any of the above parts is extremely dirty or you are not sure of their condition, have your vehicle inspected by your Toyota dealer. CAUTION ■… -
Page 361
6-3. Do-it-yourself maintenance Battery Check the battery as follows: ■ Battery exterior Make sure that the battery terminals are not corroded and that there are no loose connections, cracks, or loose clamps. Type A Terminals Hold-down clamp Type B Terminals Hold-down clamp… -
Page 362
6-3. Do-it-yourself maintenance ■ Checking battery fluid Check that the level is between the “UPPER LEVEL” and “LOWER LEVEL” lines. “UPPER LEVEL” line “LOWER LEVEL” line If the fluid level is at or below the “LOWER LEVEL” line, add dis- tilled water. -
Page 363
Make sure to turn off the engine before disconnect the battery. Take extra care when connecting the battery if the engine switch mode prior to discharge is unknown. If the engine will not start even after multiple attempts, contact your Toyota dealer. CAUTION ■… -
Page 364
6-3. Do-it-yourself maintenance CAUTION ■ Where to safely charge the battery Always charge the battery in an open area. Do not charge the battery in a garage or closed room where there is not sufficient ventilation. ■ Emergency measures regarding electrolyte ●… -
Page 365
6-3. Do-it-yourself maintenance Washer fluid Without level gauge If any washer does not work, the washer tank may be empty. Add washer fluid. With level gauge If the washer fluid level is at “LOW”, add washer fluid. ■ Using the gauge (if equipped) The washer fluid level can be checked by observing the position of the level on the liquid-covered holes in the gauge. -
Page 366
6-3. Do-it-yourself maintenance CAUTION ■ When adding washer fluid Do not add washer fluid when the engine is hot or running as washer fluid contains alcohol and may catch fire if spilled on the engine etc. NOTICE ■ Do not use any fluid other than washer fluid Do not use soapy water or engine antifreeze instead of washer fluid. -
Page 367
Fuel filter (diesel engine only) You may drain the fuel filter yourself. However, as the operation is dif- ficult, we recommend having it drained by your Toyota dealer. Even if you decide to drain it yourself, contact your Toyota dealer. -
Page 368: Tires
Front Front 2WD models: To equalize tire wear and help extend tire life, Toyota recommends that tire rotation is carried out approximately every 10000 km (6000 miles). AWD models: To equalize tire wear and help extend tire life, Toyota recommends that tire…
-
Page 369
Do not mix tires of different makes, models or tread patterns. Also, do not mix tires of remarkably different treadwear. ● Do not use tire sizes other than those recommended by Toyota. ● Do not mix differently constructed tires (radial, bias-belted or bias-ply tires). -
Page 370
6-3. Do-it-yourself maintenance NOTICE ■ Driving on rough roads Take particular care when driving on roads with loose surfaces or potholes. These conditions may cause losses in tire inflation pressure, reducing the cushioning ability of the tires. In addition, driving on rough roads may cause damage to the tires themselves, as well as the vehicle’s wheels and body. -
Page 371: Tire Inflation Pressure
Driving with incorrect tire inflation pressure may result in the following: ● Reduced fuel efficiency ● Reduced driving comfort and tire life ● Reduced safety ● Damage to the drive train If a tire needs frequent inflating, have it checked by your Toyota dealer.
-
Page 372
6-3. Do-it-yourself maintenance ■ Instructions for checking tire inflation pressure When checking tire inflation pressure, observe the following: ● Check only when the tires are cold. If your vehicle has been parked for at least 3 hours or has not been driven for more than 1.5 km or 1 mile, you will get an accurate cold tire inflation pressure reading. -
Page 373
6-3. Do-it-yourself maintenance CAUTION ■ Proper inflation is critical to save tire performance Keep your tires properly inflated. Otherwise, the following conditions may occur and result in an accident causing death or serious injury: ● Excessive wear ● Uneven wear ●… -
Page 374: Wheels
● Used wheels ● Bent wheels that have been straightened Aluminum wheel precautions ● Use only Toyota wheel nuts and wrenches designed for use with your aluminum wheels. ● When rotating, repairing or changing your tires, check that the wheel nuts are still tight after driving 1600 km (1000 miles).
-
Page 375
6-3. Do-it-yourself maintenance CAUTION ■ When replacing wheels ● Do not use wheels that are a different size from those recommended in the Owner’s Manual, as this may result in a loss of handling control. ● Never use an inner tube in a leaking wheel which is designed for a tube- less tire. -
Page 376: Air Conditioning Filter
6-3. Do-it-yourself maintenance Air conditioning filter The air conditioning filter must be changed regularly to maintain air conditioning efficiency. Removal method Vehicles without a smart entry & start system: Turn the engine switch to the “LOCK” position. Vehicles with a smart entry & start system: Turn the engine switch off.
-
Page 377
6-3. Do-it-yourself maintenance Remove the air conditioning fil- ter and replace it with a new one. The “↑UP” marks shown on the fil- ter should be pointing up. ■ Checking interval Inspect and replace the air conditioning filter according to the maintenance schedule. -
Page 378: Wireless Remote Control/Electronic Key Battery
6-3. Do-it-yourself maintenance Wireless remote control/electronic key battery Replace the battery with a new one if it is depleted. You will need the following items: ● Flathead screwdriver ● Small flathead screwdriver ● Lithium battery CR2016 (vehicles without a smart entry & start sys- tem), or CR2032 (vehicles with a smart entry &…
-
Page 379
6-3. Do-it-yourself maintenance Open the case cover using a coin protected with tape etc. and remove the depleted bat- tery. Insert a new battery with the “+” terminal facing up. Vehicles with a smart entry & start system Take out the mechanical key. Remove the cover. -
Page 380
Use a CR2016 (vehicles without a smart entry & start system), or CR2032 (vehicles with a smart entry & start system) lithium battery ● Batteries can be purchased at your Toyota dealer, local electrical appliance shops or camera stores. ●… -
Page 381
6-3. Do-it-yourself maintenance CAUTION ■ Removed battery and other parts These parts are small and if swallowed by a child, they can cause choking. Keep away from children. Failure to do so could result in death or serious injury. NOTICE ■… -
Page 382: Checking And Replacing Fuses
6-3. Do-it-yourself maintenance Checking and replacing fuses If any of the electrical components do not operate, a fuse may have blown. If this happens, check and replace the fuses as nec- essary. Vehicles without a smart entry & start system: Turn the engine switch to the “LOCK”…
-
Page 383
6-3. Do-it-yourself maintenance Under the instrument panel Remove the instrument panel under cover. Remove the cover. Behind the instrument panel Remove the glove box. (→P. 374) Remove the fuse with the pull- out tool. Only type A fuse can be removed using the pullout tool. -
Page 384
Type A and B: Replace the blown fuse with a new fuse of an appropriate amperage rat- ing. The amperage rating can be found on the fuse box lid. Type C and D: Contact your Toyota dealer. Type A Type B Type C… -
Page 385
6-3. Do-it-yourself maintenance Fuse layout and amperage ratings ■ Engine compartment type A Fuse Ampere Circuit Multiport fuel injection system/sequential multiport fuel injection system, EFI NO.1, EFI NO.2, fuel pump Multiport fuel injection system/sequential EFI-MAIN NO.1 multiport fuel injection system, EFI NO.1, EFI NO.2 Multiport fuel injection system/sequential multiport fuel injection system, EFI NO.3,… -
Page 386
6-3. Do-it-yourself maintenance Fuse Ampere Circuit Multiport fuel injection system/sequential multiport fuel injection system EFI-MAIN NO.2 Air flow sensor, fuel pump, rear O sen- EFI NO.1, EFI NO.2 VLVMATIC VALVEMATIC system Vehicle stability control, anti-lock brake ABS NO.2 system Vehicle stability control, anti-lock brake ABS NO.1 system 10 BBC… -
Page 387
6-3. Do-it-yourself maintenance Fuse Ampere Circuit Windshield wiper switch, electric current 24 WIPER-S sensor, multiport fuel injection system/ sequential multiport fuel injection system Air flow meter, purge control VSV, ACIS VSV, rear O sensor, multiport fuel injec- tion system/sequential multiport fuel injection system 25 EFI NO.1… -
Page 388
6-3. Do-it-yourself maintenance Fuse Ampere Circuit 34 H-LP RH-LO Right-hand headlight (low beam) 35 SPARE Spare fuse 36 SPARE Spare fuse 37 SPARE Spare fuse : Vehicles with 3ZR-FE and 3ZR-FAE engines : Vehicles with 2AR-FE engine : Vehicles with 2AD-FTV engine : Vehicles without discharge headlights : Vehicles with discharge headlights… -
Page 389
6-3. Do-it-yourself maintenance ■ Engine compartment type B Fuse Ampere Circuit PTC heater PTC HTR NO.1 No circuit PTC heater PTC HTR NO.2 No circuit PTC HTR NO.3 PTC heater CDS FAN Electric cooling fans RDI FAN Electric cooling fans Air conditioning system Rear window defogger, MIR HTR Daytime running lights… -
Page 390
6-3. Do-it-yourself maintenance Fuse Ampere Circuit Outside rear view mirror defoggers, mul- 14 MIR HTR tiport fuel injection system/sequential multiport fuel injection system : Vehicles with diesel engine : Vehicles with gasoline engine… -
Page 391
6-3. Do-it-yourself maintenance ■ Under the instrument panel Fuse Ampere Circuit STOP Stop lights S/ROOF Moon roof IG1 NO.1, IG1 NO.2, IG1 NO.3, ACC On-board diagnosis system Power door lock system (side doors), D/L NO.2 main body ECU FOG RR No circuit D/L BACK Power door lock system (back door) -
Page 392
BSM main switch, all-wheel drive lock switch, DAC switch, multiport fuel injection system/ sequential multiport fuel injection system, Toyota parking assist-sensor ECU, seat 19 PANEL heater switches, manual headlight level- ing dial, power outlets, power back door… -
Page 393
6-3. Do-it-yourself maintenance Fuse Ampere Circuit C/OPN, fuel pump, multiport fuel injection system/sequential multiport fuel injection 27 IGN system, stop lights, steering lock system ECU, automatic transmission ECU 28 A/B SRS airbag system ECU 29 METER Gauges and meters Alternator, headlight cleaner, rain-sens- ing windshield wiper ECU, anti-lock 30 ECU-IG NO.3 brake system/vehicle stability control… -
Page 394
6-3. Do-it-yourself maintenance ■ Behind the instrument panel Fuse Ampere Circuit P/SEAT F/L No circuit P/SEAT F/R Right-hand power seat Power back door Front power windows, power window P/W MAIN main switch… -
Page 395
If the lights do not turn on even after the fuse has been replaced, a bulb may need replacement. (→P. 394) ● If the replaced fuse blows again, have the vehicle inspected by your Toyota dealer. ■ If there is an overload in a circuit The fuses are designed to blow, protecting the wiring harness from damage. -
Page 396: Light Bulbs
Toyota dealer. For more information about replacing other light bulbs, contact your Toyota dealer. Preparing for light bulb replacement Check the wattage of the light bulb to be replaced. (→P. 495) Bulb locations ■…
-
Page 397
6-3. Do-it-yourself maintenance ■ Rear Tail light Stop/tail light Back-up light License plate lights Rear turn signal light… -
Page 398
6-3. Do-it-yourself maintenance Replacing light bulbs ■ Headlight low beams (halogen headlights) right side only: Remove the securing clip. Then move the washer tank inlet. Disconnect connector and turn the cover counter- clockwise. Unplug the connector while pulling the lock release. -
Page 399
6-3. Do-it-yourself maintenance Turn the bulb base counter- clockwise. Set the new light bulb. Align the 3 tabs on the light bulb with the mounting, and insert. Turn it clockwise to set. Set the connector. After installing the connector, shake the bulb base gently to check that it is not loose. -
Page 400
6-3. Do-it-yourself maintenance ■ Headlight high beams For the right side only: Remove the securing clip. Then move the washer tank inlet. (→P. 396) Turn the bulb base counter- clockwise. Unplug the connector while pressing the lock release. Replace the light bulb, and install the bulb base. -
Page 401
6-3. Do-it-yourself maintenance Turn and secure the bulb base. Shake the bulb base gently to check that it is not loose, turn the headlights on once and visu- ally confirm that no light is leak- ing through the mounting. For the right side only: Move the washer tank inlet and install the securing clip. -
Page 402
6-3. Do-it-yourself maintenance ■ Fog lights (if equipped) To allow enough working space, turn steering wheel to the opposite side of the bulb to be replaced. Turn the steering wheel to the left when replacing the right side light bulb, and turn the steering wheel to the right when replac- ing the left side light bulb. -
Page 403
6-3. Do-it-yourself maintenance Set the new light bulb. Align the 3 tabs on the light bulb with the mounting, and insert. Turn it clockwise to set. Set the connector. After installing the connector, shake the bulb base gently to check that it is not loose, turn the fog lights on once and visu- ally confirm that no light is leak- ing through the mounting. -
Page 404
6-3. Do-it-yourself maintenance ■ Stop/tail lights and rear turn signal lights Open the back door and remove bolts, remove the lamp assembly by pulling it directly backward from the rear of the vehicle. Turn the bulb base counterclockwise. Stop/tail lights Rear turn signal lights Remove the light bulb. -
Page 405
6-3. Do-it-yourself maintenance ■ Tail lights and back-up lights Open the back door and remove the cover. To prevent damage, cover the tip of the screwdriver with rag. Turn the bulb base counterclockwise. Tail lights Back-up lights Remove the light bulb. Tail lights Back-up lights When installing, reverse the steps listed. -
Page 406
6-3. Do-it-yourself maintenance ■ License plate lights Open the back door and remove the cover. To prevent damage, cover the tip of the screwdriver with rag. Turn the bulb base counterclockwise. Left side Right side Remove the light bulb. When installing, reverse the steps listed. -
Page 407
LED Lights The front position lights/daytime running lights, side turn signal lights and high mounted stoplight consist of a number of LEDs. If any of the LEDs burn out, take your vehicle to your Toyota dealer to have the light replaced. -
Page 408
Temporary condensation build-up on the inside of the headlight lens does not indicate a malfunction. Contact your Toyota dealer for more information in the following situations: ● Large drops of water have built up on the inside of the lens. -
Page 409
6-3. Do-it-yourself maintenance CAUTION ■ Discharge headlights (if equipped) ● Contact your Toyota dealer before replacing the discharge headlights (including light bulbs). ● Do not touch the discharge headlight’s high voltage socket when the head- lights are turned on. An extremely high voltage of 30000 V will be discharged and could result in death or serious injury by electric shock. -
Page 410
6-3. Do-it-yourself maintenance… -
Page 411: When Trouble Arises
When trouble arises 7-1. Essential information 7-2. Steps to take in an emergency Emergency flashers…410 If your vehicle needs If your vehicle has to to be towed ……413 be stopped in an emergency…….411 If you think something is wrong..420 Fuel pump shut off system (gasoline engine only)………421 If a warning light turns…
-
Page 412: Emergency Flashers
7-1. Essential information Emergency flashers The emergency flashers are used to warn other drivers when the vehicle has to be stopped in the road to a breakdown, etc. Press the switch. All the turn signals will flash. To turn them off, press the switch once again.
-
Page 413: If Your Vehicle Has To Be Stopped In An Emergency
7-1. Essential information If your vehicle has to be stopped in an emergency Only in an emergency, such as if it becomes impossible to stop the vehicle in the normal way, stop the vehicle using the follow- ing procedure: Steadily step on the brake pedal with both feet and firmly depress it. Do not pump the brake pedal repeatedly as this will increase the effort required to slow the vehicle.
-
Page 414
7-1. Essential information CAUTION ■ If the engine has to be turned off while driving ● Power assist for the brakes and steering wheel will be lost, making the brake pedal harder to depress and the steering wheel heavier to turn. Decelerate as much as possible before turning off the engine. -
Page 415: Steps To Take In An Emergency
If your vehicle needs to be towed If towing is necessary, we recommend having your vehicle towed by your Toyota dealer or a commercial towing service, using a lift-type truck or flat bed truck. Use a safety chain system for all towing, and abide by all state/ provincial and local laws.
-
Page 416
7-2. Steps to take in an emergency Emergency towing If a tow truck is not available in an emergency, your vehicle may be temporarily towed using a cable or chain secured to the emergency towing eyelet(s). This should only be attempted on hard surfaced roads for short distances at low speeds. -
Page 417
7-2. Steps to take in an emergency Installing towing eyelet Remove the eyelet cover using a flathead screwdriver. To protect the bodywork, place a rag between the screwdriver and the vehicle body as shown in the illustration. Insert the towing eyelet into the hole and tighten partially by hand. -
Page 418
7-2. Steps to take in an emergency Towing with a sling-type truck Do not tow with a sling-type truck to prevent body damage. Towing with a wheel-lift type truck From the front (2WD models) From the front (AWD models) Release the parking brake. Use a towing dolly under the rear wheels. -
Page 419
7-2. Steps to take in an emergency Using a flat bed truck If you use chains or cables to tie down your vehicle, the angles shaded in black must be 45°. Do not overly tighten the tie downs or the vehicle may be dam- aged. -
Page 420
7-2. Steps to take in an emergency CAUTION Observe the following precautions. Failure to do so may result in death or serious injury. ■ Caution while towing ● Use extreme caution when towing the vehicle. Avoid sudden starts or erratic driving maneuvers which place excessive stress on the emergency towing eyelets and the cables or chains. -
Page 421
7-2. Steps to take in an emergency NOTICE ■ To prevent damage to the vehicle when towing using a wheel-lift type truck When raising the vehicle, ensure adequate ground clearance for towing at the opposite end of the raised vehicle. Without adequate clearance, the vehicle could be damaged while being towed. -
Page 422: If You Think Something Is Wrong
7-2. Steps to take in an emergency If you think something is wrong If you notice any of the following symptoms, your vehicle proba- bly needs adjustment or repair. Contact your Toyota dealer as soon as possible. Visible symptoms ● Fluid leaks under the vehicle (Water dripping from the air conditioning after use is normal.)
-
Page 423: Fuel Pump Shut Off System (Gasoline Engine Only)
7-2. Steps to take in an emergency Fuel pump shut off system (gasoline engine only) To minimize the risk of fuel leakage when the engine stalls or when an airbag inflates upon collision, the fuel pump shut off system stops the supply of fuel to the engine. Follow the procedure below to restart the engine after the system is activated.
-
Page 424: If A Warning Light Turns On Or A Warning Buzzer Sounds
If a light comes on or flashes, but then goes off, this does not necessarily indicate a malfunction in the system. However, if this continues to occur, have the vehicle inspected by your Toyota dealer. Stop the vehicle immediately. Continuing to drive the vehicle may be dangerous.
-
Page 425
Charging system warning light Indicates a malfunction in the vehicle’s charging system Have the vehicle inspected by your Toyota dealer immediately. Failure to investigate the cause of the following warnings may lead to the system operating abnormally and possibly cause an accident. -
Page 426
(warning buzzer) (if equipped) Indicates a malfunction in Toyota parking assist-sensor (Flashes) : The corner and center indicators flash after the indicator for the malfunc- tioning sensor flashes and the vehicle indicator turns off while the buzzer sounds for approximately 7 seconds. -
Page 427
High engine coolant tem- perature warning light →P. 472 Indicates that the engine is (Red) almost overheating. Toyota parking assist-sen- indicator (warning buzzer) (if equipped) Clean the sensors. Indicates that Toyota park- ing assist-sensor is dirty or covered with ice. -
Page 428
7-2. Steps to take in an emergency : Open door warning buzzer: →P. 431 : Driver’s and passenger’s seat belt buzzer: The driver’s and passenger’s seat belt buzzer sounds to alert the driver and passenger that his or her seat belt is not fastened. The buzzer sounds intermittently for 30 seconds after the vehicle reaches a speed of 20 km/h (12 mph). -
Page 429
If the fuel tank is empty, refuel the vehicle immediately. The malfunction indicator lamp will go off after several trips. If the malfunction indicator lamp does not go off, contact your Toyota dealer as soon as possible. ■… -
Page 430: If A Warning Message Is Displayed
Multi-information display If any of the warning light comes on again after the following actions have been performed, contact your Toyota dealer.
-
Page 431
A buzzer sounds and a warning message is shown on the multi-infor- mation display. The following warning indicates the possibility of dam- age to the vehicle that may lead to an accident. Immediately stop the vehicle in a safe place and contact your Toyota dealer. Warning message Details… -
Page 432
A buzzer sounds and a warning message is shown on the multi-infor- mation display. Failure to investigate the cause of the following warn- ings may lead to the system operating abnormally and possibly cause an accident. Have the vehicle inspected by your Toyota dealer. Warning message Details… -
Page 433
7-2. Steps to take in an emergency Follow the correction procedures. A buzzer sounds and a warning message is shown on the multi-infor- mation display. After taking the specified steps to correct the sus- pected problem, check that the warning message goes off. Warning message Details Correction procedure… -
Page 434
7-2. Steps to take in an emergency Warning message Details Correction procedure Indicates that the park- brake still engaged vehicle reaches a speed of Release parking km/h mph), brake. flashes and a buzzer sounds indicate that parking brake is still engaged. -
Page 435
If the light goes off, temperature is too high you may start the vehicle again. If the light does not go off, (If equipped) contact your Toyota dealer. Indicates that amount accumu- Drain the water from lated water in the fuel the fuel filter. -
Page 436
Have the engine oil and should be changed oil filter checked and/or changed your Comes approxi- Toyota dealer. After mately 30000 changing the engine (19000 miles) after the oil, the oil change sys- engine oil is changed. -
Page 437
7-2. Steps to take in an emergency Have the malfunction repaired immediately. (vehicles with a smart entry & start system) After taking the specified steps to correct the suspected problem, check that the warning message and light go off. Interior Exterior Correction Warning message… -
Page 438
7-2. Steps to take in an emergency Interior Exterior Correction Warning message Details buzzer buzzer procedure An attempt was made to exit the vehicle with the Turn Con- electronic key and engine tinu- lock doors switch Once ous (5 without first turn- lock sec- engine… -
Page 439
7-2. Steps to take in an emergency Interior Exterior Correction Warning message Details buzzer buzzer procedure The driver’s door • Shift the was opened and shift closed while the lever electronic Con- Con- was not in the • Bring the tinu- tinu- vehicle, the shift… -
Page 440
7-2. Steps to take in an emergency Interior Exterior Correction Warning message Details buzzer buzzer procedure • When the doors were unlocked with mechanical key then engine switch Touch the pressed, electronic (Automatic electronic key to the transmission or CVT) key could not engine be detected in… -
Page 441
7-2. Steps to take in an emergency Interior Exterior Correction Warning message Details buzzer buzzer procedure Next time when start- engine, increase the engine Power was turned speed off due to the slightly and automatic power maintain off function. (Automatic that level… -
Page 442
7-2. Steps to take in an emergency Interior Exterior Correction Warning message Details buzzer buzzer procedure The driver’s door was opened and Press closed with the engine engine switch switch turned while then the engine depress- switch was put in ACCESSORY (Automatic brake… -
Page 443
7-2. Steps to take in an emergency Interior Exterior Correction Warning message Details buzzer buzzer procedure The engine switch has been turned Shift Once off with the shift shift lever lever in a position to P. (Flashes) other than P or N. (Automatic transmission or CVT) After the engine… -
Page 444
7-2. Steps to take in an emergency ■ Warning buzzer In some cases, the buzzer may not be heard because of noisy place or an audio sound. ■ After changing the engine oil (diesel engine only) Make sure to reset the oil maintenance data. (→P. 355) NOTICE ■… -
Page 445: If You Have A Flat Tire
7-2. Steps to take in an emergency If you have a flat tire Remove the flat tire and replace it with the spare tire provided. For details about tires: →P. 366 CAUTION ■ If you have a flat tire Do not continue driving with a flat tire. Driving even a short distance with a flat tire can damage the tire and the wheel beyond repair, which could result in an accident.
-
Page 446
7-2. Steps to take in an emergency Location of the spare tire, jack and tools Tool bag (if equipped) Spare tire Jack (if equipped) -
Page 447
7-2. Steps to take in an emergency CAUTION ■ Using the tire jack (if equipped) Observe the following precautions. Improper use of the tire jack may cause the vehicle to suddenly fall off the jack, leading to death or serious injury. ●… -
Page 448
7-2. Steps to take in an emergency Taking out the jack and tool bag (if equipped) Remove the cover. Take out the tool bag. Take out the jack. For loosening For tightening… -
Page 449
7-2. Steps to take in an emergency Taking out the spare tire Remove the rear deck board. Loosen the center fastener that secures the spare tire. CAUTION ■ When storing the spare tire Be careful not to catch fingers or other body parts between the spare tire and the body of the vehicle. -
Page 450
7-2. Steps to take in an emergency Replacing a flat tire Chock the tires. Flat tire Wheel chock positions Left-hand side Behind the rear right-hand side tire Front Right-hand side Behind the rear left-hand side tire Left-hand side In front of the front right-hand side tire Rear Right-hand side In front of the front left-hand side tire… -
Page 451
7-2. Steps to take in an emergency Slightly loosen the wheel nuts (one turn). Turn the tire jack portion hand until the notch of the jack is in contact with the jack point. The jack point guides are located under the rocker panel. They indi- cate the jack point positions. -
Page 452
7-2. Steps to take in an emergency Raise the vehicle until the tire is slightly raised off the ground. Remove all the wheel nuts and the tire. When resting the tire on the ground, place the tire so that the wheel design faces up to avoid scratching the wheel surface. -
Page 453
• If there are any cracks or deformations in the bolt screws, nut threads or bolt holes of the wheel, have the vehicle inspected by your Toyota dealer. When installing the wheel nuts, be sure to install them with the tapered ends facing inward. -
Page 454
7-2. Steps to take in an emergency Installing the spare tire Remove any dirt or foreign mat- ter from the wheel contact sur- face. If foreign matter is on the wheel contact surface, the wheel nuts may loosen while the vehicle is in motion, causing the tire to come off. -
Page 455
7-2. Steps to take in an emergency Lower the vehicle. Firmly tighten each wheel nut two or three times in the order shown in the illustration. Tightening torque: 103 N•m (10.5 kgf•m, 76 ft•lbf) Reinstall the wheel ornament Vehicles with full wheel ornament Align the cutout of the wheel orna- ment with the valve stem as shown. -
Page 456
7-2. Steps to take in an emergency ■ The compact spare tire (if equipped) ● The compact spare tire is identified by the label “TEMPORARY USE ONLY” on the tire sidewall. Use the compact spare tire temporarily, and only in an emergency. ●… -
Page 457
• DAC (Downhill Assist Control • TRC system) (if equipped) • Cruise control • Toyota parking assist-sensor (if equipped) Also, not only can the following system not be utilized fully, it may actually negatively effect the drive-train components: • Dynamic Torque Control AWD system (AWD models) -
Page 458
7-2. Steps to take in an emergency CAUTION ■ Speed limit when using the compact spare tire (if equipped) Do not drive at speeds in excess of 80 km/h (50 mph) when a compact spare tire is installed on the vehicle. The compact spare tire is not designed for driving at high speeds. -
Page 459
7-2. Steps to take in an emergency NOTICE ■ Driving with tire chains and the compact spare tire (if equipped) ● Compact spare tires fitted to this vehicle must have a maximum load rating of not less than 900 kg or a load index of 104 and a speed category sym- bol of not less than M (130 km/h). -
Page 460: If The Engine Will Not Start
7-2. Steps to take in an emergency If the engine will not start If the engine will not start even though correct starting proce- dures are being followed (→P. 184, 188), consider each of the fol- lowing points: The engine will not start even though the starter motor operates normally.
-
Page 461
● There may be a malfunction in the steering lock system (vehicles with a smart entry & start system). Contact your Toyota dealer if the problem cannot be repaired, or if repair procedures are unknown. Emergency start function (vehicles with a smart entry & start… -
Page 462: If The Shift Lever Cannot Be Shifted From P (Except Manual Transmission)
(a sys- tem to prevent accidental operation of the shift lever). Have the vehicle inspected by your Toyota dealer immediately. The following steps may be used as an emergency measure to ensure that the shift lever can be shifted: Set the parking brake.
-
Page 463: If The Electronic Key Does Not Operate Properly (Vehicles With A Smart Entry & Start System)
7-2. Steps to take in an emergency If the electronic key does not operate properly (vehicles with a smart entry & start system) If communication between the electronic key and vehicle is interrupted (→P. 108) or the electronic key cannot be used because the battery is depleted, the smart entry &…
-
Page 464
ACCESSORY mode. Firmly depress the brake pedal and check that is displayed on the multi-information display. Press the engine switch. In the event that the engine still cannot be started, contact your Toyota dealer. -
Page 465
ACCESSORY mode. Firmly depress the clutch pedal and check that is shown on the multi-information display. Press the engine switch. In the event that the engine still cannot be started, contact your Toyota dealer. -
Page 466
7-2. Steps to take in an emergency ■ Stopping the engine Automatic transmission or CVT Shift the shift lever to P and press the engine switch as you normally do when stopping the engine. Manual transmission Shift the shift lever to N and press the engine switch as you normally do when stopping the engine. -
Page 467: If The Vehicle Battery Is Discharged
The following procedures may be used to start the engine if the vehicle’s battery is discharged. You can also call your Toyota dealer or a qualified repair shop. If you have a set of jumper (or booster) cables and a second vehicle with a 12-volt battery, you can jump start your vehicle by following the steps below.
-
Page 468
7-2. Steps to take in an emergency 3ZR-FE and 3ZR-FAE engines Remove the engine cover. Connect a positive jumper cable clamp to the positive (+) battery terminal on your vehicle. Connect the clamp on the other end of the positive cable to the positive (+) battery terminal on the second vehicle. -
Page 469
7-2. Steps to take in an emergency 2AR-FE engine Connect a positive jumper cable clamp to the positive (+) battery terminal on your vehicle. Connect the clamp on the other end of the positive cable to the positive (+) battery terminal on the second vehicle. Connect a negative cable clamp to the negative (-) battery termi- nal on the second vehicle. -
Page 470
7-2. Steps to take in an emergency 2AD-FTV engine Remove the engine cover. Connect a positive jumper cable clamp to the positive (+) battery terminal on your vehicle. Connect the clamp on the other end of the positive cable to the positive (+) battery terminal on the second vehicle. -
Page 471
ON mode. Once the vehicle’s engine has started, remove the jumper cables in the exact reverse order from which they were connected. Once the engine starts, have the vehicle inspected at your Toyota dealer as soon as possible. ■ Starting the engine when the battery is discharged (vehicles with an automatic transmission or a CVT) The engine cannot be started by push-starting. -
Page 472
7-2. Steps to take in an emergency ■ When recharging or replacing the battery (vehicles with a smart entry & start system) ● Make sure that the key is not inside the vehicle when recharging or replac- ing the battery. The key may be locked in the vehicle if the alarm is acti- vated. -
Page 473
7-2. Steps to take in an emergency CAUTION ■ Battery precautions The battery contains poisonous and corrosive acidic electrolyte, while related parts contain lead and lead compounds. Observe the following pre- cautions when handling the battery: ● When working with the battery, always wear safety glasses and take care not to allow any battery fluids (acid) to come into contact with skin, clothing or the vehicle body. -
Page 474: If Your Vehicle Overheats
(radia- tor) for any leaks. Radiator Cooling fans If a large amount of coolant leaks, immediately contact your Toyota dealer. The coolant level is satisfactory if it is between the “FULL” and “LOW” lines on the reservoir. Reservoir “FULL”…
-
Page 475
(The fans may not operate in freezing temperatures.) If the fans are not operating: Stop the engine immediately and contact your Toyota dealer. If the fans are operating: Have the vehicle inspected at the nearest Toyota dealer. -
Page 476
7-2. Steps to take in an emergency CAUTION ■ When inspecting under the hood of your vehicle Observe the following precautions. Failure to do so may result in serious injury such as burns. ● If steam is seen coming from under the hood, do not open the hood until the steam has subsided. -
Page 477: If You Run Out Of Fuel And The Engine Stalls (Diesel Engine Only)
If the engine does not start after the above steps have been performed, wait for 10 seconds and try step again. If the engine still does not start, contact your Toyota dealer. After starting the engine, depress the accelerator pedal lightly until the engine runs smoothly.
-
Page 478: If The Vehicle Becomes Stuck
7-2. Steps to take in an emergency If the vehicle becomes stuck Carry out the following procedures if the tires spin or the vehicle becomes stuck in mud, dirt or snow: Stop the engine. Set the parking brake and shift the shift lever to P (vehicles with an automatic transmission or a CVT) or N (vehicles with a manual transmission).
-
Page 479
7-2. Steps to take in an emergency CAUTION ■ When attempting to free a stuck vehicle If you choose to push the vehicle back and forth to free it, make sure the surrounding area is clear to avoid striking other vehicles, objects or people. The vehicle may also lunge forward or lunge back suddenly as it becomes free. -
Page 480
7-2. Steps to take in an emergency… -
Page 481: Vehicle Specifications
Vehicle specifications 8-1. Specifications Maintenance data (fuel, oil level, etc.)…480 Fuel information ….496 8-2. Customization Customizable features ..498 8-3. Items to initialize Items to initialize ….502…
-
Page 482: Specifications Maintenance Data
8-1. Specifications Maintenance data (fuel, oil level, etc.) Dimensions Overall length 4570 mm (179.9 in.) Overall width 1845 mm (72.6 in.) Overall height 1660 mm (65.4 in.) Without the roof luggage carrier 1670 mm (65.7 in.) 1705 mm (67.1 in.) With the roof luggage carrier 1715 mm (67.5 in.)
-
Page 483
The vehicle identification number (VIN) is the legal identifier for your vehicle. This is the primary identification number for your Toyota. It is used in registering the ownership of your vehicle. This number is stamped under the right-hand front seat. -
Page 484
8-1. Specifications ■ Engine number The engine number is stamped on the engine block as shown. 3ZR-FE and 3ZR-FAE engines 2AR-FE engine 2AD-FTV engine… -
Page 485
8-1. Specifications Engine 3ZR-FE and 3ZR-FAE engines Model 3ZR-FE and 3ZR-FAE Type 4-cylinder in line, 4-cycle, gasoline 80.5 × 97.6 mm (3.17 × 3.84 in.) Bore and stroke Displacement 1987 cm (121.2 cu.in.) Valve clearance Automatic adjustment 7.6 10 mm (0.30 0.39 in.) Generator Water pump Drive belt tension… -
Page 486
8-1. Specifications 2AD-FTV engine Model 2AD-FTV 4-cylinder in line, 4-cycle, diesel Type (with turbocharger) 86.0 × 96.0 mm (3.39 × 3.78 in.) Bore and stroke Displacement 2231 cm (136.1 cu.in.) Valve clearance Automatic adjustment Drive belt tension Fuel Gasoline engine Fuel type Unleaded gasoline only 3ZR-FE… -
Page 487
■ Engine oil selection “Toyota Genuine Motor Oil” is used in your Toyota vehicle. Use Toyota approved “Toyota Genuine Motor Oil” or equivalent to satisfy the following grade and viscosity. Oil grade: 0W-20, 5W-20, 5W-30 and 10W-30: API grade SL “Energy-Conserving”, SM “Energy-Conserving”, SN… -
Page 488
8-1. Specifications Oil viscosity (0W-20 is explained here as an example): • The 0W in 0W-20 indicates the characteristic of the oil which allows cold startability. Oils with a lower value before the W allow for easier starting of the engine in cold weather. •… -
Page 489
■ Engine oil selection “Toyota Genuine Motor Oil” is used in your Toyota vehicle. Use Toyota approved “Toyota Genuine Motor Oil” or equivalent to satisfy the following grade and viscosity. Oil grade: G-DLD-1, API CF-4, CF or ACEA B1… -
Page 490
8-1. Specifications DLD logo mark: The Global DLD-1 logo mark, attached on some oil containers to help in selecting the oil you should use, indicates that the oil meets the guidelines recom- mended by the following asso- ciations: ● ACEA (Association des Con- structeurs Europeens d’Auto- mobiles) ●… -
Page 491
6.6L (7.0 qt., 5.8 Imp.qt.) 2AD-FTV 6.9L (7.3 qt., 6.1 Imp.qt.) engine Use either of the following: • “Toyota Super Long Life Coolant” • Similar high-quality ethylene glycol-based Coolant type non-silicate, non-amine, non-nitrite, and non-borate coolant with long-life hybrid organic acid technology Do not use plain water alone. -
Page 492
Toyota Genuine Differential gear oil LT Oil type and viscosity 75W-85 GL-5 or equivalent Your Toyota vehicle is filled with “Toyota Genuine Differential Gear Oil” at the factory. Use Toyota approved “Toyota Genuine Differential Gear Oil” or an equivalent of matching quality to satisfy the above specification. Please contact your… -
Page 493
■ CVT (Continuously Variable Transaxle) fluid type Using transaxle fluid other than “Toyota Genuine CVT Fluid TC” or “Toyota Genuine CVT Fluid FE” may cause deterioration in shift quality, locking up of your transaxle accompanied by vibration, and ultimately damage the… -
Page 494
Toyota Genuine Differential gear oil LT Oil type and viscosity 75W-85 GL-5 or equivalent Your Toyota vehicle is filled with “Toyota Genuine Differential Gear Oil” at the factory. Use Toyota approved “Toyota Genuine Differential Gear Oil” or an equivalent of matching quality to satisfy the above specification. Please contact your… -
Page 495
8-1. Specifications Brakes Pedal clearance 94 mm (3.70 in.) Min. Pedal free play 1 — 6 mm (0.04 — 0.24 in.) Parking brake lever travel 6 — 8 clicks Fluid type SAE J1703 or FMVSS No. 116 DOT 3 : Minimum pedal clearance when depressed with a force of 490 N (50 kgf, 110 lbf) while the engine is operating. -
Page 496
8-1. Specifications Tires and wheels 17-inch tires Tire size 225/65R17 102H Tire inflation pressure Front: 220 kPa (2.2 kgf/cm or bar, 32 psi) (Recommended cold tire Rear: 220 kPa (2.2 kgf/cm or bar, 32 psi) inflation pressure) 17 × 6 1/2J (steel wheel), Wheel size 17 ×… -
Page 497
8-1. Specifications Light bulbs Light bulbs Type Headlights High beam Low beam (halogen bulbs) Low beam (discharge bulbs) Fog lights Front turn signal lights Exterior Stop/tail lights 21/5 Tail lights Rear turn signal lights Back-up lights License plate lights Vanity lights Interior light (front)/personal lights Interior Interior light (rear) -
Page 498: Fuel Information
8-1. Specifications Fuel information ◆ Gasoline engine 3ZE-FE and 2AR-FE engines You must only use unleaded gasoline in your vehicle. For optimum engine performance, select unleaded gasoline with a Research Octane Number of 91 or higher. 3ZR-FAE engine You must only use unleaded gasoline in your vehicle. For optimum engine performance, select premium unleaded gaso- line with a Research Octane Number of 95 or higher.
-
Page 499
The use of fuel with more than 5% FAME content (B5) will damage the vehicle’s fuel system. You must ensure that refueling is carried out only from a source where fuel specification and quality can be guaranteed. In case of any doubt, ask your Toyota dealer. -
Page 500: 8-2. Customization
Customizable features Some function settings are changed simultaneously with other func- tions being customized. Contact your Toyota dealer for further details. Settings that can be changed by “DISP” button. (→P. 92) Settings that can be changed by your Toyota dealer Definition of symbols: O = Available, —…
-
Page 501
8-2. Customization Custom- Default Item Function ized set- setting ting Wireless remote Wireless remote control — O control (→P. 114) Moon roof Moon roof open reminder — O (→P. 154) function Level 1 to Light sensor sensitivity Level 3 — O Automatic light control… -
Page 502
8-2. Customization Custom- Default Item Function ized set- setting ting A/C Auto switch operation — O Automatic Switching between outside conditioning air and recirculated air mode system — O linked to “AUTO” switch (→P. 287) operation Interior lights illumination — O control seconds Time elapsed before the… -
Page 503
8-2. Customization : If equipped : For vehicles with the power back door and/or alarm, the default setting is “5”. : Settings that can be changed only for vehicles with the power back door and/or alarm ■ Vehicle customization When the doors remain closed after unlocking the doors and the automatic door lock function (time elapsed before the automatic door lock function is activated if a door is not opened after being unlocked) activates, the signals will be generated in accordance with the operation signal (buzzers) (if… -
Page 504: 8-3. Items To Initialize
8-3. Items to initialize Items to initialize The following items must be initialized for normal system opera- tion after such cases as the battery being reconnected, or main- tenance being performed on the vehicle: Item When to initialize Reference Engine oil maintenance data •…
-
Page 505: Index
Index What to do if… (Troubleshooting) …..504 Alphabetical index ……510…
-
Page 506
The doors cannot be locked, unlocked, opened or closed You lose your keys ● If you lose your keys or mechanical keys, new genuine keys or mechanical keys can be made by your Toyota dealer. (→P. 99) ● Vehicles with a smart entry & start system If you lose your electronic keys, the risk of vehicle theft increases significantly. -
Page 507
What to do if… (Troubleshooting) The rear door cannot be opened ● Is the child-protector lock set? The rear door cannot be opened from inside the vehicle when the lock is set. Open the rear door from outside and then unlock the child-protector lock. (→P. 119) If you think something is wrong The engine does not start (vehicles without a smart entry &… -
Page 508
What to do if… (Troubleshooting) The engine does not start (vehicles with a smart entry & start system) ● Did you press the engine switch while firmly depressing the brake pedal? (→P. 188) ● Vehicles with an automatic transmission or a CVT Is the shift lever in P? (→P. -
Page 509
What to do if… (Troubleshooting) The steering wheel cannot be turned after the engine is stopped ● Vehicles without a smart entry & start system It is locked to prevent theft of the vehicle if the key is removed from the engine switch. (→P. 192) ●… -
Page 510
What to do if… (Troubleshooting) A warning buzzer sounds during driving ● The seat belt reminder light is flashing Are the driver and the front passenger wearing the seat belts? (→P. 425) ● The brake system warning light is on Is the parking brake released? (→P. -
Page 511
What to do if… (Troubleshooting) A warning light turns on or a warning message is dis- played ● When a warning light turns on or a warning message is dis- played, refer to P. 422, 428. When a problem has occurred If you have a flat tire ●… -
Page 512: Alphabetical Index
Alphabetical index Alphabetical index Alarm ………. 75 Alarm ……..75 A/C……..280, 287 Warning buzzer….. 422 Air conditioning filter….374 All-wheel drive system…. 250 Automatic air conditioning Anchor brackets ……65 system …….. 287 Antennas (smart entry & Manual air conditioning start system)……
-
Page 513
Alphabetical index Child restraint system….48 Baby seats (infant seats), Back door definition ……. 49 Back door……121 Baby seats (infant seats), Wireless remote control ..114 installation ……59 Back-up lights Child seats (convertible Replacing light bulbs….. 403 seats), definition ….49 Wattage……… -
Page 514
Alphabetical index Coat hooks ……. 326 Procedures ……158 Winter drive tips ….269 Condenser …….. 358 Console box ……306 Dynamic Torque Control AWD system……..252 Cooling system Engine overheating ….472 Cruise control ……240 Warning message ….430 Eco drive mode.. -
Page 515
Alphabetical index EPS (Electronic Power Emergency flashers….410 Engine Steering)……… 252 Function …….. 252 “ACC” position……. 185 Accessory mode ….190 Warning light……424 Compartment ……349 Event data recorder (EDR)..10 Engine switch….184, 188 Hood ……..345 How to start Flat tire…….. -
Page 516
Alphabetical index Fuel ……….. 484 High mounted stoplight Replacing……405 Capacity …….. 484 Fuel filter ……. 365, 475 Hill-start assist control…. 258 Hood ……… 345 Fuel gauge ……87 Fuel pump shut off system..421 Hooks If you run out of fuel and Cargo hooks …… -
Page 517
Alphabetical index Language (multi-information Jack Positioning a floor jack ..347 display)……..92 Vehicle-equipped jack… 444 Lever Jack handle …… 444, 449 Auxiliary catch lever….345 Jam protection function Hood lock release lever ..345 Shift lever..195, 201, 208, 214 Moon roof…… -
Page 518
Overheating, Engine….472 control……..89 Meters ……..87 Multi-information display ..88 Parking assist sensors Warning lights ……. 422 (Toyota parking Warning messages ….428 assist-sensor)……244 Mirrors Parking brake……220 Inside rear view mirror ..142 Operation ……220… -
Page 519
Tires ……..443 Automatic headlight system …….. 225 Wireless remote control battery……… 376 Inside rear view mirror ..144 Toyota parking Reset the maintenance data … 355 Roof luggage carrier….172 assist-sensor …… 244 Rain-sensing windshield wipers ……… 232 Service reminder indicators ..82 Seat belts…….. -
Page 520
Turn signal lever ….218 Fog light switch ….. 227 Ignition switch ….184, 188 Smart entry & start system ..101 Antenna location ….104 Toyota parking Entry functions …… 101 assist-sensor …… 244 Starting the engine….188 Light switches ……. 222 Warning message .. -
Page 521
VSC (Vehicle Stability Towing Control) ……..251 Emergency towing ….414 Towing eyelet……415 Trailer towing ……173 Warning buzzers…… 422 Toyota parking Brake system ……422 assist-sensor ……244 Downshifting ..199, 212, 206 Transmission Key reminder ….106, 435 Automatic Open back door …. -
Page 522
Alphabetical index Warning messages ….428 Washer……..228 Checking ……. 363 Preparing and checking before winter ……..269 Switch ……..228 Washing and waxing ….330 Weights……..480 Wheels ……..372 Replacing wheels….372 Size ……..494 Window glasses……. 149 Window lock switch…. -
Page 523
Alphabetical index… -
Page 524
Alphabetical index… -
Page 525
Alphabetical index… -
Page 526
GAS STATION INFORMATION Auxiliary catch lever Fuel filler door P. 345 P. 238 Hood lock release lever Fuel filler door opener Tire inflation pressure P. 345 P. 238 P. 494 Fuel tank capacity (Reference) 60 L (15.9 gal., 13.2 Imp.gal.) 3ZR-FE and Unleaded gasoline with a Research Octane 2AR-FE…
инструкцияToyota RAV4 (2013)

RAV4_OM_OM42809U_(U)
Pictorial index
Search by illustration
1
For safety
and security
Make sure to read through them
2
Instrument
cluster
How to read the gauges and meters, the variety of
warning lights and indicators, etc.
3
Operation of
each component
Opening and closing the doors and windows,
adjustment before driving, etc.
4
Driving
Operations and advices which are necessary for
driving
5
Interior features
Usage of the interior features, etc.
6
Maintenance
and care
Caring for your vehicle and maintenance
procedures
7
When trouble
arises
What to do in case of malfunction or emergency
8
Vehicle
specifications
Vehicle specifications, customizable features, etc.
9
For owners
Reporting safety defects for US owners, and seat
belt and SRS airbag instructions for Canadian
owners
Index
Search by symptom
Search alphabetically
Посмотреть инструкция для Toyota RAV4 (2013) бесплатно. Руководство относится к категории автомобили, 10 человек(а) дали ему среднюю оценку 8.8. Руководство доступно на следующих языках: английский. У вас есть вопрос о Toyota RAV4 (2013) или вам нужна помощь? Задайте свой вопрос здесь
- 2013 RAV4 Owners Manual (OM42809U)
Главная
Не можете найти ответ на свой вопрос в руководстве? Вы можете найти ответ на свой вопрос ниже, в разделе часто задаваемых вопросов о Toyota RAV4 (2013).
Не нашли свой вопрос? Задайте свой вопрос здесь
Сборник руководств на английском языке по техническому обслуживанию и ремонту автомобиля Toyota RAV4 1996-1999 годов выпуска.
- Автор: —
- Издательство: Toyota Motor Corporation
- Год издания: —
- Страниц: —
- Формат: PDF
- Размер: 87,5 Mb
Сборник руководств на английском языке по техническому обслуживанию и ремонту автомобиля Toyota RAV4 2001-2005 годов выпуска.
- Автор: —
- Издательство: Toyota Motor Corporation
- Год издания: —
- Страниц: —
- Формат: PDF
- Размер: 500,6 Mb
Сборник руководств на английском языке по техническому обслуживанию и ремонту автомобиля Toyota RAV4 2006-2012 годов выпуска.
- Автор: —
- Издательство: Toyota Motor Corporation
- Год издания: —
- Страниц: —
- Формат: PDF
- Размер: 1,5 Gb
Сборник руководств на английском языке по техническому обслуживанию и ремонту автомобиля Toyota RAV4 2013-2014 годов выпуска.
- Автор: —
- Издательство: Toyota Motor Corporation
- Год издания: —
- Страниц: —
- Формат: PDF, HTML
- Размер: 239,7 Mb
Мультимедийное руководство на английском языке по техническому обслуживанию и ремонту автомобиля Toyota RAV4 30-й серии.
- Автор: —
- Издательство: Toyota Motor Corporation
- Год издания: —
- Страниц: —
- Формат: ISO
- Размер: 120,5 Mb
Сборник руководств на русском и английском языках по эксплуатации дополнительных систем автомобиля Toyota RAV4 2006-2013 годов выпуска.
- Автор: —
- Издательство: Toyota Motor Company
- Год издания: —
- Страниц: —
- Формат: PDF
- Размер: 99,0 Mb
Руководство по техническому обслуживанию и ремонту автомобиля Toyota RAV4 1994-2006 годов выпуска с бензиновыми и дизельными двигателями.
- Автор: Б. Хендерсон, Э. Легг
- Издательство: Алфамер
- Год издания: —
- Страниц: 404
- Формат: —
- Размер: —
Руководство по эксплуатации и техническому обслуживанию автомобиля Toyota RAV4 2012 года выпуска.
- Автор: —
- Издательство: Toyota Motor Company
- Год издания: 2011
- Страниц: 658
- Формат: JPG
- Размер: 210,1 Mb

Руководство по эксплуатации, техническому обслуживанию и ремонту автомобилей Toyota RAV4 1994-2000 годов выпуска.
- Автор: —
- Издательство: Motorist
- Год издания: —
- Страниц: 293
- Формат: —
- Размер: —
Руководство по эксплуатации, техническому обслуживанию и ремонту + каталог расходных запчастей автомобиля Toyota RAV4 1994-2000 годов выпуска.
- Автор: —
- Издательство: Легион-Автодата
- Год издания: —
- Страниц: 368
- Формат: —
- Размер: —
Мультимедийное руководство по техническому обслуживанию и ремонту автомобиля Toyota RAV4 2006-2009 годов выпуска.
- Автор: —
- Издательство: —
- Год издания: —
- Страниц: —
- Формат: —
- Размер: 62,0 Mb
Руководство по эксплуатации, техническому обслуживанию и ремонту + каталог расходных запчастей автомобиля Toyota RAV4 2006-2013 годов выпуска с бензиновыми двигателями объемом 2,0/2,4 л.
- Автор: —
- Издательство: Легион-Автодата
- Год издания: —
- Страниц: 534
- Формат: —
- Размер: —
Руководство по эксплуатации, техническому обслуживанию и ремонту + каталог расходных запчастей автомобиля Toyota RAV4 2013-2019 годов выпуска с бензиновыми двигателями объемом 2,0/2,5 л.
- Автор: —
- Издательство: Легион-Автодата
- Год издания: —
- Страниц: 724
- Формат: —
- Размер: —
Руководство по эксплуатации, техническому обслуживанию и ремонту автомобилей Toyota RAV4 с 2005 и Toyota Vanguard 2007-2013 годов выпуска с правым расположением руля и бензиновыми двигателями объемом 2,4/3,5 л.
- Автор: —
- Издательство: Легион-Автодата
- Год издания: —
- Страниц: 464
- Формат: —
- Размер: —
Руководство по эксплуатации и ремонту автомобиля Toyota RAV4 с 2006 года выпуска с бензиновыми и дизельными двигателями.
- Автор: —
- Издательство: Монолит
- Год издания: —
- Страниц: 698
- Формат: —
- Размер: —
Руководство по эксплуатации и ремонту автомобиля Toyota RAV4 с 2008 года выпуска с бензиновыми и дизельными двигателями.
- Автор: —
- Издательство: Монолит
- Год издания: —
- Страниц: 360
- Формат: —
- Размер: —
Руководство по эксплуатации и ремонту автомобиля Toyota RAV4 с 2013 года выпуска с бензиновыми и дизельными двигателями.
- Автор: —
- Издательство: Монолит
- Год издания: —
- Страниц: 626
- Формат: —
- Размер: —
Руководство по эксплуатации и ремонту автомобиля Toyota RAV4 с 2013 года выпуска с бензиновыми и дизельными двигателями.
- Автор: —
- Издательство: Монолит
- Год издания: 2014
- Страниц: 595
- Формат: PDF
- Размер: 253,5 Mb
Руководство по эксплуатации и ремонту автомобиля Toyota RAV4 с 2018 года выпуска с бензиновыми двигателями объемом 2,0/2,5 л.
- Автор: —
- Издательство: Монолит
- Год издания: —
- Страниц: 444
- Формат: —
- Размер: —
Руководство по эксплуатации и техническому обслуживанию автомобиля Toyota RAV4 с 2006 года выпуска.
- Автор: —
- Издательство: MoToR
- Год издания: —
- Страниц: 452
- Формат: —
- Размер: —
Руководство по техническому обслуживанию и ремонту автомобиля Toyota RAV4 1994-2000 годов выпуска.
- Автор: —
- Издательство: —
- Год издания: —
- Страниц: 293
- Формат: PDF
- Размер: 31,9 Mb
Руководство по техническому обслуживанию и ремонту автомобиля Toyota RAV4 2000-2005 годов выпуска с бензиновым двигателем объемом 2,0 л.
- Автор: —
- Издательство: Легион-Автодата
- Год издания: 2006
- Страниц: 317
- Формат: —
- Размер: —
Руководство по эксплуатации, техническому обслуживанию и ремонту + каталог расходных запчастей автомобиля Toyota RAV4 2000-2005 годов выпуска с бензиновыми двигателями объемом 1,8/2,0 л.
- Автор: —
- Издательство: Легион-Автодата
- Год издания: —
- Страниц: 404
- Формат: —
- Размер: —
Руководство по эксплуатации, техническому обслуживанию и ремонту автомобиля Toyota RAV4 с 2006 года выпуска.
- Автор: —
- Издательство: Монолит
- Год издания: —
- Страниц: 338
- Формат: —
- Размер: —
