-
nekesha
- Администратор
- Сообщения: 1668
- Зарегистрирован: 17 дек 2014, 03:43
- Благодарил (а): 2 раза
- Поблагодарили: 6 раз
Toyota Rush since 2006 / Тайота Раш с 2006
Руководство по эксплуатации, техобслуживанию и ремонту Toyota Rush / Тайота Раш
Operation, Maintenance and Repair Manual Toyota Rush

- Года выпуска: с 2006
Year of release: since 2006
Бензиновые двигатели: 3SZ-VE
Gasoline engines: 3SZ-VE
- Язык: Русский
Формат: PDF
Размер: 254,8 Мб
Russian language
Format: PDF
Size: 254.8 MB
Скачать документацию Toyota Rush / Тайота Раш
Download the documentation of Toyota Rush
для распаковки используйте пароль — avtoproblem-net.ru
use the password to unpack — avtoproblem-net.ru
- Manuals
- Brands
- Toyota Manuals
- Automobile
- Rush
- Owner’s manual
-
Contents
-
Table of Contents
-
Troubleshooting
-
Bookmarks
Quick Links
Related Manuals for Toyota Rush
Summary of Contents for Toyota Rush
-
Page 2
©2019 TOYOTA MOTOR CORPORATION All rights reserved. This material may not be reproduced or copied, in whole or in part, without the written permissio n of Toyota Motor Corporation. -
Page 3
Pictorial index Search by illustration For safety Make sure to read through them and security Instrument How to read the gauges and meters, the variety of cluster warning lights and indicators, etc. Operation of Opening and closing the doors and windows, each component adjustment before driving, etc. -
Page 4
TABLE OF CONTENTS For your information …….6 Operation of Reading this manual…..10 each component How to search ……11 Pictorial index …….12 3-1. Key information Keys ……..92 For safety and security 3-2. Opening, closing and locking the doors Key-free system ….102 1-1. -
Page 5
Driving Interior features 4-1. Before driving 5-1. Using the air conditioning system and defogger Driving the vehicle …..144 Front air conditioning Cargo and luggage ….153 system (Manual) ….. 194 4-2. Driving procedures Front air conditioning Engine (ignition) switch..154 system (Automatic) ..198 Automatic transmission..161 Rear cooler system … -
Page 6
TABLE OF CONTENTS Maintenance and care When trouble arises 6-1. Maintenance and care 7-1. Essential information Cleaning and protecting Emergency flashers ..298 the vehicle exterior ..220 If your vehicle has to Cleaning and protecting be stopped in the vehicle interior …223 an emergency …. -
Page 7
Vehicle specifications 8-1. Specifications Maintenance data (fuel, oil level, etc.)…344 Fuel information ….355 8-2. Customization Customizable features ..356 8-3. Items to initialize Items to initialize ….361 Index What to do if… (Troubleshooting) …..364 Alphabetical index ……367 RUSH_OM_General_OMBZ265… -
Page 8
Accessories, spare parts and modification of your Toyota A wide variety of non-genuine spare parts and accessories for Toyota vehi- cles are currently available in the market. Using these spare parts and acces-… -
Page 9
● Seat belt pretensioner system ● Be sure to check with your Toyota dealer for precautionary measures or spe- cial instructions regarding installation of an RF-transmitter system. Further information regarding frequency bands, power levels, antenna posi- tions and installation provisions for the installation of RF-transmitters, is avail- able on request at your Toyota dealer. -
Page 10
EDR. ● Disclosure of the EDR data Toyota will not disclose the data recorded in an EDR to a third party except when: • An agreement from the vehicle’s owner (or the lessee for a leased vehi- cle) is obtained •… -
Page 11
Be sure to have the systems of the SRS airbag and seat belt pretensioner removed and disposed of by a qualified service shop or by your Toyota dealer before you scrap your vehicle. -
Page 12
Reading this manual WARNING: Explains something that, if not obeyed, could cause death or serious injury to people. NOTICE: Explains something that, if not obeyed, could cause damage to or a malfunction in the vehicle or its equipment. Indicates operating or working procedures. Follow the steps 1 2 3 in numerical order. -
Page 13
How to search Searching by name ■ • Alphabetical index ..P. 367 Searching installation ■ position • Pictorial index….P. 12 Searching by symptom or ■ sound • What to do if… (Troubleshooting) ..P. 364 Searching by title ■… -
Page 14
Pictorial index Pictorial index ■ Exterior KBTE040101E The shape of the body may differ depending on the grade, etc. Side doors ……..P. 111 Locking/unlocking . -
Page 15
Pictorial index Wipers……..P. 172, 174 Precautions against winter season . -
Page 16
Pictorial index ■ Instrument panel (Left-hand drive vehicles) KBTE040201E Engine switch ……..P. 154 Starting the engine . -
Page 17
Pictorial index Multi-information display ……P. 85 Parking brake……..P. 166 Applying/releasing . -
Page 18
Pictorial index ■ Switches (Left-hand drive vehicles) KBTE040301E Outside rear view mirror switches….P. 137 Window lock switch ……. P. 139 Power window switches . -
Page 19
Pictorial index KBTE040302 Audio remote control switches ….. . P. 207 Talk switch ……..P. 207 : If equipped RUSH_OM_General_OMBZ265… -
Page 20
Pictorial index ■ Interior (Left-hand drive vehicles) KBTE040401E SRS airbags ……..P. 38 Floor mats . -
Page 21
Pictorial index KBTE040402E Auxiliary box ……..P. 214 Anti-glare inside rear view mirror . -
Page 22
Pictorial index ■ Instrument panel (Right-hand drive vehicles) KBTE040201 Engine switch ……..P. 154 Starting the engine . -
Page 23
Pictorial index Multi-information display ……P. 85 Parking brake……..P. 166 Applying/releasing . -
Page 24
Pictorial index ■ Switches (Right-hand drive vehicles) KBTE040301 Outside rear view mirror switches….P. 137 Window lock switch ……. P. 139 Power window switches . -
Page 25
Pictorial index KBTE040302 Audio remote control switches ….. . P. 207 Talk switch ……..P. 207 : If equipped RUSH_OM_General_OMBZ265… -
Page 26
Pictorial index ■ Interior (Right-hand drive vehicles) KBTE040401 SRS airbags ……..P. 38 Floor mats . -
Page 27
Pictorial index KBTE040402 Auxiliary box ……..P. 214 Anti-glare inside rear view mirror . -
Page 28
Pictorial index RUSH_OM_General_OMBZ265… -
Page 29
For safety and security 1-1. For safe use Before driving…….28 For safe driving ….30 Seat belts……32 SRS airbags……38 Exhaust gas precautions ..47 1-2. Child safety Riding with children….48 Child restraint systems ..49 1-3. Theft deterrent system Engine immobilizer system …….74 Alarm ……..75 RUSH_OM_General_OMBZ265… -
Page 30
1-1. For safe use Before driving Floor mat Use only floor mats designed specifically for vehicles of the same model and model year as your vehicle. Fix them securely in place onto the carpet. Insert the retaining hooks (clips) into the floor mat eyelets. Turn the upper knob of each retaining hook (clip) to secure the floor mats in place. -
Page 31
■ Do not use floor mats designed for other models or different model year ● vehicles, even if they are Toyota Genuine floor mats. Only use floor mats designed for the driver’s seat. ● Always install the floor mat securely using the retaining hooks (clips) pro- ●… -
Page 32
1-1. For safe use For safe driving For safe driving, adjust the seat and mirror to an appropriate position before driving. Correct driving posture Adjust the angle of the seat- back so that you are sitting straight up and so that you do not have to lean forward to steer. -
Page 33
1-1. For safe use WARNING Observe the following precautions. Failure to do so may result in death or serious injury. Do not adjust the position of the driver’s seat while driving. ● Doing so could cause the driver to lose control of the vehicle. Do not place a cushion between the driver or passenger and the seatback. -
Page 34
1-1. For safe use Seat belts Make sure that all occupants are wearing their seat belts before driving the vehicle. Correct use of the seat belts ● Extend the shoulder belt so that it comes fully over the shoulder, but does not come into contact with the neck or slide off the shoulder. -
Page 35
1-1. For safe use Fastening the center seat belt of the second seat Take out the plates, and then pull the seat belt. KBTE110303 Push the plate into the buckle in Plate “A” Plate “B” the order of plate “A” and plate “B”… -
Page 36
1-1. For safe use Releasing and stowing the center seat belt of the second seat To release the hooked plate “B”, push the buckle release button. KBTE110305 To release the hooked plate “A”, insert the key into the hole on the buckle. -
Page 37
Seat belt regulations ■ If seat belt regulations exist in the country where you reside, please contact your Toyota dealer for seat belt replacement or installation. RUSH_OM_General_OMBZ265… -
Page 38
Each seat belt should be used by one person only. Do not use a seat belt ● for more than one person at once, including children. Toyota recommends that children be seated in the rear seats and always ● use a seat belt and/or an appropriate child restraint system. -
Page 39
Ensure that the belt and plate are locked and the belt is not twisted. ● If the seat belt does not function correctly, immediately contact your Toyota dealer. Replace the seat assembly, including the belts, if your vehicle has been ●… -
Page 40
1-1. For safe use SRS airbags The SRS airbags inflate when the vehicle is subjected to certain types of severe impacts that may cause significant injury to the occupants. They work together with the seat belts to help reduce the risk of death or serious injury. KBTE110401E ◆… -
Page 41
1-1. For safe use SRS airbag system components KBTE110402E Seat belt pretensioners and Driver airbag force limiters Side impact sensors (rear) Front passenger airbag Side impact sensors (front) Curtain shield airbags Front impact sensors Side airbags Airbag sensor assembly SRS warning light The main SRS airbag system components are shown above. -
Page 42
1-1. For safe use WARNING SRS airbag precautions ■ Observe the following precautions regarding the SRS airbags. Failure to do so may cause death or serious injury. The driver and all passengers in the vehicle must wear their seat belts ●… -
Page 43
An infant or child who is too small to use a seat belt should be properly secured using a child restraint system. Toyota strongly recommends that all infants and children be placed in the rear seats of the vehicle and properly restrained. The rear seats are safer for infants and children than the front passenger seat. -
Page 44
1-1. For safe use WARNING Do not allow anyone to kneel on the ● passenger seat toward the door or put their head or hands outside the vehicle. KBTE110406E Do not attach anything to or lean any- ● thing against areas such as the dash- board or steering wheel pad. -
Page 45
■ Do not dispose of your vehicle or perform any of the following modifications without consulting your Toyota dealer. The SRS airbags may malfunction or deploy (inflate) accidentally, causing death or serious injury. Installation, removal, disassembly and repair of the SRS airbags ●… -
Page 46
1-1. For safe use If the SRS airbags deploy (inflate) ■ Slight abrasions, burns, bruising, etc., may be sustained from SRS airbags, ● due to the extremely high speed deployment (inflation) by hot gases. A loud noise and white powder will be emitted. ●… -
Page 47
1-1. For safe use Types of collisions that may not deploy the SRS airbags (SRS front air- ■ bags) The SRS front airbags do not generally inflate if the vehicle is involved in a side or rear collision, if it rolls over, or if it is involved in a low-speed frontal collision. -
Page 48
When to contact your Toyota dealer ■ In the following cases, the vehicle will require inspection and/or repair. Con- tact your Toyota dealer as soon as possible. Any of the SRS airbags have been inflated. ● The front of the vehicle is damaged or ●… -
Page 49
Keep the back door closed. ● If you smell exhaust gases in the vehicle even when the back door is ● closed, open the windows and have the vehicle inspected at your Toyota dealer as soon as possible. When parking ■… -
Page 50
1-2. Child safety Riding with children Observe the following precautions when children are in the vehi- cle. Use a child restraint system appropriate for the child, until the child becomes large enough to properly wear the vehicle’s seat belt. ● It is recommended that children sit in the rear seats to avoid acci- dental contact with the shift lever, wiper switch, etc. -
Page 51
Points to remember ● If child restraint system regulations exist in the country where you reside, please contact your Toyota dealer for the child restraint sys- tem installation. ● Use a child restraint system until the child becomes large enough to properly wear the vehicle’s seat belt. -
Page 52
General installation instruction is provided in this manual. Toyota strongly urges the use of a proper child restraint system that con- ● forms to the weight and size of the child, installed on the second seat. -
Page 53
1-2. Child safety Child restraint system Install the available child restraint system in vehicle upon confirming the following items. Standards for child restraint systems ■ Use a child restraint system that conforms to ECE R44 or ECE 1, 2 R129 The following approval mark is displayed on child restraint systems which are conformed. -
Page 54
1-2. Child safety Mass group (ECE R44 only) ■ This Mass group table is required when confirming the child restraint system compatibility. Confirm in accordance with the child restraint system compatibility table. (→P. 58, 66) The child restraint system which conforms to the standard of ECE R44 is categorized into 5 groups according to the weight of the child. -
Page 55
1-2. Child safety Types of child restraint system installation methods ■ Confirm with the operation manual enclosed with the child restraint system about the installation of the child restraint system. Installation method Page Seat belt P. 58 attachment KBTE110701E ISOFIX rigid anchor P. -
Page 56
1-2. Child safety When using a child restraint system When installing a child restraint system to a front passenger ■ seat For the safety of a child, install a child restraint system to a rear seat. When installing a child restraint system to a front passenger seat is unavoidable, adjust the seat as follows and install the child restraint system. -
Page 57
1-2. Child safety WARNING When using a child restraint system ■ Observe the following precautions. Failure to do so may result in death or serious injury. Never use a rear-facing child restraint ● system on the front passenger seat. The force of the rapid inflation of the front passenger airbag can cause death or serious injury to children in the event of an accident. -
Page 58
1-2. Child safety WARNING When using a child restraint system ■ Only put a forward-facing child restraint ● system on the front seat when unavoid- able. When installing a forward-facing child restraint on the front passenger seat, move the seat as far back as pos- sible. -
Page 59
1-2. Child safety WARNING When using a child restraint system ■ When a junior seat (booster seat) is installed, always ensure that the ● shoulder belt is positioned across the center of the child’s shoulder. The belt should be kept away from the child’s neck, but not so that it could fall off the child’s shoulder. -
Page 60
1-2. Child safety Child restraint system fixed with a seat belt Child restraint system compatibility for various seating posi- ■ tions The child restraint system compatibility table (→P. 58), with symbols, displays the types of usable child restraint systems and possible seating position installation for the child restraint system owned by the customer. -
Page 61
1-2. Child safety Seating Position Front Second seat Third seat Mass Group Passenger seat Outboard Center equipped) up to 10 kg (22 lb) up to 13 kg (28 lb) 1, 3 2, 3 9 to 18 kg (20 to 39 lb) 1, 3 2, 3 15 to 25 kg… -
Page 62
1-2. Child safety If the child seat cannot be installed due to interference between the head restraint and the child seat, set the head restraint to the upper most position or remove it. When securing some types of child restraint systems in second seat, it may not be possible to properly use the seat belts in posi- tions next to the child restraint without interfering with it or affecting seat belt effectiveness. -
Page 63
1-2. Child safety ◆ Installing child restraint system using a seat belt Install the child restraint system in accordance to the operation manual enclosed with the child restraint system. Place the second seat at the 4th lock position from the rear most position. -
Page 64
1-2. Child safety If your child restraint system is not equipped with a lock- off (a seat belt locking fea- ture), secure child restraint system using a lock- ing clip. KBTE110706 After installing the child restraint system, rock it back and forth to ensure that it is installed securely. -
Page 65
You may need a locking clip to install the child restraint system. Follow the instructions provided by the manufacturer of the system. If your child restraint system does not provide a locking clip, you can purchase the following item from your Toyota dealer: Locking clip for child restraint system (Part No. 73119-22010) WARNING When installing a child restraint system ■… -
Page 66
1-2. Child safety Child restraint system fixed with an ISOFIX rigid anchor ISOFIX rigid anchors (ISOFIX child restraint system) ■ Lower anchors are provided for the second outboard seats. (Marks displaying the location of the anchors are attached to the seats.) KBTE110702E Child restraint system compatibility for various seating posi- ■… -
Page 67
1-2. Child safety Confirming the Mass group and Size class for ECE R44 ISOFIX ■ corresponding child restraint systems Confirm the corresponding [Mass group] from the weight of the child (→P. 52) (Ex. 1) When the weight is 12 kg, [Mass group 0+] (Ex. -
Page 68
1-2. Child safety Child restraint systems fastened with ISOFIX (ECE R44) — Com- ■ patibility and Recommended child restraint systems table ISOFIX child restraint systems are divided in different “size class”. According to this “size class”, you will be allowed to use it in the vehicle seating position mentioned in the table below. -
Page 69
IUF=Suitable position for “universal” ISOFIX forward-facing child restraints system in this mass group. IL= Recommended to use “TOYOTA MINI” approved in this mass group. X= ISOFIX position not suitable for ISOFIX child restraint systems in this mass group and/or this size class. -
Page 70
1-2. Child safety Place the second seat at the 4th lock position from the rear most position. Adjust the seat back to 3rd lock position from the most upright position. If the adjustment above cannot assure the proper seating position, install the child restraint on the second seat behind the front passenger seat. -
Page 71
1-2. Child safety i-Size child restraint systems fastened with ISOFIX (ECER129)- ■ Compatibility table If your child restraint system is of “i-Size” category, you can install it on the positions mentioned by i-U in the table below. Child restraint system category can be found in the child restraint system manual. -
Page 72
1-2. Child safety Installation with ISOFIX rigid anchor (ISOFIX child restraint ■ system) Install the child restraint system in accordance to the operation manual enclosed with the child restraint system. Place the second seat at the 4th lock or middle* position from the rear most position. -
Page 73
KBTE110713E After installing the child restraint system, rock it back and forth to ensure that it is installed securely. (→P. 63) When using a “TOYOTA MINI” ■ Adjust the support leg and ISOFIX connectors as follows: Lock the ISOFIX connectors where number 5 can be seen. -
Page 74
1-2. Child safety WARNING When installing a child restraint system ■ Observe the following precautions. Failure to do so may result in death or serious injury. After securing a child restraint system, never adjust the seat. ● When using the lower anchors, be sure that there are no foreign objects ●… -
Page 75
1-2. Child safety Fixing the top strap to the anchor bracket ■ Install the child restraint system in accordance to the operation manual enclosed with the child restraint system. Adjust the head restraint to the upmost position. If the head restraint interferes with the child restraint system or top strap installation and the head restraint can be removed, remove the head P. -
Page 76
1-3. Theft deterrent system Engine immobilizer system The vehicle’s keys have built-in transponder chips that prevent the engine from starting if a key has not been previously regis- tered in the vehicle’s on-board computer. Never leave the keys inside the vehicle when you leave the vehi- cle. -
Page 77
1-3. Theft deterrent system Alarm The alarm The alarm uses the emergency flashers and sound to give an alert when an intrusion is detected. The alarm is triggered in the following situations when the alarm is set: ● A locked door is unlocked and opened in any way other than using the key-free function* or wireless remote control. -
Page 78
1-3. Theft deterrent system Stopping the alarm Do one of the following to stop the alarm: ● Press the lock or unlock button of the wireless remote control. ● Press the lock/unlock switch on the front door while carrying the electronic key with you. -
Page 79
1-3. Theft deterrent system Triggering of the alarm ■ The alarm may be triggered in the following situations: (Stopping the alarm deactivates the alarm system.) The doors are unlocked using the key. ● KBTE120201E A person inside the vehicle opens a door ●… -
Page 80
1-3. Theft deterrent system RUSH_OM_General_OMBZ265… -
Page 81
Instrument cluster Instrument cluster Warning lights and indicators ……80 Gauges and meters …..84 Multi-information display ..85 RUSH_OM_General_OMBZ265… -
Page 82
2. Instrument cluster Warning lights and indicators The warning lights and indicators on the instrument cluster inform the driver of the status of the vehicle’s various systems. For the purpose of explanation, the following illustration dis- plays all warning lights and indicators illuminated. ◆… -
Page 83
2. Instrument cluster Warning lights Warning lights inform the driver of malfunctions in the indicated vehi- cle’s systems. Key-free system Brake system warning warning light (→P. 312) light (→P. 310) Open door warning light Charging system (→P. 312) warning light (→P. 310) Low engine oil pressure Low fuel level warning warning light (→P. -
Page 84
There may be a mal- function in a system if a light does not come on, or if the lights do not turn off. Have the vehicle inspected by your Toyota dealer. : If equipped : The light illuminate on the center panel. -
Page 85
Have the vehicle inspected by your Toyota dealer immedi- ately if this occurs. -
Page 86
2. Instrument cluster Gauges and meters KBTE210201 Tachometer Displays the engine speed in revolutions per minute. Speedometer Displays the vehicle speed. Multi-information display Presents the driver with a variety of driving-related data. (→P. 85) Display change button →P. 85 Clock adjust button →P. -
Page 87
2. Instrument cluster Multi-information display The multi-information display presents the driver with a variety of driving-related data including the clock. Display contents Fuel gauge Clock (→P. 88) Shift position (If equipped) (→P. 161) Drive information (→P. 86) Eco Driving Indicator (→P. 146) KBTE210301 Changing the display Items displayed can be switched… -
Page 88
2. Instrument cluster Drive information Odometer ■ Displays the total distance the vehicle has been driven. Trip meter ■ Displays the distance the vehicle has been driven since the meter was last reset. Trip meters A and B can be used to record and display different distances inde- pendently. -
Page 89
2. Instrument cluster Average fuel consumption ■ Displays the average rate of fuel consumption since the function was last reset. • The function can be reset by pressing and holding the dis- play change button when the average fuel consumption is displayed. -
Page 90
2. Instrument cluster Clock The clock can be adjusted by clock adjust button. Hour Adjust Button Minute Adjust Button KBTE210312 Rounding to the nearest hour ■ Hold down the Hour Adjust Button and Minute Adjust Button simul- taneously and release the buttons. The minute values will be rounded to the nearest hour. -
Page 91
• When the outside temperature has changed suddenly (at the entrance/ exit of a garage, tunnel, etc.) When “-” or “E” is displayed, the system may be malfunctioning. ● Take your vehicle to your Toyota dealer. When disconnecting and reconnecting battery terminals ■ The following information data will be reset: ●… -
Page 92
2. Instrument cluster RUSH_OM_General_OMBZ265… -
Page 93
Operation of each component 3-1. Key information Keys……..92 3-2. Opening, closing and locking the doors Key-free system….102 Side doors……111 Back door……115 3-3. Adjusting the seats Front seats……121 Rear seats ……123 Head restraints ….127 Seat arrangement ….129 3-4. Adjusting the steering wheel and mirrors Steering wheel ….134 Anti-glare inside rear view… -
Page 94
3-1. Key information Keys The keys The following keys are provided with the vehicle. Electronic keys • Operating the key-free system (→P. 102) • Operating the wireless remote control function Mechanical keys Key number plate KBTE310101 Wireless remote control Locks all the doors ( P. -
Page 95
If you lose your mechanical keys ■ New genuine mechanical keys can be made by your Toyota dealer using another mechanical key and the key number stamped on your key number plate. Keep the plate in a safe place such as your wallet, not in the vehicle. -
Page 96
3-1. Key information FCC CAUTION Changes or modifications not expressly approved by the party responsible for compliance could void the user’s authority to operate the equipment. Hereby, ALPS ELECTRIC CO.,LTD., declares that the radio equipment type TWB1G0125 is in compliance with Directive 2014/53/EU. The full text of the EU declaration of conformity is available at the follow- ing internet address: http://www.alps.com/products/common/pdf/HandUnit/TWB1G0125.pdf… -
Page 97
3-1. Key information Por la presente, Sumitomo Wiring Systems, Ltd. declara que el tipo de equipo radioeléctrico DA5501 es conforme con la Directiva 2014/53/UE. El texto completo de la declaración UE de conformidad está disponible en la dirección Internet siguiente: https://www.sws.co.jp/en/product/docu- ment/certificate/pdf/red_doc_for_da5501.pdf O(a) abaixo assinado(a) Sumitomo Wiring Systems, Ltd. -
Page 98
3-1. Key information For vehicles sold in Republic of Paraguay RUSH_OM_General_OMBZ265… -
Page 99
3-1. Key information For vehicles sold in Republic of Benin RUSH_OM_General_OMBZ265… -
Page 100
3-1. Key information For vehicles sold in Republic of Zambia For vehicles sold in Republic of Ghana For vehicles sold in Republic of Kenya For vehicles sold in Nigeria RUSH_OM_General_OMBZ265… -
Page 101
3-1. Key information For vehicles sold in the Republic of South Africa For vehicles sold in Hashemite Kingdom of Jordan For vehicles sold in United Arab Emirates For vehicles sold in Oman RUSH_OM_General_OMBZ265… -
Page 102
3-1. Key information For vehicles sold in the Islamic Republic of Pakistan For vehicles sold in Socialist Republic of Vietnam RUSH_OM_General_OMBZ265… -
Page 103
Toyota dealer. When an electronic key is lost ■ If the electronic key remains lost, the risk of vehicle theft increases signifi- cantly. Visit your Toyota dealer immediately with all remaining electronic keys that was provided with your vehicle. RUSH_OM_General_OMBZ265… -
Page 104
3-2. Opening, closing and locking the doors Key-free system Function summary The following operations can be performed simply by carrying the electronic key on your person, for example in your pocket. (The driver should always carry the electronic key.) KBTE320106E Locks and unlocks the all doors* (→P. -
Page 105
3-2. Opening, closing and locking the doors Security feature ■ If a door is not opened within approximately 30 seconds after the vehicle is unlocked, the security feature automatically locks the vehicle again. Antenna location and effective range Antenna location ■… -
Page 106
3-2. Opening, closing and locking the doors Alarms and warning indicators ■ An alarm may sound in the car or the warning lamp may be turned on to pre- vent unexpected accidents by incorrect operation and theft. When the warn- ing lamp is turned on, take appropriate measures according to the situation. -
Page 107
3-2. Opening, closing and locking the doors With the electronic key left inside the vehicle, the driver’s door was exterior alarm closed with its door Lock the door while sounds a beep. At the handle pulled and with carrying the electronic same time all the doors the interior lock knob key with you. -
Page 108
3-2. Opening, closing and locking the doors Conditions affecting operation ■ The key-free system uses weak radio waves. In the following situations, the communication between the electronic key and the vehicle may be affected, preventing the key-free system, wireless remote control and engine immobi- lizer system from operating properly. -
Page 109
3-2. Opening, closing and locking the doors Note for the key-free function ■ Even when the electronic key is within the effective range (detection areas), ● the system may not operate properly in the following cases: • The electronic key is too close to the window or outside door handle, near the ground, or in a high place when the doors are locked or unlocked. -
Page 110
3-2. Opening, closing and locking the doors Notes for locking ■ The door may be locked and unlocked repeatedly if high-pressure water ● was splashed on the switch on the door handle while carrying the electronic key, such as when washing the car. In this case, place the key in a location 2 m or more away from the vehicle and wash the car. -
Page 111
3-2. Opening, closing and locking the doors If the key-free system does not operate properly ■ Locking and unlocking the doors: Use the mechanical key. (→P. 333) ● Starting the engine: →P. 154 ● Electronic key battery depletion ■ The standard battery life is 1 to 2 years. ●… -
Page 112
(→P. 103) The radio waves may affect the operation of such devices. If necessary, the key-free function can be disabled. Ask your Toyota dealer for details, such as the frequency of radio waves and timing of the emitted radio waves. -
Page 113
3-2. Opening, closing and locking the doors Side doors Unlocking and locking the doors from the outside The vehicle can be locked and unlocked using the key-free system, wireless remote control or door lock switch. ◆ Key-free system (if equipped) Press the lock/unlock switch to lock or unlock all doors while carrying the electronic key. -
Page 114
3-2. Opening, closing and locking the doors Operation signals ■ A buzzer sounds and the emergency flashers flash to indicate that the doors have been locked/unlocked. (Locked: once; Unlocked: twice) Security feature ■ If a door is not opened within approximately 30 seconds after the vehicle is unlocked, the security feature automatically locks the vehicle again. -
Page 115
3-2. Opening, closing and locking the doors Locking the driver’s door from the outside without a key Move the inside lock knob to the lock position. Close the door while pulling the door handle. The door cannot be locked if the engine switch is in ACCESSORY or IGNITION ON mode, or the electronic key is left inside the vehicle. -
Page 116
3-2. Opening, closing and locking the doors Impact detection door lock release system ■ In the event that the vehicle is subject to a strong impact, all the doors are unlocked. Depending on the force of the impact or the type of accident, how- ever, the system may not operate. -
Page 117
3-2. Opening, closing and locking the doors Back door The back door can be locked/unlocked and opened by the fol- lowing procedures. Unlocking and locking the back door from the outside ◆ Key-free system (if equipped) Carry the electronic key to enable this function. Press the button to lock all the doors. -
Page 118
3-2. Opening, closing and locking the doors When closing the back door Lower the back door using the back door handle. Make sure to push the back door down from the outside to close it. KBTE320202 Luggage compartment light (interlocking with the door) ■… -
Page 119
3-2. Opening, closing and locking the doors If the back door does not open ■ The back door can be opened from the inside. Retract the third seat (If equipped). (→ P. 131) Open the cover. KBTE320208 Move the lever in the direction of the arrow using a mechanical key, etc. -
Page 120
3-2. Opening, closing and locking the doors WARNING Caution while driving ■ Keep the back door closed while driving. ● If the back door is left open, it may hit near-by objects while driving or lug- gage may be unexpectedly thrown out, causing an accident. In addition, exhaust gases may enter the vehicle, causing death or a seri- ous health hazard. -
Page 121
If a bicycle carrier or similar heavy object is attached to the back door, it ● may suddenly shut again after being opened, causing someone’s hands, head or neck to be caught and injured. When installing an accessory part to the back door, using a genuine Toyota part is recommended. RUSH_OM_General_OMBZ265… -
Page 122
Do not touch the damper stay rod with ● gloves or other fabric items. Do not attach any accessories other ● than genuine Toyota parts to the back KBTE320205 door. Do not place your hand on the damper ● stay or apply lateral forces to it. -
Page 123
3-3. Adjusting the seats Front seats Adjustment procedure Seat position adjustment lever Seatback angle adjustment lever Vertical height adjustment lever (driver’s side only) KBTE330101E RUSH_OM_General_OMBZ265… -
Page 124
3-3. Adjusting the seats WARNING When adjusting the seat position ■ Take care when adjusting the seat position to ensure that other passen- ● gers are not injured by the moving seat. Do not put your hands under the seat or near the moving parts to avoid ●… -
Page 125
3-3. Adjusting the seats Rear seats Adjustment procedure Second seats KBTE330201 Seat position adjustment lever Seatback angle adjustment lever RUSH_OM_General_OMBZ265… -
Page 126
3-3. Adjusting the seats Third seats (if equipped) KBTE330202 Seatback lock release lever RUSH_OM_General_OMBZ265… -
Page 127
3-3. Adjusting the seats When getting in and out of the vehicle from the third seats (vehi- cles with the third seats) Stow the seat belt buckles of the second seat as shown. KBTE330203 Lower the head restraints to the lowest position. -
Page 128
3-3. Adjusting the seats WARNING When folding the rear seats ■ Observe the following precautions. Failure to do so may result in death or serious injury. Do not fold the seats while driving. ● Stop the vehicle on level ground, set the parking brake and shift the shift ●… -
Page 129
3-3. Adjusting the seats Head restraints Head restraints are provided for all seats. Adjusting the head restraints Pull the head restraints up. Down Push the head restraint down while pressing the lock release button. Lock release button KBTE330301 Removing the head restraints ■… -
Page 130
3-3. Adjusting the seats Adjusting the height of the head restraints (front seats) ■ Make sure that the head restraints are adjusted so that the center of the head restraint is closest to the top of your ears. KBTE330305 Using the head restraints (second seats and third seats) ■… -
Page 131
3-3. Adjusting the seats Seat arrangement ◆ Expanding luggage space Tumbling the second seats (vehicles without the third seats) (→P. 130) KBTE330411E Tumbling the third seats (vehicles with the third seats) (→P. 131) KBTE330401E ◆ Flattening the seats Flattening the front seats and second seats (→P. 132) KBTE330402E RUSH_OM_General_OMBZ265… -
Page 132
3-3. Adjusting the seats Tumbling the second seats (vehicles without the third seats) Swing the whole left and right seats up and forward. (→P. 125) Take out the hook from the pocket. KBTE330412E Hook the holding strap to the head restraint. When returning second… -
Page 133
3-3. Adjusting the seats Tumbling the third seats (vehicles with the third seats) Stow the seat belt buckles as shown. KBTE330403 Lower the head restraints to the lowest position. KBTE330404 Pull the seatback lock release lever and fold the seatback down. -
Page 134
3-3. Adjusting the seats Take out the hook from the pocket. KBTE330408 Hook the holding strap to the head restraint and secure the seat by pulling its free end. When returning the third seats to its original position, stow the holding strap securely. -
Page 135
3-3. Adjusting the seats WARNING Seat arrangement ■ Observe the following precautions. Failure to do so may result in death or serious injury. Do not arrange the seat positions while driving. ● Stop the vehicle on level ground, set the parking brake and shift the shift ●… -
Page 136
3-4. Adjusting the steering wheel and mirrors Steering wheel Adjustment procedure Hold the steering wheel and pull the lever down. KBTE340101E Adjust to the ideal position by moving the steering wheel. After adjustment, push the lever up to secure the steering wheel. KBTE340102E Horn To sound the horn, press on or… -
Page 137
3-4. Adjusting the steering wheel and mirrors WARNING Caution while driving ■ Do not adjust the steering wheel while driving. Doing so may cause the driver to mishandle the vehicle and cause an acci- dent, resulting in death or serious injury. After adjusting the steering wheel ■… -
Page 138
3-4. Adjusting the steering wheel and mirrors Anti-glare inside rear view mirror The rear view mirror’s position can be adjusted to enable suffi- cient confirmation of the rear view. Anti-glare function Reflected light from the headlights of vehicles behind can be reduced by operating the lever. -
Page 139
3-4. Adjusting the steering wheel and mirrors Outside rear view mirrors Adjustment procedure To select a mirror to adjust, turn the switch. Left Right KBTE340301E To adjust the mirror surface, operate the switch. Right Down Left KBTE340302E RUSH_OM_General_OMBZ265… -
Page 140
3-4. Adjusting the steering wheel and mirrors Folding the mirrors Manual type Push the mirror back in the direc- tion of the vehicle’s rear. KBTE340303E Power type Push the switch to fold the door mirrors. Push the switch again to open the mirrors. -
Page 141
3-5. Opening and closing the windows Power windows Opening and closing procedures The power windows can be opened and closed using the switches. Operating the switch moves the windows as follows: Closing One-touch closing (driver’s win- dow only) Opening One-touch opening (driver’s window only) : To stop the window partway, oper-… -
Page 142
If you release the switch while the window is moving, start again from the beginning. If the window re-opens slightly even after performing the above procedure correctly, have the vehicle inspected by your Toyota dealer. If the battery is disconnected ■… -
Page 143
3-5. Opening and closing the windows WARNING Observe the following precautions. Failure to do so may result in death or serious injury. Closing the windows ■ The driver is responsible for all the power window operations, including the ● operation for the passengers. In order to prevent accidental operation, especially by a child, do not let a child operate the power windows. -
Page 144
3-5. Opening and closing the windows RUSH_OM_General_OMBZ265… -
Page 145
Driving 4-1. Before driving 4-4. Refueling Driving the vehicle …..144 Opening the fuel tank cap……..176 Cargo and luggage ….153 4-5. Using the driving support 4-2. Driving procedures systems Engine (ignition) switch..154 Reverse sensor….179 Automatic transmission ..161 Driving assist systems ..184 Manual transmission..164 4-6. -
Page 146
4-1. Before driving Driving the vehicle The following procedures should be observed to ensure safe driving: Starting the engine →P. 154 Driving Vehicles with an automatic transmission With the brake pedal depressed, shift the shift lever to D. (→P. 161) Release the parking brake. -
Page 147
4-1. Before driving Parking the vehicle Vehicles with an automatic transmission With the shift lever in D, depress the brake pedal. Set the parking brake (→P. 166), and shift the shift lever to P (→P. 161). Press the engine switch to stop the engine. Lock the door, making sure that you have the key on your person. -
Page 148
The vehicle is judged to be driving uphill or downhill ● When the accelerator pedal is released ● Breaking in your new Toyota ■ To extend the life of the vehicle, observing the following precautions is recom- mended: For the first 300 km (186 miles): ●… -
Page 149
4-1. Before driving Operating your vehicle in a foreign country ■ Comply with the relevant vehicle registration laws and confirm the availability of the correct fuel. (→P. 355) WARNING Observe the following precautions. Failure to do so may result in death or serious injury. When starting the vehicle (vehicles with an automatic transmission) ■… -
Page 150
4-1. Before driving WARNING Observe the following precautions. Failure to do so may result in death or serious injury. When driving on slippery road surfaces ■ Sudden braking, acceleration and steering may cause tire slippage and ● reduce your ability to control the vehicle. Sudden acceleration, engine braking due to shifting, or changes in engine ●… -
Page 151
If you hear a squealing or scraping noise (brake pad wear indicators) ■ Have the brake pads checked and replaced by your Toyota dealer as soon as possible. Rotor damage may result if the pads are not replaced when needed. -
Page 152
4-1. Before driving WARNING Do not attach adhesive discs to the windshield or windows. Do not place ● containers such as air fresheners on the instrument panel or dashboard. Adhesive discs or containers may act as lenses, causing a fire in the vehi- cle. -
Page 153
4-1. Before driving NOTICE When driving the vehicle ■ Vehicles with an automatic transmission Do not depress the accelerator and brake pedals at the same time during ● driving, as this may restrain the engine output. Do not use the accelerator pedal or depress the accelerator and brake ●… -
Page 154
Engine damage caused by water immersion ● In the event that you drive on a flooded road and the vehicle is flooded, be sure to have your Toyota dealer check the following: Brake function ● Changes in quantity and quality of engine oil, transmission fluid, differen- ●… -
Page 155
4-1. Before driving Cargo and luggage Take notice of the following information about storage precau- tions, cargo capacity and load: WARNING Things that must not be carried in the luggage compartment ■ The following things may cause a fire if loaded in the luggage compartment: Receptacles containing gasoline ●… -
Page 156
4-2. Driving procedures Engine (ignition) switch Performing the following operations when carrying the elec- tronic key on your person starts the engine or changes engine switch modes. Starting the engine Check that the parking brake is set. Vehicles with an automatic transmission: Check that the shift lever is set in P. -
Page 157
4-2. Driving procedures Press the engine switch shortly and firmly. When operating the engine switch, one short, firm press is enough. It is not necessary to press and hold the switch. The engine will crank until it starts or for up to 30 seconds, whichever is less. -
Page 158
4-2. Driving procedures Changing engine switch modes Modes can be changed by pressing the engine switch with the brake pedal (automatic transmission) or clutch pedal (manual transmission) released. (The mode changes each time the switch is pressed.) The emergency flashers can be used. -
Page 159
4-2. Driving procedures When stopping the engine with the shift lever in a position other than P (vehicles with an automatic transmission only) If the engine is stopped with the shift lever in a position other than P, the engine switch will not be turned off but instead be turned to ACCESSORY mode. -
Page 160
4-2. Driving procedures If the engine does not start ■ The engine immobilizer system may not have been deactivated. (→P. 74) Contact your Toyota dealer. Steering lock ■ After turning the engine switch off and opening and closing the doors except the back door, the steering wheel will be locked due to the steering lock func- tion. -
Page 161
4-2. Driving procedures WARNING When starting the engine ■ Always start the engine while sitting in the driver’s seat. Do not depress the accelerator pedal while starting the engine under any circumstances. Doing so may cause an accident resulting in death or serious injury. Caution while driving ■… -
Page 162
● If the engine becomes difficult to start or stalls frequently, have your vehi- ● cle checked by your Toyota dealer immediately. Symptoms indicating a malfunction with the engine switch ■ If the engine switch seems to be operating somewhat differently than usual, such as the switch sticking slightly, there may be a malfunction. -
Page 163
4-2. Driving procedures ∗ Automatic transmission Shifting the shift lever KBTE420201E While the engine switch is in IGNITION ON mode, move the shift lever with the brake pedal depressed. When shifting the shift lever between P and D, make sure that the vehicle is completely stopped. -
Page 164
If the shift lever cannot be shifted with your foot on the brake pedal, there may be a problem with the shift lock system. Have the vehicle inspected by your Toyota dealer immediately. The following steps may be used as an emergency measure to ensure that the shift lever can be shifted. -
Page 165
4-2. Driving procedures Reverse warning buzzer ■ When shifting into R, a buzzer will sound to inform the driver that the shift lever is in R. WARNING When driving on slippery road surfaces ■ Do not accelerate or shift gears suddenly. Sudden changes in engine braking may cause the vehicle to spin or skid, resulting in an accident. -
Page 166
4-2. Driving procedures ∗ Manual transmission Shifting the shift lever KBTE420301E Fully depress the clutch pedal before operating the shift lever, and then release it slowly. To prevent it from being operated incorrectly, the shift lever cannot be shifted from 5 to R directly. Shift the shift lever to N first and then to R. If it is difficult to shift in reverse, shift the shift lever to N, release the clutch pedal momentarily, and then try again. -
Page 167
4-2. Driving procedures Turn signal lever Operation instructions Right turn Right turn signal will flash con- tinuously while the lever is kept position. Right turn signal will flash three times, when the lever is pushed to position and released immedi- ately. -
Page 168
4-2. Driving procedures Parking brake Operation instructions To set the parking brake, fully pull the parking brake lever while depressing the brake pedal. To release the parking brake, slightly raise the lever and lower it completely while press- ing the button. KBTE420501E Parking the vehicle ■… -
Page 169
4-3. Operating the lights and wipers Headlight switch The headlights can be operated manually or automatically. Operation instructions Operating the switch turns on the lights as follows: The headlights, tail lights and all the lights listed below turn on and off auto- matically. -
Page 170
4-3. Operating the lights and wipers Turning on the high beam headlights With the headlights on, push the lever away from you to turn on the high beams. Pull the lever toward you to the center position to turn the high beams off. -
Page 171
4-3. Operating the lights and wipers Power saving function ■ In order to prevent the battery from depleting, if the headlights or tail lights are illuminated with the engine switch in ACCESSORY or off, the power saving mode is activated and all lamps will turn off automatically about 10 minutes later. -
Page 172
4-3. Operating the lights and wipers Fog light switch The fog lights secure excellent visibility in difficult driving con- ditions, such as in rain and fog. Operation instructions Front fog light switch Turns the front fog off Turns the front fog lights KBTE430201E Rear fog light switch (If equipped) … -
Page 173
4-3. Operating the lights and wipers Fog lights can be used when ■ Vehicles with front fog light switch The headlights or front position lights are turned on. Vehicles with front and rear fog light switch Front fog lights: The headlights or the front position lights are turned on. Rear fog light: The headlights or the front position lights are turned on. -
Page 174
4-3. Operating the lights and wipers Windshield wipers and washer Operating the wiper lever Operating the lever operates the wipers or washer as follows. When is selected, the intervals of intermittent operation will change according to the vehicle speed. Intermittent windshield wiper operation Operates more frequently at… -
Page 175
Do not operate the switch continually as the washer fluid pump may over- heat. When a nozzle becomes blocked ■ In this case, contact your Toyota dealer. Do not try to clear it with a pin or other object. The nozzle will be damaged. To prevent battery discharge ■… -
Page 176
4-3. Operating the lights and wipers Rear window wiper and washer Operation instructions Operating the switch operates the rear wiper as follows: Intermittent window wiper operation Normal window wiper operation KBTE430401E Washer operation Pushing the lever operates the washer. KBTE430402E RUSH_OM_General_OMBZ265… -
Page 177
Do not operate the switch continually as the washer fluid pump may over- heat. When a nozzle becomes blocked ■ In this case, contact your Toyota dealer. Do not try to clear it with a pin or other object. The nozzle will be damaged. To prevent battery discharge ■… -
Page 178
4-4. Refueling Opening the fuel tank cap Perform the following steps to open the fuel tank cap: Before refueling the vehicle ● Turn the engine switch off and ensure that all the doors and win- dows are closed. ● Confirm the type of fuel. (→P. 347) Opening the fuel tank cap Pull up the opener to open the fuel filler door. -
Page 179
● When replacing the fuel tank cap ■ Do not use anything but a genuine Toyota fuel tank cap designed for your vehicle. Doing so may cause a fire or other incident which may result in death or serious injury. -
Page 180
4-4. Refueling NOTICE Refueling ■ Do not spill fuel during refueling. Doing so may damage the vehicle, such as causing the emission control system to operate abnormally, damaging fuel system components, or the vehicle’s painted surface. RUSH_OM_General_OMBZ265… -
Page 181
4-5. Using the driving support systems Reverse sensor The reverse sensors detect an obstacle behind the vehicle when reversing and a buzzer sound informs the driver and those around the vehicle of the presence of an obstacle. Position of the sensors KBTE450104 Use and operation of reverse sensors When you place the shift lever in the position R with the engine switch… -
Page 182
4-5. Using the driving support systems Range at which obstacles can be detected The range at which obstacles can be detected is as follows. However, note that the sensors cannot detect obstacles that are extremely close to the vehicle. Depending on the shape of the obstacles or the conditions, the dis- tance covered by the sensors can be reduced or in some cases the sensors are no longer able to detect an obstacle. -
Page 183
If the reverse sensors encounter abnormality, check the sensor conditions ● first. If the buzzer sounds even when there is no ice, snow nor mud, the sensors may be malfunctioning. Have them checked by a Toyota dealer. Sensors ■ In the following cases, the reverse sensors may not operate properly, lead- ing to an unexpected accident. -
Page 184
When a towing hook is installed ● When a suspension other than the genuine Toyota product is installed ● Depending on the shape of the obstacles or the conditions, the distance covered by the sensors can be reduced or no obstacle can be detected. -
Page 185
When the following happen, there are possibilities that the system does not function properly due to malfunctioning reverse sensors. Have them checked at a Toyota dealer. The buzzer does not sound even if the engine switch is set to IGNITION ●… -
Page 186
4-5. Using the driving support systems Driving assist systems To help enhance driving safety and performance, the following systems operate automatically in response to various driving situations. Be aware, however, that these systems are supple- mentary and should not be relied upon too heavily when operat- ing the vehicle. -
Page 187
4-5. Using the driving support systems When the TRC/VSC systems are operating The slip indicator light will flash while the TRC/VSC systems are operating. KBTE450101E Disabling the TRC system If the vehicle gets stuck in mud, dirt or snow, the TRC system may reduce power from the engine to the wheels. -
Page 188
4-5. Using the driving support systems Turning off the TRC/VSC systems ■ To turn the TRC/VSC systems off, press and hold for more than 3 sec- onds while the vehicle is stopped. The “TRC OFF” and VSC OFF indicator lights will come on. Press again to turn the systems back on. -
Page 189
4-5. Using the driving support systems Operating conditions of hill-start assist control ■ When the following four conditions are met, the hill-start assist control will operate: The shift lever is in a position other than P (automatic transmission) or N ●… -
Page 190
The ABS, TRC and VSC systems will not function correctly if different tires are installed on the vehicle. Contact your Toyota dealer for further information when replacing tires or wheels. Handling of tires and the suspension ■… -
Page 191
4-6. Driving tips Winter driving tips Carry out the necessary preparations and inspections before driving the vehicle in winter. Always drive the vehicle in a man- ner appropriate to the prevailing weather conditions. Preparation for winter ● Use fluids that are appropriate to the prevailing outside tempera- tures. -
Page 192
Repairing or replacing snow tires (vehicles with the tire pressure warn- ■ ing system) Request repairs or replacement of snow tires from Toyota dealers or legiti- mate tire retailers. This is because the removal and attachment of snow tires affects the opera- tion of the tire pressure warning valves and transmitters. -
Page 193
4-6. Driving tips Eco-friendly driving tips For improved fuel economy and reduced CO2 emissions, pay attention to the following points: ◆ Use of Eco Driving Indicator Eco-friendly driving is possible by maintaining the Eco Driving Indi- cator, shown in the meter, in the on state. (→P. 146) ◆… -
Page 194
4-6. Driving tips ◆ Air conditioning Use the air conditioning only when necessary. Doing so can help reduce excessive fuel consumption. In summer: When the ambient temperature is high, use the recircu- lated air mode. Doing so will help to reduce the burden on the air conditioning system and reduce fuel consumption as well. -
Page 195
Interior features 5-1. Using the air conditioning system and defogger Front air conditioning system (Manual) ….194 Front air conditioning system (Automatic)..198 Rear cooler system….205 5-2. Using the audio system Steering wheel audio switches……207 5-3. Using the interior lights Interior lights list….208 •… -
Page 196
5-1. Using the air conditioning system and defogger ∗ Front air conditioning system (Manual) Control panel KBTE610101 Adjusting the temperature setting ■ Press to decreases the temperature and press increases the temperature. If the button is not pressed, the system will blow ambient tempera- ture. -
Page 197
5-1. Using the air conditioning system and defogger Other functions Switching between outside air and recirculated air modes ■ Press The mode switches between outside air mode (indicator off) and recir- culated air mode (indicator on) each time is pressed. Defogging the rear window ■… -
Page 198
5-1. Using the air conditioning system and defogger Air outlets Location of air outlets ■ KBTE610106E Adjusting the position of the air outlets ■ Front center outlets Front side outlets KBTE610103E KBTE610104E Opening and closing the air outlets (front side outlets) ■… -
Page 199
5-1. Using the air conditioning system and defogger Fogging up of the windows ■ The windows will easily fog up when the humidity in the vehicle is high. ● Turning on will flow the dehumidified air from the outlets and defog the windshield effectively. -
Page 200
5-1. Using the air conditioning system and defogger ∗ Front air conditioning system (Automatic) Type A: Air outlet temperature, fan speed and the airflow mode are automatically adjusted according to the temperature setting. Type B: Air outlet temperature and fan speed are automatically adjusted according to the temperature setting. -
Page 201
5-1. Using the air conditioning system and defogger Adjusting the temperature setting ■ Turn the “TEMP” dial clockwise to increases the temperature and turn the dial counterclockwise to decreases the temperature. If the “A/C” indicator is turned off, the system will blow ambient tempera- ture air or heated air. -
Page 202
5-1. Using the air conditioning system and defogger Using the automatic mode Press the “AUTO” button. Air outlets (type A only) and fan speed are automatically adjusted accord- ing to the temperature setting. Adjust the temperature setting. The cooling and dehumidification function switches between on and off each time “A/C”… -
Page 203
5-1. Using the air conditioning system and defogger Air outlets Location of air outlets ■ Type A The air outlets and air volume change according selected airflow mode. KBTE610102E Type B KBTE610106E Adjusting the position of the air outlets ■… -
Page 204
5-1. Using the air conditioning system and defogger Opening and closing the air outlets (front side outlets) ■ Open the vent. Close the vent. KBTE610105E Solar radiation sensor ■ This sensor senses the solar radiation. The sensor may not function properly if an object is placed on the sensor, or anything that blocks the sensor is affixed to the windshield. -
Page 205
5-1. Using the air conditioning system and defogger Fogging up of the windows ■ ● The windows will easily fog up when the humidity in the vehicle is high. Turning “A/C” on will flow the dehumidified air from the outlets and defog the windshield effectively. -
Page 206
5-1. Using the air conditioning system and defogger NOTICE To prevent battery discharge ■ Do not leave the air conditioning system and/or rear window defogger on longer than necessary when the engine is stopped. RUSH_OM_General_OMBZ265… -
Page 207
5-1. Using the air conditioning system and defogger Rear cooler system Manual air conditioning system KBTE610201E Automatic air conditioning system KBTE610211E Front fan speed control button Rear fan speed control lever Front fan speed control dial RUSH_OM_General_OMBZ265… -
Page 208
5-1. Using the air conditioning system and defogger Using the rear cooler system Turn ON the fan of the front air conditioning system. Adjusting the fan speed To adjust the fan speed, slide the rear fan speed control lever the right (increase) or the left (decrease). -
Page 209
5-2. Using the audio system Steering wheel audio switches Some audio features can be controlled using the switches on the steering wheel. Operation may differ depending on the type of audio system. For details, refer to the manual provided with the audio system. Operating the audio system using the steering wheel switches Volume switch: •… -
Page 210
5-3. Using the interior lights Interior lights list KBTE620101E Rear interior light (→P. 209) Luggage compartment light (→P. 116) Front interior light/ Personal lights (→P. 209) RUSH_OM_General_OMBZ265… -
Page 211
5-3. Using the interior lights Front interior light Turns the switch to the door position (door linked) Turns the light off KBTE620102E Personal lights Turns the light on/off KBTE620104E Rear interior light Turns the light on Turns the light off Turns the light on/off linked to door position KBTE620103… -
Page 212
5-3. Using the interior lights Illuminated entry system ■ When the interior light is in the “DOOR” position, the light automatically turns on and off according to the locked/unlocked and opened/closed conditions of the door, and the engine switch position. To prevent battery from being discharged ■… -
Page 213
5-4. Using the storage features List of storage features KBTE630101E Bottle holders/pockets (→P. 212) Glove box (→P. 212) Auxiliary box (→P. 214) WARNING Do not leave glasses, lighters or spray cans in the storage spaces, as this ● may cause the following when cabin temperature becomes high: •… -
Page 214
5-4. Using the storage features Glove box Pull up the lever to open the glove box. KBTE630102E Bottle holders/pockets Front ■ KBTE630103E Rear ■ Type A Type B KBTE630104E KBTE630105E RUSH_OM_General_OMBZ265… -
Page 215
5-4. Using the storage features Type C KBTE630107E When using the bottle holders ■ When storing a bottle, close the cap. ● The bottle may not be stored depending on its size or shape. ● WARNING Items unsuitable for the bottle holders ■… -
Page 216
5-4. Using the storage features Auxiliary box Instrument panel driver’s seat tray ■ KBTE630109E Center tray ■ KBTE630110E Overhead console ■ Press in the lid. KBTE610108E WARNING Overhead instrument panel ■ Do not store items heavier than 200 g (0.44 lb.). Doing so may cause the auxiliary box to open and the items inside may fall out, resulting in an accident. -
Page 217
5-5. Other interior features Other interior features Sun visors To set the visor in the forward position, flip it down. To set the visor in the side posi- tion, flip down, unhook, and swing it to the side. KBTE640101E Vanity mirrors Open the cover. -
Page 218
5-5. Other interior features Power outlet Front ■ Please use as a power supply for electronic goods that use less than 12 VDC/10 A (power consumption of 120 W). Open the lid. KBTE640102E Rear (If equipped) ■ Please use as a power supply for electronic goods that use less than 12 V DC/5 A (power consumption of 60 W). -
Page 219
5-5. Other interior features NOTICE To avoid damaging the power outlet ■ Close the power outlet lid when the power outlet is not in use. Foreign objects or liquids that enter the power outlet may cause a short cir- cuit. To prevent battery discharge ■… -
Page 220
5-5. Other interior features Assist grips An assist grip installed on the ceil- ing can be used to support your body while sitting on the seat. KBTE640106E WARNING Do not use the assist grip when getting in or out of the vehicle or rising from your seat. -
Page 221
Maintenance and care 6-1. Maintenance and care 6-3. Do-it-yourself maintenance Cleaning and protecting Do-it-yourself service the vehicle exterior ..220 precautions ……244 Cleaning and protecting Hood ……..246 the vehicle interior …223 Positioning a floor jack..248 6-2. Maintenance Engine compartment..249 Maintenance Tires……..260 requirements….226 Tire inflation pressure ..272 Scheduled maintenance ..229… -
Page 222
6-1. Maintenance and care Cleaning and protecting the vehicle exterior Perform the following to protect the vehicle and maintain it in prime condition: ● Working from top to bottom, liberally apply water to the vehicle body, wheel wells and underside of the vehicle to remove any dirt and dust. -
Page 223
6-1. Maintenance and care When water is splashed to your car during car wash, etc. ■ If the electronic key is within the effective range, water pressure from car washing, etc. may push the switch on the door handle and may lock/unlock the doors. -
Page 224
6-1. Maintenance and care NOTICE To prevent paint deterioration and corrosion on the body and compo- ■ nents (aluminum wheels etc.) Wash the vehicle immediately in the following cases: ● • After driving near the sea coast • After driving on salted roads •… -
Page 225
6-1. Maintenance and care Cleaning and protecting the vehicle interior The following procedures will help protect your vehicle’s interior and keep it in top condition: Protecting the vehicle interior ● Remove dirt and dust using a vacuum cleaner. Wipe dirty surfaces with a cloth dampened with lukewarm water. -
Page 226
6-1. Maintenance and care Caring for leather areas ■ Toyota recommends cleaning the interior of the vehicle at least twice a year to maintain the quality of the vehicle’s interior. Shampooing the carpets ■ There are several commercial foaming-type cleaners available. Use a sponge or brush to apply the foam. -
Page 227
6-1. Maintenance and care NOTICE Cleaning detergents ■ Do not use the following types of detergent, as they may discolor the vehi- ● cle interior or cause streaks or damage to painted surfaces: • Non-seat portions: Organic substances such as benzene or gasoline, alkaline or acidic solutions, dye, and bleach •… -
Page 228
● Where to go for maintenance service? It makes good sense to take your vehicle to your local Toyota dealer for maintenance service as well as other inspections and repairs. Toyota technicians are well-trained specialists receiving the latest service information through technical bulletins, service tips and in-dealership train- ing programs. -
Page 229
Engine coolant temperature continually higher than normal ● If you notice any of these clues, take your vehicle to your Toyota dealer as soon as possible. Your vehicle may need adjustment or repair. RUSH_OM_General_OMBZ265… -
Page 230
6-2. Maintenance WARNING If your vehicle is not properly maintained ■ Improper maintenance could result in serious damage to the vehicle and possible death or serious injury. Handling of the battery ■ Battery posts, terminals and related accessories contain lead and lead com- pounds which are known to cause brain damage. -
Page 231
6-2. Maintenance Scheduled maintenance Perform maintenance by the schedule as follows: Maintenance schedule requirements Your vehicle needs to be serviced in according to the normal maintenance schedule. (See “Maintenance schedule”.) If you mainly operate your vehicle under one or more of the spe- cial operating conditions below, some of the maintenance sched- ule items need to be serviced more frequently in order to keep your vehicle in good condition. -
Page 232
6-2. Maintenance Maintenance schedule (except for South Africa) Maintenance operations: I = Inspect, correct or replace as necessary R = Replace, change or lubricate SERVICE ODOMETER READING INTERVAL: (Odometer x1000 MONTHS 1 10 20 30 40 50 60 70 80 reading or months, x1000… -
Page 233
6-2. Maintenance Maintenance operations: I = Inspect, correct or replace as necessary R = Replace, change or lubricate T = Tighten to specified torque SERVICE ODOMETER READING INTERVAL: (Odometer x1000 MONTHS 1 10 20 30 40 50 60 70 80 reading or months, x1000… -
Page 234
Also check the hose connection for the installation condition, corrosion etc. 3. Only use “Toyota Super Long Life Coolant” or similar high quality ethylene glycol based non-silicate, non-amine, non-nitrite and non-borate coolant with long-life hybrid organic acid technology. (Coolant with long-life hybrid organic acid technology is a combination of low phosphates and organic acids.) -
Page 235
6-2. Maintenance Additional maintenance schedule Refer to the following table for normal maintenance schedule items requiring more frequent service specific to the type of severe condi- tions. (For outline, see “Maintenance schedule requirements”.) A-1: Operating on rough or muddy roads, or roads with melted snow … -
Page 236
6-2. Maintenance A-2: Operating on dusty roads (Roads in areas where their pavement rate is low, or a cloud of dust often arises and the air is dry.) Every 5000 km (3000 miles) or Replacement of engine oil 3 months Every 5000 km (3000 miles) or … -
Page 237
6-2. Maintenance B-1: Heavily loaded vehicle (Example: Using a car top carrier, etc.) Every 5000 km (3000 miles) or Replacement of engine oil 3 months Every 5000 km (3000 miles) or Replacement of engine oil filter 3 months … -
Page 238
6-2. Maintenance B-3: Extensive idling and/or low speed driving for a long distance such as police, taxi or door-to-door delivery use Every 5000 km (3000 miles) or Replacement of engine oil 3 months Every 5000 km (3000 miles) or … -
Page 239
6-2. Maintenance Maintenance schedule (for South Africa) Maintenance operations: I = Inspect, correct or replace as necessary R = Replace, change or lubricate SERVICE ODOMETER READING INTERVAL: (Odometer x1000 km MONTHS reading or months, whichever x1000 comes first.) miles BASIC ENGINE COMPONENTS Drive belts Engine oil Engine oil filter… -
Page 240
6-2. Maintenance Maintenance operations: I = Inspect, correct or replace as necessary R = Replace, change or lubricate T = Tighten to specified torque SERVICE ODOMETER READING INTERVAL: (Odometer x1000 km MONTHS reading or months, whichever x1000 comes first.) miles CHASSIS AND BODY Brake pedal and parking brake… -
Page 241
6-2. Maintenance Maintenance operations: I = Inspect, correct or replace as necessary R = Replace, change or lubricate SERVICE ODOMETER READING INTERVAL: (Odometer x1000 km MONTHS reading or months, whichever x1000 comes first.) miles CHASSIS AND BODY I: 48 Manual transmission oil R: 96 Automatic transmission I: 36… -
Page 242
6-2. Maintenance Additional maintenance schedule (for South Africa) Refer to the following table for normal maintenance schedule items requiring more frequent service specific to the type of severe condi- tions. (For outline, see “Maintenance schedule requirements”.) A-1: Operating on rough or muddy roads, or roads with melted snow … -
Page 243
6-2. Maintenance A-2: Operating on dusty roads (Roads in areas where their pavement rate is low, or a cloud of dust often arises and the air is dry.) Every 7500 km (4500 miles) or Replacement of engine oil 6 months Every 7500 km (4500 miles) or … -
Page 244
6-2. Maintenance B-1: Heavily loaded vehicle (Example: Towing a trailer (vehicles sold in South Africa), using a car top carrier, etc.) Every 7500 km (4500 miles) or Replacement of engine oil 6 months Every 7500 km (4500 miles) or … -
Page 245
6-2. Maintenance B-3:Extensive idling and/or low speed driving for a long distance such as police, taxis or door-to-door delivery use Every 7500 km (4500 miles) or Replacement of engine oil 6 months Every 7500 km (4500 miles) or Replacement of engine oil filter 6 months … -
Page 246
Battery condition • Conventional wrench (for terminal clamp bolts) (→P. 254) • Distilled water • “Toyota Super Long Life Coolant” or a similar high quality ethylene glycol-based non-silicate, non- amine, non-nitrite and non-borate coolant with long- Engine coolant life hybrid organic acid technology level (→P. -
Page 247
6-3. Do-it-yourself maintenance WARNING The engine compartment contains many mechanisms and fluids that may move suddenly, become hot, or become electrically energized. To avoid death or serious injury, observe the following precautions. When working on the engine compartment ■ Keep hands, clothing and tools away from the moving fan and engine ●… -
Page 248
6-3. Do-it-yourself maintenance Hood Release the lock from the inside of the vehicle to open the hood. Pull the hood lock release knob. The hood will pop up slightly. KBTE730201E Pull up the auxiliary catch lever and lift the hood. KBTE730202 Hold the hood open by inserting the supporting rod into the slot. -
Page 249
6-3. Do-it-yourself maintenance WARNING When closing the hood ■ When closing the hood, take extra care to prevent your fingers etc. from being caught. KBTE730204 Pre-driving check ■ Check that the hood is fully closed and locked. If the hood is not locked properly, it may open while the vehicle is in motion and cause an accident, which may result in death or serious injury. -
Page 250
6-3. Do-it-yourself maintenance Positioning a floor jack When using a floor jack, follow the instructions in the manual provided with the jack and perform the operation safety. When raising your vehicle with a floor jack, position the jack cor- rectly. Improper placement may damage your vehicle or cause injury. -
Page 251
6-3. Do-it-yourself maintenance Engine compartment KBTE730401E Fuse box (→P. 278) Engine coolant reservoir (→P. 252) Engine oil level dipstick (→P. 250) Radiator (→P. 254) Air cleaner (→P. 258) Condenser (→P. 254) Engine oil filler cap Electric cooling fan (→P. 251) Battery (→P. -
Page 252
6-3. Do-it-yourself maintenance Engine oil With the engine at operating temperature and turned off, check the oil level on the dipstick. Checking the engine oil ■ Park the vehicle on level ground. After warming up the engine and turning it off, wait more than 5 minutes for the oil to drain back into the bottom of the engine. -
Page 253
6-3. Do-it-yourself maintenance Adding engine oil ■ If the oil level is below or near the low level mark, add engine oil of the same type as that already in the engine. KBTE730404E Make sure to check the oil type and prepare the items needed before adding oil. -
Page 254
Call your Toyota dealer, service station or auto parts store for information concerning recycling or disposal. Do not leave used engine oil within the reach of children. -
Page 255
■ Visually check the radiator, hoses, engine coolant reservoir cap, drain cock and water pump. If you cannot find a leak, have your Toyota dealer test the cap and check for leaks in the cooling system. WARNING When the engine is hot ■… -
Page 256
Check the radiator and condenser and clear away any foreign objects. If either of the above parts is extremely dirty or you are not sure of their condition, have your vehicle inspected by your Toyota dealer. WARNING When the engine is hot ■… -
Page 257
6-3. Do-it-yourself maintenance Battery exterior ■ Make sure that the battery terminals are not corroded and that there are no loose connections, cracks, or loose clamps. Terminals Hold-down clamp KBTE730406E Checking battery fluid ■ Check that the level is between “UPPER LEVEL”… -
Page 258
6-3. Do-it-yourself maintenance Before recharging ■ When recharging, the battery produces hydrogen gas which is flammable and explosive. Therefore, observe the following before recharging: If recharging with the battery installed on the vehicle, be sure to disconnect ● the ground cable. Make sure the power switch on the charger is off when connecting and dis- ●… -
Page 259
6-3. Do-it-yourself maintenance NOTICE When recharging the battery ■ Never recharge the battery while the engine is running. Also, be sure all accessories are turned off. When adding distilled water ■ Avoid overfilling. Water spilled during battery recharging may cause corro- sion. -
Page 260
6-3. Do-it-yourself maintenance Air cleaner filter Check the air cleaner filter as follows: Release the clips. KBTE730410E Lift the cover and take out the air cleaner filter. KBTE730411E Inspect the outer surface of the filter, and replace the filter if it is extremely dirty. -
Page 261
6-3. Do-it-yourself maintenance WARNING To prevent inhaling dust ■ Wear a respirator when using compressed air to clean the air cleaner filter. NOTICE To prevent damaging the engine ■ Do not drive with the air cleaner filter removed. Doing so causes excessive engine wear. -
Page 262
6-3. Do-it-yourself maintenance Tires Replace or rotate tires in accordance with maintenance sched- ules and treadwear. Checking tires Check if the treadwear indicators are showing on the tires. Also check the tires for uneven wear, such as excessive wear on one side of the tread. -
Page 263
6-3. Do-it-yourself maintenance Tire rotation Rotate the tires in the order shown. To equalize tire wear and help extend tire life, Toyota recommends that tire rotation is carried out approximately every 5000 km (3000 miles). Vehicles with steel spare Vehicles with aluminum spare … -
Page 264
The tire pressure warning valve and transmitter is equipped with a unique ID code. When replacing a tire pressure warning valve and transmitter, it is necessary to register the ID code. Have the ID code registered by your Toyota dealer. RUSH_OM_General_OMBZ265… -
Page 265
6-3. Do-it-yourself maintenance Tire labeling Many markings (e.g. Tire size, Tire Identification Number or TIN) are placed on the sidewall of a tire by tire manufacturers. These marking can provide you with useful information on the tire. Tire size ■ Here is a brief review of the tire sizing system with a breakdown of its individual elements. -
Page 266
6-3. Do-it-yourself maintenance Load and Speed Rating Descriptions ● The load and speed rating descriptions will appear follwing the size designation. They provide two important facts about the tire. First, the number designation is its load index. Second, the letter designation indicates the tire’s speed rating. (e.g.) 215 … -
Page 267
6-3. Do-it-yourself maintenance Tire Identification Number(TIN) ■ Tire Identification Number (TIN) marked on the intended outboard sidewall. The TIN is composed of four groups. Here is a brief review of the TIN with a breakdown of its individual elements. (e.g.) DOT XX XX XXX XXXX Manufacturer’s Identification Mark Tire Size… -
Page 268
6-3. Do-it-yourself maintenance Construction ● The generic name of each cord material used in the plies (both sidewall and tread area) of this tire. For example, “PLIES: TREAD 2 POLYESTER + 2 STEEL + 1 POLYAMIDE SIDEWALL 2 POLYESTER” Recommended tire inflation pressure ■… -
Page 269
A tire goes flat repeatedly or cannot be properly repaired due to the size or ● location of a cut or other damage If you are not sure, consult with your Toyota dealer. Replacing tires and wheels (vehicles with a tire pressure warning sys- ■… -
Page 270
● properly. • If non-genuine Toyota wheels are used. • A tire has been replaced with a tire that is not an OE (Original Equipment) tire. • A tire has been replaced with a tire that is not of the specified size. -
Page 271
If repeated attempts to record tire inflation pressure settings are unsuccessful, have the vehicle inspected by your Toyota dealer. When operating the tire pressure warning reset switch, the tire pressure ●… -
Page 272
Do not mix tires of different makes, models or tread patterns. ● Also, do not mix tires of remarkably different treadwear. Do not use tire sizes other than those recommended by Toyota. ● Do not mix differently constructed tires (radial, bias-belted or bias-ply ●… -
Page 273
When a tire is repaired with liquid sealants, the tire pressure warning valve and transmitter may not operate properly. If a liquid sealant is used, contact your Toyota dealer or other qualified service shop as soon as possible. After use of liquid sealant, make sure to replace the tire pressure warning valve and transmitter when repairing or replacing the tire. -
Page 274
Reduced safety ● Damage to the drive train ● If a tire needs frequent inflating, have it checked by your Toyota dealer. Instructions for checking tire inflation pressure ■ When checking tire inflation pressure, observe the following: Check only when the tires are cold. -
Page 275
6-3. Do-it-yourself maintenance WARNING Proper inflation is critical to save tire performance ■ Keep your tires properly inflated. If the tires are not properly inflated, the following conditions may occur which could lead to an accident resulting in death or serious injury: Excessive wear ●… -
Page 276
● Used wheels ● Bent wheels that have been straightened Aluminum wheel precautions ● Use only Toyota wheel nuts and wrenches designed for use with your aluminum wheels. ● When rotating, repairing or changing your tires, check that the wheel nuts are still tight after driving 1600 km (1000 miles). -
Page 277
Because tire repair or replacement may affect the tire pressure warning ● valves and transmitters, make sure to have tires serviced by your Toyota dealer or other qualified service shop. In addition, make sure to purchase your tire pressure warning valves and transmitters at your Toyota dealer. -
Page 278
6-3. Do-it-yourself maintenance Electronic key battery Replace the battery with a new one if it is depleted. You will need the following items: ● Flathead screwdriver ● Lithium battery CR2032 Replacing the battery Remove the cover. Remove the cover with the brand logo mark facing upward. -
Page 279
Assemble them by referring to the illustra- tion. KBTE730804 Use a CR2032 lithium battery ■ Batteries can be purchased at your Toyota dealer, local electrical appliance ● shops or camera stores. Replace only with the same or equivalent type recommended by the manu- ●… -
Page 280
6-3. Do-it-yourself maintenance Checking and replacing fuses If any of the electrical components do not operate, a fuse may have blown. If this happens, check and replace the fuses as nec- essary. Turn the engine switch to off. Open the fuse box cover. Engine compartment … -
Page 281
If the lights do not turn on even after the fuse has been replaced, a bulb may ● need replacement. (→P. 281) If the replaced fuse blows again, have the vehicle inspected by your Toyota ● dealer. If there is an overload in a circuit ■… -
Page 282
Never use a fuse of a higher amperage rating than that indicated, or use ● any other object in place of a fuse. Always use a genuine Toyota fuse or equivalent. ● Never replace a fuse with a wire, even as a temporary fix. -
Page 283
Toy- ota dealer. For more information about replacing other light bulbs, contact your Toyota dealer. Preparing for light bulb replacement Check the wattage of the light bulb to be replaced. (→P. 354) -
Page 284
6-3. Do-it-yourself maintenance Rear ■ KBTE731102 Back-up lights License plate lights Rear turn signal lights RUSH_OM_General_OMBZ265… -
Page 285
6-3. Do-it-yourself maintenance Replacing light bulbs Front fog lights ■ When replacing the bulb on the left side, turn the steering wheel fully to the right. When replacing the bulb on the right side, turn the steering wheel fully to the left. Remove the clips. -
Page 286
6-3. Do-it-yourself maintenance Partly remove the fender liner. KBTE731105 Turn the bulb base counter- clockwise. KBTE731106 Unplug the connector while depressing the lock release. KBTE731107 Exchange the light bulb, and install the socket. Align the 3 tabs on the light bulb with the mounting, and insert. -
Page 287
6-3. Do-it-yourself maintenance Turn and secure the socket and plug the connector. After installing the socket, turn the fog lights on once and visu- ally confirm that no light is leak- ing through the mounting. KBTE731109 Install the clips that were removed. -
Page 288
6-3. Do-it-yourself maintenance Front turn signal lights ■ Turn the bulb base counter- clockwise. KBTE731110E Remove the light bulb. KBTE731111 Attach a new light bulb and install it by turning the bulb base. KBTE731112 RUSH_OM_General_OMBZ265… -
Page 289
6-3. Do-it-yourself maintenance Rear turn signal lights ■ Open the back door. Remove the bolts. KBTE731113 Pull the light body straight back and disengage the mat- ing inside the light body. KBTE731130 Turn the bulb base counter- clockwise. KBTE731114 Remove the light bulb. KBTE731115 RUSH_OM_General_OMBZ265… -
Page 290
6-3. Do-it-yourself maintenance Attach new light bulbs. KBTE731116 Install the light bulbs by turn- ing their bulb bases. KBTE731117 Install the light unit. Align the position of the pin on the light body ( ) with the hole on the vehicle side and push in the light body straight so that the guide ( ) fits in. -
Page 291
6-3. Do-it-yourself maintenance License plate light ■ Open the back door. Remove the clips, using a flat screwdriver or the like. KBTE731120 Remove the clips by your hand. Remove the back door trim. KBTE731131 RUSH_OM_General_OMBZ265… -
Page 292
6-3. Do-it-yourself maintenance Unplug the connector while depressing the lock release. KBTE731128 Turn the bulb base counter- clockwise. KBTE731121 Remove the light bulb. KBTE731122 Attach a light bulb. Install it by turning the bulb base. KBTE731123 RUSH_OM_General_OMBZ265… -
Page 293
6-3. Do-it-yourself maintenance Plug the connector. KBTE731129 Align the holes of the back door trim with those of the back door. Install the clips. KBTE731124 RUSH_OM_General_OMBZ265… -
Page 294
6-3. Do-it-yourself maintenance Back-up lights ■ Open the back door. Remove the clips, using a flat screwdriver or the like. KBTE731120 Remove the clips by your hand. Remove the back door trim. KBTE731131 RUSH_OM_General_OMBZ265… -
Page 295
6-3. Do-it-yourself maintenance Turn the bulb base counter- clockwise. KBTE731125 KBTE731128 Remove the light bulb. KBTE731126 Attach a light bulb. Install it by turning the bulb base. KBTE731127 RUSH_OM_General_OMBZ265… -
Page 296
■ Temporary condensation build-up on the inside of the headlight lens does not indicate a malfunction. Contact your Toyota dealer for more information in the following situations: Large drops of water have built up on the inside of the lens. -
Page 297
6-3. Do-it-yourself maintenance WARNING Replacing light bulbs ■ Turn off the lights. Do not attempt to replace the bulb immediately after ● turning off the lights. The bulbs become very hot and may cause burns. Do not touch the glass portion of the light bulb with bare hands. When it is ●… -
Page 298
6-3. Do-it-yourself maintenance RUSH_OM_General_OMBZ265… -
Page 299
When trouble arises 7-1. Essential information 7-2. Steps to take in an emergency Emergency flashers…298 If your vehicle needs to If your vehicle has to be towed ……303 be stopped in an emergency….299 If you think something is wrong…….308 Fire extinguisher ….300 Fuel pump shut off If the vehicle is trapped system ……309… -
Page 300
7-1. Essential information Emergency flashers The emergency flashers are used to warn other drivers when the vehicle has to be stopped in the road due to a breakdown, etc. Press the switch. All the turn signal lights will flash. To turn them off, press the switch once again. -
Page 301
7-1. Essential information If your vehicle has to be stopped in an emergency Only in an emergency, such as if it becomes impossible to stop the vehicle in the normal way, stop the vehicle using the follow- ing procedure: Steadily step on the brake pedal with both feet and firmly depress it. Do not pump the brake pedal repeatedly as this will increase the effort required to slow the vehicle. -
Page 302
7-1. Essential information ∗ Fire extinguisher A fire extinguisher is located in the under the front passenger seat. It is for use in emergencies, such as in the event of a fire. Release the fixed band and then remove the fire extin- guisher. -
Page 303
7-1. Essential information After using the fire extinguisher ■ Store it securely in place. Replace it with a new one as soon as possible. Expiration date ■ The fire extinguisher has an expiration date. It should be replaced with a new one before the expiry date. -
Page 304
However, an emergency hammer can not shatter the windshield as it is lam- inated glass. : Contact your Toyota dealer or aftermarket accessory manufacturer for further information about an emergency hammer. Escaping the vehicle from the window ■… -
Page 305
If your vehicle needs to be towed If towing is necessary, we recommend having your vehicle towed by your Toyota dealer or commercial towing service, using a wheel-lift type truck or flatbed truck. Use a safety chain system for all towing, and abide by all state/ provincial and local laws. -
Page 306
7-2. Steps to take in an emergency Towing with a wheel-lift type truck From the front From the rear KBTE820102 KBTE820103 Use a towing dolly under the rear Use a towing dolly under the wheels. front wheels. Using a flatbed truck If your vehicle is transported by a flatbed truck, it should be tied down at the locations shown in the… -
Page 307
7-2. Steps to take in an emergency Emergency towing If a tow truck is not available in an emergency, your vehicle may be temporarily towed using cables or chains secured to the emergency towing eyelets. This should only be attempted on hard surfaced roads for at most 80 km (50 miles) at under 30 km/h (18 mph). -
Page 308
7-2. Steps to take in an emergency Tighten down the towing eyelet securely using a wheel nut wrench or hard metal bar. KBTE820110 Securely attach cables or chains to the towing eyelet. Take care not to damage the vehicle body. Enter the vehicle being towed and start the engine. -
Page 309
7-2. Steps to take in an emergency WARNING Observe the following precautions. Failure to do so may result in death or serious injury. When towing the vehicle ■ Be sure to transport the vehicle with all four wheels raised off the ground. If the vehicle is towed with the tires contacting the ground, the drivetrain and related parts may be damaged or an accident… -
Page 310
7-2. Steps to take in an emergency If you think something is wrong If you notice any of the following symptoms, your vehicle proba- bly needs adjustment or repair. Contact your Toyota dealer as soon as possible. Visible symptoms ● Fluid leaks under the vehicle (Water dripping from the air conditioning after use is normal) ●… -
Page 311
7-2. Steps to take in an emergency Fuel pump shut off system To minimize the risk of fuel leakage when the engine stalls or when an airbag inflates upon collision, the fuel pump shut off system stops the supply of fuel to the engine. Follow the procedure below to restart the engine after the system is activated. -
Page 312
; or • Malfunction in the brake system. → Immediately stop the vehicle in a safe place and con- tact your Toyota dealer. Continuing to drive the vehi- cle may be dangerous. Charging system warning light Indicates a malfunction in the vehicle’s charging system. -
Page 313
SRS warning light Indicates a malfunction in: • The SRS airbag system; or • The seat belt pretensioner system. → Have the vehicle inspected by your Toyota dealer immediately. ABS warning light Indicates a malfunction in the ABS. → Have the vehicle inspected by your Toyota dealer immediately. -
Page 314
Key-free system indicator Indicates a malfunction in the key-free system (When key-free warning light flashes→ P. 315) → Have the vehicle inspected by your Toyota dealer immediately. Open door warning light Indicates that one or more of the doors is not fully closed. -
Page 315
Toyota dealer. When the light comes on after blinking for 1 minute: Malfunction in the tire pressure warning system → Have the system checked by your Toyota dealer. Parking brake indicator (warning buzzer) Warns the driver to release parking brake. -
Page 316
7-2. Steps to take in an emergency : Rear passenger’s seat belt buzzer The buzzer sounds for about 30 seconds when the passenger unfastens the rear passenger’s seat belt while the vehicle speed is about 5 km/h or more. Once the warning buzzer starts to sound, it will sound for about 30 seconds even if the vehicle speed slows down to about 5 km/h or less. -
Page 317
7-2. Steps to take in an emergency Take immediate action Take action according to the respective countermeasures and check that the key-free warning lamp turns off. Interior Exterior Warning Warning light/Details/Actions buzzer buzzer light Key-free warning light Attempted to start the engine while not car- —… -
Page 318
7-2. Steps to take in an emergency Passenger detection sensor, passenger seat belt reminder and warning ■ buzzer If luggage is placed on the passenger seat, the front passenger detection ● sensor may cause the warning light to flash and the warning buzzer to sound even if a passenger is not sitting in the seat. -
Page 319
If the tire pressure warning light frequently comes on after blinking for 1 ■ minute (vehicles with a tire pressure warning system) If the tire pressure warning light frequently comes on after blinking for 1 min- ute when the engine switch is turned on, have it checked by your Toyota dealer. RUSH_OM_General_OMBZ265… -
Page 320
If both the ABS and the brake system warning lights remain on ■ Stop your vehicle in a safe place immediately and contact your Toyota dealer. The vehicle will become extremely unstable during braking, and the ABS system may fail, which could cause an accident resulting in death or serious injury. -
Page 321
7-2. Steps to take in an emergency If you have a flat tire Your vehicle is equipped with a spare tire. The flat tire can be replaced with the spare tire. For details about tires: →P. 260 WARNING If you have a flat tire ■… -
Page 322
7-2. Steps to take in an emergency Location of the spare tire, jack and tool Location ■ KBTE820401E Tool bag Spare tire Jack Tools ■ KBTE820402 Spanner Wheel nut wrench Extensions Towing eyelet RUSH_OM_General_OMBZ265… -
Page 323
7-2. Steps to take in an emergency WARNING Using the tire jack ■ Observe the following precautions. Improper use of the tire jack may cause the vehicle to suddenly fall off the jack, leading to death or serious injury. Do not use the tire jack for any purpose other than replacing tires. ●… -
Page 324
7-2. Steps to take in an emergency Taking out the jack and tools Move the front left seat to the front most position and pull up the cover. KBTE820403E Turn the jack joint to take out the jack. KBTE820404 Take out the tools. RUSH_OM_General_OMBZ265… -
Page 325
7-2. Steps to take in an emergency Taking out the spare tire Assembling the jack handle. Remove the wheel nut wrench and extensions from the tool bag and assemble by following these steps. Loosen the bolt using a spanner. KBTE820429 Assemble extensions and tighten the bolt. -
Page 326
7-2. Steps to take in an emergency Lower the spare tire until it fully touches the ground, pull out the spare tire and remove the anchor plate. KBTE820427 WARNING Taking out the spare tire ■ Be careful not to allow your hands or legs to touch the exhaust pipe. Since the exhaust pipe is very hot immediately after the driving, your hands or legs may get burnt if you touch the exhaust pipe. -
Page 327
7-2. Steps to take in an emergency Replacing a flat tire Chock the tires. KBTE820408 Flat tire Wheel chock positions Left-hand side Behind the rear right-hand side tire Front Right-hand side Behind the rear left-hand side tire Left-hand side In front of the front right-hand side tire Rear Right-hand side In front of the front left-hand side tire… -
Page 328
7-2. Steps to take in an emergency Assemble extensions and tighten the bolt. Check that the bolts are firmly tightened. KBTE820411 Assemble extensions and the wheel nut wrench. Insert the wheel nut wrench completely. KBTE820412 Turn the tire jack portion “A” by hand until the notch of the jack is in contact with the jack point. -
Page 329
• If there are any cracks or deformations in the bolt screws, nut threads or bolt holes of the wheel, have the vehicle inspected by your Toyota dealer. • When installing the wheel nuts, be sure to install them with the tapered ends facing inward. -
Page 330
7-2. Steps to take in an emergency Installing the spare tire Remove any dirt or foreign mat- ter from the wheel contact sur- face. If foreign matter is on the wheel contact surface, the wheel nuts may loosen while the vehicle is in motion, causing the tire to come off. -
Page 331
7-2. Steps to take in an emergency Firmly tighten each wheel nut two or three times in the order shown in the illustration. Tightening torque: 103 N·m (10.5 kgf·m, 76 ft·lbf) Do not use other tools or any addi- tional leverage other than your hands, such as a hammer, pipe or your foot. -
Page 332
7-2. Steps to take in an emergency When the tire is hoisted up, make sure that the tire is securely fixed. Rock the tire up and down. Turn the tire around. Confirm directly with your eyes that the tire is not interfering with any surrounding parts. -
Page 333
When replacing the tires (vehicles with a tire pressure warning system) ■ When removing or fitting the wheels, tires or the tire pressure warning valve and transmitter, contact your Toyota dealer as the tire pressure warning valve and transmitter may be damaged if not handled correctly. RUSH_OM_General_OMBZ265… -
Page 334
● One or both of the battery terminals may be disconnected. ● The battery may be discharged. (→P. 336) ● There may be a malfunction in the steering lock system. Contact your Toyota dealer, if the problem cannot be repaired, or if repair procedures are unknown. RUSH_OM_General_OMBZ265… -
Page 335
7-2. Steps to take in an emergency If the electronic key does not operate properly If communication between the electronic key and vehicle is interrupted (→P. 106) or the electronic key cannot be used because the battery is depleted, the key-free system and wire- less remote control cannot be used. -
Page 336
Touch the brand logo mark side of the electronic key to the engine switch. The engine switch indicator light (green) will turn on. KBTE821002E Press the engine switch. In the event that the engine still cannot be started, contact your Toyota dealer. RUSH_OM_General_OMBZ265… -
Page 337
7-2. Steps to take in an emergency Stopping the engine ■ Automatic transmission Shift the shift lever to P and press the engine switch as you normally do when stopping the engine. Manual transmission Shift the shift lever to N and press the engine switch as you normally do when stopping the engine. -
Page 338
The following procedures may be used to start the engine if the vehicle’s battery is discharged. You can also call your Toyota dealer or a qualified repair shop. If you have a set of jumper (or booster) cables and a second vehicle with a 12-volt battery, you can jump start your vehicle by following the steps below. -
Page 339
Once the vehicle’s engine has started, remove the jumper cables in the exact reverse order from which they were connected. Once the engine starts, have the vehicle inspected at your Toyota dealer as soon as possible. Starting the engine when the battery is discharged (vehicles with an ■… -
Page 340
7-2. Steps to take in an emergency WARNING Avoiding battery fires or explosions ■ Observe the following precautions to prevent accidentally igniting the flam- mable gas that may be emitted from the battery: Make sure each jumper cable is connected to the correct terminal and that ●… -
Page 341
(radia- tor) for any leaks. Radiator Cooling fan If a large amount of coolant leaks, immediately contact your Toyota KBTE820801E dealer. The coolant level is satisfactory if it is between the “FULL” and “LOW” lines on the reservoir. -
Page 342
(The fan may not operate in freezing temperatures.) If the fan is not operating: Stop the engine immediately and contact your Toyota dealer. If the fan is operating: Have the vehicle inspected at the nearest Toyota dealer. -
Page 343
7-2. Steps to take in an emergency NOTICE When adding engine coolant ■ Wait until the engine has cooled down before adding engine coolant. When adding coolant, do so slowly. Adding cool coolant to a hot engine too quickly can cause damage to the engine. To prevent damage to the cooling system ■… -
Page 344
7-2. Steps to take in an emergency If the vehicle becomes stuck Carry out the following procedures if the tires spin or the vehicle becomes stuck in mud, dirt or snow: Stop the engine. Set the parking brake and shift the shift lever to P (automatic transmission) or N (manual transmission). -
Page 345
Vehicle specifications 8-1. Specifications Maintenance data (fuel, oil level, etc.)…344 Fuel information ….355 8-2. Customization Customizable features ..356 8-3. Items to initialize Items to initialize ….361 RUSH_OM_General_OMBZ265… -
Page 346
8-1. Specifications Maintenance data (fuel, oil level, etc.) Dimensions Overall length 4435 mm (174.6 in.) Overall width 1695 mm (66.7 in.) Overall height 1705 mm (67.1 in.) Wheelbase 2685 mm (105.7 in.) Front 1445 mm (56.9 in.) Tread Rear 1460 mm (57.5 in.) * : Unladen vehicles RUSH_OM_General_OMBZ265… -
Page 347
8-1. Specifications Vehicle identification Vehicle identification number ■ The vehicle identification number (VIN) is the legal identifier for your vehicle. This is the primary identification number for your Toy- ota. It is used in registering the ownership of your vehicle. This number is stamped in the engine compartment. -
Page 348
8-1. Specifications For G.C.C. countries , Repub- lics of Yemen, Republic of Leb- anon, Hashemite Kingdom of Jordan and Republic of Iraq: This number is also on the Cer- tification Regulation plate. KBTE910107E : Saudi Arabia, Sultanate of Oman, Bahrain, United Arab Emirates, Qatar, Kuwait Year of manufacture and country of origin (G.C.C. -
Page 349
8-1. Specifications Engine Model 2NR-VE Type 4-cylinder in line, 4-cycle, gasoline 72.5 × 90.6 mm (2.85 × 3.57 in.) Bore and stroke Displacement 1496 cm (91.3 cu.in.) Valve clearance Automatic adjustment (engine cold) Drive belt tension Automatic adjustment Vehicles with an automatic transmission … -
Page 350
Engine oil selection ■ “Toyota Genuine Motor Oil” is used in your Toyota vehicle. Use Toyota approved “Toyota Genuine Motor Oil” or equivalent to satisfy the following grade and viscosity. Oil grade: 0W-20, 5W-30 and 10W-30: API grade SL “Energy-Conserving”, SM “Energy-Conserving”… -
Page 351
8-1. Specifications How to read oil container labels: Either or both API registered marks are added to some oil contain- ers to help you select the oil you should use. API Service Symbol Top portion: “API SERVICE SN” means the oil quality designa- tion by American Petroleum Institute (API). -
Page 352
5.5 L (5.8 qt., 4.8 Imp.qt.) 6.1 L (6.4 qt., 5.4 Imp.qt.) 5.2 L (5.5 qt., 4.6 Imp.qt.) Use either of the following: • “Toyota Super Long Life Coolant” • A similar high-quality ethylene glycol-based Coolant type non-silicate, non-amine, non-nitrite, and non-… -
Page 353
: The fluid capacity is a reference quantity. If replacement is necessary, con- tact your Toyota dealer. NOTICE Automatic transmission fluid type ■ Using automatic transmission fluid other than “Toyota Genuine ATF type T-IV” may cause malfunction. Manual transmission Gear oil capacity 1.08 L (1.14 qt., 0.95 Imp.qt.) -
Page 354
8-1. Specifications Clutch Pedal free play 1.0 — 8.0 mm (0.04 — 0.31 in.) Fluid type SAE J1703 or FMVSS No. 116 DOT 3 Brakes Vehicles with an automatic transmission 94 mm (3.7 in.) Pedal clearance Vehicles with a manual transmission … -
Page 355
8-1. Specifications Tires and wheels Brand name DUNLOP (P.T. SUMI RUBBER INDONESIA) Tire size 215/65R16 98S Front wheel Rear wheel Tire inflation pressure kPa (kgf/cm or bar, psi) kPa (kgf/cm or bar, psi) (Recommended cold tire inflation pressure) 240 (2.4, 34) 260 (2.6, 38) Wheel size 16 ×… -
Page 356
8-1. Specifications Light bulbs Light Bulbs Type Front turn signal lights Front fog lights Exterior Rear turn signal lights License plate lights Back-up lights Vanity lights Front interior light Interior Rear interior light Luggage compartment light A: Wedge base bulbs (clear) B: Wedge base bulbs (amber) C: Double end bulbs D: H16 halogen bulbs… -
Page 357
Use of ethanol blended gasoline in a gasoline engine ■ Toyota allows the use of ethanol blended gasoline where the ethanol content is up to 10%. Make sure that the ethanol blended gasoline to be used has a Research Octane Number that follows the above. -
Page 358
Your vehicle includes a variety of electronic features that can be personalized to suit your preferences. Programming these pref- erences requires specialized equipment and may be performed by your Toyota dealer. Customizing vehicle features When customizing vehicle features, ensure that the vehicle is parked in a safe place with the shift lever in P (automatic transmission) or N (manual transmission) and the parking brake set. -
Page 359
8-2. Customization Automatic door locking systems can be changed with the following procedures. Turn the front position lights off. Turn the engine switch to off. Close any of the doors. Move the inside lock knob on the driver’s door to the lock posi- tion. -
Page 360
Settings that can be changed using the multi-information display Settings that can be changed using the inside lock knob Settings that can be changed by your Toyota dealer for further details Definition of symbols: O = Available, — = Not available Key-free system (→P. -
Page 361
8-2. Customization Back door (→P. 115) ■ Default Customized Function setting setting Operation switch on the right Lock only Lock and unlock — — side of the back door Illumination (→P. 210) ■ Default Customized Function setting setting Time elapsed before the inte- Long Short —… -
Page 362
8-2. Customization Alarm (→P. 75) ■ Default Customized Function setting setting Emergency Alarm operation flashers and — Emergency sound flashers Rear window wiper and washer (→P. 174) ■ Default Customized Function setting setting Reverse gear-linked function — — Fast Time of the intermittent opera- Normal —… -
Page 363
8-3. Items to initialize Items to initialize The following item must be initialized for normal system opera- tion after such cases as the battery is reconnected, or mainte- nance is performed on the vehicle. Item When to initialize Reference • When rotating front and Tire pressure warn- rear tires which have differ- ing system… -
Page 364
8-3. Items to initialize RUSH_OM_General_OMBZ265… -
Page 365
Index What to do if… (Troubleshooting) …..364 Alphabetical index ……367 RUSH_OM_General_OMBZ265… -
Page 366
Toyota dealer. (→P. 93) ● If you lose your electronic keys, the risk of vehicle theft increases signifi- cantly. Contact your Toyota dealer immediately. (→P. 101) The doors cannot be locked or unlocked ● Is the key battery weak or depleted? (→P. 276) ●… -
Page 367
What to do if… (Troubleshooting) If you think something is wrong The engine does not start Did you press the engine switch while firmly depressing the brake pedal ● (vehicles with automatic transmission) or the clutch pedal (vehicles with manual transmission)? (→P. 154) ●… -
Page 368
What to do if… (Troubleshooting) A warning buzzer sounds during driving ● The seat belt reminder light is flashing Are the driver and the passenger wearing the seat belts? (→P. 312) ● The parking brake indicator is on Is the parking brake released? (→P. 313) Depending on the situation, other types of warning buzzer may also sound. -
Page 369
Alphabetical index Alphabetical index Alarm Alarm ……..75 A/C……..194, 198 Warning buzzer….. 310 Front air conditioning Anchor brackets ……72 system ……194, 198 Antenna Rear cooler system ….205 Key-free function….103 ABS (Anti-lock Brake Anti-lock Brake System System) …….. -
Page 370
Alphabetical index Coolant ……..252 Capacity…….. 350 Care……..220, 223 Checking……. 252 Aluminum wheels….221 Preparing and checking Exterior……..220 before winter……. 189 Interior……..223 Cooling system……252 Seat belts ……224 Engine overheating….339 Child restraint system ….49 CRS (Child Restraint Fixed with a seat belt …. -
Page 371
Alphabetical index Driver’s seat belt reminder If your vehicle needs to be towed……..303 light……… 312 If your vehicle overheats..339 Driving ……..144 Break-in tips ……146 Engine Correct driving posture…. 30 ACCESSORY mode ….. 156 Procedures……144 Compartment ……249 Winter drive tips …. -
Page 372
Alphabetical index Gas station information ..380 Fire extinguisher…… 300 Flat tire……..319 Gauges ……..84 Floor mats ……..28 Glove box ……… 212 Fluid Automatic transmission..351 Brake……..352 Hazard lights Clutch……..352 Switch ……..298 Washer……..257 Head restraints ……127 Fog lights…….. -
Page 373
Alphabetical index Jack handle ……320 Light bulbs Replacing……281 Jam protection function Wattage …….. 354 Power window……. 139 Lights Fog light switch ….. 170 Headlight switch….167 Key-free system ……. 102 Illuminated entry system ..210 Antenna location ….103 Interior light …… -
Page 374
Alphabetical index Radiator ……..254 Odometer……..86 Rear fog light ……170 Engine oil ……347 Switch ……..170 Manual transmission oil ..351 Rear passengers’ seat belt Opener reminder lights …… 312 Back door……115 Rear seat ……..123 Fuel filler door ……. -
Page 375
Alphabetical index Shift lever ……161, 164 Automatic transmission..161 Scheduled maintenance..229 If the shift lever cannot Seat arrangement be shifted from P ….162 Expanding the luggage Manual transmission….. 164 space ……..129 Shift lock system ….. 162 Flattening the seats…. -
Page 376
Alphabetical index Switches Audio remote control Tachometer …….. 84 switches……207 Tail lights……..167 Door lock switches ….112 Light switch ……167 Emergency flashers switch … 298 Talk switch ……. 207 Engine switch……154 Theft deterrent system Fog light switch ….. 170 Alarm …….. -
Page 377
Alphabetical index Tools ……… 320 Top strap ……..72 Vanity lights ……215 Towing Vanity lights ……215 Emergency towing ….303 Wattage …….. 354 Towing eyelet……305 Vanity mirrors ……215 Transmission ….161, 164 Vehicle data recordings ….7 Automatic transmission.. -
Page 378
Alphabetical index Washer……172, 174 Checking ……. 257 Preparing and checking before winter……. 189 Switch ……172, 174 Washing and waxing ….220 Wheels ……..274 Replacing ……274 Size ……..353 Window glasses……. 139 Window lock switch….139 Windows ……..139 Power windows ….. -
Page 379
Alphabetical index RUSH_OM_General_OMBZ265… -
Page 380
Alphabetical index RUSH_OM_General_OMBZ265… -
Page 381
Alphabetical index RUSH_OM_General_OMBZ265… -
Page 382
GAS STATION INFORMATION Fuel filler door Auxiliary catch lever P. 176 P. 246 KBTEI30001 Hood lock release Tire inflation pressure Fuel filler door opener knob P. 353 P. 176 P. 246 Fuel tank capacity 45 L (11.9 gal., 9.9 Imp.gal.) (Reference) Fuel type P.
2. Эксплуатация автомобиля
В данном положении ключ вставляется и вынимается из замка зажигания. Если ключ не удается повернуть из этого положения, повторите попытку, слегка поворачивая рулевое колесо вправо-влево.
Внимание
Не устанавливайте ключ в положение LOCK (ЗАМОК) во время движения автомобиля. В этом случае он может быть легко и непреднамеренно вынут, что приведет к блокировке рулевого управления и аварии.
Не оставляйте ключ в пустом автомобиле или в автомобиле, где находятся только дети. При случайном повороте ключ а из положения LOCK (ЗАМОК) автомобиль или электрооборудование могут неожиданно включиться.
В данном положении (АСС) ключа зажигания можно пользоваться, не запуская двигателя, вспомогательным оборудованием (радиоприемником и т.д.)
При данном положении ключа (ON) двигатель работает.
Внимание
Не оставляйте ключ зажигания в данном положении при неработающем двигателе. Это может привести к полному разряду аккумуляторной батареи.
При данном положении ключа (START) двигатель запускается. После запуска двигателя, отпустите ключ зажигания, и он автоматически вернется в положение ON (ВКЛ).
Зуммер подает сигнал при отпирании дверей ключом зажигания в позиции АСС или LOCK, предупреждая о том, что нужно вытянуть ключ.
Многофункциональный переключатель
Для включения фар поверните ручку многофункционального переключателя.
| Положение переключателя | 1-е | 2-е |
| Свет Фары | Выкл. | Вкл. |
| Габаритные фонари | Вкл. | Вкл. |
| Задние фонари | Вкл. | Вкл. |
| Подсветка номерного знака | Вкл. | Вкл. |
| Подсветка панели приборов | Вкл. | Вкл. |
Включение/выключение дальнего света
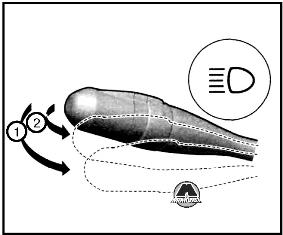
Для включения дальнего света нажмите при включенных фарах рычаг переключения вперед, а для перехода на ближний свет — оттяните его назад. При включении дальнего света на панели приборов загорается соответствующая индикаторная лампа.
Потяните рычаг переключателя на себя и отпустите его. Мигание фарами возможно как при включенных, так и при выключенных фарах.
Переключатель указателя поворота
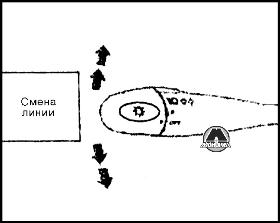
Сигнальные лампы указателей поворотов работают в мигающем режиме при ключе зажигания, повернутом в положение ON (BKJ1). Для подачи сигнала о повороте переместите рычаг многофункционального переключателя вверх или вниз. На панели приборов начинают мигать соответствующие индикаторные лампы. Вы также можете подавать сигнал об изменении полосы движения, слегка переместив рычаг и удерживая его в этом положении.
Примечание:
Мигание индикаторных ламп с большей, чем обычно, частотой может свидетельствовать о перегорании лампочки.
Зуммер уведомления о включенных осветительных приборах
Если при открывании двери выключатель зажигания установлен в положение LOCК (ЗАМОК) или АСС (АКК), и осветительные приборы остаются включенными, раздается звук зуммера, уведомляющего Вас о том, что осветительные приборы еще включены.
Выключатель аварийной сигнализации
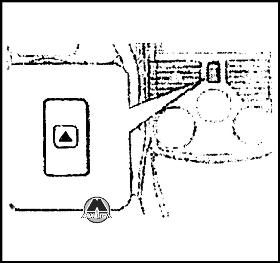
Для включения всех мигающих сигналов поворота нажмите на выключатель. Световой индикатор на панели приборов начинает мигать. Для включения сигнализации нажмите на выключатель еще раз. При включенной сигнализации переключатель указателей поворота не работает. Пользуйтесь данным выключателем только в аварийных ситуациях.
внимание
Для предотвращения аварии съезжайте в аварийных ситуациях с дороги.
Переключатели стеклоочистителей и смывателей
Внимание
Перед тем, как включить омыватель в холодную погоду, прогрейте стекло при помощи отопителя или обогревателя. Это позволит избежать обледенения, которое может затруднить Вам видимость и привести к аварии.
Изношенные или грязные щетки очистителей могут снизить видимость.
Поддерживайте щетки очистителей в исправном состоянии и при необходимости заменяйте их.
Во избежание повреждения лакокрасочного покрытия не используйте охлаждающую жидкость двигателя для заправки бачков омывателей.
Не включайте стеклоочистители, когда стекло покрыто снегом, льдом или когда стекло сухое: Вы можете повредить щетки очистителей.
Не включайте омыватель при пустом бачке омывателя: это может вывести из строя двигатель омывателя.
Переключатель очистителя и омывателя лобового стекла
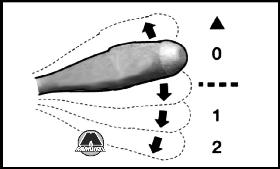
▲ — Включение очистителя ветрового стекла на один цикл
0 — Выключение очистителя ветрового стекла
— Скорость работы стеклоочистителя, зависит от скорости автомобиля
1 — Низкая скорость работы очистителя ветрового стекла
2 — Высокая скорость работы очистителя.
Очиститель и омыватель работают при установке ключа зажигания в положение ON (ВКЛ). Для включения очистителя нажмите на рычаг переключателя очистителя вниз. В том случае, если переключатель очистителя установлен в положение INT (ПРЕР), очиститель работает с перерывами. Для включения омывателя потяните рычаг переключателя на себя.
Переключатель очистителя и омывателя заднего стекла

Очиститель и омыватель работают при установке ключа зажигания в положение ON (ВКЛ) Очиститель заднего стекла работает при установке рычага очистителя в позицию ON (ВКЛ). Для подачи промывочной жидкости во время работы очистителя заднего стекла, поверните рычаг с позиции ON (ВКЛ) в позиции. 1, находящуюся выше позиции ON (ВКЛ). Кроме того, промывочная жидкость может поступать также при установке рычага из позиции OFF (ВЫКЛ,) в позицию 2, находящуюся ниже позиции OFF (ВЫКЛ).
Выключатель обогрева заднего стекла

Обогреватель заднего стекла работает при установке ключа зажигания в положение ОМ (ВКЛ.) Для того, чтобы удалить запотевание заднего стекла, нажмите на выключатель его обогревателя. О работе обогревателя свидетельствует загорание соответствующей индикаторной лампы. Обогреватель не предназначен для растапливания снега или высушивания капель дождя. При установке многофункционального переключателя в положение 1 или 2 выключатель подсвечивается. Заднее стекло подогревается, а также одновременно подогреваются наружные зеркала.
Внимание
Во избежание разрядки батарей выключайте обогреватель заднего стекла, когда запотевание удалено со стекла.
Выключатель противообледенителя ветрового стекла
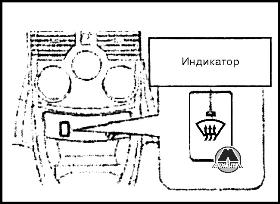
Противообледенитель работает при установке ключа зажигания в положение ON (ВКЛ). Нажмите на выключатель противообледенителя если нужно удалить запотевание ветрового стекла. При работающем противообледенителе горит его индикаторная лампа. При установке многофункционального переключателя в положение 1 или 2 выключатель подсвечивается.
Примечание:
Противообледенитель работает на протяжении 15 минут после его включения.
Выключатель противотуманных фар
1. Автомобилей, оборудованные только передними противотуманными фарами.
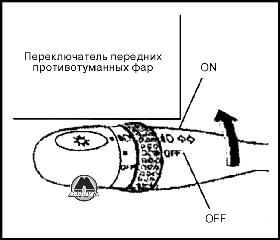
Передние фары работают при установке многофункционального переключателя в положение 1 или 2 и при установке ключа зажигания в положение ON (ВКЛ).
Примечание:
Если многофункциональный переключатель установить в позицию OFF во время свечения фар — они погаснут.
2. Автомобилей, оборудованные только задними противотуманными фарами.
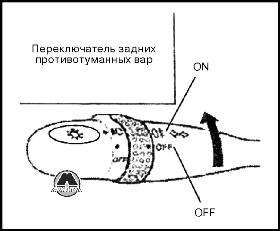
Задние противотуманные огни могут включаться при установке многофункционального переключателя в положение 1 или 2 и при положении ON (ВКЛ) ключа зажигания. При включении задних противотуманных фар загорается соответствующая индикаторная лампа.
Примечание:
При включенных задних противотуманных фар, даже при установке выключателя в 1 позицию, задние фары будут продолжать гореть. При установке многофункционального переключателя в позицию OFF (ВЫКЛ.) огни погаснут. Выключатель возвратится в позицию OFF (ВЫКЛ.)
Для того, чтобы снова включить задние противотуманные фары, нужно установить выключатель задних противотуманных фар в позицию ON (ВКЛ).
3. Автомобилей, оборудованные передними и задними противотуманными фарами
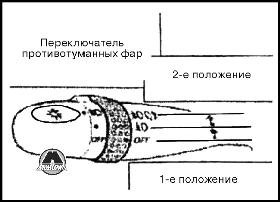
Для включения противотуманных фар, поверните выключатель согласно нижеприведенной таблице.
| Положение | 1-е положение | 2-е положение |
| Передние | ON | ON |
| Задние | OFF | ON |
Передние противотуманные фары включаются, когда многофункциональный переключатель установлен в позицию 1 и выключатель передних противотуманных фар установлен в позицию 1.
Задние противотуманные фары включаются, когда многофункциональный переключатель установлен в позицию 2, также выключаются и передние противотуманные фары. При включенных задних противотуманных фарах работает подсветка индикаторной лампы.
Примечание:
При горящих задних противотуманных фарах, даже при установке выключателя в 1 позицию, задние фары будут продолжать гореть.
При установке многофункционального переключателя, в позицию OFF, передние и задние противотуманные фары выключатся.
Для повторного включения задних противотуманных фар, поверните выключатель во 2-ю позицию.
Контрольные предупредительные лампы
Контрольные лампы указывают на ненормальную работу соответствующих систем.
ВНИМАНИЕ
При необходимости остановить двигатель или автомобиль из-за неисправности какой-либо из систем отведите автомобиль в безопасное место на обочине дороги. Заглушите двигатель и включите аварийную световую сигнализацию.
Во избежание ожогов дайте двигателю остыть перед тем, как приступить к проверке узлов в моторном отсеке.
Во избежание серьезных телесных повреждений не прикасайтесь руками к движущимся деталям в моторном отсеке, избегайте попадания в них одежды и иных предметов.
Проверка всех контрольных ламп
1. Установите автомобиль на стояночный тормоз.
2. Поверните ключ зажигания в положение ON (ВКЛ), но не запускайте двигатель. Все контрольные лампы должны загореться. Контрольная лампа АБС (антиблокировочной системы тормозов) выключается через несколько секунд. Контрольная лампа воздушных подушек выключается через 6 секунд.
3. После запуска двигателя и опускания рычага стояночного тормоза контрольные лампы должны погаснуть. В случае, если какая-либо контрольная лампа не работает, незамедлительно обратитесь для проверки к дилеру компании Daihatsu.
Контрольная лампа аварийного состояния тормозов
Контрольная лампа аварийного состояния тормозов загорается при постановке автомобиля на стояночный тормоз, а также в случае, когда уровень тормозной жидкости в компенсационном бачке приближается при работающем двигателе к отметке MIN (МИН). При необходимости долейте тормозной жидкости и убедитесь в отсутствии ее подтекания. Если контрольная лампа горит, включение тормозной системы может потребовать повышенных усилий, а тормозной путь автомобиля — возрасти.
Контрольная лампа аварийного состояния тормозов также используется для системы EBD (электронная система распределения тормозного усилия). При неисправности системы EBD. При нормальных рабочих условиях , при ключе зажигания в положении ON (ВКЛ) и включенном стояночном тормозе — контрольная лампа горит. При отпущенном стояночном тормозе и включенном двигателе — лампа погаснет.
Внимание
Не пользуйтесь автомобилем, если данная контрольная лампа горит. Это может привести к аварии. Немедленно обратитесь для проверки тормозов к уполномоченному дилеру компании Daihatsu.
Если контрольная лампа не гаснет после снятия парковочного тормоза или горит даже во время езды, вероятнее всего, уровень тормозной жидкости является недостаточным, что может привести к плохому торможению автомобиля. При снижении эффективности торможения немедленно припаркуйте Ваш автомобиль в безопасном месте сильно нажав на педаль тормоза.
В случае, если сразу обе контрольные лампы тормозной системы и системы АБС загораются и не гаснут, есть возможность резкого падения тормозного усилия. Немедленно остановите Ваш автомобиль в безопасности месте и свяжитесь с дилером компании Daihatsu.
Примечание:
Если Вы заметили ненормальный звук (визжание и т.н.) при торможении, вероятнее всего педаль тормоза износилась. Немедленно дайте проверить Ваш автомобиль дилеру компании Daihatsu.
Контрольная лампа недостаточного давления масла
Данная контрольная лампа загорается во время работы двигателя при неисправностях в системе смазки.
ВНИМАНИЕ
Если загорается данная контрольная лампа, остановите двигатель. В противном случае двигатель может быть серьезно поврежден. Немедленно обратитесь для проверки к дилеру компании Daihatsu.
Контрольная лампа заряда аккумуляторной батареи
Данная контрольная лампа загорается во время работы двигателя при неисправностях в системе зарядки. Выключите все потребители тока и двигатель. Убедитесь в правильном натяжении и отсутствии обрыва приводного ремня.
ВНИМАНИЕ
Перед тем, как приступить к проверке или регулировке приводного ремня, остановите двигатель и дайте ему остыть. Невыполнение данной рекомендации может привести к серьезным телесным повреждениям.
Не пользуйтесь автомобилем, если натяжение приводного ремня ослабло или ремень оборван. Это может привести к перегреву двигателя. Немедленно обратитесь для проверки системы к дилеру компании Daihatsu.
Контрольная лампа проверки двигателя
Данная контрольная лампа загорается во время работы двигателя при неисправностях в системе электронного управления двигателем.
внимание
Если загорается данная контрольная лампа, немедленно обратитесь для проверки автомобиля к дилеру компании Daihatsu.
Контрольная лампа АБС (антиблокировочной системы тормозов)
Если система работает нормально данная контрольная лампа загорается при включении зажигания и гаснет через несколько секунд после этого. О возможной неисправности в работе антиблокировочной системы тормозов и системы стабилизации движения может свидетельствовать следующее:
— При повороте ключа в положение ON (ВКЛ.) контрольная лампа не загорается или остается все время зажженной. Немедленно дайте проверить Ваш автомобиль дилеру компании Daihatsu.
— Погаснув, контрольная лампа вновь зажигается.
— Контрольная лампа горит во время движения.
Внимание
В случае, если сразу обе контрольные лампы тормозной системы и системы АБС загораются и не гаснут, есть возможность резкого падения тормозного усилия. Немедленно остановите Ваш автомобиль в безопасном месте и свяжитесь с дилером компании Daihatsu.
В случае, если сразу обе контрольные лампы тормозной системы и системы АБС загораются и не гаснут — возможна неисправность в АБС. Кроме этого есть возможность неустойчивого движения автомобиля при применении тормозных усилий. Немедленно остановите Ваш автомобиль в безопасном месте и свяжитесь с дилером компании Daihatsu.Примечание:
Даже при нормальной на Ваш взгляд работе тормозной системы в случае, если контрольная лампа (тормозная система это не одно и то же что и АБС) продолжает гореть после запуска двигателя или его работы на протяжении какого-то времени немедленно дайте ваш автомобиль на проверку дилеру компании Daihatsu.
Система работает нормально, если после запуска двигателя контрольная лампа горит еще несколько секунд, а потом гаснет и во время движения автомобиля не загорается.
Контрольная лампа ремня безопасности
Если ремень безопасности на сиденье водителя остается не застегнутым, загорается соответствующая контрольная лампа, которая продолжает гореть до тех пор, пока ремень не будет застегнут.
Контрольный зуммер ремня безопасности
Если при движении автомобиля со скоростью 20 км/час или более мигает контрольная лампа — зуммер на протяжении двух минут будет издавать сигнал, свидетельствующий о том, что ремни безопасности не пристегнуты.
Контрольная лампа воздушных подушек и шторок безопасности
Контрольная лампа загорается в случае обнаружения неисправности в системе и предупреждает об этом водителя. При нормальной работе системы контрольная лампа горит в течение 6 секунд после поворота ключа зажигания в положение ON (ВКЛ), а затем гаснет.
ВНИМАНИЕ
При появлении следующих условий немедленно дайте проверить автомобиль дилеру компании Daihatsu:
— Контрольная лампа не гаснет после поворота ключа зажигания в положение ON (ВКЛ).
— Контрольная лампа продолжает гореть во время работы двигателя, я Контрольная лампа продолжает гореть дольше чем 6 секунд после поворота ключа зажигания в положение ON (ВКЛ).
— Контрольная лампа продолжает мигать дольше, чем 6 секунд после поворота ключа зажигания в положение ON (ВКЛ).
Контрольная лампа уровня топлива
Лампа загорается, если уровень топлива — 7,5 л или ниже при ключе зажигания в положении (Ж (ВКЛ). В этом случае немедленно долейте топлива.
Примечание:
Когда вы движетесь по склону и поворачиваете — топливо перемещается поэтому это может также быть причиной загорания лампы. В данном случае, долейте топлива.
Контрольная лампа температуры охлаждающей жидкости
Контрольная лампа загорается при установке ключа зажигания в положение ON (ВКЛ) и гаснет через несколько секунд. Лампа начинает мигать, если температура охлаждающей жидкости чрезмерно повышается и затем горит постоянно.
Внимание
Остановите автомобиль при мигающей контрольной лампе.
Контрольная лампа VSC (система курсовой устойчивости)
При нормальной работе системы контрольная лампа загорается при установке ключа зажигания в положение ON (ВКЛ) и гаснет через несколько секунд. Следующие случаи говорят о неисправности в системе VSC (система курсовой устойчивости) или ВАС (электронная система помощи при спуске по склону). Дайте проверить автомобиль дилеру компании Daihatsu:
— Контрольная лампа не гаснет после поворота ключа зажигания в положение ON (ВКЛ).
— Лампа гаснет, но потом опять начинает гореть.
Лампа продолжает гореть во время движения автомобиля.
Индикаторная лампа температуры охлаждающей жидкости
Лампа загорается при низкой температуре охлаждающей жидкости при установке ключа зажигания в положение ON (ВКЛ).
Индикаторная лампа БАС (электронная система помощи при спуске по склону)
При нормальной работе системы контрольная лампа загорается при установке ключа зажигания в положение ON (ВКЛ) и гаснет через несколько секунд. При включенной системе БАС индикатор горит. Индикатор мигает в случаях, если выключатель находится во включенном положении:
— Если рычаг переключения передачи находится в другом положении кроме положений L и R.
— Если скорость автомобиля превышает 25 км/час (16 миль/час)/
— При частом использовании системы БАС.
— При отключении системы РАС.
При нормальной работе системы: контрольная лампа загорается при установке ключа зажигания в положение ON (ВКЛ) и гаснет через несколько секунд. Следующие условия говорят о том, что система DAC неисправна. Дайте проверить автомобиль дилеру компании Daihatsu.
— Контрольная лампа продолжает гореть после поворота ключа зажигания в положение ON (ВКЛ).
При повышении температуры в тормозном приводе из-за частого использования системы DAC — звучит прерывистый сигнал зуммера.
Внимание
Если мигает индикаторная лампа и звучит прерывистый сигнал зуммера немедленно остановите автомобиль в безопасном месте. Через некоторое время, система DAC придет в состояние готовности, прекратится сигнал зуммера и индикаторная лампа перейдет из мигающего режима в режим подсветки. При этом возможно обычное движение автомобиля. Если сигнал зуммера не прекращается, дайте проверить Ваш автомобиль дилеру компании Daihatsu.
Индикаторная лампа ОЕР (выключения) воздушных подушек безопасности
При нормальной работе системы контрольная лампа загорается при установке ключа зажигания в положение ON (ВКЛ) и гаснет через несколько секунд. При ручном выключении переключателя воздушных подушек безопасности, индикаторная лампа продолжает гореть.
Внимание
При появлении следующих условий, немедленно дайте проверить Ваш автомобиль дилеру компании Daihatsu, а Контрольная лампа не гаснет после поворота ключа зажигания в положение ON (ВКЛ).
Контрольная лампа продолжает гореть во время работы двигателя, хотя выключатель находится в положении ВКЛ.
Контрольная лампа не горит, выключатель находится в положении ВЫКЛ.
Индикаторная лампа OFF (выключения) системы VSC
При нормальной работе системы контрольная лампа загорается при установке ключа зажигания в положение ON (ВКЛ) и гаснет через несколько секунд. При выключении системы VSC (включена блокировка центрального дифференциала), индикаторная лампа горит.
Индикаторная лампа скольжения
При нормальной работе системы контрольная лампа загорается при установке ключа зажигания в положение ON (ВКЛ) и гаснет через несколько секунд. Индикаторная лампа горит при выключенной противобуксовочной системе или включенной блокировке центрального дифференциала. Лампа мигает при включении следующих систем:
— VSC (система курсовой устойчивости автомобиля).
— Противобуксовочная система.
— Электронная система помощи при спуске со склона.
— Система помощи при подъеме по склону.
Следующие условия свидетельствуют о неисправности системы VSC. Дайте проверить Ваш автомобиль дилеру компании Daihatsu.
При скольжении автомобиля в сторону звучит прерывистый сигнал зуммера.
— В зависимости от условий вождения, сигнал подается только посредством мигания лампы.
Индикаторная лампа O/D OFF (П/П ВЫКЛ)
Данная индикаторная лампа загорается при переводе выключателя повышающей передачи в положение OFF (ВЫКЛ.)
Внимание
Мигание лампы O/D OFF во время движения автомобиля свидетельствует о поломке. Дайте проверить коробку передач Вашего автомобиля дилеру компании Daihatsu.
Индикаторная лампа дальнего света
Данная индикаторная лампа загорается при включении дальнего света фар и при мигании дальним светом.
Индикаторная лампа задних фонарей
Данная индикаторная лампа загорается при установке многофункционального переключателя в 1-ю или 2-ю позицию.
Индикатор безопасности движения автомобиля
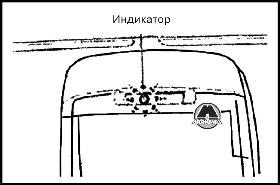
Индикатор мигает при вынимании ключа зажигания. Также, при повороте ключа из положения ON (ВКЛ) в положение АСС (АКК) или LOCK (ЗАМОК), по прошествии 30 секунд индикатор начинает мигать.
Индикаторная лампа включения задних противотуманных огней
Индикаторная лампа включения задних противотуманных огней загорается при включении задних противотуманных огней.
Индикаторная лампа блокировки центрального дифференциала
Зажженное состояние данной индикаторной лампы свидетельствует о том, что автомобиль работает в режиме с заблокированным центральным дифференциалом. Лампа загорается при установке выключателя механизма блокировки центрального дифференциала в положение ON (ВКЛ), если ключ зажигания повернут в положение ON (ВКЛ).
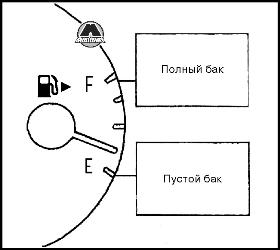
Указатель уровня топлива всегда указывает приблизительное количество топлива в топливном баке.
Внимание
Не пользуйтесь автомобилем, если указатель уровня топлива находится ниже линии пустого бака. Это может привести к перебоям в зажигании двигателя и повредить каталитический преобразователь. Более того, остановка двигателя или перебои в зажигании у находящегося в движении автомобиля могут привести к аварии.
Спидометр, одометр, счетчик пробега
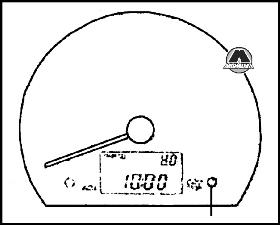
Счетчик пробега работает в двух режимах: А и В. для переустановки счетчика на О, удерживайте кнопку счетчика нажатой в течение 3 секунд.
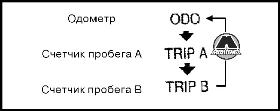
Тахометр служит для указания количества оборотов коленчатого вала двигателя в минуту. Нахождение стрелки в красном секторе означает работу двигателя с превышением допустимого числа оборотов.
Внимание
Во избежание повреждения двигателя не используйте его в режиме превышения допустимого числа оборотов коленчатого вала.
Многофункциональным дисплей
При нажатии переключателя меняется содержание на дисплее Автоматическое переключение в режим часов Дисплей автоматически возвращается в данный режим при отсутствии переключений в иные режимы.
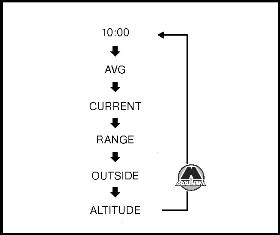
AVG (среднее потребление топлива) CURRENT (текущее потребление топлива)
RANGE (запланированный радиус движения)
OUTSIDE (внешняя температура воздуха)
ALTITUDE (высота)
1. Нажмите переключатель и держите нажатым до появления ON или OFF. Отпустите переключатель. На дисплее отобразится выбранный режим ON или OFF.
2. Каждый раз при нажатии переключателя режим меняется с ON на OFF и наоборот.
3. Дисплей автоматически возвращается в предыдущий режим при отсутствии переключений в иные режимы.
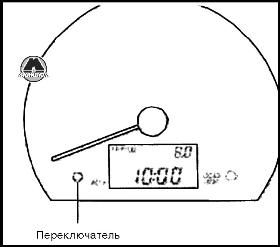
1. Нажмите на кнопку переключателя настроек. На дисплее появится режим настройки часов HOUR (ЧАСЫ).
2. При каждом новом нажатии на кнопку переключателя настройки значение часа увеличивается на одну единицу.
3. Нажмите на кнопку селекторного переключателя. На дисплее появится режим MINUTE (МИНУТА).
4. При каждом новом нажатии на кнопку переключателя настройки значение минут увеличивается на одну единицу.
5. Нажмите на кнопку селекторного переключателя. На дисплее появится режим переустановки секунд SECOND (СЕКУНДА).
6. При нажатии на кнопку переключателя настроек в режиме переустановки секунд SECOND, показатели времени будут сброшены на ноль и дисплей возвратится в цифровой режим индикации.
Примечание:
Смена данных на дисплее будет происходить быстрее при удерживании нажатой кнопки переключателя в режиме регулировки.
Внимание
Перед началом движения убедитесь, что наружные зеркала установлены в исходное положение.
Не проводите регулировку зеркал в движении. Это может привести к потере управления автомобилем.
При удалении снега и льда берегите зеркала от царапин.
Ручная регулировка зеркал
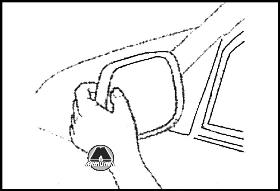
Отрегулируйте наружные зеркала таким образом, чтобы Вы могли видеть часть Вашего автомобиля в ближайшей к автомобилю части зеркала
Регулировка положения зеркал при помощи дистанционного регулятора
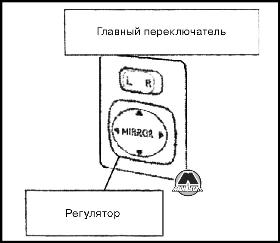
Дистанционный регулятор положения зеркал действует при установке ключа зажигания в положение АСС или ON.
1. В зависимости от Вашего желания установите главный переключатель в левое или правое положение.
2. Отрегулируйте, нажимая на регулятор, положение зеркала таким образом, чтобы увидеть часть Вашего автомобиля в ближайшей к автомобилю части зеркала.
3. По окончанию регулировки верните главный переключатель в нейтральное (OFF) положение.
Выключатель обогрева зеркал

Обогрев зеркал работает при повороте ключа зажигания в позицию ON (ВКЛ). Нажмите на выключатель обогрева зеркал для удаления запотевания с зеркала. При работе системы обогрева зеркал горит соответствующий индикатор. Обогрев зеркал не предназначен для растапливания снега или высушивания капель дождя. При установке многофункционального переключателя в положение 1 или 2 загорается соответствующий индикатор.
Внутреннее зеркало заднего вида
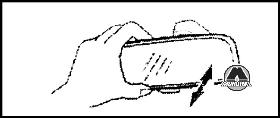
Отрегулируйте внутреннее зеркало рукой таким образом, чтобы Вы могли хорошо видеть обстановку сзади автомобиля.
Внимание
Не регулируйте положение зеркала в движении. Это может привести к потере управления автомобилем.
Ночная позиция зеркала (против слепящего света фар)
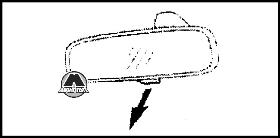
Поверните зеркало с помощью ручки так, чтобы уменьшить свет фар движущихся сзади автомобилей.
Внимание
Если нет необходимости уменьшать свет фар установите зеркало в дневную позицию, так как ночная позиция предполагает ухудшение ясности видения.
Внимание
Не давайте стартеру непрерывно работать более 10 секунд.
Во избежание повреждений не давайте холодному двигателю работать с большой частотой оборотов коленчатого вала.
До полного прогрева двигателя поддерживайте умеренную частоту оборотов коленчатого вала.
Система электронного впрыска топлива автоматически формирует состав воздушно-топливной смеси, необходимой для запуска.
1. Полностью нажмите на педаль сцепления и удерживайте ее в данном положении до пуска двигателя (коробка с механическим переключением передач).
2. Установите рычаг переключения передач в нейтральное положение коробка с механическим переключением передач) или в положение диапазона Р (автоматическая коробка передач).
3. Поверните ключ зажигания в положение ON (ВКЛ). Убедитесь, что контрольные лампы загорелись.
4. Не касаясь ногой педали акселератора, поверните ключ в положение START (СТАРТ) и отпустите его.
5. Убедитесь, что все контрольные лампы, кроме лампы стояночного тормоза или лампы тормозов, погасли.
6. Не давайте холодному двигателю работать с высокой частотой оборотов коленчатого вала. Если температура окружающего воздуха ниже точки замерзания, перед началом движения прогрейте двигатель в течение нескольких минут.
Если температура окружающей среды очень низкая
При температуре окружающей среды ниже -20°С, двигателю необходимо большее количество времени для запуска. Для того, чтобы запустить двигатель, держите ключ зажигания в положении START (СТАРТ) на протяжении трех секунд даже если Вы думаете, что двигатель уже запустился.
Механическая коробка передач
Указания по переключению механической коробки передач
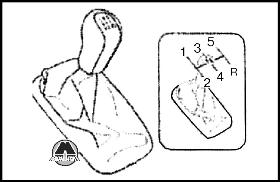
Переключение передач показано на вышеприведенном рисунке. При переключении передач полностью выжимайте педаль сцепления. Если включение передачи происходит с трудом, отпустите, вновь нажмите на педаль сцепления и попытайтесь включить передачу еще раз. Конструкция коробки передач не позволяет сразу перевести рычаг переключения из положения 5-й в положение задней передачи. Для перехода с 5-й на заднюю передачу необходимо сначала установить рычаг переключения в нейтральное положение, затем, после полной остановки автомобиля, в положение задней передачи.
Внимание
Производите включение задней передачи только после полной остановки автомобиля. В противном случае Вы можете повредить коробку передач.
Для торможения двигателем при езде по гористой местности включайте пониженную передачу в зависимости от дорожных условий и скорости автомобиля.Внимание
Соблюдайте осторожность при переходе на пониженную передачу на покрытой льдом, скользкой или мокрой дороге. При этом возможна блокировка или проскальзывание колеса, что может привести к потере управления автомобилем или аварии.
Рекомендуемые переключения скоростей
Переключение скоростей рекомендуется для более экономичного расхода топлива. Обратите внимание, что переключение скоростей зависит от погодных условий, состояния дороги и т.п.
| Передача | Скорость (км/час) |
| 1-2 2-1 |
15 |
| 2-3 3-2 |
35 |
| 3-4 4-3 |
50 |
| 4-5 5-4 |
70 |
Максимально допустимая скорость
Внимание
Если автомобиль движется со скоростью, превышающей максимальные значения, указанные в нижеприведенной таблице, не переходите на пониженную передачу. Невыполнение данного указания может привести к выходу двигателя из строя.
| Тип двиг./Передача | 3SZ-VE |
| 2ВК4ВК | |
| 1 | 40 35 |
| 2 | 70 70 |
| 3 | 110 100 |
| 4 | 150 140 |
| 5 | — |
Автоматическая коробка передач
Указания по использованию автоматической коробки передач

Обычное движение вперед всегда выполняется при рычаге селектора, установленном в положении D (Движение вперед). Для перемещения рычага селектора из положения Р (Парковка) необходимо нажать на педаль тормоза и кнопку разблокировки рычага. Для обеспечения плавной работы нажимайте педаль тормоза при переключении из положения N (Нейтраль) в положение движения передним или задним ходом.
Внимание
Перед тем, как покинуть сиденье водителя, обязательно убедитесь в том, что рычаг селектора переведен в положение Р (ПАРКОВКА); полностью затяните стояночный тормоз и выключите двигатель. При невыполнении этих мер предосторожности в предписанном порядке автомобиль может неожиданно начать непреднамеренное движение.
Для исключения повреждения автоматической коробки передач Вашего автомобиля не увеличивайте обороты двигателя, когда рычаг находится в положении R (Задний ход) или в любом положении переднего хода, а колеса заторможены.
При остановке на подъеме никогда не удерживайте автомобиль на месте за счет работы двигателя. Пользуйтесь рабочими тормозами или стояночным тормозом.
Не выполняйте переключение из положения N (Нейтраль) или Р (Парковка) в положение D (Движение вперед) или R (Задний ход) при оборотах двигателя выше оборотов холостого хода.
1. Р: для парковки автомобиля, запуска двигателя и вынимания ключа из замка зажигания.
2. R: для заднего хода автомобиля.
3. N: нейтральное положение Можно запускать двигатель. Но, тем не менее, мы рекомендуем запускать двигатель в положении Р.
4. D: при нормальной езде. В зависимости от скорости движения автомобиля переключение из 1-й скорости на повышенную, происходит автоматически.
5. 2: для торможения двигателем или ускорения. В зависимости от скорости движения автомобиля переключение из 1-й скорости на 2-ю происходит автоматически.
6. L: для эффективного торможения. С 1-й передачи не происходит переключения на повышающую передачу.
Примечание:
Запускайте двигатель только в положении Р или N.
В автомобилях, оборудованных электронно-управляемой автоматической коробкой передач при низкой температуре трансмиссионной жидкости не происходит переключения с 3-й скорости на 4-ю. при повышение температуры такое переключение происходит.
Выключатель повышающей передачи
1. Положение ON (ВКЛ.).
Данное положение используется при нормальной езде. Коробка передач работает как 4-х скоростная коробка передач.
2. Положение OFF (ВЬКЛ.).
Нажмите на выключатель для перевода его в положение OFF (ВЫКЛ.) для включения повышающей передачи нажмите выключатель еще раз.
Данное положение используется при необходимости торможения двигателем с понижением передач или при желании ехать более плавно с меньшим количество переключений при повышении передач. Коробка передач работает как трехскоростная автоматическая коробка передач.
Примечание:
Повышающая передача включается автоматически при установке ключа зажигания в положение ON.
Сильно нажмите на педаль тормоза, установите рычаг переключения в требуемое положение D, L или 2 для движения вперед или R для движения назад. Полностью отпустите стояночный тормоз и приведите автомобиль в движение, плавно отпуская педаль тормоза.
внимание
Не перемещайте рычаг переключения во время нажатия на педаль акселератора. Автомобиль может неожиданно поехать.
Когда двигатель работает на высоких оборотах (как, например, сразу после запуска, во время прогрева или при включении кондиционера воздуха) сильно нажимайте на педаль тормоза. В противном случае автомобиль может тронуться с места.
1. При обычной езде устанавливайте рычаг переключения в положение D.
2. Можно также производить вручную переключение из положения L в положение 2 или D.
3. При необходимости динамичного разгона автомобиля нажмите педаль акселератора до упора. Даже если рычаг переключения находится в положении Б, коробка передач автоматически произведет переключение на пониженную передачу, соответствующую скорости автомобиля. Если во время движения двигатель остановится, запустите его вновь с рычагом переключения в положении N. Рекомендуется, однако, производить запуск, установив рычаг переключения в положение Р.
4. При вождении автомобиля в гористой местности переключение на пониженную передачу для торможения двигателем производится в зависимости от дорожных условий и скорости авто.
Внимание
Соблюдайте осторожность при переходе на пониженную передачу на покрытой льдом, скользкой или мокрой дороге. При этом возможна блокировка или проскальзывание колеса, которые могут привести к потере управления автомобилем или аварии.
Переключайте рычаг в положения Р или R только после полной остановки автомобиля. В противном случае переключения в данные положения может привести к повреждению коробки передач.
Максимально допустимые скорости
Внимание
Если Ваш автомобиль движется со скоростью, превышающей значения, указанные в нижеприведенной таблице, не переходите на пониженную передачу. Невыполнение данного указания может привести к выходу двигателя из строя.
Максимально допустимые скорости (км/час).
| Положение | 3SZ-VE |
| 2ВК4ВК | |
| L | 45 40 |
| 2 | 90 80 |
| O/D OFF | 145 135 |
| O/D ON | — |
Сильно нажмите на педаль тормоза, не переводя рычага переключения из занимаемого положения или переведя его в положение N.
В случае, если Вы предполагаете длительную остановку, затяните стояночный тормоз, переведя рычаг переключения в положение N.
Внимание
Если педаль тормоза нажата не сильно, а рычаг переключения установлен в положения L, 2, D, R, автомобиль может тронуться с места. Для предотвращения самопроизвольного движения автомобиля:
Ставьте на подъемах автомобиль на ручной тормоз.
При переключении рычага из положения N в другие положения держите педаль тормоза нажатой.
После полной остановки затяните стояночный тормоз и переведите рычаг переключения в положение Р, продолжая нажимать на педаль тормоза.
Внимание
Во избежание самопроизвольного и непреднамеренного движения автомобиля устанавливайте рыча г переключения в положение Р полностью.
Не давайте без необходимости двигателю работать на высоких оборотах.
Если Вы хотите вытянуть ключ из замка зажигания, рекомендуется установить его в положение LOCK после перемещения рычага в положение Р. Это важно для безопасности, как последующего запуска двигателя, так и безопасности парковки.
Тормозная система с тандемным главным цилиндром
Ваш автомобиль Daihatsu оборудован тормозной системой с тандемным главным цилиндром. Каждая тормозная система работает автономно. В случае отказа любой из тормозных систем, другая система продолжает работать. Однако, в данном случае для приведения в действие тормозов требуется приложение повышенного усилия, а тормозной путь — возрастает. Кроме того, будет гореть контрольная лампа сигнализации аварийного состояния тормозной системы.
Внимание
При неисправностях тормозной системы прекратите использование автомобиля. Немедленно проверьте тормозную систему у специалиста.
Для увеличения усилия торможения усилитель тормозов использует вакуум коллектора двигателя.
Внимание
Если во время движения двигатель останавливается, торможение требует приложения большего, чем обычно усилия, а тормозной путь возрастает.
Общие меры предосторожности при торможении
Внимание
При проколе колеса не нажимайте резко на педаль тормоза. Это может привести к потере управления автомобилем.
Убедитесь, что напольный коврик не мешает свободному движению педали.
Эффективность торможения снижается при попадании в систему влаги или соли. Для удаления влаги или соли слегка нажмите на педаль тормоза несколько раз.
Не оставляйте во время вождения ногу на педали тормоза. Это может вызвать перегрев тормозов. Не держите также постоянно нажатой педаль тормоза при спуске с крутого склона. Перейдите на пониженную передачу и тормозите двигателем.
АБС (антиблокировочная система тормозов)
АБС (антиблокировочная система тормозов) предназначена для предотвращения блокировки колес во время резкого торможения или во время торможения на скользкой дороге. Тем самым она обеспечивает автомобилю устойчивость и управляемость. В некоторых случаях нажатая педаль тормоза начинает вибрировать или издавать характерные звуки. Это свидетельствует о нормальной работе системы АБС. Более того, при достижении автомобилем после трогания с места определенной скорости их моторного отсека может в течение нескольких секунд раздаваться характерный звук. Это не является признаком неправильной работы автомобиля, так как данный звук издается системой АБС, осуществляющей свою начальную самопроверку.
ЕВО (электронная система распределения тормозного усилия)
Система, помогающая распределить тормозные усилия в зависимости от условий вождения и нагрузки автомобиля.
Внимание
Несмотря на то, что ваш автомобиль оборудован системой АБС, для его остановки все же требуется достаточный тормозной путь, Всегда соблюдайте достаточную дистанцию от едущего перед Вами автомобиля.
Несмотря на то, что Ваш автомобиль оборудован системной АБС, никогда не ездите на излишне высокой скорости. Водите автомобиль с соблюдением мер безопасности. Во время движения всегда принимайте во внимание дорожные условия.
По сравнению с автомобилями, не оборудованными системой АБС, тормозной путь автомобиля, оборудованного данной системой может быть больше на неровных, покрытых гравием или снегом, дорогах.
При отказе системы АБС, загорается контрольная лампа ABS. Даже при неработающей системе АБС автомобиль сохраняет нормальную способность к торможению. При загорании этой контрольной лампы незамедлительно дайте проверить Ваш автомобиль дилеру компании Daihatsu.
Индикатор предельного износа тормозных колодок
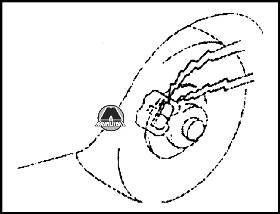
Расположенные на передних дисковых тормозах индикаторы предельного износа тормозных колодок издают при их чрезмерном износе предупредительный звук.
Внимание
Езда с изношенными тормозными колодками не разрешается. Это снижает эффективность торможения и может привести к аварии. Немедленно произведите проверку/замену тормозных колодок и ротора.
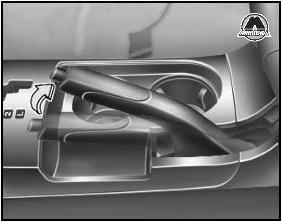
Для установки автомобиля на стояночный тормоз потяните рычаг вверх. Для снятия автомобиля со стояночного и тормоза, слегка приподнимите рычаг вверх и нажмите кнопку большим пальцем. Затем полностью опустите рычаг.
Внимание
При вождении автомобиля стояночный тормоз должен быть полностью отпущен, а контрольная лампа тормозов не должна гореть. Частично затянутый стояночный тормоз может вызвать перегрев тормозов и преждевременный износ тормозных колодок и накладок.
Приведенная глава отображена частично, с заведомо ухудшенными изображениями.
Ключи
Без системы блокировки двигателя

К Вашему автомобилю выдаются два ключа. Мы рекомендуем хранить запись номера ключа вместе с важными документами. Всегда носите с собой запасной ключ на случай, если Вы запрете автомобиль, оставив ключ внутри его. В случае потери ключей свяжитесь с дилером компании Daihatsu.
С системой блокировки двигателя
К автомобилю выдаются два закодированных ключа. Только при помощи этих двух ключей Вы можете завести двигатель.
ВНИМАНИЕ
Не вносите каких-либо изменений в систему блокировки.
Примечание:
Для изготовления нового вспомогательного ключа (при утере одного из них) представителю компании Daihatsu потребуется оставшийся другой ключ. Поэтому обеспечьте хранение основного ключа в надежном месте. Оба этих ключа служат для ввода идентификационного кода ключа в систему блокировки. Поэтому для изготовления ключа Вы должны предоставить оставшийся у Вас ключ. При потере обоих ключей немедленно обратитесь к дилеру компании Daihatsu.
При изготовлении другого вспомогательного ключа Вам необходимо предоставить дилеру компании имеющийся у Вас основной ключ и сообщить ему номер ключа. Поэтому мы рекомендуем хранить запись номера ключа в надежном безопасном месте.

Примечание:
Вы можете регистрировать и изготавливать до четырех ключей.
Внимание
В головку ключа встроен чип импульсного приемопередатчика, необходимый для работы системы блокировки двигателя. Поэтому при обращении с ключами соблюдайте следующие основные требования: 1. Не накрывайте головку ключа каким-либо предметом, препятствующим распространению электромагнитных волн (например, алюминиевыми перчатками).
2. Берегите ключи от ударов.
3. Не подвергайте ключи воздействию высоких температур в течение длительного времени. Не оставляйте ключи, например, на приборном щитке, где они подвергаются воздействию прямых солнечных лучей.
4. Запрещается погружать ключи в воду и мыть их в ультразвуковой моечной машине.
5. Не пользуйтесь ключами вместе с каким-либо электромагнитным предметом (например, магнитным браслетом).
6. Не включайте зажигание, если поверх головки ключа накинуто кольцо (как это показано на рисунке).
7. Не включайте зажигание ключом, соприкасающимся с другим ключом (как это показано на рисунке).
8. Запрещается сгибать головку ключа (как это показано на рисунке).

Система блокировки двигателя
Система блокировки двигателя выполняет задачу противоугонной системы. Когда ключ вставлен в замок зажигания, чип импульсного приемопередатчика, размещенный на головке ключа, посылает автомобилю электрический сигнал, который сопоставляется с идентификационным кодом, предварительно записанным в автомобиле. Если электрический сигнал соответствует идентификационному коду, двигатель может быть запущен. Если же они друг другу не соответствуют, двигатель не запускается.
Замки дверей
ВНИМАНИЕ
Перед тем, как открыть любую дверь, убедитесь, что обстановка вокруг автомобиля безопасна. Перед тем, как тронуться с места, убедитесь в том, сто все двери надежно закрыты. Это предотвратит самопроизвольное открытие двери во время движения и выпадение пассажира. В жаркий день не оставляйте в автомобиле детей и домашних животных без присмотра. Воздух в салоне может нагреться до чрезвычайно высокой температуры.
Отпирание/запирание дверей ключом

Чтобы закрыть замок, поверните ключ в сторону передней части автомобиля, для отпирания — в сторону задней его части. Для открытия двери потяните наружную ручку на себя. При запирании или отпирании замка двери водителя, другая(ие) дверь(и) автоматически запираются или отпираются.
Запирание/ отпирание дверей блокировочной кнопкой

Для запирания двери надавите на обращенную вперед сторону блокировочной кнопки. Для отпирания двери надавите на обращенную назад ее часть. Для открывания двери потяните внутреннюю ручку на себя. Вы также можете заблокировать дверь, когда при ее закрытии нажмете на обращенную вперед сторону блокировочной кнопки и отожмете наружную ручку.
Центральный замок
Вы можете запирать и отпирать двери, не используя ключи. При нажатой кнопке LOCK/UNLOCK все двери, включая дверь багажного отделения будут заперты или отперты. Трансмиттер сделан в виде держателя ключа, поэтому Вы можете прикрепить его к ключу зажигания.
Отпирание дверей при помощи брелка
При отпирании всех дверей дважды мигнет индикатор аварийной сигнализации, а также на протяжении 15 секунд будет гореть внутреннее освещение салона.
ВНИМАНИЕ
При приоткрытой или полностью открытой двери брелок не сработает. Покидая автомобиль, убедитесь, что двери заперты, потянув рукой за ручку двери. При нахождении ключа зажигания в цилиндре, брелок не сработает, таким образом напоминая Вас о том, что ключ зажигания находится в цилиндре. Если после отпирания дверей при помощи брелка они не будут открыты в течение 30 секунд -они будут повторно автоматически заперты, Эта функция не будет активной при нахождении ключа зажигания в цилиндре.
Замена батареи
Срок эксплуатации встроенной в брелок батареи — около 2 лет при условии, что отпирание/запирание дверей будут происходить 10 раз в день. При наличии сбоев или отсутствия работы данной функции проверьте батарею. Проконсультируйтесь у официального дилера компании Daihatsu.
Блокировка задних дверей от детей

Блокировка дверей предназначена для предотвращения случайного открытия дверей при оттягивании внутренней ручки. Установите рычаг блокировки в положение LOCK (ЗАКРЫТО) и заприте дверь. Теперь дверь может быть открыта только снаружи. Мы рекомендуем всегда использовать блокировку дверей при посадке детей в автомобиль.
Дверь багажного отделения

1. Для автомобилей, оборудованных цилиндром замка багажной двери:
Для запирания двери, поверните ключ по часовой стрелке. Для отпирания двери, поверните ключ против часовой стрелки.
2. Для автомобилей, оборудованных центральным замком:
При запирании или отпирании двери водителя, дверь багажного отделения также будет автоматически заперта или отперта.
Открывание двери

Оттяните рукой ручку двери багажного отделения вверх. При открытой двери, ручка удерживается в поднятом положении.
ВНИМАНИЕ
Запрещается открывать дверь багажного отделения при поднятом вверх стеклоочистителе. Лапа стеклоочистителя может Вас ранить. Если открытая крышка багажной двери закрывает задние фонари, стоп-сигналы, фонарь заднего хода, отражатель и сигнал поворота, в этом случае Вы должны предупредить других участников дорожного движения о присутствии Вашего автомобиля при помощи треугольного отражателя или другого приспособления.
Закрывание двери
Убедитесь, что багаж не мешает закрыванию двери.
Примечание:
Будьте внимательны, не оставляйте ключ в автомобиле.
ВНИМАНИЕ
Во время вождения дверь должна быть всегда закрытой. В ином случае ядовитые выхлопные газы могут проникнуть в салон и привести к смерти.
Стеклоподъемники
ВНИМАНИЕ
Соблюдайте следующие правила предосторожности во избежание телесных повреждений. Перед закрытием стеклоподъемников убедитесь, что головы, руки и другие части тел всех находящихся в салоне пассажиров не выглядывают из окон автомобиля. Зажатие стеклоподъемником шеи, головы или рук пассажиров может привести к серьезным телесным повреждениям. Не разрешайте маленьким детям самостоятельно без присмотра приводить в движение стеклоподъемники. Для предотвращения неожиданного включения стеклоподъемника ребенком используйте блокировку стеклоподъемников. Не оставляйте маленьких детей в автомобиле без присмотра, особенно при вставленном ключе зажигания. Во время обращения со стеклоподъемниками маленькие дети могут быть зажаты ими. Дети, оставленные без присмотра в автомобиле, могут получить серьезные телесные повреждения.
Примечание:
При ключе зажигания в положении ON, будет гореть подсветка основного выключателя (выключатель стеклоподъемника со стороны водителя) и переключателя стеклоподъемника.
Переключатель блокировки стеклоподъемников

1. Клавиша управления стеклоподъемником двери водителя. 2. Клавиша управления стеклоподъемником двери переднего пассажира.
3. Клавиша управления стеклоподъемником левой задней двери.
4. Клавиша управления стеклоподъемником правой задней двери.
5. Кнопка блокировки клавиш управления стеклоподъемниками
Управление стеклоподъемниками функционирует при ключе зажигания в положении ON. Стеклоподъемники всех дверей управляются при помощи основного выключателя на двери водителя. При положении переключателя блокировки стеклоподъемников OFF, стекла окон других пассажиров (кроме водителя) не могут быть ни подняты, ни опущены. Далее, индикаторы включения стеклоподъемников погаснут.
Общий выключатель
Для поднятия стекла нажмите на верхнюю часть переключателя. При нажатии на нижнюю часть переключателя происходит опускание стекла. Движения стекла продолжается до тех пор, пока переключатель находится в нажатом положении. Стекло со стороны водителя автоматически опускается при полном нажатии переключателя вниз. Для частичного открытия или закрытия окна нажмите на верхнюю часть переключателя.
Выключатель стеклоподъемника

Стекло со стороны переднего пассажира/заднего пассажира. При нажатии на верхнюю часть переключателя происходит поднятие стекла. При нажатии на нижнюю часть переключателя происходит опускание стекла. Движения стекла продолжается до тех пор, пока переключатель находится в нажатом положении.
Сиденья
Во время движения все находящиеся в автомобиле лица должны быть правильно расположены на сиденьях и соответствующим образом пристегнуты ремнями безопасности.
ВНИМАНИЕ
Воздержитесь от движения, если кто-либо из лиц, находящихся в салоне, неправильно сидит на сиденье или не пристегнут соответствующим образом ремнем безопасности. Не перевозите пассажиров, сидящих на полностью опущенной вниз подушке сиденья, сверху сложенного сиденья или в багажном отделении. Невыполнение данной рекомендации может привести к серьезным травмам при неожиданной остановке или столкновении автомобиля.
Передние сидения
Регулировка сидений

Поднимите вверх штангу регулировки положения сиденья и сдвиньте сиденье по салазкам в требуемое положение, слегка нажав на него телом. Затем отпустите штангу. После регулировки убедитесь, что сиденье надежно зафиксировано в данном положении, попытавшись сдвинуть его вперед и назад.
ВНИМАНИЕ
При ненадежной фиксации сиденья возможно его самопроизвольное перемещение, которое может привести к потере управления автомобилем, Не пытайтесь регулировать положение сиденья водителя во время движения. Это может привести к потере управления автомобилем и аварии.
Регулировка угла наклона спинки сиденья

Слегка наклонитесь вперед и потяните вверх рычаг регулировки угла наклона спинки сиденья. Медленно наклоните спинки сиденья в требуемое положение. Затем отпустите рычаг.
ВНИМАНИЕ
После регулировки убедитесь, что спинка надежно зафиксирована, надавив для этого на нее весом тела. Это позволит предотвратить самопроизвольные перемещения спинки сиденья во время движения, которые могут привести к потере управления автомобилем. Не пытайтесь регулировать угол наклона спинки сиденья водителя во время движения. Это может привести к потере управления автомобилем и аварии. Во избежание проскальзывания пассажира под ремнем безопасности при столкновении не отбрасывайте спинку сиденья назад больше, чем это необходимо.
Поднятие водительского сидения

Каждый раз при поднятии рычага подушка сидения будет подниматься. При опускании рынага, подушка сидения будет опускаться.
ВНИМАНИЕ
Не пытайтесь производить регулировку сидения водителя во время движения. Это может привести к потере управления автомобилем и аварии.
Подголовники
Регулировка высоты (подголовники передних сидений)

Для того, чтобы поднять подголовник потяните его прямо вверх. Для того, чтобы опустить подголовник, нажмите вниз кнопку выключения блокировки и надавите на подголовник вниз. Отрегулируйте положение подголовника таким образом, чтобы его верх находился как можно ближе к средней части Ваших ушей.
Снятие
Для того, чтобы снять подголовник, нужно потянуть его прямо вверх, нажимая при этом на кнопку выключения блокировки.
ВНИМАНИЕ
Убедитесь, что после регулировки подголовники надежно заблокированы. Это поможет предотвратить случайное передвижение подголовника и потерю управления автомобилем, Не рекомендуется ездить на автомобиле с не отрегулированными или снятыми подголовниками. Подголовники обеспечивают эффективную защиту шеи, позвоночника, в Наиболее эффективно подголовники защищают, когда они максимально приближены к голове. Не рекомендуется подкладывать подушку на спинку сидения. Не производите регулировку подголовника во время движения. Это может привести к потере управления автомобилем и аварии. Не поворачивайте подголовник в неправильном направлении. Они не зафиксируются, будучи повернуты обратной стороной.
Note for Owners:
Guidesimo.com webproject is not a service center of Toyota trademark and does not carries out works for diagnosis and repair of faulty Toyota Rush equipment. For quality services, please contact an official service center of Toyota company. On our website you can read and download documentation for your Toyota Rush device for free and familiarize yourself with the technical specifications of device.
More Automobile Devices:
-
Nissan 1999 Altima
ForewordWelcome to the growing family of newNISSAN owners. This vehicle is deliveredto you with confidence. It was producedusing the latest techniques and strict qualitycontrol.This manual was prepared to help youunderstand the operation and maintenanceof your vehicle so that you may enjoy manymiles of driving pleasure. Please readthrough this manual before operating yourvehicle.A separate Warrant …
1999 Altima Automobile, 220
-
Mazda Mazda 6
CONTENTSMazda6TrainingManualFOREWORDThis manual explains each component or system operation and function for the Mazda6.For proper repair and maintenance, a thorough familiarization with this manual is important, and it should always be kept in a handy place for quick and easy reference.All the contents of this manual, including drawings and specifications, are the latest available at the time of …
Mazda 6 Automobile, 358
-
SMART fortwo coupe
Sommer Corporate Media AGwww.smart.com smart a brand of DaimlerChryslerUSA Edition A 2008Order no. 6522 0008 13Part no. 451 584 00 874515840087smart fortwo coupé and smart fortwo cabrioInsert picture of size202x31 mmOperator’s Manualsmart fortwo coupé and smart fortwo cabrio …
fortwo coupe Automobile, 314
-
HUSKY LINERS 8141
8141 Installation Ins#C2940.doc07/27/2006THANK YOU FOR SELECTING A HUSKY FLOOR LINERFROM WINFIELD CONSUMER PRODUCTSCARE AND USE INSTRUCTIONS Your new floor liner is custom molded to fit your particular vehicle. The liner is made to take the place of yourfactory floor mats. For correct fit, it is necessary to remove the factory floor mat before installing your new floorliner. However, do not re …
8141 Automobile, 2
-
Lincoln Electric MKC 2015
Owner’s Manual2015 MKCPreproduction model shownMarch 2014First PrintingOwner’s ManualLincoln MKCLitho in U.S.A.FJ7J 19A321 AA2015 MKC Owner’s Manuallincolnowner.com lincolncanada.comPreproduction model shown …
MKC 2015 Automobile, 490