Главная
—
Статьи, фото и видео о прицепах
—
Инструкции по использованию
—Паспорт на фаркоп скачать
Паспорт на фаркоп скачать
Просмотров: 56982
Дата: 11.01.2018
Автор: Иван Алексеев
В паспорте указывается детальная схема установки фаркопа. Паспорт на фаркоп, также необходимо показывать сотрудникам ГИБДД при требовании. Ниже Вы можете скачать паспорт на фаркоп на автомобиль НИВА 2121/2131. На другие фаркопы паспорта можно скачать в карточках товаров. Например, паспорт на фаркоп для автомобиля РЕНО ДАСТЕР можно скачать здесь.
Паспорта на фаркопы других автомобилей скачать >>>
Сертификат на фаркоп скачать >>>
Документы
Паспорт фаркопа НИВА 2121 2131
1019,2 кб
Читайте также

Инструкция по установке оп� …
15 апреля 2019
// Просмотров 3136

Паспорт на прицепы OFF-ROAD МЗС …
6 марта 2018
// Просмотров 3561

Сертификат на фаркоп …
26 февраля 2018
// Просмотров 134011
Будьте всегда в курсе!
Узнавайте о скидках и акциях первым
Новости магазина
Тестовая рассылка
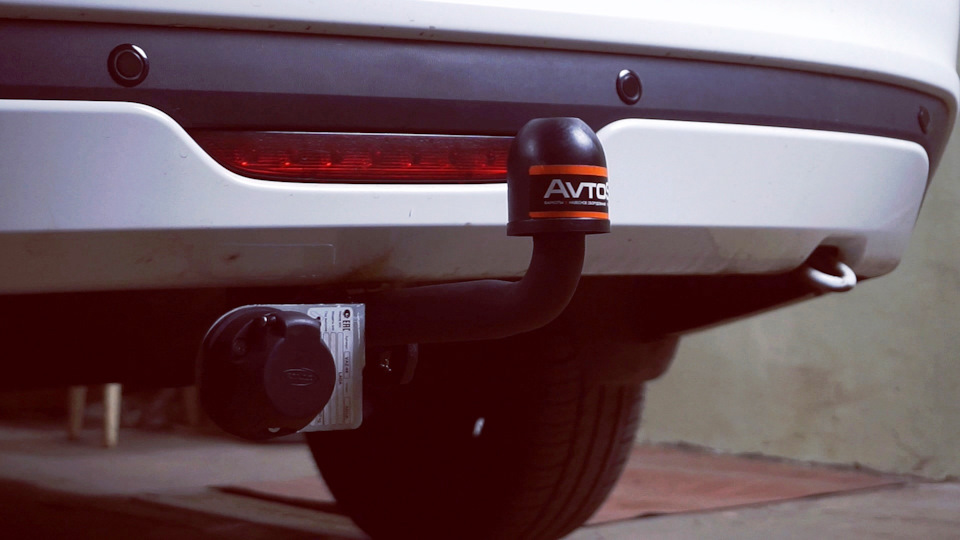
Год назад на свой автомобиль LADA Granta FL устанавливал своими руками фаркоп и подключал электрику. Весь процесс снимал на телефон, но как-то сразу не выложил, а после уже запамятовал. И вот только сейчас освобождая память смартфона наткнулся на то, что наснимал тогда и сразу же решил опубликовать в бортжурнале, заодно оставить отзыв о ТСУ (тягово-сцепное устройство) от компании AvtoS. Ну что, начнем!
Полный размер
Устройство тягово-сцепное (ТСУ) предназначено для шарнирной сцепки автомобиля с буксирным прицепом. Для обеспечения сцепки автомобиля с прицепами различных марок присоединительные элементы ТСУ стандартизованы в соответствии с ГОСТ Р 53815-2010.
Какой фаркоп выбрать AvtoS VAZ-68 или AvtoS VAZ-69?!
Так как у меня обновленная Гранта 2019 г. с типом кузова лифтбэк, выбор пал на модель фаркопа AvtoS VAZ-68 с условно съемным шаром (на двух болтах).

Полный размер
Фаркоп AvtoS VAZ-68, как заявляет производитель, подойдет к сл. автомобилям: Калина, 1117, универсал с 2007 г.в.; Калина, 1118, седан с 2007 г.в.; Гранта, 2190, седан с 2012 г.в.; Гранта, 2191, лифтбек с 2014 г.в. Фаркоп AvtoS VAZ-69 подойдет на Kalina 2 (универсал) с 2013 по 2016 г.в., с 2016 г.в.; Kalina 2 Cross (универсал) с 2013 по 2016 г.в., с 2016 г.в.; Granta (седан/лифтбек) с 08.2018 г.в. по н.в.
И вот тут будьте внимательны, перед покупкой фаркопа не поленитесь заглянуть под бампер вашего авто!
Дело в том, что в зависимости от партии лифтбеков может быть разное расположение крепления глушителя и тогда выбор будет варьироваться между моделями фаркопов VAZ-69 или VAZ-68.
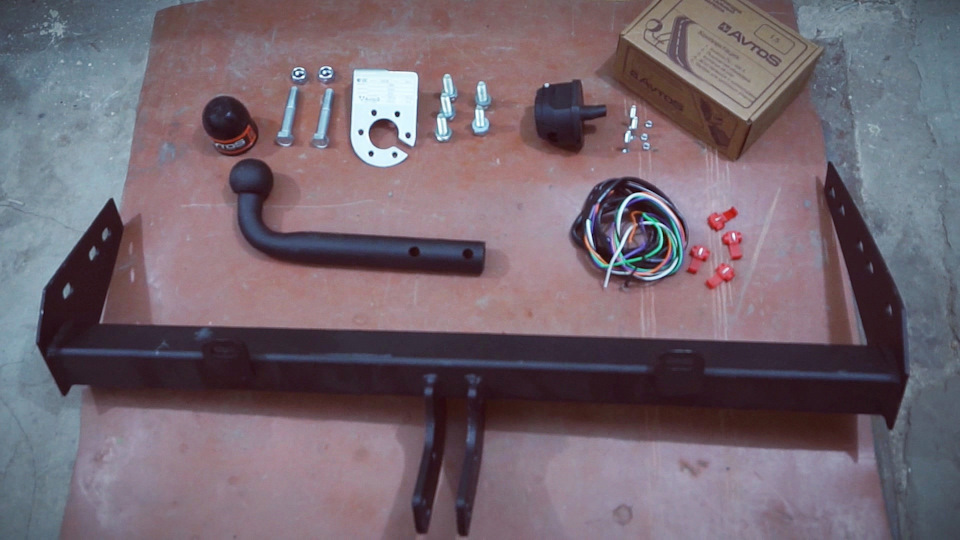
Комплектация AvtoS VAZ-68.
При покупке необходимо проверить комплектность. В руководстве должна быть указана дата продажи и поставлен штамп магазина. Необходимо сохранять руководство в течение всего гарантийного срока эксплуатации устройства.
Полный размер
Помимо тяговой сцепки и всех необходимых крепежных элементов, комплект электропроводки так же является одной из немаловажных составляющих ТСУ, как правило, приобретается он отдельно.

Полный размер
ТЕХНИЧЕСКИЕ ХАРАКТЕРИСТИКИ: Тип шарнирного соединения — шаровой Диаметр сцепного шара — 50 мм Вертикальная нагрузка на шар S, не более — 75 кг Технически допустимая масса тягача T — 1560 кг Полная масса буксируемого прицепа C, не более — 1100 кг Параметр Dc, не более — 6,32 кН Масса ТСУ, не более — 10,5 кг
Монтаж.
Установив автомобиль на смотровую яму гаража и приняв все необходимые меры безопасности приступил к выполнениям работ. Подробнее, смотрите в видеоролике ниже.

Полный размер
Данную модель фаркопа можно устанавливать без снятия бампера.

Полный размер
В Гранта заложены крепления под прицеп. Нужно только их найти, так как они заклеены мягкой лентой, покрытой сверху слоем антигравия. Простучав отвёрткой, все их можно без туда определить и подготовить для установки крепёжных болтов ТСУ.
Фаркоп установлен, затягивает крепежные болты.

Полный размер
Окончательную затяжку болтов и гаек произвести с моментом: — резьба М10х1,25 – 56 Н·м; — резьба М12х1,25 – 100 Н·м

Полный размер
Установка ТСУ на автомобиль Лада Гранта FL. Используем крепежные элементы (поз. на рис.: 4,7,8)
Электрика.
Приступаем к прокладке электропроводки для разъёма фаркопа.

Распиновка розетки фаркопа.

Полный размер
Обратите внимание 5 и 7 контакты розетки фаркопа можно замкнуть между собой перемычкой, чтобы не тянуть шестой провод. Противотуманного фонаря у меня нет на прицепе, поэтому контакт 2 – оставляю не подкл.

Полный размер
Жгут проводов можно пропустил через штатное резиновое уплотнение, расположенное с левой стороны за бампером.
Далее произведем подключение розетки фаркопа посредством «врезки» в электрическую схему питания задних фонарей.
Распиновка заднего фонаря Гранты такая.
На этом работы по установке фаркопа завершены!
Доработка электрики фаркопа.
Так как шар данного ТСУ съемный, было решено доработать электрику для быстрого отключения и снятия розетки фаркопа.
Для этого приготовил герметичные евроразъёмы, широкую термоусадочную трубку и пластиковое внутренне яйцо от киндер сюрприза.

Полный размер
Яйцо предварительно покрасил в черный цвет для большей эстетики и меньшей заметности под бампером авто.
Его основная задача — это оберегание от пыли и грязи отключенных разъёмов при снятом шаре ТСУ.
Далее в разрез проводки фаркопа подключаем герметична евро-разъемы, соединение лучше делать пайкой проводников.
Повода изолируются посредством термоусадочной трубки и черной ленты ПВХ.
Излишки проводников прячутся под бампером.

Полный размер
Перед началом эксплуатации сцепной шар покрываем слоем смазки, чтобы уменьшить трение и соответственно его преждевременную выработку.
Все готово — ПОЕХАЛИ!
Регистрация в ГИБДД?!
Не силен в юридических вопросах, поэтому продублирую информацию, которую нашел в интернете и по моему мнению, она соответствуют нынешней ситуации на «дороге», даже с учетом анонсированных нововведений от 1 июля 2021 года…
«На данный момент существуют 2 случая, при которых фаркоп можно не регистрировать в ГИБДД:
— при серийном внесении изменений в конструкции. В данном случае речь идет об установке ТСУ на заводе,
— при установке фаркопа в качестве дополнительного оборудования, если одновременно выполняются 2 условия:
1) изготовитель предусмотрел установку фаркопа в эксплуатационной документации (речь идет о руководстве по эксплуатации, которое выдается при покупке любого автомобиля);
2) фаркоп должен иметь документацию изготовителя, подтверждающую, что он предназначен для использования именно на автомобиле Вашей модели и прошел оценку соответствия.
Таким образом, список необходимых документов для использования фаркопа:
Руководство по эксплуатации автомобиля.
Документы на фаркоп, подтверждающие, что он подходит для автомобиля нужной модели.
Сертификат на фаркоп, подтверждающий, что он соответствует требованиям Технического регламента.
Обратите внимание, возить указанные документы с собой и предъявлять их сотрудникам ГИБДД Вы не обязаны. Их можно хранить и дома. Просто если у сотрудника ГИБДД возникнут вопросы по поводу фаркопа, сразу же скажите ему, что все необходимые документы у Вас есть и тягово-сцепное устройство установлено законно. Обычно этого бывает достаточно. Если полицейский все же решит оформить протокол, то Вы сможете оспорить его на основании имеющихся документов».
По итогам года использовании фаркопа AvtoS VAZ-68 глобальных проблем не обнаружено, единственное после зимнего периода начали появляться следы коррозии на метал. частях ТСУ, что говорит о низком качестве применённого материала и слабом слое лакокрасочного покрытия фаркопа. Понятное дело, что главным оправданием служит невысокая стоимость изделия. Летом планирую зачистить образовавшеюся ржавчину и подкрасить черной, матовой краской из баллончика. Плюс ко всему этому из-за близкорасположенных датчиков парктроника, пришлось заменить штатный пластиковый колпачок шара на резиновый с Али за 50 руб., что бы не было ложного срабатывания.
Заказывал здесь: dvizhcom.ru/auto/search
![]()
Download Article
![]()
Download Article
Are you looking to tow your car for some long distance? Without much hassle, you can attach a tow bar to your own vehicle, making it easy to secure your car to your towing vehicle. You have to be cautious in attaching the tow bar, however, and ensure that your other vehicle is capable of safely towing your car. It requires a little extra work, but you’ll be thankful to be saving money by not renting a tow truck.
-

1
Decide if a tow bar is your best option. For some RV owners, the tow bar works best, but you can also choose to tow your vehicle using a tow dolly.[1]
While a tow dolly props your vehicle on two wheels, the tow bar will pull your vehicle on all four wheels.- If your vehicle can be towed with all four wheels down, then the tow bar will be your best option. Attaching your tow bar often requires modifications to your car, however, so you can’t attach a tow bar to a vehicle under warranty.
- Pulling the tongue of your tow dolly up will require some strength, so physically limited owners may want to choose a tow bar.
- A tow bar is easier to stow and disassemble than a tow dolly, so if you’re planning on attaching and detaching often, you’ll want to choose a tow bar.
- The overall cost of both towing methods is fairly equivalent, so it really comes down to your preference and needs as an RV owner.
-
2
Consult the owner’s manual for both of vehicles. Before you go about the trouble of attaching a tow bar, you’ll want to ensure that your intended towing vehicle can actually transport your other load. Depending on what your towing vehicle is, that vehicle will have a different weight limit, and it’s important that you’re well aware exactly how much weight your larger vehicle can hold.[2]
- If you can’t find your owner’s manual for whatever reason, you can also resort to your compliance certification label, which is found somewhere near the driver’s door, generally. If you cannot find this label, try checking near your door sill. It should be visible when you open your vehicle’s front door.
- In certain cases, your towing vehicle may have to be «broken in» before you are able to tow certain loads. This basically means that you’ll have to drive a certain number of miles in the car before its transmission is able to hold the load that you’re intending on pulling.
- The owner’s manual for your car will show the weight of that particular model, which should be lower than your towing vehicle’s weight limit. If you can’t find that owner’s manual, you can research your car’s weight online.
Advertisement
-
3
Choose a tow bar design. When choosing a tow bar design, you’ll be looking for either a motorhome-mounted tow bar or a car-mounted tow bar.[3]
The motorhome-mounted bar will be inserted into the receiving end of the motorhome hitch receiver. These are preferred, because you won’t need to detach them from the front of your towed vehicle.- You can also store them on the back of your towed vehicle when the bar isn’t in use. If you choose to use a car-mounted tow bar, then you’ll have to keep it stored on the front of your towed vehicle. You can more easily detach these when not in use.
-
4
Purchase a tow mounting bracket. Regardless of the tow-bar that you choose, you need to attach a mounting bracket before you attach the bar.[4]
The mounting bracket, sometimes called a base plate, is used to attach the tow bar to the towed vehicle.- You want to make sure that your mounting bracket will fit specifically to your make of car, as well as the vehicle that you are towing. The base plate will be attached to the back of your car — ranging from the frame, subframe or core support — or somewhere on the undercarriage of the vehicle.
-
5
Check your braking system. Because you’re carrying an extra load on your towing vehicle, you need to make sure that your braking system won’t give out on you. It’s more than likely that you’ll have to invest in some sort of supplemental braking system.
- The inertia of your towed vehicle may be too much for the brakes of your car or truck to handle.[5]
Most states in the US require you to add a separate braking system if you’re carrying a weight larger than 1,500 pounds. - There are two different types of secondary braking systems. Electronic brakes are attached to a controller in your tow vehicle, while surge brakes are independent systems that are activated by momentum. Be careful that surge brakes are legal within the jurisdiction of your state, as it may vary depending on where you’re living.
- The inertia of your towed vehicle may be too much for the brakes of your car or truck to handle.[5]
-
6
Ensure that you have all the necessary safety equipment. Before you start to tow anything, you’ll want to have safety cables on hand. These cables will be tethered between your two vehicles, serving as a catch if anything goes wrong in the attaching of your tow bar. This means that if anything goes awry, and your cargo becomes detached from your towing vehicle, the safety cables will catch it.
- It’s also important that you have all your lights working properly. Regardless of how short your trip may be, you need to make sure that your cargo will be seen by cars driving behind you. Failure to properly light your vehicles could cause a wide variety of dangerous incidents to occur.


Advertisement
-
1
Find a good mounting area. This should be on some sturdy location on your front bumper, as that’s where the tow bar will be attaching to the back of your towing vehicle. Make sure that your tow bar will sit properly on your front bumper. This means that you’ll want to put the tow bar up against the bumper and see that it fits comfortably.
- You also want to test that there’s enough room, on the width of the bumper, to drill your holes to attach the bar. This may require the help of a friend. You’ll want to make sure the tow bar is perfectly parallel. It’s best if you have a second pair of hands to hold the other side.[6]
You may have to remove the interior boot trim of your vehicle or your side panels. - Make sure that you’re attaching it directly to your bumper. Any free-hanging paneling that protects the front end of your car will be in the way of your strongest mounting point.
- You also want to test that there’s enough room, on the width of the bumper, to drill your holes to attach the bar. This may require the help of a friend. You’ll want to make sure the tow bar is perfectly parallel. It’s best if you have a second pair of hands to hold the other side.[6]
-
2
Prepare your vehicle for drilling. Putting holes in your car can be dangerous, and you also may cause costly damage to your vehicle if you aren’t careful.[7]
Before picking up any tool, make sure you know exactly what you’ll be doing with it. You don’t want to accidentally drill into your radiator or cause any electrical damage.- Create a one-inch cross of tape at your place of drilling. This will prevent the drill from sliding off your intended entry point.
- Use a hammer and a sharp centre punch to create a light indentation in your bumper. Your drill bit will rest on this point when it enters your vehicle.
- If you have no experience drilling metal, or if you feel nervous that you will damage your car, you can seek assistance in attaching your tow bar. While you may have to pay someone to help you with this drilling, you don’t want to make a mistake and make costly damage to your vehicle.
-
3
Drill out the holes for the tow bar. You’ll be threading the bolts through the holes of the tow bar and into the chassis of the vehicle. For those maybe unfamiliar with the term, the chassis of a car refers to its frame.[8]
In this case, the chassis relates to the undercarriage of the front bumper of the car.- Start by drilling a hole smaller than your bolt by attaching a smaller drill bit. If you’re attempting to make a 3/8 inch hole, start with a 1/3 inch drill bit, and then expand the hole with 3/16 inch bit. After that, you can drill with the proper 3/8 bit.
- Make sure that you still have a person holding the other end of the tow bar, as drilling your holes in straight is unbelievably important. You’ll want to get a drill the corresponds directly to the bolt width of your tow bar brackets.
- This information should be found in the manual that came with your tow bar package. If you can’t find this, you can measure the width using a small ruler.
-
4
Secure the brackets to your car. Now that you’ve drilled the accurately sized holes into your bumper, you need to slide the bolts into the chassis of your vehicle. The bolt size will vary depending on the size of your tow bar and your vehicle. The size of the bolts, however, should align with the size of your bracket holes, as well as the holes that you’ve drilled into the bumper.
- Make sure that you’re threading the bolts through both the tow bar bracket and the bumper of the vehicle. You can’t slide the bracket onto the bolts. You’ll also want to further secure the bolts with a washer and nut set that corresponds to the size of your bracket.[9]
Tighten them quickly using a socket wrench.
- Make sure that you’re threading the bolts through both the tow bar bracket and the bumper of the vehicle. You can’t slide the bracket onto the bolts. You’ll also want to further secure the bolts with a washer and nut set that corresponds to the size of your bracket.[9]
-
5
Install your pivot brackets. After you’ve secured the tow bar to the front bumper of your vehicle, you’ll need to attach the pivot brackets. These brackets will reach from your tow bar to your towing vehicle. Your bracket will vary slightly depending on the sort of tow bar that you’ve chosen, but the process of securing will be the same.[10]
- Some brackets will be adjustable, for example, while others may be rigid A-Frame structures that are attached to the bar itself. You’ll find a separate pair of nut and bolt hardware in your kit which should be slightly larger than the hardware you used for the bar itself. Insert the pivot brackets into the two ends of your tow bar and tighten.
- If you have a pivot bracket with adjustable arms, make sure that you do not tighten the bolts completely. This bracket is meant to move slightly. You do, however, want to check the bolts before attaching your vehicle, as you don’t want them to run coming undone. It is a balance of not over-tightening while also ensuring that you don’t let the pivot bracket become loose.
-
6
Wire your tow bar. Before attaching your car to your towing vehicle, you need to wire the tow bar to ensure that your braking lights will flow between both electrical systems of your vehicles. Ensuring that your brake and turn signal lights work in tandem for both vehicles is necessary for the safety of those on the road with you.
- The two main electrical systems used for towing are the 12N and 12S systems.[11]
The 12N is best for standard vehicles, while the 12S is best for caravans and motor homes. Attach the systems between your car and towing vehicle using the color coordinated pins on your wiring sockets, each of which correspond to a different light in your two vehicles. - Depending on how often you plan on towing your car, you can also choose to use removable tail lights, which don’t actually connect the electrical systems of your two cars.[12]
Removable tail lights are the least invasive and easiest to remove from your RV. - They sit at the back of your towed car, and the wiring wraps underneath the towed car and attaches to the electrical system of your towing vehicle. If you plan on towing often, however, these may not be the most viable option.
- The two main electrical systems used for towing are the 12N and 12S systems.[11]
-
7
Attach your safety chains between your car and towing vehicle. In any towing situation, you need to use safety chains. It’s illegal to tow a vehicle without your safety chains. Simply attaching your car to your towing vehicle using the tow bar and pivot brackets won’t cut it.
- There should be two sets of safety cables that you’re using. The long set of cables will attach the RV hitch to the base plate arms of your pivot bracket. You’ll then attach the short set of cables between the base plate arms into the frame mount of the tow bar itself.
- This will ensure that in the case of any unhitching on the tow bar itself, your car will not careen into traffic. It’s doubly important to take this step if it’s your first time attaching a tow bar, as mistakes can happen.
- Some states actually require two sets of safety chains, so check your state’s safety chain laws to see if you’ll have to attach a second set of cables.


Advertisement
References
Add New Question
-
Question
What do I do if I have a car with front wheel drive?

If you have a car with a manual transmission, you may be in luck. Very likely an automatic would be damaged with flat towing, as when the engine is not running, the pump is not lubricating the automatic transmission.
-
Question
Should the vehicle being towed have the steering wheel locked or unlocked?
Unlock the steering. Make sure it will NOT lock at any point mid travel. The design and physics of the tow bars move the steering automatically.
Ask a Question
200 characters left
Include your email address to get a message when this question is answered.
Submit
Advertisement
Video
About This Article
Article SummaryX
To fit a tow bar to your car, you’ll need to screw it to your bumper and attach a safety chain. Make sure your tow bar fits onto your bumper before you drill holes in it. Before attaching your car to the towing vehicle, you’ll need to wire the tow bar to connect the vehicles’ electrical systems and make sure the turn signal lights work. Alternatively, purchase removable turn signals which work remotely. You also need to attach safety chains between your car and the towing vehicle in case the tow bar breaks. This is a legal requirement. For more tips, including how to decide between a tow bar and a tow dolly, read on!
Did this summary help you?
Thanks to all authors for creating a page that has been read 226,290 times.