Ping – утилита командной строки, которая нужна для проверки подключения к другому компьютеру на уровне IP. Принцип работы очень простой: команда ping ip отправляет серию небольших пакетов данных на указанное устройство, а затем показывает время ответа.
Ping – основная команда TCP/IP, которая используется для устранения неполадок подключения, доступности и разрешения имени. Она также позволяет узнать имя и IP-адрес компьютера.
Синтаксис команды ping
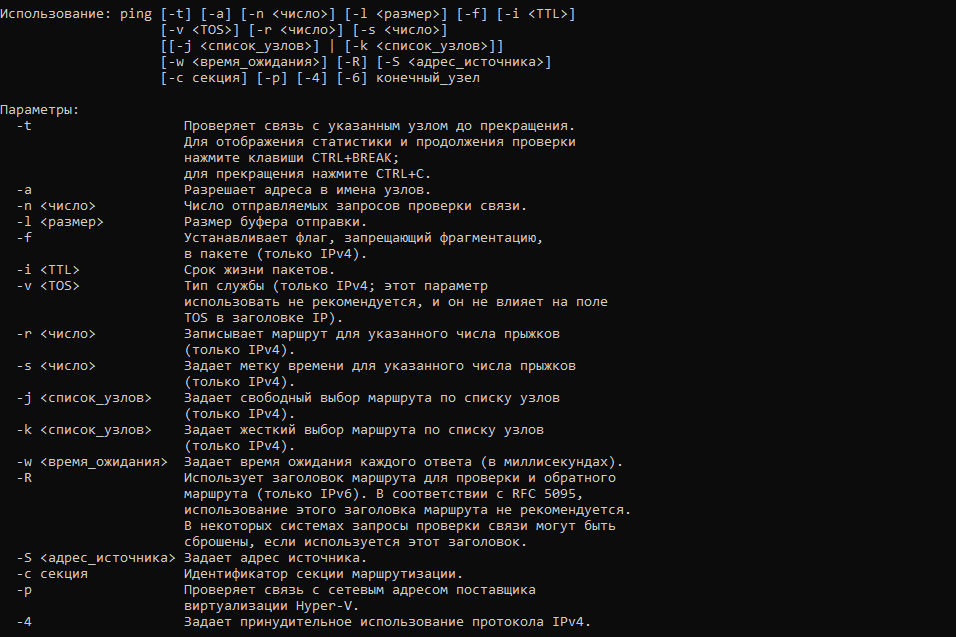
Команда ping в Windows имеет следующие параметры, которые позволяют решать разные задачи:
ping [/t] [/a] [/n <count>] [/l <size>] [/f] [/I <TTL>] [/v <TOS>] [/r <count>] [/s <count>] [{/j <hostlist> | /k <hostlist>}] [/w <timeout>] [/R] [/S <Srcaddr>] [/4] [/6] <targetname>
Чтобы посмотреть в командной строке (cmd) ping-команды, вызовите справку:
ping /?
 На Linux параметры команды отличаются. Чтобы посмотреть доступные опции, выполните в терминале команду:
ping -help

Суть команды ping проста, но примеров ее использования очень много. Давайте посмотрим, что можно делать с ее помощью.
Комьюнити теперь в Телеграм
Подпишитесь и будьте в курсе последних IT-новостей
Подписаться
Простая проверка доступности
Это то, что делали многие пользователи, – пинговали популярные ресурсы, чтобы убедиться, что интернет на их компьютере работает. Эта же команда используется для проверки доступности.
Пример запроса:
ping google.com // вместо домена можно указать IP-адрес
Windows отправит только 4 запроса, после чего выдаст статистику для указанного адреса. Можно убрать это ограничение, указав параметр -t.
Чтобы прервать отправку и получить статистику, нажимаем сочетание клавиш Ctrl+C.

По умолчанию команда ping IP-адреса на Linux посылает пакеты, пока вы не прервете их отправку вручную с помощью сочетания клавиш Ctrl+C. Чтобы ограничить количество, укажем нужное число. Например:
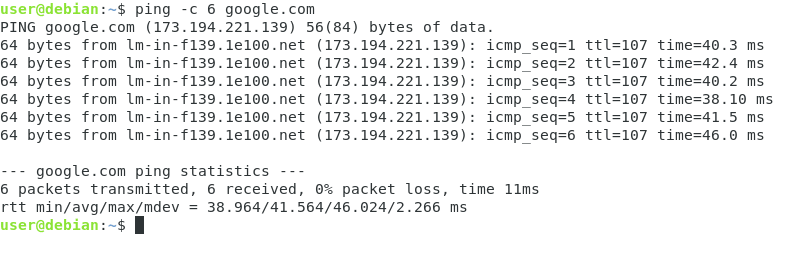
ping -c 3 google.com // будет отправлено 3 пакета
Изменение интервала между отправкой пакетов
По умолчанию пакеты отправляются с интервалом в одну секунду. Но можно установить другое время.
ping -i 5 IP-адрес // 5 секунд между отправкой пакетов

ping -i 0.2 IP-адрес // 2 миллисекунды между отправкой пакетов
Для установки значений меньше 0.2 секунды требуются права суперпользователя (sudo).
Массовая отправка пакетов для нагрузочного тестирования
Эта возможность также доступна только суперпользователям:
ping -f IP-адрес // за секунду будут отправлены сотни тысяч запросов
Изменение размера пакета
По умолчанию размер пакета – 32 байта. Можно установить другой размер:
$ ping -s 100 IP-адрес // значения указываются в байтах
Включение звукового сигнала
Если ответа от хоста нет, отправляем эту команду:
Затем начинаем искать причину сбоя. После ее устранения воспроизведется звуковой сигнал. Он говорит о том, что хост теперь отвечает.
Вывод статистики ping
Чтобы не засорять терминал лишней информацией, пропустим ответы хоста и сразу получим статистику:
А можно, наоборот, получать статистику выполнения без прерывания команды. Для этого нужно нажать сочетание клавиш CTRL + |.
В этой статье мы расскажем, что делает команда Ping, и разберём, где может понадобиться команда Ping.
Ping: описание команды
Серверы требуют постоянной диагностики своих систем. Одним из базовых инструментов, который помогает в администрировании сервера, является утилита Ping. Её основная задача ― определение работоспособности узла, сайта или сервера в интернете.
Как это работает? Команда Ping в cmd посылает небольшие пакеты на сервер, который нужно проверить. Через некоторое время от сервера приходит ответ ― те же пакеты, что и были отправлены. Исходя из этого ответа оценивается работоспособность сервера. Устройство работает нормально, если отправленные пакеты вернулись полностью и быстро.
Кроме проверки доступности удалённого хоста, с помощью этой команды можно:
- измерить время, за которое сервер отвечает на команду,
- выявить IP-адреса хоста в локальной и глобальной сети,
- определить качество соединения (были ли потеряны пакеты в пути),
- внедрить команду в bash-скрипт для автоматической проверки сетевого устройства.
Обратите внимание! Если вы используете прокси-сервер, команда пинг работать не будет, так как для её действия нужно прямое соединение с устройством.
У команды есть несколько параметров, которые предназначены для разных задач. Чтобы посмотреть все возможные опции, введите в командной строке:
В Windows:
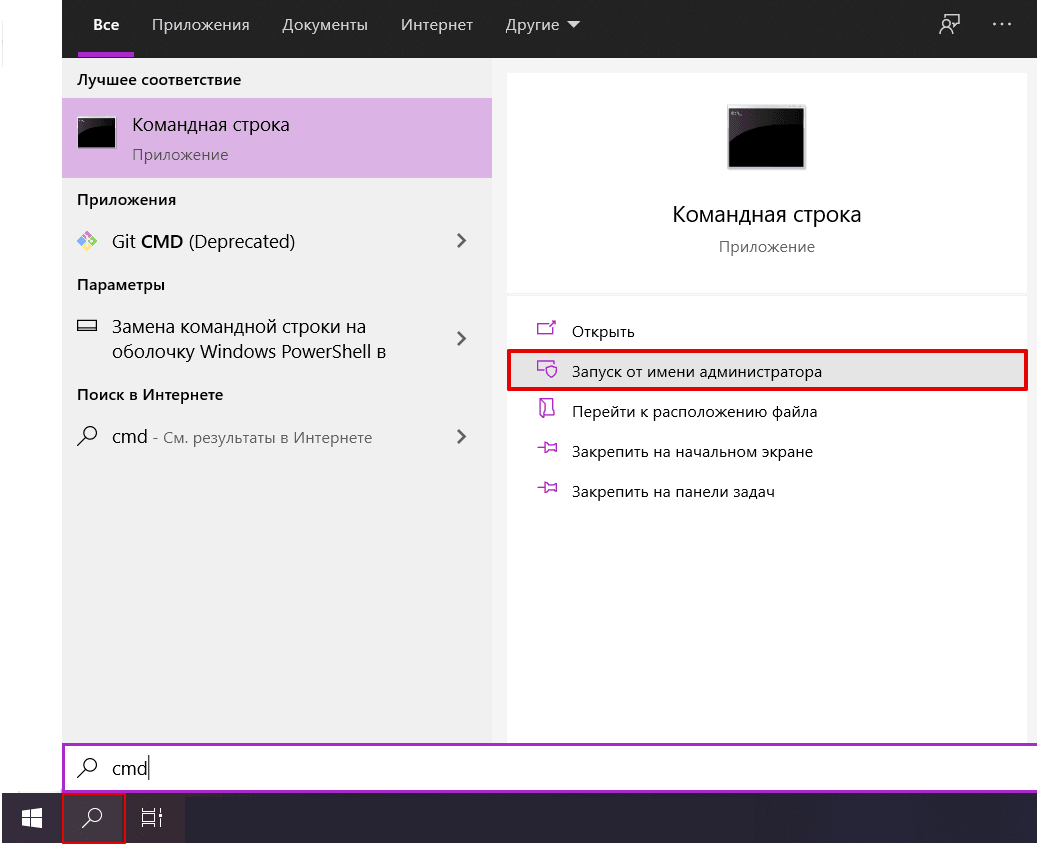
Как войти в командную строку Windows
-
1.
Нажмите значок поиска на Панели задач.
-
2.
В строке поиска введите cmd.
-
3.
В результатах поиска найдите Командная строка.
-
4.
В открывшемся меню выберите пункт Запустить от имени администратора:

В Linux:
Перед вами появится весь список доступных параметров:
Как проверить доступность и работоспособность сервера
Это самый простой запрос. Устройство должно отправить некоторое количество пакетов на нужный сервер и проверить время ответа и количество возвращённых параметров. Также этим методом пользователи пингуют популярные сайты, чтобы узнать, есть ли проблемы с интернет-соединением на их устройстве.
Для проверки доступности сервера введите:
Вместо domain.name может быть указан:
- любой домен, например доменное имя вашего сайта, на котором наблюдаются неполадки,
- IP-адрес.
На Windows и Linux эта команда работает по-разному. Команда Ping в Linux посылает пакеты, пока вы не прервёте их отправку вручную с помощью сочетания клавиш Ctrl+C.
Вам придёт ответ:

Ubuntu ping
В выданной статистике будет информация о количестве отправленных, полученных и потерянных пакетов, а также минимальное, максимальное и среднее время их передачи.
На Windows команда по умолчанию отправляет только 4 пакета. Если на Windows вам нужно отправить больше пакетов, можно ввести команду с параметром -t. Это будет выглядеть так:
Команда будет бесконечно пинговать удалённый сервер, пока вы не нажмёте Ctrl+C. После остановки перед вами снова появится статистика, но отправленных пакетов будет больше.
Хорошим временем отклика считается 10 ms, удовлетворительным ― до 20 ms. Значения выше этих могут говорить о проблеме при работе с удалённым сервером.
Вместо цифр может появиться фраза «Превышен интервал ожидания». Такое бывает, когда сервер не успел ответить за 4 секунды. Это установленное по умолчанию время ожидания для утилиты. Такой ответ не всегда говорит о проблемах на сервере. Ping-запросы не приоритетны. Если сервер перегружен, он может выполнить их позже. Можно увеличить время ожидания сервера по инструкции ниже и попробовать ещё раз.
Как увеличить время ожидания ответа от сервера
Время ожидания ответа можно изменить с помощью параметра -w.
Введите:
Где 5000 ― время ожидания в миллисекундах (1с = 1000 мс).
Как отправить определённое количество пакетов
Необязательно вручную останавливать отправку пакетов. Можно сразу ограничить их количество параметром -c. Для этого введите:
Где:
- 6 ― количество пакетов,
- domain.name ― доменное имя или IP-адрес.
Как изменить размер пакета
По умолчанию команда отправляет пакеты размером по 56 байт. Такой размер файлов не влияет на работу сети при пинговании. Если нужно, вес пакетов можно изменить. Для этого используйте параметр -s. Введите:
ping -s packet_size domain.nameГде:
- packet_size ― размер пакета в байтах,
- domain.name ― доменное имя или IP-адрес.
Например: ping —s 100 123.456.1.1
Как изменить интервал времени отправления пакета
По умолчанию пакеты отправляются с интервалом в 1 секунду. Если вы хотите сделать интервал меньше или больше, введите:
Где:
- 5 ― количество секунд между отправками пакетов,
- domain.name ― доменное имя или IP-адрес.
Обратите внимание! Для установки значений меньше 0,2 секунды требуются права суперпользователя.
Комбинация параметров
Чтобы получить подходящую команду, можно комбинировать параметры.
Например: ping —с 6 —s 100 domain.name.
Как протестировать нагрузку
Чтобы протестировать нагрузку, нужно организовать массовую отправку пакетов. Обратите внимание, эта команда доступна только для суперпользователя. Введите:
За секунду будут отправлены тысячи запросов. Чтобы прекратить отправку, нажмите Ctrl+C. Система покажет вам количество отправленных и обработанных пакетов.
Как включить звуковой сигнал для уведомления о начале работы
Если на сервере есть сбой, для его решения нужно будет глубоко погружаться в настройки системы. Для удобства можно установить звуковой сигнал. Как только проблема на сервере будет устранена, утилита автоматически оповестит пользователя о восстановлении соединения.
Для включения звукового сигнала введите:
Как вывести только результат проверки Ping в Linux
Если вы не хотите заполнять терминал пакетами, можно использовать параметр -q. Вы не будете наблюдать все параметры, а получите только статистику. Введите:
Если пакеты от команды Ping не принимаются, это может говорить о проблемах на сервере или о том, что на устройстве отключена функция ответа на ping-запросы. В обоих случаях можно воспользоваться детальной проверкой с помощью утилит tracert (для Windows) и traceroute (для Linux).
������������� ������� ��������� ��������� ���������� (man-��)
ping (8)
NAME
ping, ping6 - send ICMP ECHO_REQUEST to network hosts
SYNOPSIS
ping [ -LRUbdfnqrvVaAB] [ -c count] [ -i interval] [ -l preload] [ -p pattern] [ -s packetsize] [ -t ttl] [ -w deadline] [ -F flowlabel] [ -I interface] [ -M hint] [ -Q tos] [ -S sndbuf] [ -T timestamp option] [ -W timeout] [ hop …] destination
DESCRIPTION
ping uses the ICMP protocol’s mandatory ECHO_REQUEST
datagram to elicit an ICMP ECHO_RESPONSE from a host or gateway.
ECHO_REQUEST datagrams («pings») have an IP and ICMP
header, followed by a struct timeval and then an arbitrary
number of «pad» bytes used to fill out the packet.
OPTIONS
- -a
- Audible ping.
- -A
-
Adaptive ping. Interpacket interval adapts to round-trip time, so that
effectively not more than one (or more, if preload is set) unanswered probes
present in the network. Minimal interval is 200msec for not super-user.
On networks with low rtt this mode is essentially equivalent to flood mode. - -b
- Allow pinging a broadcast address.
- -B
-
Do not allow ping to change source address of probes.
The address is bound to one selected when ping starts. - -c count
-
Stop after sending count ECHO_REQUEST
packets. With
deadline
option, ping waits for
count ECHO_REPLY packets, until the timeout expires. - -d
-
Set the SO_DEBUG option on the socket being used.
Essentially, this socket option is not used by Linux kernel. - -F flow label
-
Allocate and set 20 bit flow label on echo request packets.
(Only ping6). If value is zero, kernel allocates random flow label. - -f
-
Flood ping. For every ECHO_REQUEST sent a period «.» is printed,
while for ever ECHO_REPLY received a backspace is printed.
This provides a rapid display of how many packets are being dropped.
If interval is not given, it sets interval to zero and
outputs packets as fast as they come back or one hundred times per second,
whichever is more.
Only the super-user may use this option with zero interval. - -i interval
-
Wait interval seconds between sending each packet.
The default is to wait for one second between each packet normally,
or not to wait in flood mode. Only super-user may set interval
to values less 0.2 seconds. - -I interface address
-
Set source address to specified interface address. Argument
may be numeric IP address or name of device. When pinging IPv6
link-local address this option is required. - -l preload
-
If preload is specified,
ping sends that many packets not waiting for reply.
Only the super-user may select preload more than 3. - -L
-
Suppress loopback of multicast packets. This flag only applies if the ping
destination is a multicast address. - -n
-
Numeric output only.
No attempt will be made to lookup symbolic names for host addresses. - -p pattern
-
You may specify up to 16 «pad» bytes to fill out the packet you send.
This is useful for diagnosing data-dependent problems in a network.
For example, -p ff will cause the sent packet
to be filled with all ones. - -Q tos
-
Set Quality of Service -related bits in ICMP datagrams.
tos can be either decimal or hex number.
Traditionally (RFC1349), these have been interpreted as: 0 for reserved
(currently being redefined as congestion control), 1-4 for Type of Service
and 5-7 for Precedence.
Possible settings for Type of Service are: minimal cost: 0x02,
reliability: 0x04, throughput: 0x08, low delay: 0x10. Multiple TOS bits
should not be set simultaneously. Possible settings for
special Precedence range from priority (0x20) to net control (0xe0). You
must be root (CAP_NET_ADMIN capability) to use Critical or
higher precedence value. You cannot set
bit 0x01 (reserved) unless ECN has been enabled in the kernel.
In RFC2474, these fields has been redefined as 8-bit Differentiated
Services (DS), consisting of: bits 0-1 of separate data (ECN will be used,
here), and bits 2-7 of Differentiated Services Codepoint (DSCP). - -q
-
Quiet output.
Nothing is displayed except the summary lines at startup time and
when finished. - -R
-
Record route. (IPv4 only)
Includes the RECORD_ROUTE option in the ECHO_REQUEST
packet and displays the route buffer on returned packets.
Note that the IP header is only large enough for nine such routes.
Many hosts ignore or discard this option. - -r
-
Bypass the normal routing tables and send directly to a host on an attached
interface.
If the host is not on a directly-attached network, an error is returned.
This option can be used to ping a local host through an interface
that has no route through it provided the option -I is also
used. - -s packetsize
-
Specifies the number of data bytes to be sent.
The default is 56, which translates into 64 ICMP
data bytes when combined with the 8 bytes of ICMP header data. - -S sndbuf
-
Set socket sndbuf. If not specified, it is selected to buffer
not more than one packet. - -t ttl
- Set the IP Time to Live.
- -T timestamp option
-
Set special IP timestamp options.
timestamp option may be either
tsonly (only timestamps),
tsandaddr (timestamps and addresses) or
tsprespec host1 [host2 [host3 [host4]]]
(timestamp prespecified hops). - -M hint
-
Select Path MTU Discovery strategy.
hint may be either do
(prohibit fragmentation, even local one),
want (do PMTU discovery, fragment locally when packet size
is large), or dont (do not set DF flag). - -U
-
Print full user-to-user latency (the old behaviour). Normally
ping
prints network round trip time, which can be different
f.e. due to DNS failures. - -v
- Verbose output.
- -V
- Show version and exit.
- -w deadline
-
Specify a timeout, in seconds, before
ping
exits regardless of how many
packets have been sent or received. In this case
ping
does not stop after
count
packet are sent, it waits either for
deadline
expire or until
count
probes are answered or for some error notification from network. - -W timeout
-
Time to wait for a response, in seconds. The option affects only timeout
in absense of any responses, otherwise ping waits for two RTTs.
When using ping for fault isolation, it should first be run
on the local host, to verify that the local network interface is up
and running. Then, hosts and gateways further and further away should be
«pinged». Round-trip times and packet loss statistics are computed.
If duplicate packets are received, they are not included in the packet
loss calculation, although the round trip time of these packets is used
in calculating the minimum/average/maximum round-trip time numbers.
When the specified number of packets have been sent (and received) or
if the program is terminated with a
SIGINT, a brief summary is displayed. Shorter current statistics
can be obtained without termination of process with signal
SIGQUIT.
If ping does not receive any reply packets at all it will
exit with code 1. If a packet
count
and
deadline
are both specified, and fewer than
count
packets are received by the time the
deadline
has arrived, it will also exit with code 1.
On other error it exits with code 2. Otherwise it exits with code 0. This
makes it possible to use the exit code to see if a host is alive or
not.
This program is intended for use in network testing, measurement and
management.
Because of the load it can impose on the network, it is unwise to use
ping during normal operations or from automated scripts.
ICMP PACKET DETAILS
An IP header without options is 20 bytes.
An ICMP ECHO_REQUEST packet contains an additional 8 bytes worth
of ICMP header followed by an arbitrary amount of data.
When a packetsize is given, this indicated the size of this
extra piece of data (the default is 56). Thus the amount of data received
inside of an IP packet of type ICMP ECHO_REPLY will always be 8 bytes
more than the requested data space (the ICMP header).
If the data space is at least of size of struct timeval
ping uses the beginning bytes of this space to include
a timestamp which it uses in the computation of round trip times.
If the data space is shorter, no round trip times are given.
DUPLICATE AND DAMAGED PACKETS
ping will report duplicate and damaged packets.
Duplicate packets should never occur, and seem to be caused by
inappropriate link-level retransmissions.
Duplicates may occur in many situations and are rarely (if ever) a
good sign, although the presence of low levels of duplicates may not
always be cause for alarm.
Damaged packets are obviously serious cause for alarm and often
indicate broken hardware somewhere in the
ping packet’s path (in the network or in the hosts).
TRYING DIFFERENT DATA PATTERNS
The (inter)network layer should never treat packets differently depending
on the data contained in the data portion.
Unfortunately, data-dependent problems have been known to sneak into
networks and remain undetected for long periods of time.
In many cases the particular pattern that will have problems is something
that doesn’t have sufficient «transitions», such as all ones or all
zeros, or a pattern right at the edge, such as almost all zeros.
It isn’t necessarily enough to specify a data pattern of all zeros (for
example) on the command line because the pattern that is of interest is
at the data link level, and the relationship between what you type and
what the controllers transmit can be complicated.
This means that if you have a data-dependent problem you will probably
have to do a lot of testing to find it.
If you are lucky, you may manage to find a file that either can’t be sent
across your network or that takes much longer to transfer than other
similar length files.
You can then examine this file for repeated patterns that you can test
using the -p option of ping.
TTL DETAILS
The TTL value of an IP packet represents the maximum number of IP routers
that the packet can go through before being thrown away.
In current practice you can expect each router in the Internet to decrement
the TTL field by exactly one.
The TCP/IP specification states that the TTL field for TCP
packets should be set to 60, but many systems use smaller values
(4.3 BSD uses 30, 4.2 used 15).
The maximum possible value of this field is 255, and most Unix systems set
the TTL field of ICMP ECHO_REQUEST packets to 255.
This is why you will find you can «ping» some hosts, but not reach them
with
telnet(1)
or
ftp(1).
In normal operation ping prints the ttl value from the packet it receives.
When a remote system receives a ping packet, it can do one of three things
with the TTL field in its response:
- *
-
Not change it; this is what Berkeley Unix systems did before the
4.3BSD Tahoe release. In this case the TTL value in the received packet
will be 255 minus the number of routers in the round-trip path. - *
-
Set it to 255; this is what current Berkeley Unix systems do.
In this case the TTL value in the received packet will be 255 minus the
number of routers in the path from
the remote system to the pinging host. - *
-
Set it to some other value. Some machines use the same value for
ICMP packets that they use for TCP packets, for example either 30 or 60.
Others may use completely wild values.
BUGS
- *
- Many Hosts and Gateways ignore the RECORD_ROUTE option.
- *
-
The maximum IP header length is too small for options like
RECORD_ROUTE to be completely useful.
There’s not much that that can be done about this, however. - *
-
Flood pinging is not recommended in general, and flood pinging the
broadcast address should only be done under very controlled conditions.
SEE ALSO
netstat(1),
ifconfig(8).
HISTORY
The ping command appeared in 4.3BSD.
The version described here is its descendant specific to Linux.
SECURITY
ping requires CAP_NET_RAWIO capability
to be executed. It may be used as set-uid root.
AVAILABILITY
ping is part of iputils package
and the latest versions are available in source form for anonymous ftp
ftp://ftp.inr.ac.ru/ip-routing/iputils-current.tar.gz.
Index
- NAME
- SYNOPSIS
- DESCRIPTION
- OPTIONS
- ICMP PACKET DETAILS
- DUPLICATE AND DAMAGED PACKETS
- TRYING DIFFERENT DATA PATTERNS
- TTL DETAILS
- BUGS
- SEE ALSO
- HISTORY
- SECURITY
- AVAILABILITY
![]()
Download Article
The complete guide to using the Linux ping command and interpreting the results
![]()
Download Article
- How Ping Works
- How to Ping
- Understanding Ping Results
- Advanced Ping Examples
- Video
- Q&A
- Tips
- Warnings
|
|
|
|
|
|
|
The ping command is extremely helpful for troubleshooting and testing network speed and connectivity issues in Linux. Ping works by sending packets of data to an IP address or hostname and reporting how long it takes to receive a response. You can use the results of a ping test to figure out whether a site or server is reachable, and if so, whether there’s any packet loss slowing things down. This wikiHow tutorial will teach you how to run the ping command in a Linux terminal, and how to understand ping results and statistics.
Things You Should Know
- The basic syntax for ping is ping <ip address>, where <ip address> is the address of another device.
- To ping an iPv6 IP address instead of an iPv4 address, you’ll use ping -6 <ip address>.
- «Destination host unreachable» means the host is down or that there is no route from your Linux computer to that host.
- «Request timed out» sometimes indicates problems on the remote computer or network, but could also just mean that there’s a firewall blocking the connection.
-
1
The ping command works by sending small packets of data to a server or host and waiting for a reply. You can ping another computer on your network, a website, a printer, a smartphone, or any other location on the internet that has a hostname or IP address. The packets sent by ping include an ICMP ECHO_REQUEST, which is basically a request that says «reply if you get this.»
-
2
When the host receives the ping request, it will reply with echo packets. These replies contain lots of helpful information, including the amount of time it took for each packet to reach the destination, and whether any packets were lost along the way. This information is easy to interpret and super helpful for diagnosing network problems.


Advertisement
-
1
Open a Terminal window. You can do this on most versions of Linux, including Ubuntu, by pressing Ctr + Alt + T. You can also double-click the Terminal app icon in your app list.
-
2
Run a basic ping. At the prompt, type ping followed by the IP address, hostname, or domain name that you want to test. When you press Enter, you’ll see the echoed results as individual entries.
-
Basic ping examples:
- To ping a website like Facebook, you’d type ping www.facebook.com or ping facebook.com.
- To ping an IPv4 IP address, such as 10.0.0.1, you’d type ping 10.0.0.1.
- To ping an IPv6 IP address, you’ll add the -6 option. To ping Facebook’s IPv6 address, you’d use ping -6 2a03:2880:f02c:13:face:b00c:0:3.
- You can also ping your own computer (localhost) to make sure your network adapter is working property. To do this, you’d use ping localhost or ping 127.0.0.1.
- For more ping examples, see Advanced Ping Examples.
-
Basic ping examples:
-
3
Press Ctrl+C to stop the ping. In Linux, the ping command will continue to display echo results until you stop the process with this keyboard shortcut. Once you stop the ping, you’ll see a statistics summary of the ping right above the prompt.


Advertisement
-
1
Check the ping statistics. At the bottom of your ping replies, you’ll see a section that says «(host or IP) ping statistics.» In Linux, you’ll find helpful information in this section, including:
-
Packets transmitted and packets received. For example, if you stopped the ping after sending 15 packets, you’ll see «15 packets transmitted,» followed by the number of packets received by the host.
- Packets that are sent but not received indicate packet loss. If some packets are lost, you’ll notice a slower or inconsistent connection between your computer and the host. For example, lag in games and sluggish downloads.
-
Percentage of packets lost. For example, if none of the packets were received by the host, you’ll see «100% packet loss» in the reply. If 2 out of 4 were received, you’ll see «50% packet loss.»
- Packet loss can be caused by many things, including network congestion, router problems, network hardware issues, and configuration issues on the remote server.[1]
- If 100% of packets are lost, there might not actually be a problem. Some servers discard ICMP packets as a security measure to avoid ping flooding, a type of denial of service attack.
- Packet loss can be caused by many things, including network congestion, router problems, network hardware issues, and configuration issues on the remote server.[1]
-
Round trip time (RTT). This tells you how long it took for each packet to be sent to the host, plus the amount of time it took for Linux to receive the reply in milliseconds (MS).[2]
- RTT is shown as multiple values: The minimum RTT (the shortest amount of time), average RTT, MAX RTT (the longest), and then MDEV RTT (mean deviation).[3]
You’ll also see a «time» value, which tells you the total amount of time the entire process took from start to finish.
- RTT is shown as multiple values: The minimum RTT (the shortest amount of time), average RTT, MAX RTT (the longest), and then MDEV RTT (mean deviation).[3]
-
Packets transmitted and packets received. For example, if you stopped the ping after sending 15 packets, you’ll see «15 packets transmitted,» followed by the number of packets received by the host.
-
2
Interpret ping errors. If you’re pinging a server, you might encounter one of these errors:
- Unknown host: If you’re trying to ping host or domain name that cannot be resolved, you’ll see this error. This could mean the host or domain does not exist, but also may mean the name cannot be translated into an IP address by your DNS servers.
- Destination host unreachable: This error means your computer was unable to send any packets to the address. This could indicate a problem on your network, or somewhere on the internet between your own network and the remote host’s.
- Request timed out: In this case, the problem is definitely not related to your own computer or network. Your computer sent the ping request, but did not receive a reply. The host may not be online, there could be a network problem on the host’s end, or the ping could’ve been blocked by the host’s firewall.
- Name or service not known: This error means the hostname or address you’re trying to ping does not exist. If the host does exist, there’s a problem with your network configuration.


Advertisement
-
1
Specify the number of packets to send. As you know from your basic ping, Linux will ping the destination repeatedly until you stop the ping by pressing Ctrl + C. If you just want to do a quick ping test that ends on its own, you can specify the number of packets to send using the -c option.
- For example, to send 5 packets to facebook.com, you’d use ping -c 5 facebook.com. The ping will stop on its own after 5 packets are sent and report the results.
- As an alternative, you can use the -w option to stop the ping after a number of seconds instead of specifying the packet number. For example, to ping Facebook for 10 seconds and then display the results, you’d use ping -w 10 facebook.com.
-
2
Change the interval between packets. By default, a ping waits one second between each packet sent. If you want to increase or decrease the time between packets sent, you can use the -i option with ping.[4]
- To increase the wait to 3 seconds between packets in your ping to Facebook, you’d use ping -i 3 facebook.com.
- To decrease the wait to half of one second, you’d use ping -i 0.5 facebook.com.
-
3
Change the size of your packets. By default, ping packets are 56 bytes, which actually translates to 64 ICMP data bytes.[5]
You can send larger or smaller packets using the -s option.- For example, if you’re running into performance trouble on your own network, you can try to send larger packets to see if your traffic is throttled. To send 1000 bytes instead of the default, you’d use ping -s 1000 facebook.com.
-
4
Do a ping flood to test your network’s performance. A great way to see how your network performs under heavy load is to «flood» a device on your network with ping requests. This outputs packets as fast as they return or 100 times per second, whichever is greater.[6]
You can do this using the -f option.- Proceed with caution, as a ping flood can overload your network.
- Because you’ll need root access to do a ping flood, you’ll need to preface the command with sudo.
- To perform a flood ping, use sudo ping -f <hostname>.
-
5
Play a sound when a host is reachable. If you’re testing a host and want to run a continuous ping until the host is reachable again, you can use the -a option.
- For example, if the local IP address 10.0.0.2 is unreachable and you want to know when it comes back up, you’d use ping -a 10.0.0.2. Once the host is reachable, the ping will run normally and display the output.
-
6
Skip the live echo responses and only display the summary. If you don’t want to see the live results of your ping and only need the statistics, you can use the -q command. For example, ping -q facebook.com.
- However, you won’t see the statistics at all until you press Ctrl + C. Because of this, you’ll usually use -q in conjunction with specifying the number of packets to send. A better way to use -q is with the -c flag, which allows you to specify the number of packets to send. For example:
- ping -c 5 -q facebook.com.
- In this example, you’ll send 5 packets of data to Facebook only. Once the packets are sent and the echoes are received, the statistics will appear.
- However, you won’t see the statistics at all until you press Ctrl + C. Because of this, you’ll usually use -q in conjunction with specifying the number of packets to send. A better way to use -q is with the -c flag, which allows you to specify the number of packets to send. For example:


Advertisement
Add New Question
-
Question
From root, can we ping others in Linux?

Yes, in root or regular user you can.
-
Question
How do I stop my machine from pinging other machines?
In a command prompt, press «Ctrl + C» to end processes in a command line. If you are not actively doing it in a command line, see if your computer is connected to a network or VPN. If not, try to find which kind of device it’s pinging and where it is located. If all else fails, either it’s nothing or you are being watched/hacked.
-
Question
How to stop a Linux Mint PC once you have used the ping command?
Cntrl + C will stop the ping if you ever start it. You can do the same to stop just about any process in Linux if you started it via command.
See more answers
Ask a Question
200 characters left
Include your email address to get a message when this question is answered.
Submit
Advertisement
Video
-
The «ping» command as it’s written here can also be used verbatim in the Command Prompt on Windows and the Terminal on Mac.
Thanks for submitting a tip for review!
Advertisement
-
Not all websites will allow you to ping their true addresses, so your ping results might not always be accurate.
Advertisement
About This Article
Article SummaryX
1. Press Ctrl+Alt+T to open the terminal.
2. Type «sudo ping -v» to install Ping Version
3. Type «Ping» followed by the website or IP address you want to ping.
4. Press Enter.
Did this summary help you?
Thanks to all authors for creating a page that has been read 674,925 times.
Is this article up to date?
 Обновлено: 19.10.2021
Опубликовано: 27.06.2016
Тематические термины: Ping, Windows, Linux.
Мы рассмотрим использование команды ping для Windows и, немного, для Linux.
Параметры команды ping и их описание
В зависимости от используемой операционной системы опции команды будут иметь разные назначения. Поэтому, если мы хотим понять все возможности, стоит ознакомиться с опцией help.
Общий синтаксис
Независимо от системы, команду ping можно применять так:
ping [опции] <имя сервера или IP-адрес>
Windows
Для просмотра в Windows также используйте команду ping /?
Используются часто:
| Параметр | Описание |
|---|---|
| -t | Команда будет отправлять запросы на проверку постоянно, пока ее не прервать клавишами Ctrl + C. Удобно, если сеть не работает и чтобы постоянно не проверять, появилась ли связь. |
| -a | Пытается определить имя узла через DNS. |
| -n | Задает определенное число попыток отправки запроса. |
| -l | Размер пакета. Используется для проверки стабильности сети, создания тестовой нагрузки и так далее. |
| -f | По умолчанию ping разрешает фрагментацию, то есть пакет может быть разбит на несколько для соответствия минимальному пропускаемому размеру (MTU). Данный флаг это запрещает. Используется для определения вышеупомянутого MTU. |
| -i | Задает срок жизни пакета (количество сетевых устройств, через которые может пройти сигнал). Может использоваться в случаях, когда количество оборудования слишком велико. Также можно определить его количества. |
| -w | Устанавливает время ожидания. Применяется, если существуют проблемы производительности на сети или расстояние до узла очень большое. |
| -S | Позволяет выполнить проверку сети с определенного источника. Может быть использовано с узла с несколькими сетевыми адаптерами и отправкой запроса с определенного. |
| -4 | Использовать только IPv4. |
| -6 | Использовать только IPv6. |
Используются редко
| Параметр | Описание |
|---|---|
| -r | Записывает маршрут для указанного числа прыжков. |
| -s | Задает метку времени для указанного числа прыжков. |
| -j | Задает свободный выбор маршрута по списку узлов. |
| -k | Задает жесткий выбор маршрута по списку узлов. |
| -R | Использует заголовок маршрута для проверки и обратного маршрута. |
Linux
При минимальной инсталляциии данной системы или использовании docker, утилиты ping может не быть. В таком случае мы увидим ошибку:
bash: ping: command not found
Для ее установки можно воспользоваться менеджером установки пакетов. В зависимости от типа операционной системы, наши команды будут немного отличаться.
а) для систем на базе deb (Debian, Ubuntu, Mint):
apt install iputils-ping
б) для систем на базе RPM (Rocky Linux, CentOS, Red Hat, Fedora):
yum install iputils
Готово, теперь можно пользоваться командой ping.
Список ключей можно посмотреть так:
ping -h
Примеры использования
Простой пример использования команды ping
ping yahoo.com
Примерный ответ с исправной связью:
Обмен пакетами с yahoo.com [206.190.36.45] с 32 байтами данных:
Ответ от 206.190.36.45: число байт=32 время=191мс TTL=47
Ответ от 206.190.36.45: число байт=32 время=191мс TTL=47
Пример ответа, если узел недоступен:
Обмен пакетами с yahoo.com [206.190.36.45] по с 32 байтами данных:
Превышен интервал ожидания для запроса.
Превышен интервал ожидания для запроса.
* до удаленного узла нет сигнала. Возможно, существуют неполадки на сети.
или
При проверке связи не удалось обнаружить узел
Проверьте имя узла и повторите попытку.
* не удалось определить имя узла. Возможные неполадки: нет связи с DNS, не работает DNS, запрашиваемого имени узла не существует.
В Linux при отсутствии ответа, мы ничего не увидим, но если нам нужно видеть неудачные попытки, то используем ping с опцией -O:
ping -O 206.190.36.45
Открытие порта для Ping
Справедливо заметить, что не во всех случаях отсутствие ответа на ping означает, что удаленный узел недоступен. Администратор ресурса может намеренно отключить ответы на эхо-запросы.
Также важно знать, что ping не использует конкретный номер порта. Чтобы открыть возможность пинга, необходимо либо найти соответствующую опцию (во многих домашних роутерах) или разрешить ICMP (Internet Control Message Protocol) на брандмауэре. Ну, или наоборот — чтобы закрыть возможность пинга, блокируем запросы ICMP.
Проверка портов
С помощью команды ping нельзя проверить открытость того или иного порта.
Для этих целей используется команда telnet или программа, например, nmap.
![]()
Была ли полезна вам эта инструкция?
Да Нет