-
Contents
-
Table of Contents
-
Bookmarks
Quick Links
MGate MB3000 Modbus Gateway
User Manual
Sixth Edition, July 2012
www.moxa.com/product
2012 Moxa Inc. All rights reserved.
Related Manuals for Moxa Technologies MGate MB3000 Series
Summary of Contents for Moxa Technologies MGate MB3000 Series
-
Page 1: User Manual
MGate MB3000 Modbus Gateway User Manual Sixth Edition, July 2012 www.moxa.com/product 2012 Moxa Inc. All rights reserved.
-
Page 2
Information in this document is subject to change without notice and does not represent a commitment on the part of Moxa. Moxa provides this document “as is,” without warranty of any kind, either expressed or implied, including, but not limited to, its particular purpose. Moxa reserves the right to make improvements and/or changes to this manual, or to the products and/or the programs described in this manual, at any time. -
Page 3: Table Of Contents
Table of Contents Chapter 1 Introduction ………………..1-1 Overview ……………………..1-2 Package Checklist ……………………. 1-3 Product Features ……………………1-3 Chapter 2 Getting Started ………………2-1 Connecting Power …………………… 2-2 Connecting Serial Devices………………..2-2 RS-485 Termination and Pull High/Low Resistors …………2-3 Connecting to a Host or the Network ……………….
-
Page 4
Configure Serial Port for RTU or ASCII, Master or Slave ……… 9-10 What is ProCOM? …………………. 9-11 How to Configure ProCOM for the MGate MB3000 ……….9-11 Configure IP Address and Other Network Settings ………… 9-14 Configure Serial Communication Parameters …………9-16 Set up Slave ID Mapping (Smart Routing) ………….. -
Page 5
Introduction …………………….11-2 Replace Serial Masters with Ethernet Master(s), Slave IDs are Configurable ….11-2 Replace Serial Masters with Ethernet Master(s), Slave IDs are Fixed ……..11-3 Keep Serial Master and Add Ethernet Master(s) …………..11-3 Integrate Modbus RTU, ASCII, and TCP at the Same Time ……….11-4 Appendix A Modbus Overview ………………. -
Page 6: Chapter 1 Introduction
Introduction Chapter 1 Welcome to the MGate MB3000 line of Modbus gateways. All models feature easy integration of Modbus TCP to Modbus RTU/ASCII and feature RS-232/422/485 ports for Modbus serial communication. One, two, and four-port models are available. This chapter is an introduction to the MGate MB3000 and includes the following sections: …
-
Page 7: Overview
In order to integrate Modbus networks, the MGate MB3000 includes an Ethernet port and up to four serial ports that support RS-232, RS-422, and RS-485 communication. It automatically and…
-
Page 8: Package Checklist
MGate MB3000 User’s Manual Hardware Reference: MB3270, MB3270I Package Checklist All models in the MGate MB3000 line are shipped with the following items: Standard Accessories 1 MGate MB3000 Modbus gateway Document & software CD Quick Installation Guide …
-
Page 9: Chapter 2 Getting Started
Getting Started Chapter 2 This chapter provides basic instructions for installing the MGate MB3000. The following topics are covered: Connecting Power Connecting Serial Devices RS-485 Termination and Pull High/Low Resistors Connecting to a Host or the Network …
-
Page 10: Connecting Power
MGate MB3000 User’s Manual Getting Started Connecting Power The unit can be powered using the AC adaptor or by connecting a power source to the terminal block, depending on the model. The following instructions are for the AC adaptor: 1. Plug the connector of the power adapter into the DC-IN jack on the back of the unit.
-
Page 11: Rs-485 Termination And Pull High/Low Resistors
ATTENTION Do not use the 1 KΩ pull high/low setting on the MGate MB3000 when using the RS-232 interface. Doing so will degrade the RS-232 signals and reduce the effective communication distance. Connecting to a Host or the Network A 10/100BaseT Ethernet port is located on the unit’s front panel.
-
Page 12: Chapter 3 Hardware: Mb3180
Hardware: MB3180 Chapter 3 This chapter provides hardware information for the MGate MB3180. The following topics are covered: Panel Layout LED Indicators Dimensions Jumpers Pin Assignments DB9 (Male) DIN-Rail, Wall Mounting Specifications…
-
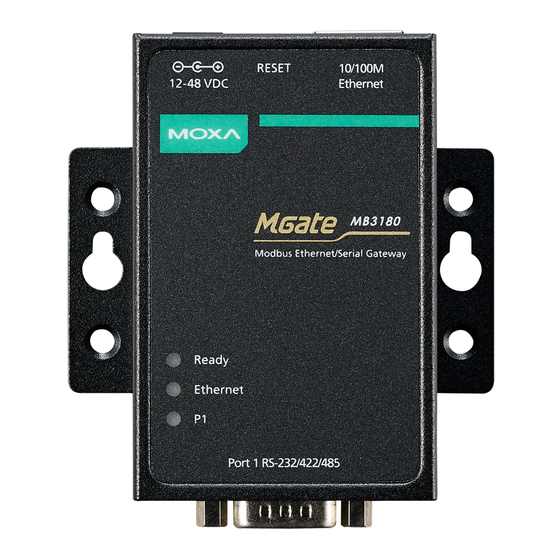
Page 13: Panel Layout
MGate MB3000 User’s Manual Hardware: MB3180 Panel Layout LED Indicators Name Color Function Steady on: Power is on and unit is booting up. Blinking: Indicates an IP conflict, or DHCP or BOOTP server is not responding properly. Ready Steady on: Power is on and unit is functioning normally.
-
Page 14: Dimensions
MGate MB3000 User’s Manual Hardware: MB3180 Dimensions…
-
Page 15: Jumpers
To set the pull high/low resistors to 1 KΩ, short jumpers JP3 and JP4 with jumper caps. ATTENTION Do not use the 1 KΩ pull high/low setting on the MGate MB3000 when using the RS-232 interface. Doing so will degrade the RS-232 signals and reduce the effective communication distance.
-
Page 16: Pin Assignments
MGate MB3000 User’s Manual Hardware: MB3180 Pin Assignments DB9 (Male) The MGate MB3000 uses DB9 (male) serial ports to connect Modbus RTU or ASCII devices. Each port supports three serial interfaces: RS-232, RS-422, and RS-485 (both 2 and 4-wire). RS-422 RS-232…
-
Page 17: Specifications
MGate MB3000 User’s Manual Hardware: MB3180 Specifications 10/100 Mbps, RJ45, Auto MDI/MDIX Ethernet Protection Built-in 1.5 KV magnetic isolation Serial Interface Interface RS-232/422/485 1 port No. of Ports Connector Type DB9 (male) Signals RS-232: TxD, RxD, RTS, CTS, DTR, DSR, DCD, GND…
-
Page 18: Chapter 4 Hardware: Mb3280
Hardware: MB3280 Chapter 4 This chapter provides hardware information for the MGate MB3280. The following topics are covered: Panel Layout LED Indicators Dimensions Jumpers Pin Assignments DB9 (Male) DIN-Rail, Wall Mounting Specifications…
-
Page 19: Panel Layout
MGate MB3000 User’s Manual Hardware: MB3280 Panel Layout LED Indicators Name Color Function Steady on: Power is on and unit is booting up. Blinking: Indicates an IP conflict, or DHCP or BOOTP server is not responding properly. Ready Steady on: Power is on and unit is functioning normally.
-
Page 20: Dimensions
MGate MB3000 User’s Manual Hardware: MB3280 Dimensions…
-
Page 21: Jumpers
Switch 4 on the port’s assigned DIP switch is reserved. ATTENTION Do not use the 1 KΩ pull high/low setting on the MGate MB3000 when using the RS-232 interface. Doing so will degrade the RS-232 signals and reduce the effective communication distance.
-
Page 22: Pin Assignments
MGate MB3000 User’s Manual Hardware: MB3280 Pin Assignments DB9 (Male) The MGate MB3000 uses DB9 (male) serial ports to connect Modbus RTU or ASCII devices. Each port supports three serial interfaces: RS-232, RS-422, and RS-485 (both 2 and 4-wire). RS-422 RS-232…
-
Page 23: Specifications
MGate MB3000 User’s Manual Hardware: MB3280 Specifications 10/100 Mbps, RJ45, Auto MDI/MDIX Ethernet Protection Built-in 1.5 KV magnetic isolation Serial Interface Interface RS-232/422/485 2 ports No. of Ports Connector Type DB9 (male) Signals RS-232: TxD, RxD, RTS, CTS, DTR, DSR, DCD, GND…
-
Page 24: Chapter 5 Hardware: Mb3480
Hardware: MB3480 Chapter 5 This chapter provides hardware information for the MGate MB3480. The following topics are covered: Panel Layout LED Indicators Dimensions Jumpers Pin Assignments DB9 (Male) DIN-Rail, Wall Mounting Specifications…
-
Page 25: Panel Layout
MGate MB3000 User’s Manual Hardware: MB3480 Panel Layout LED Indicators Name Color Function Steady on: Power is on and unit is booting up. Blinking: Indicates an IP conflict, or DHCP or BOOTP server is not responding properly. Ready Steady on: Power is on and unit is functioning normally.
-
Page 26: Dimensions
MGate MB3000 User’s Manual Hardware: MB3480 Dimensions…
-
Page 27: Jumpers
To set the pull high/low resistors to 1 KΩ, set switches 1 and 2 on the port’s assigned DIP switch to ATTENTION Do not use the 1 KΩ pull high/low setting on the MGate MB3000 when using the RS-232 interface. Doing so will degrade the RS-232 signals and reduce the effective communication distance.
-
Page 28: Pin Assignments
MGate MB3000 User’s Manual Hardware: MB3480 Pin Assignments DB9 (Male) The MGate MB3000 uses DB9 (male) serial ports to connect Modbus RTU or ASCII devices. Each port supports three serial interfaces: RS-232, RS-422, and RS-485 (both 2 and 4-wire). RS-422 RS-232…
-
Page 29: Din-Rail, Wall Mounting
MGate MB3000 User’s Manual Hardware: MB3480 DIN-Rail, Wall Mounting Mounting on a DIN-rail: You will first need to attach the mounting plates (included) to the unit. Attach the DIN-rail accessories to the mounting plates and latch the unit onto the DIN-rail as shown.
-
Page 30: Specifications
MGate MB3000 User’s Manual Hardware: MB3480 Specifications 10/100 Mbps, RJ45, Auto MDI/MDIX Ethernet Protection Built-in 1.5 KV magnetic isolation Serial Interface Interface RS-232/422/485 No. of Ports 4 ports DB9 (male) Connector Type Signals RS-232: TxD, RxD, RTS, CTS, DTR, DSR, DCD, GND…
-
Page 31: Hardware: Mb3170, Mb3170I
Hardware: MB3170, MB3170I Chapter 6 This chapter provides hardware information for the MGate MB3170 and MB3170I. The following topics are covered: Panel Layout LED Indicators Dimensions Jumpers Pin Assignments DB9 (Male) Terminal Block (RS-422, RS-485) …
-
Page 32: Panel Layout
MGate MB3000 User’s Manual Hardware: MB3170, MB3170I Panel Layout LED Indicators Name Color Function Power is being supplied to the power input. PWR1 Power is being supplied to the power input. PWR2 Steady on: Power is on and unit is booting up.
-
Page 33: Dimensions
MGate MB3000 User’s Manual Hardware: MB3170, MB3170I Dimensions…
-
Page 34: Jumpers
Switch 4 on the port’s assigned DIP switch is reserved. ATTENTION Do not use the 1 KΩ pull high/low setting on the MGate MB3000 when using the RS-232 interface. Doing so will degrade the RS-232 signals and reduce the effective communication distance.
-
Page 35: Pin Assignments
MGate MB3000 User’s Manual Hardware: MB3170, MB3170I Pin Assignments DB9 (Male) The MGate MB3170 and MB3170I use a DB9 (male) serial port for RS-232 connections to Modbus RTU or ASCII devices. RS-232 Terminal Block (RS-422, RS-485) The MGate MB3170 and MB3170I use a terminal block connector for RS-422 and RS-485 connections to Modbus RTU or ASCII devices.
-
Page 36: Power Input, Relay Output
MGate MB3000 User’s Manual Hardware: MB3170, MB3170I Power Input, Relay Output Shielded DC Power DC Power Relay Relay DC Power DC Power Ground Input 1 Input 1 Output Output Input 2 Input 2 DIN-Rail, Wall Mounting There are two sliders on the back of the unit for DIN-rail and wall mounting.
-
Page 37: Specifications
MGate MB3000 User’s Manual Hardware: MB3170, MB3170I Specifications 10/100 Mbps, RJ45, Auto MDI/MDIX Ethernet Protection Built-in 1.5 KV magnetic isolation Serial Interface Interface RS-232/422/485 1 port No. of Ports Connector Type DB9 (male) for RS-232, terminal block for RS-422/485 Signals…
-
Page 38: Hardware: Mb3270, Mb3270I
Hardware: MB3270, MB3270I Chapter 7 This chapter provides hardware information for the MGate MB3270 and MB3270I. The following topics are covered: Panel Layout LED Indicators Dimensions Jumpers Pin Assignments DB9 (Male) Power Input, Relay Output …
-
Page 39: Panel Layout
MGate MB3000 User’s Manual Hardware: MB3270, MB3270I Panel Layout LED Indicators Name Color Function Power is being supplied to the power input. PWR1 Power is being supplied to the power input. PWR2 Steady on: Power is on and unit is booting up.
-
Page 40: Dimensions
MGate MB3000 User’s Manual Hardware: MB3270, MB3270I Dimensions…
-
Page 41: Jumpers
Switch 4 on the port’s assigned DIP switch is reserved. ATTENTION Do not use the 1 KΩ pull high/low setting on the MGate MB3000 when using the RS-232 interface. Doing so will degrade the RS-232 signals and reduce the effective communication distance.
-
Page 42: Pin Assignments
MGate MB3000 User’s Manual Hardware: MB3270, MB3270I Pin Assignments DB9 (Male) The MGate MB3000 uses DB9 (male) serial ports to connect Modbus RTU or ASCII devices. Each port supports three serial interfaces: RS-232, RS-422, and RS-485 (both 2 and 4-wire). RS-422 RS-232…
-
Page 43: Din-Rail, Wall Mounting
MGate MB3000 User’s Manual Hardware: MB3270, MB3270I DIN-Rail, Wall Mounting There are two sliders on the back of the unit for DIN-rail and wall mounting. Mounting on a DIN-rail: Pull out the bottom slider, latch the unit onto the DIN-rail, and push the slider back in.
-
Page 44: Specifications
MGate MB3000 User’s Manual Hardware: MB3270, MB3270I Specifications 10/100 Mbps, RJ45, Auto MDI/MDIX Ethernet Protection Built-in 1.5 KV magnetic isolation Serial Interface Interface RS-232/422/485 No. of Ports 2 ports DB9 (male) Connector Type Signals RS-232: TxD, RxD, RTS, CTS, DTR, DSR, DCD, GND…
-
Page 45: Chapter 8 Typical Applications
Typical Applications Chapter 8 In this chapter, we introduce four typical Modbus applications. Ethernet Masters with Multiple Serial Slaves Serial Masters with Multiple Ethernet Slaves Modbus TCP Masters with ASCII and RTU Slaves Serial Master with Serial Slaves over Internet…
-
Page 46: Ethernet Masters With Multiple Serial Slaves
(Data Control System). However, many DCSs are now Ethernet-based and operate as a Modbus TCP slave device. The MGate MB3000 Modbus gateway can link a serial-based HMI to distributed DCSs over an Ethernet network. Up to 32 Modbus TCP slave devices are supported by each MGate MB3000.
-
Page 47: Modbus Tcp Masters With Ascii And Rtu Slaves
32 and the transmission distance to 1.2 km. With the MGate MB3000 Modbus gateway, you can link all Modbus devices over an Ethernet network. Up to 32 Modbus gateways can be installed in a single control network, so each device can…
-
Page 48: Configuring The Modbus Gateway
Configuring the Modbus Gateway Chapter 9 We discuss the following topics in this chapter: Installing the Software Starting MGate Manager Change Language Setting Connecting to the Unit Broadcast Search Specify by IP Address Modifying the Configuration …
-
Page 49: Installing The Software
Installing the Software The following instructions explain how to install MGate Manager, a utility for configuring and monitoring MGate MB3000 units over the network. 1. Insert the Document and Software CD into the CD-ROM drive. Locate and run the following setup program to begin the installation process: MGM_Setup_[Version]_Build_[DateTime].exe…
-
Page 50
MGate MB3000 User’s Manual Configuring the Modbus Gateway 4. When the Select Additional Tasks window appears, click Next to continue. You may select Create a desktop icon if you would like a shortcut to MGate Manager on your desktop. 5. Click Next to start copying the software files. -
Page 51
MGate MB3000 User’s Manual Configuring the Modbus Gateway 7. A message will indicate that MGate Manager is successfully installed. You may choose to run it immediately by selecting Launch MGate Manager. 8. You may also open MGate Manager through Start Programs MGate Manager … -
Page 52: Starting Mgate Manager
MGate Manager is a Windows-based utility that is used to configure the MGate MB3000. Before running MGate Manager, make sure that your PC and the MGate MB3000 are connected to the same network. Alternatively, the MGate MB3000 may be connected directly to the PC for configuration purposes.
-
Page 53: Connecting To The Unit
MGate Manager needs to connect to the unit before the unit can be configured. There are two methods to connect to the unit. Broadcast Search is used to find every MGate MB3000 on the LAN. Search by IP attempts to connect to a specific unit by IP address, which is useful if the unit is…
-
Page 54: Broadcast Search
Click Broadcast Search to begin searching the LAN for all MGate MB3000 units. When the search is complete, every MGate MB3000 that is found on the LAN will appear in the window with MAC address and IP address. Simply select the one that you wish to configure.
-
Page 55: Specify By Ip Address
MGate MB3000 User’s Manual Configuring the Modbus Gateway Specify by IP Address Click Specify by IP Address if you know the IP address of the unit and wish to connect to it directly. A dialog box will appear. Enter the unit’s IP address and click OK.
-
Page 56: Modifying The Configuration
Try doing the search again and re-entering the IP address carefully. Another possibility is that the MGate MB3000 is located on the same LAN as your PC, but on a different subnet. In this case, you can modify your PC’s IP address and/or netmask so that it is on the same subnet as the MGate MB3000.
-
Page 57: Configure Serial Port For Rtu Or Ascii, Master Or Slave
MGate MB3000 User’s Manual Configuring the Modbus Gateway Configure Serial Port for RTU or ASCII, Master or Slave The Mode tab is where each serial port’s operation mode is configured. The operation mode determines whether the device(s) that are connected to the serial port will operate as a master or a slave, and whether the Modbus RTU or Modbus ASCII protocol will be used.
-
Page 58: What Is Procom
ProCOM is the best solution for your system. Before using ProCOM, your PC needs to create virtual COM ports that connect to a specific ProCOM over an Ethernet network. By using ProCOM, the MGate MB3000 will treat your PC’s COM port as if it were an additional serial port on the MGate MB3000.
-
Page 59
This way, when you send a Modbus request to ProCOM, the driver will forward your request to the MGate MB3000 and then the MGate MB3000 will forward the request to the target Modbus device using the pre-set Modbus device mode and Slave ID. For example, the Modbus request from ProCOM can be redirected to a Modbus RTU/ASCII device that is behind the MGate MB3000’s serial interface, or to a Modbus TCP device through the MGate MB3000’s Ethernet port. -
Page 60
MGate MB3000 User’s Manual Configuring the Modbus Gateway If you would like to change the COM port numbers, double click on the items as follows: 9-13… -
Page 61: Configure Ip Address And Other Network Settings
MGate MB3000 User’s Manual Configuring the Modbus Gateway Configure IP Address and Other Network Settings The Network tab is where the unit’s network settings are configured. You can modify the Name, Network Configuration, IP Address, Netmask, Default Gateway, and DNS. You may also select a Password to protect the unit from unauthorized access.
-
Page 62
MGate MB3000 User’s Manual Configuring the Modbus Gateway Parameter Value Notes You can enter a name to help you identify the Name (an alphanumeric string) unit, such as the location, function, etc. Select “Static IP” if you are using a fixed IP… -
Page 63: Configure Serial Communication Parameters
MGate MB3000 User’s Manual Configuring the Modbus Gateway Configure Serial Communication Parameters The Serial tab is where each serial port’s communication parameters are configured. You can configure Baud Rate, Parity, Stop Bit, Flow Control, FIFO, and Interface Mode. Parameter Value…
-
Page 64: Set Up Slave Id Mapping (Smart Routing)
MGate MB3000 User’s Manual Configuring the Modbus Gateway Set up Slave ID Mapping (Smart Routing) The Slave ID Map tab is where slave IDs are managed. The definitions on this tab determine how requests will be routed by the unit.
-
Page 65
Virtual slave IDs must not conflict with each other or with other TCP slave IDs. ATTENTION The MGate MB3000 will disregard any request that is not addressed to a virtual slave ID on its slave ID map. If a device has not been assigned a virtual slave ID, it will not be accessible by masters on the other side of the Modbus gateway. -
Page 66: Customize Modbus Settings
Delay” setting. Modbus TCP Exception The MGate MB3000 is a protocol gateway that transparently passes requests and responses between the Ethernet and serial interfaces. In some situations, it may be necessary for the gateway to return an exception in response to a request from a Modbus TCP master. This is enabled or disabled with the “Modbus TCP Exception”…
-
Page 67
This allows the Modbus system to continue operation even if a slave device is disconnected or faulty. On the MGate MB3000, the “Response Time-out” field is used to configure how long the gateway will wait for a response from a Modbus ASCII or RTU slave. This field is set independently for each serial port, which is selected through the “Slave Channel”… -
Page 68: Set Up Priority Control
MGate MB3000 User’s Manual Configuring the Modbus Gateway ATTENTION Please note the following regarding automatic calibration of response timeouts: When automatically detecting the response timeout, the MGate will use the slave ID map to determine which ports and which IDs to search. Make sure that you have defined the slave ID map for your system before clicking “Auto Detection”.
-
Page 69: Accessible Ip
Access to the MGate MB3000 is controlled by IP address. That is, if a host’s IP address is in the accessible IP table, then the host will be allowed to access the MGate MB3000. The following descriptions illustrate how to configure the accessibility parameters: •…
-
Page 70
MGate MB3000 User’s Manual Configuring the Modbus Gateway Disable this function by clearing the “Enable the accessible IP list” checkbox. 9-23… -
Page 71: Miscellaneous Setup
MGate MB3000 User’s Manual Configuring the Modbus Gateway Miscellaneous Setup This page identifies options that were not mentioned previously: Auto Relay Warning, Reset Button Protect, Web Console, and Telnet Console. Auto Relay Warning will be triggered in the event of a power failure or when Ethernet links are disconnected.
-
Page 72: Verifying The Location Of The Unit
MGate MB3000 User’s Manual Configuring the Modbus Gateway ATTENTION Currently the MGate MB3180 does not support Web Console. The MGate MB3180/3280/3480 do not have relay outputs, and consequently do not support Auto Relay Warning. Verifying the Location of the Unit If you are managing multiple MGate units, you may wonder if you are configuring the correct unit in MGate Manager.
-
Page 73: Monitoring Modbus Activity
MGate MB3000 User’s Manual Configuring the Modbus Gateway Monitoring Modbus Activity For troubleshooting or management purposes, you can monitor the data passing through any MGate MB3000 on the network. Data events will be logged as they pass through the gateway. Rather than simply echoing the data, MGate Manager presents the data in an intelligent, easily-understood format, with clearly designated fields including source, type, destination, contents, and more.
-
Page 74: Open Traffic Monitor Window
MGate MB3000 User’s Manual Configuring the Modbus Gateway Open Traffic Monitor Window Select the unit that you wish to monitor and click Monitor to open the Traffic Monitor window. In the Traffic Monitor window, click Start to begin live monitoring of the data passing through the selected MGate MB3000 unit.
-
Page 75: Filter Traffic Information
MGate MB3000 User’s Manual Configuring the Modbus Gateway To stop capturing the log, press the Stop button. Filter Traffic Information By default, all events are displayed in the traffic monitor window. MGate Manager also allows the data to be filtered so only the relevant information is displayed. The filter is selected using the radio buttons and customized using the “Filter info”…
-
Page 76: Save Log To File
MGate MB3000 User’s Manual Configuring the Modbus Gateway Save Log to File To save the data log to a file, click Save. You may retrieve a saved log by clicking Load. 9-29…
-
Page 77: Upgrading Firmware
After you have downloaded the new firmware onto your PC, you can use MGate Manager to write it onto your MGate MB3000. Select the desired unit from the list in MGate Manager and click Upgrade Firmware to begin the process.
-
Page 78: Chapter 10 Pin Assignments
Pin Assignments Chapter 10 We discuss the following topics in this chapter: DB9 (Male) Terminal Block (RS-422, RS-485) Power Input, Relay Output…
-
Page 79: Db9 (Male)
MGate MB3000 User’s Manual Pin Assignments DB9 (Male) The MGate MB3000 uses DB9 (male) serial ports to connect Modbus RTU or ASCII devices. Each port supports three serial interfaces: RS-232, RS-422, and RS-485 (both 2 and 4-wire). RS-422 RS-232 RS-485 (2W)
-
Page 80: Terminal Block (Rs-422, Rs-485)
MGate MB3000 User’s Manual Pin Assignments Terminal Block (RS-422, RS-485) The MB3170 and MB3170I have a terminal block connector for RS-422 and RS-485 signals. RS-422 RS-485 (2W) RS-485 (4W) TxD+ TxD- RxD+ Data+ RxD- Data- Power Input, Relay Output Shielded…
-
Page 81: Chapter 11 Case Studies
Case Studies Chapter 11 We discuss the following topics in this chapter: Introduction Replace Serial Masters with Ethernet Master(s), Slave IDs are Configurable Replace Serial Masters with Ethernet Master(s), Slave IDs are Fixed Keep Serial Master and Add Ethernet Master(s) …
-
Page 82: Introduction
This chapter presents some case studies to help guide. If you can not find the case the same as yours, it does not mean the MGate MB3000 is not suitable with you. Please contact Moxa and we will work it out with you.
-
Page 83: Replace Serial Masters With Ethernet Master(S), Slave Ids Are Fixed
MGate MB3000 User’s Manual Case Studies Replace Serial Masters with Ethernet Master(s), Slave IDs are Fixed Some legacy Modbus slave devices have fixed IDs that cannot be changed. In order to integrate the devices into a Modbus TCP network, a multiport MGate model (MB3280, MB3270, or MB3480) can be used to assign virtual slave IDs.
-
Page 84: Integrate Modbus Rtu, Ascii, And Tcp At The Same Time
One system may use a different baudrate than another, or may use Modbus ASCII instead of Modbus RTU. The MGate MB3000 allows the different Modbus systems to be integrated into one network, regardless of the protocol or communication parameters.
-
Page 85: Appendix A Modbus Overview
Modbus Overview Appendi x A Introduction Modbus is one of the most popular automation protocols in the world. It supports both serial and Ethernet devices. Many industrial devices, such as PLCs, DCSs, HMIs, instruments, meters, motors, and drivers, use Modbus as their communication standard. Devices are Either Masters or Slaves All Modbus devices are classified as either a master or a slave.
-
Page 86: Communication Is By Request And Response
MGate MB3000 User’s Manual Modbus Overview Communication is by Request and Response All Modbus communication is by request and response. A master sends a request and a slave sends a response. The master will wait for the slave’s response before sending the next request. For broadcast commands, no response is expected.
-
Page 87: Modbus Ethernet Vs. Modbus Serial
Modbus TCP standard recommends that slaves be able to queue up to 16 requests at a time. The MGate MB3000 will queue up to 32 requests from each TCP master, for up to 16 TCP masters. Integrate Modbus Serial and Ethernet with Gateways Ordinarily, Modbus TCP and Modbus ASCII/RTU are unable to communicate with each other.
-
Page 88: Appendix B Declaration Of Conformity
Declaration of Conformity Appendi x B Manufacturer’s Name: Moxa Technologies Co., Ltd. Manufacturer’s Fl.4, No.135, Lane 235, Pao-Chiao Rd., Shing Tien City, Address: Taipei, Taiwan, R.O.C. Declares that the product: MGate MB3000 series Product Name: MGate MB3180 Model Number: MGate MB3280…
Moxa Technologies Manuals and Guides:
The main types of Moxa Technologies MGate MB3000 Modbus instructions: user guide — rules of useing and characteristics, service manual — repair, diagnostics, maintenance, operation manual — description of the main functions of Moxa Technologies MGate MB3000 Modbus equipment, etc.
Most of the instructions, that you can see on the site are uploaded by our users. If you have available a manual or document for Moxa Technologies MGate MB3000 Modbus, which is currently not on the site or present in a different language version, we ask you to upload your document on website, using the «uploading form» available to all registered users.
|
Detail Specifications: 694/694155-mgate_mb3000.pdf file (14 Jan 2023) |
Accompanying Data:
Moxa Technologies MGate MB3000 Gateway PDF Operation & User’s Manual (Updated: Saturday 14th of January 2023 11:58:57 AM)
Rating: 4.3 (rated by 49 users)
Compatible devices: MGate MB3280, MRC-1002 Series, OnCell G3470A-LTE, UC-8410, MGate 5118 Series, MGate MB3270I, MGate 5114, OnCell G3111-HSPA series.
Recommended Documentation:
Text Version of Operation & User’s Manual
(Ocr-Read Summary of Contents, UPD: 14 January 2023)
-
67, MGate MB3000 User’s Manual Configuring the Modbus Gateway 9-20 Slave Channel and Response Timeout According to the Modbus standard, the time that it takes for a slave device to respond to a request is defined by the device manufacturer (please refer to Appendix A for details). Based on this response time, a master can be configured to wait a certain amount of time for a slave’s r…
-
22, Moxa Technologies MGate MB3000 MGate MB3000 User’s Manual Hardware: MB3280 4-5 Pin Assignments DB9 (Male) The MGate MB3000 uses DB9 (male) serial ports to connect Modbus RTU or ASCII devices. Each port supports three serial interfaces: RS-232, RS-422, and RS-485 (both 2 and 4-wire). Pin RS-232 RS-422 RS-485 (4W) RS-485 (2W) 1 DCD TxD- — 2 RxD TxD+ — 3 T…
-
81, 1 1 1 1 Chapt er 11 Case Studies We discuss the following topics in this chapter: Introduction Replace Serial Masters with Ethernet Master(s), Slave IDs are Configurable Replace Serial Masters with Ethernet Master(s), Slave IDs are Fixed Keep Serial Master and Add Ethernet Master(s) Integrate Modbus RTU, ASCII, and TCP at the Same Time
… -
4, Terminal Block (RS-422, RS-485) ……………………………………………………………………. 6-5 Power Input, Relay Output ………………………………………………………………………………. 6-6 DIN-Rail, Wall Mounting ……………………………………………………………………………………….. 6-6 Specifications ……………
-
54, MGate MB3000 User’s Manual Configuring the Modbus Gateway 9-7 Broadcast Search Click Broadcast Search to begin searching the LAN for all MGate MB3000 units. When the search is complete, every MGate MB3000 that is found on the LAN will appear in the window with MAC address and IP address. Simply select the one that you wish to configure.
… -
5, Introduction ………………………………………………………………………………………………………….11-2 Replace Serial Masters with Ethernet Master(s), Slave IDs are Configurable ………………..11-2 Replace Serial Masters with Ethernet Master(s), Slave IDs are Fixed …………………………..11-3 Keep Serial Master and Add Ethernet Master(s) ..…
-
62, MGate MB3000 User’s Manual Configuring the Modbus Gateway 9-15 Parameter Value Notes Name (an alphanumeric string) You can enter a name to help you identify the unit, such as the location, function, etc. Network Configuration Static IP, DHCP, BootP, or DHCP/BootP Select “Static IP” if you are using a fixed IP address. Select one of the other options if the IP …
-
7, MGate MB3000 User’s Manual Hardware Reference: MB3270, MB3270I 1-2 Overview The MGate MB3000 is a line of protocol gateways that provides users with seamless integration of Ethernet and serial Modbus devices powerful operation modes to handle almost any Modbus application Windows utilities for easy setup and traffic monitoring Seamless integration of Ethernet an…
-
2, Moxa Technologies MGate MB3000 MGate MB3000 Modbus Gateway User’s Manual The software described in this manual is furnished under a license agreement and may be used only in accordance with the terms of that agreement. Copyright Notice Copyright 2012 Moxa Inc. All rights reserved. Reproduction without permission is prohibited. Trademarks MOXA is a registered trademark of Moxa Inc. All ot…
Recommended Instructions:
iPod 034-5051-A, 350BF, Phaser 7800DN, AD2550B-ITX, RoadRunner, SCR2000


-
DIRECT ACCESS to GW5051 Installation and Configuration Manual of GW5051 Rev: 0.2 …
GW5051 49
-
PJD5112 PJD5122 PJD6211 PJL7211 PJ260D PJL3211 PJD6531wNative ResolutionSVGA800×600SVGA800×600XGA1024x768XGA 1024x768XGA1024x768XGA1024x768WXGA1280x800Technology DLP®DLP®DLP®3-panel LCDDLP®3-panel LCDDLP®Brightness Lumens (max) 2,600 2,700 2,500 2,2002,000 3,0003,200Contrast Ratio (max) 2800:1 3000:1 2000:1 400:12000:1 500:13200:1Display Size (in.) …
WPG-150 — Wireless Video Extender 3
-
Two-Port Gateway Installation GuidePage 1 of 2Corporate Headquarters 3031 Pleasant View Road, P.O. Box 620979, Middleton, Wisconsin 53562-0979 USA Tel +608 831 4116 Fax +608 836 1736London, UK Unit 26-28, Victoria Industrial Estate, Victoria Road, London W3 6UU, UK Tel +44 (0)20 8896 1000 Fax +44 (0)20 8896 2000Rome, IT Via Pieve Torina, 48, 00156 Rome, Italy Tel +39 …
NET 3 2
-
Instruction Booklet IB150020ENEffective June 2019ContentsDescription PageOverview …………………………..2System views ……………………….2Top view ………………………….2Bottom view ……………………….2Left view …………………………3Right view ………………………..3Installing your PXG950-4G …………… …
PXG950-4G 16
Additional Information:
Popular Right Now:
Operating Impressions, Questions and Answers:
Download Operation & user’s manual of Moxa Technologies MGate MB3000 Gateway for Free or View it Online on All-Guides.com.

MGate MB3000 Modbus Gateway
User Manual
Sixth Edition, July 2012
www.moxa.co m/product
2012 Moxa Inc. All rights reserved.

Оглавление:
- Режимы работы MGate
- Modbus TCP Slave в Modbus RTU Master
- Modbus TCP Master в Modbus RTU Slave
- Режим ProCOM для эмуляции виртуального СОМ порта
- Подтягивающие и согласующие резисторы
- Распиновка разъемов СОМ портов
- Рекомендации по устранению неисправностей
MGate с протоколом Modbus – это шлюзы протоколов, которые позволяют подключить приборы с интерфейсами RS-232, RS-422 и RS-485 к сети Ethernet с преобразованием протоколов из Modbus RTU/ASCII в Modbus TCP или наоборот.
Инженеры часто не могут определить, когда нужно применять MGate или NPort. Если кратко, то NPort преобразует только интерфейсы СОМ в Ethernet и не изменяет данные, а MGate преобразует интерфейсы и протоколы.
Посмотрите видео с обзором серии MGate и примером настройки шлюза:
Режим преобразования Modbus TCP Slave в Modbus RTU Master

У нас есть Modbus TCP Master и нам нужно подключить к нему Modbus RTU Slave устройство, но без шлюза это сделать не получится. Шлюз в этой схеме будет выступать Modbus TCP Slave/Server по отношению к TCP Master/Client и Modbus RTU Master по отношению к RTU Slave устройству.
Для настройки шлюза воспользуемся утилитой MGate Manager, также шлюз можно настроить через WEB-интерфейс.


Чтобы было легче разобраться, посмотрите на картинку сверху.
Если вы подключаете RTU Slave устройство к СОМ порту, то выбирайте Режим RTU Slave, а если RTU Master устройство, то Режим RTU Master. Мы выберем режим RTU Slave и снимем галочку Включить ProCOM.


Основное поле обязательное для заполнения — это таблица ID подчиненных устройств.
В этой таблице мы выбираем куда отправить команду.
На картинке выше: если команда адресована устройствам с Modbus ID от 1 до 5, то шлюз отправит ее в 1 порт, а команды для устройств с Modbus ID от 6 до 10 шлюз отправит на 2 порт.
Еще в поле Порт таблицы маршрутизации можно указать дополнительные условия пересылки Modbus команд в зависимости от IP адреса или TCP порта, но это не обязательно.

Также мы можем задать смещение Modbus ID, что позволяет на разных портах иметь устройства с одинаковыми Modbus ID. Это нужно, например, когда вы не можете изменить Modbus ID конечных устройств.


Во вкладке Дополнительно можно активировать специфические функции, которые не влияют на преобразование протоколов, но влияют на безопасность. Доступны следующие настройки:
- Список разрешенных IP адресов
- Журнал сообщений
- Типы оповещений по Email, SNMP Trap или через реле
- Тип доступа к шлюзу HTTP, HTTPS, Telnet
- Политика в отношении доступа к шлюзу
Мы завершили настройку, нажимаем кнопку ОК и ждем перезагрузки шлюза. После короткого сигнала, шлюз готов к работе.
Проверка шлюза
Для проверки работы шлюза можно использовать любое ПО. Например, для эмуляции Modbus TCP Master можно использовать компьютер с ПО ModScan, а для Modbus RTU Slave ПО ModSim.
После настройки ПО Modbus TCP Master посылает команды в шлюз, а шлюз преобразует их в команды Modbus RTU и отправляет на нужный СОМ порт в соответствии с таблицей Modbus маршрутизации.
Чтобы посмотреть какие команды куда отправляются, можно запустить Мониторинг.


Нажимаем кнопку Мониторинг, а затем кнопку Пуск, мы видим команду Modbus TCP Request от Master устройства, шлюз преобразует ее в команду Modbus RTU Request и пересылает ее в Slave устройство на 1 порт. Далее шлюз получает ответ Modbus RTU Response, преобразует его в Modbus TCP Response и пересылает ответ для Master устройства.

Режим преобразования Modbus TCP Master в Modbus RTU Slave

У нас есть Modbus RTU Master и нам нужно подключить к нему Modbus TCP Slave устройство. Шлюз в этой схеме будет выступать Modbus TCP Master/Client по отношению к TCP Slave/Server и Modbus RTU Slave по отношению к RTU Master устройству.
Сетевые настройки и параметры СОМ порта будут такие же как выше.
Перейдем к настройкам преобразования протоколов.

Т.к. теперь мы подключаем RTU Master устройство к СОМ порту, значит выбираем Режим RTU Master.
Для примера настроим оба порта в режим RTU Master и снимем галочку Включить ProCOM.

Перейдем на вкладку Modbus-маршрутизация.
Т.к. у нас оба порта в режиме RTU Master, то в Таблице ID подчиненных устройств нет условия пересылки Modbus команд на СОМ порты.
Теперь добавим условие пересылки команд на IP адрес Modbus TCP Slave/Server устройства.

Если команда адресована устройствам с Modbus ID от 1 до 10, то шлюз отправит ее на IP адрес Modbus TCP Slave/Server устройства.
Мы завершили настройку, нажимаем кнопку ОК и ждем перезагрузки шлюза. После короткого сигнала, шлюз готов к работе.
Чтобы посмотреть какие команды куда отправляются, можно запустить мониторинг.

Режим ProCOM для эмуляции виртуального СОМ порта

Режим ProCOM позволяет создать на компьютере виртуальный СОМ порт с поддержкой протокола Modbus RTU, когда ПК подключен к шлюзу через Ethernet. Такой функционал необходим для совместимости с ПО, которое может работать только с СОМ портом по протоколу Modbus RTU.
Покажем на следующем примере, у нас есть компьютер, который может работать только с Modbus RTU протоколом и не имеет встроенных СОМ портов. К нему нужно подключить Modbus TCP Slave/Server устройство (также можно подключить Modbus RTU Slave).
Перейдем к настройкам преобразования протоколов.

Для создания виртуального СОМ порта поставим галочку Включить ProCOM.
Если мы не используем СОМ порты, то их можно отключить, для примера оставим их в режиме RTU Slave.

В Таблице ID подчиненных устройств нужно добавить условие для пересылки команд на IP адрес Modbus TCP Slave/Server устройства. Т.к. мы оставили включенными СОМ порты, то для них также доступны условия.
Мы завершили настройку, нажимаем кнопку ОК и ждем перезагрузки шлюза. После короткого сигнала, шлюз готов к работе.


После нажатия кнопки Добавить, в окне появятся 4 СОМ порта. При необходимости можно удалить ненужные СОМ порты.
После нажатия кнопки Ок, у нас появится СОМ3 порт. В диспетчере устройств он не отображается.
Чтобы посмотреть какие команды куда отправляются, можно запустить Мониторинг.

Подтягивающие и согласующие резисторы
В MGate есть встроенные резисторы, которые обеспечивают правильную работу линий RS-422/485.
Согласующий резистор или терминатор 120 Ом – ставится в начале и конце линии для предотвращения отражения сигнала от конца линии и искажении полезного сигнала в RS-422/485.
Подтягивающие резисторы (pull high/low resistors) – предназначены для ограничения тока, протекающего по сигнальным цепям, и чтобы сделать состояние цифрового входа по умолчанию высоким или низким.
Пример расположения резисторов для модели MGate MB3270 (подробности в руководстве пользователя к конкретной модели MGate):

Распиновка разъемов СОМ портов

Рекомендации по устранению неисправностей
Если возникли проблемы с передачей данных, то проверьте через Мониторинг приходят ли команды и куда они отправляются.

Если команды не приходят со стороны Ethernet, то проверьте:
- Правильно ли указан IP адрес шлюза в ПО
- Находится ли он в одной подcети с Master устройством
- Правильно ли настроена пересылка команд во вкладке Modbus-маршрутизация, а именно в таблице ID подчиненных устройств
- Воспользуйтесь другим ПО для проверки
Если проблема со стороны СОМ порта, то проверьте:
- Параметры СОМ порта: скорость, четность, тип интерфейса, протокол данных
- Правильность подключения проводов к порту
- Настройки во вкладке Modbus-маршрутизация
- Измените номинал подтягивающих резисторов
- Добавьте согласующий резистор (для RS-422/485)
- Воспользуйтесь другим ПО для проверки
Если у Вас есть вопросы по продукции МОХА, обращайтесь по телефону: +7 (495) 419-1201 или по e-mail: russia@moxa.pro