-
Contents
-
Table of Contents
-
Troubleshooting
-
Bookmarks
Quick Links
Owner’s Manual
Manuel d’utilisation
Bedienungsanleitung
Manual de usuario
Related Manuals for Vox MINI5 Rhythm
Summary of Contents for Vox MINI5 Rhythm
-
Page 1
Owner’s Manual Manuel d’utilisation Bedienungsanleitung Manual de usuario… -
Page 2
AC adapter from the wall outlet. a telephone sale, you must verify that this product is intended to be used in the country Then contact your nearest VOX dealer or the store where the equipment in which you reside. -
Page 3: Table Of Contents
Introduction Welcome aboard! Introduction ———————————————- 3 Thanks for choosing the VOX MINI5 Rhythm. To ensure a long and Welcome aboard! ————————————————— 3 trouble-free relationship with your new amp, please read this manual carefully, use the amp as directed and keep the manual for future ref- Main features ——————————————————— 3 erence.
-
Page 4: Setup
You should also remove the batteries if you’re 6. Adjust the rhythm volume with the LEVEL knob. not going to be using the MINI5 Rhythm for an extended period HINT: The top panel Power select switch controls the output level of of time.
-
Page 5: Parts And Their Function
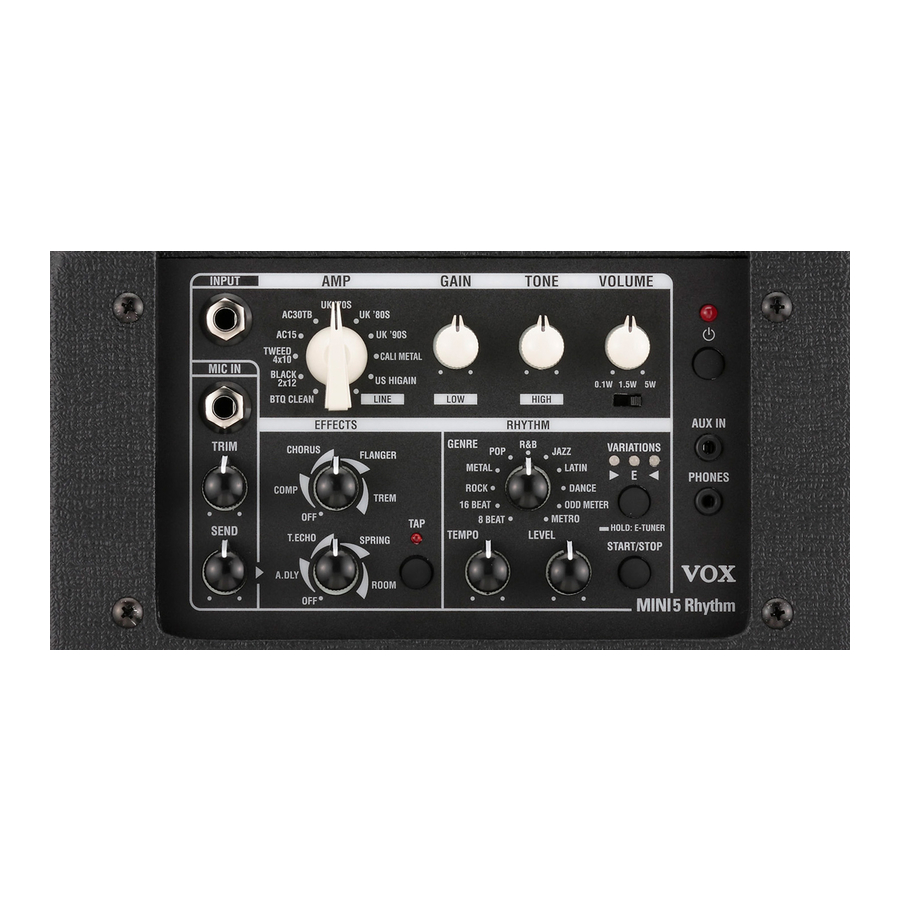
AMP section Parts and their function This section enables you to adjust various amplifier settings. Top Panel 5. AMP selector This selector enables you to choose an amp model. The gain circuit, tone control characteristics, and circuit layout will be set automatically in accordance with the selected amp model.
-
Page 6: Rear Panel
11. EFFECTS knob 2 Power/AUX IN/PHONES Section This knob enables you to select a delay/reverb-type effect and set the 18. Power button, LED intensity of the effect. To bypass the effects, rotate the knob all the Pressing and holding down this button enables you to turn the power way to the left.
-
Page 7: Auto Power Off Function
Auto Power Off Function Using the Rhythm Section The VOX MINI5 Rhythm is equipped with an Auto Power Off function. Selecting a rhythm pattern The Auto Power Off function automatically turns the power off when Select a genre for each rhythm pattern using the GENRE selector.
-
Page 8: Using The Tuner
Using the Tuner Amp Models and Effects The MINI5 Rhythm’s tuner function lets you tune a guitar that’s con- This section describes characteristics of each amp model and effect. nected to the INPUT jack. The tuner detects the pitch of the input sound, AMP model then indicates the discrepancy from the standard pitch of E.
-
Page 9: Effects
UK ’80S FLANGER This models a UK-manufactured 100W single-channel head with master This models an analog flanger that creates a sound with a peculiar swoosh- volume made in 1983. Turn the GAIN control all the way up to get that ing effect like a jet engine.
-
Page 10: Troubleshooting
Troubleshooting There’s no sound heard from the PHONES jack when you use it. • Check that the top panel VOLUME knob isn’t turned all the way down. The power does not turn on even when the power button is pressed •…
-
Page 11: Specifications
Weigh: 3.5 kg/7.72 lbs. (not including battery) Included items: AC adapter (DC 12V ), strap * Appearance and specifications of this product are subject to change without notice. For more information on Vox products, please visit our website at www.voxamps.com.
-
Page 12
Si cela se produit, débranchez l’alimentation de la prise de • En plein soleil courant et contactez votre revendeur VOX le plus proche ou la surface où • Endroits très chauds ou très humides vous avez acheté l’instrument. -
Page 13: Introduction
Introduction Bienvenue à bord! Introduction ———————————————————13 Merci d’avoir choisi un MINI5 Rhythm VOX. Pour tirer un plaisir maximum de Bienvenue à bord! ——————————————————— 13 votre nouvel ampli pendant de nombreuses années et l’utiliser correctement, veuillez lire entièrement ce manuel et respecter ses consignes. Conservez-le Caractéristiques principales ——————————————- 13…
-
Page 14: Préparation
ATTENTION: Ne tardez jamais à retirer des piles usées du MINI5 Rhythm. 5. Réglez le volume avec la commande VOLUME. Elles pourraient en effet se mettre à couler et ainsi endommager l’unité.
-
Page 15: Parties Et Leurs Fonctions
Parties et leurs fonctions Section AMP Cette section permet d’effectuer divers réglages liés à l’amplificateur. Face avant 5. Sélecteur AMP Ce sélecteur permet de sélectionner un modèle d’ampli. Le circuit de gain, les caractéristiques de contrôle du timbre et l’agencement des circuits sont automatiquement réglés en fonction du modèle d’ampli sélectionné.
-
Page 16: Face Arrière
11. Commande EFFECTS 2 Section alimentation/AUX IN/PHONES Cette commande permet de sélectionner un type d’effet Delay/Reverb et de 18. Interrupteur d’alimentation, diode régler l’intensité de l’effet. Pour contourner les effets, tournez la commande Maintenez cet interrupteur enfoncé pour mettre l’ampli sous tension et hors à…
-
Page 17: Fonction De Coupure Automatique D’alimentation
Sélection d’un motif rythmique Sélectionnez un genre pour chaque motif rythmique avec le sélecteur GENRE. L’ampli VOX MINI5 Rhythm comporte une fonction de coupure automatique Sélectionnez une variation de motif rythmique avec le bouton VARIATIONS. d’alimentation. Cette fonction coupe automatiquement l’alimentation de l’ampli Chaque pression sur le bouton VARIATIONS allume successivement chacune quand aucune manipulation n’est effectuée pendant environ 1 heure.
-
Page 18: Utiliser L’accordeur
AC15 Modélisation du canal 2 du VOX AC15 (1×12”, 15W) fabriqué en 1962 qui, à ASTUCE: Quand vous avez accordé la 6ème corde Trop haut.
-
Page 19: Effets
UK ’80S FLANGER Modélisation d’une tête britannique de 100W à un seul canal avec volume master, Ce modèle de flanger analogique crée un son ayant un effet particulier fabriquée en 1983. Tournez la commande à fond à droite pour obtenir ce son évoquant le bruit d’un moteur à…
-
Page 20: Dépannage
Dépannage Aucun signal n’est présent à la prise PHONES. • Vérifiez que la commande VOLUME en face avant n’est pas réglée au mini- mum. L’ampli ne se met pas sous tension même quand vous maintenez son interrupteur d’alimentation enfoncé. • Assurez-vous que l’ampli reçoit bien un signal. •…
-
Page 21: Fiche Technique
3,5 kg (piles non comprises) Poids: adaptateur secteur (DC 12V ), sangle Accessoires fournis: * L’apparence et les caractéristiques de ce produit sont susceptibles d’être mo- difiées sans préavis. Visitiez notre site web sous www.voxamps.com pour en savoir plus sur les produits Vox.
-
Page 22
Kaufbeleg auf, da andernfalls das Produkt von der Garantie des Herstellers oder in das Gerät gelangt sein, so trennen Sie es sofort vom Netz. Wenden Sie sich dann an Importeurs ausgeschlossen werden kann. Ihren VOX-Fachhändler. * Alle Produkt- und Firmennamen sind Warenzeichen oder eingetragene Warenzei- chen der betreffenden Eigentümer. -
Page 23: Einleitung
Vielen, aber herzlichen Dank für Ihre Entscheidung zu einem MINI5 Rhythm von Willkommen an Bord! ————————————— 23 VOX. Um über Jahre hinweg Freude an Ihrem neuen Amp zu haben und ihn richtig zu bedienen, müssen Sie sich diese Bedienungsanleitung vollständig durchlesen Die wichtigsten Merkmale ——————————— 23 und an einem Ort aufbewahren, wo man sie bei Bedarf auch wieder findet.
-
Page 24: Vorbereitung
MINI5 Rhythm entfernt werden, weil sie sonst eventuell aus- laufen und Schäden verursachen. Entfernen Sie die Batterien 6. Stellen Sie die Rhythmuslautstärke mit dem LEVEL-Regler ein. außerdem, wenn Sie den MINI5 Rhythm längere Zeit nicht ver- TIPP: Der Power-Select-Schalter auf der Oberseite regelt den Ausgangspegel wenden möchten.
-
Page 25: Teile Und Funktionen
Teile und Funktionen AMP-Sektion Hier können mehrere Verstärkerfunktionen eingestellt werden. Bedienoberfläche 5. AMP-Regler Hiermit kann ein Verstärkermodell gewählt werden. Bei Anwahl eines an- deren Modells werden GAIN, TONE und der Signalweg automatisch wie auf dem simulierten Original eingestellt. Alles Weitere hierzu finden Sie unter „Verstärkermodelle“…
-
Page 26: Rückseite
11. EFFECTS-Regler 2 Power/AUX IN/PHONES-Sektion Mit diesem Regler können Sie den gewünschten Delay/Reverb-Effekttyp 18. Einschaltknopf, Power-LED wählen und den Effektanteil einstellen. Wenn Sie keine Effekte benötigen, Indem Sie diesen Knopf gedrückt halten, schalten Sie das Gerät ein oder müssen Sie den Regler ganz nach links drehen. aus.
-
Page 27: Energiesparfunktion
Energiesparfunktion Verwendung der Rhythmusfunktion Der VOX MIN5 Rhythm ist mit einer Energiesparfunktion ausgestattet. Diese Anwahl eines Rhythmus-Pattern schaltet das Gerät automatisch aus, sobald es länger als eine Stunde nicht be- Wählen Sie mit dem GENRE-Wahlschalter ein Genre für jedes Rhythmuspat- nutzt worden ist.
-
Page 28: Verwendung Der Stimmfunktion
Verwendung der Stimmfunktion Verstärkermodelle und Effekte Der Tuner des MINI5 Rhythm erlaubt das Stimmen des Signals, das an der In diesem Kapitel werden die Verstärkermodelle und Effekttypen vorgestellt. INPUT-Buchse anliegt. Die Stimmfunktion ermittelt die Tonhöhe des empfan- Verstärkermodelle genen Signals und zeigt dann die Abweichung im Verhältnis zum „E“ an.
-
Page 29: Effekte
UK ’80S FLANGER Das Modell eines 1983 erschienenen einkanaligen 100W-Tops mit MASTER VO- Dieses Modell simuliert einen analogen Flanger-Effekt mit jenem ty- LUME-Regler. Drehen Sie den GAIN-Regler voll auf, um jenen fetten, knurrigen pischen Düsenjägerwuusch. Hard Rock- und Heavy Metal-Sound der ‘80er zu neuem Glanz zu verhelfen. Die Modulationsgeschwindigkeit kann mit dem Regler eingestellt werden.
-
Page 30: Fehlersuche
Fehlersuche Die PHONES-Buchse gibt kein Signal aus. • Der VOLUME-Regler im Bedienfeld darf sich nicht in der Mindestposition befinden. Das Gerät schaltet sich nicht ein, selbst wenn ich den Einschaltknopf längere Zeit gedrückt halte. • Überprüfen Sie, ob der Verstärker überhaupt ein Signal empfängt. •…
-
Page 31: Technische Daten
269 x 179 x 267 mm Gewicht: 3,5 kg (ohne Batterien) Lieferumfang: Netzteil (DC 12V ), Gurt * Anderungen der technischen Daten und des Designs ohne vorherige Ankün- digung vorbehalten. Weitere Infos über Vox-Produkte findest du im Internet unter www. voxamps.com.
-
Page 32
Precauciones Nota respecto a residuos y deshechos (solo UE) Cuando aparezca el símbolo del cubo de basura tachado sobre Ubicación un producto, su manual de usuario, la batería, o el embalaje de cualquiera de éstos, significa que cuando quiere tire dichos El uso de la unidad en las siguientes ubicaciones puede dar como resultado artículos a la basura, ha de hacerlo en acuerdo con la normativa un mal funcionamiento:… -
Page 33: Introducción
¡Esperamos que disfrute del estupendo sonido del MINI5 Rhythm de VOX! Instalación de las pilas ————————————————— 34 Características generales Partes y sus funciones ————————————35 • Los sonidos extraídos de la serie VOX Valvetronix se comprimen en un Panel superior ————————————————————— 35 equipo compacto. Panel posterior ————————————————————- 36 •…
-
Page 34: Configuración
NOTA: Las pilas agotadas deben extraerse inmediatamente del MINI5 Rhythm. Si la deja puestas, se pueden producir fallos de funciona- miento, como la fuga de una pila. También debe extraer las pilas si no va a utilizar el MINI5 Rhythm durante un periodo prolongado.
-
Page 35: Partes Y Sus Funciones
Partes y sus funciones Sección AMP Esta sección le permite definir diversos ajustes del amplificador. Panel superior 5. Selector AMP Este selector le permite elegir un modelo de amplificador. El circuito de ganancia, las características de control de tono y la distribución del circuito se ajustarán automáticamente en función del modelo de ampli- ficador seleccionado.
-
Page 36: Panel Posterior
11. Mando EFFECTS 2 Sección de alimentación/AUX IN/PHONES Este mando le permite seleccionar un efecto de tipo retardo/reverberación 18. Botón de alimentación, LED y ajustar la intensidad del efecto. Para omitir los efectos, gire el mando Mantener pulsado este botón le permite activar o desactivar la alimen- al máximo hacia la izquierda.
-
Page 37: Función De Desactivación Automática
Función de desactivación automática Utilizar la sección de percusión El MINI5 Rhythm de VOX está equipado con una función de desactivación Seleccionar un patrón de percusión automática. La función de desactivación automática desactiva automática- Seleccione un género para cada patrón de percusión utilizando el selector mente la alimentación cuando el usuario no ha realizado ninguna operación…
-
Page 38: Uso Del Afinador
Afinada. AC15 Modela el canal 2 del AC15 de VOX (1×12”, 15 W), fabricado en 1962 y que fue El tono es bastante grave. un gran éxito gracias a su recinto acústico compacto, potencia y magnífico tono, junto con los grupos británicos famosos de la época.
-
Page 39: Efectos
UK ’80S FLANGER Modela un cabezal de canal individual de 100 W fabricado en Reino Unido Modela un flanger analógico que crea un sonido con un peculiar efecto de “swo- con volumen general fabricado en 1983. Suba el control GAIN al máximo para osh”, parecido al motor de un jet.
-
Page 40: Solución De Problemas
Solución de problemas Cuando utilizo el jack PHONES, este no emite ningún sonido. • Compruebe que el mando VOLUME del panel superior no está al mínimo. La alimentación no se activa aunque se mantenga pulsado el botón • Asegúrese de que se emite sonido desde el amplificador. de alimentación.
-
Page 41: Especificaciones
Peso: adaptador de CA (DC 12V ), correa Elementos incluidos: * Las especificaciones y el aspecto est sujetas a cambios sin previo aviso por mejora. Para obtener más información sobre los productos de Vox, visite nuestro sitio web en www.voxamps.com.
-
Page 42
2012 KORG INC.
|
Detail Specifications: 206/206754-mini5_rhythm.pdf file (21 Oct 2022) |
Accompanying Data:
Vox MINI5 Rhythm Musical Instrument Amplifier PDF Owner’s Manual (Updated: Friday 21st of October 2022 06:34:29 PM)
Rating: 4.8 (rated by 77 users)
Compatible devices: AGA150, AC30HW60, AC4HW1, AC4C1, Valvetronix ToneLab SE, AC30S1, AC4TVH, MINI SUPERBEETLE.
Recommended Documentation:
Text Version of Owner’s Manual
(Ocr-Read Summary of Contents, UPD: 21 October 2022)
-
42, Vox MINI5 Rhythm Owner’s Manual Manuel d’utilisation Bedienungsanleitung Manual de usuario 2012 KORG INC.
… -
14, 14 Préparation Cee section décrit une installation de base exploitant l’amplicateur. ATTENTION: Ce manuel indique également les précautions à prendre et donne des conseils de sécurité. Veillez à lire entièrement ce manuel. 1. Réglez la commande VOLUME et la commande LEVEL au niveau minimum. 2. Installez les piles dans l’amplicateur. Alternativement, vous po…
-
21, 21 Fiche technique Nombre d’amplis: 11 Nombre d’effets: 8 Nombre de motifs rythmiques: 99 Tempo: 40–240 bpm Plage de détection (onde sinus): E1 à E6 (41,2 Hz à 1318,5 Hz) Entrées/sorties: INPUT, MIC IN, AUX IN, PHONES Puissance de l’ampli: Maximum d’environ 5 W RMS @ 4 ohms Haut-parleur: 6.5”, 4Ω Traitement du signal Conversion A/N: 24 bi…
-
29, 29 FLANGER Dieses Modell simuliert einen analogen Flanger-Eekt mit jenem ty- pisen Düsenjägerwuus. Die Modulationsgeswindigkeit kann mit dem Regler eingestellt werden. TREM Simulation der Tremolo-Saltung in einem begehrten amerikanisen Com- bo. Dieser Eekt moduliert die Lautstärke. Die Tremologeswindigkeit kann mit dem Regler geändert werden. EFFECTS-Regler 2…
-
23, Vox MINI5 Rhythm 23 Inhalt Einleitung ————————————————23 Willkommen an Bord! ————————————— 23 Die wichtigsten Merkmale ——————————— 23 Vorbereitung ———————————————24 Einlegen der Batterien ————————————— 24 Teile und Funktionen ———————————25 Bedienober�…
-
37, 37 Función de desactivación automática El MINI5 Rhythm de VOX está equipado con una función de desactivación automática. La función de desactivación automática desactiva automática- mente la alimentación cuando el usuario no ha realizado ninguna operación durante 1 hora aproximadamente. Si la alimentación está desactivada, no se restaura aunque s…
-
33, 33 Contenido Introducción —————————————————33 ¡Bienvenido a bordo! —————————————————— 33 Características generales ———————————————— 33 Conguración ————————————————-34 Instalación de las pilas —————————————-…
-
4, 4 Setup This section describes the basic setup of your amplier. NOTE: This manual also describes safety precautions and functions. Be sure to read the entire manual. 1. Set the VOLUME knob and LEVEL knob to the minimum level. 2. Install baeries in the amplier. Alternatively, you can connect the included AC adapter to the DC12V jack on the rear panel, then plug the adapter into an A…
-
41, 41 Especicaciones Número de tipos de amplicador: 11 Número de efectos: 8 Número de patrones de percusión: 99 Tempo: 40–240 bpm Intervalo de anador: E1–E6 (41,2 Hz–1318,5 Hz) Jacks de entrada/salida: INPUT, MIC IN, AUX IN, PHONES Salida de amplicador de potencia: Aproximadamente un máximo 5 W RMS a 4 ohmios Altavoz: 6,5”…
-
15, Vox MINI5 Rhythm 15 Parties et leurs fonctions Face avant 2 3 4 1 5 6 7 8 9 18 19 20 10 11 12 13 14 15 16 17 Section d’entrée 1. Prise INPUT C’est ici que vous branchez votre guitare. 2. Prise MIC IN Vous pouvez brancher un micro à cee prise. 3. Commande TRIM Cee commande règle le niveau d’entrée du micro. 4. Commande SEND Cee commande détermine le niveau de départ du signal du micro …
Recommended Instructions:
KB915C, DN720P, FT-2000 — MENU MODE LIST, 1, PMR755


-
Model DB 751 Hybrid Bass Head The DB 751 Bass Head features a combination of raw power and rich tone that continues the legacy of the DB 750. The DB 751 is a groundbreaking hybrid with a discrete Mosfet output section and a 3-tube preamp. While maintaining the legendary sound of the DB 750, the DB 751 features improvements in the EQ section, a better control layout, detacha …
DB 751 6
-
SERVICE MANUALGA011757HAMAMATSU, JAPANCopyright (c) Yamaha Corporation. All rights reserved. PDF- K7301 ’04.1220041220-89000 CONTENTSSPECIFICATIONS ………………………………………. 3/4PANEL LAYOUT ………………………………. 5DISASSEMBLY PROCEDURE ……………………….. 7LSI PIN DESCRIPTION ……………………….. 13IC BLOCK DIAGRAM …………… …
BBT500H 56
-
Service NotesTubesTubes are consumables, as they have a given usable lifespan. They are part of the heart of the tone, so keeping correctly operating tubes is essential. Tubes can fail catastrophically or gradually, and it’s good to know what to look for if they start to go bad. Periodically inspect them and look to see if anything inside the tube is glowing cherry red other than the normal o …
Archon 2
Popular Right Now:
Operating Impressions, Questions and Answers:
Table of Contents for Vox MINI5 Rhythm:
-
28 Verwendung der Stimmfunktion Der Tuner des MINI5 Rhythm erlaubt das Stimmen des Signals, das an der INPUT-Buse anliegt. Die Stimmfunktion ermielt die Tonhöhe des empfan- genen Signals und zeigt dann die Abweiung im Verhältnis zum „E“ an. 1. Halten Sie den VARIATIONS-Taste mindestens 1 Sekunde lang gedrüt. Alle Eekte werden umgangen und die Stimmfunktion
-
37 Función de desactivación automática El MINI5 Rhythm de VOX está equipado con una función de desactivación automática. La función de desactivación automática desactiva automática- mente la alimentación cuando el usuario no ha realizado ninguna operación durante 1 hora aproximadamente. Si la alimentación está desactivada, no se restaura aunque se utilice un mando o selector. Vuelva a activar la alimentación. NOTA: La función de desactivación automática no se ejecuta si se es
-
35 Sección AMP Esta sección le permite denir diversos ajustes del amplicador. 5. Selector AMP Este selector le permite elegir un modelo de amplicador. El circuito de ganancia, las características de control de tono y la distribución del circuito se ajustarán automáticamente en función del modelo de ampli- cador seleccionado. Para obtener más información sobre cada modelo de amplicador, consulte “Modelo AMP” en la página 38. 6. Mando GAIN Este ma
-
15 Parties et leurs fonctions Face avant 2 3 4 1 5 6 7 8 9 18 19 20 10 11 12 13 14 15 16 17 Section d’entrée 1. Prise INPUT C’est ici que vous branchez votre guitare. 2. Prise MIC IN Vous pouvez brancher un micro à cee prise. 3. Commande TRIM Cee commande règle le niveau d’entrée du micro. 4. Commande SEND Cee commande détermine le niveau de départ du signal du micro aux eets delay/réverbération. Section AMP Cee section permet d’eectuer divers réglages liés à l’amplicateur. 5. Sélecteur AMP Ce sélecteur per
-
24 Vorbereitung Hier wird erklärt, wie man den Verstärker aufstellt. ANMERKUNG: Diese Bedienungsanleitung enthält au Sierheitshinweise und Vorsitsmaßnahmen. Bie lesen Sie si die gesamte Anleitung dur. 1. Drehen Sie den VOLUME-Regler und den LEVEL-Regler komple herunter. 2. Legen Sie Baerien in den Verstärker ein. Sie können aber au das eine Ende des Netzteils an die DC12V-Buse auf der Verstärkerrüseite und das andere Ende an eine geeignete Stedose ans
-
5 AMP section This section enables you to adjust various amplier seings. 5. AMP selector This selector enables you to choose an amp model. The gain circuit, tone control characteristics, and circuit layout will be set automatically in accordance with the selected amp model. For more information on each amp model, please refer to “AMP model” on page 8. 6. GAIN knob This knob enables you to adjust the pre amp gain for the selected amp model. 7. TONE knob This knob enables you to
-
21 Fiche technique Nombre d’amplis: 11 Nombre d’effets: 8 Nombre de motifs rythmiques: 99 Tempo: 40–240 bpm Plage de détection (onde sinus): E1 à E6 (41,2 Hz à 1318,5 Hz) Entrées/sorties: INPUT, MIC IN, AUX IN, PHONES Puissance de l’ampli: Maximum d’environ 5 W RMS @ 4 ohms Haut-parleur: 6.5”, 4Ω Traitement du signal Conversion A/N: 24 bits Conversion N/A: 24 bits Alimentation: Six piles de type “AA/LR6”
-
12 Précautions Emplacement L’utilisation de cet instrument dans les endroits suivants peut en entraîner le mauvais fonctionnement. • En plein soleil • Endroits très chauds ou très humides • Endroits sales ou fort poussiéreux • Endroits soumis à de fortes vibrations • A proximité de champs magnétiques Alimentation Branchez l’adaptateur secteur mentionné à une prise secteur de tension appro- priée. Evitez de brancher l’adaptateur à une prise de courant dont la tension ne correspo
-
17 Fonction de coupure automatique d’alimentation L’ampli VOX MINI5 Rhythm comporte une fonction de coupure automatique d’alimentation. Cee fonction coupe automatiquement l’alimentation de l’ampli quand aucune manipulation n’est eectuée pendant environ 1 heure. Une fois que l’alimentation a été coupée par cee fonction de coupure automa- tique, manipuler une commande ou un sélecteur ne permet pas de remere l’ampli sous ten
-
22 Vorsichtsmaßnahmen Aufstellungsort Vermeiden Sie das Aufstellen des Geräts an Orten, an denen • es direkter Sonneneinstrahlung ausgesetzt ist; • hohe Feutigkeit oder Extremtemperaturen aureten können; • Staub oder Smutz in großen Mengen vorhanden sind; • das Gerät Ersüerungen ausgesetzt sein kann. • in der Nähe eines Magnetfeldes. Stromversorgung Sließen Sie das optionale
-
30 Die PHONES-Buchse gibt kein Signal aus. • Der VOLUME-Regler im Bedienfeld darf si nit in der Mindestposition benden. • Überprüfen Sie, ob der Verstärker überhaupt ein Signal empfängt. Lösen Sie die Kabelverbindung mit der PHONES-Buse vorübergehend. Sonst wird der Lautspreer nämli stummgesaltet. Wenn Sie jetzt immer no nits hören, siehe dann „Der Verstärker gibt keinen Laut von si“. Hören Sie hingegen wohl etwas, dann müssen Sie den Kopöre
-
6 Power/AUX IN/PHONES Section 18. Power buon, LED Pressing and holding down this buon enables you to turn the power on or o. The power LED will light up when the power is turned on. 19. AUX IN jack Connect an external audio device to this jack. This enables you to conveniently connect an audio player and play your guitar along with the player’s output. 20. PHONES jack Use this jack if you’re plugging directly in to a mixer, recording de- vice, or if you’re using headphones. The output signal from this jack is taken before the power amp, and t
-
36 Sección de alimentación/AUX IN/PHONES 18. Botón de alimentación, LED Mantener pulsado este botón le permite activar o desactivar la alimen- tación. El LED de alimentación se iluminará cuando la alimentación esté activada. 19. Jack AUX IN Conecte un dispositivo de audio externo a este jack. Esto le permite conectar con comodidad un reproductor de audio y tocar la guitarra junto con la salida del re
Questions, Opinions and Exploitation Impressions:
You can ask a question, express your opinion or share our experience of Vox MINI5 Rhythm device using right now.
 |
[Page 1] Vox MINI5 Rhythm Owner’s Manual Manuel d’utilisation Bedienungsanleitung Manual de usuario |
 |
[Page 2] Vox MINI5 Rhythm 2 Precautions Location Using the unit in the following locations can result in a malfunction: • In direct sunlight • Locations of extreme temperature or humidity • Excessively dusty or dirty locations • Locations of excessive vibration • Cl… |
 |
[Page 3] Vox MINI5 Rhythm 3 Contents Introduction ———————————————- 3 Welcome aboard! —————————————————3 Main features ———————————————————3 Setup ——————————… |
 |
[Page 4] Vox MINI5 Rhythm 4 Setup This section describes the basic setup of your amplier. NOTE: This manual also describes safety precautions and functions. Be sure to read the entire manual. 1. Set the VOLUME knob and LEVEL knob to the minimum level. 2. Install baer… |
 |
[Page 5] Vox MINI5 Rhythm 5 AMP section This section enables you to adjust various amplier seings. 5. AMP selector This selector enables you to choose an amp model. The gain circuit, tone control characteristics, and circuit layout will be set automatically in accorda… |
 |
[Page 6] Vox MINI5 Rhythm 6 Power/AUX IN/PHONES Section 18. Power buon, LED Pressing and holding down this buon enables you to turn the power on or o. The power LED will light up when the power is turned on. 19. AUX IN jack Connect an external audio device to this … |
 |
[Page 7] Vox MINI5 Rhythm 7 Auto Power Off Function The VOX MINI5 Rhythm is equipped with an Auto Power O function. The Auto Power O function automatically turns the power o when there has been no user input for about 1 hour. When the power is turned o, it’s n… |
 |
[Page 8] Vox MINI5 Rhythm 8 Using the Tuner The MINI5 Rhythm’s tuner function lets you tune a guitar that’s con- nected to the INPUT jack. The tuner detects the pitch of the input sound, then indicates the discrepancy from the standard pitch of E. 1. Press and hold … |
 |
[Page 9] Vox MINI5 Rhythm 9 FLANGER This models an analog anger that creates a sound with a peculiar swoosh- ing eect like a jet engine. Use the knob to adjust the modulation speed. TREM This models a typical tremolo built into a standard U.S. combo amp that changes th… |
 |
[Page 10] Vox MINI5 Rhythm 10 There’s no sound heard from the PHONES jack when you use it. • Check that the top panel VOLUME knob isn’t turned all the way down. • Make sure sound is coming from the amp. You’ll need to unplug your headphones or cable from the PHONES… |
 |
[Page 11] Vox MINI5 Rhythm 11 Specications Number of amp types: 11 Number of effects: 8 Number of rhythm patterns: 99 Tempo: 40–240 bpm Tuner range: E1–E6 (41.2 Hz–1318.5 Hz) Input/output jacks: INPUT, MIC IN, AUX IN, PHONES Power amp output: Maximum approx. … |
 |
[Page 12] Vox MINI5 Rhythm 12 Précautions Emplacement L’utilisation de cet instrument dans les endroits suivants peut en entraîner le mauvais fonctionnement. • En plein soleil • Endroits très chauds ou très humides • Endroits sales ou fort poussiéreux • Endroit… |
 |
[Page 13] Vox MINI5 Rhythm 13 Sommaire Introduction ———————————————————13 Bienvenue à bord! ——————————————————— 13 Caractéristiques principales ——————————————- 13 Préparati… |
 |
[Page 14] Vox MINI5 Rhythm 14 Préparation Cee section décrit une installation de base exploitant l’amplicateur. ATTENTION: Ce manuel indique également les précautions à prendre et donne des conseils de sécurité. Veillez à lire entièrement ce manuel. 1. Rég… |
 |
[Page 15] Vox MINI5 Rhythm 15 Parties et leurs fonctions Face avant 2 3 4 1 5 6 7 8 9 18 19 20 10 11 12 13 14 15 16 17 Section d’entrée 1. Prise INPUT C’est ici que vous branchez votre guitare. 2. Prise MIC IN Vous pouvez brancher un micro à cee prise. 3. Commande… |
 |
[Page 16] Vox MINI5 Rhythm 16 11. Commande EFFECTS 2 Cee commande permet de sélectionner un type d’eet Delay/Reverb et de régler l’intensité de l’eet. Pour contourner les eets, tournez la commande à bout de course vers la gauche. Si vous voulez appliqu… |
 |
[Page 17] Vox MINI5 Rhythm 17 Fonction de coupure automatique d’alimentation L’ampli VOX MINI5 Rhythm comporte une fonction de coupure automatique d’alimentation. Cee fonction coupe automatiquement l’alimentation de l’ampli quand aucune manipulation n’est e�… |
 |
[Page 18] Vox MINI5 Rhythm 18 Utiliser l’accordeur L’accordeur interne du MINI5 Rhythm permet d’accorder la guitare branchée à la prise INPUT. L’accordeur détecte la hauteur du signal d’entrée et indique la diérence entre cee hauteur et la hauteur de ré… |
 |
[Page 19] Vox MINI5 Rhythm 19 UK ’80S Modélisation d’une tête britannique de 100W à un seul canal avec volume master, fabriquée en 1983. Tournez la commande à fond à droite pour obtenir ce son hard rock et heavy metal rugissant qui a dominé les années 80. UK &… |
 |
[Page 20] Vox MINI5 Rhythm 20 Dépannage L’ampli ne se met pas sous tension même quand vous maintenez son interrupteur d’alimentation enfoncé. • Avez-vous installé des piles? La polarité est-elle correcte? Avez-vous branché le cordon de l’adaptateur à la p… |
 |
[Page 21] Vox MINI5 Rhythm 21 Fiche technique Nombre d’amplis: 11 Nombre d’effets: 8 Nombre de motifs rythmiques: 99 Tempo: 40–240 bpm Plage de détection (onde sinus): E1 à E6 (41,2 Hz à 1318,5 Hz) Entrées/sorties: INPUT, MIC IN, AUX IN, PHONES Puissan… |
 |
[Page 22] Vox MINI5 Rhythm 22 Vorsichtsmaßnahmen Aufstellungsort Vermeiden Sie das Aufstellen des Geräts an Orten, an denen • es direkter Sonneneinstrahlung ausgesetzt ist; • hohe Feutigkeit oder Extremtemperaturen aureten können; • Staub oder Smutz in gro… |
 |
[Page 23] Vox MINI5 Rhythm 23 Inhalt Einleitung ————————————————23 Willkommen an Bord! ————————————— 23 Die wichtigsten Merkmale ——————————— 23 Vorbereitung —————————————-… |
 |
[Page 24] Vox MINI5 Rhythm 24 Vorbereitung Hier wird erklärt, wie man den Verstärker aufstellt. ANMERKUNG: Diese Bedienungsanleitung enthält au Sierheitshinweise und Vorsitsmaßnahmen. Bie lesen Sie si die gesamte Anleitung dur. 1. Drehen Sie den VOLU… |
 |
[Page 25] Vox MINI5 Rhythm 25 AMP-Sektion Hier können mehrere Verstärkerfunktionen eingestellt werden. 5. AMP-Regler Hiermit kann ein Verstärkermodell gewählt werden. Bei Anwahl eines an- deren Modells werden GAIN, TONE und der Signalweg automatis wie auf dem simulier… |
 |
[Page 26] Vox MINI5 Rhythm 26 Power/AUX IN/PHONES-Sektion 18. Einsaltknopf, Power-LED Indem Sie diesen Knopf gedrüt halten, salten Sie das Gerät ein oder aus. Die leutende Power-LED zeigt an, dass das Gerät eingesaltet ist. 19. AUX IN-Buse Hier kann ein… |
 |
[Page 27] Vox MINI5 Rhythm 27 Energiesparfunktion Der VOX MIN5 Rhythm ist mit einer Energiesparfunktion ausgestaet. Diese saltet das Gerät automatis aus, sobald es länger als eine Stunde nit be- nutzt worden ist. Ist das Gerät abgesaltet, können Sie es ni�… |
 |
[Page 28] Vox MINI5 Rhythm 28 Verwendung der Stimmfunktion Der Tuner des MINI5 Rhythm erlaubt das Stimmen des Signals, das an der INPUT-Buse anliegt. Die Stimmfunktion ermielt die Tonhöhe des empfan- genen Signals und zeigt dann die Abweiung im Verhältnis zum „E�… |
 |
[Page 29] Vox MINI5 Rhythm 29 FLANGER Dieses Modell simuliert einen analogen Flanger-Eekt mit jenem ty- pisen Düsenjägerwuus. Die Modulationsgeswindigkeit kann mit dem Regler eingestellt werden. TREM Simulation der Tremolo-Saltung in einem begehrten ame… |
 |
[Page 30] Vox MINI5 Rhythm 30 Die PHONES-Buchse gibt kein Signal aus. • Der VOLUME-Regler im Bedienfeld darf si nit in der Mindestposition benden. • Überprüfen Sie, ob der Verstärker überhaupt ein Signal empfängt. Lösen Sie die Kabelverbindung mit der PH… |
 |
[Page 31] Vox MINI5 Rhythm 31 Technische Daten Anzahl der Verstärkertypen: 11 Anzahl der Effekte: 8 Anzahl der Rhythmus-Pattern: 99 Tempo: 40–240 bpm Bereich (Sinuswelle): E1–E6 (41,2 Hz–1318,5 Hz) Ein-/Ausgänge: INPUT, MIC IN, AUX IN, PHONES Ausgangsleistung d… |
 |
[Page 32] Vox MINI5 Rhythm 32 Precauciones Ubicación El uso de la unidad en las siguientes ubicaciones puede dar como resultado un mal funcionamiento: • Expuesto a la luz directa del sol • Zonas de extremada temperatura o humedad • Zonas con exceso de suciedad o polvo … |
 |
[Page 33] Vox MINI5 Rhythm 33 Contenido Introducción —————————————————33 ¡Bienvenido a bordo! —————————————————— 33 Características generales ———————————————— 33 Congurac… |
 |
[Page 34] Vox MINI5 Rhythm 34 Instalación de las pilas Retire la tapa del compartimento de las pilas, que está ubicado en la parte inferior de la unidad, tirando de la cinta. Inserte seis pilas alcalinas AA tal como se muestra en la gura. NOTA: Las pilas no están inc… |
 |
[Page 35] Vox MINI5 Rhythm 35 Sección AMP Esta sección le permite denir diversos ajustes del amplicador. 5. Selector AMP Este selector le permite elegir un modelo de amplicador. El circuito de ganancia, las características de control de tono y la distribución de… |
 |
[Page 36] Vox MINI5 Rhythm 36 Sección de alimentación/AUX IN/PHONES 18. Botón de alimentación, LED Mantener pulsado este botón le permite activar o desactivar la alimen- tación. El LED de alimentación se iluminará cuando la alimentación esté activada. 19. Jac… |
 |
[Page 37] Vox MINI5 Rhythm 37 Función de desactivación automática El MINI5 Rhythm de VOX está equipado con una función de desactivación automática. La función de desactivación automática desactiva automática- mente la alimentación cuando el usuario no ha realizado… |
 |
[Page 38] Vox MINI5 Rhythm 38 Uso del anador La función de anador del MINI5 Rhythm le permite anar una guitarra conectada al jack INPUT. El anador detecta el tono del sonido de entrada e indica la discrepancia respecto al tono estándar de E. 1. Mantenga pulsa… |
 |
[Page 39] Vox MINI5 Rhythm 39 FLANGER Modela un anger analógico que crea un sonido con un peculiar efecto de “swo- osh”, parecido al motor de un jet. Utilice el mando para ajustar la velocidad de modulación. TREM Modela un tremolo típico incorporado en un amplicad… |
 |
[Page 40] Vox MINI5 Rhythm 40 Cuando utilizo el jack PHONES, este no emite ningún sonido. • Compruebe que el mando VOLUME del panel superior no está al mínimo. • Asegúrese de que se emite sonido desde el amplicador. Tendrá que desconectar los auriculares o el cab… |
 |
[Page 41] Vox MINI5 Rhythm 41 Especicaciones Número de tipos de amplicador: 11 Número de efectos: 8 Número de patrones de percusión: 99 Tempo: 40–240 bpm Intervalo de anador: E1–E6 (41,2 Hz–1318,5 Hz) Jacks de entrada/salida: INPUT, MIC IN, … |
 |
[Page 42] Vox MINI5 Rhythm Owner’s Manual Manuel d’utilisation Bedienungsanleitung Manual de usuario 2012 KORG INC. |
Download Owner’s manual of Vox MINI5 Rhythm Musical Instrument Amplifier for Free or View it Online on All-Guides.com.

1

2

3

4

5

6

7

8

9

10

11

12

13

14

15

16

17

18

19

20

21

22

23

24

25

26

27

28

29

30

31

32

33

34

35

36

37

38

39

40

41

42

Owner’s Manual
Manuel d’utilisation
Bedienungsanleitung
Manual de usuario