-
Contents
-
Table of Contents
-
Troubleshooting
-
Bookmarks
Quick Links
Automatic Machine for Espresso Coffee and Hot Beverages
WARNING: Read these instructions carefully before using the machine.
UK
Related Manuals for Saeco SUP040RB
Summary of Contents for Saeco SUP040RB
-
Page 1
Automatic Machine for Espresso Coffee and Hot Beverages WARNING: Read these instructions carefully before using the machine. -
Page 2: Main Parts
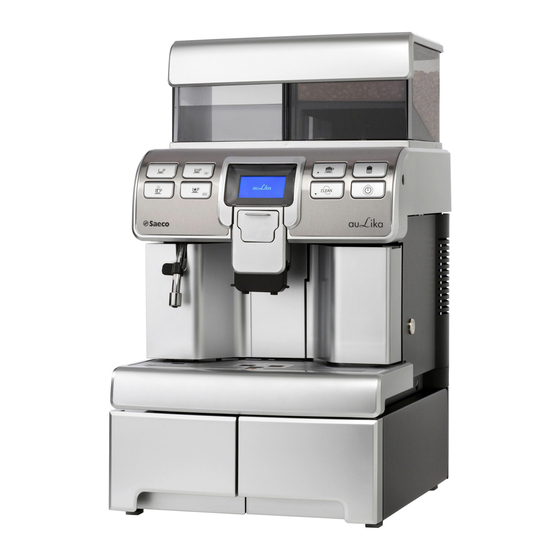
English MAIN PARTS Tank lid with lock Coffee dispensing spout Water tank Cup holder grill Control panel Full drip tray float Cappuccinatore Drip tray Hot water/Steam wand Coffee grounds drawer Service compartment door (to be used by the Service provider only) ON/OFF button Coffee bean hopper Chassis plug…
-
Page 3: Intended Use
English SAFETY INSTRUCTIONS Never allow water to Children must not play with come into contact the appliance. with Children cannot carry out electrical parts of the cleaning machine: danger maintenance operations short circuit! unless they are supervised. water and steam may cause scalding! Intended Use Power Supply…
-
Page 4
English Do not pass the power cord Do not touch the hot around corners, over sharp water wand with bare edges or over hot objects and hands. Always use the keep it away from oil. handles or knobs provided. Do not use the power Danger of Burning cord to carry or pull the Do not touch the hot… -
Page 5
English The machine may only be The machine must only be moved service installed in places where it provider. checked qualified staff. Do not use the machine outdoors. Cleaning Do not install the machine in Before cleaning a location where water jets machine, the power button may be used. -
Page 6
English Using Milk Storing the Machine Milk must be used and stored in accordance with If the machine is to remain the instructions given on inactive for a long time, the manufacturer’s original turn it off and unplug it. packaging. Store the machine in a dry place, out of the reach of We accept no liability for… -
Page 7
English Only skilled and experienced people with particular reference safety hygiene — are allowed to access the service area. -
Page 8: Table Of Contents
English CONTENTS 9.3 RINSE/SELF-CLEANING CYCLE MAIN PARTS 9.4 ECO-FRIENDLY: STAND-BY 1 INTRODUCTION TO THE MANUAL 1.1 PREAMBLE 9.5 PAYMENT SYSTEMS 1.2 ICONS USED 9.6 BREWING COFFEE 9.7 CAPPUCCINATORE 2 INFORMATION ABOUT THE MACHINE 2.1 INFORMATION FOR THE MAINTENANCE 9.8 BREWING CAPPUCCINO TECHNICIAN 9.9 BREWING LATTE MACCHIATO 2.2 DESCRIPTION AND INTENDED USE…
-
Page 9: Introduction To The Manual
Always refer to this manual before carrying out any The manufacturer reserves operation. the right to make changes without prior notice. Manufacturer: SAECO Vending S.p.A. Località Casona, 1066 — 40041 Gaggio Montano Bologna, Italy…
-
Page 10: Icons Used
English Icons Used Various kinds of warnings are contained in this manual to highlight the different hazard or competence levels. Each icon is followed by a message suggesting operating and behaviour procedures and providing useful information for the correct operation of the machine. Warning It is used to highlight danger situations for the persons in charge of using, refilling and servicing the machine.
-
Page 11: Information About The Machine
English INFORMATION ABOUT THE MACHINE Information for the Description and Intended Use Maintenance Technician This machine automatically brews: The appliance must be • coffee and espresso coffee using instantly ground coffee installed well-lit, beans; sheltered and dry place • hot water to prepare beverages; •…
-
Page 12: Appliance Identification
English Appliance Identification The appliance is identified by the model name and serial number shown on the special plate. The plate contains the following data: • name of the Manufacturer; • marks of conformity; • model; • serial number; • year and month of manufacture; •…
-
Page 13: Technical Specifications
English Technical Specifications Size (w x h x d) 334 x 574 x 452 mm Weight approx. 22 kg Machine housing material Metal — Thermoplastic material Power Rating See the data plate Supply Voltage See the data plate Power cord length approx.
-
Page 14: Safety
• use original spare parts; regulations, SAECO VENDING has prepared a technical • carefully read the instructions contained in this manual and file relating to the AULIKA machine at its premises, in the attached documents; acknowledging the following standards in the design stage: •…
-
Page 15: Operator Requirements
English Maintenance technician case failure The maintenance technician is the only person authorised to malfunctioning, please refer service the machine, start the programming procedures and perform the adjustment, set up and maintenance operations. only qualified Only skilled and experienced personnel of the technical people — with particular service.
-
Page 16: Handling And Storage
English HANDLING AND STORAGE Storage operations described in this chapter The machine is packed in cardboard and expanded polystyrene packaging. must performed If the appliance is not immediately installed, it shall be kept exclusively by the service in a sheltered place according to the following instructions: provider or a specialised •…
-
Page 17: Installation
English INSTALLATION Cautions operations described in this chapter The appliance cannot be must performed installed in external areas. exclusively by the service Avoid placing it in areas provider or a specialised where the temperature is technician, shall lower than 2°C or higher organise all the operating than 32°C…
-
Page 18: Unpacking And Positioning
English Access to the machine and The presence of magnetic the plug should be kept fields proximity clear at all times in order electrical machines which to allow users to easily generate interference reach them and to leave could cause the electronic the area immediately if controls of the machine to required.
-
Page 19
English List of Standard Accessories Right-hand fitting for Cappuccinatore: allows the milk container to be connected to the Cappuccinatore when Manual: instructions on how to use the machine. the machine features a coiner. Door safety cut-out key: it allows the door safety to be cut out in order to adjust the coffee grinder. -
Page 20: Installing The Container Base
English List of Optional Accessories Installing the Container Base Cleaning brush: to remove the coffee powder from the The containers have to be installed at the base of the service compartment. machine before starting to use the machine. Remove the drip tray and the group compartment drawer in order to be able to install the containers.
-
Page 21: Installation Of Payment Systems
English Remove the brew group by pulling it by the handle and After installing the containers, refit the components and pressing the «PRESS» button. close the door. Install the group compartment drawer and the drip tray. Installation of Payment Systems This machine is designed to manage specific payment systems according to the needs of the service provider.
-
Page 22
English Remove the lid on the left-hand side by loosening the 2 Place the wiring harnesses as shown in the figure and pass screws. the longer one through the hole. Prepare the box containing the coiner. Install the spacer on the left-hand side of the machine and fix it using the 4 screws supplied. -
Page 23
English After installing the coiner, enable the products dispensed The purchase and installation upon payment their price. Access programming mode to carry out this procedure. of the coiner are at the service provider’s expenses. The machine allows you to select a price line (0, 1, 2) Fix the coiner box to the spacer using the 2 screws supplied. -
Page 24
English Remove the screw shown in the picture. The «Apollo» system must be purchased and installed by the service provider. Please refer to the «Apollo» system manual for each programming option. Follow the instructions below to install the Apollo system: Move the protection cover to the left and pull it out by rotating it. -
Page 25: Connection To The Electric Network
English When the sensor has been connected, reinstall the Connection to the Electric protection cover using the screw. Network This operation must only be performed by specialised technical personnel or by the service provider. The Maintenance Technician, who is in charge of the appliance’s installation, shall make sure that: •…
-
Page 26: Description Of Controls
English DESCRIPTION OF CONTROLS Power button It is located in the lower left part in the rear of the machine. If set to the «I» position the machine turns on (electrical functions enabled). If set to the «O» position the machine turns off (electrical functions disabled).
-
Page 27: Supply And Start Up
English SUPPLY AND START UP • Use the special blends for espresso machines to obtain a Opening the Upper Lid strong and aromatic coffee. • Keep coffee in a cool place in an airtight sealed container. The upper protection cover should be removed in order to fill the containers.
-
Page 28: Filling The Water Tank
English Pour the coffee beans into the hopper. Filling the Water Tank Before using the machine for the first time, wash the water tank carefully. Fill the water tank with fresh drinking water only. Hot or carbonated water, as well other liquids, will…
-
Page 29: Measuring And Adjusting Water
English Rinse and fill it with fresh water; do not exceed the level Check how many squares change colour and then consult (MAX) indicated on the tank. the table. When filling the water tank, use sterile disposable The numbers correspond to the settings indicated in the following machine adjustments.
-
Page 30: Intenza+» Water Filter
Water is a key element for a good espresso coffee. Therefore, it should always be filtered in a professional manner. That is why all Saeco machines can be equipped with the INTENZA+ filter. This filter is easy to use and its sophisticated technology is effective in preventing limescale build-up.
-
Page 31: Measuring Water Hardness
English Immerse the «INTENZA+» water filter vertically in cold The anti-scale filter should water (with the opening positioned upwards) and gently press its sides to let the air bubbles out. replaced whenever indicated by the machine. Before descaling, remove the anti-scale filter from the water tank.
-
Page 32
English Press the «Coffee» button to access. To exit the procedure, press «Special Beverages» button. Press the «Coffee» button to continue. Press the «Clean» button until the «WATER MENU» option can be selected. Press the «Coffee» button to access. Press the «Clean» button until the «ACTIVATE FILTER» option can be selected. -
Page 33
English Put the filter into the empty tank. Press it to its limit stop. Place a large container under the hot water wand. Fill the tank with fresh drinking water and reinsert it into Press the «Coffee» button to confirm. the machine. -
Page 34: Closing The Upper Lid
English Closing the Upper Lid Turn off the machine by pressing ON/OFF After refilling and during normal operation, the upper protection cover must always be fitted and locked using button and remove the the special key in order to prevent access to unauthorised people.
-
Page 35: Adjusting The «Aroma» — Amount Of Ground Coffee
English Enable the safety device again Do not change the coffee as soon as the adjustment has dose with pre-grinding set been completed. to «ON» on machines where this option Turn the lever by only one notch at a time during the grinding phase.
-
Page 36: Adjusting The Coffee Dispensing Spout
English • For the use of large cups. 7.10 Adjusting the Coffee Dispensing Spout Most of the cups available on the market can be used with this coffee machine. The height of the dispensing spout can be adjusted to better fit the dimensions of the cups that you wish to use. Two cups can be placed under the dispensing spout to brew two cups of coffee at the same time.
-
Page 37: Turning On/Off The Machine
English 7.12 Setting the Language (Upon Before brewing First Use) product and/or when At first start-up, the desired display language of the bringing dispensing messages must be selected and stored. This allows the beverage parameters to be adjusted to the specific taste of spout back to its normal the country where the machine is in use.
-
Page 38: First Use — Use After A Long Period Of Inactivity
English Place a container under the hot water wand. 7.13 First Use — Use after a Long Period of Inactivity Refill the machine (follow the instructions above). Connect the plug of the appliance to the mains (see section «Connection to the Electric Network»). For a perfect Espresso: rinse the coffee circuit if using the machine for the first time or after a long period of inactivity.
-
Page 39: Using The Appliance
English 7.15 Using the Appliance Before using the machine, read this manual carefully and make sure users are familiar with the machine. After the machine has not been used for a certain time, it is recommended to read section “First Use — Use after a Long Period of Inactivity”…
-
Page 40: Programming Menu
English PROGRAMMING MENU Button Description in This chapter contains Programming Mode instructions on how to set Use the buttons described below to scroll the appliance change menus. programming parameters of the appliance. Therefore it is necessary to carefully read it and to understand exact sequence…
-
Page 41: Service Provider Programming
English Button 3: Cappuccino — Turn on the machine using the power button and… Up function This button allows you to: • browse the pages within a menu; • change the parameters when they are made editable using the «OK» button. Button 4: Clean Down function This button allows you to:…
-
Page 42: Exit Programming Mode
English above mentioned The PASSWORD will not procedure can be used to be requested if set on the access the programming default value (0000). It menu also when should be changed upon machine is still cold and has first prevent reached operating unauthorised access.
-
Page 43
English 8.2.2 Structure of the Programming Menu Coffee Length This menu allows you to manage certain machine Milk Quantity operation parameters. The main items of the programming menu are: High Speed Milk MENU ITEM Default Credits Menu Hot Water Add Credits Water Quantity Reset Credits Default… -
Page 44
English MENU ITEM Water Menu Espresso Hardness Coffee Water Net Long Coffee Enable Filter American Coffee Activate Filter Hot Water Maintenance Cappuccino Brew Group Clean Latte Macchiato DESCALING Hot Milk Start Descale Caffè Latte Descale Warning Counters Reset Cappuccinatore Cleaning Machine Menu Start Cleaning General Menu… -
Page 45
English 8.2.3 Description of Messages in the Programming Menu MENU ITEM Description This menu allows you to manage the machine credits to avoid undesired product Credits Menu brewing. Credit management is not active for hot water, hot milk and steam dispensing. This function allows you to add credits to the machine. -
Page 46
English MENU ITEM Description standard temperature. Normal high temperature. High This section allows you to program the amount of coffee to be brewed for each selected Coffee Length beverage. The bar allows you to set the exact amount of coffee to be brewed (the value is measured in turbine pulses). -
Page 47
English MENU ITEM Description active. longer in order to bring out the coffee taste. High This section allows the coffee brewing temperature to be programmed. Coffee temperature low temperature. standard temperature. Normal high temperature. High This section allows you to program the amount of coffee to be brewed for each selected Coffee Length beverage. -
Page 48
English MENU ITEM Description This section allows the coffee brewing temperature to be programmed. Coffee temperature low temperature. standard temperature. Normal high temperature. High This section allows you to program the amount of coffee to be brewed for each selected Coffee Length beverage. -
Page 49
English MENU ITEM Description Pre-brewing: Prebrewing coffee is slightly dampened before brewing so as to bring out the full aroma of the coffee that acquires an excellent taste. pre-brewing is not performed. active. longer in order to bring out the coffee taste. High This section allows the coffee brewing temperature to be programmed. -
Page 50
English MENU ITEM Description high temperature. High This section allows you to program the amount of coffee to be brewed for each selected Coffee Length beverage. The bar allows you to set the exact amount of coffee to be brewed (the value is measured in turbine pulses). -
Page 51
English MENU ITEM Description Milk and coffee are dispensed in two separate steps. NOTE: in this case, the various dispensing stages (coffee or milk) can be individually stopped. Milk and coffee are dispensed at the same time. NOTE: in this case, the user can only stop dispensing the beverage as a whole. Setting ECOMODE to OFF brings down the dispensing time of mixed products. -
Page 52
English MENU ITEM Description To change the machine operating settings. General Menu This function allows you to activate/deactivate the acoustic alarms. Tone To deactivate the acoustic alarms. To activate the acoustic alarms. This function manages the activation of the machine boilers in order to save energy. Ecomode The function is set by default to «OFF». -
Page 53
English MENU ITEM Description alarm disabled alarm enabled You can set the maximum number of grounds that the drawer can contain before Coffee Grounds requiring to be emptied. To activate the pre-grinding function for a coffee yet to be selected in order to speed up Pre Grinding coffee brewing time. -
Page 54
English MENU ITEM Description To activate the function that enables machine operation with the water network (only Water Net for models designed accordingly). NOTE: Use this function with utmost care, as a wrong setting may cause malfunctions. The «ON» option must only be activated if the «Water Network» kit is installed and connected properly. -
Page 55
English MENU ITEM Description This function starts the Cappuccinatore cleaning cycle as described in the relevant Start Cleaning section. This function activates the display warning message indicating that a Cappuccinatore Warning Cleaning cleaning cycle should be performed. With this setting, the warning message is disabled. With this setting, the warning message is enabled;… -
Page 56
English Press the «Coffee» button to enter the «GENERAL 8.2.4 Password setting MENU». The PASSWORD must be set by the service provider in order to prevent access by unauthorised personnel who could change the machine settings and cause malfunctions. To set the PASSWORD, proceed as follows: Switch to programming mode as described in section «Access to the Programming Menu». -
Page 57
English When the «Coffee» button is pressed on the last number, the machine stores the code and displays the following page. Press the «Special Beverages» button numerous times to exit the page. From now on the PASSWORD will always be required to access the menus. -
Page 58: Operation And Use
English OPERATION AND USE Turning on the Machine The use by children older Connection to the power than 8 years or by persons supply should be carried out with reduced physical, exclusively by the service mental or sensory abilities provider! or with lack of experience skills allowed,…
-
Page 59: Warm-Up And Rinsing
English Before turning on the machine, ensure that the plug is If some or all of the correctly inserted in the power socket. To turn on the machine, move the power button on the back of the machine buttons are off machine to «I».
-
Page 60: Rinse/Self-Cleaning Cycle
English Once warm-up has been completed, the machine performs If the machine is used for a rinse cycle of the internal circuits. the first time or after a long period of inactivity, contact Service Provider to start it up. Rinse/Self-Cleaning Cycle The progress bar indicates that machine…
-
Page 61: Eco-Friendly: Stand-By
English Eco-friendly: Stand-by The «Special Beverages» button is lit even if there is The machine is designed for energy saving. The machine automatically turns off after 60 minutes of inactivity. The only one free product machine automatically turns off according to the settings of programming menu described…
-
Page 62: Brewing Coffee
English Brewing Coffee service provider manages product prices To brew coffee, press and release: the «Espresso» button for an espresso; and which coins may be or the «Coffee» button for a cup of coffee; used, and is to provide all Then the brewing cycle starts: Press the desired button once to brew 1 cup of coffee.
-
Page 63
English Cappuccinatore 9.7.1 Installing the Cappuccinatore The Cappuccinatore must be suitably assembled based on This chapter explains how to use the milk Cappuccinatore whether the machine is equipped with a coiner. to prepare a cappuccino, a Latte Macchiato or to froth milk. -
Page 64: Brewing Cappuccino
English In this case, the suction tube can be attached to the Insert the tube on the right-hand side of the fitting. holders as shown in the figure. Brewing Cappuccino 9.7.1.2 Cappuccinatore with Coiner The machine can dispense cappuccino quickly and easily with the touch of a button.
-
Page 65
English Insert the Cappuccinatore into its seat until it locks into This way, all parts will be place. Check that it cannot be pulled out. perfectly clean and free of any milk residue. If this cycle is not carried out, 10 minutes after completion of the last brewing operation machine… -
Page 66
English Insert the clean tube directly into the milk container. After preheating, the machine starts brewing cappuccino. The machine dispenses frothed milk. You can stop dispensing by pressing the «Special Beverages» button. Once milk has been brewed, the machine dispenses the coffee. -
Page 67: Brewing Latte Macchiato
English In this case, press the «Cappuccino» button to brew a Brewing Latte Macchiato cappuccino. The display shows: The machine can dispense Latte Macchiato quickly and easily with the touch of a button. Clean the Cappuccinatore immediately after using it to froth milk (see section «Cappuccinatore Cleaning (After Each Use)»).
-
Page 68
English Remove the cover from the front side. Before using Cappuccinatore, clean it as described in the «Cleaning The cover can be placed on the Cappuccinatore (After the machine side using the Each Use)» section. integrated magnet. Insert the clean tube directly into the milk container. Insert the Cappuccinatore into its seat until it locks into place. -
Page 69: Hot Water Dispensing
English 9.10 Hot Water Dispensing To ensure better results when preparing Danger of burning! Dispensing may be preceded by small jets of hot water. The hot water wand may reach high cappuccino, use cold milk. temperatures. Place a container under the hot water wand. We recommend using tall glasses for this type of preparation, thus properly moving the coffee dispensing spout.
-
Page 70: Special» Products
English 9.11 «SPECIAL» Products In this menu, you can just brew one product at a The machine is designed to also brew products other than those displayed on the control panel. time. brew more After pressing the «Special products, repeat Beverages»…
-
Page 71
English Place a suitable cup under the coffee dispensing spout. The cover can be placed on the machine side using the integrated magnet. Insert the Cappuccinatore into its seat until it locks into place. Check that it cannot be pulled out. Press the «Coffee»… -
Page 72
English Place a suitable cup under the dispensing spout. Before using Cappuccinatore, clean it as described in the «Cleaning the Cappuccinatore (After Each Use)» section. Insert the clean tube directly into the milk container. Confirm by pressing the «Coffee» button to start the preparation. -
Page 73
English American Coffee Caffè Latte This programme allows you to prepare an American This programme allows you to prepare a coffee with hot coffee. milk. Press the «Special Beverages» button to access the menu. Danger burning! Press the «Clean» button to select «AMERICAN COFFEE». Dispensing preceded by small jets of hot water. -
Page 74
English Press the «Special Beverages» button to access the menu. Press the «Clean» button to select «CAFFÈ LATTE». Place a suitable cup under the dispensing spout. Before using Cappuccinatore, clean it as described in the «Cleaning the Cappuccinatore (After Each Use)» section. Insert the clean tube directly into the milk container. -
Page 75: Adjusting Brewed Products
English Steam Press the «Coffee» button to confirm. The machine warms up the system. Once the required temperature is This function is only available if reached, the steam dispensing procedure is started. previously activated by the To stop steam dispensing, press the «Special Beverages» button. service provider.
-
Page 76
English To select the «BEVERAGE MENU» option, press the Press the «Coffee» button to access the «PREBREWING» «Clean» button. menu. Press the «Coffee» button to access. Press the «Clean» button or the «Cappuccino» button to select the desired value. Then press the «Coffee» button to confirm and exit. -
Page 77
English Press the «Clean» button to select the «COFFEE LENGTH» Press the «Clean» button or the «Cappuccino» button to menu. select the desired value and then let the bar advance. the number on the side identifies the bar value (in seconds). Then press the «Coffee»… -
Page 78
English Press the «Coffee» button to confirm. The beverage The factory settings can be factory settings have been restored. Press the «Special Beverages» button once or more times to exit. restored for each single beverage and the restored 9.12.2 Visual Method settings will be applied only to This method allows the product length to be set by the that specific beverage. -
Page 79
English Press the «Coffee» button to access. Place a cup under the dispensing spout. Press the «Coffee» button to enter the «GENERAL MENU». Press and hold the «Cappuccino» button until the «MEMO» message is displayed and remove your finger. The machine is now in programming mode. -
Page 80: Using The Machine With Credits
English The machine immediately begins the coffee brewing phase. When no credits remain, no more coffee-based products The «STOP COFFEE» message is displayed. can be brewed. Available credits are displayed whenever a product is brewed. Hot water, hot milk and steam dispensing is not subject to credit;…
-
Page 81
English The machine will indicate when the coffee grounds drawer has reached Only when the display shows: its maximum capacity. The first warning alerts the user that the coffee grounds drawer must be emptied, but the machine can still be used to brew coffee. -
Page 82: Cleaning And Maintenance
English CLEANING AND MAINTENANCE 10.1 General Notes for Correct Before performing Operation maintenance and/or Non-removable cleaning operation, unplug components the power cord. machine itself must be cleaned, when differently specified, only The Manufacturer is not by using cold or lukewarm liable damage water, with a non-abrasive…
-
Page 83: Cleaning And Scheduled Maintenance
English 10.2 Cleaning and Scheduled 10.2.1 Maintenance Schedule Maintenance Operation to be carried out All parts requiring cleaning Emptying and cleaning the coffee grounds drawer are easily accessible, so no Thorough Cleaning of the Cappuccinatore Water tank cleaning tools are needed. Brew group cleaning Brew group lubrication Coffee bean hopper cleaning…
-
Page 84
English 10.2.2 Cleaning the Hot 10.2.4 Cleaning the Drip Tray Water/Steam Wand The hot water/steam wand must be cleaned externally Empty and wash the drip tray daily; this operation must with a damp cloth after each use and, in any case, once a also be performed when the float is raised. -
Page 85
English Place a container under the dispensing spout. 10.2.5 Cleaning the Cappuccinatore (After Each Use) Failure clean Cappuccinatore after use with milk cause proliferation bacteria which may be harmful for the user. The Cappuccinatore must be washed and cleaned every time it is used. -
Page 86
English Only once the cycle has been completed, press the side In this case, the wash cycle buttons and remove the Cappuccinatore. uses hot water only and does include suction tube, necessarily washed after the end of the cycle. Press the «Coffee» button to start the Cappuccinatore Put the cover onto the machine. -
Page 87
English Remove the ring from the Cappuccinatore. Here is an explanation of how to disassemble and wash the Cappuccinatore with left-hand fitting. If the right-hand fitting is installed, you can carry out the same operations except that you will need to remove the suction tube and insert it on the opposite side to that shown here. -
Page 88
Thorough Cleaning of the Cappuccinatore Clean all the Cappuccinatore parts thoroughly every month using the Saeco detergent. The Saeco detergent may be purchased at your local dealer or at authorised service centres. The lack of cleaning before and after each use can affect the correct operation of the machine. -
Page 89: Maintenance
English Press the «Coffee» button to confirm. Press the «Coffee» button to confirm. Switch to programming mode as described in section «Access to the Programming Menu». Press the «Clean» button and select the «MACHINE MENU» option; press the «Coffee» button to access the menu.
-
Page 90
English Fill the water tank and press the «Coffee» button to confirm. Place an empty container of at least 1 litre capacity under the dispensing spout and press the «Coffee» button to confirm. The machine performs a Cappuccinatore wash Pour a sachet of solution into a container with 1/2 (half) cycle. -
Page 91
English Wash the container used for the solution thoroughly and 10.2.8 Brew Group Cleaning fill it with 1/2 (half) litre of fresh drinking water which will be used for rinsing. The brew group should be cleaned whenever the coffee bean hopper is filled, or at least once a week. Turn off the Empty the container placed under the dispensing spout. -
Page 92
English Remove the brew group by pulling it by the handle and pressing Take out the inner drawer, wash it and place it back in its the «PRESS» button. The brew group must be washed with seat. lukewarm water only. Do not use any detergent. Wash the brew group with lukewarm water;… -
Page 93: Maintenance
For descaling, Make sure that the hook which locks the brew group is in the correct position. firmly press the «PRESS» button to use the Saeco descaling check its position. solution and follow the procedure described in the «Descaling»…
-
Page 94: Maintenance
English Press the «Clean» button and select the «MAINTENANCE» Press the «Coffee» button to start the brew group cleaning option. cycle. press the «Coffee» button to access the menu. Remove the drip tray and the group compartment drawer. Press the «Coffee» button to access the brew group cleaning cycle.
-
Page 95
English Open the service door with the supplied key. Place the cleaning tablet in the brew group and refit the group in the machine, making sure that all the components have been inserted and that the door is closed. Remove the brew group by pulling it by the handle and After placing the tablet in the brew group press the pressing the «PRESS»… -
Page 96
English Lubricate the brew group guides using Saeco grease only. At the end of the cycle, after performing the rinse cycle, the machine goes back normal operating mode. It is recommended to remove the group and wash it under Apply the grease evenly on both side guides. -
Page 97: Maintenance
This operation needs to be carried out before the appliance stops working properly, as in this case repair is not covered by warranty. Use the Saeco descaling product only. Its formula has been Press the «Clean» button and select the «MAINTENANCE» specifically…
-
Page 98
English Press the «Clean» button and select the «DESCALING» option; press the «Coffee» button to access the menu. Select the «START DESCALE» option; press the «Coffee» button to access the menu. Put the water tank back into the machine. Press the «Coffee»… -
Page 99
English Press the «Coffee» button. Place a container under the hot water wand and a large container under the Cappuccinatore. Insert the complete Cappuccinatore into the machine and remove the coffee dispensing spout. Use a container of at least 1.5 litre capacity. Press the «Coffee»… -
Page 100
English The machine will now start dispensing the descaling Check that the Cappuccinatore is placed in the machine. solution at intervals (the bar shows the cycle progress). Press the «Coffee» button. When the solution in the tank is finished, the machine requests to empty and rinse the tank with fresh drinking water. -
Page 101
English The rinse cycle may be After completing paused by pressing the descaling cycle, rinse the «Special Beverages» button. Cappuccinatore under To resume the cycle, press running water. the «Coffee» button. This allows you to empty the container or to leave the Empty the containers used to collect the liquid dispensed by the machine unattended for a machine and reassemble the coffee dispensing spout. -
Page 102: Troubleshooting
English TROUBLESHOOTING 11.1 Warning signals This chapter describes all the warning messages that the machine may display to the user and the actions that can and/or must be performed by the user. Warning Signals How to reset the message To restore machine operation, close the service door. Insert the drip tray in its housing.
-
Page 103
English Warning Signals How to reset the message The selected operation requires milk dispensing. Insert the previously removed valve in the Cappuccinatore as described in the manual. Fill the coffee bean hopper with coffee beans. The machine requires a descaling cycle. When this message is displayed, it is still possible to use the machine, but its correct operation might be affected. -
Page 104: Problems — Causes — Solutions
English 11.2 Problems — Causes — Solutions The following table indicates the possible error or alarm cause which may lead to a partial or total shutdown of the appliance. Problems Causes Solutions The machine does not turn on. The machine is not connected to the electric Connect the machine to the electric network.
-
Page 105: Storage — Disposal
English STORAGE — DISPOSAL 12.1 Location Change Should the machine be placed in a different location, it is necessary to: • disconnect the appliance from the supply network; • carry out the general cleaning of the appliance as indicated in chapter «Cleaning and Maintenance»; •…
-
Page 106: Instructions For End Of Operational Life Disposal
English INSTRUCTIONS FOR END OF OPERATIONAL LIFE DISPOSAL INFORMATION FOR THE USER in compliance with art. 13 of the Italian Legislative Decree dated 25 July 2005, no. 151 «Implementation of the directives 2002/95/EC, 2002/96/EC and 2003/108/EC on the restriction of the use of certain hazardous substances in electrical and electronic equipment, as well as waste disposal».
Страницы и текст этой инструкции
. Страница №1") Инструкция кофемашины Saeco Aulika Top (SUP040R)
Инструкция кофемашины Saeco Aulika Top (SUP040R)
. Страница №2") Информация отображена на картинке
Информация отображена на картинке
. Страница №3") Информация отображена на картинке
Информация отображена на картинке
. Страница №4") Информация отображена на картинке
Информация отображена на картинке
. Страница №5") Информация отображена на картинке
Информация отображена на картинке
Как использовать наш сайт инструкций OnlineManuals.ru
Наша цель состоит в том, чтобы предоставить вам быстрый доступ к содержанию инструкции для кофемашины Saeco Aulika Top (SUP040R).
С помощью онлайн просмотра, Вы можете быстро просмотреть содержимое инструкции и найти решение проблемы с кофемашины Saeco Aulika Top (SUP040R).
Для Вашего удобства
Если листать руководство пользователя кофемашины Saeco Aulika Top (SUP040R) прямо на сайте, не очень удобно для Вас, есть два возможных решения:
• Просмотр в полноэкранном режиме — легко просмотреть руководство пользователя (без загрузки его на свой компьютер), Вы можете использовать режим полноэкранного просмотра.
Для просмотра инструкции пользователя кофемашины Saeco Aulika Top (SUP040R) на полном экране, используйте кнопку «Открыть в Pdf-viewer».
• Загрузка на компьютер — Вы можете также скачать Инструкция кофемашины Saeco Aulika Top (SUP040R) на свой компьютер и сохранить его в файлах.
Многие люди предпочитают читать документы не на экране, а в печатной версии.
Возможность печати руководства пользователя также была предусмотрена на нашем сайте,
и вы можете использовать ее, нажав на иконку «печать» в Pdf-viewer.
Нет необходимости печатать все руководство кофемашины Saeco Aulika Top (SUP040R), можно выбрать только нужные страницы инструкции.
-
Инструкции по эксплуатации
1

Saeco Aulika Top (SUP040R) инструкция по эксплуатации
(56 страниц)
- Языки:Русский
-
Тип:
PDF -
Размер:
3.55 MB -
Описание:
Кофемашина
Просмотр
На NoDevice можно скачать инструкцию по эксплуатации для Saeco Aulika Top (SUP040R). Руководство пользователя необходимо для ознакомления с правилами установки и эксплуатации Saeco Aulika Top (SUP040R). Инструкции по использованию помогут правильно настроить Saeco Aulika Top (SUP040R), исправить ошибки и выявить неполадки.