-
Драйверы
2
-
Инструкции по эксплуатации
1

Samsung S1050 инструкция по эксплуатации
(98 страниц)
- Языки:Русский
-
Тип:
PDF -
Размер:
8.6 MB -
Описание:
Компактная камера
Просмотр
На NoDevice можно скачать инструкцию по эксплуатации для Samsung S1050. Руководство пользователя необходимо для ознакомления с правилами установки и эксплуатации Samsung S1050. Инструкции по использованию помогут правильно настроить Samsung S1050, исправить ошибки и выявить неполадки.
 38:27
38:27
Обзор фотоаппарата Samsung NX1000
 06:35
06:35
Samsung Galaxy S21 — МЕГА СМАРТФОН С КАМЕРОЙ В ДИСПЛЕЕ
 05:53
05:53
Review on photocamera Samsung S1050 обзор на фотокамеру Samsung S1050
 12:32
12:32
Фотогаджеты: фотокамера Samsung S1050 блок питания Robiton и коуплер-переходник Canon DR-DC10
 01:52
01:52
Samsung S1050 Zoom Test
 38:02
38:02
Сравнение качества фотосъёмки трёх фотоаппаратов Samsung S1050 Nikon S9500 Sony Alpha A5000
 01:41
01:41
Samsung S1050 Test in Tatra Mountains
S1060
Благодарим за покупку фотокамеры компании Samsung.
В данном руководстве излагает»« порядок пользования фотокамерой, объясняет»«, как вести
фотосъемку, пересылать отснятые снимки и пользоваться прикладным программным обеспечением.
Перед началом работы с новой фотокамерой внимательно прочитайте данное руководство.
РУССКИЙ ЯЗЫК

Инструкции, Знакомство с фотокамерой, Инструкции знакомство с фотокамерой
Страница 2
- Изображение
- Текст
Инструкции
Знакомство с фотокамерой
Начните работу с фотокамерой, как описано ниже.
0
Проверьте питание
фотокамеры
Пртп
Проверьте
наличие
tL [Съемного диска]
Перед подключением фотокамеры к
ПК с помощью USB-кa6eля следует
установить ее драйвер. Установите
драйвер фотокамеры, который
находится на компакт-диске с
программным обеспечением. (стр.79)
Сделайте снимок. (стр.16)
Подсоедините USB-кабель из
комплекта поставки к разъемам USB
на ПК и фотокамере. (стр.81)
Проверьте питание фотокамеры.
Если питание выключено, нажмите
кнопку питания фотокамеры, чтобы
включить ее.
Откройте Проводник и найдите
[Съемного диска]. (стр.82)
Благодарим вас за покупку цифровой фотокамеры Samsung.
• Перед началом работы с фотокамерой внимательно прочитайте
данное руководство.
• При обращении в центр по обслуживанию возьмите с собой
фотокамеру и принадлежности, вызвавшие неполадки в ее
работе (батарею, карту памяти и т.п.)
• Во избежание неприятных неожиданностей убедитесь,
что фотокамера работает нормально, до ее планируемого
использования — в поездке, на важном мероприятии и т.п.
Корпорация Samsung не несет ответственности за любые
потери и убытки, которые могут возникнуть вследствие
неисправности фотокамеры.
• Храните руководство в надежном месте.
• Изображения могут быть повреждены, если для их
копирования с карты памяти на ПК используется устройство
чтения карт. При передаче изображений, снятых на
фотокамере, не забудьте соединить фотокамеру и ПК с
помощью USB-кабеля из комплекта поставки. Обращаем ваше
внимание на то, что изготовитель не несет ответственности
за утрату или порчу изображений на карте памяти вследствие
использования устройства чтения карт.
• Содержание и иллюстративный материал настоящего
руководства могут быть изменены без предварительного
уведомления в случае изменения функций или появления
дополнительных функций фотокамеры.
^Microsoft, Windows и логотип Windows являются
зарегистрированными товарными знаками корпорации Micro
soft в США и/или других странах.
ЖВсе торговые марки и наименования изделий, упомянутые
в данном руководстве, являются зарегистрированными
товарными знаками, находящимися в собственности
соответствующих компаний.

Опасно!
Знак «ОПАСНО!» указывает на опасную ситуацию, которая,
если ее не предотвратить, может привести к летальному
исходу или тяжелым телесным повреждениям.
• Не пытайтесь переделать данную фотокамеру. Это может
привести к возгоранию, травме, поражению электрическим
током, серьезному вреду для вашего здоровья, а также
к неполадкам в работе фотокамеры. Внутренний осмотр,
обслуживание и ремонт должны выполняться дилером или в
центре по обслуживанию фототехники компании Samsung.
• Во избежание взрыва не используйте данное изделие в
непосредственной близости от горючих и взрывоопасных
газов.
• Не пользуйтесь фотокамерой при попадании в нее жидкости
или посторонних предметов. Выключите фотокамеру и затем
отсоедините источник питания. Обратитесь к дилеру или в
центр по обслуживанию фототехники компании Samsung
Camera. Прекратите пользоваться фотокамерой, так как это
может привести к возгоранию или поражению электрическим
током.
• Не вставляйте и не роняйте металлические или
легковоспламеняющиеся посторонние предметы в
фотокамеру через функциональные проемы, например,
слот карты памяти или отсек батареи питания. Это может
привести к возгоранию или поражению электрическим
током.
• Не прикасайтесь к фотокамере влажными руками. При этом
может возникнуть опасность поражения электрическим
током.
Предупреждение
Знак «ПРЕДУПРЕЖДЕНИЕ” указывает на потенциально опасную
ситуацию, которая, если ее не предотвратить, может привести к
летальному исходу или тяжелым телесным повреждениям.
• Не пользуйтесь фотовспышкой в непосредственной близости
от людей или животных. Срабатывание вспышки на очень
близком расстоянии от глаз объекта съемки может повредить
зрение объекта съемки.
• В целях безопасности храните данное изделие и
принадлежности к нему в недоступном для детей и животных
месте во избежание таких несчастных случаев, как:
— Проглатывание батарей или небольших принадлежностей
фотокамеры. При несчастном случае незамедлительно
обращайтесь к врачу.
— Движущиеся части фотокамеры могут поранить вас.
• В течение продолжительной эксплуатации батарея питания
и фотокамера могут нагреться и вызвать неполадки в работе
фотокамеры. В этом случае оставьте фотокамеру на несколько
минут в нерабочем состоянии, чтобы она охладилась.
• Не оставляйте фотокамеру в местах, подверженных
воздействию крайне высоких температур, например, в
закрытом автомобиле, в местах, подверженных действию
прямого солнечного света, или в других местах со
значительными колебаниями температуры. Высокая
температура может повредить внутренние детали фотокамеры
и вызвать возгорание.
• Ничем не накрывайте фотокамеру или зарядное устройство,
когда они включены. Это может привести к повышенному
тепловыделению и порче корпуса фотокамеры или стать
причиной возгорания. Всегда пользуйтесь фотокамерой и ее
принадлежностями в хорошо проветриваемом месте.

указывает на потенциально опасную ситуацию, которая, если …
Страница 4
- Изображение
- Текст
Внимание!
Содержание
Знак «ОСТОРОЖНО!» указывает на потенциально опасную ситуацию,
которая, если ее не предотвратить, может привести к легким или средним
телесным повреждениям.
• Протечка, перегрев или повреждение батарей могут стать причиной
возгорания или телесных повреждений.
— Используйте батареи, рекомендованные для работы с данной
фотокамерой.
— Не замыкайте батареи накоротко, не допускайте их нагрева, не
бросайте после использования в огонь.
— Соблюдайте полярность подключения батарей.
• Если вы не собираетесь пользоваться фотокамерой в течение
продолжительного времени, извлеките из нее батарею. Иначе батарея
может протечь, при этом едкий электролит может нанести фотокамере
непоправимый ущерб.
• Не включайте фотовспышку, если она соприкасается с рукой или
какими-либо предметами. Не дотрагивайтесь до фотовспышки после
продолжительной работы с ней. Это может привести к ожогу.
• Не переносите включенную фотокамеру, когда к ней подсоединен
сетевой адаптер. После работы с фотокамерой всегда выключайте ее
перед отсоединением шнура от сетевой розетки. Перед перемещением
фотокамеры убедитесь, что отсоединены все шнуры и кабели. В
противном случае возможно их повреждение и, как следствие,
возгорание и/или поражение электрическим током.
• Во избежание получения нечетких снимков или возникновения сбоев в
работе фотокамеры не прикасайтесь к объективу и прикрывающей его
крышке.
• Во время съемки не заслоняйте посторонними предметами объектив и
фотовспышку.
• Кредитные карты могут размагнититься, если их положить рядом с
корпусом. Не оставляйте карты с магнитными полосками около корпуса.
• Использование сетевого адаптера с параметрами, не соответствующими
указанным в технических характеристиках фотокамеры, может привести
к выходу фотокамеры из строя. Рекомендуется использовать батарею
из комплекта поставки или специальные аккумуляторные батареи,
предназначенные для работы с фотокамерой.
^ Можно использовать сетевой адаптер со следующими
характеристиками:
выходное напряжение : 3,3 В, выходной ток: 2 А,
диаметра ^ 2.35
• После включения фотокамеры убедитесь, что тип^используемой батареи
питания совпадает с выбранным в меню [НАСТРОЙКИ] > [ТИП БАТАР.]
(стр. 49).
ПОДГОТОВКА
07
007
008
008
009
010
010
010
011
011
012
013
СЪЕМКА/
015
ЗАПИСЬ
016
016
016
017
017
018
019
019
020
020
020
15
Системная диаграмма
Рабочие элементы
Вид спереди и сверху
Вид сзади
Вид снизу/ кнопка Курсор/ОК
Индикатор автоспуска
Индикатор состояния фотокамеры
Значки режимов
Подсоединение к источнику питания
Как вставить карту памяти
Как пользоваться картой памяти
Информация, отображаемая на ЖК-дисплее
Начало съемки/записи
Работа в режиме АВТО
Работа в режиме ПРОГРАММА
Работа в режиме ВРУЧНУЮ
Работа в режиме DIS
Режим подсказок (съемка)
Работа в режиме ПОРТРЕТ
Работа в режимах СЮЖЕТ
Работа в режиме ВИДЕО
Запись видеоклипа без звукового
сопровождения
Как сделать паузу во время записи
видеоклипа (запись с продолжением)

Содержание
021
На что обращать внимание при съемке
НАСТРОЙКИ
038
Использование ЖК-дисплея для
022
Использование кнопок управления для
38
настройки фотокамеры
настройки фотокамеры.
038
ЗАПИСЬ
022
Кнопка питания
038
Резкость
022
Кнопка спуска
039
Способ автофокусировки
022
Кнопки зума W /T
039
Звуковой комментарий
024
Кнопка обнаружения лица (FD)
040
Запись звука
025
Кнопка Описание функций / Инфо / Вверх
041
Запись видеоклипа без звукового
026
Кнопка МАКРО / ВНИЗ
сопровождения
027
Блокировка автофокусировки
041
Режим СЮЖЕТ
028
Кнопка ВСПЫШКА / ВЛЕВО
041
Меню ЗВУК
030
Кнопка АВТОСПУСК / ВПРАВО
042
ЗВУК
031
Кнопка MENU/OK
042
Громкость
032
Кнопка Е (эффекты)
042
Звуковая заставка
032
Кнопка Е (эффекты): ЦВЕТ
042
Звуковой сигнал при срабатывании
033
Кнопка Fn
затвора
033
Использование меню Fn
042
Звук.сигнал.
034
РАЗМЕР
042
Звук АФ
034
Качество/ Частота кадров
042
АВТОПОРТРЕТ
035
Экспозамер
043
Меню НАСТРОЙКИ
035
Тип фотосъемки
044
ДИСПЛЕЙ
036
ISO
044
Language
036
Баланс белого
044
Настройка даты / времени /
037
ЗНАЧ. ЭКСПОЗИЦИИ
045
формата отображения даты
Графическая заставка
045
Яркость ЖК-дисплея
045
Быстрый просмотр
4

Содержание
ВОСПРОИЗВЕДЕНИЕ
50
045
Эергосбережение (СОХР. ЖКД)
056
Кнопка E (эффекты): ИЗМЕНИТЬ РАЗМЕР
046
НАСТРОЙКИ
057
Кнопка E (эффекты): ПОВОРОТ
046
Форматирование памяти
057
Кнопка E (эффекты): ЦВЕТ
046
Инициализация
059
Настройка функции воспроизведения
047
Имя файла
с помощью ЖК-дисплея
047
Впечатывание даты
060
Включение слайдшоу
048
Автовыключение
060
Начать мульти-слайдшоу
048
Выбор типа выходного
061
Выбор изображений
видеосигнала
061
Настройка эффектов мульти-слайдшоу
049
Индикатор автофокусировки
062
Интервал показа
049
Выбор типа батареи питания
062
Выбор фоновой мелодии
062
Воспроизведение
050
Включение режима воспроизведения
062
Звуковой комментарий
050
Воспроизведение фотоснимков
063
Удаление изображений
050
Воспроизведение видеоклипа
063
Защита изображений
051
Функция захвата видео
064
DPOF
051
Воспроизведение звукозаписи
066
КОПИЯ (копирование на карту памяти)
051
Воспроизведение звукового комментария
067
PictBridge
052
Информация, отображаемая на ЖК-дисплее
068
PictBridge: выбор снимка
052
Использование кнопок управления для
068
PictBridge: настройка печати
настройки фотокамеры
069
PictBridge: СБРОС
052
Кнопка ЭСКИЗЫ / УВЕЛИЧЕНИЕ
069
Важные замечания
054
Кнопка ИНФО / ВВЕРХ
071
Предупреждающие сообщения
054
Кнопка ВОСПРОИЗВЕДЕНИЕ/ПАУЗА /ВНИЗ
072
Перед тем как обратиться в центр
055
Кнопки BЛEBO/BПPABO/MENU/OK
обслуживания
055
Кнопка ПРИНТЕР
074
Технические характеристики
055
Кнопка УДАЛИТЬ

Содержание
Программное
077
обеспечение
77
077
078
079
081
084
085
085
085
086
089
Замечания по установке программного
обеспечения
Системные требования
О программном обеспечении
Настройка прилагаемого программного
обеспечения
Включение режима ПК
Как извлечь съемный диск
Установка драйвера USB для MAC
Использование драйвера USB для MAC
Удаление драйвера USB для Windows
98SE
Программа Samsung Master
Вопросы и ответы
6

Системная диаграмма, Комплект поставки, Приобретаются отдельно
Страница 8
- Изображение
- Текст
Системная диаграмма
Перед началом эксплуатации изделия проверьте комплектность поставки. Комплект поставки может меняться в зависимости от
региона продаж. Для приобретения дополнительных принадлежностей обращайтесь к ближайшему дилеру или в центр обслуживания
корпорации Samsung.
Комплект поставки
Щелочные
батареи
типа АА
USB-кабель
AV-кабель
Ремешок для
переноски
фотокамеры
Установочный
компакт-диск
(см. стр.78)
Руководство
пользователя,
гарантийный
талон
О
13
о
00
Приобретаются отдельно
Карта памяти SD/
Аккумуляторная
Зарядное
Сетевой шнур
Сумка/чехол
SDHC/ MMC
батарея SNB-2512
устройство
(см. стр.12)
SBC-N2
ПОДГОТОВКАД?’

Рабочие элементы
Вид спереди и сверху
-Кнопка питания
-Громкоговоритель
-Фотовспышка
— Индикатор
автоспуска / датчик
автофокусировки
Гнезда подключения
■изв/ду-кабелей
-Гнездо подключения источника
питания постоянного тока
— Микрофон
8)П0ДГ0Т0ВКА

Рабочие элементы
Вид сзади
Индикатор
состояния
фотокамеры
ЖК-дисплей
Кнопка Зум дальше (Эскизы)
Кнопка Зум ближе (Цифровой зум)
Кнопка обнаружения лица (РО).
Кнопка Е (эффекты)
■Ушко крепления ремешка для
переноски
О
13
о
00
Кнопка
Воспроизведение
/
Принтер
ПОДГОТОВКАДЭ’

Комментарии
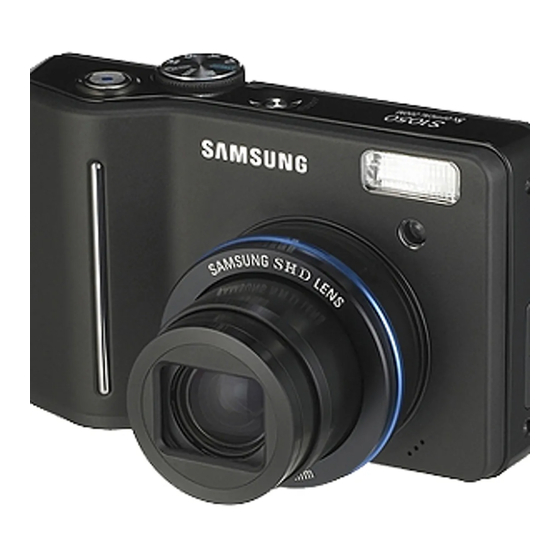
 Модель: Компактная фотокамера Samsung S1050
Год выпуска: 2007
Количество страниц: 98
Язык: русский
Формат: pdf
Размер: 7,0 Mb
Описание:
Samsung S1050 – это цифровая камера с высокой разрешающей способностью, которая оснащена 10,3-мегапиксельным сенсором с компьютерным управлением с фильтрацией реальной цветопередачи. Вы можете использовать Digimax S1050 для получения изображений лучшего качества и получения детальных фотографий для печати на формате размером до постера. К тому же, Digimax S1050 оснащен пятикратным оптическим и пятикратным цифровым увеличением, что позволяет получить 25-кратное увеличение при их одновременном использовании.
Содержание
- ПОДГОТОВКА.
- Системная диаграмма.
- Рабочие элементы.
- Вид спереди и сверху.
- Вид сзади и снизу.
- Вид снизу/ 5-ти кнопочное меню.
- Индикатор автоспуска.
- Индикатор состояния фотокамеры.
- Значки режимов.
- Подсоединение к источнику питания.
- Как вставить карту памяти.
- Как пользоваться картой памяти.
- Если фотокамера используется в первый раз.
- СЪЕМКА.
- Информация, отображаемая на ЖК-дисплее.
- Начинаем съемку.
- Съемка в режиме АВТО.
- Работа в режиме ПРОГРАММА.
- Работа в режиме Приоритет диафрагмы.
- Работа в режиме Приоритет выдержки.
- Работа в режиме ВРУЧНУЮ.
- Как использовать режим ASR (Уменьшение дрожания).
- “Умный” снимок.
- Работа в режиме СЮЖЕТ.
- Обнаружение лица.
- Работа в режиме ВИДЕО.
- Запись видеоклипа без звукового сопровождения.
- Временная приостановка записи видеоклипа (последовательная запись).
- Видеосъемка с продолжением.
- Работа в режиме ЗАПИСЬ ЗВУКА.
- На что нужно обращать внимание при съемке.
- Настройка фотокамеры с помощью кнопок.
- Кнопка питания.
- Затвор.
- Кнопка зума W/T.
- Кнопка Звукозапись/ Звуковой комментарий/ВВЕРХ.
- Кнопка Макро/ВНИЗ.
- Фиксация фокусировки.
- Кнопка ФОТОВСПЫШКА/ ВЛЕВО.
- Кнопка Автоспуск/ ВПРАВО.
- Кнопка MENU/ ОК.
- НАСТРОЙКА.
- Настройка фотокамеры с помощью ЖК-дисплея.
- Работа с меню.
- Запись.
- РЕЗКОСТЬ.
- Контрастность.
- Способ автофокусировки.
- ИНФОРМАЦИЯ НА ЭКРАНЕ.
- Звук.
- Громкость.
- Звуковая заставка.
- Звуковой сигнал при срабатывании затвора.
- Звуковой сигнал при работе.
- ЗВУК AF.
- Настройки 1.
- Имя файла.
- Язык.
- Настройка даты/ времени/ формата отображения даты.
- Впечатывание даты.
- Яркость ЖК-дисплея.
- Индикатор автофокусировки.
- Графическая заставка.
- Настройки 2.
- Быстрый просмотр.
- Автовыключение после периода бездействия.
- ЭНЕРГОСБЕР.
- Выбор типа выходного видеосигнала.
- Форматирование карты памяти.
- Инициализация.
- Выбор типа батареи питания.
- Кнопка Е (эффекты).
- Спецэффекты (кнопка Е): цвет.
- Спецэффекты (кнопка Е): Редактирование изображения.
- Цветовая насыщенность.
- Спецэффекты (кнопка Е): Развлечения.
- Зона резкости.
- Составной снимок.
- Фоторамка.
- Кнопка +/-.
- Размер.
- Качество/ Частота кадров.
- Экспозамер.
- Непрерывная съемка.
- Светочувствительность ISO.
- Баланс белого.
- Экспокоррекция.
- Стабилизатор кадров видеоклипа.
- ВОСПРОИЗВЕДЕНИЕ.
- Включение режима воспроизведения.
- Просмотр фотоснимка.
- Воспроизведение видеоклипа.
- Как выполнить захват кадров видеоклипа.
- Воспроизведение звукозаписи.
- Информация, отображаемая на ЖК-дисплее.
- Настройка фотокамеры с помощью кнопок.
- Кнопка Эскиз/ Увеличение.
- Кнопка записи звукового комментария/ ВВЕРХ.
- Кнопка Воспроизведение и Пауза/ВНИЗ.
- Спецэффекты (кнопка Е): Изменить размер.
- Спецэффекты (кнопка Е): Поворот изображения.
- Спецэффекты (кнопка Е): Цвет.
- Спецэффекты (кнопка Е): Специальный цвет.
- Цветовой фильтр.
- Цветовая маска.
- Спецэффекты (кнопка Е): редактирование изображений.
- Спецэффекты (кнопка Е): Развлечения.
- Мультик.
- Зона резкости.
- Составной снимок.
- Фоторамка.
- Стикер.
- Кнопка Удалить.
- Кнопка Принтер.
- Кнопки ВЛЕВО/ ВПРАВО/ MENU/ OK.
- Настройка воспроизведения с помощью ЖК-дисплея.
- Включение слайдшоу.
- Воспроизведение.
- Защита изображений.
- Удаление изображений.
- DPOF.
- Копирование на карту памяти.
- Информация на ЖК-дисплее.
- PictBridge.
- PictBridge: выбор снимка.
- PictBridge: настройка печати.
- PictBridge: возврат к заводским установкам.
- Важные замечания.
- Предупреждающие сообщения.
- Перед тем как обратиться в центр обслуживания.
- Технические характеристики.
- Включение режима воспроизведения.
- ПРОГРАММНОЕ ОБЕСПЕЧЕНИЕ.
- Замечания по установке программного обеспечения.
- Системные требования.
- Об установке программного обеспечения.
- Настройка прилагаемого программного обеспечения.
- Включение режима ПК.
- Отключение съемного диска.
- Установка драйвера USB на компьютере Macintosh.
- Использование драйвера USB для MAC.
- Удаление драйвера USB для Windows 98SE.
- Digimax Master.
- Часто задаваемые вопросы (FAQ).
Скачать: disk.yandex.ru | mega.co.nz
-
Contents
-
Table of Contents
-
Bookmarks
Quick Links
User Manual
Thank you for buying a Samsung camera.
This manual will guide you through using the camera, including
capturing images, downloading images and using the application software.
Please read this manual carefully before using your new camera.
ENGLISH
Related Manuals for Samsung S1050
Summary of Contents for Samsung S1050
-
Page 1: User Manual
User Manual Thank you for buying a Samsung camera. This manual will guide you through using the camera, including capturing images, downloading images and using the application software. Please read this manual carefully before using your new camera. ENGLISH…
-
Page 2: Getting To Know Your Camera
● Please check that the camera is operating properly prior to when you intend to use it (e.g. for a trip or an important event) to avoid disappointment. Samsung camera takes no responsibility for any loss or damages that may result from camera malfunction.
-
Page 3
■ Should any form of liquid or a foreign object enter the camera, do not use it. Switch off the camera, and then disconnect the power source. You must contact your dealer or Samsung Camera Service centre. Do not continue to use the camera as this may cause a fire or electric shock. -
Page 4: Table Of Contents
Caution CAUTION indicates a potentially hazardous situation which, if not avoided, may result in a minor or moderate injury. ■ Leaking, overheating, or damaged battery could result in fire or injury. •Use battery with the correct specification for the camera. •Do not short circuit, heat or dispose of battery in fire.
-
Page 5
Contents ●How to use the menu ……………31 ●Special Effect (E button) : Colour …39 ●Recording …………………………31 ●Special Effect (E button) : ■Sharpness ………………………31 Image editing………………………40 ■Contrast …………………………31 ■Saturation …………………………40 ■Auto Focus type …………………32 ●Special Effect (E button) : FUN …41 ■OSD (On Screen Display) ■Preset focus frames………………41 information ………………………32… -
Page 6: System Chart
System chart Please check that you have the correct contents before using this product. The contents can vary depending on the sales region. To buy the optional equipment, contact your nearest Samsung dealer or Samsung service centre. User manual, Camera case…
-
Page 7: Identification Of Features
Identification of features Front & Top Mode dial Shutter button Lens / Lens cover 《6》 Power button Speaker Flash Self-timer lamp / Auto focus lamp USB / AV connection terminal DC input connection port Microphone…
-
Page 8: Back & Bottom
Identification of features Back & Bottom Camera status lamp Zoom T button (Digital zoom) Zoom W button (Thumbnail) E (Effects) button LCD monitor Strap eyelet 5 function button FR(Face Recognition) button Tripod socket + / — button, Delete button Play mode / Printer button 《7》…
-
Page 9: Bottom/ 5-Function Button
Identification of features Bottom/ 5-function button Battery chamber Memory card slot Voice memo/ Voice Recording/ Up button Flash/ Left button Macro/ Down button Play & Pause button 《8》 ■ Self-timer lamp Icon Battery chamber cover ■ Camera Status Lamp Power on After taking a picture While voice memo recording…
-
Page 10: Mode Icon
Identification of features ■ Mode icon : Refer to page 15~20 for more information about the camera mode setting. MODE AUTO PROGRAM Icon MODE MOVIE VOICE RECORDING Icon SCENE MODE NIGHT PORTRAIT CHILDREN LANDSCAPE CLOSE UP Icon MODE SUNSET DAWN BACKLIGHT FIREWORKS BEACH &…
-
Page 11: Inserting The Memory Card
Connecting to a Power Source ■ Insert the battery as shown — If the camera does not turn on after you have inserted battery, please check whether the battery is inserted with the correct polarity (+ / -). — When the battery chamber cover is opened, do not press the battery chamber cover by force.
-
Page 12: Instructions On How To Use The Memory Card
● Repeated use of the memory card will eventually reduce the memory card’s performance. Should this be the case, you will need to purchase a new memory card. Wear and tear on the memory card is not covered by the Samsung warranty.
-
Page 13
Instructions on how to use the memory card INFORMATION ● Don’t remove the memory card when the camera status lamp is blinking as this may cause damage to data in the memory card. ■ The camera can use SD/SDHC Memory Cards and MMC (Multi Media Cards). Please consult the enclosed manual for using the MMC Cards. -
Page 14: When Using The Camera For The First Time
When Using the Camera for the First Time ■ Charge the rechargeable battery fully before using the camera for the first time. ■ When the camera is turned on for the first time, a menu will be displayed to set date / time, language and battery type in the LCD monitor.
-
Page 15: Lcd Monitor Indicator
LCD monitor indicator ■ The LCD monitor displays information about the shooting functions and selections. ① ② ③ ④ ⑤ ⑥ ⑦ ⑧ ⑨ ⑩ [ Image & Full Status ] Description Recording mode Aperture Value/ Shutter Speed Face Recognition Flash Self-timer 《14》…
-
Page 16: Starting The Recording Mode
Starting the recording mode ■ How to use the AUTO mode ( Please select this mode for quick and easy picture taking with minimal user interaction. 1. Insert the batteries (p.10). Insert the batteries taking note of the polarity (+ / -). 2.
-
Page 17: How To Use The Shutter Priority Mode
Starting the recording mode ■ How to use the SHUTTER PRIORITY mode ( 1. Select the SHUTTER PRIORITY Mode by rotating the mode dial. 2. Set the shutter speed by using the +/-, Left/Right button. 3. Press the + / — button twice and take an image. * High Shutter speeds can capture a moving object in a still image as if the object is not moving.
-
Page 18: Wise Shot
Starting the recording mode ■ Wise Shot 2 images are taken at a time. One is taken in the Fill-In Flash mode and the other is taken in the ASR mode. ● How to use the Wise Shot 1. Select the ASR mode by rotating the mode dial and press the +/- button. 2.
-
Page 19: Face Recognition
Starting the recording mode ■ Face recognition This mode detects the face position of the subject automatically and then sets the focus and exposure. Select this mode for quick and easy face picture. Selectable modes : 1. Press the FR (Face Recognition) button ( in the selectable modes.
-
Page 20: How To Use The Movie Clip Mode
Starting the recording mode ■ How to use the MOVIE CLIP mode ( A movie clip can be recorded for as long as the available recording time of the memory capacity allows. 1. Select the MOVIE CLIP mode by rotating the mode dial.
-
Page 21: How To Use The Voice Recording Mode
Starting the recording mode ■ How to use the VOICE RECORDING mode ( A voice can be recorded for as long as the available recording time (max:10hour) allows. 1. In any mode with the exception of Movie clip mode, select the VOICE RECORDING mode by pressing the Voice recording button twice.
-
Page 22: Using The Camera Buttons To Set The Camera
Things to Watch Out for When Taking Pictures ■ Under certain conditions the auto focus system may not perform as expected. — When photographing a subject that has little contrast. — If the subject is highly reflective or shiny. — If the subject is moving at high speed. — When there is strong reflected light, or when the background is very bright.
-
Page 23: Zoom W / T Button
ZOOM W / T button ● If the menu is not displayed, this button works as the OPTICAL ZOOM or DIGITAL ZOOM button. ● This camera has a 5X optical zoom and a 5X digital zoom function. Using both will offer a total zoom ratio of 25X. ●…
-
Page 24: Voice Recording / Voice Memo / Up Button
ZOOM W / T button INFORMATION ● Images taken using the digital zoom may take a little longer for the camera to process. Allow time for this to take place. ● The digital zoom cannot be used in movie clip shots. ●…
-
Page 25: Macro / Down Button
Macro ( ) / Down button ■ While the menu is showing, press the DOWN button to move from the main menu to a sub menu, or to move down the sub menu. When the menu is not showing, you can use the MACRO / DOWN button to take macro pictures. The distance ranges are shown below.
-
Page 26: Focus Lock
Macro ( ) / Down button ■ Available focusing method, by recording mode (O: Selectable , X: Not selectable, ∞: Infinity focus range) Mode Normal Macro Auto Macro Super Macro Manual focus SCENE Mode Normal Macro Auto Macro Super Macro Manual focus Mode Normal…
-
Page 27: Flash / Left Button
Flash ( ) / Left button ■ When the menu is displayed on the LCD monitor, pressing the LEFT button makes the cursor shift to the left tab. ■ When the menu is not displayed on the LCD monitor, the LEFT button operates as the FLASH ) button.
-
Page 28
Flash ( ) / Left button ● Flash mode indicator Icon Flash mode If the subject or background is dark, the camera Auto flash flash will operate automatically. Auto & If a subject or background is dark, the camera flash Red eye will work automatically and will reduce the red-eye reduction… -
Page 29: Self-Timer / Right Button
Self-timer ( ) / Right button ■ When the menu is displayed on the LCD monitor, pressing the Right button makes the cursor shift to the right tab. ■ When the menu is not displayed on the LCD monitor, the RIGHT button operates as the Self-timer ( ) button.
-
Page 30: Using The Lcd Monitor To Set The Camera Settings
Using the LCD monitor to set the camera settings ■ You can use the menu on the LCD monitor to set up recording functions. In any mode with the exception of VOICE RECORDING mode, pressing the MENU button displays the menu on the LCD monitor. ※…
-
Page 31
Using the LCD monitor to set the camera settings Menu tab Main menu Sub menu File Reset ENGLISH DEUTSCH PORTUGUÊS Language DANSK 07/02/01 SETUP1 Date&Time YYMMDD DDMMYY Imprint Date&Time Auto Normal AF Lamp Start Image User Image 《30》 Menu tab Page Series p.34… -
Page 32: How To Use The Menu
How to use the menu 1. Turn on the camera and press the MENU button. A menu for each camera mode appears. However, there is no menu for Voice Recording mode ( 2. Use the LEFT and RIGHT buttons to navigate through the menus. Press the RECORDING SOUND…
-
Page 33: Auto Focus Type
Recording ( [ Auto Focus type ] ■ You can select your preferred Auto Focus type according to the shooting condition. — [Center AF] : The rectangular area in the center of the LCD monitor will be focused — [Multi AF] : This camera selects a AF point from the 5 AF points. [ Center AF ] ※…
-
Page 34: Sound
Sound ( [ Volume ] ■ You can set select a volume of sound, start up sound, shutter sound, warning sound and AF sound. ● [Volume] sub menu: [Off], [Low], [Medium], [High] [ Start up sound ] ■ You can select the sound that is activated whenever the camera is turned on.
-
Page 35: Setup 1
Setup 1 ( [ File name ] ■ This function allows the user to select the file naming format. ● Assigning File Names [Reset] : After using the reset function, the next file name will be set from 0001 even after formatting, deleting all or inserting a new memory card.
-
Page 36: Imprinting The Recording Date
Setup 1 ( [ Imprinting the recording date ] ■ There is an option to include DATE / TIME on still images. ● Sub menus [Off] : The DATE & TIME will not be imprinted on the image file. [Date] : Only the DATE will be imprinted on the image file.
-
Page 37: Setup2
Setup 2 ( [ Quick view ] ■ If you enable Quick View before capturing an image, you can view the image you just captured on the LCD monitor for the duration set in the [Quick View] setup. Quick view is possible only with still images. ●…
-
Page 38: Selecting Video Out Type
Setup 2 ( [ Selecting Video out type ] ■ The Movie output signal from the camera can be NTSC or PAL. Your choice of output will be governed by the type of device (monitor or TV, etc.) to which the camera is connected. PAL mode can support only BDGHI. ■…
-
Page 39: Initialisation
Setup 2 ( [ Initialisation ] ■ All camera menu and function settings will be restored to their default values. However, values for DATE/ TIME, LANGUAGE, and VIDEO OUT will not be changed. ● Sub menus [No] : Settings will not be restored to their defaults.
-
Page 40: Special Effect (E Button) : Colour
Special Effect (E button) : Colour ■ By using the camera’s digital processor, it is possible to add special effects to your images 1. Press the E button in an available recording mode. 2. Select the menu tab by pressing the Left/ Right button. COLOR 이동…
-
Page 41: Image Editing
Special Effect (E button) : Image editing Saturation ■ You can change the saturation of the image. ● Press the E button in an available mode ( IMAGE ADJUST Select Saturation menu ( for changing the saturation will display. Move Exit Press the Shutter button to take a picture.
-
Page 42: Special Effect (E Button) : Fun
Special Effect (E button) : FUN Preset focus frames ■ You can make the subject stand out from its surroundings. The subject will be sharp and in focus while making the rest out of focus. ● Press the E button in an available mode Move Exit Select a proper menu by pressing the Left / Right button and press the OK…
-
Page 43: Composite Shooting
Special Effect (E button) : FUN Composite shooting ■ You can combine 2 — 4 different shots in a still image. ● Press the E button in an available mode Move Exit Select a desired menu by pressing the Left / Right button and press the OK button.
-
Page 44
Special Effect (E button) : FUN ● Changing a part of composite shot before taking the last shot Before taking the last composite shot, you can change a part of composite shot. 1. Pressing the + / — button. 2. A previous image will be deleted and new frame will display. If there is an image taken before, press the + / — button again and a previous image will be deleted again. -
Page 45: Photo Frame
Special Effect (E button) : FUN Photo Frame ■ You can add 9 types of frame-like borders to a still image you want to capture. ■ Date & Time information will not be printed on the stored image taken with Photo Frame menu.
-
Page 46: Button
+ / — button ■ You can use the + / — button to set the following menus. ○ ○ ○ ○ ○ Size ○ ○ ○ ○ ○ Quality ○ ○ ○ ○ Metering ○ ○ ○ ○ Shooting ○…
-
Page 47: Size
Size ■ You can select the image size appropriate for your application. Icon Still image 3648 x 3648 x 3072 x Size mode 2736 2432 2304 Movie clip Icon mode 800 x 592 720 x 480 Size SIZE 3648X2736 [ STILL IMAGE mode ] INFORMATION ●…
-
Page 48: Metering
Metering ■ If you cannot obtain suitable exposure conditions, you can change the metering method to take brighter pictures. — [Multi] : Exposure will be calculated based on an average of the available light in the image area. However, the calculation will be biased towards the centre of the image area.
-
Page 49: Iso
■ ISO : You can select the ISO sensitivity when taking pictures. The speed or specific light-sensitivity of a camera is rated by ISO numbers. — AUTO : The camera’s sensitivity is automatically changed by variables such as lighting value or subject brightness.
-
Page 50: Exposure Compensation
White balance ● Using the Custom White Balance White balance settings may vary slightly depending on the shooting environment. You can select the most appropriate white balance setting for a given shooting environment by setting up the custom white balance. 1.
-
Page 51: Movie Clip Frame Stabiliser
Movie Clip frame stabiliser ■ This function helps stabilise images captured during movie recording. You can select this menu only in the MOVIE CLIP mode. : Movie clip frame stabiliser function becomes disabled. : Reduces camera shake during movie recording. The recording frame range will become narrower than when you select the menu.
-
Page 52: Playing Back A Movie Clip
Starting play mode INFORMATION ● Manner mode : Pressing the play mode button for more than 3 seconds changes the buzzer and start-up sound setting to OFF, even though you may have set these to ON. ● Lightly press the shutter button in Play mode to switch to the currently set shooting mode.
-
Page 53: Playing Back A Recorded Voice
Starting play mode 5. Press theT button and a confirmation window will display. 6. Select a desired sub menu by pressing the Up/ Down button and press the OK button. [Yes] : The extracted frames are saved as a new file name. [No] : The movie trimming will cancel.
-
Page 54: Using The Camera Buttons To Set The Camera
Using the camera buttons to set the camera ■ In Play mode, you can use the buttons on the camera to conveniently set up the Play mode functions. Thumbnail ( ) / Enlargement ( ) button ● You can view multiple pictures, enlarge a selected picture, and crop and save a selected area of an image.
-
Page 55: Voice Memo / Up Button
Thumbnail ( ) / Enlargement ( ●The maximum enlargement rate in proportion to the image size Image size Maximum 14.3x 14.3x 12.0x enlargement rate ● Trimming : You can extract part of the image that you want and save it separately. 1.
-
Page 56: Play & Pause / Down Button
Voice ( ) memo / Up button 5. The ( ) icon will be displayed on the LCD monitor after voice memo recording has finished. — Voice memos can’t be recorded onto movie clip and voice recording files. — A distance of 40cm between you and the camera (microphone) is the best distance to record sound.
-
Page 57: Special Effect (E Button) : Resize
Special Effect (E button) : Resize ■ Change the resolution (size) of pictures taken. Select the [User Image] ( save an image to be the start-up image. The resized image will have a new file name. 1. Press the play mode button and press the E button.
-
Page 58: Special Effect (E Button) : Rotating An Image
Special Effect (E button) : Rotating an image ■ You can rotate the stored images by various degrees. Once the playback of the rotated picture is finished, it will switch back to the original state. 1. Press the play mode button and press the E button.
-
Page 59: Special Effect (E Button) : Special Colour
Special Effect (E button) : Colour ■ Custom colour : You can change the R (Red), G (Green) and B (Blue) values of the image. — Up / Down button : Selects R, G, B — Left / Right button : Change the values 《58》…
-
Page 60: Colour Mask
Special Effect (E button) : Special Colour Colour mask ● With this menu, You can select a part you want to make outstand and the rest part of image is set to black & white colour. SPECIAL COLOR Select ( selecting part will display.
-
Page 61: Image Editing
Special Effect (E button) : Image editing 1. Press the play back button and press the E button. 2. Select menu tab by pressing the Left / Right button. ● Red eye Removal : Red eye effect can be removed from the captured image. 1.
-
Page 62: Special Effect (E Button) : Fun
Special Effect (E button) : FUN FUN menus can be selected in the following conditions:10M, 7M, 5M, 3M , 1M image size Cartoon ■ You can add a text box on the image to make the image as a cartoon. Select Cartoon ( Move Exit…
-
Page 63: Preset Focus Frames
Special Effect (E button) : FUN ● Before saving the cartoon image, you can change the selected image 1. Pressing the +/- button deletes the image in order. 2. Press the OK button and you can select images. Pressing the +/- button Search Delete…
-
Page 64: Composite Image
Special Effect (E button) : FUN ● Moving and changing the focus frame You can change the focus frame after selecting a Range menu. 1. Select a focus frame by pressing the Left / Right button and press the OK button. 2.
-
Page 65
Special Effect (E button) : FUN ※ Selecting 2 composite shooting Pressing the 5 function button Move Pressing the OK button Save Move Delete Select a location by pressing the 5 function button and press the OK button 100-0054 [Final image] 《64》… -
Page 66: Photo Frame
Special Effect (E button) : FUN Photo Frame ■ You can add 9 types of frame-like borders to a still image you want to capture. ● Date & Time information will not be printed on the stored image taken with Photo Frame menu.
-
Page 67: Sticker
Special Effect (E button) : FUN Sticker ● You can add various stickers on the image. Select( Move Exit Select a additional sticker by pressing the Left / Right button and press the OK button Save Move Select the location of sticker by pressing the 5 function button ※…
-
Page 68
Delete ( ) button ■ This deletes images stored on the memory. ● Deleting Images in Play Mode 1. Select an image that you want to delete by pressing the LEFT / RIGHT button and press the DELETE ( ) button. 2. -
Page 69: Delete Button
Delete ( ) button ● Deleting Images in Thumbnail Display Mode 1. Use the UP, DOWN, LEFT, and RIGHT buttons to select the image you want to delete, and then press the DELETE ( 2. A message will display on the LCD monitor as shown below. 3.
-
Page 70: Left / Right / Menu / Ok Button
Left / Right / Menu / OK button ■ LEFT / RIGHT / MENU / OK buttons activate the following. — LEFT button : While the menu is showing, press the LEFT button to select the menu tab to the left of the cursor. While the menu is not showing, press the LEFT button to select the previous image.
-
Page 71
Setting up the play back function using the LCD monitor ■ This menu is available while the camera is connected to a PictBridge supporting printer (direct connection to the camera, sold separately) with a USB cable. Menu tab Main menu Sub menu One Pic Images… -
Page 72: Starting The Slide Show
Starting the slide show ( ■ Images can be displayed continuously at pre-set intervals. You can view the slide show by connecting the camera to an external monitor. 1. Press the play mode button and press the menu button. 2. Press the LEFT / RIGHT button and select the [SLIDE SHOW] menu tab. ●…
-
Page 73: Playback
Starting the slide show ( ● Configure slide show effects : Unique screen effects can be used for the slide show. 1. Select the [Effect] sub menu by pressing the UP / DOWN button and press the RIGHT button. 2. Use the Up / Down button to select the type of effect.
-
Page 74: Deleting Images
Playback ( Deleting images 1. Press the Up / Down button and select the [Delete] menu tab. And then press the Right button. 2. Select a desired sub menu by pressing the UP / DOWN button and press the OK button. [Select] : Selection window for an image to delete is displayed.
-
Page 75
Playback ( ■ Standard : This function allows you to embed printing quantity information on a stored image. 1. Press the Up / Down button and select the [DPOF] menu tab. And then press the Right button. 2. Press the Right button again and [Standard] sub menu will display. -
Page 76: Copy To Card
Playback ( ■ Print size : You can specify the print size when printing images stored on the memory card. The [Size] menu is available only for DPOF 1.1 compatible printers. 1. Press the Up / Down button and select the [DPOF] menu tab.
-
Page 77: On Screen Display Information
Playback ( INFORMATION ● When this menu is selected without inserting a memory card, the [No Card] message will display. ● If there is not enough space available in the memory card to copy saved images in the internal memory (48MB), the [Copy To Card] command will copy only some of the images and display [Memory Full!] message.
-
Page 78: Pictbridge
PictBridge ■ You can use the USB cable to connect this camera to a printer that supports PictBridge (sold separately) and print the stored images directly. Movie clips and voice files cannot be printed. ● Setting up the camera for connection to the printer 1.
-
Page 79: Pictbridge : Picture Selection
PictBridge : Picture Selection ■ You can select images you want to print ● Setting the Number of Copies to Print 1. Press the Menu button and the PictBridge menu will display. 2. Use the Up / Down buttons to select the [Images] menu and press the Right button.
-
Page 80: Pictbridge : Reset
PictBridge : Reset ■ Initialises user-changed configurations. 1. Use the Up / Down buttons to select the [Reset] menu tab. And then press the Right button. 2. Use the Up / Down buttons to select the desired sub menu value, and then press the OK button. If [Yes] is selected : All print and image settings will be reset.
-
Page 81
— Pay attention not to get fingerprints or foreign substances on the surface of the lens. ■ If the digital camera is not used for a long period, an electric discharge can occur. It is a good idea to remove the battery and the memory card if you do not intend using the camera for an extended period of time. -
Page 82: Warning Indicator
Warning indicator ■ There are several warnings that may appear on the LCD display. Memory Error! ㆍMemory card error → Turn off the camera power and turn it on again → Insert the memory card again → Insert and format the memory card (p.37) Card Locked! ㆍThe memory card is locked →…
-
Page 83
Before contacting a service centre Battery power quickly drains ㆍThe Camera is being used in low temperatures → Keep the camera in warm conditions (i.e. inside a coat or jacket) and only remove it in order to take images Camera does not take images when pressing the Shutter button ㆍThere is insufficient memory capacity →… -
Page 84: Specifications
Before contacting a service centre Colour of image is different to the original scene ㆍWhite balance or effect setting is incorrect → Select appropriate White balance and effect Images are too bright ㆍExposure is excessive → Reset exposure compensation No image on external monitor ㆍThe external monitor has not been connected properly with the camera →…
-
Page 85
2432 2304 2052 1944 — Capacity (256 MB MMC) ※ These figures are measured under Samsung’s standard conditions and may vary depending on shooting conditions and camera settings. — Effect : Color, Image Adjust, Fun (Highlight, Composite , Photo Frame) -
Page 86: Software
Battery & Charger) •Using a Hand-made PC or a PC and OS that has not been guaranteed by the manufacturer is not covered by the Samsung warranty. •Before reading this manual, you should have a basic knowledge of computers and O/S (Operating Systems).
-
Page 87: About The Software
● You should allow 5 ~ 10 seconds for running the automatic setup program according to the capability of your computer. If the frame does not show, run the [Windows Explorer] and select [Samsung.exe] in the CD-ROM Drive root directory.
-
Page 88
Setting up the application software 2. Install the camera driver, DirectX and Digimax Master by selecting a button shown on the monitor. If an upper version of DirectX was installed on your computer, DirectX may not be installed. 《87》… -
Page 89: Starting Pc Mode
Setting up the application software 3. After restarting the computer, connect the PC to the camera with the USB cable. 4. Turn the camera power on. The [Found New Hardware Wizard] will open and the computer will recognise the camera. ※…
-
Page 90
Starting PC mode ■ Connecting the camera to a PC ※If you selected [Printer] in Step 5, when you connect the camera to your computer, the [Connecting Printer] message will display and the connection will not be established. In this case, disconnect the USB cable, and then follow the procedure from Step 2 and onward. -
Page 91: Removing The Removable Disk
Starting PC mode 6. Press the right mouse button and a pop-up menu will open. Click [Paste]. 7. An image file is transferred from the camera to your PC. — By using [Digimax Master], you can see the stored images in the memory directly on the PC monitor and you can copy or move the image files.
-
Page 92: Setting Up The Usb Driver For Mac
Removing the removable disk 5. A [Safe to Remove Hardware] window will open. Click the [OK] button. 6. A [Unplug or Eject Hardware] window will open. Click the [Close] button and the removable disk will be removed safely. 7. Unplug the USB cable. Setting up the USB Driver for MAC 1.
-
Page 93: Removing The Usb Driver For Windows 98Se
■ You can download, view, edit and save your images and movies with this software. This software is only compatible with Windows. ■ To start the program, click [Start → Programs → Samsung → Digimax Master → Digimax Master]. ● Downloading images 1.
-
Page 94
Digimax Master 4. Select a destination and make a folder to save downloaded images and folders. — Folder names can be made in order of date and images will be downloaded. — Folder name will be made as you want and images will be downloaded. -
Page 95
Digimax Master ● Image edit : You can edit the still image. ① ② ③ — Image edit functions are listed below. ① Edit menu : You can select the following menus. [Tools] : You can resize or crop the selected image. See the [Help] menu. [Adjust] : You can modify image quality. -
Page 96: Faq
■ Please check the following if the USB connection malfunctions. Case 1 USB cable is not connected or it is not the supplied USB cable. → Connect the supplied USB cable. Case 2 The camera is not recognised by your PC. Sometimes, the camera may appear under [Unknown Devices] in Device Manager.
-
Page 97: Correct Disposal Of This Product
This product should not be mixed with other commercial wastes for disposal. Samsung Techwin cares for the environment at all product manufacturing stages to preserve the environment, and is taking a number of steps to provide customers with more environment-friendly products.
-
Page 98
■ ■ Declaration of Conformity Trade Name : SAMSUNG TECHWIN Model No. : SAMSUNG S1050 Responsible Party : Samsung Opto-Electronics America, INC. Address : 40 Seaview Dr. Secaucus,NJ 07094 Telephone No. : 201-902-0347 This device complies with Part 15 of the FCC Rules. Operation is subject to… -
Page 99
MEMO MEMO 《98》… -
Page 100
MEMO MEMO 《99》… -
Page 101
MEMO MEMO 《100》… -
Page 102
TEL : 49 ( 0 ) 6196 66 53 03 FAX : 49 ( 0 ) 6196 66 53 66 www.samsungcamera.de TIANJIN SAMSUNG OPTO-ELECTRONICS CO., LTD No.9 zhangheng Street. Micro-Electronic Industrial Park Jingang Road Tianjin China. POST CODE : 300385…

PDF инструкция · 102 страниц(ы) английский
инструкцияSamsung S1050

ENGLISH
User Manual
Thank you for buying a Samsung camera.
This manual will guide you through using the camera, including
capturing images, downloading images and using the application software.
Please read this manual carefully before using your new camera.
Посмотреть инструкция для Samsung S1050 бесплатно. Руководство относится к категории фотокамеры, 1 человек(а) дали ему среднюю оценку 6.1. Руководство доступно на следующих языках: английский. У вас есть вопрос о Samsung S1050 или вам нужна помощь? Задайте свой вопрос здесь
Главная
| Samsung | |
| S1050 | CJ050605C | |
| фото камера | |
| 8801089405524 | |
| английский | |
| Руководство пользователя (PDF) |
Качество изображения
| Мегапиксели | 10.1 MP |
| Максимальное разрешение изображения | 3648 x 2736 пикселей |
| Тип сенсора | CCD |
| Размер сенсора изображения | 1/1.8 « |
Объектив
| Цифровой зум | 5 x |
| Оптическое увеличение | 5 x |
| Фокусное расстояние | 7.8 — 39 mm |
Прочие свойства
| Цифровая зеркальная камера | Нет |
| Эквивалент расстояния для линз 35мм камеры | 38 — 190 mm |
| Скорость действия затвора | 1 — 1/2000 s |
| Встроенная вспышка | Да |
| Функция видео | Да |
| Интерфейс | USB 2.0 |
| Отображение даты | Да |
| Совместимые операционные системы | Windows 98/98SE/2000/ME/XPnMac OS 9.2-10.3 |
| Минимальные системные требования | CD-ROM |
| Минимальный объём жесткого диска | 200 MB |
| Минимальный объём ОЗУ | 128 MB |
| Минимальный процессор | Pentium II 450MHz / PowerMac G3 |
Фокус
| Фокус | TTL |
| Нормальное фокусное расстояние | 0.8 — ∞ m |
| Макро фокусирование (теле) | 0.5 — 0.8 m |
| Макро фокусирование (широкий угол) | 0.1 — 0.8 m |
| Супер макрофокусирование | 0.01 — 0.1 m |
| Диапазон автофокусирования (теле) | 0.5 — ∞ m |
| Диапазон автофокусирования (широкий угол) | 0.1 — ∞ m |
| Диапазон ручного фокусирования (теле) | 0.5 — ∞ m |
| Диапазон ручного фокусирования (широкоуг.) | 0.01 — ∞ m |
| Нормальное фокусное расстояние (широкий угол) | 0.8 — ∞ m |
| Нормальное фокусное расстояние (теле) | 0.8 — ∞ m |
Экспозиция
| Чувствительность по ISO | 80,100,200,400,800,1600,Auto |
| Режимы световой экспозиции | Авто |
| Экспонометр | Точечный |
Вспышка
| Диапазон вспышки (широкоуг.) | 0.2 — 5 m |
| Диапазон вспышки (теле) | 0.5 — 3 m |
| Время перезарядки вспышки | 4 s |
| Режимы вспышки | fill-in, Flash off, Red-eye reduction, Slow synchronization |
Память
| Оперативная память | 45 MB |
| Совместимые карты памяти | mmc, sd |
Аудио
| Встроенный микрофон | Да |
| Запись голоса | Да |
Экран
| Дисплей | ЖК |
| Диагональ экрана | 3 « |
| Разрешение дисплея (числовое) | 230000 пикселей |
Порты и интерфейсы
| PictBridge | Да |
| Версия USB | 2.0 |
Камера
| Задержка автоcпуска | 2 s |
| Масштабирование при воспроизведении (макс) | 1 x |
| Фотоэффекты | black&white, Negative film, Sepia |
| Сюжетные режимы | Backlight, beach, Children, Close-up (macro), Documents, dusk, Fireworks, Night, Portrait, Sunset, Landscape (scenery) |
| Баланс белого | auto, Cloudy, custom modes, daylight, Fluorescent, Tungsten |
| Редактирование изображения | resizing, rotating, trimming |
| Режимы воспроизведения | movie, single image, slide show, thumbnails |
Дизайн
Батарея
| Тип батареек | AA |
| Технология батареи | Щелочной |
| Число поддерживаемых батарей | 2 |
Содержимое упаковки
| Поставляемое ПО | Digimax Master |
Системные требования
Вес и размеры
| Ширина | 98.9 mm |
| Высота | 63.5 mm |
| Глубина | 25.5 mm |
Условия эксплуатации
| Диапазон относительной влажности при эксплуатации | 5 — 85 % |
| Диапазон температур при эксплуатации | 0 — 40 °C |
Затвор
| Тип затвора камеры | electronic, mechanical |
показать больше
Не можете найти ответ на свой вопрос в руководстве? Вы можете найти ответ на свой вопрос ниже, в разделе часто задаваемых вопросов о Samsung S1050.
Какой размер экрана Samsung S1050?
Какая высота Samsung S1050?
Какая ширина Samsung S1050?
Какая толщина Samsung S1050?
Инструкция Samsung S1050 доступно в русский?
Не нашли свой вопрос? Задайте свой вопрос здесь