Инструкция и руководство для
Samsung HT-P10  на русском

71 страница подробных инструкций и пользовательских руководств по эксплуатации
 04:43
04:43
Samsung ht-dm150 включается и отключается
 16:17
16:17
Кинотеатр Samsung ht-tkp75 — PROTECTION
 16:38
16:38
Samsung HT-TZ325 5.1 Скачек напруги (варистор-предохранитель)
 06:06
06:06
Samsung ht-dm150 — убийца динамиков
 10:31
10:31
Рейтинг домашних кинотеатров с качественным звучанием.
 10:06
10:06
SAMSUNG HT-Z120.№398
 03:15
03:15
My New Samsung HT-DS610 Slim 5.1 Home Theater in a Box DVD
ЦИФРОВАЯ СИСТЕМА ДОМАШНЕГО КИНОТЕАТРА HT…
Цифровая система домашнего кинотеатра, Ht-p10k инструкция для пользователя
- Изображение
- Текст
- Содержание
ЦИФРОВАЯ СИСТЕМА
ДОМАШНЕГО
КИНОТЕАТРА
HT-P10K
Инструкция для пользователя
0 ©
Ш G3 G3
GD GD GD
EDE3E3
EDE3E3
EDE3E3
EDE3E3
o
Q-Q<
d
оЙйо
DlV>^
V I D E O
wm
^ йо
□
COMPACT
PRO LOGIC
S U R R O U N D
DIGITAL AUDIO
V I D E O

I Предупреждения по технике безопасности
ЛАЗЕРНОЕ ИЗДЕЛИЕ КЛАССА 1
Использование органов регулировки или выполнение
процедур, не описанных в данной Инструкции, может
привести к опасному облучению лазером.
А
ВНИМАНИЕ
А
ОПАСНОСТЬ ПОРАЖЕНИЯ
ЭЛЕКТРИЧЕСКИМ ТОКОМ.
НЕ ОТКРЫВАТЬ
ВНИМАНИЕ
ВО ИЗБЕЖ/
ТОКОМ, НЕ
ВНУТРИ НЕ’
ПОЛЬЗОВА’
ОБСЛУЖИЕ
КВАЛИФИЦ
АНИЕ ПОРАЖЕНИЯ ЭЛЕКТР
СНИМАЙТЕ ЗАДНЮЮ КРЫШ
Т ДЕТАЛЕЙ, ОБСЛУЖИВАЕМ
ТЕЛЕМ. ДЛЯ ТЕХНИЧЕСКОГ
!АНИЯ ОБРАЩАЙТЕСЬ К
ИРОВАННОМУ СПЕЦИАЛИС
‘ИЧЕСКИМ
иКУ.
/1ЫХ
О
ТУ.
ВНИМАНИЕ — НЕВИДИМОЕ ЛАЗЕРНОЕ ИЗЛУЧЕНИЕ.
ПРИ СНЯТИИ КОЖУХА И ОТКЛЮЧЕНИИ
БЛОКИРОВОЧНЫХ КОНТАКТОВ
ИЗБЕГАЙТЕ ПОПАДАНИЯ ПОД ЛУЧ
ЛАЗЕРА.
Этот символ указывает, что внутри данного изделия
имеются детали, находящиеся под опасным
напряжением, которое может привести к поражению
электрическим током.
Этот символ указывает, что в документации на
изделие имеется важная инструкция по его
использованию или обслуживанию.
ЛАЗЕРНОЕ ИЗДЕЛИЕ КЛАССА 1
Этот проигрыватель компакт-дисков
классифицируется как ЛАЗЕРНОЕ ИЗДЕЛИЕ
КЛАССА 1.
ПРЕДУПРЕЖДЕНИЕ:
Во избежание пожара или
поражения электрическим током не
допускайте попадания данного
изделия под дождь или в условия
высокой влажности.
ВНИМАНИЕ:
ВО ИЗБЕЖАНИЕ ПОРАЖЕНИЯ
ЭЛЕКТРИЧЕСКИМ ТОКОМ, ПОЛНОСТЬЮ
ВСТАВЛЯЙТЕ ВИЛКУ В РОЗЕТКУ ТАК,
ЧТОБЫ ШИРОКАЯ ПЛАСТИНА ВИЛКИ
СОВПАЛА С ШИРОКИМ ОТВЕРСТИЕМ
РОЗЕТКИ.
Приведенная ниже маркировка, имеющаяся на изделии или в прилагаемой к нему документации, указывает на то,
что по окончании срока службы изделия оно не должно выбрасываться вместе с другими бытовыми отходами.
Для предотвращения возможного ущерба окружающей среде или здоровью людей из-за неконтролируемой
утилизации отходов, отделите это изделие от другого бытового мусора и сдайте его в повторную переработку,
чтобы способствовать обоснованному повторному использованию материальных ресурсов.
Бытовые пользователи должны обратиться либо в магазин, в котором они покупали данное изделие, либо в
местные органы власти за более подробной информацией о том, куда и как они могут сдать это изделие для его
безопасной для окружающей среды повторной переработки.
Корпоративные пользователи должны обратиться к своему поставщику и проверить условия, содержащиеся в
договоре купли-продажи.
При утилизации это изделие не должно выбрасываться совместно с другими отходами коммерческой
деятельности.
2
АЯ46
“Настоящий
продукт
маркирован
знаком
соответствия
на
основании
сертификата
соответствия,
выданного
органом
по сертификации-Ростест-Москва”

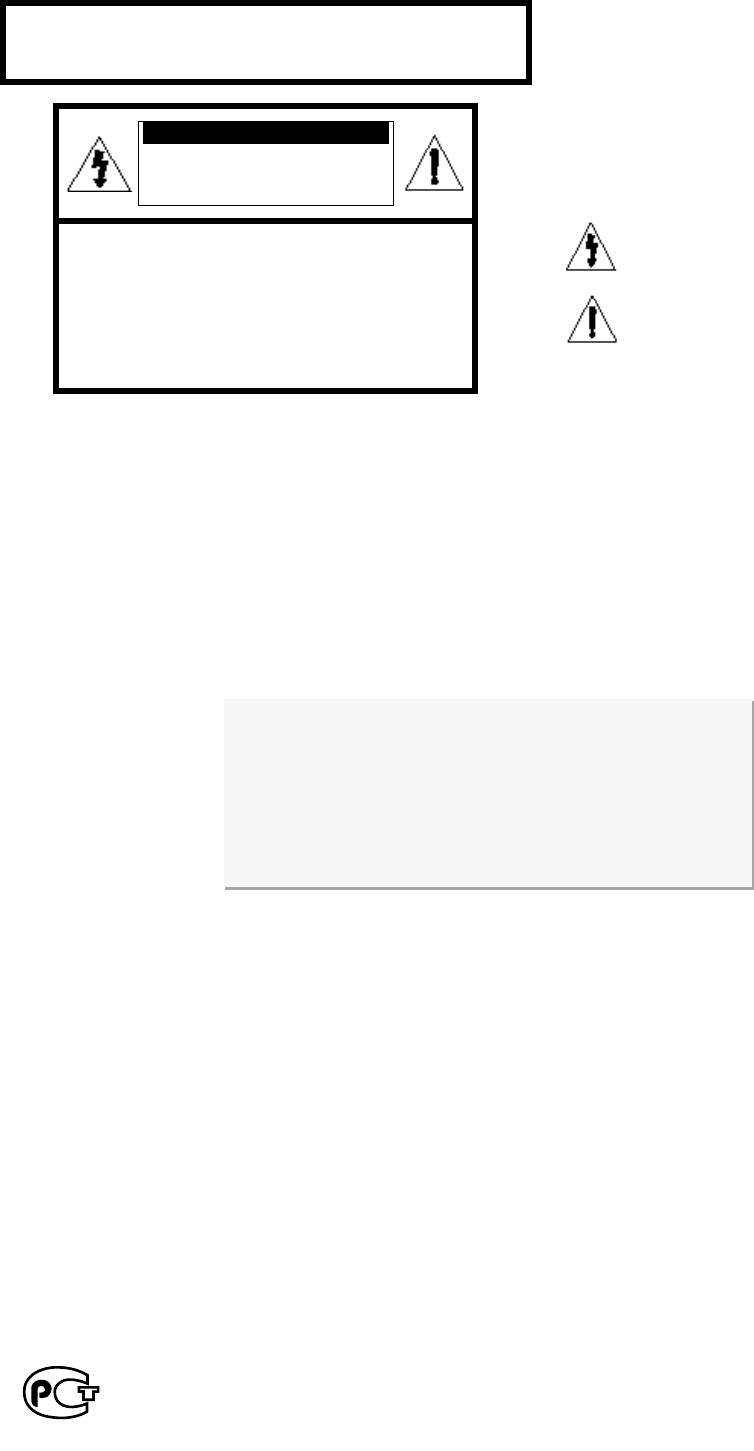
I Меры предосторожности
Убедитесь в том, что напряжение сети переменного тока в вашем доме соответствует напряжению питания системы,
указанному на паспортной табличке, расположенной на ее задней стенке. Установите систему горизонтально на
подходящую поверхность (мебель), оставив вокруг нее достаточно места для вентиляции (7-10 см). Убедитесь в том, что не
загорожены вентиляционные отверстия. Не устанавливайте на верхнюю крышку системы другие устройства и иные тяжелые
предметы. Не устанавливайте систему на усилитель или другое оборудование, которое может нагреваться. Прежде чем
передвигать систему, убедитесь в том, что в лоток для дисков не загружен диск. Эта система предназначена для
продолжительной работы. Если вы выключите ОУО-проигрыватель, переведя его в режим готовности, вы не отключите тем
самым питание системы. Чтобы полностью отключить питание системы, необходимо отсоединить вилку ее сетевого шнура
от сетевой розетки, особенно если вы не собираетесь пользоваться системой в течение длительного времени.
‘ / , ‘
7 ^ /
/ Л
‘ / / /
Во время грозы отсоедините сетевой шнур от розетки.
Скачки сетевого напряжения, вызванные молнией,
могут повредить изделие.
Избегайте воздействия на систему прямого
солнечного света и других источников тепла.
Это может привести к перегреву системы и
нарушению ее нормальной работы.
Предохраняйте систему от влаги (не ставьте на нее сосуды
с водой, например, вазы), держите ее подальше от
источников тепла (например, камина) и от оборудования,
создающего сильные магнитные или электрические поля
(например, громкоговорителей). Если система неисправна,
отсоедините сетевой шнур от розетки сети переменного
тока. Ваша система не предназначена для коммерческого
использования. Используйте ее только в домашних
условиях.
Если ваша система или диски подверглись воздействию
низких температур, на них может произойти конденсация
влаги.
При перевозке в зимнее время подождите примерно 2 часа
до тех пор, пока они не прогреются до комнатной
температуры.
Используемые в этом изделии батареи содержат
вещества, вредные для окружающей среды.
Не выбрасывайте батареи вместе с обычным бытовым
мусором.
3

I особенности системы, О поддержка различных форматов дисков и fm тюнер, Система dolby pro logic ii
О поддержка формата dts (digital theater system), О хранитель экрана телевизора, О режим энергосбережения, Настройка фонового рисунка для телеэкрана
- Изображение
- Текст
I Особенности системы
О Поддержка различных форматов дисков и FM тюнер
HT-P10K сочетает в одной системе проигрыватель, поддерживающий воспроизведение
дисков 1большинства форматов, включая диски DVD-VIDEO, VCD, компакт-диски, MP3-CD,
DivX, CD-R/RW и DVD-R/RW и высококачественный FM тюнер.
Система Dolby Pro Logic II
Система Dolby Pro Logic II — это новая технология декодирования многоканального
аудио сигнала, имеющая ряд преимуществ по сравнению с системой Dolby Pro Logic.
О Поддержка формата DTS (Digital Theater System)
DTS — это формат сжатия звука, разработанный компанией Digital
Theater Systems Inc. Он позволяет получить полноценный 5.1
канальный звук.
О Хранитель экрана телевизора
Спустя 3 минуты после выключения воспроизведения, система НТ-Р10К начинает
автоматически поочередно увеличивать и уменьшать яркость телевизионного
экрана. Спустя 20 минут после включения режима хранителя экрана, система
НТ-Р10К автоматически переходит в режим энергосбережения.
О Режим энергосбережения
Спустя 20 минут после выключения воспроизведения система НТ-Р10К автоматически-
выключается.
Настройка фонового рисунка для телеэкрана
Во время просмотра файлов JPEG, диска DVD или Video CD вы можете выбрать
понравившееся изображение и сохранить его в качестве фонового рисунка.
4

I Содержание Г о ПОДГОТОВКА К РАБОТЕ О Предупреждения по те…
Страница 5
- Изображение
- Текст

I о дисках, Поддерживаемые форматы дисков, Не пользуйтесь дисками следующих типов
Защита от копирования
- Изображение
- Текст
I о дисках
ava
И Ц
DVD (Digital Versatile Disk — Цифровой многоцелевой диск)
обеспечивает звук и изображение
фантастического качества, благодаря использованию технологии окружающего звука Dolby Digital
и технологии сжатия изображения MPEG-2. Теперь вы можете ощущать воздействие
реалистичных эффектов при просмотре кинофильмов или прослушивании музыки у себя дома, как
если бы вы находились в кинотеатре или в концертном зале.
В DVD-проигрывателях и DVD-дисках используется региональное кодирование.
Чтобы DVD-диск можно было воспроизвести, региональные коды диска и проигрывателя должны
совпадать. Если региональные коды не совпадают, диск воспроизводиться не будет. Региональный код
территориальной зоны, для которой предназначен этот проигрыватель, указан на задней панели
проигрывателя. (Ваш проигрыватель будет воспроизводить только DVD-диски, на этикетке которых
указан такой же региональный код).
Поддерживаемые форматы дисков
Тип диска
Логотип
Тип записи
Размер диска
Макс. время воспроизведения
DVD
ljvd
V I D E O
Аудио + Видео
12 см
Около 240 мин. (односторонний)
Около 480 мин. (двусторонний)
8 см
Около 80 мин. (односторонний)
Около 160 мин. (двусторонний)
VIDEO-CD
_п COMPACT
ÌPÌnOiifDT
I
DIGITAL VIDEO 1
Аудио + Видео
12 см
74 мин.
8 см
20 мин.
КОМПАКТ-ДИСК
COMPACT
tìDEMPAÌT
DIGITAL AUDIO
Аудио
12 см
74 мин.
8 см
20 мин.
ДИСК DivX
МРЕ04
МР3
12 см
74 мин.
8 см
20 мин.
OI
Не пользуйтесь дисками следующих типов!
■
Этот проигрыватель не может воспроизводить диски форматов LD, CD-G, CD-I, CD-ROM и
DVD-ROM. При попытке воспроизведения такого диска на экране телевизора появляется
сообщение «
wrong
disc
format
» (Неверный формат диска).
■
Этот проигрыватель может не воспроизводить DVD-диски, приобретенные за границей.
При попытке воспроизведения такого диска на экране телевизора появляется сообщение
«WRONG REGION CODE»
(Неверный региональный код).
Защита от копирования
6
‘ Многие DVD-диски защищены от копирования. Вследствие этого, необходимо напрямую
соединить выход DVD-проигрывателя с телевизором, а не подключать проигрыватель к
телевизору через видеомагнитофон. Если вы подсоединитесь к телевизору через
видеомагнитофон, это приведет к искажению изображения, воспроизводящегося с защищенных
от копирования
d
V
d
—
дисков
.
■ В этом изделии использована технология защиты авторских прав, основанная на методах,
защищенных несколькими патентами США и другими документами, подтверждающими право на
интеллектуальную собственность, обладателями которых являются компания Macrovision
Corporation и другие владельцы авторских прав. Разрешение на использование этой технологии
защиты авторских прав должно быть получено у Macrovision Corporation и она предназначена
только для применения в бытовой аппаратуре и другой аппаратуре для просмотра ограниченной
аудиторией, если у Macrovision Corporation не получено разрешение на ее использование в
других целях. Копирование технологии и разборка изделия запрещены.
V I D E O

Формат записанных дисков, Диски cd-r, Диски cd-r с файлами мр3
Диски cd-r с файлами jpeg, Диски cd-r/rw с файлами divx
- Изображение
- Текст
Формат записанных дисков
Диски CD-R
• В зависимости от устройства, на котором записывался диск CD-R (устройство записи дисков или ПК) и
характеристик самого диска, его воспроизведение может оказаться невозможным.
• Пользуйтесь дисками CD-R емкостью 650 Мбайт/ 74 мин. По возможности, избегайте использовать
диски CD-R емкостью больше 700Мбайт/80 минут, поскольку их воспроизведение может оказаться
невозможным.
• Воспроизведение некоторых дисков CD-RW (перезаписываемых) может оказаться невозможным.
• Диски типа CD-R могут воспроизводиться полностью только в случае, если они уже записаны
окончательно и «закрыты». Если сессия записи была завершена, но сам диск был оставлен «открытым»,
такой диск может не воспроизводиться полностью.
Диски CD-R с файлами МР3
Эта система позволяет воспроизводить диски CD-R с файлами МР3, только если это диск формата ISO 9660 или Joliet.
Имена файлов МР3 должны состоять не более, чем из 8 символов и не содержать символов пробела или
специальных символов (./=+).
Используйте диски, записанные с битрейтом не менее 128 Кбит/с.
Эта система позволяет воспроизводить только файлы с расширением «.mp3» и «.MP3».
Эта система позволяет воспроизводить многосессионные диски только с непрерывной записью. Если на
многосессионном диске имеются пустые сектора, воспроизведение будет идти только до первого пустого сектора.
Если диск не «закрыт», до начала его воспроизведения пройдет больше времени, к тому же, возможно, не все
файлы на таком диске смогут быть воспроизведены.
При воспроизведении файлов, записанных с переменным битрейтом (VBR), то есть и с высоким, и с низким
битрейтом (например, 32 Кбит/с ~ 320 Кбит/с), звук может прерываться.
Если на одном диске записано более 500 дорожек (файлов), система способна воспроизвести не более 500 дорожек.
Если на одном диске имеется более 300 папок, система способна воспроизвести файлы не более, чем из 300 папок.
Диски CD-R с файлами JPEG
Эта система позволяет воспроизводить только файлы с расширением «.jpeg» и «.JPEG».
Если диск не «закрыт», до начала его воспроизведения пройдет больше времени, к тому же, возможно, не
все файлы на таком диске смогут быть воспроизведены.
Эта система позволяет воспроизводить диски CD-R с файлами JPEG только если это диски формата ISO
9660 или Joliet.
Имена файлов JPEG должны состоять не более, чем из 8 символов и не содержать символов пробела или
специальных символов (./=+).
Эта система позволяет воспроизводить многосессионные диски только с непрерывной записью. Если на
многосессионном диске имеется пустые сектора, воспроизведение будет идти только до первого пустого сектора.
На одном диске можно сохранить максимум 9999 изображений.
При воспроизведении диска с изображениям формата Kodak/Fuji, из находящихся в папке файлов с
изображениями будут воспроизводиться только файлы формата JPEG.
При воспроизведении дисков иного формата, чем Kodak/Fuji, системе понадобится больше времени, чтобы
начать воспроизведение, к тому же такие диски с изображениями могут не воспроизводиться вовсе.
Диски CD-R/RW с файлами DivX
• Поскольку данное изделие позволяет кодировать только в форматах, поддерживаемых компанией DivX
Networks, Inc., с его помощью, возможно, не удастся воспроизвести созданные вами DivX-файлы.
• Для неподдерживаемых форматов обновление ПО невозможно (форматы QPEL, GMC, разрешение выше
720 x 480 пикс. и т.п.)
• При воспроизведении DivX-файлов могут не воспроизводиться секции, записанные с большой частотой
кадров.
• Дополнительную информацию о форматах, поддерживаемых компанией DivX Networks, Inc., можно найти на
веб-сайте «http://www.divxnetworks.net/».
7

I Описание системы
— Передняя панель —
1. Power ( сЪ/ I ) button
4. Stop ( ■) button
3. Function button
2. Open/Close button
¿OPEN/:LOSE
Ô
5. Play/Pause ( ► i i ) button
6. Volume buttons
► I M
XI
T
8. Disc Tray
7. Standby indicator
MIC1
MIC2
(ИМ)
Cf)
T»
13. ECHO LEVEL Control
12. MIC VOL Control
11. MIC 1, MIC 2
9. Tuning Up & Skip ( ^ ) buttons
10. Tuning Down & Skip (
) buttons
1- Кнопка «Питание» ( ¿)/ | ); 2- Кнопка «Открыть/Закрыть»; 3- Кнопка выбора функций; 4- Кнопка Стоп ( ■); 5- КнопкаВоспроизведение/Пауза
( ^ | |); 6- Кнопки регулировки громкости; 7- Индикатор режима «Готовность»; 8- Лоток для диска; 9- Кнопка настройки вверх по диапазону и
пропуска вперед (►►) ); 10- Кнопка настройки вниз по диапазону и пропуска назад ( i^4 ); 11- Микрофон 1, микрофон2; 12- Регулятор
громкости звука от микрофона; 13- Регулятор уровня эффекта «Эхо».
1. P.SCAN indicator
2. DOLBY DIGITAL indicator
3. DTS Disc indicator
4. LINEAR PCM indicator
5. TITLE indicator
6. GROUP indicator
7. CHAPTER indicator
8. TRACK indicator
9. PROGRAM indicator
10. REPEAT indicator
11. PBC indicator
12. TUNER indicator
13. STEREO indicator
P.SCAN]
sac
D lpcm
title
nniDIGITALl
ЯТЯ DSP-I
X
GRP CHAP TRK PRGM INDEX REP.1
rDDPLii |щдаа
asc
RRSS
14. RTA indicator
15. RDS indicator
____I __________
PBC TUNED
RDS
~L~|
fcl
i~R~l
^ ста RL][SW][RR]
18. DSP indicator
17. MPEG indicator
16. PRO LOGIC indicator
19
.
S
y
st
em
Status Dis
pl
a
y
21. SPEAKER indicator
1- Индикатор прогрессивной развертки; 2- Индикатор системы DOLBY DIGITAL; 3- Индикатор диска DTS; 4- Индикатор линейной ИКМ;
20. RADIO FREQUENCY
indicator
5- Индикатор СЮЖЕТ; 6- Индикатор ГРУППА; 7- Индикатор ФРАГМЕНТ; 8-Индикатор ДОРОЖКА; 9- Индикатор ПРОГРАММА;
10- Индикатор режима ПОВТОРА; 11- Индикатор режима PBC; 12- Индикатор настройки ТЮНЕРА; 13- Индикатор режима СТЕРЕО;
14- Индикатор RTA; 15- Индикатор RDS; ка); 16- Индикатор системы PRO LOGIC; 17- Индикатор MPEG; 18- Индикатор DSP (Цифрового
процессора звука); 19- Дисплей состояния системы; 20- Индикатор единиц измерения частоты радиосигнала; 21- Индикаторы
громкоговорителей
8
VOLU^
STANDBY

Задняя панель, 5.1 channel speaker output terminals, External audio component input
Scart jack, Принадлежности
- Изображение
- Текст
— Задняя панель —
1. Video Output Connector
Connect the TV’s video input jacks (VIDEO IN)
to the V
i
D
e
O
out
connector.
2. COMPONENT VIDEO OUTPUT jacks
Connect a TV with component video inputs to
these jacks.
3. FM Antenna Connector
4. 5.1 Channel Speaker
Output Terminals
6. External Audio Component Input
7. SCART JACK
Connect to a TV with scart input jack.
1-
Г нездо выхода ВЁДеосигнала Соедините гнездо входа видеосигнала на телевизоре (VIDEO IN) с гнездом VIDEO OUT на системе;
2-
Гнезда ВЫХОДА КОМПОНЕНТНОГО ВИДЕОСИГНАЛА Служат для подключения телевизора с входом компонентного видеосигнала;
3-
Г нездо для подключения FM антенны; 4- Выходные клеммы для подсоединения громкоговорителей 5.1 канальной акустической системы;
5-
Охлаждающий вентилятор; 6- Входные гнезда для аудио сигнала от внешнего источника; 7- РАЗЪЕМ СКАРТ Соедините с телевизором, у
которого имеется входной разъем СКАРТ;
Принадлежности
9

I описание системы, Пулы дистанционного управления, Описание системы
Страница 10
- Изображение
- Текст
I Описание системы
— Пулы дистанционного управления —
Индикатор управления
ТЕЛЕВИЗОРОМ
Кнопка ВКЛЮЧЕНИЯ СИСТЕМЫ
Кнопка Режим
Кнопка Сон
Кнопки выбора режима RDS
Кнопки С цифрами (0~9)
Кнопка Оставшееся время
Кнопка выбора видеосигнала
Кнопка выбора режима Dolby PL II
Кнопки регулировки громкости
Кнопка Меню
Кнопка Субтитры
Индикатор управления DVD-ресивером
Кнопка ОТКРЫТЬ/ЗАКРЫТЬ
Кнопка ТВ/Видео, ЯРКОСТЬ ДИСПЛЕЯ
Кнопка Возврат
Кнопка Повтор
Кнопка Шаг
Кнопка Увеличение изображения
Кнопка LOGO
Кнопка Моно/Стерео/ Замедленное
воспроизведение
Кнопка Обзор
Кнопка временного отключения звука
Кнопка EZ VIEW, переключатель NT/PAL
Кнопка подачи ТЕСТ СИГНАЛА
Кнопка настройки звучания громкоговорителей
Кнопка DSP/ Эквалайзер
Кнопка РЕЖИМ СЛАЙД-ШОУ
Кнопка
Память
тюнера/Прогрессивная
развертка
10

Комментарии
- Manuals
- Brands
- Samsung Manuals
- Home Theater System
- HT-P10
- Instruction manual
-
Contents
-
Table of Contents
-
Bookmarks
Quick Links
1p~30p(P10)-GB
2/1/05 10:44 AM
Page 3
DIGITAL HOME
CINEMA SYSTEM
HT-P10
Instruction Manual
COMPACT
COMPACT
DIGITAL AUDIO
DIGITAL VIDEO
V I D E O
Related Manuals for Samsung HT-P10
Summary of Contents for Samsung HT-P10
-
Page 1
1p~30p(P10)-GB 2/1/05 10:44 AM Page 3 DIGITAL HOME CINEMA SYSTEM HT-P10 Instruction Manual COMPACT COMPACT DIGITAL AUDIO DIGITAL VIDEO V I D E O… -
Page 2: Safety Warnings
1p~30p(P10)-GB 2/1/05 10:44 AM Safety Warnings CLASS 1 LASER PRODUCT KLASSE 1 LASER PRODUKT LUOKAN 1 LASER LAITE KLASS 1 LASER APPARAT PRODUCTO LASER CLASE 1 CAUTION RISK OF ELECTRIC SHOCK. DO NOT OPEN CAUTION: TO REDUCE THE RISK OF ELECTRIC SHOCK, DO NOT REMOVE REAR COVER.
-
Page 3: Precautions
1p~30p(P10)-GB 2/1/05 10:44 AM Precautions Ensure that the AC power supply in your house complies with the identification sticker located on the back of your player. Install your player horizontally, on a suitable base (furniture), with enough space around it for ventilation (3~4inches). Make sure the ventilation slots are not covered.
-
Page 4: Features
1p~30p(P10)-GB 2/1/05 10:44 AM Page 6 Features Multi-Disc Playback & FM Tuner The HT-P10 combines the convenience of multi-disc playback capability, including DVD, VCD, CD, MP3-CD, CD-R/RW, and DVD-R/RW, with a sophisticated FM tuner, all in a single player. Dolby Pro Logic II Dolby Pro Logic II is a new form of multi-channel audio signal decoding technology that improves upon existing Dolby Pro Logic.
-
Page 5: Table Of Contents
1p~30p(P10)-GB 2/1/05 10:44 AM Page 7 Contents PREPARATION Safety Warnings…1 Precautions …2 Features…3 Notes on Discs…5 Description …7 CONNECTIONS Connecting the Speakers …11 Connecting the Video Out to TV…13 P.SCAN(Progressive Scan) Function …14 Connecting External Component…15 Connecting the FM Antenna …16 OPERATION Disc Playback …17 MP3-CD Playback …18…
-
Page 6: Notes On Discs
1p~30p(P10)-GB 2/1/05 10:44 AM Notes on Discs DVD (Digital Versatile Disc) surround sound and MPEG-2 video compression technology. Now you can enjoy these V I D E O realistic effects in the home, as if you were in a movie theater or concert hall. DVD players and the discs are coded by region.
-
Page 7
1p~30p(P10)-GB 2/1/05 10:44 AM Disc Recording Format CD-R Discs • Some CD-R discs may not be playable depending on the disc recording device (CD-Recorder or PC) and the condition of the disc. • Use a 650MB/74 minute CD-R disc. Do not use CD-R disk over 700MB/80 minute as much as possible since it may not be played back. •… -
Page 8: P~30P(P10)-Gb 2/1/05 10:44 Am
1p~30p(P10)-GB 2/1/05 10:44 AM Description —Front Panel— Power ( ) button Disc Tray Standby indicator P.SCAN indicator DOLBY DIGITAL indicator DTS Disc indicator LINEAR PCM indicator TITLE indicator GROUP indicator DSP indicator MPEG indicator DVD AUDIO indicator PRO LOGIC indicator Page 10 Stop ( Function button…
-
Page 9: Rear Panel
1p~30p(P10)-GB 2/1/05 10:44 AM —Rear Panel— External Audio Component 5.1 Channel Speaker Output Terminals Cooling Fan Accessories Remote Control Page 11 COMPONENT VIDEO OUTPUT jacks Connect a TV with component video inputs to these jacks. Input Connector SCART JACK Connect to a TV with scart input jack. Video Output Connector Connect the TV’s video input jacks (VIDEO IN) to the VIDEO OUT connector.
-
Page 10: Remote Control
1p~30p(P10)-GB 2/1/05 10:44 AM Description —Remote Control— TV, DVD POWER button TUNER MEMORY, P.SCAN button SLEEP button RDS Selection button Number(0~9) buttons REMAIN button VIDEO SEL. button PL II MODE button VOLUME button MENU button SUB TITLE button RETURN button STEP button ZOOM button REPEAT button…
-
Page 11
1p~30p(P10)-GB 2/1/05 10:44 AM Insert Remote Batteries Remove the battery cover on the back of the remote by pressing down and sliding the cover in the direction of the arrow. Follow these precautions to avoid leaking or cracking cells: Caution •… -
Page 12: Connecting The Speakers
1p~30p(P10)-GB 2/1/05 10:44 AM Connecting the Speakers Before moving or installing the product, be sure to turn off the power and disconnect the power cord. Position of the DVD Player • Place it on a stand or cabinet shelf, or under the TV stand.
-
Page 13
1p~30p(P10)-GB 2/1/05 10:44 AM Center Speaker Rear Speaker (R) Subwoofer Press and hold the terminal tab. Insert the speaker cord. Release the finger. • Connect the red cord to the red (+) terminal and the black cord to the black (-) Note terminal. -
Page 14: Connecting The Video Out To Tv
1p~30p(P10)-GB 2/1/05 10:44 AM Connecting the Video Out to TV Choose one of the three methods for connecting to a TV. Composite Video … Good Quality METHOD 1 Connect the supplied video cable from the VIDEO OUT jack on the back panel of the system to the VIDEO IN jack on your television.
-
Page 15: P.scan(Progressive Scan) Function
1p~30p(P10)-GB 2/1/05 10:44 AM P.SCAN (Progressive Scan) Unlike regular Interlace Scan, in which two fields of picture information alternate to create the entire picture (odd scan lines, then even scan lines), Progressive Scan uses one field of information (all lines displayed in one pass) to create a clear and detailed picture without visible scan lines.
-
Page 16: Connecting External Component
1p~30p(P10)-GB 2/1/05 10:44 AM Connecting External Component Connecting an External Analog Component Example: Analog signal components such as a VCR or TV. Audio Cable (not supplied) If the external analog component has only one Audio Out, connect either Connect Audio In on the DVD player to Audio Out on the external analog component. •…
-
Page 17: Connecting The Fm Antenna
1p~30p(P10)-GB 2/1/05 10:44 AM Connecting the FM Antenna FM antenna connection 1. Connect the FM antenna supplied to the FM 75Ω COAXIAL terminal. 2. Slowly move the antenna wire around until you find a location where reception is good, then fasten it to a wall or other rigid surface. Cooling Fan The cooling fan supplies cool air to the unit to prevent overheating.
-
Page 18: Disc Playback
1p~30p(P10)-GB 2/1/05 10:44 AM Disc Playback Press OPEN/ CLOSE button to open the disc tray. Note • Depending on the content of the disc, the initial screen may appear different. To stop playback, press STOP during playback. • If pressed once, “PRESS PLAY” is displayed and the stop position will be stored in memory. If PLAY/PAUSE ( ) button or ENTER button is pressed, playback resumes from the stop position.
-
Page 19: Mp3-Cd Playback
1p~30p(P10)-GB 2/1/05 10:44 AM MP3-CD Playback Data CDs (CD-ROM, CD-R, CD-RW) encoded in MP3 format can be played. Page 21 Press the OPEN/CLOSE button to open the disc tray, and then load the MP3 disc. • The MP3 menu screen will appear and playback will start.
-
Page 20: Divx Playback
1p~30p(P10)-GB 2/1/05 10:44 AM DivX Playback Skip Forward/Back During playback, press the • Go to the next file whenever you press 2 files in the disk. • Go to the previous file whenever you press 2 files in the disk. Fast playback To play back the disc at a faster speed, press and hold…
-
Page 21: Subtitle Display
1p~30p(P10)-GB 2/1/05 10:44 AM Subtitle Display Press the SUBTITLE button. • Each time you press the button, your selection will toggle between “SUBTITLE ON” (1/1, 1/2 …) and “SUBTITLE OFF”. • If the disc has only one subtitle file, it will be played automatically. Audio Display Press the AUDIO button.
-
Page 22: Jpeg File Playback
1p~30p(P10)-GB 2/1/05 10:44 AM JPEG File Playback Images captured with a digital camera or camcorder, or JPEG files on a PC can be stored on a CD and then played back with this DVD player. Press the OPEN/CLOSE button to open the disc tray, and then load the JPEG disc.
-
Page 23: Displaying Disc Information
1p~30p(P10)-GB 2/1/05 10:44 AM Displaying Disc Information You can view disc playback information on the TV screen. Press INFO button. • Each time the button is pressed, the display changes as follows: The information display disappears from the screen Screen Display DVD display DivX display MP3 CD display…
-
Page 24: Fast/Slow Playback
1p~30p(P10)-GB 2/1/05 10:44 AM Fast/Slow Playback Fast Playback Press and hold • Each time the button is held down during playback, the playback speed changes as follows: Skipping Scenes/Songs Briefly press • Each time the button is pressed briefly during playback, the previous or next chapter, track, or directory (file) will be played.
-
Page 25: Repeat Playback
1p~30p(P10)-GB 2/1/05 10:44 AM Repeat Playback Repeat playback allows you to repeatedly play a chapter, title, track (song), or directory (MP3 file). Press REPEAT button. • Each time the button is pressed during playback, the repeat playback mode changes as follows: To Select a Repeat Playback Mode in the Disc Information Screen Press INFO button twice.
-
Page 26: A-B Repeat Playback
1p~30p(P10)-GB 2/1/05 10:44 AM A-B Repeat Playback You can repetitively play back a designated section of a DVD. Press INFO button twice. • For a VCD or CD, press INFO button once. Press Cursor to select ‘A-’ and then press ENTER button at the beginning of the desired segment.
-
Page 27: Step Function
1p~30p(P10)-GB 2/1/05 10:44 AM Step Function Press STEP button. • The picture moves forward one frame each time the button is pressed during playback. • During fast playback of a CD or MP3-CD, sound is heard only at 2x speed, Note and not at 4x, 8x, and 32x speeds.
-
Page 28: Zoom (Screen Enlarge) Function
1p~30p(P10)-GB 2/1/05 10:44 AM Zoom (Screen Enlarge) Function This function allows you to enlarge a particular area of the displayed image. Press ZOOM button. SELECT ZOOM POSITION EZ VIEW Function Press EZ VIEW button. • Each time the button is pressed, the zoom function will switch between On and Off.
-
Page 29: Selecting Audio/Subtitle Language
1p~30p(P10)-GB 2/1/05 10:44 AM Selecting Audio/Subtitle Language Page 31 Audio Language Selection Function Press INFO button twice. Note • You can use the AUDIO button on the remote control to select a audio language. Subtitle Language Selection Function Press INFO button twice.
-
Page 30: Moving Directly To A Scene/Song
1p~30p(P10)-GB 2/1/05 10:44 AM Moving Directly to a Scene/Song Press INFO button. 001/040 0:00:37 01/05 Moving to a Chapter Press Cursor buttons or numeric buttons to select the desired chapter and then press ENTER button. 01/05 025/040 0:00:01 JPEG Press the numeric buttons.
-
Page 31: Using Disc Menu
1p~30p(P10)-GB 2/1/05 10:44 AM Using Disc Menu You can use the menus for the audio language, subtitle language, profile, etc. DVD menu contents differ from disc to disc. In Stop mode, press MENU button. • When playing a VCD (version 2.), this toggles between PBC ON and OFF.
-
Page 32: Setting The Language
31P~60P(P10)-GB 2/1/05 10:45 AM Setting the Language OSD (On-Screen Display) language is set to English by default. Page 32 In Stop mode, press MENU button. Note • To select other language, select OTHER and enter the language code of your country. (See 59 page for language code of countries) AUDIO, SUB TITLE and DISC MENU language can be selected.
-
Page 33: Enter Button
31P~60P(P10)-GB 2/1/05 10:45 AM Select ‘Language’ and then press ENTER button Selecting the Selecting the OSD Language Audio Language (recorded on the disc) Page 33 Press Cursor button to select ‘OSD Language’ and then press ENTER button. Press RETURN button to return to the previous level. Press MENU button to exit the setup screen.
-
Page 34: Setting Tv Screen Type
31P~60P(P10)-GB 2/1/05 10:45 AM Setting TV Screen type Depending on your TV type (Wide Screen TV or conventional 4:3 TV), you can select the TV’s aspect ratio. Page 34 In Stop mode, press MENU button. Press Cursor button to move to ‘TV DISPLAY’…
-
Page 35: Adjusting The Tv Aspect Ratio (Screen Size)
31P~60P(P10)-GB 2/1/05 10:45 AM Adjusting the TV Aspect Ratio (Screen Size) The horizontal to vertical screen size ratio of conventional TVs is 4:3, while that of widescreen and high definition TVs is 16:9. This ratio is called the aspect ratio. When playing DVDs recorded in different screen size, you should adjust the aspect ratio to fit your TV or monitor.
-
Page 36: Setting Parental Controls (Rating Level)
31P~60P(P10)-GB 2/1/05 10:45 AM Setting Parental Controls (Rating Level) Use this to restrict playback of adult or violent DVDs you do not want children to view. Press Cursor button to move to ‘PARENTAL’ and then press ENTER button. • Note This function works only if a DVD disc contains the rating level information.
-
Page 37: Setting The Password
31P~60P(P10)-GB 2/1/05 10:45 AM Setting the Password You can set the password for the Parental (rating level) setting. Press Cursor button to move to ‘PASSWORD’ and then press ENTER button. • Note The password is set to «7890» by default. If you have forgotten the rating level password, do the following: •…
-
Page 38: Setting The Wallpaper
• You can set up to three wallpapers by repeating operation Note from Step1 to Step 3. Select this to set the Samsung Logo image as your wallpaper. Page 38 Press LOGO button. • “COPY LOGO DATA” will be displayed on the TV screen.
-
Page 39
31P~60P(P10)-GB 2/1/05 10:45 AM To Change the Wallpaper In Stop mode, press MENU button. Press to select the desired ‘USER’, and then press ENTER. Press RETURN button to return to the previous level. Press MENU button to exit the setup screen. Page 39 Press Cursor button to move to… -
Page 40: Setting The Speaker Mode
31P~60P(P10)-GB 2/1/05 10:45 AM Setting the Speaker Mode Signal outputs and frequency responses from the speakers will automatically be adjusted according to your speaker configuration and whether certain speakers are used or not. In Stop mode, press MENU button. In the Speaker Setup, press the ENTER button again.
-
Page 41: Setting The Test Tone
31P~60P(P10)-GB 2/1/05 10:45 AM Setting the Test Tone Use the Test Tone feature to check the speaker connections and to adjust the speaker levels. In Stop mode, press MENU button. Press RETURN button to return to the previous level. Press MENU button to exit the setup screen. Alternate method: press the TEST TONE button on the remote.
-
Page 42: Setting The Delay Time
31P~60P(P10)-GB 2/1/05 10:45 AM Setting the Delay Time If the speakers cannot be placed at equal distances from the listening position, you can adjust the delay time of the audio signals from the center and rear speakers. Page 42 In Stop mode, press MENU button.
-
Page 43
31P~60P(P10)-GB 2/1/05 10:45 AM Press Cursor button to move to ‘DELAY TIME’ and then press ENTER button. Setting CENTER SPEAKER • If the distance of Dc is equal to or longer than the distance of Df in the figure, set the mode as 0ms. Otherwise, change the setting according to the table. -
Page 44: Setting The Audio Quality
31P~60P(P10)-GB 2/1/05 10:45 AM Setting the Audio Quality You can adjust the balance and level for each speaker. Page 44 When adjusting the audio quality using the setup screen Method 1 In Stop mode, press MENU button. Press Cursor button to move to ‘SOUND EDIT’…
-
Page 45
31P~60P(P10)-GB 2/1/05 10:45 AM When manually adjusting with the SOUND EDIT button Method 2 Adjusting Front Speaker Balance Press SOUND EDIT button and then press Cursor TITLE CHAP PRGM RDS RT TUNED Adjusting Rear Speaker Level Press SOUND EDIT button and then press Cursor TITLE CHAP PRGM RDS RT… -
Page 46: Setting The Drc (Dynamic Range Compression)
31P~60P(P10)-GB 2/1/05 10:45 AM Setting the DRC You can use this function to enjoy Dolby Digital sound when watching movies at low volume at night. In Stop mode, press MENU button. Press Cursor button to move to ‘DRC’ and then press ENTER button.
-
Page 47: Av Sync Setup
31P~60P(P10)-GB 2/1/05 10:45 AM AV SYNC Setup Video may look slower than the audio if it is connected with digital TV. In this case, adjust the delay time of audio to optimal status to fit the video. Press the MENU button. •…
-
Page 48: Dolby Pro Logic Ii Mode
31P~60P(P10)-GB 2/1/05 10:45 AM Dolby Pro Logic II Mode You can select the desired Dolby Pro Logic II audio mode. Press PL II MODE button. • Each time the button is pressed, the mode changes as follows. • Note When selecting Pro Logic II mode, connect your external device to the AUDIO INPUT jacks (L and R) on the player.
-
Page 49: Dolby Pro Logic Ii Effect
31P~60P(P10)-GB 2/1/05 10:45 AM Dolby Pro Logic II Effect This function works only in Dolby Pro Logic MUSIC mode. Press PL II MODE button to select ‘MUSIC’ mode. Press PL II EFFECT button and then press Cursor buttons to select the mode. •…
-
Page 50: Sound Field (Dsp)/Eq Function
31P~60P(P10)-GB 2/1/05 10:45 AM Sound Field (DSP)/EQ Function DSP(Digital Signal Processor) DSP modes have been designed to simulate different acoustic environments. EQ: You can select from ROCK, POP, or CLASSIC, depending on the genre of music. Note POP, JAZZ, ROCK: Depending on the genre of music, you can select from POP, JAZZ, and ROCK. STUDIO : Provides a sense of presence as if in a studio.
-
Page 51: Sleep Timer Function
31P~60P(P10)-GB 2/1/05 10:45 AM Sleep Timer Function You can set the time that the DVD player will shut itself off. Press SLEEP button. • «SLEEP» will be displayed. Each time the button is pressed the preset time changes as follows: 10 TITLE CHAP PRGM RDS RT To confirm the sleep timer setting, press SLEEP button.
-
Page 52: Listening To Radio
31P~60P(P10)-GB 2/1/05 10:45 AM Listening to Radio You can listen to the chosen band (FM broadcast stations) by using either the automatic or manual tuning operation. Remote Control Unit Press TUNER button. • The selection toggles back and forth between «FM» each time the TUNER button is pressed.
-
Page 53: Presetting Stations
31P~60P(P10)-GB 2/1/05 10:45 AM Presetting Stations You can store up to: 15 FM stations Example: Presetting FM 89.1 in the memory Press the TUNER button and select the FM band. • Each time the button is pressed, the band switches between «FM».
-
Page 54: About Rds Broadcasting
31P~60P(P10)-GB 2/1/05 10:45 AM About RDS broadcasting Using the RDS (Radio Data System) to receive FM stations RDS allows FM stations to send an additional signal along with their regular program signals. For example,the stations send their station names,as well as information about what type of program they broadcast, such as sports or music,etc.
-
Page 55: About Rds Broadcasting
31P~60P(P10)-GB 2/1/05 10:45 AM PTY (Program Type) indication and PTY-SEARCH function One of the advantages of the RDS service is that you can locate a particular kind of program from the preset channels by specifying the PTY codes. To search for a program using the PTY codes Before you start, remember…
-
Page 56: Adjusting Display Brightness
31P~60P(P10)-GB 2/1/05 10:45 AM Adjusting Display Brightness You can adjust the brightness of the display on the main unit so it won’t interfere with your movie viewing. Press DIMMER button. • Each time the button is press, the brightness changes as follows: DARK BRIGHT.
-
Page 57: Cautions On Handling And Storing Discs
31P~60P(P10)-GB 2/1/05 10:45 AM Cautions on Handling and Storing Discs Small scratches on the disc may reduce sound and picture quality or cause skipping. Be especially careful not to scratch discs when handling them. Handling discs Disc Storage Do not keep in direct sunlight •…
-
Page 58: Before Calling For Service
Refer to the chart below when this unit does not function properly. If the problem you are experiencing is not listed below or if the instruction below does not help, turn off the unit, disconnect the power cord, and contact the nearest authorized dealer or Samsung Electronics Service Center. Symptom Disc tray does not open.
-
Page 59
31P~60P(P10)-GB 2/1/05 10:45 AM Symptom • Disc is rotating but no picture is produced. • Picture quality is poor and picture is shaking. The remote control does not work. Audio language and subtitles do not work. Menu screen does not appear even when the menu function is selected. -
Page 60: Language Code List
31P~60P(P10)-GB 2/1/05 10:45 AM Language Code List Enter the appropriate code number for the initial settings “Disc Audio”, “Disc Subtitle” and/or “Disc Menu” (See page 31). Code Language 1027 Afar 1028 Abkhazian 1032 Afrikaans 1039 Amharic 1044 Arabic 1045 Assamese 1051 Aymara 1052…
-
Page 61: Specifications
31P~60P(P10)-GB 2/1/05 10:45 AM Specifications Power Consumption Weight Dimensions (W x H x D) Operating Temperature Range Operating Humidity Range Usable Sensitivity S/N Ratio Distortion Composite Video VIDEO OUTPUT Scart Jack Front speaker output Center speaker output Rear speaker output Subwoofer speaker output Frequency range S/N Ratio…
-
Page 62
1p~30p(P10)-GB 2/1/05 10:44 AM Page 2 THIS APPLIANCE IS MANUFACTURED BY: AH68-01660B…
This manual is also suitable for:
Ht-tp12
Раздел: Бытовая, кухонная техника, электроника и оборудование
Тип: Домашний кинотеатр
Характеристики, спецификации
Основной блок:
430x60x340 мм
Суммарная мощность колонок:
255 Вт
Поддерживаемые аудиоформаты:
MP3, WMA
Поддерживаемые видеоформаты:
DivX
Форматы носителей:
CD, CD-R, CD-RW, DVD, DVD+R, DVD+RW, DVD-Audio, DVD-R, DVD-RW, Video CD
Просмотр файлов JPEG:
есть
Прогрессивная развертка:
есть
Декодеры:
Dolby Digital, Dolby Pro Logic II, DTS
Digital Sound Processor (DSP):
есть
Количество режимов «DSP»:
8
Состав:
центральный канал x 1 64 g
Фронтальные колонки:
90x107x95 мм
Тыловые колонки:
90x107x95 мм
Центральный канал:
160x90x95 мм
Инструкция к Домашнему кинотеатру Samsung HT-P10

ЭТО ИЗДЕЛИЕ ИЗГОТОВЛЕНО КОМПАНИЕЙ:
AH68-01660P
œÓ‰ÎÂÊËÚ ËÒÔÓθÁÓ‚‡Ì˲ ÔÓ Ì‡Á̇˜ÂÌ˲
‚ ÌÓχθÌ˚ı ÛÒÎӂˡı
PÂÍÓÏẨÛÂÏ˚È ÔÂËÓ‰ : 7ÎÂÚ
REV:01

ЦИФРОВАЯ СИСТЕМА
ДОМАШНЕГО КИНОТЕАТРА
HT-P10/TP12
Инструкция для пользователя
1
Указания по технике безопасности
Использование органов регулировки или выполнение
процедур, не описанных в данной Инструкции, может
ЛАЗЕРНОЕ ИЗДЕЛИЕ КЛАССА 1
привести к опасному облучению лазером
.
ВНИМАНИЕ — НЕВИДИМОЕ ЛАЗЕРНОЕ ИЗЛУЧЕНИЕ. ПРИ
СНЯТИИ КОЖУХА И ОТКЛЮЧЕНИИ
ПРЕДОСТЕРЕЖЕНИЕ
БЛОКИРОВОЧНЫХ КОНТАКТОВ
ОПАСНОСТЬ ПОРАЖЕНИЯ
ИЗБЕГАЙТЕ ПОПАДАНИЯ ПОД ЛУЧ
ЭЛЕКТРИЧЕСКИМ ТОКОМ.
ЛАЗЕРА.
НЕ ОТКРЫВАТЬ
Этот символ указывает, что внутри данного
ПРЕДОСТЕРЕЖЕНИЕ
:
изделия имеются детали, находящиеся под
ВО ИЗБЕЖАНИЕ ПОРАЖЕНИЯ
опасным напряжением, которое может привести
ЭЛЕКТРИЧЕСКИМ ТОКОМ, НЕ СНИМАЙТЕ
к поражению электрическим током.
ЗАДНЮЮ КРЫШКУ. ВНУТРИ НЕТ ДЕТАЛЕЙ,
Этот символ указывает, что в документации на
ОБСЛУЖИВАЕМЫХ ПОЛЬЗОВАТЕЛЕМ. ДЛЯ
изделие имеется важная инструкция по его
ТЕХНИЧЕСКОГО ОБСЛУЖИВАНИЯ
использованию или обслуживанию.
ОБРАЩАЙТЕСЬ К КВАЛИФИЦИРОВАННОМУ
СПЕЦИАЛИСТУ.
ПРЕДУПРЕЖДЕНИЕ:
Во избежание пожара или поражения
электрическим током не допускайте
ЛАЗЕРНОЕ ИЗДЕЛИЕ КЛАССА 1
попадания данного изделия под
Этот проигрыватель компакт—дисков классифицируется как
дождь или в условия высокой
ЛАЗЕРНОЕ ИЗДЕЛИЕ КЛАССА 1.
влажности.
ВНИМАНИЕ:
ВО ИЗБЕЖАНИЕ ПОРАЖЕНИЯ
ЭЛЕКТРИЧЕСКИМ ТОКОМ, ПОЛНОСТЬЮ
ВСТАВЛЯЙТЕ ВИЛКУ В РОЗЕТКУ ТАК,
ЧТОБЫ ШИРОКАЯ ПЛАСТИНА ВИЛКИ
СОВПАЛА С ШИРОКИМ ОТВЕРСТИЕМ
РОЗЕТКИ.
“HacÚÓfl˘ËÈ ÔÓ‰ÛÍÚ Ï‡ÍËÓ‚‡Ì ˝Ì‡ÍÓÏ ÒÓÓÚ‚ÂÚÒÚ‚Ëfl ̇
ÓÒÌÓ‚‡ÌËË ÒÂÚËÙËÍaÚa ÒÓÓÚ‚ÂÚÒÚ‚Ëfl, ‚˚‰aÌÌÓ„Ó Ó„aÌÓÏ
ÔÓ ÒÂÚËÙËÍaˆËË—PÓÒÚÂÒÚ—åÓÒÍ‚a”
¿fl46
≈≈ÒÒÎÎËË ÛÛ ‚‚‡‡ÒÒ ÂÂÒÒÚÚ¸¸ ÔÔ‰‰ÎÎÓÓÊÊÂÂÌÌËˡˇ ËËÎÎËË ‚‚ÓÓÔÔÓÓÒÒ˚˚ ÔÔÓÓ
ÔÔÓÓ‰‰ÛÛÍÍÚÚ‡‡ÏÏ SSaammssuunngg,, ÒÒ‚‚ˇˇÁÁ˚˚‚‚‡‡ÈÈÚÚÂÂÒÒ¸¸ ÒÒ
ËËÌÌÙÙÓÓÏχ‡ˆˆËËÓÓÌÌÌÌ˚˚ÏÏ ˆˆÂÂÌÌÚÚÓÓÏÏ SSaammssuunngg..
111177554455 ––ÓÓÒÒÒÒËˡˇ,, ÃÃÓÓÒÒÍÍ‚‚‡‡,, ÛÛÎÎ.. ƒƒÓÓÓÓÊÊÌ̇‡ˇˇ,, ‰‰..33,, ÍÍÓÓÔÔ.. 66
88——880000——220000——00440000
wwwwww..ssaammssuunngg..rruu
2
Меры предосторожности
Убедитесь в том, что напряжение сети переменного тока в вашем доме соответствует напряжению питания системы,
указанному на паспортной табличке, расположенной на ее задней стенке. Установите систему горизонтально на
подходящую поверхность (мебель), оставив вокруг нее достаточно места для вентиляции (7-10 см). Убедитесь в том, что не
загорожены вентиляционные отверстия. Не устанавливайте на верхнюю крышку системы другие устройства и иные
тяжелые предметы. Не устанавливайте систему на усилитель или другое оборудование, которое может нагреваться.
Прежде чем передвигать систему, убедитесь в том, что в лоток для дисков не загружен диск. Эта система предназначена
для продолжительной работы. Если вы выключите DVD-проигрыватель, переведя его в режим готовности, вы не отключите
тем самым питание системы. Чтобы полностью отключить питание системы, необходимо отсоединить вилку ее сетевого
шнура от сетевой розетки, особенно если вы не собираетесь пользоваться системой в течение длительного времени.
Во время грозы отсоедините сетевой шнур от розетки.
Избегайте воздействия на систему прямого солнечного
Скачки сетевого напряжения, вызванные молнией, могут
света и других источников тепла.
повредить изделие.
Это может привести к перегреву системы и нарушению ее
нормальной работы.
Предохраняйте систему от влаги (не ставьте на нее сосуды
Используемые в этом изделии батареи содержат вещества,
с водой, например, вазы), держите ее подальше от
вредные для окружающей среды.
источников тепла (например, камина) и от оборудования,
Не выбрасывайте батареи вместе с обычным бытовым
создающего сильные магнитные или электрические поля
мусором.
(например, громкоговорителей). Если система неисправна,
отсоедините сетевой шнур от розетки сети переменного
тока. Ваша система не предназначена для коммерческого
использования. Используйте ее только в домашних
условиях.
Если ваша система или диски подверглись воздействию
низких температур, на них может произойти конденсация
влаги.
При перевозке в зимнее время подождите примерно 2 часа
до тех пор, пока они не прогреются до комнатной
температуры.

3
Особенности системы
Поддержка различных форматов дисков и АМ/FM тюнер
HT-P10/HT-TP12 сочетает в одной системе проигрыватель, поддерживающий воспроизведение дисков большинства
форматов, включая диски DVD, VCD, компакт—диски, MP3-CD, CD-R/RW и DVD-R/RW и высококачественный
АМ/FM тюнер.
Система Dolby Pro Logic II
Система Dolby Pro Logic II – это новая технология декодирования многоканального аудио сигнала, имеющая
ряд преимуществ по сравнению с системой Dolby Pro Logic.
Поддержка формата DTS (Digital Theater System)
DTS – это формат сжатия звука, разработанный компанией Digital Theater Systems Inc. Он позволяет
получить полноценный 5.1 канальный звук.
Хранитель экрана телевизора
Спустя 3 минуты после выключения воспроизведения, система HT-P10/HT-TP12 начинает автоматически поочередно
увеличивать и уменьшать яркость телевизионного экрана.
Спустя 20 минут после включения режима хранителя экрана, система HT-P10/HT-TP12 автоматически переходит в
режим энергосбережения.
Режим энергосбережения
Спустя 20 минут после выключения воспроизведения система HT-P10/HT-TP12 автоматически выключается.
Настройка фонового рисунка для телеэкрана
Во время просмотра файлов JPEG, диска DVD или Video CD вы можете выбрать понравившееся
изображение и сохранить его в качестве фонового рисунка.
Оглавление
Аннотации для Домашнего кинотеатра Samsung HT-P10 в формате PDF
Топ 10 инструкций
Другие инструкции
- Manuals
- Brands
- Samsung Manuals
- Home Theater System
- HT-P10
- Instruction manual
Digital
-
Contents
-
Table of Contents
-
Bookmarks
Quick Links
1p~30p(P10)-GB
2/1/05 10:44 AM
Page 3
DIGITAL HOME
CINEMA SYSTEM
HT-P10
Instruction Manual
COMPACT
COMPACT
DIGITAL AUDIO
DIGITAL VIDEO
V I D E O
Downloaded From TheatreSystem-Manual.com Manuals
Related Manuals for Samsung HT-P10
Summary of Contents for Samsung HT-P10
-
Page 1
1p~30p(P10)-GB 2/1/05 10:44 AM Page 3 DIGITAL HOME CINEMA SYSTEM HT-P10 Instruction Manual COMPACT COMPACT DIGITAL AUDIO DIGITAL VIDEO V I D E O Downloaded From TheatreSystem-Manual.com Manuals… -
Page 2: Safety Warnings
1p~30p(P10)-GB 2/1/05 10:44 AM Page 4 Safety Warnings Use of controls, adjustments or performance of procedures other CLASS 1 LASER PRODUCT than those specified herein may result in hazardous radiation KLASSE 1 LASER PRODUKT exposure. LUOKAN 1 LASER LAITE KLASS 1 LASER APPARAT PRODUCTO LASER CLASE 1 CAUTION-INVISIBLE LASER RADIATION WHEN OPEN AND INTERLOCKS DEFEATED, AVOID EXPO-…
-
Page 3: Precautions
1p~30p(P10)-GB 2/1/05 10:44 AM Page 5 Precautions Ensure that the AC power supply in your house complies with the identification sticker located on the back of your player. Install your player horizontally, on a suitable base (furniture), with enough space around it for ventilation (3~4inches). Make sure the ventilation slots are not covered.
-
Page 4: Features
20 minutes in the screen saver mode. Power Saving Function The HT-P10 automatically shuts itself off after 20 minutes in the stop mode. Customized TV Screen Display The HT-P10 allows you to select your favorite image during JPEG, DVD or VCD playback and set it as your background wallpaper.
-
Page 5: Table Of Contents
1p~30p(P10)-GB 2/1/05 10:44 AM Page 7 Contents PREPARATION Safety Warnings…………………………….1 Precautions …………………………….2 Features………………………………3 Notes on Discs…………………………….5 Description …………………………….7 CONNECTIONS Connecting the Speakers …………………………11 Connecting the Video Out to TV……………………….13 P.SCAN(Progressive Scan) Function ……………………..14 Connecting External Component……………………….15 Connecting the FM Antenna ………………………….16 OPERATION Disc Playback …………………………….17 MP3-CD Playback …………………………..18…
-
Page 6: Notes On Discs
1p~30p(P10)-GB 2/1/05 10:44 AM Page 8 Notes on Discs DVD (Digital Versatile Disc) offers fantastic audio and video, thanks to Dolby Digital surround sound and MPEG-2 video compression technology. Now you can enjoy these V I D E O realistic effects in the home, as if you were in a movie theater or concert hall. DVD players and the discs are coded by region.
-
Page 7
1p~30p(P10)-GB 2/1/05 10:44 AM Page 9 Disc Recording Format CD-R Discs • Some CD-R discs may not be playable depending on the disc recording device (CD-Recorder or PC) and the condition of the disc. • Use a 650MB/74 minute CD-R disc. Do not use CD-R disk over 700MB/80 minute as much as possible since it may not be played back. -
Page 8: Description
1p~30p(P10)-GB 2/1/05 10:44 AM Page 10 Description —Front Panel— Stop ( ) button Power ( ) button Function button Play/Pause ( ) button Open/Close button Disc Tray Volume buttons Standby indicator Tuning Up & Skip ( ) buttons Tuning Down & Skip ( ) buttons P.SCAN indicator DOLBY DIGITAL indicator…
-
Page 9: Rear Panel
1p~30p(P10)-GB 2/1/05 10:44 AM Page 11 —Rear Panel— COMPONENT VIDEO OUTPUT jacks Connect a TV with component video inputs to these jacks. External Audio Component Input Connector FM Antenna Connector 5.1 Channel Speaker SCART JACK Output Terminals Connect to a TV with scart input jack. Cooling Fan Video Output Connector Connect the TV’s video input jacks…
-
Page 10: Remote Control
1p~30p(P10)-GB 2/1/05 10:44 AM Page 12 Description —Remote Control— TV, DVD POWER button OPEN/CLOSE button TUNER MEMORY, P.SCAN button DIMMER button SLEEP button DVD button AUX button TUNER button RDS Selection button Number(0~9) buttons REMAIN button CANCEL button VIDEO SEL. button Play/Pause button Stop button Tuning Preset/CD Skip button…
-
Page 11
1p~30p(P10)-GB 2/1/05 10:44 AM Page 13 Insert Remote Batteries Remove the battery Insert two 1.5V AAA Replace the battery cover on the back batteries, paying cover. of the remote by attention to the correct pressing down and polarities (+ and –). sliding the cover in the direction of the arrow. -
Page 12: Connecting The Speakers
1p~30p(P10)-GB 2/1/05 10:44 AM Page 14 Connecting the Speakers Before moving or installing the product, be sure to turn off the power and disconnect the power cord. Position of the DVD Player Selecting the Listening Position • Place it on a stand or cabinet shelf, or under The listening position should be located about 2.5 to 3 the TV stand.
-
Page 13
1p~30p(P10)-GB 2/1/05 10:44 AM Page 15 Center Speaker Rear Speaker (L) Front Speaker (L) Rear Speaker (R) Front Speaker (R) Subwoofer Press and hold the terminal tab. Insert the speaker cord. Black Release the finger. • Connect the red cord to the red (+) terminal and the black cord to the black (-) Note terminal. -
Page 14: Connecting The Video Out To Tv
1p~30p(P10)-GB 2/1/05 10:44 AM Page 16 Connecting the Video Out to TV Choose one of the three methods for connecting to a TV. METHOD 2 METHOD 3 METHOD 1 Composite Video ….Good Quality METHOD 1 Connect the supplied video cable from the VIDEO OUT jack on the back panel of the system to the VIDEO IN jack on your television.
-
Page 15: P.scan(Progressive Scan) Function
1p~30p(P10)-GB 2/1/05 10:44 AM Page 17 P.SCAN Function (Progressive Scan) Unlike regular Interlace Scan, in which two fields of picture information alternate to create the entire picture (odd scan lines, then even scan lines), Progressive Scan uses one field of information (all lines displayed in one pass) to create a clear and detailed picture without visible scan lines.
-
Page 16: Connecting External Component
1p~30p(P10)-GB 2/1/05 10:44 AM Page 18 Connecting External Component Connecting an External Analog Component Example: Analog signal components such as a VCR or TV. Audio Cable (not supplied) If the external analog component has only one Audio Out, connect either left or right.
-
Page 17: Connecting The Fm Antenna
1p~30p(P10)-GB 2/1/05 10:44 AM Page 19 Connecting the FM Antenna FM Antenna (supplied) FM antenna connection 1. Connect the FM antenna supplied to the FM 75Ω COAXIAL terminal. 2. Slowly move the antenna wire around until you find a location where reception is good, then fasten it to a wall or other rigid surface.
-
Page 18: Disc Playback
1p~30p(P10)-GB 2/1/05 10:44 AM Page 20 Disc Playback Press OPEN/ Press OPEN/ Load a disc. CLOSE button to CLOSE button to open the disc tray. close the disc tray. • Place a disc gently into the tray with the disc’s label •…
-
Page 19: Mp3-Cd Playback
1p~30p(P10)-GB 2/1/05 10:44 AM Page 21 MP3-CD Playback Data CDs (CD-ROM, CD-R, CD-RW) encoded in MP3 format can be played. Press the In Stop mode, use OPEN/CLOSE button to select to open the disc tray, the album, and then press the ENTER and then load the MP3 disc.
-
Page 20: Divx Playback
1p~30p(P10)-GB 2/1/05 10:44 AM Page 22 DivX Playback Skip Forward/Back During playback, press the button. • Go to the next file whenever you press button, if there are over 2 files in the disk. • Go to the previous file whenever you press button, if there are over 2 files in the disk.
-
Page 21: Subtitle Display
1p~30p(P10)-GB 2/1/05 10:44 AM Page 23 Subtitle Display Press the SUBTITLE button. • Each time you press the button, your selection will toggle between “SUBTITLE ON” (1/1, 1/2 …) and “SUBTITLE OFF”. • If the disc has only one subtitle file, it will be played automatically. Audio Display Press the AUDIO button.
-
Page 22: Jpeg File Playback
1p~30p(P10)-GB 2/1/05 10:44 AM Page 24 JPEG File Playback JPEG Images captured with a digital camera or camcorder, or JPEG files on a PC can be stored on a CD and then played back with this DVD player. Press the OPEN/CLOSE button to open the disc tray, and then load the JPEG disc.
-
Page 23: Displaying Disc Information
1p~30p(P10)-GB 2/1/05 10:44 AM Page 25 Displaying Disc Information You can view disc playback information on the TV screen. Press INFO button. • Each time the button is pressed, the display changes as follows: DivX JPEG DVD RECEIVER SMART NAVI Something like you Back for good Love of my life…
-
Page 24: Fast/Slow Playback
1p~30p(P10)-GB 2/1/05 10:44 AM Page 26 Fast/Slow Playback Fast Playback Slow Playback Press SLOW button. Press and hold • Each time the button is pressed during playback, • Each time the button is held down during playback, the playback speed changes as follows: the playback speed changes as follows: DivX Note…
-
Page 25: Repeat Playback
1p~30p(P10)-GB 2/1/05 10:44 AM Page 27 Repeat Playback Repeat playback allows you to repeatedly play a chapter, title, track (song), or directory (MP3 file). JPEG Press REPEAT button. • Each time the button is pressed during playback, the repeat playback mode changes as follows: JPEG Repeat Playback Options CHAPTER…
-
Page 26: A-B Repeat Playback
1p~30p(P10)-GB 2/1/05 10:44 AM Page 28 A-B Repeat Playback You can repetitively play back a designated section of a DVD. Press Cursor button Press INFO button to move to REPEAT twice. PLAYBACK ( ) display. • For a VCD or CD, press INFO button once.
-
Page 27: Step Function
1p~30p(P10)-GB 2/1/05 10:44 AM Page 29 Step Function Press STEP button. • The picture moves forward one frame each time the button is pressed during playback. • During fast playback of a CD or MP3-CD, sound is heard only at 2x speed, Note and not at 4x, 8x, and 32x speeds.
-
Page 28: Zoom (Screen Enlarge) Function
1p~30p(P10)-GB 2/1/05 10:44 AM Page 30 Zoom (Screen Enlarge) Function This function allows you to enlarge a particular area of the displayed image. Press Cursor Press ENTER Press ZOOM buttons to button. button. move to the area you want to enlarge. •…
-
Page 29: Selecting Audio/Subtitle Language
1p~30p(P10)-GB 2/1/05 10:44 AM Page 31 Selecting Audio/Subtitle Language Audio Language Selection Function Press Cursor Press INFO button buttons or numeric buttons to select the twice. desired audio language. • Depending on the number of languages on a DVD disc, a different audio language (ENGLISH, SPANISH, FRENCH, etc.) is selected each time the button is pressed.
-
Page 30: Moving Directly To A Scene/Song
1p~30p(P10)-GB 2/1/05 10:44 AM Page 32 Moving Directly to a Scene/Song Moving to a Title/Track Moving to a Chapter Press Cursor , buttons Press Cursor , or numeric buttons to select Press INFO button. buttons to move to the desired title/track and then Chapter ( ) display.
-
Page 31: Using Disc Menu
1p~30p(P10)-GB 2/1/05 10:44 AM Page 33 Using Disc Menu You can use the menus for the audio language, subtitle language, profile, etc. DVD menu contents differ from disc to disc. Press Cursor Press Cursor In Stop mode, buttons to move to buttons to press MENU ‘DISC MENU’…
-
Page 32: Setting The Language
31P~60P(P10)-GB 2/1/05 10:45 AM Page 32 Setting the Language OSD (On-Screen Display) language is set to English by default. Press Cursor In Stop mode, button to move to press MENU ‘Setup’ and then button. press ENTER button. Note • To select other language, select OTHER and enter the language code of your country. (See 59 page for language code of countries) AUDIO, SUB TITLE and DISC MENU language can be selected.
-
Page 33: Enter Button
31P~60P(P10)-GB 2/1/05 10:45 AM Page 33 Press Cursor Press Cursor Select ‘Language’ button to select ‘OSD button to select the and then press Language’ and then desired language and then ENTER button press ENTER button. press ENTER button. • Once the setup is complete, if the language was set to English, OSD will be displayed in English.
-
Page 34: Setting Tv Screen Type
31P~60P(P10)-GB 2/1/05 10:45 AM Page 34 Setting TV Screen type Depending on your TV type (Wide Screen TV or conventional 4:3 TV), you can select the TV’s aspect ratio. Press Cursor In Stop mode, button to move to press MENU ‘Setup’…
-
Page 35: Adjusting The Tv Aspect Ratio (Screen Size)
31P~60P(P10)-GB 2/1/05 10:45 AM Page 35 Adjusting the TV Aspect Ratio (Screen Size) The horizontal to vertical screen size ratio of conventional TVs is 4:3, while that of widescreen and high definition TVs is 16:9. This ratio is called the aspect ratio. When playing DVDs recorded in different screen size, you should adjust the aspect ratio to fit your TV or monitor.
-
Page 36: Setting Parental Controls (Rating Level)
31P~60P(P10)-GB 2/1/05 10:45 AM Page 36 Setting Parental Controls (Rating Level) Use this to restrict playback of adult or violent DVDs you do not want children to view. Press Cursor In Stop mode, button to move to press MENU ‘Setup’ and then button.
-
Page 37: Setting The Password
31P~60P(P10)-GB 2/1/05 10:45 AM Page 37 Setting the Password You can set the password for the Parental (rating level) setting. Press Cursor button to move to Press MENU button. ‘Setup’ and then press ENTER button. Press Cursor button to Press ENTER Enter the password move to ‘PASSWORD’…
-
Page 38: Setting The Wallpaper
You can set up to three wallpapers by repeating operation Note from Step1 to Step 3. Select this to set the Select this to set the desired Samsung Logo image as image as your wallpaper. your wallpaper. Downloaded From TheatreSystem-Manual.com Manuals…
-
Page 39
31P~60P(P10)-GB 2/1/05 10:45 AM Page 39 To Change the Wallpaper Press Cursor Press Cursor In Stop mode, button to move to button to move to press MENU ‘Setup’ and then ‘LOGO’ and then button. press ENTER button. press ENTER button. Press to select Press MENU… -
Page 40: Setting The Speaker Mode
31P~60P(P10)-GB 2/1/05 10:45 AM Page 40 Setting the Speaker Mode Signal outputs and frequency responses from the speakers will automatically be adjusted according to your speaker configuration and whether certain speakers are used or not. Press Cursor In Stop mode, button to move to press MENU ‘Audio’…
-
Page 41: Setting The Test Tone
31P~60P(P10)-GB 2/1/05 10:45 AM Page 41 Setting the Test Tone Use the Test Tone feature to check the speaker connections and to adjust the speaker levels. Press Cursor Press Cursor button In Stop mode, button to move to to move to ‘TEST press MENU ‘Audio’…
-
Page 42: Setting The Delay Time
31P~60P(P10)-GB 2/1/05 10:45 AM Page 42 Setting the Delay Time If the speakers cannot be placed at equal distances from the listening position, you can adjust the delay time of the audio signals from the center and rear speakers. Press Cursor button In Stop mode, to move to ‘Audio’…
-
Page 43
31P~60P(P10)-GB 2/1/05 10:45 AM Page 43 Press Cursor Press Cursor button Press Cursor , buttons to move to move to ‘DELAY to the desired to set the Delay TIME’ and then press speaker and then time. ENTER button. press ENTER button. •… -
Page 44: Setting The Audio Quality
31P~60P(P10)-GB 2/1/05 10:45 AM Page 44 Setting the Audio Quality You can adjust the balance and level for each speaker. When adjusting the audio quality using the setup screen Method 1 Press Cursor In Stop mode, button to move to press MENU ‘Audio’…
-
Page 45
31P~60P(P10)-GB 2/1/05 10:45 AM Page 45 When manually adjusting with the SOUND EDIT button Method 2 Adjusting Front Speaker Balance Adjusting Rear Speaker Balance Adjusting Center Speaker Level Press SOUND Press SOUND Press SOUND EDIT button and EDIT button and EDIT button and then press Cursor then press Cursor… -
Page 46: Setting The Drc (Dynamic Range Compression)
31P~60P(P10)-GB 2/1/05 10:45 AM Page 46 Setting the DRC (Dynamic Range Compression) You can use this function to enjoy Dolby Digital sound when watching movies at low volume at night. Press Cursor In Stop mode, button to move to press MENU ‘Audio’…
-
Page 47: Av Sync Setup
31P~60P(P10)-GB 2/1/05 10:45 AM Page 47 AV SYNC Setup Video may look slower than the audio if it is connected with digital TV. In this case, adjust the delay time of audio to optimal status to fit the video. Press Cursor buttons Press the MENU button.
-
Page 48: Dolby Pro Logic Ii Mode
31P~60P(P10)-GB 2/1/05 10:45 AM Page 48 Dolby Pro Logic II Mode You can select the desired Dolby Pro Logic II audio mode. Press PL II MODE button. • Each time the button is pressed, the mode changes as follows. • Note When selecting Pro Logic II mode, connect your external device to the AUDIO INPUT jacks (L and R) on the player.
-
Page 49: Dolby Pro Logic Ii Effect
31P~60P(P10)-GB 2/1/05 10:45 AM Page 49 Dolby Pro Logic II Effect This function works only in Dolby Pro Logic MUSIC mode. Press PL II EFFECT button Press PL II MODE and then press Cursor button to select ‘MUSIC’ buttons to select the mode. mode.
-
Page 50: Sound Field (Dsp)/Eq Function
31P~60P(P10)-GB 2/1/05 10:45 AM Page 50 Sound Field (DSP)/EQ Function DSP(Digital Signal Processor) DSP modes have been designed to simulate different acoustic environments. EQ: You can select from ROCK, POP, or CLASSIC, depending on the genre of music. Press DSP/EQ button. •…
-
Page 51: Sleep Timer Function
31P~60P(P10)-GB 2/1/05 10:45 AM Page 51 Sleep Timer Function You can set the time that the DVD player will shut itself off. Press SLEEP button. • «SLEEP» will be displayed. Each time the button is pressed the preset time changes as follows: 10 OFF.
-
Page 52: Listening To Radio
31P~60P(P10)-GB 2/1/05 10:45 AM Page 52 Listening to Radio You can listen to the chosen band (FM broadcast stations) by using either the automatic or manual tuning operation. Remote Control Unit Press TUNER Tune in to the button. desired station. •…
-
Page 53: Presetting Stations
31P~60P(P10)-GB 2/1/05 10:45 AM Page 53 Presetting Stations You can store up to: • FM Frequency Modulation 15 FM stations Example: Presetting FM 89.1 in the memory Press the TUNER Press the TUNER Press button and select MEMORY button. select «89.10». the FM band.
-
Page 54: About Rds Broadcasting
31P~60P(P10)-GB 2/1/05 10:45 AM Page 54 About RDS broadcasting Using the RDS (Radio Data System) to receive FM stations RDS allows FM stations to send an additional signal along with their regular program signals. For example,the stations send their station names,as well as information about what type of program they broadcast, such as sports or music,etc.
-
Page 55: About Rds Broadcasting
31P~60P(P10)-GB 2/1/05 10:45 AM Page 55 PTY (Program Type) indication and PTY-SEARCH function One of the advantages of the RDS service is that you can locate a particular kind of program from the preset channels by specifying the PTY codes. To search for a program using the PTY codes Display Program Type…
-
Page 56: Adjusting Display Brightness
31P~60P(P10)-GB 2/1/05 10:45 AM Page 56 Adjusting Display Brightness You can adjust the brightness of the display on the main unit so it won’t interfere with your movie viewing. Press DIMMER button. • Each time the button is press, the brightness changes as follows: DARK BRIGHT.
-
Page 57: Cautions On Handling And Storing Discs
31P~60P(P10)-GB 2/1/05 10:45 AM Page 57 Cautions on Handling and Storing Discs Small scratches on the disc may reduce sound and picture quality or cause skipping. Be especially careful not to scratch discs when handling them. Handling discs Do not touch the playback side of the disc. Hold the disc by the edges so that fingerprints will not get on the surface.
-
Page 58: Before Calling For Service
Refer to the chart below when this unit does not function properly. If the problem you are experiencing is not listed below or if the instruction below does not help, turn off the unit, disconnect the power cord, and contact the nearest authorized dealer or Samsung Electronics Service Center. Symptom Check/Remedy Disc tray does not open.
-
Page 59
31P~60P(P10)-GB 2/1/05 10:45 AM Page 59 Symptom Check/Remedy • • Disc is rotating but no Is the TV power on? • Are the video cables connected properly? picture is produced. • Is the disc dirty or damaged? • Picture quality is poor and •… -
Page 60: Language Code List
31P~60P(P10)-GB 2/1/05 10:45 AM Page 60 Language Code List Enter the appropriate code number for the initial settings “Disc Audio”, “Disc Subtitle” and/or “Disc Menu” (See page 31). Code Language Code Language Code Language Code Language 1027 Afar 1181 Frisian 1334 Latvian, Lettish 1506…
-
Page 61: Specifications
31P~60P(P10)-GB 2/1/05 10:45 AM Page 61 Specifications Power Consumption 3.2Kg Weight Dimensions (W x H x D) 430 x 60 x 340 mm +5°C~+35°C Operating Temperature Range 10%~75% Operating Humidity Range 10dB Usable Sensitivity 60dB S/N Ratio 0.5% Distortion 1.0Vp-p(75Ω load) Composite Video VIDEO Compositive Video : 1.0Vp-p(75Ω…
-
Page 62
1p~30p(P10)-GB 2/1/05 10:44 AM Page 2 THIS APPLIANCE IS MANUFACTURED BY: AH68-01660B Downloaded From TheatreSystem-Manual.com Manuals…
-
Руководства по ремонту
1
-
Инструкции по эксплуатации
2
Языки:

Samsung HT-P10 инструкция по эксплуатации
(63 страницы)
- Языки:Русский
-
Тип:
PDF -
Размер:
2.35 MB -
Описание:
Домашний кинотеатр
Просмотр

Samsung HT-P10 инструкция по эксплуатации
(34 страницы)
- Языки:Английский
-
Тип:
PDF -
Размер:
6.6 MB
Просмотр
На NoDevice можно скачать инструкцию по эксплуатации для Samsung HT-P10. Руководство пользователя необходимо для ознакомления с правилами установки и эксплуатации Samsung HT-P10. Инструкции по использованию помогут правильно настроить Samsung HT-P10, исправить ошибки и выявить неполадки.